

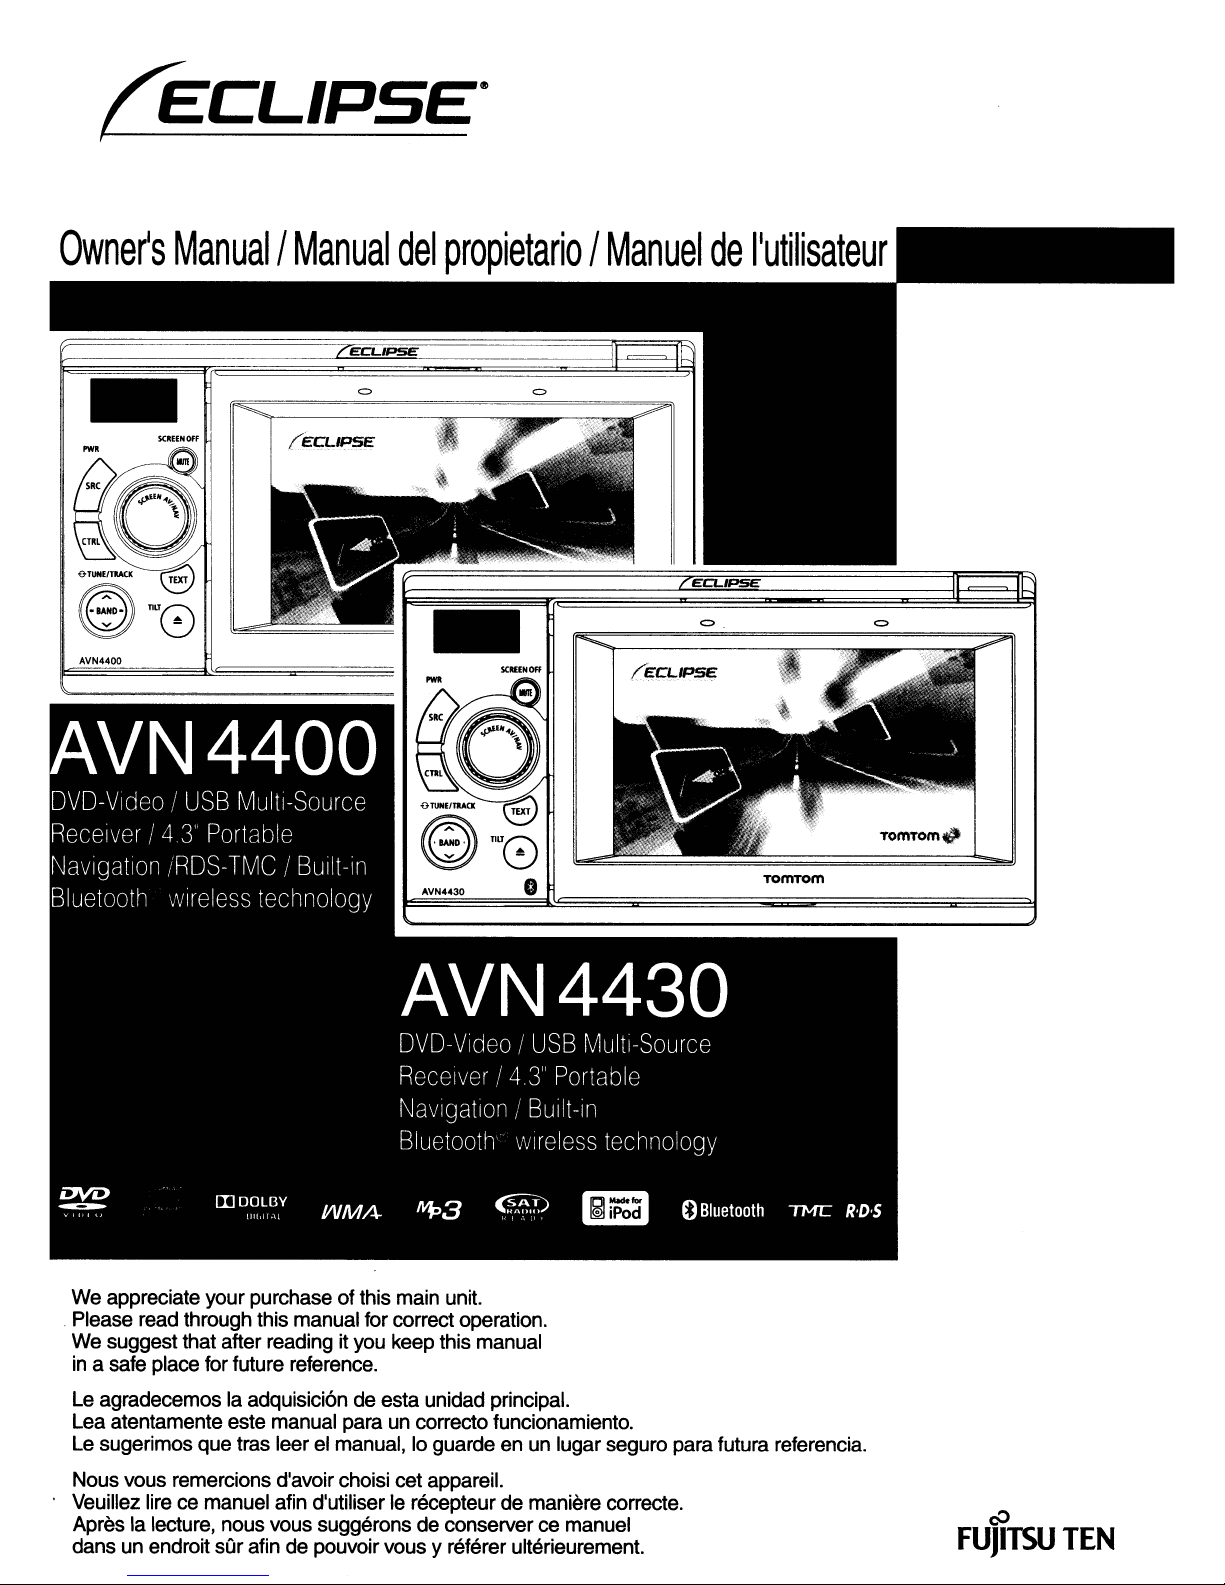
Eclipse AVN4400, AVN4430 Owner's Manual
!"ECLIPSE"
I
Owner's
Manual!
Manual
del
propietario!
Manuel
de
I'utilisateur
We
appreciate your purchase of
Please
We
inasafe
Le
Lea
Le
Nous
Veuillez
Apreslalecture,
dansunendroit
read
through this
suggest that after
place
for future
agradecemos la adquisici6ndeesta unidad principal.
atentamente este
sugerimos
vous
que
remercions d'avoir choisi cet appareil.
lirecemanuel
nous
sOr
manual
readingityou
reference.
manual
tras leerelmanual,10guardeenun
afin d'utiliserIerecepteur de maniere correcte.
vous
afin de pouvoir
this
main
for correct operation.
keep
parauncorrecto funcionamiento.
suggerons de conservercemanuel
vous
unit.
this
manual
lugar segura
y referer ulterieurement.
para
futura
referencia.
eO
FUJITSU
TEN
For
The symbols described below are foundinthis instruction manual as well
as on the device itself to insure its proper and safe usage and to prevent
injury or
these symbols before reading the rest of this manual.
Warning
•
Caution
•
The following symbols will precede information useful for preventing
damage
the
damage
to the main unit as well as for its smooth operation.
safe
This sign indicates a situationinwhich incorrect handling
through disregard
personal injury.
This sign indicates a situation
through disregard of a sign might result
may result solelyindamagetoproperty.
usage
to property. Make sure you understand the meaning of
of
this
of
a sign might resultindeathorserious
device
in
which incorrect handling
in
personal injury
or
Follow this advicetoprevent malfunctionsordamage to the
main unit. Perform the indicated action
ADViCE
• Please read
ECLIPSE
•
follow these instructions.
• Changes
and features of the product.
Please use care
Forcefully spreading or pulling on pages may resultinfalling out of the binding.
Use the manual carefully.
malfunction.
Useful information for smooth operation.
in
Facts to keep
all
materials suchasmanuals and warranties that have come with the product.
will not be responsible for unsatisfactory product performance due to failure
to
product specifications may resultindifferences between content of the manual
in
~andling
mind when operating.
the manual.
in
the event of a
to
Safety.
• Do not modify this system for use other than that specified herein. Also, do not
deviate from the installation procedures described herein; ECLIPSE will not be held
Warning
•
liable for damages including, but not limited to serious injury, death or property
damage resulting from installations that enable unintended operation.
• Some devices require the use of batteries. Never install main unit where young
children can get access to batteries. If a battery is swallowed, seek immediate
medical attention.
• When the vehicle is
adjustments to the main unit.
do
vehicle operation.
• The driver should not look at the screen while driving. Accidents may occur as a
result of not paying attention to your driving.
• Do not place foreign objects in the disc insertion slot or USB input terminal. Fires or
shocks may result.
• Do not disassemble or alter this main unit. Accidents, fires or shocks may result.
• Do not let water or foreign objects enter the internal parts of this main unit. Smoke,
fires or shocks may result.
• Do not use when main unit is malfunctioning (the screen is not lit or no sound comes
out). Accidents, fires or shocks may result.
• Always replace fuses with fuses of identical capacity and characteristics. Never use
a higher capacity fuse than the original. Using the wrong type of fuse may cause a
fire or severe damage.
• If foreign objects or water enters the main unit, smoke comes out, or thereisa
strange odor, stop using it immediately, and contact your dealer. Accidents, fires, or
shocks may result if you continue to use itinthese conditions.
• The driver should not change the disc or USB memory while driving. Accidents may
occur as a result of not paying attention to your driving, you must first stop or park
your carina safe location and then proceed to remove or insert the disc and/or
USB.
• Plastic bags and wrappings may cause suffocation and death. Keep away from
babies and children. Never place bags or wrappings over anyone's head or mouth.
• Make sure to park the vehicleina safe place and set the parking brake before
watching DVDs or videos. For safety reasons, only the sound of DVDs or videos will
be emitted while the vehicle is in motion.
precalitiQns
in
motion, never take your eyes off the road to make
You
must pay attention to the road to avoid accidents,
not let the operation or adjustment of the main unit distract you from proper
Q)
()
.~
"C
l/)
£
Ol
c
'iii
::J
.8
...
o
'C
c-
Ol
c
~
S
Q)
-£
"C
«l
Q)
a:
~
Gotothe
next page
Read the following prior
to using this device
/ .
• When thereisa lot of vibration - when drivingona bad road for example - the main
it
unit may become unable to operate normally because
cannot read data from the
disc.
• Condensation may accumulate on the lens, with the function requiring reading of
in
CDs and DVDs, immediately after turning ON the heater
cold temperatures Wait
about 1 hour for the condensation to evaporate and the main unit will operate
normally. Contact the store of purchase if normal operation does not resume after
several hours.
•
If
using this main unit immediately after having purchaseditor after having stored it
disconnected from the vehicle battery, the present location may not be accurately
displayed. Wait a moment and the GPS positioning will correct the displayed
position.
is
• This main unit
precision equipment and the information that you record onitafter
purchase can be lost as a result of static electricity, electrical noise, vibration and
You
other influences
information you store
are recommended to keep a separate record of the
in
the main unit.
• Note that the following events are not covered by the warranty.
1)
Corruption or loss of the data storedinthe main unit by the purchaser resulting
it,
from failure or incorrect operation of the main unit or trouble with
or due to the
effects of electrical noise or other influences.
2) Corruption of loss of the data stored
in
the main unit by the purchaser resulting
from misuse of the main unit by the purchaser or a third party.
3)
Corruption or loss of the data storedinthe main unit by the purchaser resulting
from failure / repair of the main unit.
CD
()
.~
"0
.!Q
-5
Ol
.~
(f)
::l
.8
.....
o
.~
Ol
C
~
:2
CD
-5
"0
<ll
Q)
a:
* Please note that by installing or using the main unit, you are regarded as having
consented to the points above.
Table of Contents
Read the following prior to using this device
For the safe usage of this device 2
!iClfE!t~
lrCltllE!
~rE!c:ClLJti()l1!)
()f
(:()rltE!rlt!i
Introduction
~ClrT1E!
~tl()LJt
E3C1!»ic:
1r1!;E!rtir1~
DisJ)lay
()f
J)Clrt!i
Panel buttons 8
ttlE!
!;c:rE!E!I1~
How to switch screens 9
Detaching the PND
About Hands-free Microphone and Light sensor
()J)E!rClti()rl
Basic operation
tilE!
di!tc:
How to insert/eject a disc (CD, DVD)
angle
Adjust the angle of the display
adjustment
••••••••••••••••••••••••••••••••••••••••••••••••••••••••••••••••••••••••••••
••••••••••••••••••••••••••••••••••••••••••••••••••••••••••••••••••••••••••••••
~
Ei
fI
~
10
11
1~
12
1:J
13
16
16
General setti
Main unit settings
ngs
OJ)erational conditions
Each operation condition for device functions
AudioNideo operation
!iwitching audio control modes 19
Switching audio control modes
Picture adjustment 22
Adjusting the picture 22
17
17
18
18
19
Switch the screen display size 23
Switch the DVD/VTR or iPod-video
display
screen size 23
AM/FM radio operation 24
How
to listen to the AM/FM radio 24
Satellite radio (SIRIUSIXM) operation (North America only) 26
How
to listen to the satellite radio 26
CD·MP3IWMA player operations 30
How
to listen to a CD·MP3/WMA
30
Operating the USB music file player 33
How
iPod@
How
to listen
operation 35
to use the iPod 35
toa
USB
music
file 33
DVD player operation 38
How
to watch a DVD 38
External device operation 40
Using
external
devices
40
Q)
u
.~
"0
C/)
£
OJ
c:
'Uj
::J
.8
...
o
.~
OJ
c:
.~
.Q
S
Q)
£:
"0
Cll
Q)
a:
For reference
Specifications
*
For
more details, refer to the
from our website.
"Full
41
Manual" which can be downloaded
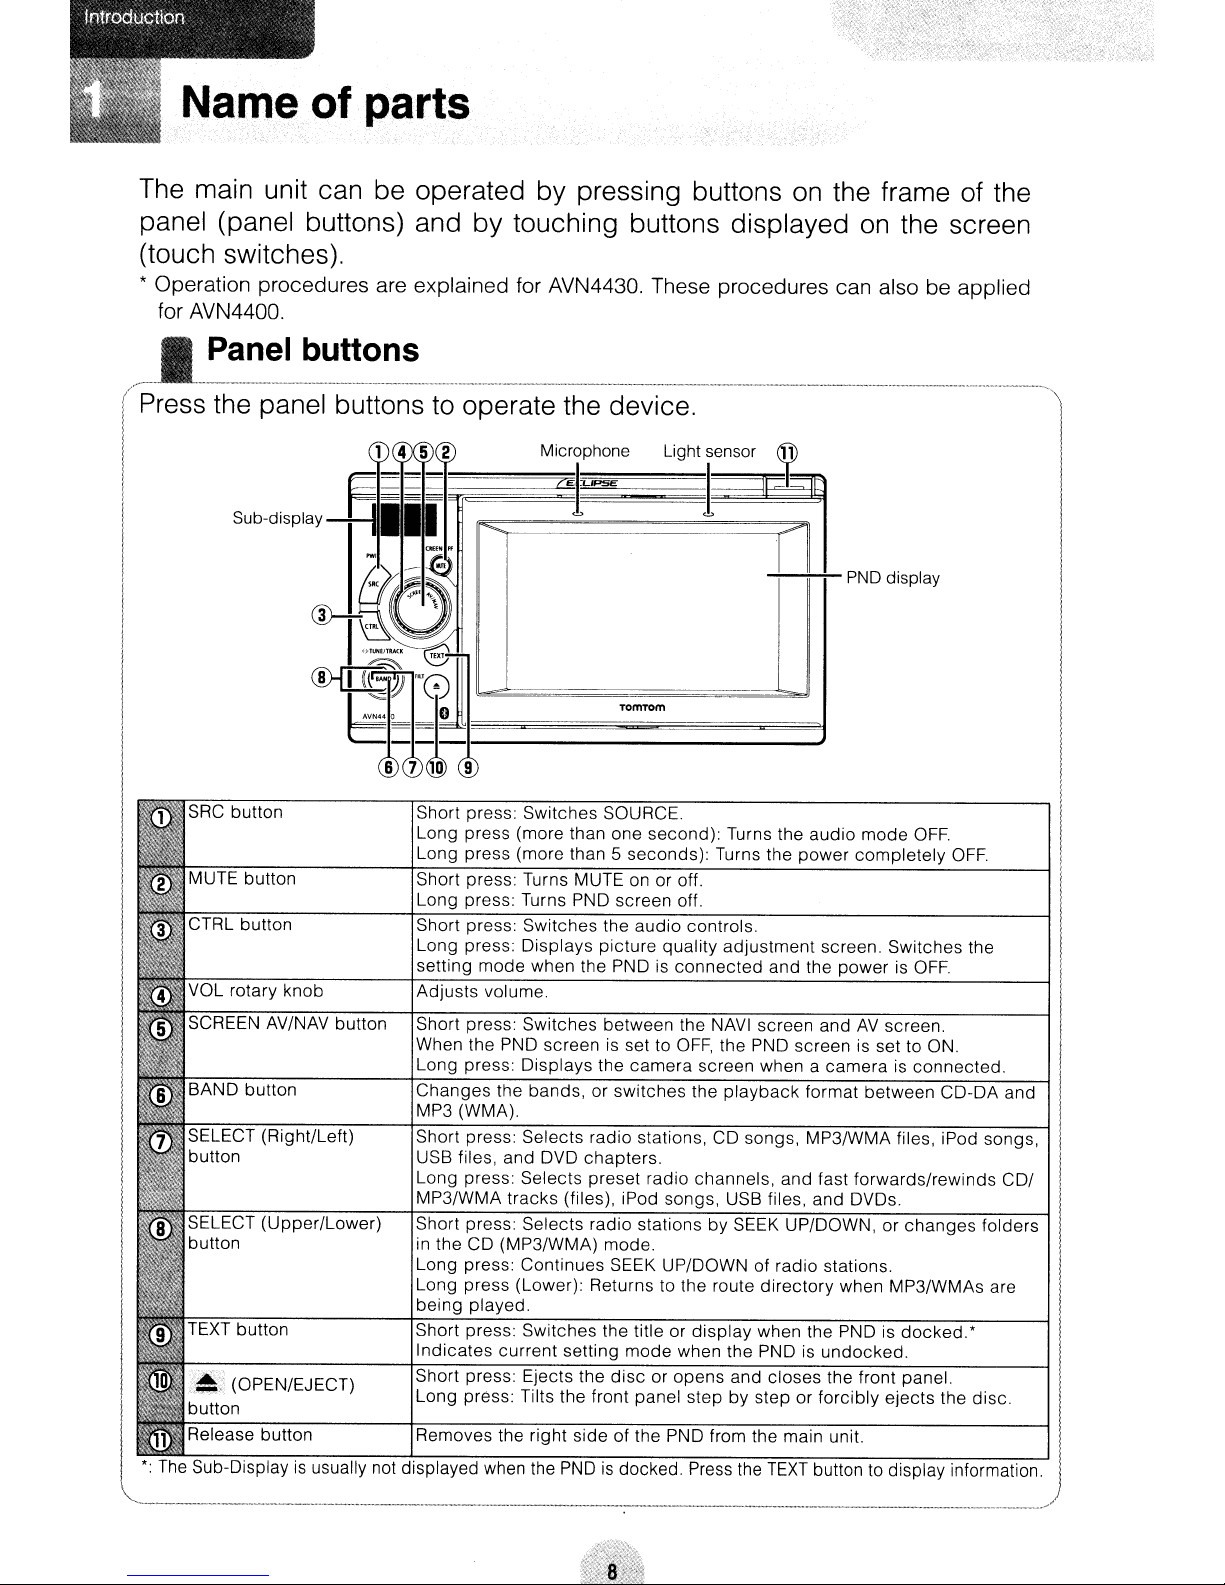
Name of parts
The
main
panel
(touch
* Operation procedures are explained for AVN4430. These procedures can also be applied
for AVN4400.
unit
can
(panel
buttons)
switches).
be
operated
and
by
touching
by
pressing
buttons
buttons
on
displayed
the
frame
on
the
of
the
screen
~
(
Press
Panel buttons
the
panel
buttonstooperate
:
Sub-display
.'
SRC
button
MUTE button
CTRL button
VOL rotary knob
SCREEN AV/NAV button
BAND button
SELECT (Right/Left)
button
SELECT (Upper/Lower)
button
TEXT button
·.~i
(OPEN/EJECT)
button
Release button
*:
The Sub-Displayisusually not displayed when the
Short press: Switches SOURCE.
Long press (more than one second): Turns the audio mode
Long press (more than 5 seconds): Turns the power completely
Short press: Turns MUTE on or off.
Long press: Turns PND screen off.
Short press: Switches the
Long press: Displays picture quality adjustment screen. Switches the
setting
Adjusts volume.
Short press: Switches between the
When the PND screen is set to
Long press: Displays the
Changes the bands, or switches the
MP3 (WMA)
Short press: Selects radio stations, CD songs, MP3/WMA files, iPod songs,
USB files, and DVD chapters.
Long press: Selects preset radio channels, and fast forwards/rewinds CD/
MP3/WMA tracks (files), iPod songs, USB files, and DVDs.
Short press: Selects radio stations
in
the CD (MP3/WMA) mode.
Long press: Continues SEEK UP/DOWN of radio stations.
Long press (Lower): Returns to the route
being
Short press: Switches the title or display when the PND is
Indicates current setting mode when the PND is undocked.
Short press: Ejects the
Long press: Tilts the front panel step by step or forcibly ejects the disc.
Removes the right side of the PND from the main unit.
mode
played.
the
device.
TomTom
audio
controls.
when the PNDisconnected
NAVI
OFF,
the PND screen is set to ON.
camera
disc
PNDisdocked. Press the
screen when a camera is connected.
playback
by
SEEK UP/DOWN, or
or opens and closes the front panel.
PND
display
OFF.
and the powerisOFF.
screen andAVscreen.
format between CD-DA and
changes
directory
TEXT
when MP3/WMAs are
docked.*
buttontodisplay information.
l
OFF.
folders
About the screens
How to switch screens
Each time you press
SCREENAVlNAV
the audio screen and the navigation screen.
Press and hold SCREEN .AV/NAV
• The camera screenisdisplayed.
87.9MHz
STEREO
Preferences
2
3
4
5
6
the display switches between
87.9MHz
STEREO
Preferences
FM1
2
3
4
5
6
The
camera screen will only be displayed when a Rear View camera (optionally-
available)
(tfJj
Press and hold
• The PND
*0
Press
• The PND
display
display
is
connected.
willgoOFF.
lil.§RJJ~A~l~~V
turns ON.
.>ILIII·Jlt
......
</j)
while the PND display is ON.
while the PND display is OFF.
Introductlon
Detaching the PND
The navigation function can also be used evenifthe
from the main unit.
How to detach the PND from the main unit
@ Remove the PND.
PND
is
detached
• When the
• When attaching the PND, do not press the monitor display.
If
the PND gets wet, do not attachitto the main unit.
•
• After removing the
Audio Cover for the main unit.
~fi/J)
Insert the left end of the PND into the main unit.
PNDisremoved, do not touch the connector on the back of the
PND
from the main unit, itisrecommended that you use the
PND.
Insert the PND.
I I
\ J
"'---._-------_.
__
._----------------------------_._-_
..
_---_._-----_
....
_
..
_._-----_.-'
I
I
I
• About Hands-free Microphone and Light sensor
'The
'PN-D--i~'
sensor.
For
"~';'~i'~'~~d---
details
~ith""~-"'-b'~i'it~-i-~-'-
on
using hands-free calling and setting the light sensor, I
refer to the operation manual of the
Built-in hands-free microphone
Pushing the hands-free microphone and light sensor with a sharp object may damage
them.
ZE
h-~'~d-~~f-r'~~-
'-~
i;;~~h~~'~'
~n-d'" ii~
PND.
Light sensor
~LIPSE
ht'
-'\\
I
c
o
n
::J
"C
e
c
Basic operation
/ Basic
ope_r_a_t_io_n
Switching the'audio source (mode)
,~"
Press··SRC . to switch the audio source in
the
I
following sequence:
• FM/AM -+ Sirius
USB*1
..
4 -+ AUX*3 -+ iPod
*1:
Cannot be selected if the corresponding
not connected to the main unit.
*2:
Cannot be selected if no
*3:
Cannot be selected if the AUX settingissettoOFF.
*4: If the PNDisnot connected to the main unit, you
cannot select the USB mode or iPod mode.
*5:
Cannot be selected when the
OFF
*6: North America only
h6
..
-+
h6
XM
..
-+ DISC (DVD or CD)*2 -+
4
..1..
-+
VTR*5
discisinserted.
VTR
setting is set to
-+ FM/AM -+
device
is
...
When the poweristurned on, the state used when the power was turned
off such
ACC position
main unit. Follow Step 2
as
CD and tuner playbackisrestored. When the vehicle has no
on
the ignition switch, care
or
Step 3 when turning off the power.
is
needed when turning off the
"
1
!
fJ)
When power is OFF, press:SRC'" .
• The power will come ON.
ff!JJ
When power is ON, press;Sft0'? for more than
one second.
• All audio sources will be turned
When power is ON, press'SR¢,· for
• The power will
go
completely
OFF.
more
OFF.
than 5 seconds.
'
.........__•__,._,__._.,_.
._,••__•__
._.
•
._.__, , •
._.__._
••••••••_._.__
.H.H. •••_'H,__
'_.
.'"__._._.'
••
".,~
••__._,.__,
,._._.__,••_.__•••
,_,_,'_._._._
......
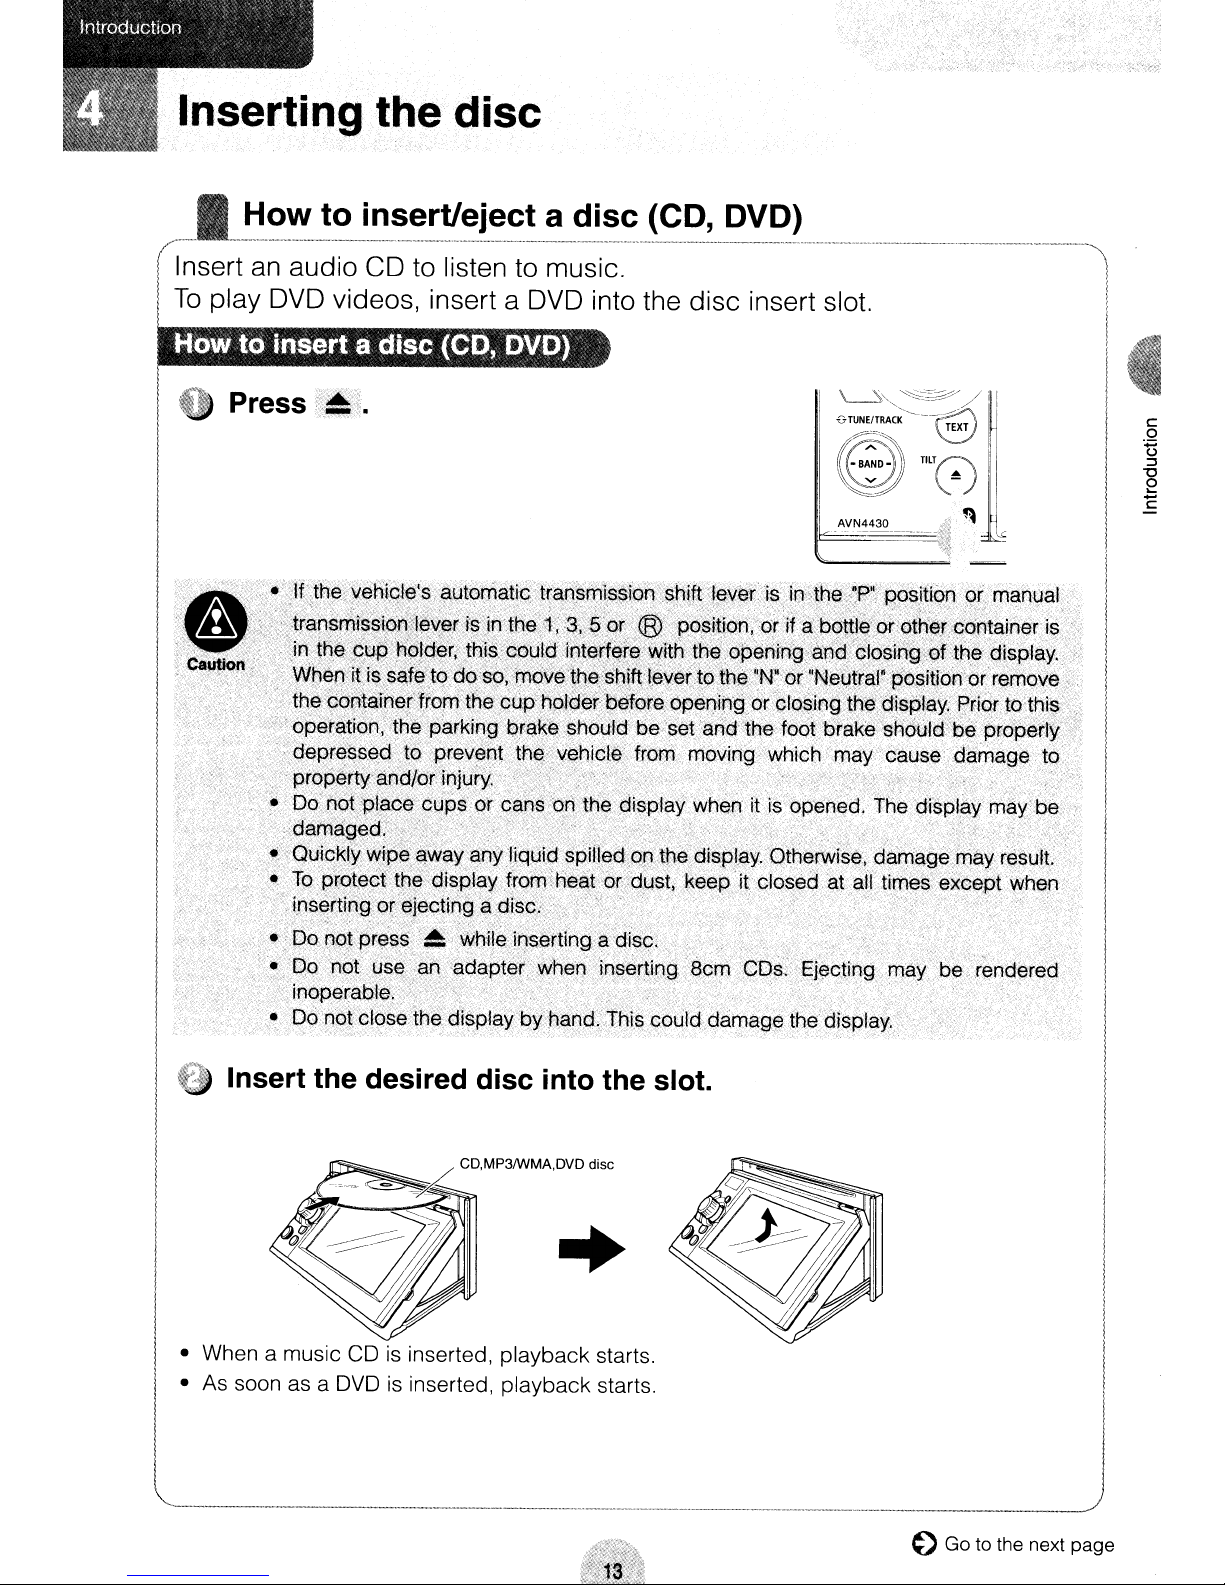
Inserting the disc
How to insert/eject a disc (CD, DVD)
Insert
To
How to insert a disc (CD, DVD)
play
an
audio CD to listen to music.
DVD
videos, insert a DVD into the disc insert slot.
----
..
'\
I
1
I
!
I" Press
r~".
I
;'.;;~;t'{~'I1~~l~~t:;rl~i~lj;~~~I~r!£«~~~~ii~:i~;;~,;
;j~;.".·.":ir:t~t~~i!pti~'~~lq~9',~~~~!8RPt~4~t~tf~r~'~it~t~~:)~~alii~~)'~~9'R,~.~!~g})~t'··t~~~i~p,~~.);
"~2{\t'r!~;I!::j!~?!!!~~~~!j]~;~~~~::i1~~~r$);
• .'.',<
(j~Rre.sse(L.tQ
"
·.<,:;,:/",,"·pr~~~rtya~~for:inju't-~~:Y·':'i'·{:.,:;,·
,.
......,~
·if.)()
..
~8ta~i~9~p~j'P~.BfP~n·{~~(t~~'91~~I~Y~·~.~.~,.i!·is:pH~~~d
·:;t;'~~~!'~r~i@fQ~··~\;~J;~fB:ir;4r¥~[h~~1~~;$\~~~·d~fcie;~~;.;s~ilf'
'.~
..
,Top(otecttne
"
'.
i,nserting or ejecting'adisc.', " : "
'".'
."~
...
'
D(}HotPr~~~·i;~,
,
..•'...
QQ
...
rlbl·
•...
'if1ClRer.~bl~~.)
•
Do?9tcI6se'the;displaybY'h~f)d
pre,v~nLth~5
displayJrbi#rie~fQr,)dust.keep~itclosedat,
'vvhij'e'I?~Mtin~a
u§~?6
.•..•
~dapt~/WfIenjn§~·rting;':eqrn:Cl)~;·;E2j~ciing
..'. .
.•...;..•..'.•..•..•.
vehicl~
'.,
from'"
•.•.•.•..•
:
...•
' •.. '
diS§{...
....:
.
..
Thiscould
Moving ;which,may cause' da-rnageto'
..•...•..
> i
.'
....
.....
.<
'.'
••.....•.....'............••..•••..<'"'.••.......••••.•.
'.'..•."
darT1ag~thE:1diSPlaY.)
;-';
.•..
','.,\".;
.•
TD,ei~l$gl~y.ma~,·.?~.··
ailtimes eieepfwhen
. .
>;;,
' .
..
rnay
'<
.'.'.
•...........,','
.:tj$
}$ndere8
','
•
.
Insert the desired disc into the slot.
~~~
• When a music
l"
As soon as a DVDisinserted, playback starts
CDisinserted, playback starts.
CD.MP3IWMA,DVD disc
..
oGo to the next page
IntroductIOn
.ovo
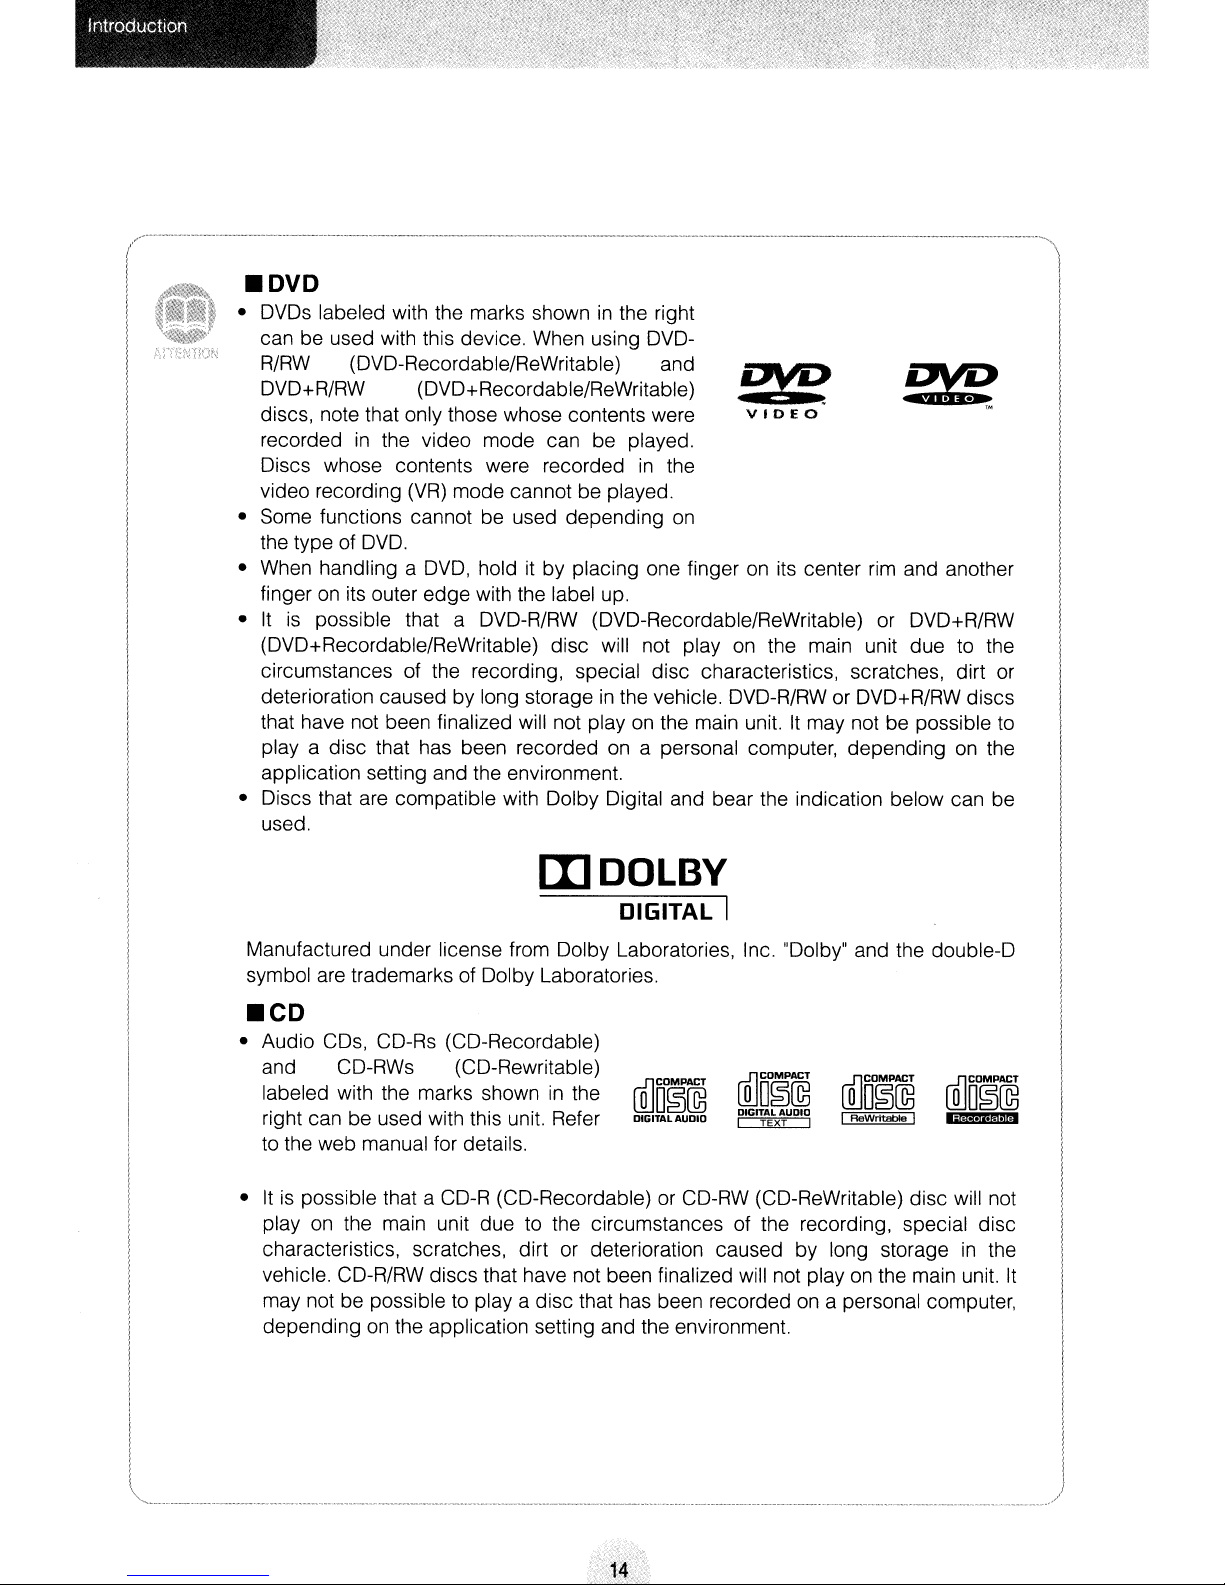
• DVDs labeled with the marks showninthe right
can be used with this device. When using DVDR/RW
DVD+R/RW (DVD+Recordable/ReWritable)
discs, note that only those whose contents were
recordedinthe video mode can be played.
Discs whose contents were recorded
video recording
• Some functions cannot be used depending
the type of
•
When
fingeronits
•
It
is
(DVD+Recordable/ReWritable) disc will not play
circumstances of the recording, special disc characteristics, scratches, dirt or
deterioration caused by long storageinthe vehicle. DVD-R/RWor DVD+R/RW discs
that have not been finalized will not playonthe main unit.Itmay not be possible to
play a disc that has been recorded
application setting and the environment.
• Discs that are compatible with Dolby Digital and bear the indication below can be
used.
(DVD-Recordable/ReWritable) and
fM>
V
IDEO
in
the
(VR)
mode cannot be played.
on
DVD.
handling a
possible that a DVD-R/RW (DVD-Recordable/ReWritable) or DVD+R/RW
DVD,
holditby placing one fingeronits center
outer edge with the label up.
on
rim
and another
on
the main unit due to the
a personal computer, depending
on
the
l
I
I
I
I
I
I
IIIDOLBV
DIGITAL I
Manufactured under license from Dolby Laboratories, Inc. "Dolby" and the double-D
symbol
•
• Audio
•Itis
are
trademarks of Dolby Laboratories.
CO
CDs,
CD-Rs (CD-Recordable)
and CD-RWs (CD-Rewritable)
labeled with the marks showninthe
right can be used with this unit. Refer
to the web manual for details.
possible that a CD-R (CD-Recordable) or CD-RW (CD-ReWritable) disc will not
play
on
the main unit due to the circumstances of the recording, special disc
characteristics, scratches, dirt or deterioration caused by long storage
vehicle. CD-R/RW discs that have not been finalized will not playonthe main unit.
may not be possible to
depending on the application setting and the environment.
playa
disc that has been recordedona personal computer,
cdm~@
DIGITAL
AUDIO
[Qm~@
DIGITAL
AUDIO
I
TEXT
I
in
the
It
..
::14'
• ,
•••'''••_.''._._
_,_
''.'__..
_d".._
".,,,·..'
_"_
"._..,.".._.'_
,.,,,
(
'._._,,,_.""_""_""_..".._..~"_'
, "
,,,
••_ .. ".,_
,.,
,.,
_ , , _ _ , " , ,..,,'_,...•__••,,,..,,._'
,.0',
,_'••_,,••',_.,..,
,..
• _.." _
'.,••_.,
_.',.,
_ .
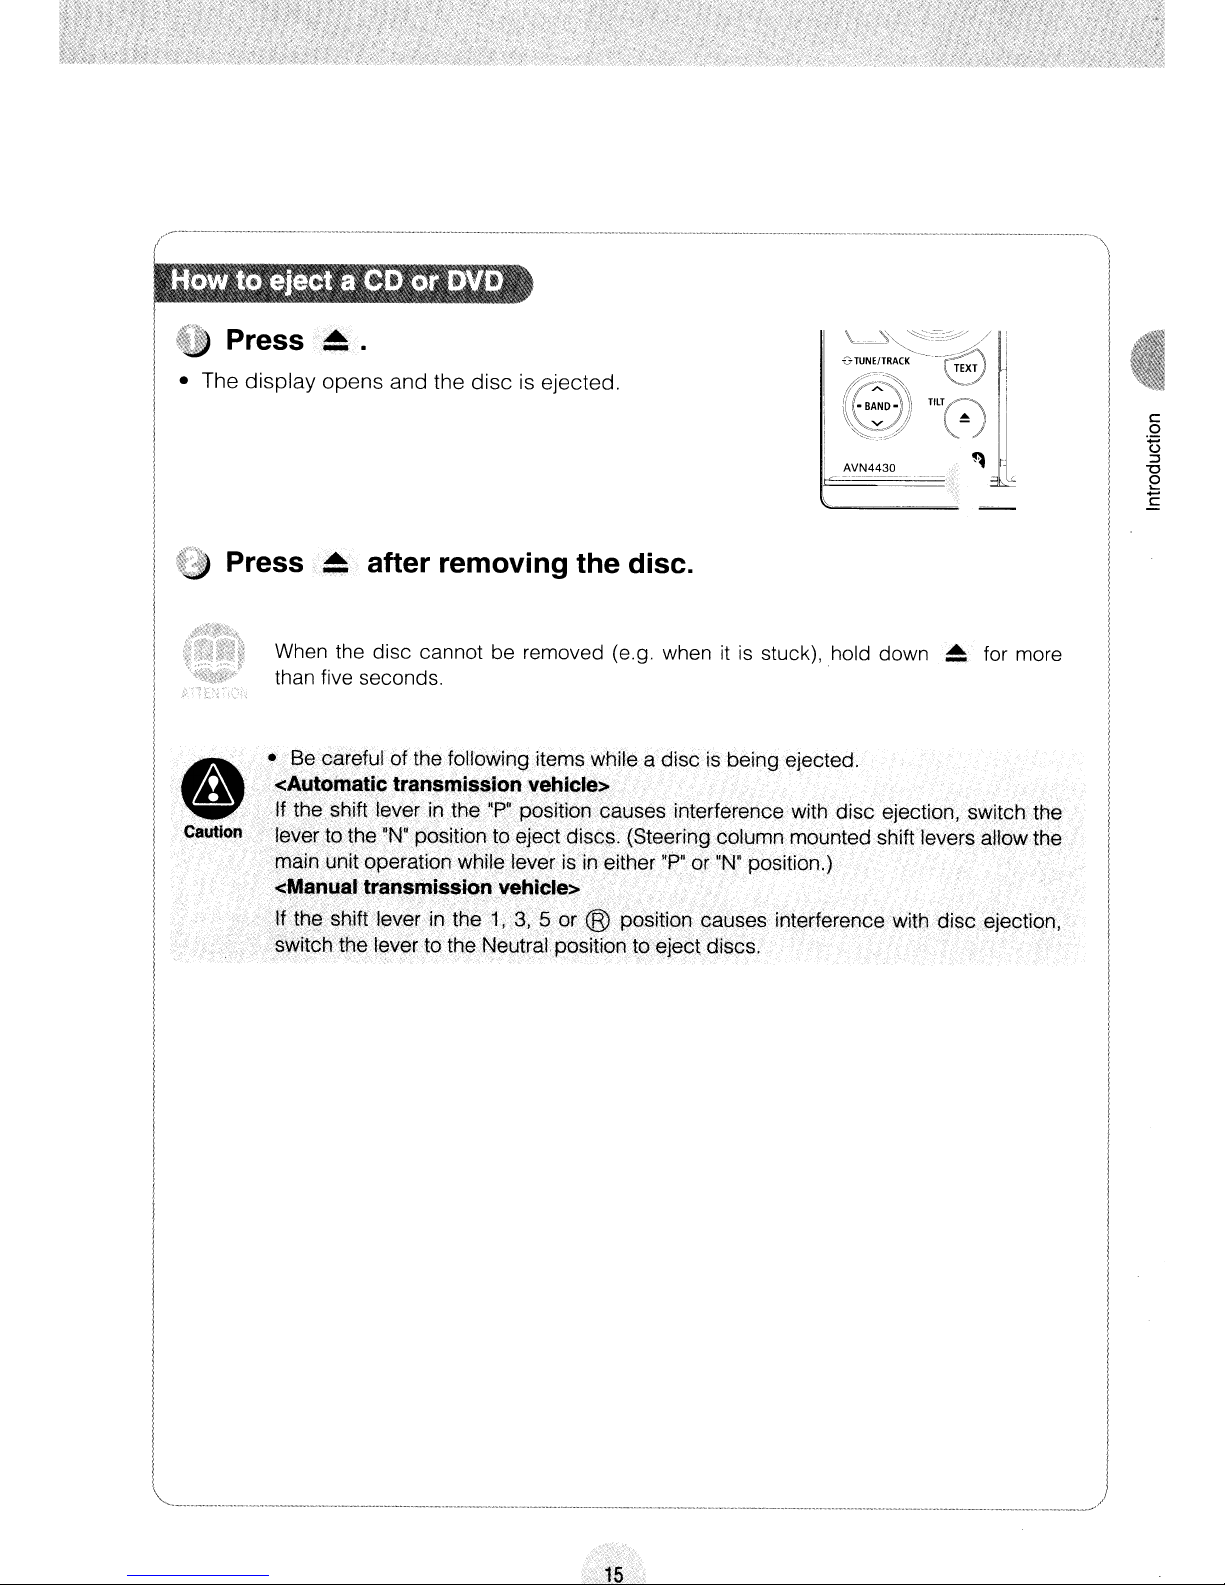
.~
Press
• The display opens and the disc is ejected.
'tz) Press
When
~
..
after removing the disc.
•
-
the disc cannot be removed (e.g. whenitis
stuck), hold down
~.
I
for more
than five seconds.
I
1ft.·
I
_H~:,Ii~::;~7~k~p::~::,~2alJses
I
Caution
!
Se
careful6f
...•.
lever
tothe"N°positiontd
'mainunitoperation while lever
the
f()lIowingite~$
wt"!ilea.
discisbeing ejected.
i~terterence
e.ject
discs. {Steering column mountedshjft levers allow the
is
in either
0p.
or
ON"
position.)
with
disc
ejection,-switch
<Manualtransrttissiorl.vehicle>. . . . .
If the
shift
lever in
:svvitchthelev~rto
th
l,3.
5
f3
·qr(f3)po~ition
causes interference with disc ejection,
the Netjtrai.positiontge.ject discs. .
the
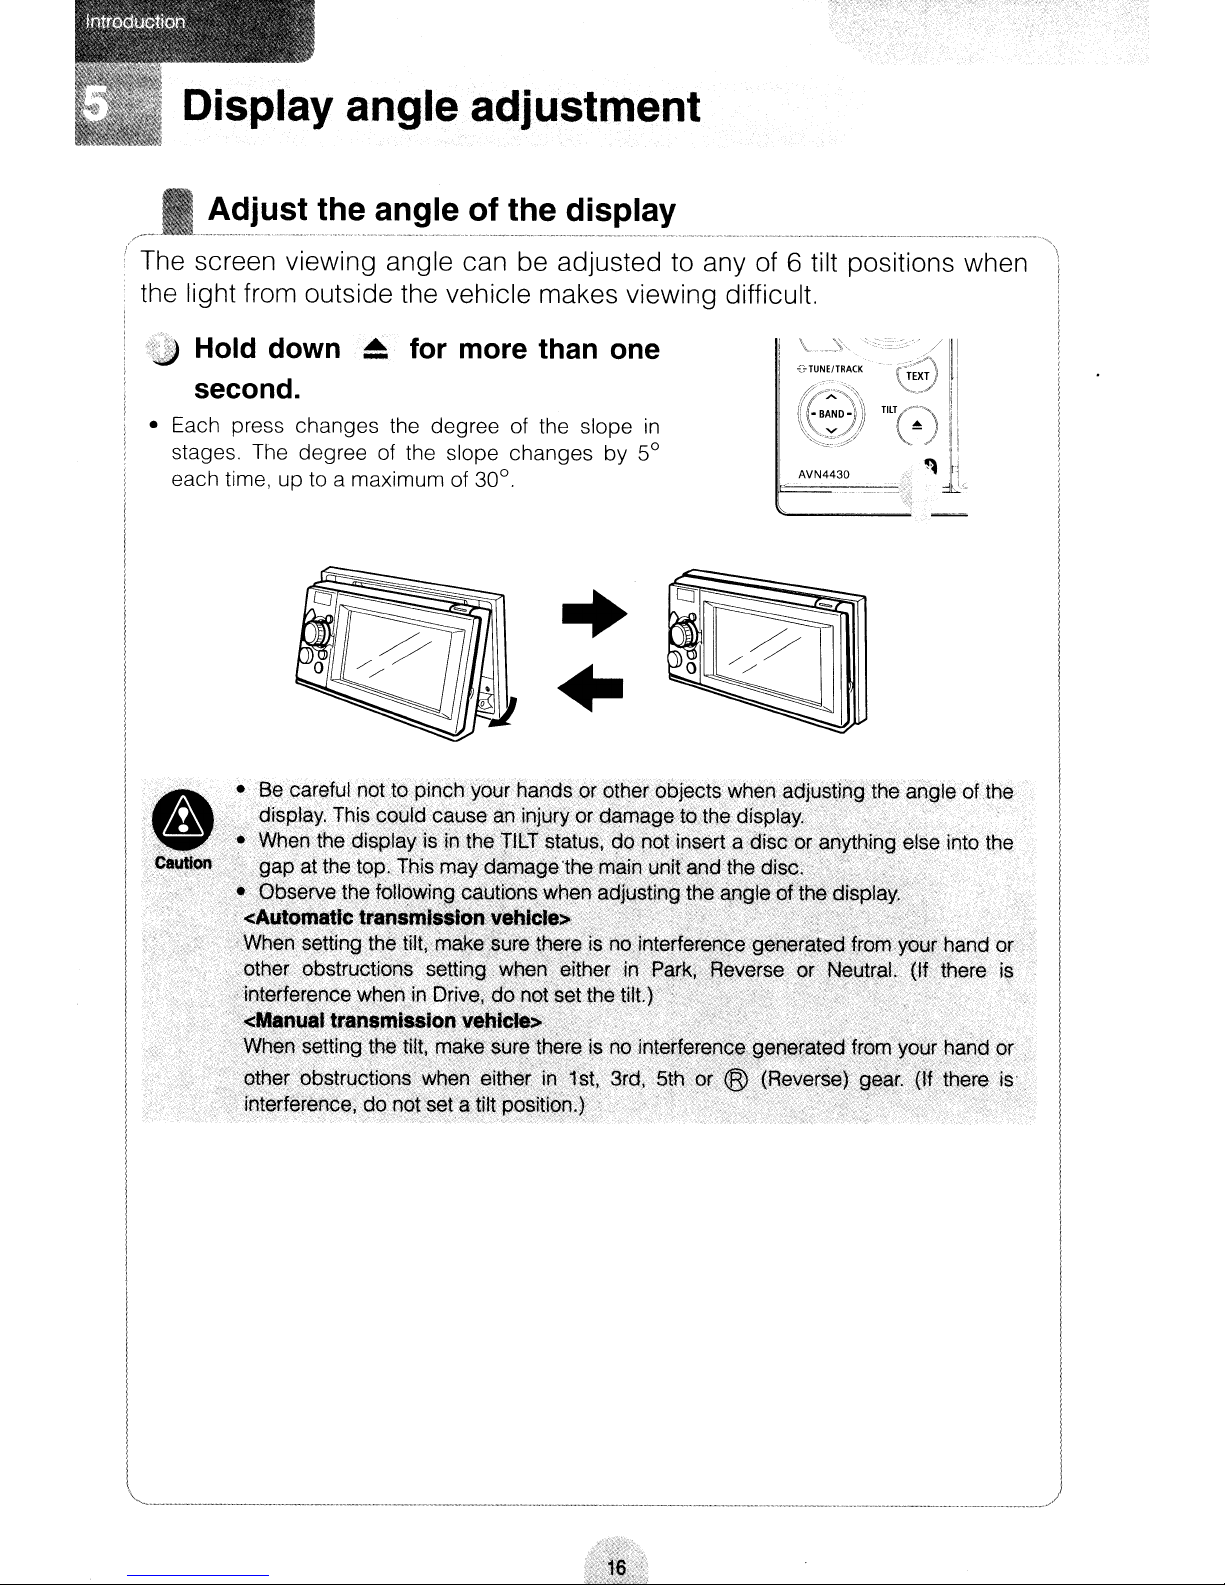
Display angle adjustment
/..--
----_
..
_~._-_.•_._~~------_..
.--------------------
The screen viewing angle can be adjusted to any of 6 tilt positions
the light from outside the vehicle makes viewing difficult.
,;t£)
Hold down
~
for more than one
second.
• Each press changes the degree of the slope
stages. The degree of the stope changes
each time, up to a maximum of
30°
by
in
5°
+
..
."
.•
. •
B~
Adjust the angle of the display
careful nbttb pinch
your.
hands or
ottler'-bbj~ctswhE3nadjus\jng:the
angled
--~
when"'
the,
..........
;;.".;.":;::;,;>:;
..•.
~
~
hI"
it',.:."
'.
other'.
oqstr~qtjon~·setting
...
~::i~~~~~~~~~.~~i~~h~~;;t~~t
..
·.wh~n'Seftingt~~:'Hlt
makeS~feth~te·ts
~~::~~n~~~~~;~~~:~~il~~~f
When~ith~r.jrt·p~r:k;··
t
tbe:t1l
):\:.
h6'
jrrt~herence.
3(d,
.~~it
.ReverseQrhJ~lltr:~l.
0,.'
•.•.••
.••• , '••::::
::;};:'>',
gen~~at~d
~,~,~~~~~);
.trorTl'ytiiJr
~~~i.~f~~~;,
··(If•.·'
there
.,.,...'.
,l1and
is'.'.'
or "
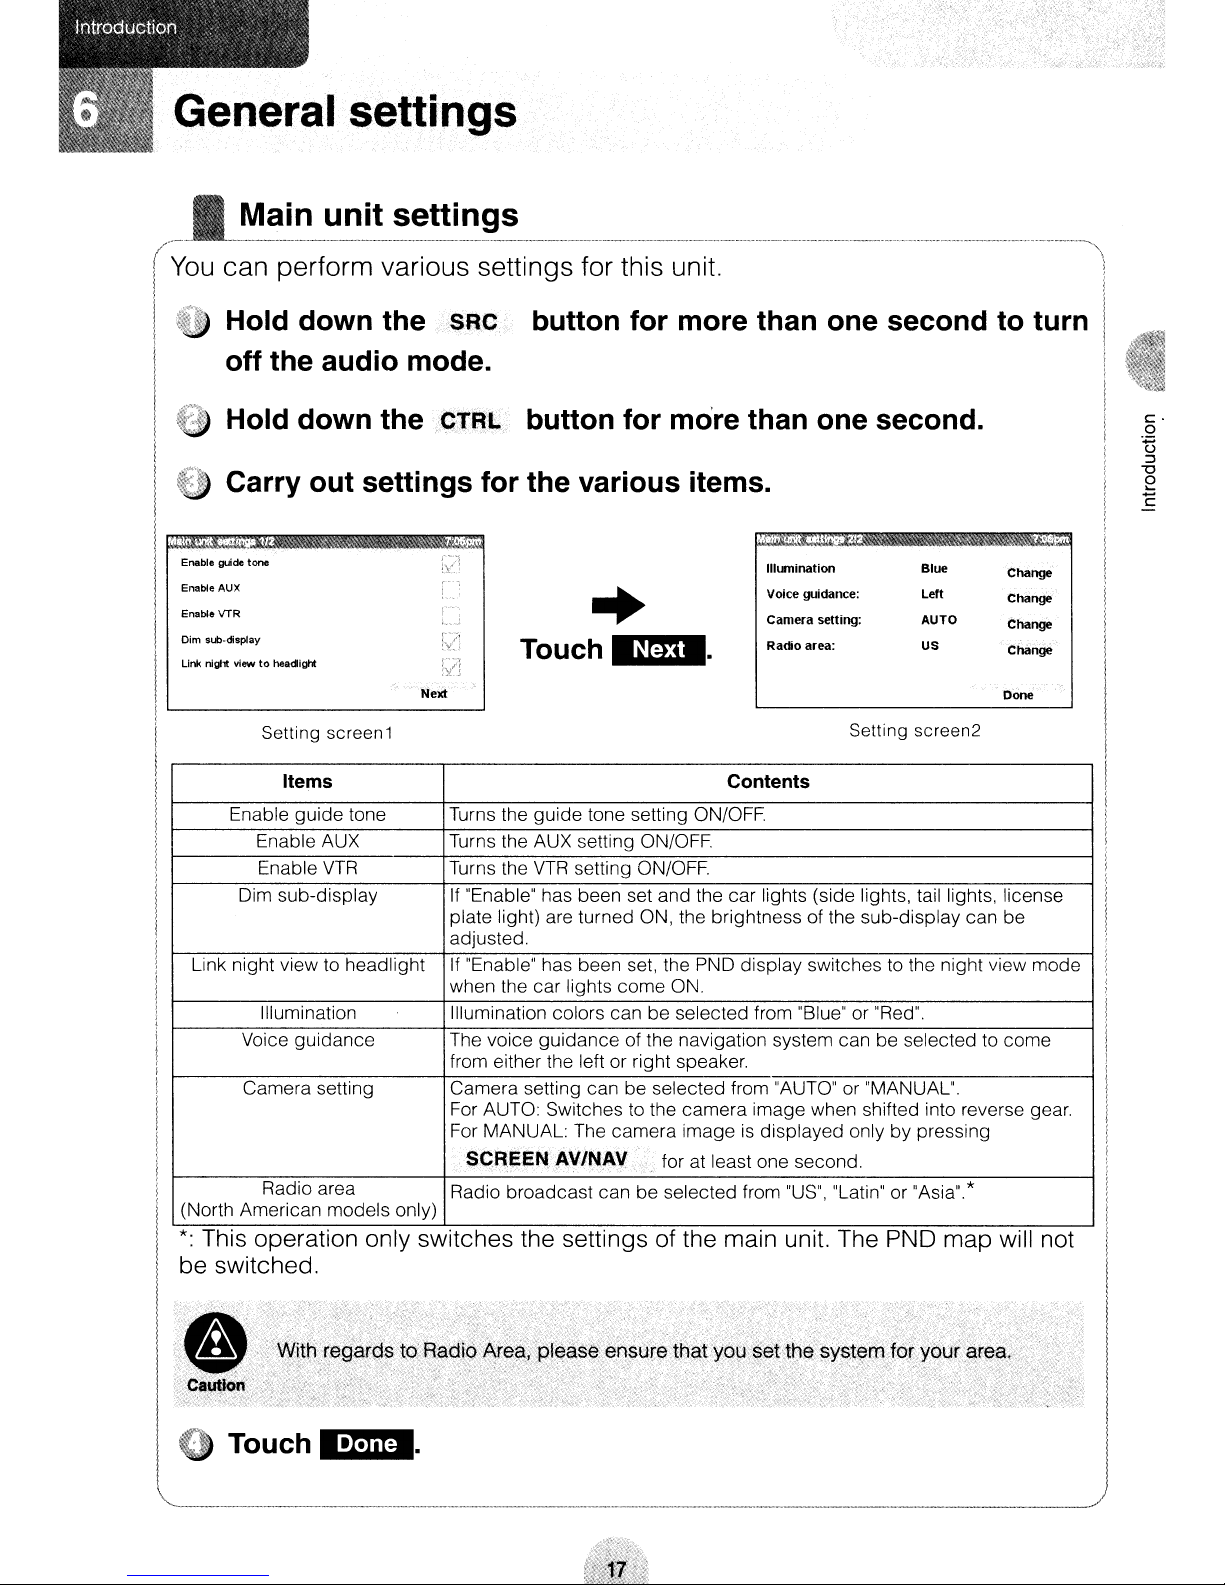
General settings
Main unit settings
You
can perform various settings for this unit.
Hold down the SRC button for more than one second to turn
off the audio mode.
Hold down
thectRL
button for more than one second.
Carry out settings for the various items.
Ji.:,'
Enable
guide
tone
Enable AUX
Enable
VTR
Dim sub-display
Link
night viewtoheadight
Next
Setting screen1
Items
Enable guide tone Turns the guide tone setting ON/OFF.
Enable AUX Turns the AUX setting ON/OFF.
Enable
Dim sub-display If "Enable" has been set and the
Link night view to headlight If "Enable" has been set, the PND display switches to the night view mode
Illumination
Voice guidance The voice guidance of the navigation system can be selected to come
Camera setting
VTR
Turns the
plate light) are turned ON, the brightness of the sub-display can be
adjusted.
when the car lights come ON.
Illumination colors can
from either the left or right
Camera setting can be selected from "AUTO" or "MANUAL".
For AUTO: Switches to the camera image when shifted into reverse
For MANUAL: The camera imageisdisplayed only by pressing
TouchlmDl·
SCReEN
Radio area
(North American models only)
*:
ThiS
operation only sWitches the settings of the main
Radio broadcast can be selected from
+
VTR
setting ON/OFF.
AV/NAV
be
selected from "Blue" or "Red".
speaker
for at least one second.
be switched.
Illumination
Voice guidance:
Camera setting:
Radio area:
Setting screen2
Contents
car
lights (side lights, tail lights, license
"US",
"Latin" or "Asia".*
unit
The PND map
Blue
Left
AUTO
US
Change
Change
Change
Change
Done
gear
Will
not
(I
Touch
EmmI·
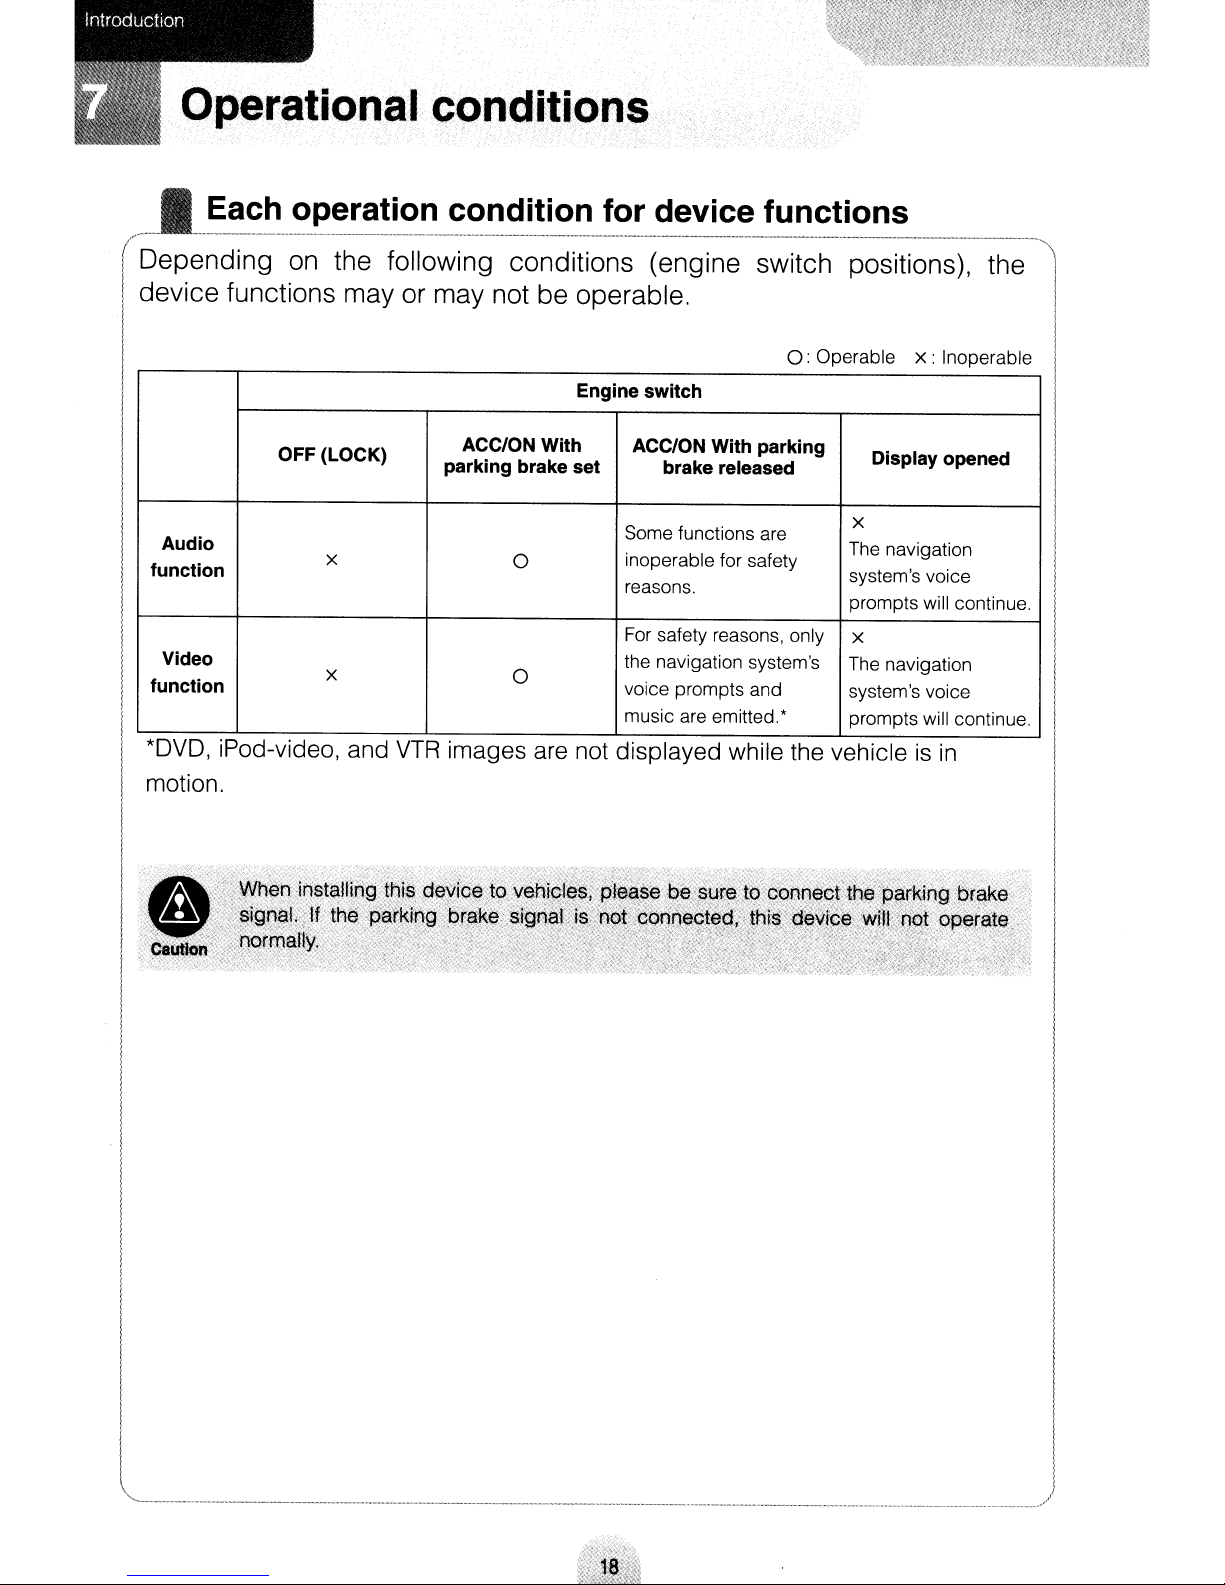
Operational conditions
Each operation condition for device functions
Depending
device functions
Audio
function
Video the navigation system's
function voice prompts and
*DVD, iPod-video, and
motion.
on
the following conditions (engine switch positions),
mayor
OFF (LOCK)
x
x
may not be operable.
Engine switch
ACC/ONWith
parking brake set brake released
0
0
VTR
images are not displayed while the vehicleisin
ACC/ON With parking
Some functions are
inoperable for safety
reasons.
For
safety reasons, only
music are emitted.*
0:
Operable
the
x:
Inoperable
Display opened
x
The navigation
system's voice
prompts will continue.
x
The navigation
system's voice
prompts will continue.
I
I
I
I
__________________
. . J
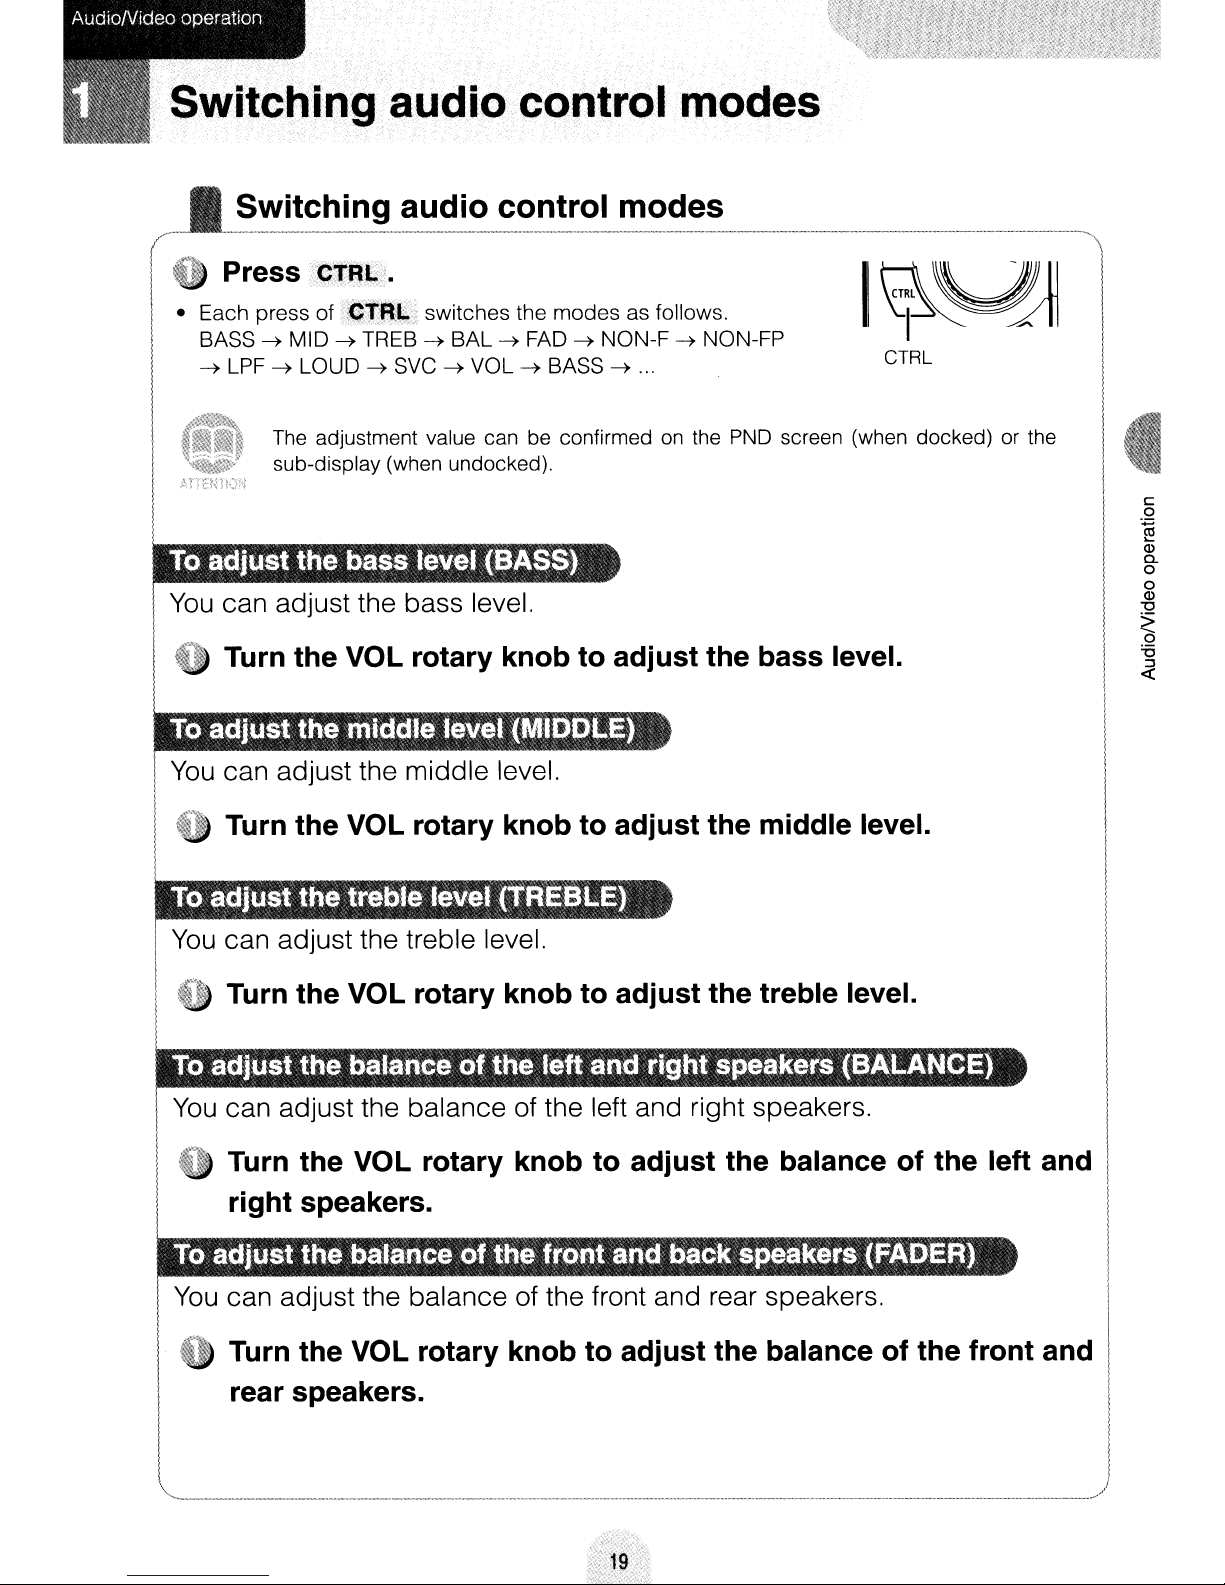
Switching audio control modes
• Switching audio control modes
I'·"·".."
(
,,"'Or
!;:rJ
• Each
You
(0
·"
·"".." ·
··".." •.."·,,
,, · .." "
_._
_..
__
""
"-
''''
PreSS/i~1t.,~:/·
press
of
(,~tB~:
BASS~MID~TREB~BAL~FAD~NON-F~NON-FP
~
LPF~LOUD~SVC~VOL~BASS~".
The adjustment value can be confirmed on the PND screen (when docked) or the
sub-display (when undocked).
can adjust the bass level.
Turn the VOL rotary knob to adjust the bass level.
switches
the
modes
as follows. \.I~~
''-
- - ''''
I
''''-
_ " _ _ _ " _
0,,
~
~
CTRL
II
"._'\
c:
o
~
Q)
Q.
o
o
Q)
'0
~
'6
::::l
«
..
:;.
. .
You
can adjust the middle level.
';0
Turn the VOL rotary knob to adjust the middle level.
You
can adjust the treble level.
Turn the VOL rotary knob to adjust the treble level.
You
can adjust the balance of the left and right speakers.
Turn the VOL rotary knob to adjust the balance of the left and
right speakers.
You
can adjust the balance of the front and rear speakers.
I
~i)
Turn the VOL rotary knob to adjust the balance of the front and
rear speakers.

AudioNldeo operation
~:,
'
~.:
..
"
,,-------_._-------------------------------------._------------------------------------_._---------------------------------~\
To
adjust the non-fader level (NON-FADER LEVEL)
I
You
can adjust the non-fader level (for connected sub-woofer).
o Turn the VOL rotary knob to adjust the non-fader level.
To
choose the phase (NON-FADER PHASE)
IThe merger of sound between the front and rear speakers and the woofer
can be improved by selecting the phase. Switch the phase which lets the
speakers combine without any disharmony.
10
Turn the VOL rotary knob to choose the phase.
• Right:
NORMAL
Make the output timing of the front/rear speakers and the woofer the same.
Left:
REVERSE
Change the phase of the output timing of the woofer.
I
You
can adjust the frequency filtering settings.
I
~
!
Turn the
settings.
• Right:
LPFON
Only allow lower frequencies (low range) through.
Left:
LPF
OFF
Allow all frequencies through regardless if the frequencies are low or
VOL rotary knob to adjust the frequency
high_
filtering
I
!
!
!
!
I
!
I
i
I
II
Accentuate low and high frequencies when the volumeislow.
When loudness
compensated
Turn the VOL rotary knob to set the loudness ON/OFF.
for.
is
ON,
l
the apparent deficiency
in
the high sounds
is
In
this mode you can set the volume level for each audio source, taking
FM
the
radio volume level as the reference level.
(The volume level of the audio source you are currently listening to
adjusted.)
Turn the VOL rotary knob to adjust the SVC setting level.
• Right:
SVC
Increase the
Left:
Decrease the
If you feel that the DVD source volumeistoo low, we recommend that you adjust
with this setting.
setting level.
SVC
setting level.
is
c
o
~
Q)
c-
o
o
Q)
"C
~
it
'6
::J
«
Press
• Pressing
to its previous level.
• While the audio system
MUTE
MuTE
•
again, or turning the VOL rotary knob to the right will restore the volume
is
muted, navigation voice guidance continues unmuted.
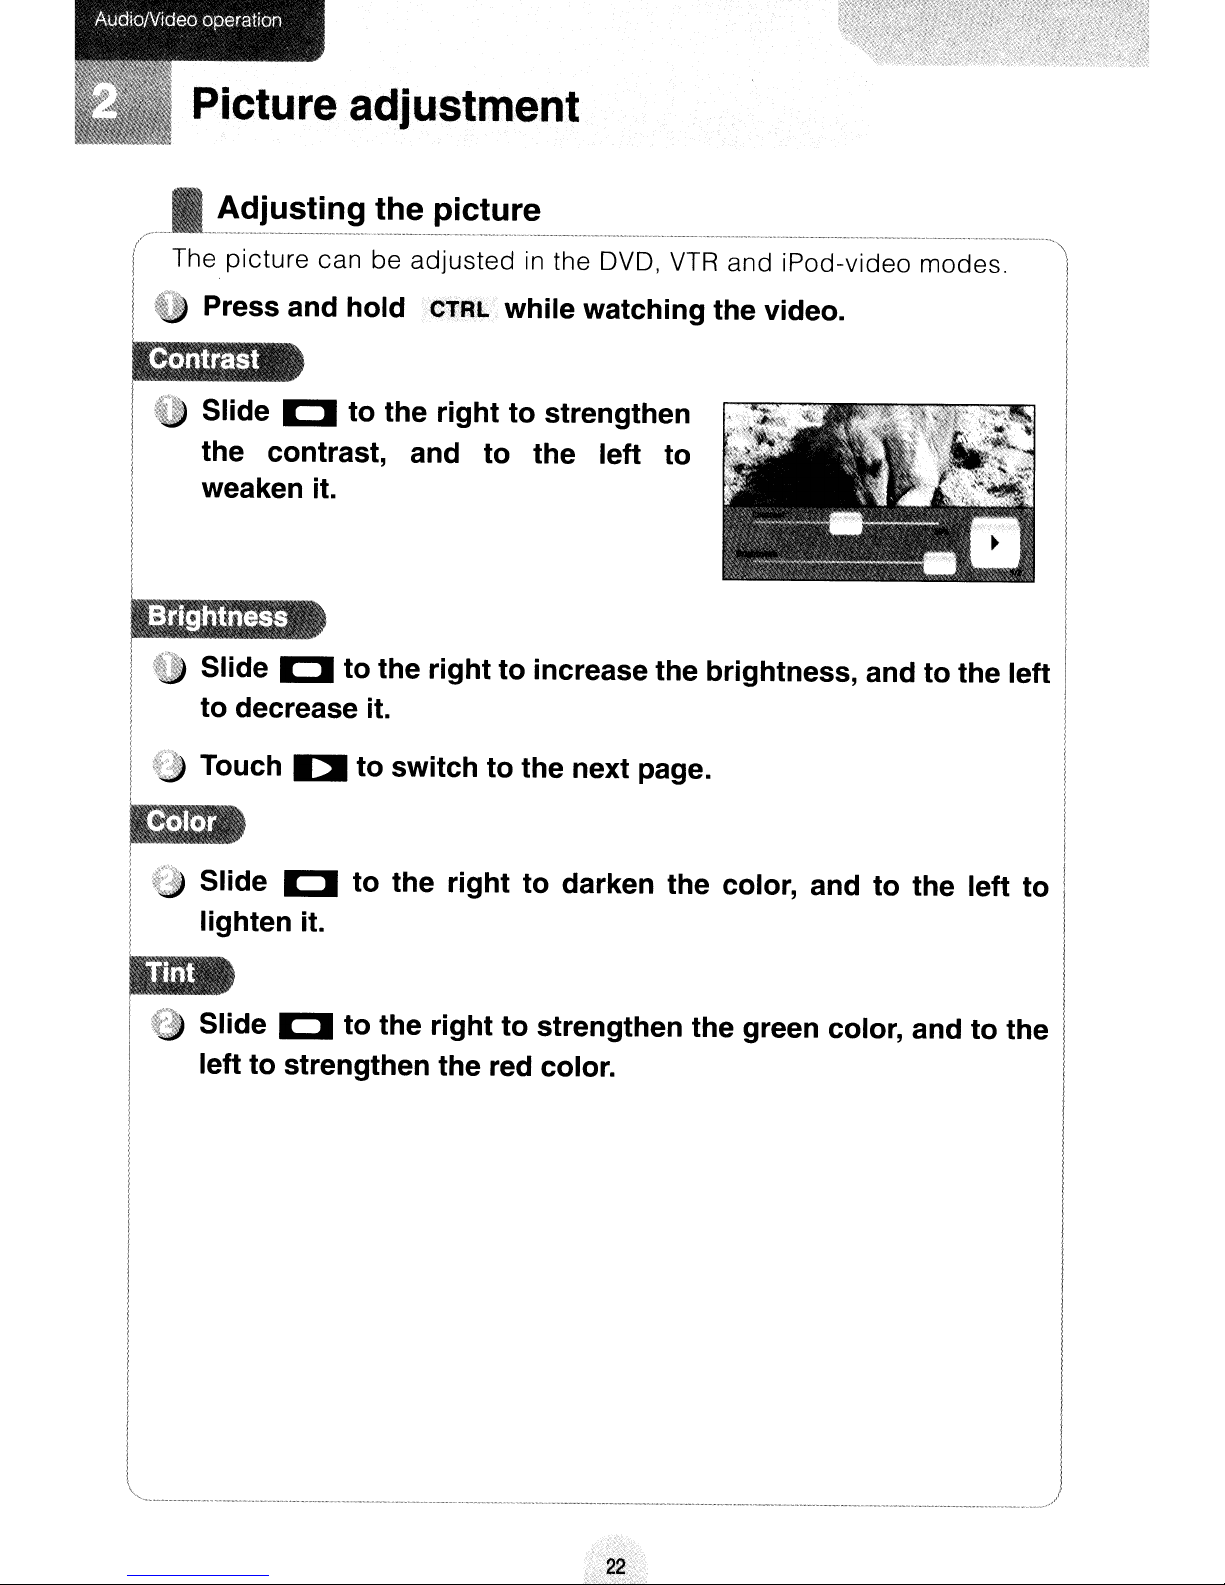
Picture adjustment
• Adjusting the picture
r<-~
~h;:::~:3:~:~~:~:~~:::::R~;:::::::~id~~'
m~d~~-'
'I
~I:I
I the contrast, and to the left to
I weaken
it.
to
the
right
to
strengthen
I
I
-@
Slide
I
i
to decrease it. i
I9 Touch D
..
I
:~
Slide
I lighten
, I
I:J
I:J
it.
to the right to increase the brightness, and to the left
to
switch
to the right to darken the color, and to the left to I
to
the next page.
I
I
!
~de
I
left
1:1
to
strengthen the red color. I
to
the right
I '
I
I
I
!
I
I
l
,,--------_._--------------------------_.
to
strengthen the green color, and
-------_._-
to
the '
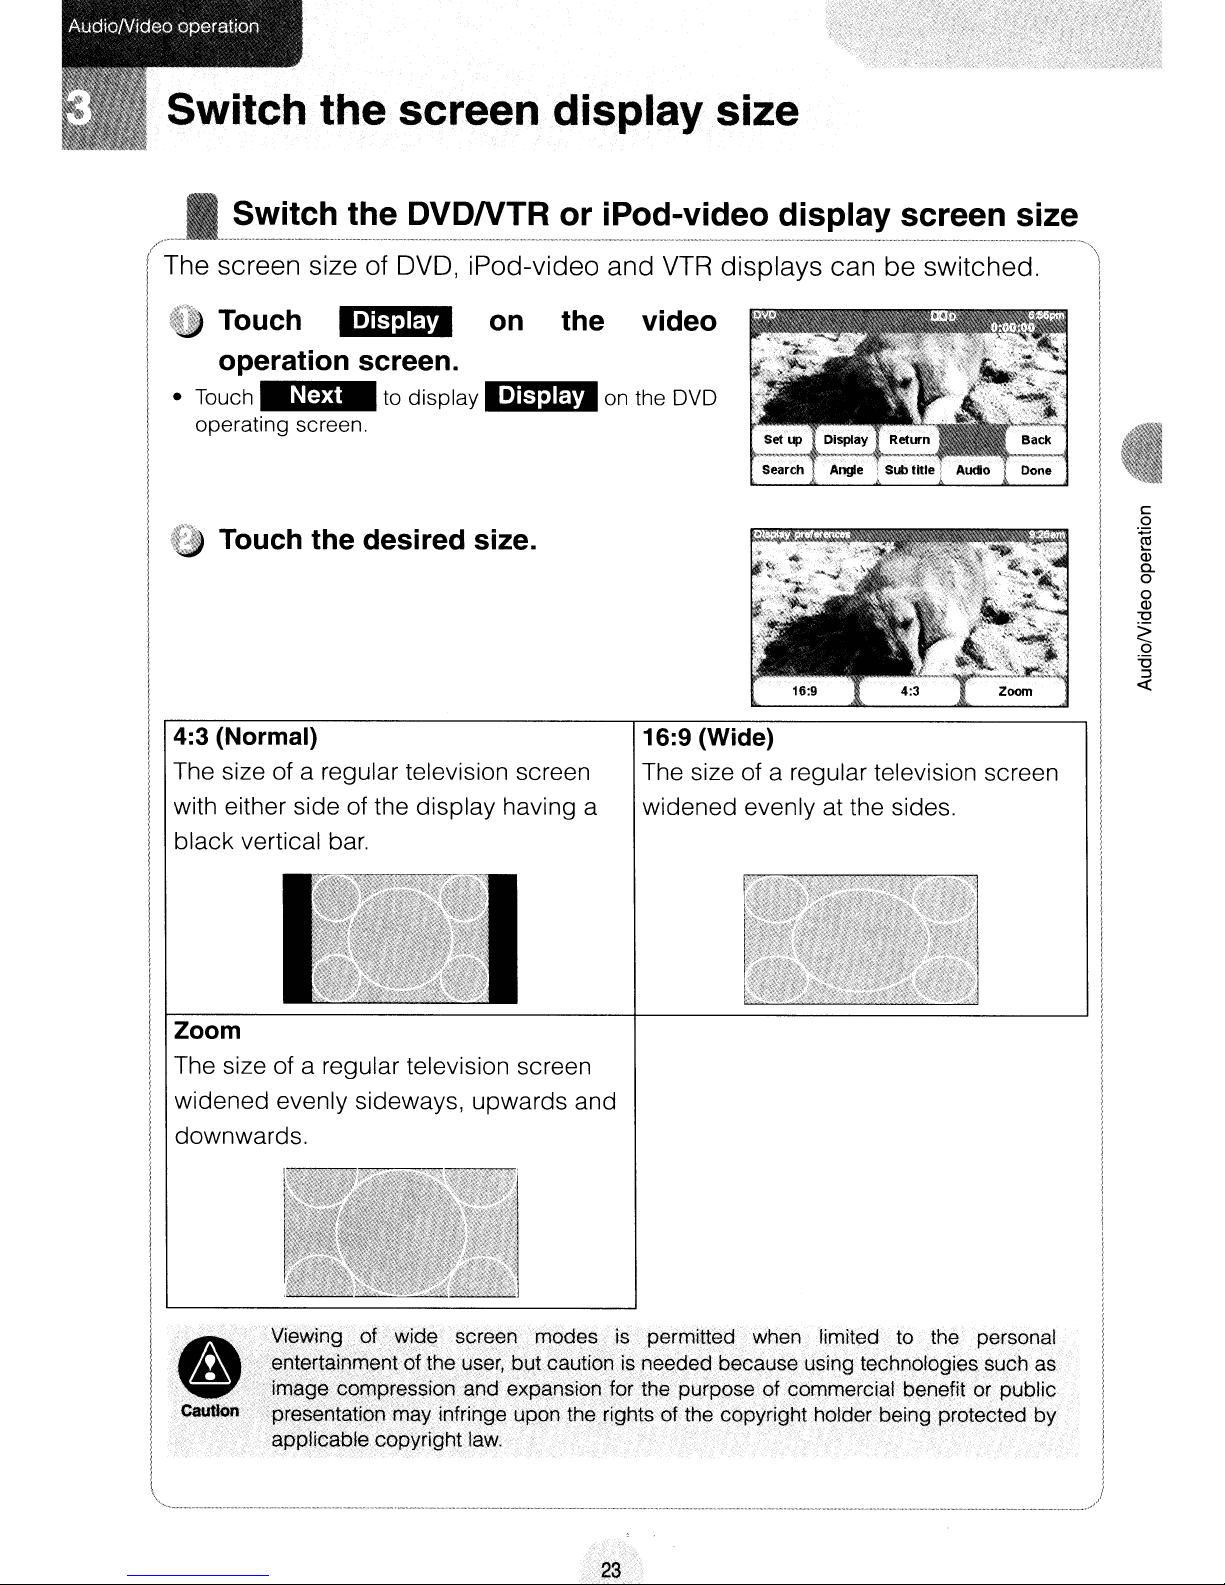
Switch the screen display size
__
(The
I @ Touch
I.
i
I
~
r-
Switch the
screen size of DVD, iPod-video and
..
operation screen.
• Touch
operating screen. i
~
DVDNTR
to
display"
on
or iPod-video display screen size
VTR
the video
on
the DVD i
displays can
.',
,'.
<:<l~:.,
'.~-.t~
<"'.~.
-:
be
switched. !
II.
,,,,;...
:"
Touch the desired size.
-:3-(N-o-r-m-a-I)------------,--1-6-:9-(-W-j-d-e)------------,
4
The size of a regular television screen The size of a regular television screen I
i
i
:
I
I
I
i
with either side of the display having a widened evenly at the sides. i
black vertical bar. I
I------------------+--------------------J:
Zoom :
The size of a regular television screen '
widened evenly sideways, upwards and
downwards. I
I
!
!'
L
II:.·.•
·.,.0·..·..·'."
".''..•...•....•..,•.•,•.•.
U .'eotertainment
I
'cautl~?i
l
-=========-
Vi~wing,of:wi9~
IT11~QecO~preS$io.n9ngexpansidn·
'cpr~sentqtibn·may·infringelJPoh
'!Ppli""bl~
copyrig~tI".(
scr~Ea~
°fth,eu~ei,but
.modes .ispermitted
cautionis neededbecause using technologies such
.-J
when
for
the purppseof commercial
therights of the copyright hoJderbeing protecteclby
.
limited to
the
personal
ben~fit.·or"public
as
I
I
I
I
1
i
I
i
I
i
i
I
>23
)
'.

AMIFM
r~dio.operation
__
How to listen to the AM/FM radio
•
Press
"AM" appears on the sub-display.
• Each press
FM1
Manual selection of radio stations
"i'·:~,eYe
of"1J~Nft
-)
FM2
-)
repeatedly
FM3
untillFM"
switches the bands as follows.
-)
AM
-)
FM1
-)
or
I
...
..
87.9MHz
STEREO
FM1
2
3;
if
5
.i;,
is
o
Press·;~i~$;¢~0j,(lfsnnr}
• Right:
to
Tunes
• Right (at least one second):
Increases the preset channel number.
• Left:
Tunes
• Left (at least one second):
Decreases the preset channel number.
• Preset channels can also be selected using the touch switches.
Automatic selection of radio stations
Press
• Upper:
Searches for higher frequencies.
• Upper (at least one second):
Searches for higher frequencies quickly.
• Lower:
Searches for lower frequencies.
• Lower (at least one second):
Searches for lower frequencies quickly.
higher frequencies.
to
lower frequencies.
;S~C.i;~:ti(Qpp.d~
orj$."~~I~~;i(~ln)i
or
,s'~4~~t(L.owe·r)'.
.
Tune button
I~~~
Seek button
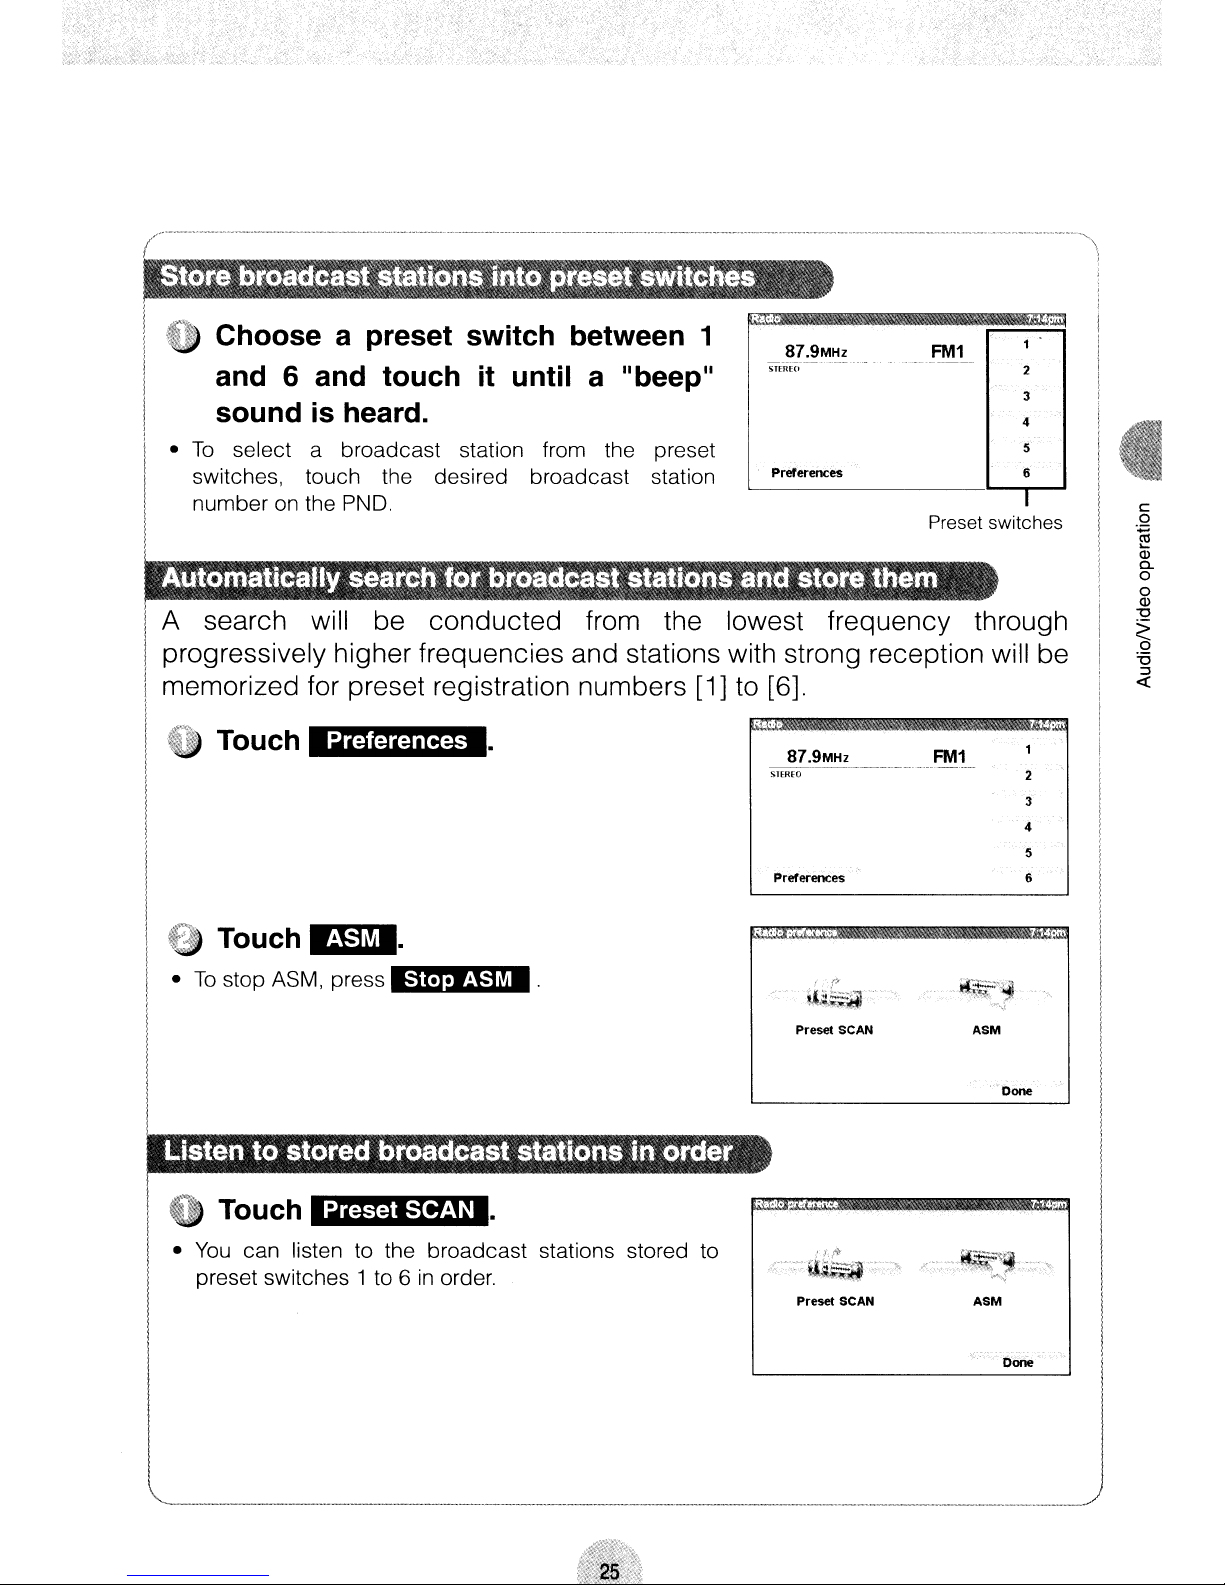
Choose a preset switch between 1
and 6 and touch it until a
is
sound
•
To
select a broadcast station from the preset
switches, touch the desired broadcast station
number on the PND.
heard.
"b
eep
r=-":·rD~~
STE-RE(I---~---------'--'-
"
Preferences
.--.-
----~.--
-----
- 2
3
4
5
II
I
Preset switches
A search will be conducted from the lowest frequency through
progressively higher frequencies and stations with strong reception will be
memorized for preset registration numbers [1] to [6].
Touch
Preferences
Touch".
•
To
stop ASM, press
Touch
•
You
can listen to the broadcast stations stored to
preset switches 1 to 6
Preset SCAN
Stop
in
ASM
order.
87.9MH2
SlERfO
Preferences
Preset SCAN ASM
Preset SCAN ASM
FM1
2
3
4
5
6
Done
Done
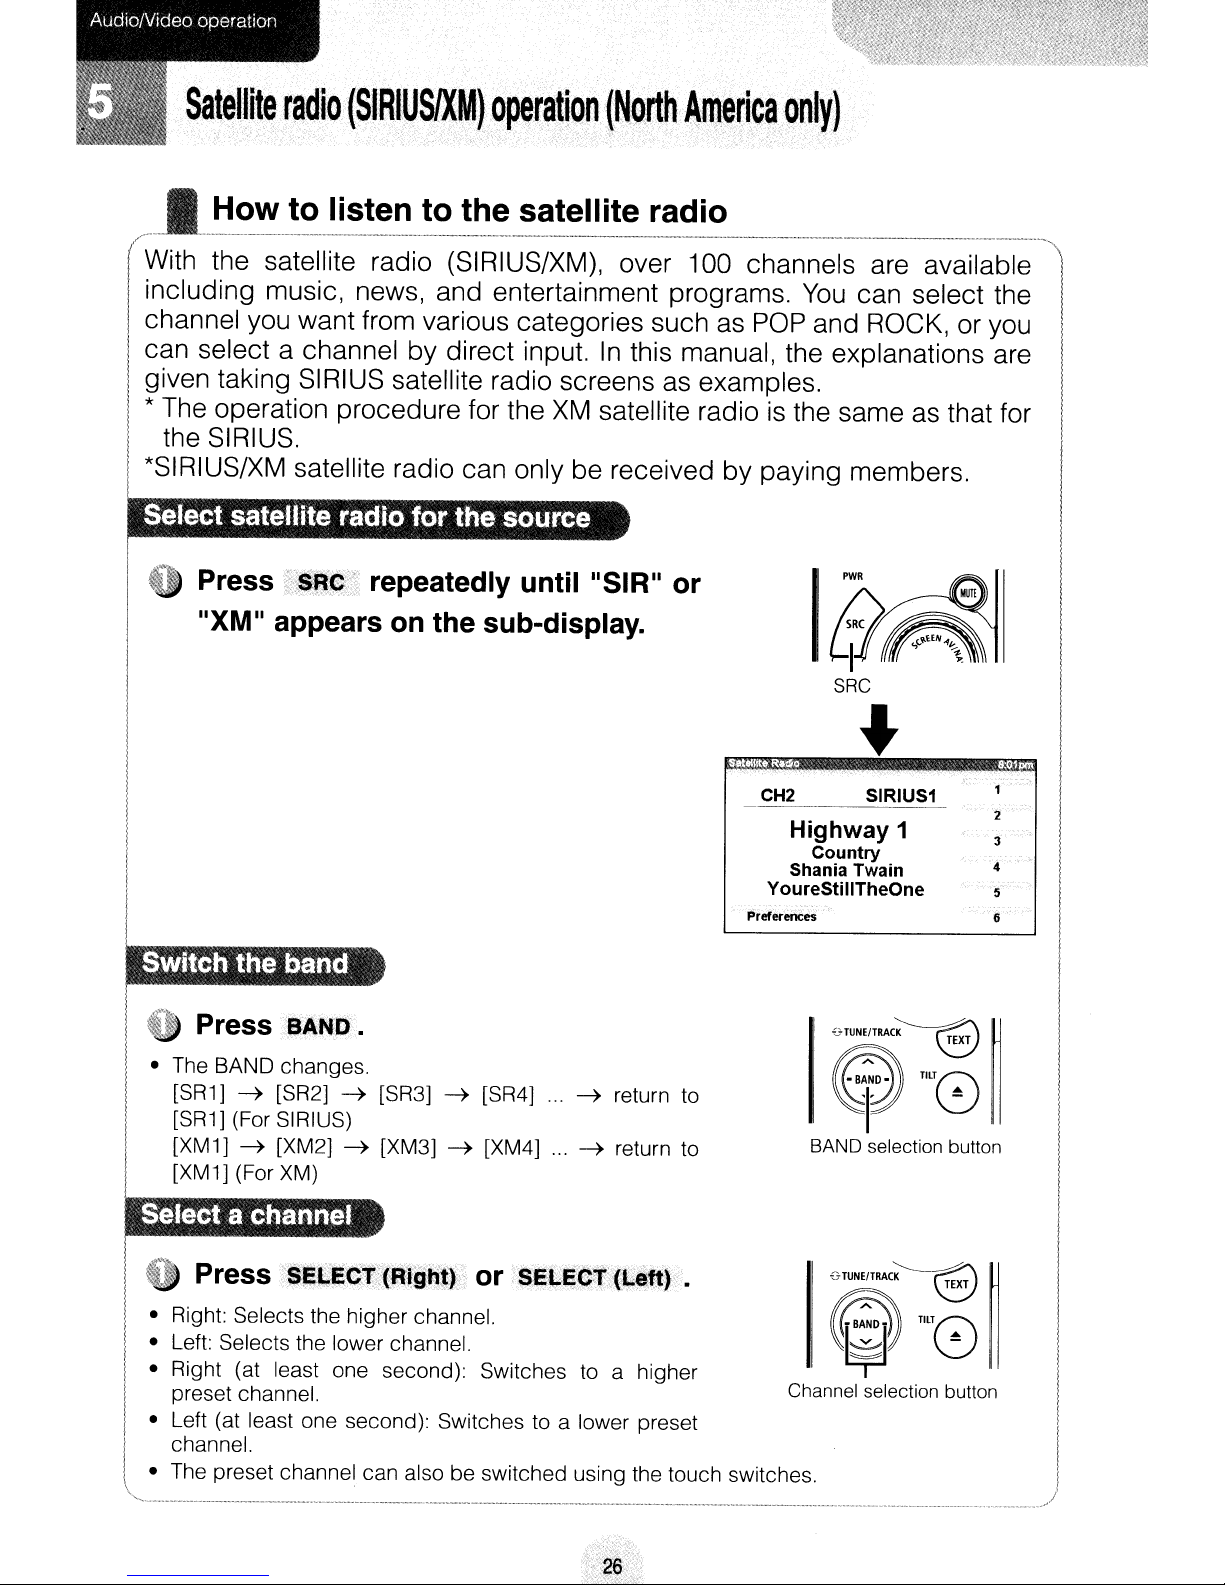
Satellite
radio
(SIRIUSIXM)operati9n(North
Am~rica
only)
~
With
including music, news, and entertainment programs.
channel you want from various categories such as POP and ROCK, or you
r
can select a channel
the satellite radio
to listen to the satellite radio
·-(-S-IR-IU-S-/X-M-)-,
by
direct input.
-o-v-e-r-1-0-0-c-h-an-n-e-ls-a-r-e-a-v-a-il-a-b-le
In
this manual, the explanations are I
You
can select the
given taking SIRIUS satellite radio screens as examples. I
* The operation procedure for the
XM
satellite radio is the same as that for
the SIRIUS.
by
*SIRIUS/XM satellite radio can only be received
Select satellite
radio
for
the
source
paying members.
CH2
Highway 1
Shania Twain
YoureStillTheOne
Prererences
SIRIUS1
Country
.,
2
3
4
I
I
Switch
,f"'~
• The BAND changes.
• Right: Selects the higher channel.
• Left: Selects the lower channel.
• Right (at least one second): Switches
• Left (at least one second): Switches to a lower preset
• The preset channel can also be switched using the touch switches. ;
I
,_
..
_----_.
the
band
Press
[SR
1]
[SRi]
[XMi]
[XMi]
preset channel.
channel. I
__
BAND'
~
[SR2]
(For SIRIUS)
~
[XM2]
(For
XM)
._-------_.
•
~
~
[SR3]
[XM3]
__
~
[SR4]
~
[XM4]
._------------_._----_._---------------------------
...
~
return to
...
~
return to
to
a higher
BAND selection button
Channel selection button
....._...
!
-
:
26
H·.'.._"
'.,••"..""·•._·_".__,,_,.,""',, _ ·""..,•••..
" _
..
>0,..
_ _
,,_,"••
_ , _.."~_ ",_" '
".,..",_
_,_
,-'__.."••
_ • • "
..
"\,
Press$lEt.IEQ:r(""PiP~I'}
or
.$t:iI...t;PTlI..Qwer)···.
• Upper: Searches towards higher channels within a
category.
• Lower: Searches towards lower channels within a
category.
• Upper (at least one second): Switches to the next category.
• Lower (at least one second): Switches to the previous category.
Touch
Touch
Preferences
Direct
CH
selection
CH2
YoureStillTheOne
Preferences
Input a channel.
Touch'-.
4
7 8
~~=~~
Category selection button
c:
o
~
Q)
C-
o
o
Q)
"0
~
"0
SIRIUS1
Highway 1
Country
Shania Twain
2
5
o
3
6
9
2
3
4
5
6
Back
Select
:::J
«
Touch
Touch
Preferences
Preset SCAN
CH2
SIRIUS1
Highway 1
Country
Shania Twain
YoureStillTheOne
Preferences
2
3
4
5
6
AudioMdeo
(
operation
-
-'~
-,.-'
--_.
-
---"._-----------
~- ~.
~
--
-----
-"---
--
-------
~~~~~~~~I!W
-_.
-~~----~----
~-~------
--
--
------------~------
...
~""~N'!II
...
--._---
-----~~_._-~-------
~~
----
--_.
-_.
~----
-- ----------
..........
• When the
Information appears
PN
0 is docked
on
the
PND
• When the PND is undocked
Information will be displayed
display.
on
the sub-display.
";''.:
-,.',
CH2
SIRIUS1
Highway 1
Country
Shania Twain
YoureStillTheOne 5
PrererenCes
SIRIUS
CH2
XM1
Highway 1
Country
Shania Twain
YoureStillTheOne 5
Preferences 6
XM
:io.!
0,'
2
4
6
2
4
U Press 'texT .
•
For
SIRIUS, the channel number will be displayed.
For
XM,
•
be displayed
follows.
channel
song/program title~channel
information
No.
~
on
the music being played will
on
the sub-display and switched
channel name
I
I
l~
.
~
artist/feature
No.~...
as
~
.-
.....
;I?J:I;)
~~
GTUNE/TRACK
6.
____________
®
rIlT
......
TEXT
J
....
~_J
<fiiJ
Touch one of the preset switches.
CH2
.~
.
SIRIUS1
•
Touch
The
selected radio10is
When
Preferences
displayed.
CHOisselected, the main screen is displayed.
Highway 1
Country
Shania Twain
YoureStillTheOne
PreferenceS
c:
o
~
(I)
a.
o
o
(I)
"'0
~
i5
:::J
«
CD·MP3IWMA player operations
I How to listen to a CD·MP3IWMA
".',..______'
,H,._
'_,'.,
._._."_,
.,
,,"_,. •.
_o<'_,_.
",."._'
"'_"__'_'_'"'
'_"''''''.
__
'_'_'_'.''_".H_.__
._,
,.".•'_.__,.•,_..__._.•
_,_..,_'
._,_..__",H
,"••
'~'~H_
_•••_',_..
_~."
..
,_._._••_,
..
,_"_,_"~_
.
__
oM
",_,.,.
__
._".,~
.".,
,_,_
, Playa
:~
PressSRc
"ROM"
CD·MP3IWMA
file
repeatedly until
"CD"
or
appears on the sub-display.
O:14MP3
Music Driving
ECLIPSE
Beat
Preferences
If
sound data and MP3/WMA data are mixed on the same disc, only the data recorded
in
the first session can be played. Refer to the web manual for details.
Track 5
On
Emotion
l
SCAN
track
• Switch to the next
music
I
•
Hold
file when
down
for more than one
track
(file).
playing
.SELECT(Rlght) or SELECT (Left)
when
an MP3/WMA.
second
I
I
I
I
I I
\ )
"---_._-_._--------------------------------------------------------_._---.-------------------------_.
playingaCD
or to the next
to fast-forward or rewind the
Track
selection (track start point),
fast-forward,
rewind
buttons
__
._--_.--'
 Loading...