

Page 1

USER MANUAL
MANUAL DE INSTRUCCI O NES
MANUEL UTILISATEUR
BEDIENUNGSANLEITUNG
Page 2

2
Page 3

3
LIST OF CONTENTS
1. IMPORTANT REMARK 04
2. INTRODUCTION 05
3. INSTALLATION 05
4. QUICK START 08
5. OPERATION AND USAGE 10
6. FURTHER CONSIDERATIONS 12
7. FUNCTION LIST 13
8. FUNCTION DIAGRAM 13
9. TECHNICAL CHARACTERISTICS 50
10. CONFIGURATION DIAGRAM 51
11. BLOCK DIAGRAM 52
All numbers subject to variation due to production tolerances. ECLER SA reserves the right to make changes or
improvements in manufacturing or design which may affect specifications.
Page 4

4
1. IMPORTANT REMARK
Safety Instructions
In order to get the optim um operation and efficiency f rom your mixing unit, it is VERY IMPOR TANT - before you
plug anything - to read this m anual v ery car efull y and tak e ser iousl y into acc ount all cons iderat ions sp ecif ied within
it. We strongly recommend that its maintenance be carried out by our Authorised Technical Services.
This apparatus must be earthed through its mains cable.
Do not expose the unit to rain or water splashes, and do not place liquid containers or incandescent
objects like candles on top of the unit.
Any change in the configuration of the unit must be carried out by a qualified technician. Should any
connection / disconnection task be done, always disconnect the unit from the mains supply.
Warranty Descriptions
Your ECLER equipm ent has undergone exhaustive laborat ory and qualit y control tests before leaving the fac tory.
Nevertheless, your may be in need of our Technical Service during the period covered by the Guarantee or
afterwards. In that cas e, caref ully protect your equipm ent in its or iginal pac ket and s end it to our Technical Service
with the transport and insur ance paid. Attac h a photocop y of your Guarantee Certificate an d a detailed desc ription
of the defect you have observed.
ECLER S.A. guarantees th e NUO4.0 mixer against material defec ts and manuf acturing faults for the period of one
year, starting from the original purchase date.
ECLER, S.A., will repair th e defective equipment within the aforem entioned period, with no charge for parts and
labour.
To ensure the validity of the G uarantee, it is essential that the attached Guar antee, Registration Card is f illed out
correctly and remitted to your ECLER distributor, within 10 DAYS after date of purchase.
The Guarantee is non-transferable and protects the original buyer only.
The Guarantee does not cover:
Damages caused by mistreatment or negligent handling, lack of elementary precautions, disregard to the
instructions in the manual, faulty connection or accidents.
ECLER, S.A., will not be held respons ible for any direct or indirect dam age, loss or other damage or iginated b y or
relating to the set.
* sets that have been manipulated, altered or repaired other than at the authorized Technical Service centers.
* the exterior fittings and electro-m ec hanica l parts, nor their wear due to use.
* shipping and insurance expenses, nor for damages the set may incur during its transport.
This Guaranteed is valid only for repairs or services carried out at an authorized Technical Service Center.
Page 5
5
2. INTRODUCTION
Congratulations for acquiring a genuine, profes s ional E CLER device!
The NUO4.0 is a prof essio nal DJ mixer designed and m anufac tured b y ECLER; an ent erprise with headq uarter s in
Barcelona, which works on professional audio equipment since 1965.
The NUO4.0 is a profess ional audio mixer thought f or any kind of DJ, due to its wide range of functions, which
make it a console able to mix any kind of music style: techno, house, minimal, electro, hip hop, …
The NUO4.0 is a mixer though t for scratching techniques, due to the vers atility of the adjustments of faders and
crossfaders. The NUO4.0 i s fur therm or e able to wear t he ET ERNA L c r ossf ader , ECLER ’s magnetic crossfader wit h
5 years guarantee, which has been specially designed for scratching specialists.
This genuine mixer uses the best components available on the market, obtaining the highest possible sound
quality. The over 40 years of ex perience in the design of profess ional audio equipment make that the c ircuits are
extremely efficient a nd a warm and c rystal cle ar anal ogue s ound is o btained. All c ircuits ar e m ounted an d tes ted in
our factory site in Barcelona.
Furthermore, the NUO 4.0 is a mixer which has be en specially designed for a ll kinds of professional ins tallations,
thanks to its two ba lanced outputs and its t wo microphone inputs. Its desi gn and resistance turn it into the ideal
console for professional installations, as well as for mobile applications executed by trendiest DJ’s.
3. INSTALLATION
The main consideration to be taken when looking for the best setup location for the NUO4.0 has to be the
maximum commodity for the user and the easiness for realizing the necessary connections.
The NUO4.0 has been basically designed as an on desk mixer and its usual
location will be between two turntables or CD players. The mixer is 37 cm
(14.57") deep and 32 cm (12.6") wide.
Using the metallic side panel kit (o ptionally avai lable) you m ay fix your NUO4.0
directly on a support surface or on those side panels which also allow you to
skew it. The "NUORAKI" metallic holders allow you to install the mixer in a
standard 19" rack.
Because of the high gain of the PHONO and MICRO inputs, alwa ys try to place
the mixer as far away as pos sible from noise sources (dim mers, engines, etc.)
and mains wires. For th e very same reason, and und er any circumstance, you
should never remove the unit's metallic cover.
The power consumpt ion of t he NUO4 .0 is very low, so they do not n eed an y coo ling, but you sho uld a void ex treme
temperatures and the atmosphere should be as dry and dust free as possible.
The NUO4.0 operates no w with a new universal input power suppl y “Switching Power Supply” and can pe rfectly
works without any interna l modific ation from 90V to 264V – 47 to 63Hz. Make sure that t he mains-w ire is far away
from the signal-cables in order to avoid any possible audio hum.
In order to protect the unit from an eventual electric al overload it carries a T 0.5A f use. Should it ever blow up,
unplug the unit fr om mains and replace it with an identical one. If the new fuse blows again contact immediatel y
with our authorized technical service.
ATTENTION: NEVER SHORT-CIRCUIT THE SECURITY PATH NOR USE A HIGHER VALUE FUSE.
CAUTION: Fuse substitutions have to be performed by a qualified technician.
Page 6

6
Audio input connections
INPUT 1 PHONO Turntable
INPUT 1 LINE CD Deck
INPUT 2 PHONO Turntable
INPUT 2 LINE CD Deck
INPUT 3 PHONO Turntable
INPUT 3 LINE CD Deck
INPUT 3 MICRO Microphone
INPUT 4 PHONO Turntable
INPUT 4 LINE CD Deck
INPUT 4 MICRO Microphone
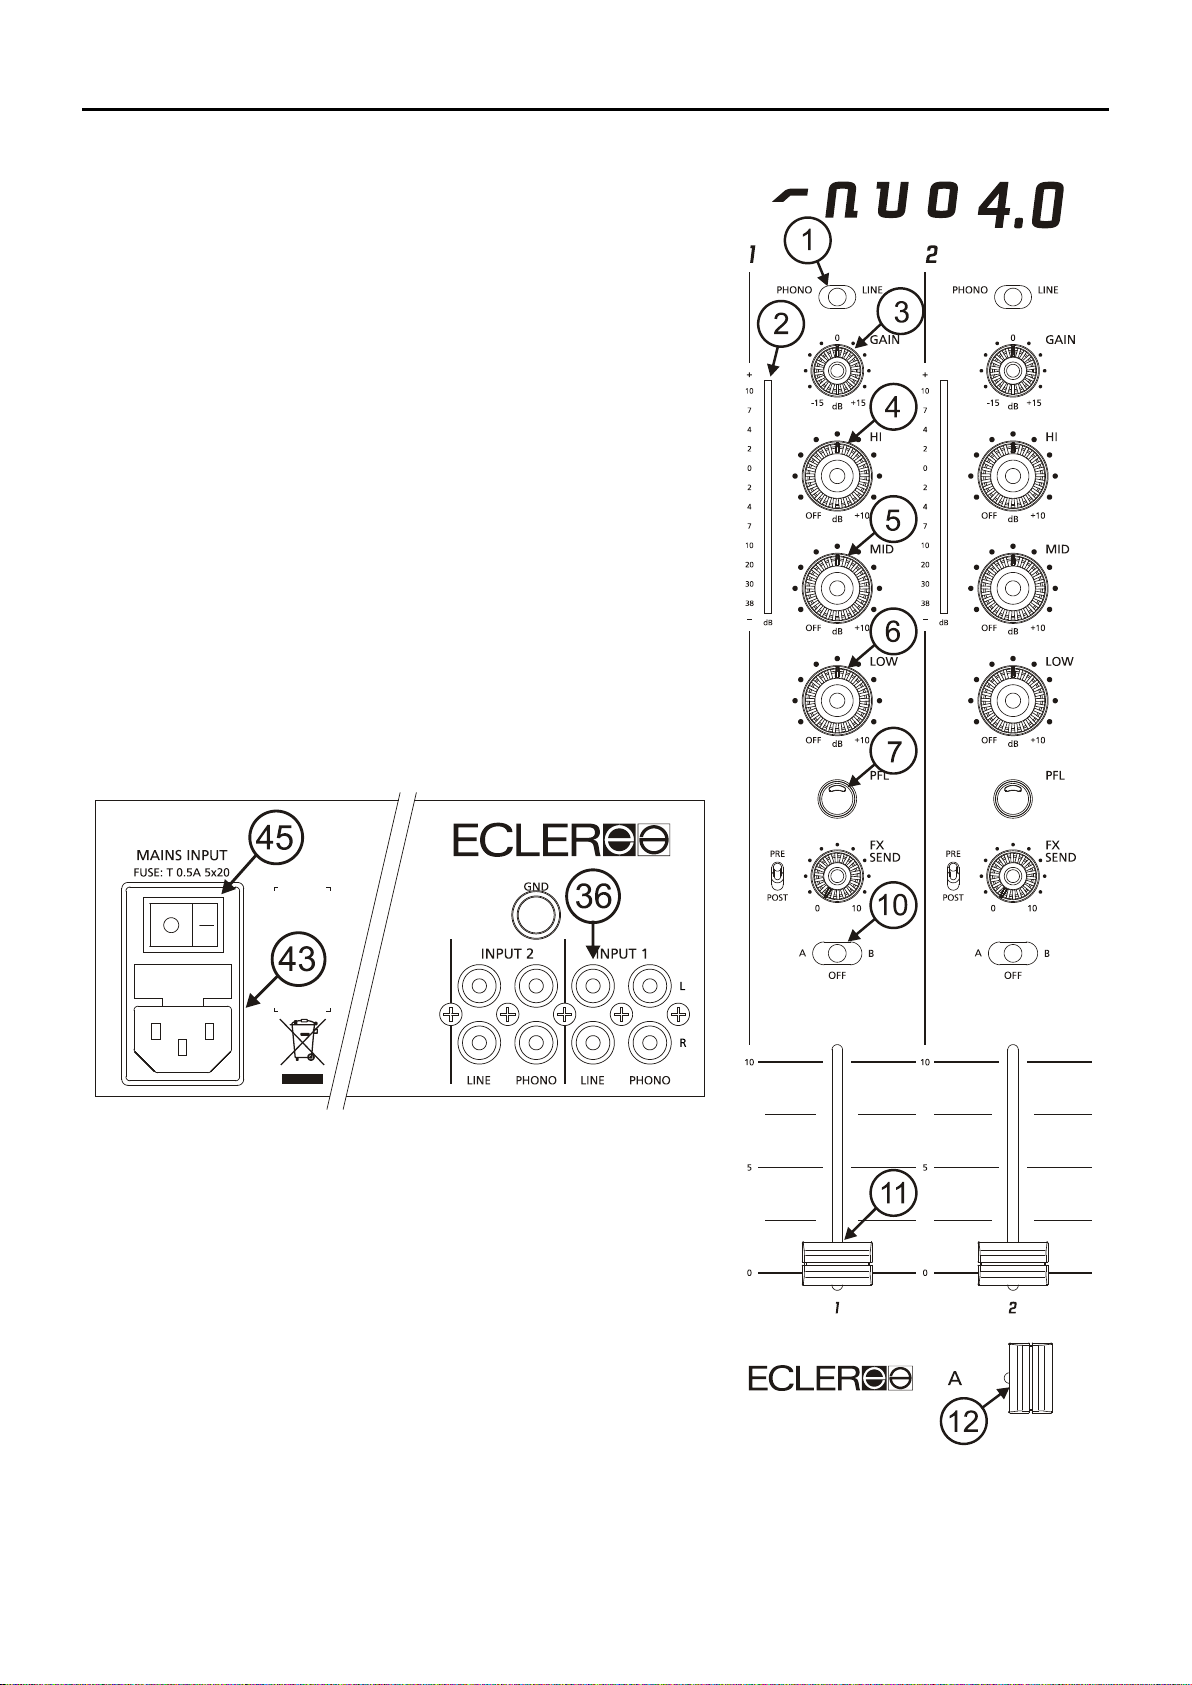
Phono Inputs
Phono Turntables m ust be fitted with a magnetic car tridge with nom inal output leve l between -55d BV and -25dBV
(1,77 to 56mV). T he PHONO inputs (35) of th e NUO4.0 have a high headr oom (margin before satur ation) and it
can handle higher ou tput c artr idg es than what is usual . These inputs are supp lie d wi th a nominal input sens itivity of
-40dBV(10mV).
Line Inputs
The sensitivity of the input s mark ed as LINE ( 36) is 0 dBV (1V). You ca n connec t sound so urces s uch as CD , DAT
or MP3 players, as well as keyboards and other instruments.
Microphone input
The MICRO inputs ( 13, 37) are a djusted f or a nom inal input level of -35dBV. The front al conn ector ( 13) is a c om bo
XLR3/Jack type, while the rear connector (37) is a XLR·type. These microphone inputs allow connections in
balanced mode. The connection has to be done as follows:
Hot or direct signal > Pin 2 Tip
Cold or inverted signal > Pin 3 Ring
Ground > Pin 1 Sleeve
The microphones must have low impedance (from 200 to 600Ω) and must be monophonic. For unbalanced
connections, a short circ uit m ust be done between pi n 3 and ground or th e center r ing. The NUO4.0 wears an 18V
Phantom power for c ondenser m icrophones. An int ernal jum per allows disabl ing the phantom power. T he NUO4.0
MICRO input is delivered ex works with enabled phantom power (see the configuration diagram).
Page 7

7
Audio outputs connections
MASTER Main power amplifier
BOOTH Booth/Room2 power amplifier
REC Recording
FX Send/Return External effect device (Input and Output)
Headphones Headphones
MASTER output
This stereo output feeds the PA system through balanced XLR3 connectors (38, 39) and an unbalanced RCA
connector (40). The nominal level for MASTER output is set to 0dBV (1V), but can be set to +6dBV using an
internal jumper. The MASTER output level is controlled by the MASTER potentiometer (24).
Near the MASTER c on trol l er you w ill f in d t he L +R switch (27), whic h ad ds th e lef t c hann el an d t he r ight c ha n nel f or
MASTER and BOOTH outp uts. This function is especi ally useful if a f ailure occurs on one of the channe ls during a
live session (a typical example could be a bad c ontact in the turntable ’s capsule). Enabling this switch, the mixer
will send the L+R sum to both loudspeakers, so that the major part of the audience will not notice the malfunction.
MASTER and BOOTH have a balance controller BAL (26)
BOOTH output
Normally this is used to obtain an independent output for the DJ booth. This stereo BOOTH output wears a
balanced XLR3 output and an unbalanced RCA output. The nominal level for the BO OTH output is set to 0dBV
(1V), but can be adjusted to +6dBV usi ng an intern al j um per. T he BOOT H output leve l is con trol led b y the BOO TH
potentiometer (25).
Record output
There is a REC output (22 ) on the control surface, whic h uses RCA connectors. T he nominal output level f or the
REC output is 0dBV (1V). This output is taken post-fader, before the MASTER signal.
FX Send/Return effects loop
The RCA connectors on th e FX SEND output (41) an d the FX RETURN input ( 42) allow creating a si gnal loop for
external effects processors, samplers or sequencers. The nominal l evel for the SEND output, as well as for the
RETURN input, is 0dBV (1V).
The signal sent to the FX SEND output c an be taken before or behind the fader using the PRE/ POST switch (9)
and the send level ca n be set usin g the as sociat ed po tentiom eter (8). T he NUO4. 0 also wear s a general FX SEN D
controller (17), which a dds the four channels, a general FX RET URN controller (15) and a controller for t he FX
RETURN monitoring signal, FX PFL (16).
Headphones
In order to obtain a high perf ormance, these should be of the high impedanc e type (200-600Ω). T hese are to be
connected to the headpho nes output (30) located on the controller surfac e using a stereophonic, normalized ¼’’
jack connector or a 3.5mm minijack connector. Sleeve is Ground, Ring is Right Channel and Tip is Left Channel.
Page 8
8
4. QUICK START
Install and connect the NUO4.0 as described in the INSTALLATION paragraph nº1.
We will describe a “Quick Start” procedure using the LINE input of
channel 1 and headphone monitoring output only.
1. Set the controllers to their initial position
Set the rotating controllers GAIN, HI, MID and LOW from channel 1 (3,
4, 5, 6) to their central position. Set th e channel’s fader (11) to its lower
end and assign the A/OFF/B switch (10) to position A (the channel is
now assigned to the crossfader’s A side).
2. Connect the headphones
Connect them to the headphones output (30). Set the headphones
LEVEL controller (29) to minimum level and move the SELECT (28)
controller into PFL position.
3. Connect a CD player
Connect a CD p layer to LINE input on cha nnel 1 (36), insert a CD and
play the CD.
4. Connect the mixer's power cable
Connect the power c ab le t o the mixer’s power supp ly input (43) and turn
it on using the MAI NS IN PUT s witch (45). Both elem ents are located on
the mixer’s backside.
5. Select the input source
Make sure that chann el 1’s input switc h (1) is in LINE position and that
the channel’s VU-meter (2) glows up. If this doesn’t happen, verify that
the CD player is correctly connected and that there is an audio track
being played back.
6. Adjust the input level
Move the GAIN (3) control until the VU-meter shows 0dB.
7. Send the signal to the main output
Move the fader from channel 1 (11) all the way up and set the
crossfader (12) to side A.
Page 9
9
8. Listen to the signal with your headphones
Press the PFL button (7) on c hanne l 1. Adjust the LEVEL contr ol ler (29) to obt ai n a c om f or table monitoring volume.
Now you should hear music with your headphones. Turn the SELECT controller (28) to the right to c rossfade the
PFL signal and the MIX s ignal. When this controller is c ompletely turned to the right, only the MIX s ignal will be
monitored.
9. Try the operation of the tone controllers
Experiment with this po werful 3-way stereo equal iser (4, 5, 6). This tone contr ol has been designed f or a creative
sound edition: each way can be individually isolated using the big and ergonomic rotary controllers.
10. Verify the crossfader settings.
Each channel can be assigned to the crossfader using the A/OFF/B
switch (10). T he crossfader allows melting the signals assigned to its
sides. If the switc h is in pos ition A or B, the c hanne l is assigne d to o ne
or the other side of the crossfader. The OFF position disables the
crossfader function for this channel.
11. Adjust the crossfader curve
The XFADER SHAPE control (19) allows you to precisely adjust the
skew angle of the cr ossf ader’s c urve. T urning the c ontroller com pletel y
to the left, the two songs will be melt softly. The crossfader’s curve
raises when turning the controller to the right. Moving the controller
completely to the right, th e signal will enter suddenl y with just a short
movement of the crossfader, which is a very suitable feature for
scratching techniques.
Page 10

10
5. OPERATION AND USAGE
Start-up
This can be done using the switch (45) located at the mixer’s back panel. Now the LED ON (23) indicator will
highlight. Even if the noise produced while enabling the NUO4.0 is as low as possible and gets completely
cancelled if all faders are turned down, it is always recommendable to turn on the devices using the following
sequence:
1. Sound sources.
2. Mixer, equalizers, active filters.
3. Finally, power amplifiers.
Powering off should be don e by followin g the exac t rever se sequenc e in order t o avoid an y possib le damage to the
loudspeakers.
Control Description
Input selector
Each channel features an input toggle switch selector (1).
Channel GAIN
All the NUO4.0 input channels ha ve an accessible input sens itivity GAIN control (3). The GAIN controls adjus t the
input level of each channel in order to compensate the different sources connected to the mixer.
The gain adjustments should be done with great care, using as a r ef erenc e t he V U-meter (2) on eac h chan nel. The
standard level reference used to mix audio signals is 0dBV.
The gain margin is set to ±15d B, but can be reduced to ±6dB V. This setting is independe nt for each channel and
can be done using soldering bridges. See the configuration diagram.
Equalization
The tone control system for each channel of f ers a wide range of modification from -30 to +10dB f or lo w f r eque nc ies
(6) and high frequenci es (4) and f rom -25 to +1 0dB for m iddle frequ encies (5) . This wide ran ge of var iation, kno wn
as “kill” type, can completely a ttenuate the selected fre quency range and has bee n speciall y designed f or creative
usage during live sessions.
ATTENTION: Use equalization carefully, by boosting too much the low frequency range, you can induce an
excessive displacement of the speakers membrane.
Monitoring System
The NUO4.0 is equipped with a flexible and easy monitoring system that will allow the performers to finely tune PFL
(Pre-fader listening) and M ix levels of each input t hrough the VU-MET ER and the HEAD PHONES. Each c hannel
can be monitorized visually and pre-listened pressing the dedicated PFL (7) button.
For HEADPHONES monitoring, the SEL ECT rotary potentiometer (28) allows you to blend a se lecte d PF L to geth er
with the main MIX Program. The LEVEL rotary potentiometer (29) controls the level of headphones output.
Each channel has a dedicated VU-meter that allows visual monitoring of the PFL signal (2).
Page 11

11
Sending to external effects units FX Send/Return
The 4 channels from the NUO4.0 are equipped with potent iometers (8) that allo w sendi ng the signal to an ex ternal
effects unit, sampler, etc. These potentiometers allow to precisely adjusting the signal level sent from each
channel.
The FX SEND output (4 1) has to be co nnected t o th e ef fec ts proc essor ’s input an d its o utput t o the R ET URN input
(42) or any LINE input (36).
This signal send ca n be configured either P RE or POST fader with th e PRE/POST toggle sw itch (9), so that the
level is affected or not by the channel fader.
The NUO4.0 also wears a general FX SEND con troller (17), which adds the four channels, a g eneral FX RETURN
controller (15) and a controller for the FX RETURN monitoring signal, FX PFL (16).
Faders
The NUO4.0 is equippe d with the new generat ion of ECLER 60mm faders (11) which are precise, extremely soft
and their features withstand over 4.000.000 manipulations, thanks to the ECLER VCA system (VCA: Voltage
Controlled Amplifier)
The usage of VCA technolog y allows the modif ication of the f ader's behavior. On the f rontal panel you will f ind the
FADER SHAPE potentiom eter (18), which allows adjusting the fader's curve so that the volume is proportionally
distributed on the fader’s range or that it appears suddenly.
Crossfader
Each channel can b e ass i g ned t o t he c r oss f ader (12) us ing t he A/OF F/ B switch (10). The cr oss f ader allo ws melting
the signals assigned to its sides. If the s witch is in positio n A or B, the chann el is ass igned to one or the other side
of the crossfader. The OFF position disables the crossfader function for this channel.
The NUO4.0’s crossfader includes a range of controls which allow adjusting its behavior and make it a really
accurate tool. The X FADER SHAPE co ntrol (19) allo ws you to precise ly adjust the s kew angle of the crossfader’s
curve. Turning the controlle r completely to the left, the two songs will be melt softly. T he crossfader’s c urve raises
when turning the controller to the right. Moving the c ontroller com pletely to the right, the sign al will enter suddenl y
with just a short movement of the crossfader, which is a very suitable feature for scratching techniques.
The REVERSE sw itch (20) inverts the cr ossfader’s direction . Depending on the selec ted direction, it is p ossible to
perform “cuts” as well as “transforms” moving the crossfader into the same direction.
The electronically correction for the CUT IN (21) is only effective if the NUO4.0 has been equipped with the optional
ETERNAL crossfader. If it only wears the s tandard cross fader, the CUT IN pote ntiometer m ust remain in the OFF
position. The CUT IN is the existing dist ance between the ph ysical end of the crossfader and the entering point of
the signal. The positi on with the shortest CUT IN provides a nearly instantan eous signal cut. To find t his position
the fader has to be set to an end and the C UT IN potentiometer m ust be turned rightwards until a m usical signal
can be heard. To enlarge the CUT IN time, turn the potentiometer to the left.
If you want to extend the life tim e of your crossfader, the NUO 4.0 allows the insta llation of the awarded ETERNAL
crossfader. This inducti ve crossfader techno logy is based on a magnet ic control s ystem and is completel y contact
free. The combination of thi s technolog y with an exc lusive, m echanical slid ing sys tem provides a s oft handli ng and
one of the most precise c rossfaders available these da ys. The inductive ETERNAL c rossfader has been specially
designed to execute ex treme turntablism techniques, which req uire an extremely soft and fast m ovement of the
crossfader.
Page 12

12
If you wish to install the ETERNAL crossfader, please accomplish the following instructions:
1. Remove the buttons from the sliding and rotating potenti ometers
of the mixer surface.
2. Unscrew the out er scr ews hol ding t he m ixer contr ol plate in place
and remove it.
3. Remove the two screws holding the crossfader in place and
remove it.
4. Carefully disconnect the multipin connector.
5. Replace the crossfader with the ETERNAL crossfader.
6. Connect the multipin connector you disconnected before.
7. Fix it with the two screws. Make sure the orientation is the one described on the drawing.
8. Put the control plate back in place and screw it tight.
9. Put the potentiometer buttons back in place.
ATTENTION: Always use original ECLER replacement parts.
WARNING: the replacement of the crossfader has to be done by a qualified technician.
MASTER and BOOTH output levels
The NUO4.0 features t wo main output level contro ls MA ST ER and BO OTH. The MASTER level is contr o ll e d b y the
MASTER (24) level knob. The BOOTH level is controlled by the BOOTH (25) level knob.
The balance potentiometer BAL (26) and the L+R switch (27) affect both outputs.
6. FURTHER CONSIDERATIONS
Ground loops
Ensure at all tim es that no signal sourc es reaching the m ixing desk and no devi ces connected to its o utput have
their earths interconn ected; that is, earth shoul d never reach them via two or more different paths, as this could
lead to humming wh ich could even in terfere with sound r eproduction qu ality. In order to avoid earth loops , ensure
that the shielding of cables, if connected to the chassis, are never connected with each other.
Background noise
The use of active circuitry can yield, depending on the conf iguration, to a significant noise lev el. The NUO4.0 has
been designed for the m inimum poss ible noise. An yway, the noise le vel will al ways depend on the c orrect u se and
installation of the m ixer. It i s not the same s etting up t he FAD ER at " 2" and the MAST ER at "10 " that th e ot her wa y
round; FADER at "10" and MASTER at "2". In the first case you get a poor signal to noise ratio that will be fully
amplified by the m aster while o n the s econd we hav e a goo d sig nal to nois e ratio onl y amplifie d b y "2". As a result,
the background noise is greater in the first case than in the second one.
Audio connections
As a general rule of thum b, make the signal connections as short as possible and use the best connecto rs and
cable available. Cables and connector s are frequently he ld cheap, forgetting t hat a bad connec tion can result i n a
poor sound quality.
Cleaning
The control panel s hould never be cle aned with solvent or abrasive substanc es as it could bec ome damaged. To
clean it, use a slightly moist soft cloth, together with a neutral liquid detergent, and then dry it with a clean cloth. It is
advisable to remove all s weat stains after use. Be caref ul to ensure that water never enter s the machine through
any of the openings.
Page 13
13
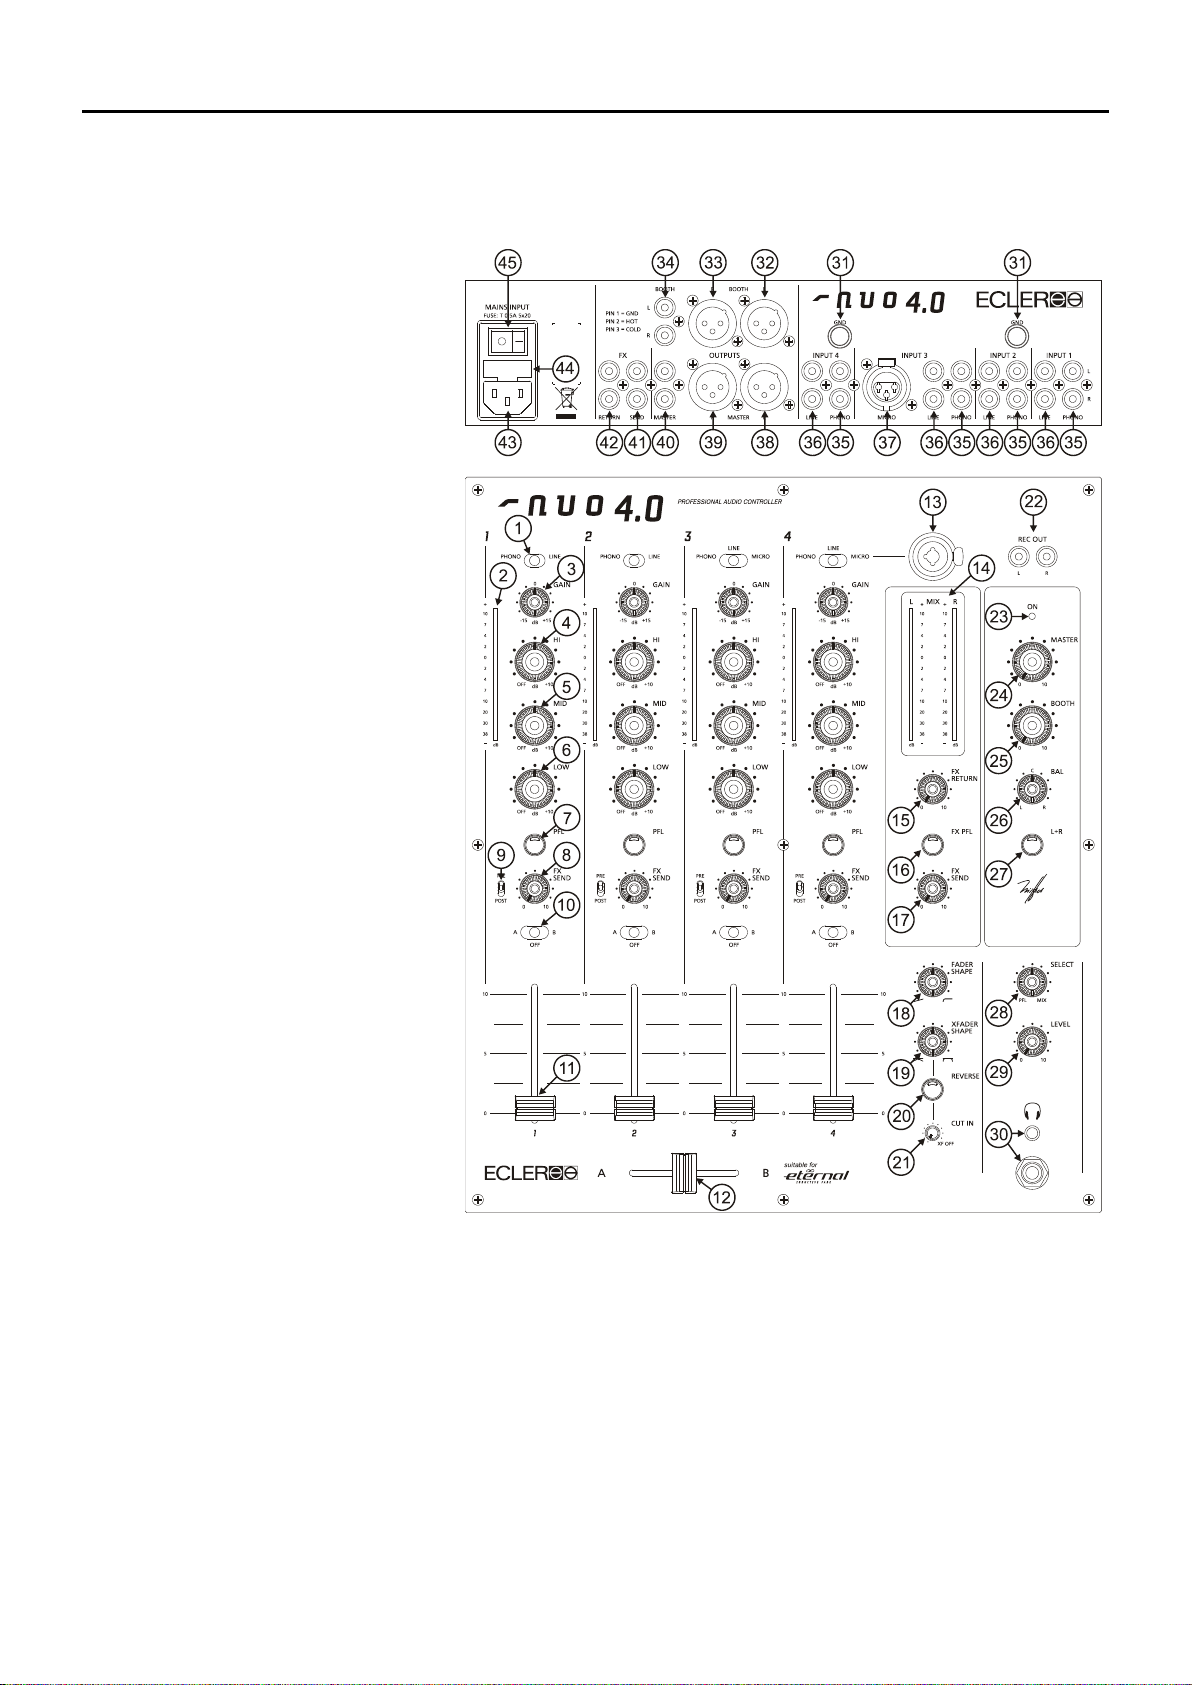
7. FUNCTION LIST 8. FUNCTION DIAGRAM
1. Input selector
2. LED VU Meter
3. Input sensitivity adjust, GAIN
4. Treble control, HI
5. Midrange control, MID
6. Bass control, LOW
7. Prefader listening control, PFL
8. Fx Send controller, FX SEND
9. Send switch to effect bus, PRE/POST
10. Send to XF switch, A/OFF/B
11. Fader
12. Crossfader control
13. Microphone XLR/JACK combo
connector, MICRO
14. LED VU Meter
15. Fx Return controller, FX RETURN
16. Prefader listening control, FX PFL
17. Fx Send controller, FX SEND
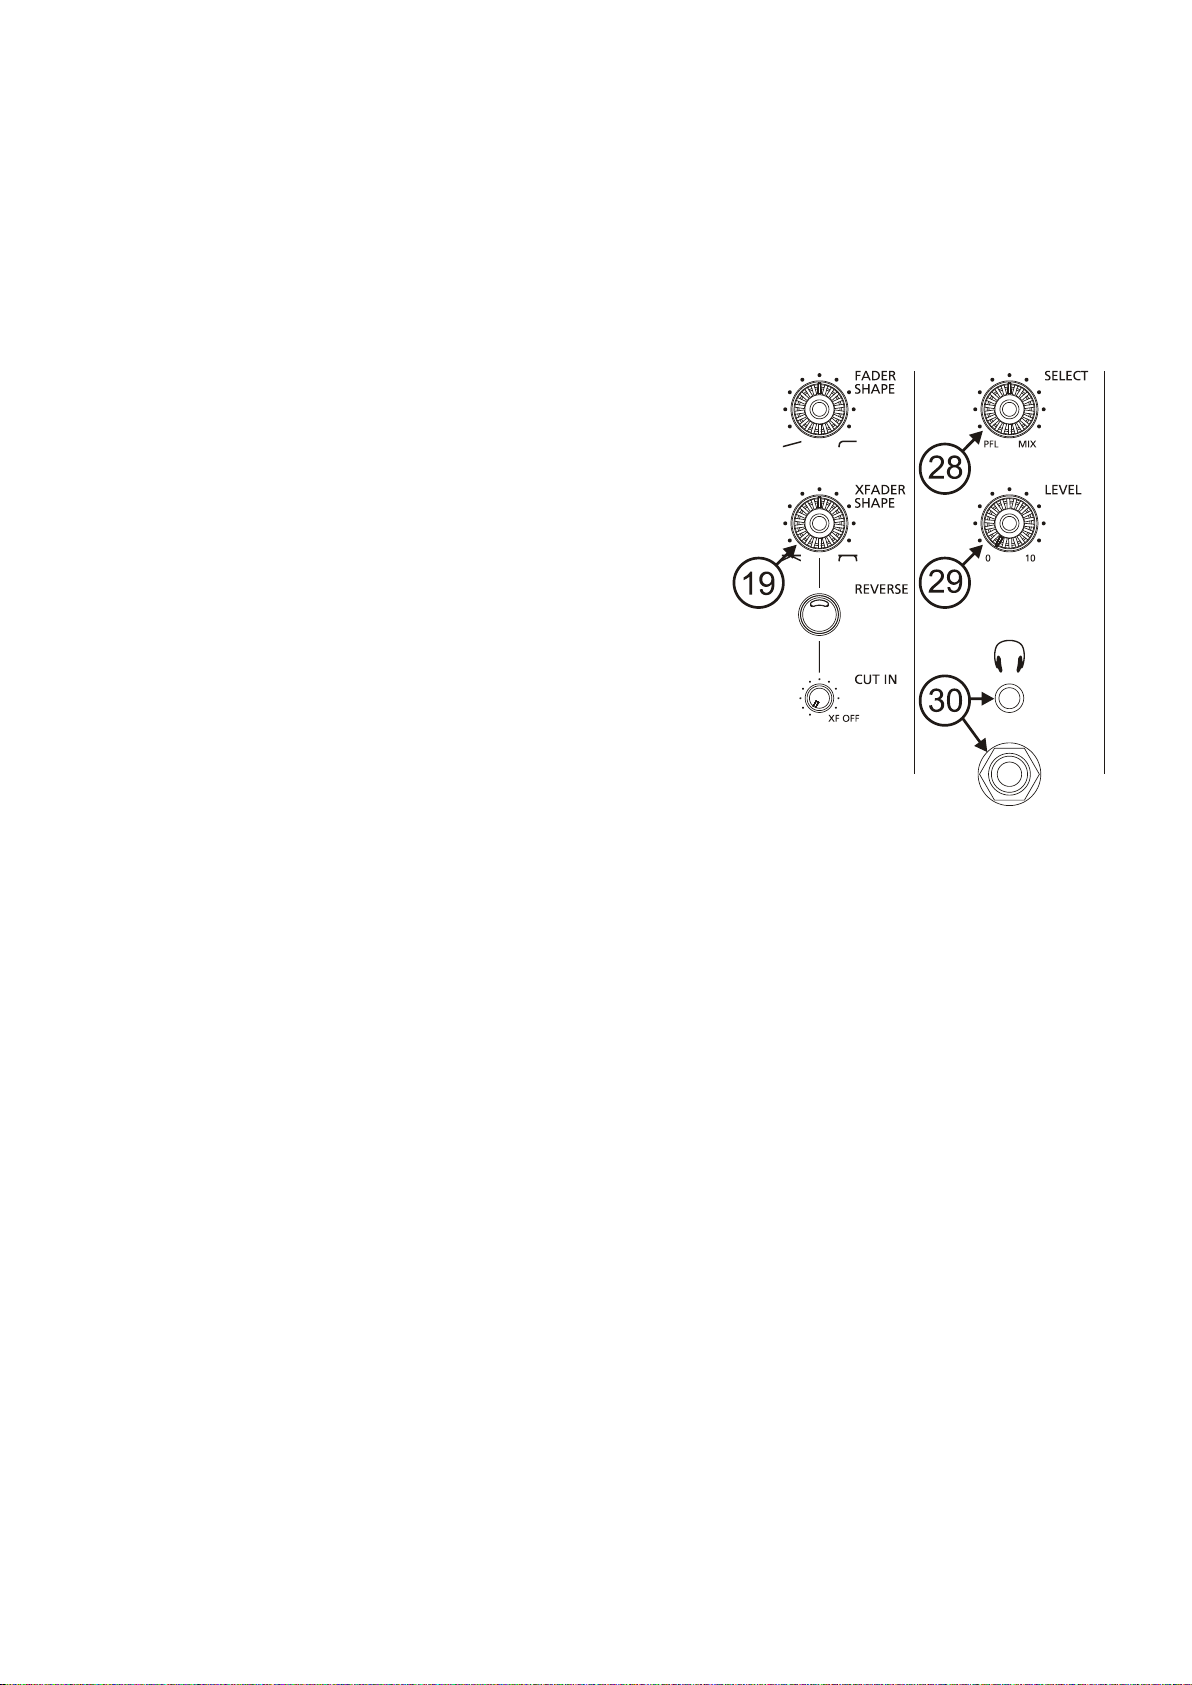
18. Fader Shape adjustment, FADER
SHAPE
19. Crossfader Shape adjuster,
XFADER SHAPE
20. Crossfader reverse function,
REVERSE
21. Crossfader "cut in time" adjustment,
CUT IN
22. Recording output, REC OUT
23. LED indicator, ON
24. Volume control, MASTER
25. Volume control, BOOTH
26. Balance control, BAL
27. Left and Right signal sum, L+R
28. PFL/MIX monitoring crossfader,
SELECT
29. Headphones volume control, LEVEL
30. Stereo jack headphones
31. Ground pin, GND
32. Left channel balanced output,
BOOTH L
33. Right channel balanced output,
BOOTH R
34. RCA output, BOOTH
35. Phono input, PHONO
36. Line input, LINE
37. Micro input, MICRO
38. Left channel balanced output,
MASTER L
39. Right channel balanced output, MASTER R
40. RCA output, MASTER
41. External FX send output, FX SEND
42. External FX return input, FX RETURN
43. Mains socket
44. Fuse holder
45. Power switch
Page 14

14 15
Page 15

ÍNDICE
1. NOTA IMPORTANTE 16
2. INTRODUCCIÓN 17
3. INSTALACIÓN 17
4. INICIO RÁPIDO 20
5. OPERACIÓN Y USO 22
6. OTRAS CONSIDERACIONES 24
7. LISTA DE FUNCIONES 25
8. DIAGRAMA DE FUNCIONES 25
9. CARACTERÍSTICAS TÉCNICAS 50
10. DIAGRAMA DE CONFIGURACIÓN 51
11. DIAGRAMA DE BLOQUES 52
Todos los datos están sujetos a variación debida a toleranc ias de producción. ECLER S.A. se reserva el derecho de
realizar cambios o mejoras en la fabricación o diseño que pudieran afectar las especificaciones.
Page 16
16
1. NOTA IMPORTANTE
Instrucciones de seguridad
Para conseguir la máxima funcionalidad del aparato y su máximo rendimiento, es muy importante antes de su
conexión, leer detenidam ente y tener m uy presentes l as c onsiderac iones que en este m anual se es pec ifican . Para
garantizar el óptimo funcionamiento de este aparato, recomendamos que su mantenimiento y eventuales
reparaciones sean llevadas a cabo por nuestros Servicios Técnicos autorizados.
Este aparato debe conectarse a tierra a través de su cable de red.
No exponer la unidad a l a lluvia o a s alpicad uras de ag ua, no col ocar r ecipient es que cont engan lí quidos
u objetos incandescentes tales como velas sobre el aparato.
Cualquier cambio e n la configuración de la unidad d ebe ser llevado a cabo por técnic os cualificados. Cualquier
conexión o desconexión de la unidad debe ser realizada, siempre, con la unidad desconectada de la red.
Descripción de la garantía
Su equipo ECLER ha superado ensayos de laboratorio y exhaustivos controles de calidad antes de salir de
fábrica. No obstante podría darse el caso que n ecesite nuestro Servici o Técnico durante el period o que cubre la
garantía o posteriorm ente. En tal caso, protej a cuidadosamente la uni dad en su caja original y envíelo a nuestro
Servicio Técnico con los gastos y el seguro pagados. Adjunte una fotocopia del certificado de garantía y una
descripción detallada del defecto observado.
ECLER S.A. garantiza e l mezclador NUO4.0 ante defectos de mat eriales o fabricación durante el period o de un
año transcurrido tras la fecha de compra original.
ECLER S.A. reparará el eq uipo defectuoso dentr o del periodo especific ado, sin cargo alguno para piezas y mano
de obra.
Para asegurar la validez de la garantía es preciso que la Garantía y la Tarjeta de Registro se rellenen
correctamente y se remitan a su distribuidor ECLER, en el plazo de 10 días después de la fecha de compra.
La garantía no es transferible y solamente protege al comprador original.
La garantía no cubre:
Daños ocasionados por malos tratos o manejo negligente, falta de cuidados elementales, desatención de las
instrucciones del manual, conexión equivocada o accidentes.
ECLER S.A., no será responsable por ningún daño directo o indirecto, pérdida o perjuicio originado por o en
relación con el equipo.
* aparatos que hayan sido manipulados, alterados o reparados fuera del Servicio Técnico autorizado.
* el mueble exterior, los componentes electromecánicos ni su desgaste por uso.
* los gastos de envío y seguros, ni los daños que el aparato pueda sufrir durante el transporte.
Esta garantía es válida sólo si las reparaciones o servicios se realizan en un Servicio Técnico autorizado.
Page 17

17
2. INTRODUCCIÓN
¡Felicidades por adquirir un auténtico equipo profesional ECLER!
El NUO4.0 es un mezclador profesional para DJ diseñado y fabricado por ECLER, una empresa con sede en
Barcelona dedicada al audio profesional desde 1965.
El NUO4.0 es un m ezclador de audio pr of es ional or ie n tado a c u alq uier ti po de DJ , gr acias a s u amplia variedad de
funciones que le con vierten en una consola apta para m ezclar cualquier estilo musical: tech no, house, minimal,
electro, hip hop...
El NUO4.0 es un mezclador apto para el scratch gracias a la versatilidad de sus ajustes de fader y crossfader. El
NUO4.0 es además apt o p ara Et er na l, e l cr oss f ader magnético de Ecler con c in c o años de gar a ntía es pec i alm ent e
diseñado para los virtuosos del scratc h.
Este genuino me zclador utiliza los mejores componentes disponibles en el mercado, obteniendo así l a más alta
calidad de sonido. Los más de 40 años de experie ncia en el diseño de equipos d e audio prof esional hacen que los
circuitos sean extrem adamente eficientes y se consiga un sonido ana lógico cálido y cristalino. Todos s us circuitos
son montados y testados en nuestra fábrica de Barcelona.
El NUO4.0 es además un mezclador especialmente apto para instalaciones profesionales de toda índole, gracias a
sus dos salidas balancea das y dos entradas de micrófono. Su f ormato y robustez hacen de él la consola ideal,
tanto para instalaciones profesionales, como para uso portátil por parte de los DJs más vanguardistas.
3. INSTALACIÓN
La principal considerac ión a tener en cuenta en el momento de buscar la u bicación de su NUO4.0 debe ser la
máxima comodidad de trabajo del operador, y su facilidad de conexionado.
El NUO4.0 está básicamente concebido como mezclador de sobremesa y su
ubicación habitual será entre dos giradiscos o reproductores de CD. El
mezclador tiene un form ato de 37 cm (14,57") de profundidad y 32 cm ( 12,6")
de anchura.
Mediante el kit de lat erales metálicos (disponibles com o opción) podrá sujetar
firmemente su NUO4.0 , ya sea d irectam ente s obre la s uperfic ie sobre la q ue se
apoye, o sobre los laterales, que también le permitirán inclinarlo. Existe otra
opción de perfiles metálicos "NUORAKI" que permiten la ubicación del
mezclador en muebles rack estándar de 19".
Dada la elevada gan ancia de las entradas de PHONO y de MICRO de be procurarse situar el m ezclador lo más
alejado posible d e fuentes de ruido (variador es de tensión, m otores , etc.) así c om o de cualquier c able d e red. Por
esta misma razón y bajo ninguna circunstancia debe quitarse la tapa metálica del aparato.
Ya que el consumo del NUO4.0 es muy bajo, éste no precisa ventilación, sin embargo debe evitarse que esté
expuesto a una temperatur a extrem a y qu e la atm ósf era del local en que es té empla zado sea lo m ás seca y limpia
de polvo posible.
El NUO4.0 funciona con una fuente de alimentación conmutada de tipo univers al permitiendo trabajar sin ningún
tipo de ajuste desde 90V a 264 V / 47-63Hz. Asegúres e de que el cable de red s e enc uentre lejos de los cabl es de
señal para evitar zumbidos.
Para proteger al m ezclador de ev entuales sobr ecargas en la línea de re d existe un f usible de re d de tipo T 0,5 A.
En caso de que éste se fu ndiera se desconec taría el aparato y se sustituiría por otro de idénticas c aracterísticas.
Si éste último se volviera a fundir, consulte con nuestro Servicio Técnico.
ATENCIÓN: EN NINGÚN CASO DEBE CORTOCIRCUITAR EL CIRCUITO DE PROTECCIÓN O
PONER UN FUSIBLE DE VALOR MÁS ELEVADO.
ADVERTENCIA: La sustitución del fusible debe ser realizada por un técnico cualificado.
Page 18

18
Conexiones de entrada de audio
INPUT 1 PHONO Plato giradiscos
INPUT 1 LINE Reproductor de CD
INPUT 2 PHONO Plato giradiscos
INPUT 2 LINE Reproductor de CD
INPUT 3 PHONO Plato giradiscos
INPUT 3 LINE Reproductor de CD
INPUT 3 MICRO Micrófono
INPUT 4 PHONO Plato giradiscos
INPUT 4 LINE Reproductor de CD
INPUT 4 MICRO Micrófono
Entradas de Phono
Los platos giradiscos de ben ir equipados con cápsula m agnética con un nivel de salida nominal entre -55dBV y
-25dBV (1,7 a 56 m V). Las entradas PHONO (35) del NUO 4.0 tienen un amplio margen antes de la saturación
(headroom) y pueden adm itir cápsulas con mayor nivel de salida de lo habitual. Estas entradas presentan una
sensibilidad de entrada nominal de -40 dBV (10 mV).
Entradas de Línea
La sensibilidad de las entradas marcadas como LINE (36) es de 0dBV (1V). Conecte fuentes de sonido como
reproductores de CD, DAT, MP3, teclados u otros instrumentos.
Entradas de Micrófono
Las entradas de MICRO (13-37) están preparadas para un nivel nominal de entrada de -35dBV. La conexión
frontal (13) es del tipo combo XLR3/Jack y la conexión posterior (37) es del tipo XLR3. Estas entradas de
micrófono admiten la conexión en modo balanceado; para ello se realizará la conexión tal y como se indica:
Vivo o señal directa > Terminal 2 Punta
Frío o señal invertida > Terminal 3 Aro central
Masa > Terminal 1 Base
Los micrófonos deben ser de baj a impedancia (de 20 0 a 600Ω) y monof ónicos. Para conex iones no balanc eadas,
cortocircuitar a masa el terminal 3 o el aro central. El NUO4.0 dispone de alimentación Phantom de 18V para
micrófonos equipados de condensador. Un jumper interno permite inhibir el funcionamiento de la alimentación
Phantom. La entrada MICRO del NUO4.0 se sirve de fábrica en posición "Phantom ON" (ver diagrama de
configuración).
Page 19

19
Conexiones de salida de audio
MASTER Amplificador de potencia principal
BOOTH Amplificador de cabina
REC Dispositivo de grabación
FX Send/Return Bus de envío auxiliar a efectos
Headphones Auriculares
Salida MASTER
Esta salida estéreo alimenta al sistema de PA a través de una c onex i ón X LR3 b al anc ead a (38, 39) y una RC A ( 40)
no balanceada. El ni vel nominal de la s alida MASTER está ajustado a 0d BV (1V), pero puede ajustarse a +6 dBV
mediante un jumper interno. El nivel de salida MASTER se controla con el potenciómetro MASTER (24).
Cerca del control MASTER se encuentra el conmutador L+R (27), que s uma las señales izquierda y derecha de
las salidas MASTER y BO OTH. Esta f unción es especialm ente útil en el caso q ue se produzca un f allo en uno de
los dos canales durante la sesión (ejem plo típico: m al contacto en la cáps ula del plato gir adiscos). Act ivando este
botón, el mezclador envía la s uma L+R a ambos altavoces, pasando el problem a desapercibido para la mayoría
del público.
MASTER y BOOTH disponen de un control de balance BAL (26).
Salida BOOTH
Habitualmente se usa para obtener una salida independiente en la cabina de l DJ. Esta salida estéreo BOOTH
incorpora una conexión X LR3 balanceada y una RCA no balancea da. El nivel nominal de la salida BOOT H está
ajustado a 0dBV (1V) , pero puede ajustarse a +6d BV mediante un jumper interno. El nivel de salida BO OTH se
controla con el potenciómetro BOOTH (25).
Salida de grabación
Hay una salida REC (2 2) sobr e la sup erf icie de co ntrol qu e em plea co nexiones RCA. El ni vel de s alida nom inal de
la salida REC es de 0dBV (1V). Esta salida es post fader, antes de Master.
Bucle externo FX Send/Return
Las conexiones de tip o RC A de sal ida FX SEND ( 41) y de e ntrad a FX R ETURN (42) perm iten la rea li zación de un
bucle externo con cualquier procesador de efectos, sampler o dispositivo secuenciador. El nivel nominal de la
salida SEND, así como la entrada RETURN es de 0dBV (1V).
La señal enviada a la salida FX SEND se selecciona antes o después del fader mediante el conmutador
PRE/POST (9), y el nivel de envío con su potenc iómetro asociado (8) . El NUO4.0 disp one además de un control
general de envío a efectos FX SEND (17) que suma las 4 vías, un control general de retorno de efectos FX
RETURN (15) y un control de pre-escucha de la señal de retorno de efectos FX PFL (16).
Auriculares
Para obtener el mejor rendimiento en su funcionamiento, éstos deber án ser de alta impedancia (200-600Ω) . Se
conectarán a la salida de auriculares (30) situada sobre la propia placa de m andos mediante un conector jack
normalizado de 1/4" ester eofónico o un conec tor mini jack de 3,5 mm. El casquillo del jac k será la mas a, el anillo
central el canal derecho y la punta el canal izquierdo.
Page 20

20
4. INICIO RÁPIDO
Instale y conecte el NUO4.0 tal y como se describe en el primer párrafo del apartado Instalación.
A continuación desc ribim os un proced imiento de inici o rápido usando la
entrada LINE de la vía 1 y monitorizan do la señal a través de la salida
de auriculares.
1. Ponga los controles en posición de inicio.
Ajuste los controles rotat ivos GAIN, HI, MID y LOW de la vía 1 (3, 4, 5,
6) en posición centr al enclavada. Sitúe el fader ( 11) del canal abajo y
asigne el selector A/OFF/ B (10) en posición A (el canal está asignado
ahora al lado A del crossfader).
2. Conecte unos auriculares.
Conéctelos a la salida de auric ulares (30). Ajuste el contr ol LEVEL (29)
de auriculares al mí nimo y lleve el control SELECT (28) a su p osición
PFL.
3. Conecte un reproductor de CD.
Conecte un reproductor de CD a la entrada LINE de la vía 1 (36),
inserte un CD y póngalo en marcha.
4. Conecte el mezclador a la red eléctrica.
Conecte el cable de red en la entrada de alimentación (43) del
mezclador y póngalo en marc ha pulsando el interruptor MAINS INPUT
(45) situados ambos en la parte trasera.
5. Seleccione la fuente de entrada.
Compruebe que el s elector de entrada de la vía 1 (1) está en posición
LINE y que se ilumina el Vu-m etro (2) de ese canal. Si no se ilumina,
asegúrese de que el reproductor de CD está b ien conectado y de que
se está reproduciendo una pista de audio.
6. Ajuste el nivel de entrada.
Mueva el control GAIN (3) hasta que el Vu-metro indique 0dB.
7. Envíe la señal a la salida principal.
Coloque el fader de la vía 1 (11) arriba y sitúe el crossfader (12) en el lado A.
Page 21

21
8. Escuche la señal en sus auriculares.
Presione el botón PFL (7) de la vía 1. Ajus te el control LEVEL (29) para obtener un nivel de escuc ha confortable.
Ahora debería escuc har la música en sus aur iculares . Mueva el contro l SELECT (28) h acia la d erecha par a fund ir
la señal PFL con la de MIX. Con este control totalmente a la derecha, tan solo escuchamos la señal MIX.
9. Compruebe el efecto del control d e tonos.
Experimente con el potente ecualizador estéreo de 3 bandas (4, 5, 6). Este contr ol de tonos está diseñado p ara la
modificación creativa del soni do: cada banda puede aislarse i ndependientemente mediant e los grandes controles
rotativos ergonómicos.
10. Compruebe el ajuste del crossfader.
Cada canal puede asignar se al c ross fader us ando el selec tor A/OFF/B
(10). El crossfader permite realizar un fundido entre las señales
asignadas a ambos lados del mismo. Con el selector en posición A o B
asignamos la vía a uno u otro lado del crossfader. La posic ión OFF
anula la función crossfader para este canal.
11. Ajuste la curva del crossfader.
El control XFADER SHAP E (19) nos per m ite ajustar la pendi ente de la
curva del c ros s f ader de manera precisa. Sit uan do el c ontrol tot almente
a la izquierda podemos mezclar dos canciones fundiéndolas
suavemente. La curva del crossfader se vuelve más afilada si
movemos el control hacia l a derecha. Situando el control totalmente a
la derecha, la señal entra de golpe con un leve movimiento del
crossfader, algo muy indicado para la técnica scratch.
Page 22

22
5. OPERACIÓN Y USO
Puesta en funcionamiento
Esta se realizará m ediante el interr uptor (45) situado en el panel pos terior. Al cabo d e unos insta ntes se i lum inará
el LED ON (23). Aunque el ruido producido por la puesta en funcionamiento del NUO4.0 es mínimo y queda
prácticamente anulado al hacerlo con los faders cerrados, siempr e resulta muy recomendable poner en m archa
todos los aparatos siguiendo la secuencia siguiente:
1. Fuentes de sonido
2. Unidad de mezclas, ecualizadores, filtros activos
3. Finalmente, amplificadores de potencia.
El paro de los aparatos debe realizarse en la secuencia inversa. Siguiendo este orden los picos o transitorios
producidos por el encendi do o apagado de los aparatos no afecta a los siguie ntes y, por consiguiente, tampoco
llegan a los altavoces.
Descripción de los controles
Selector de entrada
Cada canal principal dispone de un selector de entrada basculante (1).
Ganancia de vía
Todas las vías de entrada del NUO4.0 disponen d e un ajuste accesible de l a sensibilidad de entrada G AIN (3),
cuya misión es la de compensar las diferencias de nivel existentes entre las fuentes sonoras conectadas a la mesa
antes de ser mezcladas.
Los ajustes de gana ncia deben realizarse con sum a meticulosidad utilizando el Vu-m etro (2) de cada vía como
referencia. El nivel de referencia estándar usado para mezclar señales de audio es de 0dB.
El margen de la gana nc ia e s tá aj us tado a ± 15 dB pero s e pue de r e duc ir a ±6dBV. Este ajuste es in de pen die n te por
cada vía y se realiza mediante puentes de soldadura. Consulte el diagrama de configuración.
Ecualización
El sistema de control de t onos de cad a vía ofr ece un am plio margen de ac tuació n de -30 a +1 0dB para gr aves (6)
y agudos (4) y de -25 a +10dB para medios (5). Este amplio margen de variación del tipo "kill" atenúa
completamente la banda seleccionada y ha sido especialmente diseñado para el uso creativo en directo.
ATENCIÓN: Utilice el control de tonos con precaución, ya que la elevada ganancia máxima puede provocar
sobredesplazamientos en su sistema de altavoces.
Sistema de monitorización
El NUO4.0 está equipado con un sistema de monitorización flexible y sencillo que permite ajustar con suma
precisión los nivel es de PFL (monitorización de escucha pre-fader) y de m ezcla para cada vía a través del Vumetro y de los auriculares. Cada canal puede ser m on itorizado v isualm ente y pre-escuchado pulsand o los botones
PFL (7).
Para la monitorizaci ón a tr a vés de auriculares, e l pot e nc iómetro rotativo SELECT (28) perm ite m e zclar un P F L con
la mezcla principal MIX. El potenciómetro rotativo LEVEL (29) controla el nivel de salida de auriculares.
Cada vía cuenta además con un Vu-metro dedicado que permite monitorizar visualmente la señal PFL (2).
Page 23

23
Envío a unidades de efectos externas FX Send/Return
Las 4 vías del NUO4.0 están equipadas con potenciómetros rotativos (8) que permiten enviar la señal a una
unidad de efectos ex terna, sampler, etc . Estos potenci ómetr os permiten d osificar el nivel d e la se ñal que s e envía
desde cada una de las vías.
La salida FX SEND (41) se conecta a la entrada del procesador de efectos, y la salida de éste a la entrada
RETURN (42) o a una entrada LINE (36).
Este envío puede configurarse mediante el conmutador basculante PRE/POST (9) para que esté o no afectado por
el fader de la vía.
El NUO4.0 dispone además de un control general de envío a efectos FX SEND (17) que suma las 4 vías, un
control general de retorno de efectos FX RETURN (15) y un control de pre-es cucha de la señal de retorno de
efectos FX PFL (16).
Fader
El NUO4.0 monta una n ueva generación de faders ECLER de 6 0 mm (11) precisos, extremadam ente suaves y
con unas prestaciones que super an los 4.0 00.0 00 de maniobras gracias al s iste m a VCA de EC LER (VCA: Voltag e
Controlled Amplifier).
La utilización de tecnología VCA posibilita la modificación del comportamiento del fader. En la placa frontal
contamos con el pot enc iómetro rotativo FAD ER SHA P E ( 18) que permite regular la c urva de l mismo, de modo qu e
el volumen se distribuya de manera proporcional a lo largo del potenciómetro o por el contrario aparezca
súbitamente.
Crossfader
Cada canal puede asignars e al crossfader (12) usando el selector A/OFF /B (10). El cros sfader perm ite realizar un
fundido entre las señales as ignadas a am bos lados del m ism o. Con el selec tor en posición A o B as ign am os la vía
a uno u otro lado del crossfader. La posición OFF anula la función crossfader para ese canal.
El crossfader del N UO 4 .0 i ncor pora una serie de controles que permiten ajus tar su comportamiento, convirtiéndolo
en una precisa herramienta. El control XFADER SHAPE (19) nos permite ajustar la pendiente de la curva del
crossfader de manera precisa. Situando el control totalmente a la izquierda podemos mezclar dos canciones
fundiéndolas suavem ente. La curva del c rossfader se vuel ve más afilada si m ovemos el control h acia la derecha.
Situando el control t otalmente a la derecha, la señal entra de golpe con un leve movim iento del crossf ader, algo
muy indicado para la técnica scratch.
El conmutador REVER SE (20) inv ierte la direcció n del crossfader. Dependiendo de la dirección esc ogida, puede n
realizarse tanto "cuts" como "transforms" moviendo el crossfader en la misma dirección.
La corrección electrónica CUT IN (21) únicamente es efectiva en el caso de que el NUO4.0 haya montado el
potenciómetro ETERNAL opcional. En caso de montar el crossfader estándar, el potenciómetro CUT IN debe
quedar en posición O FF . E l CUT IN es la dist anc ia existente entre e l f in al físico del crossf ader y el primer punto de
entrada de señal. La posición más corta proporciona un corte prácticamente instantáneo. Para encontrar esa
posición, el potenciómetro debe colocarse en posición extrema y el potenciómetro CUT IN debe girarse a la
derecha hasta que se obtenga s eñal musical. Para alargar el tiempo de CUT IN, girar el potenciómetro hac ia la
izquierda.
Si desea extender la vida útil de su crossfader, el NUO4.0 permite el montaje como opción del galardonado
potenciómetro ETERNAL. Este es un crossfader de tecnología inductiva basada en un sistema de control
magnético. Esta tecnología totalmente libre de contactos, combinada con un sistema mecánico exclusivo de
deslizamiento, dan como resultado un tacto suave y uno de los crossfaders más precisos existentes en la
actualidad. El crossfader inductivo ETERNAL ha sido concebido específicamente para ejecutar técnicas de
"turntablism" extremas, dur ante las cuales el movimiento del crossf ader tiene que ser extremadamente suave y
rápido.
Page 24

24
En caso de querer colocar el crossfader ETERNAL, siga los siguientes pasos:
1. Retire los botones de los potenciómetros deslizantes y rotativos de la superficie del mezclador.
2. Desatornille los tornillos exteriores que sujetan la placa de mandos del mezclador y extráigala.
3. Retire los dos tornillos que sujetan el crossfader y extráigalo.
4. Desconecte cuidadosamente el conector multiterminal.
5. Reemplácelo por el ETERNAL.
6. Conecte el conector multiterminal que desconectó anteriormente.
7. Sujételo con los dos tornillos, respetando la orientación que
describe el dibujo.
8. Coloque y atornille la placa de mandos.
9. Vuelva a poner los botones de los potenciómetros.
ATENCIÓN: Utilice siempre repuestos originales ECLER.
ADVERTENCIA: La sustitución del crossfader debe ser realizada por un técnico cualificado.
Niveles MASTER y BOOTH
El NUO4.0 dispone de dos cont roles d e nive l de s alida MAST ER y BOOT H. El n ivel de s al ida MA STER se controla
a través del potenciómetro MASTER (24) y el nivel de salida BOOTH se controla a través del potenciómetro
BOOTH (25).
El potenciómetro de balance BAL (26) y el conmutador L+R (27) afectan a ambas salidas.
6. OTRAS CONSIDERACIONES
Bucles de masa
Procuraremos en todo momento que todas las fuente s de s eñal qu e llegu en a la mesa de mezclas, así como todos
los aparatos que estén conectados a su salida, no tengan las masas interconectadas, es decir, que nunca les
llegue masa por dos o m ás caminos distintos, ya que de esta m anera se podrían producir zumbidos que lle garían
incluso a interfer ir la ca lida d de l a repr oduc ción s onora. Los b lindaj es de los c ables , de es tar c onecta dos a c hasis,
en ningún momento deben estar unidos entre sí, de esta forma evitaremos la formación de bucles de masa.
Ruido de fondo
El empleo de circuitería activa puede aportar, según configuración, un nivel de ruido de fondo más o menos
elevado. El mezclador NUO4.0 ha sido concebido para obtener el menor ruido de fondo posible.
Independientemente de la concepción electrónica con que se haya realizado el mezclador, el nivel de ruido
dependerá directamente de la correcta utilización e instalación de la unidad de mezcla. No es lo mismo, por
ejemplo, tener el fader de una vía a " 2" y el Master a "10" q ue a la inversa. En el prim er c aso, la señal que l lega al
amplificador de mezcla, que intrínsecamente tiene un nivel de ruido de fondo propio, es débil, por lo que la relación
señal/ruido es baja (poca señal). Cuando el amplificador de salida sobredimensione indistintamente todo el
conjunto tendremos a la salida un nivel de ruido de fondo muy elevado. En el s egundo caso, al estar el fader al
máximo la señal que recibe el am plificador de mezcla es grande y por tanto c on una relación señal/ruido grand e
también, por lo tanto c uan d o es ta s eña l llegu e al Master y sea amplificada, guardar á mejor relación que e n e l c as o
anterior.
Conexiones de audio
Como norma general deberemos procurar que las conexiones de señal sean lo más cortas posible, asimismo
emplearemos conector es y cables de la mejor calidad. Norm alm ente a los cables y conectores no se les pres ta el
interés merecido. En m uchas ocasiones y debido a una mala conexión o por el us o de cables de baja calidad,
pueden aparecer importantes problemas en la reproducción sonora.
Limpieza
La carátula no deberá limpiarse con sustancias disolventes o abrasivas puesto que se corre el riesgo de
deteriorarla. Para su limpieza se utilizará un trapo ligeramente humedecido con agua y un detergente líquido
neutro, secándola a contin uació n con un paño lim pio. Se recom ienda lim piar las m anchas de s udor despué s de s u
uso. En ningún caso se debe permitir la entrada de agua por cualquiera de los orificios del aparato.
Page 25

25
7. LISTA DE FUNCIONES 8. DIAGRAMA DE FUNCIONES
1. Selector de entrada
2. Vu-metro de vía
3. Ajuste de sensibilidad de entrada, GAIN
4. Control de frecuencias agudas, HI
5. Control de frecuencias medias, MID
6. Control de frecuencias graves, LOW
7. Control de monitorización pre-fader, PFL
8. Control de envío a efectos, FX
SEND
9. Conmutador de envío a efectos pre
o post fader, PRE/POST
10. Conmutador de asignación a
Crossfader, A/OFF/B
11. Fader
12. Crossfader
13. Conexión combo XLR/Jack para
micrófono, MICRO
14. Vu-metro de MIX
15. Control general de retorno de
efectos, FX RETURN
16. Control de monitorización de
retorno de efectos, FX PFL
17. Control general de envío a efec tos,
FX SEND
18. Control de ajuste de c u r va de f ader ,
FADER SHAPE
19. Control de ajuste de curva de
crossfader, XFADER SHAPE
20. Conmutador de inversión de
crossfader, REVERSE
21. Control de ajuste de corte de
crossfader, CUT IN
22. Salida de grabación, REC OUT
23. LED indicador, ON
24. Control de nivel, MASTER
25. Control de nivel, BOOTH
26. Control de balance, BAL
27. Suma de señales izquierda y
derecha, L+R
28. Control del crossfader PFL/MIX de
auriculares, SELECT
29. Control de volumen de auriculares,
LEVEL
30. Conexión de auriculares Jack y
Mini Jack
31. Borne de toma de masa, GND
32. Salida XLR balanceada canal
izquierdo, BOOTH L
33. Salida XLR balanceada canal
derecho, BOOTH R
34. Salida RCA no balanceada, BOOTH
35. Entrada phono RCA para giradiscos, PHONO
36. Entrada RCA para línea, LINE
37. Conexión XLR para micrófono, MICRO
38. Salida XLR balanceada canal izquierdo, MASTER L
39. Salida XLR balanceada canal derecho, MASTER R
40. Salida RCA no balanceada, MASTER
41. Salida de envío a efectos, FX SEND
42. Entrada de retorno de efectos, FX RETURN
43. Base de red
44. Portafusibles
45. Interruptor de puesta en marcha
Page 26

26 27
Page 27

TABLE DES MATIERES
1. NOTE IMPORTANTE 28
2. INTRODUCTION 29
3. INSTALLATION 29
4. DEMARRAGE RAPIDE 32
5. MANUEL DE FONCTIONNEMENT ET D'UTILISATION 34
6. INFORMATIONS COMPLEMENTAIRES 36
7. LISTE DE FONCTIONS 37
8. DIAGRAMME DE FONCTIONS 37
9. CARACTÉRISTIQUES TECHNIQUES 50
10. DIAGRAMME DE CONFIGURATION 51
11. SCHÉMA SYNOPTIQUE 52
Toutes les valeurs mentionnées dans ce document sont susceptibles d’être modifiées en raison des tolérances de
production. ECLER SA se réserve le droit de changer ou d’améliorer les process us de fabrication ou la présentation de
ses produits, occasionnant ainsi des modifications dans les spécifications techniques.
Page 28

28
1. NOTE IMPORTANTE
Mesures de sécurité
Pour un fonctionnem ent et une ef ficacité optim isés de votre console de m ixage, il est T RÈS IMPORTANT – avant
tout raccordement – de lire attenti vement ce manuel et de s u ivre les ins truc ti ons e t rec om mandations qu'il co ntie nt.
Nous vous conseillons fortement de confier la maintenance de cet équipement à nos Services Techniques Agréés.
Cet appareil doit être raccordé à la terre via son cordon secteur.
Ne pas l'exposer à la pluie ou à des projections d'e au. Ne pas placer non plus de liquides ou d'objets
incandescents (tels que des bougies par exemple) sur celui-ci.
Toute modification ap portée à la configuration de l'unité doit être ex écutée par un technicien qualifié. S'il s'avère
nécessaire de procéder à une connexion / déconnexion, veiller à ce que l'alimentation secteur soit toujours coupée.
Garantie
Votre équipement ECLER a fait l'objet de tests de qu alité et de tests en laborat oire approfondis en sortie d'usine.
Néanmoins, il peut ar river que vous so yez contrai nt de contact er notre Service T echnique en cours de gara ntie ou
après expiration de celle-ci. Dans ce cas, envelopp er soigneusement votre appar eil dans son emballage d'o rigine
et adressez-le à notre Service Technique en port payé (transport et assurance). Joindre une copie de votre
Certificat de Garantie, accompagné d'une description détaillée du défaut observé.
ECLER S.A garantit la console de mixage NUO4.0 contre tout défaut de pièces ou de fabrication pendant une
période d'un an à compter de la date originale d'achat.
ECLER, S.A. s'eng age à réparer tout équipem ent défectueux dura nt la période de garantie pr écitée, sans frais de
pièces et main d'oeuvre.
Pour que votre garan tie soit valide, il est essen tiel de remplir avec soin la F iche d'Enregistrement ci-j ointe et de
l'adresser à votre distributeur ECLER dans un délai maximal de 10 JOURS à compter de la date d'achat du produit.
La Garantie n'est pas transférable et ne protège que l'acheteur d'origine.
La Garantie ne couvre pas :
Les dommages résultant d'un mauvais traitement ou d'une manipulation peu soigneuse, d'un manque de
précaution élémentaire, de la non observation des instructions données dans ce manuel, d'un mauvais
raccordement ou d'un accident.
ECLER, S.A., ne pourra être tenu responsable de tout dommage direct ou indirect, de toute perte ou autre
dommage provoqué par ou lié à l'équipement.
* Les appareils manipulés, altérés ou réparés ailleurs qu'au sein de nos Services Techniques agréés.
* Les dispositifs extérieurs ainsi que les pièces électromécaniques, pas plus que l'usure résult ant de leur uti li sation .
* Frais d'expédition et d' assurance, pas plus que les domm ages susceptibles d'être pro voqués par l'appareil (kit)
durant son transport.
Cette garantie ne s'applique qu'aux réparations ou services proposés par un Service Technique agréé.
Page 29

29
2. INTRODUCTION
Félicitations pour votre choix d'un authentique équipement professionnel ECLER !
La NUO4.0 est une cons ole de mixage professionnelle po ur DJ conçue et fabriquée par EC LER, une entreprise
basée à Barcelone qui se consacre à l'audio professionnel depuis 1965.
La NUO4.0 est une c onsol e de m ix age audio pr ofes sionne lle a daptée à tout type de DJ grâce à son vas te éventai l
de fonctions qui en font une console apte au m ixage de tout style mus ical : techno, house, m inimal, électro, hip
hop...
La NUO4.0 est une console de mixage apte au sc ratch grâce à la polyvalence de s es réglages de fader et de
crossfader. La NUO4.0 est en outre compatible Eternal, le crossfader magnétique Ecler garanti cinq ans et
spécialement conçu pour les virtuoses du scratch.
Cette console de mix age utilise les meilleurs c omposants disponibl es sur le marché, pour l a plus haute qualité de
son. Les plus de 40 ans d' ex périence de conc eption d'équ ipem ents aud io prof ess ionnels s ont à l'or igine de ci rcuits
extrêmement effic ac es et d' un s on an alogique chaud et cr istall in. T ous les c irc uits sont montés et testés dans notre
usine de Barcelone.
La NUO4.0 est en outre une cons ole de m ixage spéc ialement ad aptée aux installat ions prof essionnell es de toute s
sortes, grâce à ses deux s orties symétriques et à ses deux entrées microphone. Son for mat et sa robustesse en
font la console idéale, aussi bien pour les installations professionnelles qu'en utilisation portable par des DJ
d'avant-garde.
3. INSTALLATION
La principale considérat ion à prendre e n com pte au moment de c hercher l'em placement de s a NUO4.0 doit être le
confort de travail maximal pour l'opérateur et la facilité de connexion.
La NUO4.0 est essentiel le ment conçue comme une cons ole de table et sa place
habituelle sera entre deux platines tourne-disques ou lecteurs de CD. Elle f ait
37 cm de profondeur et 32 cm de largeur.
Au moyen du kit de corni ères latéra les (d ispon ible e n option) , vous p ourr ez fix er
fermement votre NUO4.0, soit directement sur la surface sur laquelle elle
repose, soit par les côtés, c e qui permet aussi de l'incliner. Il existe une autre
option de profilés métalliq ues "NUORAKI" qui perm et le montage de la console
dans des meubles rack standard de 19 ".
En raison du gain élevé des entrées PHONO et MICRO, veiller à toujours
installer la console le plus loin possible de sources de bruit (variateurs de tension, moteurs, etc.) et de câbles
secteur. Pour les mêmes raisons, ne retirer le capot métallique de l'appareil sous aucun prétexte.
La consommation du NUO4.0 étant très faible, aucune ventilation n'est nécessaire. Eviter cependant les
températures extrêmes et veiller à ce que l'atmosphère soit aussi sèche et exempte de poussière que possible.
La NUO4.0 fonctio nne d ésorm ais à l'aide d' une alim entat ion à déco upage de t ype u nivers el. L' utilisat eur peut a insi
travailler sans avoir à réali ser le moindre réglage pré alable à partir d'une tens ion susceptible de varier entre 90 et
264 V (47 – 63 Hz). Afin de lim iter le r isque de r onf lem ents, ve il ler à ce que le câble secteur soit él oi gné d es câbles
véhiculant les différents signaux.
En vue de protéger la cons ole d'éve ntuelles surc harges sec teur, cette der nière es t éq uipée d'un f usible T 0,5 A. En
cas de fonte de cel ui-ci, déc onnecter la cons ole e t re m placer le fus ible p ar un a utre d e carac térist iques identiq ues.
Si celui-ci devait également fondre, consulter notre service technique.
ATTENTION : NE JAMAIS COURT -CIRCUIT ER LE DI SPOSIT IF DE PROTECTION OU INSTALLER UN
FUSIBLE DE VALEUR PL U S ELE V EE.
REMARQUE : Le changement des fusibles doit être réalisé par un personnel technique qualifié.
Page 30

30
Raccordement des entrées audio
INPUT 1 PHONO Platine
INPUT 1 LINE Lecteur CD
INPUT 2 PHONO Platine
INPUT 2 LINE Lecteur CD
INPUT 3 PHONO Platine
INPUT 3 LINE Lecteur CD
INPUT 3 MICRO Microphone
INPUT 4 PHONO Platine
INPUT 4 LINE Lecteur CD
INPUT 4 MICRO Microphone
Entrées Phono
Les platines phono doivent être équipées d'un dispositif magnétique capable de délivrer un niveau de sortie
nominal compris entre -55 et -25 dBV (1,77 - 56m V). Les entrées PHONO (35) de la NUO 4.0 ayant une capacité
de surcharge importante ( mar ge avant saturation), d es disposit ifs a yant un niveau de sortie sup érieur peu vent être
admis. Ces entrées ont une sensibilité nominale de -40dBV (10mV).
Entrées Ligne
La sensibilité des entrées intitulées LINE (36) est de 0 dBV (1V). Branchez-y des sources de son comme des
lecteurs de CD, DAT, MP3, claviers ou autres instruments.
Entrées de microphone
Les entrées MICRO (13-37 ) sont prévues pour un niv eau nominal d'entrée de -35 dBV. La prise avant (13) est de
type mixte XLR3/jack et la pris e arrière (37) de type XLR3. Ces entré es de microphone accepte nt les connexions
symétriques ; pour cela, effectuez le branchement comme indiqué :
Point chaud ou signal direct > Borne 2 Pointe
Point froid ou sig na l inv e rsé > Borne 3 Bague centrale
Masse > Borne 1 Base
Les microphones doivent être de basse impédance (de 200 à 600 Ω) et monophoniques . Pour des connexions
asymétriques, relie z la masse à la broch e 3 ou au cercle centr al. La NUO4.0 dis pose d'une aliment ation fantôme
de 18 V pour microphones à condensateur. Un cavalier interne permet de désactiver l'alimentation fantôme.
L'entrée MICRO de la NUO4.0 est réglée en usine avec l'alimentation fantôme activée (voir schéma de
configuration).
Page 31

31
Raccordement des sorties audio
MASTER Amplificateur de puissance principal
BOOTH Amplificateur de puissance sortie cabine (Booth/Room2)
REC Dispositif d'enregistrement
FX Send/Return Processeur d'effet externe (Entrée et Sortie)
Headphones Écouteurs
Sortie MASTER
Cette sortie stéréo alimente la sonorisation via une connexion XLR3 symétrique (38, 39) ou cinch/RCA (40)
asymétrique. Le niveau nominal de la sortie MASTER est réglé à 0 dBV (1V), mais il peut l'être à +6 dBV au moyen
d'un cavalier interne. Le niveau de sortie MASTER se contrôle avec le potentiomètre MASTER (24).
Près du contrôle MASTER se trouve le commutateur L+R (27) qui additionne les signaux gauche et droit des
sorties MASTER et BOOTH. Cette fonct ion est particulièr ement utile en cas de défaillance d'u n des deux canaux
pendant la session (exem ple typique : mauvais contac t de la cellule de la platine tourne-disques ). En activant ce
bouton, la console de m ixage envo ie la som me L+R aux deux encei ntes s ans que la m aj orité du public s'ap erçoive
du problème.
MASTER et BOOTH disposent d'une commande de balance BAL (26).
Sortie BOOTH
Sert habituellem ent à obtenir une sort ie indépendant e dans la cabin e du DJ. Cette sort ie stéréo BOOT H possède
une connexion XLR3 s ymétrique et une con nexion c inch/R CA as ymétriqu e. Le ni veau nom inal de la sor tie B OOTH
est réglé à 0 dBV (1 V), m ais il peut l' être à +6 d BV au mo yen d'un caval ier int erne. Le n iveau de sorti e BOO T H se
contrôle avec le potentiomètre BOOTH (25).
Sortie d'enregistrement
La sortie REC (22) pr ésente sur la surface de contrô le emploie des connexions cinch/RC A. Le niveau de sortie
nominal de la sortie REC est de 0 dBV (1V). Cette sortie est post-fader, pré-Master.
Boucle de départ/retour d'effet externe (FX Send/Return)
Les connexions de type cinch/RCA pour le départ FX SEND (41) et le retour FX RETURN (42) permettent la
réalisation d'une boucle ex terne avec tout processeur d'eff ets, échantillonneur ou séquence ur. Le niveau nominal
de la sortie SEND est de 0 dBV (1V), tout comme celui de l'entrée RETURN.
Le signal envoyé à la sorti e FX SEND est pris avant ou apr ès fader selon la po sition du commutat eur PRE/POST
(9), et le niveau d'envoi se règle grâc e à son poten tiom ètre associé (8). La N UO4.0 dispos e, outre une com mande
générale d'envoi aux ef fets FX SEND ( 17) qui additi onne les 4 voies , d'une com mande générale de retour d'ef fets
FX RETURN (15) et d'une commande de pré-écoute du signal de retour d'effets FX PFL (16).
Écouteurs
Pour obtenir la meilleure performance, les écouteurs doivent être de haute impédance (200-600Ω). La sortie
casque (30) située sur la plaque de commandes elle-même accepte un connecteur jack 6,35 mm normalisé
stéréophonique ou un connecteur mini-jack de 3,5 mm. L’anneau postérieur sera la masse, l’anneau central le
canal droit et la pointe le canal gauche.
Page 32

32
4. DEMARRAGE RAPIDE
Installer et connecter la NUO4.0 en respectant les instructions du paragraphe n°1 INSTALLATION.
Cette section propose une procédure de “Démarrage Rapide” faisant
appel à l'entrée LINE de la voie 1 et à la sortie écouteurs uniquement.
1. Réglez les commandes en position initiale
Réglez les comm andes rotati ves GAIN, HI , MID et LOW de la voi e 1 (3,
4, 5, 6) en position centra le crantée. Baissez le fader (11) du c anal et
placez le sélecteur A/O FF/B (10) en position A ( le canal est m aintenant
assigné au côté A du crossfader).
2. Branchez des écouteurs
Branchez-vous à la sortie casque (30). Réglez la commande LEVEL
(29) du casque au minim um et placez la commande SELECT (28) en
position PFL.
3. Branchez un lecteur de CD
Branchez un lecteur d e CD à l'entrée LINE du canal 1 (36), insére z un
CD et mettez-le en marche.
4. Branchez la console de mixage au secteur
Branchez le câble secteur dans l'entrée d'alimentation (43) de la
console de mixage et mettez cette dernière en service en poussant
l'interrupteur MAINS INPUT (45), tous deux situés à l'arrière.
5. Choisissez la source d'entrée
Vérifiez que le sé lecteur d'entrée de la voie 1 (1) est en position LIN E
(ligne) et que le Vu-mètre (2) de ce c anal s'allume. S'il ne s'allum e pas,
vérifiez que le lecteur de CD est bien branché et q u'il reprodu it bien une
piste audio.
6. Réglage du niveau d'entrée
Bougez la commande GAIN (3) jusqu'à ce que le Vu-mètre indique 0dB.
7. Envoyez le signal à la sortie principale
Montez le fader de la voie 1 (11) et pouss ez le crossfader (1 2) du côté
A.
Page 33

33
8. Écoutez le signal aux écouteurs
Pressez le bouton PFL (7) de la voie 1. Réglez la commande LEVEL (29) pour obtenir un niveau d'écoute
confortable. Vous devriez maintenant entendre la musique dans vos écouteurs. Déplacez le sélecteur SELECT
(28) vers la droite pour mélanger l e signal de PFL avec celui de MIX. A vec cette commande à f ond à droite, vous
n'écoutez que le signal MIX.
9. Vérifiez l'effet des commandes de tonalité
Testez la puissance d e l'égalis eur stéréo à 3 ba ndes (4, 5, 6). Ces com mandes de tonal ité sont co nçues p our une
modification créativ e du son : chaque bande p eut ê tre indépendamm ent isolé e a u moyen des grandes commandes
rotatives ergonomiques.
10. Vérifiez le réglage du crossfader
Chaque canal peut être as signé au crossfader en utilisant le sélecteur
A/OFF/B (10). Le crossfader permet d'effectuer un fondu entre les
signaux assignés aux deux côtés de ce dernier. Avec le sélecteur en
position A ou B, vous assigne z la voie à l'un des côtés du cros sfader.
La position OFF annule la fonction crossfader pour ce canal.
11. Réglage de la courbe du crossfader
La commande XFAD ER SHAPE (19) vous permet de régler la pente
de la courbe du crossf ader de façon précise. E n réglant la comm ande
à fond à gauche, vous pouvez progressivement enchaîner deux
morceaux en les fond ant. La c ourbe d u cr ossf ader s' avère pl us brut ale
si vous déplacez la com mande vers la dro ite. En r églant la c omm ande
à fond à droite, le signal arr ive d'un coup suite à un m ouvement léger
du crossfader, ce qui convient très bien à la technique de scratch.
Page 34

34
5. MANUEL DE FONCTIONNEMENT ET D'UTILISATION
Démarrage
Celle-ci se fera au m o yen de l'interrupt eur (45) du p anneau ar r ière. Au bo ut de qu elques ins tants , la diode O N (23)
s'allumera. Bien que le bruit produ it par la m ise en ser vice de la NU O4.0 soit m inim al et pratiquem ent neutral isé si
les faders sont abaissés, il est toujours conseillé de mettre en marche tous les appareils dans l'ordre suivant :
1. Sources sonores
2. Console de mixage, égaliseurs, filtres actifs
3. Enfin, amplificateurs de puissance.
La mise hors tension doit respecter exactement la séquence inverse, afin d'éviter tout dommage possible aux
enceintes.
Description des commandes
Sélecteur d'entrée
Un sélecteur d'entrée (1) est assigné à chaque voie.
Commande de GAIN
Toutes les voies d'entr ée d e la NUO4.0 sont pourvues d'une c om mande accessible de la se ns ib ilité d'entrée (GAIN
(3)). Cette dernière per met d'ajuster le n iveau d'entrée de c haque voie afin de c ompenser les diff érentes sources
connectées à la console.
Les réglages de gain doive nt être faits avec un soin e xtrême en vous réf érant au Vu-m ètre (2) de chaque voie. Le
niveau de référence utilisé pour mixer des signaux audio est de 0dBV.
La marge de gain est régla ble sur ±15 dB m ais on peut réduire c ette plage à ±6 dBV. Ce réglage est indépendant
pour chaque voie et il se fait au moyen de ponts de soudure. Consultez le schéma de configuration.
Egalisation (EQ)
Le système de comm andes de tonalité de chaque voie off re une vaste plage d'action de -3 0 à +10 dB pour les
graves (6) et les ai gus (4) et de -25 à + 10 dB po ur les médiums (5). Cette vaste plage d e variation de typ e "kill"
atténue complètement la bande choisie et a été spécialement conçue pour l'utilisation créative en direct.
ATTENTION : procéder avec pr udence lor s de l' égalis ation. L e f ait de trop bo oste r la plage des f réquences bass es
peut entraîner un déplacement excessif de la membrane des enceintes.
Système de contrôle (Monitoring)
La NUO4.0 est équipée d'u n système d'écoute souple et s imple qui permet de régler avec une grande précis i on les
niveaux de PFL (écoute pré-fader) et de mix age pour chaque voie d'entrée pri ncipale au travers du VU -mètre et
des écouterurs. Chaque c anal peut être contrôlé visuellem ent et pré-écouté en press ant les boutons dédiés PFL
(7).
Pour les éc outeurs, le potentiomètre r otatif SELECT (28) permet de m ixer une écoute PFL sélect ionnée avec le
mixage principal de programme MIX. Le potentiomètre rotatif LEVEL (29) contrôle le niveau de sortie.
Chaque voie dispose en outre d'un Vu-mètre dédié qui permet de contrôler visuellement le signal PFL (2).
Page 35

35
Envoi à des unités d'effets externes par FX Send/Return
Les 4 voies de la NUO4.0 sont équipées de potentiomètres rotatifs (8) qui permettent d'envoyer le signal à une
unité d'effets externe, un échantillonn eur, etc. Ces potent iomètres permettent de doser le niveau du si gnal qui est
envoyé depuis chaque voie.
La sortie de départ FX SEN D (41) se branc he à l'entr ée du processeur d'effets , et la sortie de c elui-c i à l'entrée de
retour RETURN (42) ou à une entrée LINE (36).
Ce départ d'effet peut êtr e configuré au moyen du com mutateur basculable PRE/POST (9) de faç on à ce que le
départ soit affecté (POST) ou non (PRE) par le fader de la voie.
La NUO4.0 dispose, outr e une comm ande générale d' envoi à des eff ets FX SEND (17) qui add itionne les 4 voies ,
d'une commande générale de retour d'effets FX RETURN (15) et d'une commande de pré-éc oute du signal de
retour d'effets FX PFL (16).
Faders
La NUO4.0 est équip ée d'une n ouvelle gé nération de faders ECLER de 60 m m (11) pr écis, extrêm em ent réguliers
et avec des prestations qui dépassent les 4.000.000 de manoeuvres grâce au système VCA d'ECLER (VCA :
Voltage Controlled Amplifier ou "amplificateur contrôlé par tension").
L'utilisation de la technol ogie VCA permet la m odification du compor tement du fader. Sur la plaque s upérieure se
trouve le potentiom ètre rotatif FADER S HAPE (18) qu i perm et de régler la c ourbe du f ader de sort e que le vo lume
soit réparti de façon proportionnelle tout le long du potentiomètre ou au contraire qu'il change soudainement.
Crossfader
Chaque canal peut être as signé au crossfader (12) en utilisant le sélecteur A/OFF/B (10). Le crossfader perm et
d'effectuer un fondu en tre l es s igna ux as s ignés a ux d eux c ôtés de c e d er ni er. A v ec le sél ec teur en position A ou B,
vous assignez la voie à l'un des côtés du crossfader. La position OFF annule la fonction crossfader pour ce canal.
Le crossfader de la NUO4.0 poss ède une série de commandes qui permettent de régler son com portement, en le
transformant un outil précis . La comm ande XFADER SHAPE (19) vous permet de régler la pent e de la courbe du
crossfader de façon préc ise. En réglant la commande à fond à gauche, vous pouv ez progressivement enchaîner
deux morceaux en les f ond ant. L a c our b e du cr os sfader s'avère plus brut a le si vo us dép lac e z la c om mande vers la
droite. En réglant la commande à fond à droite, le signal arrive d'un coup suite à un mouvement léger du
crossfader, ce qui convient très bien à la technique de scratch.
Le commutateur REVE RSE (20) inverse la direc tion du crossfader . Suivant la direction cho isie, on peut effectuer
des "cuts" ou des "fades" en déplaçant le crossfader dans la même direction.
La correction électron ique CUT IN (21) n'agit que si la NUO4.0 est équipée du pote ntiomètre ET ERNAL facultatif .
Avec le crossfader standard, le potentiomètre CUT IN doit rester en position OFF. Le CUT IN est la distance
existant entre la fin physique de la c ourse du crossfader et le premier point d'entrée de signa l. La position plus
courte fournit une coup ure pratiquement instantanée . Pour obtenir cette positi on, le potentiomètre doit être placé
en position extrêm e et le potentiom ètre CUT IN doit êtr e tourné à droite jus qu'à obtention d u signal music al. Pour
allonger le temps de CUT IN, tournez le potentiomètre vers la gauche.
Si vous souhaitez prolonger la durée de vie de votre crossfader, la NUO4.0 permet de monter en option le
potentiomètre primé ETERNAL. C'est un crossfader à technologie inductive basée sur un système de contrôle
magnétique. Cette technologie totalement sans contact, combinée avec un système mécanique de glissement
exclusif, donne un toucher régulier et un des crossfaders les plus précis existant actuellement. Le crossfader
inductif ETERNAL a été spécifiquement conçu pour exécuter des techniques de "turntablism" de pointe, pour
lesquelles le mouvement du crossfader doit être extrêmement doux et rapide.
Page 36

36
Pour installer le crossfader ETERNAL, suivez les étapes ci-dessous :
1. Retirez les boutons des potentiomètres coulissants et rotatifs de la surface du mélangeur.
2. Dévissez les vis extérieures qui fixent la plaque de commandes du mélangeur et retirez-la.
3. Retirez les deux vis qui fixent le crossfader et retirez-le.
4. Déconnectez soigneusement le connecteur multibroche.
5. Remplacez le crossfader par l'ETERNAL.
6. Branchez le connecteur multibroche précédemment déconnecté.
7. Fixez-le avec les deux vis, en respectant l'orientation décrite
dans le dessin.
8. Remettez la plaque de commandes en place et vissez-la.
9. Remettez les boutons des potentiomètres.
ATTENTION: Utilisez toujours des pièces de rechange originales ECLER.
AVERTISSEMENT : Le remplacement du crossfader doit être effectué par un technicien qualifié.
Niveaux de sortie MASTER y BOOTH
La NUO4.0 intègre deux commandes principales de niveau de sortie, respectivement MASTER et BOOTH. Le
niveau de sortie MASTER est c ontrôlé par le bou ton MA STER ( 24). Le niv eau d e sortie BOO TH est contr ôlé par le
bouton BOOTH (25).
Le potentiomètre de balance BAL (26) et le commutateur L+R (27) affectent les deux sorties.
6. INFORMATIONS COMPLEMENTAIRES
Boucles de masse
S'assurer que toutes les sour ces de s ignal q ui arrive nt à la cons ole d e m ixage ains i que tous les appar eils q ui sont
raccordés à sa sort ie, n'ont pas les masses interconnectées, c'est-à-dire que la masse n'arrive pas par deux ou
trois voies différentes ; en effet, ceci peut provoquer des bruits qui altèrent le signal sonore. S'assurer que les
blindages des câbles s oient connectés au châssis sans jamais êtr e reliés entre eux afin d'éviter la form ation de
boucles de masse.
Bruit de fond
L'emploi de circuits ac tifs peut am ener , suivant l a conf iguratio n, un ni veau de bru it de f ond plus o u m oins élevé. L a
NUO4.0 a été conçue de m anièr e à dél ivrer le m oins d e bruit de fond p ossib le. Q uoi qu'i l en soit, le ni veau de br uit
dépend directement de la bonne install ation et d e l'util isation c orrect e de l'a ppareil . A titre d' exem ple, par am étrer le
FADER à "2" et le MASTER à "10" ne revient pas au même que si l'on paramètre le FADER à "10" et le MASTER à
"2". Dans le premier cas , on obtient un rapport sig nal/bruit de mauvaise qualité qui sera am plifié par le master ,
alors que dans le second cas , nous avons un bon rapport signa l/bruit, seulement am plifié de "2". Il en résulte que
le bruit de fond est plus important dans le premier cas que dans le second.
Connexions audio
Se donner comme règle de r éaliser d es li aisons a us s i cour tes que possible et d'util iser les meilleurs connecteur s et
câbles disponibles. En effet, on oublie trop souvent que des câbles et connecteurs bon marché peuvent être à
l'origine d'un son de pauvre qualité.
Nettoyage
Ne pas utiliser de dissolvants ni de produits abr asifs pour nettoyer le pann eau de commandes ; cela pourrait le
détériorer. Pour ce faire, utiliser un c hif f on lé gèrement humidifié a vec d e l’ea u c l ai re ou u n d éter g ent neu tr e, puis le
sécher avec un linge pr opre. Il est recomm andé de nettoyer les taches de transpiration après usage. De l’eau ne
doit en aucun cas pénétrer par les orifices de l’appareil.
Page 37

37
7. LISTE DE FONCTIONS 8. DIAGRAMME DE FONCTIONS
1. Sélecteur d’entrée
2. VU-mètre à Leds
3. Réglage de sensibilité d’entrée, GAIN
4. Contrôle des aigus, HI
5. Contrôle des médiums, MID
6. Contrôle des graves, LOW
7. Commutateur de pré-écoute, PFL
8. Commande de départ d'effets, FX
SEND
9. Départ vers bus d'effet, PRE/POST
10. Départ XF, A/OFF/B
11. Fader
12. Contrôle du crossfader
13. Connecteur combo XLR/JACK
Microphone, MICRO
14. VU-mètre à Leds
15. Contrôle de retour d'effet, FX
RETURN
16. Commutateur de pré-écoute, FX
PFL
17. Commande de départ d'effets, FX
SEND
18. Réglage de courbe de fader,
FADER SHAPE
19. R églage de la pente du cr ossfader,
XFADER SHAPE
20. Fo nction d'inversion du crossfader,
REVERSE
21. Réglage "Cut in time" du
crossfader, CUT IN
22. Sortie d'enregistrement, REC OUT
23. Indicateur lumineux de mise en
marche, ON
24. Contrôle de volume, MASTER
25. Contrôle de volume, BOOTH
26. Balance, BAL
27. Somme signal Gauche et Droite,
L+R
28. Crossfader d'écoute PFL/MIX,
SELECT
29. Contrôle de volume du écouteurs,
LEVEL
30. Jack stéréo connexion écouteurs
31. Borne de masse, GND
32. Sortie symétrique canal gauche,
BOOTH L
33. Sortie symétrique canal droit,
BOOTH R
34. Sortie RCA, BOOTH
35. Entrée Phono, PHONO
36. Entrée ligne, LINE
37. Entrée micro, MICRO
38. Sortie symétrique canal gauche, MASTER L
39. Sortie symétrique canal droit, MASTER R
40. Sortie RCA, MASTER
41. Sortie départ FX externe, FX SEND
42. Entrée Retour FX externe, FX RETURN
43. Embase secteur
44. Porte fusibles
45. Interrupteur de mise sous tension
Page 38

38 39
Page 39

INHALTSVERZEICHNIS
1. WICHTIGE VORBEMERKUNG 40
2. EINFÜHRUNG 41
3. INSTALLATION 41
4. SCHNELLSTART 44
5. BETRIEB UND BEDI EN U NG 46
6. WEITERE HINWEISE 48
7. FUNKTIONSLISTE 49
8. FUNKTIONSDIAGRAMM 49
9. TECHNISCHE DATEN 50
10. KONFIGURATION 51
11. BLOCKSCHALTBILD 52
Alle Angaben sind ohne Gewähr. Messwerte können produktionsbedingten Schwankungen unterliegen. ECLER S.A.
nimmt sich das Recht heraus Veränderungen am Gerät vorzunehmen, die zur Verbesserung des Produktes beitragen.
Page 40

40
1. WICHTIGE VORBEMERKUNG
Sicherheitshinweise
Um die optimale Leistung und Effizienz Ihres Mixers sicherzustellen, ist es SEHR WICHTIG, – bevor Sie
irgendeinen Anschluss vornehmen – diese Bedienungsanleitung sorgfältig durchzulesen und alle Hinweise
gewissenhaft zu befolgen. Wir empfehlen nachdrücklich, eine Reparatur oder Wartung nur von unseren
autorisierten technischen Servicestellen durchführen zu lassen.
Dieses Gerät muss über das Netzkabel geerdet sein.
Setzen Sie das Gerät keinesfalls Regen oder Spritzwasser aus und stellen Sie keine Behälter mit
Flüssigkeiten oder brennbare Gegenstände wie Kerzen auf das Gehäuse.
Jede Änderung in der Konfiguration des Gerätes muss von e inem qualifizierten Techniker durc hgeführt werden.
Trennen Sie das Gerät immer von der Netzversorgung, wenn ein Anschluss vor genommen oder entfernt werden
soll.
Garantiebestimmungen
Ihr ECLER Gerät wird umfangre ichen Labortests und Qualit ätskontrollen unterz ogen, bevor es das Werk verlässt.
Sollten Sie dennoch währe nd oder nac h A blauf des Garantiezeitraumes Hilfe unserer technischen Serv ic ea b tei lung
benötigen, senden Sie das Gerät sor gfältig im O riginalk arton verpack t, als freies und v ersichertes Paket an uns ere
technische Serviceabteilung. Fügen Sie eine Kopie Ihrer Garantiekarte und eine genaue Fehlerbeschreibung bei.
ECLER S.A. gewährt f ür de n NUO 4. 0-Mixer eine Garantie von einem Jahr ab Da tum des Erwerbs f ür Material- und
Fabrikationsmängel.
ECLER, S.A., repariert defekte Geräte kostenfrei inklusive Ersatzteilen und Arbeitszeit innerhalb des oben
genannten Zeitraumes.
Um die Gültigkeit der Garantie sicherzustellen, ist er unbedingt erforderlich, dass Sie die korrekt ausgefüllte
Garantie-Registrierkarte innerhalb von 10 Tagen nach dem Kaufdatum ihrem ECLER Händler übergeben.
Die Garantie ist nicht übertragbar und ist nur für den Erstkäufer gültig.
Die Garantie umfasst nicht:
* Schäden durch unsachgemässe Behandlung, nicht eingehaltene elementare Vorsichtsmassnahmen,
Nichtbeachtung der Bedienungsanleitung sowie bei falschem Anschluss oder Unfällen.
ECLER, S.A. ist nicht vera ntwortlich für einen direkten oder indir ekten Schaden, Verlust oder Besc hädigung, der
durch das Gerät hervorgerufen wird.
* Geräte, die nicht von unseren autorisierten Servicestellen manipuliert, verändert oder repariert wurden.
* Externe Beschläge und Elektromechanische Teile sowie gebrauchsbedingte Abnutzung.
* Transport- und Versicherungskosten sowie Beschädigungen beim Versand.
Diese Garantie ist nur gültig für Reparaturen oder Servicearbeiten bei einem unserer autorisierten Servicestellen.
Page 41

41
2. EINFÜHRUNG
Herzlichen Glückwunsch zum Erwerb eines echten, professionellen ECLER-Geräts!
Der NUO4.0 ist ein prof essione ller DJ Mixer , ent wick elt und herges tellt von ECL ER , einer in Barc elon a ansä ss igen
Firma, die seit 1965 im professionellen Audiobereich tätig ist.
Der NUO4.0 ist ein profesione ller Audi omixer , der für j eden DJ gee ignet ist. Dank seiner vielf ältigen F unktionen ist
dieser Mixer in der Lage, jeden Musikstil abzumischen: Techno, House, Minimal, Electro, Hip Hop, ...
Dank seiner vielseitigen Einstellungsmöglichkeiten von Fader und Crossfader ist der NUO4.0 bestens zum
Scratchen geeignet. Darüberhinaus ist der NUO4.0 kompatibel mit dem magnetischen Crossfader Eternal von
Ecler welcher, ausgestattet mit einer Garantie von 5 Jahren, ganz speziell für die Cracks unter den Scratchern
entwickelt wurde.
In diesem authentischen Mixer sind die besten Komponenten eingebaut, die am Markt erhältlich sind, wodurch eine
unübertreffliche Soundq uali tät erreicht wird. Über 40 Jahre Er fahrung i n der Entw ick lung von prof esionel lem AudioEquipment sind ein G arant für äusserst leistungsf ähige Scha ltkr eise und e inen warm en und k ristallk laren a nalog en
Sound. Alle Schaltkreise wer den in unser er Fa brik in Barcelona hergestellt und g etest et.
Der NUO4.0 ist ein Mixer, der sich dank seiner beiden symmetrischen Ausgänge und seiner beiden
Mikrophoneingänge ganz besonders für professionelle Anlagen jeder Art eignet. Sein Design und seine
Widerstandsfähigk eit m achen ihn zum ideal en W erk zeug, sowohl für prof essione lle Anlag en als auc h als tragbar es
Gerät für die fortschrittlichsten unter den DJ’s.
3. INSTALLATION
Bei der Suche nach einem Platz zum Aufbau des NUO4.0 sollte vor allem darauf geachtet werden, dass der
Anwender so bequem wie möglich arbeiten k ann und dass die Ansch lüsse mit Leichtigkeit v orgenommen werden
können.
Der NUO4.0 ist haupts ächlich als Tischgerät k onzipiert und wird üblicherwe ise
zwischen zwei Turntables oder CD-Playern aufgebaut. Der Mixer misst 37cm
(14,57") in der Tiefe und 32 cm (12,6") in der Breite.
Mit Hilfe der Seitenteile aus Metall (als Kit separat erhältlich) k önnen Sie den
NUO4.0 fest verank ern, sei es auf der Oberfläche, die ihn träg t, oder auf den
Seitenteilen, die es Ihnen ausserdem ermöglichen, den Mixer zu kippen. Eine
weitere Option sind die metallischen Halterungen "NUORAKI", die es
ermöglichen, den Mixer in ein Standar d 19" Rack einzubauen.
Aufgrund der hohen Empf indlichkeit der PHONO und MICRO Eingänge sollten
Sie immer versuchen, den Mix er so weit als möglich von Störquellen ( Dimmer,
Motoren usw.) und Netzleitungen aufstellen. Aus dem gleichen Grund sollten Sie unter keinen Umständen die
Metall-Abdeckung des Gerätes entfernen.
Die Leistungsaufnahme des NUO4.0 ist sehr gering, daher benötigt das Gerät keine Kühlung, extreme
Temperaturen sollten aber vermieden werden und die Luft sollte möglichst trocken und staubfrei sein.
Der NUO4.0 arbeitet jet zt mit einem neuen Universalnet zgerät “Schaltnetztei l” und kann einfach und ohn e interne
Modifikation mit Netzspann ungen von 90V bis 264 V – 47 bis 63Hz betrieben werden. Vergewis sern Sie sich, dass
die Netzleitung möglichs t weit von den signalführenden Kabeln verle gt wird, um ein mögliches Netzbrumm en zu
vermeiden.
Um das Gerät vor einer eventuellen elek trischen Überlastung zu schützen, ist eine T 0.5A Sicherung integriert.
Sollte sie einmal durchbrennen, trennen Sie das Gerät vom Netz und ersetzen Sie die Sicherung gegen eine
identische. Falls auch die neue Sicherung durchbrennen sollte, wenden Sie sich bitte sofort an eine unserer
autorisierten technischen Servicestellen.
ACHTUNG: DIE SICHERUNG DARF NIEMALS KURZGESCHLOSSEN W ERDEN ODER GEGEN EINE
MIT HÖHEREN WERTEN AUSGETAUSCHT WERDEN.
ACHTUNG: Der Sicherungswechsel muss von einem qualifizierten Fachmann durchgeführt werden.
Page 42

42
Anschluss der Audio-Eingänge
INPUT 1 PHONO Vinyl-Plattenspieler
INPUT 1 LINE CD Deck
INPUT 2 PHONO Vinyl-Plattenspieler
INPUT 2 LINE CD Deck
INPUT 3 PHONO Vinyl-Plattenspieler
INPUT 3 LINE CD Deck
INPUT 3 MICRO Mikrofon
INPUT 4 PHONO Vinyl-Plattenspieler
INPUT 4 LINE CD Deck
INPUT 4 MICRO Mikrofon
Phono Eingänge
Phono Vinyl-Plattenspieler müssen mit einem magnetischen Tonabnehmersystem ausgestattet sein, nominaler
Ausgangspegel zwische n -55dBV und -25d BV (1,77 bis 56mV). Die PHONO Ein gänge (35) d es NUO4.0 ve rfügen
über eine hohe Übersteuerungskapazität (Grenzwert, bevor Verzerrungen auftreten) und können höhere
Ausgangspegel als üblich tolerieren. Diese Eingänge besitzen eine nominale Eingangsempfindlichkeit von
-40dBV(10mV).
Line Eingänge
Die Sensibilität der als LINE gekennzeichneten Eingänge (36) beträgt 0dBV (1V). Schliessen Sie an diese
Eingänge Klangquellen wie CD-, DAT- oder MP3-Player, Keyboards oder andere Instrumente an.
Mikrophoneingänge
Die MICRO-Eingänge (13, 37) sind auf einen Nominalpegel von –35dBV eingestellt. Der Anschluss an der
Frontseite (13) ist vom Typ Kombo XLR3/Jack, währe nd der Anschluss an der Rücks eite (37) vom Typ XLR3 ist.
Diese Mikrophoneingänge ermöglichen den Anschluss von symm etrischen Signalen, der wie folgt vorzunehm en
ist:
Direktes (Hot) Signal > Pin2 Spitze
Invertiertes (Cold) Signal > Pin3 Ring
Masse > Pin1 Mantel
Die Mikrophone m üssen niederohmig (200 bis 600Ω) und monophon sein. F ür asymmetrische Anschlüss e muss
der Pin 3 mit Masse oder mit dem mittlerem Ring kurzgeschlossen werden. Der NUO4.0 verfügt über 18V
Phantomspeisung für Kondensatormikrophone. Ein interner Jumper ermöglicht die Deaktivierung der
Phantomspeisung. Der MICRO-Eingang des NUO4.0 wird ab Werk mit aktivierter Phantomspeisung geliefert (siehe
Konfigurationsdiagramm).
Page 43

43
Anschluss der Audio-Ausgänge
MASTER Haupt-Endverstärker
BOOTH Zweiter Endverstärker
REC Aufnahmegerät
FX Send/Return Externes Effektgerät (Eingang und Ausgang)
Headphones Kopfhörer
MASTER
Der Stereoausgang speist das PA-System mittels symmetrischer XLR3-Anschlüsse (38, 39) und einem
asymmetrischen RCA-Anschluss (40). Der Nominalpegel des MASTER-Ausgangs ist auf 0dBV (1V) eingestellt,
kann aber mit Hilfe eines internen Jumpers auf +6dBV festgelegt werden. D er MASTER-Ausgangspegel kann m it
dem Drehregler MASTER (24) eingestellt werden.
Neben dem MASTER-Regler befindet sich der L+R-Umschalter (27), der den linken und den rechten Kan al der
MASTER- und BOOTH-Ausgänge addiert. Diese Funktion ist besonders nützlich im Fall einer Fehlfunktion von
einem der Kanäle während einer Session (ein typisches Beispiel könnte ein schlechter Kontakt der Kapsel des
Turntables sein). Dur ch Aktiviere n dieses Schalters sendet der Mixer die Summe aus L+R an beide Lauts precher,
wodurch das Problem für den Grossteil des Publikums unbemerkt bleibt.
MASTER und BOOTH verfügen über den Balance-Regler BAL (26).
BOOTH
Üblicherweise wird dieser Regler verwendet, um einen unabhängigen Ausgang für die DJ-Kabine zu erhalten.
Dieser Stereoausgang (BOOTH) verfügt über einen symm etrischen XLR3-Anschluss und e inen asymmetrischen
RCA-Anschluss. Der nominale Ausgangspegel des BOOTH-Ausgangs ist auf 0dBV (1V) eingestellt, kann aber
mittels eines internen J umpers auf +6dBV gesetzt werden. Der Aus gangspegel des BOOTH-Ausgangs kann mit
dem Drehregler BOOTH (25) eingestellt werden.
Aufnahmeausgänge
Der REC Ausgang (22) befindet sich oberhalb der Bedienf läche und verwendet RCA-Anschlüsse. Der nominale
Ausgangspegel des REC-Ausgangs beträgt 0dBV (1V). Das Signal dieses Ausgangs wird post-fader
abgenommen, also vor dem MASTER.
FX-Send/Return-Loop für externe E ffekte
Die RCA-Anschlüsse des FX-SEND-Ausgangs (41) und des FX-RETURN-Eingangs (42) ermöglichen den
Anschluss eines externen Effektegeräts, Samplers oder Sequencers. Der nominale Ausgangspegel des SENDAusgangs sowie der des RETURN-Eingangs beträgt 0dBV (1V).
Das Signal, das an den FX-SEND-Ausgang gesendet wird, kann mit Hilfe des PRE/POST-Umschalters (9) vor oder
nach dem Fader abgenom men werden und d er Pegel dieses S ignals wird m it dem entsprechend en Drehregler (8)
eingestellt. Der NUO4.0 verfügt ausserdem über einen allgemeinen FX-SEND-Regler (17), der die 4 Kanäle
addiert, einen allgemeinen FX-RETURN-Regler (15) und einen Abhörpunkt des FX-RETURN-Signals zu
Kontrollzwecken, FX PFL (16).
Kopfhörer
Um die beste Leistung zu erreichen, sollte der Kopfhörer eine hohe Impedanz (200-600Ω) aufweisen. Der
Anschluss an den Kopfhörerausgang (30), der sich oberhalb der Schalttafel befindet, erfolgt mittels eines ¼"
Stereojacks oder eines 3.5mm Minijacks. Die Basis des Steckers entspricht der Masse, der Ring dem rechten
Kanal und die Spitze dem linken Kanal.
Page 44

44
4. SCHNELLSTART
Installieren und schließen Sie den NUO4.0 an, wie im Abschnitt 1 INSTALLATION beschrieben wurde.
Im Folgenden wird eine k urze “Schnellstart” Prozedur beschrieben, die sich aussc hließlich auf den LINE Eingang
von Kanal 1 und den Kopfhörer-Monitorausgang bezieht.
1. Bringen Sie die Regler in ihre Ausgangspositionen
Bringen Sie die Drehr egler GAIN, HI, M ID und LOW des Kanals 1 ( 3, 4, 5,
6) in die zentrale Einrastpo sition. Schieben Sie den Fader (11) ans untere
Ende und bringen Sie den A/OFF/B-Schalter in die als A markierte Position
(der Kanal ist nun der A-Seite des Crossfader s zugew i esen) .
2. Schliessen Sie die Kopfhörer an
Nehmen Sie nun den Anschluss an den Kopfhörerausgang (30) vor.
Stellen Sie die Pegelk ontrolle der Kopfhörer (29) auf minimale Lautstärke
ein und bringen Sie das Bedienelement SELECT (28) in die Position PFL.
3. Schliessen Sie einen CD-Player an
Verbinden Sie den Ausgang des CD-Player mit dem LINE-Eingang des
Kanals 1 (36), legen Sie eine CD ein und beginnen Sie mit der
Wiedergabe.
4. Schliessen Sie das Netzkabel des Mixers an
Schliessen Sie das Netzkablel an den Versorgungseingang (43) des
Mixers an und schalten Sie das Gerät ein, indem Sie den MAINS-INPUTSchalter (45) drück en. Beide El em ente befinde n sich a n der Rüc ks eite des
Mixers.
5. Wählen Sie eine Eingangsquelle
Stellen Sie sicher, dass der Schalter zur Auswah l der Eingangsquelle des
Kanals 1 (1) sich in der als LINE gekennzeichn eten Position bef indet, und
dass das VU-Meter dieses Kanals (2) aufleuchtet. Sollte das VU-Meter
nicht aufleuchten, überpr üfen Sie, ob der CD -Player ric htig angeschloss en
ist und ob ein Audiotrack wiedergegeben wird.
6. Justieren Sie den Eingangspegel
Drehen Sie den GAIN-Regler (3) so lange, bis das VU-Meter 0dB anzeigt.
7. Weisen Sie das Signal dem Hauptausgang zu
Bewegen Sie den Fader des Kanals 1 (11) nach oben und schieben Sie den Crossfader (12) an die als A
gekennzeichnete Seite.
Page 45

45
8. Überprüfen Sie das Signal mit Ihrem Kopfhö rer
Drücken Sie den PFL-Schalter (7) des Kanals 1. Stellen Sie mit dem LEVEL-Regler (29) eine angenehme
Abhörlautstärke ein. Sie s ollten die Musik jetzt über den Kopfhörer hören. Dr ehen Sie den SELECT-Regler (28)
nach rechts, um das PFL-Signal mit dem MIX-Signal zu vermischen. Wenn Sie den Regler ganz nach rechts
drehen, hören Sie nur noch das MIX-Signal.
9. Überprüfen Sie die Auswirkung der Tonkontrolle
Experimentieren Sie mit dem leistungsstarken 3-Band-Stereo-Equalizer (4, 5, 6). Diese Tonkontrolle ist für eine
kreative Soundmodifik ation entworf en worden: jedes B and k ann mit Hilfe der gross en und ergonom is ch gestalte ten
Drehregler individuell isoliert werden.
10. Überprüfen Sie die Einstellung des Crossfaders
Jeder Kanal kann mit dem A/OFF/B-Schalter (10) dem Crossfader
zugewiesen werden. Der Crossfader ermöglicht es, die Signale, die
seinen beiden Seiten zugew iesen sind, miteinander zu verschm elzen.
Wird der Schalter in die Positi onen A oder B gebracht, so wird dieser
Kanal der entpsrechenden Seite des Crossfaders zugewiesen. Wird
die als OFF markierte Position ausgewählt, so wird die CrossfaderZuweisung für diesen Kanal aufgehoben.
11. Einstellung der Crossfaderkurve
Die XFADER-SHAPE-Kontrolle (19) ermöglicht es, die Steigung der
Crossfaderkurve präzise einzustellen. W ird der Regler komplett nach
links gedreht, so können zwei Musikstücke sanft miteinander
verschmolzen werden. Di e Crossfaderkurve wird steiler, je mehr man
den Regler nach rechts dreht. Wird der Regler komplett nach rechts
gedreht, so findet bei einer leichten Bewegung des Crossfaders, ein
schlagartiger Wechsel von einem Stück zum anderen statt. Diese
Einstellung eignet sich besonders gut zum Scratchen.
Page 46

46
5. BETRIEB UND BEDIENUNG
Inbetriebnahme
Dies geschieht mit dem Schalter (45), der sich an der Rückseite des Geräts befindet. Kurz nach der Betätigung
dieses Schalters wird die Anzeige LED ON (23) aufleuchten. Auch wenn das durch die Inbetriebnahme des
NUO4.0 produzierte Rauschen minimal u nd so gut wie inex istent ist, wenn a lle Fader auf Minim um stehen, ist es
trotzdem empfehlenswert, das Einschalten der Geräte in folgender Reihenfolge durchzuführen:
1. Soundquellen
2. Mixer, Equalizer, aktive Filter
3. Zuletzt die Endverstärker
Das Ausschalten sollte ex a k t im umgekehrter Reihenfolge ausgef ühr t wer den , u m eine mögliche Beschädigung der
Lautsprecher auszuschließen.
Bedienung
Eingangswahlschalter
Jeder Kanal verfügt über einen Eingangsschalter (1).
Kanal GAIN
Alle Eingänge des NUO4.0 sind mit einem GAIN Regler (3) zur Eistellung der Eingangsempfindlichkeit
ausgestattet. Der GAIN Regler steuer t den Eingangspegel jedes Kanals, um die unterschiedlichen an den Mixer
angeschlossenen Signalquellen zu kompensieren.
Die Einstellung der Verstärkung muss mit grösster Sorgfalt und unter Beachtung des VU-Meters (2) des
entsprechenden Kana ls vorgenommen wer den. Die Standardpegel-R ef erenz zum Mixen von Audiosig nalen b eträgt
0dBV.
Der Verstärkungsbereich beträgt ±15dB, k ann aber auf ±6dBV reduziert werden. Diese Einstellung ist f ür jeden
Kanal unabhängig und wird mittels Lötbrücken vorgenommen. Schlagen Sie hierzu im Konfigurationsdiagramm
nach.
Equalizer
Die Tonkontrolle eines j eden Kanals hat einen ausg edehnten Ver stärkunsber eich von -30 bis +10dB für die T iefen
(6) und Höhen (4) und von -25 bis +10dB für die Mitten (5). Diese ausgede hnte Wandlungsbandbreite vom Typ
"Kill" kann den gewäh lten Frequenzweg kom plett ausblenden und wurde spe ziell für die kreative Anwendu ng bei
Liveauftritten entwick elt.
ACHTUNG: Setzen Sie de n Equ al i zer mit Vorsicht ein, eine zu hohe Vers tär k ung im tiefen Frequenzbere ich k önnte
eine übermäßige Auslenkung der Lautsprechermembranen zur Folge haben.
Monitorsystem
Der NUO4.0 ist mit einem flexiblen und einfach zu bedienenden Monitorsystem ausgestattet, das eine sehr
feinfühlige Einstellung der PFL (Pre-fader listening) sowie MIX (MIX Program Monitor) Peg el über die VU-Meter
und die Kopfhörer gestattet . Jeder Kanal kann durc h Betätigen der entsprechenden PF L (7) Tas ten angezeigt und
vorgehört werden.
Bei der Kontrolle über Kopf hör er ermöglicht das SELECT Potentiometer ( 28) eine Über bl end ung des aus g e w ählt en
PFL zusammen mit dem Haupt-MIX Programm. Der LEVEL Regler (29) steuert den Pegel des Kopfhörerausgangs.
Jeder Weg hat ausserdem ein eigenes VU-Meter zur visuellen Über prüfung des PFL-Signals (2).
Page 47

47
Senden von Signalen an externe Effektegeräte FX Send/Return
Die 4 Kanäle des NUO4.0 sind mit Drehreglern (8) ausgerüstet, die es ermöglichen, das Signal eines Kanals an ein
externes Effektegerät, Sampler, usw. zu senden. Mit den Reglern kann man den Signalpegel des gesendeten
Signals für jeden Kanal genau dosieren.
Der FX-SEND-Ausgang (4 1) wird an den Eingang de s Effektegeräts angeschlos sen und der Ausgang des selben
an den RETURN-Eingang (42) oder an den LINE-Eingang (36) des Mixers.
Dieses Send-Signal kann mittels des PRE/POST-Kippschalters (9) vor oder nach dem Kanalfader entnommen
werden.
Der NUO4.0 verfügt ausserdem über einen allgemeinen FX-SEND-Regler (17), der die 4 Kanäle addiert, einen
allgemeinen FX-RETURN-Regler (15) und einen Abhörpunkt des FX-RETURN-Signals zu Kontrollzwecken, FX
PFL (16).
Fader
Der NUO4.0 ist mit einer neuen Generatio n der EC L E R-Fader ausgestattet. Es handelt sich dabei um 60mm Fader
(11), die äusserst prä zise und weich in der Handhabung sind un d Dank des VCA-Systems von ECL ER mehr als
4.000.000 Betätigungen überdauern (VCA: Voltage Controlled Amplifier).
Die Nutzung der VCA-Technologie ermöglicht es, das Verhalten des Faders zu modifizieren. An der Fronttafel
befindet sind der Drehregl er FADER SHAPE (18), mit dem die Kurve des Fader s eingestellt werden kann. So ist
es, unter anderem , möglich, die Lautstärke des S ignals proportional auf d ie Länge des Faders zu vertei len oder
aber schlagartige Sprünge in der Lautstärke zu erzeugen.
Crossfader
Jeder Kanal kann mit dem A/OFF/B-Schalter (10) dem Crossfader (12) zugewiesen werden. Der Crossfader
ermöglicht es, die Signale, die seinen beiden Seiten zugewiesen sind, miteinander zu verschmelzen. Wird der
Schalter in die Positionen A oder B gebracht, so wird dieser Kanal der entpsrechenden Seite des Crossfaders
zugewiesen. W ird die als OFF m arkierte Position a usgewählt, so wird die Cros sfader-Zuweis ung für diesen K anal
aufgehoben.
Der Crossfader des NUO4.0 beinhaltet eine Reihe von Kontrollreglern, die es ermöglichen, sein Verhalten zu
modifizieren, was ihn zu e i nem äusserst präzisen Werkzeug macht. Die XFADER-SHAPE-Kontrolle (19) erm ögl icht
es, die Steigung der Cross faderk urve prä zise ein zustel len. W ird der Regler k omplett nach l ink s gedreht, s o könne n
zwei Musikstücke sanft miteinander verschmolzen werden. Die Crossfaderkurve wird steiler, je mehr man den
Regler nach rechts dreht. Wird der Regler komplett nach r echts gedr eht, so f indet bei e iner leichte n Beweg ung des
Crossfaders ein schlagartiger Wechsel von einem Stück zum anderen statt. Diese Einstellung eignet sich
besonders gut zum Scratchen.
Der REVERSE-Umschalter (20) kehrt die Richtung des Crossfaders um. Je nach aus gewählter Richtung k önnen
sowohl „cuts“, als auch „transforms“ ausgeführt werden, wenn man den Crossfader in dieselbe Richtung bewegt.
Die elektronische Korrektur des CUT IN (21) ist nur effektiv, wenn der NUO4.0 mit dem optionalen ETERNALCrossfader ausgerüstet ist. Falls der Standard-C rossfader verwendet wird, so muss der CUT -IN-Drehregler in der
als OFF gekennzeichn eten Position bleiben. M it dem Begriff CUT IN bezeic hnet man die Distanz zwisc hen dem
Anschlag des Crossf ader und dem Einb lendepunk t des Signals. W ird ein k urzes CUT IN verwendet, so er hält m an
einen fast augenblicklichen Signalschnitt. Um die Position für diese Einstellung festzulegen, schieben Sie den
Crossfader bis zum Anschlag und dann drehen Sie den CUT-IN-Drehregler nach rechts, so lange bis das
Musiksignal hörbar wird. Wünschen Sie ein längeres CUT IN, so drehen Sie den CUT-IN-Drehregler nach links.
Wollen sie die Lebensdauer Ihres Crossfaders verlängern, so besteht die Möglichkeit, den NUO4.0 mit dem
preisgekrönten ETERN AL-Crossfader auszurüsten. Hierbei handelt es sich um einen Crossfader, bei dem induktive
Technologie, basierend auf einem magnetischen Kontrollsystem, zur Anwendung kommt. Diese absolut
kontaktfreie Technologie, in Verbindung mit einem einzigartigen mechanischen Gleitsystem, bietet eine extrem
weiche Handhabung und macht diesen Crossfader zu einem der präzisesten unter den derzeit auf dem Markt
erhältlichen Crossf adern. Der induktive ET ERNAL Crossfader wurde bes onders für die Ausführun g von extremen
Turntablism-Techniken entwickelt, bei denen es auf ausserordentlich schnelle und weiche CrossfaderBewegungen ankommt.
Page 48

48
Zur Installation eines ETERNAL-Crossfaders führen Sie bitte die folgenden Anweisungen aus:
1. Entfernen Sie die Knöpfe der Dreh- und Schieberegler auf der Mischpultoberfläche.
2. Lösen Sie die äußere n Sc hrauben, m it dene n die Fr ontp latte des Misc hpults be fest igt ist, und n ehm en Sie diese
ab.
3. Entfernen Sie die be iden Schrauben, d ie den Crossfader halte n,
und nehmen Sie ihn ab.
4. Lösen Sie vorsichtig den Multipin-Stecker.
5. Ersetzen Sie den vorhan denen Cros sf ader durc h den ETERNAL-
Crossfader.
6. Schliessen Sie nun den Multipin-Stecker an, den Sie zuvor
entfernt haben.
7. Fixieren Sie den neuen Crossfader mit den beiden Schrauben.
Beachten Sie hierbei die in der Zeichnung beschriebene
Ausrichtung.
8. Setzen Sie die Frontplatte auf und schrauben Sie sie fest.
9. Stecken Sie die Knöpfe der Dreh- und Schieberegler wieder auf.
ACHTUNG: Verwenden Sie ausschliesslich ECLER Originalteile.
WARNUNG: Der Austausch des Crossfaders muss von einem qualifizierten Techniker durchgeführt
werden.
Ausgangspegel für MASTER und BOOTH
Der NUO4.0 bei nhaltet zwei Hauptausgangs-Pegelregler MAST ER und BOOTH. Der MAST ER Pegel wird durch
den MASTER (24) Regler gesteuert. Der BOOTH Pegel wird durch den BOOTH (25) Regler gesteuert.
Der Balance-Drehregler BAL (26) und der Umschalter L+R (27) haben Auswirkungen auf beide Ausgänge.
6. WEITERE HINWEISE
Erdungsschleifen
Stellen Sie immer s icher, dass weder am Mix er angeschlossene Signalquellen no ch am Ausgang anges chloss ene
Geräte über die Masse ver bunden sind; das heißt, die Erdungsle itung sollte sie niemals über zwei vers chiedene
Wege erreichen können, d a dies zu einem Brumm en und zu einer redu zi erte n Wiedergabequalität f ühren kann. Zur
Vermeidung von Erdun gsschleifen so llten Sie sich vergewissern, dass sich die Abschirm ungen der Kabel, f alls sie
mit dem Chassis verbunden sind, niemals gegenseitig berühren.
Hintergrundrauschen
Der Einsatz aktiver Schalt ungen k ann, abh ängig von d er Konf iguratio n zu einem signif ikanten Raus chpe gel führen.
Der NUO4.0 wurde für einen minimalen Rauschpegel optimiert. Der Rauschpegel hängt jedoch immer von der
korrekten Bedienung und Installation des Mix ers ab. Es ist beispie lsweise nicht das selbe, ob ein FADER auf "2 "
steht und der MA STER auf "10", als umgekehrt; FADER auf "10" und MAST ER auf "2". Im er s ten Fal l erhalten Sie
einen sehr schlechte n Signal-/Rauschabstand, der d urch den Master voll verstär kt wird, während im zweiten F all
die Verstärkung des Signal-/Rauschabstandes nur “2” beträgt. Als Resultat erhalten Sie im ersten Fall ein
wesentlich höheres Hintergrundrauschen als im zweiten Fall.
Audio Anschlüsse
Als generelle Fausregel sollten die Signalkabel so kurz als möglich sein und möglichst hochwertige Kabel und
Stecker verwendet werde n. Kabel und Stecker werden oft billig geha lten; dies resultiert aber ebenso oft in einer
schlechten Soundqualität.
Reinigung
Das Bedienungsfeld darf auf keinen Fall mit Mi ttel gereinigt werden, die Lösungs- oder Schleifmittel entha lten, da
dies zu einer Beschädig un g der d es Ger äts f ühren könnte. Zur Reinigun g ein mit Wasser angef euc htet es Tuch und
flüssigen Neutralre iniger verwenden und ansc hließend mit einem trockenen T uch abtrocknen. Nach Verwe ndung
Schweißflecken entfernen. In das Innere des Geräts darf auf keinen Fall Wasser eindringen.
Page 49

49
7. FUNKTIONSLISTE 8. FUNKTIONSDIAGRAMM
1. Eingangswahlschalter
2. LED VU Meter
3. Eingangspegelregler, GAIN
4. Höhenregler, HI
5. Mittenregler, MID
6. Tiefenregler, LOW
7. Prefader Vorhörschalter, PFL
8. Sende-Controller an Effekte, FX
SEND
9. Send Taste zum Effekt Bus,
PRE/POST
10. Send to XF taste, A/OFF/B
11. Fader
12. Austauschbarer
13. Mikrofon XLR/JACK Combo
Buchse, MICRO
14. LED VU Meter
15. Return-Controller an Effekte, FX
RETURN
16. Prefader Vorhörschalter, FX PFL
17. Sende-Controller an Effekte, FX
SEND
18. Einstellen d er Fader-Form, FADER
SHAPE
19. Crossfader Kurveneinstellung,
XFADER SHAPE
20. Crossfader Umkehrfunktion,
REVERSE
21. Crossfader "Cut in tim e" Einst ellun g,
CUT IN
22. Aufnahme-Ausgang, REC OUT
23. LED-Anzeige für den
Betriebszustand, ON
24. Ausgang Pegelregler, MASTER
25. Ausgang Pegelregler, BOOTH
26. Balance, BAL
27. Links und rechts zusammen, L+R
28. PFL/MIX Crossfaderkontrolle,
SELECT
29. Kopfhörerpegelregler, LEVEL
30. Stereo Kopfhörerbuchse
31. Erdungsklemme, GND
32. Symmetrierter Hauptau sgang, li nks ,
BOOTH L
33. Symmetrierter Hauptausgang
rechts, BOOTH R
34. RCA Ausgang, BOOTH
35. Phono Eingang, PHONO
36. Line Eingang, LINE
37. Micro Eingang, MICRO
38. Symmetrierter Hauptausgang, links, MASTER L
39. Symmetrierter Hauptausgang rechts, MASTER R
40. RCA Ausgang, MASTER
41. Externer FX Send Ausgang, FX SEND
42. Externer FX Return Eingang, FX RETURN
43. Netzanschlußbuchse
44. Sicherungshalter
45. Netzanschluß
Page 50

50
9. TECHNICAL CHARACTERISTICS 9. CARACTERÍSTICAS TÉCNICAS
9. CARACTÉRISTIQUES TECHNIQUES 9. TECHNISCHE DATEN
Inputs Sensitivity nom/Impedance LINE 0dBV/50kΩ
PHONO -40dBV/50kΩ
MICRO -35dBV/>1kΩ
FX RET URN 0dBV/>6kΩ
Outputs Level/Minimum Load MASTER (BAL) 0dBV/600Ω 1V*(+6dB 2V)
MASTER (UNBAL) 0dBV/2.2kΩ 1V*(+6dB 2V)
B OOTH (BAL) 0dBV/600Ω 1V*(+6dB 2V)
BOOTH (UNBAL) 0dBV/2.2kΩ 1V*(+6dB 2V)
REC 0dBV/10kΩ
HEADPHONES 200mW/200Ω THD 1%
FX SEND 0dBV2.2kΩ
Frequency Response LINE 10Hz÷30kHz -1dB
MICRO 10Hz÷25kHz -1dB
PHONO RIAA ±0.5dB
FX RET URN 10Hz÷50kHz –1dB
THD+N LINE <0.07%
MICRO <0.06%
PHONO <0.15%
FX RET URN <0.05%
CMRR MICRO >70dB @ 1kHz
Signal Noise Ratio LINE >95dB
MICRO >90dB
PHONO >90dB
F X RETURN >100dB
Gain control inputs 1-4 ±15dB *(±6dB)
Tone control LOW +10 / -30dB
MID +10 / -25dB
HI +10 / -30dB
Phantom voltage +18VDC/5mA max.
Mains 90-264VAC 47-63Hz
Power consumption 38VA
Dimensions 370x320x80mm
Weight 4.8kg
(*) Internally selectable
Page 51

51
10. CONFIGURATION DIAGRAM 10. DIAGR AMA DE CONFIGURACIÓN
10. DIAGRAMME DE CONFIGURATION 10. KONFIGURATION
Page 52

52
11. BLOCK DIAGRAM 11. DIAGRAMA DE BLOQUES
11. SCHÉM A SYNOPT IQ UE 11. BLOCKSCHALTBILD
ECLER Laboratorio de electro-acústica S.A.
Motors 166-168, 08038 Barcelona, Spain
INTERNET http://www.ecler.com e-mail: info@ecler.es
50.0141.01.02
 Loading...