

Echo SRM-2500 Series, SRM-3000 Series, SRM-3100 Series, SRM-3001 Series, SRM-3400 Series Installation Instructions Manual
Page 1
INSTALLATION INSTRUCTIONS
SRM/PAS/SB BLADE SET-UP GUIDE*
TO USE
THESE BLADES
Pro Maxi-Cut
Grass/Weed
Plastic Cutters
Rigid Plastic
Tri-Cut
Grass/Weed Blade
Metal
Tri-Cut/8 Tooth
Grass/Weed Blade
Metal 80T Brush Blade
Metal 22T Clearing Saw Blade
Handle
Loop Handle, w/or
w/o Barrier Bar
Loop Handle
w/Barrier Bar,
or U-Handle
Loop Handle
w/Barrier Bar,
or U-Handle
U-Handle
Debris Shield Metal Shield Metal Shield Metal Shield Metal Shield
Harness Shoulder Harness Shoulder Harness Shoulder Harness Shoulder Harness****
Upper Plate &
Flat Washer
Upper Plate
& Glide Cup
Upper/Lower
Blade Plates**
Upper/Lower
Blade Plates**
Hex Nut Hex Nut Hex Nut Hex Nut
You
must
install
these
parts!
Blade
Mounting
Hardware
New Cotter Pin*** New Cotter Pin*** New Cotter Pin*** New Cotter Pin***
* WARNING! DO NOT INSTALL BLADES ON GT (CURVED SHAFT) MODEL TRIMMERS
** Arbor diameter of Upper Blade Plate must match arbor diameter of metal blades.
*** New cotter pin required each time blade is installed.
**** Brushcutters over 16.5 lbs (7.5 kg) dry weight (weight w/o fuel) require a double shoulder harness
U-HANDLE KIT
For Models: SRM-2500/3100 SERIES P/N 35130455730
SRM-3000/3001/3400 SERIES P/N 35130455830
WARNING
You must install a Barrier Bar or U-Handle Kit and all Blade Conversion parts shown in the following instructions before operating this unit with blades, otherwise serious injury may result.
IMPORTANT
If non-standard monolament heads, METAL/PLASTIC blades or cultivators etc., are used, THE CARBURETOR
MUST BE RESET or serious engine damage can occur. See "Carburetor Adjustment" in the unit Operator's Manual.
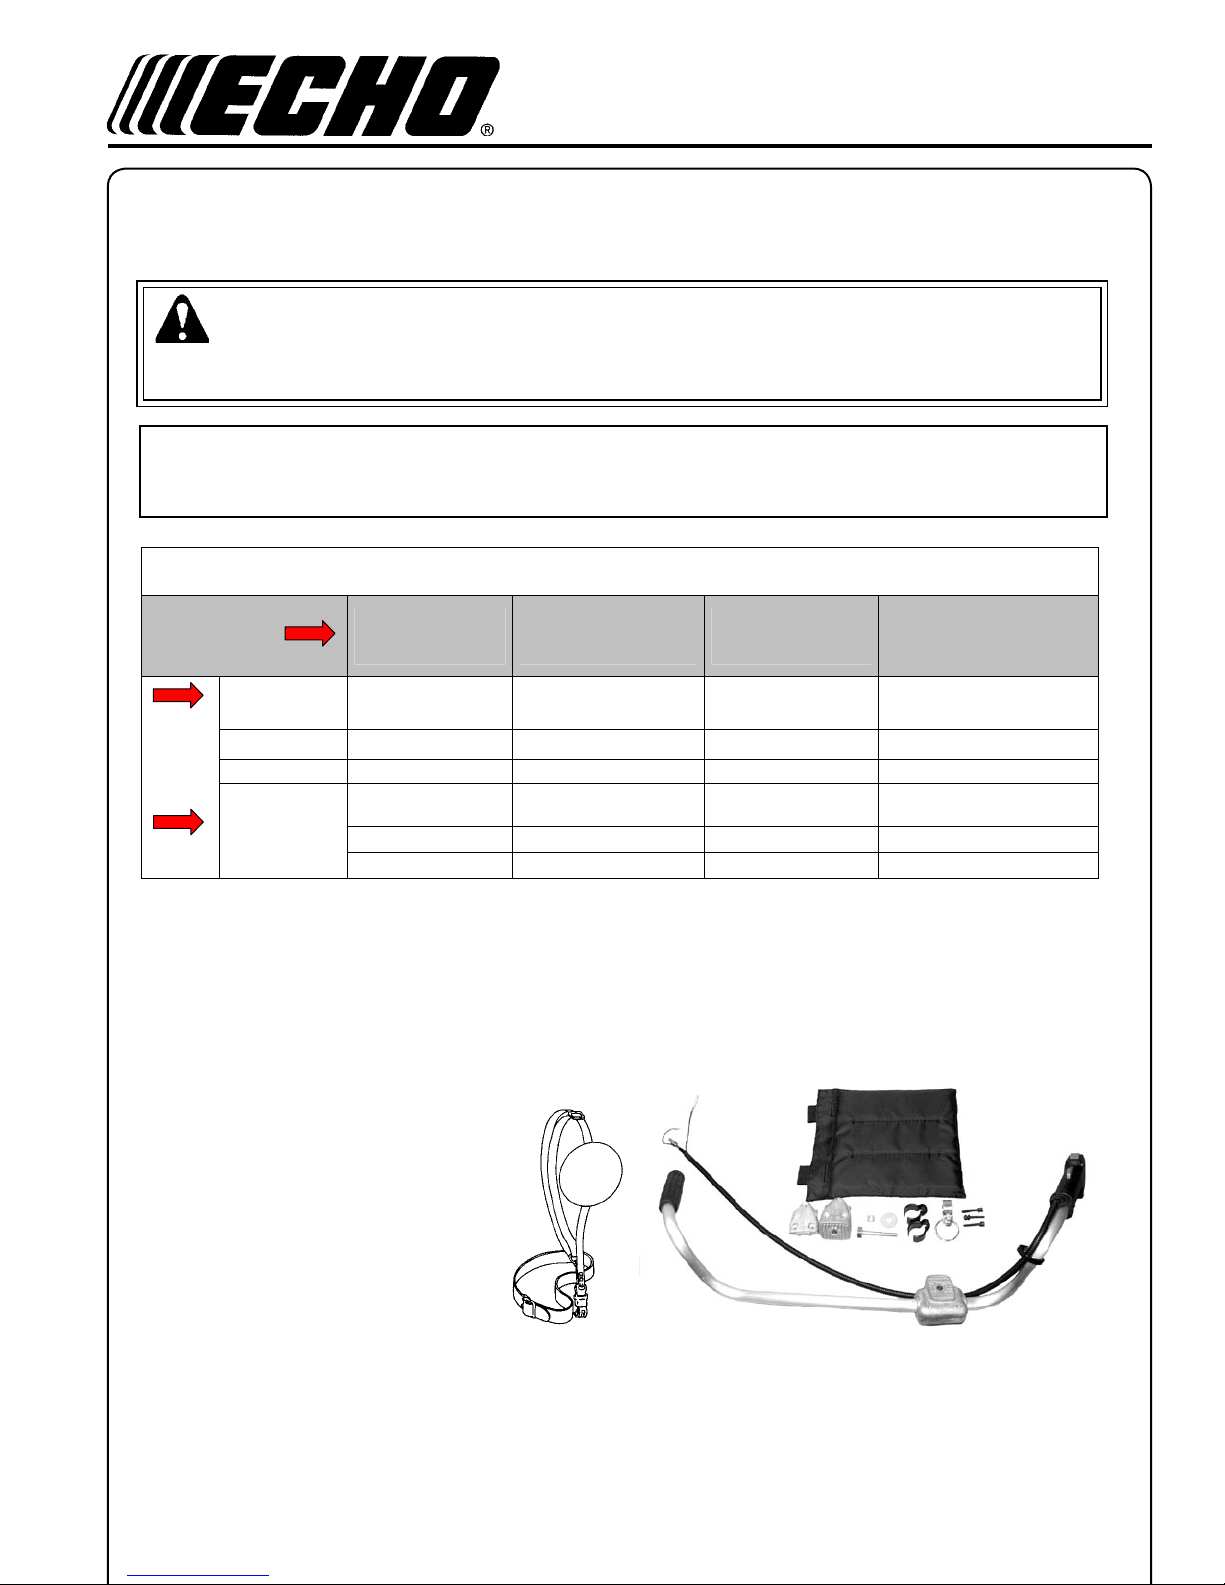
Co n t e n t s
1 U-handle assembly
1 Lower u-handle bracket (2 halves)
1 Harness clamp w/ring
1 5 x 12 mm bolt
1 8 x 55 mm bolt
1 Circular washer
1 Square nut
2 Throttle cable clips
3 5 x 30 mm bolts w/washers
1 Hip pad
1 Shoulder harness
X7502125102
89861955731
05/10
Page 2
2
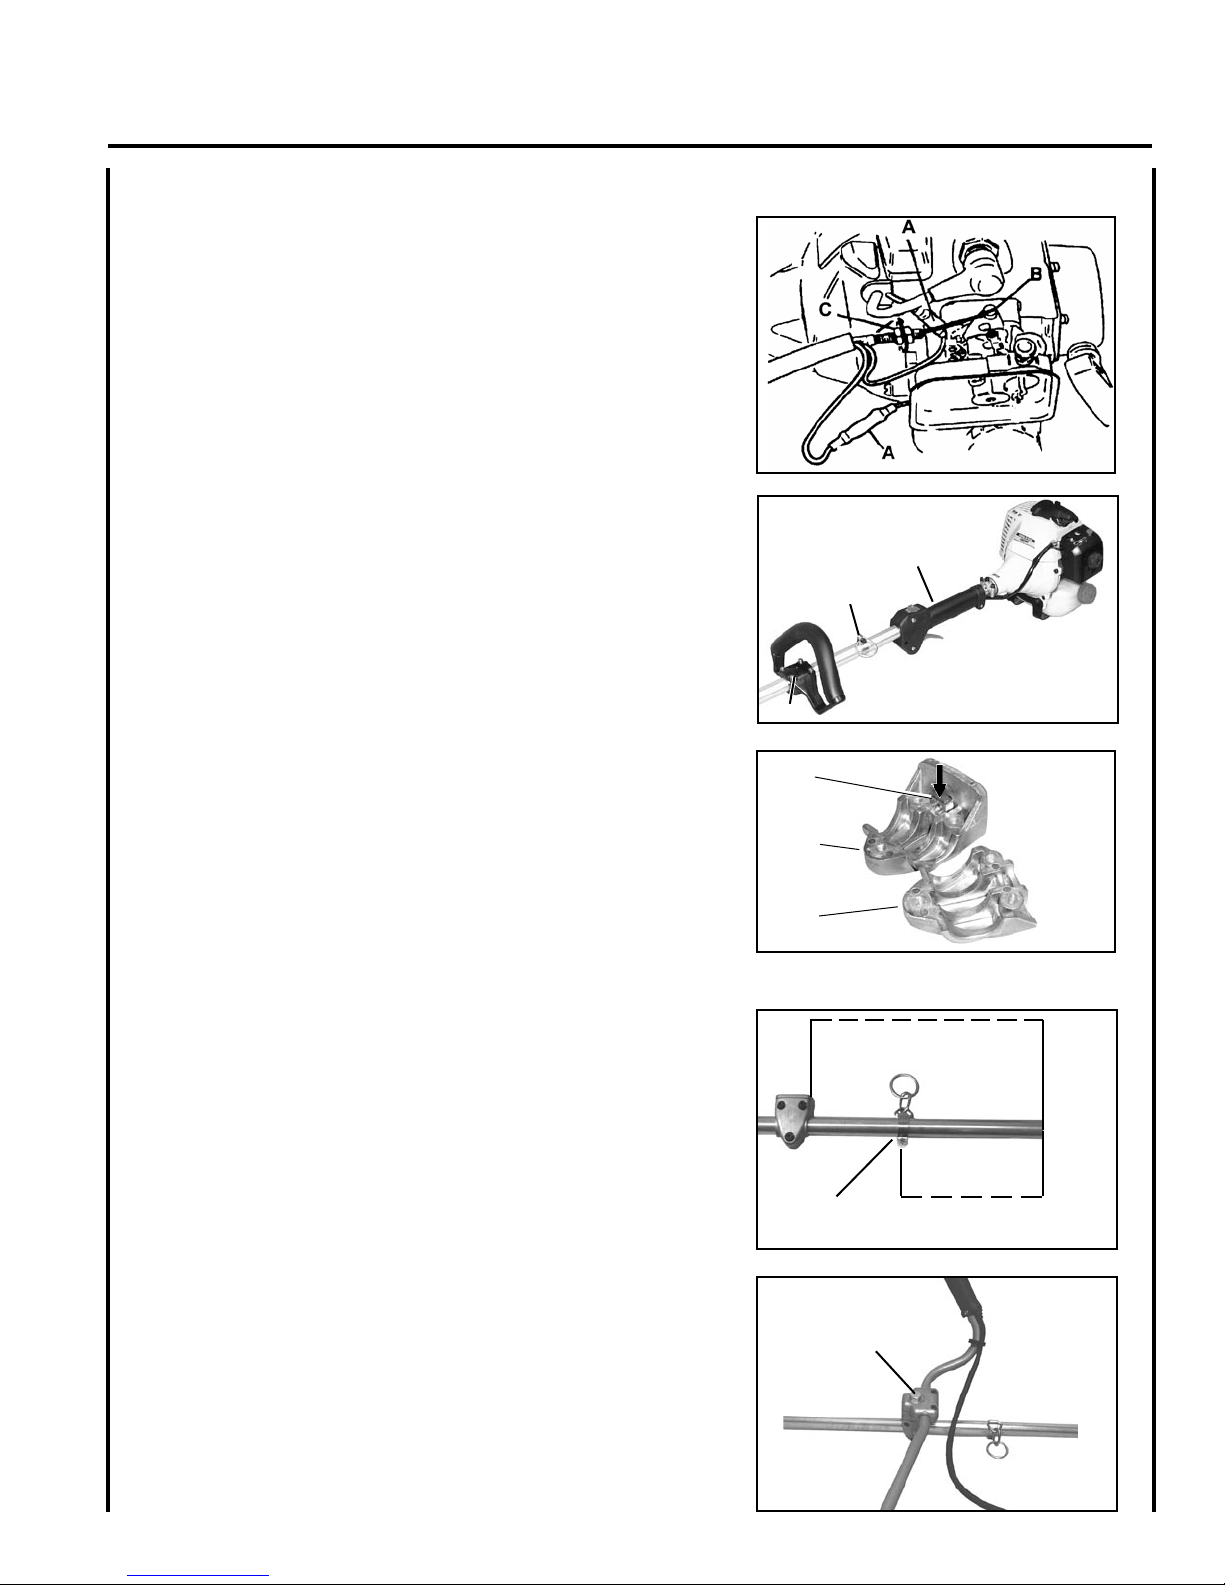
INSTALLATION INSTRUCTIONS U-HANDLE KIT
i n s t a l l a t i o n
Tools Required: 8mm x 10mm Open End Wrench, Screwdriver,
4mm Hex Wrench.
1. Close choke and remove air lter cover.
2. Disconnect ignition stop leads (A) inner throttle linkage from
carburetor swivel (B), and remove throttle cable from bracket (C).
3. Remove power head from drive shaft.
4. Remove rear handle (G) from the drive shaft assembly.
5. Remove harness clamp (E) from drive shaft assembly.
6. Remove front handle (H).
7. Insert square nut (D) in lower handle bracket (I) and place bracket
on drive shaft 400mm (15 3/4 in.) from engine end of drive shaft.
8. Secure with lower handle bracket clamp (J) and three (3) 5x30
mm hex socket bolts.
9. Position harness clamp (F) 220 mm (8-5/8 in.) from engine end of
drive shaft assembly. Install 5x12 mm bolt, but DO NOT tighten at
this time.
10. Carefully attach drive shaft assembly to engine making sure inner
drive shaft engages into clutch socket.
G
E
H
D
I
J
400 mm (15-3/4 in.)
ENGINE
END
11. Install upper U-Handle and bracket on lower bracket and secure
with one (1) 8 mm x 55 mm bolt (L) and large circular washer.
F
L
220 mm
(8-5/8 in.)
Page 3
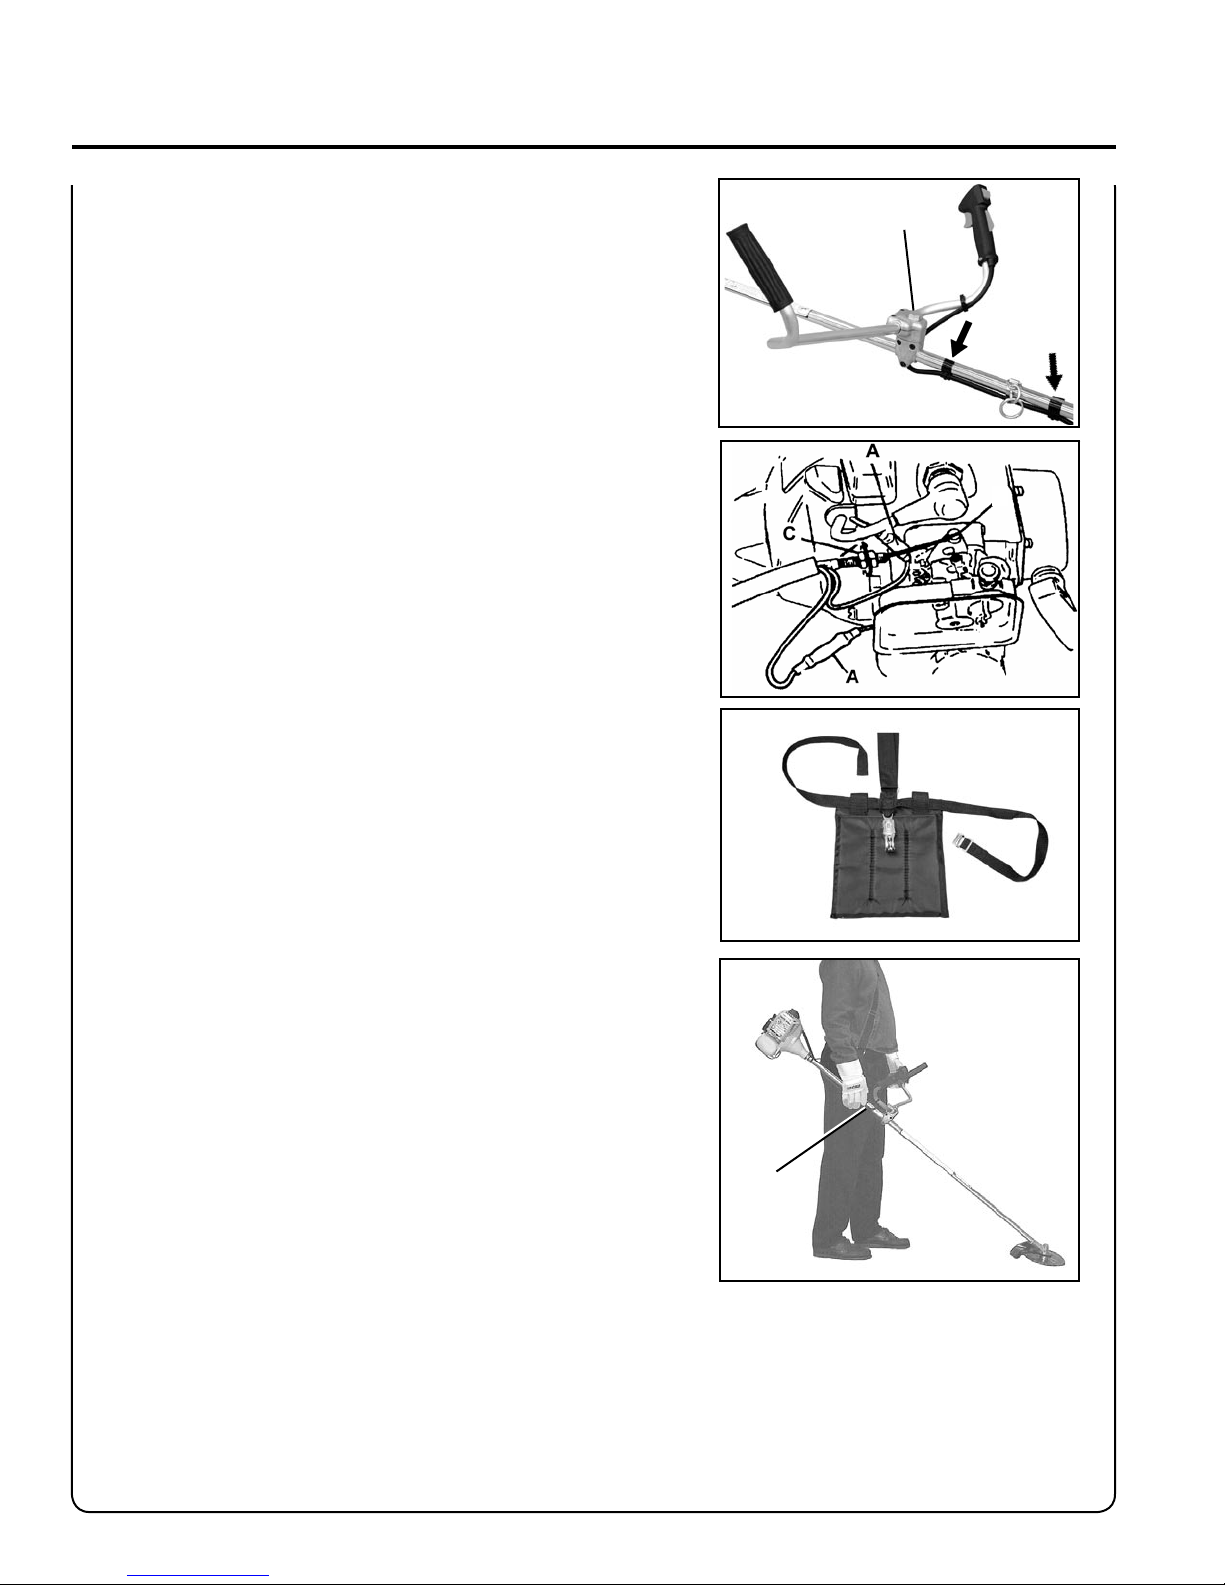
INSTALLATION INSTRUCTIONS U-HANDLE KIT
3
12. Route throttle linkage and ignition lead assembly behind U-Handle bracket and clip to drive shaft as shown.
13. Install throttle linkage to carburetor.
14. Check throttle for freedom of movement and that wide open
throttle / low idle extremes are adjusted properly. Consult with
your Echo Dealer for correct adjustment procedure.
15. Connect ignition stop leads.
16. Install air lter and cover
Install Hip Pad (Optional)
1. Attach hip pad to harness as shown.
L
A
Balance unit.
a. Put on harness and attach unit to harness.
b. Slide harness clamp (F) up or down until unit balances with
head approximately 2" - 3" from the ground.
c. Tighten harness clamp screw.
F
Page 4

e C h o C o n s u m e r p r o d u C t s u p p o r t
If you require assistance or have questions concerning the application, operation or maintenance of this product you
may call the ECHO Consumer Product Support Department at 1-800-673-1558 from 8:30 am to 4:30 pm (Central
Standard Time) Monday through Friday. Before calling, please know the model and serial number of your unit.
e C h o , i n C o r p o r a t e d
400 o a k w o o d r o a d
l a k e
z u r i C h , i l 60047
www.echo-usa.com
Page 5

INSTRUCCIONES PARA LA INSTALACION
GUÍA DE CONFIGURACIÓN DE LAS HOJAS DE SRM/PAS/SB*
PARA USAR ESTAS HOJAS
Cortadores de plástico
para hierba/ maleza Pro
Maxi-Cut
Hoja de plástico rígida Tri-
Cut para hierba/ maleza
Hoja de 8 dientes de
metal/ Tri-Cut para
hierba/ maleza
Hoja desbrozadora DE metal
80T / Hoja de sierra de metal
para desmonte 22T
Empuñadura
Asa con o sin barra de
barrera
Asa con barra de barrera, o
empuñadura en “U”
La asa con la barra de
barrera, o la
empuñadura en “U”
La empuñadura en “U”
Protector contra
residuos Protector de metal Protector de metal Protector de metal
Protector de metal
Arnés Arnés para el hombro Arnés para el hombro Arnés para el hombro
Arnés para el hombro****
Placa superior y
arandela plana
Placa superior y taza de
deslizamiento
Placas superiores e
inferiores de la hoja**
Placas superiores e inferiores
de la hoja**
Tuerca hexagonal Tuerca hexagonal Tuerca hexagonal Tuerca hexagonal
¡Usted
debe
instalar
estas
piezas!
Tornillería de
montaje de la
hoja
Nuevo pasador de
aleta***
Nuevo pasador de aleta***
Nuevo pasador de
aleta***
Nuevo pasador de aleta***
* ¡ADVERTENCIA! NO INSTALE LAS HOJAS EN LAS RECORTADORAS DE MODELO GT (EJE DE IMPULSIÓN CURVADO)
** El diámetro del de la placa superior de la hoja debe corresponder con el diámetro del
de las hojas de metal.
*** Se requiere un nuevo pasador de aleta cada vez que la hoja sea instalada.
**** Las desbrozadoras que pesen más de 7,5 kg (16,5 lb) en seco (peso sin combustible) requieren un
arnés doble para el hombro.
DE LOS AGARRADORES-U
Para los Modelos: SRM-2500/3100 SERIES N/P 35130455730
SRM-3000/3001/3400 SERIES N/P 35130455830
ADVERTENCIA
Debe instalar un juego de la barrera de barra o empuñadura en ‘U’ y un juego de conversión de hojas antes de
operar esta unidad usando hojas, ya que de lo contrario se pueden producir lesiones graves.
IMPORTANTE
Si se usan cabezas de un solo lamento que no son estándar, hojas o cultivadores de METAL/PLASTICO etc., SE
DEBE REAJUSTAR EL CARBURADOR o se producirán daños importantes en el motor. Vea “Ajuste del carbura-
dor” en el manual del operador de la unidad.
Co n t e n i d o
1 Conjunto de agarradores-u
1 Ménsula del asa (2 mitades)
1 Gancho
1 Perno de 5 x 12 mm
1 Perno de 8 x 55 mm
1 Arandela grande circular
1 Tuerca cuadrada
2 Clips de cable de la válvula reguladora
3 Pernos de 5mm x 30mm con arandela
1 Cojín de la Cadera
1 Arnés para el hombro
X7502125102
89861955731
05/10
Page 6

2
INSTRUCCIONES PARA LA INSTALACION DE LOS AGARRADORES-U
i n s t a l a C i o n
Herramientas requeridas: Llave de tuercas abierta de 8 mm x 10 mm,
destornillador, Llave Hex de 4 mm.
1. Cierre el estrangulador y retire la cubierta del ltro de aire.
2. Desconecte los cables de paro de ignición (A) el cable del estrangulador interno del balancín del carburador (B), y retire el cable
del acelerador, de la ménsula (C).
3. Retire el motor de eje motriz.
4. Retire el empuñadura trasera (G) del conjunto del eje motríz.
5. Retire el conjunto del gancho (E) del conjunto del eje motríz.
6. Retire el empuñadura delantera (H).
7. Inserte la tuerca cuadrada (D) en un soporte más bajo de la manija
(I) y soporte del lugar en el eje motriz 400m m (15 3/4 adentro) de
extremo del motor del eje motriz.
8. Asegure con una abrazadera más baja (J) y tres (3) pernos de
cabeza hexagonal de 5m m x de 30mm.
9. Coloque el gancho (F) 220mm (8-5/8 pulgadas) del extremo de
motor de eje motriz. Instale el perno de 5 x 12 mm, pero NO apri-
ete en este momento.
10. Ensamblaje cuidadosamente el eje motriz al motor, asegurando se
que el eje motriz interno engancha en el socket del embraque.
G
E
H
D
I
J
400 mm (15-3/4 in.)
PUNTA
DEL MO-
TOR
11. Instale las asas en la ménsula, coloque la parte superior de
la abrazadera sobre las asas y asegúrelas con (1) tornillo de
8 mm x 55 mm (L) y uno (1) arandela grande circular.
F
L
220 mm
(8-5/8 in.)
Page 7

INSTRUCCIONES PARA LA INSTALACION DE LOS AGARRADORES-U
12. Asegure el enlace del aclerador y el cable de ignicion el conjunto
al eje mortiz con dos (2) clips.
13. Instale el cable del acelerador en el carburador.
14. Revise que el estrangulador tenga libertad del movimiento y que
los extremos de estrangulador abierto/marcha baja en vacío estén
ajustados de manera apropiada. Consulte con su distribuidor
ECHO el procedimiento de ajuste correcto.
15. Conecte los cables de paro ignición.
L
3
16. Instale el ltro de aire y el cobertor.
Instale el Cojín de la Cadera (Opcional)
1. Una el cojín de la cadera al arnés según lo demostrado.
Balancee la unidad.
a. Póngase el arnés y una la unidad a él.
b. Deslice la abrazadera (F) hacia arriba o hacia abajo hasta que
la unidad se balancee con la cabeza a una distancia
aproximada de 2 a 3 pulgadas (5 - 7.5 cm) del piso.
c. Apriete el tornillo de la prensa del arnés.
A
F
Page 8

a s i s t e n C i a p a r a p r o d u C t o s d e l C o n s u m i d o r d e e C h o
Si necesita asistencia o tiene dudas referentes a la aplicación, operación o mantenimiento de este producto puede llamar al Departamento de asistencia de productos del consumidor de ECHO, 1-800-673-1558 de 8:30 de la mañana a
4:30 de la tarde (hora central estándar) de lunes a viernes. Antes de llamar, tenga a mano el número de modelo y serie
de su unidad para ayudar a su representante de asistencia de productos del consumidor.
e C h o , i n C o r p o r a t e d
400 o a k w o o d r o a d
l a k e
z u r i C h , i l 60047
www.echo-usa.com
Page 9

le s in s t r u C t i o n s d'i n s t a l l a t i o n
GUIDE DE CONFIGURATION SRM/PAS/SB AVEC LAME*
POUR UTILISER CES
LAMES
Lames plastique de
désherbage
Pro Maxi-Cut
Lames plastique rigides
de désherbage
Tri-Cut
Lames métalliques
de désherbage
Tri-Cut/8 dents
Lames métalliques de
débroussaillage 80 dents /
de défrichage 22 dents
Poignée
Poignée en boucle
avec ou sans barre
de protection
Poignée en boucle
avec barre de
protection, ou poignée
en U
Poignée en boucle
avec barre de
protection, ou
poignée en U
Poignée en U
Pare-débris
Pare-débris en
métal
Pare-débris en métal Pare-débris en métal Pare-débris en métal
Bandoulière
Bandoulière Bandoulière Bandoulière Bandoulière****
Plaque supérieure et
rondelle plate
Plaque supérieure et
coupelle
Plaques de lame
supérieure/
inférieure**
Plaques de lame supérieure/
inférieure**
Écrou hexa Écrou hexa Écrou hexa Écrou hexa
Installer
impérati
vement
ces
pièces
Visserie de
montage de
lame
Goupille fendue
neuve***
Goupille fendue neuve***
Goupille fendue
neuve***
Goupille fendue neuve***
* AVERTISSEMENT ! NE PAS INSTALLER DE LAMES SUR LES TAILLE-BORDURES GT (ARBRE MOTEUR INCURVÉ)
** Le diamètre d’arbre de la plaque de lame supérieure doit correspondre à celui des lames
métalliques.
*** Goupille fendue neuve requise à chaque installation de lame.
**** Une double bandoulière est nécessaire pour les débroussailleuses d’un poids à sec (sans
carburant) supérieur à 7,5 kg.
p o u r
l e k i t p o u r p o i g n é e e n u
Pour modèles : SRM-2500/3100 SERIES RÉF. 35130455730
SRM-3000/3001/3400 SERIES RÉF. 35130455830
AVERTISSEMENT
Pour éviter des risques de blessures graves, un kit de poignée en U et un kit de conversion pour lame doivent être
installés avant d’utiliser cet outil avec une lame.
IMPORTANT
Si des têtes monolament, des lames en MÉTAL/PLASTIQUE, des cultivateurs, etc. sont utilisés, LE CARBURATEUR DOIT ÊTRE RÉGLÉ pour éviter de graves dommages au moteur. Voir «Réglage du carburateur» dans le
manuel d’utilisation de l’outil.
Co n t e n u
1 Poignée en u
1 support de poignée en u (2 moitiés)
1 crochet du faisceau
1 boulon de 5 x 12 mm
1 boulon de 8 x 55mm
1 grosse rondelle
1 écrou carré
2 colliers du câble de commande des gaz
3 boulons de 5 x 30 millimètres avec des rondelles
1 garniture de hanche
1 bandoulière
X7502125102
89861955731
05/10
Page 10

le s in s t r u C t i o n s d'i n s t a l l a t i o n p o u r l e k i t p o u r p o i g n é e e n u
2
i n s t a l l a t i o n
Outillage nécessaire : clé ouverte de 8 x 10 mm, tournevis,
clé hexagonales de 4 mm
1. Fermer le starter et retirer le couvercle du ltre à air.
2. Débrancher les câbles du démarreur (A), retires de son pivot la
partie interne du câble actionnant le papillon du carburateur (B), et
retirer l’attache du câble du papillon du carburateur (C).
3. Retirer le moteur de l'arbre d’entraînement.
4. Retirer la poignée arrière (G) de l’arbre d’entraînement.
5. Retirer le crochet (E) de l’arbre.
6. Retirer la poignée arrondie (H).
7. Insérez l’écrou carré (D) dans la parenthèse inférieure de poignée
(I) et la parenthèse d’endroit sur l’arbre d’entraînement 400mm
(15 3/4 po.) de l’extrémité de moteur de l’arbre d’entraînement.
G
E
H
8. Fixez avec la bride inférieure de parenthèse de poignée (J) et trois
(3) boulons de douille de sortilège de 5mm x de 30mm.
9. Placer le crochet du faisceau (F) à 220 mm (8 5/8 po) de l’extrémité côté moteur de l’arbre. Installer le boulon de 5 x 12 mm
mais, NE PAS serrer à ce point.
10. Installer l'arbre d'entraînment au moteur, etre sûr que l'arbre d'en-
traînment intérrieur s'engage dans le plot d'embrayage.
11. Installer la poignée en U supérieure et son support sur le support
de montage inférieur et l’assujettir à l’aide d’un (L) boulon de 8 x
53 mm (L) et d’une grosse rondelle.
D
I
J
400 mm (15-3/4 in.)
F
L
DE
L’EXTRÉ-
MITÉ
CÔTÉ
220 mm
(8-5/8 in.)
Page 11

le s in s t r u C t i o n s d'i n s t a l l a t i o n p o u r l e k i t p o u r p o i g n é e e n u
12. Acheminer le câble de commande des gaz et le l d’allumage sur
l’avant du support de la poignée en U et l’assujettir avec les colliers, comme illustré.
13. Installer le cable de commande des gaz dans le carburateur.
14. S’assurer du libre fonctionnement du papillon des gaz et vérier
que les position pleins gaz et ralenti sont réglées correctement.
Consulter le concessionnaire ECHO pour les procédures de ré-
glage correctes.
15. Raccorder les ls d’allumage.
L
3
16. Remettre le ltre à air et son couvercle en place.
Installez La Garniture De Hanche (Facultative)
1. Attacjez la garniture de harche au harmais comme mantré.
Équilibrage de l’outil.
a. Mettre le harnais sur l’épaule et y accrocher l’outil.
b. Faire glisser le collier de câble (F) vers le haut ou vers le bas
jusqu’à ce que l’outil soit équilibré, l’accessoire de coupe se
trouvant à environ 5 à 7 cm du sol.
A
c. Serrer la vis du collier de harnais.
F
Page 12

s e r v i C e a p r è s -v e n t e e C h o
Pour toute assistance ou question concernant l’application, l’utilisation ou l’entretien de ce produit, appeler le
service d’assistance clients ECHO au 1-800-673-1558, de 8 heures 30 à 16 heures 30 trente (heure normale du
centre), du lundi au vendredi. Avant d’appeler, veiller à disposer des numéros de modèle et de série de l’unité.
e C h o , i n C o r p o r a t e d
400 o a k w o o d r o a d
l a k e
z u r i C h , i l 60047
www.echo-usa.com
 Loading...