

Page 1

Model: ECHO-4HR
1-Mile LCD Rechargeable 2-way Upgrade Kit
August 13, 2013
Operation & Installation Guide
Page 2

Table Of Contents
Installing & Programming The ECHO System .......................................3
Controller Overview ............................................................................... 4
The 2-Way Controller ........................................................................4
System Operations ............................................................................ 4
LCD Screen Icons .............................................................................5
In-Range Indicator ............................................................................. 5
Screen Illumination ............................................................................ 5
Multi-Car Operation ...............................................................................6
Selecting CAR #1 or CAR #2 ............................................................6
Controller Options..................................................................................6
Parking Timer & Remote Start Timer .................................................6
Selecting Melody & Vibrate Modes....................................................6
Setting The Clock ..............................................................................7
Changing Remote Start Melodies .....................................................7
Power Save Mode .............................................................................7
Button Lock .......................................................................................7
Page 3
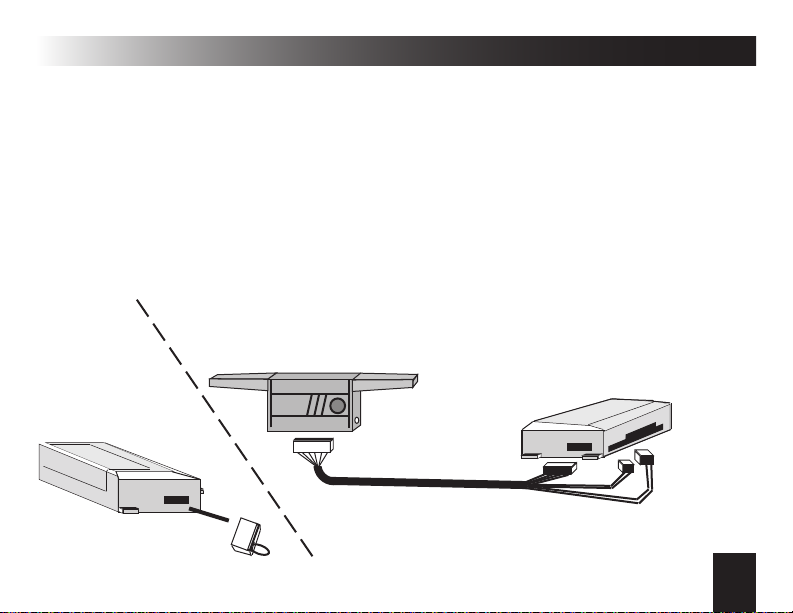
Installing & Programming The ECHO System
The ECHO communicates with a window-mounted base unit which is plugged
directly into the host system’s module. The window-mount antenna should be
mounted directly to the interior glass by utilizing the attached adhesive pad (clean
the glass before adhering) for the best performance. The receiver/transmitter
also contains alternative Status Lights and a Valet Switch. these may be used, or
the original items may be retained.
NOTE: You must install the controller batteries before use.
Step 1
Locate &
Remove the
security system’s
antenna port. The
port must be GREEN
to support the
ECHO-4HR.
(congurations vary)
Transmitter/
Receiver Unit
V
Step 2 Plug in and route the Echo
Echo Base
( ( (ECHO) ) )
Step 3 Program the Echo controller and the
original 1-way transmitters into the system
(see the system’s operation guide for instructions).
transmitter/receiver unit wiring harness.
NOTE: Some systems’ existing harness
can be used.
Host Omega Security
System Control
Module
LED and
Valet Switch
plugs.
3
Page 4

Controller Overview
THE 2-WAY CONTROLLER
Controller part number: 154-03
1) LCD Display: Displays all controller functions
as well as the status of your system.
2) Control Buttons: Lock, Unlock, Trunk Release, Remote Start / 3rd Channel
3) Programming Button: This con gures the
controller’s features.
The Controller Battery Is Rechargeable.
A USB Cable and Wall Adapter Are Included.
The light behind the buttons will ash while charging and
will stay one when a full charge is reached.
SYSTEM OPERATIONS
Your system operations are dependant on the design of the system being used with the ECHO kit.
Please refer to the system’s operation guide for details on each function. The controller buttons will
perform the same operations as your original transmitter’s buttons
2
3
1
2
4
Page 5

LCD SCREEN ICONS
Battery Level
Melody/Vibrate
Controller Overview (cont’d)
Clock
Sensor Trigger
Door Trigger
Hood
Trigger
In Range
Indicator
Lock/Unlock Status
Remote Start
Shutdown Indicator
Anti-Carjack
Mode Activated
Valet Mode Indicator
Alarm Status
IN-RANGE INDICATOR
All primary commands sent to the system have a conrmation response that is sent to the controller to indicate that the command was successful. If the command is successful, the icon will not
display the “X” in the middle of the icon. If no response is received within a few seconds, the “X” will
be displayed indicating that you may be out of range of your system.
SCREEN ILLUMINATION
The LCD screen can be illuminated in dark environments by momentarily pressing the “P” button.
The screen will illuminate for 5 seconds with each press.
5
Page 6

Multi-Car Operation
When controlling 2 systems, the controller will receive all status updates on the currently selected
vehicle and will receive only trigger alerts for the 2nd vehicle. Use these steps to change vehicles:
SELECTING CAR #1 OR CAR #2
Vehicle #1: Press the “P” and “LOCK” buttons for 1 second to select Car #1. The controller will beep/
vibrate once and the clock will change to “CAR 1”.
Vehicle #2: Press the “P” and “UNLOCK” buttons for 1 second to select Car #2. The controller
will beep/vibrate twice and the clock will change to “CAR 2”.
Controller Options
PARKING TIMER & REMOTE START TIMER
The controller has 2 convenient timer functions. The PARKING TIMER tells you how long you’ve
been parked in case you are at a parking meter or other parking areas with time restrictions. The
REMOTE START TIMER tells you how long your engine has been running in remote start mode.
PARKING TIMER: Press LOCK twice within 5 seconds. When the controller receives both LOCK
conrmations, it will start the timer indication by the clock changing to “00:00 P”.
REMOTE START TIMER: This turns on every time you remote start. indicated by the clock changing
to “00:00RS”.
Note: Pressing the “P” during either timer mode will switch between the timer and clock.
SELECTING MELODY & VIBRATE MODES
Whenever 2-way alerts are received from the system, the controller can alert you with a melody,
vibration, or both. By default, the controller is set for melody only. Press the “P” and “TRUNK“
buttons simultaneously for 1 second to change the setting. The melody & vibrate icons
6
on the status screen will turn on & off indicating your selection.
Page 7

Controller Options (cont’d)
SETTING THE CLOCK
1) Press the “P” button for 5 seconds to access the controller features. The controller will beep twice.
2) Press and release the “P“ button once to select the clock (hour digits will ash).
3) Press the “TRUNK“ button to scroll up or the “ “ button to scroll down.
4) Press the “P” button to switch to the minute digits.
5) Press the “TRUNK“ button to scroll up or the “ “ button to scroll down.
6) Wait 10 seconds or press the “P” button for 5 sec. to exit programming. The controller beeps once.
CHANGING REMOTE START MELODIES
The controller has 5 melodies to choose from for remote start “ON” and “OFF” conrmation.
1) Press the “P” button for 5 seconds to access the controller features. The controller will beep twice.
2) Press and release the “P“ button 3 times. The clock will change to “01 STRT” (start melody #1”).
3) Press the “TRUNK“ button or the “ “ button to scroll through the melodies.
4) Press the “P” button to switch to the remote start OFF melody selection.
5) Press the TRUNK button or the “ “ button to scroll through the melodies.
6) Wait 10 seconds or press the “P” button for 5 sec. to exit programming. The controller beeps once.
POWER SAVE MODE
This feature turns off the screen after 15 seconds of no activity to preserve battery life.
1) Press the “P” button for 5 seconds to access the controller features. The controller will beep twice.
2) Press the “P“ button momentarily 5 times to select the Power Save feature (clock reads “PS ON”).
3) Press the “TRUNK“ button to change between “PS ON” or “PS OFF”.
4) Wait 10 seconds or press the “P” button for 5 sec. to exit programming. The controller beeps once.
BUTTON LOCK
You can lock the buttons on the controller to prevent accidental button presses. To lock the
buttons, press “P” and “ “ simultaneously for 1 second. Repeat this to unlock the buttons.
*
*
*
*
7
*
Page 8

This device complies with FCC Rules part 15. Operation is subject to the following
two conditions, (1) This device may not cause harmful interference and, (2) This
device must accept any interference that may be received, including interference
that may cause undesired operation.
The manufacturer is not responsible for any radio or TV interference caused by
unauthorized modi cations to this equipment. Such modi cations could void the
user’s authority to operate the equipment.
www.caralarm.com | 800.554.4053
www.facebook.com/omegard
 Loading...