

Page 1

1????
ENGLISH
FRANÇAIS
DEUTSCH
ITALIANO
ESPAÑOL
OPERATOR'S MANUAL
MANUEL D'UTILISATION
BEDIENUNGSANLEITUNG
MANUALE PER L'OPERATORE
MANUAL DE INSTRUCCIONES
DSRM-300
WARNING
READ THE INSTRUCTIONS CAREFULLY AND FOLLOW THE RULES FOR
SAFE OPERATION. FAILURE TO DO SO COULD RESULT IN SERIOUS INJURY.
AVERTISSEMENT
LIRE ATTENTIVEMENT LES INSTRUCTIONS ET SUIVRE LESRÈGLES DE
SECURITÉ.LE NON-RESPECT DES RÈGLES DE SÉCURITÉ ENTRAÎNE UN
ISQUE DE BLESSURE GRAVE.
WARNUNG
LESEN SIE DIE BEDIENUNGSANLEITUNG SORGFÄLTIG DURCH, UND BE
FOLGEN SIE DIE SICHERHEITSREGELN. ANDERNFALLS BESTEHT DAS
RISIKO SCHWERER VERLETZUNGEN.
AVVERTENZA
LEGGERE E SEGUIRE ATTENTAMENTE LE ISTRUZIONI PER LAVORARE
IN CONDIZIONI DI MASSIMA SICUREZZA. LA MANCATA OSSERVANZA
DELLE ISTRUZIONI POTREBBE PROVOCARE LESIONI GRAVI.
ADVERTENCIA
LEA ATENTAMENTE LAS INSTRUCCIONES Y SIGA LAS INDICACIONES
PARA UN FUNCIONAMIENTO SEGURO. DE NO HACERLO, PODRÍA SUFRIR LESIONES GRAVES.
Page 2

2
Page 3

1Cover
ENGLISH
(Original instructions)
OPERATOR'S MANUAL
GRASS-TRIMMER
DSRM-300
WARNING
READ THE INSTRUCTIONS CAREFULLY AND FOLLOW THE
RULES FOR SAFE OPERATION.
FAILURE TO DO SO COULD RESULT IN SERIOUS INJURY.
Page 4

Contents
For safe use of your product............................................................................................... 3
Description.......................................................................................................................... 8
Before you start ..................................................................................................................9
Packing list ....................................................................................................................9
Charging the battery ....................................................................................................10
Assembly ..................................................................................................................... 11
Loop handle version .................................................................................................... 11
Adjusting the balance .................................................................................................. 12
Battery Installation ....................................................................................................... 13
Operation .......................................................................................................................... 14
Starting the unit ........................................................................................................... 15
Stopping the unit.......................................................................................................... 15
Using shoulder harness............................................................................................... 16
Basic trimming operation with nylon line cutting head ................................................. 16
Maintenance and care ...................................................................................................... 18
Servicing guidelines..................................................................................................... 18
Maintenance and care ................................................................................................. 18
Storage ........................................................................................................................ 21
Disposal.......................................................................................................................21
Specifications....................................................................................................................22
Declaration of conformity ..................................................................................................23
2
Page 5

For safe use of your product
For safe use of your product
Important information
WARNING
Please ensure that you read the operator's manual before using your product.
About your operator's manual
This manual contains necessary information about the assembly, operation, and maintenance of your product.
Please read it carefully and absorb its contents.
Always keep your manual in a place where it is readily accessible.
If you have lost your manual or it is damaged and no longer readable, please purchase a new one from your dealer.
The units used in this manual are SI units (International System of Units). Figures in parentheses are reference val-
ues, and there may be a slight conversion error in some cases.
Failure to do so could lead to an accident or serious injury.
Intended use of this product
This product is lightweight, high-performance unit designed for weed control and grass trimming in areas difficult
to control by any other means.
Do not use this unit for any purpose other than aforementioned.
The content of this manual may be changed without notice for the purpose of upgrades to the product. Some of the
illustrations used may differ from the product itself in order to make the explanations clearer.
Please consult your dealer if anything is unclear or of concern.
Failure to do so could lead to an accident or serious injury.
Do not modify the product
You must not modify the product.
To do so could lead to an accident or serious injury. Any malfunction resulting from a modification to the product will not be
covered by the manufacturer's warranty.
Do not use the product unless it has been checked and maintained
You must not use the product unless it has been checked and maintained. Always ensure that the product is checked
and maintained on a regular basis.
Failure to do so could lead to an accident or serious injury.
Loaning or assigning your product
When loaning your product to another party, ensure that the person borrowing the product receives the operator's
manual along with it.
If you assign your product to another party, please enclose the operator's manual with the product when handing it
over.
Failure to do so could lead to an accident or serious injury.
Users of the product
The product should not be used by:
people who are tired
people who have taken alcohol
people who are on medication
people who are pregnant
people who are in poor physical condition
people who have not read the operator's manual
children
Keep in mind that the operator or user is responsible for accidents or hazards occurring to other people or their prop-
erty.
Failure to observe these instructions could lead to an accident.
The components of this machine generate an electromagnetic field during operation, which may interfere with some
pacemakers. To reduce health risks, we recommend that pacemaker users consult their physician and the pacemaker manufacturer before operating this product.
3
Page 6
For safe use of your product
WARNING
Vibration and cold
It is believed that a condition called Raynaud's Phenomenon which affects the fingers of certain individuals may be
brought about by exposure to vibration and cold. Exposure to vibration and cold may cause tingling and burning,
followed by loss of colour and numbness in the fingers. The following precautions are strongly recommended because the minimum exposure which might trigger the ailment is unknown.
Keep your body warm, especially the head and neck, feet and ankles, and hands and wrists.
Maintain good blood circulation by performing vigorous arm exercises during frequent work breaks, and also by
not smoking.
Limit the number of hours of operation. Try to fill each day with jobs where operating the trimmer or other hand-
held power equipment is not required.
If you experience discomfort redness and swelling of the fingers, followed by whitening and loss of feeling, con-
sult your physician before exposing yourself further to cold and vibration.
Failure to observe these instructions could result in damage to your health.
Repetitive stress injuries
It is believed that over-using the muscles and tendons of the fingers, hands, arms and shoulders may cause sore-
ness, swelling, numbness, weakness and extreme pain to the areas just mentioned. Certain repetitive hand activities
may put you at a high risk for developing a repetitive stress injury (RSI). To reduce the risk of RSI, do the following:
Avoid using your wrist in a bent, extended or twisted position.
Take periodic breaks to minimize repetition and rest your hands. Reduce the speed and force in which you do the
repetitive movement.
Do exercises to strengthen hand and arm muscles.
See a doctor if you feel tingling, numbness or pain in your fingers, hands, wrists or arms. The sooner RSI is diag-
nosed, the more likely permanent nerve and muscle damage can be prevented.
Failure to observe these instructions could result in damage to your health.
Proper training
Do not permit operation without proper training and protective equipment.
Be thoroughly familiar with the controls and proper use of unit.
Know how to stop the unit and switch off the motor.
Know how to unhook a harnessed unit quickly.
Never allow anyone to use the unit without proper instruction.
Failure to observe these instructions could result in damage to your health.
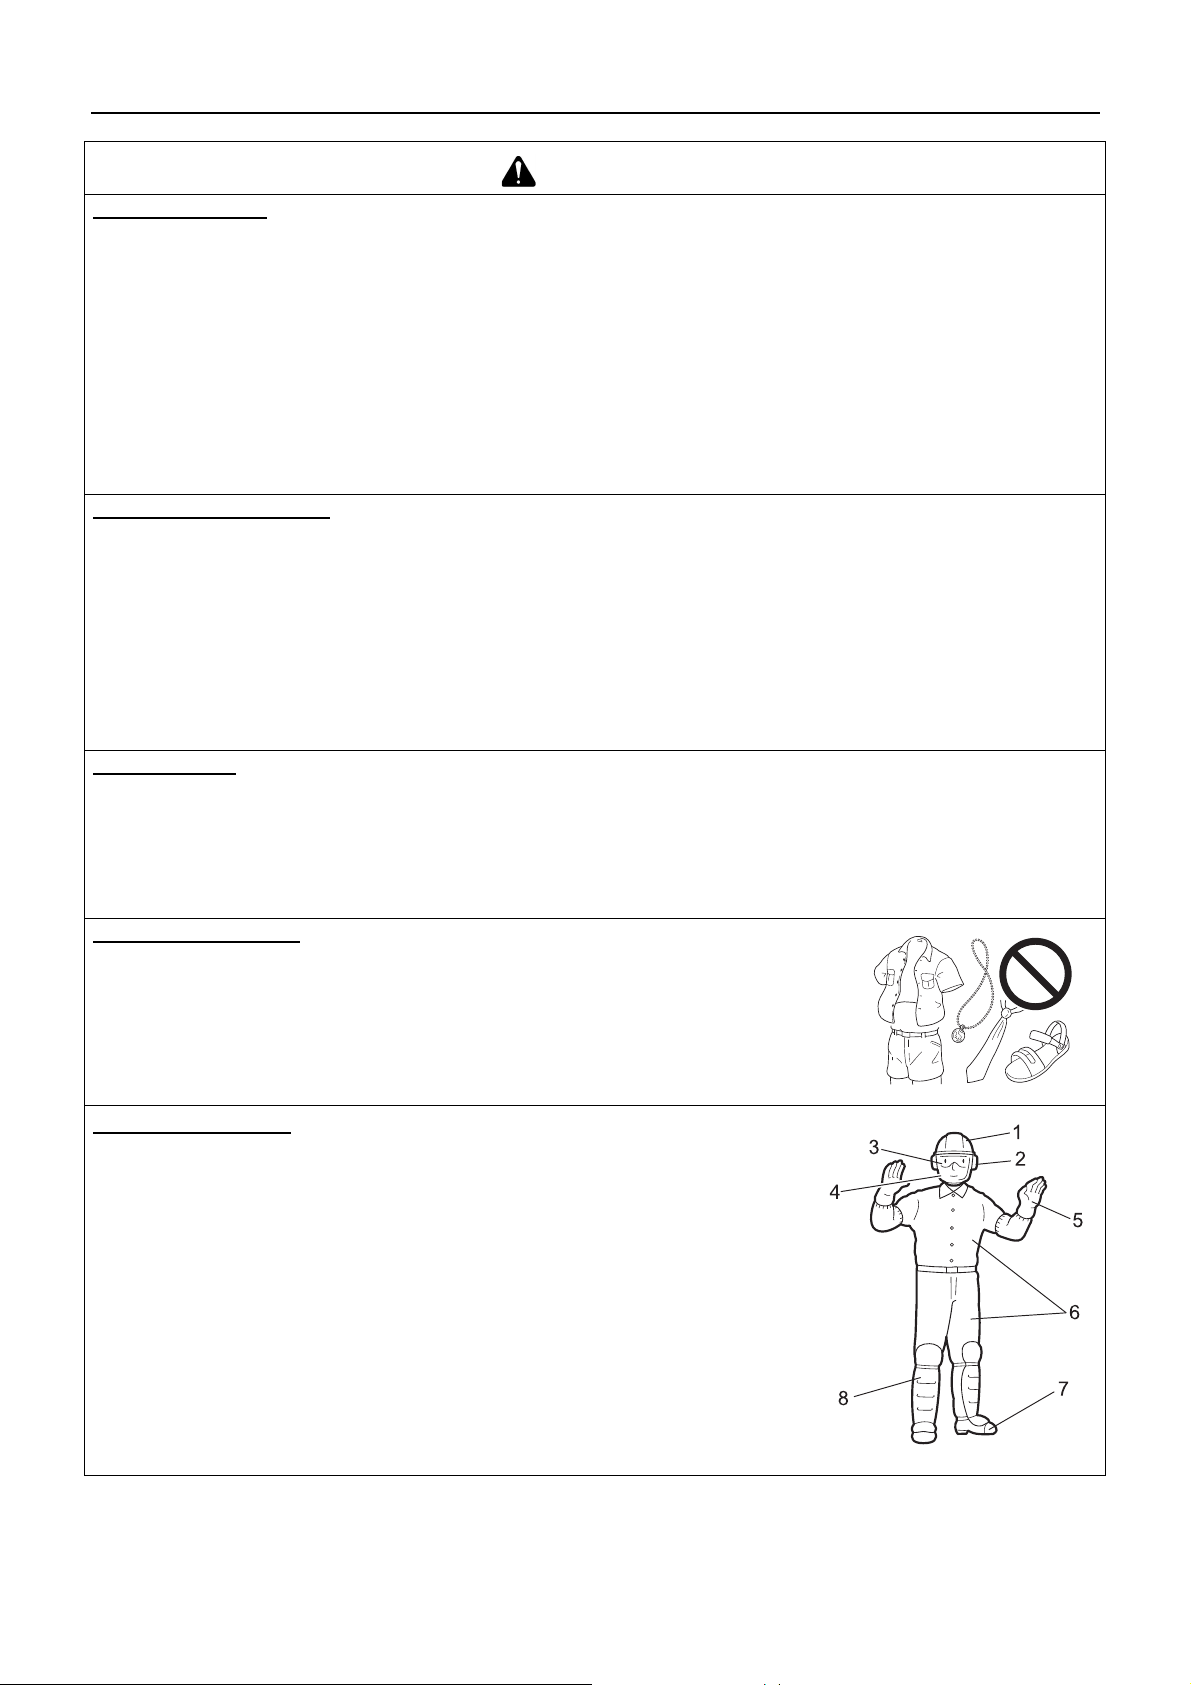
Wear proper clothing.
Secure hair so it is above shoulder length.
Do not wear ties, jewellery, or loose, dangling clothing which could be caught in the
unit.
Do not wear open toed footwear, or go bare-foot or barelegged.
Failure to observe these precautions could result in damage to your sight or hearing, or lead
to a serious injury.
Wear protective gear
Always wear the following protective gear when working with the trimmer.
1. Head protection (helmet): Protects the head
2. Ear muffs or ear plugs: Protect the hearing
3. Safety goggles: Protect the eyes
4. Face shield: Protects the face
5. Safety gloves: Protect the hands from cold and vibration
6. Work clothes that fit (long sleeves, long trousers): Protect the body
7. Heavy duty, non-slip protective boots (with toecaps) or non-slip work shoes
(with toecaps): Protect the feet
8. Shin guards: Protect the legs
Failure to observe these precautions could result in damage to your sight or hearing, or
lead to a serious injury.
When necessary, please use the protective gear below.
Dust mask: Protects the breathing apparatus
Bee net: To deal with attacks by bees
4
Page 7
For safe use of your product
WARNING
Environment of use and operation
Do not use the product:
in damp or wet locations.
in the rain.
under poor weather conditions.
on steep slopes or in places which give no secure foothold and are thus slippery.
at night or in dark places with poor visibility.
when there is a risk of lightning.
When using the product on a gentle slope, work in a level, contour-like motion.
A serious injury could result if you fall or slip, or fail to operate the product correctly.
For your own health and your safe and comfortable work, operate the machine within the air temperature range of
o
C to 40oC.
−5
Failure to observe these instructions could result in damage to your health.
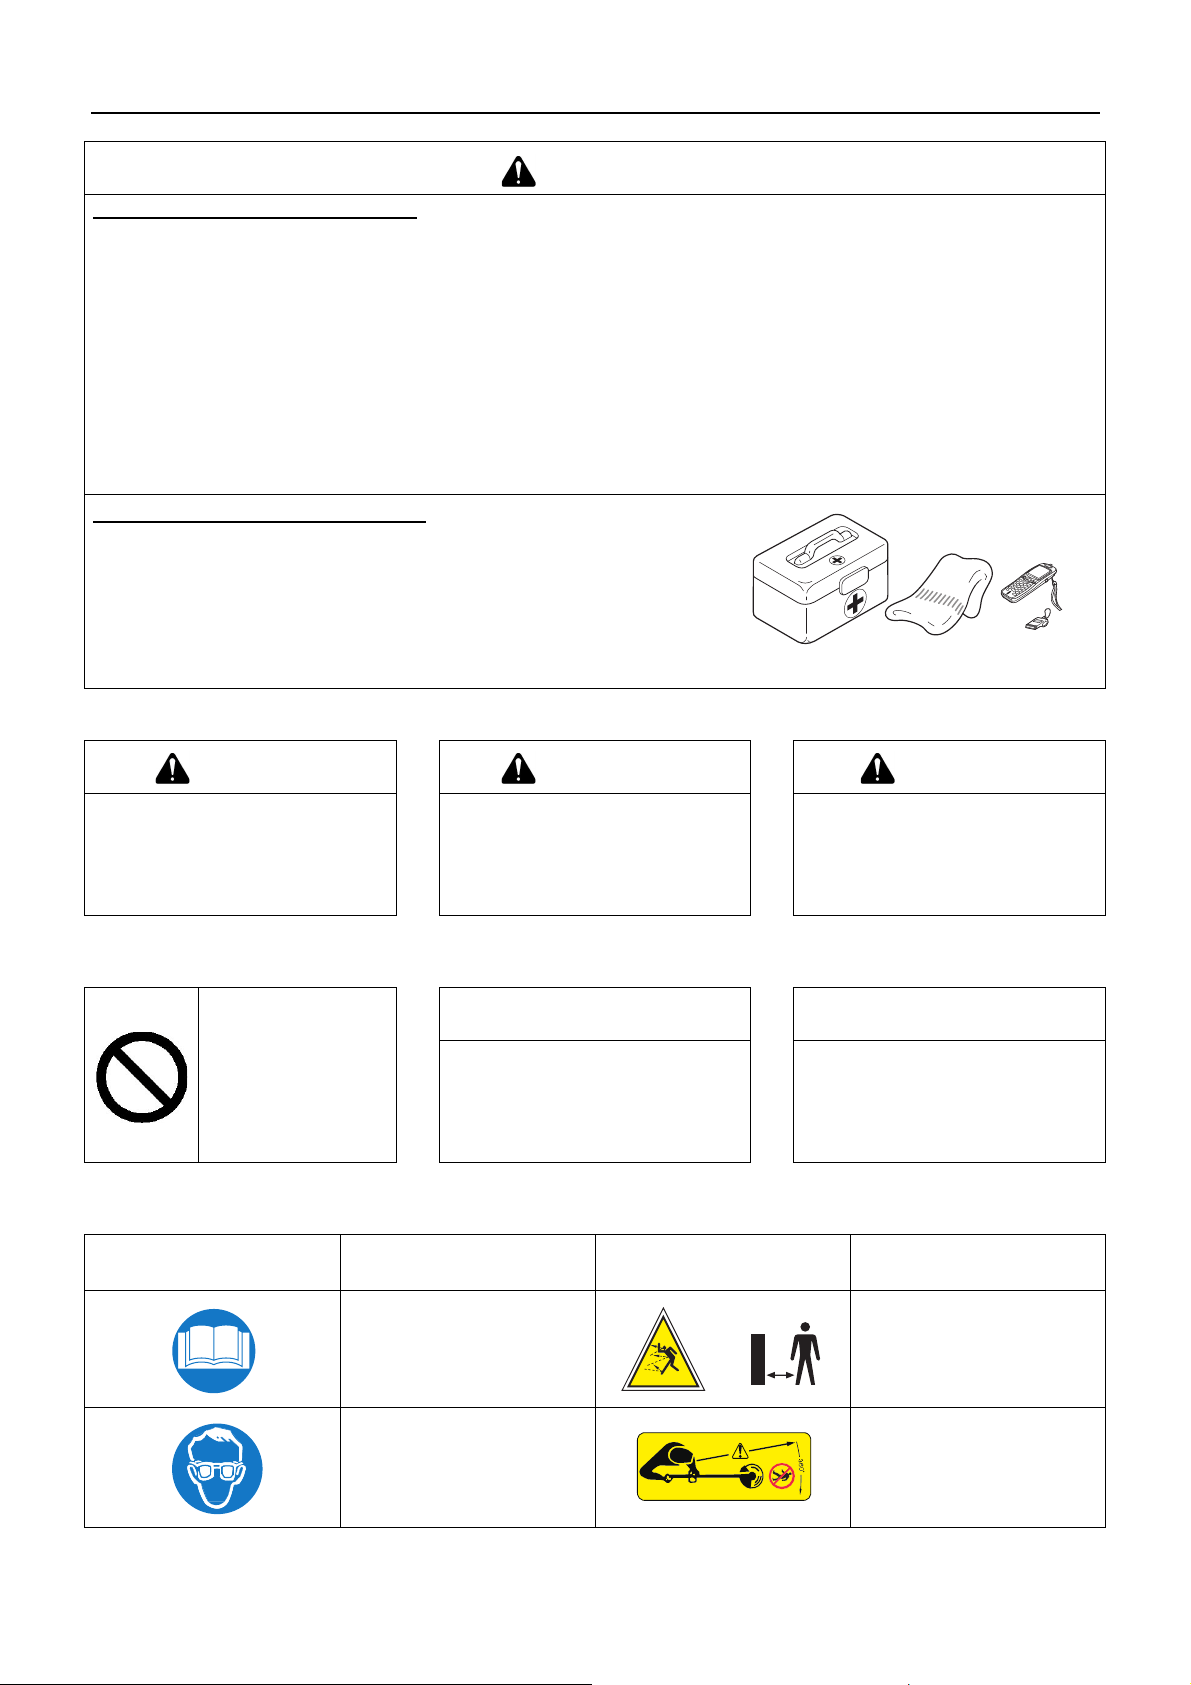
Being prepared in case of an injury
In the unlikely event of an accident or injury, please ensure that you are
prepared.
First aid kit
Towels and wipes (to stop any bleeding)
Whistle or mobile phone (for calling outside help)
If you are unable to perform first aid or call for outside help, the injury could
worsen.
Warning notices
DANGER WARNING CAUTION
This symbol accompanied by the
word "DANGER" calls attentions to
an act or a condition which will lead to
serious personal injury or death of operators and bystanders.
Other indicators
Circle and slash symbol means whatever is
shown is prohibited.
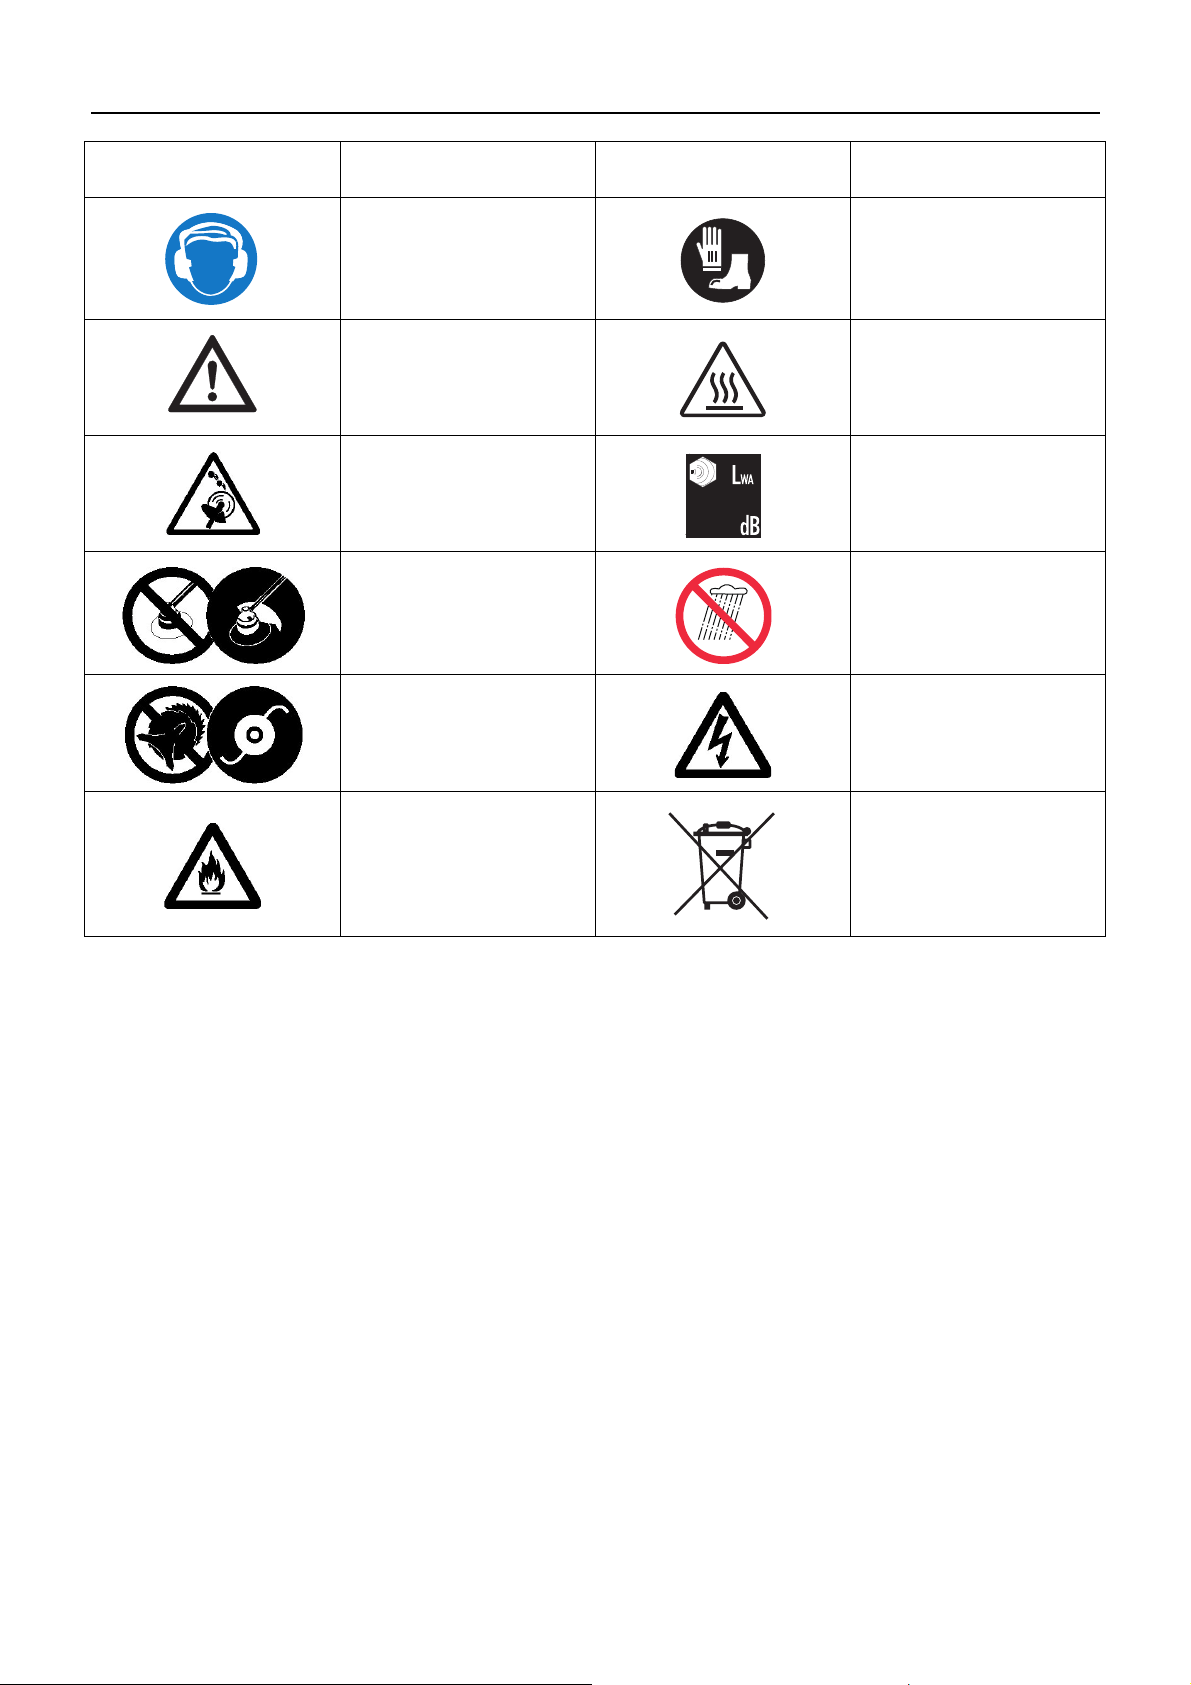
Symbols
Symbol form/shape Symbol description/applica-
This symbol accompanied by the
word "WARNING" calls attentions to
an act or a condition which can lead to
serious personal injury or death of operators and bystanders.
This enclosed message provides tips
for use, care and maintenance of the
product.
tion
"CAUTION" indicates a potentially
hazardous situation which, if not
avoided, may result in minor or moderate injury.
NOTE IMPORTANT
Framed text featuring the word "IMPORTANT" contains important infor-
mation about the use, checking,
maintenance and storage of the product described in this manual.
Symbol form/shape Symbol description/applica-
tion
Carefully read the operator's
manual
Wear eye protection Keep bystanders away 15 m
Keep bystanders away
5
Page 8
For safe use of your product
Symbol form/shape Symbol description/applica-
tion
Wear ears protection
Safety/Alert
Warning!
Thrown objects!
Usage without shield not permitted
Usage of metal blades not
permitted
Symbol form/shape Symbol description/applica-
tion
Wear foot protection and
gloves
Beware of high-temperature
areas
Guaranteed sound power level
Never use in the rain or at
damp locations
Beware of electric shocks
Beware of fire
Do not throw electrical appliances in garbage
6
Page 9

For safe use of your product
Safety decal(s)
The safety decal shown below has been attached to the products described in this manual. Ensure that you understand what
the decal means before using your product.
If the decal becomes unreadable due to wear and tear or damage, or peels off and is lost, please purchase a replacement decal
from your dealer and attach it in the location shown in the illustrations below. Ensure that the decal is readable at all times.
1. Safety decal (Part number X505-008900)
7
Page 10
Description
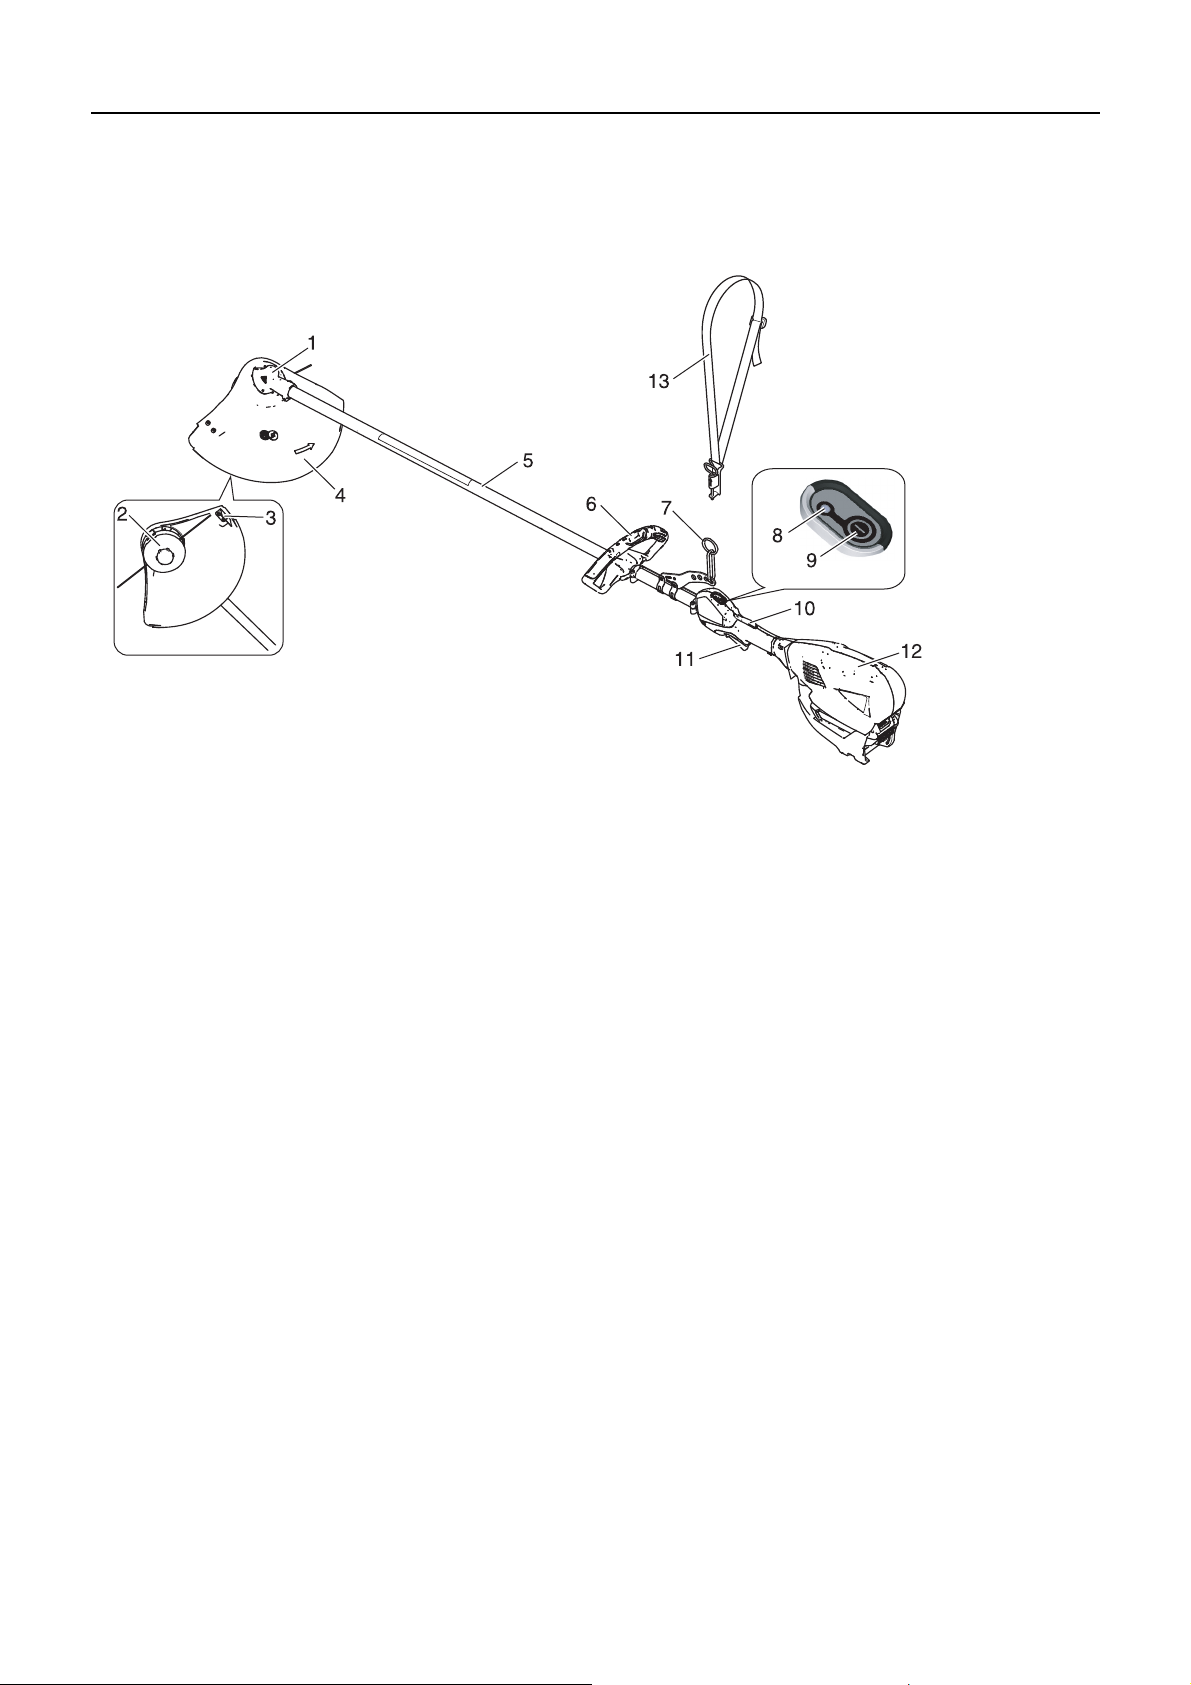
Description
1. Angle transmission - Having two gears to change the
angle of rotating axis.
2. Cutting attachment - Nylon line cutting head for cutting
grass and weed.
3. Cut off knife - Cut nylon line to adjust line length to
proper swath.
4. Shield - Device to protect the operator from accidental
contact with the cutting head and thrown objects.
5. Shaft tube - Part of the unit that provides a casing for
power transmission shaft.
6. Loop-handle - Grip for Left Hand.
7. Suspension point - Device on which the harness can
be hooked.
8. Power indicator LED - Remains illuminated when pow-
er to unit is turned on. Turns off when power to unit is off.
9. Power button - Press once to turn on power to the unit,
power indicator LED illuminates. Press once more to
turn power off to unit, power indicator LED turns off.
10. Trigger switch lockout - Locks trigger switch in the off
position until you have a proper grip with your right hand
around the handle.
11. Trigger switch - Activated by the operator's finger for
turning the motor on.
12. Power head – Houses Motor and Battery.
13. Shoulder harness - An adjustable strap to suspend
unit.
8
Page 11

Before you start
Packing list
The following parts are packed separately in the packing box.
When you have unpacked the box, please check the parts that it contains.
Contact your dealer if anything is missing or broken.
Before you start
1. Motor unit and shaft tube
2. Shield
3. Safety goggles
4. Caution tag
9. Battery pack
10. Operator's manual
5. Shoulder harness
6. Nylon line cutting head
7. Operator's manual
8. L-wrench
11. Charger
12. Operator's manual
9
Page 12

Before you start
A
B
Charging the battery
WARNING
Always use battery pack LBP-560-100/LBP-560-200 and charge only with LCJQ-560 charger.
Keep charger and battery away from damp conditions and all liquids.
Do not operate the charger on an easily combustible surface (e.g. paper, textiles) or in an environment with a high
risk of fire.
Do not cover the charger. Covering the charger will prevent it from cooling.
Do not operate the charger in explosive atmospheres, such as in the presence of flammable liquids, gases or dust.
Chargers can produce sparks which may ignite the dust or fumes - there is a risk of explosion.
Connect the charger only to the mains of voltage and frequency specified on the rating plate.
Connect the charger only to an easily accessible wall outlet.
Never insert objects in the battery pack's or charger's cooling slots (A).
Do not charge or use a defective, damaged or deformed battery pack and charger.
Do not open, damage or drop the battery pack or the charger.
Fluid may leak from the battery if it is damaged or not used properly; avoid contact with the skin. In the event of ac-
cidental contact, wash the affected areas of the skin with plenty of water and soap. If fluid gets in the eyes, do not
rub. Rinse the eyes with plenty of water for at least 15 minutes. Also seek medical assistance.
Never bridge (short circuit) the battery pack contacts or the charger's terminals with metallic objects.
Protect from direct sunlight, heat and open flames and never throw battery into fire; there is a risk of explosion.
In the event of smoke or fire in the charger, disconnect it from the wall outlet immediately.
If the connecting cord is damaged, immediately disconnect the plug from the power supply to avoid the risk of elec-
tric shock.
Do not expose battery pack to microwaves or high pressure.
Secure the unit against unintentional startup. Remove the battery pack from the unit before transporting or storing
the unit. Do not use metal containers for transporting batteries.
Do not use the connecting cord for any other purpose, e.g. for carrying or hanging up the charger.
To reduce the risk of stumbling, position and mark the connecting cord in such a way that it cannot be damaged or
endanger others.
To unplug, grasp the plug, not the cord.
NOTE
The battery comes partially charged from the factory and needs to be fully charged before first use.
Charge the battery when it no longer produces sufficient power to operate the unit or when battery lights indicate that the
battery is low.
1. Plug charger AC cord in the wall outlet.
2. Align ridges on battery with grooves on charger, and slide
battery into charger.
3. During normal charging, the charger LED (B) will blink continuously GREEN.
IMPORTANT
If charger detects a problem, LED blinks RED. Remove bat-
tery from charger, clear obstructions from contacts and reinstall battery into charger. If battery is outside acceptable
temperature range (0°C to 60°C) LED remains RED.
10
Page 13

Before you start
C
D
4. When charging is complete, LED will remain GREEN.
A fully discharged battery pack will charge in about 42 min-
utes.
5. Verify battery is fully charged by removing battery from
charger, then pressing battery charge status button (C), and
checking LED display (D).
One green light indicates that the battery has 0-25%
charge.
Two green lights indicate that the battery has 25-50%
charge.
Three green lights indicate that the battery has 50-75%
charge.
Four green lights indicate that the battery has 75-100%
charge.
6. Disconnect battery charger from power supply.
Assembly
WARNING
Read the operator's manual carefully to ensure that you assemble the product correctly.
Using a product that has been incorrectly assembled could lead to an accident or serious injury.
Loop handle version
Loop handle assembly
Installation of shield
Position handle in comfortable operating position and tighten
Bolts.
CAUTION
Install the handle so that it does not hide any of the
safety decals.
WARNING
The cut off knife on the debris shield has sharp edges.
Avoid contact when installing or removing the line
head.
1. Remove the plastic sleeve (A) from the output shaft.
2. Install the shield (B) on the bottom of the angle transmission
flange (C).
3. Place the shield plate (D) on the shield, align holes and install the three bolts (E).
4. Tighten firmly the three bolts.
5. Remove the packing (F).
NOTE
The shield is for use with the nylon line head only.
11
Page 14

Before you start
Installing nylon line cutting head
CAUTION
Fix the output shaft securely using the locking tool in
order to prevent it from rotating when mounting the nylon line head.
1. Be sure the blade retainer (A) remains on the output shaft
(B).
2. Align the locking hole in the blade retainer with a notch at the
edge of the angle transmission and insert the locking tool
(C).
3. Install the line head (D) onto the output shaft by turning it anticlockwise until the head is tight against the blade retainer.
4. Remove the locking tool.
Adjusting the balance
Adjusting the shoulder harness
WARNING
This product is designed to fit a wide variety of body sizes, but may not be adjustable for extremely tall persons. Do
not use the unit if your feet can reach the cutting attachment when the unit is attached to the harness.
IMPORTANT
A person's size can affect the balancing adjustment. Also the balancing procedure may not work with some units on some
persons. If the shoulder harness does not fit you or cannot be adjusted well, please ask your dealer for assistance.
The accompanying shoulder harness is suitable for people of
standard adult physique, who are 150 cm - 195 cm in height
and 60 cm - 140 cm in waist size.
Use a shoulder harness when provided or when recommend-
ed in this manual. Adjust both harness and the suspension
point (A) on the unit so the unit hangs with the cutting attachment a few centimetres above ground level (B).
The cutting attachment and shield should be level in all direc-
tions. Harness the unit on the right side as shown.
Balance tool for a level plane of cutting head rotation
Slide suspension point up and down the tube to find the right
balance. Rotate the clamp to level the cutting attachment and
shield. Lock in position. If the suspension point is a free-spinning type, the unit may tend to roll over sideways, however,
you should still level the attachment and shield on the front-torear axis.
Balancing and levelling, as above, may require relocation of
the clamp and readjustment of the harness straps. Also, each
type of cutting attachment and shield mounted on the unit may
require balancing.
CAUTION
Do not install the suspension point to be located farther
from you than the arrow mark ( ).
12
Page 15

Battery Installation
A
B
C
Before you start
WARNING
The attachment will operate when the battery is in-
stalled, the power indicator LED is lit, and the trigger
and trigger lockout are engaged. Make sure the trimmer
is properly positioned to prevent loss of control and
possible serious injury. Keep movable parts of the attachment off the ground and away from objects that
could become entangled or thrown.
1. Make sure power to unit is turned off.
2. Align ridges (A) on battery pack with grooves in power head.
Slide battery pack into power head.
3. Assure the battery pack latch (B) snaps into place and battery pack is secure before beginning operation.
4. To remove battery, depress battery pack latch release (C)
slide battery pack out of power head.
IMPORTANT
Before using the hedge trimmer, make sure that battery is
set correctly with battery pack latch in the complete position
(D).
NOTE
Battery pack latch is in the complete position when battery
pack latch is correctly engaged.
13
Page 16

Operation
Operation
DANGER
All over head electrical conductors and communications wires can have electricity flow with high voltages. This unit
is not insulated against electrical current. Never touch wires directly or indirectly, otherwise serious injury or death
may result.
Always stop the unit when a cutting attachment jam occurs.
Severe injury can occur if a jam is removed and the cutting attachment suddenly starts.
Do not operate the product without the shield in place.
Any objects that ricochet off the cutting attachment could cause an accident or serious injury.
The area within a 15 m radius of the product is a danger zone. Be care-
ful to observe the following precautions while working with the product.
Do not allow children and other people or pets to enter the danger
zone.
If another person enters the danger zone, switch off the unit to stop
the cutting attachment from rotating.
When approaching the operator, signal to him by, for example,
throwing twigs from outside the danger zone, and then check that
unit has been switched off and the cutting attachment has stopped
turning.
If more than one person is working with the product, identify the way
in which you will signal to each other and work at least 15 m apart.
Any objects that ricochet off the cutting attachment, and any contact with the cutting attachment, could cause blindness or a
fatal accident.
WARNING
Be particularly careful to observe the following precautions when starting the unit:
Check that none of the nuts and bolts are loose.
Leave plenty of space around the product and do not allow people or animals near it.
Failure to observe the precautions could cause an accident or injury, or even lead to a fatality.
Check that there are no abnormal vibrations or sounds once the unit starts. Do not use the product if there are ab-
normal vibrations or sounds. Contact your dealer to have it repaired.
Accidents involving parts that fall or shatter off can cause wounds or serious injury.
Always switch off the unit and remove the battery when transporting the unit.
Do not touch angle transmission and other high temperature components while the product is running
or for some time after it stops.
You could burn yourself if you touch a high temperature component.
Before starting work, check the area where you will be working and remove any small stones
and empty cans likely to ricochet off the cutting attachment, as well as any pieces of string
or wire that might become twisted around the cutting attachment.
An accident or serious injury can occur if foreign objects ricochet off the cutting attachment or wire
and other materials twisted round the product spring off it.
In the following situations, switch off the unit immediately and ensure that the cutting attachments have stopped be-
fore checking each area of the product. Replace any damaged parts.
If the cutting attachment hits a rock, tree, post, or other such obstruction while you work.
If the product suddenly starts to vibrate abnormally.
Continuing to use parts when they are damaged could lead to an accident or serious injury.
Do not hold the cutting attachment up while you work. You must not work with the cutting attachments raised above
knee level.
Raising the cutting attachment above knee level brings the plane of rotation closer to the face, and any objects that fly off the
cutting attachments could cause an accident or serious injury.
14
Page 17

Operation
WARNING
Never attempt to operate the product with one hand.
Ensure that you hook your thumbs around the grips, wrapping them in your
thumb and remaining fingers.
Never operate overreach the unit and to keep the balance at all times, to always be sure of the footing on slopes and
to walk, never run.
Never to operate the unit with defective guards or shields, or without safety devices, or if the cord is damaged or
worn.
Starting the unit
WARNING
The attachment will operate when the battery is installed, the power indicator LED is lit, and the trigger switch and
trigger switch lockout are engaged. Make sure the product is properly positioned to prevent loss of control and possible serious injury.
1. Push power button (A) once to turn on power to unit.
Power indicator LED (B) illuminates when power to unit is
turned on.
2. Hold down trigger switch lockout (C) and depress trigger
switch (D) to increase RPM to operating speed.
IMPORTANT
When power to the unit is turned on:
After one minute of inactivity, unit will power itself off.
If the LED remains lit, operation is normal.
If the LED flashes once per second, the battery needs to
be charged.
If the LED flashes four times per second, there is a fault
within the product. Turn power off to unit. Remove battery. Clear debris from around line head. Install battery.
Turn power on to unit. If flashing continues, have your authorized servicing dealer repair the product.
Stopping the unit
WARNING
The cutting attachment continues to run for a short period after the unit is switched off.
1. Release trigger switch and trigger switch lockout, and allow
trimmer head to stop.
2. Push power button (A) to turn off power to unit.
Power indicator LED (B) turns off when power to unit is
turned off.
If the trimmer head does not stop when the trigger and trig-
ger lockout are released, push power button to turn off and
remove the battery to stop the power supply to product.
Have your authorized servicing dealer repair power button
before using product again.
15
Page 18
Operation
Using shoulder harness
Always mount the trimmer correctly using the shoulder harness.
Attach product to harness.
Place shoulder harness over left shoulder and adjust straps
so the quick release pin rests just below the waist.
Check for correct adjustment by moving cutting attachment
along ground.
Re-adjust position of suspension point if necessary.
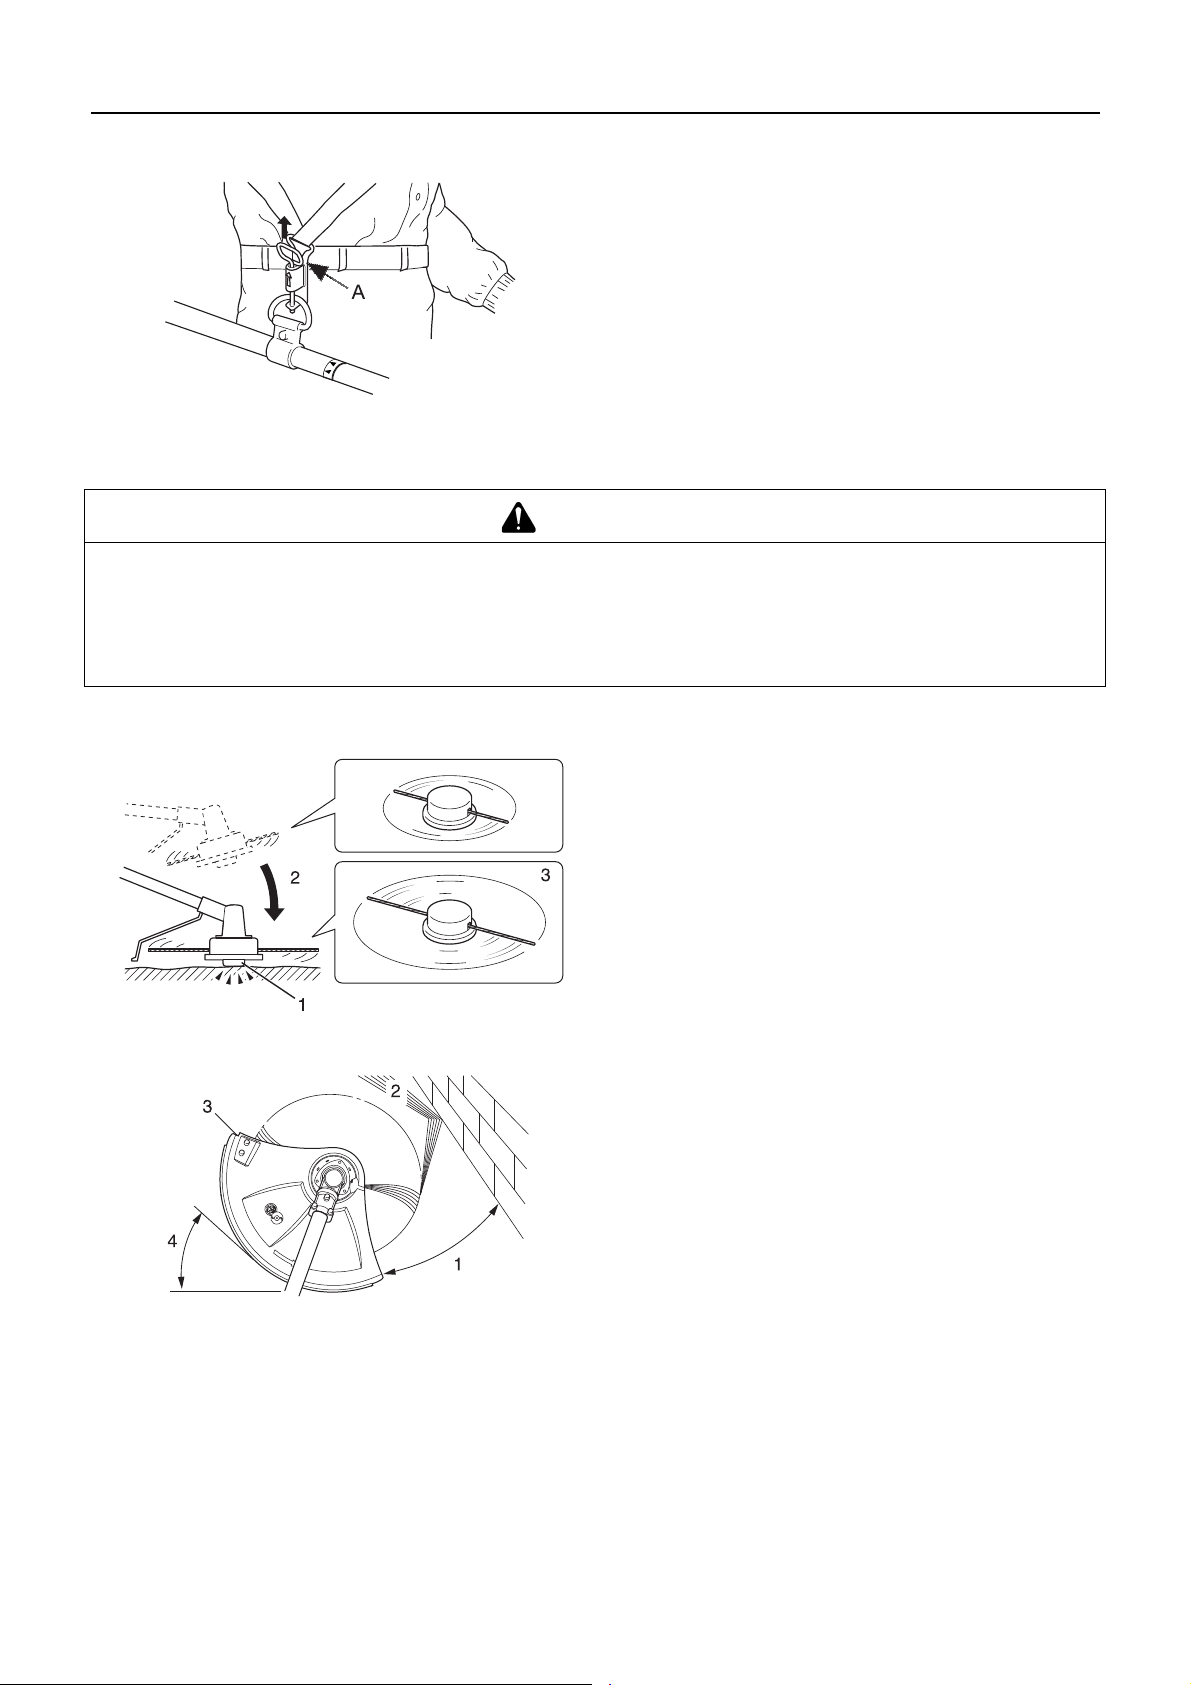
The shoulder harness is fitted with an emergency release
function. In the event of a fire or other emergency, pull the
quick release pin (A) up to release the product from your
body.
Basic trimming operation with nylon line cutting head
WARNING
Serious injury may result from the improper use of cutting attachment. Read and comply with all safety instructions
listed in this manual.
Use only cutting attachments recommended by YAMABIKO CORPORATION.
Excessive nylon line beyond cut off knife could fly off when the nylon line cutting head starts rotating after adjust-
ment of nylon line length.
Failure to do so could lead to an accident or serious injury.
Adjusting nylon line
Trimming
Do not rotate the nylon line cutting head at more than 10000 r/
min.
When releasing nylon line from spool, hit tap knob of spool
against the ground surface lightly at rotation speed lower than
4500 r/min.
Cut off knife on the shield adjusts cutting swath automatically
by cutting nylon lines evenly when attachment starts rotating.
When operating with less than maximum cutting swath, cut
two nylon lines in equal lengths.
1. Tap knob
2. Hit knob against the ground surface lightly
3. Nylon line comes out
This is feeding the trimmer carefully into the material you wish
to cut. Tilt the head slightly to direct the debris away from you.
If cutting up to a barrier such as a fence, wall or tree, approach
from an angle where any debris ricocheting off the barrier will
fly away from you.
Move the nylon line cutting head slowly until the grass is cut
right up to the barrier, but do not jam (overfeed) the line into
the barrier. If trimming up wire mesh or chain link fencing, be
careful to feed only up to the wire. If you go too far, the line will
snap off around the wire.
Trimming can be done to cut through weed stems one at a
time. Place the nylon line cutting head near the bottom of the
weed never high up, which could cause the weed to chatter
and catch the line. Rather than cut the weed right through, just
use the very end of the line to wear through the stem slowly.
1. Angle to wall
2. Debris
3. Knife side raised
4. Angle to ground
16
Page 19

Scything
Scalping and edging
Operation
This is the cutting or mowing of large grassy areas by sweep-
ing or swinging the trimmer in a level arc. Use a smooth, easy
motion. Do not try to hack or chop down the grass. Tilt the nylon line cutting head to direct the debris away from you on the
scything stroke. Then return without cutting grass for another
stroke. If you are well protected and do not care whether some
debris is thrown in your direction, you may scythe in both directions.
Both of these are done with the nylon line cutting head tilted at
a steep angle. Scalping (A) is removing top growth, leaving the
earth bare. Edging (B) is trimming the grass back where it has
spread over a pavement or driveway. During both edging and
scalping, hold the unit at a steep angle in a position where the
debris, and any dislodged dirt and stone, will not come back
towards you even if it ricochets off the hard surface.
Although the pictures show how to edge and scalp, every op-
erator must find for himself the angles which suit his body size
and cutting situation.
For nearly all cutting, it is good to tilt the nylon line cutting head
so that contact is made on the part of line circle where the line
is moving away from you and the shield (See appropriate picture). This results in the debris being thrown away from you.
Tilting the head to the wrong side will shoot the debris toward
you. If the nylon line cutting head is held flat to the ground so
that cutting occurs on the whole line circle, debris will be
thrown at you, drag will slow the unit, and you will use up a lot
of line.
Nylon line cutting head rotates anticlockwise. The knife will be
on the left side of the shield.
1. Debris
2. Cut on this side
Do not push the line into tough weeds, trees, or wire fences.
Pushing the line into chicken wire, chain link fencing or thick
brush can result in snapped-off line ends being hurled back at
the operator. The proper way is to cut right up to a barrier, such
as any of those mentioned, but never run the line into or
through the obstruction. Do not cut closely to obstruction or
barrier.
Avoid nylon line contact with broken wire fencing. Pieces of
wire broken off by the trimmer can be hurled at high speeds.
17
Page 20

Maintenance and care
A
Maintenance and care
WARNING
Observe the following precautions when checking and maintaining your product after use:
Turn power to unit off, remove battery, and make sure all moving parts have come to a complete stop.
An accident could occur if the product starts unexpectedly.
Allow unit to cool before performing service.
You could burn yourself.
IMPORTANT
Checking and maintenance requires specialist knowledge. If you are unable to check and maintain the product or deal with a
fault yourself, consult your dealer. Do not attempt to dismantle the product.
Servicing guidelines
Area Maintenance Page Before use Monthly
Battery Inspect/Clean/Charge 10 •
Nylon line cutting head Inspect 18 •
Cut off knife Inspect/Clean - •
Screws, bolts and nuts Inspect, Tighten/Replace - •
Maintenance and care
If you have any questions or problems, please contact your dealer.
Cleaning battery and battery compartment
Checking the nylon line cutting head
WARNING
Risk of electric shock or fire. Do not use conducting ma-
terials to clean battery or battery compartment.
1. Release trigger switch and trigger switch lockout and allow
trimmer head to stop.
2. Make sure power indicator LED is not illuminated.
3. Depress battery pack latch release (A) slide battery pack out
of power head.
4. Use compressed air or a soft bristle brush to remove debris
from battery and battery compartment.
1. Make sure each periphery of the 2 retaining pawls of housing
spreads almost fully up to the outer periphery of the respective cover window.
2. Check mount of cutting head on trimmer and tighten if it is
loose.
3. Check the cutter head for deflection or abnormal noise rotating it by hand. Deflection or abnormal noise can cause abnormal vibration to occur or mount to trimmer to loosen
during rotation which is dangerous.
18
Page 21

Maintenance and care
4. Inspect cover and tap knob for wear. When slot appears on
bottom of the tap knob or when slot appears on cover bottom
close to outlet for nylon line, replace them with new parts
without fail.
5. Check the cutting head for crack or chip. Replace parts that
show any crack or chip with new ones without fail.
Replacing nylon line
DANGER
Shut down the unit without fail and make sure nylon line cutting head has stopped rotating before starting replace-
ment procedure.
To do so could lead to an accident or serious injury.
WARNING
Use only flexible, non-metallic line recommended by YAMABIKO CORPORATION.
Failure to do so could lead to an accident or serious injury.
1. Press "retaining pawls" (at two places) inward and remove
cover. It is easier to remove one after another.
2. Remove spool.
3. When nylon line on the spool is almost exhausted, remove
remaining line from spool and wind "new line" according to
the procedures (4) and beyond. When the line on the spool
is "melted and stuck" remove the entire line while peeling off
the "melted and stuck" portion and wind the "removed line"
anew according to procedures (4) and beyond.
4. Bend the line at the point 10 cm away from the middle of
whole length and hook the bent portion into the "notch" of the
intermediate separator.
5. Wind the line firmly into groove of the spool following "winding direction for the line L".
6. When the line is wound to the end hook both line ends into
respective notch of spool for retaining tentatively the line
while leaving line ends approximately 10 cm beyond notch.
7. Align notches of spool for the line with grooves of eyelets
and fit spool into cover.
19
Page 22

Maintenance and care
8. Pull out the line from cover. (A) Remove the line from "respective notch of spool", and (B) pass it through "groove of
respective eyelet".
9. Fit cover and housing together. (C) Align "eyelets" of cover
with "recesses" of housing, and (D) press pawls of housing
into respective window of cover until the pawls are firmly fitted into the windows.
DANGER
Make sure each outer periphery of pawls of housing
spreads almost fully up to the outer periphery of respective window of cover. If they are loosely fitted and the cutting head is turned, cover or inside components can fly off
which is dangerous.
Troubleshooting table
IMPORTANT
For spare parts and consumables, please use only genuine parts and designated products and components.
Using parts from other manufacturers or non-designated components may result in a malfunction.
Trouble Cause Remedy
Red Charger light flashes or does not
light up
Unit will not turn on 1. Battery pack not installed properly 1. Check the battery pack installation
Unit does not run when turned on 1. Battery pack discharged
Running time is too short 1. Battery pack outside acceptable
Line won't feed 1. Not enough line on the spool
1. Plug not connected to power outlet
2. Battery pack not installed properly
3. Obstructed connection
4. Fault in the charger
5. Fault in the battery pack
2. Line head obstructed
3. Battery pack outside acceptable
temperature range
temperature range
2. Unit electronics too hot
3. Battery pack discharged
2. Line tangled in the spool
1. Plug in the charger
2. Check the battery pack installation
3. Reinstall battery pack again after removing obstructions from connection.
4. Consult your dealer
5. Consult your dealer
1. Charge the battery pack
2. Turn off the unit and clean the cutting attachment
3. Remove the battery pack and allow
to cool
1. Remove the battery pack and allow
to cool
2. Turn unit off and allow to cool
3. Charge the battery pack
1. Rewind with new line
2. Unwind and rewind the line
Line fails to cut off 1. Cut off knife in the shield is damaged
or missing
Consult your dealer in the event of a problem that is not covered in the table above, or other such concerns.
Please contact your dealer in order to dispose of the product or its parts in compliance with national laws.
1. Consult your dealer
20
Page 23

Maintenance and care
Storage
WARNING
Do not store in an enclosure where combustible fumes may accumulate.
You could cause a fire.
When storing the product for long periods of time, ensure that the following preparations for storage are carried out.
Electric trimmer
1. Turn power to unit off.
2. Remove battery from power head.
3. Remove accumulation of dirt and debris from exterior of unit.
4. Tighten all the screws and nuts.
5. Cover the battery compartment of power head, the battery, and the battery charger.
6. Store unit in a dry, dust-free place, out of the reach of children.
Battery
1. Remove battery from power head.
2. Store in a dry, dust-free place, out of the reach of children.
3. Store in temperatures between -20°C and 60°C (140°F).
4. If the battery is stored for longer than one year, charge it to approximately 40 - 60% capacity.
Battery charger
1. Remove battery from battery charger.
2. Disconnect battery charger from power supply.
3. Store in a dry, dust-free place, out of the reach of children.
Disposal
Major plastic parts making up the product have codes showing
their materials. The codes refer to the following materials; dispose of those plastic parts in accordance with local regulations.
Mark Material
>PA6-GF< Nylon 6 - Glass fiber
>PP-GF< Polypropylene - Glass fiber
>PE-HD< Polyethylene
>PP< Polypropylene
Please contact your dealer in case you do not know how you
should dispose of waste plastic parts.
Battery contains lithium. Dispose of only at a designated col-
lection point.
Lithium-ion batteries must be recycled or disposed of properly.
21
Page 24

Specifications
Specifications
DSRM-300
External dimensions:
Length × Width × Height 1830 × 350 × 280 mm
Mass:
Unit without cutting attachment, harness battery pack and guard
Unit with cutting attachment, harness battery pack and guard
Cutting attachment:
Nylon line cutting head
Line diameter
Line length
Thread
Cutting width
Gear ratio 2.93
Rotational direction of output shaft seen from above: Anticlockwise
Battery:
Type
Pack voltage
Charger type
Charger input voltage
Battery Charger Lights: Red LED – Battery is outside charging temperature range
3.6 kg
5.3 kg
G138
2.0 mm
2 × 1 m line
Left-handed M10 x 1.25
350 mm
Li-ion
56 Volts (rated 50.4 V)
CCCV
230 - 240 Volts AC
Red LED Blinking – Fault
Green LED – Battery finished charging
Green LED Blinking – Battery is charging normally
Charge Time: LBP-560-100 battery: Approximately 42 minutes.
LBP-560-200 battery: Approximately 88 minutes.
Vibration levels: (EN50636-2-91) Front handle 1.6 m/s
Rear handle 1.4 m/s
Uncertainty 1.5 m/s
Sound pressure level: (EN50636-2-91)
Sound power level: (EN50636-2-91)
Uncertainty
Guaranteed sound power level: (2000/14/EC, amended by 2005/
88/EC)
These specifications are subject to change without notice.
80.9 dB(A)
92.4 dB(A)
3.0 dB(A)
96 dB(A)
2
2
2
22
Page 25

The undersigned manufacturer:
YAMABIKO CORPORATION
7-2 SUEHIROCHO 1-CHOME
OHME; TOKYO 198-8760
JAPAN
This declaration of conformity is issued under the sole responsibility of the manufacturer.
declares that the hereunder specified new unit:
GRASS-TRIMMER, BATTERY CHARGER
Brand: ECHO
Type: DSRM-300, LCJQ-560
Declaration of conformity
Declaration of conformity
assembled by:
ECHO, INCORPORATED
400 OAKWOOD ROAD
LAKE ZURICH, ILINOIS 60047-1564
U.S.A.
complies with:
* the requirements of Directive 2006/42/EC (use of harmonized standard EN 60335-1: 2012, EN 50636-2-91: 2014)
* the requirements of Directive 2014/30/EU (use of harmonized standard EN 55014-1: 2006, EN 55014-2: 1997, EN
61000-3-2: 2006, and EN 61000-3-3: 2008)
* the requirements of Directive 2014/35/EU (use of harmonized standard EN 60335-1: 2012, EN 60335-2-29: 2004,
and EN 62233: 2008)
* the requirements of Directive 2000/14/EC
Conformity assessment procedure followed ANNEX V
* the requirements of Directive 2011/65/EU (use of harmonized standard EN 50581: 2012)
Measured sound power level: 93 dB(A), Guaranteed sound power level: 96 dB(A)
DSRM-300: Serial Number 35000001 and up, LCJQ-560: Serial Number 35001001 and up
Tokyo, May 1st 2016
YAMABIKO CORPORATION
The authorized representative in Europe who is authorized to
compile the technical file.
Company: Atlantic Bridge Limited
Address: Atlantic House, PO Box 4800, Earley, Reading RG5
4GB, UK
Masayuki Kimura Mr. Philip Wicks
General Manager
Quality Assurance Dept.
23
Page 26

1Notes and rear cover
7-2 SUEHIROCHO 1-CHOME, OHME, TOKYO 198-8760, JAPAN
PHONE: 81-428-32-6118. FAX: 81-428-32-6145.
©
2016
X750-027380
X750816-2101
Printed in Japan
0x0xxxx zzzz ES
24
Page 27

1Couverture
FRANÇAIS
(Notice originale)
MANUEL D'UTILISATION
COUPE-HERBE
DSRM-300
AVERTISSEMENT
LIRE ATTENTIVEMENT LES INSTRUCTIONS ET SUIVRE LES
RÈGLES DE SECURITÉ.
LE NON-RESPECT DES RÈGLES DE SÉCURITÉ ENTRAÎNE UN
RISQUE DE BLESSURE GRAVE.
Page 28

Table des matieres
Pour utiliser l'appareil en toute sécurité .............................................................................. 3
Description.......................................................................................................................... 8
Avant de commencer.......................................................................................................... 9
Contenu de l'emballage ................................................................................................. 9
Chargement de la batterie ........................................................................................... 10
Assemblage................................................................................................................. 11
Version poignée semi-circulaire................................................................................... 11
Equilibrage................................................................................................................... 12
Pose de la batterie....................................................................................................... 13
Fonctionnement ................................................................................................................ 14
Mise en marche de l'appareil.......................................................................................15
Arrêt de l'appareil......................................................................................................... 15
Utilisation du harnais ................................................................................................... 16
Utilisation de base de l'appareil avec tête de coupe à fil nylon ................................... 16
Entretien ........................................................................................................................... 19
Instructions d'entretien de l'appareil ............................................................................ 19
Entretien ......................................................................................................................19
Remisage .................................................................................................................... 22
Mise au rebut............................................................................................................... 22
Caractéristiques................................................................................................................23
Déclaration de conformité................................................................................................. 24
2
Page 29

Pour utiliser l'appareil en toute sécurité
Pour utiliser l'appareil en toute sécurité
Information importante
AVERTISSEMENT
Lire attentivement le manuel d'utilisation avant d'utiliser l'appareil pour la première fois.
À propos du manuel d'utilisation
Ce manuel contient les informations nécessaires au montage, à l'utilisation et à l'entretien de l'appareil. L'utilisateur
doit donc le lire attentivement et intégrer les informations qu'il contient.
Toujours conserver le manuel à portée de main.
En cas de perte du manuel ou si ce dernier a été détérioré et n'est plus lisible, s'adresser à un revendeur pour en
obtenir un nouveau.
Les unités utilisées dans ce manuel sont les unités SI (Système international d'unités). Les chiffres indiqués entre
parenthèses sont des valeurs de référence. De légères erreurs de conversion peuvent survenir dans certains cas.
Le non-respect de cette règle de sécurité entraîne un risque d'accident ou de blessure grave.
Utilisation de l'appareil
Ces machines sont des machines légères, très performantes, et conçues pour désherber et tondre dans des endroits
inaccessibles par d'autres moyens.
Ne pas utiliser cet appareil pour d'autres applications que celles mentionnées ci-dessus.
Le constructeur se réserve le droit de modifier sans préavis le contenu de ce manuel en fonction des améliorations
apportées au produit. Il se peut que certains des schémas de ce manuel soient différents de l'appareil. Ces différences ont pour objectif de rendre les explications plus claires.
En cas de doute, consulter un revendeur.
Le non-respect de cette règle de sécurité entraîne un risque d'accident ou de blessure grave.
Ne pas modifier l'appareil
Aucune modification ne doit être apportée à l'appareil.
Le non-respect de cette règle de sécurité entraîne un risque d'accident ou de blessure grave. Tout dysfonctionnement dû à
une modification de l'appareil n'est pas couvert par la garantie du fabricant.
Ne pas utiliser l'appareil avant d'avoir effectué les opérations de vérification et d'entretien nécessaires
Il ne faut pas utiliser l'appareil avant d'avoir effectué les opérations de vérification et d'entretien nécessaires. Veiller
à ce que l'appareil soit vérifié et entretenu régulièrement.
Le non-respect de cette règle de sécurité entraîne un risque d'accident ou de blessure grave.
Prêt ou cession de l'appareil à un tiers
Si l'appareil est prêté à un tiers, veiller à lui confier également le manuel d'utilisation fourni avec l'appareil.
Si l'appareil est cédé à un tiers, transmettre le manuel d'utilisation fourni avec l'appareil lors de la vente.
Le non-respect de cette règle de sécurité entraîne un risque d'accident ou de blessure grave.
Utilisateurs de l'appareil
L'appareil ne doit pas être utilisé si :
l'utilisateur est fatigué ;
l'utilisateur a consommé de l'alcool ;
l'utilisateur prend des médicaments ;
la personne qui souhaite utiliser l'appareil est enceinte ;
l'utilisateur est en mauvaise condition physique ;
l'utilisateur n'a pas lu le manuel d'utilisation ;
la personne qui souhaite utiliser l'appareil est un enfant.
L'utilisateur est tenu pour responsable en cas d'accidents ou de risques pouvant entraîner des accidents corporels
ou des dommages matériels.
Le non-respect de ces règles de sécurité constitue un risque d'accident.
Les composants de cette machine produisent en fonctionnement un champ électromagnétique susceptible d'inter-
férer avec certains stimulateurs cardiaques. Pour réduire les risques pour la santé, nous recommandons aux porteurs d'un stimulateur cardiaque de consulter leur médecin et le fabricant du stimulateur avant d'utiliser cet appareil.
3
Page 30

Pour utiliser l'appareil en toute sécurité
AVERTISSEMENT
Exposition aux vibrations et au froid
Les personnes exposées aux vibrations et au froid peuvent être victimes du phénomène de Raynaud, une affection
qui touche les doigts. L'exposition à des vibrations et au froid peut provoquer une sensation de picotement et de
brûlure, suivie d'une décoloration et d'un engourdissement des doigts. Il est vivement recommandé de respecter les
mesures de précaution suivantes car le seuil d'exposition minimum pouvant provoquer l'apparition de ce phénomène reste inconnu à ce jour.
Limiter la perte de chaleur corporelle, en protégeant en priorité la tête, le cou, les pieds, les chevilles, les mains
et les poignets.
Stimuler la circulation sanguine en interrompant le travail régulièrement pour remuer énergiquement les bras, et
éviter de fumer.
Limiter le nombre d'heures d'utilisation. Essayer d'intégrer à l'emploi du temps de la journée des tâches ne né-
cessitant pas l'utilisation de l'appareil ou d'une autre machine portative.
En cas d'inconfort, de rougeur et de gonflement au niveau des doigts, suivis d'un blanchissement et d'une perte
de sensibilité, consulter un médecin avant de s'exposer à nouveau au froid et aux vibrations.
Le non-respect de ces instructions peut être dangereux pour la santé.
Lésions attribuables au travail répétitif
Il apparaît que la sollicitation excessive des muscles et des tendons des doigts, des mains, des bras et des épaules
peut provoquer une irritation, un gonflement, un engourdissement, une faiblesse et de fortes douleurs au niveau des
membres mentionnés ci-dessus. L'apparition de lésions attribuables au travail répétitif (LATR) est très fréquente
chez les personnes pratiquant certaines activités manuelles répétitives. Pour réduire le risque d'apparition de LATR,
respecter les mesures de précaution suivantes :
Éviter de plier, d'étirer ou de tordre le poignet pendant le travail.
Faire des pauses régulières pour réduire l'effet répétitif et pour reposer ses mains. Effectuer le mouvement répé-
titif plus lentement et en faisant moins d'effort.
Faire des exercices de musculation des mains et des bras.
En cas de picotements, d'engourdissement ou de douleur dans les doigts, les mains, les poignets ou les bras,
consulter un médecin. Plus les LATR sont diagnostiquées précocement, plus les chances d'empêcher les lésions
nerveuses et musculaires irréversibles sont grandes.
Le non-respect de ces instructions peut être dangereux pour la santé.
Une formation adaptée
Toute personne devant utiliser cet appareil doit obligatoirement avoir reçu une formation et un équipement de pro-
tection adaptés.
Vous devez avoir une connaissance parfaite des commandes et du fonctionnement de l'appareil.
Vous devez savoir comment arrêter l'appareil et couper le moteur.
Vous devez savoir comment décrocher la machine du harnais en urgence.
Ne laisser personne utiliser l'appareil sans avoir préalablement reçu une formation adaptée.
Le non-respect de ces instructions peut être dangereux pour la santé.
Port de vêtements adaptés.
Attacher les cheveux longs au-dessus du niveau de l'épaule.
Ne pas porter de cravates, bijoux ou vêtements amples qui pourraient se prendre dans
l'appareil.
Ne pas porter de chaussures ouvertes, ne pas travailler pieds nus ou jambes nues.
Le non-respect de ces mesures de précaution peut entraîner une dégradation de la vue ou de
l'ouïe de l'utilisateur, ainsi qu'un risque de blessure grave.
4
Page 31

Pour utiliser l'appareil en toute sécurité
AVERTISSEMENT
Port d'équipements de protection
Toujours porter les équipements de protection suivants pour utiliser un taille-
haies.
1. Protection de la tête (casque) : protège la tête.
2. Casque de protection anti-bruit ou protecteurs d'oreilles : protègent l'ouïe.
3. Lunettes de sécurité : protègent les yeux.
4. Protection du visage : protège le visage.
5. Gants de sécurité : protègent les mains contre le froid et les vibrations.
6. Vêtements de travail adaptés (manches longues, pantalons longs) : protègent le corps.
7. Bottes résistantes avec semelles anti-dérapantes (à bouts renforcés) ou
chaussures de travail avec semelles anti-dérapantes (à bouts renforcés) : protègent les pieds.
8. Protège-tibias : protègent les jambes.
Le non-respect de ces mesures de précaution peut entraîner une dégradation de la vue
ou de l'ouïe de l'utilisateur, ainsi qu'un risque de blessure grave.
Si nécessaire, utiliser les équipements de protection ci-dessous.
Masque anti-poussière : protège les voies respiratoires.
Voilette de protection : protège contre les piqûres d'abeilles.
Environnement d'utilisation et fonctionnement de l'appareil
Ne pas utiliser l'appareil :
dans des endroits humides ou mouillés ;
sous la pluie ;
en cas de mauvaises conditions météo ;
sur des pentes raides ou sur des surfaces instables et glissantes ;
la nuit ou dans des endroits sombres mal éclairés.
en cas de risque de foudre.
Lorsque vous utilisez l'appareil sur un terrain en pente douce, employez un mouvement régulier et gardez la tête de
coupe parallèle au sol.
Toute chute, glissade ou utilisation incorrecte de l'appareil constitue un risque de blessures graves pour l'utilisateur.
Afin de préserver votre santé et de travailler dans des conditions de sécurité et de confort optimales, utiliser l'appa-
reil uniquement par des températures comprises entre -5
Le non-respect de ces instructions peut être dangereux pour la santé.
o
C et 40 oC.
Savoir réagir en cas de blessure
Même si les cas de blessure ou d'accident restent exceptionnels, l'utilisa-
teur doit savoir réagir à ces situations.
Kit de premiers secours
Serviettes et lingettes (pour arrêter les saignements)
Sifflet ou téléphone portable (pour appeler de l'aide)
Si l'utilisateur n'est pas capable de prodiguer les premiers soins ou d'appeler à
l'aide, la blessure peut s'aggraver.
Etiquettes et symboles d'avertissement
DANGER AVERTISSEMENT ATTENTION
Ce symbole associé au mot
« DANGER » signale une action ou
une situation présentant un risque de
blessure corporelle grave ou d'accident mortel pour l'utilisateur et les
personnes à proximité.
Ce symbole associé au mot
« AVERTISSEMENT » signale une
action ou une situation présentant un
risque de blessure corporelle grave
ou d'accident mortel pour l'utilisateur
et les personnes à proximité.
« ATTENTION » signale une situation potentiellement dangereuse qui,
si elle n'est pas évitée, peut entraîner
une blessure légère à modérée.
5
Page 32

Pour utiliser l'appareil en toute sécurité
Autres indications
REMARQUE IMPORTANT
Le cercle barré indique
une interdiction.
Symboles
Ce type de message fournit des
conseils relatifs à l'utilisation et à l'entretien de l'appareil.
Le texte dans l'encadré où figure le
mot «IMPORTANT» donne des in-
formations importantes concernant
l'utilisation, la vérification, l'entretien
et le remisage de l'appareil décrit
dans ce manuel.
Forme des symboles Description/application des
symboles
Lire attentivement le manuel
d'utilisation
Porter des lunettes de protection
Porter des protections auditives
Alerte/sécurité
Avertissement !
Projections !
Forme des symboles Description/application des
symboles
Ne laisser personne s'approcher
Ne laisser personne s'approcher à moins de 15 mètres
Port obligatoire de chaussures
et de gants de protection
Attention aux températures
élevées
Niveau de puissance sonore
garanti
Ne pas utiliser sans protecteur
d'outil
Interdiction d'utiliser des
lames métalliques
Attention aux risques d'incendie
Ne jamais utiliser cet appareil
lorsqu'il pleut ou dans des endroits humides
Attention aux risques de choc
électrique
Ne pas jeter les appareils
électriques avec les ordures
ménagères.
6
Page 33

Pour utiliser l'appareil en toute sécurité
Étiquette(s) de sécurité
L'étiquette de sécurité ci-dessous figure sur les appareils décrits dans ce manuel. S'assurer de bien comprendre la signification
de l'étiquette avant d'utiliser l'appareil.
Si l'étiquette devient illisible avec le temps ou si elle s'est décollée ou a été déchirée, contacter un revendeur pour obtenir une
nouvelle étiquette et la coller à l'emplacement indiqué sur les illustrations ci-dessous. Veiller à ce que l'étiquette soit toujours
lisible.
1. Autocollant de sécurité (référence X505-008900)
7
Page 34

Description
Description
1. Renvoi d'angle - Avec deux engrenages pour changer
l'angle de l'axe de rotation.
2. Outil de coupe. - Tête de coupe à fil nylon pour couper
l'herbe et les mauvaises herbes.
3. Couteau. - Coupe le fil de nylon pour obtenir la lon-
gueur de fil appropriée.
4. Protecteur d'outil. - Protège l'utilisateur contre les pro-
jections et empêche tout contact accidentel avec la tête
de coupe.
5. Tube de transmission - Pièce de l'appareil qui protège
l'arbre de transmission.
6. Poignée en boucle - Poignée pour la main gauche.
7. Point d'accrochage - Dispositif sur lequel le harnais
peut être accroché.
8. DEL du témoin d'alimentation - Reste allumée
lorsque l'appareil est sous tension. S'éteint lorsque l'appareil est mis hors tension.
9. Bouton d'alimentation - Un appui bref permet de
mettre l'appareil sous tension, la DEL du témoin d'alimentation s'allume. Un nouvel appui met l'appareil hors
tension, la DEL du témoin d'alimentation s'éteint.
10. Blocage de l'interrupteur à poussoir - Bloque l'inter-
rupteur à poussoir en position d'arrêt jusqu'à ce que
l'utilisateur puisse positionner correctement sa main
droite sur la poignée.
11. Interrupteur à poussoir - Activé par le doigt de l'utilisa-
teur pour mettre le moteur en marche.
12. Tête motrice – Renferme le moteur et la la batterie.
13. Harnais - Lanière réglable pour suspendre l'appareil.
8
Page 35

Avant de commencer
Avant de commencer
Contenu de l'emballage
Les pièces suivantes sont conditionnées séparément dans le carton d'emballage.
Lors de l'ouverture du carton, passer en revue les pièces qu'il contient.
Contacter un revendeur si une pièce est manquante ou endommagée.
1. Moteur et tube de transmission
2. Protecteur d'outil
3. Lunettes de sécurité
4. Étiquette de sécurité
9. Bloc-batterie
10. Manuel d'utilisation
5. Harnais
6. Tête de coupe à fil nylon
7. Manuel d'utilisation
8. Clé coudée
11. Chargeur
12. Manuel d'utilisation
9
Page 36

Avant de commencer
A
B
Chargement de la batterie
AVERTISSEMENT
Toujours utiliser le bloc-batterie LBP-560-100/LBP-560-200 et le charger uniquement avec le chargeur LCJQ-560.
Garder le chargeur et la batterie à l'abri de l'humidité et de tous les liquides.
Ne pas utiliser le chargeur sur une surface facilement inflammable (telle que du papier ou du textile) ou dans envi-
ronnement présentant un risque d'incendie élevé.
Ne pas couvrir le chargeur. Couvrir le chargeur l'empêcherait de se refroidir.
Ne pas utiliser le chargeur dans une atmosphère explosible, par exemple en présence de liquides, gaz ou poussières
inflammables. Les chargeurs peuvent produire des étincelles qui peuvent enflammer des poussières ou des vapeurs
– il existe un risque d'explosion.
Brancher le chargeur uniquement sur une alimentation correspondant à la tension et à la fréquence spécifiées sur
la plaque signalétique.
Brancher le chargeur uniquement sur une prise murale aisément accessible.
Ne jamais insérer d'objet dans les évents de refroidissement du bloc-batterie ou du chargeur (A).
Ne pas charger ni utiliser un bloc-batterie et un chargeur défectueux, endommagés ou déformés.
Ne pas ouvrir, endommager ou faire tomber le bloc-batterie ou le chargeur.
Une batterie endommagée ou mal utilisée risque de fuir ; éviter tout contact avec la peau. En cas de contact acci-
dentel, laver abondamment à l'eau et au savon les parties touchées. Si du liquide pénètre dans l'œil, ne pas frotter.
Rincer abondamment les yeux à l'eau pendant au moins 15 minutes. Consulter également un médecin.
Ne jamais ponter (court-circuiter) les contacts du bloc-batterie ou les bornes du chargeur avec des objets métal-
liques.
Protéger d'une exposition directe au soleil, à la chaleur et à toute flamme nue et ne jamais jeter la batterie au feu ; il
existe un risque d'explosion.
Si de la fumée ou des flammes se dégagent du chargeur, débrancher immédiatement celui-ci de la prise murale.
Si le cordon d'alimentation est endommagé, débrancher immédiatement la fiche de l'alimentation électrique pour
éviter tout risque de choc électrique.
Ne pas exposer le bloc-batterie à des ondes d'hyperfréquence ou à une pression élevée.
Prendre les mesures requises pour empêcher un démarrage intempestif de l'appareil. Retirer le bloc-batterie de l'ap-
pareil avant de transporter ou de ranger celui-ci. Ne pas utiliser un récipient en métal pour transporter les batteries.
Ne pas utiliser le cordon d'alimentation à d'autres fins, par exemple pour transporter ou suspendre le chargeur.
Pour réduire le risque de trébuchement, positionner et signaler le cordon d'alimentation de telle manière qu'il ne
puisse pas être endommagé et de façon à ce qu'il ne constitue un danger pour personne.
Pour débrancher, saisir la fiche et non le cordon.
REMARQUE
La batterie est partiellement chargée lorsqu'elle quitte l'usine ; il convient de la charger entièrement avant la première utilisa-
tion.
Charger la batterie lorsqu'elle ne produit plus suffisamment de courant pour faire fonctionner l'appareil ou lorsque les voyants
indiquent qu'elle est déchargée.
1. Brancher le cordon secteur du chargeur dans la prise murale.
2. Aligner les nervures de la batterie sur les rainures du chargeur et faire coulisser la batterie dans le chargeur.
3. Durant la charge normale, la DEL (B) du chargeur clignote
en continu en VERT.
IMPORTANT
Si le chargeur détecte un problème, la DEL clignote en
ROUGE. Retirer la batterie du chargeur, nettoyer les
contacts et réinstaller la batterie dans le chargeur. Si la batterie n'est pas dans la plage de température acceptable (de
0 à 60 °C), la DEL reste allumée en ROUGE.
10
Page 37

Avant de commencer
C
D
4. Lorsque la charge est terminée, la DEL reste allumée en
VERT.
Un bloc-batterie complètement déchargé se chargera en
42 minutes environ.
5. Vérifier que la batterie est entièrement chargée en la retirant
du chargeur et appuyant sur le bouton d'état de charge de la
batterie (C). Vérifier les indications données par les DEL (D).
Un voyant vert indique que la batterie est chargée entre 0
et 25 %.
Deux voyants verts indiquent que la batterie est chargée
entre 25 et 50 %.
Trois voyants verts indiquent que la batterie est chargée
entre 50 et 75 %.
Quatre voyants verts indiquent que la batterie est chargée
entre 75 et 100 %.
6. Débrancher le chargeur de batteries de l'alimentation électrique.
Assemblage
AVERTISSEMENT
Lire attentivement le manuel d'utilisation pour s'assurer que l'appareil est monté correctement.
L'utilisation d'un appareil monté de façon incorrecte entraîne un risque d'accident ou de blessure grave.
Version poignée semi-circulaire
Assemblage de la poignée semi-circulaire
Montage du protecteur d'outil
Orienter la poignée dans une position d'utilisation confortable,
puis serrer les boulons.
ATTENTION
Monter la poignée de telle sorte que toutes les éti-
quettes de sécurité restent bien visibles.
AVERTISSEMENT
Les arêtes du couteau monté sur le protecteur d'outil
anti-projection sont tranchantes. Éviter tout contact
lors de la pose ou de la dépose de la tête de coupe à fil.
1. Déposer le manchon en plastique (A) de l'arbre de sortie.
2. Poser le protecteur d'outil (B) sur la base de la bride de renvoi d'angle (C).
3. Placer la plaque de protecteur d'outil (D) sur le protecteur,
aligner les trous et poser les trois boulons (E).
4. Bien serrer les trois boulons.
5. Retirer la garniture (F).
REMARQUE
Le protecteur d'outil est conçu pour être utilisé uniquement
avec la tête de coupe à fil nylon.
11
Page 38

Avant de commencer
Montage de la tête de coupe à fil nylon
ATTENTION
Fixer solidement l'arbre de sortie à l'aide de l'outil de
blocage pour éviter qu'il ne tourne lors de la pose de la
tête de coupe à fil nylon.
1. Veiller à ce que le flasque (A) reste sur l'arbre de sortie (B).
2. Aligner l'orifice de blocage du flasque sur une entaille située
sur le bord du renvoi d'angle et insérer l'outil de blocage (C).
3. Poser la tête de coupe (D) sur l'arbre de sortie en la tournant
dans le sens contraire des aiguilles d'une montre, jusqu'à ce
que la tête soit bien ajustée contre le flasque.
4. Retirer l'outil de blocage.
Equilibrage
Réglage du harnais
AVERTISSEMENT
Cet appareil est conçu de manière à pouvoir être utilisé par des personnes de tailles différentes ; il se peut néan-
moins qu'il ne convienne pas aux personnes de très grande taille. Ne pas utiliser l'appareil si les pieds de l'utilisateur
atteignent l'outil de coupe lorsque l'appareil est fixé au harnais.
IMPORTANT
La taille de l'utilisateur peut avoir un impact sur l'équilibrage de l'appareil. En outre, il se peut que la procédure d'équilibrage
ne fonctionne pas sur certains appareils avec certaines personnes. Si le harnais n'est pas à la taille de l'utilisateur ou ne peut
pas être réglé correctement, contacter le revendeur pour obtenir de l'aide.
Le harnais fourni avec l'appareil convient aux adultes de taille
moyenne, mesurant entre 150 et 195 cm de hauteur et entre
60 et 140 cm de tour de taille.
Utiliser un harnais lorsque celui-ci est fourni avec l'appareil ou
lorsque son utilisation est recommandée dans ce manuel. Régler le harnais et le point d'accrochage (A) de l'appareil sur
l'unité de sorte que l'outil de coupe se situe à quelques centimètres au-dessus du sol (B).
L'outil de coupe et le protecteur d'outil doivent être parallèles
au sol dans toutes les directions. Fixer l'appareil au harnais
sur le côté droit, comme indiqué.
Equilibrer l'outil de sorte à ce que le plan de rotation de
la tête de coupe soit parallèle au sol.
Faire glisser le point d'accrochage le long du tube pour trouver
le point d'équilibre. Tourner la bride pour régler le parallélisme
de l'outil de coupe et du protecteur. Verrouiller la position. Si
le point d'accrochage est de type à rotation libre, il se peut que
l'appareil ait tendance à se retourner sur le côté ; néanmoins,
toujours régler l'outil de coupe et le protecteur selon l'axe
avant/arrière.
Il se peut que l'équilibrage et la mise à niveau, comme indi-
qués ci-dessus, nécessitent le déplacement de la bride et le
réajustement des lanières du harnais. En outre, tous les types
d'outil de coupe et de protecteur d'outil montés sur l'appareil
doivent être équilibrés.
ATTENTION
Le point d'accrochage ne doit pas être situé plus loin
que le repère en forme de flèche ( ).
12
Page 39

Pose de la batterie
A
B
C
Avant de commencer
AVERTISSEMENT
L'outil de coupe fonctionne lorsque la batterie est ins-
tallée, la DEL du témoin d'alimentation allumée et le dispositif de déclenchement et le blocage du dispositif de
déclenchement engagés. Veiller à positionner le coupeherbe correctement pour éviter toute perte de contrôle
et un éventuel accident grave. Tenir les pièces mobiles
au-dessus du sol et à distance des objets susceptibles
d'être happés ou projetés.
1. S'assurer que l'appareil est hors tension.
2. Aligner les nervures (A) du bloc-batterie sur les rainures de
la tête motrice. Faire glisser le bloc-batterie dans la tête motrice.
3. S'assurer que le verrou du bloc-batterie (B) est mis en place
et que le bloc-batterie est bien fixé avant de faire fonctionner
l'appareil.
4. Pour retirer la batterie, enfoncer le verrou du bloc-batterie
(C) et extraire le bloc-batterie de la tête motrice.
IMPORTANT
Avant d'utiliser le taille-haie, s'assurer que la batterie est
correctement mise en place et le verrou du bloc-batterie en
position fermée (D).
REMARQUE
Le verrou du bloc-batterie est en position fermée lorsqu'il est
correctement engagé.
13
Page 40

Fonctionnement
Fonctionnement
DANGER
Tous les conducteurs électriques aériens et les câbles de télécommunication peuvent avoir une alimentation élec-
trique à haute tension. Cet appareil n'est pas isolé par une protection contre les courants électriques. Ne jamais toucher les câbles directement ou indirectement, sous risque de blessures graves ou de mort.
Toujours couper le fonctionnement de l'appareil en cas de blocage de l'outil de coupe.
Une fois l'objet débloqué, l'outil de coupe redémarrerait soudainement, entraînant ainsi un risque de blessure grave.
Ne pas utiliser l'appareil sans le protecteur d'outil.
Il est possible que des objets ricochent sur l'outil de coupe et soient projetés vers l'utilisateur, entraînant ainsi un risque d'accident ou de blessure grave.
La zone comprise dans un rayon de 15 mètres autour de l'appareil est
une zone dangereuse. Veillez à bien respecter les mesures de précaution suivantes lors de l'utilisation de l'appareil.
Ne laisser personne (enfants, animaux ou autres personnes) péné-
trer dans la zone dangereuse.
Si quelqu'un pénètre dans la zone dangereuse, couper le fonction-
nement de l'appareil pour arrêter l'outil de coupe.
Lorsque vous vous approchez de l'utilisateur, signalez-lui votre pré-
sence en lançant des brindilles, par exemple, sans entrer dans la
zone dangereuse. Vérifiez ensuite que le fonctionnement de l'appareil est coupé et que l'outil de coupe ne tourne plus.
Si l'appareil est utilisé par plus d'une personne, convenez entre
vous d'un signal et travaillez à plus de 15 mètres les uns des autres.
Toute projection d'objet ou tout contact avec l'outil de coupe entraîne un risque d'accident mortel ou pouvant causer la cécité
de l'utilisateur.
AVERTISSEMENT
Veiller à bien respecter les mesures de précaution suivantes lors de la mise en marche de l'appareil :
Vérifier que tous les écrous et toutes les vis sont bien serrés.
Établir un périmètre de sécurité autour de l'appareil et s'assurer que personne ni aucun animal ne se trouve à proxi-
mité.
Le non-respect de ces mesures de précaution constitue un risque d'accident et de blessures graves voire mortelles.
Au démarrage de l'appareil, vérifier l'absence de vibrations et de sons anormaux. Ne pas utiliser l'appareil en cas de
vibrations ou de sons anormaux. S'adresser à un revendeur pour faire effectuer les réparations nécessaires.
La chute ou la rupture accidentelle de pièces constitue un risque de blessures graves.
Toujours éteindre l'appareil et retirer la batterie avant de transporter l'appareil.
Ne pas toucher le renvoi d'angle et autres composants sous haute température lorsque l'appareil fonc-
tionne et pendant la phase qui suit l'arrêt de l'appareil.
Il existe un risque de brûlure en cas de contact avec un composant à haute température.
Avant de commencer à travailler, inspecter la zone de travail et retirer tous les cailloux et les
canettes vides susceptibles de ricocher sur l'outil de coupe, ainsi que les morceaux de fils
ou de câbles qui risquent de s'enrouler autour de l'outil de coupe.
Un risque de projection pouvant entraîner un accident ou une blessure grave peut survenir lorsqu'un
objet ricoche sur l'outil de coupe ou lorsqu'un fil s'enroule autour de ce dernier.
Couper immédiatement le fonctionnement de l'appareil et attendre que l'outil de coupe soit complètement arrêté
avant d'inspecter les composants de l'appareil. Remplacer toute pièce endommagée.
Si l'outil de coupe heurte une pierre, un arbre, un poteau ou tout autre obstacle au cours de son utilisation.
Si l'appareil se met à vibrer soudainement de façon anormale.
L'utilisation prolongée de pièces endommagées entraîne un risque d'accident ou de blessure grave.
Ne pas tenir l'outil de coupe vers le haut pendant le travail. Ne pas travailler en tenant l'outil de coupe au-dessus des
genoux.
Si l'outil de coupe est au-dessus des genoux, le plan de rotation est plus proche du visage de l'utilisateur, ce qui entraîne un
risque d'accident ou de blessure grave en cas de projections.
14
Page 41

Fonctionnement
AVERTISSEMENT
Ne jamais essayer d'utiliser l'appareil d'une seule main.
Passer les pouces autour de la poignée et saisir la poignée en l'envelop-
pant avec les autres doigts.
Ne jamais utiliser l'appareil en se penchant trop en avant et veiller à rester bien en équilibre à tout moment. Veiller à
être toujours bien d'aplomb sur les terrains en pente et à marcher ; ne jamais courir.
Ne jamais utiliser l'appareil si les protections ou les protecteurs d'outil sont défectueux, sans dispositif de sécurité
ou lorsque le cordon est endommagé ou usé.
Mise en marche de l'appareil
AVERTISSEMENT
L'outil de coupe fonctionne lorsque la batterie est installée, la DEL du témoin d'alimentation allumée et l'interrupteur
à poussoir et le blocage de l'interrupteur à poussoir engagés. Veiller à positionner le produit correctement pour éviter toute perte de contrôle et un éventuel accident grave.
1. Appuyer brièvement sur le bouton d'alimentation (A) pour
mettre l'appareil sous tension.
La DEL du témoin d'alimentation (B) s'allume lorsque l'ap-
pareil est sous tension.
2. Enfoncer le blocage de l'interrupteur à poussoir (C) et appuyer sur l'interrupteur à poussoir (D) de façon à ce que le
moteur atteigne la vitesse normale de fonctionnement.
IMPORTANT
Lorsque l'appareil est sous tension :
Au bout d'une minute d'inactivité, il s'éteint tout seul.
Si la DEL reste allumée, l'appareil fonctionne normale-
ment.
Si la DEL clignote une fois par seconde, la batterie doit
être chargée.
Si la DEL clignote quatre fois par seconde, l'appareil pré-
sente un défaut. Mettre l'appareil hors tension. Retirer la
batterie. Enlever les débris autour de la tête de coupe.
Installer la batterie. Mettre l'appareil sous tension. Si le
clignotement persiste, demander à un technicien agréé
de réparer l'appareil.
Arrêt de l'appareil
AVERTISSEMENT
L'outil de coupe continue de fonctionner pendant une courte durée une fois l'appareil éteint.
15
Page 42

Fonctionnement
Utilisation du harnais
1. Relâcher l'interrupteur à poussoir et le blocage de l'interrupteur à poussoir, et laisser le taille-haie s'arrêter.
2. Appuyer sur le bouton d'alimentation (A) pour mettre l'appareil hors tension.
La DEL du témoin d'alimentation (B) s'éteint lorsque l'appa-
reil est hors tension.
Si le taille-haie ne s'arrête pas lorsque l'interrupteur à pous-
soir et le blocage de l'interrupteur à poussoir sont relâchés,
appuyer sur le bouton d'alimentation pour enclencher la
mise hors tension et retirer la batterie afin d'interrompre
l'alimentation du produit. Demander à un technicien agréé
de réparer le bouton d'alimentation avant d'utiliser à nouveau le produit.
Toujours monter correctement le coupe-herbe avec le harnais.
Fixer l'appareil au harnais.
Placer le harnais sur l'épaule gauche et régler les lanières
de sorte que l'axe de décrochage rapide se situe juste sous
la taille.
Pour vérifier que l'appareil est correctement ajusté, dépla-
cer l'outil de coupe au-dessus du sol.
Réajuster le point d'accrochage si nécessaire.
Le harnais est doté d'une fonction de décrochage rapide.
En cas d'incendie ou en cas d'urgence, tirer l'axe de décrochage rapide (A) vers le haut pour détacher l'appareil.
Utilisation de base de l'appareil avec tête de coupe à fil nylon
AVERTISSEMENT
Une mauvaise utilisation de l'outil de coupe peut entraîner un risque de blessure grave. Lire attentivement et respec-
ter l'ensemble des règles de sécurité décrites dans ce manuel.
Utiliser uniquement les outils de coupe recommandés par YAMABIKO CORPORATION.
Tout excédent de fil nylon dépassant du couteau risque d'être projeté lorsque la tête de coupe à fil nylon commence
à tourner après le réglage de la longueur du fil nylon.
Le non-respect de cette règle de sécurité entraîne un risque d'accident ou de blessure grave.
Réglage du fil nylon
La vitesse de rotation de la tête de coupe à fil nylon ne doit pas
dépasser 10000 tr/min.
Pour dérouler le fil nylon, taper légèrement la partie inférieure
de la bobine sur le sol à une vitesse de rotation inférieure à
4500 tr/min.
Le couteau situé sur le protecteur règle automatiquement la
longueur du fil nylon en le coupant de manière uniforme
lorsque l'outil de coupe commence à tourner.
Pour utiliser l'appareil avec une longueur de fil inférieure à la
longueur de coupe maximum, couper deux fils nylon de même
longueur.
1. Partie inférieure de la bobine
2. Taper légèrement la bobine sur le sol
3. Le fil de nylon se déroule
16
Page 43

Taille
Fonctionnement
La taille consiste à avancer l'appareil avec précaution dans
l'objet à couper. Incliner légèrement la tête de coupe pour que
les débris soient projetés loin de l'utilisateur. Pour effectuer
une opération de taille a proximité d'une barrière, d'un mur ou
d'un arbre, approcher l'appareil sous un angle tel que les débris ricochant sur la barrière ne soient pas projetés vers l'utilisateur.
Déplacer lentement la tête de coupe à fil nylon jusqu'à ce que
l'herbe soit coupée jusqu'au niveau de la barrière, en évitant
soigneusement de bloquer le fil dans la barrière. En cas de
taille à proximité d'un grillage ou d'une clôture métallique, faire
bien attention à ne pas coincer le fil dans le grillage ou la clôture. Si l'appareil est approché trop près, le fil se casse et s'enroule autour du grillage.
Pour couper les tiges de mauvaises herbes, procéder tige par
tige. Toujours placer la tête de coupe à fil nylon au pied de la
plante, jamais en haut, car la plante risque de se briser et de
se prendre dans le fil. Plutôt que d'utiliser toute la longueur du
fil pour couper une plante, ne passer que l'extrémité du fil sur
la tige afin de la couper progressivement.
1. Angle par rapport au mur
2. Débris
3. Côté couteau relevé
4. Angle par rapport au sol
Fauchage
Désherbage et taille des bordures
Le fauchage consiste à couper ou tondre de grandes surfaces
d'herbe en effectuant des mouvements en arc de cercle avec
l'appareil. Procéder par mouvements lents et réguliers. Ne pas
essayer de hacher l'herbe. Incliner la tête de coupe à fil nylon
de sorte que les débris ne soient projetés dans la direction de
l'utilisateur durant l'opération de fauchage. Puis retourner au
point de départ (sans couper d'herbe) pour recommencer
l'opération. Si l'utilisateur est bien protégé et n'est pas gêné
par la projection de débris, il peut faucher dans les deux sens.
Ces deux opérations sont effectuées à l'aide de la tête de
coupe à fil nylon inclinée sous un angle aigu. Le désherbage
(A) consiste à retirer les plantes de surface, laissant la terre
nue. La taille de bordures (B) consiste à couper l'herbe qui a
poussé sur un trottoir ou dans une allée. Lors du désherbage
ou de la taille de bordures, maintenir l'appareil sous un angle
de coupe aigu de sorte que les débris, pierres et poussières
soulevés ne soient pas projetés en direction de l'utilisateur,
même s'ils ricochent sur une surface dure.
Les images montrent comment désherber et tailler les bor-
dures. Cependant, c'est à l'utilisateur de trouver les angles de
coupe les mieux adaptés à sa taille et à l'opération effectuée.
Pour la plupart des opérations de coupe, il est recommandé
d'incliner la tête de coupe à fil nylon de sorte que le contact se
fasse uniquement sur la partie du cercle décrit par le fil la plus
éloignée de l'utilisateur (voir l'image correspondante). Ainsi,
les débris ne sont pas projetés en direction de l'utilisateur.
Si la tête est inclinée du mauvais côté, les débris sont projetés
vers l'utilisateur. Si la tête de coupe à fil nylon est maintenue
à plat sur le sol et que la coupe s'effectue sur la totalité du
cercle décrit par le fil, les débris sont projetés en direction de
l'utilisateur, la résistance ralentit l'appareil et une grande quantité de fil doit être utilisée.
La tête de coupe à fil nylon tourne dans le sens inverse des
aiguilles d'une montre. Le couteau se situe sur le côté gauche
du protecteur d'outil.
1. Débris
17
Page 44

Fonctionnement
2. Couper de ce côté
Ne pas approcher le fil d'herbes drues, d'arbres ou de gril-
lages.
Mettre le fil en contact avec du grillage ou avec des brous-
sailles denses peut causer la rupture du fil ; les extrémités du
fil risquent alors d'être projetées vers l'utilisateur. La bonne
technique consiste à couper l'herbe jusqu'à l'obstacle, mais à
ne jamais heurter le fil contre l'obstacle. Ne pas utiliser l'appareil à proximité d'un obstacle ou d'une barrière.
Éviter de mettre le fil nylon en contact avec des morceaux de
grillage. À haut régime, les morceaux de fils de fer peuvent
être projetés.
18
Page 45

Entretien
A
Entretien
AVERTISSEMENT
Respecter les mesures de précaution suivantes lors de la vérification et de l'entretien de l'appareil après utilisation :
Mettre l'appareil hors tension, retirer la batterie et s'assurer que toutes les pièces mobiles sont complètement à l'ar-
rêt.
Il existe un risque d'accident en cas de démarrage intempestif de l'appareil.
Laisser l'appareil refroidir avant tout entretien.
Il existe un risque de brûlure.
IMPORTANT
La vérification et l'entretien de l'appareil nécessitent des connaissances spécialisées. Si l'utilisateur ne possède pas les com-
pétences requises pour effectuer les opérations de vérification et d'entretien de l'appareil ou pour remédier à un dysfonctionnement, il doit consulter un revendeur. Ne pas essayer de démonter l'appareil.
Instructions d'entretien de l'appareil
Pièce Entretien Page Avant utilisation Tous les mois
Batterie Contrôler/nettoyer/charger 10 •
Tête de coupe à fil nylon Contrôler 19 •
Couteau Contrôler/nettoyer - •
Vis, boulons et écrous Contrôler, serrer/remplacer - •
Entretien
En cas de questions ou de problèmes, contacter un revendeur.
Nettoyage de la batterie et de son logement
AVERTISSEMENT
Risque de choc électrique ou d'incendie. Ne pas utiliser
de matériaux conducteurs pour nettoyer la batterie ou
son logement.
1. Relâcher l'interrupteur à poussoir et le blocage de l'interrupteur à poussoir et laisser le taille-haie s'arrêter.
2. S'assurer que la DEL du témoin d'alimentation n'est pas allumée.
3. Appuyer sur le verrou du bloc-batterie (A) et faire glisser le
bloc-batterie hors de la tête motrice.
4. Utiliser de l'air comprimé ou une brosse à poils souples pour
enlever les débris de la batterie et de son logement.
Vérification de la tête de coupe à fil nylon
1. S'assurer que le pourtour des 2 ergots de fixation du boîtier
corresponde parfaitement au pourtour des ouvertures correspondantes du couvercle.
2. Vérifier que la tête de coupe est bien fixée sur le coupeherbe et la resserrer le cas échéant.
3. Contrôler la tête de coupe et rechercher toute déformation
ou bruit anormal en la faisant tourner manuellement. Une
déformation ou un bruit anormal peut provoquer des vibrations anormales ou entraîner le desserrage du coupe-herbe
pendant la rotation, ce qui constitue un risque.
19
Page 46

Entretien
4. Vérifier le degré d'usure du couvercle et de la partie inférieure de la bobine. Si une fente apparaît au bas de la partie
inférieure de la bobine ou au bas du couvercle, à proximité
de la sortie du fil nylon, il faut impérativement remplacer ces
pièces.
5. Vérifier si la tête de coupe présente des fissures ou des
éclats. Remplacer impérativement toute pièce présentant
une fissure ou un éclat.
Remplacement du fil nylon
DANGER
Toujours couper le fonctionnement de l'appareil et s'assurer que la tête de coupe à fil nylon ne tourne plus avant de
procéder au remplacement de la pièce.
Le non-respect de cette règle de sécurité entraîne un risque d'accident ou de blessure grave.
AVERTISSEMENT
Utiliser uniquement un fil de coupe flexible et non métallique recommandé par YAMABIKO CORPORATION.
Le non-respect de cette règle de sécurité entraîne un risque d'accident ou de blessure grave.
1. Comprimer les « ergots de fixation » (en deux endroits) vers
l'intérieur, puis retirer le couvercle. Il est plus facile de les retirer l'un après l'autre.
2. Déposer la bobine.
3. Lorsqu'il n'y a presque plus de fil nylon sur la bobine, retirer
le fil restant de la bobine et enrouler le « nouveau fil » en suivant les instructions (4) et suivantes. Lorsque le fil est
« collé » sur la bobine, retirer complètement le fil en décollant la partie « collée », puis enrouler le fil ainsi « décollé »
en suivant les instructions (4) et suivantes.
4. Plier le fil à 10 cm du milieu de sa longueur totale et accrocher la partie pliée sur l'« encoche » du séparateur intermédiaire.
5. Enrouler le fil bien tendu dans la rainure de la bobine en suivant « le sens d'enroulement du fil à gauche ».
6. Lorsque le fil est entièrement enroulé autour de la bobine,
accrocher ses deux extrémités dans les encoches correspondantes de la bobine pour le bloquer provisoirement ; laisser environ 10 cm de fil dépasser des encoches.
7. Aligner les encoches de la bobine avec les rainures des œillets, puis emboîter la bobine dans le couvercle.
20
Page 47

Entretien
8. Tirer le fil pour le faire dépasser du couvercle. (A) Retirer le
fil des « encoches correspondantes de la bobine », puis (B)
le faire passer dans les « rainures des œillets correspondants ».
9. Assembler le couvercle et le boîtier. (C) Aligner les
« œillets» du couvercle avec les « renfoncements » du boitier, puis (D) enfoncer les ergots du boîtier dans les ouvertures correspondantes du couvercle jusqu'à ce que les
ergots s'encastrent parfaitement.
DANGER
S'assurer que le pourtour extérieur des ergots du boîtier
corresponde parfaitement au pourtour extérieur des ouvertures correspondantes du couvercle. Si les ergots sont
mal emboîtés et que la tête de coupe pivote, le couvercle
ou des composants internes risquent d'être projetés, ce
qui représente un danger potentiel pour l'utilisateur.
Guide de dépannage
IMPORTANT
En ce qui concerne les pièces de rechange et les consommables, utiliser uniquement des pièces d'origine et les produits et
composants recommandés.
L'utilisation de pièces d'autres marques ou de composants inappropriés peut entraîner un dysfonctionnement de l'appareil.
Problème Cause Solution
Voyant rouge du chargeur clignotant ou
ne s'allumant pas
L'appareil ne se met pas en marche 1. Bloc-batterie mal installé 1. Contrôler la pose du bloc-batterie
L'appareil ne fonctionne pas lorsqu'il est
mis en marche
Le temps d'utilisation est trop court 1. Bloc-batterie hors de la plage de
1. Fiche non branchée dans la prise
d'alimentation
2. Bloc-batterie mal installé
3. Connexion obstruée
4. Défaut du chargeur
5. Défaut du bloc-batterie
1. Bloc-batterie déchargé
2. Tête de coupe obstruée
3. Bloc-batterie hors de la plage de
température acceptable
température acceptable
2. Module électronique de l'appareil
trop chaud
3. Bloc-batterie déchargé
1. Brancher le chargeur
2. Contrôler la pose du bloc-batterie
3. Réinstaller le bloc-batterie après
avoir éliminé ce qui empêche la
connexion
4. Consulter un revendeur
5. Consulter un revendeur
1. Charger le bloc-batterie
2. Arrêter l'appareil et nettoyer l'outil de
coupe
3. Retirer le bloc-batterie et le laisser
refroidir
1. Retirer le bloc-batterie et le laisser
refroidir
2. Éteindre l'appareil et laisser refroidir
3. Charger le bloc-batterie
Avance du fil impossible 1. Quantité insuffisante de fil sur la bo-
bine
2. Fil emmêlé dans la bobine
Le fil ne se coupe pas 1. Couteau placé dans le protecteur
d'outil endommagé ou manquant
21
1. Rembobiner à l'aide de fil neuf
2. Débobiner puis rembobiner le fil
1. Consulter un revendeur
Page 48

Entretien
En cas de problème différent de ceux décrits dans le tableau ci-dessus, consulter un revendeur.
S'adresser à un revendeur pour la mise au rebut de l'appareil ou de ses composants conformément à la législation nationale
en vigueur.
Remisage
AVERTISSEMENT
Ne pas remiser dans une enceinte où une accumulation de vapeurs inflammables est susceptible de se
produire.
Il existe un risque d'incendie.
Si l'appareil doit être remisé pendant une longue période, respecter les instructions de remisage suivantes.
Taille-haie électrique
1. Mettre l'appareil hors tension.
2. Retirer la batterie de la tête motrice.
3. Éliminer la saleté et les débris accumulés à l'extérieur de l'appareil.
4. Serrer l'ensemble des vis et écrous.
5. Couvrir le logement de batterie de la tête motrice, la batterie et le chargeur de batteries.
6. Remiser l'appareil dans un endroit sec, non poussiéreux et hors de portée des enfants.
Batterie
1. Retirer la batterie de la tête motrice.
2. Remiser dans un endroit sec, non poussiéreux et hors de portée des enfants.
3. Remiser à une température comprise entre -20 (-4 °F) et 60 °C (140 °F).
4. Si la pile est stockée pendant plus d'un an, la charger à environ 40 à 60 % de sa capacité.
Chargeur de batteries
1. Retirer la batterie du chargeur de batteries.
2. Débrancher le chargeur de batteries de l'alimentation électrique.
3. Remiser dans un endroit sec, non poussiéreux et hors de portée des enfants.
Mise au rebut
Les pièces plastiques principales de l'appareil portent des
codes indiquant la nature de leurs matériaux de composition.
Ces codes font référence aux matériaux suivants ; procéder à
l'élimination de ces pièces plastiques conformément à la législation locale en vigueur.
Code Matériau
>PA6-GF< Nylon 6 - Fibre de verre
>PP-GF< Polypropylène - Fibre de verre
>PE-HD< Polyéthylène
>PP< Polypropylène
Si vous ne connaissez pas la procédure à suivre pour vous dé-
barrasser des pièces plastiques, contactez votre revendeur.
La batterie contient du lithium. Effectuer la mise au rebut uni-
quement dans un site de ramassage désigné.
Recycler ou mettre au rebut les batteries au lithium-ion
comme il se doit.
22
Page 49

Caractéristiques
Caractéristiques
DSRM-300
Dimensions externes :
Longueur × Largeur × Hauteur 1830 × 350 × 280 mm
Masse :
Appareil sans l'outil de coupe, le bloc-batterie et la protection du
harnais
Appareil avec l'outil de coupe, le bloc-batterie et la protection du
harnais
Outil de coupe :
Tête de coupe à fil nylon
Diamètre du fil
Longueur du fil
Filetage
Largeur de coupe
Rapport de vitesse 2,93
Sens de rotation de l'arbre de sortie vu du dessus : Sens inverse des aiguilles d'une montre
Batterie :
Type
Tension du bloc
Type de chargeur
Tension d'entrée du chargeur
3,6 kg
5,3 kg
G138
2,0 mm
Fil de 2 × 1 m
À gauche M10 x 1,25
350 mm
Li-ion
56 volts (puissance 50,4 V)
CCCV
230 - 240 volts CA
Voyants du chargeur de batteries : DEL rouge – batterie hors de la plage de température de
charge
DEL rouge clignotante – défaut
DEL verte – mise en charge de la batterie terminée
DEL verte clignotante – batterie en cours de charge normale
Temps de charge : Batterie LBP-560-100 : environ 42 minutes.
Batterie LBP-560-200 : environ 88 minutes.
Niveaux de vibrations : (EN50636-2-91) Poignée avant 1,6 m/s
Poignée arrière 1,4 m/s
Incertitude 1,5 m/s
Niveau de pression sonore : (EN50636-2-91)
Niveau de puissance sonore : (EN50636-2-91)
Incertitude
Niveau de puissance sonore garanti : (2000/14/CE, amendé par
2005/88/CE)
Ces caractéristiques sont susceptibles d'être modifiées sans préavis.
80,9 dB(A)
92,4 dB(A)
3,0 dB(A)
96 dB(A)
2
2
2
23
Page 50

Déclaration de conformité
Le fabricant soussigné :
YAMABIKO CORPORATION
7-2 SUEHIROCHO 1-CHOME
OHME ; TOKYO 198-8760
JAPON
Cette déclaration de conformité est délivrée sous la seule responsabilité du fabricant.
déclare que l'appareil neuf désigné ci-après :
COUPE-HERBE, CHARGEUR DE BATTERIES
Marque : ECHO
Type : DSRM-300, LCJQ-560
Déclaration de conformité
assemblé par :
ECHO, INCORPORATED
400 OAKWOOD ROAD
LAKE ZURICH, ILLINOIS 60047-1564
États-Unis
est conforme :
* aux exigences de la directive 2006/42/CE (utilisation des normes harmonisées EN 60335-1: 2012, EN 50636-2-91:
2014)
* aux exigences de la directive 2014/30/UE (utilisation des normes harmonisées EN 55014-1: 2006, EN 55014-2:
1997, EN 61000-3-2: 2006 et EN 61000-3-3: 2008)
* aux exigences de la directive 2014/35/UE (utilisation des normes harmonisées EN 60335-1: 2012, EN 60335-2-29:
2004 et EN 62233: 2008)
* spécifications de la directive 2000/14/CE
Procédure d'évaluation de la conformité suivant l'ANNEXE V
* aux exigences de la directive 2011/65/UE (utilisation de la norme harmonisée EN 50581: 2012)
Niveau de puissance sonore mesuré : 93 dB(A), niveau de puissance sonore garanti : 96 dB(A)
DSRM-300 : Numéro de série 35000001 et suivants, LCJQ-560 : Numéro de série 35001001 et suivants
Tokyo, le 1er mai 2016
YAMABIKO CORPORATION
Représentant autorisé en Europe, autorisé à constituer le
dossier technique.
Société : Atlantic Bridge Limited
Adresse : Atlantic House, PO Box 4800, Earley, Reading RG5
4GB, Royaume-Uni
Masayuki Kimura M. Philip Wicks
Directeur général
Service Assurance qualité
24
Page 51

1Remarques et dos de couverture
NOTES
2016
X750-027380
X750816-2101
25
Page 52

7-2 SUEHIROCHO 1-CHOME, OHME, TOKYO 198-8760, JAPON
TÉLÉPHONE : 81-428-32-6118. FAX : 81-428-32-6145.
©
2016
X750-027380
X750816-2101
Imprimé au Japon
0x0xxxx zzzz ES
26
Page 53

1Schutzabdeckung
DEUTSCH
(Original Gebrauchsanleitung)
BEDIENUNGSANLEITUNG
RASENTRIMMER
DSRM-300
WARNUNG
LESEN SIE DIE BEDIENUNGSANLEITUNG SORGFÄLTIG DURCH,
UND BEFOLGEN SIE DIE SICHERHEITSREGELN.
ANDERNFALLS BESTEHT DAS RISIKO SCHWERER
VERLETZUNGEN.
Page 54

Inhalt
Sichere Verwendung des Produkts .................................................................................... 3
Beschreibung...................................................................................................................... 8
Bevor Sie beginnen ............................................................................................................9
Betrieb .............................................................................................................................. 14
Wartung und Pflege ..........................................................................................................19
Technische Daten............................................................................................................. 23
Konformitätserklärung....................................................................................................... 24
Packliste ........................................................................................................................ 9
Laden des Akkus ......................................................................................................... 10
Zusammenbau............................................................................................................. 11
Rundgriff-Version.........................................................................................................11
Ausrichten der Balance................................................................................................ 12
Batterieinstallation ....................................................................................................... 13
Starten des Geräts ...................................................................................................... 15
Stoppen des Geräts.....................................................................................................15
Verwendung des Schultergurts.................................................................................... 16
Einfaches Trimmen mit dem Nylonfadenkopf .............................................................. 16
Wartungsrichtlinien ...................................................................................................... 19
Wartung und Pflege..................................................................................................... 19
LAGERUNG................................................................................................................. 22
Entsorgung ..................................................................................................................22
2
Page 55

Sichere Verwendung des Produkts
Sichere Verwendung des Prod ukts
Wichtige Informationen
WARNUNG
Lesen Sie unbedingt die Bedienungsanleitung, bevor Sie das Produkt verwenden.
Allgemeines zu dieser Bedienungsanleitung
Diese Bedienungsanleitung enthält wichtige Informationen über Montage, Bedienung und Instandhaltung Ihres
Produkts. Bitte lesen Sie sie sorgfältig durch, und machen Sie sich mit dem Inhalt vertraut.
Bewahren Sie die Anleitung stets an einem schnell zugänglichen Ort auf.
Sollte die Anleitung verloren gehen oder aufgrund von Beschädigungen nicht mehr lesbar sein, besorgen Sie sich
bitte eine neue Anleitung von Ihrem Händler.
Die in dieser Anleitung verwendeten Einheiten sind SI-Einheiten (Système International d'unités; Internationales
Einheitensystem). Zahlenangaben in Klammern sind Referenzwerte, bei denen mitunter geringe Umrechnungsfehler
vorliegen können.
Andernfalls kann es zu Unfällen bzw. schweren Verletzungen kommen.
Bestimmungsgemäßer Gebrauch dieses Produkts
Dieses Produkt ist ein Hochleistungsgerät geringen Gewichts, das sich zur Unkrautbekämpfung sowie zum
Rasentrimmen an Stellen eignet, wo andere Methoden unzulänglich sind.
Verwenden Sie das Gerät nur für den oben angegebenen Zweck.
Um Weiterentwicklungen des Produkts Rechnung zu tragen, bleiben dem Hersteller Änderungen am Inhalt dieser
Anleitung vorbehalten. Einige Abbildungen in dieser Anleitung können vom Produkt abweichen, um Sachverhalte
klarer darzustellen.
Bei Unklarheiten oder Problemen wenden Sie sich bitte an Ihren Händler.
Andernfalls kann es zu Unfällen bzw. schweren Verletzungen kommen.
Keine Veränderungen am Produkt vornehmen
An dem Produkt dürfen keine Veränderungen vorgenommen werden.
Andernfalls kann es zu Unfällen bzw. schweren Verletzungen kommen. Funktionsfehler, die auf Veränderungen am Produkt
zurückzuführen sind, fallen nicht unter die Herstellergarantie.
Produkt nur verwenden, wenn es überprüft und gewartet wurde
Das Produkt darf nur verwendet werden, wenn es überprüft und gewartet wurde. Die Überprüfung und Wartung des
Produkts muss regelmäßig durchgeführt werden.
Andernfalls kann es zu Unfällen bzw. schweren Verletzungen kommen.
Verleihen oder Übereignen des Produkts
Wenn Sie das Produkt verleihen, muss die ausleihende Person auch die zugehörige Bedienungsanleitung erhalten.
Wenn Sie das Produkt einer anderen Person übereignen, muss die Bedienungsanleitung zusammen mit dem
Produkt ausgehändigt werden.
Andernfalls kann es zu Unfällen bzw. schweren Verletzungen kommen.
Anwender des Produkts
Das Produkt darf von folgenden Personen nicht gebraucht werden:
übermüdete Personen
alkoholisierte Personen
unter Medikamenteneinfluss stehende Personen
schwangere Frauen
Personen in schlechter körperlicher Verfassung
Personen, die die Bedienungsanleitung nicht gelesen haben
Kinder
Seien Sie sich bewusst, dass der Benutzer für Unfälle bzw. Gefährdungen anderer Personen oder deren Eigentum
verantwortlich ist.
Eine Nichtbefolgung dieser Anweisungen kann zu Unfällen führen.
Die Bauteile dieser Maschine erzeugen im Betrieb ein elektromagnetisches Feld, das manche Herzschrittmacher
stören kann. Um Gesundheitsrisiken zu reduzieren, empfehlen wir, dass Personen mit Herzschrittmachern vor dem
Betrieb dieses Produkts ihren Arzt und den Hersteller des Herzschrittmachers konsultieren.
3
Page 56

Sichere Verwendung des Produkts
WARNUNG
Vibration und Kälte
Es wird vermutet, dass das Raynaud-Syndrom, das die Finger mancher Menschen befällt, durch stark vibrierende
Arbeitsgeräte und Arbeiten bei Kälte herbeigeführt wird. Durch stark vibrierende Arbeitsgeräte und das Arbeiten bei
Kälte kann sich ein Prickeln und Brennen bemerkbar machen, dem sich Farblosigkeit und Gefühllosigkeit der Finger
anschließen. Die nachstehend aufgeführten Vorsichtsmaßnahmen werden dringend empfohlen, da die
Mindestwerte, bei denen diese Krankheit ausgelöst wird, nicht bekannt sind.
Halten Sie Ihren Körper warm, insbesondere Kopf und Nacken, Füße und Fußgelenke sowie Hände und
Handgelenke.
Legen Sie häufige Pausen ein, in deren Verlauf Sie den Kreislauf durch intensive Armübungen anregen, und
rauchen Sie nicht.
Begrenzen Sie die Dauerbetriebszeiten auf ein Minimum. Teilen Sie jeden Arbeitstag so ein, dass auch Arbeiten
ohne Trimmer oder tragbare motorisierte Geräte verrichtet werden.
Wenn Ihre Finger schmerzen, rot und angeschwollen sind und schließlich bleich und gefühllos werden, müssen
Sie einen Arzt aufsuchen, bevor Sie sich weiterhin Kälte und Vibrationen aussetzen.
Eine Nichtbefolgung dieser Anweisung kann zu gesundheitlichen Schäden führen.
RSI-Syndrom
Es wird angenommen, dass eine Überanstrengung der Muskeln und Sehnen der Finger, Hände, Arme und Schultern
in den betreffenden Körperteilen Schmerz, Schwellungen, Gefühllosigkeit, Schwäche und auch akuten Schmerz
verursachen kann. Durch bestimmte ständig wiederholte Handbewegungen steigt das Risiko für die Entwicklung
eines RSI-Syndroms. Auf folgende Art mindern Sie das Risiko des RSI-Syndroms:
Achten Sie darauf, dass Sie Ihr Handgelenk nicht zu sehr beugen, strecken oder verdrehen.
Legen Sie von Zeit zu Zeit Pausen ein, um wiederholte Bewegungen zu minimieren, und lassen Sie Ihre Hände
ruhen. Reduzieren Sie die Geschwindigkeit und den Kraftaufwand, mit denen Sie die Wiederholungsbewegung
ausführen.
Führen Sie geeignete Übungen zur Stärkung der Hand- und Armmuskulatur durch.
Suchen Sie einen Arzt auf, wenn Sie ein Prickeln, Gefühllosigkeit oder Schmerzen in Ihren Fingern, Händen,
Handgelenken oder Armen bemerken. Je früher das RSI-Syndrom erkannt wird, desto eher lässt sich eine
dauerhafte Schädigung von Nerven und Muskeln verhindern.
Eine Nichtbefolgung dieser Anweisung kann zu gesundheitlichen Schäden führen.
Angemessene Unterweisung
Das Gerät darf nicht ohne angemessene Unterweisung bzw. ohne Schutzkleidung bedient werden.
Machen Sie sich mit der richtigen Handhabung des Geräts und seiner Bedienungselemente vertraut.
Sie müssen wissen, wie sich das Gerät stoppen und der Motor abstellen lässt.
Zudem müssen Sie lernen, wie das Gerät schnell vom Schultergurt getrennt werden kann.
Erlauben Sie niemals einer anderen Person, das Gerät ohne vorherige Unterweisung zu benutzen.
Eine Nichtbefolgung dieser Anweisung kann zu gesundheitlichen Schäden führen.
Geeignete Kleidung tragen.
Ihr Haar sollte maximal schulterlang sein, ansonsten verwenden Sie ein Haarnetz.
Tragen Sie keine Krawatten, Schmuckstücke oder lose, weite Kleidungsstücke, die sich
im Gerät verfangen könnten.
Tragen Sie keine Schuhe mit freien Zehen, und arbeiten Sie nicht barfuß oder in kurzen
Hosen.
Bei Nichtbeachtung dieser Sicherheitsvorkehrungen sind Ihr Augenlicht und Ihr Gehör
gefährdet, und es drohen andere schwere Verletzungen.
4
Page 57

Sichere Verwendung des Produkts
WARNUNG
Schutzausrüstung tragen
Tragen Sie beim Arbeiten mit dem Trimmer immer die folgende
Schutzausrüstung:
1. Kopfschutz (Helm): schützt den Kopf
2. Ohrenschützer oder Ohrenstöpsel: schützen das Gehör
3. Schutzbrille: schützt die Augen
4. Gesichtsschutzschild: schützt das Gesicht
5. Sicherheitshandschuhe: schützen die Hände vor Kälte und Vibration
6. Eng anliegende Arbeitskleidung (lange Ärmel, lange Hosen): schützt den
Körper
7. Robuste, rutschfeste Stiefel (mit Schutzkappe) oder rutschfeste Schuhe (mit
Schutzkappe): schützen die Füße
8. Schienbeinschützer: schützen die Beine
Bei Nichtbeachtung dieser Sicherheitsvorkehrungen sind Ihr Augenlicht und Ihr Gehör
gefährdet, und es drohen andere schwere Verletzungen.
Falls erforderlich, verwenden Sie auch folgende Schutzausrüstung:
Staubmaske: schützt das Atmungssystem
Bienennetz: schützt vor angreifenden Bienen
Arbeitsumgebung und Bedienung
Produkt nicht verwenden:
an feuchten oder nassen Orten,
im Regen,
unter schlechten Wetterbedingungen,
an steilen Abhängen oder auf rutschigem Untergrund ohne ausreichenden Halt,
nachts oder bei schlechten Sichtverhältnissen,
bei Blitzrisiko.
Arbeiten Sie an leichten Hanglagen in horizontalen, bogenartigen Bewegungen.
Wenn Sie fallen oder ausrutschen oder das Produkt nicht mehr voll beherrschen, kann dies zu schweren Verletzungen führen.
Aus Gesundheits- und Sicherheitsgründen sollten Sie mit dem Gerät nur bei Lufttemperaturen von -5
arbeiten.
Eine Nichtbefolgung dieser Anweisung kann zu gesundheitlichen Schäden führen.
o
C bis 40 oC
Vorsorge für den Fall von Verletzungen
Für den unwahrscheinlichen Fall, dass es dennoch zu Verletzungen
kommt, sollten Sie folgende Dinge vorbereitet haben:
Verbandskasten
Hand- und Wischtücher (um etwaige Blutungen zu stoppen)
Trillerpfeife oder Mobiltelefon (um Hilfe rufen zu können)
Wenn Sie weder erste Hilfe leisten noch Hilfe rufen können, kann sich die
Verletzung verschlimmern.
Warnhinweise
GEFAHR WARNUNG VORSICHT
Dieses Symbol in Verbindung mit
dem Wort „GEFAHR“ macht auf
Handlungen oder Bedingungen
aufmerksam, die zu schweren
Verletzungen oder zum Tod von
Bediener und umstehenden
Personen führen.
Dieses Symbol in Verbindung mit
dem Wort „WARNUNG“ macht auf
Handlungen oder Bedingungen
aufmerksam, die zu schweren
Verletzungen oder zum Tod von
Bediener und umstehenden
Personen führen können.
„VORSICHT“ warnt vor einer
Gefahrensituation, in der es zu
leichten bis mäßigen Verletzungen
kommen kann.
5
Page 58

Sichere Verwendung des Produkts
Sonstige Kennzeichnungen
HINWEIS WICHTIG
Kreis mit umgekehrtem
Schrägstrich bedeutet,
dass das Dargestellte
unzulässig ist.
Symbole
Symbol Beschreibung des Symbols Symbol Beschreibung des Symbols
Lesen Sie die
Bedienungsanleitung
sorgfältig durch
Hinweise dieser Art enthalten Tipps
zur Verwendung, Pflege und Wartung
des Produkts.
Umrahmter Text mit der Überschrift
„WICHTIG“ enthält wichtige
Informationen zur Verwendung,
Überprüfung, Wartung und Lagerung
des in dieser Anleitung
beschriebenen Produkts.
Passanten auf Abstand halten
Tragen Sie Augenschutz
Tragen Sie Ohrenschutz
Sicherheit/Alarm Achtung, heiße Bereiche
Warnung!
Gegenstände werden
hochgeschleudert!
Einsatz ohne Schutzschild
verboten
Passanten auf einen Abstand
von 15 m halten
Tragen Sie
Schutzhandschuhe und
Schutzschuhe
Garantierter
Schallleistungspegel
Nie im Regen oder an
feuchten Orten betreiben
Verwendung von
Metallmessern verboten
Achtung, Brandgefahr
Achtung, Stromschlag-Gefahr
Entsorgen Sie elektrische
Geräte nicht über den
Hausmüll.
6
Page 59

Sichere Verwendung des Produkts
Sicherheitsaufkleber
Die in dieser Anleitung beschriebenen Produkte sind mit dem unten dargestellten Sicherheitsaufkleber versehen. Machen Sie
sich die Bedeutung des Sicherheitsaufklebers bewusst, bevor Sie das Produkt verwenden.
Falls der Sicherheitsaufkleber aufgrund von Verschleiß oder Beschädigung nicht mehr lesbar ist oder sich abgelöst hat,
erwerben Sie bitte einen neuen Sicherheitsaufkleber von Ihrem Händler, und bringen Sie ihn an der nachstehend gezeigten
Stelle an. Der Sicherheitsaufkleber muss stets gut lesbar sein.
1. Sicherheitsaufkleber (Teilenummer X505-008900)
7
Page 60

Beschreibung
Beschreibung
1. Winkelgetriebe - Ermöglicht es, den Winkel der
Rotationsachse zu ändern.
2. Schneidvorrichtung - Nylonfadenkopf zum Schneiden
von Gras und Unkraut.
3. Fadenschneidmesser - Schneidet den Nylonfaden auf
die richtige Länge ab.
4. Schutzschild - Schützt den Bediener vor Kontakt mit
dem Schneidkopf und weggeschleuderten Objekten.
5. Antriebswellenrohr - Geräteteil, das als Gehäuse für
die Antriebswelle dient.
6. Schlaufengriff - Griff für die linke Hand.
7. Trageöse - Vorrichtung, mit der das Gerät am
Schultergurt befestigt wird.
8. Betriebsanzeige-LED - Leuchtet, wenn das Gerät
Strom erhält. Geht aus, wenn die Stromzufuhr zum
Gerät unterbrochen wird.
9. Ein/Aus-Knopf - Ein Mal drücken, um die Stromzufuhr
zu dem Gerät einzuschalten – die Betriebsanzeige-LED
leuchtet. Wieder drücken, um die Stromzufuhr zu dem
Gerät auszuschalten – die Betriebsanzeige-LED geht
aus.
10. Hebelschaltersperre - Dient zum Arretieren des
Hebelschalters in der Aus-Stellung, bis Sie mit der
rechten Hand den Griff ganz umgriffen haben.
11. Hebelschalter - Schaltet den Motor ein und wird durch
den Bediener mit einem Finger betätigt.
12. Antriebskopf – Enthält Motor und Akku.
13. Schultergurt - Einstellbarer Riemen, an dem das Gerät
aufgehängt wird.
8
Page 61
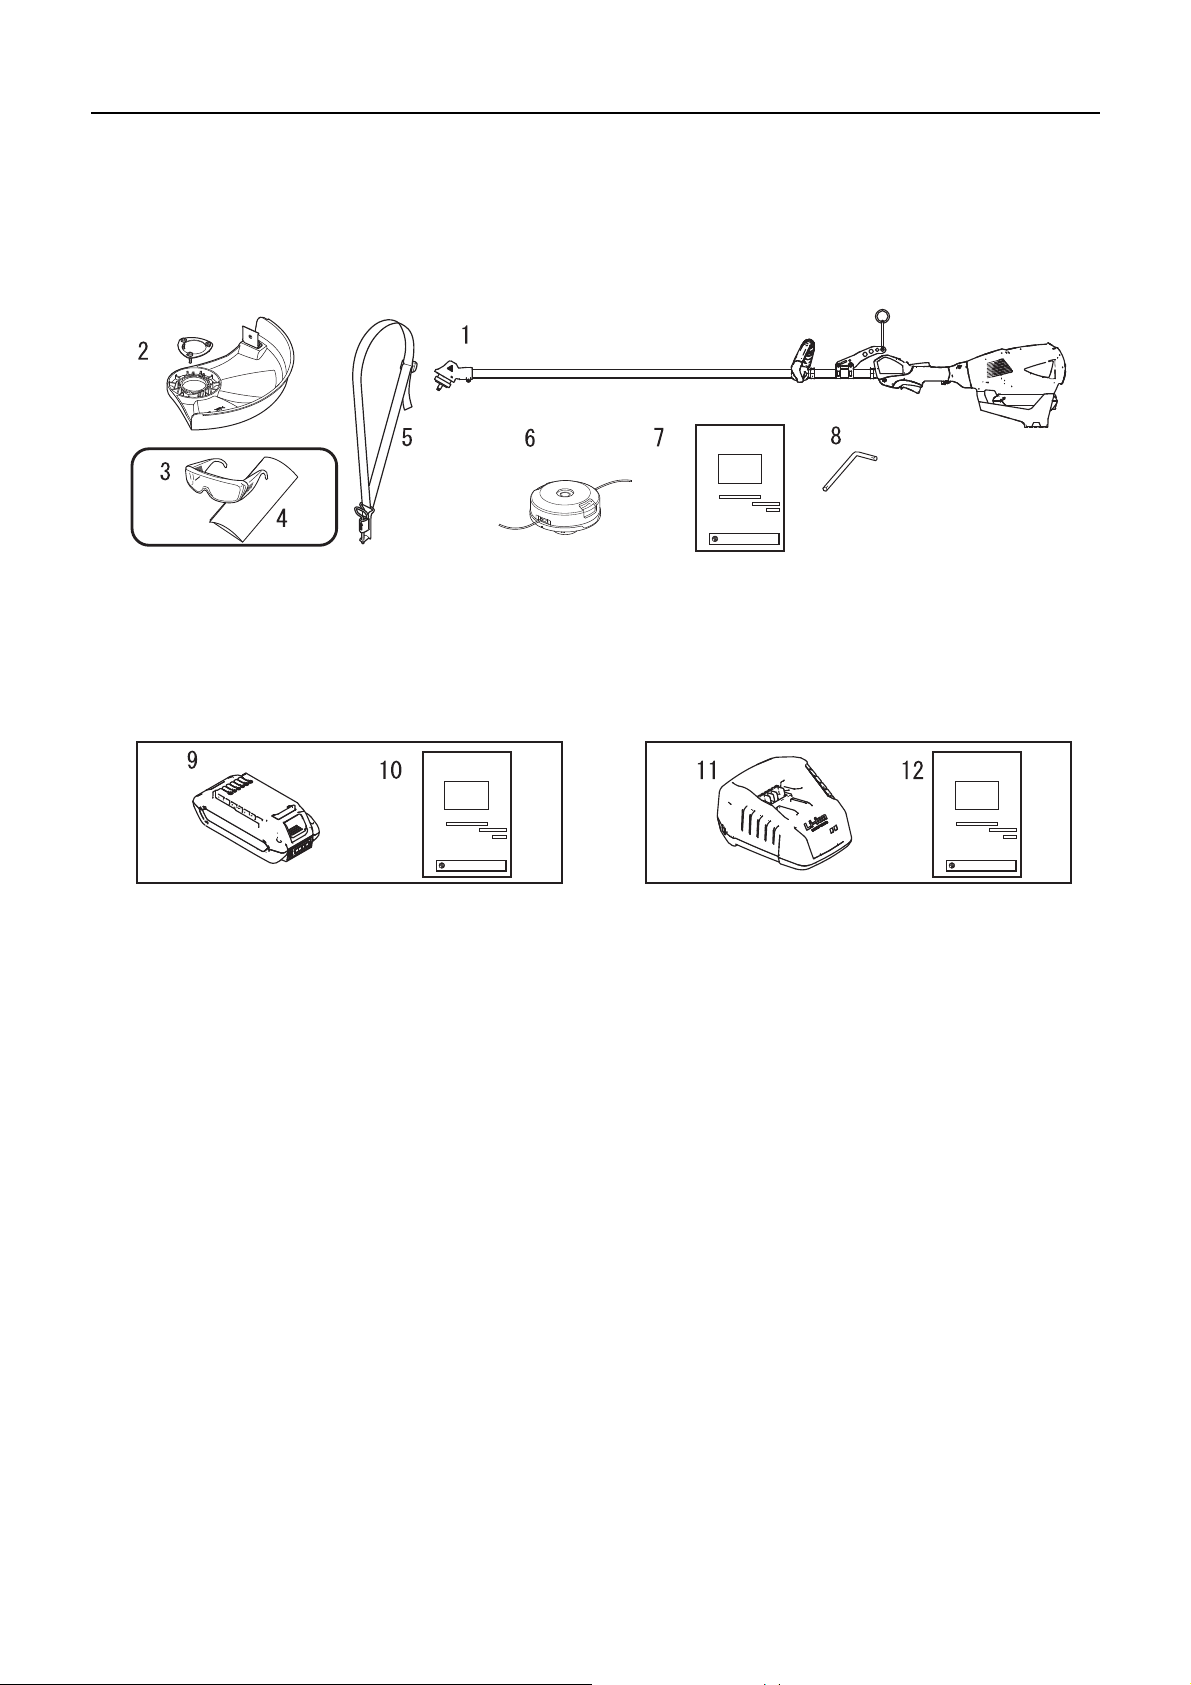
Bevor Sie beginnen
Packliste
Die nachfolgend aufgeführten Einzelteile sind in der Verpackung enthalten.
Überprüfen Sie nach dem Auspacken die Vollständigkeit des Inhalts.
Wenden Sie sich an Ihren Händler, wenn Teile fehlen oder beschädigt sind.
Bevor Sie beginnen
1. Motoreinheit und Antriebswellenrohr
2. Schutzschild
3. Schutzbrille
4. Vorsichtshinweis
9. Akku
10. Bedienungsanleitung
5. Schultergurt
6. Nylonfadenkopf
7. Bedienungsanleitung
8. L-Schlüssel
11. Ladegerät
12. Bedienungsanleitung
9
Page 62

Bevor Sie beginnen
A
B
Laden des Akkus
WARNUNG
Verwenden Sie nur den Akku LBP-560-100/LBP-560-200, und laden Sie diesen nur mit dem Ladegerät LCJQ-560.
Halten Sie Ladegerät und Akku fern von Feuchtigkeit und allen Flüssigkeiten.
Verwenden Sie das Ladegerät nicht auf leicht brennbaren Materialien (z. B. Papier, Stoff) und nicht in einer
Umgebung mit erhöhter Brandgefahr.
Bedecken Sie das Ladegerät nicht. Ist das Ladegerät bedeckt, kann es nicht kühlen.
Verwenden sie das Ladegerät nicht in explosiven Umgebungen, wie in der Gegenwart von entflammbaren
Flüssigkeiten, Gasen oder Staub. Ladegeräte können Funken verursachen, die Staub oder Rauch entzünden können
- es besteht Explosionsgefahr.
Schließen Sie das Ladegerät nur an das Netz an, wenn Spannung und Frequenz mit den Angaben auf dem
Typenschild übereinstimmen.
Schließen Sie das Ladegerät nur an eine leicht zugängliche Steckdose an.
Stecken Sie nie Gegenstände in die Kühlschlitze (A) des Akkus oder des Ladegeräts.
Defekte, beschädigte oder verformte Akkus oder Ladegeräte dürfen nicht geladen oder verwendet werden.
Der Akku und das Ladegerät dürfen nicht geöffnet, beschädigt oder fallengelassen werden.
Aus dem Akku kann Flüssigkeit austreten, wenn er beschädigt ist oder nicht ordnungsgemäß verwendet wird. Den
Hautkontakt vermeiden. Bei versehentlichem Kontakt die betroffenen Bereiche der Haut mit viel Wasser und Seife
abwaschen. Wenn Flüssigkeit in die Augen gerät, die Augen nicht reiben. Spülen Sie die Augen mindestens 15
Minuten lang mit viel Wasser. Suchen Sie auch einen Arzt auf.
Überbrücken Sie die Kontakte des Akkus oder die Klemmen des Ladegeräts nie mit Metallgegenständen
(Kurzschluss).
Schützen Sie den Akku vor direkter Sonneneinstrahlung, Hitze und offenem Feuer, und werfen Sie ihn nie in ein
Feuer, es besteht Explosionsgefahr.
Falls Rauch oder Flammen aus dem Ladegerät aufsteigen, ziehen Sie sofort den Stecker aus der Steckdose.
Ist das Verbindungskabel beschädigt, ziehen Sie unverzüglich den Stecker aus der Steckdose, um Stromschläge zu
verhindern.
Setzen Sie den Akku nie Mikrowellen oder hohem Druck aus.
Sichern Sie das Gerät gegen unbeabsichtigtes Starten. Nehmen Sie zum Transport und zur Lagerung des Geräts den
Akku heraus. Verwenden Sie keine Metallcontainer für den Transport von Akkus.
Verwenden Sie das Verbindungskabel nicht für andere Zwecke, z. B. um das Ladegerät zu tragen oder aufzuhängen.
Um die Stolpergefahr zu beschränken, bringen Sie das Verbindungskabel so an und markieren Sie es so, dass es
nicht beschädigte werden kann und keine Gefahr für andere darstellt.
Umgreifen Sie beim Herausziehen den Stecker, nicht das Kabel.
HINWEIS
Der neue Akku wird teilgeladen geliefert und muss vor dem ersten Gebrauch voll geladen werden.
Laden Sie den Akku, wenn die Leistung nicht mehr für den Betrieb des Geräts ausreicht, oder wenn die Lampen am Akku
anzeigen, dass der Akku schwach ist.
1. Stecken Sie das Wechselstromkabel des Ladegeräts in die
Netzsteckdose.
2. Richten Sie die Ränder des Akkus an den Nuten am
Ladegerät aus und schieben Sie den Akku in das Ladegerät.
3. Während des normalen Aufladevorgangs blinkt die GRÜNE
LED (B) auf dem Ladegerät kontinuierlich.
WICHTIG
Wenn das Ladegerät ein Problem erkennt, blinkt die LED
ROT auf. Entfernen Sie den Akku aus dem Ladegerät,
entfernen Sie Schmutz o. ä. von den Kontakten und
installieren Sie den Akku wieder im Ladegerät. Wenn der
Akku einer Temperatur ausgesetzt ist, die außerhalb des
zugelassenen Bereichs (0-60 °C) liegt, bleibt die LED ROT.
10
Page 63

Bevor Sie beginnen
C
D
4. Nach beendeter Ladung leuchtet die LED konstant grün.
Ein vollständig entladener Akku lädt in etwa 42 Minuten.
5. Prüfen Sie, ob der Akku vollständig geladen ist, indem Sie
den Akku aus dem Ladegerät nehmen, die
Akkuladezustand-Taste (C) drücken und die LED-Anzeige
beobachten (D).
Ein grünes Licht bedeutet, dass der Akku 0 bis 25 %
Ladung hat.
Zwei grüne Lichter bedeuten, dass der Akku 25 bis 50 %
Ladung hat.
Drei grüne Lichter bedeuten, dass der Akku 50 bis 75 %
Ladung hat.
Vier grüne Lichter bedeuten, dass der Akku 75 bis 100 %
Ladung hat.
6. Trennen Sie das Akkuladegerät vom Netz.
Zusammenbau
WARNUNG
Lesen Sie die Bedienungsanleitung aufmerksam durch, um sicherzustellen, dass Sie das Produkt
korrekt zusammenbauen.
Die Verwendung eines falsch zusammengebauten Produkts kann zu Unfällen bzw. schweren Verletzungen
führen.
Rundgriff-Version
Befestigung des Rundgriffs
Montage des Schutzschilds
Richten Sie den Griff in eine für das Arbeiten bequeme Position
aus, und ziehen Sie die Bolzen fest.
VORSICHT
Montieren Sie den Griff so, dass er die
Sicherheitsaufkleber nicht verdeckt.
WARNUNG
Das Fadenschneidmesser des Schutzschildes ist
scharfkantig. Vermeiden Sie Kontakt beim Ein- oder
Ausbau des Fadenkopfs.
1. Entfernen Sie die Kunststoffhülse (A) von der
Ausgangswelle.
2. Installieren Sie den Schutzschild (B) unten am
Winkelgetriebeflansch (C).
3. Positionieren Sie die Platte (D) auf den Schild, richten Sie
die Öffnungen aus und drehen Sie die drei Schrauben
ein(E).
4. Ziehen Sie die drei Bolzen fest an.
5. Entfernen Sie die Dichtung (F).
HINWEIS
Der Schutzschild ist ausschließlich für den Gebrauch mit
dem Nylonfadenkopf vorgesehen.
11
Page 64

Bevor Sie beginnen
Montage des Nylonfadenkopfs
VORSICHT
Verhindern Sie mit Hilfe des Arretierwerkzeugs ein
Mitdrehen des Werkzeugaufnahmebolzens, bevor Sie
den Nylonfadenkopf montieren.
1. Achten Sie darauf, dass die obere Druckplatte (A) auf dem
Werkzeugaufnahmebolzen (B) bleibt.
2. Richten Sie die Verriegelungsöffnung in der oberen
Druckplatte an der Kerbe der Winkelgetriebekante aus und
setzen Sie das Arretierwerkzeug (C) ein.
3. Installieren Sie den Fadenkopf (D) auf dem
Werkzeugaufnahmebolzen, indem Sie ihn gegen den
Uhrzeigersinn drehen, bis der Kopf fest gegen die obere
Druckplatte sitzt.
4. Entfernen Sie das Arretierwerkzeug.
Ausrichten der Balance
Einstellen des Schultergurts
WARNUNG
Dieses Produkt ist für viele verschiedene Körpergrößen ausgelegt, lässt sich aber evtl. nicht für sehr große
Personen einstellen. Verwenden Sie das Gerät nicht, wenn Ihre Füße an die Schneidvorrichtung heranreichen,
während das Gerät am Schultergurt eingehängt ist.
WICHTIG
Die Körpergröße einer Person kann sich auf das Gerätegleichgewicht auswirken. Manchen Personen ist u. U. nicht möglich,
bestimmte Geräte ins Gleichgewicht zu bringen. Fragen Sie Ihren Händler um Rat, wenn es Ihnen nicht gelingt, den
Schultergurt an Ihre Körpermaße anzupassen.
Der mitgelieferte Schultergurt ist fur Personen mit einer Grose
von 150 bis 195 cm und einem einem Bauchumfang von 60
bis 140 cm geeignet.
Tragen Sie den Schultergurt, wenn dies in dieser
Bedienungsanleitung empfohlen oder vorgeschrieben wird.
Justieren Sie sowohl den Gurt als auch die Trageöse (A) am
Gerät so, dass das Gerät mit der Schneidvorrichtung einige
Zentimeter über dem Boden (B) hängt.
Die Schneidvorrichtung und der Schutzschild müssen sich in
jeder Richtung auf einer Ebene befinden. Bringen Sie den
Tragegurt rechts wie abgebildet an.
Gerät so ausbalancieren, dass der Schneidkopf
parallel zum Boden steht
Verstellen Sie die Trageöse entlang des Antriebswellenrohrs,
um die richtige Balanceposition zu finden. Drehen Sie die
Trageöse so, dass Schneidvorrichtung und Schutzschild
parallel zum Boden ausgerichtet sind. Arretieren Sie sie in
dieser Position. Wenn es sich um eine frei bewegliche
Trageöse handelt, kann sich das Gerät leicht zur Seite neigen.
Sie müssen aber dennoch die Schneidvorrichtung und den
Schutzschild auf einer Achse von vorn nach hinten nivellieren.
Beim oben beschriebenen Ausrichten und Nivellieren ist es
u. U. erforderlich, die Trageöse anders zu positionieren und
die Schultergurte anders einzustellen. Außerdem kann es
sein, dass die verschiedenen Schneidvorrichtungen und
12
Page 65

Batterieinstallation
A
B
C
Bevor Sie beginnen
Schutzschilde am Gerät einzeln ausgerichtet werden müssen.
VORSICHT
Montieren Sie die Trageöse so, dass sie nicht weiter
von Ihnen entfernt ist als die Pfeilmarkierung ( ).
WARNUNG
Die Vorrichtung arbeitet, wenn der Akku eingesetzt ist,
die Betriebsanzeige-LED leuchtet und der
Hebelschalter und die Hebelschaltersperre betätigt
werden. Achten Sie darauf, dass die Heckenschere
richtig positioniert ist, damit Sie nicht die Kontrolle
verlieren – es besteht schwere Verletzungsgefahr.
Halten Sie die beweglichen Teile des Geräts fern vom
Boden und von Gegenständen, die eingezogen oder
weggestoßen werden könnten.
1. Kontrollieren Sie, dass die Stromzufuhr zum Gerät
unterbrochen ist.
2. Richten Sie die Ränder (A) des Akkus an den Nuten am
Antriebskopf aus Schieben Sie den Akku in den
Antriebskopf.
3. Vergewissern Sie sich vor Betriebsbeginn, dass die
Akkuverriegelung (B) einrastet und der Akku fest sitzt.
4. Zum Entnehmen des Akkus drücken Sie auf die
Akkuverriegelung (C) und schieben den Akku aus dem
Antriebskopf.
WICHTIG
Bevor Sie die Heckenschere gebrauchen, kontrollieren Sie,
dass der Akku ganz eingeschoben und die
Akkuverriegelung eingerastet ist (D).
HINWEIS
Die Akkuverriegelung rastet ein, wenn der Akku ganz
eingeschoben ist.
13
Page 66

Betrieb
Betrieb
GEFAHR
In allen über Kopf befindlichen elektrischen Leitern und Kommunikationskabeln kann elektrischer Strom mit
Hochspannung fließen. Dieses Gerät ist nicht stromisoliert. Vermeiden Sie jede direkte oder indirekte Berührung der
Kabel, dies könnte sonst zu schweren Verletzungen oder sogar zum Tod führen.
Stellen Sie den Motor sofort ab, wenn die Schneidvorrichtung blockiert wird.
Wenn die Blockade beseitigt wird und die Schneidvorrichtung plötzlich anläuft, kann es zu schweren Verletzungen kommen.
Verwenden Sie das Produkt niemals ohne den daran befestigten Schutzschild.
Von der Schneidvorrichtung abprallende Gegenstände können Unfälle mit schweren Verletzungen verursachen.
Der Bereich in einem Radius von 15 m rund um dieses Gerät gilt als
Gefahrenzone. Beachten Sie bei der Arbeit mit diesem Gerät folgende
Sicherheitsregeln:
Lassen Sie keine Personen (insbesondere Kinder) oder Tiere in die
Gefahrenzone.
Sollte eine Person in die Gefahrenzone gelangen, stellen Sie den
Motor ab, so dass sich die Schneidvorrichtung nicht mehr dreht.
Wenn Sie sich dem Bediener nähern möchten, signalisieren Sie ihm
Ihre Absicht, indem Sie z. B. Zweige von außerhalb der
Gefahrenzone werfen, und warten Sie dann, bis der Motor abgestellt
wurde und die Schneidvorrichtung stillsteht.
Wenn mehrere Personen mit dem Produkt arbeiten, vereinbaren Sie
eine Art der gegenseitigen Kommunikation, und arbeiten Sie mit
mindestens 15 m Abstand voneinander.
Von der Schneidvorrichtung abprallende Gegenstände und Kontakt mit der Schneidvorrichtung können zu Blindheit oder
tödlichen Unfällen führen.
WARNUNG
Befolgen Sie beim Starten des Geräts insbesondere die folgenden Sicherheitsregeln:
Überprüfen Sie, ob alle Bolzen und Muttern fest angezogen sind.
Sorgen Sie für ausreichenden Abstand rund um das Produkt, und lassen Sie keine Personen oder Tiere in die Nähe.
Eine Nichtbefolgung der Sicherheitsregeln kann zu Unfällen, Verletzungen oder sogar zum Tod führen.
Achten Sie nach dem Starten des Geräts auf ungewöhnliche Vibrationen oder Geräusche. Verwenden Sie das
Produkt nicht, wenn Sie ungewöhnliche Vibrationen oder Geräusche feststellen. Wenden Sie sich an Ihren Händler,
um es reparieren zu lassen.
Durch abfallende oder absplitternde Teile kann es zu schweren Verletzungen kommen.
Schalten Sie das Gerät immer aus und entfernen Sie den Akku, wenn Sie das Gerät transportieren.
Winkelgetriebe und andere stark erhitzte Teile des Produkts dürfen während des Betriebs und einige
Zeit danach nicht berührt werden.
Beim Berühren heißer Teile können Sie sich Verbrennungen zuziehen.
Bevor Sie mit der Arbeit beginnen, überprüfen Sie den Bereich, in dem Sie arbeiten möchten,
und entfernen Sie kleine Steine und leere Dosen, die durch die Schneidvorrichtung
weggeschleudert werden könnten, sowie Schnüre oder Drähte, die sich um die
Schneidvorrichtung wickeln könnten.
Wenn Fremdkörper durch die Schneidvorrichtung weggeschleudert werden oder sich Drähte oder
andere Materialien um die Schneidvorrichtung wickeln, kann dies zu Unfällen bzw. schweren
Verletzungen führen.
Stellen Sie den Motor in den nachfolgend genannten Situationen sofort ab, und vergewissern Sie sich, dass sich die
Schneidvorrichtung nicht mehr dreht. Überprüfen Sie dann die einzelnen Bereiche des Produkts. Ersetzen Sie
beschädigte Teile durch neue.
Die Schneidvorrichtung trifft beim Arbeiten auf einen Stein, Baum, Pfosten oder ein anderes Hindernis.
Das Produkt beginnt plötzlich, ungewöhnlich zu vibrieren.
Wenn beschädigte Teile weiter verwendet werden, kann dies zu Unfällen bzw. schweren Verletzungen führen.
Halten Sie die Schneidvorrichtung während des Arbeitens nicht nach oben. Die Schneidvorrichtung darf nicht über
Kniehöhe angehoben werden.
Durch Anheben der Schneidvorrichtung über Kniehöhe würden Sie die Rotationsebene näher ans Gesicht bringen, und
Gegenstände, die von der Schneidvorrichtung weggeschleudert werden, könnten Unfälle bzw. schwere Verletzungen
verursachen.
14
Page 67

Betrieb
WARNUNG
Versuchen Sie nie, das Produkt mit nur einer Hand zu bedienen.
Halten Sie die Griffe immer so, dass sie von Daumen und übrigen Fingern
fest umschlossen sind.
Das Gerät darf während des Betriebs nie überlastet und muss immer im Gleichgewicht betrieben werden. Um in
abschüssigem Gelände immer sicher zu treten, laufen Sie nie, sondern gehen Sie immer.
Das Gerät darf nie mit defekten Schützern oder Schutzschildern, ohne Sicherheitsvorrichtungen oder mit
beschädigtem oder verschlissenem Kabel betrieben werden.
Starten des Geräts
WARNUNG
Die Vorrichtung arbeitet, wenn der Akku eingesetzt ist, die Betriebsanzeige-LED leuchtet und der Hebelschalter und
die Hebelschaltersperre betätigt werden. Achten Sie darauf, dass das Produkt richtig positioniert ist, damit Sie nicht
die Kontrolle verlieren – es besteht schwere Verletzungsgefahr.
1. Drücken Sie den Ein/Aus-Knopf (A) ein Mal, um die
Stromzufuhr zu dem Gerät einzuschalten.
Die Betriebsanzeige-LED (B) leuchtet, wenn das Gerät
Strom erhält.
2. Halten Sie die Hebelschaltersperre (C) unten, und ziehen
Sie den Hebelschalter (D), um die Drehzahl auf
Betriebsdrehzahl zu bringen.
WICHTIG
Wenn die Stromzufuhr zu dem Gerät eingeschaltet ist:
Nach einer Minute Inaktivität schaltet sich das Gerät von
selbst aus.
Wenn die LED anbleibt, ist der Betrieb normal.
Wenn die LED ein Mal pro Sekunde blinkt, ist der Akku
ladebedürftig.
Wenn die LED vier Mal pro Sekunde blinkt, liegt in dem
Produkt eine Störung vor. Schalten Sie die Stromzufuhr
zu dem Gerät aus. Entnehmen Sie den Akku. Räumen
Sie den Fadenkopf frei. Setzen Sie den Akku ein.
Schalten Sie die Stromzufuhr zu dem Gerät ein. Wenn
die LED wieder blinkt, lassen Sie das Produkt von Ihrem
autorisierten Kundendiensthändler reparieren.
Stoppen des Geräts
WARNUNG
Die Schneidvorrichtung muss nach Ausschalten des Geräts für kurze Zeit weiterlaufen.
15
Page 68

Betrieb
Verwendung des Schultergurts
1. Lassen Sie den Hebelschalter und die Hebelschaltersperre
los und den Scherenkopf zum Stillstand kommen.
2. Drücken Sie den Ein/Aus-Knopf (A), um die Stromzufuhr zu
dem Gerät auszuschalten.
Die Betriebsanzeige-LED (B) geht aus, wenn die
Stromzufuhr zum Gerät unterbrochen wird.
Wenn der Scherenkopf nicht stoppt, wenn Hebelschalter
und Hebelschaltersperre gelöst werden, schalten Sie den
Ein/Aus-Knopf aus und entfernen Sie den Akku, um das
Produkt von der Stromzufuhr zu trennen. Lassen Sie den
Ein/Aus-Knopf von Ihrem autorisierten
Kundendiensthändler reparieren, bevor Sie das Produkt
wieder in Betrieb nehmen.
Hängen Sie den Trimmer immer ordnungsgemäß am
Schultergurt auf.
Befestigen Sie das Gerät am Schultergurt.
Legen Sie den Schultergurt über die linke Schulter, und
stellen Sie die Riemen so ein, dass sich die
Schnelllöseeinrichtung knapp unterhalb der Hüfte befindet.
Überprüfen Sie die richtige Einstellung, indem Sie das
Gerät über den Boden führen.
Stellen Sie die Position der Trageöse ggf. nach.
Der Schultergurt ist mit einer Schnelllöseeinrichtung für
Notfälle ausgestattet. Ziehen Sie bei Bränden oder in
anderen Notfällen die Schnelllöseeinrichtung (A) nach
oben, um das Produkt von Ihrem Körper zu lösen.
Einfaches Trimmen mit dem Nylonfadenkopf
WARNUNG
Bei falscher Verwendung der Schneidvorrichtung drohen schwere Verletzungen. Lesen und befolgen Sie alle
Sicherheitsanweisungen in dieser Bedienungsanleitung.
Verwenden Sie nur von der YAMABIKO CORPORATION empfohlene Schneidvorrichtungen.
Nylonfäden, die über das Fadenschneidmesser hinausragen, könnten weggeschleudert werden, wenn sich der
Fadenkopf nach der Anpassung der Nylonfadenlänge zu drehen beginnt.
Andernfalls kann es zu Unfällen bzw. schweren Verletzungen kommen.
Einstellen der Nylonfadenlänge
Verwenden Sie den Nylonfadenkopf nicht mit mehr als
10000 U/min.
Zum Nachstellen des Nylonfadens schlagen Sie den
Nylonfadenkopf bei unter 4500 U/min leicht gegen den Boden.
Das am Schutzschild montierte Fadenschneidmesser
begrenzt die Schnittbreite automatisch, indem es die
Nylonfäden auf die gleiche Länge abschneidet, nachdem der
Fadenkopf zu rotieren beginnt.
Wenn Sie mit einer geringeren Schnittbreite (weniger als max.
Länge) arbeiten möchten, schneiden Sie die beiden
Nylonfäden in gleicher Länge ab.
1. Auslöseknopf
2. Schlagen Sie den Auslöseknopf leicht gegen den Boden
3. Nylonfaden tritt aus
16
Page 69

Trimmen
Betrieb
Hierbei wird der Trimmer vorsichtig an das zu schneidende
Material herangeführt. Stellen Sie den Fadenkopf etwas
schräg, damit das Schneidgut von Ihnen weggeleitet wird.
Arbeiten Sie sich beim Schneiden in Richtung eines
Hindernisses (z. B. Zaun, Mauer oder Baum) in einem Winkel
vor, bei dem sichergestellt ist, dass vom Hindernis
abprallendes Schneidgut von Ihnen weggeleitet wird.
Bewegen Sie den Nylonfadenkopf langsam, bis das Gras bis
zum Hindernis abgemäht ist, dabei aber der Faden das
Hindernis nicht berührt. Wenn Sie Trimmarbeiten entlang
eines Maschendraht- oder Kettengliedzauns durchführen, so
achten Sie darauf, dass Sie das Gerät nur bis zum Zaundraht
führen. Ansonsten kann der Faden beim Auftreffen auf den
Zaundraht reißen.
Beim Trimmen können Unkrauthalme nacheinander
durchgeschnitten werden. Setzen Sie den Nylonfadenkopf
immer am unteren Bereich der Pflanze an, da sich die Pflanze
sonst evtl. nur beugt und wieder aufrichtet und sich im
Nylonfaden verfangen könnte. Anstatt das Unkraut sofort
durchzuschneiden, führen Sie das Ende des Nylonfadens
allmählich durch den Unkrauthalm.
1. Winkel zur Wand
2. Schneidgut
3. Schräg gestellte Schneidvorrichtung
4. Winkel zum Boden
Mähen
Skalpieren und Kantenschneiden
Hierbei werden große Grasflächen durch Schwingen des
Trimmers in einem horizontalen Bogen gemäht. Arbeiten Sie
in gleichmäßigen, ruhigen Bewegungen. Versuchen Sie nicht,
das Gras durch Hackbewegungen zu schneiden. Kippen Sie
den Nylonfadenkopf so, dass das gemähte Gras von Ihnen
weg auf die bereits gemähte Fläche geworfen wird. Dann –
ohne Gras zu schneiden – das Gerät zurückführen, um den
nächsten Bogen auszuführen. Wenn Sie gut geschützt sind
und es Ihnen nichts ausmacht, wenn Schneidgut auf Sie
zugeschleudert wird, können Sie in beide Richtungen mähen.
Beides wird durchgeführt, indem der Nylonfadenkopf steil
gekippt wird. Beim Skalpieren (A) wird die Vegetation so weit
geschnitten, dass nur der kahle Boden zurückbleibt. Beim
Kantenschneiden (B) wird das Gras an Stellen
zurückgetrimmt, an denen es über einen Fußgängerweg oder
eine Zufahrt gewachsen ist. Sowohl beim Kantenschneiden
als auch beim Skalpieren ist das Gerät in einem steilen Winkel
so zu halten, dass das Schneidgut sowie sich aus dem Boden
lösende Steine und Schmutz nicht auf Sie zugeschleudert
werden.
Wenngleich das Kantenschneiden und Skalpieren hier in einer
bestimmten Weise abgebildet sind, muss jeder Bediener für
sich selbst gemäß seiner Körpergröße den Winkel
herausfinden, in dem er besten arbeiten kann.
Bei fast allen Schneidarbeiten empfiehlt es sich, den
Nylonfadenkopf so schräg zu stellen, dass der Kontakt in dem
Teil des Schneidkreises erfolgt, wo der Nylonfaden sich von
Ihnen und dem Schutzschild wegbewegt (siehe Abbildung).
Dadurch wird das Schneidgut von Ihnen weggeleitet.
Wenn Sie den Fadenkopf zur falschen Seite neigen, wird das
Schneidgut auf Sie zugeschleudert. Wenn der
Nylonfadenkopf flach gegen den Boden gehalten wird, so
dass der Schneidvorgang über den gesamten Schneidkreis
erfolgt, wird das Schneidgut auf Sie zugeschleudert, das
Gerät durch den Widerstand verlangsamt, und es wird sehr
viel mehr Nylonfaden verbraucht.
17
Page 70

Betrieb
Nylonfadenkopf dreht sich gegen den Uhrzeigersinn. Das
Fadenschneidmesser befindet sich links am Schutzschild.
1. Schneidgut
2. Auf dieser Seite schneiden
Lassen Sie den Nylonfadenkopf nicht in zähes Unkraut,
Bäume oder Zäune eindringen.
Wenn der Nylonfaden in Maschendraht, Zäune oder dichtes
Gestrüpp eindringt, kann es passieren, dass abgerissene
Fadenstücke gegen den Bediener geschleudert werden. Am
besten arbeiten Sie sich so weit wie möglich an das jeweilige
Hindernis heran, ohne den Nylonfaden in das Hindernis
vordringen zu lassen. Schneiden Sie nicht direkt an einem
Hindernis.
Achten Sie darauf, dass der Nylonfaden nicht mit
beschädigtem Zaundraht in Berührung kommt. Durch den
Trimmer abgebrochene Drahtstücke können mit hoher
Geschwindigkeit durch die Luft geschleudert werden.
18
Page 71

Wartung und Pflege
A
Wartung und Pflege
WARNUNG
Beachten Sie die folgenden Sicherheitsregeln, wenn Sie das Produkt nach dem Gebrauch überprüfen und warten:
Um das Gerät auszuschalten, entfernen Sie den Akku und vergewissern Sie sich, dass alle beweglichen Teile zu
einem kompletten Stillstand gekommen sind.
Wenn sich das Produkt unerwarteterweise in Betrieb setzt, kann es zu Unfällen kommen.
Lassen Sie das Gerät abkühlen, bevor Sie Wartungsarbeiten durchführen.
Andernfalls können Sie sich verbrennen.
WICHTIG
Für die Überprüfung und Wartung sind entsprechende Fachkenntnisse erforderlich. Wenn Sie das Produkt nicht selbst
überprüfen, warten oder instand setzen können, wenden Sie sich an Ihren Händler. Versuchen Sie nicht, das Produkt zu
zerlegen.
Wartungsrichtlinien
Komponente Wartung Seite Vor der Verwendung Monatlich
Akku Überprüfen/reinigen/laden 10 •
Nylonfadenkopf Überprüfen 19 •
Fadenschneidmesser Überprüfen / reinigen - •
Schrauben, Bolzen und
Muttern
Überprüfen, festziehen / ersetzen - •
Wartung und Pflege
Wenden Sie sich bei Fragen oder Problemen bitte an Ihren Händler.
Reinigen von Akku und Akkufach
1. Lassen Sie den Hebelschalter und die Hebelschaltersperre
2. Kontrollieren Sie, dass die Betriebsanzeige-LED aus ist.
3. Drücken Sie auf die Akkuentriegelung (A), und schieben den
4. Entfernen Sie Schmutz von Akku und Akkufach mit Druckluft
Überprüfen des Nylonfadenkopfs
1. Vergewissern Sie sich, dass jeder der 2 Rückhaltestifte des
2. Überprüfen Sie die Montage des Fadenkopfs am Trimmer,
3. Überprüfen Sie den Fadenkopf durch Drehen per Hand auf
WARNUNG
Stromschlag- und Brandgefahr. Verwenden Sie zum
Reinigen des Akkus und des Akkufachs keine leitenden
Materialien.
los und den Scherenkopf zum Stillstand kommen.
Akku aus dem Antriebskopf.
oder einen weichen Bürste.
Gehäuses vollständig in die entsprechenden Aussparungen
eingerastet ist.
und ziehen Sie ihn fest, falls er lose ist.
unrunden Lauf und ungewöhnliche Geräusche. Bei
unrundem Lauf und ungewöhnlichen Geräuschen können
Vibrationen auftreten, die sich auf den Trimmer übertragen
können. Dadurch können sich Teile lösen und eine Gefahr
darstellen.
19
Page 72

Wartung und Pflege
4. Überprüfen Sie die Abdeckung und den Auslöseknopf auf
Abnutzung. Wenn am unteren Bereich des Auslöseknopfs
oder in der Nähe des Nylonfadenaustritts ein Spalt zu sehen
ist, ersetzen Sie diese Teile umgehend durch neue.
5. Prüfen Sie den Fadenkopf auf Bruch oder Absplitterung.
Ersetzen Sie alle Teile, die gebrochen sind oder
Absplitterungen aufweisen, umgehend durch neue.
Auswechseln des Nylonfadens
GEFAHR
Bevor Sie mit dem Auswechseln des Nylonfadens beginnen, stellen Sie das Gerät ab, und warten Sie, bis sich der
Nylonfadenkopf nicht mehr dreht.
Andernfalls kann es zu Unfällen bzw. schweren Verletzungen kommen.
WARNUNG
Verwenden Sie nur flexible, nichtmetallische, von der YAMABIKO CORPORATION empfohlene Nylonfäden.
Andernfalls kann es zu Unfällen bzw. schweren Verletzungen kommen.
1. Drücken Sie die Rückhaltestifte (an beiden Seiten) nach
innen, und entfernen Sie den Deckel. Es ist leichter, ein Teil
nach dem anderen zu entfernen.
2. Entfernen Sie die Fadenspule.
3. Wenn der Nylonfaden auf der Spule aufgebraucht ist,
entfernen Sie den Rest des Fadens, und wickeln Sie den
neuen Faden gemäß der Anleitung ab Punkt (4) wieder auf.
Wenn der Nylonfaden auf der Spule geschmolzen ist und
feststeckt, entfernen Sie den Faden vollständig, schneiden
Sie das beschädigte Fadenstück ab, und wickeln Sie den
verbleibenden Faden gemäß der Anleitung ab Punkt (4)
wieder auf.
4. Stecken Sie den Knick des Fadens in den Schlitz der
Unterteilung. Beachten Sie dabei, dass ein Ende des
Fadens ca. 10 cm länger als das andere ist.
5. Wickeln Sie den Nylonfaden fest in Wickelrichtung (nach
rechts) auf die Fadenspule „L“.
6. Wenn Sie beim Aufwickeln des Faden ans Ende kommen,
klemmen Sie die beiden Fadenenden vorläufig so in die
Schlitze der Fadenspule ein, dass noch ungefähr 10 cm
Faden überstehen.
7. Richten Sie die Schlitze mit dem eingeklemmten Faden so
aus, dass sie sich direkt über den Fadendurchführungen
befinden, und passen Sie die Spule in den Deckel ein.
20
Page 73

Wartung und Pflege
8. Ziehen Sie den Faden aus dem Deckel. Lösen Sie (A) den
Faden aus den entsprechenden Schlitzen der Fadenspule,
und führen Sie ihn (B) durch die beiden
Fadendurchführungen.
9. Fügen Sie Deckel und Gehäuse zusammen. Ordnen Sie (C)
die Fadenösen des Deckels über den Aussparungen in der
Fadenspule an, und drücken Sie (D) die beiden Stifte des
Gehäuses ganz in die Aussparungen der Fadenspule, bis
sie fest in die Fenster einrasten.
GEFAHR
Vergewissern Sie sich, dass die Stifte vollständig in die
Fenster der Fadenspule eingerastet sind. Wenn sie nur
leicht hineingesteckt sind und sich der Fadenkopf zu
drehen beginnt, können sich der Deckel oder innere Teile
lösen und davon geschleudert werden, was sehr
gefährlich ist.
Fehlerbehebung
WICHTIG
Verwenden Sie nur Original-Ersatzteile und -Verbrauchsprodukte, die für das Produkt zugelassen sind.
Die Verwendung von Teilen anderer Hersteller oder nicht zugelassener Produkte kann zu Fehlfunktionen führen.
Problem Ursache Abhilfe
Rote Ladegerätlampe blinkt oder Lampe
leuchtet nicht auf
Gerät lässt sich nicht einschalten 1. Akku ist nicht korrekt installiert 1. Prüfen Sie den Einbau des Akkus.
Gerät läuft nicht, obwohl es eingeschaltet
ist
Laufzeit ist zu kurz 1. Akkutemperatur zu hoch oder zu
1. Stecker nicht mit der Steckdose
verbunden
2. Akku ist nicht korrekt installiert
3. Schlechter Kontakt
4. Fehler im Ladegerät
5. Fehler im Akku
1. Akku entladen
2. Fadenkopf verschmutzt
3. Akkutemperatur zu hoch oder zu
niedrig
niedrig
2. Geräteelektronik zu heiß
3. Akku entladen
1. Stecken Sie das Ladegerät ein.
2. Prüfen Sie den Einbau des Akkus.
3. Bauen Sie den Akku mit gereinigten
Kontakten wieder ein.
4. Wenden Sie sich an Ihren Händler.
5. Wenden Sie sich an Ihren Händler.
1. Laden Sie den Akku.
2. Schalten Sie das Gerät aus und
reinigen Sie die Schneidvorrichtung
3. Bauen Sie den Akku aus, und lassen
Sie den Akku abkühlen.
1. Bauen Sie den Akku aus, und lassen
Sie den Akku abkühlen.
2. Schalten Sie das Gerät aus, und
lassen Sie das Gerät abkühlen.
3. Laden Sie den Akku.
Faden ist nicht lang genug 1. Es ist nicht genug Faden auf der
Spule
2. Faden ist in der Spule verfangen
Faden wird nicht abgeschnitten 1. Das Schneidmesser im Schutzschild
ist beschädigt oder es fehlt
Bei Problemen oder Störungen, die nicht in der obigen Tabelle genannt werden, wenden Sie sich an Ihren Händler.
Informationen zur vorschriftsmäßigen Entsorgung des Produkts oder seiner Einzelteile erhalten Sie bei Ihrem Händler.
1. Mit neuem Kabel neu aufwickeln
2. Faden ab- und wieder aufwickeln
1. Wenden Sie sich an Ihren Händler.
21
Page 74

Wartung und Pflege
LAGERUNG
WARNUNG
Lagern Sie das Gerät nicht in einem Raum, in dem sich brennbare Dämpfe sammeln können.
Es besteht Brandgefahr.
Gehen Sie folgendermaßen vor, wenn Sie das Produkt lange Zeit lagern möchten:
Elektrischer Scherenkopf
1. Schalten Sie die Stromzufuhr zu dem Gerät aus.
2. Entnehmen Sie den Akku aus dem Antriebskopf.
3. Entfernen Sie Ansammlungen von Schmutz und Fremdstoffen außen an dem Gerät.
4. Ziehen Sie alle Schrauben und Muttern fest.
5. Bedecken Sie das Akkufach des Antriebskopfes, den Akku und das Ladegerät.
6. Lagern Sie das Gerät trocken, staubfrei und für Kinder unzugänglich.
Akku
1. Entnehmen Sie den Akku aus dem Antriebskopf.
2. Wählen Sie für die Lagerung einen trockenen, staubfreien und für Kinder unzugänglichen Ort.
3. Die Lagerung soll bei Temperaturen zwischen –20 °C und 60 °C erfolgen.
4. Wenn der Akku länger als ein Jahr nicht verwendet worden ist, laden Sie ihn auf 40 - 60 % auf.
Akkuladegerät
1. Entnehmen Sie den Akku aus dem Akkuladegerät.
2. Trennen Sie das Akkuladegerät vom Netz.
3. Wählen Sie für die Lagerung einen trockenen, staubfreien und für Kinder unzugänglichen Ort.
Entsorgung
Auf den größeren Kunststoffteilen des Produkts befindet sich
jeweils eine Kennzeichnung (Code) des Werkstoffs. Diese
Codes beziehen sich auf die folgenden Werkstoffe; entsorgen
Sie diese Kunststoffteile unter Einhaltung der gesetzlichen
Vorschriften Ihres Landes.
Kennzeichnung Werkstoff
>PA6-GF< Nylon 6 - Glasfaser
>PP-GF< Polypropylen - Glasfaser
>PE-HD< Polyethylen
>PP< Polypropylen
Wenn Sie Fragen zur korrekten Entsorgung von
Kunststoffteilen haben, setzen Sie sich bitte mit Ihrem
Fachhändler in Verbindung.
Batterie enthält Lithium. Nur an den dafür vorgesehenen
Sammelstellen entsorgen.
Lithium-Ionen-Batterien müssen vorschriftsgemäß recycelt
und entsorgt werden.
22
Page 75

Technische Daten
Technische Daten
DSRM-300
Außenabmessungen:
Länge × Breite × Höhe 1830 × 350 × 280 mm
Gewicht:
Gerät ohne Schneidvorrichtung, Gurtakku und Schützer
Gerät mit Schneidvorrichtung, Gurtakku und Schützer
Schneidvorrichtung:
Nylonfadenkopf
Fadendurchmesser
Fadenlänge
Gewinde
Schnittbreite
Untersetzungsverhältnis 2,93
Drehrichtung des Werkzeugaufnahmebolzens von oben
gesehen:
Akku:
Typ
Akkuspannung
Ladegerättyp
Ladegeräteingangsspannung
Akkuladegerätlampen: Rote LED - Akku befindet sich außerhalb des
Ladezeit: Akku LBP-560-100: Circa 42 Minuten
Schwingungspegel: (EN50636-2-91) Vorderer Griff 1,6 m/s
Schalldruckpegel: (EN50636-2-91)
Schallleistungspegel: (EN50636-2-91)
Unsicherheit
Garantierter Schallleistungspegel: (2000/14/EG, geändert
durch 2005/88/EG)
3,6 kg
5,3 kg
G138
2,0 mm
2 × 1 m-Faden
Linksgewinde M10 x 1,25
350 mm
Gegen den Uhrzeigersinn
Li-Ion
56 Volt (Nennspannung 50,4 V)
CCCV
230 - 240 Volt WS
Ladetemperaturbereichs
Rote LED blinkt - Fehler
Grüne LED - Akku ist aufgeladen
Grüne LED blinkt – Akku lädt normal
Akku LBP-560-200: Circa 88 Minuten
2
Hinterer Griff 1,4 m/s
Unsicherheit 1,5 m/s
80,9 dB(A)
92,4 dB(A)
3,0 dB(A)
96 dB(A)
2
2
Änderungen der technischen Daten vorbehalten.
23
Page 76

Konformitätserklärung
Der unterzeichnete Hersteller:
YAMABIKO CORPORATION
7-2 SUEHIROCHO 1-CHOME
OHME, TOKIO 198-8760
JAPAN
Diese Konformitätserklärung wird unter der alleinigen Verantwortung des Herstellers
erstellt.
erklärt, dass das nachstehend spezifizierte neue Gerät:
RASENTRIMMER, AKKULADEGERÄT
Marke: ECHO
Typ: DSRM-300, LCJQ560
Konformitätserklärung
montiert durch:
ECHO, INCORPORATED
400 OAKWOOD ROAD
LAKE ZURICH, ILLINOIS 60047-1564
USA
Folgendem entspricht:
* den Anforderungen der Richtlinie 2006/42/EG (Anwendung der harmonisierten Norm EN 60335-1: 2012, EN 50636-
2-91: 2014)
* Anforderungen der Richtlinie 2014/30/EWG (Verwendung der harmonisierten Normen EN 55014-1: 2006, EN 55014-
2: 1997, EN 61000-3-2: 2006 und EN 61000-3-3: 2008)
* Anforderungen der Richtlinie 2014/35/EWG (Verwendung der harmonisierten Normen EN 60335-1: 2012, EN 60335-
2-29: 2004 und EN 62233: 2008)
* Anforderungen der Richtlinie 2000/14/EG
Konformitätsbewertung nach ANHANG V
* Anforderungen der Richtlinie 2011/65/EU (Verwendung der harmonisierten Norm EN 50581: 2012)
Gemessener Schallleistungspegel: 93 dB(A) Garantierter Schallleistungspegel: 96 dB(A)
DSRM-300: Seriennummer ab 35000001, LCJQ-560: Seriennummer 35001001 und höher
Tokio, den 1. Mai 2016
YAMABIKO CORPORATION
Der Dokumentenbevollmächtigte in Europa, welcher
autorisiert ist, die technischen Daten zusammenzustellen.
Unternehmen: Atlantic Bridge Limited
Adresse: Atlantic House, PO Box 4800, Earley, Reading RG5
4GB, Vereinigtes Königreich
Masayuki Kimura Herr Philip Wicks
Hauptabteilungsleiter
Abteilung Qualitätssicherung
24
Page 77

1Notizen und hintere Umschlagseite
NOTIZEN
2016
X750-027380
X750816-2101
25
Page 78

7-2 SUEHIROCHO 1-CHOME, OHME, TOKIO 198-8760, JAPAN
TELEFON: 81-428-32-6118. FAX: 81-428-32-6145.
©
2016
X750-027380
X750816-2101
Gedruckt in Japan
0x0xxxx zzzz ES
26
Page 79

1Coperchio
ITALIANO
(Istruzioni originali)
MANUALE PER L’OPERATORE
DECESPUGLIATORE
DSRM-300
AVVERTENZA
LEGGERE E SEGUIRE ATTENTAMENTE LE ISTRUZIONI PER
LAVORARE IN CONDIZIONI DI MASSIMA SICUREZZA.
LA MANCATA OSSERVANZA DELLE ISTRUZIONI POTREBBE
PROVOCARE LESIONI GRAVI.
Page 80

Contenuto
Per un uso sicuro del prodotto............................................................................................ 3
Descrizione ......................................................................................................................... 8
Prima di iniziare .................................................................................................................. 9
Contenuto della confezione ........................................................................................... 9
Carica della batteria.....................................................................................................10
Montaggio.................................................................................................................... 11
Versione con impugnatura ad anello ........................................................................... 11
Regolazione del punto di equilibrio.............................................................................. 12
Installazione della batteria ...........................................................................................13
Funzionamento ................................................................................................................. 14
Avvio dell’unità............................................................................................................. 15
Arresto dell’unità.......................................................................................................... 15
Uso della cinghia a spalla............................................................................................ 16
Funzionamento base del taglio con testina a filo di nylon ........................................... 16
Manutenzione e cura ........................................................................................................ 19
Guida alla manutenzione............................................................................................. 19
Manutenzione e cura ................................................................................................... 19
Rimessaggio................................................................................................................ 22
Smaltimento................................................................................................................. 22
Caratteristiche tecniche .................................................................................................... 23
Dichiarazione di conformità .............................................................................................. 24
2
Page 81

Per un uso sicuro del prodotto
Per un uso sicuro del prodotto
Informazioni importanti
AVVERTENZA
Si raccomanda di leggere il manuale per l'operatore prima di utilizzare questo prodotto.
Informazioni sul manuale per l'operatore
Questo manuale contiene informazioni necessarie per l'assemblaggio, il funzionamento e la manutenzione del pro-
dotto. Si raccomanda di leggerlo attentamente e di assimilarne il contenuto.
Tenere sempre il manuale in un luogo facilmente accessibile.
Se il manuale viene smarrito o danneggiato e non può essere consultato, acquistarne uno nuovo presso il proprio
rivenditore.
Le unità di misura utilizzate in questo manuale sono espresse in conformità al sistema internazionale. Le cifre ripor-
tate tra parentesi sono valori di riferimento e in alcuni casi ci potrebbero essere lievi errori di conversione.
La mancata osservanza di queste precauzioni potrebbe causare incidenti o lesioni gravi.
Tipologia di impiego del prodotto
Questo prodotto è un attrezzo leggero a elevate prestazioni con motore a benzina, realizzato per tenere sotto la cre-
scita delle erbacce e il taglio dell'erba in aree difficili da controllare con altri mezzi.
Non usare il prodotto per impieghi differenti da quelli specificati sopra.
Il contenuto di questo manuale può essere modificato senza preavviso per renderlo conforme a eventuali aggiorna-
menti del prodotto. Al fine di illustrare con maggiore chiarezza le spiegazioni sul prodotto, alcune illustrazioni potrebbero essere differenti da quelle del prodotto reale.
Per ulteriori chiarimenti, consultare il proprio rivenditore.
La mancata osservanza di queste precauzioni potrebbe causare incidenti o lesioni gravi.
Non modificare il prodotto
Il prodotto non deve essere modificato.
La mancata osservanza di queste precauzioni potrebbe causare un incidente o lesioni gravi. Qualsiasi guasto causato da
modifiche apportate al prodotto non sarà coperto dalla garanzia del produttore.
Non utilizzare il prodotto senza aver effettuato prima il controllo e la manutenzione
Non utilizzare il prodotto senza aver effettuato prima il controllo e la manutenzione. Accertarsi sempre che il control-
lo e la manutenzione vengano eseguiti a scadenze regolari.
La mancata osservanza di queste precauzioni potrebbe causare incidenti o lesioni gravi.
Prestito o cessione del prodotto
In caso di prestito del prodotto, consegnare alla persona che lo riceve anche il manuale dell'operatore.
Se si cede o vende il prodotto a terzi, consegnare anche il manuale dell'operatore assieme al prodotto.
La mancata osservanza di queste precauzioni potrebbe causare incidenti o lesioni gravi.
Utenti del prodotto
Il prodotto non deve essere utilizzato da:
persone stanche
persone che hanno assunto bevande alcoliche
persone sotto trattamento farmacologico
persone in stato di gravidanza
persone in condizioni fisiche precarie
persone che non hanno letto il manuale dell'utente
bambini
Tenere presente che l'operatore o l'utente è responsabile di eventuali rischi o incidenti provocati ad altre persone o
alle proprietà altrui.
La mancata osservanza di queste istruzioni potrebbe provocare incidenti.
I componenti di questa macchina generano un campo elettromagnetico durante l’uso, e ciò potrebbe interferire con
alcuni tipi di peacemaker. Per ridurre i rischi per la salute, consigliamo ai portatori di pacemaker di consultare il proprio medico e il produttore del pacemaker prima di utilizzare questo prodotto.
3
Page 82

Per un uso sicuro del prodotto
AVVERTENZA
Vibrazioni e freddo
Si ritiene che la condizione definita fenomeno di Raynaud, che colpisce le dita di alcune persone, sia causata
dall'esposizione alle vibrazioni e al freddo. L'esposizione al freddo e alle vibrazioni può causare formicolio e bruciore, seguiti da pallore e intorpidimento delle dita. Dato che non si conosce il livello di esposizione minima che causa
i disturbi, si consiglia vivamente di osservare le seguenti precauzioni.
Tenere il corpo caldo, soprattutto testa, collo, piedi, caviglie, mani e polsi.
Mantenere una buona circolazione del sangue facendo vigorosi esercizi con le braccia durante frequenti pause di
lavoro, ed evitare di fumare.
Limitare il numero di ore di impiego. Cercare di pianificare altri lavori nell'arco della giornata lavorativa, in cui non
sia richiesto l'uso del decespugliatore o di altre macchine portatili.
Se si accusano disagi e disturbi e se si riscontrano arrossamenti e gonfiore delle dita seguiti da pallore e perdita
di sensibilità, rivolgersi al proprio medico prima di esporsi di nuovo al freddo e alle vibrazioni.
La mancata osservanza di queste istruzioni potrebbe causare danni alla salute.
Lesioni da sforzi ripetuti
Si ritiene che l'uso eccessivo dei muscoli e dei tendini di dita, mani, braccia e spalle possa causare dolore, gonfiore,
intorpidimento, debolezza e fortissimi dolori nelle zone menzionate. Alcune attività manuali ripetitive possono essere causa di alto rischio per lo sviluppo di lesioni da sforzi ripetitivi. Per ridurre il rischio di lesioni da sforzi ripetitivi:
Evitare di usare il polso piegato, allungato o girato.
Fare pause a intervalli regolari per ridurre al minimo i movimenti ripetuti e far riposare le mani. Ridurre la velocità
e la forza con cui il movimento ripetitivo viene eseguito.
Fare esercizi per rafforzare i muscoli delle mani e delle braccia.
Consultare un medico se si avverte formicolio, intorpidimento o dolori nelle dita, nelle mani, nei polsi o nelle brac-
cia. Una tempestiva diagnosi di lesioni da sforzi ripetitivi consente di evitare danni permanenti ai nervi e ai muscoli.
La mancata osservanza di queste istruzioni potrebbe causare danni alla salute.
Addestramento
Non permettere a nessuno di azionare l'attrezzo senza idoneo addestramento o attrezzature di protezione adeguate.
Acquisire dimestichezza con i comandi e il corretto impiego dell'attrezzo.
Familiarizzare con le procedure di arresto e spegnimento motore dell'attrezzo.
Imparare a sganciare rapidamente un attrezzo spalleggiato.
Non permettere a nessuno di utilizzare l'attrezzo senza idoneo addestramento.
La mancata osservanza di queste istruzioni potrebbe causare danni alla salute.
Indossare indumenti idonei.
Raccogliere i capelli in modo che non tocchino le spalle.
Non indossare cravatte, gioielli o vestiti poco aderenti che potrebbero restare impigliati
nella macchina.
Non indossare calzature aperte, non lavorare a piedi nudi o a gambe nude.
La mancata osservanza di queste precauzioni potrebbe causare danni alla vista o all'udito o
lesioni gravi.
Indossare indumenti protettivi
Indossare sempre i seguenti indumenti protettivi durante il lavoro con il decespu-
gliatore.
1. Casco (elmetto): Protegge la testa
2. Protezioni acustiche o tappi per le orecchie: Proteggono l'udito
3. Occhiali di protezione: Proteggono gli occhi
4. Schermo facciale: Protegge il viso
5. Guanti protettivi: Proteggono le mani dal freddo e dalle vibrazioni
6. Indumenti da lavoro aderenti (maniche lunghe e pantaloni lunghi): Proteggono il corpo
7. Stivali protettivi antiscivolo per lavori pesanti (con protezione delle punte) o
scarpe da lavoro antiscivolo (con protezione delle punte): Proteggono i piedi
8. Parastinchi: Proteggono gli stinchi
La mancata osservanza di queste precauzioni potrebbe causare danni alla vista o
all'udito o lesioni gravi.
Se necessario, utilizzare anche i seguenti indumenti protettivi.
Respiratore: Protegge l'apparato respiratorio
Rete antiapi: Per proteggersi dalle api
4
Page 83

Per un uso sicuro del prodotto
AVVERTENZA
Ambiente di utilizzo e funzionamento
Non utilizzare il prodotto:
In ambienti umidi.
Sotto la pioggia.
In condizioni di cattivo tempo.
In pendii ripidi o in luoghi con punti di appoggio non sicuri e quindi scivolosi.
Di notte o in luoghi bui con scarsa visibilità.
Ove sussistano rischi di fulmini.
Quando si utilizza il prodotto su un pendio delicato, lavorare seguendo i contorni del terreno.
Cadute, scivolate o un uso non corretto del prodotto potrebbero causare lesioni gravi.
Per un uso salutare, sicuro e confortevole, utilizzare la macchina solo a temperature comprese nell'intervallo da -5
o
C a 40oC.
La mancata osservanza di queste istruzioni potrebbe causare danni alla salute.
Essere pronti in caso di lesioni
Nell'improbabile evento di incidenti o lesioni, è consigliabile essere pre-
parati.
Cassetta di pronto soccorso
Asciugamani e fazzoletti (per fermare eventuali emorragie)
Fischietto o telefono cellulare (per chiedere aiuto)
Se non si è in grado di effettuare un primo soccorso o chiedere aiuto, le lesioni
potrebbero peggiorare.
Messaggi di avviso
PERICOLO AVVERTENZA ATTENZIONE
Questo simbolo accompagnato dalla
parola "PERICOLO" richiama l'attenzione su un'azione o una condizione
che potrebbe causare infortuni gravi o
la morte di utenti o di persone presenti.
Altri indicatori
Il cerchietto barrato sta
ad indicare che quanto
è illustrato è proibito.
Simboli
Questo simbolo accompagnato dalla
parola "AVVERTENZA" richiama
l'attenzione su un'azione o una condizione che potrebbe causare lesioni
gravi o la morte di utenti o di persone
presenti.
NOTA IMPORTANTE
Il messaggio qui riportato fornisce
consigli per l'uso, la cura e la manutenzione del prodotto.
"ATTENZIONE" indica una situazione potenzialmente pericolosa che, se
non evitata, potrebbe causare lesioni
minori o moderate.
Il testo incorniciato, caratterizzato
dalla parola "IMPORTANTE", contiene informazioni importanti riguardo
l'uso, il controllo, la manutenzione e il
rimessaggio del prodotto descritto in
questo manuale.
Forma del simbolo Descrizione / applicazione del
simbolo
Leggere attentamente il manuale per l'operatore
Indossare protezioni per gli
occhi
Forma del simbolo Descrizione / applicazione del
simbolo
Tenere gli astanti a distanza di
sicurezza
Tenere gli astanti a una distanza di 15 m
5
Page 84

Per un uso sicuro del prodotto
Forma del simbolo Descrizione / applicazione del
simbolo
Indossare protezioni per le
orecchie
Protezione/allarme
Avvertenza!
Oggetti scagliati!
Vietato l'uso senza protezione
Vietato l'uso di dischi metallici
Forma del simbolo Descrizione / applicazione del
simbolo
Indossare protezioni per i piedi e guanti
Prestare attenzione nelle aree
ad alta temperatura
Livello di potenza acustica garantito
Non utilizzare mani sotto la
pioggia o in ambienti umidi
Attenzione alle scosse elettriche
Attenzione al fuoco
Non smaltire le apparecchiature elettriche con la spazzatura normale
6
Page 85

Per un uso sicuro del prodotto
Decalcomania/e
La decalcomania riportata sotto è stata applicata sui prodotti descritti in questo manuale. Prima di utilizzare il prodotto accertarsi
di aver compreso quanto riportato sulla decalcomania.
Se la decalcomania diventa illeggibile a causa dell'usura, si strappa o si stacca e si perde, acquistarne una di ricambio presso
il rivenditore e fissarla nel punto illustrato nella figura in basso. Accertarsi che la decalcomania sia sempre leggibile.
1. Decalcomania (Codice ricambio X505-008900)
7
Page 86

Descrizione
Descrizione
1. Trasmissione angolare - Due ingranaggi per cambiare
l'angolo dell'asse di rotazione.
2. Accessorio di taglio - Testina a filo di nylon per falciare
erba e erbacce.
3. Coltello tagliafilo - Taglia il filo di nylon per regolarne
la lunghezza proporzionalmente.
4. Protezione - Protegge l’utente dal contatto accidentale
con la testina di taglio e con eventuali oggetti espulsi.
5. Tubo dell’albero - Parte dell'attrezzo che funge da tubo
di rivestimento dell'albero di trasmissione.
6. Impugnatura ad anello - Offre una salda presa per la
mano sinistra.
7. Punto di sospensione - Dispositivo su cui si aggancia
la cintura a bandoliera.
8. LED di alimentazione Il LED resta illuminato quando
l’unità è alimentata. Il LED si spegne quando l’unità viene spenta.
9. Pulsante di accensione Premere una volta per accen-
dere l’unità. Il LED di alimentazione si illumina. Premere
nuovamente il pulsante per spegnere l’unità. Il LED di
alimentazione si spegne.
10. Fermo interruttore a grilletto - Blocca l'interruttore a
grilletto in posizione OFF fin quando la mano destra non
afferra saldamente l'impugnatura.
11. Interruttore a grilletto - Azionato dall'operatore con la
mano per attivare il motore.
12. Testa unità – alloggia motore e batteria.
13. Cinghia a spalla - Cinghia regolabile per sostenere l'at-
trezzo.
8
Page 87

Prima di iniziare
Contenuto della confezione
Le seguenti parti sono state imballate separatamente nella scatola di imballaggio.
Dopo aver aperto la confezione, controllare che siano presenti tutte le parti.
In caso di parti mancanti o rotte, contattare il rivenditore.
Prima di iniziare
1. Unità motore e tubo dell'albero
2. Protezione
3. Occhiali di protezione
4. Etichetta di precauzione
9. Pacco batterie
10. Manuale per l'operatore
5. Cinghia a spalla
6. Testina a filo di nylon
7. Manuale per l'operatore
8. Chiave a L
11. Caricabatterie
12. Manuale per l'operatore
9
Page 88

Prima di iniziare
A
B
Carica della batteria
AVVERTENZA
Utilizzare sempre batterie di tipo LBP-560-100/LBP-560-200 e ricaricare solo con il caricabatterie LCJQ-560.
Tenere il caricabatterie e la batteria lontane da umidità e liquidi.
Non azionare il caricabatterie su una superficie facilmente infiammabile (ad es. carta, tessuti) o in un ambiente ad
alto rischio di incendio.
Non coprire il caricabatterie. Se viene coperto, il caricabatterie non sarà in grado di raffreddarsi.
Non utilizzare il caricabatterie in atmosfere esplosive, come ambienti saturi di liquidi, gas o polveri infiammabili. I
caricabatterie possono generare scintille, che possono infiammare polveri o fumi, con il conseguente rischio di
esplosioni.
Collegare il caricabatterie al tipo di alimentazione di rete e alla frequenza di rete indicate sulla targhetta delle speci-
fiche.
Collegare il caricabatterie solo a una presa a muro facilmente accessibile.
Non inserire mai oggetti nelle fessure di raffreddamento del pacco batterie o del caricabatterie (A).
Non caricare o utilizzare un pacco batterie o un caricabatterie difettoso, danneggiato o deformato.
Non aprire, danneggiare o far cadere il pacco batterie o il caricabatterie.
Se la batteria è danneggiata o viene utilizzata in modo improprio, potrebbe fuoriuscire del liquido; evitare il contatto
con la pelle. In caso di contatto accidentale, sciacquare abbondantemente le aree della pelle interessate con acqua
e sapone. In caso di contatto del liquido con gli occhi, non strofinare. Sciacquare abbondantemente gli occhi con
acqua per almeno 15 minuti. Richiedere inoltre assistenza medica.
Non ponticellare (cortocircuitare) i contatti del pacco batteria o i terminali del caricabatterie con oggetti metallici.
Proteggere dai raggi diretti del sole, calore e fiamme aperte e non gettare mai le batterie nel fuoco; vi è rischio di
esplosione.
In presenza di fumo o incendio nel caricabatterie, scollegarlo immediatamente dalla presa a muro.
Se il cavo di alimentazione è danneggiato, scollegarlo immediatamente dalla presa, per evitare il rischio di scosse
elettriche.
Non esporre il pacco batterie a microonde o alta pressione.
Proteggere l'unità da eventuali avviamenti non intenzionali. Rimuovere il pacco batterie dall'unità prima dell'even-
tuale trasporto o stoccaggio dell'unità. Non utilizzare contenitori metallici per il trasporto delle batterie.
Non utilizzare il cavo di alimentazione per impieghi differenti da quelli specificati, come per il trasporto o per appen-
dere il caricabatterie.
Al fine di ridurre il rischio di inciampare, posizionare e marcare il cavo di alimentazione in modo tale che non possa
essere danneggiato o che costituisca un rischio per gli altri.
Per lo scollegamento, afferrare la spina e non il cavo.
NOTA
La batteria viene fornita già parzialmente carica quando l’unità viene spedita dalla fabbrica e deve pertanto essere caricata
completamente prima dell’uso.
Ricaricare la batteria quando questa non è più in grado di generare una potenza sufficiente a far funzionare l’unità, oppure
quando la spia della batteria indica una bassa carica residua.
1. Inserire il cavo di alimentazione CA del caricabatterie in una
presa di rete.
2. Allineare i bordi della batteria con le scanalature del caricabatterie e quindi inserire la batteria all’interno del caricabatterie.
3. Durante le normali fasi di ricarica, il LED del caricabatterie
(B), emetterà un lampeggio continuo di colore VERDE.
IMPORTANTE
Se il caricabatterie rileva un problema, il LED emette un
lampeggio di colore rosso. In tal caso, rimuovere la batteria
dal caricabatterie, eliminare le eventuali ostruzioni dai contatti e reinstallare la batteria nel caricabatterie. Se la batteria
sta operando fuori dai limiti di temperatura (da 0 °C a 60 °C),
il LED continuerà ad emettere il lampeggio ROSSO.
10
Page 89

Prima di iniziare
C
D
4. Una volta completata la ricarica, il LED emette una luce
VERDE fissa.
Un pacco batterie completamente scarico può essere rica-
ricato in circa 42 minuti.
5. Assicurarsi che la batteria sia interamente carica, rimuovendola dal caricabatterie e quindi premendo il pulsante di misurazione dello stato di carica della batteria (C), e
verificando lo stato sul relativo indicatore a LED (D).
1 luce verde indica che la batteria ha una carica residua del
0-25%.
2 luci verdi indicano che la batteria ha una carica residua
del 25-50%.
3 luci verdi indicano che la batteria ha una carica residua
del 50-75%.
4 luci verdi indicano che la batteria ha una carica residua
del 75-100%.
6. Scollegare il caricabatterie dall’alimentazione di rete.
Montaggio
AVVERTENZA
Leggere attentamente il manuale per l'operatore per essere certi di montare correttamente il prodotto.
L'uso di un prodotto non montato correttamente potrebbe causare incidenti o lesioni gravi.
Versione con impugnatura ad anello
Montaggio dell'impugnatura ad anello
Montaggio della protezione
Collocare l'impugnatura in una posizione comoda e serrare i bulloni.
ATTENZIONE
Montare l'impugnatura in modo da non nascondere
nessuna delle etichette di sicurezza.
AVVERTENZA
Il coltello tagliafilo montato sulla protezione dai detriti
ha i bordi taglienti. Evitare di toccarlo durante il montaggio o lo smontaggio della testina a filo di nylon.
1. Smontare il manicotto di plastica (A) dall'alberino di uscita.
2. Installare la protezione (B) sulla parte inferiore della flangia
della trasmissione angolare (C).
3. Posizionare la piastra sulla protezione (D), allineare i fori e
installare i tre bulloni (E).
4. Serrare saldamente i tre i bulloni.
5. Rimuovere le guarnizioni (F).
NOTA
La protezione deve essere usata solo con la testina a filo di
nylon.
11
Page 90

Prima di iniziare
Montaggio della testina a filo di nylon
ATTENZIONE
Fissare saldamente l'alberino di uscita con l'utensile di
bloccaggio per impedirne la rotazione durante il montaggio della testina a filo di nylon.
1. Accertarsi che il fermo della lama (A) rimanga sull'alberino di
uscita (B).
2. Allineare il foro di bloccaggio nel fermo della lama con un intaglio sul bordo della trasmissione angolare e inserire l'utensile di bloccaggio (C).
3. Installare la testina a filo (D) sull'alberino di uscita ruotandola
in senso antiorario fino al serraggio della testina sul fermo
della lama.
4. Smontare l'utensile di bloccaggio.
Regolazione del punto di equilibrio
Regolazione della cinghia a spalla
AVVERTENZA
Questo prodotto è progettato per adattarsi a vari tipi di corporature, ma non sempre è regolabile per persone molto
alte. Non utilizzare l'attrezzo se i piedi raggiungono l'accessorio di taglio quando l'attrezzo è fissato alla cinghia a
spalla.
IMPORTANTE
L’altezza della persona può influire sulla regolazione del punto di equilibrio. Inoltre, la procedura di bilanciamento può non
essere valida per alcune unità o per alcune persone. Se la cinghia a spalla non si adatta o non può essere ben regolata, richiedere assistenza al proprio rivenditore.
La cinghia a spalla in dotazione e adatta per persone con una
corporatura da adulto standard, con un'altezza di 150 - 195 cm
e un giro vita di 60 - 140 cm.
Utilizzare una cinghia a spalla se in dotazione o se consigliata
in questo manuale. Regolare sia la cinghia che il punto di sospensione (A) sull'unità in modo che questa rimanga sospesa
con l'accessorio di taglio a pochi centimetri da terra (B).
L'accessorio di taglio e la protezione devono essere a livello in
tutte le direzioni. Agganciare l'unità sul lato destro come mostrato.
Equilibrare l’attrezzo per un taglio con rotazione livellata
Far scorrere il punto di sospensione su e giù lungo l'albero per
trovare l'equilibrio adeguato. Ruotare il fermo per portare l'accessorio di taglio a livello con la protezione. Bloccare in posizione. Se il punto di sospensione è di tipo a rotazione libera,
l'unità può tendere a sbilanciarsi lateralmente; tuttavia, è necessario livellare ugualmente l’accessorio e la protezione
sull'asse anteriore-posteriore.
In seguito al bilanciamento e al livellamento può essere ne-
cessario riposizionare il fermo e regolare le fascette della cinghia. All’occorrenza riequilibrare l'accessorio di taglio e la
protezione montati sull'unità.
ATTENZIONE
Non montare il punto di sospensione a una distanza dal
corpo superiore a quella indicata dalla freccia ( ).
12
Page 91

Installazione della batteria
A
B
C
Prima di iniziare
AVVERTENZA
L'accessorio è in funzione quando la batteria è inserita,
il LED di alimentazione è acceso e l’interruttore a grilletto e il relativo fermo dell’interruttore a grilletto sono attivati. Assicurarsi che il decespugliatore sia posizionato
correttamente, per evitare di perdere il controllo e scongiurare il rischio di gravi infortuni. Mantenere le parti
mobili dell'accessorio sollevate da terra e lontano da
oggetti che potrebbero rimanere incagliati o essere lanciati.
1. Assicurarsi che l’unità sia disalimentata.
2. Allineare i bordi (A) del pacco batterie con le scanalature
presenti sulla testa dell’unità. Inserire il pacco batterie all’interno della testa dell’unità.
3. Prima di azionar l’unità, accertarsi che il fermo sul pacco batterie (C) sia correttamente innestato nella sua sede e che il
pacco batterie sia saldamente inserito nel suo alloggiamento.
4. Per estrarre la batteria, premere il pulsante di sgancio della
batteria (C) e quindi estrarre la batteria dalla testa dell’unità.
IMPORTANTE
Prima di utilizzare il tagliasiepi, assicurarsi che la batteria sia
inserita correttamente, con il fermo saldamente fissato nella
posizione di blocco (D).
NOTA
Il fermo della batteria è in posizione di blocco quando questo
appare correttamente inserito nella sua sede.
13
Page 92

Funzionamento
Funzionamento
PERICOLO
Le linee elettriche e i cavi aerei per le comunicazioni possono trasportare flussi di corrente con tensioni elevate. Que-
sta unità non è isolata dalla corrente elettrica. Al fine di evitare il rischio di lesioni gravi o mortali, non toccare mai
direttamente o indirettamente i cavi.
Spegnere sempre l’unità quando l'accessorio di taglio si inceppa.
Se durante la rimozione dell'inceppamento l'accessorio di taglio si avvia improvvisamente può causare gravi lesioni.
Non utilizzare il prodotto senza protezione.
Qualsiasi oggetto che rimbalza dall'accessorio di taglio può provocare un incidente o lesioni gravi.
L'area nel raggio di 15 m dal prodotto deve essere considerata zona pe-
ricolosa. Osservare le seguenti precauzioni mentre si sta lavorando
con il prodotto.
Non permettere a bambini, altre persone o animali di entrare nella
zona pericolosa.
Qualora nell’area di utilizzo dell'attrezzo siano presenti soggetti terzi
non autorizzati, spegnere l’unità per arrestare la rotazione dell'accessorio di taglio.
Prima di avvicinarsi all'utente, fargli prima un segnale, per esempio,
gettando dei ramoscelli dall'esterno della zona pericolosa, quindi
controllare che l’unità sia spenta e che l'accessorio di taglio sia fermo.
Se più persone devono lavorare con il prodotto, trovare un modo per
comunicare con il collega da una distanza di 15 m.
Qualsiasi oggetto che rimbalza dall'accessorio di taglio e qualsiasi contatto con l'accessorio di taglio può causare cecità o
morte.
AVVERTENZA
Prestare particolare attenzione alle seguenti precauzioni quando si avvia l’unità:
Controllare che non ci siano dadi o bulloni allentati.
Lasciare sufficiente spazio intorno al prodotto e non permettere a persone o animali di avvicinarsi.
La mancata osservanza di queste precauzioni può provocare incidenti, lesioni o perfino la morte.
Quando l’unità è in funzione, assicurarsi che non ci siano vibrazioni o rumori anomali. Non utilizzare il prodotto se
ci sono vibrazioni o rumori anomali. Contattare il rivenditore per la riparazione.
Incidenti che provocano la caduta o la rottura di parti possono causare ferite o lesioni gravi.
Prima di un eventuale trasporto, spegnere sempre l'unità e rimuovere la batteria.
Non toccare la trasmissione angolare o altri componenti ad alta temperatura mentre il prodotto è acceso
e subito dopo lo spegnimento.
Il contatto con componenti ad alta temperatura potrebbe causare ustioni.
Prima di iniziare a lavorare controllare l'area e rimuovere le pietre piccole e i recipienti vuoti
che potrebbe rimbalzare dall'accessorio di taglio, e pezzi di lacci o fili che si potrebbero attorcigliare attorno ad esso.
Corpi estranei rimbalzati dall'accessorio di taglio o fili e altri materiali attorcigliati attorno al prodotto
potrebbero causare un incidente o lesioni gravi.
Nelle seguenti situazioni arrestare immediatamente l’unità e assicurarsi che l'accessorio di taglio sia fermo prima di
procedere ad effettuare l’ispezione di qualunque parte del prodotto. Sostituire le parti danneggiate.
Se l'accessorio di taglio urta contro una roccia, un albero, un palo o qualsiasi altra ostruzione mentre si sta lavo-
rando.
Se il prodotto comincia improvvisamente a vibrare in maniera anomala.
Continuare a utilizzare parti danneggiate potrebbe provocare un incidente o lesioni gravi.
Non sollevare l'accessorio di taglio durante il lavoro. Non lavorare con l'accessorio di taglio sollevato oltre il livello
del ginocchio.
Sollevando l'accessorio di taglio sopra il livello del ginocchio, il piano di rotazione si avvicinerebbe al viso ed eventuali oggetti
potrebbero volare dall'accessorio di taglio causando un incidente o lesioni gravi.
14
Page 93

Funzionamento
AVVERTENZA
Non tentare mai di utilizzare il prodotto con una mano sola.
Le dita e il pollice di ogni mano devono afferrare saldamente le impugnatu-
re.
Non utilizzare mai l’unità sporgendosi e mantenere sempre una posizione che garantisca un equilibrio ottimale; as-
sicurarsi inoltre di avere sempre i piedi saldamente poggiati al suolo mentre si opera su tratti in pendenza o si cammina. Non correre durante l’uso dell’unità.
Non utilizzare mai l’unità con protezioni o schermature difettose, oppure quando questa è priva di dispositivi di si-
curezza, oppure ancora quando il filo è danneggiato o usurato.
Avvio dell’unità
AVVERTENZA
L'accessorio è in funzione quando la batteria è inserita, il LED di alimentazione è acceso e l’interruttore a grilletto e
il relativo fermo dell’interruttore a grilletto sono attivati. Assicurarsi che il prodotto sia posizionato correttamente,
per evitare di perdere il controllo e scongiurare il rischio di gravi infortuni.
Arresto dell’unità
1. Premere il pulsante di accensione (A) una volta, per accendere l’unità.
Il LED di alimentazione (B) resta illuminato quando l’unità è
accesa.
2. Tenere premuto il fermo dell’interruttore a grilletto (C) e premere l’interruttore a grilletto (D) per incrementare il regime di
giri fino a raggiungere la corretta velocità di funzionamento.
IMPORTANTE
Quando l’unità è accesa:
Dopo un minuto di inutilizzo l’unità si spegnerà automati-
camente.
Se il LED rimane acceso, il funzionamento è normale.
Se il LED lampeggia una volta al secondo, è necessario
sostituire la batteria.
Se il LED lampeggia quattro volte al secondo, significa
che l’unità è guasta. Disalimentare l’unità. Rimuovere la
batteria. Rimuovere ogni traccia di residui dalla testina a
filo. Reinstallare la batteria. Rialimentare l’unità. Se il
LED continua a lampeggiare, recarsi presso un centro di
assistenza autorizzato per far riparare il prodotto.
AVVERTENZA
L'accessorio di taglio continua a funzionare per un breve periodo dopo lo spegnimento dell'unità.
15
Page 94

Funzionamento
Uso della cinghia a spalla
1. Rilasciare l’interruttore a grilletto e il fermo dell’interruttore a
grilletto, per arrestare la testa di taglio.
2. Premere il pulsante di accensione (A), per spegnere l’unità.
Il LED di alimentazione (B) resta spento quando l’unità è
spenta.
Se la testa di taglio non si arresta quando vengono rilasciati
l’interruttore a grilletto e il relativo fermo, premere il pulsante di accensione per spegnere l’unità e quindi rimuovere la
batteria per disalimentare totalmente l’unità. Quindi, portare l’unità presso un centro di assistenza autorizzato per far
riparare il pulsante di accensione, prima di utilizzare nuovamente prodotto.
Montare sempre il decespugliatore correttamente utilizzando
la cinghia a spalla.
Agganciare il prodotto alla cinghia a spalla.
Collocare la cinghia sulla spalla sinistra e regolare le fa-
scette in modo che la spina a sgancio rapido rimanga immediatamente sotto la vita.
Verificare la corretta regolazione muovendo l'accessorio di
taglio sul terreno.
Se necessario, regolare nuovamente la posizione del punto
di sospensione.
La cinghia a spalla è dotata di una funzione di rilascio di
emergenza. In caso di incendio o altra emergenza, tirare la
spina a sgancio rapido (A) per staccare il prodotto dal corpo.
Funzionamento base del taglio con testina a filo di nylon
AVVERTENZA
L'uso improprio dell'accessorio di taglio può causare lesioni gravi. Leggere e osservare le istruzioni per la sicurezza
riportate in questo manuale.
Utilizzare solo accessori di taglio raccomandati da YAMABIKO CORPORATION.
In seguito alla regolazione della lunghezza del filo, il filo di nylon superfluo che si estende oltre il coltello tagliafilo
potrebbe volare via quando l'accessorio di taglio che lo contiene inizia a girare.
La mancata osservanza di queste precauzioni potrebbe causare un incidente o lesioni gravi.
Regolazione del filo di nylon
Non far girare la testina a filo di nylon a più di 10000 giri/min.
Per far avanzare il filo della bobina, battere leggermente il po-
mello di battuta contro la superficie del terreno a una velocità
di rotazione inferiore a 4500 giri/min.
Il coltello tagliafilo sulla protezione regola automaticamente i
fili tagliandoli in modo uniforme quando l'accessorio inizia a
ruotare.
Quando si lavora con una lunghezza di taglio inferiore alla
massima, tagliare i due fili di nylon alla stessa lunghezza.
1. Pomello di battuta
2. Battere leggermente il pomello contro la superficie del terreno
3. Il filo di nylon fuoriesce
16
Page 95

Taglio
Falciatura
Funzionamento
Consiste nell'inserimento attento del decespugliatore nel ma-
teriale da tagliare. Inclinare leggermente la testa per indirizzare i detriti lontano dal corpo. Se il taglio viene eseguito fino a
una barriera, quale una recinzione, un muro o un albero, avvicinarsi da un’angolazione tale per cui i detriti che rimbalzano
dall'ostacolo non vengano contro l'utente.
Muovere la testina a filo di nylon lentamente finché l’erba non
è stata tagliata fino alla barriera, ma non insistere troppo con
il filo. Se si esegue il taglio lungo una rete, prestare attenzione
a non avvicinarsi troppo. Se il filo è troppo lungo va ad avvolgersi e ad impigliarsi con la rete.
Il taglio serve anche per tagliare un gambo di erbacce alla vol-
ta. Mettere la testina a filo di nylon accanto alla base del fascio, mai in alto, dove l’erbaccia potrebbe vibrare ed
impigliarsi nel filo. Anziché tagliare completamente le erbacce,
tagliare lentamente il gambo con la punta del filo.
1. Angolo con il muro
2. Detriti
3. Lato lama alzato
4. Angolo con il suolo
Si tratta del taglio di aree erbose piuttosto estese, eseguito de-
scrivendo un arco con il decespugliatore. con un movimento
lento e uniforme, senza cercare di appiattire o tranciare l'erba.
Inclinare leggermente la testina a filo di nylon per indirizzare i
detriti lontano dal corpo nella corsa di falciatura. Quindi tornare indietro senza tagliare l'erba e iniziare un'altra corsa. Se si
è ben protetti e quindi non ci si deve preoccupare dei detriti ricevuti addosso, è possibile falciare in entrambe le direzioni.
Rasatura al suolo e rifilatura
Entrambe vengono eseguite con la testina a filo di nylon ad
angolo acuto. La rasatura al suolo (A) consente di eliminare la
crescita, lasciando solo la base di terra. La rifilatura (B) consiste nell'eliminare la crescita dell’erba da un'area pavimentata
o da un vialetto. Durante entrambe le operazioni, tenere l'unità
a un angolo acuto in una posizione per cui i detriti ed eventuali
rifiuti o pietre scalzati non tornino verso l'utente anche rimbalzando contro la superficie dura.
Sebbene le illustrazioni mostrino come radere al suolo e rifini-
re, ciascun utente deve individuare autonomamente l’inclinazione più adatta al suo corpo e al taglio desiderato.
Per quasi ogni tipo di taglio è buona pratica inclinare la testina
a filo di nylon in modo che il contatto avvenga sulla sezione del
cerchio tracciato dal filo quando si sposta lontano dall’utente e
dalla protezione (vedere la figura corrispondente). In questo
modo, i detriti vengono scagliati lontano dall'utente.
Inclinando la testina in direzione errata, l’utente fa volare i de-
triti verso il proprio corpo. Se la testina a filo di nylon viene tenuta piatta rispetto al suolo in modo che il taglio abbia luogo
su tutto il cerchio tracciato, i detriti saranno scagliati verso
l'utente, la resistenza farà rallentare l’unità con un elevato consumo di filo.
La testina a filo di nylon ruota in senso antiorario. Il coltello si
trova sul lato sinistro della protezione.
1. Detriti
2. Tagliare da questo lato
17
Page 96

Funzionamento
Non spingere il filo tra erbacce robuste, alberi o reti metalliche.
Quando si spinge il filo in reti zincate leggere o recinzioni in
tessuto metallico o fitta vegetazione, l’utente rischia di venire
colpito dalle estremità spezzate del filo. Il metodo corretto consiste nel tagliare fino a un ostacolo come quelli già accennati,
senza mai permettere che il filo entri o penetri nell’ostacolo.
Non tagliare vicino a ostacoli o barriere.
Evitare che il filo di nylon venga a contatto con la rete metalli-
ca. I pezzi di rete spezzata dal decespugliatore possono essere scagliati ad alta velocità.
18
Page 97

Manutenzione e cura
A
Manutenzione e cura
AVVERTENZA
Osservare le seguenti precauzioni durante il controllo e la manutenzione del prodotto dopo l'uso:
Spegnere l’unità, rimuovere la batteria e assicurarsi che tutte le parti in movimento si siano completamente arresta-
te.
Un avvio imprevisto del prodotto potrebbe causare un incidente.
Prima di eseguire le operazioni di manutenzione, far raffreddare l'unità.
L'esecuzione di interventi a motore caldo può causare ustioni.
IMPORTANTE
Il controllo e la manutenzione richiedono competenze specialistiche. In caso di problemi o difficoltà durante il controllo o la
manutenzione del prodotto o la riparazione in caso di guasto, consultare il proprio rivenditore. Non tentare di smontare il prodotto.
Guida alla manutenzione
Parte Manutenzione Pagina Prima dell'uso Mensilmente
Batteria Ispezionare / pulire / caricare 10 •
Testina a filo di nylon Ispezionare 19 •
Coltello tagliafilo Ispezionare/pulire - •
Viti, bulloni e dadi Ispezionare, serrare / sostituire - •
Manutenzione e cura
In caso di dubbi o problemi, contattare il rivenditore.
Pulitura della batteria e dello scomparto batterie
AVVERTENZA
Rischio di scosse elettriche o incendio. Non utilizzare
materiali conduttivi per pulire la batteria o lo scomparto
batterie.
1. Rilasciare l’interruttore a grilletto e il fermo dell’interruttore a
grilletto, per arrestare la testa di taglio.
2. Assicurarsi che il LED di alimentazione non sia illuminato.
3. Premere il pulsante di sgancio della batteria (A) e quindi
estrarre la batteria dalla testa dell’unità.
4. Utilizzare aria compressa o una spazzola a setole morbide
per rimuovere gli eventuali residui presenti sulla batteria e
nello scomparto batteria.
Verifica della testina a filo di nylon
1. Accertarsi che i due cricchetti che bloccano il coperchio al
corpo della testina siano ben fissati e scattino perfettamente
nel loro alloggiamento.
2. Verificare che la testina a filo sia montata saldamente sul
bordatore/decespugliatore e serrarla ulteriormente se necessario.
3. Controllare che non vi sia deflessione o rumorosità anomala
ruotando la testina manualmente. Deflessione o eccessiva
rumorosità possono produrre forti vibrazioni o causare un allentamento del sistema di fissaggio al bordatore/decespugliatore durante il funzionamento con conseguenti gravi
rischi.
19
Page 98

Manutenzione e cura
4. Accertarsi che il coperchio del pomello di battuta non sia
usurato. Se è evidente la presenza di una fessura all'interno
del pomello di battuta o all'interno del coperchio nelle vicinanze dell'apertura dove esce il filo, sostituirli se consumati.
5. Accertarsi che non vi siano incrinature o schegge nella testina. Se si dovessero riscontrare incrinature o schegge sostituire subito le parti danneggiate.
Sostituzione del filo di nylon
PERICOLO
Spegnere l’unità e accertarsi che la testina a filo di nylon abbia smesso di ruotare, prima di iniziare la procedura di
sostituzione.
La mancata osservanza di queste precauzioni potrebbe causare un incidente o lesioni gravi.
AVVERTENZA
Usare solo filo flessibile non metallico raccomandato da YAMABIKO CORPORATION.
La mancata osservanza di queste precauzioni potrebbe causare incidenti o lesioni gravi.
1. Spingere in dentro i "cricchetti di bloccaggio" (in due punti) e
smontare il coperchio. La rimozione è più semplice se eseguita in successione.
2. Rimuovere la bobina.
3. Quando il filo di nylon sulla bobina è quasi esaurito, eliminare il filo residuo e avvolgere un filo nuovo attenendosi alle
procedure indicate al punto (4) e successive. Quando il filo
di nylon sulla bobina è "fuso e incollato", eliminare l'intero filo
asportando la porzione "fusa e incollata" e avvolgere nuovamente il "filo rimosso" attenendosi alle procedure indicate al
punto (4) e successive.
4. Piegare il filo nel punto a 10 cm di distanza dalla metà dell'intera lunghezza e fissare la porzione piegata nella "feritoia"
del separatore intermedio.
5. Avvolgere saldamente il filo nella scanalatura della bobina
seguendo la "direzione di avvolgimento per il filo L".
6. Quando il filo è avvolto fino alla fine, fissare entrambe le
estremità nelle rispettive feritoie della bobina per bloccarle
provvisoriamente lasciando le estremità a circa 10 cm oltre
la feritoia.
7. Allineare le feritoie della bobina con le scanalature degli occhielli e inserire la bobina nel coperchio.
20
Page 99

Manutenzione e cura
8. Estrarre il filo dal coperchio. (A) Rimuovere il filo dalla "rispettiva feritoia della bobina" e (B) farlo passare attraverso
la "scanalatura del rispettivo occhiello".
9. Assemblare coperchio e alloggiamento. (C) Allineare gli "occhielli" del coperchio con i "recessi" dell'alloggiamento e (D)
spingere i cricchetti dell'alloggiamento nelle rispettive aperture del coperchio fino a che non si incastrano saldamente
nelle aperture.
PERICOLO
Accertarsi che la parte esterna dei cricchetti dell'alloggiamento si estenda quasi completamente nella parte esterna
della rispettiva apertura nel coperchio. Se i cricchetti sono
allentati e si aziona la testina, il coperchio o i componenti
interni possono saltare fuori, rappresentando un pericolo.
Problemi tecnici
IMPORTANTE
Per i pezzi di ricambio e gli articoli di consumo, utilizzare solo parti originali, prodotti e componenti raccomandati.
L'utilizzo di ricambi di altri produttori o componenti non raccomandati potrebbe provocare guasti.
Problema Causa Rimedio
La spia rossa del caricabatterie lampeggia oppure non si illumina
L'unità non si accende 1. Pacco batterie non installato corret-
L'unità non funziona dopo l’accensione 1. Pacco batterie scarico
Tempo di funzionamento troppo breve 1. La temperatura del pacco batterie è
Il filo non si inserisce 1. Filo insufficiente sulla bobina
Il filo non riesce a tagliare 1. Il coltello tagliafilo nella protezione è
1. Spina non collegata alla presa muro
2. Pacco batterie non installato correttamente
3. Collegamento ostruito
4. Anomalia nel caricabatterie
5. Anomalia nel pacco batterie
tamente
2. La testina a filo è ostruita
3. La temperatura del pacco batterie è
superiore ai valori considerati accettabili
superiore ai valori considerati accettabili
2. I componenti elettronici sono surriscaldati
3. Pacco batterie scarico
2. Filo impigliato nella bobina
danneggiato o mancante
1. Collegare il caricabatterie all'alimentazione
2. Controllare l'installazione del pacco
batterie
3. Reinstallare il pacco batterie dopo
aver rimosso le ostruzioni dal collegamento.
4. Consultare il rivenditore
5. Consultare il rivenditore
1. Controllare l'installazione del pacco
batterie
1. Caricare il pacco batterie
2. Spegnere l'unità e pulire l'accessorio
di taglio
3. Rimuovere il pacco battere e farlo
raffreddare
1. Rimuovere il pacco battere e farlo
raffreddare
2. Spegnere l’unità e attendere che si
raffreddi
3. Caricare il pacco batterie
1. Riavvolgere con un filo nuovo
2. Svolgere e riavvolgere il filo
1. Consultare il rivenditore
21
Page 100

Manutenzione e cura
In caso di problemi non menzionati nella tabella consultare il proprio rivenditore.
Contattare il proprio rivenditore per smaltire il prodotto o parti di esso in conformità alle leggi nazionali.
Rimessaggio
AVVERTENZA
Non stoccare in un contenitore in cui potrebbero accumularsi fumi infiammabile.
Questo potrebbe provocare un incendio.
Quando si conserva il prodotto per un lungo periodo, assicurarsi di effettuare le seguenti operazioni di preparazione.
Tagliasiepi elettrico
1. Spegnere l’unità.
2. Rimuovere la batteria dalla testa dell’unità.
3. Rimuovere eventuali accumuli di sporco e detriti dalle parti esterne dell'unità.
4. Serrare tutte le viti e i dadi.
5. Coprire lo scomparto batteria della testa dell’unità, la batteria e il caricabatterie.
6. Conservare l'unità in un luogo asciutto e privo di polvere, lontano dalla portata dei bambini.
Batteria
1. Rimuovere la batteria dalla testa dell’unità.
2. Conservare in un luogo asciutto e privo di polvere, lontano dalla portata dei bambini.
3. Conservare a temperature comprese tra -20 °C e 60 °C.
4. Se la batteria deve restare inutilizzata per oltre un anno, ricaricarla fino al 40 - 60 % della capacità.
Caricabatterie
1. Rimuovere la batteria dal caricabatterie.
2. Scollegare il caricabatterie dall’alimentazione di rete.
3. Conservare in un luogo asciutto e privo di polvere, lontano dalla portata dei bambini.
Smaltimento
I componenti principali di plastica del prodotto presentano dei
codici che indicano i materiali che li costituiscono. I codici fanno riferimento ai seguenti materiali; smaltire questi componenti di plastica in conformità alla legislazione locale.
Contrassegno Materiale
>PA6-GF< Nylon 6 - Fibra di vetro
>PP-GF< Polipropilene - Fibra di vetro
>PE-HD< Polietilene
>PP< Polipropilene
Contattare il proprio concessionario per ottenere informazioni
sulle modalità di smaltimento dei componenti in plastica.
La batteria contiene litio. Eseguire lo smaltimento soltanto
presso uno dei punti di raccolta designati.
Le batterie agli ioni di litio devono essere riciclate o smaltite
correttamente.
22
 Loading...