

Page 1
1Top cover(composite volume)
ENGLISH
FRANÇAIS
DEUTSCH
ITALIANO
ESPAÑOL
OPERATOR'S MANUAL
MANUEL D'UTILISATION
BEDIENUNGSANLEITUNG
MANUALE PER L'OPERATORE
MANUAL DE INSTRUCCIONES
DPB-600
WARNING
READ THE INSTRUCTIONS CAREFULLY AND FOLLOW THE RULES FOR
SAFE OPERATION.
FAILURE TO DO SO COULD RESULT IN SERIOUS INJURY.
AVERTISSEMENT
LIRE ATTENTIVEMENT LES INSTRUCTIONS ET SUIVRE LES RÈGLES DE
SÉCURITÉ.LE NON-RESPECT DES RÈGLES DE SÉCURITÉ ENTRAÎNE UN
RISQUE DE BLESSURE GRAVE.
WARNUNG
LESEN SIE DIE BEDIENUNGSANLEITUNG SORGFÄLTIG DURCH, UND
BEFOLGEN SIE DIE SICHERHEITSREGELN. ANDERNFALLS BESTEHT DAS
RISIKO SCHWERER VERLETZUNGEN.
AVVERTENZA
LEGGERE E SEGUIRE ATTENTAMENTE LE ISTRUZIONI PER LAVORARE IN
CONDIZIONI DI MASSIMA SICUREZZA. LA MANCATA OSSERVANZA DELLE
ISTRUZIONI POTREBBE PROVOCARE LESIONI GRAVI.
ADVERTENCIA
LEA ATENTAMENTE LAS INSTRUCCIONES Y SIGA LAS INDICACIONES
PARA UN FUNCIONAMIENTO SEGURO. DE NO HACERLO, PODRÍA SUFRIR
LESIONES GRAVES.
Page 2

Packing list
Packing list
3
Page 3

1Top cover
ENGLISH
(Original instructions)
OPERATOR'S MANUAL
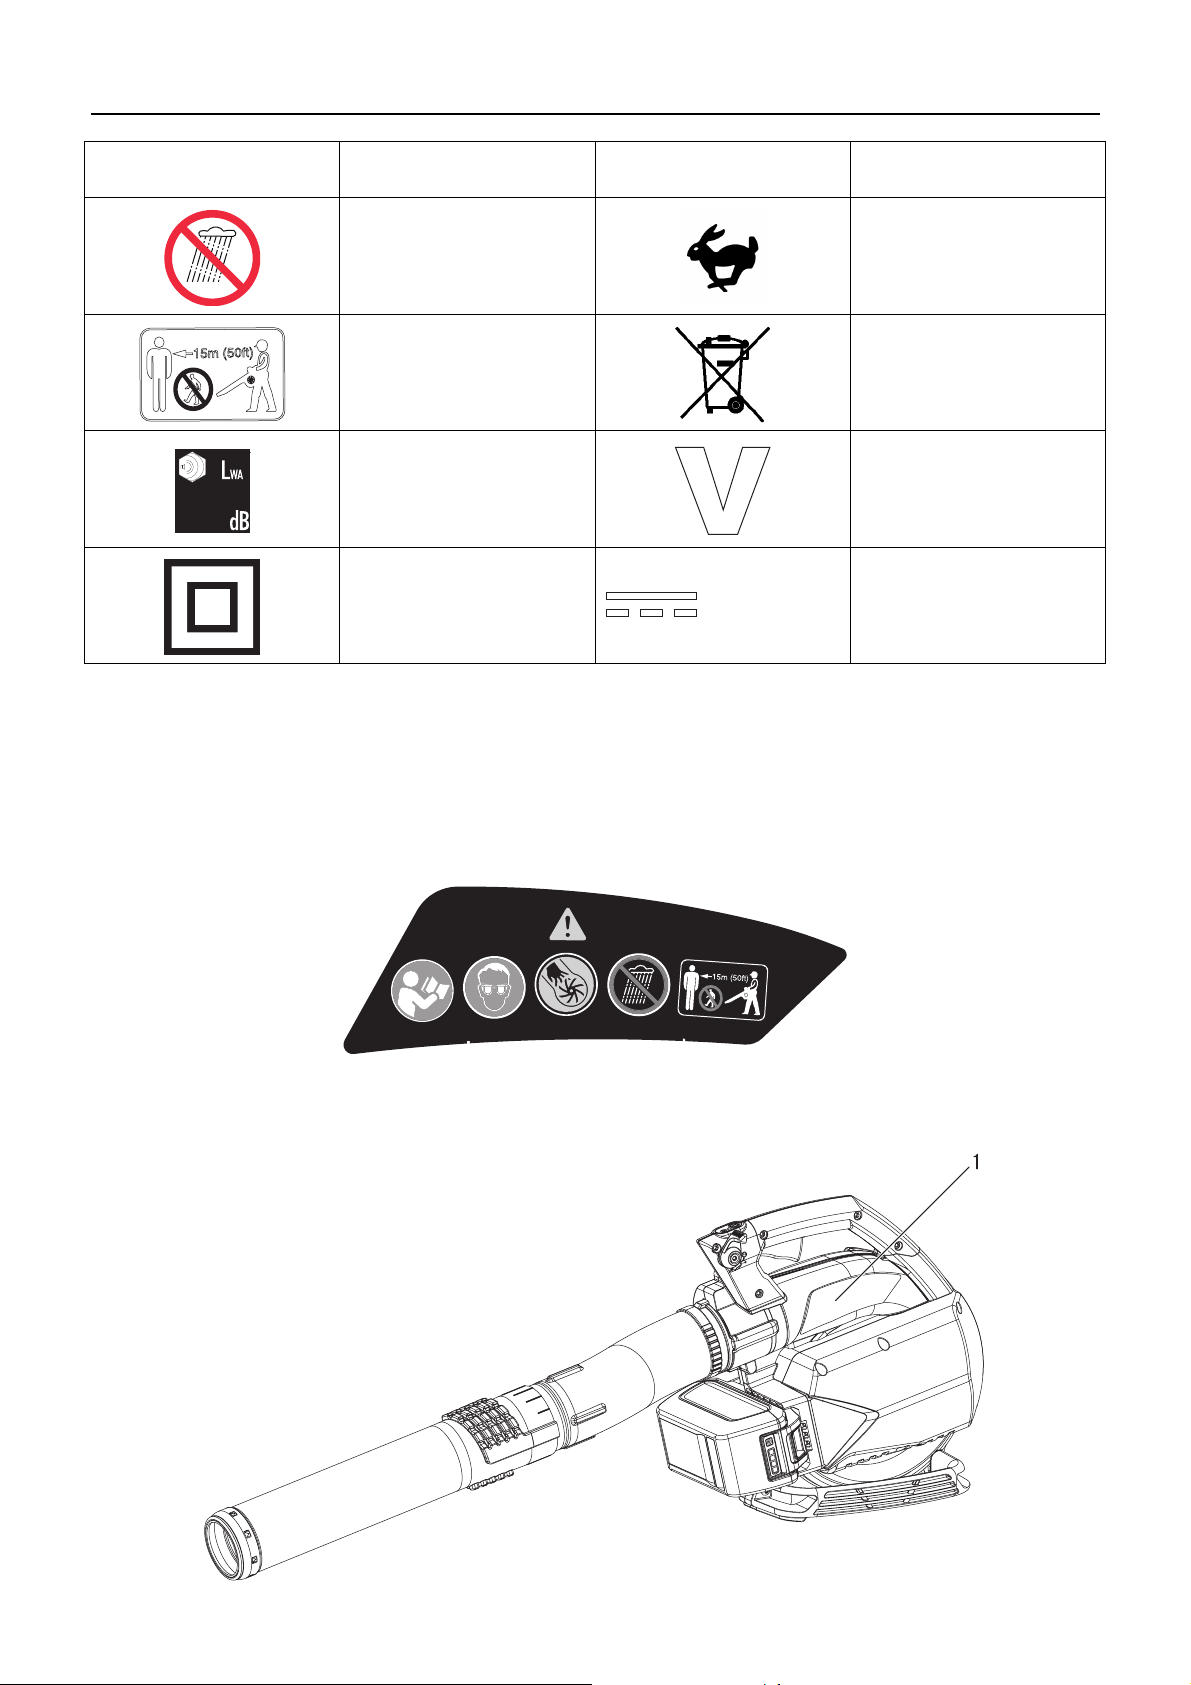
RECHARGEABLE POWER BLOWER
DPB-600
WARNING
READ THE INSTRUCTIONS CAREFULLY AND FOLLOW THE
RULES FOR SAFE OPERATION.
FAILURE TO DO SO COULD RESULT IN SERIOUS INJURY.
Page 4

Important information
2Important information
Please ensure that you read the operator's manual before using your product.
Intended use of this product
ECHO Rechargeable Power Blower are designed for blowing away dust of various sorts, including fallen leaves.
Do not use this tool for anything other than its intended purpose.
Users of the product
You should not use this product until you have read the operator's manual carefully and fully understand its content.
This product should not be used by anyone who has failed to read the operator's manual properly, is suffering from a
cold, tiredness or otherwise in poor physical condition, or children.
Keep in mind that the operator or user is responsible for accidents or hazards occurring to other people or their prop-
erty.
About your operator's manual
This manual contains necessary information about the operation and maintenance of your product. Please read it care-
fully and understand its contents.
Always keep your manual in a place where it is readily accessible.
If you have lost your manual or it is damaged and no longer readable, please purchase a new one from your ECHO
DEALER.
The units used in this manual are SI units (International System of Units). Figures in parentheses are reference values,
and there may be a slight conversion error in some cases.
Loaning or assigning your product
When loaning the product described in this manual to another party, ensure that the person borrowing and working with
the product receives the operator's manual along with the product. If you assign your product to another party, please
enclose the operator's manual with the product when handing it over.
Enquiries
Please contact your ECHO DEALER for requests regarding information about your product, the purchase of consum-
ables, repairs, and other such enquiries.
Notices
The content of this manual may be changed without notice for the purpose of upgrades to the product. Some of the
illustrations used may differ from the product itself in order to make the explanations clearer.
This product requires the assembly of some parts.
Please consult your ECHO DEALER if anything is unclear or of concern.
Manufacturer
YAMABIKO CORPORATION
7-2 SUEHIROCHO 1-CHOME, OHME, TOKYO 198-8760, JAPAN
Authorized Representative in Europe
Atlantic Bridge Limited
Atlantic House, PO Box 4800, Earley, Reading RG5 4GB, United Kingdom
2
Page 5

Contents
For safe use of your product ............................................................................................... 4
Warning notices ............................................................................................................. 4
Other indicators ............................................................................................................. 4
Symbols.........................................................................................................................4
Location in which the safety decal is attached............................................................... 5
Handling the product ..................................................................................................... 6
Packing list........................................................................................................................12
Description........................................................................................................................ 13
Before you start ................................................................................................................14
Assembly ..................................................................................................................... 14
Starting and Stopping ....................................................................................................... 18
Starting the unit ........................................................................................................... 18
Stopping the unit.......................................................................................................... 18
Operation ..........................................................................................................................19
Operating blower ......................................................................................................... 19
Maintenance and care ...................................................................................................... 21
Servicing guidelines..................................................................................................... 21
Maintenance and care ................................................................................................. 21
Troubleshooting table .................................................................................................. 22
Storage ........................................................................................................................ 23
Disposal....................................................................................................................... 24
Specifications.................................................................................................................... 25
Declaration of conformity .................................................................................................. 26
3
Page 6
For safe use of your product
Be careful to read this section before using your product.
For safe use of your product
The precautions described in this section contain important safety information. Please observe them carefully.
You must also read the precautions that appear in the body of the manual itself.
Text following a [diamond mark] mark describes the potential consequences of failing to observe the precaution.
Warning notices
Situations where there is a risk of physical injury to the operator and other people are indicated in this manual and on the product
itself by the following warning notices. Always read and observe them carefully in order to ensure safe operation.
DANGER WARNING CAUTION
This symbol accompanied by the
word "DANGER" calls attention to an
act or a condition which will lead to
serious personal injury or death of operators and bystanders.
Other indicators
As well as warning notices, this manual uses the following explanatory symbols:
This symbol accompanied by the
word "WARNING" calls attention to
an act or a condition which can lead to
serious personal injury or death of operators and bystanders.
"CAUTION" indicates a potentially
hazardous situation which, if not
avoided, may result in minor or moderate injury.
NOTE IMPORTANT
Circle and slash symbol means whatever is
shown is prohibited.
This enclosed message provides tips
for use, care and maintenance of the
product.
Framed text featuring the word "IM-
PORTANT" contains important information about the use, checking,
maintenance and storage of the product described in this manual.
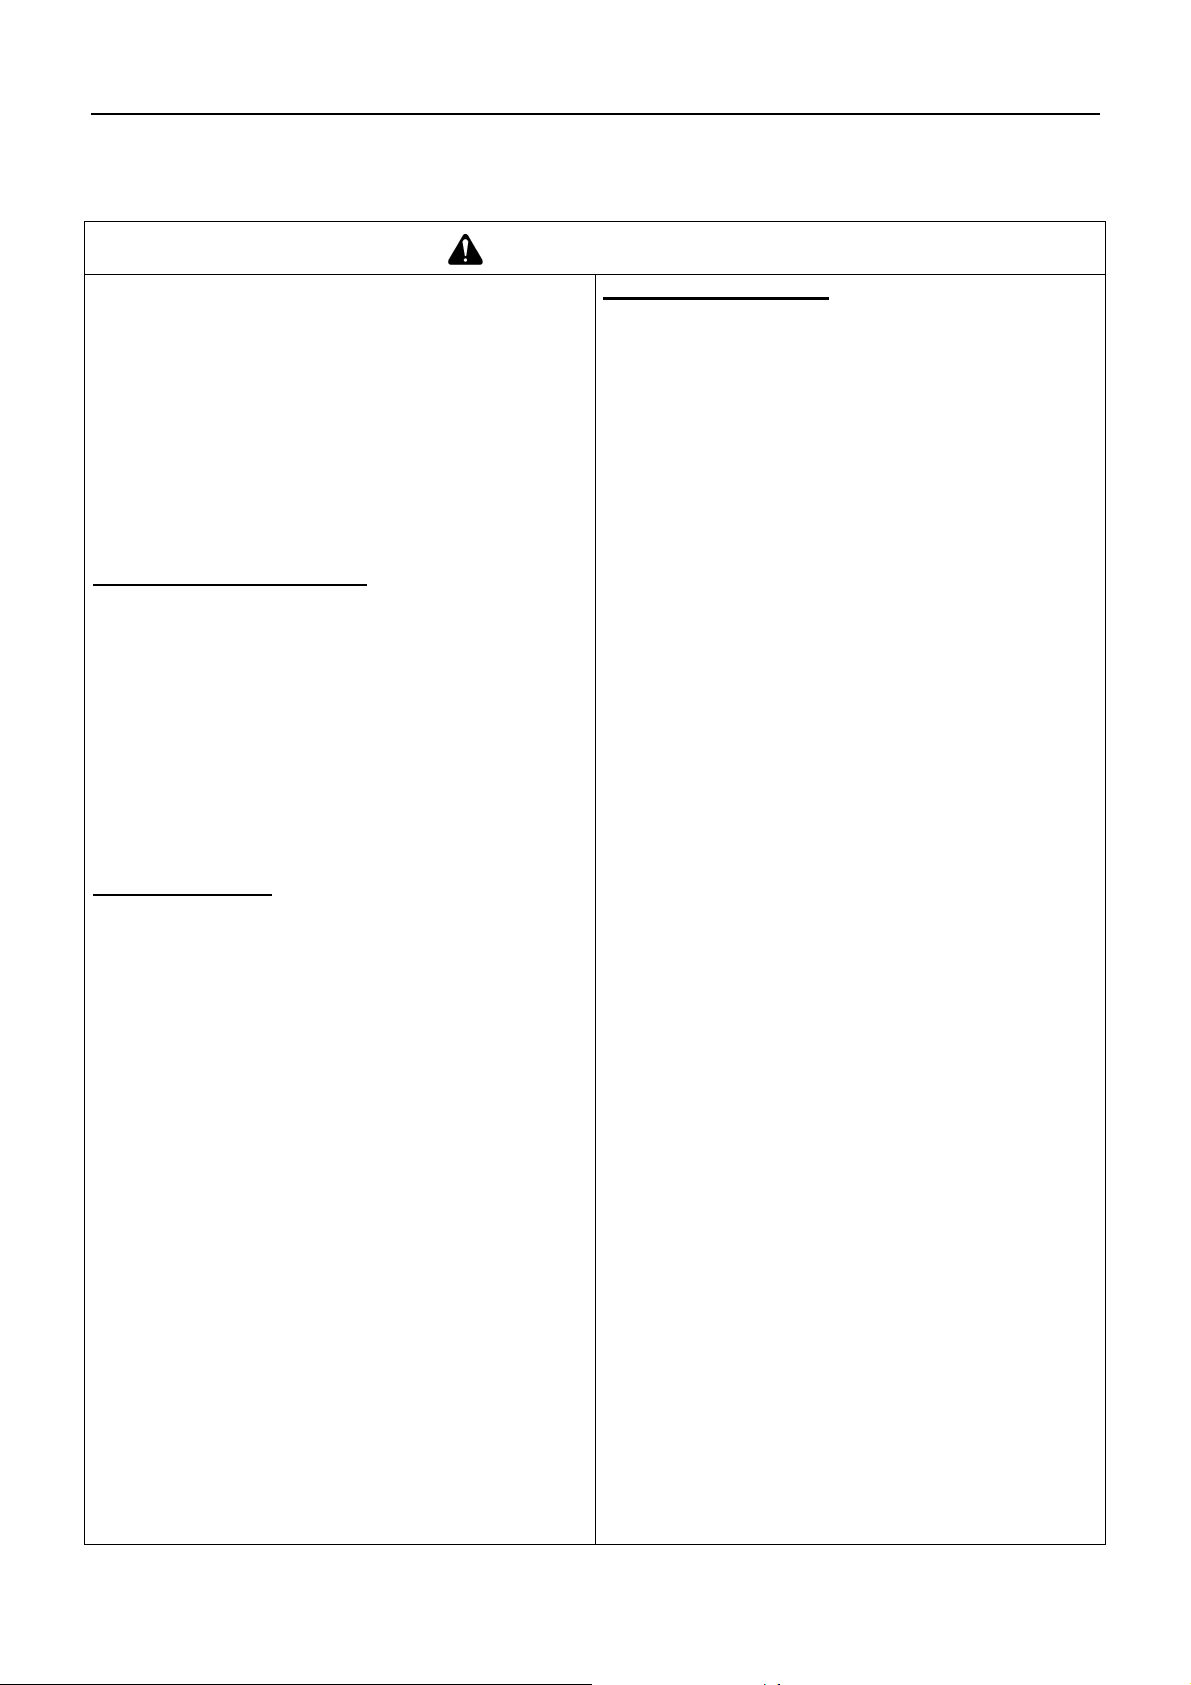
Symbols
In this manual and on the product itself, a series of explanatory symbols is used. Please make sure that you fully understand what
each symbol means.
Symbol form/shape Symbol description/applica-
tion
Carefully read the operator's
manual
Safety / Alert Finger severing
Beware of electric shocks
Stop Slow speed
Symbol form/shape Symbol description/applica-
tion
Wear eye protection
Beware of high-temperature
areas
Never use in the rain or at
damp locations
Fast speed
4
Page 7
For safe use of your product
Symbol form/shape Symbol description/applica-
tion
Keep bystanders away 15 m Environmental protection!
Guaranteed sound power level
Class II tool
Symbol form/shape Symbol description/applica-
tion
Volts
or DC
Direct current
Location in which the safety decal is attached
The safety decal shown below has been attached to the product described in this manual. Ensure that you understand what the
decal means before using your product.
If the decal becomes illegible due to wear and tear, damage, or peels off, please purchase a replacement decal from your dealer
and attach it in the location shown in the illustration below. Ensure that the decal is readable at all times.
1. Safety decal (Part number X505008910)
5
Page 8

For safe use of your product
Handling the product
General Power Tool Safety Warnings
WARNING
Read all safety warnings and all instructions.
Failure to follow the warnings and instructions may result in
electric shock, fire and/or serious injury.
Save all warnings and instructions for future reference.
The term "power tool" in the warnings refers to your mains-operated (corded) power tool or battery-operated (cordless) power tool.
Work area safety
Keep work area clean and well lit.
Cluttered or dark areas invite accidents.
Do not operate power tools in explosive atmospheres,
such as in the presence of flammable liquids, gases or
dust.
Power tools create sparks which may ignite the dust or
fumes.
Keep children and bystanders away while operating a
power tool.
Distractions can cause you to lose control.
Electrical safety
Power tool plugs must match the outlet. Never modify
the plug in any way. Do not use any adapter plugs with
earthed (grounded) power tools.
Unmodified plugs and matching outlets will reduce risk of
electric shock.
Avoid body contact with earthed or grounded surfaces
such as pipes, radiators, ranges and refrigerators.
There is an increased risk of electric shock if your body is
earthed or grounded.
Do not expose power tools to rain or wet conditions.
Water entering a power tool will increase the risk of electric
shock.
Do not abuse the cord. Never use the cord for carrying,
pulling or unplugging the power tool. Keep cord away
from heat, oil, sharp edges or moving parts.
Damaged or entangled cords increase the risk of electric
shock.
When operating a power tool outdoors, use an exten-
sion cord suitable for outdoor use.
Use of a cord suitable for outdoor use reduces the risk of
electric shock.
If operating a power tool in a damp location is unavoid-
able, use a ground fault circuit interrupter (GFCI) protected supply.
Use of an GFCI reduces the risk of electric shock.
Personal safety
Stay alert, watch what you are doing and use common
sense when operating a power tool. Do not use a power
tool while you are tired or under the influence of drugs,
alcohol or medication.
A moment of inattention while operating power tools may re-
sult in serious personal injury.
Use personal protective equipment. Always wear eye
protection.
Protective equipment such as dust mask, non-skid safety
shoes, hard hat, or hearing protection used for appropriate
conditions will reduce personal injuries.
Prevent unintentional starting. Ensure the switch is in
the off-position before connecting to power source and/
or battery pack, picking up or carrying the tool.
Carrying power tools with your finger on the switch or ener-
gising power tools that have the switch on invites accidents.
Remove any adjusting key or wrench before turning the
power tool on.
A wrench or a key left attached to a rotating part of the power
tool may result in personal injury.
Do not overreach. Keep proper footing and balance at
all times.
This enables better control of the power tool in unexpected
situations.
Dress properly. Do not wear loose clothing or jewellery.
Keep your hair, clothing and gloves away from moving
parts.
Loose clothes, jewellery or long hair can be caught in mov-
ing parts.
If devices are provided for the connection of dust ex-
traction and collection facilities, ensure these are connected and properly used.
Use of dust collection can reduce dust-related hazards.
The vibration emission during actual use of the power tool can
differ from the declared total value depending on the ways in
which the tool is used; and of the need to identify safety measures to protect the operator that are based on an estimation of
exposure in the actual conditions of use (taking account of all
parts of the operating cycle such as the times when the tool is
switched off and when it is running idle in addition to the trigger
time).
6
Page 9
For safe use of your product
WARNING
Power tool use and care
Do not force the power tool. Use the correct power tool
for your application.
The correct power tool will do the job better and safer at the
rate for which it was designed.
Do not use the power tool if the switch does not turn it
on and off.
Any power tool that cannot be controlled with the switch is
dangerous and must be repaired.
Disconnect the plug from the power source and/or the
battery pack from the power tool before making any adjustments, changing accessories, or storing power
tools.
Such preventive safety measures reduce the risk of starting
the power tool accidentally.
Store idle power tools out of the reach of children and
do not allow persons unfamiliar with the power tool or
these instructions to operate the power tool.
Power tools are dangerous in the hands of untrained users.
Maintain power tools. Check for misalignment or bind-
ing of moving parts, breakage of parts and any other
condition that may affect the power tool’s operation. If
damaged, have the power tool repaired before use.
Many accidents are caused by poorly maintained power
tools.
Keep cutting tools sharp and clean.
Properly maintained cutting tools with sharp cutting edges
are less likely to bind and are easier to control.
Use the power tool, accessories and tool bits etc. in ac-
cordance with these instructions, taking into account
the working conditions and the work to be performed.
Use of the power tool for operations different from those in-
tended could result in a hazardous situation.
Battery tool use and care
Recharge only with the charger specified by the manu-
facturer.
A charger that is suitable for one type of battery pack may
create a risk of fire when used with another battery pack.
Use power tools only with specifically designated bat-
tery packs.
Use of any other battery packs may create a risk of injury
and fire.
When battery pack is not in use, keep it away from other
metal objects, like paper clips, coins, keys, nails,
screws or other small metal objects, that can make a
connection from one terminal to another.
Shorting the battery terminals together may cause burns or
a fire.
Under abusive conditions, liquid may be ejected from
the battery; avoid contact. If contact accidentally occurs, flush with water. If liquid contacts eyes, additionally seek medical help.
Liquid ejected from the battery may cause irritation or burns.
Service
Have your power tool serviced by a qualified repair per-
son using only identical replacement parts.
This will ensure that the safety of the power tool is main-
tained.
7
Page 10
For safe use of your product
General precautions
WARNING
Operator's manual
Be careful to read the operator's manual
properly before using your product in order to ensure correct operation.
Failure to do so could lead to an accident or
serious injury.
Do not use the product for anything
other than its intended purpose
You must not use the product for any purpose other
than those described in the operator's manual.
To do so could lead to an accident or serious injury.
Do not modify the product
You must not modify the product.
To do so could lead to an accident or serious injury. Any
malfunction resulting from a modification to the product will
not be covered by the manufacturer's warranty.
Loaning or assigning your product
When loaning your product to another party, ensure
If you assign your product to another party, please en-
Failure to do so could lead to an accident or serious injury.
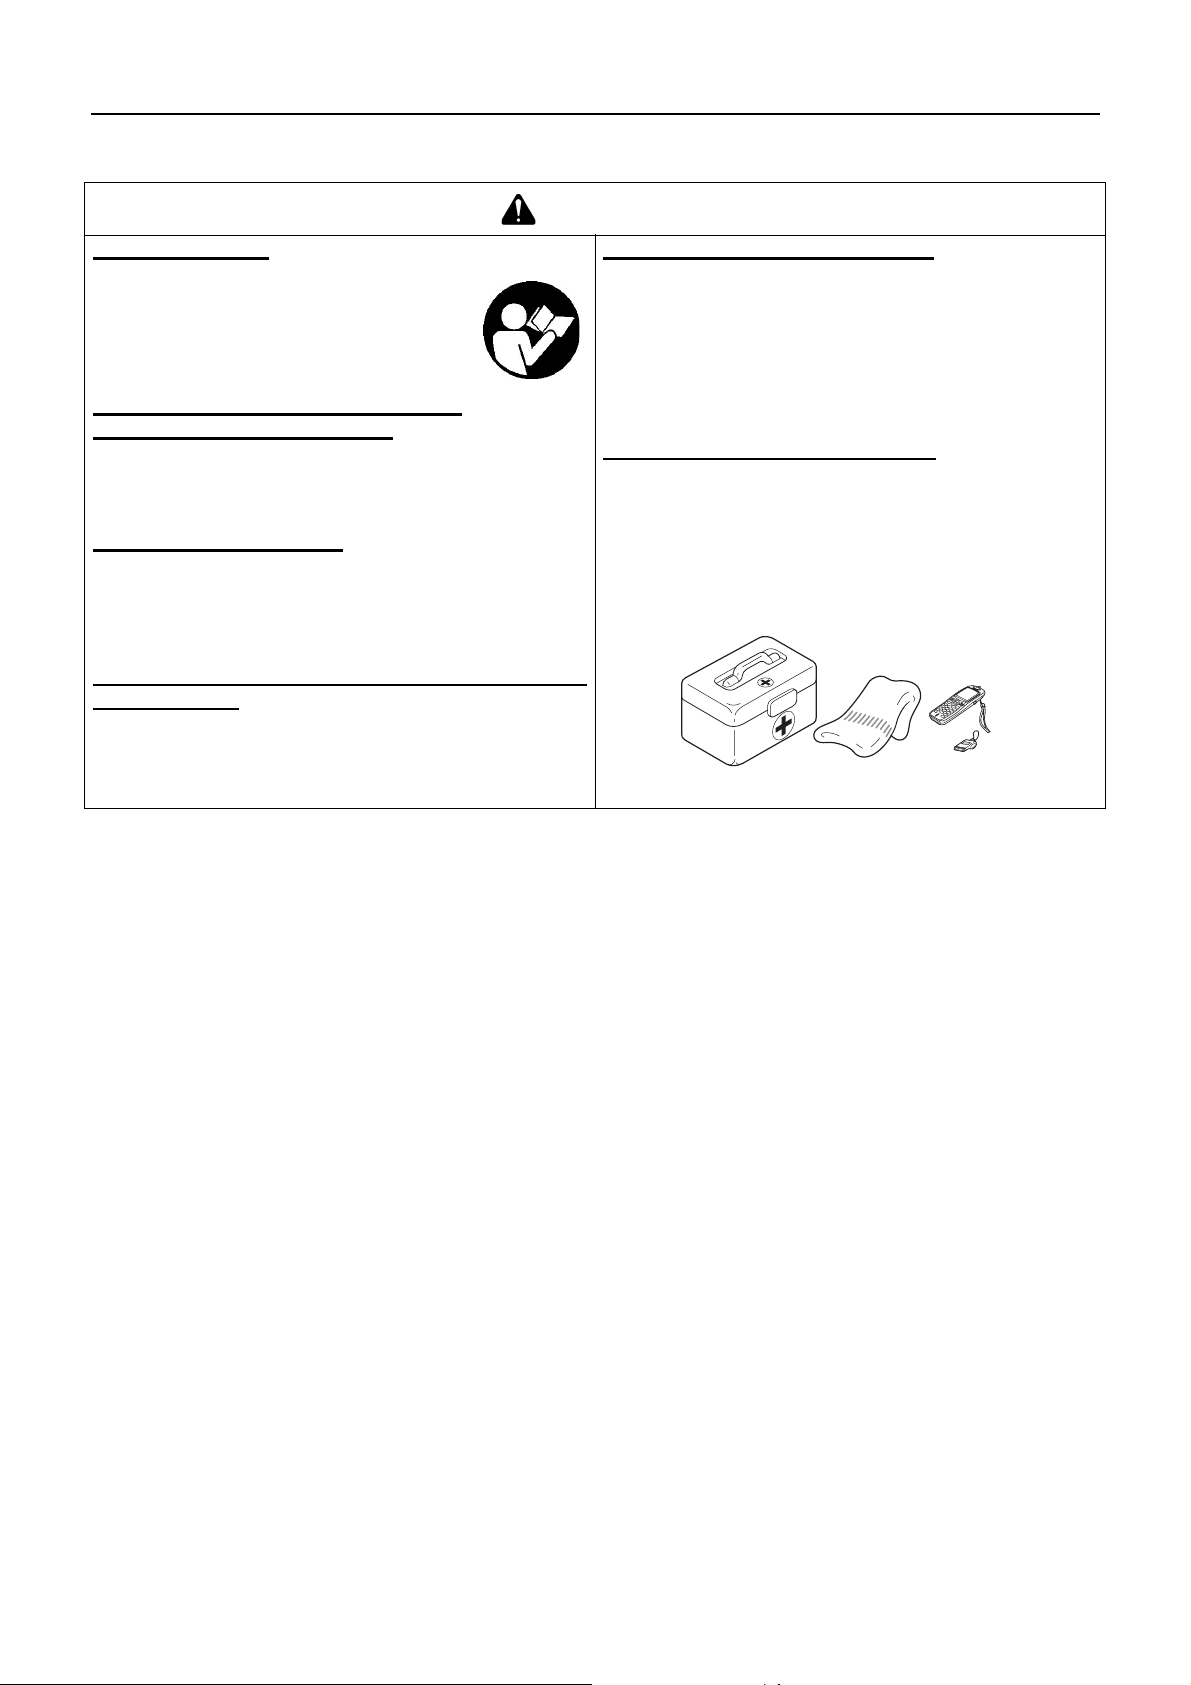
Being prepared in case of an injury
In the unlikely event of an accident or injury, please ensure
that you are prepared.
First aid kit
Towels and wipes (to stop any bleeding)
Whistle or mobile phone (for calling outside help)
If you are unable to perform first aid or call for outside help,
that the person borrowing the product receives the operator's manual along with it.
close the operator's manual with the product when
handing it over.
the injury could worsen.
Do not use the product unless it has been checked
and maintained
You must not use the product unless it has been
checked and maintained. Always ensure that the product is checked and maintained on a regular basis.
Failure to do so could lead to an accident or serious injury.
8
Page 11
For safe use of your product
Precautions for use
WARNING
Users of the product
The product should not be used by:
people who are tired
people who have taken alcohol
people who are on medication
people who are pregnant
people who are in poor physical
condition
people who have not read the op-
erator's manual
children
Failure to observe these instruc-
tions could lead to an accident.
This product generates electromagnetic fields during opera-
tion. Magnetic fields can cause pacemaker interference or
pacemaker failure. To reduce health risks, we recommend
that pacemaker users consult their physician and the pacemaker manufacturer before operating this product.
Environment of use and operation
Do not use the product
in damp or wet locations.
in the rain.
under poor weather conditions.
To do so could lead to an accident or serious in-
jury.
Do not use the product in places where there is no sure
foothold, such as on steep slopes or after rainfall, as
such places are slippery and dangerous.
Do not operate the product at night or in dark places
with poor visibility.
A serious injury could result if you fall or slip, or fail to oper-
ate the product correctly.
The area within a 15 m radius is a danger zone
The area within a 15 m radius of the product is a danger
zone. Be careful to observe the following precautions
while working with the product.
Do not allow children and other people or pets to enter
the danger zone.
If another person enters the danger zone, turn off the
unit to stop.
When approaching the operator, signal to him by, for
example, throwing twigs from outside the danger zone,
and then check that unit has been turn off.
If more than one person is working with the product,
identify the way in which you will signal to each other
and work at least 15 m apart.
Thrown objects could cause serious injury to the operator or
bystanders.
Using the product
When using the product, pay special attention to observe
the following precautions.
Do not point the blower pipe at people or pets.
Do not use the product in places where there is no sure
foothold.
Hold the handle tightly.
Avoid using the product late at night or early in the
morning so that the neighbors will not be disturbed by
noise.
Failure to observe these instructions could lead to an acci-
dent or injury.
Turn off the unit when moving around
When moving around in the situations described below,
turn off the unit and move.
Moving to the place where you are working.
Moving to another area while you are working.
Leaving the place where you have been working.
Failure to observe these precautions could cause burns or
serious injury.
When transporting the product by car, remove the bat-
tery, and secure it firmly in place to prevent it from moving around.
Be careful not to get caught in the fan
Be careful not to get your hair caught in the fan.
The wind suction from the fan could make your hand and an-
ything being caught in the fan, resulting in a serious injury.
Vibration and cold
It is believed that a condition called Raynaud's Phenomenon which affects the fingers of certain individuals may be
brought about by exposure to vibration and cold. Exposure to vibration and cold may cause tingling and burning,
followed by loss of colour and numbness in the fingers.
The following precautions are strongly recommended because the minimum exposure which might trigger the ailment is unknown.
Keep your body warm, especially the head and neck,
feet and ankles, and hands and wrists.
Maintain good blood circulation by performing vigorous
arm exercises during frequent work breaks, and also by
not smoking.
Limit the number of hours of operation.
Try to fill each day with jobs where operating the blower
or other hand-held power equipment is not required.
If you experience discomfort redness and swelling of
the fingers, followed by whitening and loss of feeling,
consult your physician before exposing yourself further
to cold and vibration.
Failure to observe these instructions could result in damage
to your health.
9
Page 12

For safe use of your product
WARNING
Repetitive stress injuries
It is believed that over-using the muscles and tendons of
the fingers, hands, arms and shoulders may cause soreness, swelling, numbness, weakness and extreme pain to
the areas just mentioned. Certain repetitive hand activities
may put you at a high risk for developing a repetitive
stress injury (RSI).
To reduce the risk of RSI, do the following:
Avoid using your wrist in a bent, extended or twisted
position.
Take periodic breaks to minimize repetition and rest
your hands. Reduce the speed and force in which you
do the repetitive movement.
Do exercises to strengthen hand and arm muscles.
See a doctor if you feel tingling, numbness or pain in
your fingers, hands, wrists or arms. The sooner RSI is
diagnosed, the more likely permanent nerve and muscle
damage can be prevented.
Failure to observe these instructions could result in damage
to your health.
Turn off the unit immediately if anything goes wrong
Turn off the unit immediately if the product suddenly
Continuing to use parts when they are damaged could lead
Turn off the unit when checking or maintaining the
product
Observe the following precautions when checking and
maintaining your product after use:
Turn off the unit, remove battery, and make sure all
An accident could occur if the product starts unexpectedly.
Allow unit to cool before performing service.
You could burn yourself.
starts to emit abnormal sounds or vibrate abnormally.
The product cannot be used when it suffers from abnormal vibration or sounds.
Contact your ECHO DEALER for repair.
to an accident or serious injury.
moving parts have come to a complete stop.
Instructions to disconnect the battery
Whenever the machine is left by the user.
Before clearing a blockage.
Before checking, cleaning or working on the machine.
After striking a foreign object to inspect the machine for
damage.
If the machine starts to vibrate abnormally, for immedi-
ately check.
An accident could occur if the product starts unexpectedly.
10
Page 13

For safe use of your product
Protective gear
WARNING
Wear protective gear
Wear appropriate work clothes and protective gear
when working with the power blower. Above all, make
sure to wear safety goggles and dust mask at all times
while working.
Without the protective gear, you could inhale the debris or
dust blown away or get them in your eyes, which could lead
to an accident or injury.
a Safety goggles: Protect the eyes
b Dust mask: Breathing protection
c Safety gloves: Protect the hands from cold and vibration
d Trim fitting clothes (long sleeves, long trousers): Protect
the body
e Sturdy shoes or boots : Protect the feet
Failure to observe these precautions could result in damage
to your sight or hearing, or lead to a serious injury.
When necessary, please use the protective gear below.
Head protection (helmet): Protects the head
Ear muffs or ear plugs: Hearing protection
Bee net: Insect protection
Wear proper clothing
Do not wear ties, jewellery, or loose, dangling clothing which could be
caught in the unit. Do not wear open toed footwear, or go bare foot or barelegged.
Failure to observe these precautions could result in an accident or lead to a se-
rious injury.
11
Page 14
Packing list
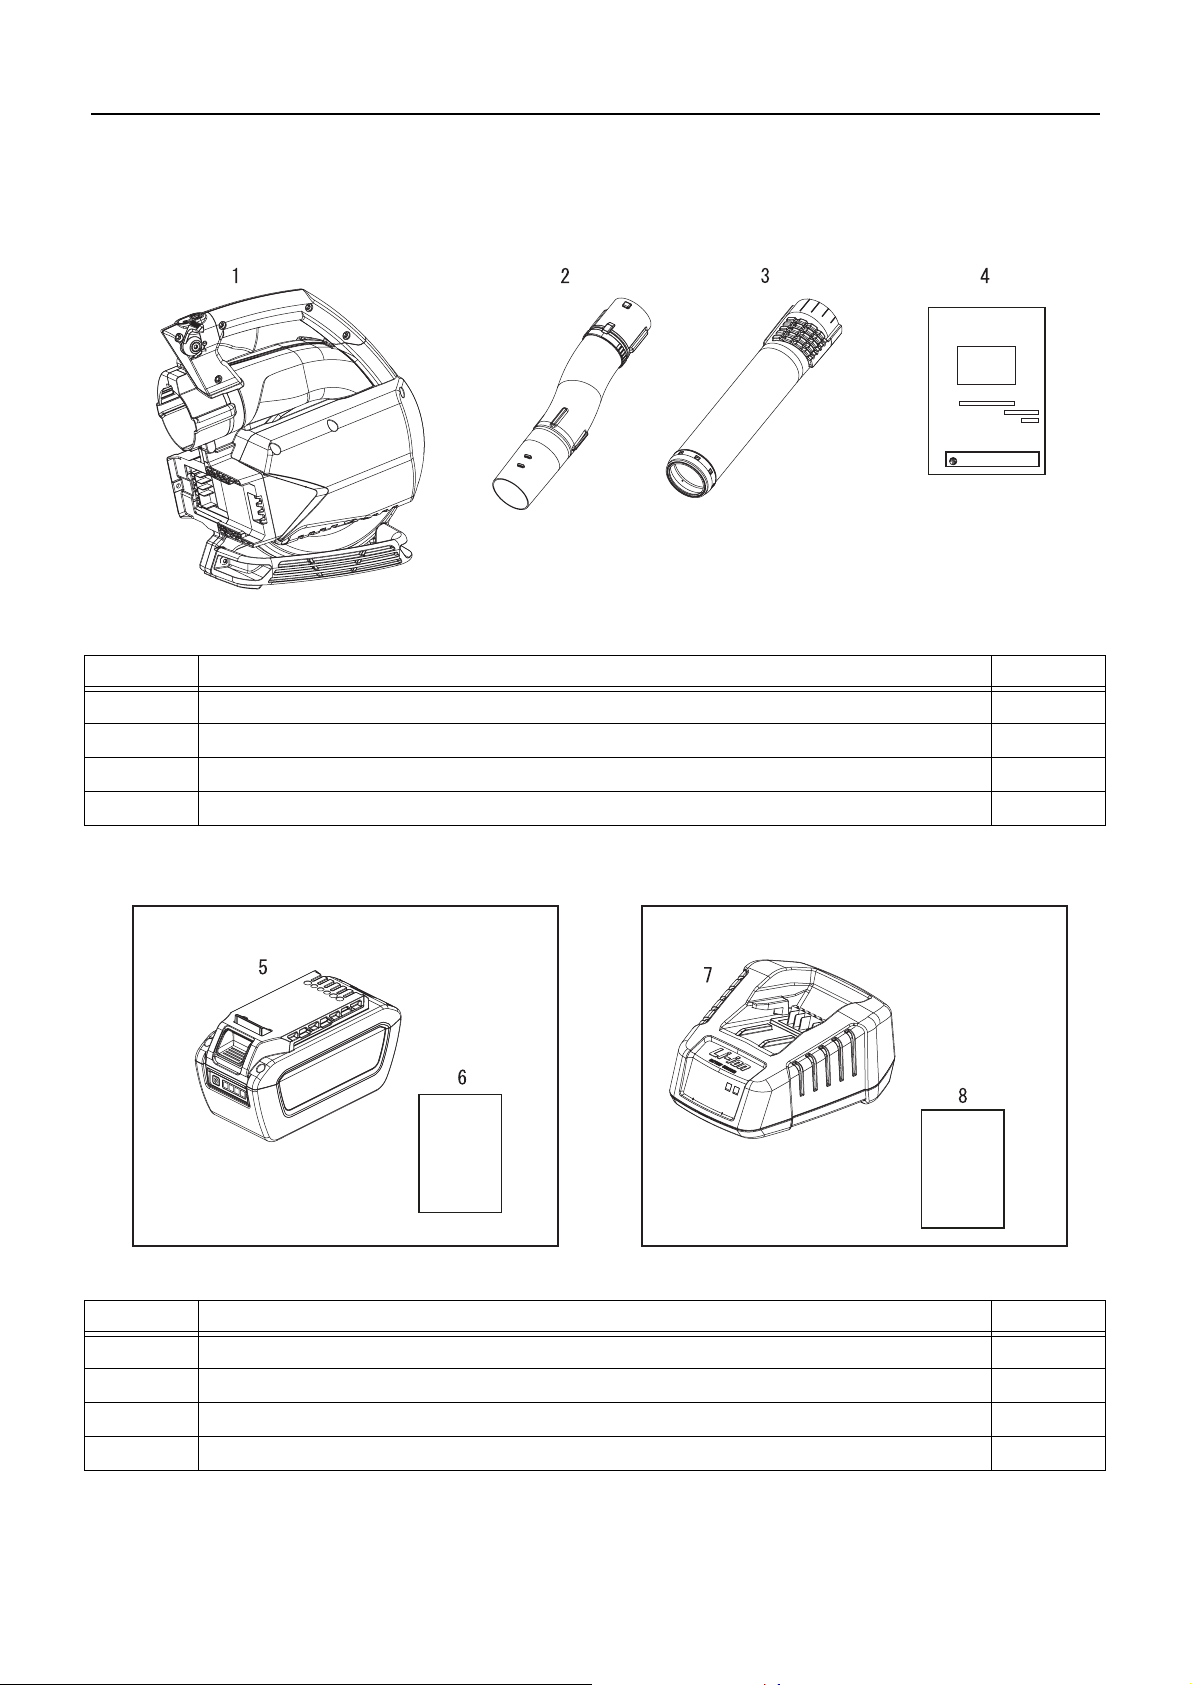
The following parts are packed separately in the packing box.
When you have unpacked the box, please check the parts that it contains.
Contact your dealer if anything is missing or broken.
Number Part name Quantity
(1) Power Head 1
(2) Blower pipe 1
Packing list
(3) Round Straight Nozzle 1
(4) Operator's manual 1
Number Part name Quantity
(5) Battery pack 1
(6) Operator's manual 1
(7) Charger 1
(8) Operator's manual 1
12
Page 15

Description
Description
1. Power button Press once to turn on power to the unit,
power indicator LED illuminates. Press once more to
turn power off to unit, power indicator LED turns off.
2. Power indicator LED Remains illuminated when power
to unit is turned on. Turns off when power to unit is off.
3. Trigger switch Activated by the operator's finger for turn-
ing the motor on.
4. Cruise control lever Pull back to increase blower speed.
5. Motor unit
6. Battery pack
7. Housing cover Covers blower fan area.
8. Serial number label Lists model number and serial num-
ber of unit.
9. Blower pipes Exclusive positive locking system.
13
Page 16
Before you start
Before you start
Assembly
WARNING
Read the operator's manual carefully to ensure that you assemble the product correctly.
Never perform maintenance or assembly procedures with unit running.
Using a product that has been incorrectly assembled could lead to an accident or serious injury.
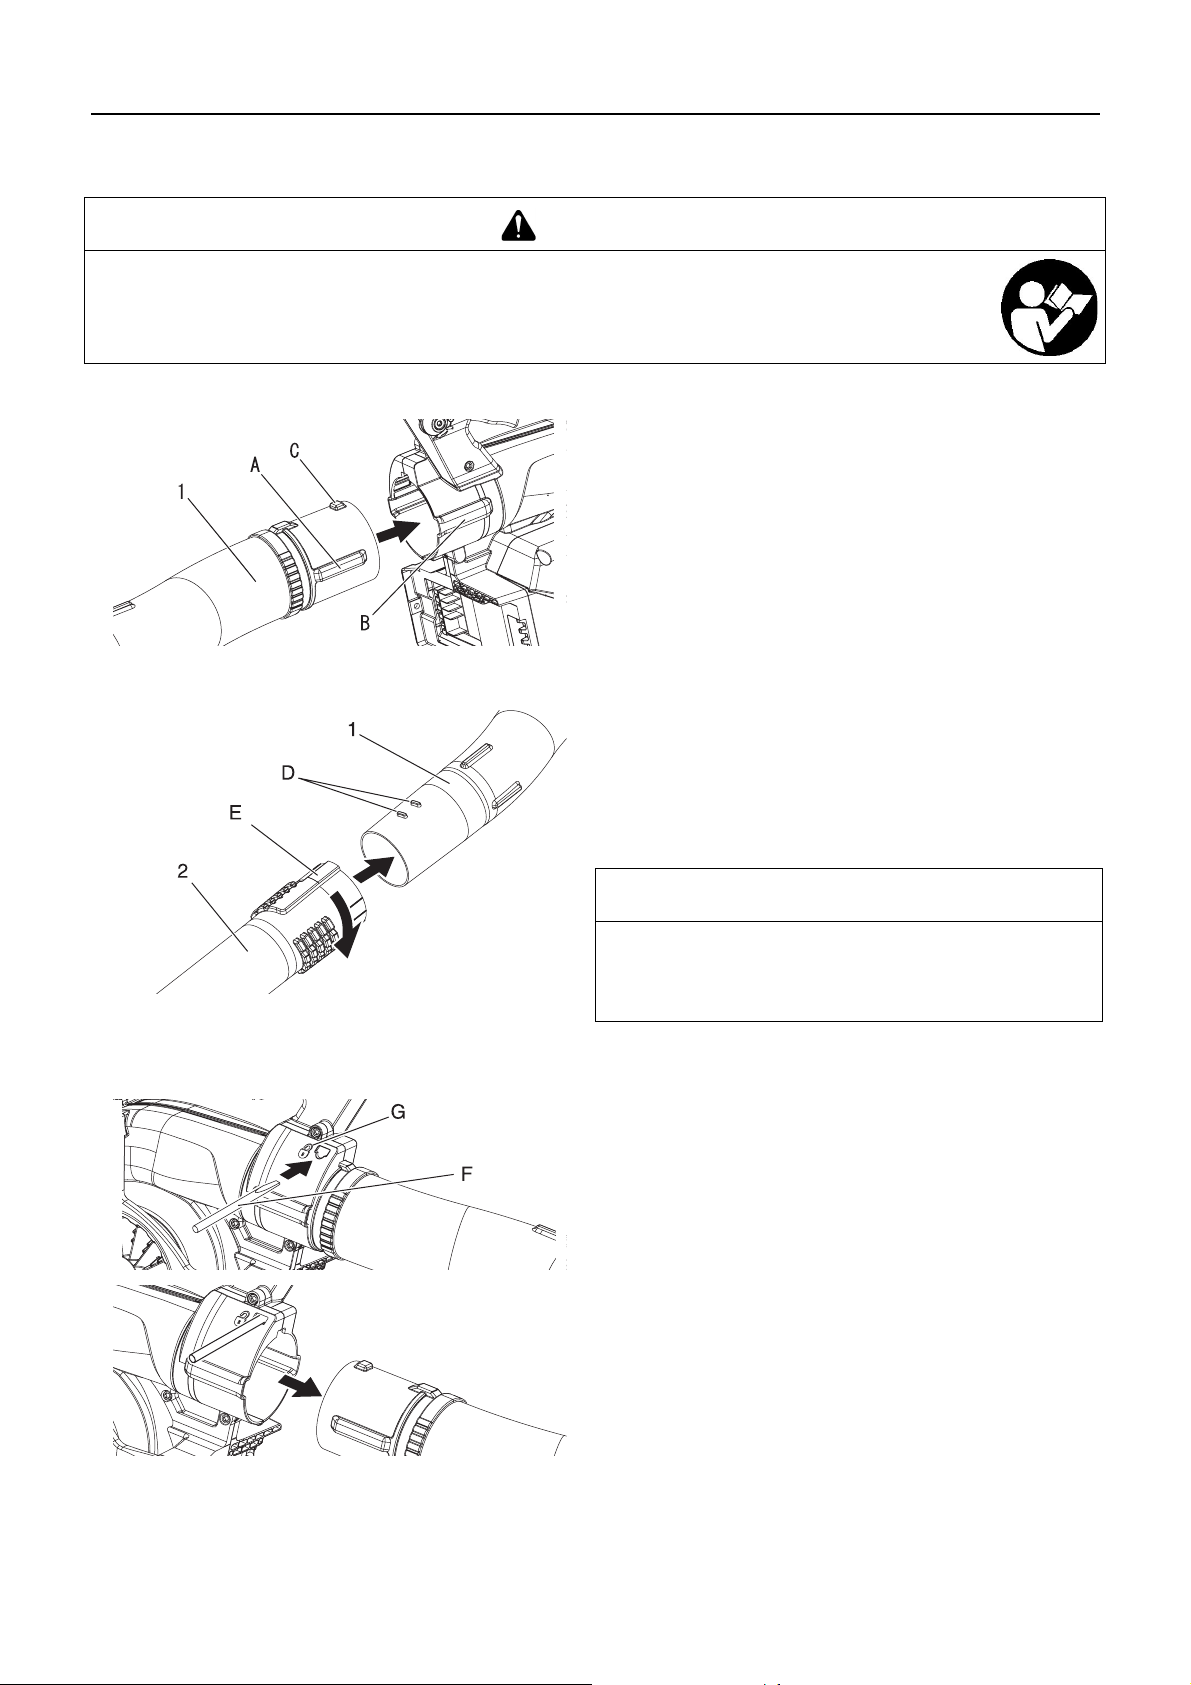
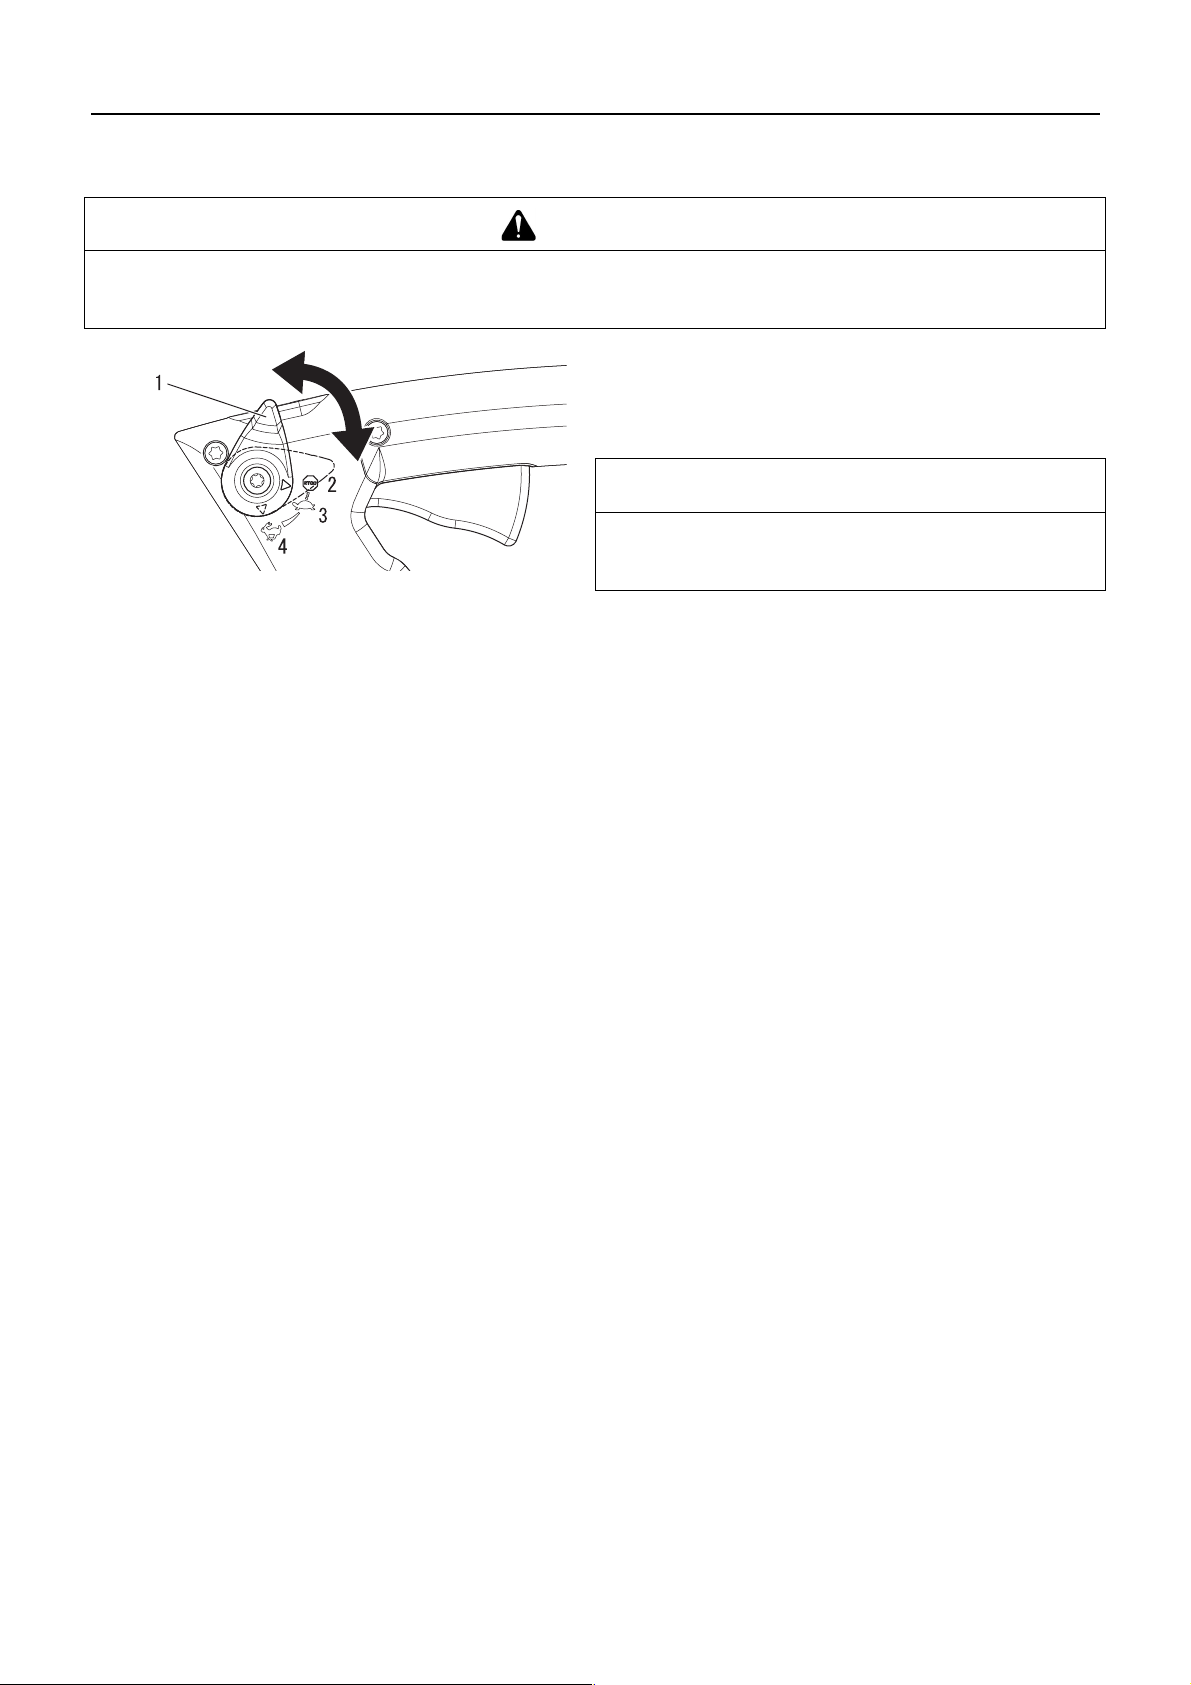
Install blower pipes
1. Stand unit upright on blower base.
2. Align locking ribs (A) on the blower pipe with recesses (B) in
fan case. Assure short locking rib (C) faces upward. Slide
the blower pipe into fan case until a clicking sound is heard.
1. Blower pipe
1. Blower pipe 2. Round straight nozzle
Remove blower pipes
3. Align tabs (D) with grooves (E) and slide the round straight
nozzle over the blower pipe until there is light resistance. Do
not force connection.
4. Hold the blower pipe, and turn the round straight nozzle
clockwise, engaging positive locking channels until connection is firm. Do not force connection.
NOTE
Blower use will eventually loosen pipe connections. Exclusive
positive locking system allows pipes to be tightened. If loosening occurs, remove the round straight nozzle and install according to instructions 3 & 4.
1. Insert screwdriver (F) into hole located near lock symbol (G)
to release pipe lock.
2. Pull pipes out of fan cace.
3. Remove screwdriver.
14
Page 17
Before you start
Battery charging
WARNING
Always use battery pack LBP-560-100/LBP-560-200/LBP-560-900 and charge only with LCJQ-560 charger.
Keep charger and battery away from damp conditions and all liquids.
Do not operate the charger on an easily combustible surface (e.g. paper, textiles) or in an environment with a high
risk of fire.
Do not cover the charger. Covering the charger will prevent it from cooling.
Do not operate the charger in explosive atmospheres, such as in the presence of flammable liquids, gases or dust.
Chargers can produce sparks which may ignite the dust or fumes - there is a risk of explosion.
Connect the charger only to the mains of voltage and frequency specified on the rating plate.
Connect the charger only to an easily accessible wall outlet.
Never insert objects in the battery pack's or charger's cooling slots.
Do not charge or use a defective, damaged or deformed battery pack and charger.
Do not open, damage or drop the battery pack or the charger.
Fluid may leak from the battery if it is damaged or not used properly; avoid contact with the skin. In the event of ac-
cidental contact, wash the affected areas of the skin with plenty of water and soap. If fluid gets in the eyes, do not
rub. Rinse the eyes with plenty of water for at least 15 minutes. Also seek medical assistance.
Never bridge (short circuit) the battery pack contacts or the charger's terminals with metallic objects.
Protect from direct sunlight, heat and open flames and never throw battery into fire; there is a risk of explosion.
In the event of smoke or fire in the charger, disconnect it from the wall outlet immediately.
If the connecting cord is damaged, immediately disconnect the plug from the power supply to avoid the risk of elec-
tric shock.
Do not expose battery pack to microwaves or high pressure.
Secure the unit against unintentional startup. Remove the battery pack from the unit before transporting or storing
the unit. Do not use metal containers for transporting batteries.
To reduce the risk of stumbling, position and mark the connecting cord in such a way that it cannot be damaged or
endanger others.
NOTE
The battery comes partially charged from the factory and needs to be fully charged before first use.
Charge the battery when it no longer produces sufficient power to operate the unit or when battery lights indicate that the
battery is low.
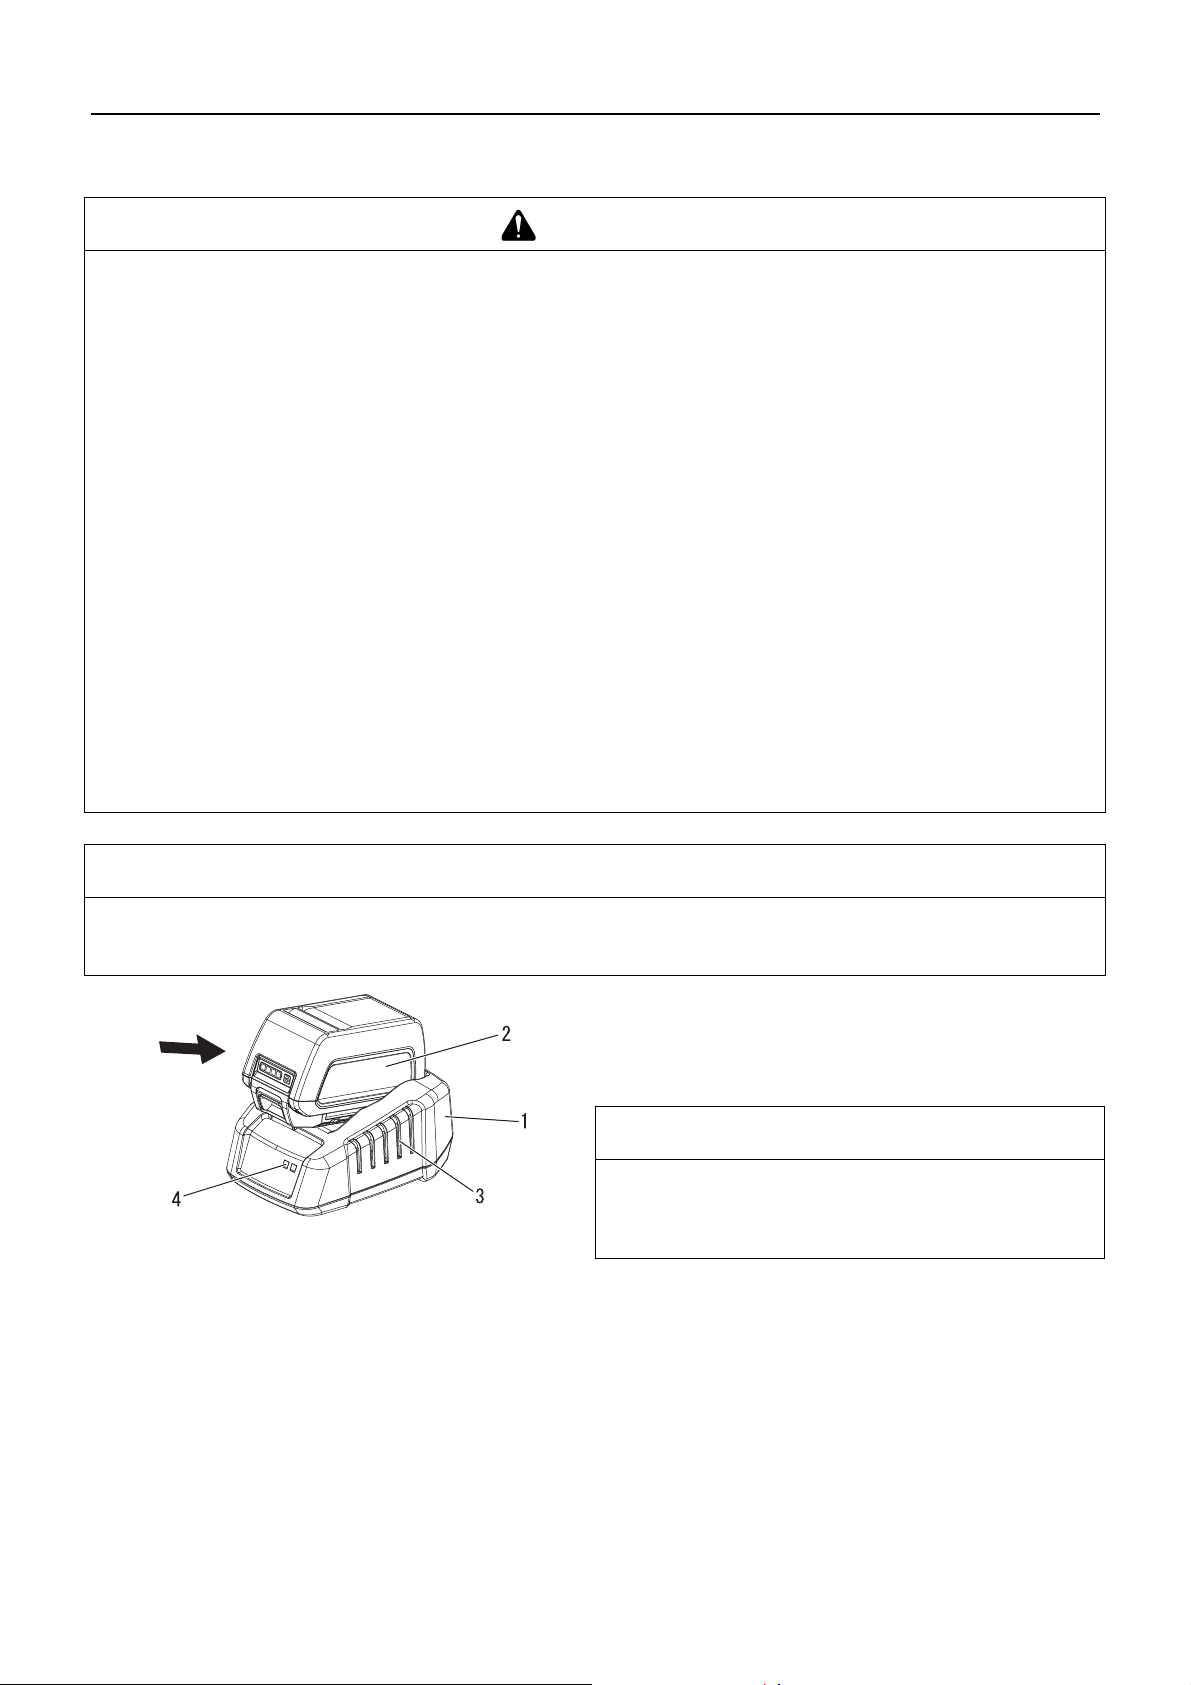
1. Plug charger AC cord in the wall outlet.
2. Align ridges on battery with grooves on charger, and slide
battery into charger.
3. During normal charging, the charger LED will blink continuously GREEN.
IMPORTANT
If charger detects a problem, LED blinks RED. Remove bat-
tery from charger, clear obstructions from contacts and reinstall battery into charger. If battery is outside acceptable
1. Charger
2. Battery
3. Cooling slots
4. Charger LED
temperature range (0°C to 60°C) LED remains RED.
15
Page 18

Before you start
4. When charging is complete, LED will remain GREEN.
∗ A fully discharged battery pack will charge in about 42 min-
utes. (LBP-560-100)
∗ A fully discharged battery pack will charge in about 88 min-
utes. (LBP-560-200)
∗ A fully discharged battery pack will charge in about 336
minutes. (LBP-560-900)
5. Verify battery is fully charged by removing battery from
charger, then pressing battery charge status button, and
checking LED display.
One green light indicates that the battery has 0-25%
1. Battery
2. Battery charge status
button
3. LED display
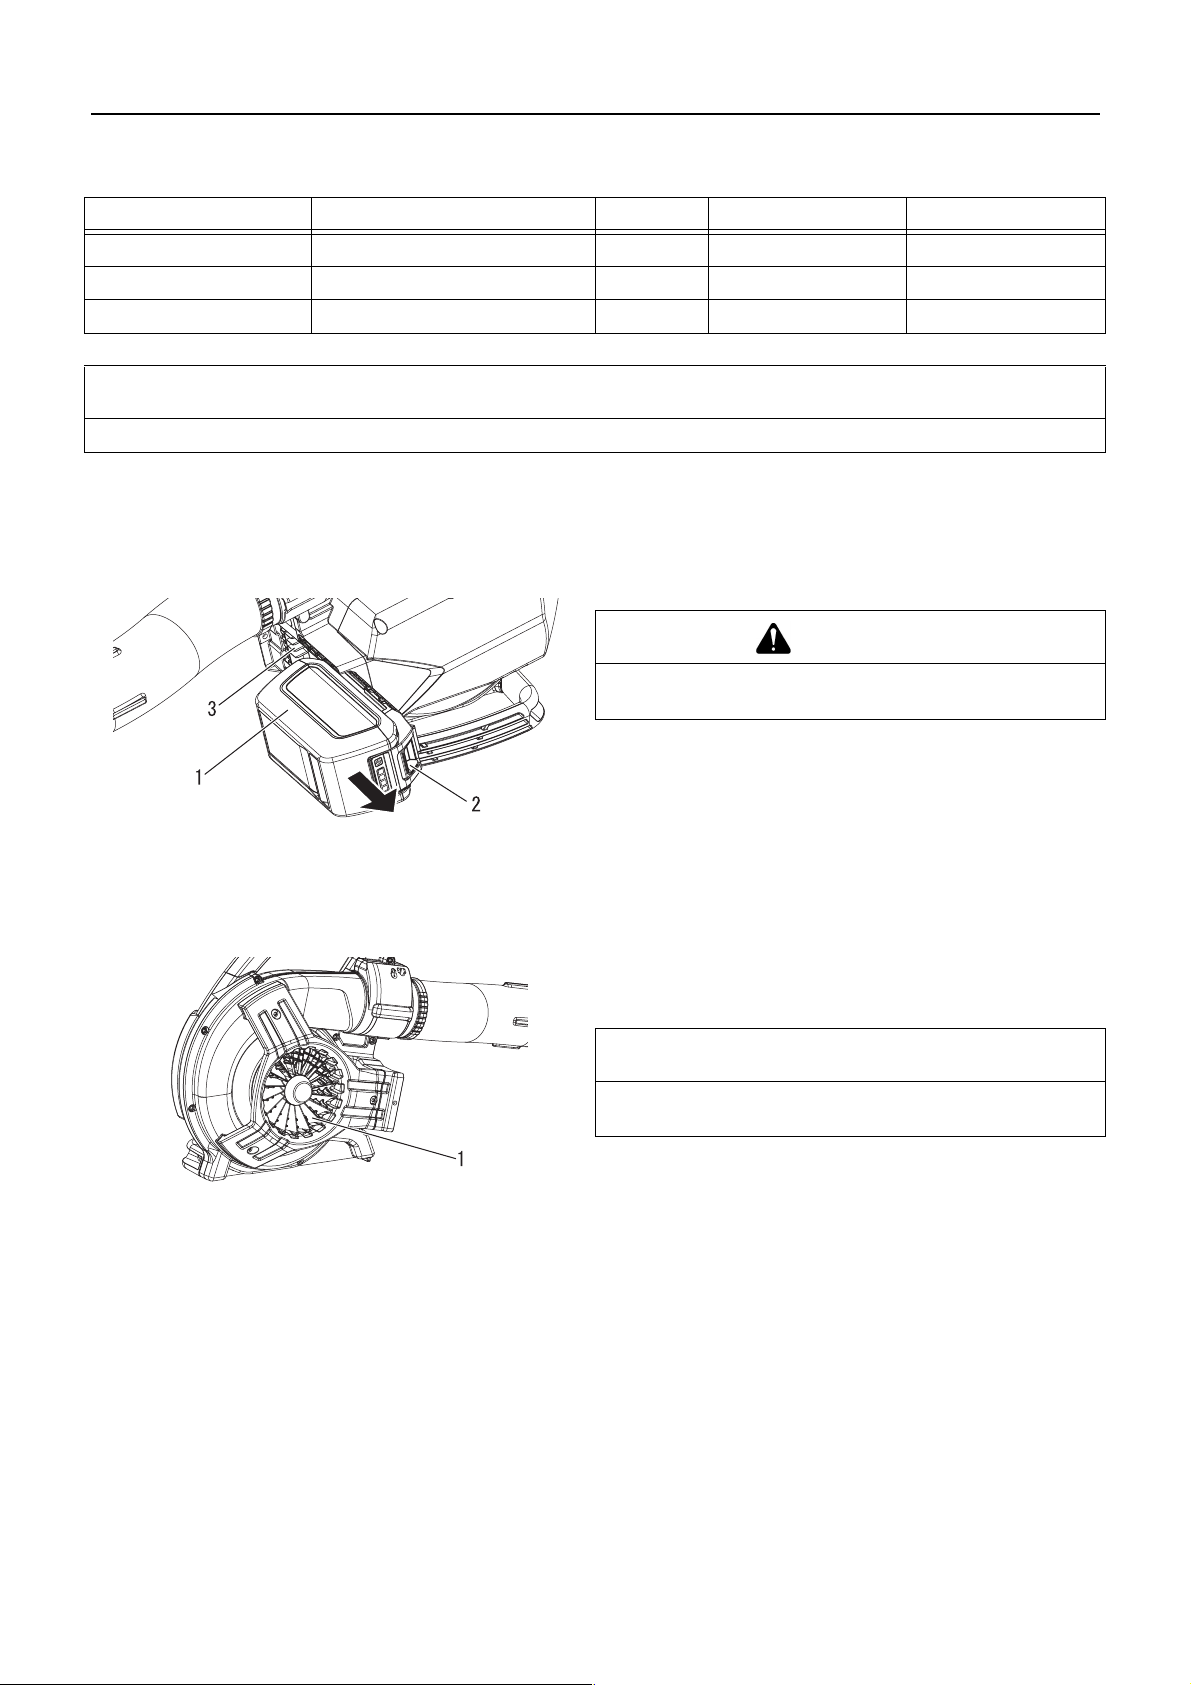
Fitting and removing the battery
WARNING
The power blower will operate when the battery is installed, the power indicator LED is lit. Make sure the power blower is
properly positioned to prevent loss of control and possible serious injury.
charge.
Two green lights indicate that the battery has 25-50%
charge.
Three green lights indicate that the battery has 50-75%
charge.
Four green lights indicate that the battery has 75-100%
charge.
6. Disconnect battery charger from power supply.
NOTE
The battery comes partially charged from the factory and needs to be fully charged before first use.
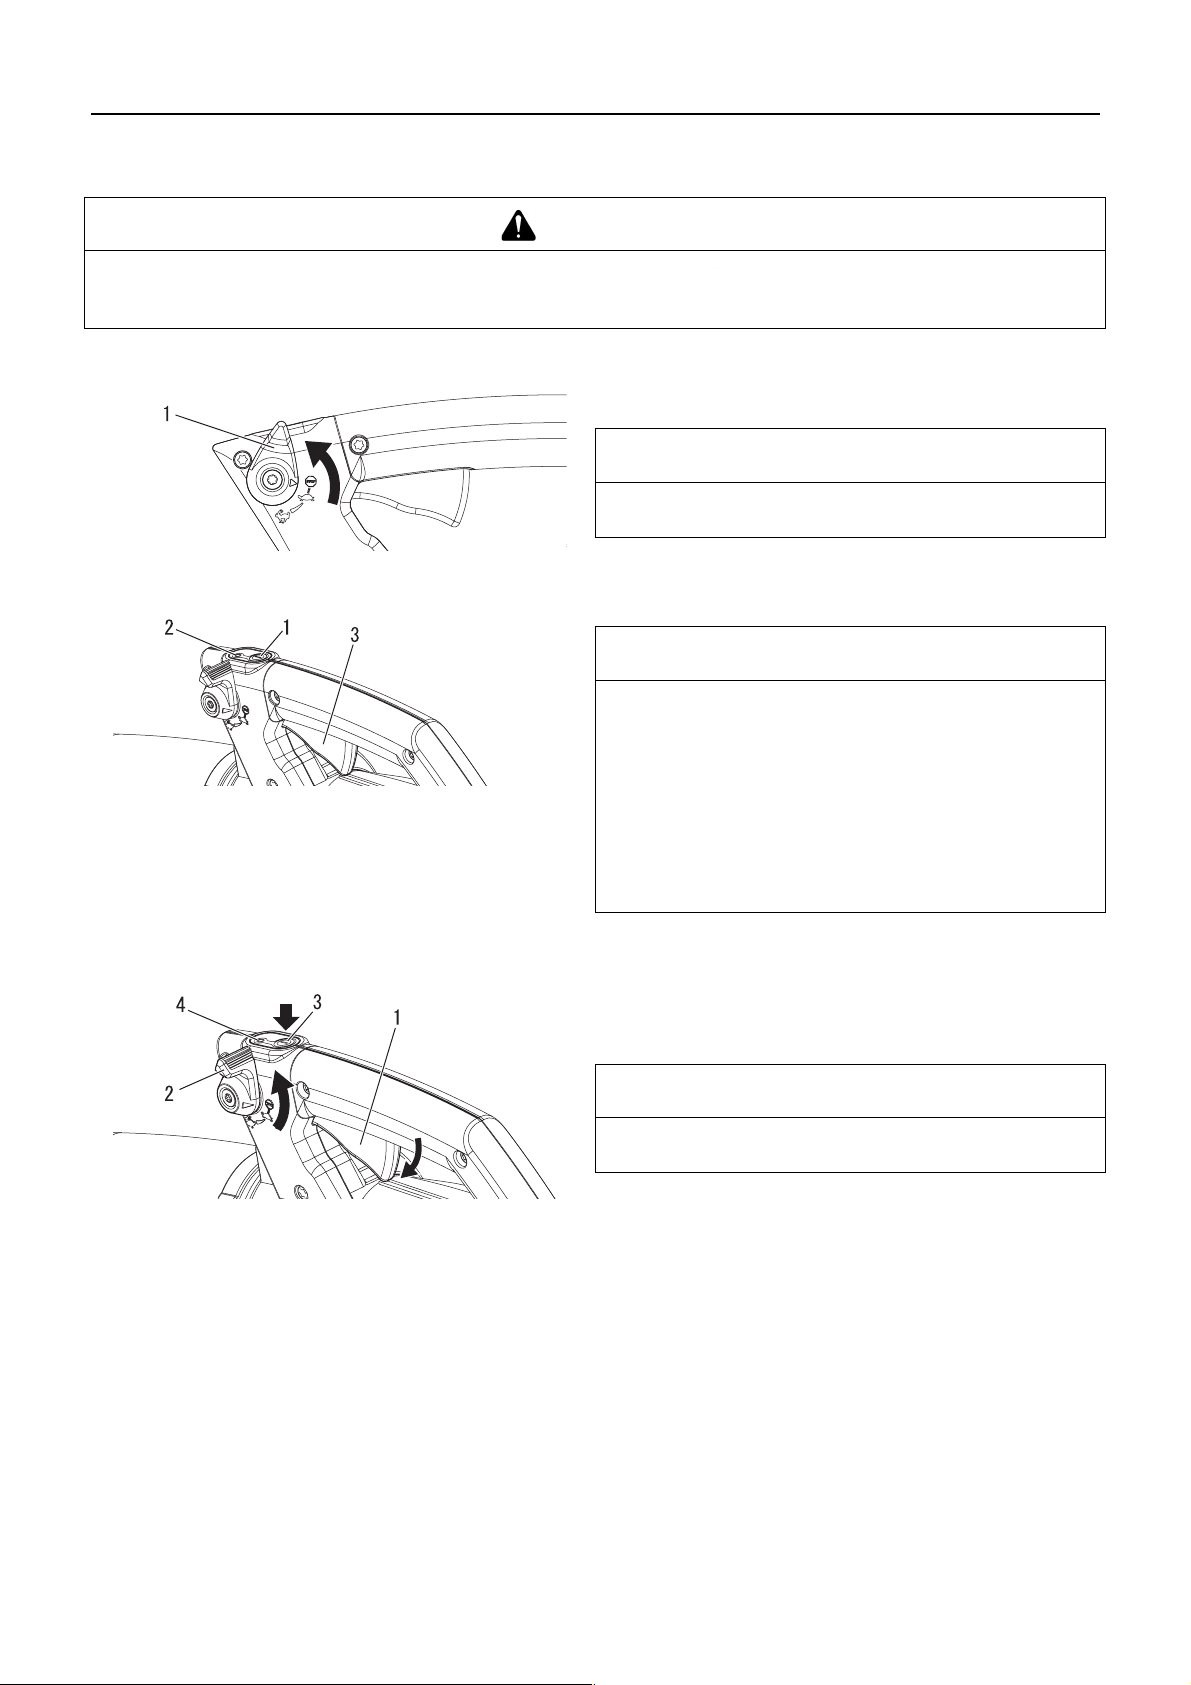
Fitting the battery
1. Release trigger switch and move the cruise control lever
completely forward to the stop position.
2. Make sure power to unit is turned off.
3. Align ridges on battery with groove on power blower, and insert battery until battery pack latch gets in the complete position a clicking sound is heard.
1. Battery
2. Ridge
3. Battery pack latch
IMPORTANT
Before using the power blower, make sure that battery is set
correctly with battery pack latch in the complete position.
NOTE
Battery pack latch is in the complete position when battery
1. Complete position
2. Uncomplete position
3. Battery pack latch
4. Battery pack
pack latch is correctly engaged.
16
Page 19

1. Battery 2. Battery pack latch
Before you start
Removing the battery
1. To remove battery, depress battery pack latch, and slide battery out of the power blower.
17
Page 20
Starting and Stopping
Starting and Stopping
Starting the unit
WARNING
When starting the unit, observe the precautions described from Page 4 in the section "For safe use of your product"
to ensure that you operate the product correctly.
Failure to observe the precautions could cause an accident or injury, or even lead to a fatality.
1. Move cruise control lever all the way forward to stop position.
2. Push power button once to turn on power to unit.
NOTE
Power indicator LED illuminates when power to unit is
turned on.
1. Cruise control lever
1. Power button
2. Power indicator LED
Stopping the unit
3. Trigger switch
3. Depress trigger switch to increase blower speed.
IMPORTANT
When power to the unit is turned on:
After one minute of inactivity, unit will power itself off.
If the LED remains lit, operation is normal.
If the LED flashes once per second, the battery needs to be
charged.
If the LED flashes four times per second, there is a fault with-
in the product. Turn power off to unit. Remove battery. Clear
debris from around fan. Install battery. Turn power on to unit.
If flashing continues, have your authorized servicing dealer
repair the product.
1. Cruise control lever
Release trigger switch and move the cruise control lever completely forward (Stop position), and allow blower to stop.
2. Push power button to turn off power to unit.
NOTE
Power indicator LED turns off when power to unit is turned
off.
1. Trigger switch
2. Cruise control lever
3. Power button
4. Power indicator LED
∗ If the power button does not stop the blower, remove the bat-
tery to stop the power supply to blower. Have your authorized
ECHO servicing dealer repair power button before using blower again. If the blower does not stop when the trigger is released and the cruise control lever is moved completely
forward (Stop position), remove the battery to stop the power
supply to blower. Have your authorized ECHO servicing dealer repair unit before using again.
18
Page 21
Operation
Operation
Operating blower
WARNING
Always wear safety glasses and take all safety precautions or serious personal injury may result. Do not point the blower pipe in the direction of people or pets.
IMPORTANT
To avoid motor damage, do not block blower pipe opening. Never run the blower without the blower pipes fitted.
NOTE
Never use a higher speed setting than necessary to perform a task. Remember, the higher the speed, the louder the blower
noise. Minimize dust by using blower at lower speeds. Keep debris on your property. Be Smart - be a good neighbor.
Read the Safety Section carefully.
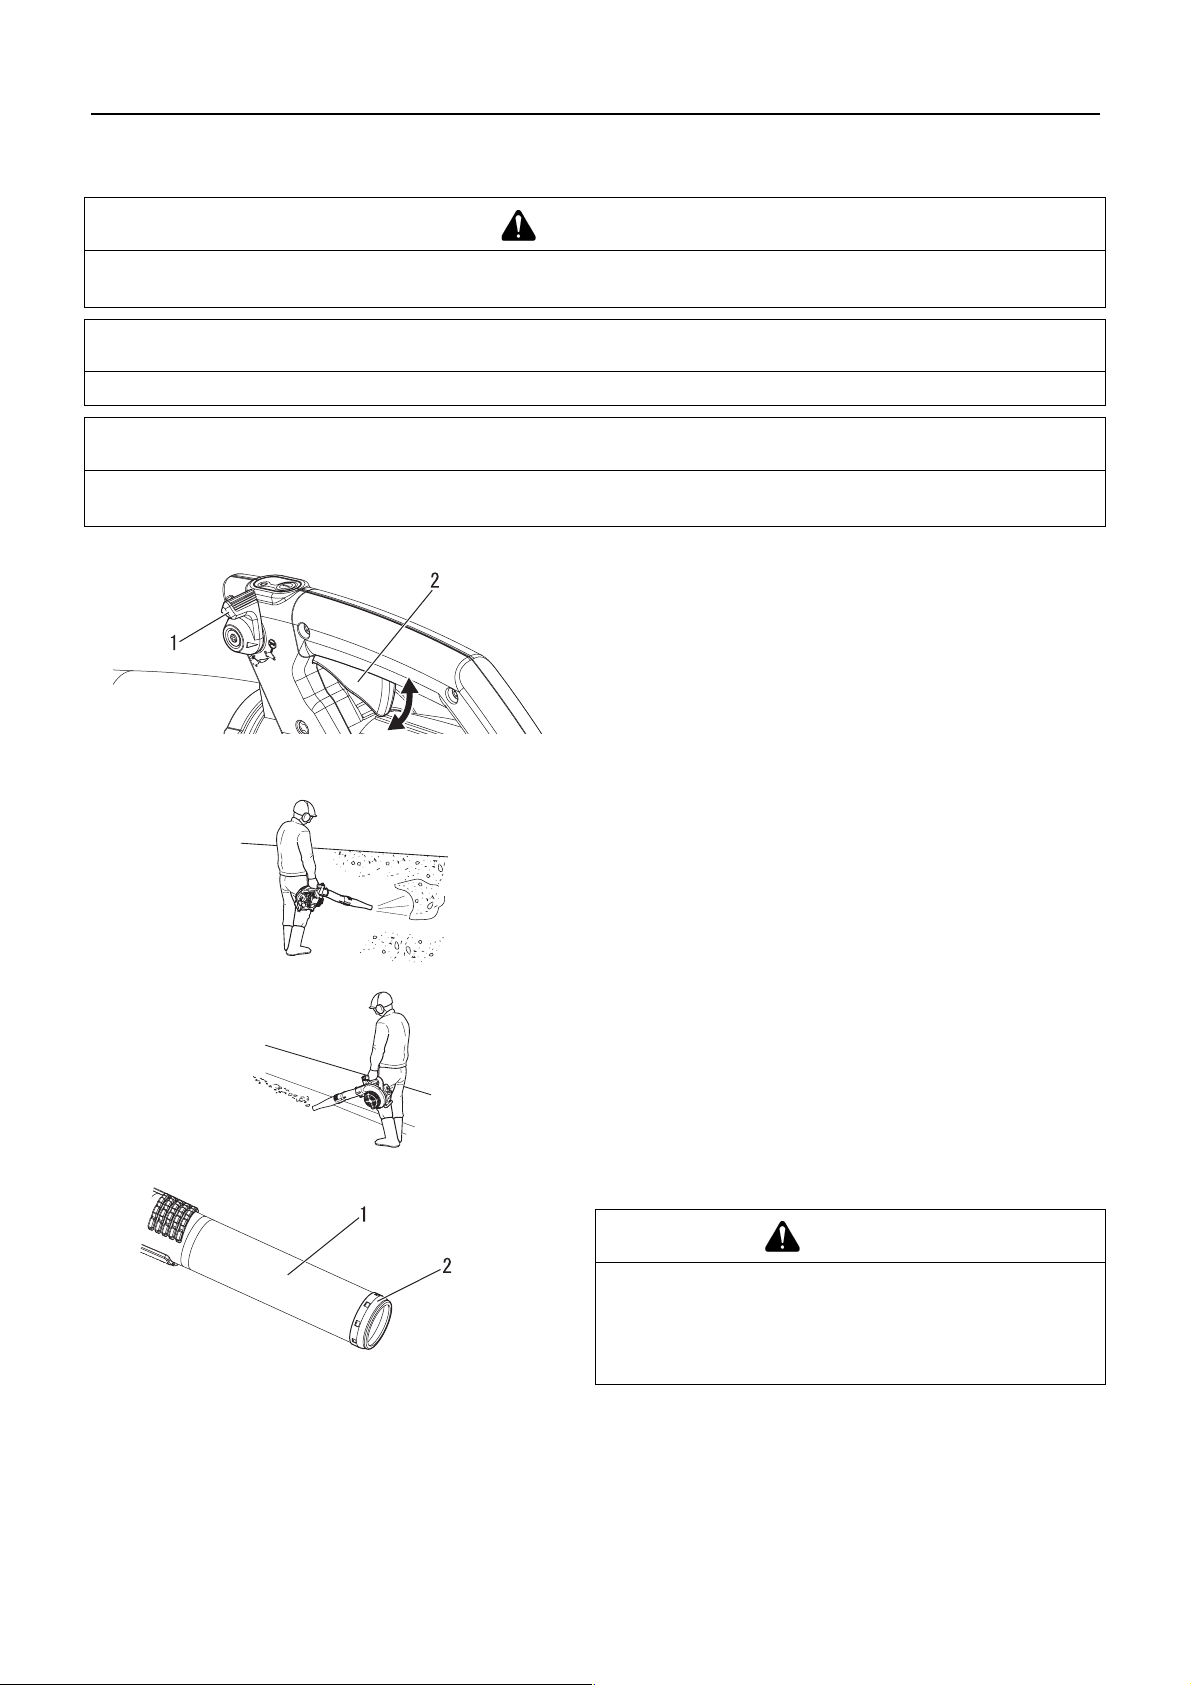
1. Use only during appropriate hours.
2. Control blower speed with trigger switch, or for continuous
use, set blower speed with cruise control lever. Rotate cruise
control lever forward for lower speed, back for higher speed.
1. Cruise control lever 2. Trigger switch
1. Round straight nozzle 2. Protective metal ring
3. Use lower speed to blow dry grass and leaves from walks,
patios and drives.
4. Additional speed may be necessary to clean leaves from a
lawn or flowerbed.
5. Higher speed may be necessary to move gravel, dirt, snow,
bottles or cans from a driveway, street, parking lot or stadium.
6. When working near a house, do not blow air towards open
windows. Debris could be blown into window.
7. Loosen or break up debris with a rake to make debris easier
to move.
8. Dampen dusty areas before moving debris to reduce airborne dust.
9. Always stop unit using stop procedure.
CAUTION
Contacting round straight nozzle tip on abrasive surfaces can
create sharp cutting edges and can result in personal injury if
touched. Do not scrape or drag round straight nozzle tip when
operating or transporting unit. Replace round straight nozzle
assembly if protective metal ring is worn, cracked or deformed.
19
Page 22
Operation
Cruise Control
WARNING
Before connecting a battery pack to the blower, always move the cruise control lever completely forward to the stop
position. Failure to ensure that it is in the stop position could result in accidental starting of the blower and serious
injury. Do not lock the throttle trigger in applications where the blower may need to be suddenly stopped.
1. Move the cruise control lever towards the rear of the blower
and into either the STOP, SLOW or FAST speed position.
2. Blower will remain running at selected speed.
3. To stop the blower, move cruise control lever completely forward (Stop position).
NOTE
If the cruise control feature is engaged during use and the battery pack is removed from the tool, disengage the cruise control
feature immediately.
1. Cruise control lever
2. Blower stop
3. Slow speed
4. Fast speed
20
Page 23
Maintenance and care
Maintenance and care
Servicing guidelines
Area Maintenance Page Before use Monthly
Battery Inspect/Clean/Charge 21 •
Housing cover Inspect/Clean 21 •
Screws, bolts and nuts Inspect/Tighten/Replace - •
IMPORTANT
Time intervals are maximum. Actual use and your experience will determine the frequency of required maintenance.
Maintenance and care
If you have any questions or problems, please contact your ECHO DEALER.
Cleaning battery and battery compartment
WARNING
Risk of electric shock or fire. Do not use conducting ma-
terials to clean battery or battery compartment.
1. Battery
2. Battery pack latch
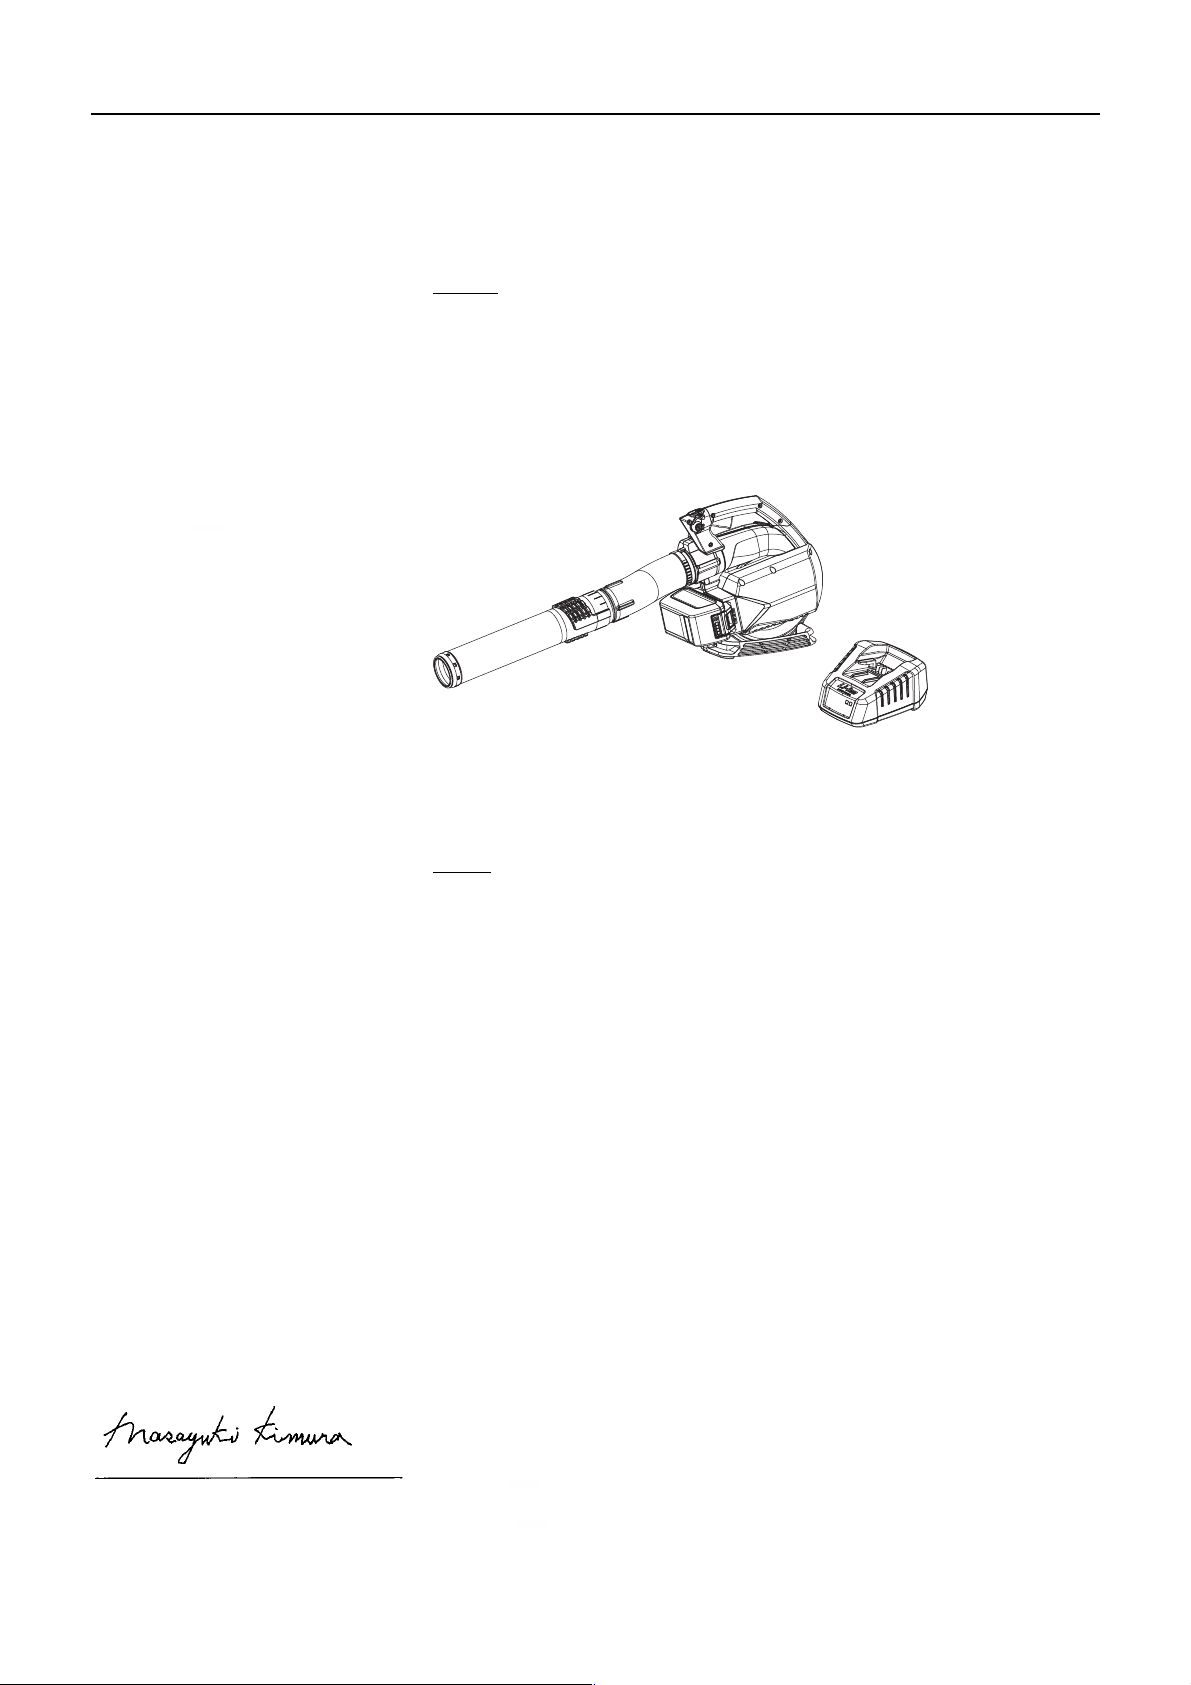
Cleaning housing cover
1. Housing cover
3. Battery compartment
1. Release trigger switch and move the cruise control lever
completely forward (Stop position), and allow blower to turn
off.
2. Make sure power indicator LED is not illuminated.
3. Depress battery pack latch release slide battery pack out of
blower.
4. Use compressed air or a soft bristle brush to remove debris
from battery and battery compartment.
Remove dust of various sorts, including fallen leaves blocking
the housing cover.
IMPORTANT
Do not remove the housing cover. If necessary, Please consult
your dealer.
21
Page 24

Maintenance and care
Troubleshooting table
Trouble Cause Solution
Red Charger light flashes or does not light up Plug not connected to power
outlet
Plug in the charger
Battery pack not installed prop-
erly
Obstructed connection Reinstall battery pack again after
Fault in the charger Consult your ECHO dealer
Fault in the battery pack Consult your ECHO dealer
Unit will not turn on Battery pack not installed prop-
erly
Unit does not run when turned on Battery pack discharged Charge the battery pack
Battery pack outside accepta-
ble temperature range
Running time is too short Battery pack outside accepta-
ble temperature range
Unit electronics too hot Turn unit off and allow to cool
Battery pack discharged Charge the battery pack
Unit runs, but doesn’t blow or is weak Blower pipe clogged Unclog pipe
Blower pipe loose Tighten pipe
Blower pipe damaged Replace pipe
Air inlet clogged Unclog air inlet
Fault in the fan Consult your ECHO dealer
Check the battery pack installation
removing obstructions from connection
Check the battery pack installation
Remove the battery pack and al-
low to cool
Remove the battery pack and al-
low to cool
Unit vibrates excessively Fault in internal parts Consult your ECHO dealer
Checking and maintenance requires specialist knowledge. If you are unable to check and maintain the product or deal with a
fault yourself, consult your ECHO dealer. Do not attempt to dismantle the product.
Consult your dealer in the event of a problem that is not covered in the table above, or other such concerns.
For spare parts and consumables, please use only genuine parts and designated products and components. Using parts from
other manufacturers or non-designated components may result in a malfunction.
22
Page 25

Maintenance and care
Storage
WARNING
Do not store in an enclosure where combustible fumes may accumulate.
You could cause a fire.
When storing the product for long periods of time, ensure that the following preparations for storage are carried out.
Rechargeable Power Blower
Do not store your unit without performing protective storage
maintenance which includes the following:
1. Turn power to unit off.
2. Remove battery from blower.
3. Remove accumulation of dirt and debris from exterior of unit.
4. Tighten all screws and nuts.
5. Remove blower pipe assembly from unit.
6. Cover battery compartment of blower.
7. Store unit in a dry, dust-free place.
1. Battery compartment
Battery
1. Remove battery from blower.
2. Store in a dry, dust-free place, out of the reach of children.
3. Store in temperatures between -20°C (-4°F) and 60°C
(140°F).
4. If battery is stored for longer than one year, charge it to approximately 40 - 60% capacity.
Battery Charger
1. Remove battery from battery charger.
2. Disconnect battery charger from power supply.
3. Store in a dry, dust-free place.
23
Page 26

Maintenance and care
Disposal
Major plastic parts making up the product have codes showing
their materials.
The codes refer to the following materials; dispose of those
plastic parts in accordance with local regulations.
Mark Material
>PA6-GF< Nylon 6 - Glass fiber
>PP-GF< Polypropylene - Glass fiber
>PE-HD< Polyethylene
Battery contains lithium. Dispose of only at a designated col-
lection point.
Lithium-ion batteries must disposed of properly.
Please contact your ECHO dealer in case you do not know
how to dispose of or recycle waste plastic parts.
24
Page 27

Specifications
Specifications
DPB-600
Mass:
with blower pipes, without battery kg 3.2
with blower pipes and battery kg 5.0
External dimensions (without blower pipes):
Length mm 353
Width mm 187
Height mm 336
Air volume: m
Max. air speed: m/sec 72.5
Battery:
Type Li-Ion
Pack voltage V 56 (rated 50.4)
Charger type CCCV
Charger input voltage V AC 230 - 240
Battery Charger Lights: Red LED – Battery is outside charging temperature
3
/h 648
range
Red LED Blinking – Fault
Green LED – Battery finished charging
Green LED Blinking – Battery is charging normally
Charge Time: LBP-560-100 battery: Approximately 42 minutes.
LBP-560-200 battery: Approximately 88 minutes.
LBP-560-900 battery: Approximately 336 minutes.
Sound Pressure Level: (EN 50636-2-100) dB(A) 81.9
Sound Power Level: (EN 50636-2-100) dB(A) 94
Uncertainty dB(A) 3
Vibration levels: (EN 50636-2-100) m/s² 0.7
Uncertainty:K m/s² 1.5
These specifications are subject to change without notice.
The declared vibration total value has been measured in accordance with a standard test method and may be used for com-
paring one tool with another.
The declared vibration total value may also be used in a preliminary assessment of exposure.
25
Page 28
Declaration of conformity
The undersigned manufacturer:
YAMABIKO CORPORATION
7-2 SUEHIROCHO 1-CHOME
OHME; TOKYO 198-8760
JAPAN
This declaration of conformity is issued under the sole responsibility of the manufacturer.
Declares that the hereunder specified new unit:
POWER BLOWER
BATTERY CHARGER
Brand: ECHO
Type: DPB-600
LCJQ-560
Declaration of conformity
assembled by:
Complies with:
* The requirements of Directive 2006/42/EC (use of harmonized standard EN 60335-1: 2012, EN 50636-2-100: 2014)
* The requirements of Directive 2014/30/EU (use of harmonized standard EN 55014-1: 2006, EN 55014-2: 1997, EN
61000-3-2: 2006, and EN 61000-3-3: 2008)
* The requirements of Directive 2014/35/EU (use of harmonized standard EN 60335-1: 2012, EN 60335-2-29: 2004,
and EN 62233: 2008)
* The requirements of Directive 2000/14/EC
Conformity assessment procedure followed ANNEX V
* The requirements of Directive 2011/65/EU (use of harmonized standard EN 50581: 2012)
Measured sound power level : 94 dB(A)
Guaranteed sound power level : 97 dB(A)
DPB-600
LCJQ-560
Tokyo, July 1st, 2016
ECHO, INCORPORATED
400 Oakwood Road
Lake Zurich, Illinois 60047-1564
U.S.A.
Serial Number 35001001 to 35100000
Serial Number 35001001 to 35100000
YAMABIKO CORPORATION
The authorized representative in Europe who is authorized to
compile the technical file.
Company: Atlantic Bridge Limited
Address: Atlantic House, PO Box 4800,
Earley, Reading RG5 4GB, United Kingdom
Masayuki Kimura Mr. Philip Wicks
General Manager
Quality Assurance Dept.
26
Page 29

1Notes and rear co ver
MEMORANDUM
2016
X750-027 39 0
X750 821-010 2
27
Page 30

7-2 SUEHIROCHO 1-CHOME, OHME, TOKYO 198-8760, JAPAN
PHONE: 81-428-32-6118. FAX: 81-428-32-6145.
©
2016
X750-027 39 0
X750 821-010 2
Printed in Japan
0x0xxxx zzzz ES
28
Page 31

1Couvercle supérieur
FRANÇAIS
(Notice originale)
MANUEL D'UTILISATION
SOUFFLEUR ÉLECTRIQUE
RECHARGEABLE
DPB-600
AVERTISSEMENT
LIRE ATTENTIVEMENT LES INSTRUCTIONS ET SUIVRE LES
RÈGLES DE SÉCURITÉ.
LE NON-RESPECT DES RÈGLES DE SÉCURITÉ ENTRAÎNE UN
RISQUE DE BLESSURE GRAVE.
Page 32

Information importante
2Information importante
Lire attentivement le manuel d'utilisation avant d'utiliser l'appareil pour la première fois.
Utilisation de l'appareil
Les souffleurs électriques rechargeables ECHO sont conçus pour éliminer les poussières et autres déchets, y compris
les feuilles mortes.
Ne pas détourner cet outil de son utilisation normale.
Utilisateurs de l'appareil
Lire attentivement ce manuel d'utilisation et assimiler les informations qu'il contient avant d'utiliser l'appareil pour la pre-
mière fois.
Toute personne n'ayant pas lu attentivement ce manuel d'utilisation, enrhumée, fatiguée ou en mauvaise condition
physique ne doit pas utiliser cet appareil. Ne pas laisser un enfant manipuler l'appareil.
L'utilisateur est tenu pour responsable en cas d'accidents ou de risques pouvant entraîner des accidents corporels ou
des dommages matériels.
À propos du manuel d'utilisation
Ce manuel contient les informations nécessaires à l'utilisation et à l'entretien de l'appareil. L'utilisateur doit donc le lire
attentivement et assimiler les informations qu'il contient.
Toujours conserver le manuel à portée de main.
En cas de perte du manuel ou si ce dernier a été détérioré et n'est plus lisible, s'adresser à un REVENDEUR ECHO
pour en obtenir un nouveau.
Les unités utilisées dans ce manuel sont les unités SI (Système international d'unités). Les chiffres indiqués entre pa-
renthèses sont des valeurs de référence. De légères erreurs de conversion peuvent survenir dans certains cas.
Prêt ou cession de l'appareil à un tiers
Si l'appareil décrit dans ce manuel est prêté à un tiers, veiller à lui confier également le manuel d'utilisation fourni avec
l'appareil. Si l'appareil est cédé à un tiers, transmettre le manuel d'utilisation fourni avec l'appareil lors de la vente.
Renseignements
S'adresser à un REVENDEUR ECHO pour toute demande d'information concernant l'appareil, l'achat de consom-
mables, les réparations ou pour tout autre renseignement.
Remarques
Le constructeur se réserve le droit de modifier sans préavis le contenu de ce manuel en fonction des améliorations
apportées au produit. Il se peut que certains des schémas de ce manuel soient différents de l'appareil. Ces différences
ont pour objectif de rendre les explications plus claires.
L'appareil nécessite le montage de certains éléments.
En cas de doute, consulter un REVENDEUR ECHO.
Fabricant
YAMABIKO CORPORATION
7-2 SUEHIROCHO 1-CHOME, OHME, TOKYO 198-8760, JAPON
Représentant autorisé en Europe
Atlantic Bridge Limited
Atlantic House, PO Box 4800, Earley, Reading RG5 4GB, Royaume-Uni
2
Page 33

Table des matieres
Pour utiliser l'appareil en toute sécurité .............................................................................. 4
Etiquettes et symboles d'avertissement ........................................................................4
Autres indications .......................................................................................................... 4
Symboles....................................................................................................................... 4
Emplacement de l'étiquette de sécurité......................................................................... 5
Manipulation de l'appareil .............................................................................................. 6
Contenu de l'emballage .................................................................................................... 12
Description........................................................................................................................ 13
Avant de commencer ........................................................................................................ 14
Assemblage ................................................................................................................. 14
Démarrage et arrêt ........................................................................................................... 18
Mise en marche de l'appareil....................................................................................... 18
Arrêt de l'appareil......................................................................................................... 18
Fonctionnement ................................................................................................................ 19
Fonctionnement du souffleur ....................................................................................... 19
Entretien ........................................................................................................................... 21
Instructions d'entretien de l'appareil ............................................................................ 21
Entretien ...................................................................................................................... 21
Guide de dépannage ................................................................................................... 22
Remisage .................................................................................................................... 23
Mise au rebut............................................................................................................... 24
Caractéristiques................................................................................................................25
Déclaration de conformité ................................................................................................. 26
3
Page 34

Pour utiliser l'appareil en toute sécurité
Lire attentivement cette section avant d'utiliser l'appareil pour la première fois.
Pour utiliser l'appareil e n toute sécuri té
Les mesures de précaution décrites dans cette section contiennent des informations essentielles pour la sécurité. Les
suivre scrupuleusement.
Il est également nécessaire de prendre connaissance des mesures de précaution exposées tout au long de ce manuel.
Le texte précédé d'une puce [en forme de losange] décrit les risques encourus en cas de non-respect d'une mesure de précaution.
Etiquettes et symboles d'avertissement
Les mises en garde figurant dans le manuel et sur l'appareil signalent les situations pouvant entraîner un risque de blessure de
l'utilisateur et d'autres personnes. Pour des raisons de sécurité, toujours lire et suivre attentivement les instructions qui les accompagnent.
DANGER AVERTISSEMENT ATTENTION
Ce symbole associé au mot
« DANGER » signale une action ou
une situation présentant un risque de
blessure corporelle grave ou d'accident mortel pour l'utilisateur et les
personnes à proximité.
Autres indications
Outre les étiquettes et les symboles d'avertissement, ce manuel contient les symboles d'explication suivants :
Ce symbole associé au mot
« AVERTISSEMENT » signale une
action ou une situation présentant un
risque de blessure corporelle grave
ou d'accident mortel pour l'utilisateur
et les personnes à proximité.
« ATTENTION » signale une situation potentiellement dangereuse qui,
si elle n'est pas évitée, peut entraîner
une blessure légère à modérée.
REMARQUE IMPORTANT
Le cercle barré indique
une interdiction.
Ce type de message fournit des
conseils relatifs à l'utilisation et à l'entretien de l'appareil.
Le texte dans l'encadré où figure le
mot « IMPORTANT » donne des informations importantes concernant
l'utilisation, la vérification, l'entretien
et le remisage de l'appareil décrit
dans ce manuel.
Symboles
De nombreux symboles d'explication sont utilisés dans ce manuel et sur l'appareil lui-même. S'assurer d'avoir bien compris la signification de chacun de ces symboles.
Forme des symboles Description/application des
symboles
Lire attentivement le manuel
d'utilisation
Alerte/sécurité
Attention aux risques de choc
électrique
Arrêt Vitesse minimale
Forme des symboles Description/application des
symboles
Porter des lunettes de protection
Risque de sectionnement des
doigts
Attention aux températures
élevées
4
Page 35
Pour utiliser l'appareil en toute sécurité
Forme des symboles Description/application des
symboles
Ne jamais utiliser cet appareil
lorsqu'il pleut ou dans des endroits humides
Ne laisser personne s'approcher à moins de 15 mètres
Niveau de puissance sonore
garanti
Outil de classe II
Forme des symboles Description/application des
symboles
Vitesse maximale
Protection de
l'environnement !
Volts
ou DC
Courant continu
Emplacement de l'étiquette de sécurité
L'autocollant de sécurité ci-dessous a été apposé sur l'appareil décrit dans ce manuel. S'assurer de bien comprendre la signi-
fication de l'autocollant avant d'utiliser l'appareil.
Si l'autocollant devient illisible avec le temps ou s'il s'est décollé ou a été déchiré, acheter un autocollant de rechange chez un
revendeur et le coller à l'emplacement indiqué sur les illustrations ci-dessous. Veiller à ce que l'autocollant soit toujours lisible.
1. Etiquette de sécurité (Numéro de pièce X505008910)
5
Page 36
Pour utiliser l'appareil en toute sécurité
Manipulation de l'appareil
Consignes générales de sécurité concernant les outils motorisés
AVERTISSEMENT
Lire l'ensemble des mises en garde et consignes de sécurité.
Négliger les mises en garde et consignes de sécurité pourrait
entraîner un choc électrique, un départ de feu ou un accident
corporel grave.
Conserver l'ensemble des mises en garde et consignes de
sécurité pour pouvoir les consulter ultérieurement.
Le terme « outil motorisé » utilisé dans les mises en garde désigne un outil motorisé fonctionnant sur secteur (avec un cordon) ou sur batterie (sans fil).
Sécurité de la zone de travail
Garder la zone de travail propre et bien éclairée.
Les endroits encombrés ou sombres favorisent la survenue
d'accidents.
Ne pas utiliser des outils motorisés dans une atmos-
phère explosible, par exemple en présence de liquides,
gaz ou poussières inflammables.
Les outils motorisés créent des étincelles qui peuvent en-
flammer des poussières ou des vapeurs.
Tenir les enfants et les spectateurs à distance pendant
l'utilisation d'un outil motorisé.
Les distractions peuvent être à l'origine d'une perte de
contrôle de l'outil.
Sécurité électrique
La fiche de l'outil motorisé doit correspondre à la prise
secteur. Ne jamais modifier la fiche de quelque manière
que ce soit. Ne pas utiliser d'adaptateurs avec les outils
motorisés reliés à la terre.
Les fiches non modifiées et les prises secteur correspon-
dantes réduiront le risque de choc électrique.
Éviter le contact corporel avec les surfaces reliées à la
terre ou à une masse telles que les tuyaux, radiateurs,
cuisinières et réfrigérateurs.
Le contact corporel avec une terre ou une masse représente
un risque accru de choc électrique.
Ne pas exposer les outils motorisés à la pluie ou à l'hu-
midité.
L'eau qui pénètre dans un outil motorisé augmentera le
risque de choc électrique.
Ne pas forcer sur le cordon. Ne jamais utiliser le cordon
pour porter, tirer ou débrancher l'outil motorisé. Tenir le
cordon à l'écart des sources de chaleur, des huiles, des
bords tranchants ou des pièces en mouvement.
Un cordon endommagé ou emmêlé augmente le risque de
choc électrique.
Pour faire fonctionner un outil motorisé à l'extérieur,
utiliser un cordon prolongateur adapté à cet usage.
L'utilisation d'un cordon adapté à un usage extérieur réduit
le risque de choc électrique.
Si un outil motorisé doit absolument être utilisé dans un
endroit humide, utiliser une alimentation protégée par
un disjoncteur différentiel résiduel (DDR).
L'utilisation d'un DDR réduit le risque de choc électrique.
Sécurité des personnes
Rester alerte, regarder ce que l'on fait et faire preuve de
bon sens lorsque l'on utilise un outil motorisé. Ne pas
utiliser un outil motorisé lorsque l'on est fatigué ou
sous l'emprise de drogues, de l'alcool ou de médicaments.
Un moment d'inattention tandis que l'on utilise des outils mo-
torisés peut entraîner un accident corporel grave.
Utiliser des équipements de protection individuelle.
Toujours porter des lunettes de protection.
Les équipements de protection tels que masque antipous-
sières, chaussures de sécurité antidérapantes, casque ou
protections auditives utilisés à bon escient réduiront le
risque d'accidents corporels.
Prévenir tout démarrage accidentel. S'assurer que l'in-
terrupteur est en position d'arrêt avant de raccorder
l'appareil à une source d'alimentation ou à un bloc-batterie, de le ramasser ou de le transporter.
Transporter des outils motorisés en ayant le doigt sur l'inter-
rupteur ou mettre sous tension des outils motorisés dont l'interrupteur est en position de marche favorisera la survenue
d'accidents.
Retirer toute clé de réglage avant de mettre l'outil moto-
risé en marche.
Une clé laissée fixée sur une pièce tournante de l'outil mo-
torisé peut entraîner un accident corporel.
Ne pas tenir l'appareil à bout de bras. Veiller à avoir de
bons appuis et garder l'équilibre en permanence.
Ceci permet de mieux maîtriser l'outil motorisé dans des si-
tuations inattendues.
S'habiller de façon appropriée. Ne pas porter de vête-
ments amples ni de bijoux. Garder les cheveux, vêtements et gants à distance des pièces en mouvement.
Les vêtements amples, bijoux ou cheveux longs peuvent se
prendre dans les pièces en mouvement.
Si des dispositifs sont prévus pour le raccordement
d'un système d'extraction et de recueil des poussières,
veiller à les raccorder et à bien les utiliser.
L'utilisation d'un système de dépoussiérage pourra réduire
les dangers liés aux poussières.
L'émission de vibrations pendant l'utilisation proprement dite
de l'outil motorisé peut être différente de la valeur totale déclarée en fonction des modes d'utilisation de l'appareil ; il est nécessaire de déterminer les mesures de sécurité à prendre pour
protéger l'utilisateur sur la base de l'estimation de l'exposition
dans les conditions réelles d'utilisation (en prenant en compte
toutes les parties du cycle d'utilisation telles que les moments
où l'appareil est éteint et les moments où il fonctionne au ralenti
en plus du temps d'actionnement de la commande).
6
Page 37
Pour utiliser l'appareil en toute sécurité
AVERTISSEMENT
Utilisation et entretien des outils motorisés
Ne pas forcer sur les outils motorisés. Utiliser l'outil mo-
torisé adapté au travail à effectuer.
L'outil motorisé adapté fonctionnera mieux et de façon plus
sûre au niveau de puissance pour lequel il a été conçu.
Ne pas utiliser l'outil motorisé si l'interrupteur ne per-
met pas de le mettre en marche et de l'arrêter.
Tout outil motorisé impossible à commander à l'aide de l'in-
terrupteur est dangereux et doit être réparé.
Débrancher la fiche de la source d'alimentation ou reti-
rer le bloc-batterie de l'outil motorisé avant de procéder
à des réglages, de changer d'accessoire ou de remiser
l'appareil.
Ces mesures de sécurité préventive réduisent le risque de
mise en marche accidentelle des outils motorisés.
Remiser les outils motorisés hors de portée des enfants
et ne pas autoriser les personnes non familiarisées
avec l'outil ou le présent manuel à utiliser l'appareil.
Les outils motorisés sont dangereux entre les mains d'utili-
sateurs non formés.
Entretenir les outils motorisés. Vérifier l'absence de
pièces mobiles mal alignées ou bloquées ou encore de
pièces cassées. Repérer toute autre situation susceptible d'avoir une incidence sur le fonctionnement de
l'outil motorisé. Si un outil motorisé est endommagé, le
faire réparer avant de l'utiliser.
De nombreux accidents sont provoqués par des outils mo-
torisés mal entretenus.
Garder les outils de coupe tranchants et propres.
Des outils de coupe correctement entretenus avec des
arêtes tranchantes sont moins susceptibles de se coincer et
sont plus faciles à maîtriser.
Utiliser les outils motorisés, accessoires, embouts, etc.,
conformément à la présente notice, en tenant compte
des conditions d'utilisation et du travail à effectuer.
L'utilisation d'un outil motorisé pour des travaux différents de
ceux prévus pourrait entraîner une situation dangereuse.
Utilisation et entretien des outils à batterie
Ne recharger les batteries qu'avec le chargeur préconi-
sé par le fabricant.
Un chargeur adapté à un type de bloc-batterie peut créer un
risque d'incendie s'il est utilisé avec un autre bloc-batterie.
Utiliser les outils motorisés uniquement avec les blocs-
batteries spécialement prévus à cet effet.
L'utilisation de tout autre bloc-batterie peut créer un risque
d'accident et de départ de feu.
Lorsque le bloc-batterie n'est pas utilisé, le tenir à
l'écart des autres objets métalliques tels que trombones, pièces de monnaie, clés, clous, vis ou autres petits objets en métal qui pourraient établir une connexion
entre les bornes de la batterie.
La mise en court-circuit des bornes de la batterie peut occa-
sionner des brûlures ou un départ de feu.
En situation d'utilisation trop intensive, du liquide peut
être éjecté de la batterie – éviter tout contact avec ce liquide. En cas de contact accidentel, rincer à l'eau. Si ce
liquide atteint les yeux, demander par ailleurs une aide
médicale.
Le liquide éjecté de la batterie peut occasionner une irrita-
tion ou des brûlures.
Entretien
Faire procéder à l'entretien des outils motorisés par un
réparateur qualifié n'utilisant que des pièces de rechange identiques.
Ceci assurera le maintien de la sécurité des outils motori-
sés.
7
Page 38

Pour utiliser l'appareil en toute sécurité
Mesures de précaution générales
AVERTISSEMENT
Manuel d'utilisation
Lire attentivement le manuel d'utilisation
avant d'utiliser l'appareil pour la première fois afin d'éviter toute erreur d'utilisation.
Le non-respect de cette mesure de précau-
tion entraîne un risque d'accident ou de
blessure grave.
Ne pas détourner l'appareil de son utilisation normale
Utiliser l'appareil uniquement pour les tâches décrites
dans ce manuel d'utilisation.
Le non-respect de cette règle de sécurité entraîne un risque
d'accident ou de blessure grave.
Ne pas modifier l'appareil
Aucune modification ne doit être apportée à l'appareil.
Le non-respect de cette règle de sécurité entraîne un risque
d'accident ou de blessure grave. Tout dysfonctionnement dû
à une modification de l'appareil n'est pas couvert par la garantie du fabricant.
Prêt ou cession de l'appareil à un tiers
Si l'appareil est prêté à un tiers, veiller à lui confier éga-
lement le manuel d'utilisation fourni avec l'appareil.
Si l'appareil est cédé à un tiers, transmettre le manuel
d'utilisation fourni avec l'appareil lors de la vente.
Le non-respect de cette règle de sécurité entraîne un risque
d'accident ou de blessure grave.
Savoir réagir en cas de blessure
Même si les cas de blessure ou d'accident restent exceptionnels, l'utilisateur doit savoir réagir à ces situations.
Kit de premiers secours
Serviettes et lingettes (pour arrêter les saignements)
Sifflet ou téléphone portable (pour appeler de l'aide)
Si l'utilisateur n'est pas capable de prodiguer les premiers
soins ou d'appeler à l'aide, la blessure peut s'aggraver.
Ne pas utiliser l'appareil avant d'avoir effectué les
opérations de vérification et d'entretien nécessaires
Il ne faut pas utiliser l'appareil avant d'avoir effectué les
opérations de vérification et d'entretien nécessaires.
Veiller à ce que l'appareil soit vérifié et entretenu régulièrement.
Le non-respect de cette règle de sécurité entraîne un risque
d'accident ou de blessure grave.
8
Page 39

Pour utiliser l'appareil en toute sécurité
Précautions d'utilisation
AVERTISSEMENT
Utilisateurs de l'appareil
L'appareil ne doit pas être utilisé si :
l'utilisateur est fatigué
l'utilisateur a consommé de l'alcool
l'utilisateur prend des médicaments
la personne qui souhaite utiliser l'appareil est enceinte
l'utilisateur est en mauvaise
condition physique
l'utilisateur n'a pas lu le manuel
d'utilisation
la personne qui souhaite utiliser
l'appareil est un enfant
Le non-respect de ces règles de sé-
curité constitue un risque d'accident.
Cet appareil produit des champs électromagnétiques lors-
qu'il fonctionne. Les champs magnétiques peuvent provoquer des interférences ou des pannes sur les stimulateurs
cardiaques. Pour réduire les risques pour la santé, nous recommandons aux porteurs d'un stimulateur cardiaque de
consulter leur médecin et le fabricant du stimulateur avant
d'utiliser cet appareil.
Environnement d'utilisation et fonctionnement de
l'appareil
Ne pas utiliser l'appareil
dans des endroits humides ou mouillés ;
sous la pluie ;
en cas de mauvaises conditions météo.
Le non-respect de cette règle de sécurité en-
traîne un risque d'accident ou de blessure grave.
Ne pas utiliser l'appareil sur une surface instable,
comme un terrain en pente raide ou détrempé. Ces
types de terrain sont glissants et donc dangereux.
Ne pas utiliser l'appareil la nuit ou dans des endroits
mal éclairés offrant de mauvaises conditions de visibilité.
Toute chute, glissade ou utilisation incorrecte de l'appareil
constitue un risque de blessures graves pour l'utilisateur.
La zone comprise dans un rayon de 15 mètres autour de l'appareil est une zone dangereuse.
La zone comprise dans un rayon de 15 mètres autour de
l'appareil est une zone dangereuse. Veiller à bien respecter les mesures de précaution suivantes lors de l'utilisation de l'appareil.
Ne laisser personne (enfants, animaux ou autres per-
sonnes) pénétrer dans la zone dangereuse.
Si quelqu'un pénètre dans la zone dangereuse, éteindre
l'appareil pour l'arrêter.
Lorsqu'une personne s'approche de l'utilisateur, elle
doit lui signaler sa présence en lançant des brindilles,
par exemple, sans entrer dans la zone dangereuse. Elle
doit ensuite vérifier que l'appareil est arrêté.
Si l'appareil est utilisé par plusieurs personnes, celles-
ci doivent convenir entre elles des signaux à utiliser et
travailler à plus de 15 mètres les unes des autres.
Les objets projetés peuvent blesser gravement l'utilisateur
ou les personnes présentes à proximité.
Utilisation de l'appareil
Veiller à bien respecter les mesures de précaution suivantes lors de l'utilisation de l'appareil.
Ne pas diriger le tuyau de soufflage vers des personnes
ou des animaux domestiques.
Ne pas utiliser l'appareil sur une surface instable.
Tenir la poignée fermement.
Afin d'éviter toute nuisance sonore pour le voisinage,
ne pas utiliser l'appareil tard le soir ou tôt le matin.
Le non-respect de ces règles de sécurité constitue un risque
d'accident ou de blessure.
Arrêter l'appareil pour se déplacer
Dans les exemples de déplacement décrits ci-dessous,
commencer par arrêter l'appareil.
Se déplacer vers le lieu de travail.
Se déplacer vers un autre endroit tout en travaillant.
Quitter le lieu de travail.
Le non-respect de ces mesures de précaution constitue un
risque de brûlure ou de blessure grave.
Pour transporter l'appareil dans une voiture, retirer la
batterie et s'assurer que l'appareil est bien calé pour
éviter qu'il se déplace lors du trajet.
Attention à ne pas se faire prendre dans la turbine
Veiller à ne pas avoir les cheveux happés dans la tur-
bine.
L'aspiration créée par la turbine risque de happer la main ou
des objets quelconques vers la turbine et donc d'entraîner
un accident grave.
Exposition aux vibrations et au froid
Les personnes exposées aux vibrations et au froid
peuvent être victimes du phénomène de Raynaud, une affection qui touche les doigts. L'exposition à des vibrations
et au froid peut provoquer une sensation de picotement et
de brûlure, suivie d'une décoloration et d'un engourdissement des doigts.
Il est vivement recommandé de respecter les mesures de
précaution suivantes car le seuil d'exposition minimum
pouvant provoquer l'apparition de ce phénomène reste inconnu à ce jour.
Limiter la perte de chaleur corporelle, en protégeant en
priorité la tête, le cou, les pieds, les chevilles, les mains
et les poignets.
Stimuler la circulation sanguine en interrompant le tra-
vail régulièrement pour remuer énergiquement les bras,
et éviter de fumer.
Limiter le nombre d'heures d'utilisation.
Essayer d'intégrer à l'emploi du temps de la journée des
tâches ne nécessitant pas l'utilisation du souffleur ou
d'une autre machine portative.
En cas d'inconfort, de rougeur et de gonflement au ni-
veau des doigts, suivis d'un blanchissement et d'une
perte de sensibilité, consulter un médecin avant de
s'exposer à nouveau au froid et aux vibrations.
Le non-respect de ces instructions peut être dangereux pour
la santé.
9
Page 40
Pour utiliser l'appareil en toute sécurité
AVERTISSEMENT
Lésions attribuables au travail répétitif
Une trop grande sollicitation des muscles et des tendons
des doigts, des mains, des bras et des épaules peut entraîner l'apparition d'inflammations, de gonflements, d'engourdissements, d'une sensation de faiblesse ou d'une
douleur aiguë dans ces parties du corps. L'apparition de
lésions attribuables au travail répétitif (LATR) est très fréquente chez les personnes pratiquant certaines activités
manuelles répétitives.
Pour réduire le risque d'apparition de LATR, respecter les
mesures de précaution suivantes :
Éviter de plier, d'étirer ou de tordre le poignet pendant
le travail.
Faire des pauses régulières pour réduire l'effet répétitif
et pour reposer ses mains. Effectuer le mouvement répétitif plus lentement et en faisant moins d'effort.
Faire des exercices de musculation des mains et des
bras.
En cas de picotements, d'engourdissement ou de dou-
leur dans les doigts, les mains, les poignets ou les bras,
consulter un médecin. Plus les LATR sont diagnostiquées précocement, plus les chances d'empêcher les
lésions nerveuses et musculaires irréversibles sont
grandes.
Le non-respect de ces instructions peut être dangereux pour
la santé.
Arrêter immédiatement l'appareil en cas d'anomalie.
Arrêter immédiatement l'appareil s'il se met à vibrer
soudainement ou émet des bruits anormaux. Ne pas utiliser l'appareil en cas de vibrations ou de sons anormaux.
S'adresser à un REVENDEUR ECHO pour faire effectuer
les réparations nécessaires.
L'utilisation prolongée de pièces endommagées entraîne un
risque d'accident ou de blessure grave.
Arrêter l'appareil avant de procéder à des vérifications ou à l'entretien de celui-ci.
Respecter les mesures de précaution suivantes lors de la
vérification et de l'entretien de l'appareil après utilisation :
Arrêter l'appareil, retirer la batterie et s'assurer que
toutes les pièces mobiles se sont complètement immobilisées.
Il existe un risque d'accident en cas de démarrage intem-
pestif de l'appareil.
Laisser l'appareil refroidir avant d'intervenir dessus.
Il existe un risque de brûlure.
Quand débrancher la batterie
Dès que l'utilisateur doit laisser l'appareil sans surveil-
lance.
Avant d'éliminer un blocage.
Avant de vérifier ou de nettoyer l'appareil ou de travail-
ler dessus.
Après un choc avec un objet afin de contrôler l'état de
l'appareil.
Si l'appareil commence à vibrer de manière anormale,
pour le vérifier immédiatement.
Il existe un risque d'accident en cas de démarrage intem-
pestif de l'appareil.
10
Page 41

Pour utiliser l'appareil en toute sécurité
Equipement de protection
AVERTISSEMENT
Port d'équipements de protection
Toujours porter des vêtements et des équipements de
protection adaptés pour utiliser le souffleur. Veiller surtout à toujours porter des lunettes de sécurité et un
masque antipoussières lorsque l'on travaille avec l'appareil.
Sans ces équipements de protection, il existe un risque d'in-
haler les débris ou la poussière soufflés par l'appareil. Ces
corps étrangers peuvent également être projetés vers les
yeux, entraînant ainsi un risque d'accident ou de blessure.
a Lunettes de sécurité : protègent les yeux.
b Masque antipoussières : protection respiratoire.
c Gants de sécurité : protègent les mains contre le froid et
les vibrations.
d Vêtements bien ajustés (manches longues, pantalons
longs) : protègent le corps.
e Chaussures ou bottes robustes : protègent les pieds.
Le non-respect de ces mesures de précaution peut entraî-
ner une dégradation de la vue ou de l'ouïe de l'utilisateur,
ainsi qu'un risque de blessure grave.
Si nécessaire, utiliser les équipements de protection cidessous.
Protection de la tête (casque) : protège la tête.
Casque de protection anti-bruit ou protecteurs
d'oreilles : protection auditive.
Voilette de protection : protection contre les insectes.
Port de vêtements adaptés
Ne pas porter de cravates, bijoux ou vêtements amples qui pourraient se
prendre dans l'appareil. Ne pas porter de chaussures ouvertes, ne pas travailler pieds nus ou jambes nues.
Le non-respect de ces mesures de précaution peut entraîner un accident ou un
risque de blessure grave.
11
Page 42

Contenu de l'emballage
Les pièces suivantes sont conditionnées séparément dans le carton d'emballage.
Lors de l'ouverture du carton, passer en revue les pièces qu'il contient.
S'adresser au revendeur si une pièce est manquante ou endommagée.
Numéro Désignation Quantité
(1) Tête du souffleur 1
(2) Tuyau de soufflage 1
Contenu de l'emballage
(3) Buse droite ronde 1
(4) Manuel d'utilisation 1
Numéro Désignation Quantité
(5) Bloc-batterie 1
(6) Manuel d'utilisation 1
(7) Chargeur 1
(8) Manuel d'utilisation 1
12
Page 43

Description
Description
1. Bouton d'alimentation Un appui bref permet de mettre
l'appareil sous tension, la DEL du témoin d'alimentation
s'allume. Un nouvel appui met l'appareil hors tension, la
DEL du témoin d'alimentation s'éteint.
2. DEL du témoin d'alimentation Reste allumée lorsque
l'appareil est sous tension. S'éteint lorsque l'appareil est
mis hors tension.
3. Interrupteur à poussoir Activé par le doigt de l'utilisateur
pour mettre le moteur en marche.
4. Levier de commande de vitesse Tirer le levier vers l'ar-
rière pour augmenter la vitesse du souffleur.
5. Moteur
6. Bloc-batterie
7. Couvercle du boîtier Couvre le logement de la turbine du
souffleur.
8. Étiquette avec numéro de série Indique le numéro de
modèle et le numéro de série de l'appareil.
9. Tuyaux de soufflage Système de verrouillage automa-
tique exclusif.
13
Page 44

Avant de commencer
Avant de commencer
Assemblage
AVERTISSEMENT
Lire attentivement le manuel d'utilisation pour s'assurer que l'appareil est monté correctement.
Ne jamais effectuer d'opérations d'entretien ou de montage lorsque l'appareil fonctionne.
L'utilisation d'un appareil monté de façon incorrecte entraîne un risque d'accident ou de blessure grave.
Installer les tuyaux de soufflage
1. Mettre l'appareil debout, sur la base du souffleur.
2. Aligner les nervures de blocage (A) sur le tuyau de soufflage
avec les évidements (B) dans le carter de la turbine. Vérifier
que la nervure de blocage courte (C) est orientée vers le
haut. Insérer le tuyau de soufflage dans le carter de la turbine jusqu'à ce qu'un déclic se fasse entendre.
1. Tuyau de soufflage
1. Tuyau de soufflage 2. Embout droit rond
Déposer les tuyaux de soufflage
3. Aligner les languettes (D) avec les rainures (E) et glisser
l'embout droit rond sur le tuyau de soufflage jusqu'à rencontrer une légère résistance. Ne pas forcer.
4. Tenir le tuyau de soufflage et tourner l'embout droit rond
vers la droite, en engageant les canaux de verrouillage jusqu'à obtenir une connexion sûre. Ne pas forcer.
REMARQUE
Les raccords entre les tuyaux se desserrent au fil de l'utilisation
du souffleur. Le système de verrouillage automatique exclusif
permet de serrer les raccords entre les tuyaux. En cas de desserrage, déposer et reposer l'embout droit rond conformément
aux instructions 3 et 4.
1. Insérer le tournevis (F) dans l'orifice situé près du symbole
de blocage (G) pour débloquer le tuyau.
2. Retirer les tuyaux du carter du ventilateur.
3. Retirer le tournevis.
14
Page 45

Avant de commencer
Charge de la batterie
AVERTISSEMENT
Toujours utiliser le bloc-batterie LBP-560-100/LBP-560-200/LBP-560-900 et le charger uniquement avec le chargeur
LCJQ-560.
Garder le chargeur et la batterie à l'abri de l'humidité et de tous les liquides.
Ne pas utiliser le chargeur sur une surface facilement inflammable (telle que du papier ou du textile) ou dans envi-
ronnement présentant un risque d'incendie élevé.
Ne pas couvrir le chargeur. Couvrir le chargeur l'empêcherait de se refroidir.
Ne pas utiliser le chargeur dans une atmosphère explosible, par exemple en présence de liquides, gaz ou poussières
inflammables. Les chargeurs peuvent produire des étincelles qui peuvent enflammer des poussières ou des vapeurs
– il existe un risque d'explosion.
Brancher le chargeur uniquement sur une alimentation correspondant à la tension et à la fréquence spécifiées sur
la plaque signalétique.
Brancher le chargeur uniquement sur une prise murale aisément accessible.
Ne jamais insérer d'objet dans les évents de refroidissement du bloc-batterie ou du chargeur.
Ne pas charger ni utiliser un bloc-batterie et un chargeur défectueux, endommagés ou déformés.
Ne pas ouvrir, endommager ou faire tomber le bloc-batterie ou le chargeur.
Une batterie endommagée ou mal utilisée risque de fuir ; éviter tout contact avec la peau. En cas de contact acci-
dentel, laver abondamment à l'eau et au savon les parties touchées. Si du liquide pénètre dans l'œil, ne pas frotter.
Rincer abondamment les yeux à l'eau pendant au moins 15 minutes. Consulter également un médecin.
Ne jamais ponter (court-circuiter) les contacts du bloc-batterie ou les bornes du chargeur avec des objets métal-
liques.
Protéger d'une exposition directe au soleil, à la chaleur et à toute flamme nue et ne jamais jeter la batterie au feu ; il
existe un risque d'explosion.
Si de la fumée ou des flammes se dégagent du chargeur, débrancher immédiatement celui-ci de la prise murale.
Si le cordon d'alimentation est endommagé, débrancher immédiatement la fiche de l'alimentation électrique pour
éviter tout risque de choc électrique.
Ne pas exposer le bloc-batterie à des ondes d'hyperfréquence ou à une pression élevée.
Prendre les mesures requises pour empêcher une mise en route intempestive. Retirer le bloc-batterie de l'appareil
avant de transporter ou de ranger celui-ci. Ne pas utiliser un récipient en métal pour transporter les batteries.
Pour réduire le risque de trébuchement, positionner et signaler le cordon d'alimentation de telle manière qu'il ne
puisse pas être endommagé et de façon à ce qu'il ne constitue un danger pour personne.
REMARQUE
La batterie est partiellement chargée lorsqu'elle quitte l'usine ; il convient de la charger entièrement avant la première utilisa-
tion.
Charger la batterie lorsqu'elle ne produit plus suffisamment de courant pour faire fonctionner l'appareil ou lorsque les voyants
indiquent qu'elle est déchargée.
1. Brancher le cordon secteur du chargeur dans la prise murale.
2. Aligner les nervures de la batterie sur les rainures du chargeur et faire coulisser la batterie dans le chargeur.
3. Durant la charge normale, la DEL du chargeur clignote en
continu en VERT.
IMPORTANT
Si le chargeur détecte un problème, la DEL clignote en
ROUGE. Retirer la batterie du chargeur, nettoyer les
1. Chargeur
2. Batterie
3. Fentes de refroidissement
4. DEL du chargeur
contacts et réinstaller la batterie dans le chargeur. Si la batterie n'est pas dans la plage de température acceptable (de
0 à 60 °C), la DEL reste allumée en ROUGE.
15
Page 46

Avant de commencer
1. Batterie
2. Bouton d'état de charge
de la batterie
Pose et retrait de la batterie
3. Affichage à DEL
4. Lorsque la charge est terminée, la DEL reste allumée en
VERT.
∗ Un bloc-batterie complètement déchargé se chargera en
42 minutes environ. (LBP-560-100)
∗ Un bloc-batterie complètement déchargé se chargera en
88 minutes environ. (LBP-560-200)
∗ Un bloc-batterie complètement déchargé se chargera en
336 minutes environ. (LBP-560-900)
5. Vérifier que la batterie est entièrement chargée en la retirant
du chargeur et appuyant sur le bouton d'état de charge de la
batterie. Vérifier les indications données par les DEL.
Un voyant vert indique que la batterie est chargée entre 0
et 25 %.
Deux voyants verts indiquent que la batterie est chargée
entre 25 et 50 %.
Trois voyants verts indiquent que la batterie est chargée
entre 50 et 75 %.
Quatre voyants verts indiquent que la batterie est chargée
entre 75 et 100 %.
6. Débrancher le chargeur de batteries de l'alimentation électrique.
AVERTISSEMENT
Le souffleur électrique fonctionne lorsque la batterie est installée et la DEL du témoin d'alimentation allumée. Veiller à posi-
tionner le souffleur électrique correctement pour éviter toute perte de contrôle et un éventuel accident grave.
REMARQUE
La batterie est partiellement chargée lorsqu'elle quitte l'usine ; il convient de la charger entièrement avant la première utilisa-
tion.
Pose de la batterie
1. Relâcher l'interrupteur à poussoir et pousser le levier de
commande de vitesse à fond vers l'avant en position d'arrêt.
2. S'assurer que l'appareil est hors tension.
3. Aligner les nervures de la batterie sur les rainures du souffleur électrique et insérer la batterie jusqu'à ce que le verrou
du bloc-batterie soit en position fermée ; un déclic se fait
alors entendre.
1. Batterie
2. Nervure
3. Verrou du bloc-batterie
1. Position fermée
2. Position non fermée
3. Verrou du bloc-batterie
4. Bloc-batterie
IMPORTANT
Avant d'utiliser le souffleur électrique, s'assurer que la batterie est correctement mise en place et le verrou du blocbatterie en position fermée.
REMARQUE
Le verrou du bloc-batterie est en position fermée lorsqu'il est
correctement engagé.
16
Page 47

1. Batterie 2. Verrou du bloc-batterie
Avant de commencer
Retrait de la batterie
1. Pour retirer la batterie, enfoncer le verrou du bloc-batterie et
extraire la batterie du souffleur électrique.
17
Page 48

Démarrage et arrêt
Démarrage et arrêt
Mise en marche de l'appareil
AVERTISSEMENT
Lors de la mise en marche de l'appareil, respecter les précautions décrites à la page 4 au chapitre « Pour utiliser
l'appareil en toute sécurité » pour faire en sorte d'utiliser l'appareil correctement.
Le non-respect de ces mesures de précaution constitue un risque d'accident et de blessures graves voire mortelles.
1. Pousser le levier de commande de vitesse à fond vers
l'avant en position d'arrêt.
2. Appuyer brièvement sur le bouton d'alimentation pour mettre
l'appareil sous tension.
REMARQUE
La DEL du témoin d'alimentation s'allume lorsque l'appareil
1. Levier de commande de
vitesse
est sous tension.
3. Appuyer sur l'interrupteur à poussoir pour augmenter la vitesse du souffleur.
1. Bouton d'alimentation
2. DEL du témoin d'alimentation
Arrêt de l'appareil
1. Interrupteur à poussoir
2. Levier de commande de
vitesse
3. Interrupteur à poussoir
3. Bouton d'alimentation
4. DEL du témoin d'alimentation
IMPORTANT
Lorsque l'appareil est sous tension :
Au bout d'une minute d'inactivité, il s'éteint tout seul.
Si la DEL reste allumée, l'appareil fonctionne normalement.
Si la DEL clignote une fois par seconde, la batterie doit être
chargée.
Si la DEL clignote quatre fois par seconde, l'appareil pré-
sente un défaut. Mettre l'appareil hors tension. Retirer la
batterie. Enlever les débris autour de la turbine. Installer la
batterie. Mettre l'appareil sous tension. Si le clignotement
persiste, demander à un technicien agréé de réparer l'appareil.
1. Levier de commande de vitesse
Relâcher l'interrupteur à poussoir et pousser le levier de commande de vitesse à fond vers l'avant (position d'arrêt), puis
laisser le souffleur s'arrêter.
2. Appuyer sur le bouton d'alimentation pour mettre l'appareil
hors tension.
REMARQUE
La DEL du témoin d'alimentation s'éteint lorsque l'appareil
est hors tension.
∗ Si le bouton d'alimentation ne permet pas d'arrêter le souf-
fleur, retirer la batterie pour couper l'alimentation de l'appareil.
Demander à un technicien agréé ECHO de réparer le bouton
d'alimentation avant d'utiliser à nouveau le souffleur. Si le
souffleur ne s'arrête pas lorsque l'on relâche l'interrupteur et
lorsque l'on pousse le levier de commande de vitesse à fond
vers l'avant (position d'arrêt), retirer la batterie pour couper
l'alimentation électrique de l'appareil. Demander à un technicien agréé ECHO de réparer l'appareil avant de l'utiliser à nouveau.
18
Page 49
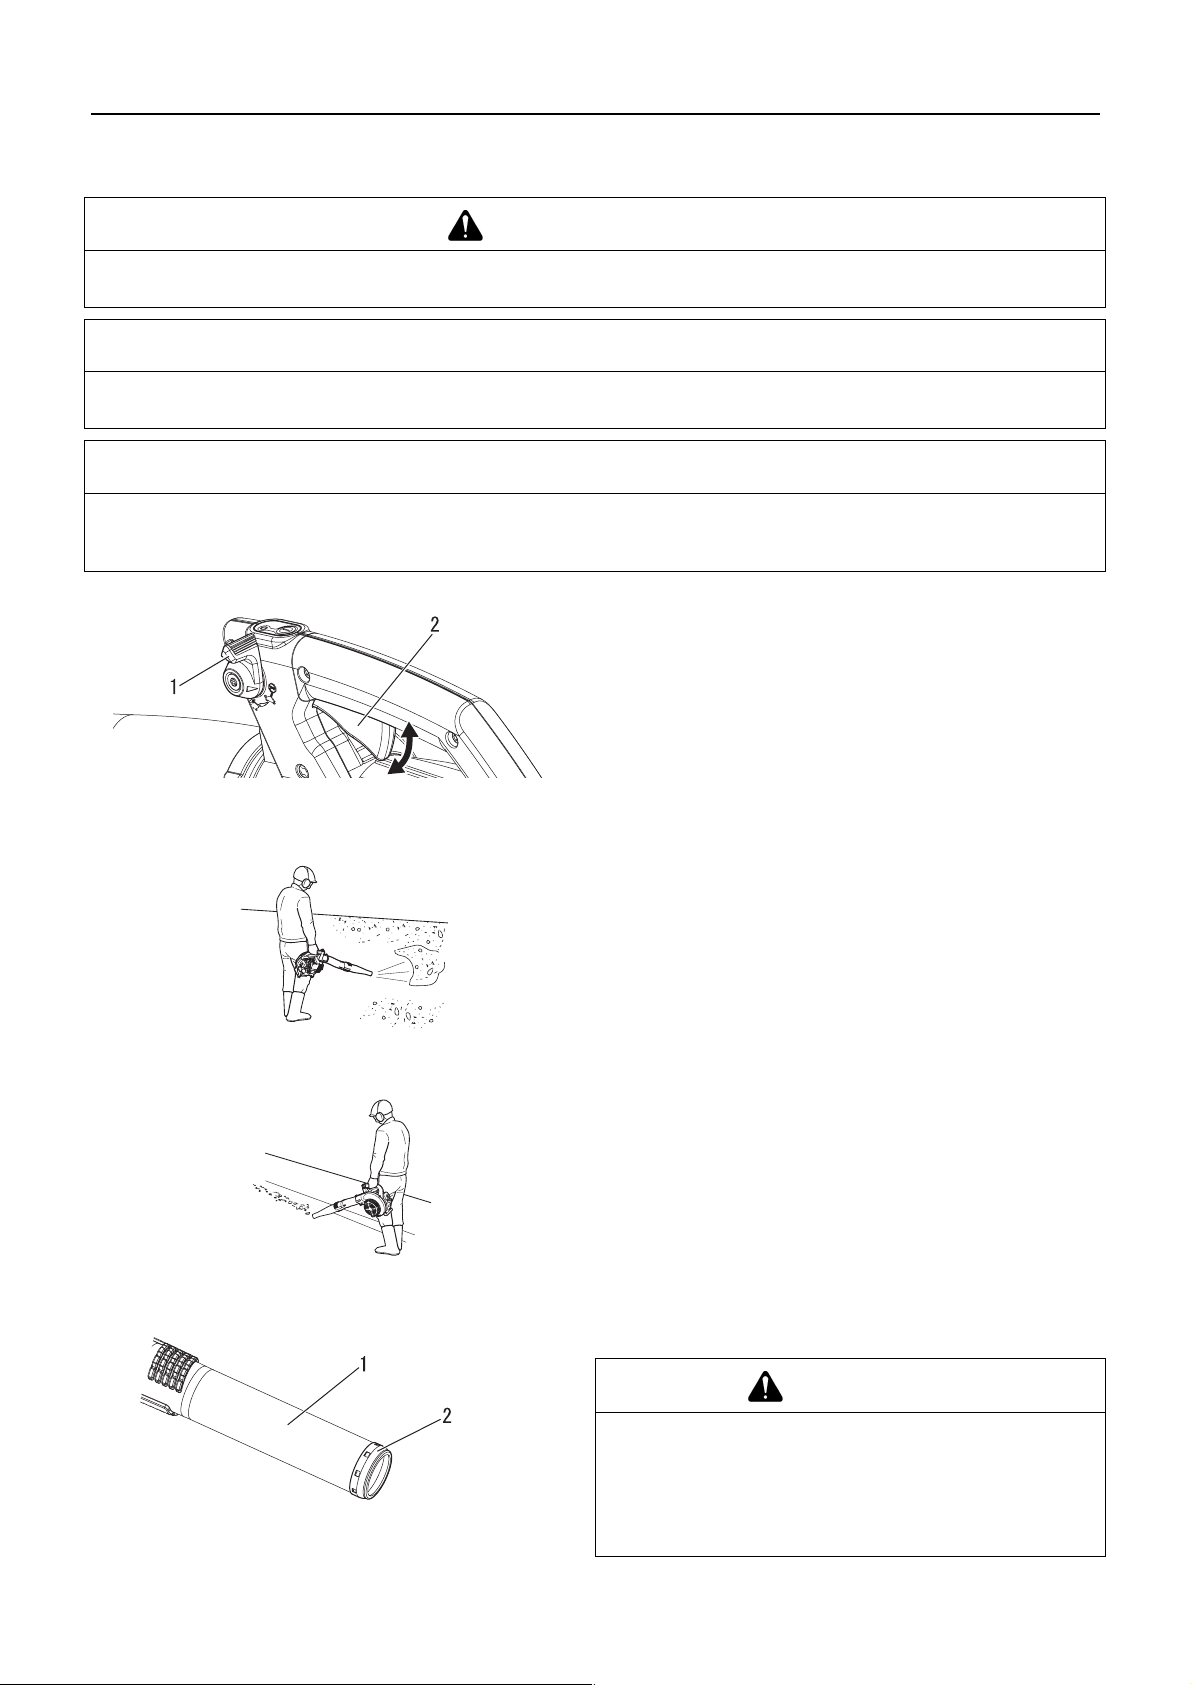
Fonctionnement
Fonctionnement
Fonctionnement du souffleur
AVERTISSEMENT
Toujours porter des lunettes de sécurité et prendre toutes les précautions de sécurité pour éviter un accident corporel
grave. Ne pas diriger le tuyau de soufflage vers des personnes ou des animaux.
IMPORTANT
Pour éviter d'endommager le moteur, ne pas obstruer l'ouverture du tuyau de soufflage. Ne jamais faire tourner le souffleur sans
avoir préalablement fixé les tuyaux de soufflage.
REMARQUE
Ne jamais utiliser l'appareil à un régime plus élevé que nécessaire. Rappel : plus la vitesse est élevée, plus le souffleur est
bruyant. Utiliser le souffleur à bas régime afin de réduire le déplacement de poussière. Garder les débris sur le lieu de travail.
Respecter le voisinage.
Lire attentivement le chapitre Sécurité.
1. Utiliser l'appareil uniquement aux heures appropriées.
2. Contrôler la vitesse du souffleur à l'aide de l'interrupteur à
poussoir ou, pour une utilisation en continu, régler la vitesse
du souffleur à l'aide du levier de commande de vitesse. Déplacer le levier de commande de vitesse vers l'avant pour réduire la vitesse et vers l'arrière pour augmenter la vitesse.
1. Levier de commande de
vitesse
2. Interrupteur à poussoir
3. Utiliser l'appareil à bas régime pour souffler les herbes et les
feuilles présentes dans les allées, les cours intérieures et les
passages.
4. Pour souffler les feuilles présentes sur une pelouse ou un
parterre de fleurs, il peut s'avérer nécessaire d'utiliser l'appareil à un régime supérieur.
5. Pour souffler du gravier, de la poussière, de la neige, des canettes ou des bouteilles vides présentes dans une allée, une
rue, un parking ou un stade, il peut s'avérer nécessaire d'utiliser l'appareil à un régime encore supérieur.
6. Pour les travaux près d'une habitation, ne pas souffler d'air
vers des fenêtres ouvertes. Des débris pourraient être soufflés dans ces fenêtres.
7. Détacher ou réduire les débris en morceaux à l'aide d'un râteau afin d'en faciliter le déplacement.
8. Humidifier les zones poussiéreuses avant de déplacer les
débris, de manière à réduire la poussière en suspension
dans l'air.
9. Toujours arrêter l'appareil en respectant la procédure d'arrêt.
1. Tuyau droit 2. Anneau de protection
en métal
ATTENTION
Une extrémité de tuyau droit touchant des surfaces abrasives
peut créer un bord tranchant et entraîner des blessures en cas
de contact. Ne pas érafler ou traîner une extrémité de tuyau
lors de l'utilisation ou du transport de l'appareil. Remplacer l'ensemble de tuyau droit si l'anneau de protection en métal est
usé, fendillé ou déformé.
19
Page 50
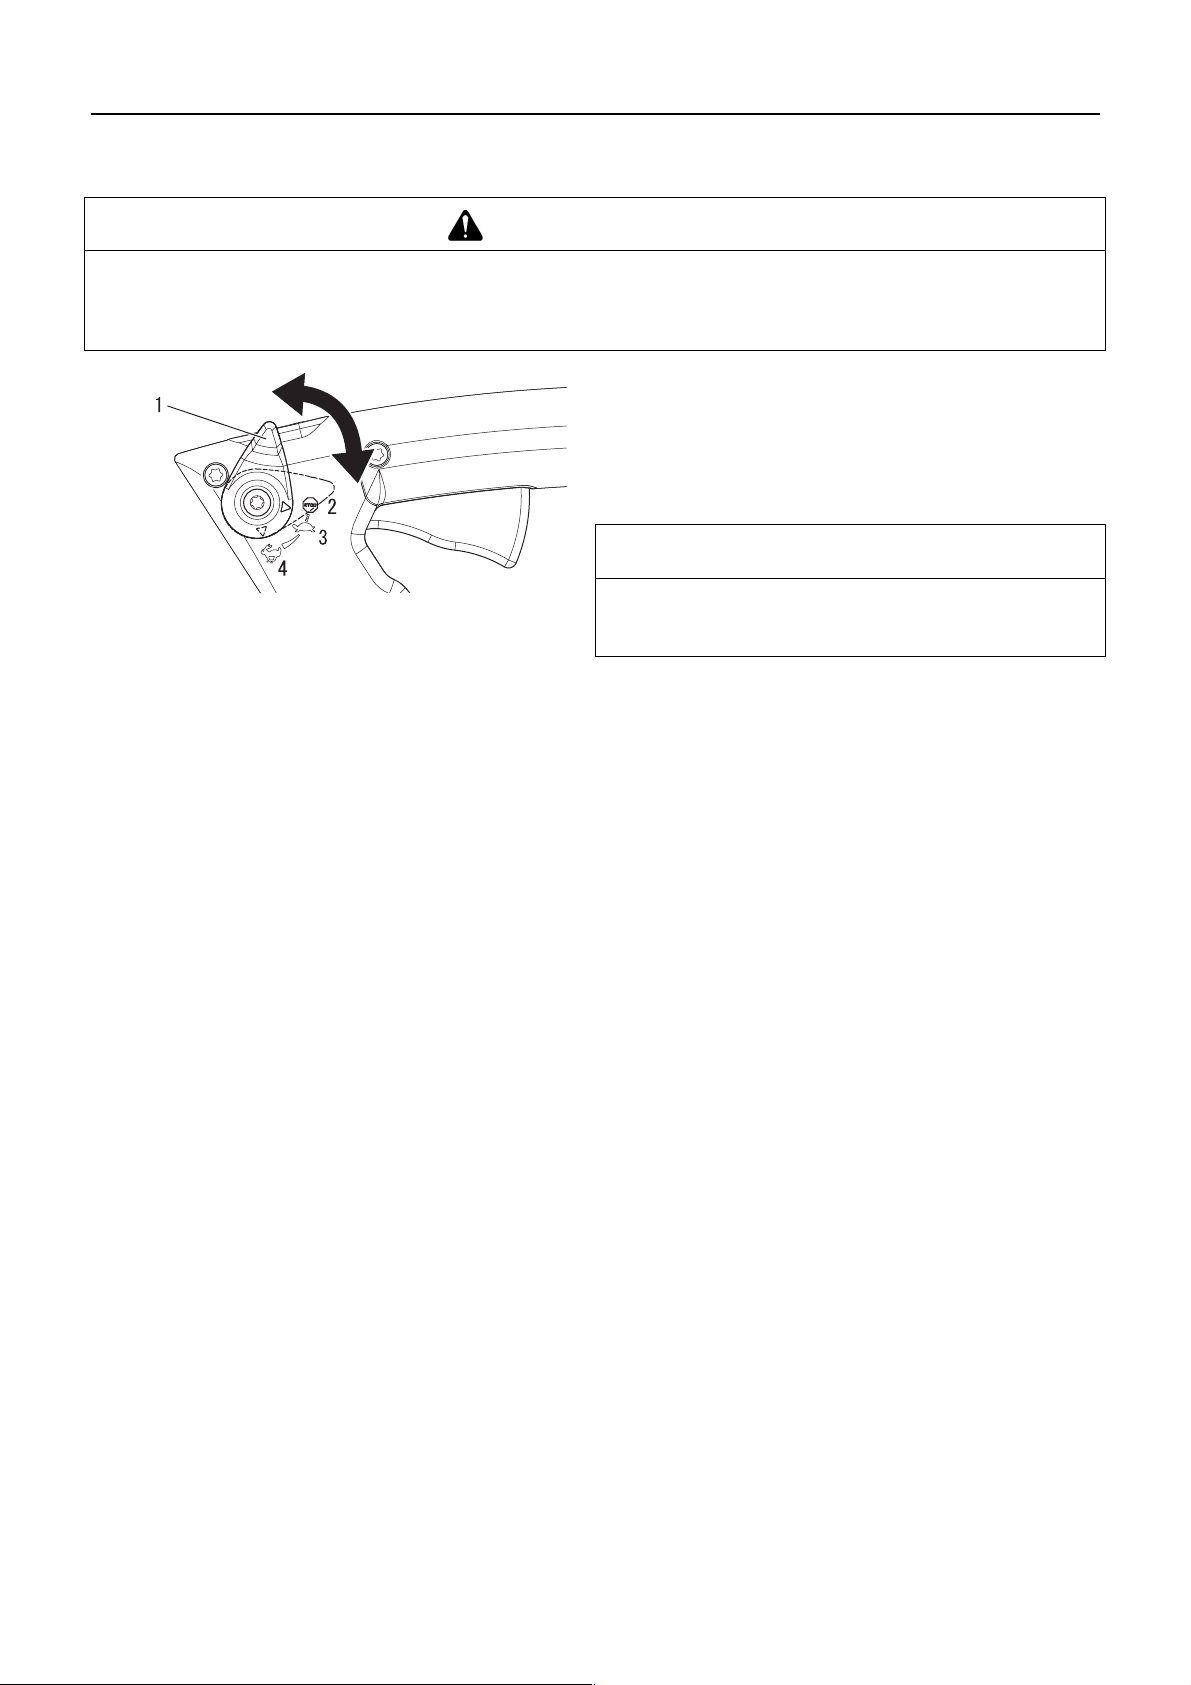
Fonctionnement
Commande de vitesse
AVERTISSEMENT
Avant de raccorder un bloc-batterie au souffleur, toujours pousser le levier de commande de vitesse à fond vers l'avant
en position d'arrêt. Négliger de vérifier que le levier est en position d'arrêt pourrait entraîner un démarrage accidentel
du souffleur et des blessures graves. Ne pas bloquer l'interrupteur à poussoir dans les applications où il peut être nécessaire d'arrêter brusquement le souffleur.
1. Déplacer le levier de commande de vitesse vers l'arrière du
souffleur et en position d'ARRÊT, vitesse MINIMALE ou vitesse MAXIMALE.
2. Le souffleur va fonctionner en continu à la vitesse sélectionnée.
3. Pour arrêter le souffleur, pousser le levier de commande de
vitesse à fond vers l'avant (position d'arrêt).
REMARQUE
Si la fonction de commande de vitesse est en cours d'utilisation
1. Levier de commande de
vitesse
2. Arrêt du souffleur
3. Vitesse minimale
4. Vitesse maximale
au moment où l'on retire le bloc-batterie de l'outil, placer immédiatement le levier en position d'arrêt.
20
Page 51
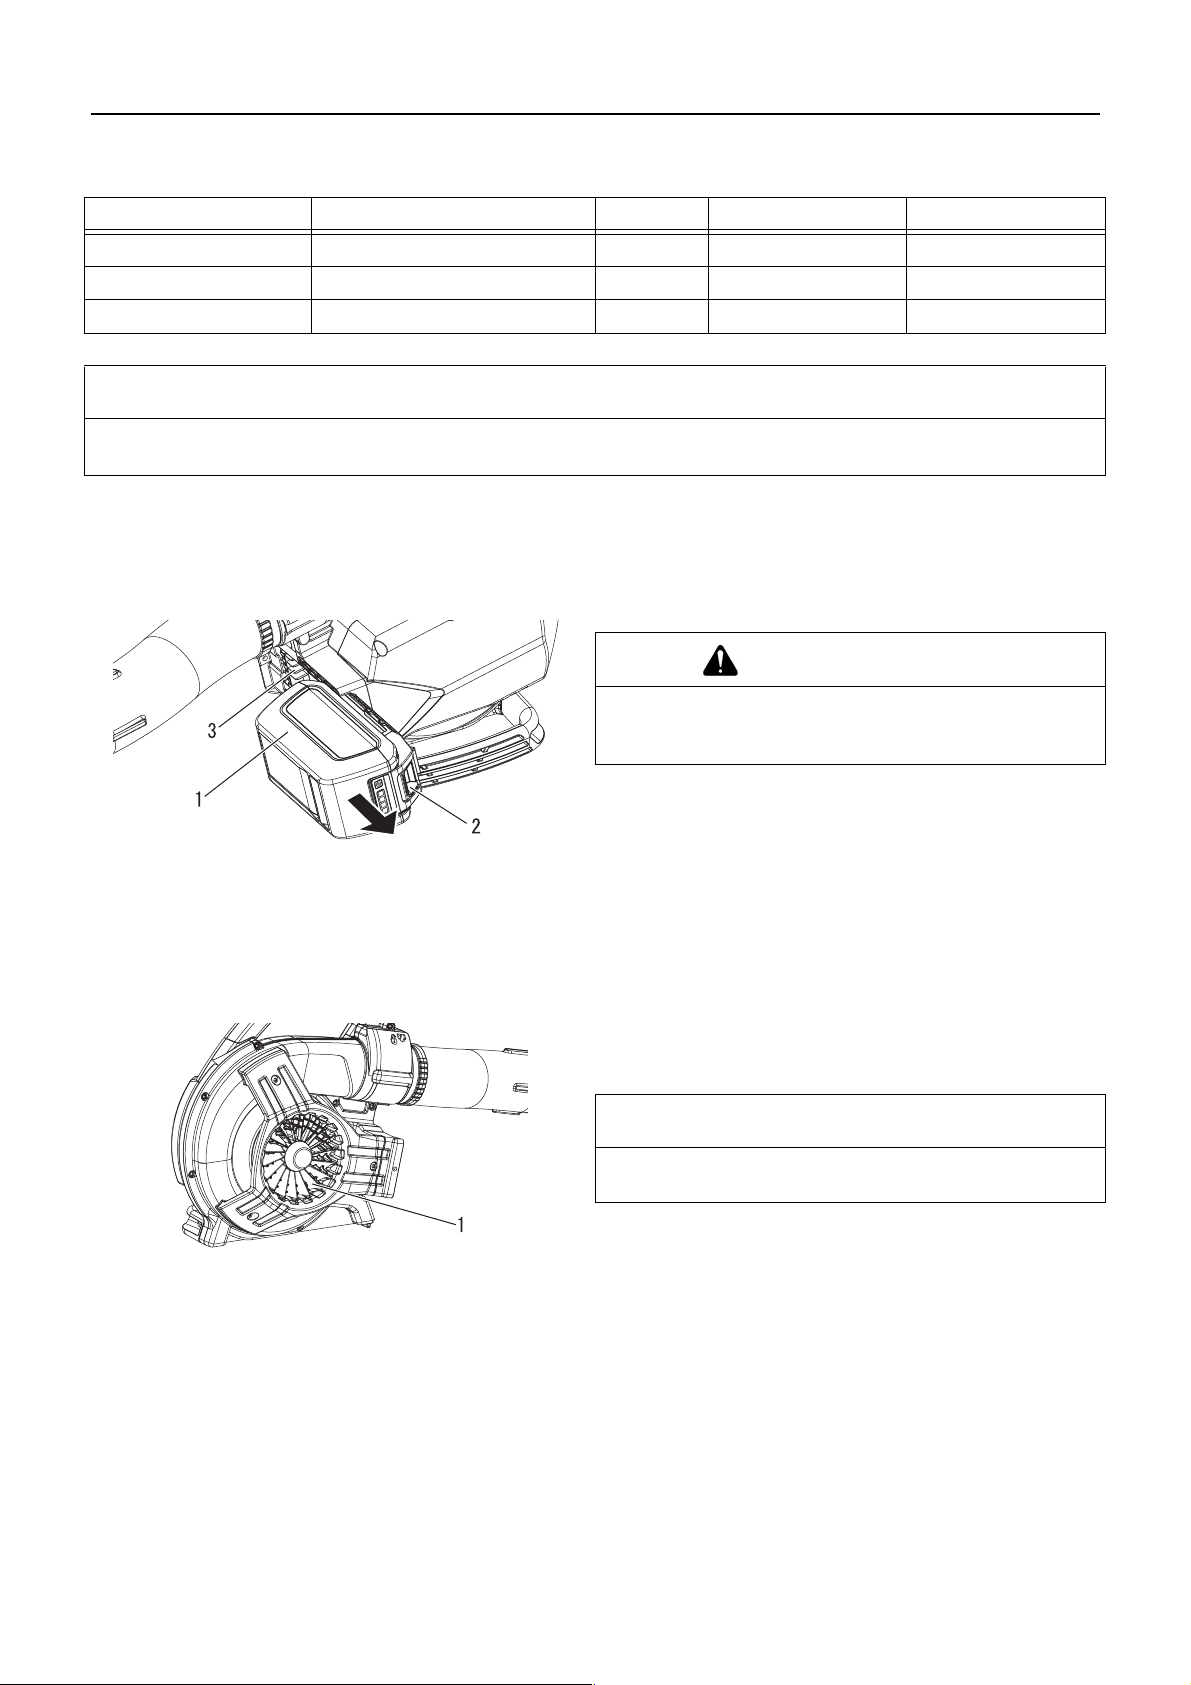
Entretien
Entretien
Instructions d'entretien de l'appareil
Pièce Entretien Page Avant utilisation Tous les mois
Batterie Contrôler/nettoyer/charger 21 •
Couvercle du boîtier Contrôler/nettoyer 21 •
Vis, boulons et écrous Contrôler/serrer/remplacer - •
IMPORTANT
Les intervalles indiqués sont un maximum. La fréquence des opérations d'entretien varie en fonction de l'utilisation réelle de l'appareil et de l'expérience de l'utilisateur.
Entretien
En cas de questions ou de problèmes, contacter un REVENDEUR ECHO.
Nettoyage de la batterie et de son logement
1. Batterie
2. Verrou du bloc-batterie
3. Logement de la batterie
Nettoyage du couvercle du boîtier
AVERTISSEMENT
Risque de choc électrique ou d'incendie. Ne pas utiliser
de matériaux conducteurs pour nettoyer la batterie ou
son logement.
1. Relâcher l'interrupteur à poussoir et pousser le levier de
commande de vitesse à fond vers l'avant (position d'arrêt),
puis laisser le souffleur s'arrêter.
2. S'assurer que la DEL du témoin d'alimentation n'est pas allumée.
3. Appuyer sur le verrou du bloc-batterie et faire glisser le blocbatterie hors de l'appareil.
4. Utiliser de l'air comprimé ou une brosse à poils souples pour
enlever les débris de la batterie et de son logement.
Eliminer les poussières et autres déchets, y compris les
feuilles mortes obstruant le couvercle du boîtier.
IMPORTANT
Ne pas déposer le couvercle du boîtier. Si nécessaire, consulter votre concessionnaire.
1. Couvercle du boîtier
21
Page 52

Entretien
Guide de dépannage
Problème Cause Solution
Voyant rouge du chargeur clignotant ou ne s'allumant pas
L'appareil ne se met pas en marche Bloc-batterie mal installé Contrôler la pose du bloc-batterie
L'appareil ne fonctionne pas lorsqu'il est mis en
marche
Le temps d'utilisation est trop court Bloc-batterie hors de la plage
Fiche non branchée dans la
prise d'alimentation
Bloc-batterie mal installé Contrôler la pose du bloc-batterie
Connexion obstruée Réinstaller le bloc-batterie après
Défaut du chargeur Consulter un revendeur ECHO
Défaut du bloc-batterie Consulter un revendeur ECHO
Bloc-batterie déchargé Charger le bloc-batterie
Bloc-batterie hors de la plage
de température acceptable
de température acceptable
Brancher le chargeur
avoir éliminé ce qui empêche la
connexion
Retirer le bloc-batterie et le laisser
refroidir
Retirer le bloc-batterie et le laisser
refroidir
Module électronique de l'appa-
reil trop chaud
Bloc-batterie déchargé Charger le bloc-batterie
L'appareil fonctionne mais ne souffle pas ou souffle
faiblement
Appareil vibrant de façon excessive Défaut des pièces internes Consulter un revendeur ECHO
La vérification et l'entretien de l'appareil nécessitent des connaissances spécialisées. Si l'utilisateur ne possède pas les com-
pétences requises pour effectuer les opérations de vérification et d'entretien de l'appareil ou pour remédier à un dysfonctionnement, il doit consulter un revendeur ECHO. Ne pas essayer de démonter l'appareil.
En cas de problème différent de ceux décrits dans le tableau ci-dessus, consulter un revendeur.
En ce qui concerne les pièces de rechange et les consommables, utiliser uniquement des pièces d'origine et les produits et
composants recommandés. L'utilisation de pièces d'autres marques ou de composants inappropriés peut entraîner un dysfonctionnement de l'appareil.
Tuyau de soufflage obstrué Déboucher le tuyau
Tuyau de soufflage desserré Serrer le tuyau
Tuyau de soufflage endomma-gé Remplacer le tuyau
Entrée d'air colmatée Déboucher l'entrée d'air
Défaut au niveau de la turbine Consulter un revendeur ECHO
Éteindre l'appareil et laisser refroi-
dir
22
Page 53
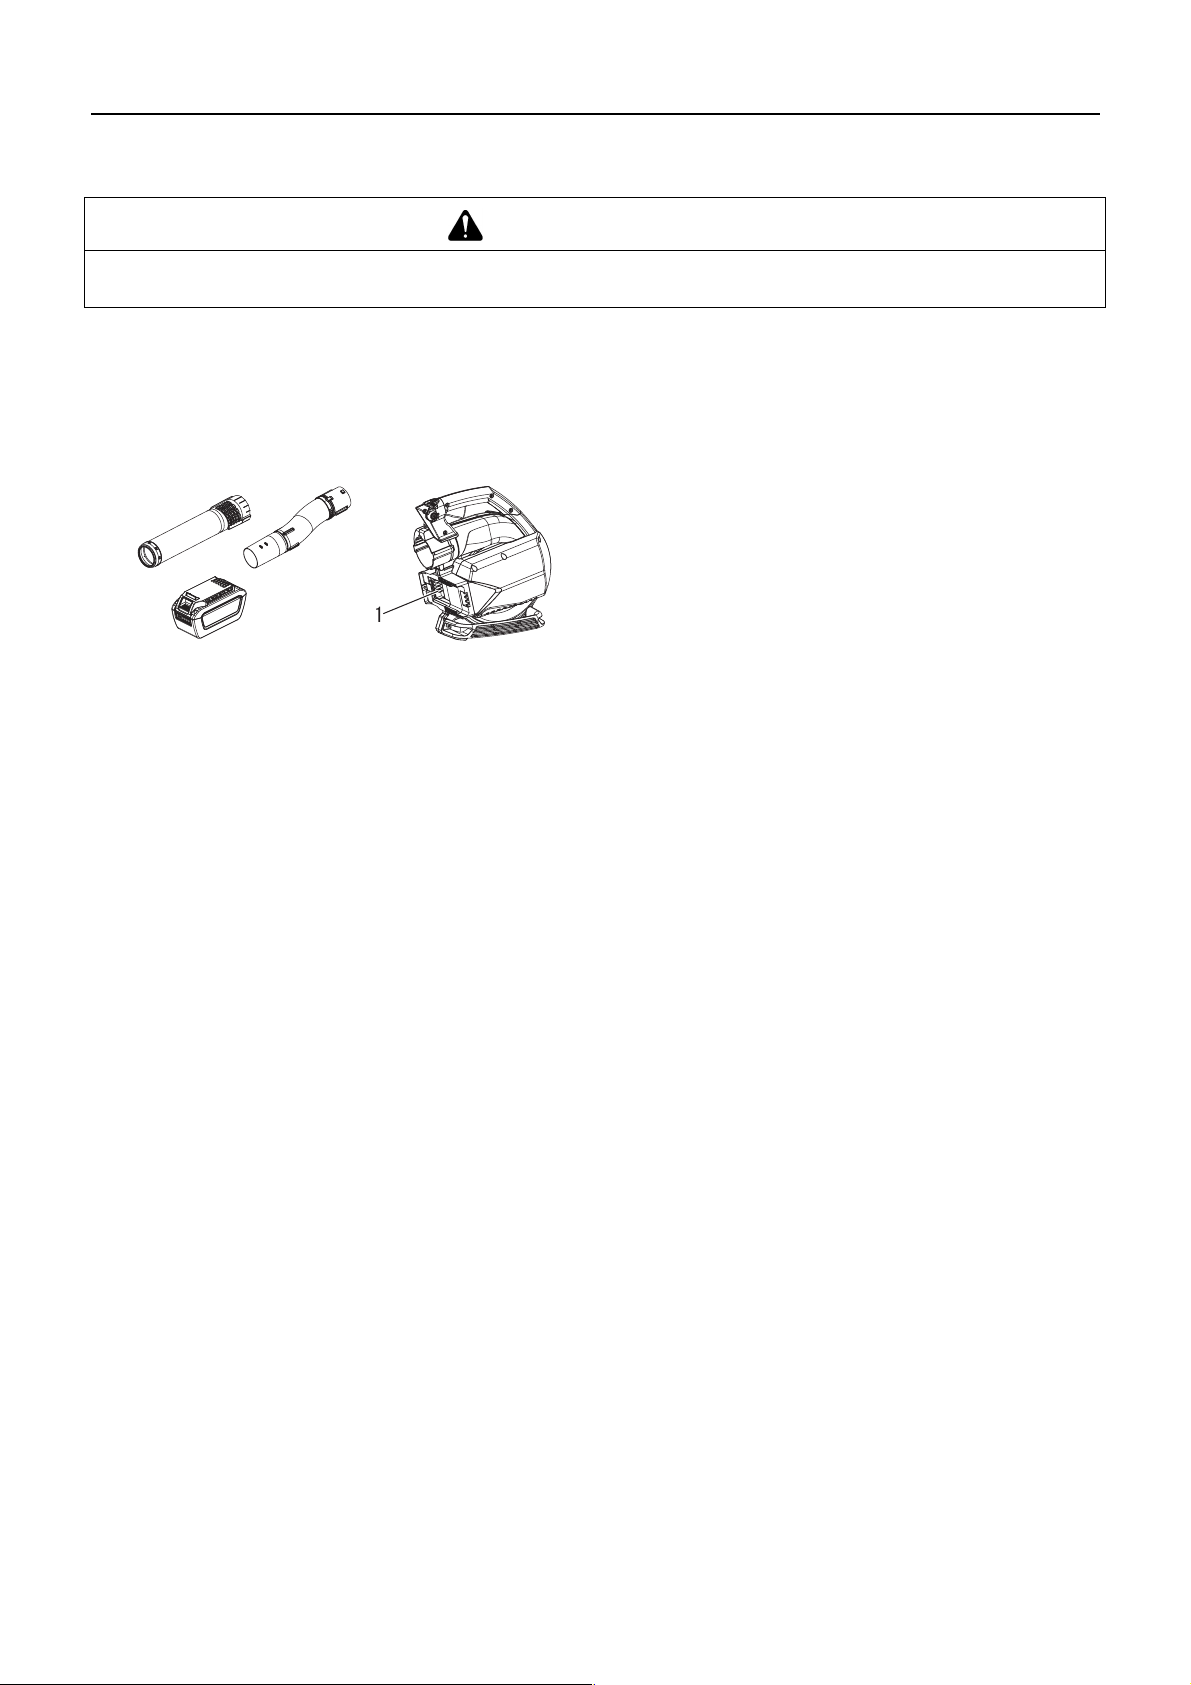
Entretien
Remisage
AVERTISSEMENT
Ne pas remiser dans une enceinte où une accumulation de vapeurs inflammables est susceptible de se produire.
Il existe un risque d'incendie.
Si l'appareil doit être remisé pendant une longue période, respecter les instructions de remisage suivantes.
Souffleur électrique rechargeable
Ne pas remiser l'appareil sans avoir préalablement effectué
les opérations d'entretien préventives spécifiques au remisage, qui comprennent les mesures suivantes :
1. Mettre l'appareil hors tension.
2. Retirer la batterie du souffleur.
3. Éliminer la saleté et les débris accumulés à l'extérieur de
l'appareil.
4. Serrer l'ensemble des vis et écrous.
5. Enlever l'ensemble des tuyaux de soufflage de l'appareil.
6. Couvrir le logement de batterie du souffleur.
7. Entreposer l'appareil dans un endroit sec, à l'abri de la pous-
1. Logement de la batterie
sière.
Batterie
1. Retirer la batterie du souffleur.
2. Remiser dans un endroit sec, non poussiéreux et hors de
portée des enfants.
3. Remiser à une température comprise entre -20 (-4 °F) et
60 °C (140 °F).
4. Si la batterie est remisée pendant plus d'un an, il convient de
la charger à environ 40 à 60 % de sa capacité.
Chargeur de batteries
1. Retirer la batterie du chargeur de batteries.
2. Débrancher le chargeur de batteries de l'alimentation électrique.
3. Remiser dans un endroit sec, à l'abri de la poussière.
23
Page 54

Entretien
Mise au rebut
Les pièces plastiques principales de l'appareil portent des
codes indiquant la nature de leurs matériaux de composition.
Ces codes font référence aux matériaux suivants ; procéder à
l'élimination de ces pièces plastiques conformément à la législation locale en vigueur.
Code Matériau
>PA6-GF< Nylon 6 - fibre de verre
>PP-GF< Polypropylène - fibre de verre
>PE-HD< Polyéthylène
La batterie contient du lithium. Effectuer la mise au rebut uni-
quement dans un site de collecte désigné.
Les batteries lithium-ion doivent être correctement mises au
rebut.
Si vous ne connaissez pas la procédure à suivre pour mettre
au rebut des pièces plastiques, adressez-vous à votre revendeur ECHO.
24
Page 55

Caractéristiques
Caractéristiques
DPB-600
Masse :
avec tuyaux de soufflage, sans batterie kg 3,2
avec tuyaux de soufflage et batterie kg 5,0
Dimensions externes (sans tuyaux de soufflage) :
Longueur mm 353
Largeur mm 187
Hauteur mm 336
Volume d'air : m
Vitesse maximale de l'air : m/s 72,5
Batterie :
Type Li-ion
Tension du bloc V 56 (tension nominale 50,4)
Type de chargeur CCCV
Tension d'entrée du chargeur V 230 - 240 CA
Voyants du chargeur de batteries : DEL rouge – batterie hors de la plage de tempéra-
3
/h 648
ture de charge
DEL rouge clignotante – défaut
DEL verte – mise en charge de la batterie terminée
DEL verte clignotante – batterie en cours de
charge normale
Temps de charge : Batterie LBP-560-100 : environ 42 minutes.
Batterie LBP-560-200 : environ 88 minutes.
Batterie LBP-560-900 : environ 336 minutes.
Niveau de pression sonore : (EN 50636-2-100) dB(A) 81,9
Niveau de puissance sonore : (EN 50636-2-100) dB(A) 94
Incertitude dB(A) 3
Niveaux de vibrations : (EN 50636-2-100) m/s² 0,7
Incertitude : K m/s² 1,5
Ces caractéristiques sont susceptibles d'être modifiées sans préavis.
La valeur totale déclarée pour les vibrations a été mesurée conformément à une méthode d'épreuve normalisée et peut être
utilisée pour comparer un outil à un autre.
La valeur totale déclarée pour les vibrations peut également être utilisée dans une évaluation préliminaire de l'exposition.
25
Page 56

Déclaration de conformité
Le fabricant soussigné :
YAMABIKO CORPORATION
7-2 SUEHIROCHO 1-CHOME
OHME ; TOKYO 198-8760
JAPON
Cette déclaration de conformité est délivrée sous la seule responsabilité du fabricant.
Déclare que l'appareil neuf désigné ci-après :
SOUFFLEUR
CHARGEUR DE BATTERIES
Marque : ECHO
Type : DPB-600
LCJQ-560
Déclaration de confor mité
assemblé par :
Est conforme :
* aux exigences de la directive 2006/42/CE (utilisation des normes harmonisées EN 60335-1: 2012, EN 50636-2-100:
2014)
* aux exigences de la directive 2014/30/UE (utilisation de la norme harmonisée EN 55014-1: 2006, EN 55014-2: 1997,
EN 61000-3-2: 2006, et EN 61000-3-3: 2008)
* aux exigences de la directive 2014/35/UE (utilisation de la norme harmonisée EN 60335-1: 2012, EN 60335-2-29:
2004, et EN 62233: 2008)
* aux exigences de la directive 2000/14/CE
Procédure d'évaluation de la conformité suivie : ANNEXE V
* aux exigences de la directive 2011/65/UE (utilisation des normes harmonisées EN 50581: 2012)
Niveau de puissance sonore mesuré : 94 dB(A)
Niveau de puissance sonore garanti : 97 dB(A)
DPB-600
LCJQ-560
Tokyo, le 1er juillet 2016
ECHO, INCORPORATED
400 Oakwood Road
Lake Zurich, Illinois 60047-1564
États-Unis
Numéro de série 35001001 à 35100000
Numéro de série 35001001 à 35100000
YAMABIKO CORPORATION
Représentant autorisé en Europe, autorisé à constituer le dossier technique.
Société : Atlantic Bridge Limited
Adresse : Atlantic House, PO Box 4800,
Earley, Reading RG5 4GB, Royaume-Uni
Masayuki Kimura M. Philip Wicks
Directeur général
Service Assurance qualité
Importateur pour la France
Société : P.P.K.
Adresse : Z.I. du Chemin Vert 10/16 rue de l'Angoumois
BP 8002 - 95811 ARGENTEUIL CEDEX, France
26
Page 57

1Remarques et dos de couverture
NOTES
2016
X750-027 39 0
X750 821-010 2
27
Page 58

7-2 SUEHIROCHO 1-CHOME, OHME, TOKYO 198-8760, JAPON
TÉLÉPHONE : 81-428-32-6118. FAX : 81-428-32-6145.
©
2016
X750-027 39 0
X750 821-010 2
Imprimé au Japon
0x0xxxx zzzz ES
28
Page 59

1Buchdeckel
DEUTSCH
(Original-Anleitung)
BEDIENUNGSANLEITUNG
AKKU-LAUBBLÄSER
DPB-600
WARNUNG
LESEN SIE DIE BEDIENUNGSANLEITUNG SORGFÄLTIG
DURCH, UND BEFOLGEN SIE DIE SICHERHEITSREGELN.
ANDERNFALLS BESTEHT DAS RISIKO SCHWERER
VERLETZUNGEN.
Page 60

Wichtige Informationen
2Wichtige Informationen
Lesen Sie unbedingt die Bedienungsanleitung, bevor Sie das Produkt verwenden.
Bestimmungsgemäßer Gebrauch dieses Produkts
ECHO Akku-Laubbläser sind darauf ausgelegt, verschiedene Arten Schmutz und Laub zusammen zu blasen.
Gebrauchen Sie das Produkt für keinen anderen als den vorgesehenen Zweck.
Anwender des Produkts
Verwenden Sie dieses Produkt erst, nachdem Sie die Bedienungsanleitung sorgfältig gelesen und den Inhalt genau
verstanden haben.
Das Produkt darf von keiner Person verwendet werden, die die Bedienungsanleitung nicht gelesen hat, an Erkältung,
Müdigkeit oder einer anderen körperlichen Schwäche leidet. Das Produkt darf nicht von Kindern verwendet werden.
Seien Sie sich bewusst, dass der Benutzer für Unfälle bzw. Gefährdungen anderer Personen oder deren Eigentum
verantwortlich ist.
Allgemeines zu dieser Bedienungsanleitung
Diese Bedienungsanleitung enthält wichtige Informationen über die Bedienung und Instandhaltung Ihres Produkts.
Bitte lesen Sie sie sorgfältig durch, und machen Sie sich mit dem Inhalt vertraut.
Bewahren Sie die Anleitung stets an einem schnell zugänglichen Ort auf.
Sollte die Anleitung verloren gehen oder aufgrund von Beschädigungen nicht mehr lesbar sein, besorgen Sie sich bitte
eine neue Anleitung von Ihrem ECHO-Händler.
Die in dieser Anleitung verwendeten Einheiten sind SI-Einheiten (Système International d'unités; Internationales
Einheitensystem). Zahlenangaben in Klammern sind Referenzwerte, bei denen mitunter geringe Umrechnungsfehler
vorliegen können.
Verleihen oder Übereignen des Produkts
Wenn Sie das in dieser Anleitung beschriebene Produkt verleihen, muss die Person, die das Produkt ausleiht und
verwendet, auch die zugehörige Bedienungsanleitung erhalten. Wenn Sie das Produkt einer anderen Person
übereignen, muss die Bedienungsanleitung zusammen mit dem Produkt ausgehändigt werden.
Anfragen
Wenden Sie sich mit Fragen zum Produkt, zu Ersatzteilen und Reparaturen und dergleichen bitte an Ihren ECHO-
HÄNDLER.
Anmerkungen
Um Weiterentwicklungen des Produkts Rechnung zu tragen, bleiben dem Hersteller Änderungen am Inhalt dieser
Anleitung vorbehalten. Einige Abbildungen in dieser Anleitung können vom Produkt abweichen, um Sachverhalte
klarer darzustellen.
Vor Inbetriebnahme des Produkts müssen einige Teile montiert werden.
Bei Unklarheiten oder Problemen wenden Sie sich bitte an Ihren ECHO-Händler.
Hersteller
YAMABIKO CORPORATION
7-2 SUEHIROCHO 1-CHOME, OHME, TOKIO 198-8760, JAPAN
Autorisierte Vertretung in Europa
Atlantic Bridge Limited
Atlantic House, PO Box 4800, Earley, Reading RG5 4GB, Vereingtes Königreich
2
Page 61

Inhalt
Sichere Verwendung des Produkts .................................................................................... 4
Warnhinweise ................................................................................................................ 4
Sonstige Kennzeichnungen........................................................................................... 4
Symbole.........................................................................................................................4
Stelle, an der sich der Sicherheitsaufkleber befindet..................................................... 5
Umgang mit dem Produkt.............................................................................................. 6
Packliste ........................................................................................................................... 12
Beschreibung....................................................................................................................13
Bevor Sie beginnen .......................................................................................................... 14
Zusammenbau............................................................................................................. 14
Starten und Stoppen ......................................................................................................... 18
Starten des Geräts ...................................................................................................... 18
Stoppen des Geräts..................................................................................................... 18
Betrieb ..............................................................................................................................19
Betrieb des Bläsers...................................................................................................... 19
Wartung und Pflege .......................................................................................................... 21
Wartungsrichtlinien ...................................................................................................... 21
Wartung und Pflege ..................................................................................................... 21
Fehlerbehebung .......................................................................................................... 22
LAGERUNG................................................................................................................. 23
Entsorgung .................................................................................................................. 24
Technische Daten............................................................................................................. 25
Konformitätserklärung....................................................................................................... 26
3
Page 62

Sichere Verwendung des Produkts
Lesen Sie diesen Abschnitt unbedingt durch, bevor Sie das Produkt verwenden.
Sichere Verwendung des Produkts
Er enthält wichtige Informationen zum Thema Sicherheit. Befolgen Sie die Anweisungen sorgfältig.
Lesen Sie außerdem die Sicherheitshinweise im Hauptteil dieser Bedienungsanleitung.
In Textabschnitten, die mit einem [diamond mark]-Symbol beginnen, werden die möglichen Folgen einer Nichtbeachtung von
Sicherheitshinweisen beschrieben.
Warnhinweise
Auf Situationen, in denen eine Verletzungsgefahr für den Bediener und andere Personen besteht, wird in dieser Anleitung und auf
dem Produkt selbst durch die nachstehenden Warnhinweise aufmerksam gemacht. Lesen Sie diese Warnhinweise genau durch,
und befolgen Sie sie, um sicheres Arbeiten zu gewährleisten.
GEFAHR WARNUNG VORSICHT
Dieses Symbol in Verbindung mit
dem Wort „GEFAHR“ macht auf
Handlungen oder Bedingungen
aufmerksam, die zu schweren
Verletzungen oder zum Tod von
Bediener und umstehenden
Personen führen.
Sonstige Kennzeichnungen
Zusätzlich zu den Warnhinweisen werden in dieser Anleitung folgende erklärende Symbole verwendet:
Dieses Symbol in Verbindung mit
dem Wort „WARNUNG“ macht auf
Handlungen oder Bedingungen
aufmerksam, die zu schweren
Verletzungen oder zum Tod von
Bediener und umstehenden
Personen führen können.
„VORSICHT“ warnt vor einer
Gefahrensituation, in der es zu
leichten bis mäßigen Verletzungen
kommen kann.
HINWEIS WICHTIG
Kreis mit umgekehrtem
Schrägstrich bedeutet,
dass das Dargestellte
unzulässig ist.
Symbole
In dieser Anleitung und auf dem Produkt selbst werden verschiedene erklärende Symbole verwendet. Wichtig ist, dass Sie die
Bedeutung der einzelnen Symbole genau verstehen.
Symbol Beschreibung des Symbols Symbol Beschreibung des Symbols
Lesen Sie die
Bedienungsanleitung
sorgfältig durch
Sicherheit/Alarm Gefahr der Fingerabtrennung
Hinweise dieser Art enthalten Tipps
zur Verwendung, Pflege und Wartung
des Produkts.
Umrahmter Text mit der Überschrift
„WICHTIG“ enthält wichtige
Informationen zur Verwendung,
Überprüfung, Wartung und Lagerung
des in dieser Anleitung
beschriebenen Produkts.
Tragen Sie Augenschutz
Achtung, Stromschlag-Gefahr Achtung, heiße Bereiche
Stopp Langsame Drehzahl
4
Page 63

Sichere Verwendung des Produkts
Symbol Beschreibung des Symbols Symbol Beschreibung des Symbols
Nie im Regen oder an
feuchten Orten betreiben
Passanten auf einen Abstand
von 15 m halten
Garantierter
Schallleistungspegel
Klasse II
oder DC
Hohe Drehzahl
Schutz der Umwelt!
Volt
Gleichstrom
Stelle, an der sich der Sicherheitsaufkleber befindet
Das in dieser Anleitung beschriebene Produkt ist mit dem unten dargestellten Sicherheitsaufkleber versehen. Machen Sie sich
die Bedeutung des Sicherheitsaufklebers bewusst, bevor Sie das Produkt verwenden.
Wenn der Sicherheitsaufkleber abgerieben oder beschädigt und nicht mehr lesbar ist oder sich abgelöst hat, besorgen Sie bitte
einen neuen Sicherheitsaufkleber von Ihrem Händler, und bringen Sie ihn an der in der Abbildung unten gezeigten Stelle an.
Der Sicherheitsaufkleber muss stets gut lesbar sein.
1. Sicherheitsaufkleber (Teilenummer X505008910)
5
Page 64

Sichere Verwendung des Produkts
Umgang mit dem Produkt
Allgemeine Sicherheitswarnungen zu Elektrowerkzeugen
WARNUNG
Lesen Sie alle Sicherheitswarnungen und alle
Anweisungen.
Wenn die nachstehenden Warnungen und Anweisungen nicht
beachtet werden, besteht die Gefahr von Stromschlag, Brand
und/oder schweren Verletzungen.
Bewahren Sie alle Warnhinweise und Anweisungen zum
Nachschlagen auf.
Der Begriff „Elektrowerkzeug“ in den Warnhinweisen bezieht
sich auf ein netzbetriebenes (kabelgebundenes)
Elektrowerkzeug oder ein akkubetriebenes (kabelloses)
Elektrowerkzeug.
Sicherheit im Arbeitsbereich
Sorgen Sie dafür, dass der Arbeitsbereich aufgeräumt
und gut beleuchtet ist.
Unordentliche und dunkle Arbeitsbereiche bedeuten
Unfallgefahr.
Betreiben Sie Elektrowerkzeuge nicht in
explosionsgefährdeten Bereichen, wie sie z. B. durch
brennbare Flüssigkeiten, Gase oder Stäube in der
Umgebung entstehen.
Elektrowerkzeuge können Funken erzeugen, und diese
können die Stäube oder Dämpfe entzünden.
Halten Sie bei der Arbeit mit einem Elektrowerkzeug
Kinder und Umstehende fern.
Wenn Sie abgelenkt werden, können Sie die Kontrolle über
das Werkzeug verlieren.
Elektrische Sicherheit
Elektrowerkzeugstecker müssen passend für die
Steckdose sein. Verändern Sie den Stecker in keiner
Weise. Verwenden Sie in Verbindung mit geerdeten
Elektrowerkzeugen keine Adapterstecker.
Unveränderte Stecker und passende Steckdosen mindern
das Risiko eines elektrischen Schlags.
Vermeiden Sie den Körperkontakt mit geerdeten
Flächen wie Rohren, Heizkörpern, Öfen und
Kühlschränken.
Das Risiko eines elektrischen Schlags ist höher, wenn Ihr
Körper geerdet wird.
Setzen Sie Elektrowerkzeuge nie Regen oder Nässe
aus.
Wasser, das in ein Elektrowerkzeug eindringt, erhöht das
Risiko eines elektrischen Schlags.
Missbrauchen Sie das Kabel nicht. Gebrauchen Sie das
Kabel nie zum Tragen, Ziehen oder Ausstecken des
Elektrowerkzeugs. Halten Sie das Kabel fern von Hitze,
Öl, scharfen Kanten und beweglichen Teilen.
Beschädigte oder verhedderte Kabel erhöhen das Risiko
eines elektrischen Schlags.
Verwenden Sie beim Einsatz eines Elektrowerkzeugs im
Freien ein für den Außenbereich geeignetes
Verlängerungskabel.
Die Verwendung eines für den Außenbereich geeigneten
Kabels vermindert das Risiko eines elektrischen Schlags.
Wenn der Einsatz eines Elektrowerkzeugs an einem
feuchten Ort unvermeidlich ist, verwenden Sie eine
Stromquelle mit Fehlerstrom-/DifferenzstromSchutzschalter.
Die Verwendung eines Fehlerstrom-/Differenzstrom-
Schutzschalters vermindert das Risiko eines elektrischen
Schlags.
Persönliche Sicherheit
Seien Sie bei der Arbeit mit einem Elektrowerkzeug
aufmerksam, konzentrieren Sie sich auf das, was Sie
tun, handeln Sie umsichtig und vernünftig. Gebrauchen
Sie ein Elektrowerkzeug nicht, wenn Sie müde sind oder
unter dem Einfluss von Drogen, Alkohol oder
Medikamenten stehen.
Ein Moment der Unachtsamkeit beim Betrieb von
Elektrowerkzeugen kann dazu führen, dass Personen
schwer verletzt werden.
Tragen Sie persönliche Schutzausrüstung. Tragen Sie
immer einen Augenschutz.
Den Bedingungen angemessene Schutzausrüstung wie
Staubmaske, Schuhwerk mit rutschfesten Sohlen,
Schutzhelm und Gehörschutz vermindert die
Verletzungsgefahr.
Verhindern Sie, dass das Werkzeug unbeabsichtigt in
Gang gesetzt wird. Achten Sie darauf, dass der Schalter
ausgeschaltet ist, bevor Sie die Verbindung zur
Stromquelle oder mit dem Akku herstellen und bevor
Sie das Werkzeug aufnehmen und tragen.
Das Tragen von Elektrowerkzeugen mit dem Finger am
Schalter und das Herstellen der Stromzufuhr zu
Elektrowerkzeugen bei eingeschaltetem Schalter bedeuten
Unfallgefahr.
Entfernen Sie vor dem Einschalten des
Elektrowerkzeugs eventuell benutzte Einstellschlüssel,
Schraubenschlüssel usw.
Ein Schrauben- oder Einstellschlüssel, der an einem
drehenden Teil des Elektrowerkzeugs vergessen wird,
bedeutet Verletzungsgefahr.
Beugen Sie sich nicht zu weit über. Achten Sie stets auf
sicheren Tritt und Stand, und halten Sie das
Gleichgewicht.
So behalten Sie das Elektrowerkzeug auch in einer
unvorhergesehenen Situation besser unter Kontrolle.
Achten Sie auf angemessene Kleidung. Tragen Sie
keine lose sitzende Kleidung oder losen Schmuck.
Bleiben Sie mit Haaren, Kleidung und Handschuhen
weg von drehenden Teilen.
Lose sitzende Kleidung, Schmuck und langes Haar können
sich in beweglichen Teilen verfangen.
Bei Geräten mit Vorsehung für eine Staubabsaug- und
Staubsammeleinrichtung stellen Sie sicher, dass diese
angeschlossen ist und wie vorgesehen genutzt wird.
Solche Einrichtungen können Gefahren durch Staub
mindern.
Die Schwingungsemissionen, die im praktischen Gebrauch
des Elektrowerkzeugs auftreten, können von dem deklarierten
Vibrationsgesamtwert abweichen; abhängig ist dies von der
Art, wie das Werkzeug eingesetzt wird, und der Notwendigkeit,
Sicherheitsmaßnahmen zum Schutz des Bedieners
festzulegen, die sich nach der geschätzten Exposition unter
praktischen Arbeitsbedingungen richten (und die den
vollständigen Arbeitszyklus, also neben der Betriebszeit auch
Ausschaltzeiten und Leerlaufzeiten berücksichtigen).
6
Page 65
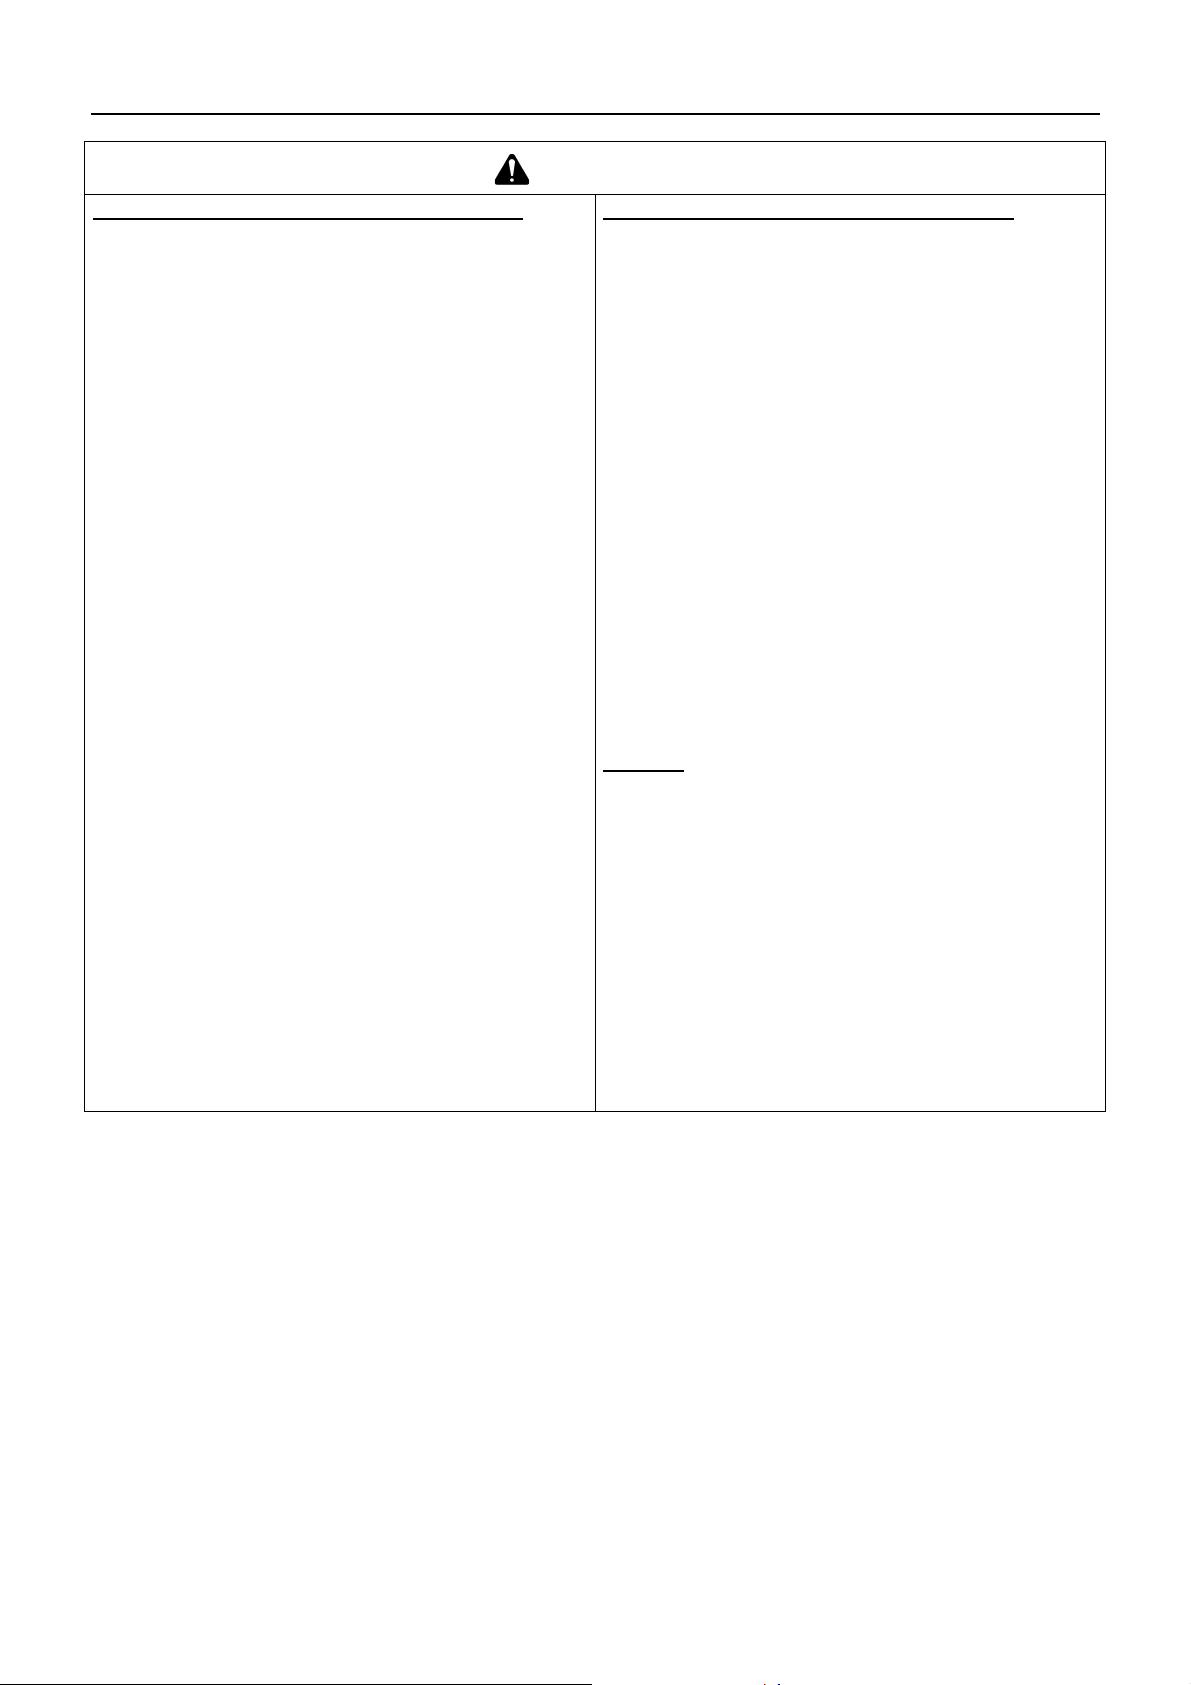
Sichere Verwendung des Produkts
WARNUNG
Gebrauch und Pflege von Elektrowerkzeugen
Überbeanspruchen Sie das Elektrowerkzeug nicht.
Wählen Sie das richtige Elektrowerkzeug für die
Aufgabe.
Ein für die betreffende Aufgabe richtig bemessenes und
ausgelegtes Elektrowerkzeug erledigt die Aufgabe besser
und sicherer.
Gebrauchen Sie das Elektrowerkzeug nicht, wenn der
Ein- und Ausschalter nicht funktioniert.
Ein Elektrowerkzeug, dessen Schalter nicht funktionieren,
ist gefährlich und muss repariert werden.
Trennen Sie den Stecker von der Stromquelle bzw.
bauen Sie den Akku aus, bevor Sie an
Elektrowerkzeugen Einstellungen vornehmen,
Gerätezubehör wechseln oder die Werkzeuge lagern.
Solche Vorsichtsmaßnahmen mindern das Risiko, dass das
Elektrowerkzeug unbeabsichtigt in Gang gesetzt wird.
Halten Sie Elektrowerkzeuge außer Reichweite von
Kindern, und verhindern Sie, dass Personen, die mit
dem Werkzeug und diesen Anweisungen nicht vertraut
sind, Umgang mit dem Werkzeug haben.
Elektrowerkzeuge stellen in Händen ungeübter Nutzer eine
Gefahr dar.
Halten Sie Elektrowerkzeuge instand. Achten Sie auf
Fluchtungsfehler, auf festgegangene oder gebrochene
Teile und andere Umstände, die den sicheren Einsatz
des Elektrowerkzeugs gefährden können. Lassen Sie
ein schadhaftes Elektrowerkzeug vor dem Gebrauch
reparieren.
Viele Unfälle gehen auf schlecht gewartete
Elektrowerkzeuge zurück.
Halten Sie Schneidwerkzeuge scharf und sauber.
Ordentlich instand gehaltene Schneidwerkzeuge mit
scharfen Schneidkanten fressen nicht so leicht fest und sind
leichter zu führen.
Gebrauchen Sie das Elektrowerkzeug, Zubehör,
Wechselwerkzeuge usw. wie in dieser Anleitung
beschrieben und unter Berücksichtigung der
Arbeitsbedingungen und der durchzuführenden Arbeit.
Der nicht bestimmungsgemäße Gebrauch des
Elektrowerkzeugs stellt eine Gefahr dar.
Gebrauch und Pflege von Akkuwerkzeugen
Laden Sie Akkus nur mit dem vom Hersteller
angegebenen Ladegerät.
Ein Ladegerät, das für den einen Akku geeignet ist, kann bei
einem anderen Akku einen Brand verursachen.
Betreiben Sie Elektrowerkzeuge nur mit den speziell
vorgesehenen Akkus.
Bei der Verwendung anderer Akkus kann Verletzungs- und
Brandgefahr bestehen.
Halten Sie einen Akku, der nicht in Gebrauch ist, von
anderen metallischen Gegenständen, wie
Büroklammern, Schlüsseln, Nägeln, Schrauben und
dergleichen Kleinteilen fern, die eine leitende
Verbindung zwischen den Polen herstellen können.
Beim Kurzschließen der Akkupole besteht die Gefahr von
Brandverletzungen und Brandgefahr.
Bei falscher Behandlung des Akkus kann Flüssigkeit
aus dem Akku treten – vermeiden Sie den Kontakt. Nach
versehentlichem Kontakt spülen Sie die betroffene
Stelle mit Wasser. Wenn die Flüssigkeit in die Augen
gerät, begeben Sie sich außerdem in ärztliche
Behandlung.
Ausgelaufene Akkusäure kann Reizungen und Verätzungen
hervorrufen.
Wartung
Lassen Sie das Elektrowerkzeug von einer qualifizierten
Reparaturwerkstatt mit identischen Ersatzteilen warten.
Dadurch ist gewährleistet, dass die Gerätesicherheit
erhalten bleibt.
7
Page 66

Sichere Verwendung des Produkts
Allgemeine Sicherheitsregeln
WARNUNG
Bedienungsanleitung
Lesen Sie die Bedienungsanleitung vor
der Inbetriebnahme des Produkts
aufmerksam durch, um eine korrekte
Bedienung zu gewährleisten.
Andernfalls kann es zu Unfällen
bzw.schweren Verletzungen kommen.
Produkt nur für den vorgesehenen Zweck
verwenden
Das Produkt darf nicht für andere als die in dieser
Bedienungsanleitung genannten Zwecke verwendet
werden.
Andernfalls kann es zu Unfällen bzw. schweren
Verletzungen kommen.
Keine Veränderungen am Produkt vornehmen
An dem Produkt dürfen keine Veränderungen
vorgenommen werden.
Andernfalls kann es zu Unfällen bzw. schweren
Verletzungen kommen. Funktionsfehler, die auf
Veränderungen am Produkt zurückzuführen sind, fallen
nicht unter die Herstellergarantie.
Verleihen oder Übereignen des Produkts
Wenn Sie das Produkt verleihen, muss die ausleihende
Person auch die zugehörige Bedienungsanleitung
erhalten.
Wenn Sie das Produkt einer anderen Person
übereignen, muss die Bedienungsanleitung zusammen
mit dem Produkt ausgehändigt werden.
Andernfalls kann es zu Unfällen bzw. schweren
Verletzungen kommen.
Vorsorge für den Fall von Verletzungen
Für den unwahrscheinlichen Fall, dass es dennoch zu
Verletzungen kommt, sollten Sie folgende Dinge
vorbereitet haben:
Verbandskasten
Hand- und Wischtücher (um etwaige Blutungen zu
stoppen)
Trillerpfeife oder Mobiltelefon (um Hilfe rufen zu
können)
Wenn Sie weder erste Hilfe leisten noch Hilfe rufen können,
kann sich die Verletzung verschlimmern.
Produkt nur verwenden, wenn es überprüft und
gewartet wurde
Das Produkt darf nur verwendet werden, wenn es
überprüft und gewartet wurde. Die Überprüfung und
Wartung des Produkts muss regelmäßig durchgeführt
werden.
Andernfalls kann es zu Unfällen bzw. schweren
Verletzungen kommen.
8
Page 67
Sichere Verwendung des Produkts
Sicherheitsregeln für die Benutzung
WARNUNG
Anwender des Produkts
Das Produkt darf von folgenden Personen nicht gebraucht
werden:
übermüdete Personen
alkoholisierte Personen
unter Medikamenteneinfluss stehende Personen
schwangere Frauen
Personen in schlechter
körperlicher Verfassung
Personen, die die
Bedienungsanleitung nicht
gelesen haben
Kinder
Eine Nichtbefolgung dieser
Anweisungen kann zu Unfällen führen.
Dieses Produkt erzeugt während des Betriebs
elektromagnetische Felder. Magnetfelder können
Störungen oder Ausfälle bei Herzschrittmachern
verursachen. Um Gesundheitsrisiken zu reduzieren,
empfehlen wir, dass Personen mit Herzschrittmachern vor
dem Betrieb dieses Produkts ihren Arzt und den Hersteller
des Herzschrittmachers konsultieren.
Arbeitsumgebung und Bedienung
Produkt nicht verwenden
In feuchten oder nassen Umgebungen.
bei Regen.
unter schlechten Wetterbedingungen.
Andernfalls kann es zu Unfällen bzw. schweren
Verletzungen kommen.
Verwenden Sie das Produkt nicht an Orten ohne
sicheren Untergrund, etwa an steilen Hängen oder nach
Regengüssen, da solche Stellen rutschig und
gefährlich sind.
Verwenden Sie das Gerät nicht nachts oder an dunklen
Stellen mit schlechten Sichtverhältnissen.
Wenn Sie fallen oder ausrutschen oder das Produkt nicht
mehr voll beherrschen, kann dies zu schweren
Verletzungen führen.
Gefahrenzone im 15-m-Radius
Der Bereich in einem Radius von 15 m rund um dieses
Produkt gilt als Gefahrenzone. Beachten Sie bei der Arbeit
mit diesem Produkt folgende Sicherheitsregeln:
Lassen Sie keine Personen (insbesondere Kinder) oder
Tiere in die Gefahrenzone.
Wenn eine andere Person die Gefahrenzone betritt,
schalten Sie das Gerät aus.
Wenn Sie sich dem Bediener nähern möchten,
signalisieren Sie ihm Ihre Absicht, indem Sie z. B.
Zweige von außerhalb der Gefahrenzone werfen, und
prüfen Sie dann, dass das Gerät abgestellt wurde.
Wenn mehrere Personen mit dem Produkt arbeiten,
vereinbaren Sie eine Art der gegenseitigen
Kommunikation, und arbeiten Sie mit mindestens 15 m
Abstand voneinander.
Ausgeworfene Gegenstände können ernstliche Verletzung
des Bedieners oder Personen in dessen Umfeld
verursachen.
Arbeiten mit dem Produkt
Achten Sie bei der Arbeit mit dem Produkt besonders auf
folgende Sicherheitsanweisungen:
Richten Sie das Rohr nicht auf Menschen oder Tiere.
Arbeiten Sie nicht in Bereichen ohne ausreichenden
Halt.
Halten Sie den Griff fest.
Arbeiten Sie nicht spät nachts oder früh morgens, da
sich Anwohner vom Geräusch gestört fühlen.
Bei Nichtbeachtung dieser Anweisungen kann es zu
Unfällen mit Verletzungsfolge kommen.
Gerät beim Wechsel des Arbeitsorts abstellen
Stellen Sie das Gerät ab, wenn Sie den Arbeitsort
wechseln, wie unten beschrieben.
Sie suchen Ihren Arbeitsbereich auf.
Sie wechseln im Verlauf der Arbeit den Arbeitsbereich.
Sie verlassen Ihren bisherigen Arbeitsbereich.
Bei Nichtbeachtung dieser Sicherheitsregeln können
Verbrennungen oder andere schwere Verletzungen die
Folge sein.
Entfernen Sie den Akku des Geräts zum Transport in
Kraftfahrzeugen, und sichern Sie das Gerät so, dass es
nicht verrutschen kann.
Vorsicht mit dem Gebläse!
Lassen Sie Ihre Haare nicht in das Gebläse gelangen!
Ihre Hand oder Gegenstände können ins Gebläse gesaugt
und schwer verletzt bzw. beschädigt werden.
Vibration und Kälte
Es wird vermutet, dass das Raynaud-Syndrom, das die
Finger mancher Menschen befällt, durch stark vibrierende
Arbeitsgeräte und dem Arbeiten bei Kälte herbeigeführt
wird. Durch stark vibrierende Arbeitsgeräte und das
Arbeiten bei Kälte kann sich ein Prickeln und Brennen
bemerkbar machen, dem sich Farblosigkeit und
Gefühllosigkeit der Finger anschließen.
Die nachstehend aufgeführten Vorkehrungen werden
dringend empfohlen, da die Mindestwerte, bei denen diese
Krankheit ausgelöst wird, nicht bekannt sind.
Halten Sie Ihren Körper warm, insbesondere Kopf und
Nacken, Füße und Fußgelenke sowie Hände und
Handgelenke.
Legen Sie häufige Pausen ein, in deren Verlauf Sie den
Kreislauf durch intensive Armübungen anregen, und
rauchen Sie nicht.
Begrenzen Sie die Dauerbetriebszeiten auf ein
Minimum.
Teilen Sie jeden Arbeitstag so ein, dass auch Arbeiten
ohne Bläser oder tragbare Motorgeräte verrichtet
werden.
Wenn Ihre Finger schmerzen, rot und angeschwollen
sind und schließlich bleich und gefühllos werden,
müssen Sie einen Arzt aufsuchen, bevor Sie sich
weiterhin Kälte und Vibrationen aussetzen.
Eine Nichtbefolgung dieser Anweisung kann zu
gesundheitlichen Schäden führen.
9
Page 68

Sichere Verwendung des Produkts
WARNUNG
RSI-Syndrom
Es wird angenommen, dass eine Überanstrengung der
Muskeln und Sehnen der Finger, Hände, Arme und
Schultern in den betreffenden Körperteilen Schmerzen,
Schwellungen, Gefühllosigkeit, Schwäche und auch
akuten Schmerz verursachen kann. Durch bestimmte
ständig wiederholte Handbewegungen steigt das Risiko
für die Entwicklung eines RSI-Syndroms.
Auf folgende Art mindern Sie das Risiko des RSISyndroms:
Achten Sie darauf, dass Sie Ihr Handgelenk nicht zu
sehr beugen, strecken oder verdrehen.
Legen Sie von Zeit zu Zeit Pausen ein, um wiederholte
Bewegungen zu minimieren, und lassen Sie Ihre Hände
ruhen. Reduzieren Sie die Geschwindigkeit und den
Kraftaufwand, mit denen Sie die
Wiederholungsbewegung ausführen.
Führen Sie geeignete Übungen zur Stärkung der Hand-
und Armmuskulatur durch.
Suchen Sie einen Arzt auf, wenn Sie ein Prickeln,
Gefühllosigkeit oder Schmerzen in Ihren Fingern,
Händen, Handgelenken oder Armen bemerken. Je
früher das RSI-Syndrom erkannt wird, desto eher lässt
sich eine dauerhafte Schädigung von Nerven und
Muskeln verhindern.
Eine Nichtbefolgung dieser Anweisung kann zu
gesundheitlichen Schäden führen.
Bei Problemen oder Auffälligkeiten das Gerät sofort
abstellen
Schalten Sie das Gerät sofort aus, wenn das Produkt
plötzlich ungewohnte Geräusche erzeugt oder zu
vibrieren beginnt. Unter diesen Umständen darf das
Produkt nicht betrieben werden.
Wenden Sie sich bei anfallenden Reparaturen an Ihren
ECHO-Händler.
Wenn beschädigte Teile weiter verwendet werden, kann
dies zu Unfällen bzw. schweren Verletzungen führen.
Das Gerät zur Prüfung und Wartung ausschalten
Beachten Sie die folgenden Sicherheitsregeln, wenn Sie
das Produkt nach dem Gebrauch überprüfen und warten:
Schalten Sie das Gerät aus, entfernen Sie den Akku,
und stellen Sie sicher, dass alle beweglichen Teile zum
Stillstand gekommen sind.
Wenn sich das Produkt unerwarteterweise in Betrieb setzt,
kann es zu Unfällen kommen.
Lassen Sie das Gerät abkühlen, bevor Sie
Wartungsarbeiten durchführen.
Andernfalls können Sie sich verbrennen.
Anweisungen zum Trennen des Akkus
Wenn die Maschine nicht mehr betrieben wird.
Vor dem Entfernen einer Verstopfung.
Vor dem Prüfen, Reinigen oder Arbeiten an der
Maschine.
Nach dem Kontakt mit einem Fremdkörper, um die
Maschine auf Beschädigungen zu prüfen.
Wenn die Maschine abnormal zu vibrieren beginnt, zur
sofortigen Überprüfung.
Wenn sich das Produkt unerwarteterweise in Betrieb setzt,
kann es zu Unfällen kommen.
10
Page 69

Sichere Verwendung des Produkts
Schutzausrüstung
WARNUNG
Schutzausrüstung tragen
Tragen Sie bei Arbeiten mit dem Bläser angemessene
Arbeitskleidung und eine Schutzausrüstung. Tragen
Sie bei der Arbeit vor allem stets eine Schutzbrille und
eine Staubschutzmaske.
Ohne Schutzausrüstung besteht die Gefahr, dass
aufgewirbelte Schmutzpartikel in Atemwege oder Augen
gelangen, was zu Unfällen und Verletzungen führen kann.
a Schutzbrille: schützt die Augen
b Staubmaske: Atemschutz
c Sicherheitshandschuhe: schützen die Hände vor Kälte
und Vibration
d Eng anliegende Kleidung (lange Ärmel, lange Hosen):
schützt den Körper
e Robuste Schuhe oder Stiefel: schützen die Füße
Bei Nichtbeachtung dieser Sicherheitsvorkehrungen sind Ihr
Augenlicht und Ihr Gehör gefährdet, und es drohen andere
schwere Verletzungen.
Falls erforderlich, verwenden Sie auch folgende
Schutzausrüstung:
Kopfschutz (Helm): schützt den Kopf
Gehörschutzbügel oder Ohrenstöpsel: Gehörschutz
Bienennetz: Insektenschutz
Geeignete Kleidung tragen
Tragen Sie keine Krawatten, Schmuckstücke oder lose, weite
Kleidungsstücke, die sich im Gerät verfangen könnten. Tragen Sie keine
offenen Schuhe, und arbeiten Sie nicht barfuß oder in kurzen Hosen.
Bei Nichtbeachtung dieser Sicherheitsvorkehrungen besteht Unfallgefahr und
die Gefahr schwerer Verletzungen.
11
Page 70

Packliste
Die nachfolgend aufgeführten Einzelteile sind in der Verpackung enthalten.
Überprüfen Sie nach dem Auspacken die Vollständigkeit des Inhalts.
Wenden Sie sich an Ihren Händler, wenn Teile fehlen oder beschädigt sind.
Nummer Bezeichnung des Teils Menge
(1) Motoreinheit 1
(2) Rohr 1
Packliste
(3) Runde gerade Düse 1
(4) Bedienungsanleitung 1
Nummer Bezeichnung des Teils Menge
(5) Akku 1
(6) Bedienungsanleitung 1
(7) Ladegerät 1
(8) Bedienungsanleitung 1
12
Page 71

Beschreibung
Beschreibung
1. Ein/Aus-Knopf Ein Mal drücken, um die Stromzufuhr zu
dem Gerät einzuschalten – die Betriebsanzeige-LED
leuchtet. Wieder drücken, um die Stromzufuhr zu dem
Gerät auszuschalten – die Betriebsanzeige-LED geht
aus.
2. Betriebsanzeige-LED Leuchtet, wenn das Gerät Strom
erhält. Geht aus, wenn die Stromzufuhr zum Gerät
unterbrochen wird.
3. Hebelschalter Schaltet den Motor ein und wird vom
Bediener mit dem Finger betätigt.
4. Leerlaufsteller Ziehen Sie ihn nach hinten, um die
Motordrehzahl zu erhöhen.
5. Motoreinheit
6. Akku
7. Gehäuseabdeckung Deckt die Gebläsefläche ab.
8. Seriennummernschild Gibt Auskunft über Modell- und
Seriennummer des Geräts.
9. Blasrohre Exklusive, kraftschlüssige Steckverbindungen.
13
Page 72
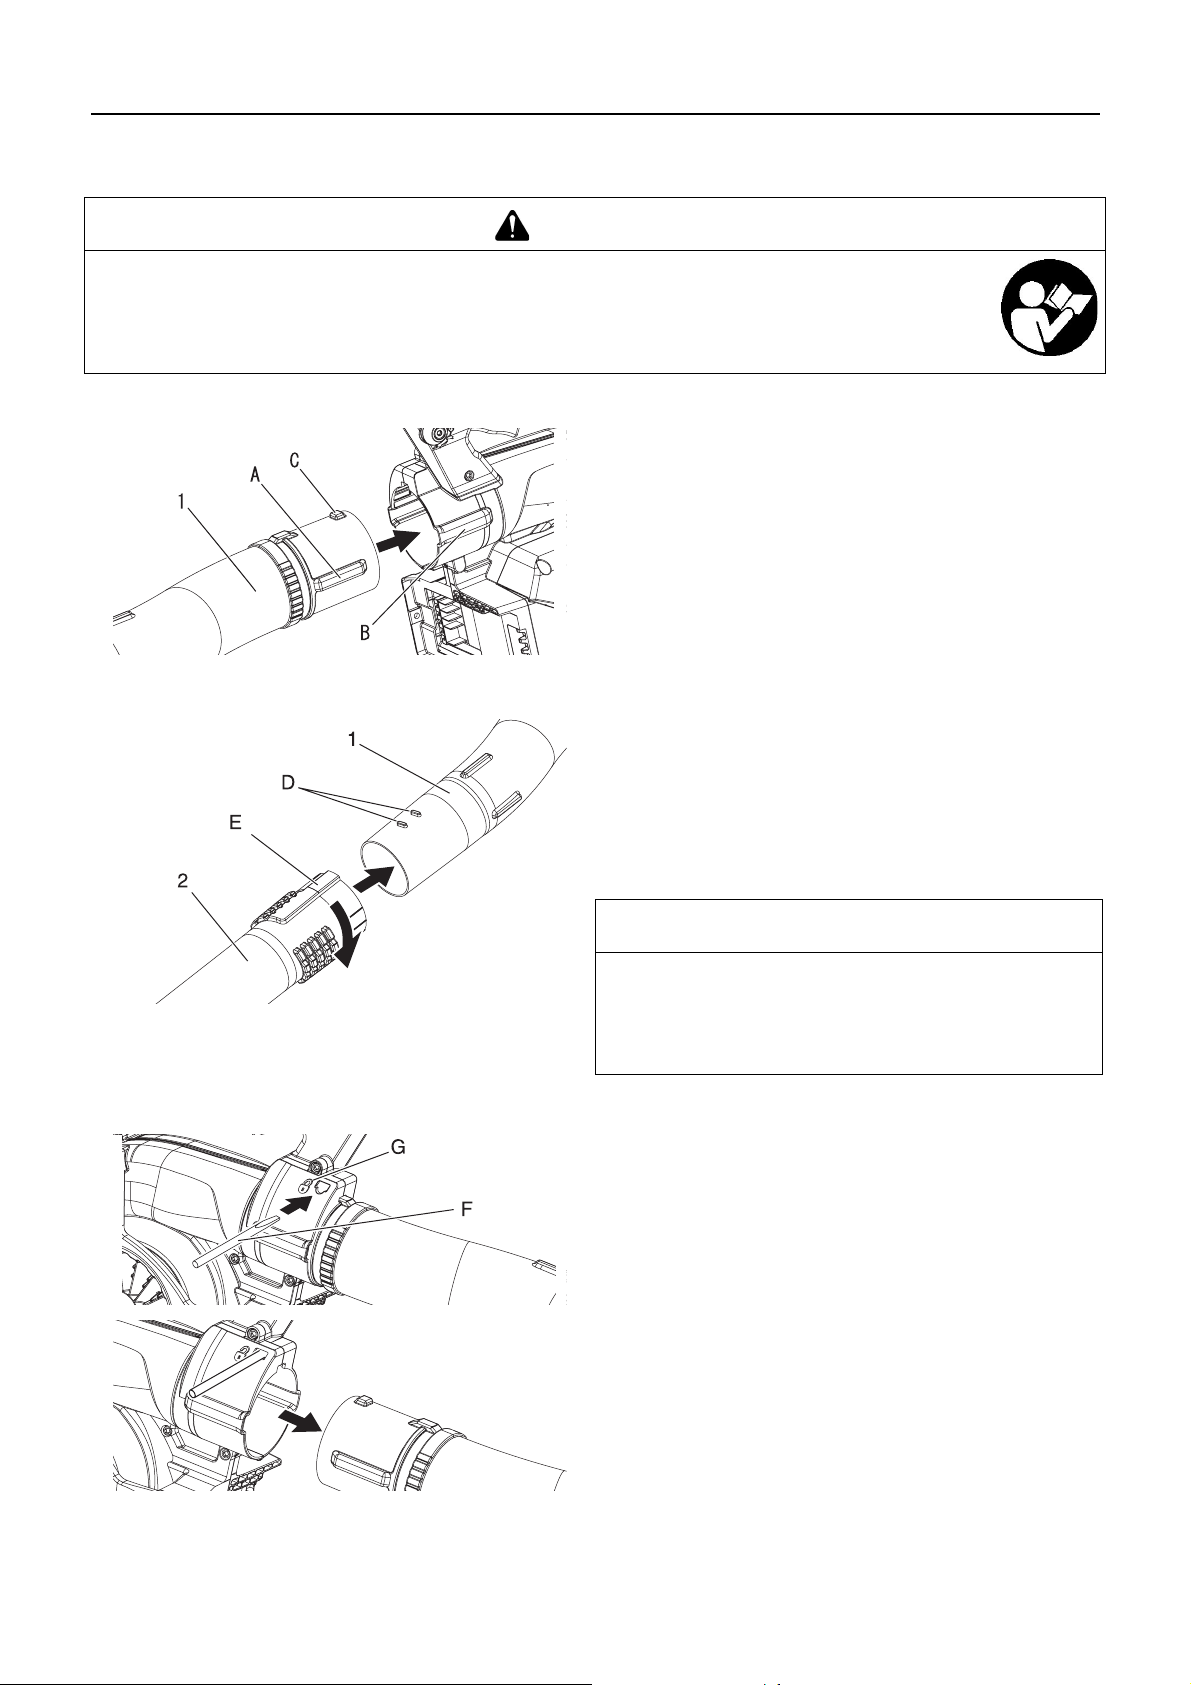
Bevor Sie beginnen
Bevor Sie beginnen
Zusammenbau
WARNUNG
Lesen Sie die Bedienungsanleitung aufmerksam durch, um sicherzustellen, dass Sie das Produkt
korrekt zusammenbauen.
Führen Sie bei laufendem Gerät niemals Wartungs- oder Einbauarbeiten durch.
Die Verwendung eines falsch zusammengebauten Produkts kann zu Unfällen bzw. schweren Verletzungen
führen.
Montage der Rohre
1. Stellen Sie das Gerät aufrecht ab.
2. Richten Sie die Verriegelungsnasen (A) am Rohr auf die
Aussparungen (B) im Gebläsegehäuse aus. Stellen Sie
sicher, dass die Verriegelungsnase (C) nach oben zeigt.
Schieben Sie das Rohr in das Gebläsegehäuse, bis es
hörbar einrastet.
1. Rohr
1. Rohr 2. Runde gerade Düse
Entfernen der Rohre
3. Richten Sie die Passfedern (D) auf die Nuten (E) aus, und
schieben Sie die runde gerade Düse auf das Rohr, bis Sie
einen leichten Widerstand spüren. Wenden Sie keine
Gewalt an!
4. Halten Sie das Rohr fest und drehen Sie die runde gerade
Düse im Uhrzeigersinn, bis die Verbindung einrastet.
Wenden Sie keine Gewalt an!
HINWEIS
Durch die Anwendung des Bläsers lockern sich die
Verbindungen mit der Zeit. Die exklusive, formschlüssige
Verbindung hält die Rohre fest zusammen. Sollten sich die
Verbindungen lösen, bauen Sie die runde gerade Düse aus
und wie in Schritt 3 und 4 beschrieben wieder ein.
1. Führen Sie einen Schraubendreher (F) in die Öffnung neben
dem Verriegelungssymbol (G) ein, um die Rohrverriegelung
freizugeben.
2. Ziehen Sie die Rohre aus dem Gebläsegehäuse heraus.
3. Entfernen Sie den Schraubendreher.
14
Page 73
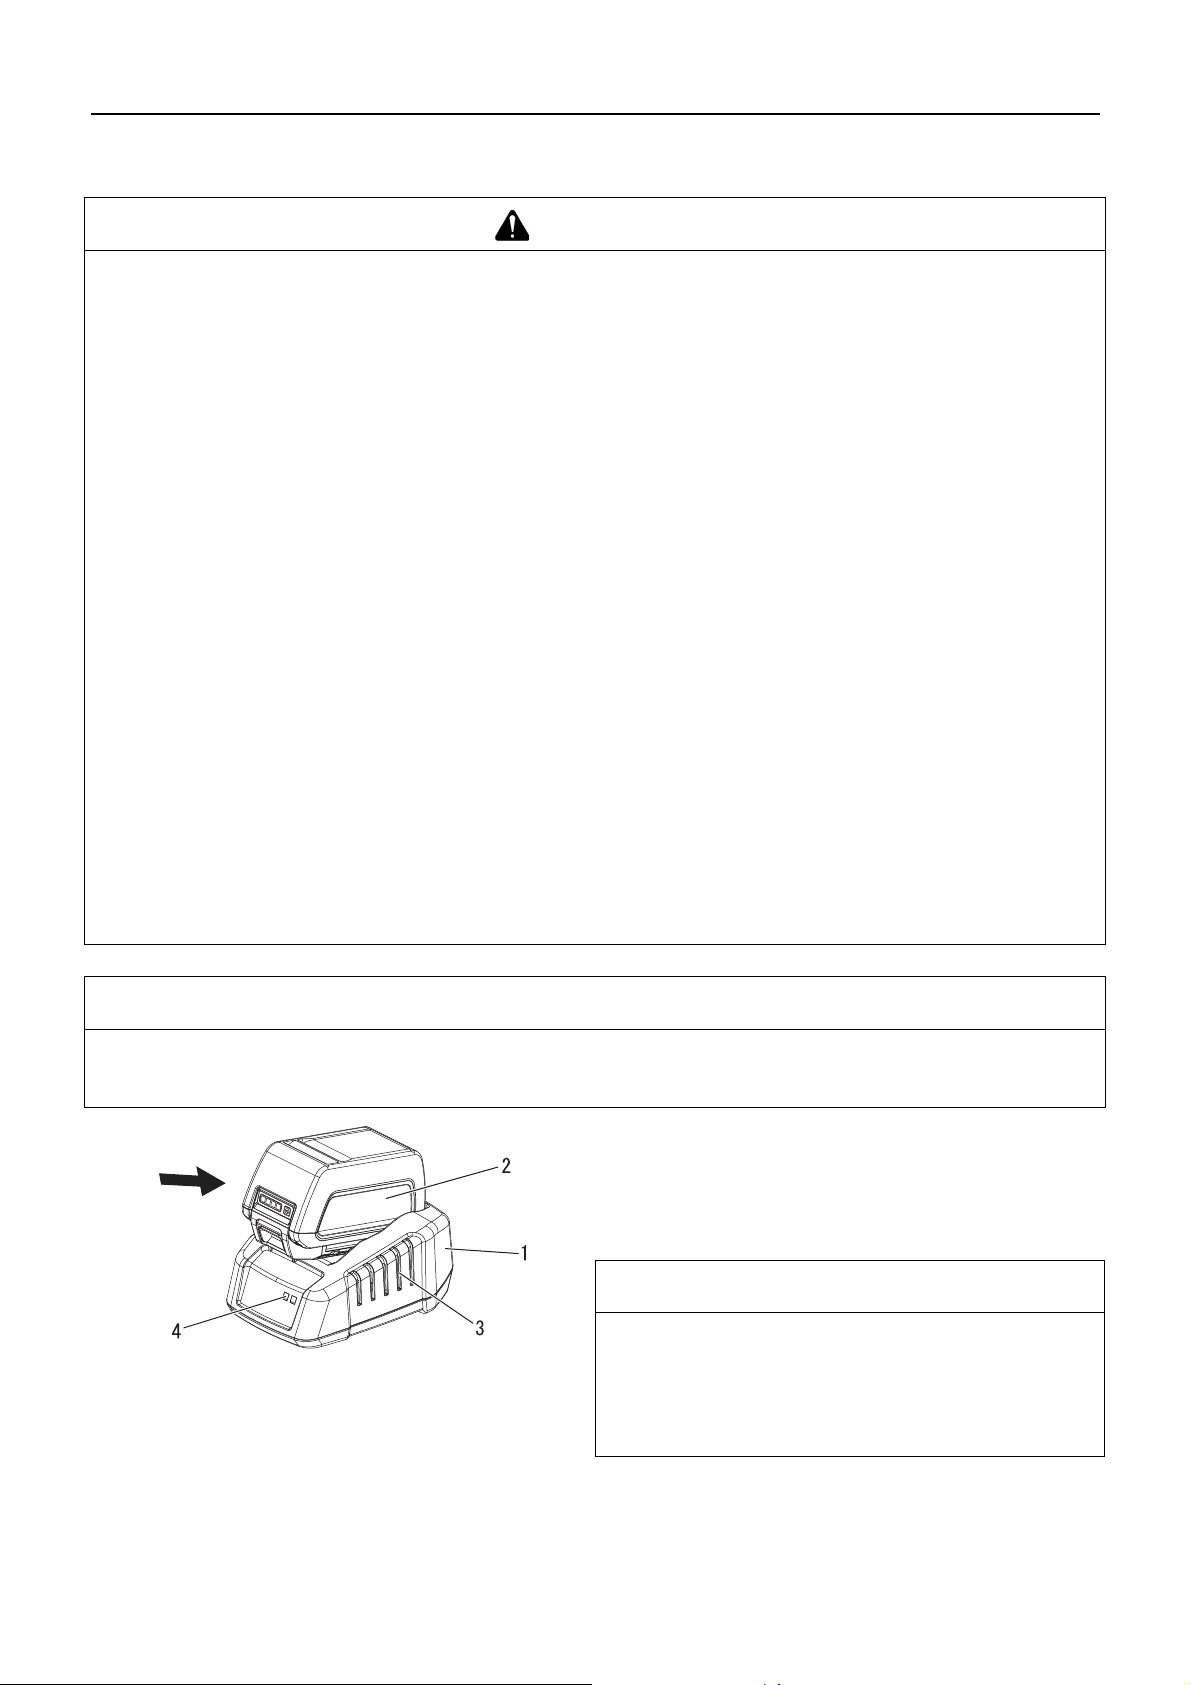
Bevor Sie beginnen
Ladung der Batterie
WARNUNG
Verwenden Sie nur den Akku LBP-560-100/LBP-560-200/LBP-560-900, und laden Sie diesen nur mit dem Ladegerät
LCJQ-560.
Halten Sie Ladegerät und Akku fern von Feuchtigkeit und allen Flüssigkeiten.
Verwenden Sie das Ladegerät nicht auf leicht brennbaren Materialien (z. B. Papier, Stoff) und nicht in einer
Umgebung mit erhöhter Brandgefahr.
Bedecken Sie das Ladegerät nicht. Ist das Ladegerät bedeckt, kann es nicht kühlen.
Verwenden Sie das Ladegerät nicht in explosiven Umgebungen, wie in der Gegenwart von entflammbaren
Flüssigkeiten, Gasen oder Staub. Ladegeräte können Funken verursachen, die Staub oder Rauch entzünden können
– es besteht Explosionsgefahr.
Schließen Sie das Ladegerät nur an das Netz an, wenn Spannung und Frequenz mit den Angaben auf dem
Typenschild übereinstimmen.
Schließen Sie das Ladegerät nur an eine leicht zugängliche Steckdose an.
Stecken Sie nie Gegenstände in die Kühlschlitze des Akkus oder des Ladegeräts.
Defekte, beschädigte oder verformte Akkus oder Ladegeräte dürfen nicht geladen oder verwendet werden.
Der Akku und das Ladegerät dürfen nicht geöffnet, beschädigt oder fallengelassen werden.
Aus dem Akku kann Flüssigkeit austreten, wenn er beschädigt ist oder nicht ordnungsgemäß verwendet wird. Den
Hautkontakt vermeiden. Bei versehentlichem Kontakt die betroffenen Bereiche der Haut mit viel Wasser und Seife
abwaschen. Wenn Flüssigkeit in die Augen gerät, die Augen nicht reiben. Spülen Sie die Augen mindestens 15
Minuten lang mit viel Wasser. Suchen Sie auch einen Arzt auf.
Überbrücken Sie die Kontakte des Akkus oder die Klemmen des Ladegeräts nie mit Metallgegenständen
(Kurzschluss).
Schützen Sie den Akku vor direkter Sonneneinstrahlung, Hitze und offenem Feuer, und werfen Sie ihn nie in ein
Feuer; es besteht Explosionsgefahr.
Falls Rauch oder Flammen aus dem Ladegerät aufsteigen, ziehen Sie sofort den Stecker aus der Steckdose.
Ist das Verbindungskabel beschädigt, ziehen Sie unverzüglich den Stecker aus der Steckdose, um Stromschläge zu
verhindern.
Setzen Sie den Akku nie Mikrowellen oder hohem Druck aus.
Sichern Sie das Gerät gegen unbeabsichtigtes Starten. Nehmen Sie zum Transport und zur Lagerung des Geräts den
Akku heraus. Verwenden Sie keine Metallcontainer für den Transport von Akkus.
Um die Stolpergefahr zu beschränken, bringen Sie das Verbindungskabel so an und markieren Sie es so, dass es
nicht beschädigt werden kann und keine Gefahr für andere darstellt.
HINWEIS
Der neue Akku wird teilgeladen geliefert und muss vor dem ersten Gebrauch voll geladen werden.
Laden Sie den Akku, wenn die Leistung nicht mehr für den Betrieb des Geräts ausreicht, oder wenn die Lampen am Akku
anzeigen, dass der Akku schwach ist.
1. Stecken Sie das Wechselstromkabel des Ladegeräts in die
Netzsteckdose.
2. Richten Sie die Ränder des Akkus an den Nuten am
Ladegerät aus und schieben Sie den Akku in das Ladegerät.
3. Während des normalen Ladevorgangs blinkt die LadegerätLED GRÜN.
WICHTIG
Wenn das Ladegerät ein Problem erkennt, blinkt die LED
ROT auf. Entfernen Sie den Akku aus dem Ladegerät,
1. Ladegerät
2. Akku
3. Kühlschlitze
4. Ladegerät-LED
entfernen Sie Schmutz o. ä. von den Kontakten und
installieren Sie den Akku wieder im Ladegerät. Wenn der
Akku einer Temperatur ausgesetzt ist, die außerhalb des
zulässigen Bereichs (0 bis 60 °C) liegt, bleibt die LED ROT.
15
Page 74

Bevor Sie beginnen
1. Akku
2. Akkuladezustand-Taste
Einsetzen und Entfernen des Akkus
3. LED-Anzeige
4. Nach beendeter Ladung leuchtet die LED konstant GRÜN.
∗ Ein vollständig entladener Akku lädt in etwa 42 Minuten.
(LBP-560-100)
∗ Ein vollständig entladener Akku lädt in etwa 88 Minuten.
(LBP-560-200)
∗ Ein vollständig entladener Akku lädt in etwa 336 Minuten.
(LBP-560-900)
5. Prüfen Sie, ob der Akku vollständig geladen ist, indem Sie
den Akku aus dem Ladegerät nehmen, die
Akkuladezustand-Taste drücken und die LED-Anzeige
beobachten.
Ein grünes Licht bedeutet, dass der Akku 0 bis 25 %
Ladung hat.
Zwei grüne Lichter bedeuten, dass der Akku 25 bis 50 %
Ladung hat.
Drei grüne Lichter bedeuten, dass der Akku 50 bis 75 %
Ladung hat.
Vier grüne Lichter bedeuten, dass der Akku 75 bis 100 %
Ladung hat.
6. Trennen Sie das Akkuladegerät vom Netz.
WARNUNG
Der Laubbläser funktioniert, wenn der Akku installiert ist, und die Betriebsanzeige-LED leuchtet. Achten Sie darauf, dass der
Laubbläser richtig positioniert ist, damit Sie nicht die Kontrolle verlieren – es besteht schwere Verletzungsgefahr.
HINWEIS
Der neue Akku wird teilgeladen geliefert und muss vor dem ersten Gebrauch voll geladen werden.
Einsetzen des Akkus
1. Lassen Sie den Hebelschalter los und bewegen Sie den
Leerlaufsteller ganz nach vorne bis zum Anschlag.
2. Kontrollieren Sie, dass die Stromzufuhr zum Gerät
unterbrochen ist.
3. Richten Sie die Rippen am Akku auf die Nut am Laubbläser
aus, und schieben Sie den Akku ein, bis die
Akkuverriegelung einrastet.
1. Akku
2. Rippe
3. Akkuverriegelung
WICHTIG
Bevor Sie den Laubbläser gebrauchen, kontrollieren Sie,
dass der Akku ganz eingeschoben und die
Akkuverriegelung eingerastet ist.
1. Eingerastet
2. Nicht eingerastet
3. Akkuverriegelung
4. Akku
HINWEIS
Die Akkuverriegelung rastet ein, wenn der Akku ganz
eingeschoben ist.
16
Page 75

1. Akku 2. Akkuverriegelung
Bevor Sie beginnen
Entnehmen des Akkus
1. Zum Entnehmen des Akkus drücken Sie auf die
Akkuverriegelung und schieben den Akku aus dem
Laubbläser.
17
Page 76

Starten und Stoppen
Starten und Stoppen
Starten des Geräts
WARNUNG
Beachten Sie beim Starten des Geräts die Sicherheitsregeln und Hinweise für den sicheren Betrieb und die richtige
Handhabung des Produkts ab der Seite 4 im Abschnitt „Sichere Verwendung des Produkts“.
Eine Nichtbefolgung der Sicherheitsregeln kann zu Unfällen, Verletzungen oder sogar zum Tod führen.
1. Bewegen Sie den Leerlaufsteller ganz nach vorn bis zum
Anschlag.
2. Drücken Sie den Ein/Aus-Knopf ein Mal, um die Stromzufuhr
zu dem Gerät einzuschalten.
HINWEIS
Die Betriebsanzeige-LED leuchtet, wenn das Gerät Strom
1. Leerlaufsteller
erhält.
3. Betätigen Sie den Hebelschalter, um die Drehzahl zu
erhöhen.
1. Ein/Aus-Knopf
2. Betriebsanzeige-LED
Stoppen des Geräts
1. Hebelschalter
2. Leerlaufsteller
3. Hebelschalter
3. Ein/Aus-Knopf
4. Betriebsanzeige-LED
WICHTIG
Wenn die Stromzufuhr zu dem Gerät eingeschaltet ist:
Nach einer Minute Inaktivität schaltet sich das Gerät von
selbst aus.
Wenn die LED anbleibt, ist der Betrieb normal.
Wenn die LED ein Mal pro Sekunde blinkt, ist der Akku
ladebedürftig.
Wenn die LED vier Mal pro Sekunde blinkt, liegt in dem
Produkt eine Störung vor. Schalten Sie die Stromzufuhr zu
dem Gerät aus. Entnehmen Sie den Akku. Räumen Sie das
Gebläse frei. Setzen Sie den Akku ein. Schalten Sie die
Stromzufuhr zu dem Gerät ein. Wenn die LED wieder blinkt,
lassen Sie das Produkt von Ihrem autorisierten
Kundendiensthändler reparieren.
1. Leerlaufsteller
Lassen Sie den Hebelschalter los und bewegen Sie den
Leerlaufsteller ganz nach vorne bis zum Anschlag, damit der
Bläser stoppt.
2. Drücken Sie den Ein/Aus-Knopf, um die Stromzufuhr zu
dem Gerät auszuschalten.
HINWEIS
Die Betriebsanzeige-LED geht aus, wenn die Stromzufuhr
zum Gerät unterbrochen wird.
∗ Wenn der Ein/Aus-Knopf den Bläser nicht stoppt, bauen Sie
den Akku aus, um die Stromzufuhr zum Bläser zu
unterbrechen. Lassen Sie den Ein/Aus-Knopf von Ihrem
autorisierten ECHO-Kundendiensthändler reparieren, bevor
Sie den Bläser wieder in Betrieb nehmen. Wenn der Bläser
nicht stoppt, wenn der Hebelschalter losgelassen und der
Leerlaufsteller ganz nach vorne bis zum Anschlag bewegt
wurde, entfernen Sie den Akku, um die Stromzufuhr zum
Bläser zu unterbrechen. Lassen Sie das Gerät vor dem
Wiedergebrauch von Ihrem autorisierten ECHOKundendiensthändler reparieren.
18
Page 77

Betrieb
Betrieb
Betrieb des Bläsers
WARNUNG
Tragen Sie immer eine Schutzbrille, und treffen Sie alle Sicherheitsvorkehrungen, da es sonst zu schweren
Verletzungen kommen kann. Richten Sie das Rohr nicht auf Menschen oder Tiere.
WICHTIG
Um Motorschäden zu vermeiden, blockieren Sie nicht die Rohröffnung des Bläsers. Lassen Sie den Bläser niemals ohne
montiertes Rohr laufen.
HINWEIS
Stellen Sie die Drehzahl nie höher ein als notwendig. Je höher die Drehzahl, desto größer die Geräuschentwicklung. Minimieren
Sie Staubentwicklung, indem Sie das Gebläse mit niedriger Drehzahl betreiben. Achten Sie darauf, dass Schmutz auf Ihrem
Grundstück bleibt. Nehmen Sie klugerweise Rücksicht auf Ihre Nachbarn.
Lesen Sie den Abschnitt „Sicherheit“ sorgfältig durch.
1. Arbeiten Sie stets zu angemessener Tageszeit.
2. Regeln Sie die Bläserdrehzahl mithilfe des Hebelschalter s
oder stellen Sie die Bläserzahl für Dauerbetrieb mithilfe des
Leerlaufstellers ein. Bewegen Sie den Leerlaufsteller nach
vorn, um die Drehzahl zu verringern, und nach hinten, um
sie zu erhöhen.
1. Leerlaufsteller 2. Hebelschalter
1. Gerades Rohr 2. Metallschutzring
3. Blasen Sie trockenes Gras und Laub auf Wegen, in
Innenhöfen und Auffahrten mit niedriger Drehzahl
zusammen.
4. Zum Entfernen von feuchtem Laub von Rasenflächen oder
aus Blumenbeeten sind meist etwas höhere Drehzahlen
erforderlich.
5. Bei Kies, Schmutz, Schnee, Flaschen oder Dosen auf
Auffahrten, Straßen, Parkplätzen oder im Umfeld von
Stadien müssen höhere Drehzahlen eingestellt werden.
6. Wenn Sie in der Nähe von Häusern arbeiten, richten Sie den
Luftstrom nicht in die Richtung von Fenstern. Dadurch
könnte Schmutz in die Innenräume geblasen werden.
7. Schmutzmaterial kann mit einer Harke gelöst oder
aufgebrochen werden, sodass es einfacher zu bewegen ist.
8. Befeuchten Sie staubige Flächen, bevor Sie das
Schmutzmaterial bewegen, um das Aufwirbeln von Staub zu
vermeiden.
9. Halten Sie das Gerät immer durch Anhalten des Motors an.
VORSICHT
Der Kontakt zwischen der Spitze des gerade Rohrs und
abreibenden Oberflächen kann scharfe Schnitte auf der
Oberfläche und bei Berührung Verletzungen verursachen. Die
Spitze des geraden Rohrs beim Betrieb oder Transport des
Geräts nicht schleifen lassen und nicht mit ihr schaben. Die
gesamte Baugruppe, gerades Rohr muss ausgetauscht
werden, wenn der Metallring verschlissen, gerissen oder
verzogen ist.
19
Page 78

Betrieb
Leerlaufsteller
WARNUNG
Bevor Sie einen Akku am Bläser anschließen, bewegen Sie den Leerlaufsteller immer ganz nach vorn bis zum Anschlag
(Stopp-Position). Ein Nichtbeachten dieses Verfahrens führt dazu, dass der Bläser in der Stopp-Position versehentlich
gestartet werden kann, was zu schweren Verletzungen führen. Blockieren Sie den Gashebel nicht in Anwendungen, bei
denen der Bläser möglicherweise plötzlich gestoppt werden muss.
1. Bewegen Sie den Leerlaufsteller zur Rückseite des Bläsers
und in die Stellungen STOPP oder langsame oder schnelle
Drehzahl.
2. Der Bläser läuft weiter mit der ausgewählten Drehzahl.
3. Um den Bläser zu stoppen, bewegen Sie den Leerlaufsteller
ganz nach vorne (Stopp-Position).
HINWEIS
Wenn der Leerlaufsteller während des Gebrauchs
eingeschaltet und der Akku vom Werkzeug entfernt wird,
1. Leerlaufsteller
2. Bläser Stopp
3. Langsame Drehzahl
4. Hohe Drehzahl
schalten Sie den Leerlaufsteller sofort aus.
20
Page 79

Wartung und Pflege
Wartung und Pflege
Wartungsrichtlinien
Komponente Wartung Seite Vor der Verwendung Monatlich
Akku Überprüfen/reinigen/laden 21 •
Gehäuse-Abdeckung Überprüfen / reinigen 21 •
Schrauben, Bolzen und
Muttern
Überprüfen/festziehen/ersetzen - •
WICHTIG
Angegeben sind die maximalen Zeitabstände. Die Häufigkeit der erforderlichen Wartungsarbeiten richtet sich nach der
tatsächlichen Beanspruchung und Ihrer Erfahrung.
Wartung und Pflege
Bei Fragen oder Problemen wenden Sie sich bitte an Ihren ECHO-Händler.
Reinigen von Akku und Akkufach
WARNUNG
Stromschlag- und Brandgefahr. Verwenden Sie zum
Reinigen des Akkus und des Akkufachs keine leitenden
Materialien.
1. Lassen Sie den Hebelschalter los und bewegen Sie den
Leerlaufsteller ganz nach vorne bis zum Anschlag, und
warten Sie, bis der Bläser ausgeschaltet wird.
2. Kontrollieren Sie, dass die Betriebsanzeige-LED aus ist.
1. Akku
2. Akkuverriegelung
3. Akkufach
3. Drücken Sie auf die Akkuentriegelung, und schieben den
Akku aus dem Bläser.
4. Entfernen Sie Schmutz von Akku und Akkufach mit Druckluft
oder einen weichen Bürste.
Reinigen der Gehäuse-Abdeckung
1. Gehäuse-Abdeckung
Entfernen Sie jegliche Verschmutzungen inklusive Laub, das
die Gehäuse-Abdeckung verstopfen kann.
WICHTIG
Entfernen Sie nicht die Gehäuse-Abdeckung. Fragen Sie bei
Bedarf bitte Ihren Händler um Rat.
21
Page 80

Wartung und Pflege
Fehlerbehebung
Problem Ursache Lösung
Rote Ladegerätlampe blinkt oder Lampe leuchtet
nicht auf
Gerät lässt sich nicht einschalten Akku ist nicht korrekt installiert Prüfen Sie den Einbau des Akkus.
Gerät läuft nicht, obwohl es eingeschaltet ist Akku entladen Laden Sie den Akku.
Stecker nicht mit der
Steckdose verbunden
Akku ist nicht korrekt installiert Prüfen Sie den Einbau des Akkus.
Schlechter Kontakt Bauen Sie den Akku aus und mit
Fehler im Ladegerät Wenden Sie sich an Ihren ECHO-
Fehler im Akku Wenden Sie sich an Ihren ECHO-
Stecken Sie das Ladegerät ein.
gereinigten Kontakten wieder ein.
Händler.
Händler.
Akkutemperatur zu hoch oder
zu niedrig
Laufzeit ist zu kurz Akkutemperatur zu hoch oder
zu niedrig
Geräteelektronik zu heiß Schalten Sie das Gerät aus, und
Akku entladen Laden Sie den Akku.
Gerät läuft, bläst aber nur schwach oder gar nicht Bläserrohr verstopft Verstopfung beseitigen
Bläserrohr locker Rohr festziehen
Bläserrohr beschädigt Rohr ersetzen
Lufteinlass verstopft Verstopfung beseitigen
Fehler im Gebläse Wenden Sie sich an Ihren ECHO-
Gerät vibriert stark Fehler an internen Teilen Wenden Sie sich an Ihren ECHO-
Für die Überprüfung und Wartung sind entsprechende Fachkenntnisse erforderlich. Wenn Sie das Produkt nicht selbst
überprüfen, warten oder instand setzen können, wenden Sie sich an Ihren ECHO-Händler. Versuchen Sie nicht, das Produkt
zu zerlegen.
Bei Problemen oder Störungen, die nicht in der obigen Tabelle genannt werden, wenden Sie sich an Ihren Händler.
Verwenden Sie nur Original-Ersatzteile und -Verbrauchsprodukte, die für das Produkt zugelassen sind. Die Verwendung von
Teilen anderer Hersteller oder nicht zugelassener Produkte kann zu Fehlfunktionen führen.
Bauen Sie den Akku aus, und
lassen Sie den Akku abkühlen.
Bauen Sie den Akku aus, und
lassen Sie den Akku abkühlen.
lassen Sie das Gerät abkühlen.
Händler.
Händler.
22
Page 81

Wartung und Pflege
LAGERUNG
WARNUNG
Lagern Sie das Gerät nicht in einem Raum, in dem sich brennbare Dämpfe sammeln können.
Es besteht Brandgefahr.
Gehen Sie folgendermaßen vor, wenn Sie das Produkt lange Zeit lagern möchten:
Akku-Laubbläser
Lagern Sie das Gerät nicht ein, ohne zuvor die folgenden
schützenden Wartungsmaßnahmen durchgeführt zu haben:
1. Schalten Sie die Stromzufuhr zu dem Gerät aus.
2. Entfernen Sie den Akku aus dem Bläser.
3. Entfernen Sie Ansammlungen von Schmutz und
Fremdstoffen außen an dem Gerät.
4. Ziehen Sie alle Schrauben und Muttern fest.
5. Gebläserohr komplett vom Gerät abnehmen.
6. Verschließen Sie das Akkufach des Bläsers.
7. Lagern Sie die Maschine an einem trockenen, staubfreien
1. Akkufach
Ort.
Akku
1. Entfernen Sie den Akku aus dem Bläser.
2. Wählen Sie für die Lagerung einen trockenen, staubfreien
und für Kinder unzugänglichen Ort.
3. Die Lagerung soll bei Temperaturen zwischen –20 °C und
60 °C erfolgen.
4. Wenn der Akku länger als ein Jahr gelagert wird, laden Sie
ihn auf ca. 40 bis 60 % seiner Ladekapazität.
Akkuladegerät
1. Entnehmen Sie den Akku aus dem Akkuladegerät.
2. Trennen Sie das Akkuladegerät vom Netz.
3. Lagern Sie ihn an einem trockenen, staubfreien Ort.
23
Page 82

Wartung und Pflege
Entsorgung
Auf den größeren Kunststoffteilen des Produkts befindet sich
jeweils eine Kennzeichnung (Code) des Werkstoffs.
Diese Codes beziehen sich auf die folgenden Werkstoffe;
entsorgen Sie diese Kunststoffteile unter Einhaltung der
gesetzlichen Vorschriften Ihres Landes.
Kennzeichnung Werkstoff
>PA6-GF< Nylon 6 – Glasfaser
>PP-GF< Polypropylen – Glasfaser
>PE-HD< Polyethylen
Der Akku enthält Lithium. Nur an den dafür vorgesehenen
Sammelstellen entsorgen.
Lithium-Ionen-Akkus müssen korrekt entsorgt werden.
Wenn Sie Fragen zur korrekten Entsorgung von Altöl oder
Kunststoffteilen haben, setzen Sie sich bitte mit Ihrem ECHOFachhändler in Verbindung.
24
Page 83

Technische Daten
Technische Daten
DPB-600
Gewicht:
mit Bläserrohr, ohne Akku kg 3,2
mit Bläserrohr, mit Akku kg 5,0
Außenmaße: (ohne Rohre):
Länge mm 353
Breite mm 187
Höhe mm 336
Luftvolumen: m
Maximale Luftgeschwindigkeit: m/s 72,5
Akku:
Typ Li-Ion
Akkuspannung V 56 (bemessen 50,4)
Ladegerättyp CCCV
Ladegeräteingangsspannung V AC 230 – 240
Akkuladegerätlampen: Rote LED – Akku nicht im Ladetemperaturbereich
3
/h 648
Rote LED blinkt – Fehler
Grüne LED – Akku fertig geladen
Grüne LED blinkt – Akku lädt normal
Ladezeit: Akku LBP-560-100: Circa 42 Minuten
Akku LBP-560-200: Circa 88 Minuten
Akku LBP-560-900: Circa 336 Minuten
Schalldruckpegel: (EN 50636-2-100) dB (A) 81,9
Schallleistungspegel: (EN 50636-2-100) dB (A) 94
Unsicherheit dB (A) 3
Schwingungspegel: (EN 50636-2-100) m/s² 0,7
Unsicherheit: K m/s² 1,5
Änderungen der technischen Daten vorbehalten.
Der deklarierte Vibrationsgesamtwert wurde nach einem Standardprüfverfahren ermittelt und kann zum Vergleich der Geräte
untereinander herangezogen werden.
Der deklarierte Vibrationsgesamtwert kann außerdem zur vorläufigen Beurteilung der Exposition herangezogen werden.
25
Page 84
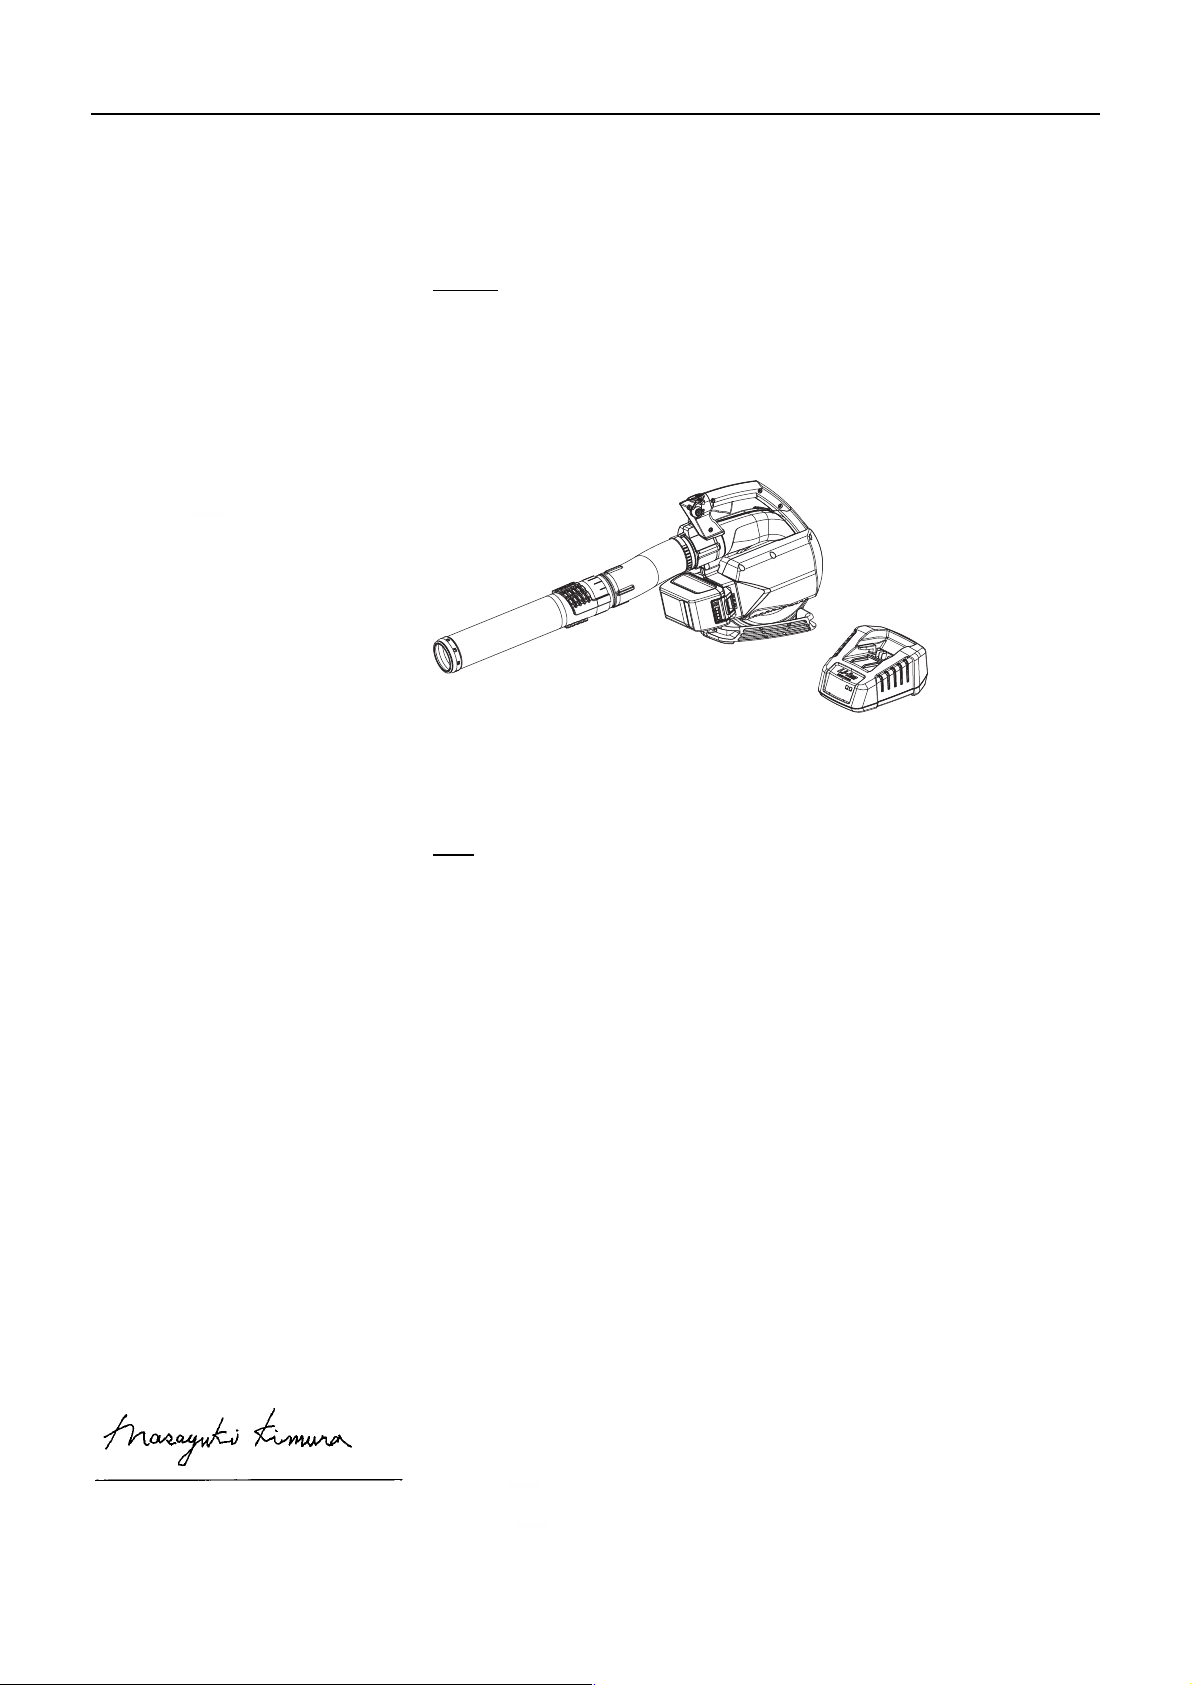
Konformitätserklärung
Der unterzeichnete Hersteller:
YAMABIKO CORPORATION
7-2 SUEHIROCHO 1-CHOME
OHME, TOKIO 198-8760
JAPAN
Diese Konformitätserklärung wird unter der alleinigen Verantwortung des Herstellers
erstellt.
erklärt, dass das nachstehend spezifizierte neue Gerät:
LAUBBLÄSER
AKKULADEGERÄT
Marke: ECHO
Typ: DPB-600
LCJQ-560
Konformitätserklärung
montiert durch:
Folgendes erfüllt:
* Anforderungen der Richtlinie 2006/42/EG (Anwendung der harmonisierten Norm EN 60335-1: 2012, EN 50636-2-
100: 2014)
* Anforderungen der Richtlinie 2014/30/EU (Anwendung der harmonisierten Norm EN 55014-1: 2006, EN 55014-2:
1997, EN 61000-3-2: 2006, und EN 61000-3-3: 2008)
* Anforderungen der Richtlinie 2014/35/EU (Anwendung der harmonisierten Norm EN 60335-1: 2012, EN 60335-2-29:
2004, und EN 62233: 2008)
* Anforderungen der Richtlinie 2000/14/EG
Konformitätsbewertungsverfahren nach ANHANG V
* Anforderungen der Richtlinie 2011/65/EU (Anwendung der harmonisierten Norm EN 50581: 2012)
Gemessener Schallleistungspegel: 94 dB(A)
Garantierter Schallleistungspegel: 97 dB(A)
DPB-600
LCJQ-560
Tokio, den 1. Juli 2016
ECHO, INCORPORATED
400 Oakwood Road
Lake Zurich, lllinois 60047-1564
USA
Seriennummer 35001001 bis 35100000
Seriennummer 35001001 bis 35100000
YAMABIKO CORPORATION
Der Dokumentenbevollmächtigte in Europa, welcher autorisiert
ist, die technischen Daten zusammenzustellen.
Unternehmen: Atlantic Bridge Limited
Adresse: Atlantic House, PO Box 4800,
Earley, Reading RG5 4GB, Vereinigtes Königreich
Masayuki Kimura Herr Philip Wicks
Hauptabteilungsleiter
Abteilung Qualitätssicherung
26
Page 85

1Notizen und hintere U mschlagseite
NOTIZEN
2016
X750-027 39 0
X750 821-010 2
27
Page 86

7-2 SUEHIROCHO 1-CHOME, OHME, TOKIO 198-8760, JAPAN
TELEFON: 81-428-32-6118. FAX: 81-428-32-6145.
©
2016
X750-027 39 0
X750 821-010 2
Gedruckt in Japan
0x0xxxx zzzz ES
28
Page 87

1Copertina
ITALIANO
(Istruzioni originali)
MANUALE PER L’OPERATORE
SOFFIATORE RICARICABILE
DPB-600
AVVERTENZA
LEGGERE E SEGUIRE ATTENTAMENTE LE ISTRUZIONI PER
LAVORARE IN CONDIZIONI DI MASSIMA SICUREZZA.
LA MANCATA OSSERVANZA DELLE ISTRUZIONI POTREBBE
PROVOCARE LESIONI GRAVI.
Page 88

Informazioni importanti
2Informazioni importanti
Si raccomanda di leggere il manuale per l'operatore prima di utilizzare questo prodotto.
Tipologia di impiego del prodotto
Il soffiatore ricaricabile ECHO è stato progettato per allontanare polvere e materiali di vario tipo, incluse le foglie cadute
dagli alberi.
Non utilizzare l’attrezzo per impieghi differenti da quelli per i quali è progettato.
Utenti del prodotto
Prima di utilizzare questo prodotto leggere attentamente e familiarizzare con il contenuto del manuale per l'operatore.
Non utilizzare questo prodotto senza aver prima letto attentamente il manuale per l'operatore, non utilizzare il prodotto
in condizioni debilitate a causa di raffreddore o stanchezza o in condizioni fisiche e psicologiche non ottimali; inoltre
vietare l'uso ai bambini.
Tenere presente che l'operatore o l'utente è responsabile di eventuali rischi o incidenti provocati ad altre persone o alle
proprietà altrui.
Informazioni sul manuale per l'operatore
Questo manuale contiene informazioni necessarie per il funzionamento e la manutenzione del prodotto. Si raccomanda
di attentamente il manuale, familiarizzando con il contenuto.
Tenere sempre il manuale in un luogo facilmente accessibile.
Se il manuale viene smarrito o danneggiato e non può essere consultato, acquistarne uno nuovo presso il rivenditore
ECHO.
Le unità di misura utilizzate in questo manuale sono espresse in conformità al sistema internazionale. Le cifre riportate
tra parentesi sono valori di riferimento e in alcuni casi ci potrebbero essere lievi errori di conversione.
Prestito o cessione del prodotto
In caso di prestito o cessione del prodotto descritto in questo manuale, consegnare alla persona che lo riceve in prestito
e che dovrà utilizzarlo anche il manuale per l'operatore. Se si cede o vende il prodotto a terzi, consegnare anche il
manuale dell'operatore assieme al prodotto.
Richieste
Per ricevere ulteriori informazioni sul prodotto, per l'acquisto di articoli di consumo, per riparazioni e altre eventuali ri-
chieste, contattare il proprio rivenditore ECHO.
Avvisi
Il contenuto di questo manuale può essere modificato senza preavviso per renderlo conforme a eventuali aggiorna-
menti del prodotto. Al fine di illustrare con maggiore chiarezza le spiegazioni sul prodotto, alcune illustrazioni potrebbero essere differenti da quelle del prodotto reale.
Questo prodotto richiede l'assemblaggio di alcune parti.
Consultare il proprio rivenditore ECHO per ulteriori chiarimenti.
Produttore
YAMABIKO CORPORATION
7-2 SUEHIROCHO 1-CHOME, OHME, TOKYO 198-8760, GIAPPONE
Rappresentante autorizzato in Europa
Atlantic Bridge Limited
Atlantic House, PO Box 4800, Earley, Reading RG5 4GB, Regno Unito
2
Page 89

Contenuto
Per un uso sicuro del prodotto............................................................................................ 4
Messaggi di avviso ........................................................................................................ 4
Altri indicatori ................................................................................................................. 4
Simboli........................................................................................................................... 4
Posizione in cui è applicata la decalcomania ................................................................5
Gestione del prodotto .................................................................................................... 6
Contenuto della confezione .............................................................................................. 12
Descrizione .......................................................................................................................13
Prima di iniziare ................................................................................................................ 14
Montaggio .................................................................................................................... 14
Avviamento e arresto ........................................................................................................ 18
Avvio dell’unità............................................................................................................. 18
Arresto dell’unità .......................................................................................................... 18
Funzionamento ................................................................................................................. 19
Funzionamento del soffiatore ...................................................................................... 19
Manutenzione e cura ........................................................................................................ 21
Guida alla manutenzione............................................................................................. 21
Manutenzione e cura ................................................................................................... 21
Problemi tecnici ........................................................................................................... 22
Rimessaggio ................................................................................................................ 23
Smaltimento................................................................................................................. 24
Caratteristiche tecniche .................................................................................................... 25
Dichiarazione di conformità .............................................................................................. 26
3
Page 90

Per un uso sicuro del prodotto
Leggere questa sezione prima di utilizzare il prodotto.
Per un uso sicuro d el prodotto
Le precauzioni descritte in questa sezione contengono importanti informazioni per la sicurezza. Si raccomanda di se-
guirle scrupolosamente.
Leggere anche le precauzioni presenti all'interno del manuale.
Il testo seguito da un contrassegno [a forma di rombo] descrive le potenziali conseguenze che si potrebbero verificare in caso di
mancata osservanza delle precauzioni.
Messaggi di avviso
Situazioni in cui c'è il rischio di causare lesioni fisiche all'utente e ad altre persone sono indicate in questo manuale e sul prodotto,
con le seguenti avvertenze. Leggerle e osservarle sempre per lavorare in condizioni di massima sicurezza.
PERICOLO AVVERTENZA ATTENZIONE
Questo simbolo accompagnato dalla
parola "PERICOLO" richiama l'attenzione su un'azione o una condizione
che potrebbe causare infortuni gravi o
la morte di utenti o di persone presenti.
Altri indicatori
Oltre alle avvertenze, questo manuale utilizza i seguenti simboli esplicativi:
Questo simbolo accompagnato dalla
parola "AVVERTENZA" richiama
l'attenzione su un'azione o una condizione che potrebbe causare lesioni
gravi o la morte di utenti o di persone
presenti.
"ATTENZIONE" indica una situazione potenzialmente pericolosa che, se
non evitata, potrebbe causare lesioni
minori o moderate.
NOTA IMPORTANTE
Il cerchietto barrato sta
ad indicare che quanto
è illustrato è proibito.
Il messaggio qui riportato fornisce
consigli per l'uso, la cura e la manutenzione del prodotto.
Il testo incorniciato, caratterizzato
dalla parola "IMPORTANTE", contiene informazioni importanti riguardo
l'uso, il controllo, la manutenzione e il
rimessaggio del prodotto descritto in
questo manuale.
Simboli
In questo manuale e sul prodotto sono riportati alcuni simboli esplicativi. Accertarsi di aver ben compreso il significato di tutti i simboli.
Forma del simbolo Descrizione / applicazione del
simbolo
Leggere attentamente il manuale per l'operatore
Protezione/allarme Taglio delle dita
Attenzione alle scosse elettriche
Arresto Velocità ridotta
Forma del simbolo Descrizione / applicazione del
simbolo
Indossare protezioni per gli
occhi
Prestare attenzione nelle aree
ad alta temperatura
4
Page 91

Per un uso sicuro del prodotto
Forma del simbolo Descrizione / applicazione del
simbolo
Non utilizzare mani sotto la
pioggia o in ambienti umidi
Tenere gli astanti a una distanza di 15 m
Livello di potenza acustica garantito
Attrezzo di II classe
Forma del simbolo Descrizione / applicazione del
simbolo
Massima velocità
Protezione ambientale!
Volt
o DC
Corrente continua
Posizione in cui è applicata la decalcomania
La decalcomania riportata sotto è stata applicata al prodotto descritto in questo manuale. Prima di utilizzare il prodotto accertarsi
di aver compreso quanto riportato sulla decalcomania.
Se la decalcomania diventa illeggibile a causa dell'usura, si strappa o si stacca e si perde, acquistarne una di ricambio presso
il rivenditore e fissarla nel punto illustrato nella figura in basso. Accertarsi che la decalcomania sia sempre leggibile.
1. Decalcomania (Codice ricambio X505008910)
5
Page 92

Per un uso sicuro del prodotto
Gestione del prodotto
Avvisi di sicurezza generici per gli utensili elettrici
AVVERTENZA
Leggere tutti gli avvisi di sicurezza e le istruzioni.
La mancata osservanza di avvisi e istruzioni può causare scosse elettriche, incendi e/o gravi infortuni.
Conservare avvisi e istruzioni per un eventuale utilizzo futuro.
Il termine "utensile elettrico", riportato negli avvisi, fa riferimento ad attrezzi alimentati mediante un cavo di alimentazione collegato alla rete elettrica, oppure ad attrezzi privi di cavo e
alimentati a batteria.
Sicurezza dell’area di lavoro
L'area di lavoro deve essere pulita e ben illuminata.
Le aree di lavoro sporche o disordinate accrescono il rischio
di incidenti.
Non utilizzare gli utensili elettrici in atmosfere esplosi-
ve, come gli ambienti saturi di liquidi, gas o polveri infiammabili.
Gli utensili elettrici generano scintille, che possono incendia-
re polveri o fumi infiammabili.
Tenere i bambini e le persone circostanti a distanza di
sicurezza durante l’uso di un utensile elettrico.
Le distrazioni possono causare perdite di controllo dell’uten-
sile.
Sicurezza elettrica
La spina di alimentazione dell’utensile elettrico deve
corrispondere a quella della relativa presa di alimentazione. Non modificare mai la spina, in alcun modo. Non
utilizzare alcun tipo di adattatore con gli utensili elettrici
dotati di messa a terra (massa).
L’uso di spine e prese non modificate minimizza i rischi di
scosse elettriche.
Evitare il contatto tra parti del corpo e superfici dotate
di collegamento di messa a terra, come tubazioni, radiatori, fornelli e refrigeratori.
Il contatto tra parti del corpo e oggetti con collegamento di
terra può accrescere il rischio di scosse elettriche.
Evitare di utilizzare gli utensili elettrici sotto la pioggia o
in ambienti umidi.
L’acqua che penetra all’interno degli utensili elettrici accre-
sce il rischio di scosse elettriche.
Evitare di sottoporre il cavo di alimentazione a sollecita-
zioni e stress meccanico. Non utilizzare il cavo di alimentazione per trascinare, tirare o scollegare l’utensile
elettrico dalla presa di alimentazione. Tenere il cavo di
alimentazione a distanza di sicurezza da fonti di calore,
oli, bordi affilati o parti in movimento.
I cavi di alimentazione danneggiati o attorcigliati accrescono
il rischio di scosse elettriche.
Durante l’utilizzo di un’utensile elettrico all'aperto, uti-
lizzare cavi di prolunga adatti all’uso in ambienti esterni.
L’uso di cavo idonei all’uso in ambienti esterni riduce il ri-
schio di scosse elettriche.
Qualora fosse necessario utilizzare l’utensile elettrico
in ambienti umidi, utilizzare una sorgente di alimentazione protetta da un interruttore automatico differenziale (GFCI).
L’uso di un interruttore GFCI riduce il rischio di scosse elet-
triche.
Sicurezza personale
Mantenersi sempre vigili, assicurandosi di avere sem-
pre il controllo di ciò che si sta facendo, operando sempre in base a norme di buon senso e ragionevolezza
nell’uso dell’utensile elettrico. Non azionare l’utensile
elettrico in condizioni di stanchezza o sotto l'effetto di
alcol, droghe o farmaci.
Durante l’uso degli utensili elettrici, basta un momento di di-
sattenzione per incorrere in gravi infortuni.
Utilizzare dotazioni di protezione personali adeguate.
Indossare sempre protezioni per gli occhi.
Le attrezzature di protezione come mascherine antipolvere,
scarponi con suole antiscivolo, elmetti di protezione o protezioni acustiche in base alle condizioni di lavoro specifiche,
consente di ridurre il rischio di infortuni.
Prevenzione delle accensioni accidentali. Assicurarsi
che l’interruttore sia sempre in posizione "OFF", prima
di procedere al collegamento dell’utensile alla sorgente
di alimentazione e/o prima di inserire il pacco batterie,
nonché prima di sollevare o trasportare l’utensile.
Trasportare gli utensili elettrici mentre si tiene il dito sull’in-
terruttore, oppure la pressione casuale e immotivata degli
interruttori di accensione di utensili elettrici alimentati può
causare incidenti.
Rimuovere qualunque chiave o attrezzo di regolazione
prima di accendere l’utensile elettrico.
La presenza di chiavi o attrezzi collegati alle parti rotanti
dell’utensile elettrico può causare gravi infortuni.
Non sporgersi. Mantenere sempre una postura di lavoro
stabile e bilanciata.
Ciò garantirà un migliore controllo dell’utensile elettrico an-
che nelle situazioni impreviste.
Utilizzare indumenti di tipo corretto. Non indossare in-
dumenti larghi o gioielli. Tenere capelli, indumenti e
guanti a distanza di sicurezza dalle parti in movimento.
Indumenti larghi, gioielli, e capelli lunghi potrebbero restare
impigliati tra le parti in movimento.
Se gli utensili sono dotati di attacchi per il collegamento
a sistemi di estrazione e raccolta polveri, assicurarsi
che tali accessori siano collegati e utilizzati correttamente.
L’uso di un sistema di raccolta polveri può ridurre i rischi as-
sociati all’inalazione di polveri.
L’intensità delle vibrazioni durante l’uso dell’utensile elettrico
può variare rispetto al valore totale dichiarato. Tale intensità
varia in base al modo in cui l'utensile viene adoperato. Pertanto, è necessario stabilire misure di sicurezza in grado di proteggere l’operatore che siano basate su una stima del livello di
esposizione effettivo nelle condizioni di lavoro reali (tenendo
anche in considerazione tutte le fasi del ciclo operativo, come
gli intervalli di tempo durante i quali l’utensile è spento e quando questo è acceso ma non in uso, oltre al solo tempo di utilizzo
netto).
6
Page 93

Per un uso sicuro del prodotto
AVVERTENZA
Utilizzo e cura dell’utensile elettrico
Evitare di utilizzare l’utensile elettrico sotto sforzo. Uti-
lizzare sempre l’utensile elettrico adatto al tipo di operazione da effettuare.
L’uso di un utensile elettrico adeguato consentirà di esegui-
re il lavoro in maniera ottimale e in piena sicurezza, dato che
questo funzionerà nelle condizioni ideali per le quali è stato
progettato.
Non utilizzare l’utensile elettrico se l’interruttore di ali-
mentazione è danneggiato.
Qualsiasi utensile elettrico che non può essere controllato
costituisce un pericolo e pertanto l’utensile elettrico dovrà
essere riparato al più presto possibile.
Scollegare la spina dalla presa di alimentazione e/o
estrarre la batteria dall'alloggiamento, prima di effettuare qualunque tipo di regolazione, sostituire accessori o
conservare gli utensili elettrici quando questi sono inutilizzati.
Tali misure preventive riducono il rischio di accensioni acci-
dentali dell’utensile elettrico.
Gli utensili elettrici non utilizzati devono essere conser-
vati lontano dalla portata dei bambini. È inoltre necessario evitare che l’utensile venga utilizzato da persone che
non hanno familiarità con il suo utilizzo e con il presente
manuale di istruzioni.
Gli utensili elettrici possono costituire un pericolo quando
utilizzati da utenti non adeguatamente addestrati.
Manutenzione degli utensili elettrici. Ispezionare l’uten-
sile elettrico per evidenziare eventuali disallineamenti o
parti mobili deformate, danneggiate o qualunque altra
condizione che possa influire sul corretto funzionamento dell’utensile elettrico. Gli utensili elettrici danneggiati
devono essere riparati prima dell’uso.
Numerosi incidenti sono causati proprio dall’uso di utensili
elettrici in cattivo stato di manutenzione.
Tenere gli attrezzi da taglio affilati e puliti.
Gli attrezzi da taglio tenuti in buono stato di manutenzione,
con le lame correttamente affilate, sono meno propensi a
piegarsi e sono quindi più facili da controllare.
Utilizzare gli utensili elettrici, accessori e punte in con-
formità con le istruzioni riportate in questo manuale, tenendo sempre in considerazione le condizioni operative
e il tipo di lavoro da eseguire.
L’utilizzo di utensili elettrici per effettuare operazioni di tipo
differente da quello per cui tali utensili sono progettati causa
situazioni pericolose.
Utilizzo e cura della batteria
Ricaricare solo utilizzando il caricabatterie specificato
dal produttore.
Un caricabatterie indicato per un determinato tipo di batteria
può causare incendi se utilizzato con batterie di tipo differente.
Utilizzare gli utensili elettrici solo con batterie del tipo
specificato.
L’uso di batterie di tipo differente può causare incendi e in-
fortuni.
Quando il pacco batterie non viene utilizzato, tenerlo a
distanza di sicurezza da oggetti metallici, come graffette, monete, chiavi, chiodi, viti o altri elementi metallici di
piccole dimensioni, che potrebbero causare falsi contatti con i terminali della batteria.
Un eventuale contatto accidentale tra i due poli della batteria
potrebbe causare ustioni e incendi.
In caso di utilizzi estremi, la batteria potrebbe essere
soggetta perdite di liquido. In tal caso, di raccomanda di
evitare il contatto con tale liquido. In caso di contatto
accidentale con il liquido della batteria, risciacquare
l’area interessata con acqua. In caso di contatto con gli
occhi, risciacquare con acqua e consultare un medico.
Il liquido che fuoriesce dalla batteria può causare irritazioni
e ustioni.
Manutenzione
L’utensile elettrico deve essere riparato da un tecnico
riparatore specializzato, utilizzando solo parti originali.
Ciò consente di garantire una corretta manutenzione
dell’utensile elettrico.
7
Page 94

Per un uso sicuro del prodotto
Precauzioni generali
AVVERTENZA
Manuale per l'operatore
Per un corretto funzionamento del pro-
dotto, prima di utilizzarlo leggere attentamente il manuale per l'operatore.
La mancata osservanza di queste precau-
zioni potrebbe causare un incidente o lesioni gravi.
Prestito o cessione del prodotto
In caso di prestito del prodotto, consegnare alla perso-
na che lo riceve anche il manuale dell'operatore.
Anche in caso di cessione, consegnare il prodotto insie-
me al manuale per l'operatore.
La mancata osservanza di queste precauzioni potrebbe
causare un incidente o lesioni gravi.
Non utilizzare il prodotto per eseguire lavori diversi
da quelli per cui è stato progettato
Non utilizzare il prodotto per eseguire lavori diversi da
quelli descritti nel manuale dell'operatore.
La mancata osservanza di queste precauzioni potrebbe
causare un incidente o lesioni gravi.
Non modificare il prodotto
Non modificare il prodotto.
La mancata osservanza di queste precauzioni potrebbe
causare un incidente o lesioni gravi. Qualsiasi guasto causato da modifiche apportate al prodotto non sarà coperta
dalla garanzia del produttore.
Non utilizzare il prodotto senza aver effettuato prima
il controllo e la manutenzione
Non utilizzare il prodotto senza aver effettuato prima il
controllo e la manutenzione. Accertarsi sempre che il
controllo e la manutenzione vengano eseguiti a scadenze regolari.
La mancata osservanza di queste precauzioni potrebbe
causare un incidente o lesioni gravi.
Essere pronti in caso di lesioni
Nell'improbabile evento di incidente o lesioni è consigliabile essere preparati.
Cassetta di pronto soccorso
Asciugamani e fazzoletti (per fermare eventuali emorra-
gie)
Fischietto o telefono cellulare (per chiedere aiuto)
Se non si è in grado di effettuare un primo soccorso o chie-
dere aiuto, le lesioni potrebbero peggiorare.
8
Page 95

Per un uso sicuro del prodotto
Precauzioni per l'uso
AVVERTENZA
Utenti del prodotto
Il prodotto non deve essere utilizzato da:
persone stanche
persone che hanno assunto bevande alcoliche
persone sotto trattamento farmacologico
persone in stato di gravidanza
persone in condizioni fisiche
precarie
persone che non hanno letto il
manuale dell'utente
bambini
La mancata osservanza di queste
istruzioni potrebbe provocare incidenti.
Questo prodotto genera un campo magnetico durante il fun-
zionamento. I campi magnetici possono causare interferenze con i pacemaker o il malfunzionamento di questi ultimi.
Per ridurre i rischi per la salute, consigliamo ai portatori di
pacemaker di consultare il proprio medico e il produttore del
pacemaker prima di utilizzare questo prodotto.
Ambiente di utilizzo e funzionamento
Non utilizzare il prodotto
In ambienti umidi.
Sotto la pioggia.
In condizioni di cattivo tempo.
La mancata osservanza di queste precauzioni
potrebbe causare un incidente o lesioni gravi.
Non utilizzare il prodotto su terreni instabili, ad esempio
con forti pendenze o dopo un acquazzone, oppure su
terreni scivolosi e pericolosi.
Non utilizzare il prodotto di notte o in zone con scarsa
visibilità.
Cadute, scivolate o un uso non corretto del prodotto potreb-
bero causare lesioni gravi.
L'area nel raggio di 15 m deve essere considerata
zona pericolosa
L'area nel raggio di 15 m dal prodotto deve essere considerata zona pericolosa. Osservare le seguenti precauzioni
mentre si sta lavorando con il prodotto.
Non permettere a bambini, altre persone o animali di en-
trare nella zona pericolosa.
Se nell'area di lavoro sono presenti altre persone, spe-
gnere l’unità.
Prima di avvicinarsi all'utente, segnalare la propria pre-
senza, per esempio, gettando dei ramoscelli dall'esterno della zona pericolosa, quindi controllare che l'unità
sia stata spenta.
Se più persone devono lavorare con il prodotto, trovare
un modo per comunicare con il collega da una distanza
di 15 m.
Eventuali oggetti scagliati potrebbero provocare lesioni gra-
vi all'operatore o agli astanti.
Uso del prodotto
Durante l'uso del prodotto, prestare particolare attenzione
e osservare le seguenti precauzioni.
Non puntare il condotto del soffiatore in direzione di
persone o animali domestici.
Non utilizzare il prodotto su terreni instabili.
Mantenere la maniglia in modo fermo e saldo.
Evitare di utilizzare il prodotto nelle ore notturne o al
mattino presto, per non disturbare i vicini con il rumore.
La mancata osservanza di queste istruzioni potrebbe causa-
re incidenti o lesioni.
Spegnere l'unità durante gli spostamenti
Durante gli spostamenti, nelle situazioni descritte di seguito, spegnere l'unità e spostarla.
Spostandosi verso il luogo in cui si sta lavorando
Spostandosi in un altro luogo mentre si sta lavorando
Lasciando il luogo in cui è stato eseguito il lavoro
La mancata osservanza di queste precauzioni potrebbe
causare scottature o lesioni gravi.
Durante il trasporto del prodotto in automobile, togliere
la batteria e fissare saldamente il prodotto per evitare
che si sposti durante il viaggio.
Prestare attenzione a non rimanere impigliati nella
ventola
Prestare attenzione a non impigliare i capelli nella ven-
tola.
L'effetto di risucchio dell'aria generata dalla ventola potreb-
be attirare la mano o altri oggetti all'interno del vano ventola,
causando lesioni gravi.
Vibrazioni e freddo
Si ritiene che la condizione definita fenomeno di Raynaud,
che colpisce le dita di alcune persone, sia causata
dall'esposizione alle vibrazioni e al freddo. L'esposizione
al freddo e alle vibrazioni può causare formicolio e bruciore, seguiti da pallore e intorpidimento delle dita.
Dato che non si conosce il livello di esposizione minima
che causa i disturbi, si consiglia vivamente di osservare le
seguenti precauzioni.
Tenere il corpo caldo, soprattutto testa, collo, piedi, ca-
viglie, mani e polsi.
Mantenere una buona circolazione del sangue facendo
vigorosi esercizi con le braccia durante frequenti pause
di lavoro, ed evitare di fumare.
Limitare il numero di ore di impiego.
Si consiglia di non lavorare con altre macchine portatili
oltre al soffiatore nell'arco della stessa giornata.
Se si accusano disagi e disturbi e se si riscontrano ar-
rossamenti e gonfiore delle dita seguiti da pallore e perdita di sensibilità, rivolgersi al proprio medico prima di
esporsi di nuovo al freddo e alle vibrazioni.
La mancata osservanza di queste istruzioni potrebbe causa-
re danni alla salute.
9
Page 96
Per un uso sicuro del prodotto
AVVERTENZA
Lesioni da sforzi ripetuti
Si ritiene che l'uso eccessivo dei muscoli e dei tendini di
dita, mani, braccia e spalle possa causare dolore, gonfiore, intorpidimento, debolezza e fortissimi dolori nelle zone
menzionate. Alcune attività manuali ripetitive possono essere causa di alto rischio per lo sviluppo di lesioni da sforzi ripetitivi.
Per ridurre il rischio di lesioni da sforzi ripetitivi:
Evitare di usare il polso piegato, allungato o girato.
Fare pause a intervalli regolari per ridurre al minimo i
movimenti ripetuti e far riposare le mani. Ridurre la velocità e la forza con cui il movimento ripetitivo viene
eseguito.
Fare esercizi per rafforzare i muscoli delle mani e delle
braccia.
Consultare un medico se si avverte formicolio, intorpi-
dimento o dolori nelle dita, nelle mani, nei polsi o nelle
braccia. Una tempestiva diagnosi di lesioni da sforzi ripetitivi consente di evitare danni permanenti ai nervi e
ai muscoli.
La mancata osservanza di queste istruzioni potrebbe causa-
re danni alla salute.
In caso di imprevisti spegnere immediatamente
l’unità
Spegnere immediatamente l'unità se il prodotto inizia
improvvisamente a produrre rumori o vibrazioni anomale. Il prodotto non può essere utilizzato se produce rumori o vibrazioni anomale.
Contattare il rivenditore ECHO per la riparazione.
Continuare a utilizzare parti danneggiate potrebbe provoca-
re un incidente o lesioni gravi.
Durante l'esecuzione di ispezioni o manutenzioni
dell’unità, spegnere il motore
Osservare le seguenti precauzioni durante il controllo e la
manutenzione del prodotto dopo l'uso:
Spegnere l'unità, rimuovere la batteria e verificare che
tutte le parti mobili si siano fermate completamente.
Un avvio imprevisto del prodotto potrebbe causare un inci-
dente.
Prima di eseguire le operazioni di manutenzione, far raf-
freddare l'unità.
L'esecuzione di interventi a motore caldo può causare ustio-
ni.
Istruzioni per scollegare la batteria
Ogni qualvolta la macchina viene lasciata dall'utente.
Prima di eliminare un intasamento.
Prima di controllare, pulire o intervenire sulla macchina.
Dopo avere urtato un oggetto estraneo, controllare che
la macchina non abbia subito danni.
Se la macchina inizia a vibrare in maniera anomala, sot-
toporla immediatamente a un controllo.
Un avvio imprevisto del prodotto potrebbe causare un inci-
dente.
10
Page 97
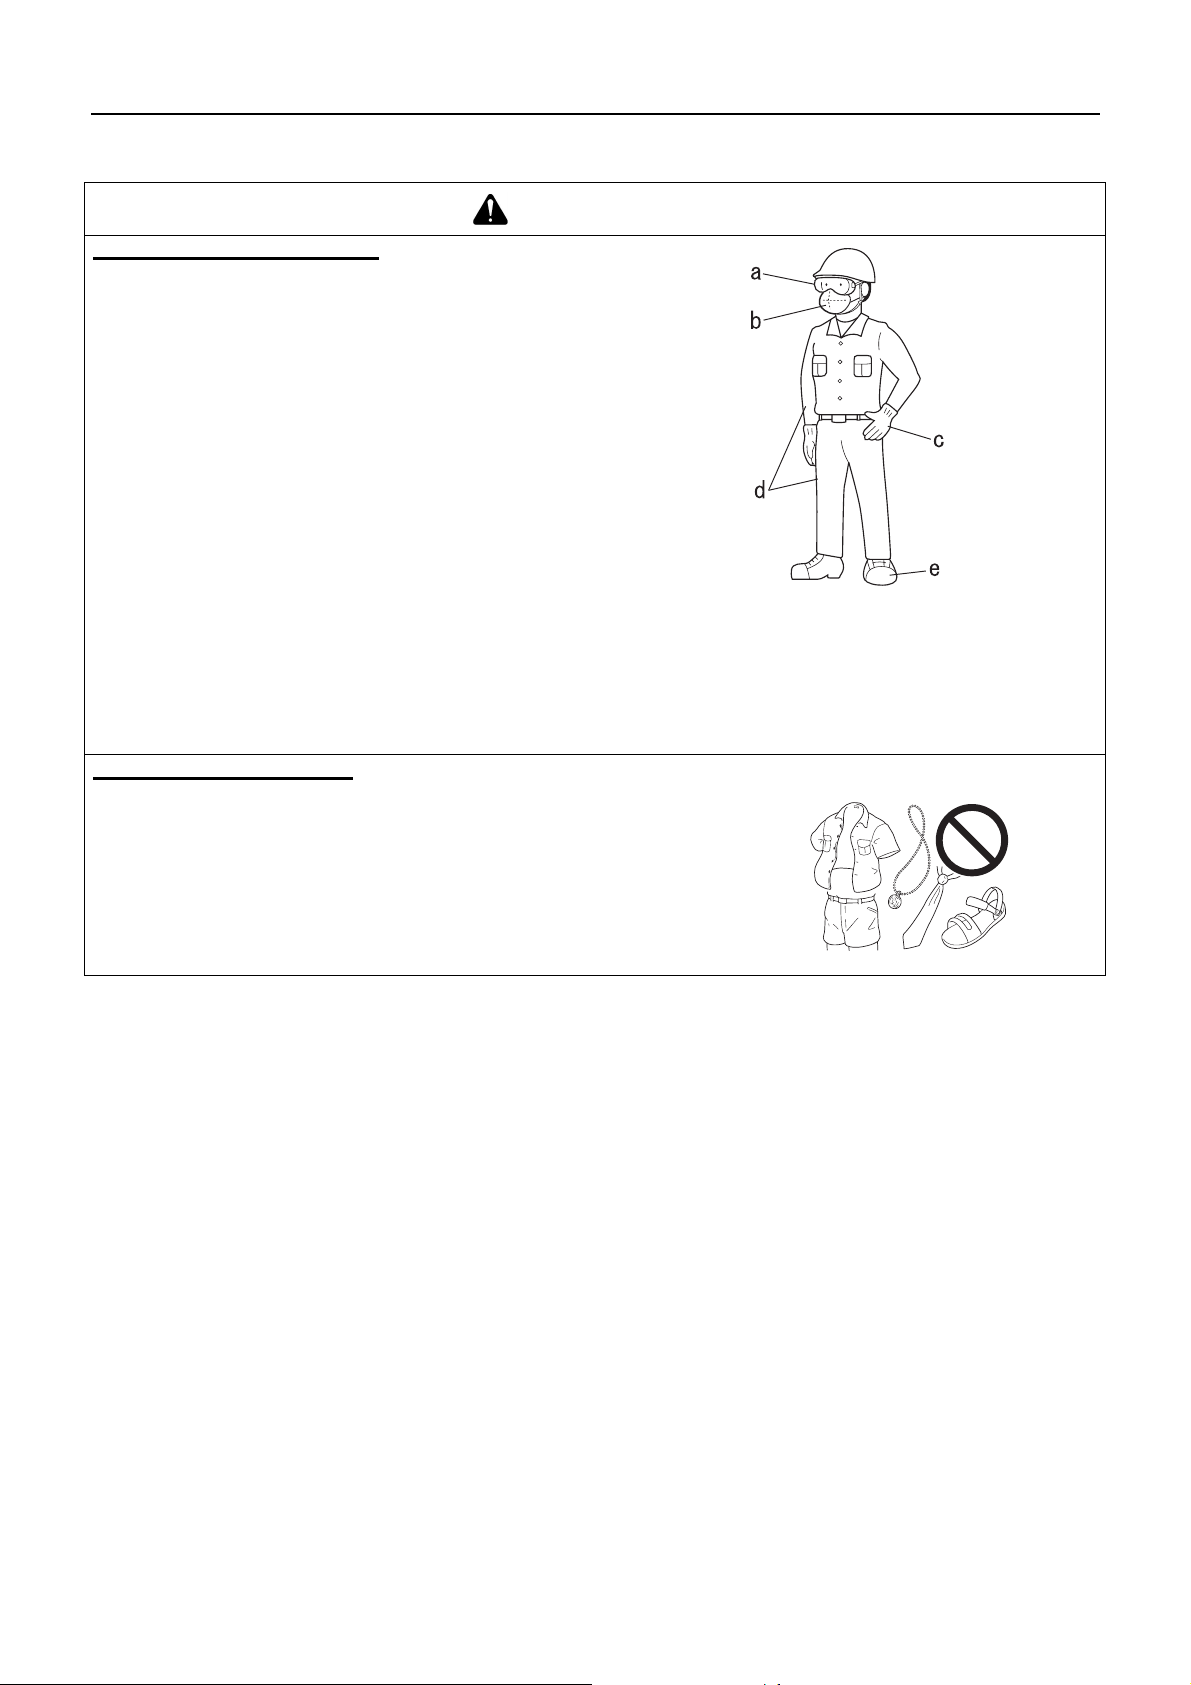
Per un uso sicuro del prodotto
Indumenti protettivi
AVVERTENZA
Indossare indumenti protettivi
Durante il lavoro con il soffiatore indossare sempre in-
dumenti e abiti protettivi appropriati. Soprattutto, durante il lavoro, indossare occhiali di protezione, una
mascherina antipolvereg.
Senza indumenti protettivi, i detriti o la polvere soffiata via
potrebbe essere inalata o colpire gli occhi provocando incidenti o lesioni.
a Occhiali di protezione: Proteggono gli occhi
b Respiratore: Protezione per l’apparato respiratorio
c Guanti protettivi: Proteggono le mani dal freddo e dalle vi-
brazioni
d Indumenti aderenti (maniche lunghe, pantaloni lunghi):
Proteggono il corpo
e Scarpe robuste o stivali: Proteggono i piedi
La mancata osservanza di queste precauzioni potrebbe
causare danni alla vista o all'udito o lesioni gravi.
Se necessario, utilizzare anche i seguenti indumenti protettivi.
Casco (elmetto): Protegge la testa
Protezioni acustiche o tappi per le orecchie: Protezione
per le orecchie
Rete anello di metallo: Protezione antinsetti
Indossare indumenti idonei
Non indossare cravatte, gioielli o vestiti poco aderenti che potrebbero restare impigliati nella macchina. Non indossare calzature aperte, non lavorare a
piedi nudi o a gambe nude.
La mancata osservanza di queste precauzioni potrebbe causare incidenti o le-
sioni gravi.
11
Page 98

Contenuto della confezione
Le seguenti parti sono state imballate separatamente nella confezione.
Dopo aver aperto la confezione, controllare che tutte le parti siano presenti.
In caso di parti mancanti o danneggiate, contattare il rivenditore.
Numero Nome parte Quantità
(1) Testa del soffiatore 1
(2) Tubo del soffiatore 1
Contenuto della confezione
(3) Ugello tondo dritto 1
(4) Manuale per l'operatore 1
Numero Nome parte Quantità
(5) Pacco batterie 1
(6) Manuale per l'operatore 1
(7) Caricabatterie 1
(8) Manuale per l'operatore 1
12
Page 99

Descrizione
Descrizione
1. Pulsante di accensione Premere una volta per accende-
re l’unità. Il LED di alimentazione si illumina. Premere
nuovamente il pulsante per spegnere l’unità. Il LED di
alimentazione si spegne.
2. LED di alimentazione Il LED resta illuminato quando
l’unità è alimentata. Il LED si spegne quando l’unità viene spenta.
3. Interruttore a grilletto Azionato dal dito dell’operatore
per attivare il motore.
4. Leva di regolazione acceleratore Tirare indietro per au-
mentare il regime del soffiatore.
5. Unità motore
6. Pacco batterie
7. Coperchio della scatola Copre l'area della ventola del
soffiatore.
8. Etichetta numero di serie Riporta il numero di modello e
il numero di serie dell'unità.
9. Tubi del soffiatore Dotati di un esclusivo sistema a bloc-
caggio positivo.
13
Page 100

Prima di iniziare
Prima di inizia re
Montaggio
AVVERTENZA
Leggere attentamente il manuale per l'operatore per essere certi di montare correttamente il prodotto.
Non eseguire mai operazioni di manutenzione o procedure di montaggio con l'unità in funzione.
L'uso di un prodotto non montato correttamente potrebbe causare incidenti o lesioni gravi.
Montaggio dei condotti del soffiatore
1. Posizionare l'unità in verticale, facendola poggiare sulla
base del soffiatore.
2. Allineare le nervature della ghiera di bloccaggio (A) del tubo
del soffiatore alle scanalature (B) dell'alloggiamento della
ventola. Assicurarsi che la nervatura corta (C) sia rivolta verso il basso. Far scorrere il tubo del soffiatore nell'alloggiamento della ventola fino a quando non scatta in posizione.
1. Tubo del soffiatore
1. Tubo del soffiatore 2. Ugello tondo dritto
Smontaggio dei condotti del ventilatore
3. Allineare le linguette (D) alle scanalature (E) e far scorrere
l'ugello tondo dritto sul tubo del soffiatore finché non si avverte una leggera resistenza. Non forzare.
4. Bloccare il tubo del soffiatore, quindi ruotare l'ugello piatto
dritto in senso orario, innestando saldamente i canali di bloccaggio. Non forzare.
NOTA
Durante l'uso del soffiatore le giunzioni tra i tubi possono allentarsi. Il pratico ed esclusivo sistema di bloccaggio positivo consente un saldo fissaggio dei tubi. In caso di allentamento,
rimuovere l'ugello rotondo dritto ed eseguire una nuova installazione seguendo le istruzioni riportate nei punti 3 e 4.
1. Inserire il cacciavite (F) nel foro posizionato accanto al simbolo di bloccaggio (G) per rilasciare il bloccaggio del condotto.
2. Estrarre i condotti dall'alloggiamento della ventola.
3. Rimuovere il cacciavite.
14
 Loading...