

Page 1
1
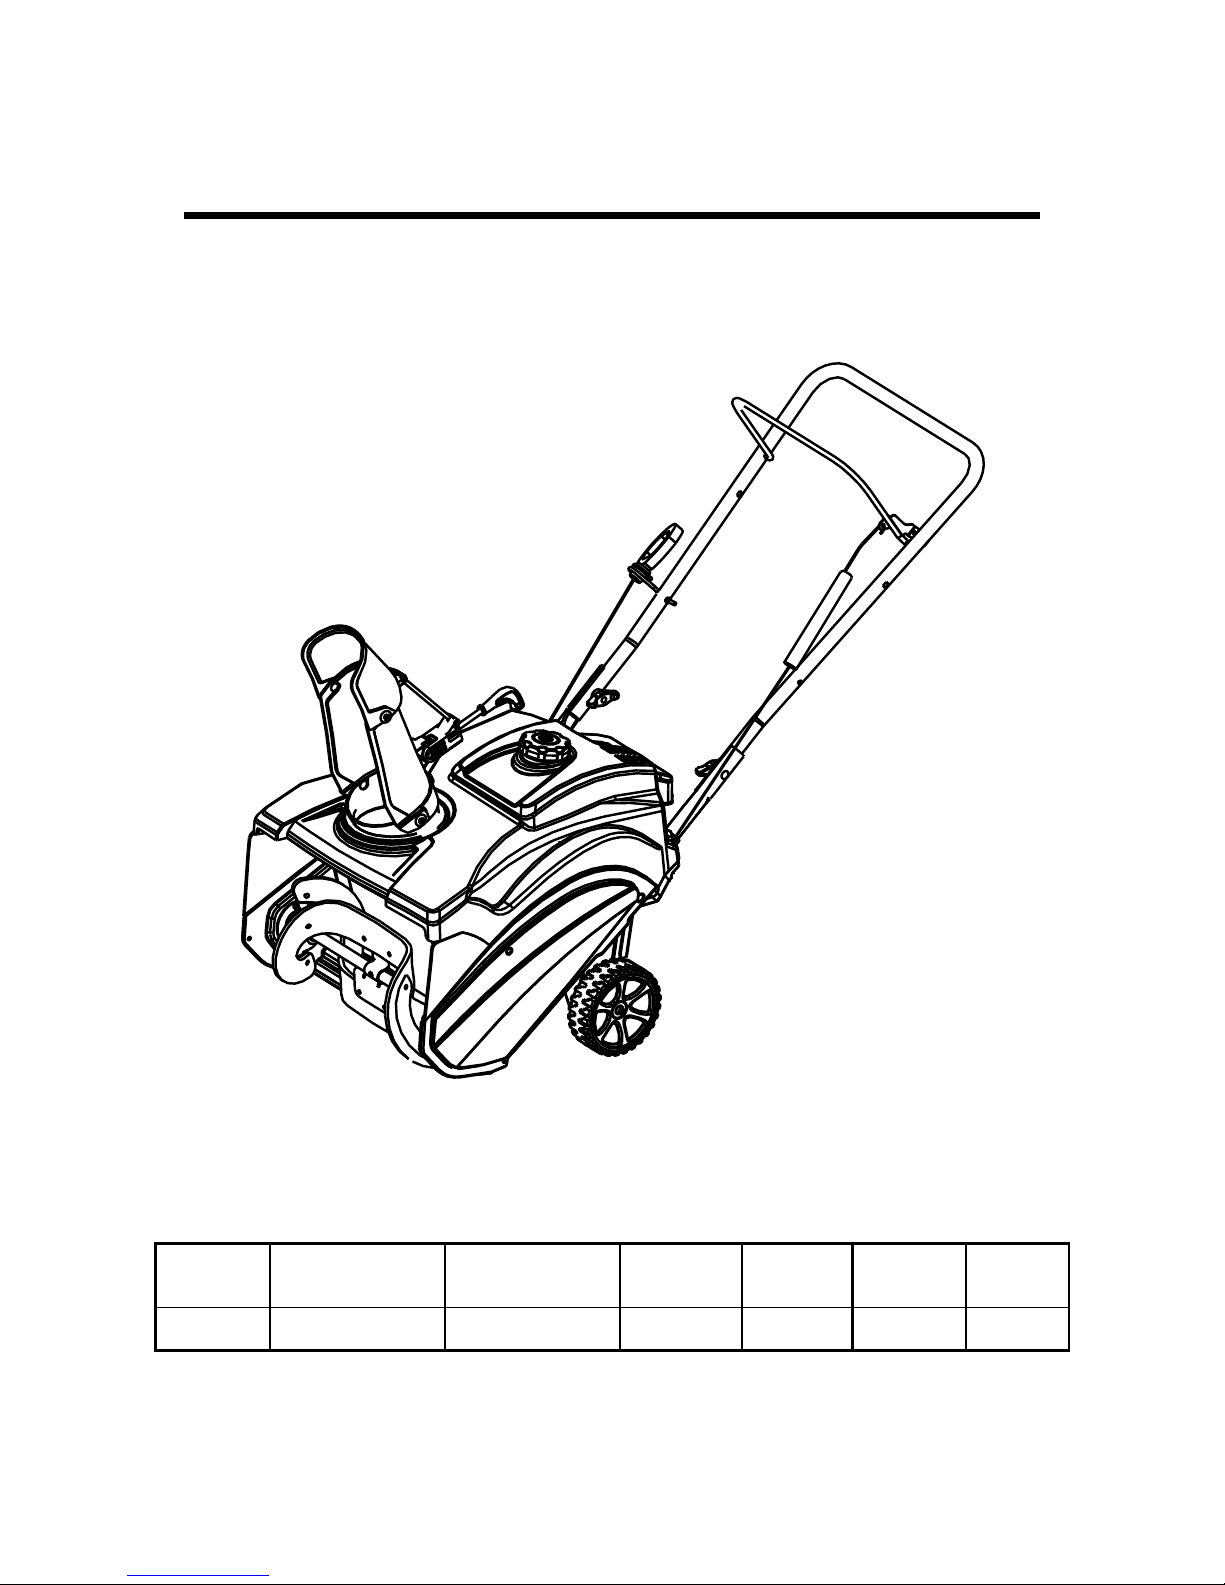
ECHELON
™
SNOW BLOWER
INSTRUCTION MANUAL
SKU: SNOW18
IMPORTANT: PLEASE READ MANUAL BEFORE ASSEMBLY OR USE
Key Technical Parameters
Working
Width
Max. Throwing
Distance
Max Output
Fuel Tank
Cap.
Startup
Mode
Vibration
Net
Weight
18in.
26ft
2.8HP/1.65KW
1.6L
Manual
4.0m/s2
24.5lbs
BASEMENT BRANDS ● WWW.BASEMENTBRANDS.COM ● CustomerService@BasementBrands.com ● 515-577-0977
Page 2
2
Introduction
This machine is intended for use by residential
homeowners. It is primarily designed to remove
snow from paved surfaces, such as driveways,
sidewalks, and other surfaces for traffic on
residential or commercial properties. It is not
designed to remove materials other than snow,
nor is it designed to clear off gravel surfaces.
Read this manual carefully to learn how to operate
and maintain your product properly, and to avoid
injury and product damage. You are responsible
for operating the product properly and safely.
This is the safety alert symbol. It alerts you to
potential personal injury hazards. Follow all safety
messages that follow this symbol to avoid possible
injury or death.
This manual uses two words to highlight
information: ―Important‖ calls attention to special
mechanical information and ―Note‖ emphasizes
general information worthy of special attention.
Safety
This machine meets or exceeds the ANSI B71.3
Specifications of the American National
Standards Institute in effect at the time of
production.
Read and understand the contents of this
manual before you start the engine.
This machine is capable of throwing objects
and of injuring hands and feet. Failure to
observe the following safety instructions could
result in serious injury.
Improperly using or maintaining this machine
could result in injury or death. To reduce this
potential, comply with the following safety
instructions.
Training
• Read, understand, and follow all instructions
on the machine and in the manual(s) before
operating this machine.
• Thoroughly familiarize yourself with the controls
and proper use of the machine. Know how to stop
the machine and disengage the controls quickly.
• Never allow children to operate the machine.
Never allow adults to operate the machine
without proper instruction.
• Keep the area of operation clear of all persons,
particularly small children.
• Exercise caution to avoid slipping or falling.
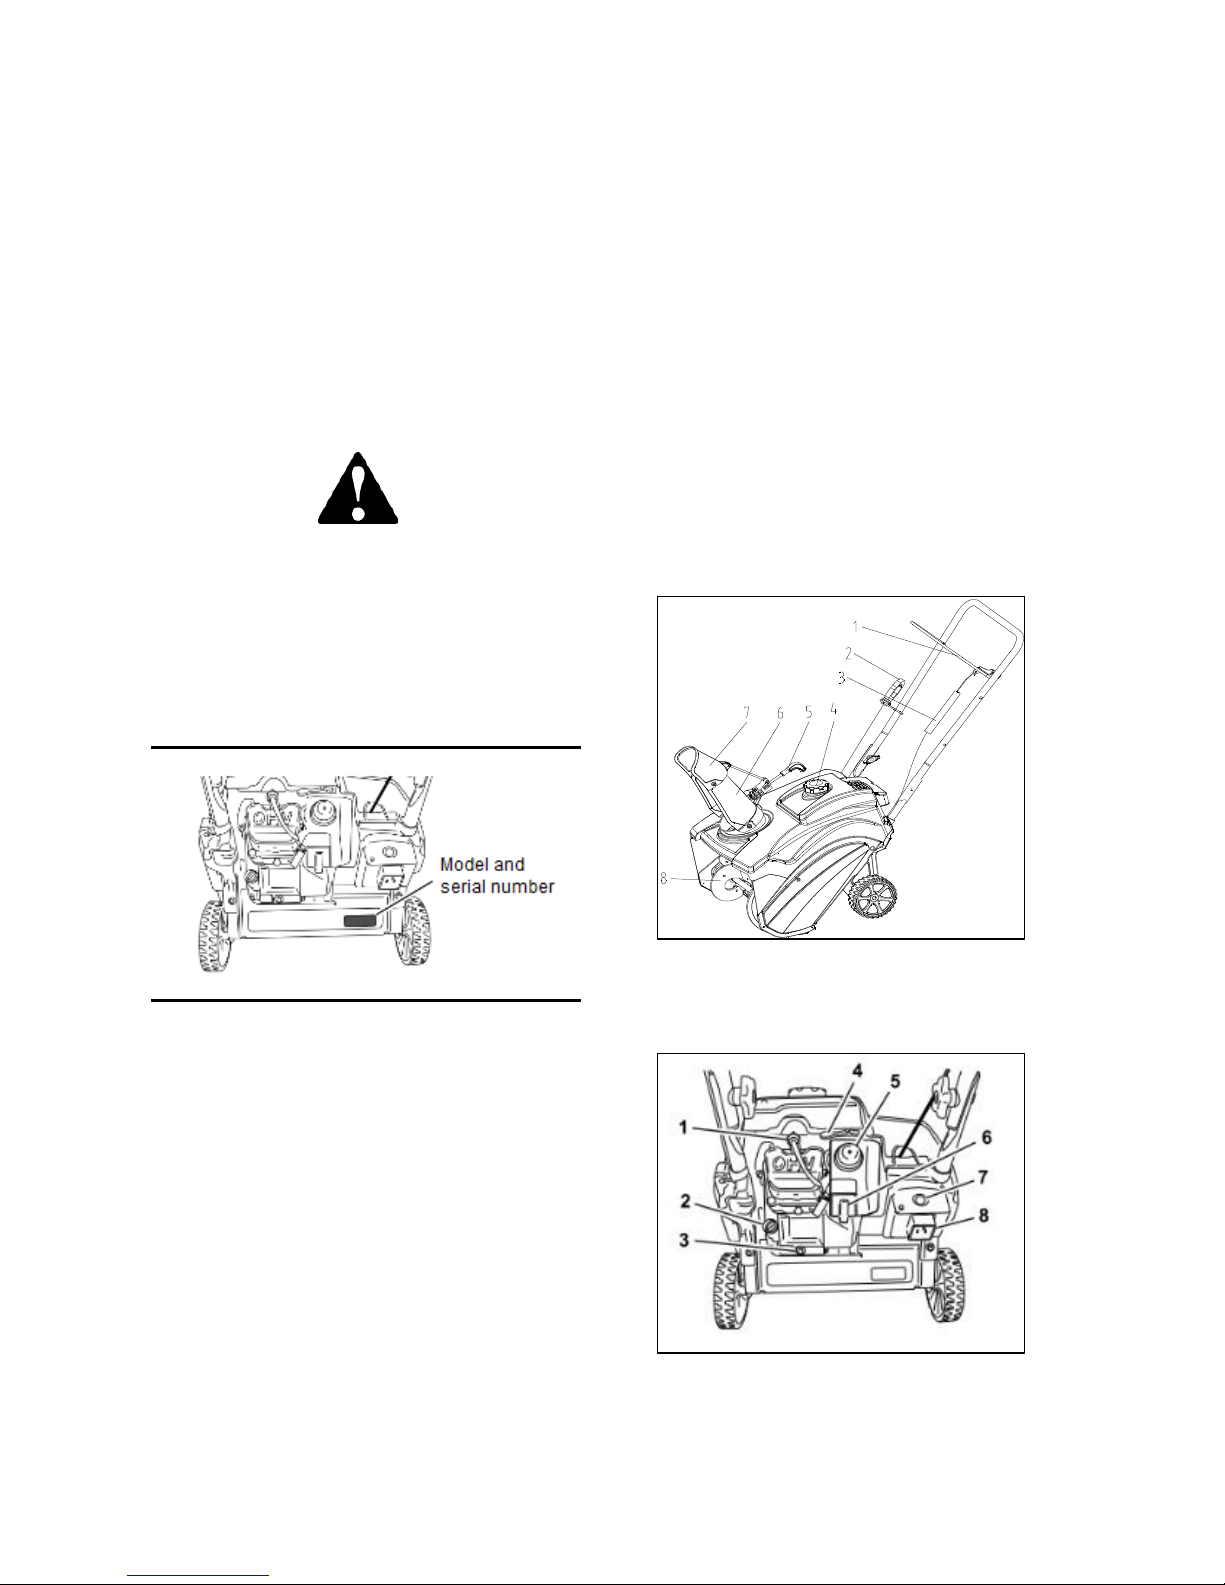
Product Overview
1. Control bar 5. Control handle
2. Recoil start handle 6. Discharge chute
3. Spring cover 7. Chute deflector
4. Fuel tank cap 8. Rotor Blade
1. Spark plug 5. Primer
2. Oil fill cap 6. Ignition key
3. Oil drain plug 7. Electric start button
4. Choke leveler 8. Electric plug-in
Page 3

3
Preparation
• Thoroughly inspect the area where the
machine is to be used. Remove all door mats,
sleds, boards, wires, and other foreign objects.
• Do not operate the machine without wearing
adequate winter garments. Avoid loose fitting
clothing that can get caught in moving parts.
Wear footwear that will improve footing on
slippery surfaces.
• Handle fuel with care; it is highly flammable.
- Use an approved fuel container.
- Never add fuel to a running engine or to a
hot engine.
- Use extreme care while filling a fuel tank
outdoors. Never fill a fuel tank indoors.
- Never fill containers inside a vehicle or on
a truck or trailer bed with a plastic liner.
Always place containers on the ground,
away from your vehicle, before filling.
- When practical, remove gas-powered
machinery from the truck or trailer and
refuel it on the ground. If this is not
possible, then refuel such machinery on a
trailer with a portable container, rather
than from a gasoline dispenser nozzle.
- Keep the nozzle in contact with the rim of
the fuel tank or container opening at all
times, until refueling is complete. Do not
use a nozzle lock-open device.
- Replace the gasoline cap securely and
wipe up any spilled fuel.
- If any fuel is spilled on clothing, change
clothing immediately.
• Use extension cords and receptacles as
specified by the manufacturer for all machines
with electric-starting motors.
• Do not attempt to clear snow from a gravel or
crushed rock surface. This product is only
intended for use on paved surfaces.
• Never attempt to make any adjustments while the
engine is running, unless specifically
recommended by the manufacturer.
• Always wear safety glasses or eye shields to
protect eyes from foreign objects that may be
thrown from the machine during operation, or
while performing an adjustment or repair.
Operation
• Do not put hands or feet near or under rotating
parts. Stay clear of the discharge opening at
all times.
• Exercise extreme caution when operating on
or crossing gravel drives, walks, or roads. Stay
alert for hidden hazards or traffic.
• After striking a foreign object, stop the engine,
remove the ignition key, thoroughly inspect the
machine for any damage, and repair the
damage before restarting and operating the
machine.
• If the machine should start to vibrate
abnormally, immediately stop the engine and
check the machine for the cause of vibration.
Vibration is generally a warning of trouble.
• Stop the engine whenever you leave the
operating position, before unclogging the rotor
blade housing or discharge chute, and when
making any repairs, adjustments or
inspections.
• When cleaning, repairing, or inspecting the
machine, stop the engine and make certain
that the rotor blades and all moving parts have
stopped.
• Do not run the engine indoors, except when
starting the engine and for transporting the
machine in or out of a building. Open the
outside doors; exhaust fumes are dangerous.
• Exercise extreme caution when operating the
machine on sloped surfaces.
• Never operate the machine without proper
guards and other safety protective devices in
place and working.
• Never direct the discharge toward people or
areas where property damage can occur.
Keep children and others away.
• Do not overload the machine capacity by
attempting to clear snow at too fast a rate.
• Look behind you and use care when backing up
with the machine.
• Disengage power to the rotor blades when
machine is transported or not in use.
• Never operate the machine without good visibility
or light. Always be sure of your footing, and keep
a firm hold on the handles. Never run with the
machine.
• Never touch a hot engine or muffler.
Page 4

4
Clearing a Clogged Discharge
Chute
Important: The most common cause of injury
associated with snow blowers is from hand
contact with rotating rotor blades inside the
discharge chute. Never use your hand to clean
out the discharge chute.
To clear the chute:
• Shut the engine off!
• Wait 10 seconds to be sure the rotor blades
have stopped rotating.
• Always use a clean-out tool, not your hands.
Maintenance & Storage
Check all fasteners often, to ensure proper
tightness and that the machine is in safe working
condition.
Allow the engine to cool before storing it in any
enclosure. Never store the machine with fuel in the
fuel tank inside a building where ignition sources
are present, such as hot water heaters, space
heaters, or clothes dryers.
Always refer to the manual for important details if
the machine is to be stored for an extended period.
Maintain or replace safety and instruction labels as
necessary.
Continue running the machine for a few minutes
after throwing snow to prevent rotor blades from
freezing up.
Snow Blower Safety
The following list contains safety information that you
must know before operating this machine.
• Rotating rotor blades can injure fingers or hands.
Stay behind the handles and away from the
discharge opening while operating the machine.
• Keep your face, hands, feet, and any other part
of your body or clothing away from moving or
rotating parts.
• Before adjusting, cleaning, repairing, and
inspecting the machine, and before unclogging
the discharge chute, stop the engine, remove the
key, and wait for all moving parts to stop.
• Before leaving the operating position, stop the
engine, remove the ignition key, and wait for all
moving parts to stop.
• If a shield, safety device, or decal is damaged,
illegible or lost, repair or replace it before
beginning operation. Tighten any loose fasteners.
• Do not smoke while handling gasoline.
• Do not use the machine on a roof.
• Do not touch the engine while it is running or soon
after it has stopped because the engine may be
hot enough to cause a burn.
• Only perform those maintenance instructions
described in this manual. Before performing any
maintenance, service, or adjustment, stop the
engine and remove the key. Contact an
Authorized Service Dealer if major repairs are
necessary.
• Do not change the governor settings on the
engine.
• Remove the key from the ignition switch before
storing the machine. Store fuel in an approved
container. When storing the machine for more
than 30 days, drain the fuel from the fuel tank to
prevent a potential hazard.
Page 5
5
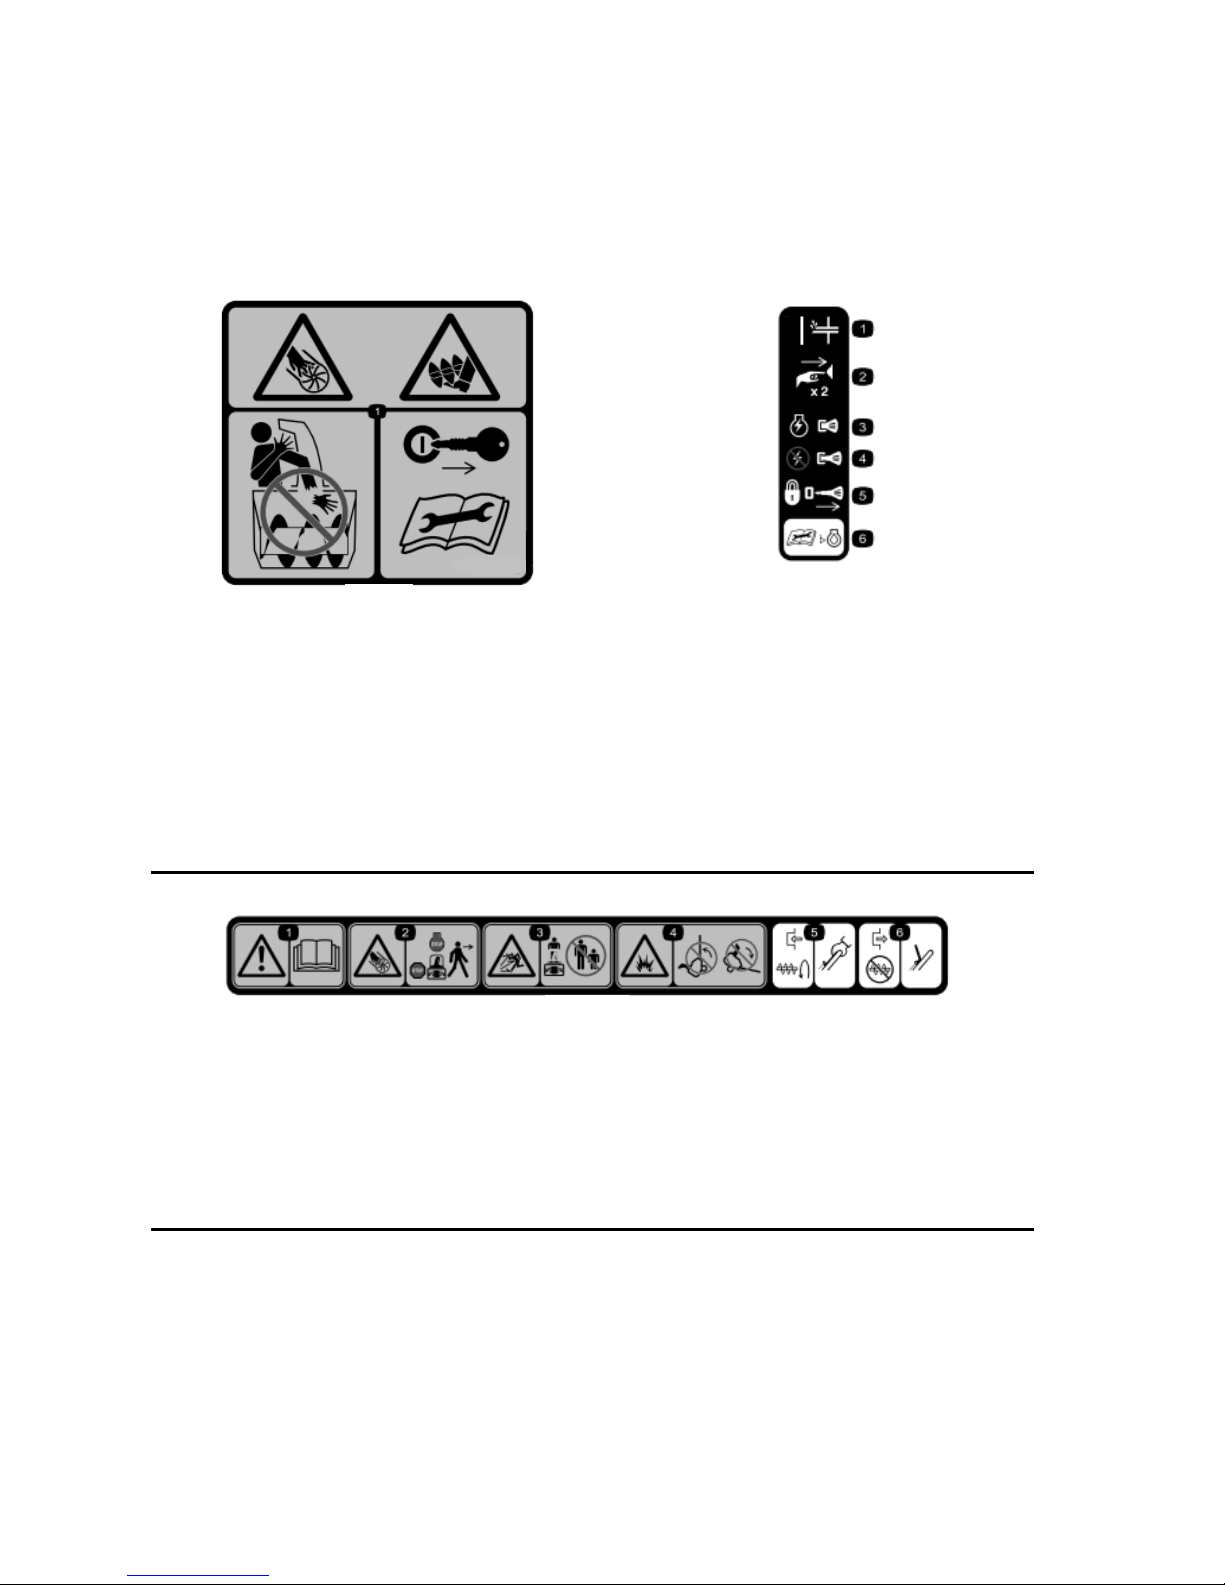
Safety and Instructional Decals
Important: Safety and instruction decals are located near areas of potential danger.
Replace lost or damaged decals.
Cutting/dismemberment hazard,
impeller and cutting/dismemberment
hazard, auger hazards—do not place
your hand in the chute; remove the
ignition key and read the instructions
before servicing or performing
maintenance.
1. Primer
2. Push the primer two times to prime
the engine
3. Push key in to switch the engine ―On‖
4. Pull key to switch the engine ―Off‖
5. Remove key to lock the engine
6. Read the engine’s operator’s manual
before checking the engine oil level
1. Warning: read the Operator's Manual.
2. Cutting/dismemberment hazard, impeller—stop the engine before leaving the machine.
3. Thrown object hazard—keep bystanders a safe distance from the machine.
4. Fuel spill hazard—do not tip machine forward or backward.
5. To engage the auger, squeeze the control bar.
6. Release the control bar to disengage the auger.
Page 6

6
SETUP
Loose Parts
Use the chart below to verify that all parts have been shipped.
Procedure
Description
Qty
Use
1
Oval-head bolts
Curved washers
Handle knobs
2
2 2 Install the handle.
2
No parts required
-
Install the recoil starter handle.
3
Discharge chute assembly
Screws
Washers
Locknuts
1
2
2
2
Install the discharge chute
assembly.
4
Bottle of engine oil
1
Fill the engine with oil.
5
No parts required
-
Adjust the control cable.
1. Installing the Handle
Parts needed for this procedure:
Oval-head bolts
Curved washers
Handle knobs
2
2
2
Procedure
1. Position the ends of the upper handle on
the inside of the lower handle and align
the holes.
2. Insert the oval-head bolts into the aligned
holes, with the bolt heads on the outside
of the handle (Figure 1).
3. Install the curved washers and the handle
knobs on the bolt on the inside of the
handle (Figure 1) and tighten the knobs
securely.
Important: Ensure that the cable is
routed to the outside of the handle.
2. Installing the Recoil
Starter Handle
Parts needed for this procedure:
(none)
Procedure
Install the recoil starter handle in the rope
guide as shown in Figure 2.
Figure 1
Figure 2
Page 7

7
3. Installing the Discharge
Chute
Parts needed for this procedure:
Discharge chute assembly
Screws
Washers
Locknuts
1
2
2
2
Procedure
Install the discharge chute assembly (Figure 3).
Note: Install the bolts from inside the discharge
chute assembly so that the washers and
locknuts are on the outside of the chute.
Important: Do not over-tighten locknuts.
4. Filling the Engine with Oil
Parts needed for this procedure:
Bottle of engine oil
Important: Before starting the engine, fill the
engine with oil. Your machine does not come
with oil in the engine, but it does come with a
bottle of oil.
Max fill: 12 oz. (0.35 L)
Type: Automotive detergent oil with an API
service classification of SJ, SL, or higher.
Use Figure 4 to select the best oil viscosity for
the outdoor temperature range expected.
Procedure
1. Move the machine to a level surface.
2. Clean around the oil fill cap.
3. Unscrew the oil fill cap and remove it.
4. Slowly pour oil into the oil fill hole. Wait 3
minutes, and then check the oil level on the
dipstick by wiping the dipstick clean and
then inserting, but not screwing in, the oil fill
cap into the hole.
Note: Refer to Figure 5 to determine the
proper oil level on the dipstick.
Note: Fill the engine crankcase with oil until
the dipstick indicates that the engine oil
level is correct as in Figure 5. If you overfill
the engine with oil, remove the excess oil
as directed in ―Changing the Engine Oil.‖
Note: You may tip the machine forward
slightly to make adding oil easier. Remember
to return the machine to its operating position
before checking the oil level.
Important: Do not tip the machine all the
way forward onto its nose or fuel may
leak out of the machine.
5. Screw the oil fill cap into the oil fill hole and
hand tighten it securely.
Figure 4
Figure 5
Figure 3
Page 8

8
5. Adjusting the Control Cable
Parts needed for this procedure:
(none)
Service Interval
After the first hour & yearly: check the
control cable and adjust it if necessary
Important: You may need to adjust the
control cable before you operate the
machine for the first time.
Important: The control cable must have
some slack when you disengage the control
bar for the rotor blades to stop properly.
Checking the Control Cable
Move the control bar back toward the
handle to remove the slack in the
control cable (Figure 6).
Adjusting the Control Cable
1. Slide up the spring cover and unhook the
spring from the adjuster link (Figure 7).
Pulling up on the adjuster link and cable
may make unhooking the spring easier.
2. Move the Z-fitting to obtain a higher or
lower hold on the adjuster link as needed
to obtain the 1/16-inch to 1/8-inch (2mm
to 3mm) gap between the control bar and
the handle (Figure 7).
Note: Moving the Z-fitting higher decreases
the gap between the control bar and the
handle; moving it lower increases the gap.
3. Hook the spring to the adjuster link and
slide the spring cover over the adjuster link.
4. Check the adjustment (refer to ―Checking
the Control Cable‖ above).
Note: The belt may slip (squeal) in wet
conditions; to dry out the drive system, start
the rotor and run it without a load for 30
seconds.
Figure 7
Figure 6
Page 9

9
Operation
Note: Determine the left and right sides of the
machine from the normal operating position.
Gasoline is extremely flammable and explosive.
A fire or explosion from gasoline can burn you
and others.
• To prevent a static charge from igniting the
gasoline, place the container and/or machine
on the ground before filling, not in a vehicle or
on an object.
• Fill the tank outdoors when the engine is cold.
Wipe up spills.
• Do not handle gasoline when smoking or around
an open fame or sparks.
• Store gasoline in an approved fuel container,
out of the reach of children.
• Do not tip the machine either forward or
backward with fuel in the fuel tank; otherwise,
fuel may leak out of the machine.
Filling the Fuel Tank
Fill the fuel tank with fresh unleaded gasoline
having an octane rating at or near 87 from a
major name-brand service station (Figure 8).
Important: Do not add oil to the gasoline.
Important: Do not use E85 or E20 fuel.
Alternative fuels with high alcohol content can
cause hard starting, poor engine performance,
and may cause internal engine damage.
Note: For best results, purchase only the quantity of
gasoline that you expect to use in 30 days. Otherwise,
you may add fuel stabilizer to newly purchased
gasoline to keep it fresh for up to 6 months.
Checking the Engine Oil
Service Interval:
Before each use or daily —Check the engine
oil level and add oil if necessary.
Procedure
1. Ensure that the fuel tank is not overfilled (see
Figure 8) and that the fuel cap is securely in place.
2. Move the machine to a level surface.
3. Clean around the oil fill cap.
4. Unscrew the oil fill cap and remove it.
5. Wipe the dipstick that is on the oil fill cap with
a clean cloth.
6. Insert, but do not screw in, the oil fill cap into
the oil fill hole.
7. Remove the oil fill cap and check the dipstick.
8. To determine the proper oil level on the
dipstick, refer the Figures and accompanying
instructions under ―Filling the Engine with Oil.‖
9. Screw the oil fill cap into the oil fill hole and hand
tighten it securely.
Starting the Engine
1. Push the ignition key fully inward to the
―On‖ position (Figure 9).
2. Move the choke lever fully to the right (Figure 10).
Figure 9
Figure 10
½ inch
(13mm)
Figure 8
Page 10

10
3. Firmly push in the primer 2 times with your
thumb holding the primer in for a second
before releasing it each time (Figure 11).
Note: Remove your glove when you push in
the primer so that air cannot escape from
the primer hole.
Important: Do not use the primer or
choke if the engine has been running and
is hot.
Excessive priming may flood the engine
and prevent it from starting.
4. Connect an extension cord to a power
source and the machine, and push the
electric-start button (model 38282 only)
(Figure 12), or pull the recoil start handle
(Figure 13).
Note: Only use a UL-listed, 16-gauge
extension cord recommended for outdoor
use that is not longer than 50 feet (15m).
The electrical cord can become damaged,
causing a shock or fire.
Thoroughly inspect the electrical cord
before plugging it into a power source. If
the cord is damaged, do not use it to
start the machine. Replace or repair the
damaged cord immediately. Contact an
Authorized Service Dealer for assistance.
Important: Run the electric starter no more than
10 times at intervals of 5 seconds on, and then 5
seconds off. Running the electric starter
extensively can overheat and damage it. If the
engine does not start after this series of
attempts, wait at least 40 minutes to allow the
starter to cool before attempting to start it again.
If the engine does not start after the second
series of attempts, take the machine to an
Authorized Service Dealer for service.
Note: If the recoil starter does not operate
properly, it may be frozen. Thaw out the starter
before attempting to start the machine.
5. While the engine is running, move the choke
lever gradually to the left.
6. Unplug the extension cord from the power
source and the machine (model 38282 only).
If you leave the machine plugged into a
power source, someone can inadvertently
start the machine and injure people or
damage property. Unplug the power cord
whenever you are not starting the machine.
Figure 11
Figure 12
Figure 13
Page 11

11
Figure 17
Engaging the Rotor Blades
To engage the rotor blades, hold the control bar
against the handle (Figure 14).
Disengaging the Rotor Blades
To disengage the rotor blades, release the control
bar (Figure 15).
Stopping the Engine
To stop the engine, pull the ignition key outward until
it clicks into the ―Off‖ position (Figure 16) or move the
choke lever fully to the right (Figure 10).
Adjusting the Discharge
Chute and Chute Defector
1. Adjust the control handle to change the direction
of snow (Figure 17).
2. Pull the handle apart from the gear to adjust the
angle of chute cap (Figure 18).
Clearing a Clogged Discharge
Chute
Important: The most common cause of injury
associated with snow blowers is from hand
contact with the rotating rotor blades inside
the discharge chute. Never use your hand to
clean out the discharge chute.
To clear the chute:
• Shut the engine off!
• Wait 10 seconds to be sure the rotor blades
have stopped rotating.
• Always use a clean-out tool, not your hands.
Figure 15
Figure 14
Figure 18
Figure 16
Page 12

12
Self-Propelling the Snow
Blower
Lift the machine handle until the wheels are just off
the ground and the scraper and rotor blades touch
the ground. The machine will propel forward
(Figure 19).
Note: By slightly varying lifting force on the handle,
you can control the forward speed of the machine. In
heavy snow, push forward on the handle if
necessary, but let the machine work at its own pace.
Do not lift the handle any more than necessary,
because the scraper will lift off the ground and snow
will escape behind the machine.
Preventing Freeze-up After Use
• Let the engine run for a few minutes to prevent
moving parts from freezing. Stop the engine,
wait for all moving parts to stop, and remove ice
and snow from the machine.
• Clean off any snow and ice from the base of
the chute.
• Rotate the discharge chute left and right to free
it from any ice buildup.
• With the ignition key in the Off position, pull the
recoil starter handle several times or connect
the electrical cord to a power source and the
machine and push the electric star t button once
to prevent the recoil starter and/or the electric
starter from freezing up.
• In snowy and cold conditions, some controls
and moving parts may freeze. Do not use
excessive force when trying to operate frozen
controls. If you have difficulty operating any
control or part, start the engine and let it run for
a few minutes.
Operating Tips
The rotor blades can throw stones and other
foreign objects and cause serious personal injury
to the operator or to bystanders.
Keep the area to be cleared free of all objects
that the rotor blades could pick up and throw.
Keep all children and pets away from the area
of operation.
• Remove snow as soon as possible after it falls.
• Overlap each pass to ensure complete snow
removal.
• Discharge snow downwind whenever possible.
Figure 19
Page 13

13
Maintenance
Recommended Schedules:
Maintenance Service Interval
Maintenance Procedure
After the first hour
• Check the control cable and adjust it if necessary
• Check for loose fasteners and tighten them if necessary
After the first 2 hours
• Check the engine oil
Daily or before each use
• Check the engine oil level and add oil if necessary
Annually
• Check the control cable and adjust it if necessary
• Inspect the rotor blades and have an Authorized Service
Dealer replace the rotor blades and scraper if necessary
• Change the engine oil
• Service the spark plug and replace it if necessary
• Check for loose fasteners and tighten them if necessary
• Have an Authorized Service Dealer inspect the drive belt
and replace it if necessary
Annually or before storage
• Prepare the machine for storage
Adjusting the Control Cable
Refer to ―Adjusting the Control Cable‖ in Setup.
Inspecting the Rotor Blades
Service Interval
Yearly. Inspect the rotor blades and have an
Authorized Service Dealer replace the rotor
blades and scraper if necessary.
Before each session, inspect the rotor blades
for wear. When a rotor blade edge has worn
down to the wear indicator hole, have an
Authorized Service Dealer replace the rotor
blades and the scraper (Figure 20).
Changing the Engine Oil
Service Interval
After the first 2 hours, then yearly. Run the
engine a few minutes before changing the
oil to warm it. Warm oil flows better and
carries more contaminants.
Procedure
1. Ensure that the fuel tank is not overfilled
(Figure 8) and that the fuel cap is secure.
2. Move the machine to a level surface.
3. Place a drain pan under the oil drain plug.
Remove the drain plug, and tip the machine
backward (handle down) halfway to the
ground to drain the used oil into the drain pan.
Important: Do not tip the machine all the
way to the ground or fuel may leak out.
4. After draining the used oil, return the
machine to the operating position.
5. Re-install the drain plug and tighten it securely.
6. Clean around the oil fill cap.
7. Unscrew the oil fill cap and remove it.
8. Refill the engine with oil by referring to the
instructions under ―Filling the Engine with Oil.‖
9. Screw the oil fill cap into the oil fill hole,
and hand tighten it securely.
10. Wipe up any spilled oil.
11. Dispose of used oil properly at a local
recycling center.
Figure 20
Page 14

14
Servicing the Spark Plug
Service Interval: Yearly. Service the spark plug
and replace it if necessary.
1. Stop the engine and wait for all moving
parts to stop.
2. Disconnect the wire from the spark plug.
3. Clean around the spark plug.
4. Remove the spark plug from the cylinder head.
Important: Replace a cracked, damaged,
or dirty spark plug. Do not clean the
electrodes because grit entering the
cylinder can damage the engine.
5. Set the gap on the plug to 0.030 inch
(0.76mm) (Figure 21).
6. Install the spark plug and torque it to
20–22ft-lb (27–30 N-m).
7. Connect the wire to the spark plug.
Replacing the Drive Belt
If drive belt becomes worn, oil-soaked, excessively
cracked, frayed, or otherwise damaged, replace it.
1. Remove the 4 bolts that hold the drive belt
cover (Figure 22) in place.
Note: The transmission belt cover is fixed by
two small bolts, one nut, two tapping screws
and a piece of reinforced plate.
2. Remove the belt from the rotor pulley.
3. Press down on the idler arm and remove the
belt from between the tab on the idler arm
brake and the rotor pulley.
Note: The engine pulley belt guide is very
close to the pulley, and the belt may not fit
through the gap.
4. Twist the belt out in front of the belt guide so
that the belt is wedged between the belt
guide and the engine pulley.
5. Insert a screw driver into the hole in the belt
guide as shown in Figure 23, and flex the
belt guide toward the rotor pulley enough to
pull the belt through the gap.
Note: Take care not to distort or damage the
belt guide.
6. To install the new drive belt, reverse the
steps above.
Important: Ensure that you install the
drive belt so that it sits above the two
tabs on the idler arm and below the idler
arm brake. (Figure 24).
7. Install the drive belt cover with the
fasteners that you removed in step 1.
Figure 21
Figure 24
Figure 23
Figure 22
Page 15

15
Storage
Gasoline fumes are highly flammable,
explosive, and dangerous if inhaled. If you
store the product in an area with an open
fame, the gasoline fumes may ignite and
cause an explosion.
Do not store the machine in a house (living
area), basement, or any other area where
ignition sources may be present, such as hot
water and space heaters, clothes dryers,
furnaces, and other like appliances.
Do not store the machine with its handle
tipped down onto the ground, because oil will
leak into the engine cylinder and onto the
ground, and the machine will not start or run.
1. On the last refueling of the season, add fuel
stabilizer to fresh fuel as directed by the
engine manufacturer.
2. Run the engine for 10 minutes to distribute
the conditioned fuel through the fuel system.
3. Change the engine oil while the engine is still
warm. Refer to ―Changing the Engine Oil.‖
4. Drain the fuel from the tank and carburetor
by performing the following steps:
A. Loosen the fuel tank cap.
B. Unscrew, but do not remove, the small
screw on the side of the carburetor fuel
bowl (Figure 25) until the fuel begins to
drain from the carburetor. Drain the fuel
into an approved fuel container.
Important: Do not remove the
carburetor bowl bolt on the bottom of
the carburetor.
C. Wait for a few minutes until the fuel has
drained, then install the fuel cap and
tighten the small screw on the carburetor.
5. Dispose of unused fuel properly. Recycle it
according to local codes, or use it in your
automobile.
6. Remove the spark plug.
7. Squirt 2 teaspoons of oil into the spark plug
hole.
8. Install the spark plug by hand and then
torque it to 20–22ft-lb (27–30 N-m).
9. With the ignition key in the ―Off‖ position, pull
the recoil starter slowly to distribute the oil on
the inside of the cylinder.
10. Disconnect the ignition key from the lanyard
and store the ignition key in a safe place.
11. Clean the machine.
12. Touch up chipped surfaces with paint
available from an Authorized Service Dealer.
Sand affected areas before painting, and
use a rust preventative to prevent the metal
parts from rusting.
13. Tighten any loose fasteners. Repair or
replace any damaged parts.
14. Cover the machine and store it in a clean, dry
place out of the reach of children. Allow the
engine to cool before storing it in any enclosure.
Residual Risks
Even when the machine is used as prescribed
it is not possible to eliminate all residual risk
factors. The following hazards may arise in
connection with the machine’s construction
and design:
1. Damage to lungs if an effective dust mask
is not worn.
2. Damage to hearing if effective hearing
protection is not worn.
3. Damages to health resulting from vibration
emission if the power tool is being used over
longer period of time or not adequately
managed and properly maintained.
This machine produces an electromagnetic
field during operation. This field may under
some circumstances interfere with active or
passive medical implants. To reduce the risk
of serious or fatal injury, we recommend
persons with medical implants to consult
their physician and the medical implant
manufacturer before operating this machine.
Figure 25
 Loading...