

Page 1

SmartServer XMPP Client
Developer’s Guide
078-0471-01A
Page 2

Echelon, LON, LONWORKS, LonTalk, Neuron, LONMARK, 3120,
3150, LNS, LonMaker, and the Echelon logo are trademarks
of Echelon Corporation registered in the United States and
other countries. LonPoint and LonSupport are trademarks of
Echelon Corporation.
Other brand and product names are trademarks or
registered trademarks of their respective holders.
Neuron
Chips, LonPoint Modules, and other OEM Products
were not designed for use in equipment or systems which
involve danger to human health or safety or a risk of property
damage and Echelon assumes no responsibility or liability for
use of the Neuron
Chips or LonPoint Modules in such
applications.
Parts manufactured by vendors other than Echelon and
referenced in this document have been described for
illustrative purposes only, and may not have been tested by
Echelon. It is the responsibility of the customer to determine
the suitability of these parts for each application.
ECHELON MAKES NO REPRESENTATION, WARRANTY, OR
CONDITION OF ANY KIND, EXPRESS, IMPLIED, STATUTORY, OR
OTHERWISE OR IN ANY COMMUNICATION WITH YOU,
INCLUDING, BUT NOT LIMITED TO, ANY IMPLIED WARRANTIES OF
MERCHANTABILITY, SATISFACTORY QUALITY, FITNESS FOR ANY
PARTICULAR PURPOSE, NONINFRINGEMENT, AND THEIR
EQUIVALENTS.
No part of this publication may be reproduced, stored in a
retrieval system, or transmitted, in any form or by any means,
electronic, mechanical, photocopying, recording, or
otherwise, without the prior written permission of Echelon
Corporation.
Printed in the United States of America.
Copyright ©1997–2012 by Echelon Corporation.
Echelon Corporation
www.echelon.com
Page 3

Table of Contents
Preface ..................................................................................................... v
Purpose .......................................................................................................... vi
Audience......................................................................................................... vi
Requirements ................................................................................................. vi
For More Information and Technical Support................................................. vi
1 Using SmartServer XMPP................................................................. 1
Introduction...................................................................................................... 2
Supported XMPP Protocol and Extensions .............................................. 2
BOSH ........................................................................................................ 3
Addressing ................................................................................................ 3
Creating an XMPP Solution............................................................................. 4
Step 1: Configuring an XMPP Server .......................................................4
Step 2: Configuring the SmartServer XMPP Client ..................................8
Step 3: Developing a Client Application.................................................. 12
XMPP Chat Client Example.............................................................. 12
SOAP/XMPP Example .....................................................................13
Getting More Information on XMPP Programming........................... 14
Step 4: Adding User Accounts to the XMPP Server ............................... 15
Step 5: Exchanging Data over XMPP ..................................................... 18
Running SmartServer-Pidgin XMPP Chat........................................ 18
Creating a Web Connection Over XMPP ......................................... 23
SmartServer XMPP Client Developer’s Guide iii
Page 4

iv Preface
Page 5

Preface
You can use the Extensible Messaging and Presence Protocol (XMPP) to enable
communication between SmartServers and client applications that reside behind
restrictive firewalls.
SmartServer XMPP Client Developer’s Guide v
Page 6

Purpose
This document describes how to use XMPP to enable the SmartServer and client applications to
communicate bi-directionally when they are located behind firewalls.
Audience
This guide is intended for application developers creating SmartServer applications that run remotely
from the SmartServer, and that communicate with the SmartServer using SOAP over XMPP.
Requirements
Requirements for implementing a full XMPP solution are listed below:
• SmartServer 2.0 SP1 (Release 4.04.088) or newer.
• XMPP server. This document uses an ejabberd XMPP server, which is required if your
SmartServer’s firmware version is 4.04.088. You can use any XMPP compliant server if your
SmartServer’s firmware version is 4.04 .1 1 9 or newer .
• XMPP client application. This document is for software developers creating the XMPP client
application. The examples in this document use the Pidgin messaging client to demonstrate an
XMPP client application.
For More Information and Technical Support
If you have technical questions that are not answered by this document, you can contact technical
support. Free e-mail support is available or you can purchase phone support from Echelon or an
Echelon support partner. See
training services.
You can also view free online training or enroll in training classes at Echelon or an Echelon training
center to learn more about developing devices. You can find additional information about device
development training at
You can obtain technical support via phone, fax, or e-mail from your closest Echelon support center.
The contact information is as follows (check
information):
Region Languages Supported Contact Information
The Americas
www.echelon.com/support for more information on Echelon support and
www.echelon.com/training.
www.echelon.com/support for updates to this
English
Japanese
Echelon Corporation
Attn. Customer Support
550 Meridian Avenue
San Jose, CA 95126
Phone (toll-free):
1.800-258-4LON (258-4566)
Phone: +1.408-938-5200
Fax: +1.408-790-3801
lonsupport@echelon.com
vi Preface
Page 7

Region Languages Supported Contact Information
Europe
English
German
French
Italian
Echelon Europe Ltd.
Suite 12
Building 6
Croxley Green Business Park
Hatters Lane
Watford
Hertfordshire WD18 8YH
United Kingdom
Phone: +44 (0)1923 430200
Fax: +44 (0)1923 430300
lonsupport@echelon.co.uk
Japan
China
Other Regions
Japanese Echelon Japan
Holland Hills Mori Tower, 18F
5-11.2 Toranomon, Minato-ku
Tokyo 105-0001
Japan
Phone: +81.3-5733-3320
Fax: +81.3-5733-3321
lonsupport@echelon.co.jp
Chinese
English
Echelon Greater China
Rm. 1007-1008, IBM Tower
Pacific Century Place
2A Gong Ti Bei Lu
Chaoyang District
Beijing 100027, China
Phone: +86-10-6539-3750
Fax: +86-10-6539-3754
lonsupport@echelon.com.cn
English
Japanese
Phone: +1.408-938-5200
Fax: +1.408-328-3801
lonsupport@echelon.com
SmartServer XMPP Client Developer’s Guide vii
Page 8

viii Preface
Page 9

1
Using SmartServer XMPP
This chapter summarizes how the SmartServer and client applications can exchange
data using XMPP.
SmartServer XMPP Client Developer’s Guide 1
Page 10
Introduction
You can use the Extensible Messaging and Presence Protocol (XMPP) to enable SmartServers and
client applications to exchange data when firewalls prevent bi-directional communication. XMPP is an
open technology for real-time communication that provides a decentralized client-server architecture.
XMPP facilitates simple client-to-client communication where clients may reside behind different
firewalls, which are typically configured to allow outgoing connections, but block incoming
connections. With XMPP, SmartServers and client applications function as clients to a shared XMPP
server. In this case, the client-XMPP connections are outgoing and therefore allowed by firewalls—
without opening any ports or creating any special firewall configurations.
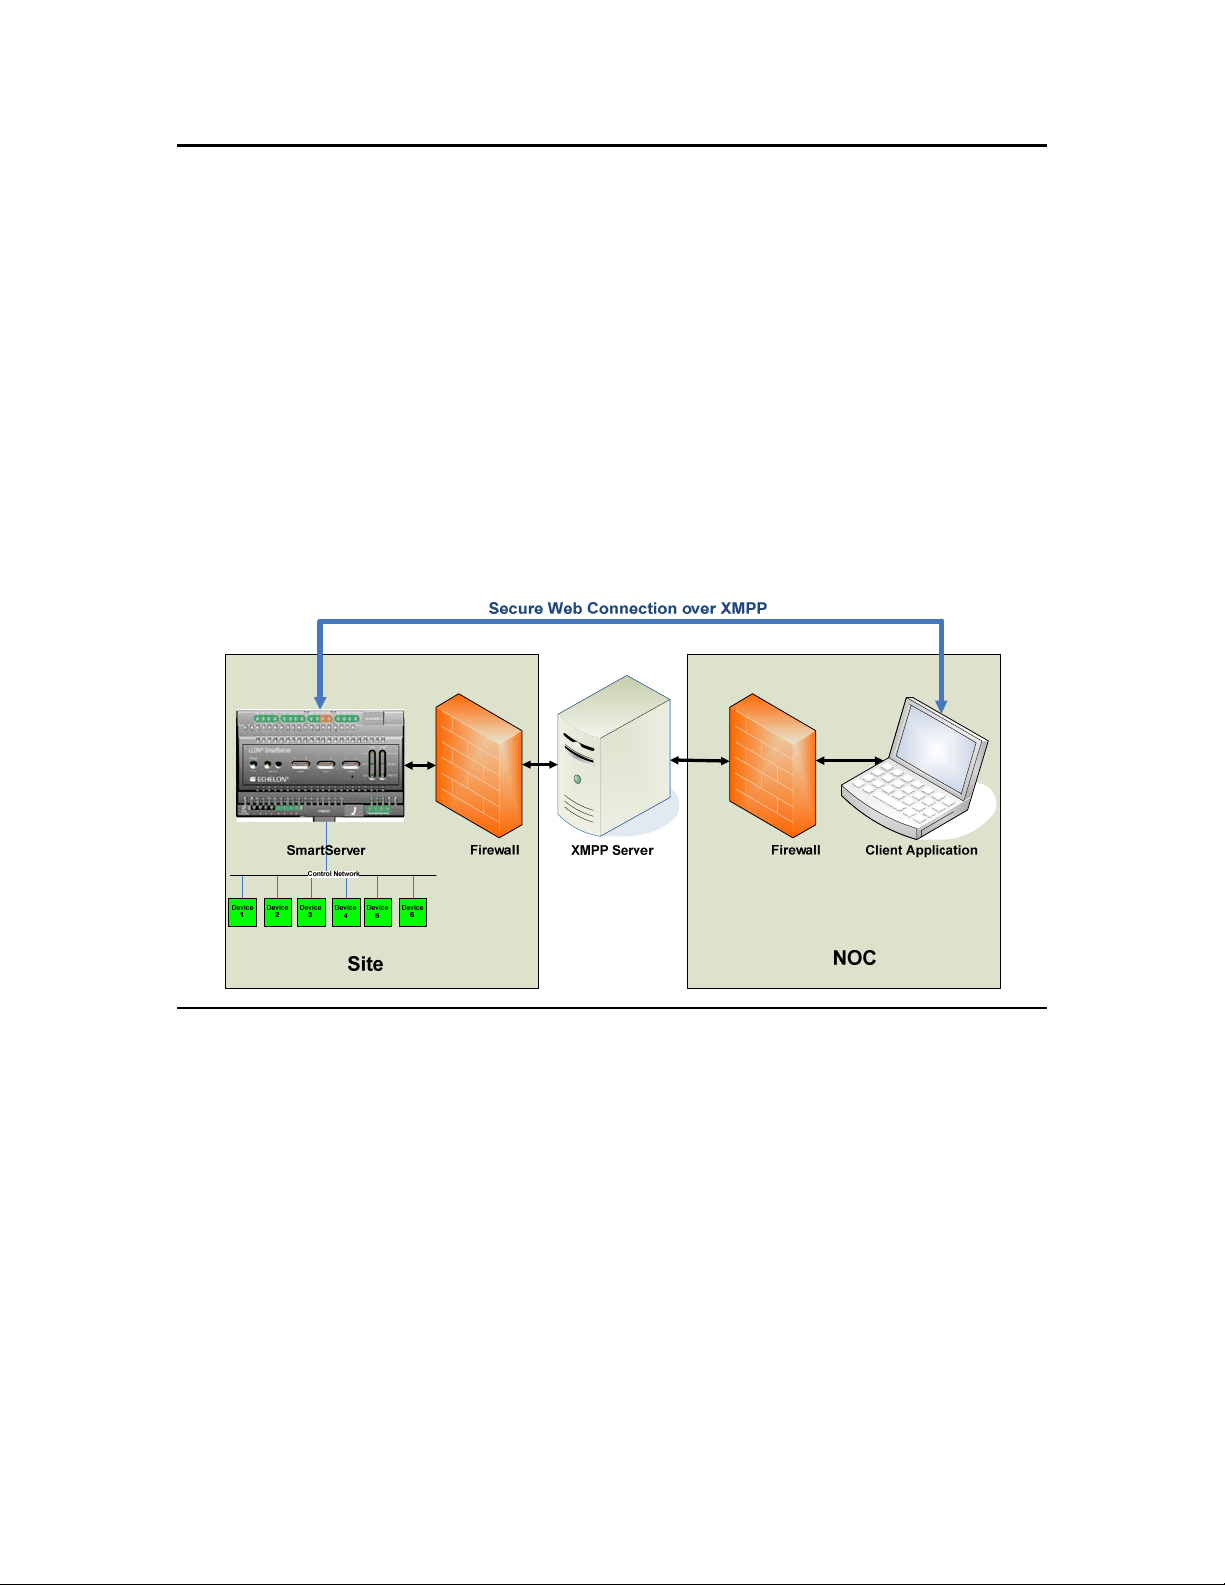
The SmartServer includes a built-in XMPP client that enables it communicate bi-directionally with a
client application. Client applications for the SmartServer are typically enterprise applications such as
energy management, demand response, or supervisory control applications. Both the SmartServer and
the client application may be behind different firewalls, and the firewalls only need to support
outbound access to the XMPP server. The XMPP server may be on the same server as the client site,
or it may be running on a separate server either at the same location or at a remote site. The following
figure illustrates a typical system using a SmartServer with XMPP to communicate with an
XMPP-enabled client application at a network operations center (NOC).
Supported XMPP Protocol and Extensions
XMPP is defined by base protocol and a number of optional protocol extensions for supporting
different types of clients and applications. The base protocol and the extensions supported by
the SmartServer are defined at the following locations:
xmpp.org/xmpp-protocols/xmpp-core/
•
xmpp.org/protocols/
•
xmpp.org/extensions/xep-0124.html
•
xmpp.org/extensions/xep-0206.html
•
xmpp.org/extensions/xep-0072.html
•
xmpp.org/extensions/xep-0060.html
•
Additional XMPP extensions are listed at the following location:
xmpp.org/xmpp-protocols/xmpp-extensions/
•
2 Using SmartServer XMPP
Page 11

The SmartServer supports the following XMPP extensions:
Bidirectional-streams Over
Synchronous HTTP
(BOSH, XEP-0124)
XMPP over BOSH (XEP-
0206)
SOAP over XMPP (XEP-
0072)
Specifies how a binary stream of data can be carried on the HTTP
protocol. XMPP uses a connection method that does not require a
client to maintain a long-lived TCP connection.
BOSH emulates a bidirectional streams that are similar to TCP
binding, but implemented efficiently using multiple, synchronous
HTTP or HTTPS request/response pairs.
Specifies how XMPP can be implemented over a BOSH
connection.
Specifies how SOAP messaging can be performed over XMPP.
The SmartServer uses SOAP for communicating with client
applications.
BOSH
BOSH is used by both the SmartServer and client applications to exchange data. BOSH-based systems
are usually deployed with a special connection manager that acts as a proxy between a client and the
XMPP Server. If a client resides behind a restrictive firewall, it has to be configured to use a BOSH
connection manager. The BOSH connection manager may be implemented on the same server with
the XMPP server, and many XMPP server implementations include an embedded BOSH connection
manager.
The client starts an XMPP session with the XMPP server by sending an initial HTTP or HTTPS
request to the BOSH connection manager. The BOSH connection manager then opens a regular
XMPP connection to the XMPP server, forwards the request, and receives an XMPP reply, which it
forwards to the client in an HTTP or HTTPS response. The client then authenticates with the XMPP
server. After the client has successfully authenticated with the XMPP server, it is ready for
communication.
During the client’s initial request, BOSH properties are used to drive the communication with the
BOSH connection manager, including the number of HTTP connections to use and a request timeout.
The value of the timeout property is determined by the client. When the client does not send or receive
any XMPP message for longer than the timeout period, the BOSH connection manager sends
keep-alive messages to the client if the timeout period is about to expire. If the client does not have
anything to send to the XMPP server, then the client also sends a keep-alive message with the defined
timeout. The client and the BOSH connection manager keep sending these keep-alive messages every
timeout interval until either the BOSH connection manager receives data for the client and returns it in
the response’s body, or the client sends new data within the request’s body.
Addressing
Each XMPP client (SmartServer or client application) requires a unique address, called a
Jabber ID (JID), which has the following format: [<userName>]@<hostname>/[<resource>=].
The following table describes each components of the JID:
userName Identifies a user name registered with the XMPP server. XMPP
clients can use the user name of any user configured on the
XMPP server. For SmartServer clients, you can use the MAC
IDs as the userName to distinguish multiple SmartServer clients
more easily.
hostname The hostname of the XMPP server. This may be the same as
the domain name of the XMPP server host, or it may be a
different name specified in the XMPP server configuration.
resource Identifies a specific client belonging to the user (for example
SmartServer XMPP Client Developer’s Guide 3
Page 12

home, work, or mobile). This property enables a user to log in
from multiple locations. This property may be included in the
JID by appending a slash followed by the name of the resource.
For example, the full JID of a user's mobile account would
username@example.com/mobile.
be
For a SmartServer client, you can append “/ilon” to identify the
XMPP client as a SmartServer more easily.
For example, a JID for a SmartServer with a MAC ID of 08-00-00-1A-7C-62 that uses an
XMPP server with a hostname of myDomain.com would be 08-00-00-1A-7C-
62@myDomain.com/ilon. Client applications may use any JID, as long as they are unique for
each client and share the same hostname.
Creating an XMPP Solution
Enabling the SmartServer and client applications to exchange data using XMPP entails the following
steps, which are described in the subsequent chapters:
1. Configuring an XMPP server.
2. Configuring the SmartServer as an XMPP client.
3. Developing a client application.
4. Adding user accounts to the XMPP server for the SmartServers and client applications.
5. Exchanging data between the SmartServer and client application over XMPP.
Step 1: Configuring an XMPP Server
You need to configure an XMPP server to facilitate bi-directional client-to-client communication
between SmartServers and client applications. You can use any XMPP server that supports BOSH.
For a list of available XMPP servers, go to
SmartServer XMPP support using the ejabberd XMPP server, which includes a BOSH connection
manager that is enabled by default.
To download, install, and configure the XMPP Server, follow these steps:
1. Download the ejabber d XMPP server from
www.process-one.net/en/ejabberd/ (commercial Web site), or http://www.processone.net/en/blogs/ (blogs).
xmpp.org/xmpp-software/servers/. Echelon has tested the
www.ejabberd.im/ (community Web site),
4 Using SmartServer XMPP
Page 13

2. Install the ejabberd Server following these steps:
a. Fo llow the instructions in the Setup wizard to install the ejabberd Server.
b. In the ejabberd Server domain window, accept the default, which is the name of your
computer.
Tip: You will need to enter the information you specify in the installer on multiple
occasions; therefore, open a text editor, and then copy and paste the ejabberd server domain
and the administrator password that you will enter in step d.
c. The installer creates an administrator user account. Accept the default “admin” user name, or
enter a different name (do not enter spaces).
SmartServer XMPP Client Developer’s Guide 5
Page 14

d. Enter a password for the administrator that is at least five characters, and then confirm it.
e. Complete the ejabberd Setup wizard. The installation may take up to five minutes depending
on your system.
3. Start the ejabberd Server following these steps:
a. Click Start, point to Programs, point to ProcessOne, and then click Start ejabberd.
b. A Command prompt opens stating that ejabberd is starting.
6 Using SmartServer XMPP
Page 15

c. The Command prompt closes automatically after approximately 40 seconds, the ejabberd
Server starts, and then a Web page opens automatically informing you that the ejabberd
Server has started. The Start Web page includes the user name for logging in to the ejabberd
Server.
d. Click the admin interface link.
Note: The admin interface uses port 5280 to access the ejabberd server; therefore, verify that
this port is open on your computer.
e. Enter the administrator user name and password in the login dialog that opens. The default
user name is “admin@<computerName>”. If you forget the name of your computer, you can
copy it from the ejabberd Start Web page.
SmartServer XMPP Client Developer’s Guide 7
Page 16

4. The ejabberd Web Admin Web page opens.
Step 2: Configuring the SmartServer XMPP Client
You can setup a SmartServer as an XMPP client that can be accessed by one or more remote
clients. Remote clients include client applications and other SmartServers. Each remote client
can communicate with one or more SmartServers using SO AP o ver XMPP; therefore, the
XMPP solution can be used to facilitate communication between a single SmartServer and
client application, or many SmartServers and many client applications.
You can configure the SmartServer XMPP client using either the SmartServer’s built-in Web
pages or a SOAP application. To setup a SmartServer as an XMPP client using the built-in
Web pages, follow these steps:
1. Enable XMPP support on the SmartServer following these steps:
a. Enter the following URL in a Web browser:
http://[SmartServerIpAddress]/user/echelon/index.htm?elon_enable_message_service=true
where SmartServerIpAddress is the IP address or hostname of your SmartServer
b. Enter your log in credentials. The SmartServer Web interface opens with the Welcome Web
page.
8 Using SmartServer XMPP
Page 17

2. Add the XMPP server as a host device to the SmartServer following these steps:
a. In the navigation pane on the left side of the SmartServer Web interface, right-click the LAN
entry, point to Add Host, and then click Server on the shortcut menu.
b. The Setup – Host Web page opens and a host entry for the XMPP server is added to the
navigation pane.
c. In the IP or Hostname box, enter the IP address or hostname of your XMPP server, and then
click Submit. The name of the XMPP host device in the navigation pane is updated. The
SmartServer XMPP Client Developer’s Guide 9
Page 18

same XMPP server must be used by the SmartServer and all client applications that will
access the SmartServer.
3. Add a message service to the XMPP server following these steps:
a. Right-click the XMPP host entry, point to Add Service, and then click Message on the
shortcut menu.
b. The Setup – Message Web page opens.
c. Enter the following properties:
Message Port The port used for the XMPP connection manager. This is
determined by the configuration for the XMPP server.
10 Using SmartServer XMPP
Page 19

The default port is 5280 for the ejabberd XMPP
connection manager.
Message Domain Enter the ejabberd server domain that you specified in
2b in the Step 1: Configuring an XMPP Server
step
section. By default, this is the name of your computer.
Message Server
BOSH Path
Accept the default XMPP BOSH path, which is /httpbind. Typically, you should not have to change this.
User Name To ensure a unique user name, enter the MAC ID for
your SmartServer. You can locate the program ID from
the SmartServer hardware, a SOAP program, or the
SmartServer Web pages.
• Hardware. The MAC ID is printed on a label on
the bottom of your SmartServer
• Programmatically. The MAC ID is included in the
header of all SmartServer SOAP messages.
• SmartServer Web Pages. The MAC ID is
displayed in the System Info Web page. To open
this Web page, right-click the SmartServer host
device in the navigation pane, point to Setup, and
then click System Info.
Tip: To improve the readability of the MAC ID, enter
the hyphens between each pair of its hex digits.
Password Click Change Password. Enter and con firm the
password you specified for the administrator account in
2d in the Step 1: Configuring an XMPP Server
step
section. Click OK.
Tip: If you copied your ejabberd domain server and administrator password to a text file,
also copy and paste the MAC ID to the file. You will need the MAC ID when creating a
user for the SmartServer XMPP client on the ejabberd XMPP server.
d. Click Submit. The SmartServer notifies the XMPP server that it is online. If you are using
an ejabberd server, the SmartServer will appear in the Online Users list after you click
Submit.
SmartServer XMPP Client Developer’s Guide 11
Page 20

Step 3: Developing a Client Application
You can develop a client application that communicates with one or more SmartServers using XMPP.
You can build, send, and receive XMPP packets from your application, or you can use an XMPP client
library to accelerate your development (for a list of client libraries, go to the XMPP Standards
Foundation Web site at
www.igniterealtime.org/projects/smack/), which is also used in Apache projects. Other XMPP client
(
libraries should also work.
To demonstrate the SmartServer XMPP solution, this section describes how to configure the Pidgin
XMPP chat client, that we will later connect to the SmartServer via XMPP. In addition, this section
includes an example that shows how a client application can communicate with the SmartServer via
SOAP over XMPP.
XMPP Chat Client Example
To download, install, and configure Pidgin follow these steps:
xmpp.org/xmpp-software/libraries/). The SmartServer team uses Smack
1. Go to the Pidgin Web site at
2. Download and install the latest version of Pidgin.
3. Start Pidgin. To do this, click Start, point to Programs, and then click Pidgin. The Accounts
dialog opens.
4. Click Add. The Add Account dialog opens.
www.pidgin.im.
5. Add an account to Pidgin following these steps:
a. In the Protocol box, select XMPP.
b. In the Username box, enter “pidgin” or some other descriptive name.
c. In the Domain box, enter the ejabberd server domain that you specified in step
1: Configuring an XMPP Server section. By default, this is the name of your computer.
d. In the Resource box, enter “pidgin” or some other descriptive value that will be appended to
the IM messages.
e. In the Password box, enter a password for the user name specified in step b.
12 Using SmartServer XMPP
2b in the Step
Page 21

Tip: If you copied your ejabberd domain server, administrator password, MAC ID to a
text file, also copy and paste the pidgin user name, resource, and password to the file.
You will need this information when creating a user for the Pidgin XMPP client on the
ejabberd XMPP server.
f. Click Add.
g. An SSL Certificate Verification dialog opens. Click Accept.
SOAP/XMPP Example
The following example demonstrates how a client application can communicate with the SmartServer
via SOAP/XML over XMPP.
SOAP over XMPP Request
<iq to='08-00-00-1A-7C-62@nitrogen/ilon' type='set' id='dpRead1'>
SmartServer XMPP Client Developer’s Guide 13
Page 22

<Envelope xmlns="http://schemas.xmlsoap.org/soap/envelope/"
xmlns:xsi="http://www.w3.org/2001/XMLSchema-instance"
encodingStyle="http://schemas.xmlsoap.org/soap/encoding/">
<Header>
<messageProperties
xmlns="http://wsdl.echelon.com/web_services_ns/ilon100/v4.0/message/" />
</Header>
<Body>
<SystemService_Read_Info
xmlns="http://wsdl.echelon.com/web_services_ns/ilon100/v4.0/message/" >
<Data><iLONSystemService><UCPTsystemInfoType>SI_RTR</UCPTsystemInfoType
></iLONSystemService></Data>
</SystemService_Read_Info>
</Body>
</Envelope>
</iq>
SOAP over XMPP Response
<iq to='08-00-00-1A-7C-62@nitrogen/ilon'
type='set'
id='dpRead1'>
<Envelope xmlns="http://schemas.xmlsoap.org/soap/envelope/"
xmlns:xsi="http://www.w3.org/2001/XMLSchema-instance"
encodingStyle="http://schemas.xmlsoap.org/soap/encoding/">
<Header>
<messageProperties
xmlns="http://wsdl.echelon.com/web_services_ns/ilon100/v4.0/message/" />
</Header>
<Body>
<Read xmlns="http://wsdl.echelon.com/web_services_ns/ilon100/v4.0/message/">
<iLonItem>
<Item xsi:type="Dp_Data">
<UCPTname>Net/LON/iLON App/Real Time Clock/nvoRtTimeDate</UCPTname>
</Item>
</iLonItem>
</Read>
</Body>
</Envelope>
</iq>
<iq to='08-00-00-1A-7C-62@nitrogen/ilon'
type='set'
id='dpRead1'>
<Envelope xmlns="http://schemas.xmlsoap.org/soap/envelope/"
xmlns:xsi="http://www.w3.org/2001/XMLSchema-instance"
encodingStyle="http://schemas.xmlsoap.org/soap/encoding/">
<Header>
<messageProperties
xmlns="http://wsdl.echelon.com/web_services_ns/ilon100/v4.0/message/" />
</Header>
<Body>
<SystemService_Read_Info
xmlns="http://wsdl.echelon.com/web_services_ns/ilon100/v4.0/message/" >
<Data><iLONSystemService><UCPTsystemInfoType>SI_NETWORK</UCPTsystemInfo
Type></iLONSystemService></Data>
</SystemService_Read_Info>
</Body>
</Envelope>
</iq>
Getting More Information on XMPP Programming
For more information on the XMPP protocol and development of applications that support XMPP, you
can do the following:
• Go to the XMPP Standards Foundation Web site at
14 Using SmartServer XMPP
xmpp.org.
Page 23

• Read Professional XMPP Programming with JavaScript an d jQuery (Moffit, Jack. Indianapolis:
Wiley Publishing, 2010).
• Read XMPP: The Definitive Guide. (Saint-Andre, Peter, Kevin Smith, and Remko Troncon.
Sebastopol: O’Reilly Media, 2009).
Step 4: Adding User Accounts to the XMPP Server
After you activate the XMPP client on the SmartServer and create a client application, you need to
create user accounts on the XMPP server for the SmartServer and client application. The procedure
for creating users depends on the XMPP server. The following section describes how to create users
for on the ejabberd XMPP server that was set up in
To add users to the ejabberd XMPP server, follow these steps:
1. Verify that you have started the ejabberd XMPP server and logged in to the ejabberd Web
Admin Web page as described in
2. Click Virtual Hosts.
Step 1: Configuring an XMPP Server.
Step 1: Configuring an XMPP Server.
3. Click the virtual host that you created in
virtual host corresponds to the ejabberd server domain that you specified in step
Configuring an XMPP Server section, which is the name of your computer by default.
4. Click Users.
Step 1: Configuring an XMPP Server. The name of the
2b in the Step 1:
SmartServer XMPP Client Developer’s Guide 15
Page 24

5. Enter the user name and password for the SmartServer following these steps:
a. In the User box, enter the MAC ID of your SmartServer that you entered in the SmartServer
Web interface in
b. In the Password box, enter the password you entered and confirmed in the SmartServer Web
interface. This is also the password you specified for the administrator account in step
the Step 1: Configuring an XMPP Server section.
step 4 of the Step 2: Configuring the SmartServer section.
2d of
c. Click Add User.
d. Your SmartServer XMPP client user name (MAC ID) should be listed under the User
property, and the “Online” status should appear under the Last Activity property. This
indicates that the XMPP server is communicating with the SmartServer.
16 Using SmartServer XMPP
Page 25

e. You can click the SmartServer XMPP client user name to view the connection status of your
SmartServer.
6. Repeat step 5 for the Pidgin client you created in the
3: Developing a Client Application.
XMPP Chat Client Example section in Step
SmartServer XMPP Client Developer’s Guide 17
Page 26

7. Repeat step 5 for any other SmartServer or client application.
Step 5: Exchanging Data over XMPP
After you have added user accounts to the XMPP server for the SmartServer XMPP client and your
client application, you can initiate communication between the SmartServer and client application.
This example connects the SmartServer via instant message to the Pidgin XMPP chat client created in
XMPP Chat Client Example section in Step 3: Developing a Client Application. In addition, it
the
shows how to create a Web connection that uses XMPP to enable comm uni cati on between
SmartServers that reside behind firewalls.
Running SmartServer-Pidgin XMPP Chat
To have the SmartServer communicate with the Pidgin XMPP chat client via instant message, follow
these steps:
1. Verify that Pidgin is running.
2. Click Buddies and then click New Instant Message.
3. Enter the user name for the SmartServer XMPP client, w hich sh o ul d be <SmartServer MAC ID>@
<ejabberd server domain>. You can copy this from the ejabberd Users Web page.
18 Using SmartServer XMPP
Page 27

4. Click OK.
5. The SmartServer and Pidgin XMPP instant message dialog opens.
6. Enter any message and then press ENTER. The SmartServer will respond with the following
message: “I like that statement.”
SmartServer XMPP Client Developer’s Guide 19
Page 28

Note: You can also view this message in the SmartServer console. See Appendix B of the
SmartServer 2.0 User’s Guide for more information on using the SmartServer console application.
7. You can send a SOAP/XML message via chat following these steps:
a. In the Buddy List dialog, click Tools and then click Plugins. The Plugins dialog opens.
20 Using SmartServer XMPP
Page 29

b. Select the XMPP Console check box and then click Close.
c. Right-click the Pidgin tray icon, point to XMPP Console, and then click XMPP Console.
SmartServer XMPP Client Developer’s Guide 21
Page 30

d. The XMPP Console dialog opens.
e. Co py and paste the following SOAP/XML request in the text box at the bottom:
<iq to='00-D0-71-03-01-22@jduvalgx620/ilon' type='set' id='req1'>
<Envelope xmlns="http://schemas.xmlsoap.org/soap/envelope/"
xmlns:xsi="http://www.w3.org/2001/XMLSchema-instance"
encodingStyle="http://schemas.xmlsoap.org/soap/encoding/">
<Header>
<messageProperties
xmlns="http://wsdl.echelon.com/web_services_ns/ilon100/v4.0/message/"/>
</Header>
<Body>
<SystemService_Read_Info
xmlns="http://wsdl.echelon.com/web_services_ns/ilon100/v4.0/message/">
<iLONSystemService>
<UCPTsystemInfoType>SI_TIME</UCPTsystemInfoType>
</iLONSystemService>
</SystemService_Read_Info>
</Body>
</Envelope>
</iq>
Note: Remember to replace the SmartServer user name in the iq element with your
SmartServer’s user name. The user name should be <SmartServer MAC ID>@ <ejabberd
server domain>/ilon. You can copy this from the SmartServer-Pidgin instant message
response displayed at the end of step 6.
f. Press ENTER.
g. The SmartServer returns the following system information related to time.
22 Using SmartServer XMPP
Page 31

Creating a Web Connection Over XMPP
You can create Web connections that use XMPP to communicate between SmartServers that
are located behind different firewalls. To set up a Web connection that uses XMPP, follow
these steps for each remote SmartServer:
1. In the SmartServer Web interface, right-click the LAN entry in the navigation pane, point to Add
Host, and then click i.LON SmartServer.
SmartServer XMPP Client Developer’s Guide 23
Page 32

2. In the Setup – Remote i.LON SmartServer Web page, enter the IP address or hostname of the
remote SmartServer in the IP or Hostname box, and then click Submit.
3. Right-click the new remote SmartServer entry in the navigation pane, point to Add Service, and
then click Message.
4. Set the following properties and then click Submit:
Message Domain Enter the ejabberd server domain that you specified in step
2b in the Step 1: Configuring an XMPP Server section. By
default, this is the name of your computer.
User Name Enter the MAC ID of the remote SmartServer. You can get
the MAC ID from the label on the remote SmartServer
hardware, programmatically, or you can right-click the
remote SmartServer host device in the navigation pane of
the local SmartServer Web interface, point to Setup, and
then click System Info.
24 Using SmartServer XMPP
Page 33

5. Right-click the new host entry in the navigation pane, point to Add Service, and then click
WebBinder Target on the shortcut menu. The Setup – Web Service page opens.
6. Click Submit. You can now use the new host as a target for Web connections as described in
Creating Web Connections in Chapter 4 of the SmartServer 2.0 User’s Guide.
SmartServer XMPP Client Developer’s Guide 25
Page 34

www.echelon.com
 Loading...