

Page 1

NodeBuilder®
Resource Report
Generator
User’s Guide
Release 1
Revision 1
®
@ ECHELON
C o r p o r a t i o n
078-0260-01A
Page 2

Echelon, LON, LONWORKS, LonTalk, Neuron, LONMARK, 3120, 3150,
NodeBuilder, ShortStack, the LonUsers logo, the Echelon logo, and
the LONMARK logo are registered trademarks of Echelon
Corporation. LonPoint, LonPoint Schedule Maker, LonMaker, and
LonSupport are trademarks of Echelon Corporation.
Other brand and product names are trademarks or registered
trademarks of their respective holders.
Neuron
Chips, LonPoint Modules, and other OEM Products were
not designed for use in equipment or systems which involve
danger to human health or safety or a risk of property damage
and Echelon assumes no responsibility or liability for use of the
Neuron
Chips or LonPoint Modules in such applications.
Parts manufactured by vendors other than Echelon and
referenced in this document have been described for illustrative
purposes only, and may not have been tested by Echelon. It is the
responsibility of the customer to determine the suitability of these
parts for each application.
ECHELON MAKES NO REPRESENTATION, WARRANTY, OR CONDITION
OF ANY KIND, EXPRESS, IMPLIED, STATUTORY, OR OTHERWISE OR IN
ANY COMMUNICATION WITH YOU, INCLUDING, BUT NOT LIMITED
TO, ANY IMPLIED WARRANTIES OF MERCHANTABILITY, SATISFACTORY
QUALITY, FITNESS FOR ANY PARTICULAR PURPOSE,
NONINFRINGEMENT, AND THEIR EQUIVALENTS.
No part of this publication may be reproduced, stored in a
retrieval system, or transmitted, in any form or by any means,
electronic, mechanical, photocopying, recording, or otherwise,
without the prior written permission of Echelon Corporation.
Printed in the United States of America.
Copyright ©2003 by Echelon Corporation.
Echelon Corporation
www.echelon.com
2 NodeBuilder Resource Report Generator User’s Guide
Page 3

Table of Contents
Introduction 2
Getting Started 3
System Requirements ..................................................................................... 4
Report Generator Updates .............................................................................. 4
Viewing Reports 5
Report Structure .............................................................................................. 6
Navigation........................................................................................................ 7
Reading Reports.............................................................................................. 8
Saving and Converting a Resource Report..................................................... 8
Printing a Resource Report ........................................................................... 10
Resource Report Generator Wizard 12
Generating a Resource Report...................................................................... 13
Welcome Page ..............................................................................................14
Resource Reports Page ................................................................................ 15
Report Language Selection Page ................................................................. 16
Support Files Preferences Page.................................................................... 17
Dependencies Handling Page....................................................................... 18
Server and Transformation Page ..................................................................19
Finish Page.................................................................................................... 20
Report Generator Progress Window ............................................................. 21
Generating Reports Locally and for Hosting 22
Generating a Local Report ............................................................................23
Generating a Report for Hosting.................................................................... 26
Verifying Hosted Reports............................................................................... 30
Hosting Reports for User-Defined Resources ............................................... 31
Resource File Validations.............................................................................. 35
Providing Supplementary Information 38
Usage.xml Data .............................................................................................39
Using the Usage Hint Editor Software........................................................... 40
Starting the Usage Hint Editor ....................................................................... 43
Creating a Usage Hint ................................................................................... 44
XHTML Restrictions....................................................................................... 45
Customizing Report Presentations 46
XSLT Transformations................................................................................... 47
Report Generator Templates Folder ............................................................. 47
Creating a Custom Report Presentation .......................................................49
Table of Contents i
Page 4

1
Introduction
The NodeBuilder Resource Report Generator is a
NodeBuilder Resource Editor plug-in that helps you
create reports that document resources that you select.
You can create reports for standard and user-defined
network variable types (NVTs), configuration property
types (CPTs), enumeration types, and functional profiles.
The report generator converts the resource definitions that
you select to extensible markup language (XML) format.
The report generator includes an extensible stylesheet
language transformation (XSLT) that allows a Web
browser or any other application that supports XSLT to
format the data in the XML report. You can modify the
XSLT files to create custom reports for your resource
data. You can host and view reports on your computer, or
you can host your reports on a Web server for remote,
multi-user access. You can see examples of hosted reports
created by the report generator at types.echelon.com and
types.lonmark.org.
In addition to viewing reports with a Web browser, you
can easily convert reports into Microsoft Word
documents, and with XSL or JavaScript knowledge,
convert reports into text, RTF, PDF, or any other format.
2 NodeBuilder Resource Report Generator User’s Guide
Page 5

2
Getting Started
The following section provides you with information on
how to set up your computer to view, generate, and
maintain resource reports.
3 NodeBuilder Resource Report Generator User’s Guide
Page 6

System Requirements
To generate reports, you need a computer with the NodeBuilder software and Internet
access (optional). To view reports, you only need a computer with a Web browser
(Internet Explorer 6.0 or later).
Software
Before installing the Report generator, you should have the following software
programs installed on your computer:
• NodeBuilder software version 3.1 or later (required)
• Internet Explorer 6.0 or later (required for viewing reports)
• A compression utility such as WinZip for opening downloaded support
files(recommended)
Hardware
If you want to host reports on a Web server, your computer should be connected to the
Internet. An Internet connection is required for downloading software updates, hosting
and accessing remotely hosted reports, and viewing the LONMARK® Web site for support
information.
Report Generator Updates
For the latest report generator updates, visit
http://www.echelon.com /downloads/.
4 NodeBuilder Resource Report Generator User’s Guide
Page 7

3
Viewing Reports
This section describes how to view and analyze reports. A
description of the report structure is also provided.
5 NodeBuilder Resource Report Generator User’s Guide
Page 8

Report Structure
Each report created by the report generator contains a single HTML page that serves as
an index page. This page, also known as the root index, contains links to pages with
report data that describes network variable types, configuration property types, functional
profiles, and enumeration types. The root index is also linked to an XSLT stylesheet.
Each report page may also contain links to the LONMARK Web site, or to other sites on
your local network or the Internet. The L
provides a report for the standard resources, and it provides utilities that may be referred
to by resource reports. For example, if your design contains the SCPTbypassTime
configuration property type, the report can link to the LONMARK Web site to show details
of this configuration property type. The SCPTbypassTime variable is based on the
SNVT_time_min network variable type.
Hint: For a practical experience, you may launch your Microsoft Internet Explorer and
point it to types.lonmark.org to view the standard resource report.
ONMARK Web site at types.lonmark.org
Figure 3.1 Report Structure
6 NodeBuilder Resource Report Generator User’s Guide
Page 9

Navigation
The resource report resembles a Web page and navigating through a report is much like
navigating through a Web site. To view a report, launch your Web browser and open the
report index page. For example, point your browser to types.lonmark.org to view the
following report.
In addition to using your Web browser to navigate through a report, each report page may
contain navigation options that allow you to perform a variety of functions. Table 3.1
describes these functions.
Table 3.1 Resource Report Navigation Functions
Navigation Item Description
Root Brings you back to the main report page (or root index)
Show All Lists all report items on a single page
Contact Links to the resource file set developer
LonMark Links to the LonMark Web site
Search box Allows you to perform a specific search on the report page in the reported items by
Print Prints the current report page
typing a name fragment
7 NodeBuilder Resource Report Generator User’s Guide
Page 10

Reading Reports
Each resource is listed on its own page and contains detailed information about its type,
attributes, related formats, and other useful information. The report page may also list all
resources referenced by the reported resource as well as those resources that refer to the
reported resource.
Note: Language string resources are not reported separately, but are used by the report pages in place of the
appropriate references.
Saving and Converting a Resource Report
You can convert a resource report into a variety of formats including Word documents,
PDF files, RTF files, or text files. You can then
e-mail, print, or archive these reports. For changing the appearance of a report or more
complex format conversions, see the Customizing Report Presentations section.
Saving a Resource Report as a Word, RTF, or Text File
You can save a resource report as a Microsoft Word, RTF, text file, or other word
processing document. To save a resource report as a word processing document, follow
these steps:
1. Open an existing report with your browser. See the Generating Reports Locally and for
Hosting section for instructions on how to generate a report.
2. Navigate to the desired section (Network Variables, Configuration Properties, Functional
Profiles, or Enumerations) from the index page.
8 NodeBuilder Resource Report Generator User’s Guide
Page 11
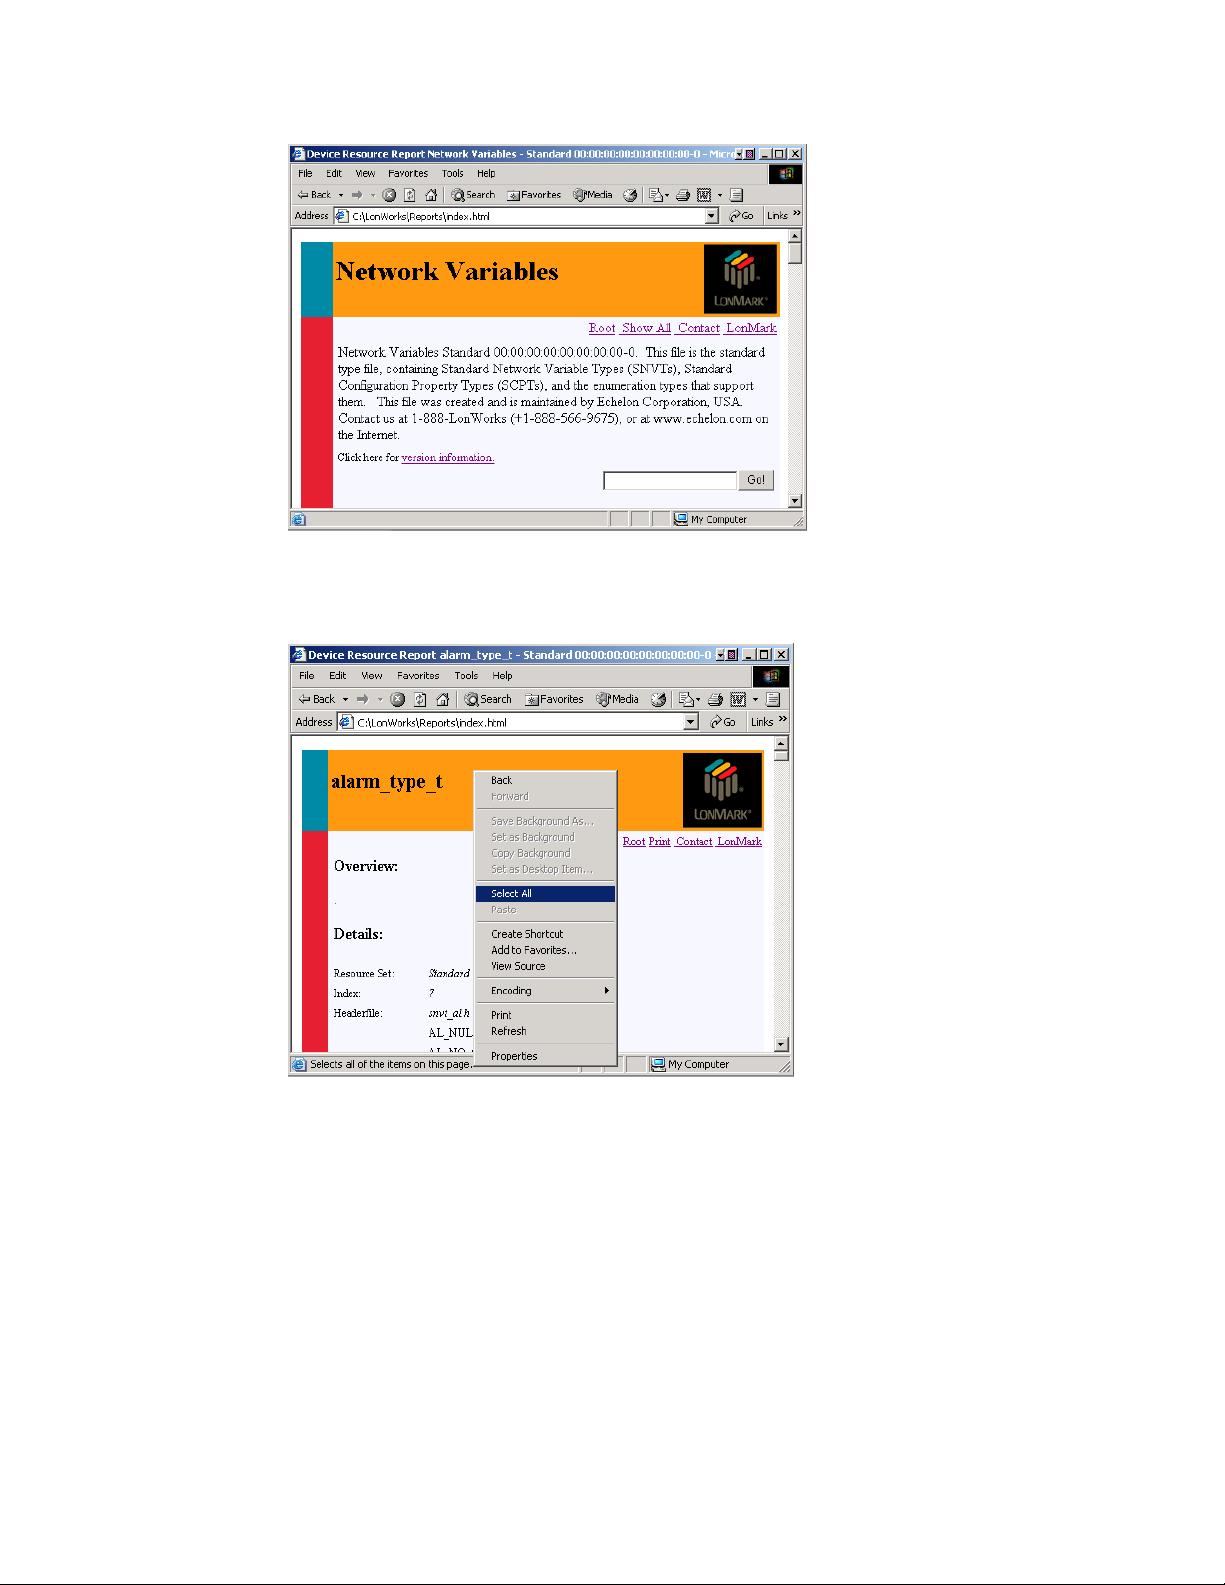
3. Select Show All from the report page. This displays all resources in that category (for
example, all network variable types).
4. Right click the page and choose Select All.
5. On the Edit menu, click Copy.
6. Start a word processing application that supports HTML content such as Microsoft Word.
7. Create a new document. For example, on the Word File menu, click New.
8. Paste the clipboard into the new document. For example, on the Word Edit menu, click
Paste. The report contents appear with formatting intact.
9. Repeat steps 2 through 8 for each section (Network Variables, Configuration
Properties, Functional Profiles, or Enumerations) from the root directory to save an
entire report. You can skip steps 6 and 7 and use the same document for all sections.
10. Save the new document. For example, on the Word File menu, click Save As.
11. Enter a file name and select the appropriate file type from the Save as Type list.
9 NodeBuilder Resource Report Generator User’s Guide
Page 12

12. Click Save.
Saving a Resource Report as a PDF File
You can convert a resource file to an Adobe Portable Document Format (PDF) file, using
Adobe Acrobat or any other tool capable of generating PDF documents. For example, to
convert a Word format resource report to PDF format, follow these steps:
1. Follow the procedure described above in the Saving a Resource Report as a Word, RTF,
or Text File section. Use Microsoft Word as save the file in Word format.
2. On the Acrobat menu, click Convert to Adobe PDF. The Acrobat software
converts the report to PDF.
Printing a Resource Report
You can print a resource report. Depending on the resources contained within your
report, the printed output may be very large. For example, a report of all standard
resources will contain over 500 pages. For large reports, hosting a report on a Web server
or creating a report CD may be better alternatives to printing a report. If you choose to
print a full report, the following guidelines will assist you in conserving paper while still
promoting readability.
Printing a Single Resource Definition
To print a single resource report page, perform the following steps:
1. Navigate to the desired resource definition from the index page in the report.
2. Select Print from the resource report page or open the File menu and then click Print.
The print dialog box appears.
3. Click Print.
Printing a Section
To print an entire section, perform the following steps:
1. Navigate to the desired section from the root directory.
2. Select Show All from the report page. This displays all resources associated with your
section.
10 NodeBuilder Resource Report Generator User’s Guide
Page 13

3. On the View menu, point to Text Size, and then click Smallest. This compresses the
size of the Web page text and significantly reduces the page count of your report.
4. On the File menu, click Print Preview. The Print Preview screen appears.
5. Click Print. The Print dialog box appears.
6. Click the Layout tab.
7. Select the Landscape orientation.
8. Specify 2 Pages Per Sheet.
9. Click Print.
This report may contain several hundred pages.
11 NodeBuilder Resource Report Generator User’s Guide
Page 14

4
Resource Report
Generator Wizard
The NodeBuilder Report Generator Wizard provides a
simple, easy-to-use interface for generating resource
reports. The wizard allows you to control many aspects of
the generated report.
The wizard guides you through the process of generating
a resource report. An explanation of each wizard page is
provided below.
12 NodeBuilder Resource Report Generator User’s Guide
Page 15

Generating a Resource Report
You can create a resource report using the NodeBuilder Resource Report Generator
Wizard. To generate a report, follow these steps:
1. Start the NodeBuilder Resource Editor as described in Chapter 7 of the
NodeBuilder User’s Guide.
Table 4.1 provides a brief description of the functionality of the Resource Editor.
2. Right-click the resource catalog, a resource folder, a resource file set, or an
individual resource definition, and then click Report on the shortcut menu. The
wizard appears and allows you to generate a resource report for the resource or
resources that you selected. If you selected the resource catalog, the wizard
creates a report for all resource definitions contained within your resource
catalog.
The following sections describe the individual pages on the wizard.
13 NodeBuilder Resource Report Generator User’s Guide
Page 16

Welcome Page
You can choose the report output destination folder and prepare reports for hosting using
the Welcome page.
Set the options as described in Table 4.2 and then click Next.
Table 4.2 Welcome Screen Control Options
Item Description
Report Output Location Specifies the location of the output folder in this box. This is the folder is where the
Prepare Locally Generated Files
for Hosting
Show All Options Shows all pages of the report wizard screen. Clear this checkbox to skip directly to
generated report is be stored.
Enabling this option formats the report for posting at a specified URL. The default
setting is cleared. See the Generating Reports Locally and for Hosting section for
more information.
the Finish page with the last report settings intact. The default setting is set. You
must visit each wizard page at least once for this option to become enabled.
14 NodeBuilder Resource Report Generator User’s Guide
Page 17

Resource Reports Page
You can specify the location of the resource report using the Resource Reports page.
You can specify a location on a local computer, your local network, or an Internet
address. By default, resource reports are generated for your computer.
Set the options for each resource file set as described in Table 4.3, and then click Next.
To set the options for a resource file set, select it in the Resource File Set list.
Table 4.3 Resources Reports Control Options
Item Description
Resource File Set Lists all available resource file sets available and shows their name, program
Exclude this File Set from the
Report
Generate Local Report Specifies that the resource report will be stored on your computer’s file system
Refer to Remote Report Specifies that the resource report will link to a previously generated resource
ID and scope selector value. Selecting a resource file set displays the Report
Location for the selected set.
Excludes a resource set from the report. Set this checkbox when a file set is
still being constructed, and you do not want to include it in your report. This
checkbox is cleared by default.
and promotes viewing of the report without an active Internet connection. This
checkbox is set by default.
report via the Internet. For example, you can generate the standard resource
file set locally or have your report link to the L
cannot change the remote hosting location of the standard resource report.
However, you can provide a valid URI for non-standard resource reports.
ONMARK Web site. Note that you
15 NodeBuilder Resource Report Generator User’s Guide
Page 18

Report Language Selection Page
You can choose between 29 different report languages using the Report Language
Selection page. You can define a list of preferred languages for use with the language
string resources within the resource file sets. The default setting is U.S. English. The
language selection only affects language resources obtained from the resource files. Other
details (such as column headers and field labels) in the report are presented in U.S.
English.
You can specify multiple languages using the Preferred list. The report displays as much
information in the first preferred language as possible. If information is unavailable in the
first preferred language, the report displays information in the second preferred language,
and so on.
16 NodeBuilder Resource Report Generator User’s Guide
Page 19

Support Files Preferences Page
You can specify the location of the support files that are required to view a report using
the Support Files Preference page. These files can be located in the Templates folder on
your computer or referenced over the Internet. This page allows you to choose between
using a local copy of the Templates folder or linking to the standard Templates folder on
http://types.lonmark.org/templates (default setting). Local template folders may
become outdated, but allow you to view resource reports without an active Internet
connection.
17 NodeBuilder Resource Report Generator User’s Guide
Page 20

Dependencies Handling Page
You can include resource definitions for resources that are referenced by your report
using the Dependencies Handling page. To include referenced resources, set the
Automatically Include Reports for Referenced Resources checkbox. For example, if
you have a UNVT that references an enumeration type defined within the same resource
file set, then setting this checkbox automatically adds the enumeration type definition to
the report. References to occurrences in other resource file sets are included as well. If
you exclude resource file sets from your report, the new report omits references to those
sets. Clear this checkbox to only include resource file references without links in the new
report. The default setting is set.
18 NodeBuilder Resource Report Generator User’s Guide
Page 21

Server and Transformation Page
You can specify the index page file name and the transformation stylesheet on the Server
and Transformation page. The default names are index.html and index.xsl.
For viewing local reports, you may enter any index page name with an .html or .htm file
extension in Report Start Page Name. When preparing the resource report for hosting,
you should change the default page name to suit your Web server software. The
Microsoft Internet Information Server (IIS) software works best using default.htm as the
file name. The Apache Web server software works best using index.html. Other Web
server software may have other naming conventions for default pages, please consult
your Web server user’s guide for details.
If you are not providing your own transformation stylesheets, use the default name
index.xsl in Initial XSLT Transformation Stylesheet. See the Customizing Resource
Reports section for more information.
19 NodeBuilder Resource Report Generator User’s Guide
Page 22

Finish Page
You can generate your report using the options that you specified in the wizard using the
Finish page. Set the Launch Browser upon Completion checkbox to start your browser
with the newly generated report. If you set this checkbox and your report does not display
properly, you may need to update your browser. For browser requirements, see Getting
Started.
Set the Launch Usage Hint Editor checkbox to enter or edit usage hints that provide
additional descriptive information for your resource definitions. See Providing
Supplementary Information for information on how to use usage hints.
20 NodeBuilder Resource Report Generator User’s Guide
Page 23

Report Generator Progress Window
The Report Generator Progress window displays the status of your report while the
report is being created. Depending on the complexity of your report, this process may
take several minutes. The window displays report status and any errors or warnings that
occur. Upon completion, the report generator starts your Web browser and/or the Usage
Hint Editor if you selected these options. Click Finish to exit the report generator. For
more information about errors and warnings, see the Resource File Validations section.
See the Viewing Reports section for information on interpreting report information.
21 NodeBuilder Resource Report Generator User’s Guide
Page 24

5
Generating Reports
Locally and for Hosting
You can prepare resource reports for local use and for
hosting on a server. Locally stored reports remain secure
and do not require an Internet connection for viewing.
Hosted reports allow viewing by multiple users with
Internet or intranet access. You can convert resource
reports into Word or PDF documents. For information on
converting a resource report, see Viewing Reports and
Customizing Report Presentations.
22 NodeBuilder Resource Report Generator User’s Guide
Page 25

Generating a Local Report
You can generate and view a report on your local hard disk. To generate a local report,
follow these steps:
1. Start the NodeBuilder Resource Editor as described in Chapter 7 of the NodeBuilder
User’s Guide. The NodeBuilder Resource Editor window appears.
2. Right-click the resource catalog file at the top of the resource catalog, and then click
Report on the shortcut menu. The report generator Welcome window appears.
3. Type a directory name in Report Output Location. For example, type
“C:\MyReports\Reports.”
4. Clear the Prepare Locally Generated Files for Hosting check box.
5. Set the Show All Options check box (this is the default setting).
6. Click Next. The Resources Report window appears.
23 NodeBuilder Resource Report Generator User’s Guide
Page 26

7. Select a resource file set from the Resource File Set list.
8. Choose whether or not you want to exclude any file sets from your report with the
Exclude this File Set from the Report check box. You can use this option to leave out
file sets that are under development.
9. Set the Generate Local Report check box in Report Location.
10. Repeat steps 7, 8, and 9 for each resource file set listed in the Resource File Set list.
11. Click Next. The Report Language Selection window appears.
Note: The standard resource file set report (standard 00:00:00:00:00:00: 00:00-0) is
available at types.lonmark.org. For this file set, you may choose to generate a local
report or refer to the L
user file sets, you cannot change the standard file set’s hosting location. File set data
hosted on types.lonmark.org is updated regularly and may be more recent than data
stored on your hard disk.
12. Select the preferred report language or languages.
13. Click Next. The Support Files Preferences window appears.
14. Select your support files preference. The support files include templates that are required
to view a report. You can link to support files on the L
to local copies of the support files.
ONMARK Web site by setting Refer to Remote Report. Unlike
ONMARK Web site, or you can link
Set Link to http://types.lonmark.org/templates to reference support files on the
ONMARK Web site. This option is the default setting and provides you with updated
L
reference files, but requires an Internet connection for viewing the report. Set Specify
Templates to use support files stored on your hard disk or a remote location. The report
generator installs a set of support files in your L
ONWORKS Types\Templates directory
(this is c:\LonWorks\Types\Templates by default). You can use these or create your own
custom templates
15. Click Next.
16. Set or clear Automatically Report Referenced Resources. The default setting is set and
is suitable for most reports.
17. Click Next.
18. Type names in Report Start Page Name and Initial XSLT Transformation Stylesheet.
24 NodeBuilder Resource Report Generator User’s Guide
Page 27

The default names are index.html and index.xsl. For viewing local reports, enter any
report start page name with an .html or .htm file extension. For Initial XSLT
Transformation Stylesheet, use the default name unless you are providing your own
transformation stylesheets. For more information on modifying transformation
stylesheets, see Customizing Report Presentations.
19. Click Next. The Finish window appears.
20. Set or clear Launch Browser upon Completion and Launch Usage Hint Editor. The
default settings are clear.
21. Click Next. The Report Generator Progress window appears and report data is
generated.
22. Click Finish to exit the report generator.
To view previously generated reports, go to the directory you specified in
step 3. You do not have to run the Wizard again unless you wish to change your reporting
preferences or you modified the reported resource data.
25 NodeBuilder Resource Report Generator User’s Guide
Page 28

Generating a Report for Hosting
You can generate a report to be hosted on a Web server. This allows multiple users to
view your report. The following procedure includes examples that describe how the
standard resource report at types.lonmark.org was generated.
1. Start the NodeBuilder Resource Editor as described in Chapter 7 of the NodeBuilder
User’s Guide. The NodeBuilder Resource Editor window appears.
2. Right-click the STANDARD (Scope 0, Standard) resource file set, and then click
Report on the shortcut menu. The report generator Welcome window appears.
3. Type a directory name in Report Output Location. For example, type
“C:\MyReports\Reports”.
4. Set the Prepare Locally Generated Files for Hosting check box.
5. Type a base URL in the box (i.e., http://types.lonmark.org) as the host location.
6. Set the Show All Options check box (this is the default setting).
7. Click Next. The Resources Report window appears.
8. Select the standard resource file set (standard 00:00:00:00:00:00:00:00-0) from the
26 NodeBuilder Resource Report Generator User’s Guide
Page 29

Resource File Set list. Preferences are ignored for all other file sets listed in the
Resource File Set list.
9. Clear the Exclude this File Set from the Report check box.
10. Select Generate Local Report in Report Location. This report must be generated
locally before posting.
11. Click Next. The Report Language Selection window appears.
12. Select the preferred language or languages. The default language is US English.
13. Click Next. The Support Files Preferences window appears.
14. Select Specify Templates and type the name of the location of the templates you wish to
use (i.e., http://types.lonmark.org/templates). The default setting is a link to
http://types.lonmark.org/templates.
You can use local or remote (hosted) templates for local reports, but you must use hosted
templates for reports generated for hosting.
15. Click Next.
16. Set or clear Automatically Report Referenced Resources. It is set by default, which is
suitable for most reports.
27 NodeBuilder Resource Report Generator User’s Guide
Page 30

17. Click Next.
18. Type names in Report Start Page Name and Initial XSLT Transformation Stylesheet.
Consult your Webmaster before setting the names of these fields. Typically, these pages
are named default.html, default.html, or index.html. The Microsoft Internet
Information Server (IIS) software works best using default.htm, and the Apache Web
server works best with index.html. Other servers may require different names.
For Initial XSLT Transformation Stylesheet, use the default name (index.xsl) unless
you are providing your own transformation stylesheets.
19. Click Next. The Finish window appears.
20. Set or clear Launch Browser upon Completion and Launch Usage Hint Editor. They
are set by default.
21. Click Next. The Report Generator Progress window appears and the software
generates report data. Your browser starts if you set Launch Browser upon Completion.
22. Click Finish to exit the report generator.
You can only view the report from the intended hosting location. The hosting location
specified in the report setup is the only URI that can host your report.
23. Copy the contents of the report output folder (the location is specified in
Step 4) and the entire Templates folder (a copy can be found in your L
Types\Templates directory—c:\LonWorks\Types\Templates by defult) for hosting. In this
example, the report will be hosted on http://types.lonmark.org. Make sure that you
preserve the hierarchy of the folders when you post the contents. If the hierarchy is not
preserved, the report will not display properly. Consult your Web server administrator for
details on hosting a report.
24. Verify access to the reports by launching a Web browser and opening the following
URLs, substituting your report URL for type.lonmark.org. Ignore the presentation of the
data, but make sure the browser does not report any errors.
http://types.lonmark.org
http://types.lonmark.org/templates/rrg.xsl
http://types.lonmark.org/templates/art/lonmark.gif
http://types.lonmark.org/0000000000000000-0/enums.xml
ONWORKS
28 NodeBuilder Resource Report Generator User’s Guide
Page 31

Note: This procedure only tests that the report was successfully hosted and that the links
work properly. It does not verify each file of the report.
You must configure your Web server and firewall software to allow for serving XML
files with “.xml” and “.xsl” file extensions and JavaScript source files with a “.js”
extension.
To view previously generated reports, start your browser and go to the directory you
specified in Step 4. You do not have to run the wizard again unless the resource file set
has changed or you want to change your report preferences.
29 NodeBuilder Resource Report Generator User’s Guide
Page 32

Verifying Hosted Reports
You can verify that a report has been hosted correctly and that the Web server and related
infrastructure have been set up correctly. To do this, follow these steps:
1. View the hosted report from outside of the network (like a normal visitor would
view the report). For example, if the report is hosted on a Web server that is
protected by a firewall, connect from outside of the firewall.
2. Visit the start index page, e.g. http://types.echelon.com, and make sure the
page displays correctly.
3. Visit at least one sub index for each resource file set listed on a start index page.
For example, visit the list of network variables for the first reported resource file
set, the list of configuration properties for the second one, and so forth.
4. Visit at least one detailed report for each type of reported resource. Make sure to
view at least one network variable type report, one configuration property
report, and so forth.
5. Follow at least one internal cross-reference (if applicable). For example, if the
report contains a configuration property type that refers to a network variable
type, and that network variable type is also hosted on the same server, make sure
to view this configuration property type and follow the link to the network
variable type.
6. Follow at least one external cross-reference (if applicable). For example, if the
report contains a configuration property type that refers to a standard network
variable type, and that standard network variable type is referred to on the
standard location at http://types.lonmark.org, make sure to view this
configuration property type and follow the link to the network variable type.
Note that external references may not be bi-directional (the standard network
variable type may not link back to your configuration property type), whereas
internal references are.
30 NodeBuilder Resource Report Generator User’s Guide
Page 33

Hosting Reports for User-Defined Resources
This example shows you how to report generate and host user-defined, non-standard
resource reports.
1. Start the NodeBuilder Resource Editor as described in Chapter 7 of the NodeBuilder
User’s Guide. The NodeBuilder Resource Editor window appears.
2. Right-click a user-defined resource file set and then click Report on the shortcut menu.
The Welcome dialog appears.
3. Enter a folder name in Report Output Location. For example: enter
“c:\MyReports\Reports” to create reports in the c”\MyReports\Reports directory.
4. Set the Prepare Locally Generated Files for Hosting checkbox.
5. Type in a base URL in the box (e.g., http://types.mycompany.com) as the host location.
This is the location you use for accessing the report once it has been generated.
6. Set the Show All Options checkbox (this is the default setting).
31 NodeBuilder Resource Report Generator User’s Guide
Page 34

7. Click Next.
8. Set your reporting preferences for each resource file set listed in the Resource Reports
page.
9. Choose whether or not you want to exclude any file sets from your report in the Exclude
this File Set from the Report checkbox. This option is useful for leaving out file sets
that are under development.
10. Set the Generate Local Report option in Report Location. You must generate a report
before posting it.
Note: The standard resource file set (standard 00:00:00:00:00:00:00:00-0) is available at
the types.lonmark.org Web site. For this file set, you should enable the Refer to
Remote Report feature. You can change the standard file set’s remote hosting location
by generating the standard report locally and hosting it on your own Web server. The
advantage of referencing types.lonmark.org is that the types.lonmark.org copy of the
standard resource file set is automatically updated when a new standard resource file set
is released.
11. Click Next. The Report Language Selection dialog appears.
12. Select the preferred language or languages. The default language is US English.
13. Click Next. The Support Files Preferences dialog appears.
14. To link to the standard templates on the L
http://types.lonmark.org/templates. To link to your own server with custom templates
or to a local copy of the templates, set Specify Templates and enter the name of the
location of the templates you wish to use (i.e., http://types.mycompany.com/templates
or any other location you wish to specify). The default setting is Link to
http://types.lonmark.org/templates. If you are generating a hosted report, you must link
to hosted templates, either at http://types.lonmark.org/templates or at your own server.
If you are generating a local report, you can either use a local copy of the templates, link
to hosted templates.
ONMARK Web site, set Link to
32 NodeBuilder Resource Report Generator User’s Guide
Page 35

15. Click Next.
16. Clear the Automatically Report Referenced Resources checkbox if you do not want
referenced resources to be included in the report. Referenced resources are included by
default.
17. Click Next.
18. Enter a name for your report start page in Report Start Page Name. Consult your
Webmaster before setting the start page name. Typically, these pages are named
default.html, default.html, or index.html. The Microsoft Internet Information Server
(IIS) software works best using default.htm, and the Apache Web server works best with
index.html. Other servers may require different names.
19. Enter a name for an initial stylesheet in Initial XSLT Transformation Stylesheet. Use
the default name (index.xsl) unless you are providing your own transformation
stylesheets.
Configure your Web server and firewall software to allow for serving XML files with
“.xml” and “.xsl” file extensions and JavaScript source files with a “.js” extension.
20. Click Next. The Finish dialog appears.
21. Set Launch Browser upon Completion to automatically start your browser upon
completion of the wizard.
33 NodeBuilder Resource Report Generator User’s Guide
Page 36

22. Set Launch Usage Hint Editor features to start the Usage Hint Editor upon completion
of the Wizard. You can start the Usage Hint Editor at any time to create or edit usage
hints.
23. Click Next. The Report Generator Progress window appears and the report generator
generates your report data.
24. Click Finish to exit the report generator.
25. Copy the contents of the report output folder (the location that you specified in Step 3)
and the entire Templates folder (you can find a copy in your L
Types\Templates folder—this is c:\LonWorks\Types\Templates by default) for to your
Web server for hosting. Make sure that you preserve the hierarchy of the folders when
you post the contents. If the hierarchy is not preserved, the report may not display
properly.
26. Verify access to the reports and check all links by starting a Web browser and opening
the following URLs (substitute your server location for types.mycompany.com). You
can ignore the presentation of the data, but make sure the browser does not report any
errors.
http://types.mycompany.com
http://types.mycompany.com/templates/rrg.xsl
http://types.mycompany.com/(subfolder name)/enumbs.xml
http://types.lonmark.org/0000000000000000-0/enums.xml
ONWORKS
This procedure tests that the report was successfully hosted and that some of its
components can be accessed properly, but does not verify each file of the report.
To view previously generated reports, start your browser and open the directory you
specified in Step 3. You do not have to run the Wizard again unless the resource file set
changes or you want to change your report preferences.
34 NodeBuilder Resource Report Generator User’s Guide
Page 37

Resource File Validations
When you generate a resource report with the report generator, it reports problems in the
resource file set. Problems may be fatal errors or warnings. Fatal errors mean that the
report information is not valid. A write protected output folder or an unavailable device
resource file can cause a fatal error. Warnings will not stop the report generator from
producing a valid resource report, but may indicate problems listed in Table 5.1.
A list of warnings and errors are stored in a file named ReportGeneratorErrors.log.
This log is generated or deleted as needed in the output folder. Table 5.1 lists all warnings
or errors that might be reported.
35 NodeBuilder Resource Report Generator User’s Guide
Page 38

Table 5.1 Resource File Validation Warnings
Warning Message Displayed Description
Missing Strings Warning: String ^<scope
Min/Max Data
Validation
Missing Format Warning: No format
Invalid Format
#1
Invalid Format
#2
selector>:<index> can not
be located for program ID
<program_id>: <detailed
reason>
Warning: <type name>
minimum value (<value>)
exceeds maximum value
(<value).
definition was found in
<format file> to match type
<typename>
Warning: Cannot validate
existing format(s) for type
<typename>: <reason>
Warning: Format <name>
cannot be used with type
<typename> (and test data
that is <number> bytes of
0x00): <reason>
This warning occurs if a string with scope selector and
index as detailed in the message cannot be located for
the given program ID. The typical reason is that the
string is missing or the resource file set’s scope scope
selector was lowered after a resource was created.
You should contact the resource file set manufacturer.
Minimum values must not exceed maximum values (but
the minimum might be equal to the maximum).
This validation is not currently being performed for
configuration property types, or configuration property
members of functional profiles.
This may be as designed, but generally indicates a
missing or misnamed format file entry. Each network
variable and configuration property type should have at
least one distinct format each.
A problem occurred while validating the formats for
<typename>. This warning can point to a missing or
corrupt format file, or to a corrupted installation of the
local machine.
This warning is a result of an attempt to use format
<name> with type <typename>, and <number> bytes of
test data (all zeroes). This message might be benign (in
case a test vector of all zeroes is inappropriate and the
formatter fails to apply the format to the data offered),
but more typically suggests an invalid syntax being
used within the format specification.
CP “Applies To”
Validation
Overloading
FPT
Bad FPT
Inheritance
Warning: Cannot resolve
‘apples to’ information: <fptname>::<cp-member-name>
applies to NV with index
<nv-index>, no such NV
found”
Warning: Functional profile
<fp-name> uses key <keyvalue>, without using
inheritance. Consider
inheriting rather than
overriding, or adjust the FPT
key to a value >= 20000.
Warning: Functional profile
<fp-name> uses key <keyvalue> and inheritance. You
cannot inherit from a UFPT;
consider correcting the
inheritance preference, or
indicate the correct SFPT to
inherit from by setting the
key to < 20000.
This is a serious problem. The functional profile <fptname> is invalid. It might be possible to use the
functional profile in case the CP <cp-member-name> is
optional and not implemented, but the profile must be
corrected so that the CP applies to the entire functional
profile, or to an existing member-NV.
This is a recommendation, and may be as designed by
the resource file set developer. Generally it is better to
derive a user functional profile from a standard
functional profile by inheritance rather than by redefining (overriding).
This warning is only shown for user functional profiles.
This is a serious problem. The implementer of the user
functional profile <fp-name> plans to inherit from a
functional profile that is not defined with a profile
number that indicates it being part of the standard
functional profile range.
36 NodeBuilder Resource Report Generator User’s Guide
Page 39

Table 5.1 Resource File Validation Warnings
Warning Message Displayed Description
Dangling
Reference
Format Rollover Warning: Cannot format
Reverse
Reference
Bad CP
Inheritance
Warning: Fail to resolve
reference for <referringtype> to <scope
selector>::<index>: no such
referee
<type detail>: <reason>
(now using alternative
formatting policy)
Warning: Set <set-id>
attempts to reference an
item from a higher scope
(<target scope selector>).
This reference cannot be
resolved!
Warning: Functional profile
member <member>
implements a configuration
property <CPT name>,
which is of an inheriting
type, applying to the entire
profile. However, the
functional profile does not
implement a principal NV
from which this CP could
inherit its type.
This is a serious problem. A resource R1 refers to
another resource R2, where R2 doesn’t exist.
Removing resource R2 after defining R1 might cause
this problem. It might be caused by an incomplete
resource file catalog (the resource file set that contains
R2 is missing).
This might be benign and may have been designed by
the resource file set developer. The resource report will
finish generating the report, listing the detail in question
using a built-in, alternative, formatting strategy.
This is a serious problem. The resource file set in
question is defined with a scope selector S1, and it
contains one or more references to scope selector S2,
with S2 > S1. Such a reference cannot be resolved.
This may be caused by changing the set’s scope
selector to S1, where the original selector S0 was used
with S0 > S2.
This is a serious problem, preventing this functional
profile from being implemented. Make sure all inheriting
CPs apply to a well-defined NV, or specify a principal
network variable.
Bad Profile
Number
Warning: Standard
functional profile <name>
specifies key <profile
number>, which is within the
range of FPT keys defined
for user profiles. Consider
correcting the key to <
20000.
Standard functional profiles must use profile numbers
(keys) less than 20000.
37 NodeBuilder Resource Report Generator User’s Guide
Page 40

6
Providing Supplementary
Information
When the report generator generates a report, only data
that is present in the selected resource file sets is included
in the report. You can add additional documentation to
help describe complex resources such as functional
profiles. This additional documentation is called usage
hints. The report generator includes a Usage Hint Editor
that allows you to easily create and edit XHTML-based
usage hints.
Each resource report generated by the report generator
includes a usage.xml file. This file stores usage hint
information and can provide supplementary information
for any resource (an NVT, CPT, enumeration type, or
functional profile) or a component of a resource such as a
field within a structure or a member within a functional
profile. You can include an unlimited number of usage
hints within a usage.xml file. Each usage hint identifies
the resource, or part of a resource, through its hint ID.
38 NodeBuilder Resource Report Generator User’s Guide
Page 41

Usage.xml Data
A usage.xml file contains usage hints displayed in XHTML text. Each hint can include
any XHTML and HTML tags that can be included in an HTML table cell (<td> </td>
tags). However, the markup must conform to XHTML rules. Additional restrictions apply
and are listed later in this document.
Each usage hint applies to a part of the report. The usage.xml file contains an unlimited
number of hint nodes, whose value contains the usage hint. Each usage hint element also
carries a hint identifier, whose value determines the reported item to which the usage hint
applies. You can include any of the hint references listed in Table 6.1:
Table 6.1 Usage Hint Data: Supported Hint References
Hint applies to… ID Attribute Example
The entire resource file set
Network Variable <nvt-name> <hint id=”SNVT_switch”>
Configuration Property <cpt-name> <hint id=”SCPTgain”>
Functional Profile <fpt-name> <hint id=”SFPTopenLoopSensor”>
Enumeration <enum-tag> <hint id=”boolean_t”>
Network Variable Member (for
structures or union types)
Configuration Property (for structures or
union types)
Enumeration member <enum-tag>::<enum-
Functional Profile member <fpt-name>::<fpt-member> <hint id=”UFPTmyFpt::nvoValue”>
set <hint id=”set”>
<fully qualified set name> <hint id=”Echelon
<nvt-name>::<membername>
<cpt-name>::<membername>
member>
description here
</hint>
80:00:01:00:00:00:00:00-3”>
description here
</hint>
description here
</hint>
description here
</hint>
description here
</hint>
description here
</hint>
<hint id=”SNVT_switch::value”>
description here
</hint>
<hint id=” SCPTgain::multiplier”>
description here
</hint>
<hint id=”occup_t::OC_BYPASS”>
description here
</hint>
description here
</hint>
39 NodeBuilder Resource Report Generator User’s Guide
Page 42

Using the Usage Hint Editor Software
The Usage Hint Editor provides a simple interface with three main components: a
Resource pane, a Hint pane, and the main menu.
Resource Pane
The Resource pane shows a list of all resources and resource components within a
resource report that may include a usage hint. Only one resource report may be open at a
time. The resource items are grouped into separate categories. Table 6.2 explains the
different categories used in the usage hint editor.
Table 6.2 Usage Hint Editor Resource Categories
Category Description
Network Variables If the report includes any NVT definitions, the Network Variables folder
Configuration Properties If the report includes any CPT definitions, the Configuration Properties
Functional Profile Templates If the report includes any functional profile definitions, the Functional
Enumeration Types If the report includes any enumeration type definitions, the Enumeration
Orphan Hints If the report includes any hints that cannot be mapped to resources or
Set If the report includes a Set hint, it is shown at the top of the Resource
<fully qualified setname> An entry at the top of the Resource hierarchy that displays the value of
lists all network variable types. Structured NVTs contain field members
NVT may contain sub levels representing sub-elements of this NVT
(structure or union members).
folder lists all configuration property types. Structured CPTs contain
field members.
Profile Templates folder lists all functional profiles. Each functional
profile may include Member Network Variables and Member
Configuration Properties folders listing the profile members.
Types folder lists all enumeration types. Each enumeration type may
contain a list of enumerators.
resource components within the report, the Orphan Hints folder contains
these hints. When an orphan hint is detected during the loading of a
resource report, the Usage Hint Editor issues a warning and advises you
to review the content of the Orphan Hints group. You cannot create
orphan hints with the Usage Hint Editor, but they may appear if you
manually create or edit a usage hint file.
hierarchy within the Resource pane. It includes the hint-ID set, if
available.
the control/title element (e.g., “Echelon 80:00:01:00:00:00:00:00-3”).
40 NodeBuilder Resource Report Generator User’s Guide
Page 43

Table 6.2 Usage Hint Editor Resource Categories
Category Description
This entry represents a hint that applies to the entire set.
You can click the plus (“+”) sign next to any folder to view the resource items within the
folder. If a folder is red, it does not currently contain any usage hints, but you may add
one or more. If a folder is yellow, it contains usage hints that you have modified since
you started the Usage Hint Editor. If a folder is white, it contains usage hints.
To view, add, modify, or delete a usage hint, click a red, yellow, or white resource item.
The associated hint, if any, displays in the Hint pane. To add a hint, enter the hint text
into the blank Hint pane. To modify a hint, edit the text in the Hint pane. To delete a hint,
delete all text in the Hint pane. The color of the resource item changes to red, except for
the following circumstances:
• Deleting all hint text for the Set hint removes this hint entirely. The Usage Hint
Editor supports this hint when it exists, but does not support the creation of the
set hint. The Usage Hint Editor uses the fully -qualified set name to promote a
set-wide hint. See Table 6.1.
• Deleting all text associated with an orphan hint removes the orphan.
• Selecting an item in the Resource pane that does not support hints such as the
Network Variables folder disables the edit pane entirely.
41 NodeBuilder Resource Report Generator User’s Guide
Page 44

Hint Pane
The Hint pane shows the usage hint text for the currently selected resource item in the
Resource pane. The Hint pane provides a simple XHTML source editor that you can use
to view, add, modify, and delete hints.
Table 6.3 shows the hint editor features:
Feature
Syntax Coloring
Fragment Insertion
Code Validation
Main Menu
From the main menu, you can perform a variety of tasks including:
Table 6.3 Hint Editor Features
Description
Strings, tags, CDATA sections, and comments are indicated with different text colors.
You can insert XHTML fragments into hint text.
The hint editor validates the XHTML content of a usage hint when you select a new
resource item, and when the hint editor otherwise saves the hint data. You cannot save
usage hints with XHTML syntax violations. Due to browser software versions, operating
systems and evolving standards, this validation process is not comprehensive. Always
verify that any complex hints work correctly by opening your resource report in a Web
browser. This is also important if you create custom transformation stylesheets.
• Open and save a usage hint file
• Insert XHTML fragments
• Insert images
• Find help on a variety of topics
42 NodeBuilder Resource Report Generator User’s Guide
Page 45

Starting the Usage Hint Editor
You can start the Usage Hint Editor automatically when you run the report generator, or
you can start the Usage Hint Editor from Windows.
To start the Usage Hint Editor automatically, set the Launch Usage Hint Editor
checkbox in the Finish window of the report generator. The Usage Hint Editor appears
when you click Next. The checkbox will not be available if you have not previously used
the Usage Hint Editor.
To start the Usage Hint Editor from Windows, follow these steps:
1. Open the Windows Start menu and then click Run.
2. Click Browse.
3. Browse to the L
default.
4. Double-click the UsageHintEditor.exe file. The Usage Hint Editor appears.
ONWORKS NodeBuilder folder. This is c:\LonWorks\NodeBuilder by
43 NodeBuilder Resource Report Generator User’s Guide
Page 46

Creating a Usage Hint
You can create a usage hint for any resource item. To create a usage hint for a resource
item, follow these steps.
1. Start the Usage Hint Editor as described in Starting the Usage Hint Editor.
2. Open the File menu, and then click Open.
3. Browse to a folder with an existing resource report, select a file, and then click Open.
4. Browse to the resource item in the Resource pane and click it. The Hint pane switches
from grey to white.
5. Click inside the Hint pane. A blinking cursor appears.
6. Enter the usage hint by typing text or by selecting the hint items from the Insert menu.
For example, your usage hint could be a hyperlink to support documentation or a full
explanation on how to use the selected resource.
7. Open the File menu, and then click Save. The Usage Hint Editor saves your usage hint in
the Usage.xml file.
44 NodeBuilder Resource Report Generator User’s Guide
Page 47

XHTML Restrictions
You must enter usage hints in an XHTML compliant format. However, not all data that
may appear in an XHTML page may also appear in a usage hint. Variations with browser
technology present challenges when creating usage hints. Before finalizing a project with
complex usage hints, test and view your files before releasing your final report. Below is
a short summary of XHTML details as they apply to individual usage hints:
• XHTML, unlike HTML, requires you to follow XML syntax rules. These rules
require element names to be case sensitive and in lower case, and require all
elements to be fully balanced and fully closed.
• XHTML tags used in table cells (i.e., between <td> and </td>) are typically OK.
XHTML tags that may not appear in table cells are not supported, an unlikely to
work correctly.
• You cannot use DTD records, XML headers, DOCTYPE tags, and METATAG
elements.
• Host any script source code in a separate file, and reference it using a <script
src=”….” /> tag.
45 NodeBuilder Resource Report Generator User’s Guide
Page 48

7
Customizing Report
Presentations
This section shows you how to change the appearance of
resource reports. This section provides only information
about the principles of operation and does not address
specific technologies.
46 NodeBuilder Resource Report Generator User’s Guide
Page 49

XSLT Transformations
A resource report consists of a set of XML files that can be viewed in a Web browser.
The XML files contain unformatted data. They also contain references to an XSLT
transformation that defines how information is presented in a generated report page. The
XSLT transformation is responsible for converting information into HTML for viewing
reports using a Web browser. You can create transformations that produce different
report formats (such as XML file based reports with different markup), or a PDF-based
report. The number of variations is unlimited.
Transformations written in the XSLT programming language can be executed in many
environments, including Web servers or Web browsers. However, XSLT engines are
also available through command line tools such as Saxon.exe or MSXSL.exe (and any
other APIs, such as Microsoft’s comprehensive MSXML4 package). Using these tools
allows you to customize resource reports without visiting the report start page. You
could, for example, convert the entire resource report into an eBook using an XSLTbased CGI application and send it to an eBook subscriber.
Report Generator Templates Folder
The default implementation of the report viewing process uses a two-step transformation
process. The index transformation creates a list of sub-indexes.
The type transformation converts information from the sub indexes and displays reported
resources. See below.
47 NodeBuilder Resource Report Generator User’s Guide
Page 50

XSLT transformation stylesheets and JavaScript code control the entire transformation
process. These files are all stored in the Templates folder on your local hard drive. The
default location for the Templates folder is c:\LonWorks\Types\Templates. You can also
access standard template files at the LonMark Web site
(http://types.lonmark.org/Templates).
Table 7.1 shows a list of available template files and a short description for each file.
Table 7.1 Template Files
File Description
index.xsl XSLT stylesheet containing the index transformation templates
types.xsl XSLT stylesheet containing the type transformation templates
rrg.xsl XSLT stylesheet containing common variables and transformation templates that are used by both
rrg.js JavaScript source code that is included in all HTML pages: the report start index page, the sub index
Art/ This folder contains artwork that is referred by the various HTML pages generated. The content of
the index transformation and the type transformation. Both index.xsl and types.xsl include rrg.xsl
automatically.
HTML pages, and the type report pages.
A JavaScript function, Transform, controls the application of a given XSLT transformation (type
transformation, or index transformation) to a given report component (described by the relevant XML
data location and an XPath expression identifying a portion of that XML data) is included in this file.
Transform function uses an essential function (XSL transformation on single, selected nodes)
The
that is currently only available in Microsoft’s Internet Explorer version 6.0 or higher.
If you want to customize report presentations or add support for resource report viewing by other
browser platforms, please thoroughly review the information provided in the rrg.js file.
the Art folder is specific to the default report presentation and transformations, and may not be
required for custom report presentations.
When hosting a set of custom templates on a Web server, you must configure the Web
server to host these files correctly. type/xml is a sufficient mime type for the XSLT
stylesheet, and type/text is a good choice for rrg.js.
48 NodeBuilder Resource Report Generator User’s Guide
Page 51

Creating a Custom Report Presentation
You can customize reports in two ways: you can change the layout and look of a report or
you can change how a report is viewed.
Changing the Report Layout
You can customize the look and feel of a report (adding company logos and CI features
or excluding certain data, for example), by modifying the transformations of the
generated report (the index.xsl file for sub index pages and the types.xsl file for type
transformation pages). You cannot, however, change the format of the start index page
since a transformation does not take place before this page is being viewed.
You can modify the index transformation independently. Changes to the type
transformation, however, require that you also make changes to the index transformation.
The report generator asks for the name and location of the index transformation when the
report is being generated. This index transformation holds information that is referenced
when the report is being generated. You may need to create a custom index
transformation after the report is generated.
General procedures for changing the layout of the report are listed below:
1. Generate a report. For instructions on how to create a report, see the Generating Reports
Locally and for Hosting section in this document.
2. Open the Templates folder. The default location is C:\LonWorks\Types\templates.
3. Open the index.xsl file using a suitable editor.
4. Make and save desired changes using a new name and rerun the report generator.
Running the report generator is not necessary if you do not rename and save this file.
5. Specify the location of the modified file in the Support Files Preferences dialog box in
the report generator.
49 NodeBuilder Resource Report Generator User’s Guide
Page 52

6. Specify the name and location of your modified XSLT transformation stylesheet in the
Server and Transformation dialog box.
7. Finish generating the report. The changes you made to the report should appear after the
report is finished compiling.
Changing the Report Structure
You can change the physical appearance of your report by providing your own,
customized index and type transformations. These transformations process XML data
produced by the report generator. You can, for example, create a tool based on XSL
Formatting Objects (XSL-FO), and use it to turn your report into a book, complete with
index tabs and a table of contents.
This level of customization is beyond the scope of this document, but you can find a
variety of documentation about XML-related technologies on the Internet or in
bookstores.
50 NodeBuilder Resource Report Generator User’s Guide
 Loading...