

Page 1

MPR-50 Multi-Port Router
User’s Guide
@®
078-0308-01B
Page 2

Echelon,
3150, LonPoint, and the Echelon logo are trademarks of Echelon
Corporation registered in the United States and other countries.
LonScanner is a trademark of Echelon Corporation.
Other brand and product names are trademarks or registered
trademarks of their respective holders.
Neuron Chips and other OEM Products were not designed for use in
equipment or systems which involve danger to human health or
safety or a risk of property damage and Echelon assumes no
responsibility or li ability for use of these products in such applications.
Parts manufactured by vendors other than Echelon and referenced in
this document have been described for illustrative purposes only, and
may not have been tested by Echelon. It is the responsibility of the
customer to determine the suitability of these parts for each
application.
ECHELON MAKES AND YOU RECEIVE NO WARRANTIES OR
CONDITIONS, EXPRESS, IMPLIED, STATUTORY OR IN ANY
COMMUNICATION WITH YOU, AND ECHELON SPECIFICALLY DISCLAIMS
ANY IMPLIED WARRANTY OF MERCHANTABILITY OR FITNESS FOR A
PARTICULAR PURPOSE.
LON, LONWORKS, LonMaker, LNS, LONMARK, LonTalk, Neuron, 3120,
No part of this publication may be reproduced, stored in a retrieval
system, or transmitted, in any form or by any means, electronic,
mechanical, photocopying, recording, or otherwise, without the prior
written permission of Echelon Corporation.
Copyright © 2005, 2006 by Echelon Corporation.
Echelon Corporation
www.echelon.com
Page 3

FCC Notice (for USA only)
Federal Communications Commission Radio Frequency Interference
Statement
Warning: This equipment has been tested and found to comply with the limits for a Class B
digital device, pursuant to part 15 of the FCC Rules. These limits are designed to provide
reasonable protections against harmful interference i n a residential installation. This
equipment generates, uses, and can radiate radio frequency energy and, if not installed
and used in accordance with the instructions, may cause harmful interference to radio
communications. However, there is no guarantee that interference will not occur in a
particular installation. If this equipment does cause harmful interference to radio or
television reception, which can be determined by turning the equipment off and on, the
user is encouraged to try to correct the interference by one or more of the following
measures:
* Reorient or relocate the receiving antenna;
* Increase the separation between the equipment and the receiver;
* Connect the equipment to an outlet on a circuit different from that to which the
receiver is connected; or
* Consult the dealer or an experienced radio/TV technici an for help.
Changes or modifications not expressly approved by Echelon Corporation could void the
user's authority to operate the equipment.
Safety
TÜV
Certified, per EN 60950, 2000, IEC60950, 2000
MPR-50 Multi-Port Router User's Guide
3
Page 4

Page 5

Preface
This document describes how to install and use Echelon’s
MPR-50 Multi-Port Router and is written for system
designers and installers.
MPR-50 Multi-Port Router User's Guide
i
Page 6

Content
This manual provides information about the MPR-50 Multi-Port Router.
• Chapter 1 introduces the MPR-50 Multi-Port Router and provides
a quick overview.
• Chapter 2 describes the router hardware and how to connect it to
a network. Software content is described, too.
• Chapter 3 describes how to install the router on a network.
• Chapter 4 introduces the built-in channel monitor.
• Chapter 5 provides troubleshooting symptoms and diagnoses.
• Appendix A describes the Buffer Management Utility.
ii
Preface
Page 7

Contents
FCC Notice
Declaration of Conformity
Preface i
Content ii
1 Overview 1
Introduction 2
2 MPR-50 Multi-Port Router Hardware and Software 3
Mechanical Description 4
Mounting and Connecting 4
MPR-50 Multi-Port Router Dimensions 6
Screw Terminal Connectors 6
Applying Power to the MPR-50 Multi-Port Router 7
Attaching the Router to a L
LED Legends 8
Service Buttons 10
Channel Connectors 10
Software 10
ONWORKS
3 Connecting to the Network 11
Installing the MPR-50 on a Network 12
Repeater Mode 12
Commissioning with Network Tools other than the LonMaker
Commissioning with the LonMaker Integration Tool 13
Defining an MPR-50 Router 13
Moving a LonMaker Shape 14
Commissioning an MPR-50 Router 14
Buffers 18
4 MPR-50 Monitor 21
Introduction 22
Self-Installation 22
Service Button 22
Wink Request 23
Node Object Functional Block 24
Network Variables 24
Configuration Properties 26
Error Log 26
Channel Monitor Functional Blocks 27
Network Variables 27
Configuration Properties 28
Alarms 29
®
Network 7
®
Tool 12
MPR-50 Multi-Port Router User's Guide
iii
Page 8

5 Troubleshooting 31
Troubleshooting Table 32
Appendix A Buffer Management Utility 35
Buffer Management Utility 36
Installing and Running the MPR Buffer Management Utility 37
Using the MPR Program 37
Checking the Current Buffer Sizes 37
Using Buffer Configure 37
Using Buffer Recovery Mode 39
Changing the Utility's Buffer Sizes 41
iv
Preface
Page 9

1
Overview
This chapter introduces Echelon’s MPR-50 Multi-Port Router.
MPR-50 Multi-Port Router User's Guide 1
Page 10

Introduction
Echelon’s MPR-50 Multi-Port Router performs LonTalk® (ANSI/CEA-709.1
standard) routing between five LonTalk channels: one TP/XF-1250 channel and four
TP/FT-10 channels. The MPR-50 may be used as a 2-way, 3-way, or 4-way
TP/FT-10–to–TP/FT-10 router, or in any combination with the TP/XF-1250 router.
The MPR-50 helps reduce the number of routing devices in multi-channel networks,
reducing both installation cost and time. The MPR-50 provides the highest possible
messaging performance: all four of the TP/FT-10 channels operate at saturation, the
maximum possible operating rate. The MPR-50 includes a flexible power supply, a
ONMARK
L
status, and a time-stamped alarm log that is accessible via the network. In addition,
the router includes an intelligent repeater mode that requires no tools to install and
will typically be used in place of a four-way TP/FT-10 physical-layer repeater.
®
certified Monitor that displays status locally on LEDs as well as provides
The MPR-50 can be installed by both LNS
including the LonMaker Integration Tool. The router is wall and 35mm DIN rail
(EN 50 022) mountable, includes screw terminal connectors for power and channel
wiring, and provides separate service switches and 3.5mm jacks for each channel. A
CD included with the product provides documentation, L
a LonMaker stencil to simplify router installation with the LonMaker tool.
®
and non LNS based network tools,
ONMARK resource files, and
2 Overview
Page 11

2
MPR-50 Multi-Port Router
Hardware and Software
This chapter provides a description of the MPR-50 Multi-Port
Router hardware, including enclosure construction, mounting
instructions, explanation of indicators and connectors, and
wiring guidelines. In addition, the Multi-Port Router CD
contents and installation instructions are described in this
chapter.
MPR-50 Multi-Port Router User's Guide 3
Page 12

Mechanical Description
The MPR-50 is 35mm DIN rail compatible, 9 TE wide, and conforms to EN 50 022.
The figure below presents the front view of the MPR-50 Multi-Port Router. The face
of the MPR-50 includes a network diagram that shows how the five routers and the
Monitor are externally and internally connected.
Status LED Indicator
Service Button
Channel Mono Phone Jack (3.5mm, 1/8”)
Power LED
Figure 2.1 MPR-50 Multi-Port Router Enclosure (front view)
Mounting and Connecting
The MPR-50 Multi-Port Router enclosure is designed for mounting on a DIN rail or
wall/panel. A spring-loaded DIN rail lock securely grabs the DIN rail onto which the
enclosure is mounted. Tabs in the DIN rail area present a pressure fit on the DIN
rail, which prevents the MPR-50 from sliding. The DIN rail lock must be activated to
either remove the MPR-50 from a DIN rail or to slide the router along the DIN rail.
To release the enclosure from the DIN rail, insert a flathead screwdriver into the
DIN rail locking tab and gently pull the tab downwards (away from the enclosure).
Figure 2.2 shows the location of the DIN rail-locking tab.
Wiring Screw Terminals
4 MPR-50 Multi-Port Router Hardware and Software
Page 13

Four key hole slots in the rear of the enclosure are provided for wall/panel
mounting the router. The key hole slots on each side of the DIN rail allow
mounting normally or upside-down. The top of the MPR-50 includes two scored
alignment guides for positioning the screws and for aligning the MPR-50 with
the screws during mounting.
Key Hole Slots for Mounting
DIN Rail Lock
Figure 2.2 MPR-50 Multi-Port Router Enclosure (back view)
Use the following steps to mount the router.
1. Insert two 6-32 flat-head screws into the surface upon which the MPR-50 is to be
mounted. Mounting dimensions are shown in the following drawing, in millimeters.
3. Be sure the heads of screws are protruding slightly from the mounting surface.
4. Slide the MPR-50 onto the screws. It may be necessary to adjust the screws into or
out of the wall slightly to assure a secure mounting.
MPR-50 Multi-Port Router User's Guide 5
Page 14
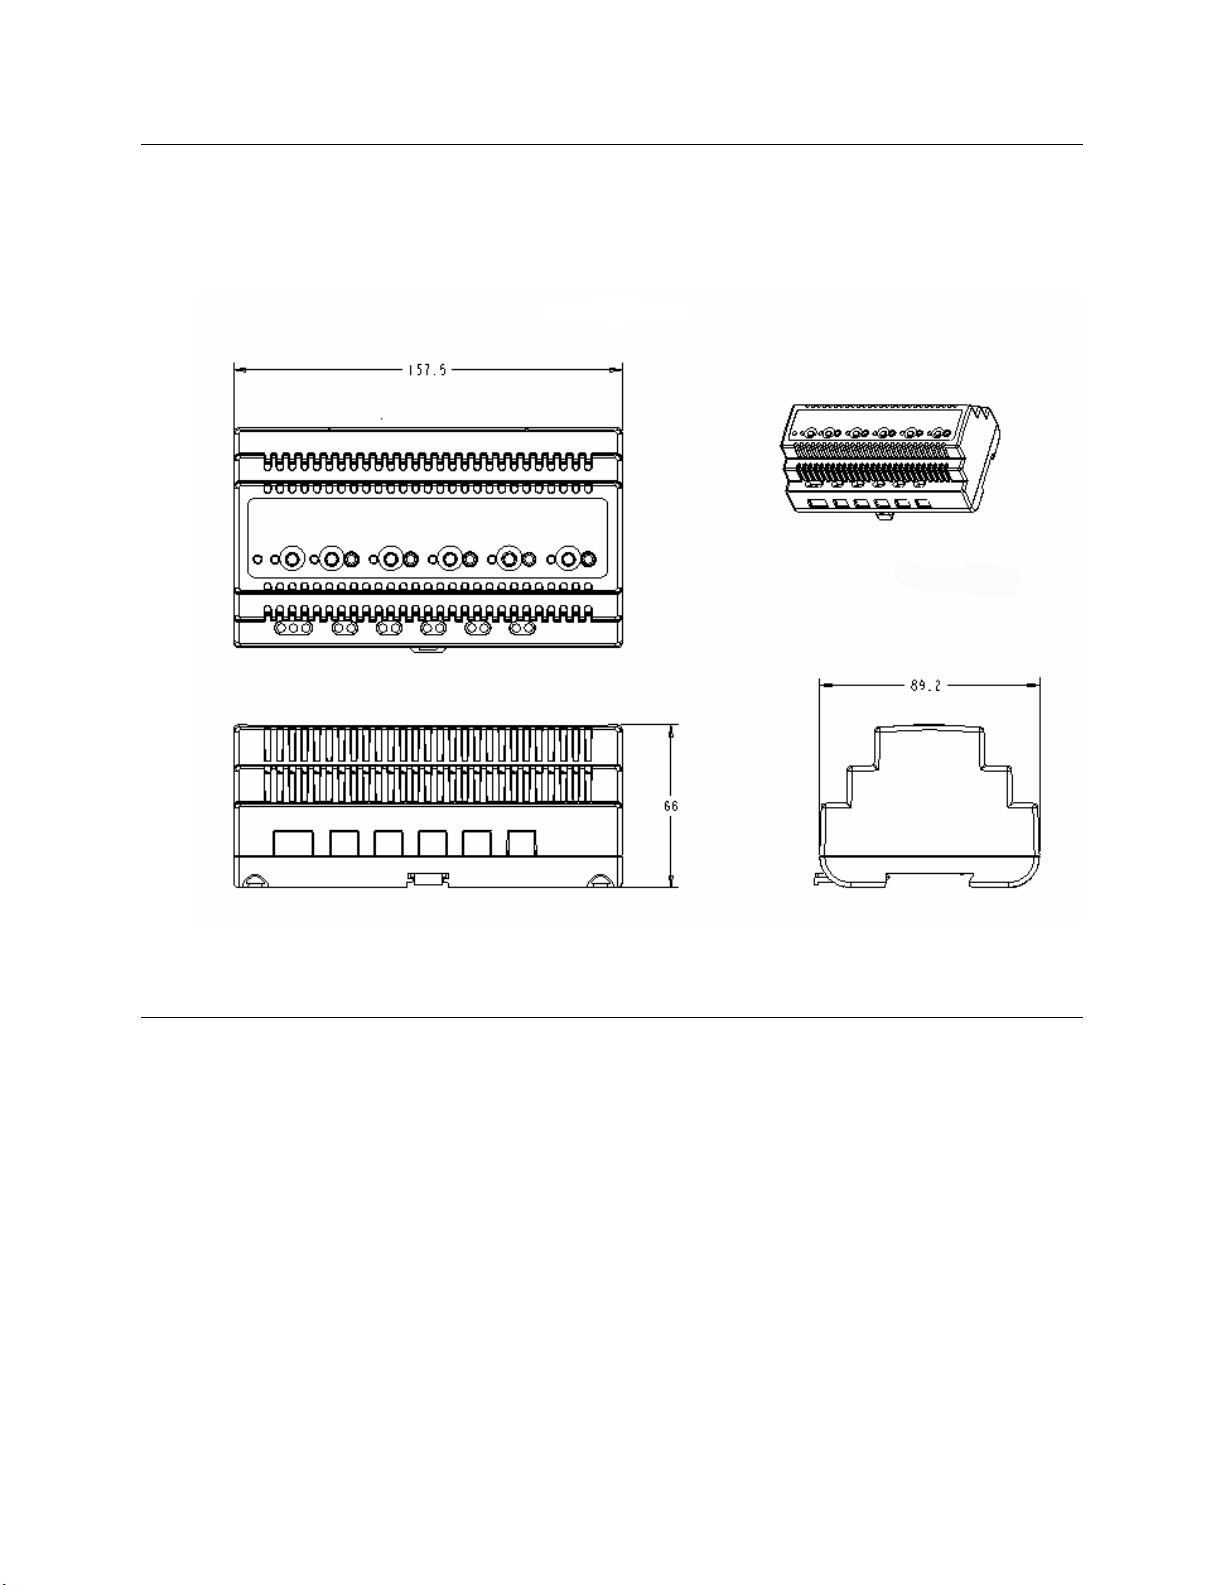
MPR-50 Multi-Port Router Dimensions
For mounting purposes, the following figure provides further dimensions of the
router. All measurements below are in millimeters.
Figure 2.3 MPR-50 Multi-Port Router Dimensions
Screw Terminal Connectors
The screw terminals for connecting power and network wires are located on the
bottom edge of the enclosure. The screw terminals accept 0.34–4.0 mm
12AWG) gauge wire. The optimum tightening torque for the screw terminals is
0.75mm (6 lbs. in.) maximum. The ideal flathead screwdriver tip width for use
with the screw terminal connectors is 3mm (0.12”). Wires should be stripped to a
length of 7mm (0.28”). A soldering iron may be used to tin the stripped lengths of
any stranded wires to prevent fraying and inadvertent contact with adjacent
terminals, although this is not required.
6 MPR-50 Multi-Port Router Hardware and Software
2
(22–
Page 15

Applying Power to the MPR-50 Multi-Port Router
Connect earth ground, if available, to terminal 3. Then connect 9–28VAC (40–70Hz)
or 9–35VDC power to terminals 1 and 2—the power terminals are polarity-
insensitive so the polarity of the DC input is unimportant. The green Power LED
will illuminate to indicate the unit is powered and the Status LEDs will begin
operating within seconds.
Attaching the Router to a LONWORKS Network
Connect the screw terminals marked Router 1 through Router 5 to the desired
channels. Router 1 is for the TP/XF-1250 channel, while Routers 2–5 are for the
TP/FT-10 channels. TP/XF-1250 and TP/FT-10 channel wiring is polarityinsensitive, and the TP/FT-10 connections are link power compatible. Any router
that is not going to be used may be left unconnected.
Figure 2.4 Router Connections for the Multi-Port Router
For complete information about acceptable wire types, maximum stub lengths,
termination requirements, and cable vendors, consult the Junction Box and
Wiring Guidelines for Twisted Pair
available from Echelon’s Web site.
MPR-50 Multi-Port Router User's Guide 7
LONWORKS Networks Engineering Bulletin
Page 16

LED Legends
The Power LED will illuminate whenever power is connected to the MPR-50.
The following two tables describe the behavior of the Status LEDs for the Monitor
and for Routers 1–5. For easy reference, shortened versions of the Status LED
legends are printed on the front panel of the MPR-50.
The Status LEDs illuminate as green, orange, and yellow. When yellow is displayed,
orange and green may appear illuminated together depending upon the lighting
conditions.
Color Description
Off No power to MPR-50.
Green on steadily The Monitor and Routers 1–5 are configured. Since
Green slow flashing Repeater mode. Routers 1–5 will repeat all valid
Yellow on steadily Monitor is offline. All of the router Status LEDs will
Yellow slow flashing Monitor has not been commissioned. Slow flashing is
Orange fast flashing Router alarm condition(s) logged.
Table 2.1 Monitor Status LED Legend
power-up, no errors have been logged for Routers 1–5
or their externally connected channels.
traffic. This mode is useful for plug ‘n play use without
network management tools.
Slow flashing is defined as on-for-one-second/off-forone-second.
also be yellow on, although the routers will still be
routing if they were previously configured to do so.
The router Status LEDs are yellow on since the
Monitor, being offline, is unable to determine the states
of the routers.
defined as on-for-one-second/off-for-one-second. The
router Status LEDs continue to indicate the current
status for their associated routers and attached
channels.
Fast flashing is defined as on-for-one-half-second/offfor-one-half-second.
8 MPR-50 Multi-Port Router Hardware and Software
Page 17

Table 2.2 Routers 1–5 Status LED Legend
Color Description
Off No power to MPR-50.
Router is configured. No errors have been detected on the
Green on steadily
Green slow flashing
Yellow on steadily
Yellow slow flashing
router or on the external channel to which it attaches within
the past 10 seconds. The channel has been idle for at least
the past 10 seconds.
Router is configured. No errors have been detected on the
router or on the external channel to which it attaches within
the past 10 seconds. There has been traffic on the channel
within the previous 10 seconds.
Slow flashing is defined as on-for-one-second/off-for-onesecond.
If the Monitor LED is also yellow on, the router Status LED
does not indicate the router state—the router will still be
routing if it was previously configured to do so. If the
Monitor LED is not yellow on, then the router is disabled or
offline, and is not routing messages.
Router unconfigured or not responding.
Slow flashing is defined as on-for-one-second/off-for-one-
second.
Orange fast flashing
An alarm condition on the router or its attached external
channel has been detected within the past 10 seconds.
After the alarm condition clears, the router Status LED will
revert to another status. The alarm condition will continue to
be reported by the Monitor Status LED for as long as power
is continuously applied to the router, even after the condition
is cleared.
Fast flashing is defined as on-for-one-half-second/off-forone-half-second.
MPR-50 Multi-Port Router User's Guide 9
Page 18

Service Buttons
The MPR-50 Multi-Port Router has six service buttons: one for the Monitor and one
for each of the routers. To reset the MPR-50 Multi-Port Router to factory defaults,
hold the Monitor service button down for 10 seconds.
Note that service pin messages are broadcast onto any attached channels when the
unit is put into factory default state. Some tools that listen for service pin messages
and perform automatic configuration may recognize the MPR-50 and begin
configuring it, potentially unexpectedly.
Channel Connectors
The MPR-50 front panel includes a separate 3.5mm (1/8”) mono phone jack for each
of the five external channels. The jack is compatible with the connector used on the
LonPoint
Echelon manufactures cables for connecting the MPR-50 to Echelon network
interfaces such as the PCC-10 PC Card Network Interface and the U10 USB
Network Interface.
®
Routers, LonPoint Modules, and various third-party products.
Software
The MPR-50 Multi-Port Router CD includes the following content:
• ReadMe
• Quick Start Guide
• User's Guide
• Software installer to install the above-listed content as well as L
resource files for the Monitor and the LonMaker stencil
The MPR-50 software does not
Routers
status over the network.
To install the MPR-50 software, first insert the CD into a CD-ROM drive. The
installation program starts automatically. If not, run setup.exe. Follow the prompts
to complete the software installation. After installation completes, documentation is
available from the Echelon Routers program shortcut. The L
for the Monitor are installed into the folders recommended by L
International, and the LonMaker stencil is installed into the default LonMaker
stencils folder.
1–5; however, the software must be installed in order to access the MPR-50’s
need to be installed in order to commission
ONMARK resource files
ONMARK
ONMARK
10 MPR-50 Multi-Port Router Hardware and Software
Page 19

3
Connecting to the Network
This chapter demonstrates how to install the MPR-50 MultiPort Router on a network.
MPR-50 Multi-Port Router User's Guide 11
Page 20

Installing the MPR-50 on a Network
Once the MPR-50 is physically attached to a network and powered-up, it must be
logically installed on the network. The MPR-50 is by default unconfigured and will
not route messages in this state. The MPR-50 can either be put into repeater mode
(which requires no network management tools), or it can be commissioned using
standard network management tools such as the LonMaker tool.
The Monitor within the MPR-50 only needs to be commissioned to interact with it
over the network. If the Monitor will not be accessed over the network, it does not
need to be commissioned.
Repeater Mode
To use the MPR-50 on a network without using network management tools, it must
be put into the repeater mode. Repeater mode is useful for the following:
• Self-installed networks where physical length of the network or node density
per-channel requires the use of a router
• Replacing free topology physical-layer repeaters, as physical-layer repeaters
are susceptible to noise which can halt traffic not just on the noisy channel,
but on the entire network
• Networks that have low traffic density and protocol routing is not required.
When in the repeater mode, the MPR-50 does not segregate traffic and may not be
appropriate for larger networks, or networks with traffic levels that in aggregate
approach saturation for the slowest channel.
To put the MPR-50 into repeater mode, hold down the Monitor Service button
continuously for 20 seconds. The Monitor Status LED will slowly flash green after
repeater mode is entered. To take the MPR-50 out of repeater mode, either hold
down the Monitor Service button continuously for 10 seconds (this will set the MPR50 to the factory default state), or commission Routers 1–5
management tool (in this case it is not
repeater mode).
necessary to first take the MPR-50 out of
with a network
Commissioning with Network Tools other than the LonMaker Tool
The MPR-50 contains five routers and a Monitor. Before installing the Monitor,
install the software as described in the previous chapter. The L
for the Monitor are installed into the L
following chapter for a detailed description of the Monitor.
12 Connecting to the Network
ONMARK recommended folders. See the
ONMARK resource files
Page 21

Commissioning with the LonMaker Integration Tool
The LonMaker tool is an easy-to-use integration tool that supports both routers and
application devices. According to the protocol specification, devices on separate
channels cannot communicate unless the channels are connected by a router. This
section describes how to create a router in a LonMaker network design.
These instructions assume the use of LonMaker 3.1. Newer versions of the
LonMaker tool may operate differently; in particular, there may be fewer dialogs
presented to the user during router definition and commissioning.
Routers, like devices, are created in two steps: definition and commissioning.
Defining an MPR-50 Router
To define the MPR-50, follow these steps:
1. If the Multi-Port Router Shapes stencil is not open, open it from File->Stencils.
2. Drag a MPR-50 master shape from the Multi-Port Router Shapes stencil
onto the drawing.
3. The Channel Definition dialog appears. Most users will want to click OK
repeatedly thus accepting all of the defaults presented. The most common
exception to accepting the defaults is choosing to connect to a pre-existing
channel. Accept all other default values in this case. The routers are defined in
reverse order, from Router 5 to Router 1.
Note: When defining multiple MPR-50 routers within a drawing, make certain
that the Internal Channel of each MPR-50 is defined as a separate channel.
4. To monitor and control the status and logging objects on the Monitor, drag the
MPR-50 Node Object and MPR-50 Channel Monitor objects onto the drawing.
Note that there is one Node Object and five Channel Monitor objects. Drag onto
the drawing Channel Monitor objects that correspond to the channels you are
using with the MPR-50.
MPR-50 Multi-Port Router User's Guide 13
Page 22

Moving a LonMaker Shape
The MPR-50 shape can be moved within a LonMaker drawing; the MPR-50 shape
moves as a unit that includes the five router shapes, the Monitor shape, and the
internal channel.
• To move the MPR-50 shape within a subsystem (page), drag the shape to its
desired location.
• To move an individual router to another subsystem, right-click the shape to move
and then click Change Subsystem on the shortcut menu.
Note: You cannot move LonMaker shapes using Visio's cut and paste commands.
Commissioning an MPR-50 Router
1. Right-click the shape of the router that you have connectivity to from your
LonMaker tool, and then click Commission. The Commission Device Wizard
appears. Note that you may have connectivity to any of the five routers—it is not
necessarily Router 1 as shown below.
2. Select whether the router application will be online or offline upon
commissioning. The router can forward packets between its channels only when
it is online. Most end-users will want to choose online.
14 Connecting to the Network
Page 23

3. Click Next. The Device Identification Method window appears.
®
4. Select a method for obtaining the Neuron
ID of the router. You can choose to
either press the service pin of the router when prompted or directly enter its
Neuron ID.
5. Click Finish. The Press Service Pin window appears.
6. Press the service pin of the router. The LonMaker tool commissions the router.
7. Click the Monitor shape and hold down SHIFT. Click the router shapes for all of
the other routers you want to commission. Right click, and then click
Commission. The Commission Device Wizard appears.
MPR-50 Multi-Port Router User's Guide 15
Page 24

8. Set the State, Source of CP Values and Device Specific CPs options as
appropriate. See the LonMaker User’s Guide for an explanation of the effects of
the various options.
9. Click Next. The Commission Device Wizard appears.
16 Connecting to the Network
Page 25

10. Select the initial states of the routers being commissioned. Most end-users will
want to choose online.
11. Click Next. The Device Identification Method window appears.
MPR-50 Multi-Port Router User's Guide 17
Page 26

12. Select the method for obtaining the Neuron IDs of the Monitor and the routers
being commissioned.
13. Click Finish. The Device Installation window appears.
Buffers
14. Press the service pins of the Monitor and the routers being commissioned, in the
order presented in the window.
The default buffer sizes for the MPR-50 Multi-Port Router support LONMARK standard
message sizes. The sizes and counts are found on the next page.
See Appendix A, Buffer Management Utility, for instructions on how to use the Buffer
Management Utility to change your buffer configuration.
18 Connecting to the Network
Page 27

TP/XF-1250 External Side (Router 1)
Type Size/Count
app_buf_out_size 42
app_buf_in_size 42
app_buf_out_count 2
app_buf_in_count 2
app_buf_out_priority_count 1
net_buf_out_size 114
net_buf_in_size 114
net_but_out_count 127
net_buf_in_count 47
net_buf_out_priority_count 31
TP/FT-10 External Side (Routers 2-5)
Type Size/Count
app_buf_out_size 42
app_buf_in_size 42
app_buf_out_count 2
app_buf_in_count 2
app_buf_out_priority_count 1
net_buf_out_size 114
net_buf_in_size 114
net_but_out_count 3
net_buf_in_count 5
net_buf_out_priority_count 1
Internal Channel Side (Routers 1-5)
Type Size/Count
app_buf_out_size 42
app_buf_in_size 42
app_buf_out_count 2
app_buf_in_count 2
app_buf_out_priority_count 0
net_buf_out_size 114
net_buf_in_size 114
net_but_out_count 5
net_buf_in_count 3
net_buf_out_priority_count 0
MPR-50 Multi-Port Router User's Guide 19
Page 28

20 MPR-50 Monitor
Page 29

4
MPR-50 Monitor
This chapter describes the interfaces and functionality of the MPR-50’s
Monitor.
MPR-50 Multi-Port Router User's Guide 21
Page 30

Introduction
The MPR-50’s Monitor observes and reports on the health of Routers 1–5 through
Status LEDs and through the network. The Monitor can be commissioned by a
network management tool and operates independently from the MPR-50’s five
routers.
The Monitor is a L
In addition to the Node Object, it contains one Channel Monitor functional block
each for Routers 1–5.
For the sake of efficiency, bit arrays, network variable arrays, and configuration
property arrays are used. It is important to understand that the L
file and LonMaker tool indices start at zero while, for ease-of-use, the Routers are
numbered one through five on the enclosure, as well as on the LonMaker shapes. The
following table shows the indices to these arrays:
Array
Index
0 Router 1 – TP/XF-1250 Router 1 (1250) and Channel 1 (1250)
1 Router 2 – TP/FT-10 Router 2 (FT) and Channel 2 (FT)
2 Router 3 – TP/FT-10 Router 3 (FT) and Channel 3 (FT)
3 Router 4 – TP/FT-10 Router 4 (FT) and Channel 4 (FT)
4 Router 5 – TP/FT-10 Router 5 (FT) and Channel 5 (FT)
Self-Installation
ONMARK certified application organized as six functional blocks.
ONMARK resource
Enclosure Markings Visible Router and Channels Names in the
LonMaker Stencil
The Monitor self-installs and does not need to be installed by a network management
tool in order to provide status via the front panel LEDs. To obtain status from the
Monitor remotely, it should be installed by a network management tool. The
Monitor intelligently manages its own installation state so that the user does not
need to manage it.
Service Button
Momentarily pressing any of the Service buttons causes the associated Monitor or
router to transmit a service pin message (a router transmits two service pin
messages—one onto the MPR-50’s internal channel and one onto its external
channel). Since the Monitor is attached to the internal channel, a service pin
message from the Monitor will be routed onto a particular external channel only if
the associated router that connects the internal channel to the external channel is
configured to route messages.
22 MPR-50 Monitor
Page 31

To reset the MPR-50 to factory defaults, hold the Monitor Service button down for 10
seconds. Release the Service button as soon as the Status LEDs change after 10
seconds have elapsed. The Monitor will self-install and Routers 1–5
that they are unconfigured.
will indicate
Note that when resetting the MPR-50 to factory defaults, service pin messages are
broadcast onto any attached channels. Some tools that listen for service pin
messages and perform automatic configuration may recognize the MPR-50 and begin
configuring it, potentially unexpectedly.
To put the MPR-50 into repeater mode, hold down the Monitor Service button
continuously for 20 seconds. The Monitor Status LED will slowly flash green after
repeater mode is entered. To take the MPR-50 out of repeater mode either hold
down the Monitor Service button continuously for 10 seconds (this will set the MPR50 to the factory default state), or commission Routers 1–5
management tool (in this case it is not
repeater mode).
Two configuration properties on the Monitor’s Node Object functional block
(UCPTfactoryDefaultsEnable and UCPTrepeaterModeEnable) determine
whether the Monitor's Service button can be used to reset the MPR-50 to factory
defaults, or put it into repeater mode. By default these two configuration properties
are set to True. However, one or both of these configuration properties can be set to
False with a network management tool in order to prevent tampering with the
configuration of the MPR-50 via access to the front panel.
necessary to first take the MPR-50 out of
with a network
Wink Request
A network tool may send a wink message to the MPR-50 to help physically identify
it. When a wink request is received, the Monitor will illuminate the Router 1–5
Status LEDs in a distinctive sequence.
A wink request is ignored if a wink sequence is currently in progress.
MPR-50 Multi-Port Router User's Guide 23
Page 32

Node Object Functional Block
Network Variables
The Node Object implements the following network variables.
Note: The programmatic Network Variable name appears first. The LonMaker Node
Object's Network Variable shape name is located under it, in parentheses.
Network Variable Type Description
nviRequest
(Request)
nvoStatus
(Status)
nvoFileDirectory
(File Directory)
nvoHealthy
(Healthy)
nvoErrorMap
(Error Map)
SNVT_request
SNVT_status
SNVT_address
SNVT_switch
SNVT_state
Standard L
ONMARK status request
variable. Used by network
management tools to request current
status of the Monitor. See the
ONMARK Application Layer
L
Interoperability Guidelines for details
on how to use this variable.
Standard L
ONMARK status response
variable. Used by network
management tools to read the current
status of the Monitor. See the
ONMARK Application Layer
L
Interoperability Guidelines for details
on how to use this variable.
Contains the memory address for the
file directory containing descriptors for
configuration files. Used by network
management tools to read and write
ONMARK configuration files and for
the L
reading the error log. See the
ONMARK Application Layer
L
Interoperability Guidelines and the
section Error Log later in this chapter
for details on how to use this variable.
If the state field of this variable is
True, there are no reportable errors
on any of the five routers. If the state
field is False, one or more errors have
been logged. The Monitor Status LED
reflects the state of this variable.
If an error has been logged for a
particular channel, the corresponding
bit in this variable is set. The
corresponding Router Status LED will
also reflect the state of the bit, if an
error has been logged for that router
and attached channel.
24 MPR-50 Monitor
Page 33

nviClearStat
(Clear
Statistics)
nvoElapsedTime
(Elapsed Time)
nvoAlarm2
(Alarm)
SNVT_switch
SNVT_elapsed_time
SNVT_alarm_2
When diagnosing a network problem,
it may be useful to use this network
variable to clear all of the router
statistics and error log after corrective
actions have been taken, so that one
can verify whether or not the actions
were effective. The Status LEDs on
the front panel, if they indicated error
conditions, will also revert to their
normal status indications, until
another error occurs.
It is not necessary to set the network
variable to OFF. It automatically sets
itself to OFF once the ON state is
detected. The value field of this
network variable is ignored by the
Node Object; however, the network
tool should send valid values.
The default state is OFF.
The Status LED behavior is described
in Chapter 2, MPR-50 Multi-Port
Router Hardware and Software. The
error log is described in the Error Log
section, later in this chapter.
Elapsed time since power-up or last
reset. Normally used to compute at
what time in the past events logged in
the error log occurred. The MPR-50
does not have a real-time clock, which
means this variable is subject to
accuracy errors particularly over long
periods of time.
Used to transmit alarm data for each
functional block on the device
whenever an alarm occurs or is
cleared, and upon request. For more
information, see the Alarms section,
later in this chapter.
MPR-50 Multi-Port Router User's Guide 25
Page 34

Configuration Properties
The Node Object implements the following configuration properties:
Configuration Property Description
SCPTmajDevVer
SCPTminDevVer
UCPTfactoryDefaultsEnable
UCPTrepeaterModeEnable
Defines the major version of the device, and can be
useful for integrators when upgrading or verifying
installations. This property is read-only.
Defines the minor version of the device, and can be
useful for integrators when upgrading or verifying
installations. This property is read-only.
If set to True (the default), an end-user can use the
Monitor Service button to reset the MPR-50 to factory
defaults. To prevent tampering with the configuration
of the MPR-50 from the front panel, disable this
feature by setting the configuration property to False.
If set to True (the default), an end-user can use the
Monitor Service button to put the MPR-50 into
repeater mode. To prevent tampering with the
configuration of the MPR-50 from the front panel,
disable this feature by setting the configuration
property to False.
Error Log
Certain network variables that are part of the Channel Monitor functional blocks are
alarmed, and the Monitor maintains an error log of any alarm conditions. The log is
circular, the entries are in the SNVT_alarm_2 format, and it contains up to 50 of the
latest alarms. Think of this error log as the latest 50 values that have been output
on the Node Object's nvoAlarm2 output. The error log is not retained across power
cycles or resets.
A network management tool can read this error log using standard L
memory read/write commands, and use the error log contents to aid in debugging
network problems. The network management tool uses the nvoFileDirectory
network variable to find the location of the error log. LNS based tools can use the
available LNS FileTransfer method to transfer the log file. For instance, when using
LonMaker Turbo Edition, choose LonWorks FTP… from the LonMaker menu. When
not using an LNS based tool, see the Node Object Functional Profile and the
ONMARK Application Layer Interoperability Guidelines on the LONMARK Web site
L
for details about how to read the log file.
The index of the log file in the Monitor is 3. The format of the error log is as follows:
ONMARK direct
26 MPR-50 Monitor
Page 35

Item Offset
(Bytes)
Version 0 1 Error log version number. Currently 1.
Entry size 1 1 Size of each error log entry
Entry count 2 1 Current number of error log entries
Latest entry 3 1 Index of latest error log entry
Sequence 4 2 Incremented for each additional error log entry
Error log entries 6 Entry size *
To compute the time at which an alarm in the error log occurred, first compute the
alarm time by using the alarm_time and milliseconds fields from a particular error
log record. The record format is SNVT_alarm_2. Then read the nvoElapsedTime
network variable. Using the difference, subtract that time from the local time of day.
Don't forget to factor in daylight savings time, if applicable.
Since direct memory commands are used to read the log, it is possible that the
Monitor will be updating the log while a network management tool is reading it. In
order to ensure that reads are consistent, read the error log only after all of the
Channel Monitor functional blocks are temporarily disabled.
Length
(Bytes)
Entry count
Description
(Entry count) SNVT_alarm_2 records
Channel Monitor Functional Blocks
Network Variables
Each of the five Channel Monitor functional blocks collects information about the
number of errors and number of messages on the associated externally-connected
channel. This information is used to update the Status LEDs described in LED
Legends in Chapter 2, and this information is also available on the network through
the following network variables:
Note: The programmatic Network Variable name appears first. The LonMaker
Channel Monitor's Network Variable shape name is located under it, in parentheses.
Network Variable Type Description
nvoIvalBandUtl
(Last Bandwidth
Use)
nvoIvalPackets
(Last Packets)
SNVT_lev_cont
SNVT_count_32
Percentage of bandwidth being used
in the last interval. This variable is
alarmed. See the section Alarms
below for details.
Number of messages received in the
last interval.
MPR-50 Multi-Port Router User's Guide 27
Page 36

nvoIvalCrcErr
(Last CRC Errors)
nvoIvalMissed
(Last Missed
Packets)
TotalPkts
(Total Packets)
nvoTotalCRCErr
(Total CRC Errors)
nvoTotalMissed
(Total Missed
Packets)
nvoMaxBandUtil
(Max Bandwidth
Use)
nvoMaxPackets
(Max Packets)
nvoAvgPackets
(Average Packets)
SNVT_lev_cont
SNVT_lev_cont
SNVT_count_32
SNVT_count_32
SNVT_count_32
SNVT_lev_cont
SNVT_count_32
SNVT_count_32
Percentage of messages with CRC
errors in the last interval. This
variable is alarmed. See the section
Alarms below for details.
Percentage of missed messages in
the last interval. This variable is
alarmed. See the section Alarms
below for details.
Total messages received since last
reset or clearance of statistics.
Total number of messages with CRC
errors since last reset or clearance of
statistics.
Total number of missed messages
since last reset or clearance of
statistics.
Maximum bandwidth percentage
utilization in any interval since last
reset or clearance of statistics.
Maximum number of messages in any
interval since last reset or clearance
of statistics.
Average number of packets per
interval since last reset or clearance
of statistics.
Configuration Properties
Each of the five Channel Monitor functional blocks implements the following
configuration properties. The alarm configuration properties are described
separately in the next section, Alarms.
Configuration Property Description
SCPTholdTime
SCPTneuronId
The amount of time (in tenths of seconds) that a
router's Status LED flashes green after detecting
activity on its external channel.
An array that contains the two Neuron IDs of the
router, with the first Neuron ID in the array being on
the internal channel of the MPR-50, and the second
Neuron ID in the array being on the external channel.
This configuration property is useful for network
management tools and plug-ins to be able to
automatically install all of the routers in the MPR-50
by reading this configuration property and then being
able to know which router is connected to which
external channel.
28 MPR-50 Monitor
Page 37

UCPTinterval
UCPTpacketBytesAverage
UCPTpacketsPerSecondMax
This configuration property defines the interval over
which statistics are collected. Its type is
SNVT_elapsed_tm, with the default being one minute.
The maximum interval supported is 65,535 seconds
(over 18 hours). A minimum interval of 5 seconds is
enforced, which means that if this configuration
property is set to a value below 5 seconds, the
statistics interval will be 5 seconds. This is a shared
configuration property that applies to all of the
Channel Monitor functional blocks.
To calculate bandwidth utilization, the Monitor uses an
approximate value for the average packet size. The
average packet size defaults to 15 bytes, but can be
configured to whatever your average message size is.
The bandwidth utilization calculation is made relative
to a fixed model of the maximum channel capacity of
the TP/FT-10 and TP/XF-1250 channels. The default
is 0 for all channels and should not be changed.
Alarms
The Monitor implements LONMARK alarms for several network variables in the
Channel Monitor functional blocks. The alarmed network variables and their default
alarm limits are listed below. These alarm limits may be modified with a network
management tool.
Note: The programmatic Network Variable name appears first. The LonMaker Channel
Monitor's Network Variable shape name is located under it, in parentheses.
Network Variable Low
Limit
nvoIvalCrcErr
(Last CRC Errors)
nvoIvalMissed
(Last Missed Packets)
nvoIvalBandUtl
(Last Bandwidth Use)
N/A N/A 5% 2%
N/A N/A 1% 0%
0% 0% 70% 5%
Low
Hysteresis
High
Limit
High
Hysteresis
Alarm conditions are reported on the nvoAlarm2 output on the Node Object. This
output is of type SNVT_alarm_2 and contains a string with the current alarm
source, the error type, and the percentage value. The following alarm source strings
are used (where <n> is for router (and channel) and xx is either a whole number like
57 or a real number like 49.5.):
• Ch<n>: CRC errors (xx%)
• Ch<n>: Missed (xx%)
MPR-50 Multi-Port Router User's Guide 29
Page 38

• Ch<n>: Bandwidth (xx%)
In the L
for each of the low and high limits. The MPR-50 implements a single limit according
to the following rules:
1. If the alarm type was not AL_HIGH_LMT_ALM_1 and the value is now greater
2. If the alarm type was AL_HIGH_LMT_ALM_1 and the value drops below
3. If the alarm type was not AL_LOW_LMT_ALM_1 and the value is now less than
4. If the alarm type was AL_LOW_LMT_ALM_1 and the value rises above
The nvoIvalCrcErr and nvoIvalMissed variables have a high alarm limit
(SCPThighLimit1) and do not have a low alarm limit. A hysteresis value
(SCPThystHigh1) is used to prevent oscillation of the alarm condition when it is
near the high alarm limit value. The high alarm is enabled by default via the
SCPThighLimit1Enable property.
ONMARK guidelines, the possibility exists for two limit levels (levels 1 and 2)
than SCPThighLimit1, then the alarm type becomes AL_HIGH_LMT_ALM_1.
SCPThighLimit1 minus SCPThystHigh1, then the alarm type becomes
AL_HIGH_LMT_CLR_1. For high limit alarms, the hysteresis value is used only to
subtract from the limit value.
SCPTlowLimit1, then the alarm type becomes AL_LOW_LMT_ALM_1.
SCPTlowLimit1 plus SCPThystLow1, then the alarm type becomes
AL_LOW_LMT_CLR_1. For low limit alarms, the hysteresis value is used only to
add to the limit value.
The nvoIvalBandUtl variable has both a high alarm limit (SCPThighLimit1) and
a low alarm limit (SCPTlowLimit1). The high alarm is enabled by default via the
SCPThighLimit1Enable property, and the low alarm limit is disabled by default
via the SCPTlowLimit1Enable property. The low alarm limit can be useful to
detect that, for instance, a certain level of background heartbeat traffic expected on a
channel has slowed or stopped—which indicates a power, channel wiring, or other
problem. If the low alarm limit is enabled, also set the SCPTlowLimit1 property to
a non-zero value that is slightly below the expected level of background heartbeat
traffic. Hysteresis values (SCPThystHigh1 and SCPThystLow1 as appropriate) are
used to prevent oscillation of the alarm condition when it is near the alarm limit
value.
30 MPR-50 Monitor
Page 39

5
Troubleshooting
The MPR-50 is designed to offers years of reliable service without
maintenance. In the unlikely event that a problem arises, this
chapter describes how to diagnose and correct the problem. If
the problem cannot be readily corrected, please contact Echelon
Support at www.echelon.com/support.
MPR-50 Multi-Port Router User's Guide 31
Page 40

Troubleshooting Table
This troubleshooting table is intended to address abnormal operation only and does not
include errors reported on the Status LEDs. Refer to the LED Legends section in Chapter
2 for a description of the Status LED messages.
Symptom Troubleshooting Solutions
The Power LED is not on continuously.
A network tool does not receive a service pin
message when the Monitor’s Service button
is pressed.
The network tool returns error messages
when attempting to install Routers 1–5 and
the Monitor in a single operation.
• Verify that the input voltage measured
at the MPR-50 power input connector is
within limits.
• Verify that the input power is connected
to terminals 1 and 2.
• Remove the earth ground connection
temporarily if it is connected.
• Verify that Service pin messages from
other devices can be received.
• Verify that the router inside the MPR-50,
in between the Monitor and the network
tool, has been commissioned properly by
the network tool or is in repeater mode.
• Verify that the network wiring is
functional by pressing the Service button
on any intervening routers, and on the
router inside the MPR-50, in between the
Monitor and the network tool.
• Verify that the proper transceiver types
are connected to a particular channel.
For instance, verify that a TP/FT-10
channel is not
– TP/XF-1250 port of the MPR-50, and
that a TP/XF-1250 channel is not
connected to Routers 2-5.
• Verify that the network channels are
properly terminated with either a single
or double termination, as required.
• If the configuration of Routers 1–5 is in
doubt, put it into repeater mode. Then
press the Service button on the Monitor.
• First commission only the router nearest
to the network tool. Then commission
the other routers and the Monitor at the
same time.
connected to the Router 1
32 Troubleshooting
Page 41

Symptom Troubleshooting Solutions
When using multiple MPR-50s, network
topology errors occur.
The MPR-50 does not pass messages larger
than 114 bytes.
• Ensure that the internal channel of each
of the MPR-50s in the network is defined
within the network tool as a separate
channel.
• The MPR-50 can support messages up to
256 bytes. Configure the router buffers
using the application described in
Appendix A, Buffer Configuration
Utility.
MPR-50 Multi-Port Router User's Guide 33
Page 42

34 Appendix A – Buffer Management Utility
Page 43

Appendix A
Buffer Management Utility
This appendix explains how to use the buffer management
utility for the MPR-50 Multi-Port Router.
MPR-50 Multi-Port Router User's Guide 35
Page 44

Buffer Management Utility
The MPR-50 Buffer Management utility is a stand-alone Windows program that
allows you to:
• Change the MPR-50 Network buffer sizes.
• Fix the buffer settings if they become corrupted (for example, if they are set
to an invalid number).
Figure 1 shows the main window for the utility. This program provides four common
buffer sizes for the MPR routers. If you need to use a different buffer size than what
is provided, see
Changing the Utility’s Buffer Sizes.
Figure 1. MPR-50 Buffer Management Utility Main Window
Button Action
Open, Close Opens/Closes a Network Interface
Buffer Configure Changes the Buffer size to the selected Buffer Configuration. The
service pins from all five routers must be recorded before it works – you
must see *5 before you can use it.
Buffer Recovery Mode Sets the Buffers to default. Use to fix corrupted buffer settings.
Routers Found Indicates the number of router service pins received. Click to clear the
Routers Found number.
Clear Log Clears the Log box.
Exit Exits the program.
36 Appendix A – Buffer Management Utility
Page 45

Installing and Running the MPR Buffer Management Utility
To install the MPR-50 Buffer Management utility, unzip the files from the supplied
ZIP file into the LONWORKS bin directory (usually, C:\LonWorks\bin). This step
creates a new directory with four files.
To run the MPR-50 Buffer Management utility, double click the icon for the “MPR50Tool.exe” file.
This program requires the following Windows dynamic link library (DLL) files to be
present on the Windows system:
• LDV32.DLL – for the LDV32 interface
• MFC42.DLL – for the Microsoft Foundation Classes
This program supports the following Network Interfaces:
• Supported: USB U10 and RNI (e.g., i.LON
• Not Supported: IP-852 Network Interfaces.
®
10 and i.LON 100).
Using the MPR Program
To check the MPR-50 buffer sizes:
1. Connect the network interface to any of the MPR routers (e.g., Router 2).
a. Router 1 is for a TP/XF-1250 channel and Routers 2 – 5 are for TP/FT-10
channels.
2. Select the Network Interface and click Open.
a. Click Close to close the Network Interface.
Checking the Current Buffer Sizes
To check the MPR-50 buffer sizes:
1. Make sure the Buffer Recover Mode button is off (i.e., grey background).
2. Click the Routers Found Button to clear the list of registered routers.
3. Press each MPR router service pin. The buffers sizes will be displayed in the Log
Box.
Using Buffer Configure
To configure the MPR-50 buffers, you first need to configure the MPR-50 for repeater
mode. If you are unable to configure the MPR-50, or it is not working, then the
router buffer settings might be corrupted. To fix them, use the Buffer Recover Mode
on the routers before changing the buffer sizes to the desired values; see
Buffer Recover Mode
Note: While the Buffer Recover Mode is enabled (the button is orange), when you
press a Service Pin on the MPR-50, the utility tries to recover the buffers for that
router and sets the buffer size to 114 bytes.
To change the MPR-50 buffer sizes:
1. Decommission all the routers in the MPR-50 if they have been commissioned
before. If the MPR-50 has not been commissioned or if all the MPR-50’s status
on page 39 for more information.
Using
MPR-50 Multi-Port Router User's Guide 37
Page 46

LEDs are flashing green, proceed to step 2.
To decommission the routers, perform either of the following steps:
a. Use your Network Integration Tool (such as the LonMaker
LonMaker tool, right-click the router shape and select decommission.
b. Press the Service Pin button on each router for at least 20 seconds until the
Status LED flashes orange.
2. Connect your Network Interface to any of the MPR-50’s routers.
3. Place the MPR-50 in Repeater mode by pressing the Monitor Service Pin button
for 30-40 seconds. The MPR is in repeater mode when all the LEDs flash green.
4. Start the MPR-50 Buffer Management utility.
5. Select the Network Interface device from dropdown list in the Network Interface
area of the MPR-50 Buffer Management utility main window, and click Open.
6. Select the buffer size that you want from the Buffer Configurations area of the
MPR-50 Buffer Management utility main window.
7. Ensure that the Buffer Recovery Mode is off and that the button’s background
is grey and not orange (or yellow). When the button is grey, you are in buffer
configuration mode.
8. Press the Service Pin button on all of the MPR-50’s routers.
As you press each of the Service Pins, notice that the number displayed on the
Routers Found button of the MPR-50 Buffer Management utility main window
is incremented. When you see “*5*” on the Routers Found button, the utility
has received all five of the MPR-50 routers’ Service Pin messages. You must
press the Service Pin for all of the MPR-50’s routers before the utility can
configure their buffers.
If the utility does not recognize all of the routers’ Service Pin messages, then the
MPR-50 is likely not in Repeater Mode (see step
3).
You can click the Routers Found button to clear the list of registered routers.
9. Click the Buffer Configure button on the MPR-50 Buffer Management utility
main window to change the buffer sizes.
10. The log area of the MPR-50 Buffer Management utility main window shows
“Buffer configuration complete” when the buffers have been successfully
modified.
11. Click the Routers Found Button to clear the list of registered routers.
12. Press each MPR router service pin. The buffers sizes are displayed in the Log
Box.
13. When the buffer configuration is complete, click Exit to close the MPR-50 Buffer
Management utility.
®
tool). For the
38 Appendix A – Buffer Management Utility
Page 47

Using Buffer Recover Mode
You can use the MPR-50 Buffer Management utility’s buffer recovery mode to
recover router nodes that have had invalid buffer configurations programmed into
them. Without the MPR-50 Buffer Management utility, buffer recovery can be
difficult. For example, some configurations result in a router that is only capable of
receiving a few network packets before it enters a state in which it can no longer
receive messages. In these cases, it might be necessary to reset (power cycle) the
router before attempting recovery. As a further complication, the Monitor Node
periodically tries to communicate with these router nodes, which uses packet buffers
if the router node is configured incorrectly.
When you click the Buffer Recover Mode button, the MPR-50 Buffer Management
utility enters the buffer recovery mode; if you click this button again, the utility
returns to buffer configuration mode. While the utility is in buffer recovery mode,
any Service Pin message captured by the utility causes it to perform the following
steps:
1. It checks the Program ID to ensure that the message came from a router.
2. It uses the Neuron
router node using the un-ack’d service. The utility uses this service because the
node might not be able to generate a response. The router is also reset as a
result of the buffer configuration message.
3. After a small delay, the utility uses the same Neuron ID to send a buffer
configuration message to the far router node using the un-ack’d service. The
router is reset as a result.
4. After another small delay, the utility reads the router’s far side buffer
configuration and confirms it.
If this process is successful, you should proceed with the next router using the
connectivity that you now have with the recovered router. If it is impossible to
recover the other routers using the internal channel path, you may have to approach
the routers from each of their external channel interfaces.
Note: A single “safe” default buffer configuration is used for all recovery operations
(the same one used for the default configuration of the FT10 nodes). Normally, the
internal node configuration is different from the external node configuration, and the
TP1250 configuration is quite large. To correct for this difference, after the recovery
process is complete, you should re-configure all five routers using the normal buffer
configuration mode.
Fixing the MPR-50 buffers because of a corrupted buffer can take several attempts to
fix all five routers.
To fix the MPR-50 buffer sizes:
1. Decommission all the routers in the MPR-50 if they have been commissioned
before. If the MPR-50 has not been commissioned, proceed to step
decommission the routers, perform either of the following steps:
a. Use your Integration Tool (for example, the LonMaker tool).
b. Press the Service Pin button on each router for at least 20 seconds until the
Status LED flashes orange.
2. Connect your Network Interface to any of the MPR-50 routers.
®
ID to address a buffer configuration message to the near
2. To
MPR-50 Multi-Port Router User's Guide 39
Page 48

3. Place the MPR in Repeater mode by pressing the Monitor Service Pin button for
30-40 seconds. The MPR is in repeater mode when all the LEDs flash green.
4. Start the MPR-50 Buffer Management utility.
5. Select the Network Interface device from dropdown list in the Network Interface
area of the MPR-50 Buffer Management utility main window, and click Open.
6. Click the Buffer Recover Mode button to ON to enter buffer recovery mode.
The button turns orange (or yellow) while you are in this mode.
7. Press the Service Pin button on the router that the network interface is
connected to.
8. The log area of the MPR-50 Buffer Management utility main window shows
“Buffer configuration complete” when the buffers have been successfully
modified.
9. Press the Service Pin button on another of the MPR-50’s routers. If you don’t see
that this Service Pin message is received, make sure that the router is in
Repeater Mode (see step
10. The log area of the MPR-50 Buffer Management utility main window shows
“Buffer configuration complete” when the buffers have been successfully
modified.
11. Repeat steps
9 and 10 until you have fixed the buffers for all five routers.
12. If you want to use the default buffer size of 114 bytes, proceed to step
Otherwise, proceed to the next step.
13. Click the Buffer Recover Mode button to OFF to leave buffer recovery mode.
The button turns grey.
14. Select the buffer size that you want from the Buffer Configurations area of the
MPR-50 Buffer Management utility main window.
15. Press the Service Pin button on all of the routers.
As you press each of the Service Pins, notice that the number displayed on the
Routers Found button of the MPR-50 Buffer Management utility main window
is incremented. When you see “*5*” on the Routers Found button, the utility
has received all five of the MPR-50 routers’ Service Pin messages.
You must press the Service Pin for all of the MPR-50’s routers before the utility
can configure their buffers.
If the utility does not recognize all of the routers’ Service Pin messages, then the
MPR-50 is likely not in Repeater Mode (see step
You can click the Routers Found button to clear the list of registered routers.
16. Click the Buffer Configure button on the MPR-50 Buffer Management utility
main window to change the buffer sizes.
3).
18.
3).
40 Appendix A – Buffer Management Utility
Page 49

17. The log area of the MPR-50 Buffer Management utility main window shows
“Buffer configuration complete” when the buffers have been successfully
modified.
18. Click the Routers Found Button to clear the list of registered routers.
19. Press each MPR router service pin. The buffers sizes are displayed in the Log
Box.
20. When the buffer configuration is complete, click Exit to close the MPR-50 Buffer
Management utility.
Changing the Utility’s Buffer Sizes
The utility uses a text file that presents up to four separate “Buffer Configurations”.
This is a comma-separated value (CSV) file that contains an informational header
plus various buffer configuration fields. The file name is “buffconfig.csv”, and you can
edit it with a text editor or a spreadsheet application (such as Microsoft Excel). This
file must exist in the same folder as the utility’s executable file. Also provided is an
alternative CSV file that shows how to support 255 byte buffers (see the “Alternate
CSV” sub-directory).
Table 1 shows an example of the file layout.
Table 1. Buffer Configuration File
# This is a
comment.
NodeID Name NetBuff
EXTFT10 66 Bytes 66 42 7 7 2 2 2 1
INTDIFF 66 Bytes 66 42 5 11 0 2 2 0
EXTTP12 66 Bytes 66 42 127 191 63 2 2 1
EXTFT10 114 Bytes 114 42 5 3 1 2 2 1
INTDIFF 114 Bytes 114 42 3 5 0 2 2 0
EXTTP12 114 Bytes 114 42 47 127 31 2 2 1
Size
AppBuff
Size
NetBuffIn
Count
NetBuffOut
Count
NetBuffOut
PriCount
AppBuffInCount AppBuffOut
Count
AppBuffOut
PriCount
The “NodeID” field must contain one of the following values:
• EXTFT10
• INTDIFF
• EXTTP12
The “Name” field is used to create one of the four unique buffer configurations that
appear in the “Buffer Configurations” area of the utility.
The rest of the fields refer to standard Neuron buffer configurations values. The
order of the rows in the file are only important in that the first three entries are used
to set the default values. However, the order of the columns are important because
they are always assigned in the order that matches the descriptors listed in the table
(the program doesn’t use these descriptors; they are purely informative for the CSV
file).
For each unique configuration “Name” value, there should be 3 entries, one for each
NodeID. The utility checks all values against the acceptable buffer configuration
MPR-50 Multi-Port Router User's Guide 41
Page 50

values, and rejects any that are out of range, including Network buffer sizes that
aren’t consistent within a specific configuration. If you attempt to use a buffer
configuration that exceeds the available RAM for the particular NodeID type, the
utility displays an error and the configuration will not proceed.
The utility communicates with the router nodes using Neuron ID addressing on the
zero-length domain. As each router is configured, the utility resets it before
proceeding to the next router.
42 Appendix A – Buffer Management Utility
Page 51

www.echelon.com
 Loading...