

Page 1

LNS Programmer's Guide
Turbo Edition
@echelon
C o r p o r a t i o n
078-0177-01F
Page 2

Echelon, LON, L
LonTalk, Neuron, L
ONWORKS, NodeBuilder,
ONMARK, LNS, LonBuilder,
LonUsers, BeAtHome, LonManager, 3120,
3150, LonPoint, Digital Home, L
ONWORLD,
ShortStack, i.LON, the Echelon logo, and the
ONMARK logo are registered trademarks of
L
Echelon Corporation. LNS Powered by
Echelon, LonMaker, LonLink, LonResponse,
OpenLDV, LONews, Open Systems Alliance,
Panoramix, Panoramix Powered by Echelon,
ONMARK Powered by Echelon, Powered by
L
Echelon, and LonSupport are trademarks of
Echelon Corporation.
Other brand and product names are trademarks or
registered trademarks of their respective holders.
Neuron
Chips and other OEM Products were not
designed for use in equipment or systems which
involve danger to human health or safety or a risk of
property damage and Echelon assumes no
responsibility or liability for use of the Neuron
Chips
in such applications.
Parts manufactured by vendors other than Echelon
and referenced in this document have been
described for illustrative purposes only, and may not
have been tested by Echelon. It is the responsibility
of the customer to determine the suitability of these
parts for each application.
ECHELON MAKES AND YOU RECEIVE NO
WARRANTIES OR CONDITIONS, EXPRESS, IMPLIED,
STATUTORY OR IN ANY COMMUNICATION WITH YOU,
AND ECHELON SPECIFICALLY DISCLAIMS ANY
IMPLIED WARRANTY OF MERCHANTABILITY OR
FITNESS FOR A PARTICULAR PURPOSE.
No part of this publication may be reproduced,
stored in a retrieval system, or transmitted, in any
form or by any means, electronic, mechanical,
photocopying, recording, or otherwise, without the
prior written permission of Echelon Corporation.
Printed in the United States of America.
Copyright ©2000-2004 by Echelon Corporation.
Echelon Corporation
www.echelon.com
Page 3

Preface
®
The LNS
network operating system provides a
comprehensive set of software tools that allows multiple
network applications to perform a broad range of services
over L
ONWORKS
®
and IP networks. These services include
network management (network installation, configuration,
maintenance, and repair) and system-wide monitoring and
control. This guide describes how to use the LNS Object
Server ActiveX Control to write LNS applications on a
®
Microsoft Windows
Server 2003, Windows XP, or Windows
2000 host PC.
LNS Programmer's Guide i
Page 4

Purpose
This guide describes how to use the LNS Object Server ActiveX Control to develop an
LNS application on a Microsoft Windows Server 2003, Windows XP, or Windows 2000
host PC.
Audience
This guide is intended for software developers creating LNS applications. LNS
applications may be written in any language that supports COM Components or ActiveX
controls, including Microsoft
6.0. Readers of this guide should have programming experience in such a language, and
familiarity with L
introduction to L
System document available at www.echelon.com
ONWORKS
ONWORKS technology can be found in the Introduction to the LONWORKS
®
Visual C++ (versions 6.0-7.1) and Microsoft Visual Basic
®
technology and COM/ActiveX control concepts. An
.
Examples
Throughout this guide, Visual Basic code examples are used to illustrate concepts. To
make the examples more easily understood, they have been simplified. Error checking
has been removed, and in some cases, the examples are only fragments that will not
compile.
For complete examples, see the example applications provided with the LNS Application
Developer’s Kit. This includes example network management, monitor and control, plugin and director, and xDriver applications. Appendix C of this document describes the
example applications in more detail.
Technical Support
If you have technical questions that are not answered within this document or the online
help files provided with the LNS Application Developer’s Kit, you can contact Echelon for
technical support. Your LNS Application Developer’s Kit distributor may also provide
technical support. In addition, you can enroll in training classes at Echelon to learn more
about LNS.
You can find out more about Echelon’s technical support and training services on the
Echelon Support home page at http://www.echelon.com/support
.
System Requirements
System requirements and recommendations for the PC on which the LNS Application
Developer’s Kit and LNS Redistribution Kit, as well as the LNS Server or LNS Remote
Client redistributions, will run are listed below.
ii
LNS Programmer's Guide
Page 5

Development System
The following requirements are for the PC on which the LNS Application Developer’s Kit
or LNS Redistribution Kit will be run:
• Windows Server 2003, Windows XP, or Windows 2000
• Pentium III 600 MHz or faster
• 256 MB RAM (512 MB RAM recommended)
• 50 MB or more of free disk space. For highest performance during
development, Echelon recommends using a high-performance hard disk.
• Any Windows application development tool that supports the use of COM
components or ActiveX controls. Echelon has tested and offers technical
assistance on the following development environments only:
• Microsoft Visual Basic 6.0, Service Pack 6 or higher
• Microsoft Visual Studio .NET 2003 (C++, used with ATL or MFC)
• CD-ROM drive
• Mouse or compatible pointing device
• LNS Network Interface card. Chapter 11 of this document lists and
describes the compatible LNS Network Interface cards. Note that an
Ethernet card can function as an LNS Network Interface if you are using
Echelon's i.LON 1000 Internet Server or the i.LON 600 L
Server, and can also be used to access network interfaces such as the
i.LON 100 Internet Server or the i.LON 10 Ethernet Adapter.
• The minimum screen size required to use all LNS utilities is SVGA
800x600.
ONWORKS/IP
LNS Server PC for a Smaller Network
The following requirements are for a PC on which an LNS Server for a smaller network
will be run.
• Windows Server 2003, Windows XP, or Windows 2000
• Pentium 100MHz or faster
• 50 MB or more of free disk space, not taking into account the size of the
LNS application and LNS network databases
• 256 MB RAM or more, depending upon the requirements of the LNS
applications that will be running in addition to the LNS Server
• LNS Network Interface card. Chapter 11 of this document lists and
describes the compatible LNS Network Interface cards. Note that an
Ethernet card can function as an LNS Network Interface if you are using
Echelon's i.LON 1000 Internet Server or the i.LON 600 L
Server, and can also be used to access network interfaces such as the
i.LON 100 Internet Server or the i.LON 10 Ethernet Adapter.
• The minimum screen size required to use all LNS utilities is SVGA
800x600.
ONWORKS/IP
LNS Programmer's Guide
iii
Page 6

LNS Server PC for a Larger, Busier Network
These requirements and recommendations are also valid for a PC on which a large
network database is engineered before the LNS Server for that network becomes
operational.
• Windows Server 2003, Windows XP, or Windows 2000
• Pentium 4 1GHz or faster
• 50 MB or more of free disk space, not taking into account the size of the
LNS application and LNS network databases. For highest performance
during development, Echelon recommends using a high-performance
hard disk.
• 512 GB RAM or more, depending upon the requirements of the LNS
applications that will be running in addition to the LNS Server. Echelon
recommends that you have between 500 MB and 1 GB available.
• LNS Network Interface card. Chapter 11 of this document lists and
describes the compatible LNS Network Interface cards. Note that an
Ethernet card can function as an LNS Network Interface if you are using
Echelon's i.LON 1000 Internet Server or the i.LON 600 L
Server, and can be used to access network interfaces such as the i.LON
100 Internet Server or the i.LON 10 Ethernet Adapter.
• The minimum screen size required to use all LNS utilities is SVGA
800x600.
ONWORKS/IP
LNS Remote Client PC
The following requirements are for a PC on which the LNS Remote Client redistribution
will be run.
• Windows Server 2003, Windows XP, or Windows 2000
• Pentium 100MHz or faster
• 50 MB or more of free disk space, not taking into account the size of the
LNS application and LNS network databases
• 128 MB RAM or more, depending upon the requirements of the LNS
applications that will be running in addition to the LNS Server
• LNS Network Interface card. Chapter 11 of this document lists and
describes the compatible LNS Network Interface cards. Note that an
Ethernet card can function as an LNS Network Interface if you are using
Echelon's i.LON 1000 Internet Server or the i.LON 600 L
Server, and can also be used to access network interfaces such as the
i.LON 100 Internet Server or the i.LON 10 Ethernet Adapter.
• The minimum screen size required to use all LNS utilities is SVGA
800x600.
ONWORKS/IP
iv
LNS Programmer's Guide
Page 7

Table of Contents
Preface ................................................................................................................................................. i
Purpose................................................................................................................................................ii
Audience..............................................................................................................................................ii
Examples.............................................................................................................................................ii
Technical Support...............................................................................................................................ii
System Requirements ........................................................................................................................ii
Development System ...................................................................................................................iii
LNS Server PC for a Smaller Network.......................................................................................iii
LNS Server PC for a Larger, Busier Network ...........................................................................iv
LNS Remote Client PC ................................................................................................................iv
Table of Contents................................................................................................................................v
Chapter 1 - Installing the LNS Software....................................................................................... 1
System Requirements ........................................................................................................................2
3rd Party Software...............................................................................................................................2
Installing the LNS Application Developer’s Kit...............................................................................2
Installing the LNS Application Developers Kit Software .........................................................2
Installing the LNS Redistribution Kit........................................................................................3
Developing Your LNS Application..............................................................................................4
Chapter 2 - What’s New in Turbo Edition..................................................................................... 5
Performance Enhancements ..............................................................................................................6
New Features......................................................................................................................................6
Enhanced Data Formatting.........................................................................................................7
GetDataPoint Method ...........................................................................................................7
FormatLocales Collection......................................................................................................7
Changeable Network Variable Types .........................................................................................9
Improved Support for Dynamic Interfaces.................................................................................9
Improved Monitoring Performance.............................................................................................11
Using Permanent Monitor Sets ............................................................................................11
Using Temporary Monitor Sets ............................................................................................12
Availability of Network Resource Information ..........................................................................13
Enhanced LonMark Interoperability..........................................................................................13
Improved Device Commissioning Performance .........................................................................14
System Management Mode Enhancements ...............................................................................15
Enhanced Configuration Property Management.......................................................................16
Online Database Validation and Backup...................................................................................16
Miscellaneous ...............................................................................................................................17
New LNS Runtime Installations.................................................................................................18
Compatibility ......................................................................................................................................18
Interface Compatibility ...............................................................................................................19
Database .......................................................................................................................................19
Runtime Component Updates.....................................................................................................19
Application Developer’s Kit Include Files ..................................................................................20
Exception Codes ...........................................................................................................................20
New Features ...............................................................................................................................21
Propagating Device Changes While Offnet .........................................................................21
Dynamic Functional Blocks ..................................................................................................21
DataPoint Object Improvements ..........................................................................................21
Formatting Enhancements ...................................................................................................22
Enhanced LonMark Interoperability ...................................................................................22
LNS Programmer's Guide
v
Page 8

LonWorks Interfaces Control Panel .....................................................................................22
Support for i.LON 1000, i.LON 600 and ANSI/CEA-852 Channels ..................................22
Flexible Program ID ..............................................................................................................23
Modifiable Device-Specific Configuration Properties .........................................................23
Changeable Network Variable Types ..................................................................................24
Security ...............................................................................................................................................26
Chapter 3 - LNS Overview................................................................................................................ 27
Introduction to LNS ...........................................................................................................................28
The LNS Programming Model...........................................................................................................29
LNS Components................................................................................................................................30
LNS Databases and the LNS Server ..........................................................................................30
LNS Object Server .......................................................................................................................31
LNS Object Server Hierarchy...............................................................................................32
Network Service Devices .............................................................................................................35
Network Interfaces ......................................................................................................................35
LNS Network Services .......................................................................................................................36
Network Management .................................................................................................................36
Monitor and Control ....................................................................................................................37
LNS Clients.........................................................................................................................................37
Local Client Applications ............................................................................................................38
Lightweight Client Applications.................................................................................................39
Full Client Applications...............................................................................................................40
Independent Clients.....................................................................................................................41
Getting Started ...................................................................................................................................41
Chapter 4 - Programming an LNS Application ........................................................................... 45
Programming an LNS Application ....................................................................................................46
Importing the LNS ActiveX Control .................................................................................................46
Importing the Control into Visual Basic 6.0 ..............................................................................46
Importing the Control into Visual C++ ......................................................................................47
Initializing an LNS Application ........................................................................................................48
Initializing a Local Client Application .......................................................................................48
Selecting the Access Mode ....................................................................................................49
Specifying the Licensing Mode .............................................................................................49
Opening the Object Server....................................................................................................50
Selecting a Network Interface ..............................................................................................50
Opening a Network ...............................................................................................................51
Initializing a Remote Full Client Application............................................................................52
Selecting the Access Mode ....................................................................................................53
Specifying the License Mode.................................................................................................53
Opening the Object Server....................................................................................................54
Selecting a Network Interface ..............................................................................................54
Opening a Network ...............................................................................................................55
Initializing a Remote Lightweight Client Application ..............................................................57
Selecting the Remote Access Mode.......................................................................................58
Specifying the License Mode.................................................................................................58
Opening the Object Server....................................................................................................59
Opening a Network ...............................................................................................................59
Initializing an Independent Client .............................................................................................60
Opening a System...............................................................................................................................61
Setting System Parameters.........................................................................................................63
Using Transactions and Sessions ......................................................................................................65
Managing Transactions ...............................................................................................................65
vi
LNS Programmer's Guide
Page 9

Monitoring and Transactions ...............................................................................................66
Using Transactions With Collections...................................................................................66
Managing Sessions.......................................................................................................................67
Event Handling...................................................................................................................................67
Exception Handling............................................................................................................................70
Terminating an LNS Application ......................................................................................................71
Chapter 5 - Network Management : Installing a Network ........................................................ 73
LNS Network Installation Scenarios ................................................................................................74
Installation Scenarios ..................................................................................................................75
Engineered Mode Installation ..............................................................................................76
Ad Hoc Installation ...............................................................................................................76
Automatic Installation ..........................................................................................................76
Engineered Mode................................................................................................................................77
Definition Phase...........................................................................................................................77
Commissioning Phase..................................................................................................................81
Commissioning Phase, Multiple Networks..........................................................................84
Ad Hoc Installation ............................................................................................................................85
Automatic Installation .......................................................................................................................89
Discovering and Installing Devices ............................................................................................91
Discovering When New Devices are Attached to the Network ..........................................91
Installing Devices ..................................................................................................................93
Discovering When Devices are Detached or Replaced ........................................................96
System Management Mode Considerations .....................................................................................97
lcaMgmtModePropagateConfigUpdates.....................................................................................97
lcaMgmtModeDeferConfigUpdates.............................................................................................98
Intended Usage of the System Management Mode ...................................................................98
Changing the System Management Mode .................................................................................99
Tracking Device Updates ......................................................................................................99
Tracking System Management Mode Changes ...................................................................100
Affects on Network Management Methods and Properties................................................100
Chapter 6 - Network Management: Defining, Commissioning and Connecting
Devices ................................................................................................................................................. 103
Defining, Commissioning and Connecting Devices..........................................................................104
Device Interfaces ................................................................................................................................104
Program IDs and DeviceTemplate Objects ................................................................................106
Device Resource Files ..................................................................................................................107
Scope Selectors ......................................................................................................................108
The Bigger Picture .......................................................................................................................110
Maintaining Device Interfaces With LNS..................................................................................112
Defining and Commissioning Devices...............................................................................................113
Creating AppDevice Objects........................................................................................................113
Neuron ID Assignment ................................................................................................................115
Service Pin .............................................................................................................................115
Find and Wink .......................................................................................................................117
Manual Entry ........................................................................................................................119
Loading Device Application Images ...........................................................................................119
Post-Load State .....................................................................................................................120
Reloading a Device's Application .........................................................................................121
Commissioning Devices ...............................................................................................................121
Using the Commission and Commission Ex Methods ........................................................122
Device Validation Options ....................................................................................................123
Device Configuration Considerations ..................................................................................124
LNS Programmer's Guide
vii
Page 10

LNS Licensing Considerations .............................................................................................124
Configuring Devices.....................................................................................................................125
Generic Configuration Data..................................................................................................125
Application-specific Configuration Data..............................................................................125
Setting Devices Online ................................................................................................................128
Other Device Management Operations ............................................................................................129
Testing Devices and Detecting Device Failures.........................................................................129
Using the OnAttachment Event...........................................................................................130
Performing Diagnostics on LonMarkObjects.......................................................................131
Replacing Devices ........................................................................................................................132
Replacing Network Service Devices .....................................................................................133
Upgrading Devices .......................................................................................................................134
Decommissioning Devices ...........................................................................................................136
Moving Devices and Managing Networks With Multiple Channels ........................................137
Removing Devices ........................................................................................................................137
Removing Devices From Multiple Subsystems ...................................................................137
Connecting Devices ............................................................................................................................138
Connection Rules .........................................................................................................................140
Adding Connections .....................................................................................................................142
Modifying Connections ................................................................................................................143
Listing Connections and Connection Members ...................................................................144
Using the OnNodeConnChange Event ................................................................................145
Connection Descriptions..............................................................................................................145
Chapter 7 - Network Management: Optimizing Connection Resources ................................ 147
Using Custom Connection Description Templates ..........................................................................148
Setting ConnectDescTemplate Properties..................................................................................149
Optimizing Connection Resources.....................................................................................................151
Network Design Time ..................................................................................................................152
Alias Options..........................................................................................................................152
Broadcast Options .................................................................................................................153
Using the AliasOptions and BroadcastOptions Properties ................................................154
Example Connection Scenario: Building Controls.....................................................................155
Solving Problems With Your Connection Scenarios ..................................................................157
Shortage of Groups ................................................................................................................157
Shortage of Address Table Space .........................................................................................157
Shortage of Aliases ................................................................................................................158
Summary of Resource Shortage Recommendations............................................................158
Predictive Strategies...................................................................................................................159
Conclusion ....................................................................................................................................161
Chapter 8 - Network Management: Advanced Topics................................................................ 163
Managing Network Service Devices..................................................................................................164
Upgrading a Network Service Device.........................................................................................164
Moving a Network Service Device ..............................................................................................164
Remote Full Clients...............................................................................................................165
Using the PreReplace Method ..............................................................................................166
Using Shared Media...........................................................................................................................167
Managing Networks with Multiple Channels ..................................................................................169
Overview of Router Types and Operation ..................................................................................170
Explicitly Controlling Channel Allocation...........................................................................172
Explicitly Controlling Subnet Allocation .............................................................................173
Installing and Configuring Routers............................................................................................174
Installation Order..................................................................................................................175
viii
LNS Programmer's Guide
Page 11

Installing Devices With Multiple Channels...............................................................................175
Channel Isolation Process.....................................................................................................176
Resolving Installation Failures ............................................................................................177
Moving Devices and Routers Between Channels ......................................................................177
Removing Routers ........................................................................................................................178
Using Dynamic Device Interfaces .....................................................................................................179
Accessing a Device Interface .......................................................................................................179
Adding a Custom Interface to a Device................................................................................181
Adding LonMark Functional Blocks To a Custom Interface..............................................182
Adding Message Tags To a Custom Interface .....................................................................183
Creating Dynamic Network Variables.................................................................................184
Tracking Custom Interface Changes ...................................................................................185
Changeable Network Variable Types ...............................................................................................185
SCPTnvType Configuration Properties......................................................................................186
Chapter 9 - Monitor and Control .................................................................................................... 189
Introduction to Monitor and Control.................................................................................................190
Temporary and Permanent Monitor Sets .........................................................................................192
Permanent Monitor Sets .............................................................................................................192
Temporary Monitor Sets..............................................................................................................193
Creating Monitor Sets........................................................................................................................194
Managing Monitor Sets......................................................................................................................195
Adding Network Variable Monitor Points to a Monitor Set .....................................................195
Adding Message Monitor Points to a Monitor Set .....................................................................197
Setting Monitoring Options.........................................................................................................200
Network Variable Monitor Point Options............................................................................201
Message Monitor Point Options ...........................................................................................208
Opening and Enabling Monitor Sets.................................................................................................213
Using the Enable Method .....................................................................................................213
Using Network Variable Monitor Points ..........................................................................................214
Explicitly Reading and Writing Network Variable Monitor Points .........................................215
Example of Explicitly Reading a Network Variable Monitor Point...................................216
Example of Explicitly Writing a Network Variable Monitor Point....................................216
Polled Network Variable Monitoring..........................................................................................217
Setting the Poll Interval .......................................................................................................218
Example of a Network Variable Event Handler .................................................................219
The Implicit Bound Network Variable Monitoring Scenario....................................................220
The Explicit Bound Network Variable Monitoring and Control Scenario ...............................221
Fan-in Connections ...............................................................................................................221
Fan-out Connections .............................................................................................................222
Creating and Using Host Network Variables......................................................................223
Using Message Monitor Points..........................................................................................................224
Monitoring Message Monitor Points ..........................................................................................225
Receiving Message Monitor Point Updates .........................................................................226
Example Message Monitor Point Event Handler................................................................226
Controlling Message Points.........................................................................................................227
Developing Remote Monitor and Control Applications ...................................................................227
Tracking Monitor Point Updates.......................................................................................................228
System Management Mode Considerations .....................................................................................230
Directly Reading and Writing Network Variables...........................................................................231
Data Points and Enumerated Types...........................................................................................232
Using Configuration Properties In a Monitor and Control Application .........................................233
Device-Specific Configuration Properties...................................................................................234
Using the GetDataPoint Method ................................................................................................235
LNS Programmer's Guide
ix
Page 12

Data Source Options .............................................................................................................236
Resynchronizing Configuration Property Values ......................................................................238
Performance Considerations .......................................................................................................240
Data Formatting.................................................................................................................................241
FormatSpec Property...................................................................................................................241
Reading the FormatSpec Object ...........................................................................................242
CurrentFormatLocale ..................................................................................................................244
Creating FormatLocale Objects............................................................................................245
Chapter 10 - LNS Database Management ..................................................................................... 249
Overview of LNS Databases ..............................................................................................................250
Automatic Database Upgrade............................................................................................................250
Backing Up Network Databases .......................................................................................................251
Backup Method ............................................................................................................................251
Validating Network Databases .........................................................................................................252
LNS Database Validation Tool ...................................................................................................252
Validate Method...........................................................................................................................253
Special Considerations ................................................................................................................254
Using the CompactDb() Method..................................................................................................255
Removing Network Databases ..........................................................................................................255
Moving Network Databases...............................................................................................................256
Network Recovery...............................................................................................................................257
Network Recovery Inconsistencies .............................................................................................258
Performing a Network Recovery .................................................................................................260
Application-Level Recovery .........................................................................................................262
Recovery and Mirrored Connections...........................................................................................263
Chapter 11 - LNS Network Interfaces ........................................................................................... 265
Network Interfaces Overview ............................................................................................................266
Standard and High Performance Network Interfaces .....................................................................266
Addressing .............................................................................................................................269
LonTalk Transactions ...........................................................................................................269
Number of Groups .................................................................................................................270
Supporting Multiple Networks.............................................................................................270
Neuron Ids .............................................................................................................................270
Using xDriver Interfaces....................................................................................................................271
Using LONWORKS/IP Interfaces .....................................................................................................272
Network Interfaces and Network Service Devices...........................................................................273
Chapter 12 - Director Applications and Plug-Ins........................................................................ 277
Introduction to the LNS Plug-In Model ............................................................................................278
LNS Plug-In API.................................................................................................................................279
Registering Plug-Ins...........................................................................................................................279
Registering a Plug-In in the LNS Database ..............................................................................279
Registering a Plug-In in the Windows Registry ........................................................................279
Registering Plug-In Commands in the Windows Registry........................................................280
Accessing Extension Data..................................................................................................................280
Implementing an LNS Director Application.....................................................................................280
Implementing the Client-Side LNS Plug-In API.......................................................................281
Detecting Existing Plug-Ins ........................................................................................................282
Registering Plug-Ins ....................................................................................................................283
Detecting Applicable Plug-Ins.....................................................................................................284
Launching Plug-Ins......................................................................................................................286
Advanced Plug-In Management Tasks.......................................................................................287
Implementing an LNS Plug-In ..........................................................................................................288
x
LNS Programmer's Guide
Page 13

Implementing an LNS Device Plug-In ..............................................................................................288
Managing Device Configuration .................................................................................................288
Chapter 13 - LNS Licensing ............................................................................................................. 289
Overview of LNS Licensing and Distribution ..................................................................................290
Demonstration Mode ..........................................................................................................................291
Standard Mode ...................................................................................................................................291
Entering the Standard Mode ......................................................................................................292
Protecting Your Keys ............................................................................................................292
Viewing License Status ...............................................................................................................292
Tracking License Events .............................................................................................................293
License Event Types..............................................................................................................293
Licensing and Network Recovery ......................................................................................................294
Licensing and Device Manufacturing ...............................................................................................295
Testing Devices ............................................................................................................................295
Using the LNS License Utilities........................................................................................................295
Using the LNS Server License Wizard.......................................................................................295
Using the LNS Server License Transfer Utility ........................................................................298
Chapter 14 – Distributing LNS Applications ............................................................................... 301
Distributing LNS Applications..........................................................................................................302
Using the LNS Redistributable Maker Utility ..........................................................................302
Adding the LNS Runtime to an LNS-based Product Installation ............................................306
Using setup.exe......................................................................................................................307
Using _SetupLNS.dll.............................................................................................................310
LNS Server and Remote Client Runtime Incompatibility..................................................312
Windows Installer and InstallShield Caveats.....................................................................312
Chapter 15 - Advanced Topics......................................................................................................... 313
File Transfer .......................................................................................................................................314
Using the OnSystemNssIdleEvent....................................................................................................316
Developing Remote Tools ...................................................................................................................316
Developing Mobile Tools ....................................................................................................................317
Registering a Mobile Application................................................................................................318
Moving a Mobile Application to a New Channel .......................................................................318
Multi-Threading and LNS Applications ...........................................................................................318
Avoiding Memory Leaks with LNS ...................................................................................................319
Debugging LNS Applications.............................................................................................................320
LNS and Line-Safe Expressions ........................................................................................................320
LNS and Internet Information Services ...........................................................................................322
Appendix A - Deprecated Methods and Obsolete Files.............................................................. 323
Deprecated Methods, Objects, Properties and Events .....................................................................324
Deprecated Objects ......................................................................................................................324
Deprecated Methods ....................................................................................................................324
Deprecated Properties .................................................................................................................325
Deprecated Events .......................................................................................................................326
Obsolete Files......................................................................................................................................326
Appendix B – LNS, MFC and ATL................................................................................................... 329
LNS, MFC and ATL ...........................................................................................................................330
Generating the Legacy MFC Class Wrapper Files ....................................................................332
Appendix C – LNS Turbo Edition Example Application Suite................................................. 337
LNS Turbo Edition Example Application Suite ...............................................................................338
Network Management Example .................................................................................................338
LNS Programmer's Guide
xi
Page 14

Initializing a Network ...........................................................................................................339
Performing Network Management Tasks............................................................................341
Source Code Mappings ..........................................................................................................344
Monitor and Control Example ....................................................................................................346
Source Code Mappings ..........................................................................................................350
xDriver Example Applications ....................................................................................................351
Example Director Application.....................................................................................................351
xii
LNS Programmer's Guide
Page 15

Chapter 1 - Installing the LNS
Software
This chapter describes how to install the LNS Turbo Edition
software.
LNS Programmer's Guide
1
Page 16

System Requirements
System requirements and recommendations for the PC on which the LNS Application
Developer’s Kit, LNS Server or LNS Remote Client redistributions will run are listed in
the System Requirements section on page ii of this document. Before installing any LNS
software, you should make sure the installation PC meets these requirements.
3rd Party Software
Before installing the LNS Application Developer’s Kit, you should note that LNS installs
the following 3
• FastObjects 9.5. LNS uses FastObjects 9.5 as its object database engine.
• CrypKey 5.7. LNS uses CrypKey 5.7 as part of its licensing software.
• Microsoft XML Parser 3.0
You should be aware of this if you are using other versions of these products on your
target PC. In addition, you should be aware that when service packs and fixes for these
products are released, it may have ramifications for the LNS runtime software.
rd
party software:
Installing the LNS Application Developer’s Kit
To install the LNS Application Developer’s Kit and begin developing an LNS application,
follow these steps:
1. Install the LNS Application Developer’s Kit.
2. If you are planning to redistribute your LNS applications, install the LNS
Redistribution Kit.
3. Start developing your LNS application.
Installing the LNS Application Developers Kit Software
The LNS Application Developer's Kit uses an automated, Windows-based installation
program called SETUP. Because the LNS Application Developer’s Kit CD contains
compressed files, you cannot install the software by copying the files directly to your hard
disk. This section describes how you can install the LNS Application Developer’s Kit.
You should stop all LNS-based applications, utilities and services before performing this
installation. This includes the LNS Server application, the OpenLDV xDriver connection
broker, and any LNS client applications running as Windows services. You will need to
manually restart these services after you complete the installation.
In addition, you must log in as a member of the Administrators user group when
installing the LNS Application Developer’s Kit. To install the LNS software, perform the
following steps:
1. Insert the LNS Application Developer's Kit CD into a CD-ROM drive. If
the start-up window does not automatically start after a few seconds,
start the setup program manually. You can start the start-up program
2
LNS Programmer's Guide
Page 17

like any other Windows program, e.g. by selecting the Run... item from
the Start menu of the Windows task bar, browsing to the Setup
application, and clicking Open.
2. This opens the LNS Application Developer’s Kit screen. Select Install
Products, and then select LNS Application Developer’s Kit to begin
installing the LNS Application Developer’s Kit software.
3. This opens the Welcome window. Click Next to continue.
4. This opens the License Agreement window. Read the license agreement,
and if you agree to the terms of the license agreement, click I accept the
terms in the license agreement. Then, click Next.
5. This opens the Customer Information dialog. Enter your name in the
User Name text box, and enter your company name in the
Organization text box. If you want the LNS Application Developer’s Kit
to be available to anyone who logs onto your PC, select Anyone who
uses this computer. Or, select Only for me if only you should have
access to the LNS Application Developer’s Kit. Then, click Next to
continue.
6. This opens the Ready to Install the Program window. Click Install to
begin the installation.
7. When LNS has completed the installation, a confirmation dialog will
appear. Click Finish to exit the installation and return to the main LNS
Application Developer’s Kit screen.
Installing the LNS Redistribution Kit
If you are using the LNS Application Developer’s Kit, you may distribute your LNS
applications, but may not distribute any of the LNS runtime files. If you want to
redistribute LNS runtimes files, you must use the LNS Redistribution Kit. See Chapter
14, Distributing LNS Applications, for more information on redistributing LNS
applications.
In LNS Turbo Edition, the LNS Server and LNS Remote Client installations, which are
created and installed with the LNS Redistribution Kit, have been recreated as Windows
Installer installations. This is to make LNS installations more compatible with recent
versions of Windows. For more information on this change, see New LNS Runtime
Installations on page 18.
You must log in as a member of the Administrators user group when installing the LNS
Redistribution Kit. To install the LNS Redistribution Kit, follow these steps:
1. Insert the LNS Application Developer's Kit CD into a CD-ROM drive. If
the start-up window does not automatically start after a few seconds,
start the setup program manually. You can start the start-up program
like any other Windows program, e.g. by selecting the Run... item from
the Start menu of the Windows task bar, browsing to the Setup
application, and clicking Open.
2. This opens the LNS Redistribution Kit screen. Select Install Products,
and then select LNS Redistribution Kit to begin installing the LNS
Redistribution Kit software.
LNS Programmer's Guide
3
Page 18

3. This opens the Welcome window. Click Next to continue.
4. This opens the License Agreement window. Read the license agreement,
and if you agree to the terms of the license agreement, click I accept the
terms in the license agreement. Then, click Next.
5. This opens the Customer Information dialog. Enter your name, company
name, and product serial number in the appropriate text boxes. If you
want the LNS Redistribution Kit to be available to anyone who logs onto
your PC, select Anyone who uses this computer. Or, select Only for
me if only you should have access to the LNS Redistribution Kit. Then,
click Next to continue.
6. This opens the Ready to Install the Program window. Click Install to
begin the installation.
7. When LNS has completed the installation, a confirmation dialog will
appear. Click Finish to exit the installation and return to the main LNS
Redistribution Kit screen.
Developing Your LNS Application
Your applications will access the network services provided by LNS using the LNS Object
Server ActiveX Control. This control gives you access to the LNS object hierarchy, where
each object corresponds to physical and logical objects in your network. Your LNS
applications will retrieve information from the LNS network operating system via the
object hierarchy. You will also use the hierarchy to access device information directly. In
short, everything will be done through the hierarchy.
You do not need to understand or use every object in the hierarchy to write a useful LNS
application. However you should be familiar with most of the objects in the hierarchy.
You should read the remainder of the LNS Programmer’s Guide for information on the
LNS programming model, and detailed instructions on how you should write your LNS
applications.
The next chapter describes the new features that have been added to LNS for Turbo
Edition. The following chapter (Chapter 3, LNS Overview) provides an overview of the
LNS object hierarchy, and a roadmap you can follow through the rest of this document.
4
LNS Programmer's Guide
Page 19

Chapter 2 - What’s New in
Turbo Edition
This chapter introduces the new features that have been
added to LNS for Turbo Edition, and describes how LNS
performance has improved in Turbo Edition. It also provides
guidelines to follow when upgrading your applications to use
Turbo Edition.
LNS Programmer's Guide
5
Page 20

Performance Enhancements
For Turbo Edition, numerous internal changes have been made that will significantly
improve the speed, performance and stability of most LNS applications. This includes
improved internal use of transactions, locking and indexing for faster database
operations.
Internal indexing in some of the major LNS collections has been vastly improved, so the
time required to access items from these collections has been reduced from a linear-time
operation (varying with respect to the size of the collection) to a relatively small,
constant-time operation. For large networks with large databases, this will make for a
noticeable performance improvement when you use the Item property, the
ItemByHandle() method, the ItemByIndex() method, or the
ItemByProgrammaticName() method to retrieve an object from the following
collections:
• AppDevices Collection (when accessed through Subsystem object)
• NetworkVariables Collection
• ConfigProperties Collection
• LonMarkObjects Collection
• MessageTags Collection
• Routers Collection
The introduction of temporary monitor sets in Turbo Edition will improve the
performance of your monitor and control applications. Temporary monitor sets serve the
same purpose as the permanent monitor sets that were introduced in Release 3.0.
However, temporary monitor sets are not stored in the LNS database. As a result, it
takes considerably less time to create temporary monitor sets than it does to create
permanent monitor sets. Temporary monitor sets can only be used in a single client
session by the client application that created them. In contrast, permanent monitor sets
can be used by multiple clients in multiple client sessions. If you are creating a monitor
and control application that does not need to re-use monitor sets and monitor points, you
can maximize your application’s performance by using temporary monitor sets. For more
information on temporary monitor sets, see the next section, New Features.
New Features
This section describes the major features that have been added to LNS for Turbo Edition.
This includes the following topics:
• Enhanced Data Formatting
• Changeable Network Variable Types
• Improved Support for Dynamic Interfaces
• Improved Monitoring Performance
• Availability of Network Resource Information
6
LNS Programmer's Guide
Page 21

• Enhanced LonMark Interoperability
• Improved Device Commissioning Performance
• System Management Mode Enhancements
• Enhanced Configuration Property Management
• Online Database Validation and Backup
Enhanced Data Formatting
LNS 3.0 featured the introduction of the DataPoint object, which you can use to read
and write to the values of monitor points. Formatting of DataPoint objects is handled
locally, in the client process. As a result, formatting changes made to the value of a
monitor point through a data point by a given application do not affect other applications
that are reading the value of the same monitor point. This eliminates any confusion
caused when separate client applications need to format data independently.
In LNS Turbo Edition, you can create DataPoint objects to read and write the values of
network variables and configuration properties, as well as to the values of monitor
points. LNS Turbo Edition also features several modifications and enhancements to the
DataPoint object that will allow each client application to better format and display the
data it accesses through DataPoint objects. This section describes these changes.
GetDataPoint Method
The ConfigProperty and NetworkVariable objects now include an additional
method, the GetDataPoint() method. This method returns a DataPoint object you
can use to read and write to the value of the configuration property or network variable.
Most of the properties and methods you can use with each DataPoint you access
through a configuration property or a network variable are the same as those you could
use with the DataPoint objects accessed through monitor points in LNS 3.0. For more
information on using DataPoint objects to access network variables, see Directly
Reading and Writing Network Variables on page 231. For more information on using
DataPoint objects to access configuration properties, see Using Configuration Properties
In a Monitor and Control Application on page 233.
In addition, several properties have been added to the DataPoint object in this release:
the SourceOptions, SourceIndex, MinValue and MaxValue properties. You can
use the SourceOptions and SourceIndex properties to identify the type of source
object used to create a data point. You can use the MinValue and MaxValue properties
to identify or set the minimum and maximum values that should be assigned to a scalar
data field. For more information on these properties, see the LNS Object Server Reference
help file.
FormatLocales Collection
The new FormatLocales collection is another feature that you can take advantage of
when using DataPoint objects. Each FormatLocale object contains a series of
properties that reflect a particular geographical area’s conventions for data display.
These conventions affect how data should be displayed in that area, including factors
LNS Programmer's Guide
7
Page 22

such as language, measurement system (U.S. or Systeme Internationale), date formats,
time formats, and decimal number formats. The settings of a FormatLocale object
determine how data accessed through the FormattedValue properties of all DataPoint
objects will be displayed when your application uses that FormatLocale object.
Each client application can select the FormatLocale object it will use by passing that
FormatLocale to the CurrentFormatLocale property of the ObjectServer object
before opening any networks and formatting any data. As a result, client applications in
different regions can use their own sets of local formats when displaying data, without
affecting the data formatting used by other clients. This greatly reduces the risk of your
application returning information that is confusing or misleading due to formatting
changes made by another application.
You can access the FormatLocales collection through the FormatLocales property of
the ObjectServer object. When initialized, the FormatLocales collection contains 4
pre-defined FormatLocale objects:
1. UserDefaultRegionalSettings. This is the default value for the
CurrentFormatLocale property. When you use this FormatLocale object, all the
properties will be set based on the user-defined Windows regional settings for the
user currently logged onto the PC running your application. You can change the
regional settings on a PC using the Windows control panel Regional Options applet.
Consult the Microsoft Developer’s Network (MSDN) documentation of the Win32
GetLocaleInfo() function for more information on the Windows regional settings.
2. SystemDefaultRegionalSettings. When you use this FormatLocale object, all
the properties will be set based on the default Windows regional settings on the PC
running the application. The default settings may vary, depending on which
operating system is installed on the PC. Consult the MSDN documentation of the
Win32 GetLocaleInfo() function for more information on the Windows Regional
settings.
3. LonMarkCompatibility. When you use this FormatLocale object, all properties
will be set so that formatted data will be displayed based on the LonMark
standards
used prior to LNS 3.0, when localized formatting was not available. In this case,
Systeme Internationale measurement units, LonMark-defined time and date
formats, and U.S. options for everything else, will be used to display all formatted
data.
4. ISO8601DateAndTime. When you use this FormatLocale object, the settings will
be the same as the LonMarkCompatibility settings, except for the localized time
and date formats, which will be based on the ISO 8601 standard. This standard helps
avoid confusion that may be caused by the different national notations used for dates
and times, and increases the portability of computer user interfaces.
The pre-defined FormatLocale objects are read-only, but you can create custom
FormatLocale objects to suit the specific needs of your application with the Add
method of the FormatLocales collection. Note that all custom FormatLocale objects
are instantiated with the same initial settings as the pre-defined
UserDefaultRegionalSettings FormatLocale object described above.
For more information on the FormatLocales collection, see Data Formatting on page
241.
8
LNS Programmer's Guide
Page 23

Changeable Network Variable Types
Each NetworkVariable object contains a new property called the
ChangeableTypeSupport property, which indicates whether or not you can use LNS to
change the network variable’s type. If the ChangeableTypeSupport property is set to
lcaNvChangeableTypeSdOnly or lcaNvChangeableTypeSCPT, you can change the
network variable’s type. You can do so by modifying the NetworkVariable object’s new
TypeSpec property.
The TypeSpec property returns a TypeSpec object. If a network variable supports
changeable types, you can change the various properties of the TypeSpec object
(ProgramId, Scope, TypeName), and then pass it back to the TypeSpec property to
change the network variable’s type. Alternatively, you can write the TypeSpec property
of one network variable to the TypeSpec property of another network variable. By doing
so, you can change the type of a network variable to any type contained in your local set
of resource files, provided that the device containing the network variable supports the
selected type.
If a network variable supports changeable types via a SCPTnvType configuration
property (as specified in version 3.3 of the LonMark Application-Layer Interoperability
Guidelines), LNS will automatically set the value of the SCPTnvType configuration
property when the network variable’s TypeSpec or SnvtId property is changed.
For more information on LNS support for changeable network variable types, see
Changeable Network Variable Types on page 185.
Improved Support for Dynamic Interfaces
A typical device in a LONWORKS network uses a static interface, consisting of a static set
of LonMark Functional Blocks, member network variables and configuration properties
that define the device’s functionality in the system. In most cases, this functionality is
dependent upon the device’s hardware and defined by the device manufacturer.
Sometimes, there is a need to modify this functionality. For example, controller devices
may be used to control other devices. As a result, the number of components required for
a controller device’s interface is often an attribute of the network configuration (e.g. how
many devices it is controlling), rather than of the device’s hardware. Ideally, the
resources on these controllers would be allocated dynamically, in order to fit the
changing requirements of a given network as devices are added to it.
In Release 3.0, LNS supported dynamic network variables, which solved one aspect of the
dynamic allocation of resources on a controller. However, dynamic network variables do
not convey semantic information to a device or an LNS application in the same way that
LonMark Functional Blocks and LonMark Functional Block membership do. In order to
support the dynamic definition of a controller’s interface in Turbo Edition, LNS has been
enhanced to support additional dynamic interface components.
Dynamic LonMark Functional Blocks and dynamic network variables can only be added
to application devices that support them. For example, Network Services Devices support
up to 4096 dynamic network variables, but do not support dynamic LonMark Functional
Blocks. The number of LonMark Functional Blocks and dynamic network variables that
a device supports is documented in the device’s external interface file and selfdocumentation. LNS reads this information from the external interface file when it is
LNS Programmer's Guide
9
Page 24

imported, or from the device’s self-documentation when it uploads the device’s device
template.
In LNS, an application device’s interface is represented by an Interface object. The
Interface objects contained by an application device may be the device’s main, static
interface, or they may be custom interfaces that have been added to the device
dynamically, using the new features described in this section. You can access the main
interface of a device through the AppDevice object’s Interface property. Main
interfaces are static interfaces that cannot be modified.
You can access the collection of custom interfaces that have been added to a device
through the device’s Interfaces property. If supported by the device, you can modify
these custom interfaces by adding or removing objects from their NetworkVariables,
LonMarkObjects, and MessageTags collections.
Or, you can add custom Interface objects to a device by accessing the Interfaces
collection through the device’s Interfaces property, and then calling the Add()
method. Once you have created a custom Interface object, you can modify it to suit
your exact needs.
You can access the collection of LonMark Functional Blocks defined on the custom
Interface. A LonMark Functional Block represents a collection of network variables
and configuration properties on a device that perform a related function. For example, a
digital input device with four switches could contain one functional block for each switch.
In LNS, LonMark Functional Blocks are represented by LonMarkObject objects. Each
Interface object contains a LonMarkObjects property, which you can use to access the
collection of LonMark Functional Blocks defined on that Interface. If the interface
supports dynamic LonMark Functional Blocks, you can add and remove LonMarkObject
objects from the collection using the Add() and Remove() methods. In addition, you can
assign and un-assign existing network variables to and from the LonMarkObject objects
using the AssignNetworkVariable() and UnassignNetworkVariable() methods.
You can check if an Interface object supports the addition of dynamic LonMarkObject
objects by reading the Interface object’s DynamicLonMarkObjectCapacity property.
You can check if an Interface object supports the addition of dynamic network
variables by reading the Interface object’s MaxNvSupported and StaticNvCount
properties.
You can also access the collection of network variables defined on an Interface or on a
LonMarkObject through the object’s NetworkVariables property. This property
contains the entire set of NetworkVariable objects defined on that Interface. You
can use the Add() and Remove() methods to modify this collection on your custom
Interface objects as you desire.
In LNS Turbo Edition, each custom Interface object also contains a
DynamicMessageTags collection. You can use this collection to add dynamic
MessageTag objects to the interface. This allows you to add message tags to any device
that supports monitor sets, and use those message tags to send explicit messages from
that device to a group of devices, as with static message tags. For example, consider the
case of a Network Service Device. Network Service Devices do not contain static message
tags. However, you can now add dynamic message tags to the AppDevice object
associated with a NetworkServiceDevice. Once you have added to a message tag to a
Network Service Device, you can connect the message tag to the devices you want to send
the messages to. Following that, you can create a message monitor point on the Network
10
LNS Programmer's Guide
Page 25

Service Device that specifies the new dynamic message tag as the monitor target. Then,
open the monitor set and use the message monitor point to send messages from the
Network Service Device to the devices bound to the message tag. Note that you can still
use message monitor points to send messages to individual application device, as
described in Chapter 9 of this document.
To help you keep track of changes related to these new dynamic interface capabilities,
the OnNodeIntfChangeEvent, which is fired each time a device’s external interface is
changed, has been modified for Turbo Edition. The OnNodeIntfChangeEvent event
now returns several new values indicating that interface changes related to these new
features have been made. For example, once an application registers for this event, it will
be fired each time a network variable is added or removed from a LonMarkObject, or
each time a LonMarkObject is added to an interface.
For a general overview of device interfaces, see Device Interfaces on page 104. For details
on how you can use the dynamic device interface features described in this section, see
Using Dynamic Device Interfaces on page 179.
Improved Monitoring Performance
As of LNS Turbo Edition, there are two separate types of MonitorSet objects:
permanent MonitorSet objects, which can be used in multiple client sessions, and
temporary MonitorSet objects, which can only be used in a single client session by the
application that created them.
If you need monitor points that will only be used in a single client session, you should use
temporary MonitorSet objects, as it takes less time and database resources to create
them. If you are creating a group of monitor points that you need to use in multiple client
sessions, you must use the permanent MonitorSet objects.
This section describes the major differences between permanent and temporary monitor
sets.
Using Permanent Monitor Sets
Each Network object contains a MyVNI property, which returns an AppDevice object
representing your client's Network Service Device on the network. You can use this
AppDevice to access all the permanent MonitorSet objects that are stored in the LNS
database for your client’s Network Service Device. Echelon recommends that you only
use the MyVni property to access MonitorSet objects when creating permanent
MonitorSet objects, or when modifying the configuration of those MonitorSet objects.
For actual monitor and control operations with permanent monitor sets, use the
CurrentMonitorSets property of the Network object.
The CurrentMonitorSets property returns a collection of all the permanent
MonitorSet objects on a network that are currently stored in your client’s Network
Service Device. This is useful if you have created monitor sets while the system
management mode is set to lcaMgmtModeDeferConfigUpdates (note that prior to
LNS Turbo Edition, this was lcaOffNet). Although those monitor sets exist in the LNS
database and can be accessed through the MyVni collection mentioned in the previous
paragraph, they will not be commissioned into the Network Service Device, and cannot
be used for monitoring operations, until the system management mode is set to
LNS Programmer's Guide
11
Page 26

lcaMgmtModePropagateConfigUpdates (note that prior to LNS Turbo Edition, this
was lcaOnNet) and the Network Service Device is updated. The collection accessed
through the CurrentMonitorSets property allows access to all the monitor sets in your
Network Service Device that you can currently open and enable on a network (the
collection accessed through the MyVni property allows access to these monitor sets, as
well as those in the LNS database that have not yet been commissioned into your client
PC’s Network Service Device). You can use all the monitor sets obtained through the
CurrentMonitorSets property as runtime monitor sets, meaning that you can enable
them and use them for monitoring operations. However, persistent changes to their
configuration are not allowed when accessed through this collection. As noted previously,
you should use the collection obtained through the MyVni property when you need to
change the persistent configuration of your client’s local MonitorSet objects.
NOTE: You can access the CurrentMonitorSets collection when running in
independent mode (i.e. without connection to the LNS Server PC).
Using Temporary Monitor Sets
If you need monitor points that will only be used in a single client session, you should use
temporary MonitorSet objects. As of LNS Turbo Edition, you can create a temporary
monitor set with the CreateTemporaryMonitorSet() method of the Network object.
The properties and methods that can be used on a temporary MonitorSet object and the
monitor points it contains are generally the same as those that can be used on a
permanent MonitorSet object and its monitor points. However, if you have been using
permanent MonitorSet objects with LNS 3.0, you should note a few exceptions to this
rule.
Temporary MonitorSet objects cannot be created or used while in independent mode.
The Open() and Close() methods have no effect on temporary MonitorSet objects,
because temporary MonitorSet objects are opened as soon as they are created, and
closed when they are released, or when the client session in which they were created
ends. You should also note that temporary monitor sets are not enabled as they are
opened. You must explicitly enable temporary monitor sets and temporary monitor
points with your application using the applicable Enable method. For this purpose, the
MsgMonitorPoint object now includes an Enable method.
In addition, the DefaultOptions properties stored in MsgMonitorPoint and
NvMonitorPoint objects in temporary monitor sets are read-only. The values applied to
these properties are taken from the temporary monitor set’s MsgOptions or NvOptions
properties.
Monitor points in temporary monitor sets do not support the use of connection
description templates to define certain monitoring options, as monitor points in
permanent monitor sets do. As a result, you must set the connDesc element to NULL
when you use the Add() method to add a message monitor point or network variable
monitor point to a temporary monitor set.
There is one other variance to note when you use temporary MonitorSet objects.
Network variable monitor points in temporary monitor sets cannot be automatically
bound to the monitoring node. As a result, the UseBoundUpdates property of all
temporary monitor sets and monitor points can only be set to False, meaning that you
cannot use LNS to implicitly connect network variables monitored by temporary monitor
12
LNS Programmer's Guide
Page 27

points to the host PC. However, you can still connect network variables to your Network
Service Device using explicit connections, and utilize these with the
SuppressPollingIfBound property.
For more information on monitor and control in this document, see Chapter 9.
Availability of Network Resource Information
The NetworkResources property has been added to the System object for Turbo
Edition. This property returns a NetworkResources object that provides access to
important network resource information for a system, including the number of
AppDevices and Routers that have been installed on the system, the number of
exclusive and sharable network variable selectors available on the system, and the
number of subnets and group IDs allocated on the system.
This information is useful if you are managing a large system. For example, if you are
writing an application that creates large numbers of multicast connections on a system,
you will need to know how many groups and exclusive selector are available on the
system. Or, if you are merging two LNS databases, you will need to know how many
subnets, groups, and exclusive selectors have been assigned in each database, to make
sure that the merged database will not exceed the limits for each resource.
For more information on the NetworkResources object and its properties, see the LNS
Object Server Reference section of the LNS Application Developer’s Kit help file.
Enhanced LonMark Interoperability
Several changes have been made to LNS Turbo Edition to comply with version 3.3 of the
LonMark Application-Layer Interoperability Guidelines, and to better support the latest
versions of the LonMark standard resource files.
When importing a device interface from an external interface file, previous versions of
LNS would set the Mode property of all LonMarkObject objects defined in the device
interface to one of two values. It would set the Mode property of a LonMarkObject object
to 0 if the LonMarkObject object’s TypeIndex property was in the range of standard
Functional Profile Template (FPT) indices, or to 3 if the LonMarkObject object’s
TypeIndex property was in the range of user-defined FPT indices. Turbo Edition
features automatic scope determination, which means LNS will now search the set of
installed and cataloged resource files to find the most device-specific match for the FPT,
and set the LonMarkObject object’s Mode property based on this determination when
the device interface is imported. If no match is found, LNS will set the LonMarkObject
object’s Mode property to lcaResourceScopeUnknown.
In addition, the ResyncToResources() method has been added to the
DeviceTemplate object. You can use this method to re-synchronize a device template
with modified or newly accessible device resource file information. This may be necessary
if you are upgrading to the current version of the LonMark resource files, or if you
imported a device’s external interface file before the resource files for that device were
available in the resource file catalog.
To complement this change, the ResyncToTemplate() method has been added to the
AppDevice object. You can use this method at any time to re-synchronize the
configuration of an AppDevice with the DeviceTemplate it is using. This may be
LNS Programmer's Guide
13
Page 28

necessary if you have recently re-imported a device’s external interface file, or if you have
used the ResyncToResources() method to update the DeviceTemplate that the
device is using.
There are several other changes that you may find useful when using the LonMark
resource files. For example, the TypeInherits property has been added to the
ConfigProperty object. This property indicates whether or not the configuration
property inherited its type from the network variable that the configuration property
applies to. If a configuration property inherits its type, you may need to program your
application to account for changes to the configuration property’s type. For example,
consider a configuration property with the TypeInherits property set to True. If the
configuration property applies to a network variable, and an application changes the
network variable’s type, then LNS would change the data display format of the
configuration property automatically, since the TypeInherits property is set to True.
You would need to know about this change when reading the value of the configuration
property, and you can use this property to keep track of which configuration properties
could be modified by LNS in this fashion.
In addition, the IndexToSNVT property has been added to the LonMarkAlarm object.
The IndexToSNVT property contains the device index number of the network variable on
the LonMarkObject that caused the current alarm condition (i.e. the condition
summarized by the LonMarkAlarm object). This will allow you to quickly identify all
alarm conditions that occur on your network. Note that the LonMarkAlarm object
supports alarming on devices that implement their alarms through SNVT_alarm network
variables, but not through the more recent SNVT_alarm2 type. However, SNVT_alarm2
type network variables can be monitored and controlled using standard monitor and
control techniques.
Finally, the OnLonMarkObjectStatusChangeEvent event has been added to LNS to
allow you to track when an LNS application on your system changes the status of a
LonMarkObject object.
Consult the LNS Object Server Reference help file for more information on the properties
and methods introduced in this section. For general information on device resource files
and device interfaces, see Device Interfaces on page 104
Improved Device Commissioning Performance
When you commission a device using an LNS version prior to Turbo Edition, LNS
validates that the device is on the intended channel, and that it is using a program
interface consistent with the definition in the LNS database. This validation is provided
to catch simple errors that might otherwise cause serious system problems. However,
performing this validation requires the transmission of several messages, which may
significantly increase the time required to commission a slow network with simple nodes.
For systems whose content is extremely well controlled, the benefits of validation may
not be worth the extra time the validation process incurs.
For this reason, the DeviceValidation property has been added to the
DeviceTemplate object. You can use this property to determine what validation steps
LNS will perform when commissioning devices that use that DeviceTemplate. This
may be useful if you are commissioning a large number of devices, and are confident that
the devices contain the correct program information and are installed on the correct
14
LNS Programmer's Guide
Page 29

channel. In this case, you can modify the DeviceValidation property to bypass parts of
the validation process, and reduce the time it takes to commission those devices.
You should be aware that if parts of the validation process are disabled, the risk of
network configuration problems due to inconsistent device settings will increase. If you
disable the validation process, you should be sure that the Channel and ProgramId
properties of the AppDevice objects using the device template have valid settings before
commissioning, upgrading or replacing those devices. Skipping this validation, and then
commissioning a device with the wrong interface may make subsequent communication
with the device impossible. Note that you can also use this property to force a validation
check of a device, by setting the DeviceValidation property to perform all validation
steps, and then re-commissioning the device.
In addition, the SelfDocConsistency property has been added to the
DeviceTemplate object. This property determines how much LNS will assume about
the self-documentation of devices that are using the device template. This affects how
LNS will read the self-documentation data of those devices, and what level of program
interface validation LNS will perform when commissioning those devices. Some settings
of this property allow LNS to assume higher degrees of self-documentation consistency
among devices using this template, and cause LNS to operate more efficiently when
updating those devices during the commissioning process. However, these settings may
cause problems if the device developer has produced multiple devices that have the same
program ID, but use different self-documentation strings or formats, as version 3.3 of the
LonMark Application-Layer Interoperability Guidelines allows.
For more information on device commissioning, and on the features described in this
section, see Commissioning Devices on page 121.
System Management Mode Enhancements
Several changes have been made to enhance the LNS operation when the system
management mode (MgmtMode property) is set to lcaMgmtModeDeferConfigUpdates.
Before considering these changes, you should note that new names for the system
management mode settings have been provided in Turbo Edition. The old names still
exist in LNS for compatibility reasons, but the documentation refers only to the new
names. The new lcaMgmtModeDeferConfigUpdates value maps to the old lcaOffNet
value, and the new lcaMgmtModePropagateConfigUpdates value maps to the old
lcaOnNet value.
When the system management mode is set to lcaMgmtModeDeferConfigUpdates, all
network configuration changes caused by your application will be applied to the LNS
database, but not to the physical devices on the network. Prior to LNS Turbo Edition,
these changes would be queued and then applied to all the physical devices as soon as
the network management was set back to lcaMgmtModePropagateConfigUpdates.
However, as of LNS Turbo Edition, you can call the new
PropagateDeviceConfigUpdates() method on a device to apply configuration
changes that affect only that device (such as configuration property values) to the device
without changing the system management mode back to
lcaMgmtModePropagateConfigUpdates. This may be useful if you have configuration
changes pending for a large number of devices, and only want to apply them to a subset
of those devices. This method will not propagate updates that affect multiple devices,
such as changes to addresses or connections.
LNS Programmer's Guide
15
Page 30

LNS Turbo Edition also includes a new option (lcaReplaceFlagPropagateUpdates)
for the ReplaceEx() method, which you can use to replace an AppDevice or Router. If
you call the Replace() method, or if you call the ReplaceEx() method without
specifying the lcaReplaceFlagPropagateUpdates option, on a device while the
system management mode is set to lcaMgmtModeDeferConfigUpdates, the physical
devices will not be updated with configuration changes caused by the replace process
until the system management mode is set back to
lcaMgmtModePropagateConfigUpdates. You can now use the ReplaceEx() method
with the lcaReplaceFlagPropagateUpdates option to replace devices while the
system management mode is still set to lcaMgmtModeDeferConfigUpdates. This may
be useful if there are configuration changes pending for a large number of devices, and
you want to replace a device without waiting for all of those changes to be applied. A
similar option is also provided for use with the new CommissionEx() method, which you
can use to re-commission a device while the system management mode is set to
lcaMgmtModeDeferConfigUpdates.
Finally the OnSystemMgmtModeChangeEvent event has been added to the
ObjectServer object. Once an application registers for this event, it will be fired each
time the system management mode changes.
For more information on the features described in this section, see Chapter 6, Defining,
Commissioning and Connecting Devices.
Enhanced Configuration Property Management
Several properties have been added to the ConfigProperty object that will allow your
application to better identify the source and configuration of a ConfigProperty object.
For example, in some cases the value stored in the LNS database for a configuration
property may not match the actual value of the configuration property in the physical
device on the network. To help you make this determination, the ValueStatus has been
added to the ConfigProperty object. The ValueStatus property indicates whether or
not the value currently stored in the LNS database for a configuration property matches
the value stored in the physical device on the network.
Two additional properties, the DeviceSpecificAttribute and ConstantAttribute
properties, have been added to the ConfigProperty object. These properties allow you
to read and write the device-specific and constant attributes of the configuration property
with your LNS application.
For more information on these configuration property attributes, see the Configuration
Property Flags section of version 3.3 of the LonMark Application-Layer Interoperability
Guidelines. For more information on configuration properties in this document, and for
information on how you might want to use configuration properties within an LNS
application, see Using Configuration Properties In a Monitor and Control Application on
page 233.
Online Database Validation and Backup
LNS Turbo Edition features two new ways to help you maintain your LNS network
databases: online backup and database validation. You can perform database validations
using the LNS Database Validation Tool, or by calling the Validate() method on a
Network object. When you perform a database validation, LNS will process the contents
16
LNS Programmer's Guide
Page 31

of an entire network database, and report any errors or inconsistencies it discovers. It
can optionally repair some of these errors during the validation process. Inconsistencies
and errors that may be discovered during the database validation procedure include
orphan objects (inaccessible objects in the database), broken interfaces, and duplicate
objects.
You can access the LNS Database Validation Tool by selecting LNS Database
Validator from the Echelon LNS Utilities group in the Windows Programs menu.
Consult the online help for the LNS Database Validation Tool for more detailed
information on how to use the utility.
You can also perform a database validation with your own LNS application by calling the
Validate() method on a network. LNS will then start a transaction and validate the
network database. When the validation is complete, the method returns a
DatabaseValidationReport object containing information summarizing the results of
the validation. This is the same set of information that would be provided by the LNS
Database Validation Tool if you used it to perform a validation on the same database,
including descriptions of all the errors discovered, all the errors that were repaired, and
all the errors that were not repaired.
While the ability of the new LNS database validation feature can be used to repair many
of the errors that might occur in your network databases, you should not consider it a
replacement for consistent, regular back-ups of your network databases. To facilitate
database back-ups, the Backup() method has been added to the Network object. You
can call this method on any local network to make a backup copy of the network
database, and export the backup copy to a local folder of your choice. This method is quite
useful, as you can use it to back up a network database while the network and system
are open, and while clients are attached. Echelon recommends that you use this feature
in conjunction with the database validation feature to perform regular, validated
backups of your network databases.
For more information on the database validation feature, see Validating Network
Databases on page 252. For more information on the online backup feature, see Backing
Up Network Databases on page 251.
Miscellaneous
LNS Turbo Edition features several other changes you may find useful as you develop
your applications. Consult the LNS Object Server Reference help file for more information
on these features.
• The RemoveEx() method has been added to the Networks collections. The
RemoveEx() method allows you to specify whether the network database is to be
deleted when the network is removed from the collection. If you do not delete the
network database, you can then restore the network later, without having to recreate the database. This may be useful if you want to store network databases
on a central file server and add them to (or remove them from) any LNS Server
PC on demand.
• The CopyWithParent property has been added to the Extension object. An
Extension object represents user-defined data. You can use the
CopyWithParent property to indicate whether or not the Extension object
should be copied when its parent object is copied. This may be useful if you are
writing an application that is copying an object containing a large Extensions
LNS Programmer's Guide
17
Page 32

collection. You may not want the application to copy every extension record
stored in the object. You can use this property to mark which extension records
the application should copy.
• The ConstNodeConnChangeEvent event now returns additional values.
Previously, the possible values that could be returned for the event’s
ObjectChangeType element were contained in the ConstObjectChangeTypes
constant. Those values are now stored in the ConstNodeConnChangeType
constant, which includes more detailed information. The values of the
ConstNodeConnChangeTypes constant now map to the values of the
ConstObjectChangeTypes constant, so this change will not affect applications
that were written using pre-Turbo Edition versions of LNS.
• The ItemByProgrammaticName() method has been added to the
LonMarkObjects and NetworkVariables collections. This allows you to
retrieve a LonMarkObject or NetworkVariable from its respective collection
by its programmatic name.
• The AliasUseCount and AliasCapacity properties have been added to the
AppDevice object. These properties indicate how many aliases are being used on
a device, and how many are available, respectively.
• You can now use the OnSessionChangeEvent event to keep track of when the
Network Service Device is offline. You will need to know this because polling is
suspended and monitor and control events will not be delivered to your
application while the Network Service Device is offline. Once your application
registers for this event, is will be fired each time the state of your client’s
Network Service Device changes from the online state to the offline state, or vice
versa.
New LNS Runtime Installations
The LNS Server and LNS Remote Client installations, which are created and installed
with the LNS Redistribution Kit, have been re-created as Windows Installer (a.k.a.
Microsoft Installer) installations in order to make LNS Turbo Edition installations more
compatible with recent versions of Windows. This has important implications for how
the LNS redistribution installations should be installed. For more information, please
see Chapter 14, Distributing LNS Applications.
Compatibility
Echelon's goal is to allow easy integration of new LNS releases into your LNS
applications. COM interface compatibility allows for the possibility of “drop in”
replacement of one LNS release with another, and Echelon strives to design new features
and fix defects in a way that supports this. The following sections provide details on
several LNS compatibility issues you should consider when upgrading to LNS Turbo
Edition. Some of these issues are applicable to all LNS releases, and some apply
specifically to LNS Turbo Edition.
18
LNS Programmer's Guide
Page 33

Interface Compatibility
LNS follows the Microsoft COM interface guidelines for maintaining interface
compatibility. Methods and properties can be added to the LNS OCX interface, but
existing interfaces cannot be modified. Automated comparison tools are run on the LNS
interface at each release to verify that the COM interface rules are followed.
Because COM methods and properties may not be modified or removed from an interface,
an established interface can become cluttered with obsolete and duplicate methods and
properties. As a result, Echelon has introduced the concept of a deprecated interface to
provide better guidance for optimal use of LNS Turbo Edition. Deprecated properties,
methods and objects are marked as such in the LNS Object Server Reference help file.
This help file also lists which version each property, method and object was introduced
in, to assist the development of applications that work with multiple versions of LNS.
Note that in the LNS Object Server Reference help file, Turbo Edition is referred to as
Release 3.20, and all properties, methods and objects marked as added to LNS in Release
3.20 are new in Turbo Edition.
For a list of deprecated interfaces in Turbo Edition, see Appendix A, Deprecated API and
Obsolete Files. Remember that deprecated interfaces are generally deprecated because
they do not provide the complete functionality that alternative interfaces provide.
However, most of these interfaces are still included in the LNS Object Server for
backward compatibility reasons. Deprecated features that are no longer implemented or
supported are marked as such in Appendix A.
Database
LNS uses the FastObjects database engine to store its objects. When new features are
added, the database schema must change to support them. The result is that LNS
databases are not usually backward compatible. An LNS Turbo Edition database will not
be accessible by any application using LNS 3.0, or versions of LNS prior to that.
However, LNS databases are always forward compatible. When an application using
LNS Turbo Edition opens an LNS 3.0 database, the database will be automatically
converted to LNS Turbo Edition format in a potentially time-consuming process. Since
database conversion is a one-way process, Echelon recommends that backup databases
be kept as long as there is any question about rolling back to a previous LNS Server
runtime. Note that you cannot use the new Backup() method to do so, as this will
upgrade the database to Turbo Edition format.
LNS Service Pack releases, starting with LNS 3.04, have not modified the database
schema, and Echelon will continue to follow this discipline in future Service Packs. If a
Service Pack must modify the schema in order to fix a serious problem, the Service Pack
read-me file will note that fact prominently.
Runtime Component Updates
In general, LNS Service Packs may not be uninstalled. Patching technology, including
Windows Installer patches, does not generally support uninstallation of patch updates.
Since LNS databases are usually not backward compatible, the updated LNS Turbo
Edition installation will update the LNS global database and individual network
databases as they are opened, further complicating any attempt to return to a previous
version of LNS.
LNS Programmer's Guide
19
Page 34

LNS Turbo Edition servers and clients do not interoperate with clients and servers of
other LNS versions. When updating an LNS site with a central server and remote
clients, the LNS Server PC must be updated first. LNS server-independent mode,
introduced in LNS 3.0, will allow any remote clients that run only in server-independent
mode to be stopped, updated, and restarted some time after the server is updated.
Remote clients that do not operate in server-independent mode should be updated when
the LNS Server PC is. Live updates of LNS servers or clients are not supported, and
server-independent mode is the only LNS client mode that does not require a constant
client-server connection, so this is the only distributed update scenario that Echelon
supports. For more information on server-independent mode, see Independent Clients on
page 41.
Application Developer’s Kit Include Files
The LNS Turbo Edition Application Developer’s Kit has changed from previous LNS
versions in that it does not install any include files or “class wrapper” files for using the
OCX with C++ projects. There were two problems with these files:
• Only C++ was supported. None of the other supported development
environments, such as Visual Basic 6.0, could use the C++ include files.
• With the same definitions in two places (the include files and on the OCX), the
definitions sometimes became inconsistent.
The recommended solution in this and all subsequent releases is to provide all of the
necessary constants on the OCX interface, accessible to C++ users through the #import
“lcaobjsv.ocx” named_guids rename_namespace("lca") directive. For more
information on this, see Chapter 4. As an alternative, you could generate the old class
wrapper files within your project. For more information on this, see Appendix B, LNS,
MFC and ATL.
Remember that if you are not using C++ to develop your LNS application, you can
continue accessing the OCX as in your previous version of LNS.
Exception Codes
As new features are added or defects fixed, some existing LNS features will add new
exception codes to provide more useful information about new or modified failure cases.
For example, prior to Turbo Edition, LNS threw the
SRSTS_NEURON_VERSION_MISMATCH exception (from the obsolete include file
ns_srsts.h) when an attempt to load an application image into a device failed because the
Neuron model number or the system image version number of the device did not match
that of the linked application. LNS will now distinguish these two exception cases. The
following new exception codes have been defined:
lcaErrNsNeuronModelMismatch "Incompatible Neuron model number."
lcaErrNsFirmwareVersionMismatch "Incompatible firmware version number."
The lcaErrNsFirmwareVersionMismatch value maps to the (now obsolete)
SRSTS_NEURON_VERSION_MISMATCH code, since it is more likely that the system
image version number would differ than the neuron model number.
20
LNS Programmer's Guide
Page 35

Common exception codes for particular methods can and should be handled specially to
provide more guidance to your particular end-user. However, because the complete set of
exception codes that can be thrown for a given method can be large, and because all
exception codes must be handled by your application, you should also use a generic error
handler in your application that will handle all errors returned by LNS.
New Features
When adding new features to LNS, Echelon must make compatibility tradeoffs in order
to improve functionality and performance. Some of the new features described earlier in
this chapter may introduce compatibility issues into your application, so you should
consider the following information carefully when integrating these new features.
Propagating Device Changes While Offnet
The commission and replace operations behave identically in LNS Turbo Edition as in
prior versions of LNS, unless the new “propagate” flags provided with the ReplaceEx()
and CommissionEx() methods are specified by the LNS application.
The new AllowPropagateModeDuringRemoteOpen property is simply an alias for the
RemoteIgnorePendingUpdate property. The RemoteIgnorePendingUpdate property
is marked as hidden, but reading and writing the property is still supported by LNS
Turbo Edition.
Opening a remote Full client application with LNS Turbo Edition may succeed while the
system management mode is set lcaMgmtModeDeferConfigUpdates, even if there are
pending updates for other devices, and the RemoteIgnorePendingUpdate flag is
False. The Network Service Device will be re-commissioned in this case. In prior
versions of LNS, the open would fail, and return an error.
Opening a remote Full client application with LNS Turbo Edition while the system
management mode is set to lcaMgmtModeDeferConfigUpdates, and the
AllowPropagateModeDuringRemoteOpen property is set to True, may result in
commissioning the remote Network Service Device without propagating pending updates
to other devices. In prior versions of LNS, this would always result in propagating all
pending changes.
Dynamic Functional Blocks
Your application might currently assume that it will find all defined LonMarkObject
objects for a device by accessing the DeviceTemplate object’s interface. However, the
dynamic LonMarkObject objects on a device do not appear in the interface of the
device’s DeviceTemplate object. Another possible problem is if your application
assumes that the collection index assigned to a LonMarkObject is one greater than the
value of the LonMarkObject object’s Index property. This relationship happens to hold
for static LonMarkObject objects, but may not for dynamic LonMarkObject objects.
DataPoint Object Improvements
The DataPoint object was introduced in LNS 3.0 to allow convenient access to the data
contained in monitor points. The feature allowing access to individual DataPoint fields
contained several defects that may not allow a current implementation of the feature to
LNS Programmer's Guide
21
Page 36

be compatible with a previous implementation. However, in this release, the DataPoint
object provides new functionality – including consistent field-by-field formatting between
network variables and configuration properties, and client-specific formatting – that is
the new standard for LNS data formatting.
Formatting Enhancements
The default Formatting Locale has been changed in this release from the System Default
Locale to the User Default Locale. In recent versions of Windows, it has become more and
more difficult to set System Default Locale settings, and Echelon made this change in
order to make current applications easier to use. In most systems, the System and User
Default Locales are the same, and this change should not cause a noticeable difference in
operation. Consult the MSDN documentation of the Win32 GetLocaleInfo() function
for more information on the System and User Default Locales, as LNS uses this function
to retrieve the Windows locale settings.
Enhanced LonMark Interoperability
Under some conditions, LNS may use the new automatic scope determination feature to
set the Mode property of a LonMarkObject object to values that were not previously set
automatically. In previous versions of LNS, the Mode property of each LonMarkObject
object would only be automatically set to 0 or 3. In Turbo Edition, the Mode property of
each LonMarkObject object may be automatically set to any of the values of the
ConstResourceScope constant when an external interface file is imported. For more
information on this, see the help pages for the LonMarkObject object’s Mode property
and the ConstResourceScope constant in the LNS Object Server Reference help file.
LonWorks Interfaces Control Panel
The LONWORKS Interfaces Control Panel Applet was introduced in LNS 3.07 to support
the i.LON 10 Ethernet Adapter and the i.LON 100 Internet Server. In this release, the
ONWORKS /IP Channels Control Panel application introduced in LNS 3.0 has been
L
merged with the L
ONWORKS Interfaces Control Panel Applet to provide this similar
functionality through a single utility. If your user documentation provided directions for
using the L
the new, merged L
ONWORKS /IP Channels Control Panel, it should be updated to direct them to
ONWORKS Interfaces application in the Windows Control Panel.
Support for i.LON 1000, i.LON 600 and ANSI/CEA-852 Channels
LONWORKS /IP channels in LNS Turbo Edition require the use of the new Echelon
L
ONWORKS/IP Configuration Server. This means that if a site using an i.LON 1000
Internet Server upgrades from LNS 3.0 to LNS Turbo Edition, they must also upgrade
the i.LON 1000 Configuration Server. To mitigate this requirement, the LNS Server
Turbo Edition installation installs the Echelon L
Turbo Edition and the new Echelon L
ONWORKS/IP Configuration Server support
backward compatibility with the i.LON 1000 Internet Server by allowing the creation of,
and connection to, LonWorks/IP channels that are compatible with the i.LON 1000
Internet Server. If the Echelon L
ONWORKS/IP Configuration Server is not running on the
same PC as the LNS Server installation, the Echelon L
ONWORKS/IP Configuration Server. LNS
ONWORKS/IP Configuration
22
LNS Programmer's Guide
Page 37

Server installer will be available to LNS customers on the Echelon web-site, and on the
LNS Application Developer’s Kit CD for redistribution by licensed LNS developers.
For more information on the i.LON 1000 Internet Server and the i.LON 600
L
ONWORKS/IP Server in this document, see Chapter 11, LNS Network Interfaces.
Flexible Program ID
By default, LonMark devices with a given program ID are expected to have the same selfdocumentation data format. LNS has never verified that the number and type of
LonMark Functional Blocks on two devices sharing a program ID match. However, such
inconsistencies would normally be detected in previous releases because LNS checked the
self-documentation string length, and did a spot check on the node self-documentation
null terminator. In LNS Turbo Edition, LonMark devices are allowed to have different
self-documentation strings by default. Therefore, LNS will no longer detect many
inconsistencies in LonMark self-documentation data by default.
Modifiable Device-Specific Configuration Properties
There are two main behavioral differences an LNS application might observe when
running LNS Turbo Edition instead of a previous LNS version, due to the changes made
to support modifiable device-specific configuration properties.
The way LNS reads a modifiable device-specific configuration property with the
ConfigProperty object’s GetElement() or GetRawValues() methods, or the Value or
RawValue properties, has changed. Prior versions of LNS did not recognize modifiable
device-specific configuration properties as any different than “normal” configuration
properties, and these properties and methods would return data from the LNS database
(if the value in the database was known). Therefore no contact with the device was
necessary.
In LNS Turbo Edition, these methods and properties read the data directly from the
device. As a result, reading these values in LNS Turbo Edition is likely to take longer
than in previous releases, and may return different data values. If the value cannot be
read from the device, LNS will return an error, whereas in previous releases it would not.
This is consistent with the treatment of constant device-specific configuration properties,
and is the same as if the value in the database was not present. If the value is not
known, and the system management mode is set to
lcaMgmtModeDeferConfigUpdates, prior versions of LNS would return an exception,
whereas LNS Turbo Edition will attempt to read the value from the device.
In prior versions of LNS, constant device-specific configuration properties would never be
set in the database. As of LNS Turbo Edition, operations such as calling the
DownloadConfigurationProperties() method with the
lcaConfigPropOptSetDefaults option set will cause constant device-specific
configuration property values to be stored in the database, as well as other configuration
property values.
Likewise, calling the UploadConfigurationProperties() method may store a
constant device-specific configuration property value in the database. Using the new
operation to read configuration property values from the database will allow an
application to see the database copy of the constant device-specific configuration
property. However, none of the methods or properties available in previous releases will
read the database version of a constant device-specific configuration property. Under no
LNS Programmer's Guide
23
Page 38

circumstances will LNS write a constant device-specific configuration property to a
device unless the configuration property’s DeviceSpecificAttribute property is set
to False.
Changeable Network Variable Types
This feature has been supported to some extent for several LNS releases. Version 3.3 of
the LonMark Application-Layer Interoperability Guidelines introduced a new, standard
mechanism for supporting network variables with changeable types and sizes. The
version 11 L
property type that a network manager can use to inform an application device of a
change to a network variable type and size. The version 11 resource files also include a
new SCPTmaxNVLength configuration property type, to be implemented as a constant
configuration property, to document the maximum legal length of a given network
variable.
ONMARK standard resource files include a new SCPTnvType configuration
Compatibility Case 1 – Writing Compatible Network
Management Tools and Plug-Ins
Some network management tools use the SCPtnvType configuration property to change
the type of a network variable. They set the value of the configuration property to match
the new type they want the network variable to use, and they also set the value of the
SnvtId property in the LNS database. This use-case demonstrates how a plug-in that
was designed to manage devices using SCPTnvType configuration properties with
previous versions of LNS will work using LNS Turbo Edition.
A) Tools that set the SCPTnvType configuration property first should follow these steps:
1. Get the SCPTnvType configuration property for the network variable.
2. Change its value. When using LNS Turbo Edition this will automatically
set the network variable’s SnvtId property to the correct value (0 for
UNVTs, >0 for SNVTs).
3. Set the value of the SnvtId property in the LNS database to match the
type chosen in step 2 (0 for UNVTs, >0 for SNVTs). When using LNS
Turbo Edition this step has no effect, since the SnvtId property was
already modified by the previous step.
B) Tools that set the SnvtId property first should follow these steps:
1. Set the SnvtId property in the LNS database. When using LNS Turbo
Edition, if the SnvtId represents a standard type (non-zero), LNS will
automatically set the SCPTnvType configuration property for the
network variable.
2. Get the SCPTnvType configuration property for the network variable.
3. Change its value. When using LNS Turbo Edition, this step has no effect
if the SnvtId property was set to a standard type in step 1, since the
configuration property value would have already been set at that point.
For either scenario, the same end results will apply. The network variable’s type will be
successfully changed in the LNS database, an event will be generated to indicate this,
24
LNS Programmer's Guide
Page 39

and the value of the SCPTnvType configuration property will be updated to inform the
device of the network variable type.
For ideal performance, an application using versions of LNS prior to LNS Turbo Edition
should modify the SnvtId property first, and then the SCPTnvType configuration
property. The operations should be performed in the same transaction. However,
applications using LNS Turbo Edition and later should use the TypeSpec property for all
network variable type changes, since this method supports user-defined types and
standard types, is more efficient, and does not require the application to explicitly
manage the SCPTnvType configuration properties.
Compatibility Case 2 – Devices That Support Old and New Style
NV Type Management
Consider a device that supports both the old SI/SD method of network variable type
modification, and can read the SCPTnvType configuration property. Such an application
should:
1. Define the default value of the network variable with its type_category
set to NVT_CAT_NUL.
2. Honor the SI/SD value if the configuration property’s type_category is
NVT_CAT_NUL (i.e. use the SNVT_ID stored on the device). Otherwise,
honor the value of the configuration property.
First, consider the device being managed by an application using an LNS version prior to
Turbo Edition that does not update the SCPTnvType configuration property. Changes to
the network variable type will result in updating the SI/SD data on the device. The
application device will then use the SI/SD information because the value of the
SCPTnvType configuration property value will remain invalid.
Now consider how an upgrade to Turbo Edition will affect this application. LNS will
recognize that the configuration property value is invalid (its type_category set to
NVT_CAT_NUL) or unknown, so LNS will continue to use the SI/SD to inform the device
of the network variable type. A replace or recommission operation on the device will set
the SI/SD information to be updated, based on the type assigned to the network variable
in the LNS database. Changing the network variable type to a standard type in the LNS
database will cause LNS to update the SCPTnvType configuration property
automatically and to stop updating the SI/SD data for the network variable. The
application will honor the configuration property. Changing the network variable type to
0 (indicating a non-standard type) will cause LNS to update the SCPTnvType
configuration property with a category of NVT_CAT_NUL, and set the SI/SD value in the
physical device to 0.
Next, consider a device being managed by an application that uses the SCPTnvType
configuration property properly, using an LNS version prior to Turbo Edition. In this
case, the application device honors the value of the SCPTnvType configuration property,
since it is valid. When upgrading to LNS Turbo Edition, the LNS database conversion
will recognize that the configuration property is valid, and will update the network
variable type based on that value. A subsequent replace operation will not update the
SI/SD data for that network variable.
LNS Programmer's Guide
25
Page 40

Security
New security features have been added to LNS since Release 3.0 to protect against
unwanted access to sensitive data. In LNS 3.07, Echelon introduced the OpenLDV
xDriver to support a new class of remote network interfaces, including the i.LON 10
Ethernet Adapter and the i.LON 100 Internet Server. The TCP/IP link to those new
interfaces includes MD5 authentication and sequence numbering to prevent
unauthorized access or replay attacks on the link. In LNS Turbo Edition, RC4 encryption
is also used when passing LonWorks authentication keys over the link.
For more information on the OpenLDV xDriver, see the OpenLDV Programmer’s Guide,
xDriver Supplement. This document can be downloaded from Echelon’s website at:
http://www.echelon.com/support/documentation/default.htm
26
LNS Programmer's Guide
Page 41

Chapter 3 - LNS Overview
This chapter provides an overview of the LNS network
operating system. It introduces the various LNS components,
and describes the fundamental network services provided by
LNS. For an introduction to L
Introduction to the L
available for download from Echelon's web site at
http://www.echelon.com/
ONWORKS System document, which is
ONWORKS networks, see the
.
LNS Programmer's Guide
27
Page 42
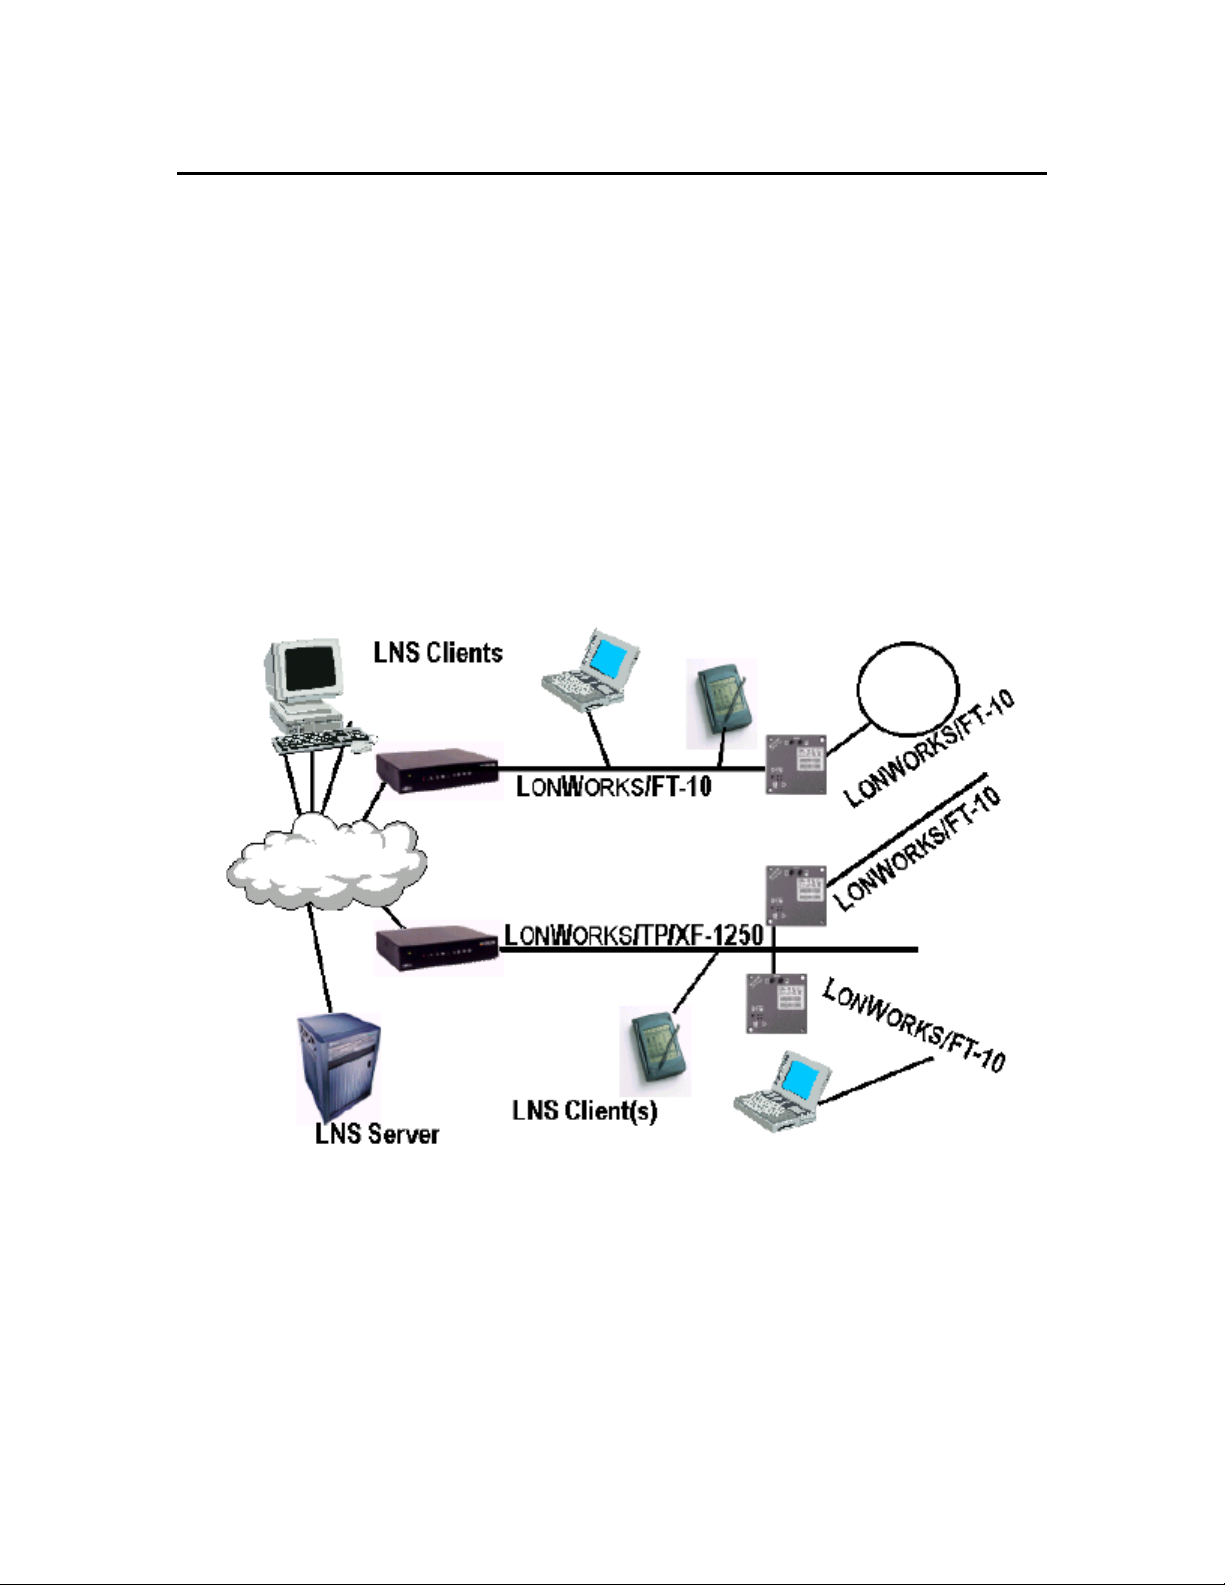
Introduction to LNS
LONWORKS Network Services (LNS) is the control networking industry's first multi-client
network operating system. Much like a standard operating system, which implements
the fundamental operating tasks of a computer, the LNS network operating system
encapsulates common L
installation, management, monitoring, and controlling services required by most network
applications. In addition, LNS provides a standard interface that enables multiple
network applications from multiple vendors to interoperate.
The LNS architecture combines the power of client-server architecture with objectoriented, component-based software design. LNS also incorporates Internet Protocol (IP)
support for remote applications, and it works with the most common development
platforms, including rapid application development (RAD) tools, thus offering the fastest
way to bring network control on-line with all your other information systems. With LNS,
multiple system integrators, managers, and maintenance personnel can simultaneously
access network and application management services and data from separate client tools.
ONWORKS network operations, providing the essential directory,
Figure 3.1 Sample Network Managed by LNS
The LNS network operating system provides the following benefits:
• Reduced commissioning time and cost. With LNS, multiple installers can
work on the same system at the same time, without conflicts. Each tool is
a client to the LNS Server, allowing multiple installers to work in
parallel without database synchronization problems.
Since remote client tools do not need to contain a network database, they can
28
LNS Programmer's Guide
Page 43

be anything from a remote monitoring station, to an installation laptop PC
using wireless networking. Each client tool can have a different user
interface, optimized to the particular network being managed (e.g. material
handling, access control, gas analysis, or HVAC) or to the skill set of the user.
By building application-specific knowledge into network tools, all or part of
the commissioning process can be automated, further reducing
commissioning time and training cost.
• Simplified system integration. By defining the basic object framework as
well as the higher-level component specifications, the LNS network
operating system provides a basis for tools to interact and communicate
with each other. Interoperable tools greatly simplify system integration,
and the use of plug-in applications allows system integrators to add new
features to their L
ONWORKS systems quickly and at low cost.
• Easy customization. By allowing tools to interoperate, LNS allows
developers to create custom system-level or device-level tools that
complement their systems or devices. For OEMs, this provides another
way to add value to their systems by embedding application-specific
knowledge into their tools. For integrators, system-to-system
communication reduces the need to understand the implementation
details within a given system. For end-users, this results in disparate
systems that work together, leading to more efficient operation, higher
yield, and greater comfort.
• Greater access to data. LNS provides users with the ability to deploy
Human Machine Interface (HMI), Supervisory Control and Data
Acquisition (SCADA), and data logging stations. Because of its clientserver architecture, there are no databases to copy or redundant updates
to make. Users no longer need to worry about tools losing synchronization
with the network’s configuration. LNS tracks the requirements of each
tool, and automatically informs them of configuration changes.
• Increased system up-time. With LNS, repair technicians can plug tools
into the network at any point, and access all network services and data.
Since multiple tools can interoperate on the same network, multiple
technicians can diagnose problems and make repairs simultaneously,
with no need to coordinate their actions or even to be aware of one
another. By building application-specific knowledge into their tools,
OEMs can further reduce system downtime by automating fault
detection, isolation, reporting, and repair.
• Transparent IP network communication. LNS allows tools to access
ONWORKS networks over TCP/IP links. Any workstation connected to an
L
LNS Server can run LNS applications that operate like local tools. This
allows users to easily integrate LNS-based networks with Internet-based
applications to create powerful enterprise-wide solutions, as well as
allowing for a high-speed connection using existing LAN infrastructure.
The LNS Programming Model
The LNS network operating system provides a compact, object-oriented programming
model that reduces development time, host code space, and host processing
requirements. LNS uses a hierarchy of objects that correspond to physical network
devices and logical objects to represent a L
of methods, properties, and events that implement the functionality and configuration of
LNS Programmer's Guide
ONWORKS network. Each object provides a set
29
Page 44

the network device represented by the object. This is described in more detail later in the
chapter.
LNS leverages Microsoft’s COM and ActiveX technologies, the Windows standard for
component-based software, to simplify the development of network applications for
Windows hosts. Using LNS, developers are free to take advantage of the support for
ActiveX and COM components built into Windows development tools.
COM interfaces are 32-bit, language-independent programmable objects that can be used
with a variety of development tools, such as Microsoft Visual Basic and Visual C++.
These tools make COM interface calls and property assignments look like native
language calls and assignments. LNS applications can therefore be implemented without
knowing the underlying ActiveX and COM mechanisms.
LNS Components
The LNS Programming Model is comprised of the following major components. These
components are described in the following sections.
• LNS Databases and the LNS Server
• LNS Object Server
• Network Service Devices
• Network Interfaces
LNS Databases and the LNS Server
LNS uses two types of databases to store and maintain the configurations of your
L
ONWORKS networks: the LNS global database, and a set of LNS network databases.
These are high-performance disk-based databases with in-memory caching to optimize
repeated access to data.
The PC containing the LNS global database acts as the LNS Server. The location of the
global database is maintained in the Windows Registry, and can be accessed by reading
the DatabasePath property of the LNS ActiveX Object Server Control. By default, the
global database is stored in the ObjectServer\GlobalDb subfolder of the L
folder. The location of the global database will be set when LNS is installed and should
never be changed, as LNS applications must access the same global database if they are
to interoperate.
The global database contains the Networks collection, which is the group of L
networks that are being managed with the LNS Server. Each of these networks has its
own network database. The network database contains the network and device
configuration information for that particular L
network database is specified when a network is created, and stored in the global
database. Each LNS network database also contains extension records, which are userdefined records for storing application data. For more information on this, see the online
help for the Extensions object in the LNS Object Server Reference help file.
ONWORKS network. The location of each
ONWORKS
ONWORKS
LNS applications can run as local client applications, meaning that they run on the same
PC as the LNS Server and the global database. Or, they can run as remote client
applications, meaning that they do not run on the same PC as the LNS Server. This is
shown in Figure 3.2.
30
LNS Programmer's Guide
Page 45

Remote Client Application(s)
LNS Network Database
Network 1
Local Client Application(s)
LNS Server
LNS Global
Database
LNS Network Database
Network 2
LNS Network Database
Network 3
Remote Access
LNS Server Utility
Figure 3.2 LNS Architecture
The gray-shaded blocks in Figure 3.2 represent the LNS Server PC, and items on the
LNS Server PC. This includes the LNS global database, any local LNS applications
running on the LNS Server PC, and the LNS Server utility.
In Figure 3.2, the global database is connected to three network databases, indicating
that there are three networks defined in the global database. Note that the network
databases are not necessarily stored on the same PC as the global database and the LNS
Server.
As shown in Figure 3.2, the LNS Server utility also runs on the LNS Server PC. You can
use the LNS Server utility to enable remote LNS applications to access the LNS
databases and the LNS Server. You must enable the LNS Server with this
utility to perform network management applications with remote LNS
applications. The LNS Server utility, the different remote client types, and the media
they use to connect to the LNS Server, are described in detail later in this chapter.
LNS Object Server
All local and remote LNS applications must reference the LNS Object Server to access
the LNS Server and the LNS databases. Once an application has referenced the LNS
Object Server, it can read and write LNS object properties, and call LNS object methods.
The LNS Object Server routes each request to the appropriate LNS database.
You can reference the LNS Object Server within your application by importing the LNS
ActiveX control into your development environment, as described in the Importing the
LNS ActiveX Control section on page 46. The LNS Object Server provides all the network
services you can use with LNS. It maintains the network databases that store the
configuration of your L
of access to its services and data.
LNS Programmer's Guide
ONWORKS networks, and enables and coordinates multiple points
31
Page 46

Applications access the services provided by the LNS Server using the LNS Object
Server. The LNS Object Server is a COM server that provides an interface, independent
of any specific programming language, to the LNS Server and the LNS database.
The LNS Object Server provides the resources to manage and record the configuration
information for any L
• Up to 100 open networks per application when operating in server-independent
mode, and up to 50 open networks per application when operating in serverdependent mode. The differences between the server-independent and serverdependent modes are described later in this chapter in the LNS Clients section.
• Up to 10 remote LNS client applications, and an unlimited number of local
applications, per network. These applications may invoke services on the LNS
Server, provide their own subsystem-specific services, properties and events, as
well as act as application nodes in the network. Some applications can open more
than one network at the same time.
• Up to 1,000 channels.
• Up to 1,000 routers.
• Up to 32,385 application devices.
ONWORKS network within the following constraints:
• There are up to 12,288 network variable selectors in each network. A network
variable's selector is a 14-bit number used to identify connected network
variables. All network variables in a given connection use the same network
variable selector. The LNS Server shares a network variable selector among
connections if the connections share one or more network variables. LNS can
intelligently reuse network variable selectors; thus, an LNS-managed network is
not limited to 12,288 connections.
• Up to 4,096 network variables on each host-based device, and up to 62 network
variables on each device hosted on a Neuron Chip or Smart Transceiver.
LNS Object Server Hierarchy
The LNS Object Server defines a set of objects, properties, methods and events that
represent the physical attributes of your network and their configurations. The objects
are grouped together in a hierarchical fashion, such that the ObjectServer object (i.e.
the object representing the LNS Object Server) is at the top of the hierarchy.
The ObjectServer object contains a collection of Network objects, each of which
represents a network defined in the global database that the LNS Object Server can
administer. Each Network object contains a System object representing the network’s
system, and each System object contains a set of Subsystem objects that represent
logical or physical partitions of that particular network. Each Subsystem object contains
a collection of AppDevice objects, which represent the application devices defined in that
subsystem, and Router objects, which represent the routers defined in that subsystem.
For example, you could set up a network to control a building with 3 floors. You could
define 3 subsystems within the network, so that you could logically group the devices and
routers on each floor separately. You could also set up additional subsystems
representing different rooms on each floor of the building, as your network design
requires.
32
LNS Programmer's Guide
Page 47

Because subsystems are logical divisions of a network, and devices can belong to multiple
logical divisions, you can create multiple subsystems that cross-reference a network for
different purposes with your application, and add individual devices to each one. In this
manner, devices could appear in multiple subsystems. For example, you could create one
subsystem to represent the physical layout of your network, and another to represent the
functional layout, separating the HVAC, lighting and security systems in this way.
Each of the object types defined in the LNS Object Server includes its own set of
properties and methods. Properties contain information defining the current
configuration and operational behavior of an object. Methods provide a mechanism to
perform various operations on each object. The LNS Object Server also defines a set of
events that you can use to keep your application informed when the configurations of
certain objects are modified, or when certain operations are performed.
The LNS Object Server supports all valid COM data types. In addition, the LNS Object
Server contains a series of defined exceptions, which are error messages that will be
generated if you write invalid data to any of the properties or objects defined in the LNS
Object Server, or if an operation caused by the invocation of a method fails for any
reason.
The complete LNS Object Server Hierarchy is displayed below. The various objects
included in this diagram are described in this manual, and in the LNS Object Server
Reference help file.
NOTE: You can use the LNS Object Browser to browse the contents of the LNS Object
Hierarchy when developing your application. The LNS Object Browser application offers
point-and-click access to almost every object, method, and property in the LNS Network
Operating System. This makes the Object Browser the ideal tool to investigate an
existing LNS-based environment during LNS application development, or to explore LNS
for training purposes. It can also be used to manipulate an LNS-based system by
modifying properties and invoking methods. Consult the online help provided with the
LNS Object Browser for more information on the utility.
LNS Programmer's Guide
33
Page 48

ObjectServer
ComponentApp Extension NetworkInterface
Network (3)
System
Channel
Extension
Extension
NetworkServiceDevice
NetworkInterface
AppDevice
Interface
Application
AppDevice (MyVNI)
MonitorSet
NvMonitorOptions
MsgMonitorOptions
NvMonitorPoint
NvMonitorOptions (2)
DataPoint
FormatSpec
FormatSpec
MsgMonitorPoint
MsgMonitorOptions (2)
DataPoint
FormatSpec
FormatSpec (2)
MonitorSet
NetworkServiceDevice
NetworkInterface
AppDevice
Interface
Subnet
Connections
MessageTag
NetworkVariable
DataPoint
Alias
ConfigProperty
TypeSpec
Error
Extension
RecoveryStatus
ComponentApp
PingIntervals
ServiceStatus
Account
CreditInfo
FileTransfer
NetworkResources
LdrfLanguage
TemplateLibrary
ConnectDescTemplate
DeviceTemplate
ComponentApp
Extension
Interface
NetworkVariable
MessageTag
ConfigProperty
DataPoint
LonMarkObject
NetworkVariable
ConfigProperty
ObjectStatus (2)
LonMarkAlarm
FormatLocale
Subsystem
Subsystem
AppDevice
Interface
Subnet
Channel
DeviceTemplate
DetailInfo
Subsystem
Extension
TestInfo
UpgradeStatus
UpgradeInfo
Router
DetailInfo
RouterSide (2)
Channel
Subnet
TestInfo
Extension
Subsystem
Extension
DataValue*
DatabaseValidationReport*
DatabaseValidationErrorSummary*
DatabaseValidationErrorInstance*
*The objects marked with the * character are not referenced directly by any other object, but are created by events
and methods. The DataValue and SourceAddress objects are created by network variable and monitor point update
events, respectively. The DatabaseValidationReport, DatabaseValidationErrorSummary, and
DatabaseValidationErrorInstance objects are created when you call the Validate() method.
KEY:
A parenthetical number next to
an object or collection indicates
references multiple copies of
Object Only
Object &
Collection
that the parent object
that object or collection
SourceAddress*
Figure 3.3 LNS Object Server Hierarchy
34
LNS Programmer's Guide
Page 49

Network Service Devices
You will notice in Figure 3.3 that each Network object includes a collection of
NetworkServiceDevice objects. Each NetworkServiceDevice object represents a
L
ONWORKS device implemented by LNS for use with that particular network.
Each LNS application uses a Network Service Device to communicate with the
application devices and routers on a L
managing, and monitoring and controlling the network. Each Network Service Device
contains an LNS network interface. Note that the PC running the LNS Server and
containing the LNS network database is included in the NetworkServiceDevices
collection. The Network Service Device for the LNS Server PC sends all network
management commands required when any application connected to a network installs,
configures and maintains the devices on that network. This is handled transparently by
LNS.
As noted earlier in this chapter, LNS applications can run on the LNS Server PC, or on a
remote PC. Depending on the way a remote application connects to the LNS Server, the
client might use the same Network Service Device as the LNS Server PC within a
network, or it may use its own Network Service Device. For more information on this,
and for an overview the various client types you can use with LNS, and how each one
connects to the LNS Server, see LNS Clients on page 37.
ONWORKS network when installing, connecting,
Separate Network Service Devices are defined for each network, even if they are both
associated with the same application. For example, if a single application has two
networks open, each network will contain a separate NetworkServiceDevice object
representing the application’s Network Service Device on that network. All LNS
applications running on the LNS Server PC will use the same NetworkServiceDevice
object within each separate network. Each Network Service Device has its own LonTalk
address, and may have network variables and monitor sets defined on it to support
monitoring and control operations.
Network Interfaces
Each Network Service Device uses a network interface. A network interface (also called a
network services interface, or NSI) is the device that connects the Network Service
Device to the L
connection to the network and the messaging connection to the LNS Server. They route
service requests to the LNS Server and other LNS network interfaces (if multiple
Network Service Devices are connected to the network) and coordinate with the LNS
Server to manage transactions.
For more information on network interfaces, and for a list of the various network
interface devices that are commonly used with LNS, see Chapter 11, LNS Network
Interface Devices.
ONWORKS network. LNS network interfaces also provide the physical
LNS Programmer's Guide
35
Page 50

LNS Network Services
The primary purpose of the LNS network operating system is to simplify the
performance of network services. Network services are operations that fall into the
following three major categories:
• Network installation and configuration
• Network maintenance and repair
• System monitoring and control
The first two categories are collectively called network management. The third category
is called monitor and control.
A simple network service typically results in the transmission of multiple LonTalk
messages across the network. When the application requests a service, e.g. to connect a
set of network variables, the LNS Object Server translates the request into LNS service
calls which are then expanded into the required network actions — allocating network
resources; building, sending, and processing network messages; performing error
checking and recovery. The result of the request is routed back to the LNS Object Server,
which notifies the application if an error has occurred.
By selecting the appropriate object and invoking its methods, an LNS application can
quickly accomplish each network management task with a minimum of overhead. The
LNS Object Server manages the device and network resources for the application, and
sends and processes the required LonTalk messages.
The LNS Object Server automates network-related tasks whenever possible. You can
configure it to automatically discover the presence of newly attached devices on the network.
Where automation is not possible, simplification is provided. For example, the LNS Object
Server provides connection description objects that allow the LNS application to specify all
the attributes of a connection in a single object. As a result, an application can choose a preexisting connection description when connecting two devices, instead of manually specifying
each attribute of the connection. By adding application knowledge (for example, the set of
devices that it may encounter and the types of configurations that make sense), an application
can further automate tasks and simplify the user interface.
The LNS Object Server provides these core network services to LNS applications. See the
sections following this for a more detailed overview of network services that can be
applied to network management tasks, and services that can be applied to monitor and
control tasks.
Network Management
LNS provides all the network services you need to install, configure, and manage a
network with your application. This includes the following:
• Device discovery, installation, configuration, removal, replacement,
resetting, testing, and management
• Router installation, configuration, removal, replacement, testing, and
management
• Importing device self-documentation and self-identification information
ad hoc or through external interface files
• Connection and disconnection of network variables and message tags
36
LNS Programmer's Guide
Page 51

• LonMark object access
• Receiving service pin messages
• Data formatting based on standard and user-defined resource files
• Addition and removal of network variables, message tags and LonMark
Functional Blocks on host-based devices that support dynamic interface
components.
• Copying of configuration property values from one device to another
• Querying and setting of device properties, such as locations, priority slots,
self documentation, and network variable attributes
• Generation of network configuration change events
• Subnet and channel creation
• Modification of network variable types of unbound network variables
• Creating connections between devices
• Database recovery from the network
Monitor and Control
Monitoring is the process of fetching data from devices on the network, and control is the
process of writing data to network devices. Both involve subordinate tasks such as data
formatting and address change tracking (to ensure that data is not lost due to address
changes). In a L
bound connections, polling messages at regular intervals, or explicit one-time polls.
Formatting is accomplished automatically by processing network variable types
according to predefined formatting files. Additional formatting or processing may also be
performed by the LNS application.
ONWORKS network, data may be retrieved from application devices using
The first step to take when programming an LNS application is to select a client type and
initialize the LNS Object Server. Following that, you can use any of the network services
provided by LNS to perform the monitor and control (or network management) tasks
listed in these sections. Before doing so, you should review the rest of this chapter, which
describes the various client types you can use with LNS, and provides a roadmap you can
use when reading this document.
LNS Clients
LNS applications are capable of running locally or remotely. Multiple applications, some
running locally and some running remotely, can access a single network simultaneously.
A local application is one that is operating on the same PC as the LNS Server and the
LNS global database.
A remote client application is one that is running on a PC that does not contain the LNS
database or run the LNS Server. Remember that you need to use the LNS Server utility
on the LNS Server PC to enable access to the LNS Server by remote clients. If you are
using an LNS high performance (Layer 2) network interface, an application running on
your client can simultaneously access one or more local networks and one or more remote
networks using a single physical network interface (i.e. access a network database on the
application's PC as well as a network database on another PC).
LNS Programmer's Guide
37
Page 52

An application that accesses the LNS Server remotely can do so as a Lightweight Client
or as a Full Client. A Lightweight Client is an application that communicates with the
physical network through the LNS Server PC, via a TCP/IP connection. A Full Client is
as application that has its own network interface, and thus communicates with the LNS
Server PC through the network, as well as directly with devices on the network. A Full
Client is as application that has its own Network Service Device connecting to the
network and to the LNS Server PC. The Network Services Device uses an LNS network
interface, and either a regular L
ONWORKS channel or a LONWORKS /IP channel, to do so.
A remote Full client communicates with the LNS Server PC through the network, as well
as directly with devices on the network.
Note that some applications, known as Independent Clients, can access a network
without connecting to the LNS Server or to the global database. Independent clients can
only be used for monitor and control operations.
When enabling remote client access with the LNS Server application, the LNS Server
starts listening at TCP port 2540 by default. Any Lightweight client can then access your
LNS Server, if they are aware of your LNS Server's IP address and TCP base port
numbers. If you wish to completely disable access by Lightweight clients, see the
available options that are detailed in the help file for the LNS Server application. If you
wish to restrict access by remote LNS applications to specific IP addresses or IP address
ranges, use the PermissionString property. For more information on the use the
PermissionString property, see the LNS Object Server Reference help file.
The following sections detail the various ways local and remote applications
communicate with the LNS Server and the L
ONWORKS network.
Local Client Applications
Local Client applications run on the LNS Server PC – the same PC that contains the
LNS global database. This is shown in Figure 3.4. In this configuration, the PC running
the application contains an LNS network interface that is used to communicate directly
with the physical network. For descriptions of the network interfaces you can use with
LNS, see Chapter 11, LNS Network Interfaces.
Each network contains a NetworkServiceDevice object that is shared by the LNS
Server PC, and all local applications that have that network open.
38
LNS Programmer's Guide
Page 53

LNS Application and LNS Server PC
LONWORKS Channel
LONWORKS
Device
LONWORKS
Device
LONWORKS
Device
LONWORKS
Device
LONWORKS
Device
Figure 3.4 Network Communication as a Local Client
Lightweight Client Applications
Lightweight client applications run on a different PC than the LNS Server and the LNS
database. The remote PC is connected to the LNS Server PC via TCP/IP sockets, as
shown in figure 3.5.
LNS Application PC (Lightweight Client)
LNS Server PC
LONWORKS Channel
LONWORKS
Device
LONWORKS
Device
LONWORKS
Device
LONWORKS
Device
Figure 3.5 Network Communication as a Remote Lightweight Client
Remote Lightweight client applications must have regular contact with the LNS Server.
A Lightweight client application will be disconnected from the LNS Server if the TCP/IP
connection is broken. A Lightweight client application cannot perform monitor and
control operations if the connection to the LNS Server is lost, because both the
LNS Programmer's Guide
39
Page 54

connection to the LNS Server and the data monitoring and control are through the
TCP/IP connection.
On some PCs, if an established TCP/IP connection is idle for some time, the PC enters a
power-save mode that causes TCP/IP disconnection. The LNS Server treats this as it
would any other disconnection. Once the LNS Server detects the disconnection, the client
application must reestablish its connection to the LNS Server by closing the System and
Network, and then reacquiring and reopening them. Similarly, all other LNS object
references that the LNS application holds in scope must be released and reacquired from
the LNS Server. To avoid going into power save mode unintentionally, disable the power
saver mode on the LNS Server PC and the PC running your Lightweight client
application.
All remote Lightweight client applications use the same NetworkServiceDevice object
that the LNS Server PC uses, and that the local client applications use for a given
network. Therefore, any network variables, connections, and monitor sets defined on that
Network Service Device are available to both Local and Lightweight clients.
Full Client Applications
Full Client applications run on a different PC than the LNS Server and the LNS
database, as shown in Figure 3.6.
LonWork s
Devices
LONWORKS
Device
LNS Serv er PC
(Host PC)
LONWORKS
Device
LONWORKS Network
LONWORKS Network
LONWORKS
Device
LNS Application PC
(Remote PC)
LONWORKS
Device
LONWORKS
Device
Figure 3.6 Network Communication as a Full Client
Each Full client PC contains a network interface it uses to connect to the L
ONWORKS
channel, and communicate with the LONWORKS network and LNS Server. For
descriptions of the network interfaces you can use with LNS, see Chapter 11, LNS
Network Interfaces.
In the case of a communication problem between the LNS Server and a Full Client
application, the LNS Server will retry the connection for more than a minute before
timing out and determining that the client is disconnected. From the point of view of the
Full Client application, a communication problem that results in disconnection will
appear to be an unusually long LNS service that ultimately returns the LCA:#120
lcaErrNoConnectionToServer exception.
Each remote Full Clients use a NetworkServiceDevice object defined for shared use
by it and all the other remote Full Clients on the same PC connected to the network.
They do not share the Network Service Device used by Local Client applications,
40
LNS Programmer's Guide
Page 55

Lightweight Client applications, or the LNS Server PC. Therefore network variables,
connections and monitor sets defined on the Network Service Device used by a remote
Full client application are shared only by other remote Full clients on the same PC that
are connected to the same network.
Independent Clients
If an application does nothing but perform monitor and control services, it does not need
to access the LNS network database, and thus does not need to connect to the LNS
Server. For this reason, LNS provides a server-independent mode. An application running
in server-independent mode is considered an Independent client application.
Independent client applications do not need the LNS Server to be running on the PC
containing the LNS global database, as shown in Figure 3.7. However, only applications
which can directly access the L
L
ONWORKS/IP channel can operate as Independent client applications. Note that in
Figure 3.7, the LNS Server PC is not attached to the network.
ONWORKS network via an LNS network interface or
LNS Server PC
LNS Application PC with Network
Interface
X
LONWORKS Channel
LONWORKS
Device
Figure 3.7 Network Communication As An Independent Client
Independent client applications can monitor and control monitor points that have been
previously created by a Full or Local client application, and automatically receive
network addressing updates from the network. They cannot create monitor sets, or add
monitor points to a monitor set, because Independent client applications cannot access
the LNS database. No objects can be added or removed by an Independent client
application, and most methods and properties unrelated to monitor and control are
unavailable. As noted, Independent client applications can only be used for monitor and
control operations.
LONWORKS
Device
LONWORKS
Device
LONWORKS
Device
LONWORKS
Device
For more information on monitor and control, see Chapter 9 of this document.
Getting Started
The first step to take when programming an LNS application is to select a client type and
initialize the LNS Object Server. Following that, you can use the network services
provided by LNS. Before doing so, you should review the rest of this document. For your
LNS Programmer's Guide
41
Page 56

convenience, Table 3.1 lists the remaining chapters of this document, and summarizes
their contents.
You should note that the remaining chapters of this document describe LNS methods,
objects and properties as they pertain to each network management or monitor and
control task. In many cases, you can find more extensive details about an object,
property, method or event in the LNS Object Server Reference file. The LNS Object Server
Reference file can be accessed through the main Echelon LNS Application Developer’s Kit
help file via the Echelon LNS Application Developer’s Kit menu in the Windows
Programs group.
42
LNS Programmer's Guide
Page 57

Table 3.1 LNS Programmer’s Guide Document Roadmap
Chapter Description
Chapter 4, Programming an
LNS Application
Chapter 5, Network
Management : Installation
Scenarios
Chapter 6, Network
Management : Defining,
Commissioning, and
Connecting Devices
This chapter describes the steps you need to take
when initializing an LNS application, whether you
plan to use that application for network management,
or for monitor and control. This includes all the steps
you need to take to open the LNS Object Server, and
initially access a L
ONWORKS network.
Separate instructions are provided for each of the
client types introduced in this chapter.
This chapter begins the discussion of the network
management operations you can perform with LNS. It
starts with an overview of the three basic installation
scenarios you can use when creating a L
ONWORKS
network with LNS, and follows with step-by-step
instructions you can follow when performing each
installation scenario. The tasks included in each step
are described in more detail in Chapters 5, 6 and 7 of
this document.
Chapter 5 introduces the tasks you need to take when
installing and defining a network, and explains when
you should perform each task. Chapter 6 provides
additional details on these tasks. This includes topics
such as installing, configuring, commissioning, and
connecting devices.
Chapter 7, Network
Management : Optimizing
Connection Resources
Chapter 8, Network
Management : Advanced
Topics
Chapter 9, Monitor and
Control
Chapter 10, LNS Database
Management
This chapter contains guidelines you may find useful
when planning connections between devices on large
networks.
This chapter provides information on advanced topics
that may be of use to you when writing a network
management application. This includes how to
properly manage a Network Service Device, how to
manage a network with multiple channels, and how
you can take advantage of the dynamic device
interface features added to LNS for Turbo Edition.
This chapter describes how to write applications to
monitor and control the devices on your L
ONWORKS
network.
This chapter provides information about how you
should manage your LNS databases, and describes
the LNS features you can use to do so. This includes a
description of the LNS database validation and online
database backup features that have been added to
LNS for Turbo Edition, how to move LNS databases,
and how to perform a network database recovery with
LNS.
LNS Programmer's Guide
43
Page 58

Chapter Description
Chapter 11, LNS Network
Interface Devices
Chapter 12, Director
Applications and Plug-Ins
Chapter 13, LNS Licensing
Chapter 14, Distributing
LNS Applications
Chapter 15, Advanced
Topics
Appendix A, Deprecated
Methods and Obsolete Files
This chapter describes the various network interfaces
you can use with LNS.
This chapter discusses the standards and
development methodology for creating interoperable
LNS director and plug-in applications.
This chapter describes the LNS licensing model. This
will be of interest to developers writing a network
management application, as you will need to consider
some licensing issues when installing and
commissioning the devices on your network.
This chapter describes how you can redistribute your
LNS applications, including how to use the LNS
Redistributable Maker utility and how to install your
LNS application.
This chapter describes advanced topics you may find
useful when using LNS. This includes subjects like
file transfer, developing remote and portable tools,
multi-threading, avoiding memory leaks, and writing
interoperable LNS applications.
This appendix will be of interest mainly to those who
are upgrading to LNS Turbo Edition from a previous
version of LNS. It may also be of interest if you are
developing a plug-in application that must work with
older versions of LNS. It lists LNS methods,
properties and objects that you should avoid using
with Turbo Edition. It also lists files installed with
previous versions of LNS that are no longer installed
or used.
Appendix B, LNS, MFC and
ATL
This appendix provides additional information you
will need when developing an LNS application with
MFC and ATL.
Appendix C, LNS Turbo
Edition Example
This appendix summarizes the example applications
included with the LNS Turbo Edition software.
Application Suite
44
LNS Programmer's Guide
Page 59

Chapter 4 - Programming an
LNS Application
This chapter describes the steps you will need to follow when
initializing an LNS application, whether it is an application
for network management, or for monitor and control. The
tasks described in this chapter include how to initialize the
LNS Object Server, how to open a network, and how to
terminate an LNS application.
LNS Programmer's Guide
45
Page 60

Programming an LNS Application
This chapter describes the tasks you need to follow when initializing an LNS application.
This includes the following steps:
1. Import the LNS ActiveX Control into your development environment. For
more information on this, see the next section, Importing the LNS
ActiveX Control.
2. Initialize the LNS Object Server, and open the network you plan to use.
For more information on these tasks, see Initializing an LNS Application
on page 48.
3. Open the system and set the system parameters. For more information
on these tasks, see Opening a System on page 61.
4. Once you have completed the tasks described in steps 1-3, you can use the
network management and monitor and control services provided by LNS.
Chapters 5, 6, 7 and 8 of this document describe the network
management tasks you can perform with LNS. Chapter 9 describes the
monitor and control services you can take advantage of.
Before moving to these chapters, you should note that this chapter
contains information on other LNS features that may be vital to any LNS
application. This includes guidelines on how to use transactions and
sessions within an LNS application, how to handle errors, guidelines on
handling events within an LNS application, and instructions to follow
when terminating your LNS application.
Importing the LNS ActiveX Control
To begin developing your LNS application, you first need to import the LNS Object
Server ActiveX Control into your development environment, and add a reference to the
control to your project. This will allow you to access the objects, methods and properties
included in the LNS object hierarchy with your application.
Importing the Control into Visual Basic 6.0
The Visual Basic environment is especially suited for rapid application development.
Before you use the LNS Object Server, you must add the LNS Object Server ActiveX
Control to the Visual Basic tool palette using the Custom Controls menu item. To do
so, follow these steps:
1. Open Visual Basic.
2. From the Project menu, select the Components... command.
3. In the list box scroll down to the LNS Object Server ActiveX Control 3.20
box. Click on the box to the left so that an X appears.
4. Click the OK button to close the Custom Controls dialog box. The Object
Server control should now appear in the Visual Basic Tool Palette.
46
LNS Programmer's Guide
Page 61

Once the tool is part of the Visual Basic tool palette, you can add the LNS Object Server
to an application by selecting the tool and dragging it onto one of the application’s forms.
To do so, follow these steps:
1. Select the LNS Object Server icon on the Visual Basic tool palette.
2. Drag the Object Server control onto one of your application’s forms. By
default, the name of the control will be [formName].LcaObjectServer1,
where [formName] is the name of the form where you placed the control.
3. Optionally, change the name of the Object Server control by setting the Name
property for the control.
Importing the Control into Visual C++
To import the LNS Object Server control into Visual C++ and Visual C++ .NET, make
sure that the LNS Application Developer’s Kit is installed on your development PC, and
then add the following statement to a global header file for your project, such as
StdAfx.h:
“#import "lcaobjsv.ocx" named_guids rename_namespace("lca")”
This statement will direct the preprocessor to locate the LNS type library, and create
header files containing wrappers that expose the available interfaces. Once the wrappers
are created, the #import statement will also serve as an include statement for the
wrapper header files. For more information on this, see Appendix B, LNS, MFC and
ATL.
For Visual C++ .NET, adding the #import statement shown above is the only step you
need to take to import the LNS Object Server control. If you are using Visual C++ 6.0
and want to use the MFC Class Wizard for event handlers, perform these steps as well:
1. From the Project menu, select the Add to Project command. Then, select
the Components and Controls Item in the sub-menu. This activates the
Component and Controls Gallery.
2. Open the Registered ActiveX Controls folder.
3. Select the L
4. A confirmation dialog appears with the name of the wrapper class to be
created for the Object Server.
5. Click the OK button to finish adding the control. The LNS Object Server
control now appears as a tool icon in the resource editor’s control toolbar.
6. Click the Close button to close the component gallery dialog.
Once the control is part of the resource editor’s toolbox, you can add the control to an
application by dragging the control from the toolbox onto a dialog resource, and then
using the MFC Class Wizard to create the member variable for the control and its LNS
Object class definitions. When creating a Visual C++ application, Echelon recommends
that you do not reduce the default Visual C++ stack size.
To create an instance of the Object Server control in a Visual C++ application, follow
these steps:
ONWORKS ObjectServer control icon, and click Insert.
1. Select the LNS Object Server icon on the resource editor toolbox.
LNS Programmer's Guide
47
Page 62

2. Drag the Object Server control onto one of your application’s dialogs.
3. Change the control’s resource ID, as necessary, by right clicking on the
newly added control and selecting Properties. This opens a dialog box
containing the current resource ID and other properties of the control.
4. From the View menu, select Class Wizard. This opens the Visual C++
Class Wizard.
5. Select the Member Variables tab.
6. Select the Object Server’s control ID (defined in step 3) from the list of
control IDs, and click the Add Variable button.
7. Enter the variable name, verify that the Category box contains the value
"Control", then click OK. The member variable is then created within the
class for the dialog containing the control.
Initializing an LNS Application
After you have imported the LNS Object Server Active X control, you can begin using
LNS services to perform network management or monitor and control operations. You
first need to perform some initialization tasks.
The first initialization task is to configure and open the LNS Object Server. To do so,
your must select the network access mode and licensing mode for your application. Then,
your application can open the Object Server and begin accessing your L
networks.
The steps you need to follow vary for Local, Full, Lightweight and Independent client
applications. The following sections describe the steps you need to take for each client
type. For a description of each client type, and reasons why you might want to use each
client type, see LNS Clients on page 37.
ONWORKS
Initializing a Local Client Application
This section describes how to initialize a Local client application. This includes the
following steps:
1. Selecting the Local Access Mode
2. Specifying the License Mode
3. Opening the Object Server
4. Selecting a Network Interface
5. Opening a Network
Table 4.1 includes sample code that you could use when performing each of these tasks.
See the sections following Table 4.1 for more information on each task.
48
LNS Programmer's Guide
Page 63

Table 4.1 Initializing a Local Client Application
Task Sample Code
Selecting
ObjectServer.RemoteFlag = False
the Local
Access
Mode
Specifying
ObjectServer.SetCustomerInfo(CustomerID,CustomerKey)
the
License
Mode
Opening
ObjectServer.Open()
the Object
Server
Selecting
a Network
Interface
Opening a
Network
Dim NICollection as LcaNetworkInterfaces
Dim SelectedNI as LcaNetworkInterface
Set NICollection = ObjectServer.NetworkInterfaces
Set SelectedNI = NICollection.Item("LON1")
Dim MyNetworks as LcaNetworks
Dim MyNetwork as LcaNetwork
Set NetworksCollection = ObjectServer.Networks
Set MyNetwork=NetworksCollection.Item("Building 76")
MyNetwork.Open()
For More
Information,
See…
Selecting the Access
Mode on page 49
Specifying the
Licensing Mode on
page 49
Opening the Object
Server on page 50
Selecting a
Network Interface
on page 50
Opening a Network
on page 51
Selecting the Access Mode
Each application must have some way of determining whether it will run as a remote or
local client. Sometimes, the access mode is user-determined, meaning that a user selects
a remote or local option as part of your application's start-up process. In other cases, you
might design your applications specifically for one form of operation.
To specify the LNS application access mode as local, set the ObjectServer object's
RemoteFlag property to False, as shown below:
ObjectServer.RemoteFlag = False
Specifying the Licensing Mode
The last step you should take before opening the LNS Object Server is to set the licensing
mode. The licensing mode determines how the LNS Object Server will track the addition
of devices to a network by your application. You can set the licensing mode to either
Demonstration Mode, or Standard Mode. Demonstration Mode is used by default, but you
must use the Standard Mode once your application begins normal operation.
To enable the Standard Mode, set your customer identification information by calling
the SetCustomerInfo() method on the ObjectServer, as shown below:
ObjectServer.SetCustomerInfo(CustomerID, CustomerKey)
LNS Programmer's Guide
49
Page 64

The CustomerID and CustomerKey parameter supplied to the function refer to the
customer identification and key numbers that are printed on the back cover of the LNS
Application Developer’s Kit CD-ROM jewel case. For more information on LNS licensing,
and for more details on the differences between Standard Mode and Demonstration
Mode, see Chapter 13, LNS Licensing.
Opening the Object Server
Once you have set the network access mode and licensing mode, you can open the Object
Server, as shown below:
ObjectServer.Open()
This opens the LNS global database. An application can determine or change the location
of the global database, which is stored in the Windows System Registry, by accessing the
ObjectServer object’s DatabasePath property. If the value of this property is
changed, the Windows Registry will be updated automatically. By default, the path
value is set to the following by the LNS software setup program:
[Windows Drive]\L
Note that interoperable LNS applications should not modify the global database path,
since all LNS applications running on the PC must share the global database, and
changing the path may cause other applications to be unable to access the global
database.
ONWORKS\ObjectServer\Globaldb
NOTE: If you will be opening any networks with an LNS application that is running as a
Windows service, then the first application to open the LNS Object Server must also be
running as a Windows service. In addition, if a network is to be opened by an LNS
application that is running as Windows service, then that network and system must be
opened by an LNS application that is running as Windows service before it is opened
with an LNS application running as a user process. For more information on this, consult
the help pages for the Open() methods of the Network and ObjectServer objects in
the LNS Object Server Reference help file.
Selecting a Network Interface
When operating locally, an LNS application may run while physically attached to a
network, or while detached from the network. To run attached, the LNS application must
select the network interface it will use to communicate with the network. To run
detached, the LNS application must explicitly de-select the previously selected network
interface.
Note that before you use a network interface, you may need to configure the network
interface with the L
more information on this, and for general information on the various network interfaces
you can use with LNS, see Chapter 11, LNS Network Interfaces.
The engineered mode installation scenario described in Chapter 5 of this document splits
the process of installing L
stage and a commissioning stage. During the definition stage, a network interface is not
required. So, when using the engineered mode installation scenario, your application
does not need to specify a network interface. This is referred to as engineered mode. If the
network interface has never been assigned, the system will start in engineered mode. If a
network interface has been previously assigned, the application must explicitly deselect
that network interface to start in engineered mode (by setting the NetworkInterface
ONWORKS Interfaces application in the Windows control panel. For
ONWORKS devices on a network into two stages — a definition
50
LNS Programmer's Guide
Page 65

property to NOTHING for Visual Basic, or NULL for Visual C++). This is described in more
detail in Chapter 5.
If multiple client applications have the same network open, they must either use the
same network interface, or they must all be in engineered mode. If an LNS application
opens a network without explicitly selecting a network interface, the network will be
opened using the same network interface that was used the last time the network was
opened, or it will be opened in engineered mode if the network was last opened in
engineered mode. Newly created networks will be opened in engineered mode if the
network interface is not explicitly specified.
To select a network interface for local operation, follow these steps:
1. Fetch the ObjectServer object’s NetworkInterfaces collection. All
network interfaces registered in the Windows System Registry on the PC
running your application are automatically detected by the LNS Object
Server and included in this collection.
Dim NICollection as LcaNetworkInterfaces
Set NICollection = ObjectServer.NetworkInterfaces
2. Select the desired network interface. The following code selects a network
interface named "LON1" which will be used to open the system.
Dim SelectedNI as LcaNetworkInterface
Set SelectedNI = NICollection.Item("LON1")
Opening a Network
Once you have opened the Object Server, you can begin using your Local client
application to access L
network, and how to create a new network. To open a network, or to create a new
network, follow these steps:
1. Retrieve the Networks collection from the ObjectServer object’s
2. To create a new network, call the Add() method on the Networks
ONWORKS networks. This section describes how to open an existing
Networks property. The Networks collection contains all local networks.
For Local client applications, the Object Server retrieves the Networks
collection from the LNS global database.
Dim MyNetworks as LcaNetworks
Set MyNetworks = ObjectServer.Networks
collection. Networks can only be created when running locally. The
following code creates a network named "Building 75" with database path
"c:\bldg75". The final parameter supplied to the Add() method forces the
creation of a new network database in the specified database path if set
to True, and imports an existing database from the specified database
path if set to False.
Dim MyNetwork as LcaNetwork
Set MyNetwork = MyNetworks.Add("Building75","c:\bldg75",True)
To fetch an existing network from the collection, obtain the desired
Network object from the Networks collection. You can iterate through
the Networks collection to list all available networks, or you can use the
Item property to open a specific network by its name or by its index
LNS Programmer's Guide
51
Page 66

within the Networks collection. The name to use is specified by the
Network object’s Name property. The following code fetches an existing
network called “Building76” from the global database.
Dim MyNetwork as LcaNetwork
Set MyNetwork = MyNetworks.Item("Building 76")
3. Call the Open() method on the Network retrieved in step 2 to open its
LNS network database.
MyNetwork.Open()
4. Optionally repeat steps 2 and 3 to open more networks. Once you have
opened a network, you should follow the tasks described in the Opening a
System section later in this chapter to configure and open the system.
Initializing a Remote Full Client Application
This section describes how to initialize a Full client application. This includes the
following steps:
1. Selecting the Remote Access Mode
2. Specifying the License Mode
3. Opening the Object Server
4. Selecting a Network Interface
5. Opening a Network
Table 4.2 includes sample code that you could use to incorporate each of these tasks. See
the sections following Table 4.2 for more information on each task.
Table 4.2 Initializing a Full Client Application
Task Sample Code
Selecting
the Access
ObjectServer.RemoteFlag = True
ObjectServer.Flags = lcaFlagsUseNSI
Mode
Specifying
ObjectServer.SetCustomerInfo(CustomerID,CustomerKey)
the
License
Mode
Opening
ObjectServer.Open()
the Object
Server
For More
Information,
See..
Selecting the
Access Mode
on page 53
Specifying the
License Mode
on page 53
Opening the
Object Server
on page 53
Selecting
a Network
Interface
52
LNS Programmer's Guide
Dim NICollection as LcaNetworkInterfaces
Dim SelectedNI as LcaNetworkInterface
Set NICollection = ObjectServer.NetworkInterfaces
Set SelectedNI = NICollection.Item("LON1")
Set ObjectServer.ActiveRemoteNI = SelectedNI
Selecting a
Network
Interface on
page 54
Page 67

Task Sample Code
Opening a
Network
Dim MyNetworks as LcaNetworks
Dim MyNetwork as LcaNetwork
ObjectServer.RemoteFlag = True
Set MyNetworks = ObjectServer.Networks
Set MyNetwork=NetworksCollection.Item("Building 75")
MyNetwork.Open()
Selecting the Access Mode
As described in Selecting the Access Mode on page 49, each application must have some
means of determining whether it will run as a remote or local client. To specify the access
mode for a Full client, follow these steps:
1. If the PC running your application has not previously opened the network
you plan to use, or if the Network Service Device your application is using
is on a different channel than it was last time the network was opened,
select remote operation by setting the ObjectServer object's
RemoteFlag property to True.
ObjectServer.RemoteFlag = True
2. Set the ObjectServer object's Flags property to lcaFlagsUseNSI.
This indicates that the Full client application will use a network interface
to access the LNS Server:
For More
Information,
See..
Opening a
Network on
page 55
ObjectServer.Flags = lcaFlagsUseNSI
NOTE: The lcaFlagsUseNSI and lcaFlagsUseTCP flags are
mutually exclusive.
NOTE: The first time you open a network with a remote Full client application, the LNS
Object Server will need to query the network to determine what remote networks are
currently opened in all connected LNS Servers. This may take a long time, since the LNS
Object Server must search the network for all accessible servers. After the first time you
have opened a network, you can generally bypass this process by changing the way you
initialize your Full client application. For instructions on this, see Opening a Network on
page 55.
Specifying the License Mode
The last step you should take before opening the LNS Object Server is to set the licensing
mode. The licensing mode determines how the LNS Object Server will track the addition
of devices to a network by your application. You can set the licensing mode to either
Demonstration Mode, or Standard Mode. Demonstration Mode is used by default, but you
must use the Standard Mode once your application begins normal operation.
To enable the Standard Mode, set your customer identification information by calling
the SetCustomerInfo() method on the ObjectServer, as shown below:
ObjectServer.SetCustomerInfo(CustomerID, CustomerKey)
The CustomerID and CustomerKey parameter supplied to the function refer to the
customer identification and key numbers that are printed on the back cover of the LNS
LNS Programmer's Guide
53
Page 68

Application Developer’s Kit CD-ROM jewel case. For more information on LNS licensing,
and for more details on the differences between Standard Mode and Demonstration
Mode, see Chapter 13, LNS Licensing.
Opening the Object Server
Once you have set the network access and license modes, you can open the Object Server,
as shown below:
ObjectServer.Open()
NOTE: If you will be opening any networks with an LNS application that is running as a
Windows service, then the first application to open the LNS Object Server must also be
running as a Windows service. In addition, if a network is to be opened by an LNS
application that is running as Windows service, then that network and system must be
opened by an LNS application that is running as Windows service before it is opened
with an LNS application running as a user process. For more information on this, consult
the help pages for the Open() methods of the Network and ObjectServer objects in
the LNS Object Server Reference help file.
Selecting a Network Interface
Local clients can access a record of the possible networks and servers from the LNS
global database. In contrast, each Full client application must register with the LNS
Server in order to interact with a network. Each Full client does so by querying the
L
ONWORKS network it’s attached to for available servers.
Each Full client applications must specify its network interface prior to having access to
the available servers and networks. You can do so by following these steps:
1. Fetch the NetworkInterfaces collection from the ObjectServer
object. All network interfaces registered in the Windows System Registry
on your application PC are automatically read by the Object Server, and
are included in this collection.
Dim NICollection as LcaNetworkInterfaces
Set NICollection = ObjectServer.NetworkInterfaces
2. Select the desired network interface. Remember that the
NetworkInterfaces collection contains all registered network
interfaces, including those that are not suitable for use with LNS.
NOTE: In LNS 3.0 and all subsequent releases, if multiple Full Client
applications on the same PC attempt to open the same network, they
must use the same network interface. Consider a case where you have
two PCLTA-20 network interface cards called LON1 and LON2 on a PC
that is running several Full client application
PC opens a network using LON1, and then another application on the PC
attempts to open the same network using LON2, the second application
will receive
exception when it attempts to open the network. However, the second
application will be able to successfully open the network using LON1.
the NS#149 lcaErrNsConflictWithCurrentNetwork
s. If an application on that
The following code selects a network interface named "LON1.”
54
LNS Programmer's Guide
Page 69

Dim SelectedNI as LcaNetworkInterface
Set SelectedNI = NICollection.Item("LON1")
3. Set the remote network interface for the LNS application to the network
interface selected in step 2.
ObjectServer.ActiveRemoteNI = SelectedNI
Note that before you use a network interface, you may need to
configure the network interface with the L
application in the Windows control panel. For more information on
this, and for general information on the various network interfaces
you can use with LNS, see Chapter 11, LNS Network Interfaces.
ONWORKS Interfaces
Opening a Network
This section describes how to connect to a network with a Full client application. You
cannot create new networks with Full client applications. The LNS Server utility must
be running on the PC containing the LNS databases (i.e. the LNS Server PC) to open a
network as a Full client.
The steps required to open a network with a remote Full client application vary,
depending on whether a remote Full client application using your Network Service
Device has opened the network before. If a remote Full client application has not
previously accessed the network to be opened with your Network Service Device, follow
these steps:
1. Get the ObjectServer object's Networks collection. The LNS Object
Server will need to query the network to determine what remote
networks are currently opened in all connected LNS Servers. This may
take a few moments, since the LNS Object Server must search for all
accessible servers.
Dim MyNetworks as LcaNetworks
Set MyNetworks = ObjectServer.Networks
2. Get the network to be opened. You need to specify the network to be
opened by the Network object’s Name property, which was specified when
the network was created, or by using the object’s numerical index within
the Networks collection.
Dim MyNetwork as LcaNetwork
Set MyNetwork = MyNetworks.Item(“Building 75”)
3. Call the Network object’s Open() method to open its LNS network
database. The LNS Server must be running on the PC containing the
LNS network database, or the operation will fail.
MyNetwork.Open()
LNS Programmer's Guide
55
Page 70

4. Optionally repeat steps 2 and 3 to open more networks. Note that a
remote Full client application can access multiple networks
simultaneously, but must use the same network interface to open each
one.
Once you have opened a network, you should follow the tasks described in
the Opening a System section later in this chapter to configure and open
the system.
If a remote Full client application using your Network Service Device has accessed the
network before, and the LcaNsdType property of the Network Service Device is set to
lcaNsdTypePermanent, you can use the RemoteNetworks collection to access the
network. This allows you to skip the time consuming process of querying the network for
available servers. The RemoteNetworks collection contains all the networks that have
previously been opened by Full client applications running on your PC.
When using the RemoteNetworks collection, the Flags property should not be set to
lcaFlagsUseNSI
, and your application should not specify a network interface, as
described earlier in this section. When a network is opened via the RemoteNetworks
collection, LNS will use the last network interface used to open the network. If you want
to use a different network interface to open a network with a remote Full client
application, you need to access the network through the Networks collection, as
described previously.
To open a network via the RemoteNetworks collection, follow these steps:
1. Before opening the Object Server, make sure that the Flags property is
not set to lcaFlagsUseNSI, and that your application has not specified
a remote network interface. In addition, set the RemoteFlag property to
False.
ObjectServer.ActiveRemoteNI = nothing
ObjectServer.RemoteFlag = False
ObjectServer.Flags = ObjectServer.Flags And Not _
(lcaFlagsUseNSI Or lcaFlagsUseTCP)
2. Access the RemoteNetworks collection.
Dim MyNetworks as LcaNetworks
Set MyNetworks = ObjectServer.RemoteNetworks
You should be aware that changes made on the LNS Server PC can result
in inconsistencies between the LNS Server and the RemoteNetworks
collection. This includes changing the local network interface (if this
results in a new Neuron ID on the LNS Server PC), or removing the
Network Service Device for a Full client. These changes may prevent
your remote Full client application from successfully using an entry in
the RemoteNetworks collection. In addition, if the LcaNsdType of the
client application’s Network Service Device is set to
lcaNsdTypeTransient or (in some cases) lcaNsdTypeStandard, the
Network Service Device will be removed when the client application
closes, and will not exist in the RemoteNetworks collection. Finally, if
your application’s Network Service Device, or if the Network Service
Device used by the LNS Server has changed channels, it may not be
possible to successfully use an entry in the RemoteNetworks collection.
56
LNS Programmer's Guide
Page 71

In any of these cases, your client application should resort to using the
Networks collection. Once opened, the entry for the network in the
RemoteNetworks collection will be repaired.
3. Get the network to be opened. In this case, you need to specify the
network to be opened by the Network object’s RemoteNetworkName
property. The default value for the RemoteNetworkName property is
r_<Network Name>, where <NetworkName> represents the value
assigned to the Network object’s Name property. For example, if the Name
property is set to HVAC, the name in the RemoteNetworks collections
will be r_HVAC.
Dim MyNetwork as LcaNetwork
Set MyNetwork = NetworksCollection.Item("r_Building 75")
4. Call the Network object’s Open() method to open its LNS network
database. The LNS Server utility must be running on the PC containing
the LNS network database, or the operation will fail.
MyNetwork.Open()
5. Once you have opened a network, you should follow the tasks described in
the Opening a System section later in this chapter to configure and open
the system.
Initializing a Remote Lightweight Client Application
This section describes how to initialize a Lightweight client application. This includes the
following steps:
1. Selecting the Remote Access Mode
2. Specifying the License Mode
3. Opening the Object Server
4. Opening a Network
Table 4.3 includes sample code that you could use to incorporate each of these tasks. See
the sections following Table 4.3 for more information on each task.
Table 4.3 Initializing a Lightweight Client Application
Task Sample Code
Selecting
the
Remote
Access
Mode
ObjectServer.RemoteFlag = True
ObjectServer.Flags = lcaFlagsUseTCP
For More
Information,
See..
Selecting the
Remote Access
Mode on page
58
Specifying
the
License
Mode
LNS Programmer's Guide
ObjectServer.SetCustomerInfo(CustomerID,CustomerKey)
Specifying the
License Mode
on page 58
57
Page 72

Task Sample Code
Opening
ObjectServer.Open()
the Object
Server
Opening a
Network
Dim Networks as LcaNetworks
Dim MyNetwork as LcaNetwork
Set MyNetworks = ObjectServer.Networks
Set MyNetwork=MyNetworks.Item("Building 75")
MyNetwork.Open()
Selecting the Remote Access Mode
As described in Selecting the Access Mode on page 49, each application must have some
means of determining whether it will run as a remote or local client. To specify the access
mode for a Lightweight client, follow these steps:
1. Set the ObjectServer object's Flags property to lcaFlagsUseTCP.
This sets the network transport mode, and indicates that the Lightweight
client will access the LNS Server via a TCP/IP connection:
ObjectServer.Flags = lcaFlagsUseTCP
For More
Information,
See..
Opening the
Object Server
on page 58
Opening a
Network on
page 59
NOTE: The lcaFlagsUseNSI and lcaFlagsUseTCP flags are
mutually exclusive.
2. Select remote operation by setting the ObjectServer object's
RemoteFlag property to True. This will cause the Networks collection to
contain all remote networks have been entered into the Windows
Registry on the PC running your application after the Object Server has
been opened:
ObjectServer.RemoteFlag = True
Specifying the License Mode
The last step you should take before opening the LNS Object Server is to set the licensing
mode. The licensing mode determines how the LNS Object Server will track the addition
of devices to a network by your application. Remote Lightweight client applications must
always operate in Standard Mode. To enable the Standard Mode, set your customer
identification information by calling the SetCustomerInfo() method on the
ObjectServer, as shown below:
ObjectServer.SetCustomerInfo(CustomerID, CustomerKey)
The CustomerID and CustomerKey parameter supplied to the function refer to the
customer identification and key numbers that are printed on the back cover of the LNS
Application Developer’s Kit CD-ROM jewel case. For more information on LNS licensing,
and for more details on the differences between Standard Mode and Demonstration
Mode, see Chapter 13, LNS Licensing.
58
LNS Programmer's Guide
Page 73

Opening the Object Server
Once you have set the network access mode, and licensing mode for your Lightweight
client application, you can open the Object Server, as shown below:
ObjectServer.Open()
NOTE: If you will be opening any networks with an LNS application that is running as a
Windows service, then the first application to open the LNS Object Server must also be
running as a Windows service. In addition, if a network is to be opened by an LNS
application that is running as Windows service, then that network and system must be
opened by an LNS application that is running as Windows service before it is opened
with an LNS application running as a user process. For more information on this, consult
the help pages for the Open() methods of the Network and ObjectServer objects in
the LNS Object Server Reference help file.
Opening a Network
This section describes how to connect to a network with a Lightweight client application.
Lightweight client applications cannot create new networks. The LNS Server utility
must be running on the PC containing the LNS databases (i.e. the LNS Server PC) to
open a network with a Lightweight client application. To connect to an existing network
with a Lightweight client application, follow these steps:
1. Retrieve the Networks collection from the ObjectServer object’s
Networks property. The Networks collection will contain all Lightweight
client networks that have been entered into the Windows Registry on the
PC running your application (i.e. all the networks that have previously
been opened on your PC).
Dim MyNetworks as LcaNetworks
Set MyNetworks = ObjectServer.Networks
LNS Programmer's Guide
59
Page 74

2. If this is the first time the network will be opened on the PC running your
application, use the Networks collection object's Add() method to save
the network's name, IP address, and port (identified by the database
path) into the Windows Registry on the remote PC. In this case, the final
createDatabase parameter you supply to the Add method must be set
to True.
Dim MyNetwork as LcaNetwork
Set MyNetwork = MyNetworks.Add("Building 75", _
"lns://bldgServer.acme.com:2540", True)
Note that the database path supplied to the Add() method contains a
URL containing the LNS Lightweight client protocol name (“lns://”), the
server’s IP address (“bldgServer.acme.com”, or “10.1.2.3” for a fixed IP
address), and the port on which the LNS Server listens for Lightweight
clients (“:2540”).
If the network to be opened has already been opened on the PC running
your application, get the Network object from the Networks collection.
You can iterate through the Networks collection to list all available
networks, or you can specify the network to be opened by its name.
Dim MyNetwork as LcaNetwork
Set MyNetwork = MyNetworks.Item("Building 75")
3. Call the Network object’s Open() method to open the LNS network
database. The LNS Server utility must be running on the PC containing
the LNS network database, or the operation will fail.
MyNetwork.Open()
4. Once you have opened a network, you should follow the tasks described in
the Opening a System section later in this chapter to configure and open
the system.
Initializing an Independent Client
As described in Chapter 3, you can use Independent client applications to open networks
in server-independent mode. You should note that only networks that have been
previously opened by a Local or Full client application using your application’s Network
Service Device can be opened in server-independent mode. To open a network in serverindependent mode, follow these steps:
1. Set the access and licensing modes for the Independent client application
and open the ObjectServer object as you would with a Local or Full
client application. For more information on these tasks, see Initializing a
Local Client Application on page 48.
Note that when opening a network with an Independent client
application, you cannot select a new network interface, as you can with
other client types. LNS will open the network using the same network
interface as the last Local or Full client application that opened the
network.
2. Select a network from the ObjectServer object's VNINetworks
collection. The VNINetworks collection contains all networks that have
60
LNS Programmer's Guide
Page 75

been previously opened by Local or Full client applications with the
Network Service Device your application is using:
Dim IndependentNetworks as LcaNetworks
Dim MyNetwork as LcaNetwork
Set IndependentNetworks = ObjectServer.VNINetworks
Set MyNetwork= IndependentNetworks.Item("Building 75")
3. Call the OpenIndependent() method on the selected network:
MyNetwork.OpenIndependent()
4. Once you have opened a network with an Independent client application,
you can begin performing monitor and control tasks with the application,
as described in Chapter 9, Monitor and Control.
Opening a System
Once you have completed the tasks described in the previous sections and opened a
network or group of networks, you need to open the System object for each of your open
networks, and set the System object’s parameters. If an application is running locally,
this allows your application to attach to the network and make modifications to the
network database. If your application is running remotely, this registers your application
with the LNS Server and attaches it to the network, which allows the application to
make database modifications. Note that you cannot open the system when operating an
Independent client application.
To open the system for Full, Lightweight and Local client applications, follow these steps:
1. Get the System object from the active network's Systems collection.
There is only one system per network, so select the first system in the
Systems collection.
Dim MySystems as LcaSystems
Dim MySystem as LcaSystem
Set MySystems = MyNetwork.Systems
Set MySystem = MySystems.Item(1)
2. If you are running a Full or Lightweight client application and
authentication is enabled for this System, set the authentication key.
The authentication key is a 12-character string representing a 12-digit
hexadecimal value.
MySystem.AuthenticationKey = "01FE23DC45BA"
Local client applications do not need to set the authentication key for
client/server communication. However, Full and Lightweight client
applications must, or they will be unable to communicate with the LNS
Server. You can provide additional IP security for Lightweight clients by
setting IP permissions on the LNS Server PC via the System object's
PermissionString property.
LNS Programmer's Guide
61
Page 76

3. If the System is being opened for the first time and can share media with
other independently managed systems, configure the system to use
shared media by setting the InstallOptions property to
lcaSharedMedia. The default for this property is private media
(lcaPrivateMedia). The shared media setting is typically required for
systems with power line, RF, or L
ONWORKS/IP channels.
Setting the InstallOptions property after you have initially
opened a system has no effect. You can only set this property
with a Local client application before opening the system for the
first time. You cannot set this property with a remote client
application.
When the lcaSharedMedia option is specified, the LNS ObjectServer
assigns a unique 6-byte value to the DomainId property that is based on
the Neuron ID of the Network Service Device that the LNS Server is
using. It also disables background discovery by setting the
DiscoveryInterval property to zero, disables background devicepinging, and disables automatic registration of devices when service pin
messages are received. This is to avoid registering devices from other
systems. For more information on shared media, see Using Shared Media
on page 167.
MySystem.InstallOptions = lcaPrivateMedia
4. If the system is being opened for the first time and you are not using
shared media, set the system’s domain ID. Domain IDs can be 1, 3, or 6
bytes in length and are represented using 2 hexadecimal characters per
byte. If shared media was not selected and no domain ID is specified, the
LNS Object Server will set the domain ID length to 1 byte and the value
to 01. The following code shows a 3-byte domain ID.
MySystem.DomainId = "32A0CF"
NOTE: You can change the domain ID after opening the system. If you
plan on using the engineered mode installation scenario described in
Chapter 5 of this document, you do not need to set the domain ID until
the commissioning stage. This allows a single database to be defined that
is commissioned with many systems, each with a different domain ID.
62
LNS Programmer's Guide
Page 77

5. For Full client applications, set the System object’s RemoteChannel
property to the Channel object corresponding to the remote PCs channel.
You do not need to perform this step if you are running a Local or
Lightweight client application, if the system only contains one channel, or
if the system contains multiple channels and only uses configured
routers, bridges or physical repeaters. This step is only necessary for
remote Full client applications attached to multiple channel networks
containing store and forward repeaters.
For those client applications that do require this step, it is important to
note that the Network object’s Channels property is not valid until the
System has been opened. As a result, since the System object’s
RemoteChannel property must be set before the System is opened, you
must pre-open the System to obtain the desired channel, set the
RemoteChannel property, and then re-open the System. This is
demonstrated in the following example:
Dim MyChannels as LcaChannels
’ Pre-open the system:
MySystem.Open()
’ Fetch and assign the desired channel
Set MyChannels = MyNetwork.Channels
’ Set the RemoteChannel property
Set MySystem.RemoteChannel = MyChannels.Item(“C2”)
6. Invoke the System object’s Open() method to open the System (or re-
open the system, if you set the RemoteChannel property in step 5).
MySystem.Open()
Setting System Parameters
System parameters are represented as properties of the System object. You should set
some of these properties before opening the System object, as described in the previous
section. You should set other key properties of the System object after you have opened
it, as follows:
1. MgmtMode Property. This property sets the system management mode,
which determines whether device configuration changes are propagated
to the devices (lcaMgmtModePropagateConfigUpdates) on the
network as they are applied to the LNS database, or saved for later
processing (lcaMgmtModeDeferConfigUpdates). For a new network,
the default setting is lcaMgmtModeDeferConfigUpdates. If you are
opening an existing network, this setting may have been changed by
another LNS application.
While the system management mode is set to
lcaMgmtModeDeferConfigUpdates, changes are stored in the LNS
database. They are automatically propagated to the network as soon as
the system management mode is changed back to
lcaMgmtModePropagateConfigUpdates. While the system
LNS Programmer's Guide
63
Page 78

management mode is set to lcaMgmtModePropagateConfigUpdates,
all device configuration changes are immediately propagated to the
network.
Note that the system management mode is global, and affects all clients
currently attached to the system. For more information on the system
management mode, see System Management Mode Considerations on
page 97.
MySystem.MgmtMode = lcaMgmtModePropagateConfigUpdates
2. DiscoveryInterval Property. If the shared media option was not
selected when the system was opened, set the discovery interval. The
discovery interval specifies the rate, in seconds, at which the LNS Object
Server will scan the network for unconfigured devices that have been
attached to the network. The default setting for this property is 180 if the
InstallOptions property is set to lcaPrivateMedia, and 0 if the
InstallOptions property is set to lcaSharedMedia. The setting may
have been changed by another LNS application if you are opening an
existing network.
Setting the interval to 0 disables discovery. You should set this property
to 0 unless the control network is expected to be highly dynamic, and
your LNS application is programmed to respond to the automatic
registration of new devices.
Because this property affects all current and future clients accessing this
network, Echelon recommends that you specify an appropriate discovery
interval only when you create the network and open the System for the
first time.
ActiveSystem.DiscoveryInterval = 600
3. UpdateInterval Property. This property determines how often the LNS
Object Server will try to complete operations such as device
commissioning that occurred as a result of a device update failure. A
device update failure occurs when a transaction has been completed and
committed to the LNS database, but LNS is unable to load the
information into the physical device due to some error. The default value
for this property is 120 seconds. Note that you can force the LNS Object
Server to complete such operations at any time by calling the
RetryUpdates() method on the System object. Setting this property to
0 disables automatic retries, and requires explicit calls to the
RetryUpdates() method.
MySystem.UpdateInterval = 240
Because this property affects all current and future clients accessing this
network, Echelon recommends that you specify an appropriate update
interval only when you create the network and open the System the first
time. It is recommended to set this property to 0 only when you require
explicit control of bandwidth usage in low-bandwidth networks.
Steps 1 through 3 list several key properties of the System object that you need to set
when initializing your application, but there are many others you should consider as you
program your application. You should also note that many properties of the System
64
LNS Programmer's Guide
Page 79

object are not available until the system has been opened. See the LNS Object Server
Reference help file for a complete list of the properties of the System object, and
descriptions of those properties.
Once you have opened the System object and set its parameters as you desire, you can
begin programming your application to perform monitor and control operations, or to
perform network management tasks. Echelon recommends that you review the rest of
this chapter before proceeding to these tasks.
Using Transactions and Sessions
LNS provides two ways to group sets of database modifications: transactions and
sessions.
Transactions allow a set of database and network modifications to be treated as an
atomic operation. This allows sequences of changes to be canceled on the network and in
the LNS databases if a failure occurs during any part of the sequence. You can also use
transactions to substantially speed up operations if you group multiple changes within a
single transaction. Unless operations must be kept separate or are not allowed within a
transaction, transactions should be used to optimize performance and allow for atomic
roll back of the operation sequence.
Sessions allow certain types of database and network modifications to be grouped and
executed together, without requiring verification that each property write and method
invocation was valid until all operations have completed. This allows your application to
create connections more efficiently, and to avoid failure scenarios that can occur when
devices or routers are moved or changed one step at a time.
Managing Transactions
Transactions can be explicitly managed by an LNS application using the transaction
methods provided by the LNS Object Server, or implicitly managed by the LNS Object
Server. If an application does not explicitly start a transaction, the LNS Object Server
automatically starts one when the LNS application invokes a method that causes a
database modification to two or more objects, and commits the transaction when the
service completes. This is called an implicit transaction.
Implicit transactions are easy to use because they are transparent to the application.
Explicit transactions are useful when you want to group multiple actions into a single
operation. For example, you may want to treat installing a device and connecting that
device to a set of other devices as one indivisible action. Or, you may want exclusive
access to the services you are performing. Only one client can use a transaction at a time.
Thus, if the user cancels part of a transaction prior to completion, the application can
cancel the entire transaction, returning the database to the same condition it was in
prior to the invocation of any of the services. Grouping several related actions as a
transaction improves performance in many cases, since device updates are not sent out
until the transaction is committed. The performance improvements caused by using
explicit transactions can be significant, so use them whenever possible, particularly if
you are creating multiple objects of any type or if you are iterating through a collection.
For more information on using transactions with collections, see the Using Transactions
With Collections section later in this chapter.
LNS Programmer's Guide
65
Page 80

To explicitly start a transaction, call the System object’s StartTransaction() method.
Once a transaction is started for an application, all network modifications invoked by
that application will be considered part of the transaction. To end the transaction and
save the changes, call the CommitTransaction() method.
To abort the transaction and cause the LNS database to revert to its state prior to the
start of the transaction, the application can use the CancelTransaction() method.
Explicit transactions and some implicit transactions can be canceled while they are in
progress from within the OnSystemNssIdle event handler. For more information on the
OnSystemNssIdle event handler, see Using the OnSystemNssIdleEvent on page 316.
If a transaction is interrupted prior to completion for any reason, the LNS databases and
the network are returned to their states prior to the start of the transaction. If an
application starts a transaction, then it should commit or cancel the transaction within a
reasonable time to avoid hanging other applications. No application can start a new
transaction until the current one is committed or cancelled. While a transaction is in
progress, LNS automatically queues requests to start either additional implicit or explicit
transactions. If an application shuts down while it has an outstanding transaction, and
another application attempts to start a transaction, the LNS Object Server will abort the
abandoned transaction within 30 seconds. Once a transaction is committed or canceled,
other transactions on the system can begin.
This behavior can cause problems when debugging your application. For example, LNS
may cancel a transaction because your application has started a transaction and is
halted in a breakpoint. You can disable this behavior by setting the following Windows
Registry DWORD entry to a non-zero value:
HKEY_LOCAL_MACHINE\SOFTWARE\LonWorks\NSS\Configuration\Transaction
Debugging
Set its value to 0 (zero), or remove the entry, to disable the transaction debugging mode.
You should only modify this Registry entry for debugging purposes, since disabling this
feature may cause all LNS clients to lock up if the value is changed, and an application
running a transaction is improperly terminated.
Monitoring and Transactions
Transactions may be used when working with monitor and control-related methods and
properties, just as with other LNS operations. However, it is important to realize that
some properties used for monitor and control operations are not stored in the LNS
database persistently. As a result, it is not possible for the LNS Object Server to rollback
changes to these properties if a transaction is cancelled.
For more information on monitor and control, see Chapter 9 of this document.
Using Transactions With Collections
In many cases, you will need to iterate through the objects in a collection. LNS provides
several methods and properties you can use to do so for most collections, such as the
Item property and the ItemByHandle() method. The Item property allows you to
retrieve an object by specifying the object’s name or collection index, and the
ItemByHandle() method allows you to retrieve an object by specifying its handle.
66
LNS Programmer's Guide
Page 81

Echelon recommends that you use the handle or name assigned to an object to retrieve it
from a collection. The handle may be most desirable, since it is a static, unique value.
However, if you need to iterate through a collection using index numbers to retrieve each
object, you should do so within a transaction. If another client application adds or
removes an object from a collection while your application is iterating through it, you
may encounter invalid or repeated data as LNS adjusts the indices assigned to other
objects in the collection. Exceptions you might encounter in this situation are the
LCA:#96 lcaErrObjectDeleted, LCA:#15 lcaErrInvalidCollectionIndex, and
LCA:#6 lcaErrObjectNotFound exceptions. If you iterate through the collection
within a transaction, your application will maintain a consistent view of the collection
during the transaction, and it will not be affected if other client applications modify the
collection. In addition, using a transaction will result in better performance.
Managing Sessions
A given client can have at most one session in progress at a time. A session must be part
of an explicit transaction, and each transaction can contain more than one session.
Changes made in a session will not be committed until the transaction that contains the
session is committed. Sessions can be used to group operations that are within the same
transaction.
To begin a session within an explicit transaction, call the System object's
BeginSession() method. This method takes one argument, sessionClass, which
must be set to lcaSessionMove. Once a session is started, certain methods and
properties may be invoked, and these methods and properties will be considered part of
the session until the session is ended.
Consider a case where you are moving a large number of devices with subnet broadcast
connections from one channel to another, using the unacknowledged repeat messaging
service. If only some of these devices are moved, your application would detect that not
all of the devices are on the same subnet and the move would fail (since unacknowledged
repeat service for domain wide broadcast is not allowed). By grouping the moves in a
session, the actual connecting and validation does not take place until the session ends,
and so the network configuration is not affected if the operation fails.
The only network operations you should perform within sessions are those related to
changes in the physical topology of your network. This includes moving devices and
routers, adding and removing routers, and setting router classes. As a result, the
methods you can use within a session include the following methods of the AppDevices
and Routers collections: PreMove(), MoveEx(), PostMove(), Add(), and Remove().
You can also write to the Class property of a Router object within a session.
To end a session, call the EndSession() method. This method also takes the
sessionClass argument, which must be set to lcaSessionMove. When this method is
called, LNS checks for any error conditions that may have resulted from all method and
property calls that were made since the BeginSession() method was called, and
applies the changes caused by those calls to the LNS database.
Event Handling
LNS uses events to inform the application of a variety of network occurrences, such as
the arrival of service pin messages, or changes to the network’s configuration. You can
LNS Programmer's Guide
67
Page 82

subscribe your application to most events by invoking the Begin<event> method (where
<event> represents the name of the event) for the desired event. Each separate
application must subscribe to an event to receive that event (i.e. one client application
subscribing to an event will not cause other client applications to receive that event). The
source of a stream of events is called the event generator. An application that subscribes
to a stream of events is called an event subscriber.
LNS implements a core set of events for installation and for monitoring and control tools.
These events are described below. The rest of this document describes when certain
events might be useful. You can also find out more about these events in the LNS Object
Server Reference help file.
• Service pin events. The OnSystemServicePin event is generated when a
service pin message is received. This event is used in several of the
installation scenarios described in Chapter 5.
• Change events. These events are generated whenever devices, routers,
channels, or subnets are added, deleted, moved or renamed, or when
device interfaces are modified.
Examples of change events include the OnChangeEvent, which is fired
any time an object in the LNS database is modified, and the
OnNodeIntfChangeEvent, which is fired every time a device’s external
interface is modified.
Note that some external interface change events are fired when the
change is made to the database and others are fired as the changes are
propagated to the devices. See the online help for the
OnNodeIntfChangeEvent event for more information on this.
• Update and update failure events. These events are generated when a
monitored network variable or message point is updated, or when an LNS
application fails to update a network variable or message point.
Examples of update events include the
OnNvMonitorPointUpdateEvent, which is fired every time a network
variable monitor point update is received, and the
OnMsgMonitorPointUpdateEvent, which is fired every time a message
monitor point update is received. Update failure events include the
OnNvUpdateErrorEvent and OnNvMonitorPointErrorEvent events.
• Commissioning status change events for devices and routers. The
OnCommission event is generated whenever the commission status of an
application device or router changes. Whenever a change that affects the
configuration of a device or router is made to the LNS database and that
device or router’s CommissionStatus property is set to
lcaCommissionUpdatesCurrent (indicating that the device has no
pending configuration changes), LNS will generate an OnCommission
event to indicate that the device or router now has pending updates (and
the CommissionStatus property will be set to
lcaCommissionUpdatesPending).
The OnCommission event will also be generated whenever the LNS
Object Server propagates, or fails to propagate changes to a device or
router.
This event is useful if you want to initiate operations as soon as a device’s
network image is up-to-date. For example, you might use it to determine
when to set a device online after its network image has been updated by
68
LNS Programmer's Guide
Page 83

an automated installation tool. You could also use it to provide feedback
to a user about the configuration state of devices or routers on your
network. For example, when building a connection, you might want to be
informed of devices that could not be updated. Or, upon receiving a
commission status change event with an “update failed” code, your
application could indicate this by drawing a red circle around the device’s
icon. Later, when the device is reattached to the network and the Object
Server refreshes the device’s network image, your application can remove
the red circle upon receiving a commissioning status change event with
an "update succeeded" code.
• Attach/detach events. The OnAttachment event is generated when the
attachment status of an AppDevice or Router changes. Once an
application device or router has been commissioned, it can be monitored
via periodic pinging to ensure it is attached. A change in the attachment
status results in this event being generated. Note that the
attachment/detachment events can also be used to monitor the presence
of other remote Full client applications on the network.
• Licensing events. You can use the OnLicenseEvent event to monitor
when the licensing status of the LNS Server changes. This event is
generated upon device crediting, device debiting, deficit credit usage, and
license expiration.
• Missed-event events. The OnMissedEvent event is generated for Full
client applications when one or more events were generated, but not
received by subscribers. For example, missed events could occur while
your application’s Network Service Device is being updated. This event
will contain information about how many events were missed and
whether the missed events are recoverable. You can use the
SetEventSyncMode method to determine whether missed events can be
recovered or not, and you can use the DoEventSync method to maintain
event synchronization in the case of missed events. Consult the LNS
Object Server Reference help file for more information on these methods.
When implementing an event handler for any of the LNS-generated events discussed in
this document, the developer should take into account the following guidelines:
• Each event handler must be implemented as an IDispatch() method
with a valid DISPID. The valid DISPIDs you can use with LNS are
included in the ConstEventIds constant. For a complete list, see the
help page for the ConstEventIds constant in the LNS Object Server
Reference help file. LNS does not query your event sink object for
DISPIDs by name. This is usually handled automatically by the
application framework (e.g. ATL, MFC, Visual Basic) you are using.
• When not using direct callbacks, your application must service its
Windows Message Queue in order to receive events. In addition to not
receiving events, your application will appear to leak memory while the
queue is not serviced. This is usually only a concern for console or
Windows service applications. For more information on direct callbacks,
see Multi-Threading and LNS Applications on page 318.
• Each event handler should process the event, and return quickly. New
events cannot be processed by a client until the current event handler
returns.
LNS Programmer's Guide
69
Page 84

• Event handlers should not try to release any event object parameters, per
COM rules. LNS will handle this itself on return from the event handler.
If a client needs to make a copy of an object parameter, it must AddRef()
the object to ensure it remains valid. For more information on this, see
Avoiding Memory Leaks with LNS on page 319.
• Where possible, event handlers should avoid making new calls into LNS
(especially modifying calls), except to extract information from any
passed-in object parameters. This should not cause direct problems, but
no further events will be processed until the event handler returns when
using direct callbacks. As an alternative, you can post a Windows
message to your main thread for further processing.
• Transactions within event handlers are treated the same as outside event
handlers. In particular, any operations performed within in an event
handler will become a part of the current transaction.
• Event handlers should not start or terminate any transactions, especially
when using direct callbacks, except for cancellation of explicit
transactions from within an OnNssIdleEvent event handler.
• Event handlers will be executed from one of several non-client threads
when using direct callbacks. You may need to keep this in mind for
thread safety, e.g. if your application makes use of thread local storage.
For more information on direct callbacks and LNS, see Multi-Threading
and LNS Applications on page 318.
• Applications should not subscribe to an event unless the application is
prepared to withdraw useful information from an event, as receiving but
not responding to events causes undesirable performance degradation.
This can also consume a large amount of network bandwidth, particularly
for Full client applications.
Exception Handling
As mentioned in the LNS Components section in Chapter 3 of this document, LNS
defines a set of exceptions that will be returned when an operation fails for any reason.
With the enhanced support for ATL in LNS Turbo Edition, there are now several ways to
handle runtime errors and warnings. Most applications have a try/catch clause (or some
similar construct) for general exceptions or COM errors, such as ‘out of memory’ or
‘access violation’.
Every property and method in LNS has at least two public interfaces: one that returns
an error code, and one that does not. For example, ILcaAppDevices.get_Item()
returns HRESULT error codes and does not throw exceptions for LNS-specific error
conditions, and ILcaAppDevices.GetItem() uses exceptions to notify the application
of error conditions. If the developer chooses the interface that does not return an error
code, then their catch clause will catch and handle the error. When using this type of
interface, both errors and update warnings will be thrown as COM exceptions.
If the developer chooses the interface that returns an error code, then the catch clause
will not be invoked upon an LNS error or warning for that invocation. Instead, the
returned exception will contain an error code, 0x8004yyyy, where yyyy represents an
LNS error code (i.e. 0x4269) or an LNS warning code (i.e. 0x0FBE). For a complete list of
the exceptions LNS may return, see the LNS Errors Online Reference section of the LNS
Object Server Reference.
70
LNS Programmer's Guide
Page 85

Some properties and methods normally return an object, e.g. the Add() method of the
AppDevices collection, and some return a value. However, if an exception is generated,
the return value has no meaning and is not used, and the returned object (were it to be
non-zero) is not valid. Likewise, when you use the interface that returns HRESULT
codes instead of producing exceptions, the accessors return data results via pointers
(output parameters). In case the HRESULT code indicates failure, the result pointer does
not refer to valid data.
Note that when making changes inside of an explicit transaction, the updates are
deferred until the transaction is committed. Therefore, update warnings are never
thrown or returned when methods are called from within a transaction, but may be
thrown or returned when the CommitTransaction() method is called. However,
warnings or errors related to parameters provided to a method within the transaction
may be reported before you call the CommitTransaction() method. For example,
calling the AddTarget() method with a bad target reference parameter may result in an
immediate error condition.
You also need to consider the pairing requirements for open and close statements, and
StartTransaction() and CommitTransaction() statements. If an open operation
was successful, you should always make sure to invoke the matching close operation.
However, if the open failed, it may not make sense to perform the matching close
operation (although the close operation should not cause any problems in this case).
Transactions have a different requirement. After the StartTransaction() method has
been called, your application will eventually need to invoke the CommitTransaction()
method or the CancelTransaction() method. You should note that if the call to
CommitTransaction() fails, you still need to invoke the CancelTransaction()
method to cancel the transaction.
Terminating an LNS Application
You should terminate any LNS application, regardless of client type, by following these
steps:
1. Stop all monitoring and control tasks. If using permanent monitor sets,
those MonitorSet objects should be closed. For more information on
monitor and control, see Chapter 9, Monitor and Control.
2. If you are operating in server-dependent mode (i.e. not as an Independent
client), close each open System object by invoking its Close() method. If
the application is a Local or Full client, this detaches the LNS Object
Server from the network. If the application is a Local client, and the LNS
Server application was automatically launched by an LNS application,
this also shuts down the LNS Server application. For Lightweight clients,
this method de-registers the application from the LNS Server.
MySystem.Close()
3. Close each open Network with the Close() method. If you are running
an independent client, use the CloseIndependent() method.
MyNetwork.Close()
4. Close the ObjectServer control by invoking its Close() method.
ObjectServer.Close()
LNS Programmer's Guide
71
Page 86

72
LNS Programmer's Guide
Page 87

Chapter 5 - Network
Management : Installing a
Network
This chapter describes how you can use LNS to install and
configure a L
three installation scenarios you can use: automatic
installation, ad hoc installation, and engineered mode
installation.
ONWORKS network. This includes descriptions of
LNS Programmer's Guide
73
Page 88

LNS Network Installation Scenarios
To understand what is required to install LONWORKS devices on a LONWORKS network,
you should consider the types of control systems that L
Many conventional control systems use wiring harnesses or point-to-point wires. In these
systems, the wiring between devices serves two purposes when the devices are installed.
It physically interconnects the devices, and it determines which control signals should be
sent to which device. Once attached to the wire, the behavior and interaction among the
devices is completely defined.
Other control systems use a master-slave architecture, and require DIP switches or dials
on each device to specify the device’s address. The device addresses are predefined and
based on the control algorithm in the master. When these devices are installed, the
master polls each address, and the appropriate device responds. Such systems are
usually limited to a small number of devices, and changes to system behavior usually
require resetting the DIP switches on each device, and modifying the master control
software.
A L
ONWORKS network consists of intelligent devices called nodes or application devices
that are connected by one or more communications media. Application devices
communicate with one another using the L
ONWORKS protocol (also referred to as the
LonTalk protocol). Each intelligent device on the network, e.g. a programmable
thermostat in a building control system, is a L
ONWORKS application device. The devices
communicate with one another across a shared communications medium, such as a
twisted pair cable, a power line circuit, or an RF link. Figure 5.1 shows the wiring
difference between a conventional system and a L
ONWORKS networks replace.
ONWORKS network.
The devices on a L
Figure 5.1 Wire Reduction in a L
ONWORKS network contain objects that respond to a variety of inputs,
ONWORKS Network
and produce desired outputs. Although the function of a given device may be quite
simple, the interaction among devices allows L
tasks. A benefit of L
ONWORKS networks is that a small number of common device types
ONWORKS networks to perform complex
can perform a broad spectrum of different functions, depending on how they are
configured and logically connected.
In a L
ONWORKS network, devices share their physical media (e.g. twisted-pair wire or a
power line circuit), which eliminates the redundant point-to-point wiring found in
conventional control systems. Without point-to-point wiring (e.g. a light switch wired to a
lamp) the physical attachment no longer uniquely identifies a device. In a L
ONWORKS
network, the physical attachment only provides a path for devices to send and receive
messages. It does not tell the devices which other devices they should send data to.
Therefore, in addition to physically attaching the devices to the network, you also need to
perform the following tasks when installing a L
ONWORKS network:
• Assign a network address to each device. A network address identifies
which application device a L
ONWORKS messages should be sent to, just as
a postal address identifies which house a letter should be delivered to. A
74
LNS Programmer's Guide
Page 89

device’s network address consists of three components — the device’s
domain, the device’s subnet, and the device’s subnet ID. The LNS Object
Server is responsible for assigning each device a unique network address
when the device is installed.
• Define the information that devices share with one another. Devices
communicate with one another using high-level objects called network
variables, or low-level messages. Interoperable network devices send
messages using implicit addressing for network variable updates and
application messages. When using implicit addressing, the Neuron Chip
firmware on the application device builds and sends network variable and
application messages using information contained in tables in its
EEPROM. In order to send application messages in this fashion, the
device application specifies a message tag when sending the message.
The message tag is associated with an address table entry stored in the
device’s EEPROM.
When an LNS application requests that a device share information with
another device, an address table entry is allocated and configured on the
device sending the information. This address table entry associates the
output defined by the device application (either a network variable or a
message tag) with the domain/subnet/node address, group address or
broadcast address of the device or devices receiving the information. The
process of creating and configuring these tables is called binding or
connecting. The addressing established during this process is called a
connection. The LNS Object Server is responsible for allocating the
network resources used by connections.
• Set site-specific parameters. L
flexibility to customize and tune network behavior and response
characteristics, if required by the system. For example, network
performance can be fine-tuned by assigning devices to priority slots on a
channel. You can assign these priority slots with LNS. You can use LNS
to further customize devices by setting application-specific information
such as location, temperature set points, and calibration tables.
ONWORKS technology provides the
Installation Scenarios
The first step in writing an LNS application to install a LONWORKS network is to select
the installation scenario or scenarios that the application will support. Based on your
knowledge of the network and the capabilities of the installation personnel, you must
decide what steps the installer will go through to add devices and build connections, how
much flexibility will be required, and what tasks can be automated by your LNS
application. Once you choose an installation scenario, you can map the scenario to the
required objects in the LNS database, and add intelligence to the application to automate
tasks as appropriate.
The installation scenario you use to install your network determines the "look and feel"
of the network as viewed by the person responsible for network installation. The best
scenario for any given network depends on many factors, including the skill level of the
installer, the amount of flexibility desired, and the requirements of the end-user. In all
cases, the installation process should be automated as much as possible. Automation
both simplifies and speeds network installation.
The three installation scenarios are automatic installation, engineered mode installation,
and ad hoc installation. Note that you can install a network using a mix of these
LNS Programmer's Guide
75
Page 90

scenarios. For example, you could begin defining a network’s devices and connections
using the engineered system scenario. Once the network is commissioned, you could add
additional devices to it using the ad hoc scenario.
Engineered Mode Installation
In the engineered mode installation, installation is a two-step process consisting of a
definition phase and a commissioning phase. In the definition phase, the application
defines all of the network configuration information in the LNS database, without
modifying the physical network. In the commissioning phase, the application loads the
configuration information defined during the definition stage into the physical network.
The advantage of the engineered mode installation scenario is that the network
installation on-site is quick, easy, and error free, since most of the time-consuming data
entry and processing is done off-site. This scenario is often used when installing systems
that require preplanning, when building multiple clones of a single network design, or
when installing systems that are built in response to a bid.
For more information on engineered mode installation, see Engineered Mode on page 77.
Ad Hoc Installation
In the ad hoc installation scenario, installation is a one-step process. In this scenario, a
network tool loads the network configuration information into each device as the devices
are physically installed on the network, and then creates connections between them. The
LNS application provides a user interface that controls the amount of information and
the sequencing of the information required.
This is different from the engineered system scenario in that information is loaded
incrementally. It is different from the automatic installation scenario in that the installer
makes decisions about the network configuration instead of the tool (although the tool
may provide assistance). The goal of ad hoc installation is to integrate all installation
activities into a single step. Ad hoc installation offers the most flexibility, since it allows
the installer to make decisions on-site. Since this scenario can be time consuming, it is
typically used in conjunction with the engineered system scenario for large installations.
Ad hoc is the installation scenario typically used when servicing an existing network.
Automatic Installation
Automatic installation is usually accomplished by an onsite network tool with a minimal
user interface. The network tool automates all installation tasks, so it must discover
when new devices have been attached to the network, and form network variable and
message tag connections between the discovered devices in a way that makes sense in
the context of the network design. The network tool must also be able to determine when
devices have been removed from the network, and reconfigure the network accordingly.
To be able to automate installation and eliminate or minimize end-user interaction, the
network tool’s application program needs to be very knowledgeable about the system it is
managing. For this reason, automatic installation is most commonly used in single
vendor systems, or in systems that are dedicated to a single function.
For more information on automatic installation, see Automatic Installation on page 89.
76
LNS Programmer's Guide
Page 91

Engineered Mode
In the engineered mode installation scenario, the network installation consists of two
phases:
1. A definition phase in which the user defines the configuration of the
devices and connections on the network in the LNS database without
physically modifying the network.
2. A commissioning phase in which the application loads the network
configuration created during the definition phase from the LNS database
into the physical devices on the network. Application images may also be
loaded during this phase, and some configuration properties may be
adjusted based on testing in order to properly calibrate the system.
Definition Phase
In the definition phase, the network configuration is defined off-site and loaded into the
LNS database, without modifying the physical network. The LNS application defines the
user interface that is used to enter the information. The interface can be anything from a
simple keypad, to a graphic display. The amount of information that the user must enter
is under the control of the application. In the most general case, the user could enter all
the information related to the network, including what devices will be installed on the
network, and how they will be connected. Alternatively, the application could automate
certain parts of the definition process. For example, the user may only need to pick a
configuration from a list of options, or the user may only need to enter device
configuration information while the tool automates connections.
The steps you need to follow to accomplish the tasks involved in the definition phase are
shown in figure 5.2. They are described in more detail in the section following figure 5.2.
LNS Programmer's Guide
77
Page 92
Initialize the Object Server and
create or obtain the network you
are defining. Open the network’s
System object. See Chapter 4
for more information on these
tasks.
Set NetworkServiceDevice.NetworkInterface = NOTHING
Add devices and connections as your network design requires. When you have finished,
move to the commissioning phase described in the Commissioning Phase section below.
NOTE: If your network uses multiple channels, you will need to install, configure and
commission the network's routers before commissioning the application devices defined
Add a device
Create or select the Subsystem
object that will contain the new
Add an AppDevice object for the new device to to the
AppDevices collection of the selected Subsystem:
Set MyAppDevices = Subsystem.AppDevices
Set MyDevice = MyAppDevices.Add()
device:
Subsystems.Add()
Subsystems.Item()
Define device templates for the devices you
Set the application into Engineered mode:
are going to install:
DeviceTemplates.Add()
DeviceTemplate.Import()
during the definition stage.
Add a connection
Connect a device to other
devices on the network:
NvHub.AddTarget()
NvHub.Connect()
For more information on
connections, see Connecting
Devices in Chapter 6.
Remove a device
Remove the device:
MyAppDevices.Remove()
If you know the device’s Neuron
ID, assign it to the AppDevice
MyDevice.NeuronId = <ID>
Ensure that the configuration
property values in the device
MyDevice.Priority = Prio
MyDevice.Location = Loc
object:
are properly set.
Optionally, set other device
properties. For example:
Figure 5.2 Engineered Mode Installation Tasks - Definition Phase
The following section describes the steps listed in figure 5.2 in more detail:
1. Initialize your application, create the network that is to be installed, and
open the system. These tasks are described in Chapter 4, Programming
an LNS Application.
2. The definition phase can be performed while your application is in
engineered mode, meaning that it is not attached to the network. In this
case, your application does not need to specify a network interface.
78
LNS Programmer's Guide
Page 93

Chapter 4 describes how to specify a network interface for each client
type. If your application has already done so, you can switch the
application to engineered mode by setting the NetworkInterface
property of the system's NetworkServiceDevice object to NOTHING.
Dim MyNetworkServiceDevice as LcaNetworkServiceDevice
Set MyNetworkServiceDevice = System.NetworkServiceDevice
Set MyNetworkServiceDevice.NetworkInterface = NOTHING
3. Begin defining the devices and connections on your system. To do so,
fetch the Subsystems collection from the System object, and use the
collection’s Item property to obtain the Subsystem you plan to add the
devices to. Alternatively, you can use the Add() method to create a new
Subsystem.
The returned Subsystem object contains an AppDevices collection you
can add the new devices to. You can add new devices using the
collection’s Add() method.
When using the engineered mode scenario, you must specify a
DeviceTemplate and Channel object when you call the Add() method.
If you do not specify a DeviceTemplate, you will not be able to predefine the device’s connections, and or pre-load its configuration
properties. You must specify the Channel object so the LNS Object
Server can properly assign network addresses and compute transaction
timers for the device when it is added to connections. For more
information on creating AppDevice objects, see Creating AppDevice
Objects on page 113.
NOTE: If your network uses multiple channels, you will also need to
define the network’s routers and channels during the definition stage. For
more information on this, and on other considerations you will need to
make when managing a network with multiple channels, see Managing
Networks with Multiple Channels on page 169.
4. If you know the Neuron ID that the device will use, enter it into the
database by writing the Neuron ID to the AppDevice object’s NeuronId
property.
MyAppDevice.NeuronId = DeviceNeuronId
It is common to obtain the devices’ Neuron ID from a sticker on the device
that contains the ID in barcode and/or readable form. In a typical
scenario, the on-site installation staff mounts and wires the physical
devices. While doing so, each device’s Neuron ID sticker is taken from the
device, and attached to a floor plan or similar document. That document
is then used during the definition phase to provide Neuron IDs to the
LNS database.
Note that the Neuron ID may also be acquired via the device’s service pin
and assigned during the commissioning phase, as described in the next
section.
5. Ensure that all configuration properties are properly set, and that they
will be downloaded to the device when it is commissioned. You can do
this by calling the DownloadConfigProperties() method on the
LNS Programmer's Guide
79
Page 94

device with the lcaConfigPropOptLoadValues and
lcaConfigPropOptSetDefaults options set.
Then, set individual configuration properties as desired using
configuration property data points. Note that some configuration
properties may need to be adjusted (or calibrated) during the
commissioning phase as portions of the system are brought online and
tested. For information on setting configuration property values, see
Writing Configuration Property Values on page 128.
6. Set the Priority and Location properties of the AppDevice object to
their desired values. Optionally, set any other properties of the
AppDevice object, as described in Configuring Devices section on page
125.
7. Repeat steps 3, 4, 5 and 6 until you have defined all the devices you plan
on adding to the network. Then, create connections between the network
variables on those devices as your network design requires. For detailed
information on creating connections and connection management, see
Connecting Devices on page 138.
8. Once you have completed these tasks, you are ready to move onto the
commissioning phase of the network installation. For more information
on this, see the next section, Commissioning Phase.
9. Figure 5.2 references additional tasks you may need to perform when
managing a network installed with this installation scenario, such as
removing devices and connections from the network. For details on how
to perform these tasks, see Other Device Management Operations on page
129.
NOTE: The following methods cannot be invoked while the LNS Object Server is in
engineered mode:
• AppDevice.Load()
• AppDevice.LoadEx()
• AppDevice.Test()
• AppDevice.UploadConfigProperties()
• AppDevice.Wink()
• System.DeconfigNetwork()
80
LNS Programmer's Guide
Page 95

The following properties cannot be read while the LNS Object Server is in engineered
mode:
• AppDevice.SelfDocumentation
• AppDevice.State
• AppDevice.DetailInfo
• NetworkVariable.SelfDocumentation
• Router.State
• RouterSide.State
• RouterSide.DetailInfo
• NetworkVariable.Value
Commissioning Phase
During the commissioning phase, the configuration information defined during the
definition phase is loaded into the devices on the network. The LNS Object Server must
be attached to the network during this phase, meaning that the application must specify
a network interface. The application used for this phase can be different than the
application used for the definition phase. For example, the application used for the
definition phase may provide a more functional user interface than the application used
for the commissioning phase. In fact, the application running the commissioning phase
could be completely automated. If a different PC is used for the commissioning phase, the
network database must be transferred to the new PC and imported into its LNS Object
Server. For instructions on this, see Moving Network Databases on page 256.
It is common, but not required, for the commissioning phase to be performed locally. A
local commissioning tool allows for easy on-site trouble-shooting. However, the
commissioning phase can be performed remotely when using network interfaces such as
the SLTA-10, the i.LON 10 Ethernet Adapter or the i.LON 100 Internet Server.
Alternatively, you can connect locally to a network containing distant devices using an
Internet router such as the i.LON 600 L
Server. If you plan to commission your network remotely, it is recommended that you
assign each device its Neuron ID during the definition phase.
The methods and tasks you need to perform to accomplish each task in the
commissioning phase are shown in figure 5.3.
ONWORKS/IP Server or the i.LON 1000 Internet
LNS Programmer's Guide
81
Page 96
Open the network and system to be commissioned:
Set MyNetworks=ObjectServer.Networks
Set MyNetwork=MyNetworks.Item(“MyNetwork”)
Specify a network interface, open the system, and set the system
management mode to lcaMgmtModePropagateConfigUpdates :
Set MySystems = MyNetwork.Systems
Set MySystem = MySystems.Item(1)
Set MyNSD.NetworkInterface = MyNetworkInterface
MySystem.MgmtMode = lcaMgmtModePropagateConfigUpdates
Acquire the AppDevices collection for the subsystem
containing the AppDevice objects you have defined.
Perform the following steps for each device, until all devices
MyNetwork.Open()
MySystem.Open()
have been commissioned:
Make sure the device has
been asssigned a Neuron ID,
and then optionally load the
device’s application:
MyDevice.LoadEx()
Synchronize the device configuration properties, and commission the
device. Perform these operations within the same transaction:
MySystem.StartTransaction()
MyDevice.DownloadConfigProperties()
MyDevice.CommissionEx()
MySystem.EndTransaction()
Bring the device online by setting the State property
of each AppDevice object to
lcaStateCnfgOnline.
MyDevice.State = lcaStateCnfgOnline
Yes
More devices to be
commissioned?
Figure 5.3 Engineered Mode Installation Tasks - Commissioning Phase
The following section describes the steps depicted in figure 5.3 in more detail:
1. If the database was defined on a different PC, copy the database and import it into
the PC being used for the commissioning phase. For details on how you can perform
these tasks, see Chapter 10, LNS Database Management.
82
LNS Programmer's Guide
Page 97

2. Open the network and the system, and then set the system management mode to
lcaMgmtModePropagateConfigUpdates. Before opening the system, make sure
that your application has specified a network interface.
Set MyNetworks = ObjectServer.Networks
Set MyNetwork = MyNetworks.Item(“Broadcasting Center”)
Set MySystems = MyNetwork.Systems
Set MySystem = MySystems.Item(1)
Set MySystem.NetworkInterface = MyNetworkInterface
MySystem.Open()
MySystem.MgmtMode = lcaMgmtModePropagateConfigUpdates
NOTE: Generally, there are many factors you need to consider when writing to the
MgmtMode property. For more information on this, see System Management Mode
Considerations on page 97.
3. Acquire the AppDevices collection for the subsystem containing the AppDevice
objects you have defined. Then, follow steps 4-8 of this procedure for each device in
the collection.
4. If a device was not assigned a Neuron ID during the definition phase, you need to
explicitly set the AppDevice object’s NeuronId property at this point. For
information on how you can use LNS to determine a device’s Neuron ID, see Neuron
ID Assignment on page 115.
5. If a device does not have the correct application image defined, you should load the
device’s application image at this point. For instructions on loading device
application images, see Loading Device Application Images on page 119.
6. Start a transaction, and commission the device with the Commission() or
CommissionEx() methods. Before committing the transaction, you should use the
DownloadConfigProperties() method to synchronize the configuration property
values in the physical device with those stored in the LNS database.
Alternatively, you could commission the device and then call the
UploadConfigProperties() method after committing the transaction to
synchronize the configuration property values in the database with those stored in
the LNS database. For more details on how you can synchronize configuration
property values, and for information on other considerations you should make when
commissioning devices, see Commissioning Devices on page 121.
NOTE: If your network uses multiple channels, you will need to commission the
network’s routers as you commission the devices. The Managing Networks with
Multiple Channels section on page 169 provides details on this, including guidelines
on the order you should follow when commissioning routers and application devices
at the same time.
7. Bring each device online by setting the State property of each AppDevice object to
lcaStateCnfgOnline.
You may wish to commission all the devices in the network first, and then set all the
devices online. This prevents superfluous network traffic generated by those devices
that are already online, network delivery errors caused by network variable updates
targeted to devices that are not yet online, and generally helps the commissioning
process proceed more efficiently.
LNS Programmer's Guide
83
Page 98

8. As you manage the network you have created, you may need to perform other
maintenance tasks, such as the removal of devices and connections, and the
replacement of devices. For details on how you can use LNS to perform these tasks,
see Other Device Management Operations and page 129.
Commissioning Phase, Multiple Networks
When commissioning multiple networks that have similar configurations, it may be most
efficient to use a "cookie cutter" approach. To do so, follow the steps described in the
Definition Phase section to create a "prototype" LNS database that contains the basic
configuration you want to apply to each network. You can then customize individual
networks from this proto-type by adding additional information on-site during the
commissioning phase, as described below:
1. Initialize your application in engineered mode, meaning that the application
explicitly resets the network interface and detaches from the network. Chapter 4
describes how to specify a network interface for each client type.
Set MyNetworkServiceDevice.NetworkInterface = NOTHING
2. Create device templates for the devices on that network by importing external
interface files. Then, define each device, adjust its configuration property values,
and create connections between the devices.
For detailed information on how to define devices in engineered mode, see the
Definition Phase section earlier in this chapter.
3. Create your common reference database by making a backup copy of the network
folder. You can use the Backup() method to do so. See Chapter 10, LNS
Database Management, for more information on the Backup() method.
4. Rename the database copy created in step 3 as desired, or create a copy of the
backup using another directory with a name of your choice.
5. To load the reference database into a new Network object, access the
ObjectServer object’s Networks collection, and invoke the collection’s Add()
method. Specify the createDatabase parameter as False, and the
databasePath parameter as the path to the copy of the reference database.
6. Assign a suitable network interface to the NetworkServiceDevice object’s
NetworkInterface property to exit engineered mode and attach the application
to the physical network.
7. Open the system by accessing the System object for the newly created network,
and calling the Open() method.
8. Set the DomainId property to the domain ID for the site. For shared media,
Echelon recommends that you use the Neuron ID of the on-site PC’s network
interface as the domain ID. For standard network interfaces, this ensures
uniqueness as long as the same network interface is not used for multiple
installations on the same shared media.
If the same network interface is used for multiple installations, Echelon
recommends using a random domain ID. For networks containing shared media
such as powerline or RF channels or shared twisted-pair channels, Echelon
recommends using a 6-byte domain ID to ensure uniqueness. For most private
84
LNS Programmer's Guide
Page 99

networks, a 1-byte domain ID is sufficient, and allows for optimum performance.
The domain ID is automatically selected when the shared media installation
option is specified before the system is opened for the first time.
9. Set the System object’s MgmtMode property to
lcaMgmtModePropagateConfigUpdates.
10. If any of the devices' Neuron IDs have not been specified, acquire and assign
them using the methods described in the Neuron ID Assignment section on page
115.
11. If a device does not have the correct application image defined, you should load
the device’s application image at this point. For instructions on loading device
application images, see Loading Device Application Images on page 119.
12. For each device, start a transaction and commission the device with the
Commission() or CommissionEx() methods. Before committing the
transaction, you should you should use the DownloadConfigProperties()
method to synchronize the configuration property values in the physical device
with those stored in the LNS database. For details on how you can do so, and for
information on other considerations you should make when commissioning
devices, see Commissioning Devices on page 121.
13. Add and connect any additional devices that are not included in the basic
network configuration defined by the prototype database.
Ad Hoc Installation
In the ad hoc installation scenario, the LNS application loads the network configuration
information into the physical devices on the network as the installer defines devices and
connections in the LNS database. The LNS application can provide a user interface that
controls the amount of information and sequencing of the information required, or it
could automate as much of the installation process as desired. The basic tasks you will
need to perform during an ad hoc installation are shown in figure 5.4. These are
described in more detail in the following sections.
LNS Programmer's Guide
85
Page 100

Initialize the Object Server, create the network, and open the system. Make
sure that your application is attached to the network when doing so. See
Chapter 4 for more information on these tasks.
Make sure that the system management mode is set to propagate device configuration updates:
System.MgmtMode = lcaMgmtModePropagateConfigUpdates
Create a device
Create or select the Subsystem object that will
contain the new device:
Subsystems.Add()
Subsystems.Item()
Add an AppDevice object for the new device to to
the AppDevices collection of the selected
Subsystem:
Set MyAppDevices = Subsystem.AppDevices
Set MyDevice = MyAppDevices.Add()
Acquire the Neuron ID for the device as
described in the Neuron ID Assignment section
in Chapter 6 of this document. Then, assign the
Neuron ID to the new AppDevice object.
MyDevice.NeuronId = AcquiredId
Optionally. load the device’s application
image:
MyDevice.LoadEx()
Choose a task:
Remove a device
Add a connection
Remove the device:
Connect a device to other
devices on the network:
NvHub.AddTarget()
NvHub.Connect()
For more information on
connections, see Connecting
Devices in Chapter 6.
Commission the device, and then synchronize the device
configuration properties, and commission the device. You can also
update any configuration property values in this step. Perform these
operations within the same transaction:
MySystem.StartTransaction()
MyDevice.CommissionEx()
MyDevice.DownloadConfigProperties()
MySystem.EndTransaction()
AppDevices.Remove()
Set the device to the online state.
MyDevice.State = lcaStateCnfgOnline
Set the device’s Priority and Location
properties to their desired values:
MyDevice.Priority = Prio
MyDevice.Location = Loc
Figure 5.4 Ad Hoc Installation Tasks
The following section describes the tasks depicted in figure 5.4 in more detail. Note that
if your network uses multiple channels, you will need to define the network’s channels
and install and configure the network’s routers as you define your devices. For more
information on this, and on other considerations you will need to make when managing a
network with multiple channels, see Managing Networks with Multiple Channels on
page 169.
1. Initialize your application, create the network that is to be installed, and open
the system. Make sure that your application is attached to the network at this
point (meaning that is has specified a network interface). These tasks are
described in Chapter 4, Programming an LNS Application.
86
LNS Programmer's Guide
 Loading...