

Page 1
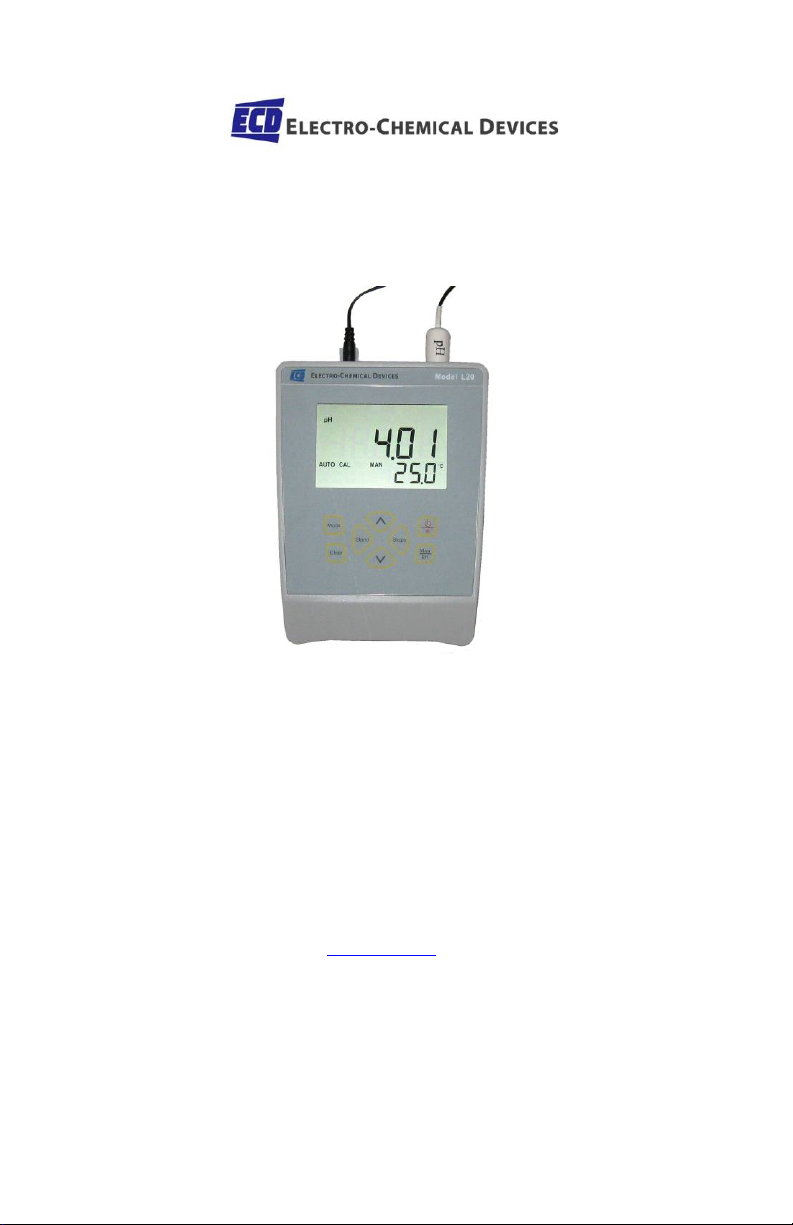
Model L20
Instruction Manual
Microprocessor based
pH, ORP, Temperature
Bench Top Meter
Electro-Chemical Devices, Inc.
1681 Kettering, Irvine, CA 92614 USA
Telephone: +1-949-336-6060
FAX: +1-949-336-6064
www.ecdi.com
Page 2

Contents
General Introduction………………………. 3
Initial Inspection……………………………... 3
Powering the Unit……………………………. 4
Installing the Batteries…………………….. 4
Display and Key Functions……………….. 5
Operational Procedures………………….. 7
Buffer Set Selection………………………… 7
• pH Calibration………………………………. 7
• pH Measurements………………………… 11
• Temperature Measurements……….. 13
• mV Measurements………………………. 13
pH Buffer Tables……………………………. 14
Error Displays & Troubleshooting….. 15
Specifications………………………………… 16
Warranty………………………………………. 18
2
Page 3

General Introduction
Thank you for selecting the Model L20 pH meter. The Model L20 is
a precision tool that measures pH, mV, ORP and temperature. A
built-in microprocessor stores, calculates and compensates for all
parameters related to pH determinations including pH electrode
temperature characteristics, electrode slope deviations and buffer
solutions.
This meter has a waterproof IP54 case. The mechanical keys are
highly reliable with tactile and audio feedback. This meter is
powered by six AAA size alkaline batteries or with a UL approved
AC adapter (Output 9VDC). The meter also displays a “BAT”
message when the batteries are in need of replacement. Recalibration is not required when power is restored.
The front of the meter has a large LCD that displays pH or mV and
temperature simultaneously along with user prompts and mode
indicators. The unit prompts the user through calibration and
measurement procedures.
An AUTOLOCK feature for both pH and mV measurements
enables the unit to automatically sense the end point and “HOLD”
the display to indicate the end point value of a measurement.
AUTOLOCK and user prompts help eliminate most errors in
determining pH and mV values, resulting in precise, repeatable
and error-free measurements. The Model L20 can also be used in
non-AUTOLOCK mode.
The Model L20 is available with pH, ORP and ATC (Automatic
Temperature Compensation) probes. Other features include
single, dual or three point calibration, electrode offset
recognition, electrode slope recognition; electrode efficiency
display, built-in buffer coefficients, automatic or manual
temperature compensation, long battery life, and 50/60Hz AC
noise rejection. This meter is user-friendly, for field, industrial and
laboratory applications.
Initial Inspection
Carefully unpack the unit and accessories. Inspect for damages
made in shipment. If any damage is found, notify your ECD
representative immediately. All packing materials should be saved
until satisfactory operation is confirmed.
3
Page 4

Powering the Unit
The model pH6175 can be powered by an 115V or 230VAC adaptor
as well as 6 “AAA” alkaline batteries. Check the label on the AC 3
adaptor supplied with the instrument to make sure that the AC line
voltage is correct. If the wrong AC adaptor is supplied, notify your
ECD representative immediately.
Installing the Batteries
The Model L20 pH met er is packaged with 6 “AAA” alkaline
batteries required for operation. To insert the batteries into the
meter, follow the procedure outlined below.
1. Use two hands to fl ip the buckles and battery cover to
expose the battery compartment. (Figure 1)
2. Note the polarity and insert the batteries into the battery
compartment correctly.
3. Replace the battery cover.
Figure 1
4
Page 5
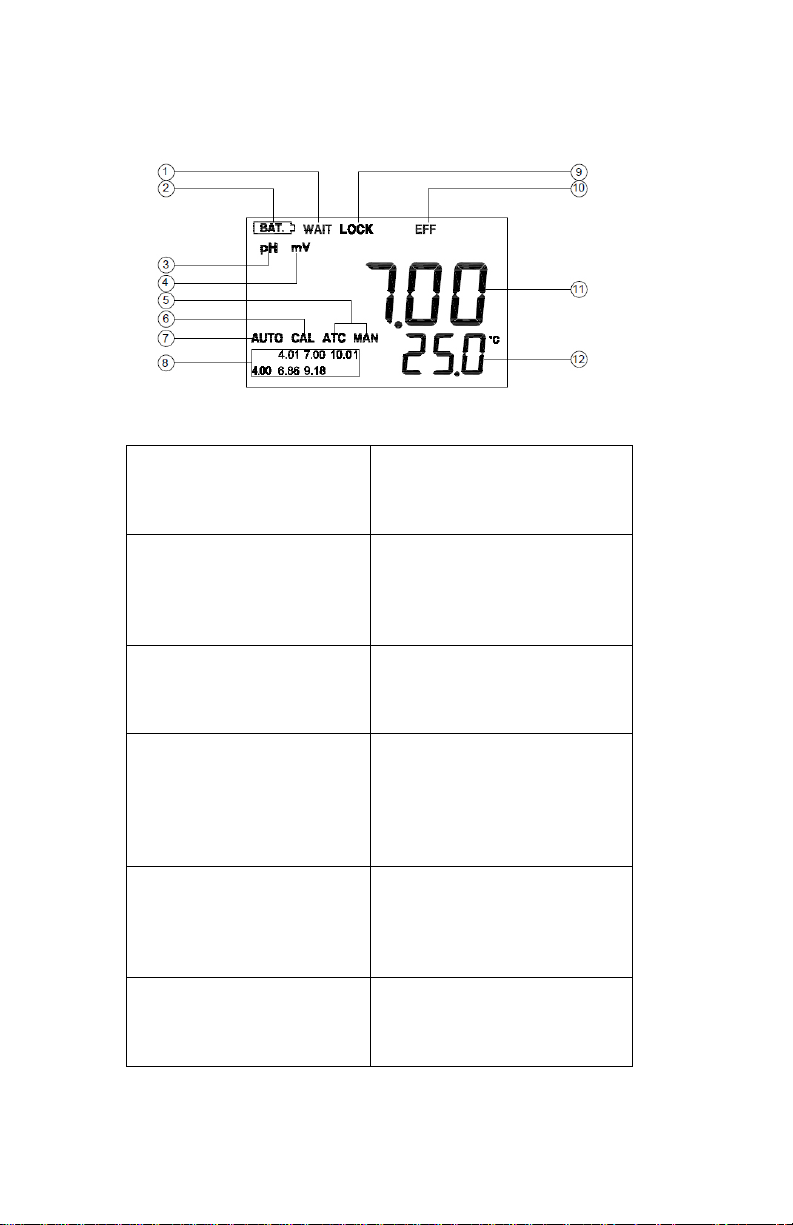
Display and Key Functions
1. WAIT
reading or end point sensing.
7. AUTO-
2. BAT-
8. Buffer Selection
unit has been calibrated.
3. pH
9. LOCK
This will indicate that the reading i
4. mV
10. EFF -
user is
efficiency value is less than 75%.
5. ATC/MAN
indicator will be displayed.
11. Main display
6. CAL
calibration mode
12. Secondary Display
A. Display
Figure 2
This will be displayed when the
unit is still waiting for a stable
Low Battery Indicator
Unit and mode indicators
Unit and mode indicators.
ATC indicator will be displayed
if a temperature probe is
connected otherwise the MAN
This will be displayed when
the unit enters into the
Auto Lock mode indicator.
This indicator will flash if the
unit is not yet calibrated. This
indicator will remain lit-up if the
during AUTOLOCK mode.
This will be displayed if the
viewing the efficiency of the
electrode. It is recommended to
use a new electrode when the
For pH, mV
and probe efficiency values
Temperature and unit display
5
Page 6
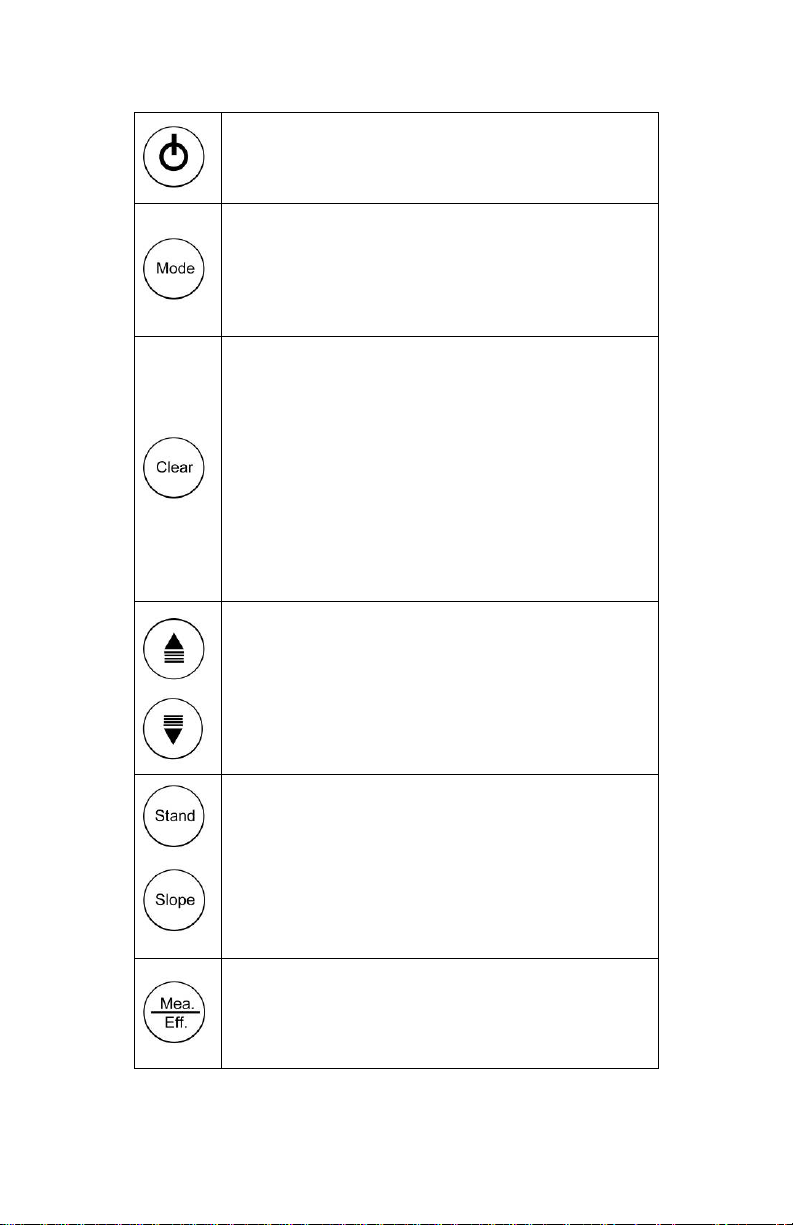
B. Keys
On/Off
Mode-
“Mode” key to exit the two point calibration mode.
Clear-
that the unit must be calibrated.
Mea. / Eff.-
the LCD will display the efficiency of the electrode.
Press and hold this key for 5 seconds to power on and
shut off the meter. Once the unit is power up, press the
same key to turn on or off the backlight.
Selects display mode. Pressing this key changes the
display sequentially to display pH-AUTO, mV-AUTO, pH
and mV. The calibration values will not be affected by
changing the display modes. In “pH calibration”, press
It is used to clear the unit when error signal appears. It
clears all calibration values stored in the internal
memory.
Under normal use the key will not be activated unless
pressed and held for 2 seconds to prevent accidental
erasing stored memory.
When the Clear key is pressed, all segments of the LCD
will be on. After about 2 seconds the unit will enter the
pH-AUTO mode. The “AUTO” and “CAL” will be on and
one of the buffer values will start to flash. This means
Up/Down-
Increases or decreases the displayed temperature value
when in manual mode, buttons have no effect when in
ATC mode.
Stand/Slope-
The Stand and Slope keys are used for dual or three
point pH calibration of the unit. Pressing and holding
the Stand key while turning on the power, will change
the buffer set to the other available buffer set.
The key is used to bring the unit out of the AUTOLOCK
condition when operating in the pH-AUTOLOCK or mVAUTOLOCK mode. Press and hold this key for 5 seconds,
6
Page 7

Operational Procedures
A. Buffer Set Selection
The Model L20 meter has two buffer sets: 7.00, 4.01, 10.01pH and
6.86, 4.00, 9.18 pH. The meter is factory pre-set at 7.00, 4.01 and
10.01 pH. To change the buffer set, turn off the unit, then press and
hold the “Stand” key while turning on the unit again.
[Note: There is no need to repeat this procedure every time the unit
is power up unless one decides to change the buffer settings.]
B. pH Calibration
The Model L20 uses 2-point or 3-point calibration. The first point
must be 6.86/7.00, and the second point can either be 4.00/4.01 or
9.18 / 10.01.
Calibration with an ATC/Temp probe in the pHAUTOLOCK mode
1. Turn the unit on. Press “Clear” key for 2 seconds, all LCD
elements will light up. The meter clears all calibration
values stored in internal memory.
2. Connect the pH electrode to the BNC connector and the
ATC/Temp probe to the ATC/Temp connector of the unit:
“ATC” icon will light up. “pH” icon and “AUTO” icon light
up. The buffer set icon will flash.
3. Rinse the pH and ATC/Temp probes in distilled water and
immerse them in the first buffer solution (either 7.00 or
6.86). Allow temperature reading to stabilize, then press
and hold “Stand” key for 5 seconds to calibrate. The
“WAIT” icon will flash until the unit detects a stable
reading. Once the unit calibrates the first point, the
selected buffer remains lit up while the remaining two
buffers start to flash. The unit is ready to be sloped at the
second buffer.
[Note: If the first buffer solution is 7.00 or 6.86, at this
moment, press the “Mode” key. The unit will exit the
calibration mode. Single point calibration is complete. If
the first buffer solution is 4.00, 4.01, 9.18 or 10.00, at this
moment, the unit will automatically exit the calibration
mode. Single point calibration is complete.]
7
Page 8

4. Rinse the pH and ATC/Temp probe in distilled water and
immerse them in the second buffer solution (either
4.00/4.01 or 9.18/10.01). Allow temperature reading to
stabilize, then press “Slope” key to calibrate. The “WAIT”
icon will flash until the unit detects a stable reading. Once
the unit calibrates the second point, the “SLOPE” icon will
flash. The unit is ready to be sloped at the third buffer.
[Note: At this moment, press the “Mode” key, to exit the
calibration mode. Dual point calibration is complete.]
5. Rinse the pH and ATC/Temp probe in distilled water and
immerse them in the third buffer solution (either
9.18/10.01 or 4.00/4.01). Allow temperature reading to
stabilize, then press “Slope” key to calibrate. The “WAIT”
icon will flash until the unit detects a stable reading. Once
the unit calibrates the third point and the unit will
automatically exit the calibration mode. The three point
calibration is complete.
6. The unit calculates and compensates for the pH electrode
slope deviation corresponding to the values of the three
calibration buffers. After calibration, press and hold
“Mea./Eff.” key for about 5 seconds to display the new
electrode efficiency.
Calibration with manual temperature compensation in
the pH-AUTOLOCK mode
1. Turn the unit on. Press “Clear” key for 2 seconds, all LCD
elements will light up. The meter clears all calibration
values stored in internal memory.
2. Connect the pH electrode to the BNC connector of the
unit, “MAN” icon will light up. “pH” icon and “AUTO” icon
light up. The buffer set icon will flash.
3. Rinse the pH probes in distilled water and immerse it in
the first buffer solution (either 7.00 or 6.86). Adjust the
temperature reading to that of the first buffer using the up
or down keys (0.0 to 60.0℃) before pressing the “Stand”
key. Then press and hold the “Stand” key for 5 seconds to
calibrate. The “WAIT” icon will flash until the unit detects a
stable reading. Once the unit calibrates the first point, the
selected buffer remains lit up while the remaining two
8
Page 9

buffers start to flash. The unit is ready to be sloped at the
second buffer.
4. Rinse the pH probe in distilled water and immerse it in the
second buffer solution (either 4.00/4.01 or 9.18/10.01),
then press “Slope” key to calibrate. The “WAIT” icon will
flash until the unit detects a stable reading. Once the unit
calibrates the second point, the “SLOPE” icon will flash.
The unit is ready to be sloped at the third buffer.
[Note: At this moment, press the “Mode” key, to exit the
calibration mode. Dual point calibration is complete.]
5. Rinse the pH probe in distilled water and immerse it in the
third buffer solution (either 9.18/10.01 or 4.00/4.01), then
press “Slope” key to calibrate. The “WAIT” icon will flash
until the unit detects a stable reading. Once the unit
calibrates the third point and the unit will automatically
exit the calibration mode. The three point calibration is
complete.
6. The unit calculates and compensates for the pH electrode
slope deviation corresponding to the values of the three
calibration buffers. After calibration, press and hold
“Mea./Eff.” key for about 5 seconds to display the new
electrode efficiency.
Calibration with an ATC/Temp probe in the pH NONAUTOLOCK mode
1. Turn the unit on. Press “Clear” key for 2 seconds, all LCD
elements will light up. The meter clears all calibration
values stored in internal memory.
2. Connect the pH electrode to the BNC connector and the
ATC/Temp probe to the ATC/Temp connector of the unit:
“ATC” icon will light up. “pH” icon is on. The buffer set icon
will flash.
3. Rinse the pH and ATC/Temp probes in distilled water and
immerse them in the first buffer solution (either 7.00 or
6.86). Allow temperature reading to stabilize, then press
and hold “Stand” key for 5 seconds to calibrate. Once the
unit calibrates the first point, the selected buffer remains
lit up while the remaining two buffers start to flash. The
unit is ready to be sloped at the second buffer.
9
Page 10

4. Rinse the pH and ATC/Temp probe in distilled water and
immerse them in the second buffer solution (either
4.00/4.01 or 9.18/10.01). Allow temperature reading to
stabilize, then press “Slope” key to calibrate. Once the unit
calibrates the second point, the “SLOPE” icon will flash.
The unit is ready to be sloped at the third buffer. [Note: At
this moment, press the “Mode” key, to exit the calibration
mode. Dual point calibration is complete.]
5. Rinse the pH and ATC/Temp probe in distilled water and
immerse them in the third buffer solution (either
9.18/10.01 or 4.00/4.01). Allow temperature reading to
stabilize, then press “Slope” key to calibrate. Once the unit
calibrates the third point and the unit will automatically
exit the calibration mode. The three point calibration is
complete.
6. The unit calculates and compensates for the pH electrode
slope deviation corresponding to the values of the three
calibration buffers. After calibration, press and hold
“Mea./Eff.” key for about 5 seconds to display the new
electrode efficiency.
Calibration with manual temperature compensation in
the pH NON-AUTOLOCK mode
1. Turn the unit on. Press “Clear” key for 2 seconds, all LCD
elements will light up. The meter clears all calibration
values stored in internal memory.
2. Connect the pH electrode to the BNC connector of the
unit, “MAN” icon will light up. Press “Mode” key until “pH”
icon is on. The buffer set icon will flash
3. Rinse the pH probes in distilled water and immerse it in
the first buffer solution (either 7.00 or 6.86). Adjust the
temperature reading to that of the first buffer using the up
or down keys (0.0 to 60.0℃) before pressing “Stand” key.
Then press and hold “Stand” key for 5 seconds to calibrate.
Once the unit calibrates the first point, the selected buffer
remains lit up while the remaining two buffers start to
flash. The unit is ready to be sloped at the second buffer
4. Rinse the pH probe in distilled water and immerse it in the
second buffer solution (either 4.00/4.01 or 9.18/10.01),
10
Page 11

then press “Slope” key to calibrate. Once the unit
calibrates the second point, the “SLOPE” icon will flash.
The unit is ready to be sloped at the third buffer.
[Note: At this moment, press the “Mode” key, to exit the
calibration mode. Dual point calibration is complete.]
5. Rinse the pH probe in distilled water and immerse it in the
third buffer solution (either 9.18/10.01 or 4.00/4.01), then
press “Slope” key to calibrate. Once the unit calibrates the
third point and the unit will automatically exit the
calibration mode. The three point calibration is complete.
6. The unit calculates and compensates for the pH electrode
slope deviation corresponding to the values of the three
calibration buffers. After calibration, press and hold
“Mea./Eff.” key for about 5 seconds to display the new
electrode efficiency.
[Note: For accurate measurements, it is recommended
that pH calibration is preformed once a week and after
replacing the electrode.]
C. pH Measurements
To take pH measurements, the pre-selected buffer solution set must
lit up, indicating the unit is Single point or dual-point or three-point
calibrated and ready for measurements. If buffer solution set
flashes, perform a pH calibration before taking measurements.
Measurement with an ATC/Temp probe in the pH
AUTOLOCK mode
1. Connect the pH electrode to the BNC connector and the
ATC/Temp probe to the ATC/Temp connector of the unit.
The “ATC” icon will light up.
2. Press “Mode” key until “pH” icon and “AUTO” icon light
up.
3. Rinse the pH electrode and ATC/temp probe with distilled
water and immerse in the sample to be measured.
Remove any air bubbles trapped around the probe by
shaking or stirring the probe.
4. Press the “Mea.” key. The “WAIT” icon will start flashing.
The unit is waiting for a stable reading. The display will
11
Page 12

track the pH value as sensed by the pH electrode and the
ATC/Temp probe.
5. When the “WAIT” icon disappears, the reading is then
“LOCK” and will not respond to further changes from the
sample. The pH value shown is the pH value of the sample
at the displayed sample temperature.
[Note: For samples that are inherently unstable, the unit will not
AUTOLOCK. In these cases, use the pH NON- AUTOLOCK mode for
measurements.]
Measurement with manual temperature compensation
in the pH-AUTOLOCK mode
1. Connect the pH electrode to the BNC connector of the
unit. The “MAN” icon will lit up. Set unit to display the
sample temperature by pressing the up and down keys (-
10.0 to 120.0℃).
2. Press “Mode” key until “pH” icon and “AUTO” icon light
up.
3. Rinse the pH electrode probe with distilled water and
immerse in the sample to be measured. Remove any air
bubbles trapped around the probe by shaking or stirring
the probe.
4. Press the “Mea.” key. The “WAIT” icon will start flashing.
The unit is waiting for a stable reading. The display will
track the pH value as sensed by the pH electrode probe.
5. When the “WAIT” icon disappears, the reading is then
“LOCK” and will not respond to further changes from
sample. The pH value shown is the pH value of the sample
at the set sample temperature.
[Note: For samples that are inherently unstable, the
instrument will not AUTOLOCK. In this case, use the pH
NON- AUTOLOCK mode for measurements.]
Measurement with an ATC/Temp probe in the pH NONAUTOLOCK mode
1. Connect the pH electrode to the BNC connector and the
ATC/Temp probe to the ATC/Temp connector of the unit.
The “ATC” icon will light up.
2. Press “Mode” key until “pH” icon light up.
12
Page 13

3. Rinse the pH electrode and ATC/temp probe with distilled
water and immerse in the sample to be measured.
4. Allow sufficient time for the display to stabilize. The
instrument will display the pH value of the sample at the
displayed sample temperature.
Measurement with manual temperature compensation
in the pH NON-AUTOLOCK mode
1. Connect the pH electrode to the BNC connector of the
unit. The “MAN” icon will light up.
2. Press “Mode” key until “pH” icon light up.
3. Rinse the pH electrode probe with distilled water and
immerse in the sample to be measured.
4. Allow sufficient time for the display to stabilize. The
instrument will display the pH value of the sample at the
set sample temperature.
D. Temperature Measure
The pH6810 can measure temperature independently with the
ATC/temp probe without using the pH electrode. Place the
ATC/temp probe in the sample. The unit will display the measured
temperature.
E. mV Measurements
Measurement in the mV-AUTOLOCK mode
1. Connect the optional combination ORP electrode to the
BNC connector of the unit.
2. Press “Mode” key until “mV” icon and “AUTO” icon lit up.
3. Rinse electrode with distilled water and immerse it in
sample to be measured.
4. Press the “Mea.” key. The “WAIT” icon will start flashing.
The unit is waiting for a stable reading. The display will
track the mV value as sensed by the ORP electrode
5. When the “WAIT” icon disappears, the reading is then
“LOCK” and will not respond to further changes from the
sample. The mV value is the sample reading.
13
Page 14

[Note: For samples that are inherently unstable, the unit will not
°C
4.00
6.86
9.18
4.01
7.00
10.01
0
4.01
6.98
9.46
4.01
7.11
10.32
5
4.00
6.95
9.39
4.01
7.08
10.25
10
4.00
6.92
9.33
4.00
7.06
10.18
15
4.00
6.90
9.28
4.00
7.03
10.12
20
4.00
6.88
9.23
4.00
7.01
10.06
25
4.00
6.86
9.18
4.01
7.00
10.01
30
4.01
6.85
9.14
4.01
6.98
9.97
35
4.02
6.84
9.10
4.02
6.98
9.93
40
4.03
6.84
9.07
4.03
6.97
9.89
45
4.04
6.83
9.04
4.04
6.97
9.86
50
4.06
6.83
9.02
4.06
6.97
9.83
55
4.07
6.83
8.99
4.08
6.97
9.80
60
4.09
6.84
8.97
4.10
6.98
9.78
AUTOLOCK. In this case, use the pH NON- AUTOLOCK mode for
measurements.]
Measurement in the mV NON-AUTOLOCK mode
1. Connect the optional combination ORP electrode to the
BNC connector of the unit.
2. Press “Mode” key until “mV” icon light up.
3. Rinse electrode with distilled water and immerse it in
sample to be measured.
4. Allow sufficient time for the display to stabilize. The
instrument will display the mV value of the sample.
pH Calibration Buffer Table
The temperature coefficient of pH calibration buffers 4.01, 6.86,
7.00, 9.18 and 10.01 are stored inside the instrument. The buffers
used to calibrate the instrument must exhibit the same temperature
characteristics as the stored values.
Temperature coefficient of the pH buffers
14
Page 15

Error Displays and troubleshooting
●
●
●
●Press “Clear” key, allow
●Replace electrode.
●
●
●
●Allow sufficient time for the
meter.
Temperature is out of t
0.0 to 60.0°C range.
●Measured pH is out of the
●
●
out
range.
●Bring sample pH into the
●
●
range.
Main
Display
“Er1”
“Er2”
“Er3”
“Over”
Or
“Undr”
Possible Causes
“Stand” was pressed before
the electrode and ATC/Temp
probe settled to within +/-
1.5 pH of the buffer value.
pH electrode offset is greater
/ less than +/-1.5 pH.
pH electrode is faulty.
“Slope” was pressed before
the electrode and
ATC/Temp probe settled to
within 30% of the buffer
value.
Buffer 4.00, 4.01, 9.18 and
10.01 is not correct.
pH electrode slope is off by
more than 30% of ideal
slope.
he
2.00 to 16.00 pH range.
Measured mV is out of the
1999 to 1999 mV range.
Measured temperature is
of the –10.0 to 120.0°C
Corrective
Actions
sufficient time for the
electrode and ATC/Temp
probe to stabilize, re-press
“Stand” key to start the
calibration procedure.
●Replace the buffer and /or
the pH electrode. Press
“Clear” key to recalibrate
meter.
electrode and ATC/Temp
probe to stabilize, re-press
“Slope” key to continue the
calibration procedure.
●Check if the correct buffer is
used.
●Replace the buffer and /or
the pH electrode. Press
“Clear” key to recalibrate
Bring the buffer temperature
within range.
correct measuring range.
Bring sample ORP into the
correct measuring range.
Bring sample temperature
correct measuring
into the
15
Page 16

Specifications
Display
Range
Resolution
Accuracy
pH
-2.00 to 16.00 pH
0.01 pH
0.1% FS
mV
-1999 to 1999 mV
1 mV
0.1% FS
Temperature
0.0 to 100.0 °C
0.1 °C
0.5 °C
pH 7.00, 4.01, 10.01 or pH 6.86, 4.00,
9.18
±
±
±
pH buffer recognition
pH Temperature compensation AUTO/MAN –10.0°C to 120.0 °C
pH Buffer Temperature range 0°C to 60.0°C
pH Electrode Offset recognition ±90 mV at pH 7.00 or 6.86
pH Electrode Slope recognition ±30% at pH 4.00, 4.01, 9.18 and 10.01
Input Impedance 1012 ohms
Power
Battery Life ~1000 hours
Calibration Back-up EEPROM
Audio Feedback All Touch Keys
Display 11mm : 7mm high LCD
Ambient Temperature 0 to 50 °C
Relative Humidity up to 90%
Case IP67 watertight case
Dimensions 75mm x 157mm x 35mm
Weight 230 grams(Batteries included)
Four “AAA” Batteries
16
Page 17

17
Page 18

Warranty
Electro-Chemical Devices, Inc. (ECD) warrants all products it
manufactures to be free from defect in materials and factory
workmanship, and agrees to repair or replace any product that fails
to perform, as specified, within one (1) year after date of shipment.
This warranty shall not apply to any product that has been:
1. Subjected to misuse, negligence or accident;
2. Connected, installed, adjusted or otherwise used not in
accordance with the instructions furnished by ECD;
3. Repaired, modified or altered by persons not authorized
by ECD, resulting in injury to the performance, stability or
reliability of the product.
This warranty is in lieu of any other warranty, expressed or implied.
ECD reserves the right to make changes in the design or construction
of its products at any time, without prior notification, and without
incurring any obligation to make any changes in previously delivered
products.
Seller’s sole liabilities and the buyer’s sole remedies under this
agreement shall be limited to a refund in the purchase price, or at
ECD’s discretion, to the repair or replacement of any product that
proves, upon ECD’s examination, to be defective, when returned to
the factory, transportation prepaid by the buyer, within one (1) year
of the product’s original shipment date. Seller shall not be liable for
damages consequential or incidental to defects in any product, for
failure of delivery in whole or in part, for injuries resulting from its
use, or for any other cause.
This warranty and the writing attached constitute the full
understanding of seller and the buyer, and no terms, conditions,
understanding, or agreement purporting to modify or vary the terms
hereof shall be binding unless hereafter made in writing and signed
by an authorized official of Electro-Chemical Devices, Inc.
This warranty does not cover pH, ORP or Specific Ion measurement,
reference or combination electrodes or electrode cartridges that
have been commissioned in service.
If service or repair is required, please obtain the serial number(s) or
sales order number of the product(s) in question and contact ECD’s
Service Department at: +1-800-729-1333 (USA/Canada) or +1-949336-6060
18 19
Page 19

Page 20

1681 Kettering, Irvine, CA USA
Phone +1 949 336-6060 FAX +1 949 336-6064
www.ecdi.com
20
 Loading...