


L10 Liter Outdoor
Tankless Water Heater
EccoTemp Systems, LLC
Volume EU1, Issue 1
THE FUTURE OF EFFICIENCY 10 LITER OUTDOOR MOUNT LIQUID PROPANE WATER HEATER
Table of Contents |
|
Use and Care Introduction ............................................................. |
3 |
WARNINGS ................................................................................... |
4 |
The Purpose and Benefits of the L10 ............................................ |
7 |
Functions and Features ................................................................. |
8 |
Getting Started ............................................................................. |
10 |
Installation/Use ............................................................................ |
12 |
Adjustment…………………………………………………………….14 |
|
Troubleshooting……………………………………………………... |
16 |
Additional Products ...................................................................... |
20 |
This water heater complies with Gas Appliance Directive
2009/142/EC (ex-90/396/EEC)

Use & Care Manual – L10
The purpose of this manual is twofold; one, to provide the installer with the basic directions and recommendations for the proper installation and adjustment of the water heater, and two, to the owner operator, to explain the features, operation, safety precautions, maintenance and troubleshooting of the water heater. This manual also includes a parts list.
It is imperative that all persons who are expected to install, operate, or adjust this water heater read the instructions carefully so they may understand how to perform these functions. If you do not understand these instructions or any terms within, seek professional advice.
Any questions regarding the operation, maintenance service or warranty of this water heater should be directed to Eccotemp Systems, LLC or one of its International Distributors directly.
North America: Eccotemp Systems, LLC, 866.356.1992 Toll Free or support@eccotemp.com
UK: Abbas Cabins, LTD, +44 01202 5900008, abbascabins@eccotemp.com
Netherlands/Germany: KIIP, +0031 229582915, kiip@eccotemp.com
Do not destroy this manual. Please read carefully and keep in a safe place for future reference.
California Proposition 65 Warning: This product contains chemicals known to the State of California to cause cancer, birth defects, or other reproduction harm.
WARNING: If the information in these instructions is not followed exactly, a fire or explosion may result causing property damage, personal injury or death.
3

4

DANGER!
NATURAL GAS AND LIQUIEFIED PRETROLEUM MODELS
Both LP and natural gas have an odorant added to aid in the detecting a gas leak. Some people may not physically be able to smell or recognize this odorant. If you are unsure or unfamiliar with the smell of LP or NG, ask the gas supplier. Other conditions such as “odorant fade”, which causes the odorant to diminish in intensity, can also hide or camouflage a gas leak.
Water heaters utilizing LP gas are different from natural gas models. A natural gas water heater will not function safely on LP gas and vice versa
No attempt should ever be made to convert the water heater from NG to LP gas. To avoid possible equipment damage, personal injury, or fire, do not connect the water heater to a fuel type not in accordance with the data plate.
LP gas must be used with great caution. It is heavier than air and will collect first in lower areas making it hard to detect at nose level.
Before attempting to light the water heater, make sure to look and smell for gas leaks. Use a soapy solution to check all gas fittings and connections. Bubbling at a connection indicates a leak that must be corrected. When smelling to detect a gas leak, be sure to sniff near the floor also.
Gas detectors are recommended in LP and NG applications and their installation should be in accordance with the detector manufacturer’s recommendations and/or local laws, rules, regulations or customs.
5
ADDITIONAL WARNINGS
1.Do not leave unattended
2.The exhaust gas and top of the unit is HOT! Do not place hands or any foreign object near the top of the heater.
3.Do not use in high wind conditions
4.If the smell of gas is detected, turn off the gas valve at the tank immediately! Do not use flame for leak detection.
5.Use only Liquid Propane
6.Use only outdoors
7.Do not over tighten the gas regulator connection to the unit with a wrench. This may cause a crack in the gas regulator.
6
The Purpose and Benefits the L10
The EccoTemp L-10 is a liquid propane fired water heater capable of delivering 2 to 2.65 gallons (up to 10 liters) of hot water almost anywhere. The unit has standard 1/2“NPT (BSP for European models) pipe fittings and an adapter for using a standard garden hose for inlet water supply (North American models).
The L10 is not a toy. People around the world use similar units to heat the water in their homes, safely, and reliably.
Gas is supplied from a standard propane cylinder (not included) such as used with outdoor grills. A regulator with hose is furnished with the heater.
You may also plumb it in to existing water lines and using a low pressure LP gas regulator. Check local codes for proper installation.
The unit includes a stainless steel rain cap that is to help venting of the flue gases as well as protect it for outdoor usage.
Ignition is automatic and powered by 2 “D” cell batteries (not included). Burners come on when water flows, and off when the water is shut off. No pilot light!
7
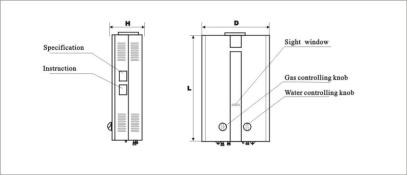
Functions and Features
Water controlled automatic ignition: Water pressure between 20-80 PSI /1.38-5.5 bar opens the ignition circuit for easy and convenient operation
Auto-cut-off protection: The auto-cut-off protection will shut the gas supply off immediately in the event of flameout to reduce the risk of gas leakage. There is also an automatic shut-off timer after 20 minutes of continuous use (North American models only)
Energy savings: EF of 85%
Removable drain valve to avoid water pipe and regulator damage caused by freezing water*
Anti-dry combustion protection: The unit will shut off the gas supply in the event water stops flowing through the unit
*Read the maintenance section on draining the unit entirely to avoid freeze issues.
8

Construction and Name of Parts for the L10 Flue Duct System
9
Getting Started
1.Check box for damage. Damages caused in shipment must be reported immediately.
2.Make sure you have all the parts:
a.Water heater
b.LP gas regulator and hose
c.Rain cap
d.½” NPT to garden hose adapter (North American models)
e.Hardware pack
3.Install the rain cap to the top of the flue vent. The rain cap should fit securely. It is recommended that a beaded layer of high temperature sealant is used around the perimeter of the seal between the rain cap and the flue vent.
4.If using a standard garden hose, attach the ½” NPT to garden hose adapter to the fitting marked with the blue arrow (far right connection) on North American models only. For European models, attached your water source hose to the far right connection. Use “Teflon” tape or other approved sealing method on the threads for a secure, water tight fit. Check to make sure the screen inside the water inlet is in place and clean. Then attach your water input/garden hose.
5.Install gas supply line and regulator to the unit. DO NOT
OVER TIGHTEN. OVER TIGHTING MAY CRACK THE GAS REGULATOR CAUSING A GAS LEAK! Check for
10
any gas smell before ignition! Make sure it is screwed all the way on. For European models, ensure that the black rubber washer is securely in the gas input connection.
6.Attach your water output apparatus to the fitting marked “Water Outlet”. Do not over tighten! If installing in an existing water system, connect the hot water line directly to the ½” NPT/BSP fitting.
7.Install two “D” cell batteries in the compartment on the bottom left of the heater. Check that batteries are facing the correct direction.
8.Use the top tab on the unit to suspend from a screw adequate to holding 30 pounds/13 KG. Place at a comfortable height without putting stress on the gas hose. If the unit is to be permanently mounted, use screws to attach the bottom tab firmly.
9.Attach gas regulator with hose to the LP tank. Use hand pressure only on the plastic connector. LEAVE GAS
TANK VALVE IN THE “OFF” POSITION”.
11
Before going to the USE section:
Check around area for flammables, especially gasoline or other vapors which may ignite. The exhaust and top of the unit will get HOT! Make sure there are no foreign objects around the unit or have fallen into the top.
Use and Starting
1.Turn on incoming water supply. Ensure that you have adequate water pressure of between 20-80 PSI /1.38- 5.5 bar.
2.Turn your water output device to its “off” position.
3.Turn the gas valve on the cylinder all the way open.
4.IF THE SMELL OF GAS IS DETECTED, TURN OFF THE GAS VALVE IMMEDIATELY!!!!
5.Set the water regulator knob on the face of the unit to its highest setting.
6.Set the gas regulator knob on the face of the unit to its minimum setting.
7.Turn on your water output device to the “on” position and adjust to the desired water flow.
8.There will be a series of audible clicks and the burner will ignite. (Should the burner not ignite after 5 seconds, shut off and go to the “Trouble Shooting” section.
12
9.Upon completion of use or storage, open the drain valve (ribbed cylindrical stem next to the water input valve) to ensure draining of water.
10.Turn off your gas supply.
11.WARNING: If the outside temperature is around or below freezing (32 degrees F, 0 degrees C), ensure that the drain valve is opened and water drained from the unit after each use to avoid internal damage to the water regulator. You will also need to unhook the outgoing water line to ensure that any water in the heat exchanger is drained. Failure to properly drain your unit will cause water damage which may or may not be reparable. Please check the warranty information found on our website at www.eccotemp.com/freeze for more information on freezing issues.
13
ADJUSTMENT
The temperature of the outgoing water is dependent on the temperature of the incoming water balanced with the amount of heat applied. Use extreme caution in setting the outlet water temperature.
1.With the water regulator set to high, and the gas regulator set to low, feel the outgoing water. This is the lowest setting available.
2.To initially raise the outgoing temperature, slowly turn the gas valve towards maximum. Adjust slowly and check the temperature often. There will be a slight delay between increasing the gas supply and the increase in water temperature.
3.Should the outlet water temperature need to be higher, slowly reduce the water flow regulator until desired temperature is reached.
WARNING:
THE UNIT IS CAPABLE OF PRODUCING SCALDING WATER TEMPERATURES!
14

15
DO NOT RETURN TO STORE:
Call Eccotemp or one of its International Distributors directly found on page 1 if you encounter a problem!
TROUBLE SHOOTING
Unit will not start – there are no audible clicks at startup:
a.The first thing to check is to ensure that the incoming water on the "right" side of the unit. If the incoming and outgoing are reversed, the unit will not work. The incoming is on the far right and the outgoing is in the middle.
b.Check to make sure you have fresh batteries and they are installed in the correct position
c.Number one reason that the unit does not ignite is that there is not enough water pressure. You need a minimum of 20 PSI/1.38 bar, sustained. Municipal water should supply enough water pressure. Most 12/18/120/240 pumps well as long as they are capable of delivering pressure of 30 PSI / 2 bar or greater.
ADJUSTMENT: Looking up at the bottom of the unit, you will see two “slits” in the case where the front and back come together. Locate the water regulator where you will see two Philip head screws. Take the screw that is furthest on the right (larger screw) in about a ¼ or ½ turn. This will enable the unit to operate on a lower water pressure by restricting flow.
16
NOTE: Before attempting to remove the cover, call technical support found on page 1
e.A wire has become disconnected inside the unit during shipping. Make sure the gas is OFF. The front cover is held by six screws, four on top, two on bottom. The knobs pull off. All the wiring is done with push together plastic connectors. They are all visible without further dismantling of the unit. It should be obvious when a wire has become disconnected.
f.It is possible that some debris or epoxy might have entered the water regulator. Check to see if the filter screen on the water inlet is clear of debris. You can also reverse the hookup by taking your water source and hooking it up to the water outlet side and back
flushing the system.
g. Propane gas cylinders sometimes are contaminated with air, especially new tanks upon their first filling. Cycle the unit on and off by using the shower head switch several times (5) to purge the air from the gas.
Should a unit fail to light or stay lit after 10 cycles, Call technical support found on page 1
Units starts, then shuts off:
a.The unit requires a minimum of about 0.5 gallons per minute (2 liters) and a minimum of about 20 PSI / 1.38 bar* Note, water pressure is at the lower end of operating parameters. You will need a sustained water pressure of approximately 40-60 PSI / 2.7- 4.1 bar for adequate use if you are using a 12/18/120/240 volt pump. See ADJUSTMENT in previous section above.
b.High wind
c.Out of, or low on gas. Propane gas cylinders sometimes are contaminated with air, especially new tanks upon their first filling. Cycle the unit on and off by using the shower head switch several times (5) to purge the air from the gas.
17
If this doesn't clear the air then the tank must be purged.
d.One of the ignition sensors is bent and/or too close to the burner. Look to ensure that the ignition pins and the heat sensor are completely vertical and they do a 90 degree to the back of the box. If they are not straight (i.e. a 45 degree angle) then you can straighten them with pliers.
e.The thermocouple is either too high or too low to complete the circuit. Check to ensure that the thermocouple is flush with the hole in the heat exchanger.
f.The gas sensor wire (looks like a black ground wire on the gas regulator) flange might have come loose or is no longer connected.
g.There is a faulty heat or oxygen sensor. This is usually diagnosed by taking the front case off of the unit and let it run. If it continues to operate, then one of the sensors and/or the wire harness needs to be replaced. This may also be caused by insufficient clearance on the back of the unit where the majority of air intake is.
h. The valve on the propane tank should be all the way “Open”.
i.. Fresh batteries are required for ignition spark. Make sure batteries are aligned in the proper polarity (+/-).
The water does not get hot enough:
a.You are operating the unit above 6,000 feet / 1820 meters. While it has been field tested up to 7,200 feet / 2195 meters, we only recommend using it below elevations of 6,000 feet / 1820 meters.
b.Look into the viewer panes (middle horizontal windows on the front cover) to see if there is a blue flame. If the flame is yellow there could be a cracked gas regulator. Do Not Attempt to use the unit and call Eccotemp directly.
18
Water is flowing, but there is no hot water coming out:
a.Ensure that you have the incoming water supply and the outgoing water supply hooked up properly. Your water supply should be attached to your incoming connection (located on the far right) and the shower head should be attached to the outgoing water (located as the center connection)
b.Ensure that you have adequate water pressure of at least 20 PSI / 1.38 bar, sustained.
c.Ensure that you have adequate gas in your propane bottle and that the LP regulator is threaded all of the way on to the unit.
d.Fresh batteries are required for ignition spark. Make sure batteries are aligned in the proper polarity (+/-)
If you are still having troubles or are on a modified water system, please call technical support at found on page 1
The unit does nothing:
a. Ensure that you have your water source hooked up to the water inlet side (far right connection) and the shower handle is hooked up on the water outlet side (far right connection)
b.Ensure that you have an adequate supply of propane
c.Ensure that you have fresh batteries
If you are still having troubles or are on a modified water system, please call technical support at found on page 1
19

Other Products:
L5: The L5 is the smaller sister unit of the L10. This top vented outdoor unit delivers up to 1.4 GPM and temperatures up to 150 degrees F. An ideal choice for portable hot water applications.
40-H: Outdoor mount LP or NG whole house water heater. GAMA rated at 6.3 GPM, it is the ideal choice for a standard 3 bedroom, 2-2.5 bath home. Outdoor mount means no additional vent piping to purchase.
40-HI: Indoor mount LP or NG whole house water heater. The indoor version of the 40-H, it is an ideal choice for a standard 3 bedroom, 2-2.5 bath home. Indoor installation makes it a convenient choice for a retrofit on your old, inefficient storage tank heater.
FVI12: Indoor mount LP or NG, this sleek and modern designed water heater is great for one bath homes, cottages, and barns. 120 volt electronic ignition and power vent, it comes with a horizontal vent kit for quick and seamless installation.
20
Visit us on the web www.eccotemp.com Call us (866) 356.1992
Fax us at (843) 875.4230
Email us at info@eccotemp.com
International Distributors
United Kingdom: Abbas Cabins
+44 01202 590008 Phone
+44 01202 331963 Fax abbascabins@eccotemp.com
Germany/Netherlands: KIIP
+0031 229582915 Phone kiip@eccotemp.com
EccoTemp
Systems, LLC
315-A Industrial Road
Summerville, SC 29483
Phone (866) 356.1992 www.eccotemp.com info@eccotemp.com
21

Chauffe-Eau 
Sans Réservoir L-10
EccoTemp Systems, LLC
Volume EU1, 1 Publication
LE FUTURE DE L'EFFICACITÉ
CHAUFFE-EAU EXTÉRIEUR DE 10 LITRES AU PROPANE
22
Table des Matières |
|
Introduction à l'Utilisation et à l'Entretien |
.......................................3 |
AVERTISSEMENTS ...................................................................... |
4 |
Utilité et Bénéfices du L-10 ............................................................ |
7 |
Fonctions et Caractéristiques ........................................................ |
8 |
Démarrage ................................................................................... |
10 |
Installation/Utilisation ................................................................... |
12 |
Ajustements…………………………………………………………..14 |
|
Résolution des Problèmes…………….…………………………... 16 |
|
Produits Additionnels ................................................................... |
20 |
Manuel d’Utilisation et d’Entretien – L10
Le but de ce manuel est double; premièrement, de fournir à l'utilisateur les directions et recommandations de bases pour l'installation adéquate et ajustements du chauffe-eau, et deuxièmement, d'expliquer au propriétaire et opérateur, les fonctions, l'opération, précautions de sécurité, entretien et résolution des problèmes du chauffe-eau. Ce manuel contient aussi une liste des pièces.
Il est impératif que toute personne se préparant à installer, faire fonctionner, ou à ajuster ce chauffe-eau lise les instructions attentivement pour qu'elle puisse comprendre comment exécuter ces fonctions. Si vous ne comprenez pas ces instructions ou quelconques termes ci-contre, ayez recours aux conseils d'un professionnel.
Toutes questions concernant l'opération, les services d'entretien ou la garantie de ce chauffe-eau devrait être adressées à Eccotemp Systems, LLC directement en appelant sans-frais au 866.356.1992 ou via courriel au info@eccotemp.com.
Ne pas détruire ce manuel. Veuillez le lire attentivement et le conserver en lieu sûr pour référence future.
!Avertissement de Californie, Proposition 65 : Ce produit
contient des produits chimiques reconnus par l'État de la Californie comme étant cancérigènes, causant des anomalies et nuisances à la naissance.
AVERTISSEMENT : Si l'information contenue dans ces instructions n'est pas suivie exactement, un feu ou une explosion pourrait en résulter, causant dommages à la propriété, blessures personnelles ou la mort.
IMPORTANTES INFORMATIONS DE SÉCURITÉ.
LIRE TOUTES LES INSTRUCTIONS AVANT D’UTILISER.
Assurez-vous de lire et de comprendre le Manuel d’Utilisation et d’Entretien avant de tenter d’installer et de faire fonctionner ce chauffe-eau. Il pourrait vous sauver argent et temps. Portez une attention particulière aux Instructions de Sécurité. Omettre de suivre ces avertissements pourrait entraîner des blessures sérieuses ou la mort. Si vous avez des problèmes à comprendre les instructions dans ce manuel, ou avez des questions, ARRÊTEZ, et allez chercher de l’aide auprès d’un technicien de service qualifié, ou les services de gaz locaux.
DANGER!
INSTALLER ET VENTILER ADÉQUATEMENT LE CHAUFFE-EAU…
Omettre d’installer le chauffe-eau à l’extérieur comme souligné pourrait entraîner un fonctionnement non sécuritaire du chauffe-eau. Pour éviter les risques de feu, explosion, ou asphyxie du monoxyde de carbone, ne faites jamais fonctionner ce chauffe-eau sauf s’il est installé adéquatement et possède une source d’air approprié pour une utilisation convenable. Soyez certain d’inspecter le conduit terminal pour une installation adéquate au démarrage initial; au moins annuellement par la suite. Référez-vous à la section d'Entretien et Nettoyage de ce manuel pour plus d’information concernant l’inspection du conduit terminal.
ATTENTION!
L’essence, et autres liquides et matériaux inflammables (adhésifs, solvants, diluant à peinture, etc.) et les vapeurs qu’ils produisent sont extrêmement dangereux. NE PAS manipuler, utiliser ou entreposer de l’essence ou autres produits inflammables ou combustibles près ou dans les environs du chauffe-eau ou n’importe quel autre appareil. Soyez certain de lire et de suivre les étiquettes sur le chauffe-eau, ainsi que les avertissements imprimés sur ce manuel. Omettre de faire cela pourrait entraîner des dommages à votre propriété, blessures et mort.
DANGER
Les vapeurs provenant de liquides inflammables exploseront et prendrons en feu causant la mort et brûlure sévères. Ne pas utiliser ou entreposer des produits inflammables comme de l’essence, solvants ou adhésifs dans la même pièce ou dans la zone près du chauffe-eau.
Gardez les produits inflammables :
1.loin du chauffe-eau,
2.dans des conteneurs approuvés,
3.fermé sécuritairement et
4.hors de la portée des enfants.
Le chauffe-eau à une flamme de brûleur principale.
La flamme du brûleur principal :
1.qui peut s’allumer à n’importe quel moment et
2.mettra en feu les vapeurs inflammables.
Vapeurs :
1.ne peuvent pas être vues
2.sont plus lourdes que l’air,
3.se déplace sur de longues distances sur le sol et
4.peuvent être transporté à partir d’autres pièces par des courants d’air
Installation :
Ne pas installer le chauffe-eau où des produits inflammables seront entreposés ou utilisés sauf si la flamme du brûleur principal est au moins 18 pouces (50 cm). Ceci réduira, mais n’éliminera pas les risques que les vapeurs soient mises en feu par la flamme principale du brûleur.
Lire et suivre les avertissements et instructions du chauffe-eau. Si le manuel de l’utilisateur est manquant, contacter le détaillant ou le manufacturier.
25

DANGER!
MODÈLES AU GAZ NATUREL ET PÉTROLE LIQUÉFIÉ
Le pétrole liquéfié et le gaz naturel possèdent tous deux une odeur ajoutée pour aider à la détection d'une fuite de gaz. Certaines personnes ne pourraient pas être en mesure de sentir ou reconnaître cette odeur. Si vous êtes incertains ou peu familiers avec l'odeur du pétrole ou du gaz, demandez au fournisseur de gaz. D'autres conditions comme “l'affaiblissement de l'odeur”, qui fait en sorte que l'odeur diminue en intensité, peut aussi cacher ou camoufler une fuite de gaz.
Les chauffe-eau utilisant des gaz de PL sont différents des modèles à gaz naturels. Un chauffe-eau au gaz naturel ne fonctionnera pas sécuritairement en utilisant du gaz de PL et vice versa
Aucune tentative ne devrait être faite de convertir le chauffe-eau du gaz naturel ou gaz de PL. Pour éviter des dommages possibles à l'équipement, blessures personnelles, ou un feu, ne connectez pas le chauffe-eau dans un type de carburant non conforme à ses caractéristiques.
Le gaz à PL doit être utilisé avec beaucoup de prudence. Il est plus lourd que l'air et s'accumulera en premier dans les zones les plus basses, le rendant plus difficile à détecter au niveau du nez.
Avant de tenter d'allumer le chauffe-eau, assurez-vous de chercher et de sentir pour des fuites de gaz. Utilisez une solution savonneuse pour vérifier toutes les poses et connexions de gaz. La présence de bulles sur une connexion indique une fuite devant être corrigée. Lorsque vous sentez pour détecter une fuite de gaz, assurez-vous aussi de renifler près du sol.
Les détecteurs de gaz sont recommandés dans un système au gaz naturel ou pétrole liquéfié et leur installation devrait être
conforme aux recommandations du manufacturier du détecteur et/ou aux lois locales, règles, règlementations et douanes.
AVERTISSEMENTS ADDITIONNELS
8.Ne pas laisser sans surveillance
9.Le gaz d'échappement et dessus de l'unité sont CHAUDS! Ne pas placer les mains ou autre objet sur le dessus du chauffe-eau.
10.Ne pas utiliser dans des conditions de vents forts.
11.Si une senteur de gaz est détectée, fermez la valve du réservoir immédiatement! Ne pas utiliser de flamme pour détecter la fuite.
12.Utiliser du Propane Liquide seulement
13.Utiliser à l'extérieur seulement
14.Ne pas trop resserrer la connexion régulatrice du gaz à l'unité avec une clé. Ceci pourrait causer une fissure dans le régulateur de gaz.
27
 Loading...