

Page 1
M3G150 / 200 Demontageanleitung
Dokumenten-Nr.: - • Änderung: 01 • Freigabedatum: 2019-02-12 • (VM-POK) • Seite 1/9
ebm-papst Mulfingen GmbH & Co. KG • Bachmühle 2 • 74673 Mulfingen • Germany
Phone +49 7938 81-0 • Fax +49 7938 81-110 • info1@de.ebmpapst.com • www.ebmpapst.com
1. SICHERHEITSVORSCHRIFTEN UND HINWEISE
Diese Anleitung ist ausschließlich zur Demontage eines Motors
vorgesehen. Lesen Sie diese Anleitung sorgfältig durch, bevor Sie mit den
Arbeiten zur Montage beginnen.
Beachten Sie die folgenden Warnungen, um Personengefährdung oder
Störungen zu vermeiden. Stellen Sie sicher, dass die Montageanleitung
immer griffbereit am Montageort zur Verfügung steht.
Bei einer Weitergabe muss die Montageanleitung mitgeliefert werden. Zu
Informationszwecken darf die Montageanleitung vervielfältigt werden.
In dieser Demontageanleitung ist beispielhaft ein Radialventilator
dargestellt.
Die Angaben gelten analog auch für andere Ventilatoren-Arten.
1.1. Qualifikation des Personals
Das Produkt darf ausschließlich durch geeignetes, qualifiziertes,
unterwiesenes und autorisiertes Fachpersonal transportiert, ausgepackt,
bedient, gewartet und anderweitig verwendet werden.
1.2. Hinweise zur Demontage
Diese Anleitung dient ausschließlich zur Demontage der folgenden
Motorentypen
• M3G150
• M3G200
2. VORBEREITUNG
WARNUNG
Spannung an Klemmen und Anschlüssen auch bei
abgeschaltetem Gerät.
Elektrischer Schlag.
→
Gerät erst fünf Minuten nach allpoligem Abschalten der
Spannung öffnen.
WARNUNG
Einzelne Komponenten nicht wiederverwenden.
Beschädigungsgefahr.
→ Entsorgen Sie die ausgebauten Komponenten fachgerecht.
VORSICHT
Verletzungsgefahr
.
→ Tragen Sie Sicherheitsschuhe.
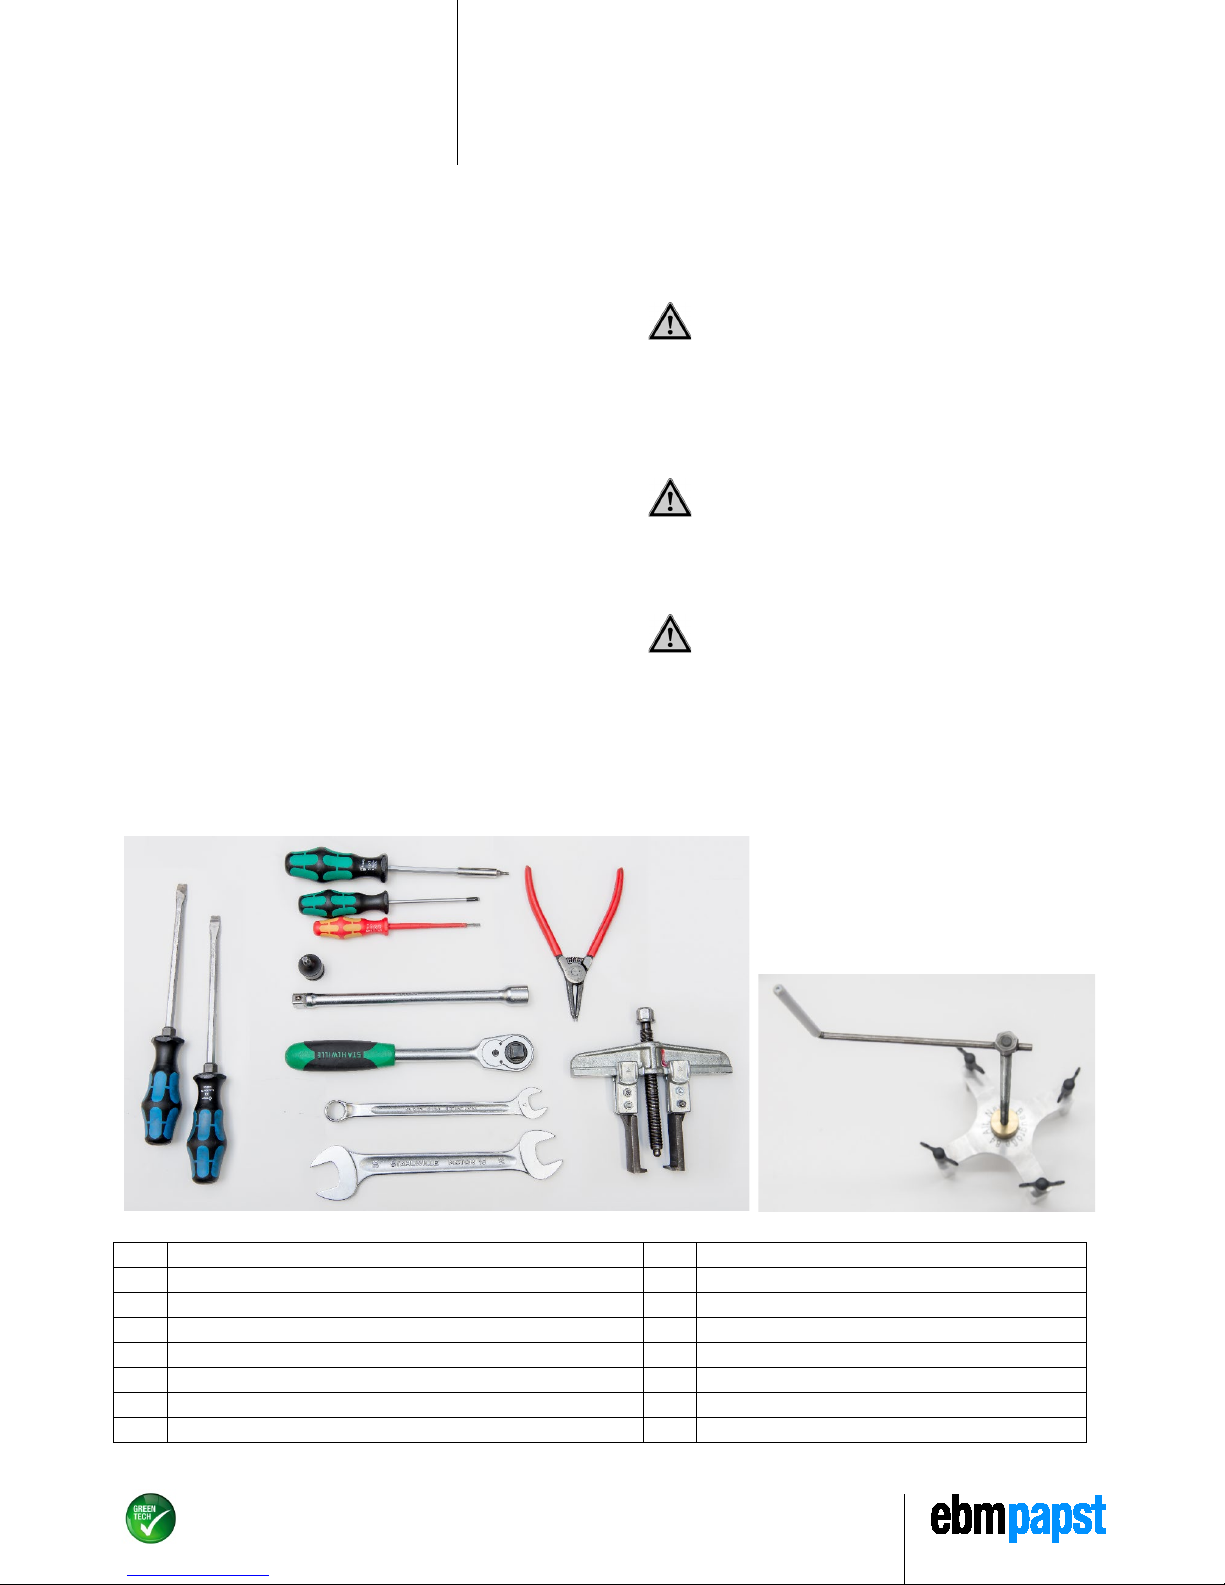
2.1. Werkzeug
Für die Demontage benötigen Sie folgendes Werkzeug:
Nr. Bezeichnung Nr. Bezeichnung
1 Schraubendreher „Schlitz“ groß 8 Ringschlüssel (für Abzieher)
2
Torx-Schraubendreher T25
9
Maulschlüssel 24/26
3
Torx-Schraubendreher T20
10
Sicherungsringzange
4 Schraubendreher „Schlitz“ klein 11 Abzieher für Kugellager
5
Torx-Steckeinsatz T40
12
Abzieher für Stator *
6
Verlängerung
7
Ratsche
* Wenn Sonderwerkzeug benötigt wird, wenden Sie sich bitte an ebm-papst.
3 2151
789
4
10
11 612
Page 2
M3G150 / 200 Demontageanleitung
Dokumenten-Nr.: - • Änderung: 01 • Freigabedatum: 2019-02-12 • (VM-POK) • Seite 2/9
ebm-papst Mulfingen GmbH & Co. KG • Bachmühle 2 • 74673 Mulfingen • Germany
Phone +49 7938 81-0 • Fax +49 7938 81-110 • info1@de.ebmpapst.com • www.ebmpapst.com
3. DEMONTAGE
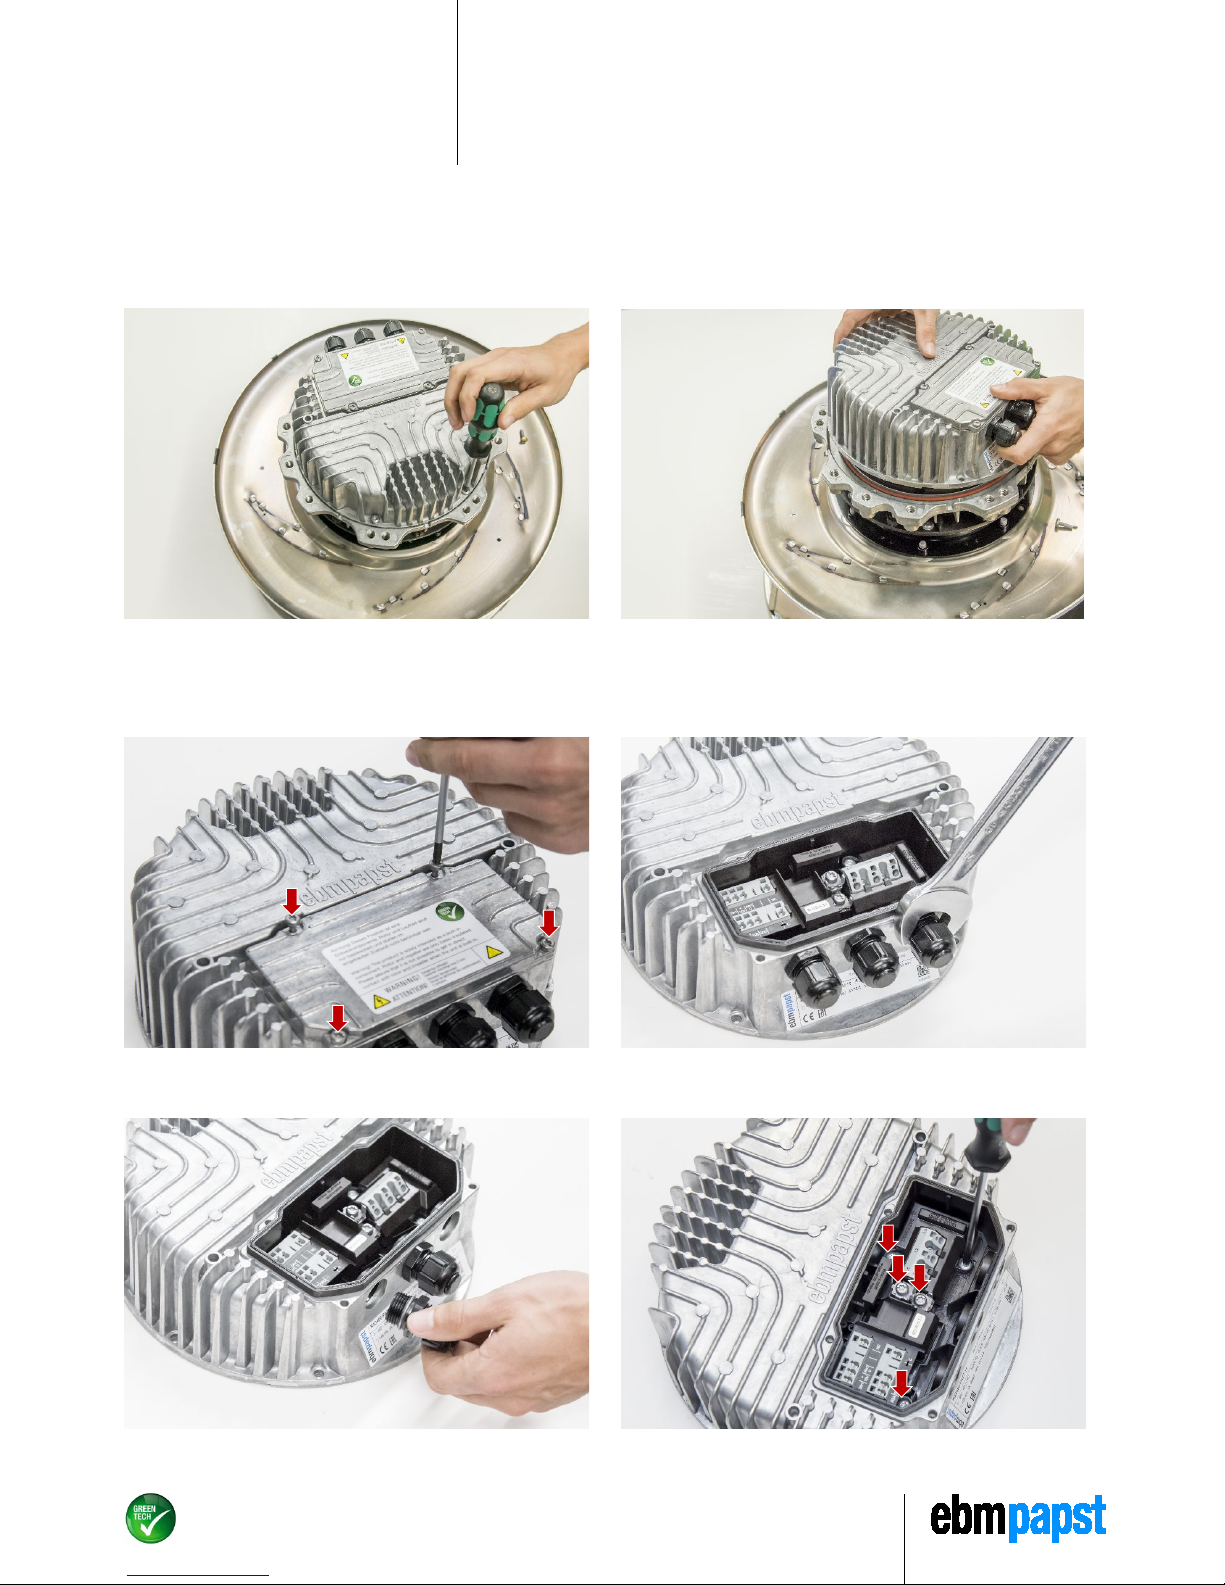
3.1. Elektronikgehäuse von Lüfterrad trennen
1. Lösen Sie die sechs Schrauben am Gehäuse.
2. Nehmen Sie das Gehäuse ab.
3.2. Elektronikgehäuse zerlegen
3. Lösen Sie die vier Schrauben am Gehäuse und nehmen Sie die
Abdeckung ab.
4. Klemmen Sie die Kabel ab (nicht abgebildet) und lösen Sie die Kabel-
Verschraubungen.
5. Schrauben Sie die drei Kabel-Verschraubungen komplett ab.
6. Lösen Sie die fünf Schrauben im Klemmkasten.
Page 3

M3G150 / 200 Demontageanleitung
Dokumenten-Nr.: - • Änderung: 01 • Freigabedatum: 2019-02-12 • (VM-POK) • Seite 3/9
ebm-papst Mulfingen GmbH & Co. KG • Bachmühle 2 • 74673 Mulfingen • Germany
Phone +49 7938 81-0 • Fax +49 7938 81-110 • info1@de.ebmpapst.com • www.ebmpapst.com
7. Nehmen Sie die Abdeckung heraus.
8. Lösen Sie die zwei Schrauben im Plastikklemmkasten.
9. Hebeln Sie den Anschlussblock heraus.
10. Nehmen Sie den Anschlussblock heraus.
11. Nehmen Sie den Plastikklemmkasten heraus.
Page 4

M3G150 / 200 Demontageanleitung
Dokumenten-Nr.: - • Änderung: 01 • Freigabedatum: 2019-02-12 • (VM-POK) • Seite 4/9
ebm-papst Mulfingen GmbH & Co. KG • Bachmühle 2 • 74673 Mulfingen • Germany
Phone +49 7938 81-0 • Fax +49 7938 81-110 • info1@de.ebmpapst.com • www.ebmpapst.com
12. Lösen Sie die sechs Schrauben der Leiterplatte.
13. Hebeln Sie die Leiterplatte mit einem Schraubendreher heraus
14. Nehmen Sie die Leiterplatte komplett heraus.
15. Lösen Sie die drei Schrauben.
Page 5
M3G150 / 200 Demontageanleitung
Dokumenten-Nr.: - • Änderung: 01 • Freigabedatum: 2019-02-12 • (VM-POK) • Seite 5/9
ebm-papst Mulfingen GmbH & Co. KG • Bachmühle 2 • 74673 Mulfingen • Germany
Phone +49 7938 81-0 • Fax +49 7938 81-110 • info1@de.ebmpapst.com • www.ebmpapst.com
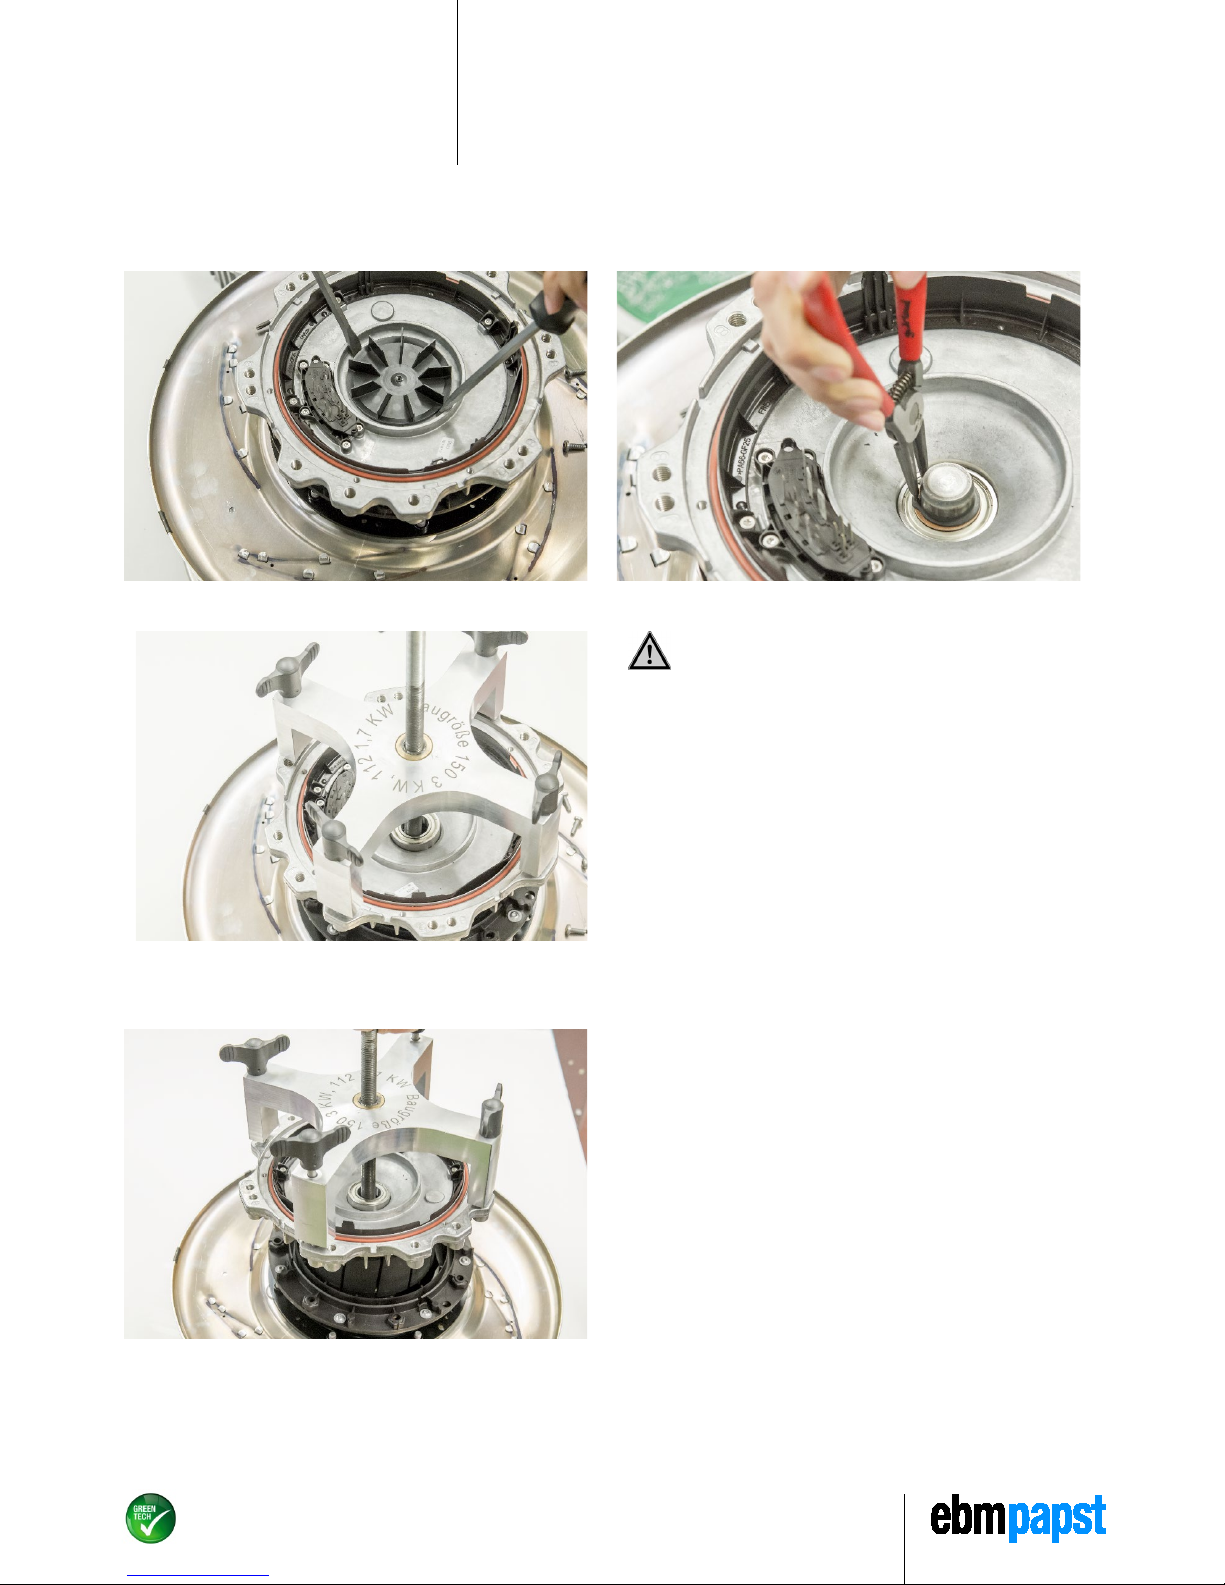
3.3. Motor öffnen
16.
Hebeln Sie das Lüfterrad mit zwei Schraubendrehern heraus.
17. Nehmen Sie den Sicherungsring mit einer Sicherungsringzange ab.
WARNUNG
Starke Magnetische Anziehung.
Verletzungsgefahr.
→ Finger nicht zwischen Stator und Rotor bringen.
18. Setzen Sie den Abzieher auf und schrauben diesen an allen vier
Gewindebohrungen im Stator fest. Lösen Sie den Stator indem Sie die
Spindel des Abziehers im Uhrzeigersinn drehen.
19. Nehmen Sie den Stator heraus.
Page 6
M3G150 / 200 Demontageanleitung
Dokumenten-Nr.: - • Änderung: 01 • Freigabedatum: 2019-02-12 • (VM-POK) • Seite 6/9
ebm-papst Mulfingen GmbH & Co. KG • Bachmühle 2 • 74673 Mulfingen • Germany
Phone +49 7938 81-0 • Fax +49 7938 81-110 • info1@de.ebmpapst.com • www.ebmpapst.com
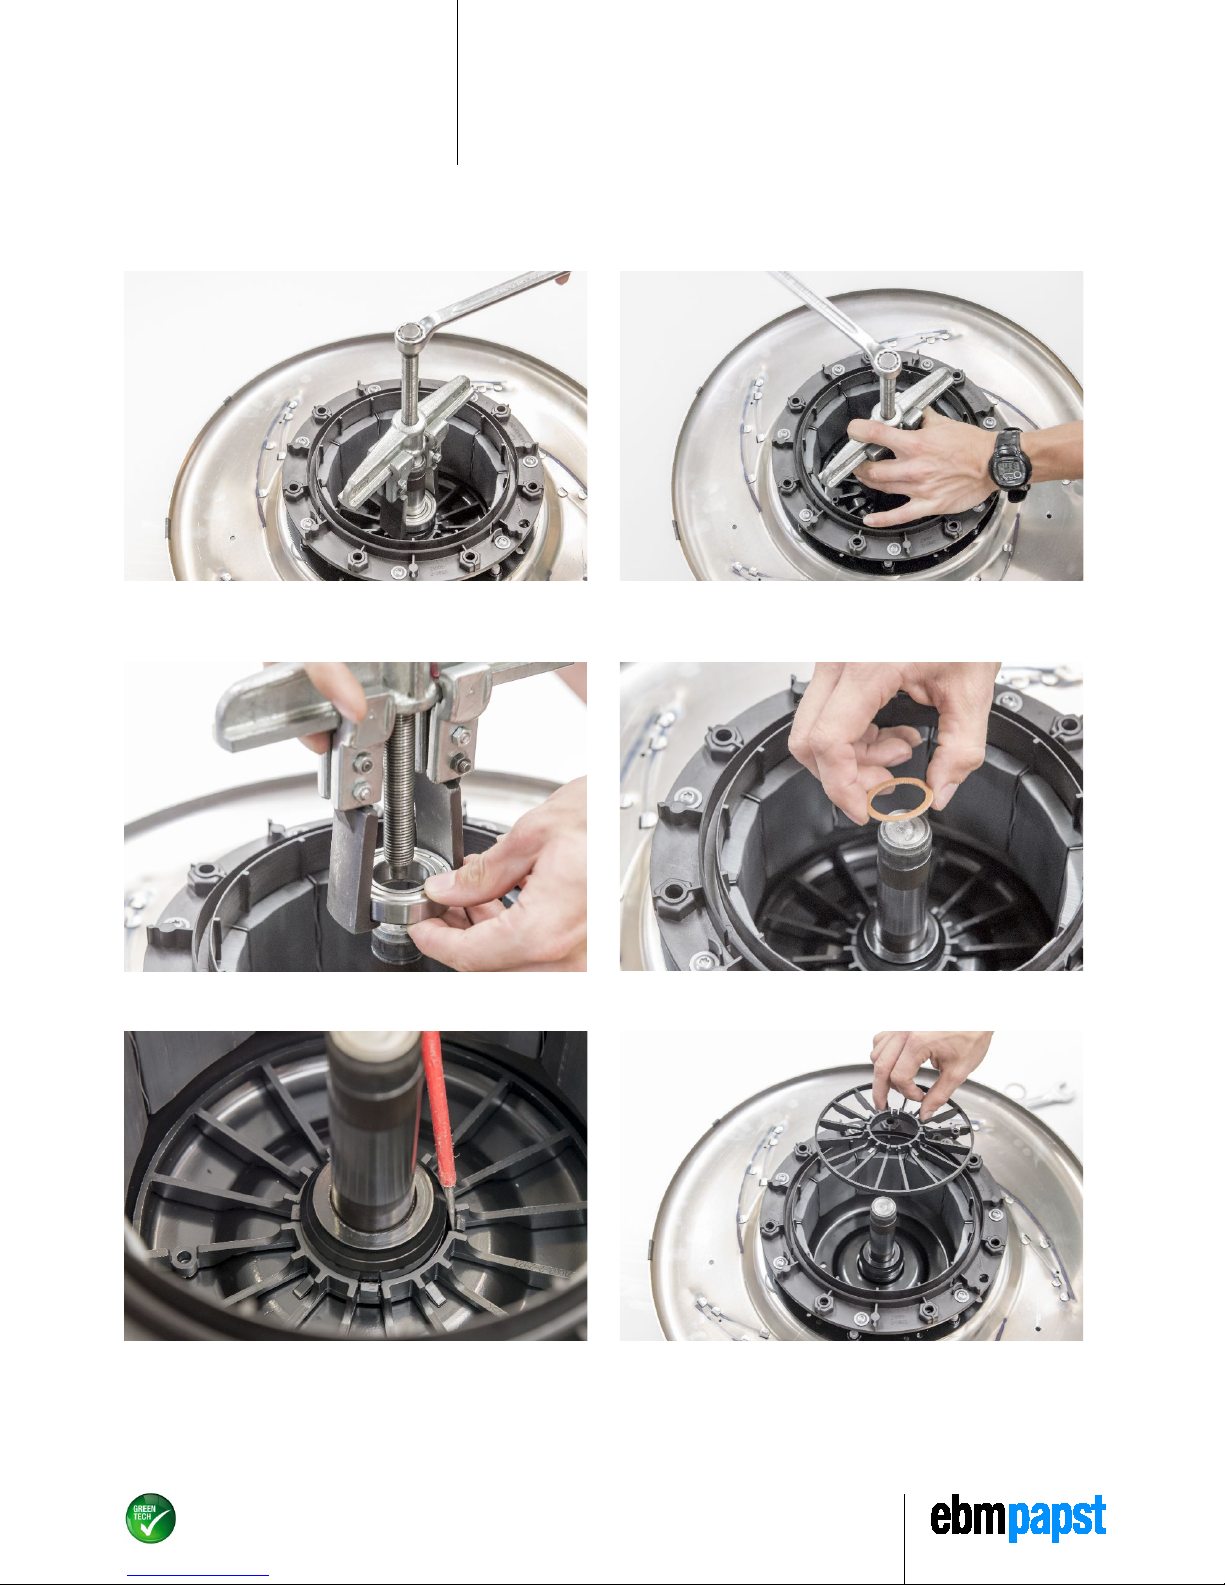
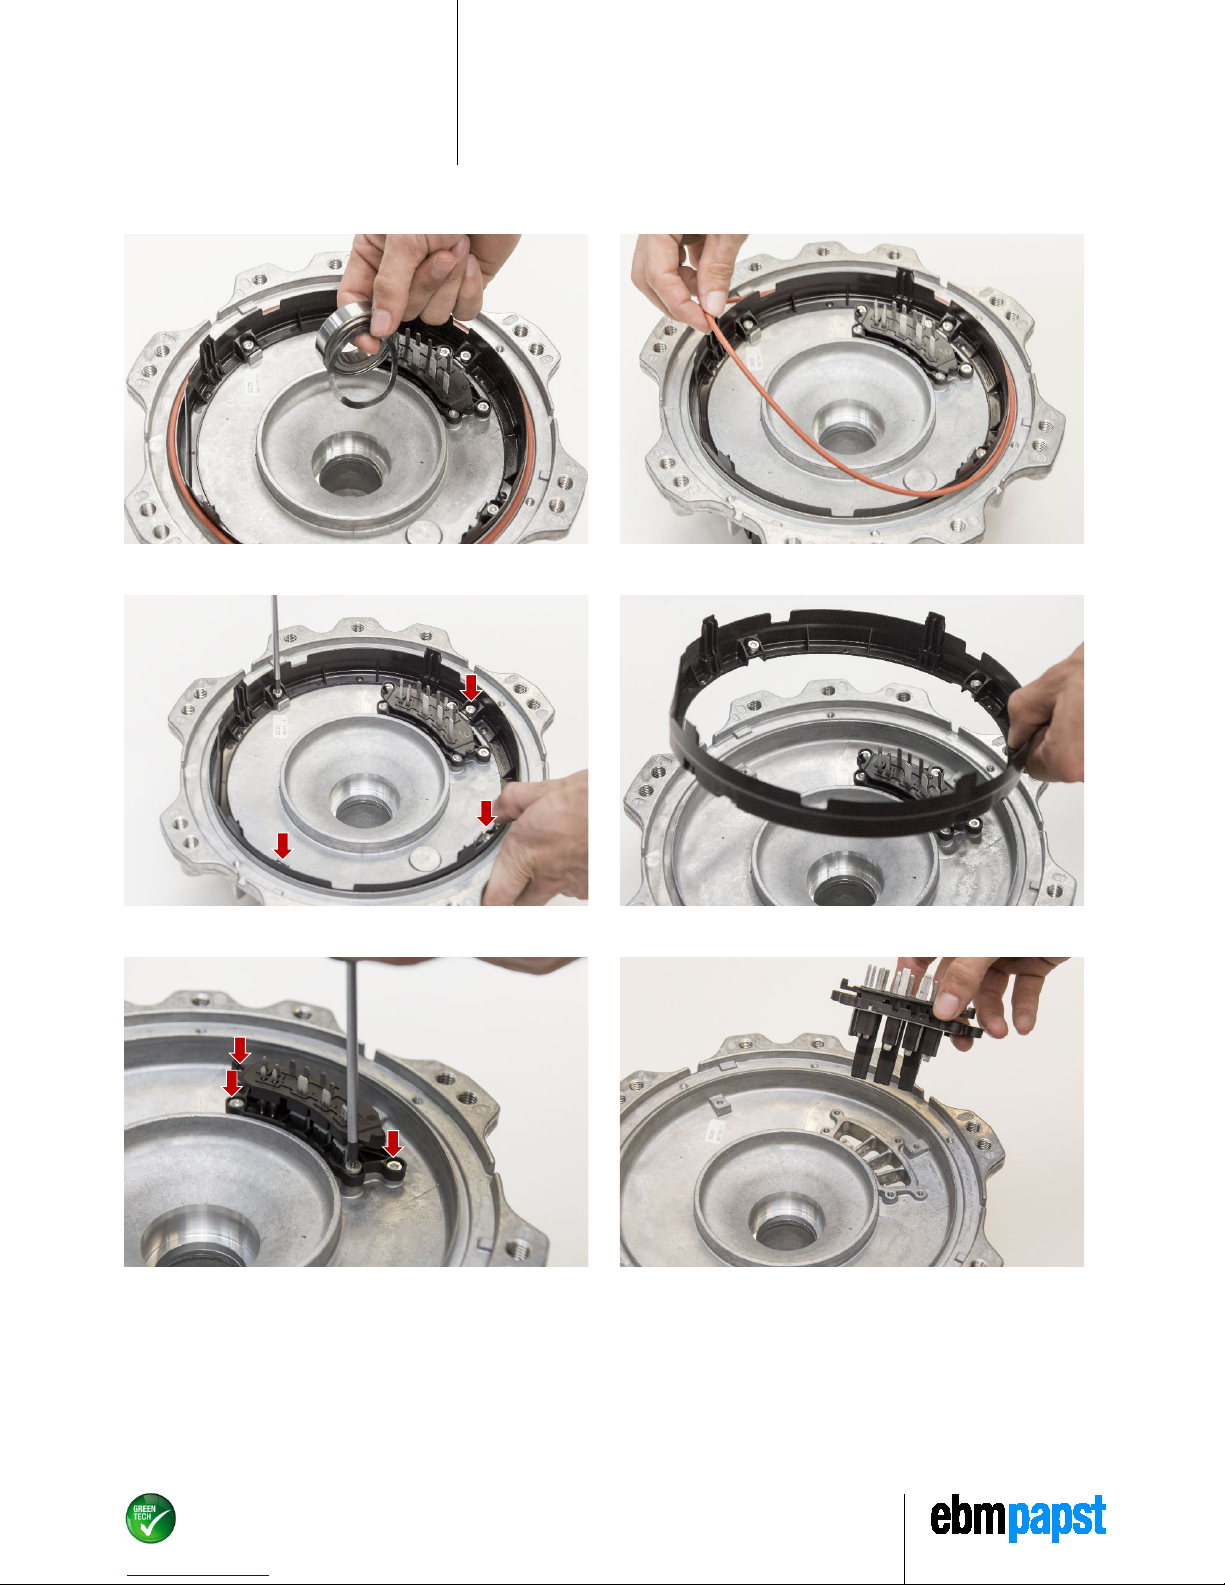
3.4. Kugellager entfernen
20. Setzen Sie den Abzieher in der Mitte auf.
21. Lösen Sie das Kugellager, indem Sie die Spindel des Abziehers im
Uhrzeigersinn drehen.
22. Nehmen Sie das Kugellager aus dem Abzieher aus der Rotorglocke
heraus.
23. Nehmen Sie den Ring heraus.
24. Lösen Sie die Verriegelungen (Nasen) am Kühlrad mit einem
Schraubendreher.
25. Nehmen Sie das Kühlrad heraus.
Page 7

M3G150 / 200 Demontageanleitung
Dokumenten-Nr.: - • Änderung: 01 • Freigabedatum: 2019-02-12 • (VM-POK) • Seite 7/9
ebm-papst Mulfingen GmbH & Co. KG • Bachmühle 2 • 74673 Mulfingen • Germany
Phone +49 7938 81-0 • Fax +49 7938 81-110 • info1@de.ebmpapst.com • www.ebmpapst.com
26. Nehmen Sie die restlichen Teile des Kugellagers heraus.
27. Nehmen Sie den O-Ring ab.
28. Lösen Sie die vier Schrauben.
29. Nehmen Sie den Kunststoffring ab.
30. Lösen Sie die vier Schrauben des Verbinders.
31. Ziehen Sie den Steckkontakt heraus.
Page 8

M3G150 / 200 Demontageanleitung
Dokumenten-Nr.: - • Änderung: 01 • Freigabedatum: 2019-02-12 • (VM-POK) • Seite 8/9
ebm-papst Mulfingen GmbH & Co. KG • Bachmühle 2 • 74673 Mulfingen • Germany
Phone +49 7938 81-0 • Fax +49 7938 81-110 • info1@de.ebmpapst.com • www.ebmpapst.com
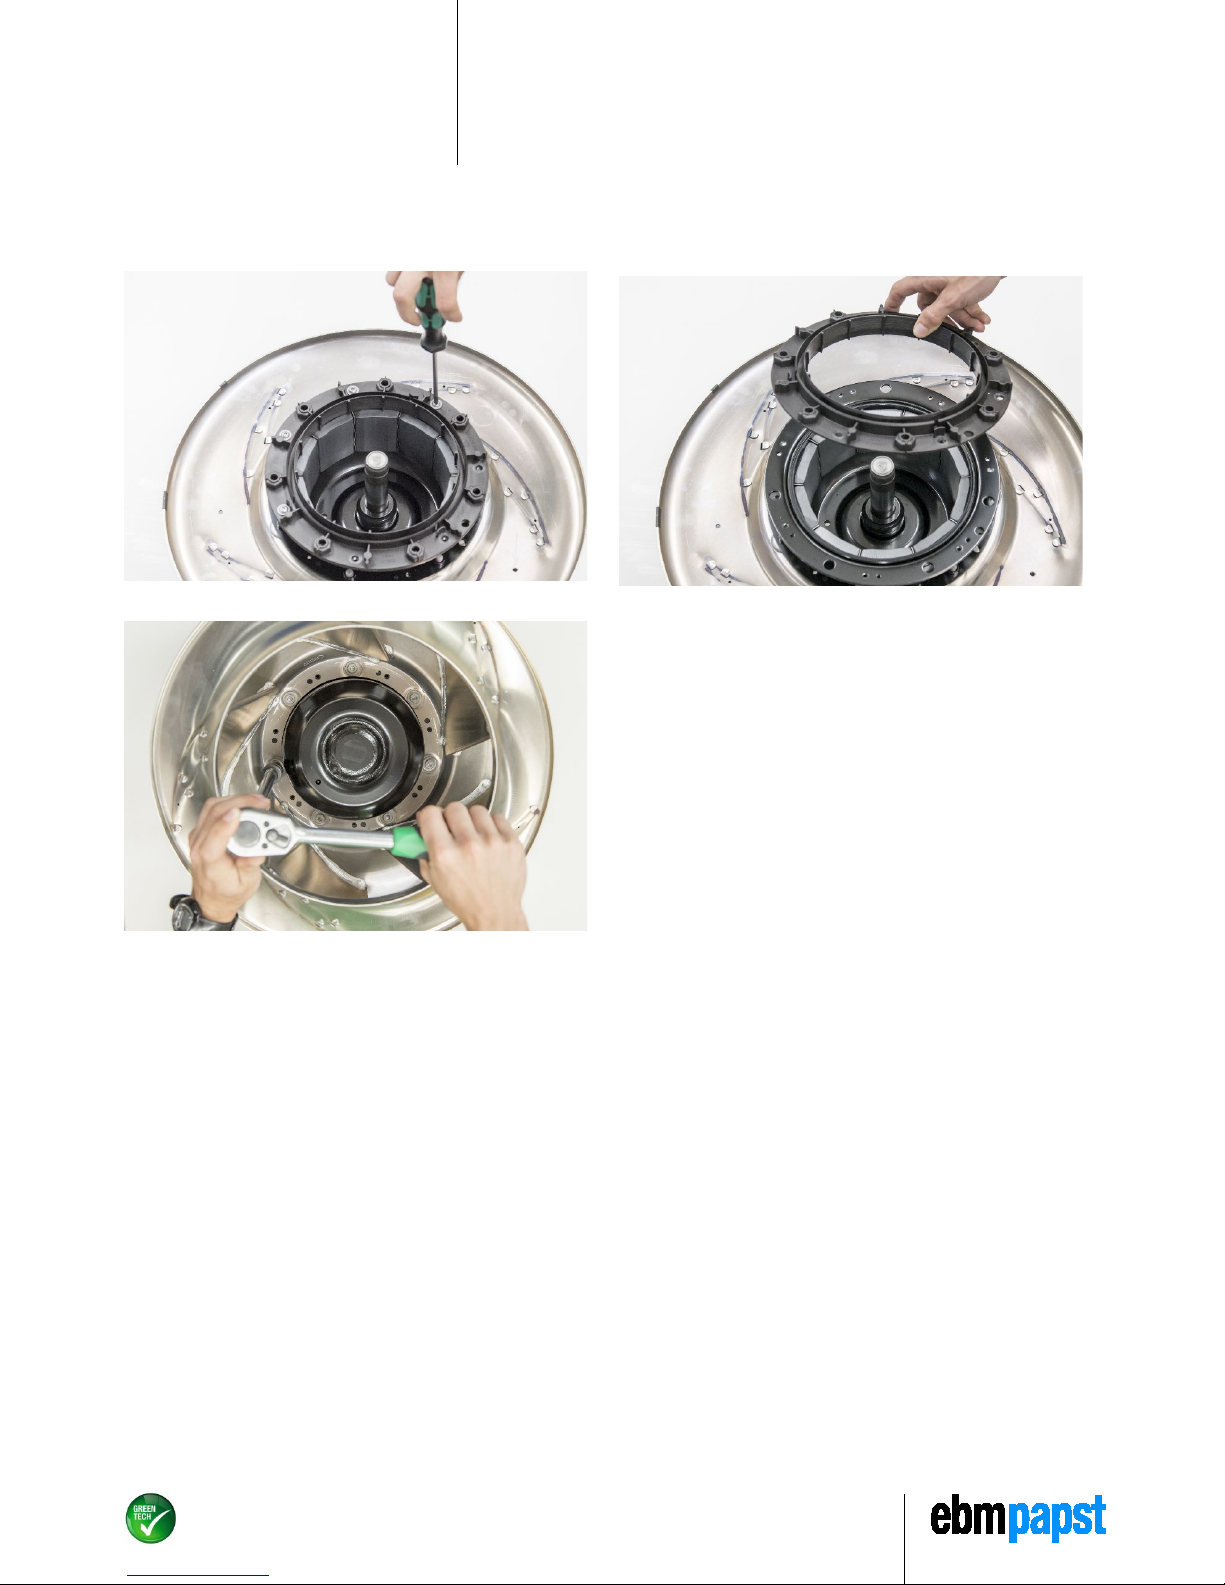
3.5. Rotor vom Lüfterrad trennen
32. Lösen Sie die sieben Schrauben mit einem Schraubendreher.
33. Nehmen Sie den Kunststoffring ab.
34. Lösen Sie die sieben Schrauben mit einer Ratsche und nehmen Sie das
Lüfterrad ab.
Page 9

M3G150 / 200 Demontageanleitung
Dokumenten-Nr.: - • Änderung: 01 • Freigabedatum: 2019-02-12 • (VM-POK) • Seite 9/9
ebm-papst Mulfingen GmbH & Co. KG • Bachmühle 2 • 74673 Mulfingen • Germany
Phone +49 7938 81-0 • Fax +49 7938 81-110 • info1@de.ebmpapst.com • www.ebmpapst.com
4. ENTSORGUNG
• Alle Komponenten sind zu untersuchen und in geltende Abfallkategorien einzuteilen (z. B. Elektrobauteile, Metalle, Kunststoffe).
• Alle elektrischen Komponenten sind gemäß den geltenden, landesspezifischen Umwelt- und Abfallentsorgungsgesetzen ggf. einer separaten
Wiederverwertung zuzuführen.
• Die in Abfallkategorien eingeteilten und demontierten Komponenten sind gemäß der zum Zeitpunkt der Demontage geltenden, landesspezifischen
Umwelt- und Abfallentsorgungsgesetze zu verwerten oder einer vorgeschriebenen Beseitigung zuzuführen.
• Beauftragen Sie ggf. einen Fachbetrieb mit der Entsorgung.
Page 10

M3G150 / 200 Disassembly instructions
Document No.: - • Change: 01 • Release date: 2019-02-12 • (VM-POK) • Page 1/9
ebm-papst Mulfingen GmbH & Co. KG • Bachmühle 2 • 74673 Mulfingen • Germany
Phone +49 7938 81-0 • Fax +49 7938 81-110 • info1@de.ebmpapst.com • www.ebmpapst.com
1. SAFETY REGULATIONS AND INFORMATION
These instructions are intended solely for motor disassembly.
Parts cannot be re-used following disassembly!
Read these instructions carefully before starting disassembly work.
Observe the following warnings to prevent malfunctions or danger to
persons. Make sure the instructions are always to hand.
The disassembly instructions may be duplicated for information purposes.
In these disassembly instructions, a radial fan is shown by way of
example. The information also applies analogously to other fan species.
1.1. Personnel qualifications
The product is only to be transported, unpacked, operated, maintained and
otherwise used by suitably qualified, trained and authorized technical staff.
1.2. Notes on disassembly
These instructions apply solely to disassembly of the following motor types
• M3G150
• M3G200
2. PREPARATION
WARNING
Live terminals and connections even with the
device
switched off.
Electric shock.
→ Wait five minutes after disconnecting the voltage at all poles
before opening the device.
WARNING
Do not re
-use individual components.
Risk of damage.
→ Ensure proper disposal of the components removed.
CAUTION
Risk of injury.
→ Wear safety shoes.
2.1. Tools
The following tools are required for disassembly:
No.
Designation
No.
Designation
1
Large "slotted" screwdriver
8
Box wrench (for puller)
2 Torx screwdriver T25 9 Open-end wrench 24/26
3
Torx screwdriver T20
10
Circlip pliers
4
Small "slotted" screwdriver
11
Puller for ball bearing
5
Torx socket T40
12
Puller for stator *
6 Extension
7
Ratchet
* *The special tools are only examples. They cannot be delivered by ebm-papst.
3 21
517
894
10
11
6
12
Page 11

M3G150 / 200 Disassembly instructions
Document No.: - • Change: 01 • Release date: 2019-02-12 • (VM-POK) • Page 2/9
ebm-papst Mulfingen GmbH & Co. KG • Bachmühle 2 • 74673 Mulfingen • Germany
Phone +49 7938 81-0 • Fax +49 7938 81-110 • info1@de.ebmpapst.com • www.ebmpapst.com
3. DISASSEMBLY
3.1. Separating the electronics housing from the fan impeller
1. Unfasten the six screws at the housing.
2. Detach the housing.
3.2. Dismantling the electronics housing
3. Unfasten the four screws at the housing and detach the cover.
4. Disconnect the cables (not shown) and unfasten the cable glands.
5. Completely unscrew the three cable glands.
6. Unfasten the five screws in the terminal box.
Page 12

M3G150 / 200 Disassembly instructions
Document No.: - • Change: 01 • Release date: 2019-02-12 • (VM-POK) • Page 3/9
ebm-papst Mulfingen GmbH & Co. KG • Bachmühle 2 • 74673 Mulfingen • Germany
Phone +49 7938 81-0 • Fax +49 7938 81-110 • info1@de.ebmpapst.com • www.ebmpapst.com
7. Take out the cover.
8. Unfasten the two screws in the plastic terminal box.
9. Prise out the terminal block.
10. Take out the terminal block.
11. Take out the plastic terminal box.
Page 13

M3G150 / 200 Disassembly instructions
Document No.: - • Change: 01 • Release date: 2019-02-12 • (VM-POK) • Page 4/9
ebm-papst Mulfingen GmbH & Co. KG • Bachmühle 2 • 74673 Mulfingen • Germany
Phone +49 7938 81-0 • Fax +49 7938 81-110 • info1@de.ebmpapst.com • www.ebmpapst.com
12. Unfasten the six circuit board screws.
13. Use a screwdriver to prise out the circuit board.
14. Completely remove the circuit board.
15. Unfasten the three screws.
Page 14

M3G150 / 200 Disassembly instructions
Document No.: - • Change: 01 • Release date: 2019-02-12 • (VM-POK) • Page 5/9
ebm-papst Mulfingen GmbH & Co. KG • Bachmühle 2 • 74673 Mulfingen • Germany
Phone +49 7938 81-0 • Fax +49 7938 81-110 • info1@de.ebmpapst.com • www.ebmpapst.com
3.3. Opening the motor
16.
Use two screwdrivers to prise out the fan impeller.
17. Use circlip pliers to detach the circlip.
WARNING
Strong magnetic attraction.
Risk of injury.
→ Do not reach into the area between the stator
and rotor.
18. Fit the puller and screw it in position at all four tapped holes in the stator.
Unfasten the stator by turning the spindle of the puller in clockwise
direction.
19. Take out the stator.
Page 15

M3G150 / 200 Disassembly instructions
Document No.: - • Change: 01 • Release date: 2019-02-12 • (VM-POK) • Page 6/9
ebm-papst Mulfingen GmbH & Co. KG • Bachmühle 2 • 74673 Mulfingen • Germany
Phone +49 7938 81-0 • Fax +49 7938 81-110 • info1@de.ebmpapst.com • www.ebmpapst.com
3.4. Removing the ball bearing
20. Position the puller in the center.
21. Unfasten the ball bearing by turning the spindle of the puller in clockwise
direction.
22. Take the ball bearing out of the puller and out of the rotor bell.
23. Take out the ring.
24. Use a screwdriver to unfasten the locking elements (lugs) at the cooling
wheel.
25. Take out the cooling wheel.
Page 16
M3G150 / 200 Disassembly instructions
Document No.: - • Change: 01 • Release date: 2019-02-12 • (VM-POK) • Page 7/9
ebm-papst Mulfingen GmbH & Co. KG • Bachmühle 2 • 74673 Mulfingen • Germany
Phone +49 7938 81-0 • Fax +49 7938 81-110 • info1@de.ebmpapst.com • www.ebmpapst.com
26. Take out the remaining parts of the ball bearing.
27. Detach the O-ring.
28. Unfasten the four screws.
29. Detach the plastic ring.
30. Unfasten the four screws of the connector.
31. Pull out the plug contact.
Page 17
M3G150 / 200 Disassembly instructions
Document No.: - • Change: 01 • Release date: 2019-02-12 • (VM-POK) • Page 8/9
ebm-papst Mulfingen GmbH & Co. KG • Bachmühle 2 • 74673 Mulfingen • Germany
Phone +49 7938 81-0 • Fax +49 7938 81-110 • info1@de.ebmpapst.com • www.ebmpapst.com
3.5. Separating the rotor from the fan impeller
32. Use a screwdriver to unfasten the seven screws.
33. Detach the plastic ring.
34. Use a ratchet to unfasten the seven screws and detach the fan impeller.
Page 18

M3G150 / 200 Disassembly instructions
Document No.: - • Change: 01 • Release date: 2019-02-12 • (VM-POK) • Page 9/9
ebm-papst Mulfingen GmbH & Co. KG • Bachmühle 2 • 74673 Mulfingen • Germany
Phone +49 7938 81-0 • Fax +49 7938 81-110 • info1@de.ebmpapst.com • www.ebmpapst.com
4. DISPOSAL
• Examine all the components and sort them into the applicable refuse categories (e.g. electrical components, metals, plastics).
• All electrical components are to be taken for separate recycling if this is required by the applicable local environmental and refuse disposal legislation.
• Following dismantling and sorting into refuse categories, the components are to be recycled or properly disposed of in accordance with the local
environmental and refuse disposal legislation applicable at the time of disassembly.
• Call in a specialist company to deal with disposal if necessary.
 Loading...