

Page 1
EasyStart R
Operating instructions.
Radio remote control
with heating function feedback
for parking heaters.
22 1000 32 85 06
07.2006
Page 2

Contents
Introduction
• Please read first...................................................................................................... 3
• Safety information ..................................................................................................3
• Statutory regulations ..............................................................................................3
• Purpose ................................................................................................................. 3
• General information ................................................................................................4
Overview
• Mobile unit of the radio remote control ...................................................................5
• LED displays .......................................................................................................... 6
Operation and Adjustment
• Basic operation and adjustment rules ..................................................................... 7
– Activate mobile unit ........................................................................................ 7, 8
– Switch off mobile unit / protect mobile unit against involuntary actuation ............ 7
– Confirm input ..................................................................................................... 7
– Terminate / quit settings ..................................................................................... 7
– LED display disappears...................................................................................... 7
– Permanently change operating time ................................................................... 7
– Display during data transmission ........................................................................ 7
• Activate mobile unit / query heater‘s operating state .............................................. 8
• Function pushbuttons ........................................................................................... 8
• Switch on heater .................................................................................................... 9
• Switch off heater .................................................................................................... 9
• Permanently change operating time .....................................................................10
• General information on “ventilate” mode ............................................................... 11
– Switching between “ventilate” and “heat” mode ............................................... 11
– Switch off “ventilate” or “heat” mode ................................................................ 11
• Switch on “ventilate” mode................................................................................... 12
• Switch off “ventilate” mode ................................................................................... 12
Maintenance
• Charged status of the mobile unit‘s battery ..........................................................13
• Replace battery .................................................................................................... 13
What to do if …?
• Displays ....................................................................................................... 13 – 15
Service
• Hotline ................................................................................................................. 15
2
Page 3
Introduction
Please read rst
Before you start to set and use the
radio remote control, please ensure you
carefully read through these operating
instructions.
These operating instructions contain
important information, which you require
to set and use the radio remote control.
Please store these operating instructions
in a safe place so you can refer to it at a
later date.
Safety information
Danger!
– Only the battery cover of the mobile unit
may be opened.
– The battery and battery cover must be
kept out of reach of children – swallowed small parts.
– Before washing clothing, remove the
mobile unit from pocket.
– Protect the mobile unit from adverse
effects (impacts, extreme temperatures,
moisture, rain, liquids).
– The mobile unit and heater must be
switched off when refuelling.
– Dispose of the battery and mobile part
according to the statutory regulations.
– Only use the recommended battery and
original spare parts.
– All information and notes, in particular
the safety information in the heater‘s
technical description must be observed
at all times!
Statutory regulations
Return / disposal of electrical
and electronic equipment in
accordance with Art 4 Paragraph 1 Alt Fz-VO (End-of-Life
Vehicles Regulations)
As a part of the vehicle, when the vehicle
is handed into a recognised waste collection body, a recognised returns body or
a recognised dismantling firm, the radio
remote control must be placed in the
vehicle for return in accordance with Art 4
Paragraph 1 Alt Fz-VO.
Purpose
The bidirectional EasyStart R radio
remote control (mobile unit in conjunction
with stationary unit) is used for remote
controlled switching on / off, selection of
the operating mode and for changing the
operating time of the heater installed in
the vehicle.
Please note!
Improper use and use outside the specified area of use cancels all liability and
warranty.
3
Page 4
Introduction
General information
The mobile unit of the radio remote con
trol has a simple control structure.
All functions can be set, and if necessary
changed, with 2 keys only.
The mobile unit‘s switching pulses have
a range of up to 1000 metres in open
outdoor spaces (direct visual contact).
External interference, local conditions
and dense building development in the
surrounding area reduce the range.
and ambient influences, however, the
LED display can indicate different flashing
signals. The remedy for this is described
on pages 13 to 15.
Operation of the mobile unit is described
in detail from page 7.
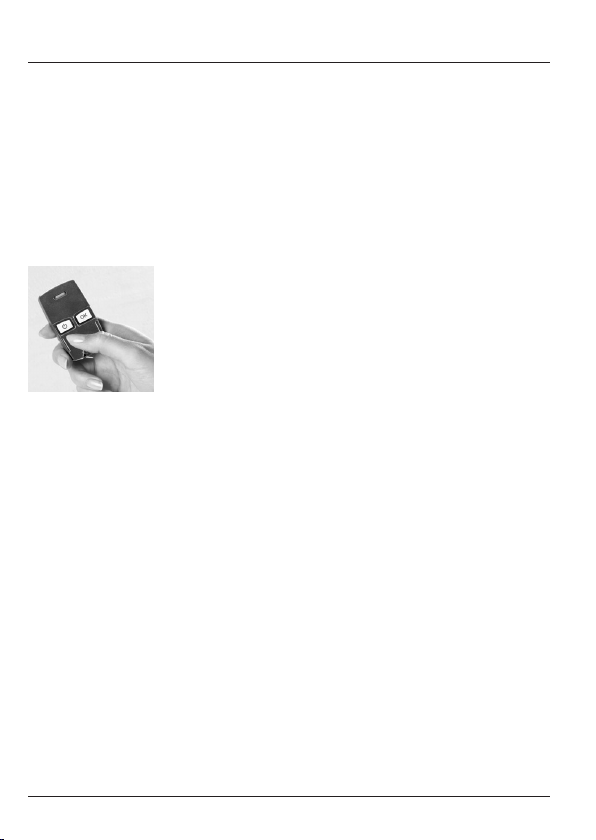
The mobile unit
should always be
pointed towards
the vehicle when
activated or for
data transmission.
Depending on
the application
4
Page 5
Overview
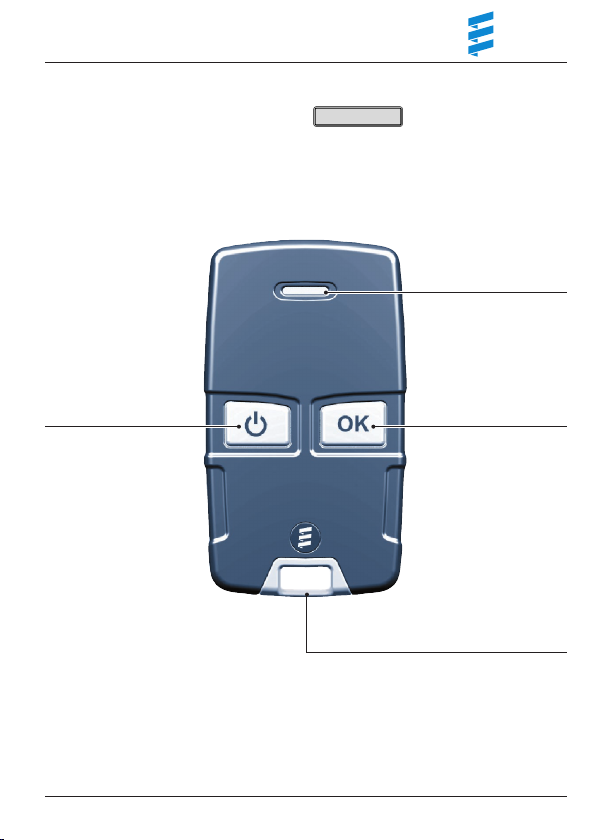
Mobile unit of the radio remote
control
The mobile unit of the radio remote control can be used to make the necessary
adjustments for operation of the heater
and various units can be switched on
and off.
Please note!
The type of LED displays possible differs
depending on the installed heater and
feature options.
LED display
Activation key
• Mobile unit – ON / OFF
• Change operating time
OK key
Confirm entries
Key fob
5
Page 6

Overview
LED displays
Data transmission
Heater off
Heater on
Ventilation off
Ventilation on
Please note!
• Please refer to the general notes on
“ventilate” mode given on page 11
for information about the LED display
“ventilate off” and “ventilate on”.
• Possible LED displays such as fast,
alternating red-green flashing, slow,
alternating red-green flashing, fast red
flashing or a red display are described
in the “What to do if …?” chapter from
page 13.
LED display lights up green.
LED display flickers red.
LED display flashes red.
LED display flickers green.
LED display flashes green.
6
Page 7

Operation and Adjustment
Basic operation and adjustment rules
Activate mobile unit
Before each operation or setting, a con-
nection must be established between the
mobile unit and the stationary unit.
To do this, press until the LED display
is permanently lit green, then release the
key and continue with the operation or
adjustment (see also page 8).
Switch off mobile unit / protect mobile unit against involuntary actuation
If is pressed for a long time the LED
display disappears, i.e. the mobile unit is
switched off and is therefore also protec-
ted against involuntary actuation.
Confirm input
The settings and changes must always
be confirmed with , otherwise they
are lost.
Terminate / quit settings
The setting can be cancelled or termina-
ted with .
LED display disappears
After confirming a setting or change the
LED display goes out.
If no further settings or confirmations are
made within 10 seconds the mobile unit
switches to its normal condition.
For renewed input you must press
again.
If data transmission was not possible, the
LED display disappears after 4 seconds.
Permanently change operating time
An operating time of 20, 30, 40 or 60
minutes can be set (factory setting is 30
minutes).
See page 10 for setting/adjustment.
Display during data transmission
During data transmission the LED display
is permanently lit green.
Please note!
7
Page 8

Operation and Adjustment
Activate mobile unit / query heater‘s operating state
Use the mobile unit to establish the connection with the
stationary unit.
press until the LED display lights up green. Then
release the key. If a link has been established
between the mobile unit and stationary unit,
• the LED display flickers red (heater off)
or
• the LED display flashes red (heater on).
The radio remote control is activated.
Please note!
• If the key is not released when the LED is list
green the mobile unit switches itself off.
• Possible LED displays such as fast alternating red-
green flashes, slow alternating red-green flashing,
fast red flashing or a red display are described in the
chapter ”What to do if …?“ from page 13.
Function pushbutton
The following activities can be executed with the button
installed in the vehicle:
• Start heater mode, heating duration 30 minutes
(LED on ON button)
• Switch off heater mode (LED on OFF button)
LED display
LED: green
LED: flickers red
LED: flashes red
8
Page 9

Operation and Adjustment
Switch on heater
Activate mobile unit with (see also page 8).
LED display
Data transmission
LED: green
LED display “heater off”.
Confirm with .
Heater is switched on.
The following action is possible:
Change operating time (see page 10).
Switch off heater
Activate mobile unit with (see also page 8).
LED display “heater on”.
Confirm with .
Heater is switched off.
The following action is possible:
Change operating time (see page 10).
LED: flickers red
Data transmission
LED: green
LED: flashes red
LED display
Data transmission
LED: green
LED: flashes red
Data transmission
LED: green
LED: flickers red
9
Page 10

Operation and Adjustment
Permanently change operating time
Activate mobile unit with (see page 8).
LED display
Data transmission
LED: green
LED: flickers red
Briefly press and simultaneously.
“Permanently change operating time” function is
activated.
Select operating time by pressing once or several
times
Selection and display
20 minutes operating time
30 minutes operating time
40 minutes operating time
60 minutes operating time
Confirm selected operating time with .
Selected operating time is saved.
Please note!
After a brief pause the flashing signals are repeated five
times in total by when the mobile unit switches to its
normal condition.
LED: flashes red
LED: flashes
red twice
LED: flashes
red 3 times
LED: flashes
red 4 times
LED: flashes
red 6 times
Data transmission
LED: green
LED: flashes twice,
long green flash
10
Page 11

Operation and Adjustment
General notes on “ventilate” mode
„Ventilate“ mode is only possible in the
following heater models and subject to
certain requirements:
• The additional “heat/ ventilate” switch
(Order No.: 22 1000 31 89 00) must be
installed in HYDRONIC water heaters
(B / D 4 W S, B / D 5 W S,
B / D 4 W SC and B / D 5 W SC).
• The mini controller (Order No.
22 1000 32 0700) must be installed in
the AIRTRONIC / AIRTRONIC M and
AIRTRONIC L air heaters.
Exception – in air heaters with two dia-
gnosis cables and the EasyStart R with
EasyStart T combination, “ventilate”
mode can be activated without the mini
controller (see page 12).
Please note!
• In all other heaters “ventilate” mode is
not available.
• “Ventilate” mode is not provided for
upgraded independent heaters.
Switching between „ventilate“ and
„heat“ mode
If the operating mode is to be changed
during “ventilate” or “heat” mode, the
heater must be switched off using the
mobile unit of the radio remote control
(see page 9).
• If the heater is switched off in “heat”
mode the heater runs on. Once this
after-run has ended use the “heat /
ventilate” switch or the “mini controller”
to switch to “ventilate” mode. Then use
the mobile unit of the radio remote control to switch the heater back on.
• After the heater has been switched off
in “ventilate” mode, you can immediately switch to “heat” mode using the
“heat / ventilate” switch or the “mini
controller”. Then use the mobile unit of
the radio remote control to switch the
heater back on.
Please note!
• “Ventilate” or “heat” mode must be
selected before switching on the
heater.
• In the “ventilate” switch setting of
HYDRONIC water heaters the vehicle
blower is directly controlled by bypassing heat mode and in AIRTRONIC air
heaters the heater’s blower is bypassed
in the same way.
• If you have any further questions regarding “ventilate” mode please contact
your installation workshop or call the
service phone number (see page 15).
Switch of “ventilate” or “heat” mode
Switch off the heater using the mobile unit
of the radio remote control (see page 9).
11
Page 12

Operation and Adjustment
Switch on ventilate (only possible in air heaters with two diagnosis cables and the
combination of EasyStart R with EasyStart T.
Activate mobile unit with (see also page 8).
LEDdisplay
Data transmission
LED: green
Select LED display „ventilate off“ with
and confirm with .
Ventilate is switched on.
The following action is possible:
• can be used to switched to “heat on”
(see page 9 for further procedures).
• Change operating time (see page 10).
Switch off ventilate
Activate mobile unit with (see also page 8).
Confirm LED display „ventilate on“
with .
Ventilate is switched off.
The following action is possible:
• can be used to switched to “heat on”
(see page 9 for further procedures).
• Change operating time (see page 10).
12
LED: flickers green
Data transmission
LED: green
LED: flashes green
LED: flickers red
LEDdisplay
Data transmission
LED: green
LED: flashes green
LED: flickers green
LED: flickers red
Page 13

Maintenance
Charged status of the
mobile unit‘s battery
If the LED display of the mobile unit indicates the battery is too weak with a red
display, purchase a standard CR 2430
type round cell battery made by Varta,
Sony or Renata, as recommended by
JE-Eberspächer.
Replace battery
LED display
LED: Display lights up red
• Use a coin to turn the bayonet fastening of the battery
cover in the direction of the
arrow.
• Remove the battery cover.
• Check the cover seal for damage.
• Remove dead battery.
• Insert new battery. The battery has been
correctly inserted if the plus pole symbol
and the type designation of the battery
can be read.
• Put on the battery cover.
The drip-shaped marking
must point to the web
between the recesses.
• Use a coin to turn the
bayonet fastening of the battery cover
in a clockwise direction until the slit
reaches the vertical position.
• Activate mobile unit (see page 8).
What to do if …?
LED displays
Fast red flashing
Description Remedy
A fault occurs in the heater during operation (e.g. fuel shortage or interruption in
the diagnostics cable).
Refer to the heater‘s installation instructions for troubleshooting advice.
13
Page 14

What to do if …?
LED displays
Fast red-green flashing
Description
Communication between the mobile unit and stationary unit is not possible.
Possible causes Remedy
Distance between mobile unit and vehicle
too large.
Dense buildings between mobile unit and
vehicle?
Several Easy Start radio remote controls
are operated simultaneously.
Mobile unit has not been taught. Teach mobile unit as described in the
Please note!
The unit cannot be used during the ”fast
red-green flashing“ signal. A running
heater can only be switched off using the
button in the vehicle.
Slow red-green flashing
Description Remedy
Stationary unit is in learn mode. Teach mobile unit as described in the
Reduce distance.
Change the position relative to the
vehicle e.g. hold mobile unit higher or
move it to the side. Reduce distance
from vehicle.
Reactivate mobile unit after a pause.
installation instruction.
installation instruction.
LED lights up red after activation
Description Remedy
The mobile unit‘s battery is too weak.
Data transmission is not possible.
14
Replace battery (see page 13).
Page 15

What to do if …?
LED displays
The mobile unit cannot be activated
Possible causes Remedy
Battery dead. Replace battery (see page 13).
No battery inserted. Insert battery (see page 13).
Battery inserted wrong way around. Insert battery correctly (see page 13).
LED in pushbutton flashes
Description Remedy
Stationary unit is in learn mode. The display switches itself off after 30
Please note!
If you were unable to correct the error
or fault, please contact an authorised
JE workshop or call the service phone
number given in the following.
seconds or teach the mobile unit as
described in the installation instruction.
Service
Hotline
Call the following service phone number
if you have any technical questions or a
problem with the radio remote control or
the heater:
Telephone hotline
00 49 (0)800 / 12 34 300
Fax hotline
00 49 (0)1805 / 26 26 24
Outside Germany, please contact the
respective national Eberspächer representative.
15
Page 16

www.eberspaecher.com
J. Eberspächer
GmbH & Co. KG
Eberspächerstraße 24
D-73730 Esslingen
Telefon 0711 939-00
Telefax 0711 939-0643
info@eberspaecher.com
We reserve the right to make changes Printed in Germany © J. Eberspächer GmbH & Co. KG
 Loading...