

Page 1

End Suction Centrifugal
EBARA Fluid Handling
EBARA International Corporation
Operating Instructions, Installation & Maintenance Manual
Models 3U / 3UB
Page 2

Page 3
EBARA End Suction Centrifugal 3U / 3UB
Operating, Installation, and Maintenance
EBARA Fluid Handling
www.pumpsebara.com
3
(t) 803 327-5005 • (f) 803 327-5097
rev. 02/09
IMPORTANT SAFETY INSTRUCTIONS
Rules for Safe Installation and Operation
Installation
Contents
Section Page
Safety Specifications and Installation 3
3U / 3UB Selection Chart 5
3U / 3UB Specifications 6
3U / 3UB Type 1 Sectional View and Parts List 7
3U(B) 65 Type 3 Sectional View and Parts List 8
Installation Instructions 9
Maintenance and Service 10
3U / 3UB Assembly – 3HP - 15HP 11
3U / 3UB Assembly – 20HP - 30HP 12
Troubleshooting Checklist and Maintenance Information 13
1. Read these rules and instructions carefully. Failure to follow them could cause serious bodily injury and/or property damage.
2. Check your local codes before installing. You must comply with their rules
3. For maximum safety, this product should be connected to a grounded circuit equipped with a ground fault interrupter device.
4. Before installing this product, have the electrical circuit checked by an electrician to make sure it is properly grounded.
5. Before installing or servicing your pump, BE CERTAIN pump power source is disconnected.
6. Make sure the line voltage and frequency of the electrical current supply agrees with the motor wiring. If motor is dual voltage
type, BE SURE it is wired correctly for your power supply.
7. Complete pump and piping system MUST be protected against below freezing temperature. Failure to do so could cause severe
damage
and voids the Warranty.
8. Avoid system pressures that may exceed one and a half times the operating point selected from the pump performance curve.
9. Do not run your pump dry. If it is, there will be damage to the pump seal.
PACKAGE CONTENTS
1. Be sure all parts have been furnished and that nothing has been damaged in shipment.
2. The catalog lists all parts included with package. A packing list packed with pump, also lists contents.
3. OPEN PACKAGES AND MAKE THIS CHECK BEFORE GOING ON JOB.
PIPING – Pipes must line up and not be forced into position by unions. Piping should be independently supported near
the
pump so that no strain will be placed on the pump casing. Where any noise is objectionable, pump should be insulated
from
the piping with rubber connections. Always keep pipe size as large as possible and use a minimum of fittings to reduce
friction losses.
SUCTION PIPING – Suction pipe should be direct and as short as possible. It should be at least one size larger than suction
inlet tapping and should have a minimum of elbows and fittings (5 to 6 pipe diameters of straight pipe before inlet is recommended).
The piping should be laid out so that it slopes upward to pump without dips or high points so that air pockets are eliminated.
The highest point in the suction piping should be the pump inlet except where liquid flows to the pump inlet under pressure.
The suction pipe must be tight and free of air leaks or pump will not operate properly.
WARNING
Page 4

EBARA End Suction Centrifugal 3U / 3UB
Operating, Installation, and Maintenance
EBARA Fluid Handling
www.pumpsebara.com
4
(t) 803 327-5005 • (f) 803 327-5097
rev. 02/09
DISCHARGE PIPING – Discharge piping should never be smaller than pump tapping and should preferably be one size
larger. A gate valve should always be installed in discharge line for throttling if capacity is not correct. To protect the pump
from water hammer and to prevent backflow, a check valve should be installed in the discharge line between the pump and
gate valve.
ELECTRICAL CONNECTIONS – Be sure motor wiring is connected for voltage being used. Unit should be connected to a
separate circuit. A fused disconnect switch or circuit breaker must be used in this circuit. Wire of sufficient size should be
used to keep voltage drop to a maximum of 5%.
Single phase motors have built-in overload protection. Flexible metallic conduit should be used to protect the motor leads.
PRIMING – The pump must be primed before starting. The pump casing and suction piping must be filled with water before
starting motor. When water is poured into pump to prime, remove all air before starting motor.
STARTING – When the pump is up to operating speed, open the discharge valve to obtain desired capacity or pressure.
WARNING! DO NOT ALLOW THE PUMP TO RUN WITH THE DISCHARGE VALVE TIGHTLY CLOSED. IF THE PUMP
RUNS FOR AN EXTENDED PERIOD OF TIME WITHOUT LIQUID BEING DISCHARGED, THE LIQUID IN THE PUMP
CASE CAN GET EXTREMELY HOT CAUSING SEVERE DAMAGE TO THE PUMP AND POSSIBLY CAUSE INJURY TO
PEOPLE.
ROTATION – All single phase motors are single rotation and leave factory with proper rotation. Three phase motors should
be checked to ensure proper rotation
FREEZING – Care should be taken to prevent the pump from freezing during cold weather. It may be necessary, when
there
is any possibility of this, to drain the pump casing when not in operation. Drain by removing the pipe plug in the bottom
of the
casing.
ROTARY SEAL – PRO STEEL pumps are fitted only with rotary seal. This seal is recommended for LIQUIDS free from abrasives.
LOCATION OF UNIT – The pump should be installed as near to the liquid source as is practical so that the static suction
head (vertical distance from the center line of the pump to water level) is maximized, and so that a short, direct suction pipe
may be used. The capacity of a centrifugal pump is reduced when the unit is operated under a high suction lift. The piping
should be as free from turns and bends as possible, as elbows and fittings greatly increase friction loss. Place the unit so that
it is readily accessible for service and maintenance and on a solid foundation, which provides a rigid and vibration-free support. Protect the pump against flooding and excess moisture.
Rules for Safe Installation and Operation
(continued)
Page 5
EBARA End Suction Centrifugal 3U / 3UB
Operating, Installation, and Maintenance
EBARA Fluid Handling
www.pumpsebara.com
5
(t) 803 327-5005 • (f) 803 327-5097
rev. 02/09
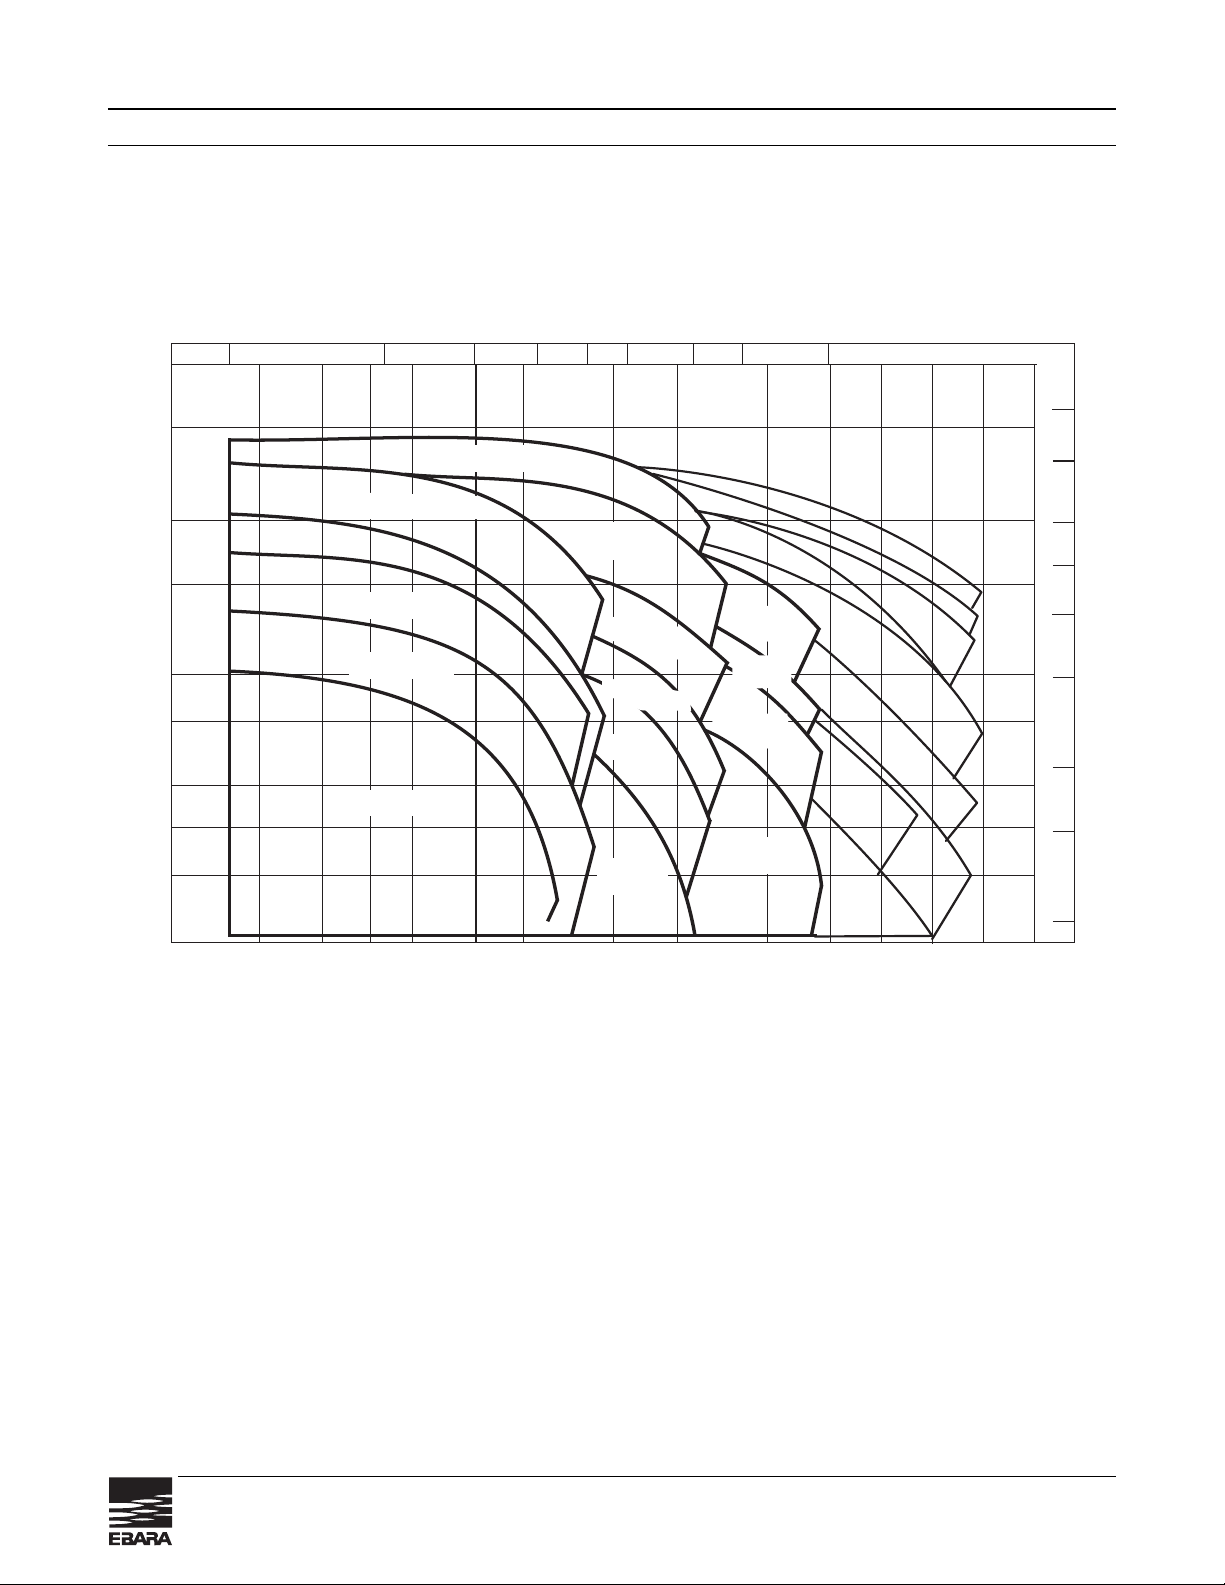
Model 3U / 3UB Selection chart Synchronous Speed 3450 RPM
0.1 0.2 0.3 0.4 0.5 0.6 0.8 1.0 1.5
100M
80
60
50
40
30
20
15
10
Ft
300
200
150
100
80
60
50
20 30 40 50 60 80 100 150 200 300 400 600 700
M
3
/MIN
CAPACITY IN GPM
TOTAL HEAD
*
Three phase motor only
50-160 10HP
40-160 7½HP
32-200 7½HP
32-200 7½HP
32-125-3HP
50-125
7½HP
40-125A 5HP
50-125-1
10HP
40-125B 5HP
*50-160-1
15HP
*40-200A 15HP
40-160-1 10HP
50-160 10HP
32-160A-5HP
32-160B-5HP
32-200-1-10HP
*40-200B-15HP
40-160 7½HP
1. 3U65-125-7.5HP
1
2. 3U65-125-10HP
2
3. 3U65-160-10HP
3
4. 3U65-160-15HP*
4
5. 3U65-160-20
HP*
5
40
30
6. 3U65-160-25
HP*
6
7. 3U65-200-20HP*
7
8. 3U65-200-25
HP*
8
9. 3U65-200-30HP*
9
Page 6

EBARA End Suction Centrifugal 3U / 3UB
Operating, Installation, and Maintenance
EBARA Fluid Handling
www.pumpsebara.com
6
(t) 803 327-5005 • (f) 803 327-5097
rev. 02/09
Standard Optional
Size
Suction 3U32 – 2'' ANSI Equivalent Companion Flange kit
(150 lb. ANSI R.F. equivalent) 3U40 – 2
1
/2
'' ANSI Equivalent 150 Lb. ANSI, Female NPT
3U50 – 2
1
/2'' ANSI Equivalent
3UB65 – 3'' ANSI Equivalent
Discharge 3U32 – 1
1
/4'' ANSI Equivalent
(150 lb. ANSI R.F. equivalent) 3U40 – 1
1
/
2'' ANSI Equivalent
3U50 – 2'' ANSI Equivalent
3UB65 – 2
1
/2'' ANSI Equivalent
Range of HP 3U – 3 HP to 15 HP
3UB – 7
1
/2 HP to 30 HP
Range of Performance
Capacity 13 to 750 GPM at 3450 RPM
Head 33 to 250 feet at 3450 RPM
Liquid handled
Type of liquid Clean water
Temperature 212°F (100°C) Max. 250°F (121°C) with optional
high temperature seal
Max. working pressure 230 PSI (15 Bar)
Materials 3U 3UB
Casing 304L Stainless Steel 304L Stainless Steel
Impeller (closed type) 304L Stainless Steel Bronze
Stainless steel option for 3UB models
Shaft Sleeve 304L Stainless Steel 304L Stainless Steel
Bracket Cast iron Cast iron
Shaft Seal
Mechanical Seal – Type 21
Seal Material Carbon/Ceramic/Viton Consult factory for additional
Carbon/Ceramic/Buna optional seal availability
Hot water – Carbon/Ni-Resist/Viton, 250°F (121°C) max.
Direction of Rotation Clockwise when viewed from motor end
Motor
Type NEMA JM, TC, TSC Frame
Speed 60 Hz, 3450 RPM (2 poles) 4 pole – consult factory as noted
Bearing Ball Bearing
Single Phase TEFC – 3 HP
ODP – 3 HP to 10 HP
Three Phase TEFC – 3 HP to 30 HP Explosion proof – consult factory
ODP – 3 HP to 30 HP for availability
208-230/460V Washdown duty – consult factory
Motor Protection Overload protection must be provided for availability
Standard Accessories Suction and Discharge Flange Gasket
Motor support
Specifications
Page 7

EBARA End Suction Centrifugal 3U / 3UB
Operating, Installation, and Maintenance
EBARA Fluid Handling
www.pumpsebara.com
7
(t) 803 327-5005 • (f) 803 327-5097
rev. 02/09
Sectional view – 3U / 3UB Type 1
001
011
018
021
021
039
041
111
115
117-1
117-2
117-3
125
160
212
800
Casing
Casing cover
Bracket
Impeller (3U)
Impeller (3UB)
Key
Shaft sleeve
Mechanical seal
O-Ring
Gasket
Gasket
Gasket
Impeller Bolt
Motor support (not shown)
Plug
Motor
Suction Flange Gasket
Discharge Flange Gasket
304L Stainless
304L Stainless
Cast Iron
304L Stainless
Bronze
304L Stainless
304L Stainless
–
Viton
Nylon
Nylon
Nylon
304L Stainless
Steel
304L Stainless
–
Viton
Viton
1
1
1
1
1
1
1
1
1
1
1
1
1
1 set
1
1
1
1
Part No. Part Name Material No. for 1 Unit
212
001
125
021
115
111
011
117-3
041
117-2
129
135-1
018
039
800
117-1
Page 8

EBARA End Suction Centrifugal 3U / 3UB
Operating, Installation, and Maintenance
EBARA Fluid Handling
www.pumpsebara.com
8
(t) 803 327-5005 • (f) 803 327-5097
rev. 02/09
001
003
003A
004
006
007
011
012
025
026
032
034
040
041
042
042A
044
234
Casing
Motor bracket
Adapter ring
Casing cover
Coupling
Impeller
Mechanical seal
Motor
Drain plug
O-ring
Key
Impeller nut
Flange Gasket
Flange Gasket
Motor support
Casing support (65-160 25HP only)
Coupling guard
Lip seal
304L Stainless
Cast iron
Cast iron
304L Stainless
Steel / Stainless steel
Bronze/optional Stainless Steel
304L Stainless
Viton
304L Stainless
Stainless / Nylon
EPDM
EPDM
Steel
Steel
Stainless Steel
304L Stainless
1
1
1
1
1
1
1
1
1
1
1
1
2
2
2
2
2
1
Part No. Part Name Material No. for 1 Unit
Sectional view – Model 3U 65 Type 3
3U 65-160/20
3U 65-160/25
3U 65-200/20
3U 65-200/25
3U 65-200/30
Page 9

EBARA End Suction Centrifugal 3U / 3UB
Operating, Installation, and Maintenance
EBARA Fluid Handling
www.pumpsebara.com
9
(t) 803 327-5005 • (f) 803 327-5097
rev. 02/09
3U / 3UB Installation Instructions
Mounting the Assembly
Do not operate the pump unless the assembly is securely and properly mounted.
Misalignment of the motor/pump assembly or not having the assembly reasonably level may cause pump vibration,
noisy operation, fluid leaks, or air leaks and air locks in the suction pipe.
1. Place the motor/pump assembly in its intended operating position.
2. Level the pump through the centerline of the motor/pump assembly suction port.
Initial Operation
Make certain the motor is not connected to a power source until the motor is properly assembled and mounted.
Serious personal injury or damage to the motor/pump assembly could occur if the motor is activated improperly.
Only certified electricians should make electrical connections.
1. Prime the pump by adding fluid to the volute case through the top plug.To properly prime the pump, venting
may be required.
2. Check the nameplate on the motor to determine the correct wiring procedure for your intended power source
and if the motor is single or three phase. Connect the motor to a power source by following the wiring procedure
on the motor's nameplate.
Note:
a. Single phase motors are typically dual voltage. In some cases, three phase motors are tri-voltage. Check the
nameplate and follow the proper wiring procedure for the voltage you are using. Improperly wiring the motor
could result in damage to the motor.
b. Three phase motors require a control box. Install overload protection to help prevent motor damage.
c. Depending on the wiring, three phase motors may start in reverse. Interchange any two power leads to
change the starting direction and pump rotation.
• Always follow correct operating procedures.
• Always disconnect the motor/pump assembly from all power sources before servicing the pump or motor.
• Periodically check all power connections, bolts, screws, and the motor's mounting.
• Failure to properly follow assembly and operating instructions could result in damage to the pump and motor.
• Failure to properly install the impeller and impeller nut could result in damage to the pump and could cause
serious personal injury.
WARNING
Initial Operation
Make certain the motor is not connected to a power source until the motor is properly assembled and mounted.
Serious personal injury or damage to the motor/pump assembly could occur if the motor is activated improperly.
Only certified electricians should make electrical connections.
1. Prime the pump by adding fluid to the volute case through the top plug.To properly prime the pump, venting
may be required.
2. Check the nameplate on the motor to determine the correct wiring procedure for your intended power
source and if the motor is single or three phase. Connect the motor to a power source by following the wiring
procedure on the motor's nameplate.
Page 10

EBARA End Suction Centrifugal 3U / 3UB
Operating, Installation, and Maintenance
EBARA Fluid Handling
www.pumpsebara.com
10
(t) 803 327-5005 • (f) 803 327-5097
rev. 02/09
Service
Keep ventilation openings clear of extraneous objects which may hinder free flow of air thru motor. Motor bearings are lubricated
during manufacture. Additional lubrication is not required during their normal lifetime.
Maintenance
Disassembly Instructions
All pumping parts can be removed from case without disturbing the piping.
POWER SUPPLY – Open the power supply switch contacts and remove fuses. Disconnect the electrical wiring from the motor.
VOLUTE CASE
(a) Drain pump case by removing drain plugs.
(b) Remove the bolts securing volute case to pump bracket.
(c) Pry volute case from casing cover with a screwdriver.
IMPELLER
(a) Hold the motor shaft with a screwdriver in the shaft end slot. Grasp and turn the impeller counterclockwise (as viewed
from pump end).
SEAL
(a) Remove the rotating part of the seal by pulling it off the shaft.
(b) The stationary seat can be pressed from the casing cover.
CHECK LIST FOR EXAMINATION OF PUMP PARTS
IMPELLER - Replace the impeller if any vane is broken, excessive erosion shows, or if labyrinth surfaces are worn. Impeller
cap screw, washer and lockwasher should be replaced if damaged.
MECHANICAL SEAL - Seal face, O-ring and sealing members should be free of burrs and dirt. Complete seal assembly
should be replaced if not in perfect condition.
SHAFT- Shaft sleeve surface under seal or packing must be clean, smooth and without any grooves. It should be replaced if
necessary.
VOLUTE AND SEAL/PACKING PLATE LABYRINTH SURFACES (Wear Rings)- If worn, replace the necessary part. If furnished with pressed in wear rings, only the rings need be replaced.
GASKETS - Volute, suction pipe and discharge pipe gaskets should be checked for damage. Replace if necessary.
NOTE
If replacement parts are ordered, please furnish the following information to your EBARA distributor:
1. Reference Numbers
2. Description of Pump Part
3. EBARA Model Number and Serial Number on the Nameplate.
WARNING
CAUTION
Draining
The pump and piping should always be protected against freezing temperatures. If there is any danger of freezing, the unit
should be drained. To drain the pump, remove the drain plug at the bottom of the volute, and remove the priming plug to
vent the pump. Drain all piping.
Page 11

EBARA End Suction Centrifugal 3U / 3UB
Operating, Installation, and Maintenance
EBARA Fluid Handling
www.pumpsebara.com
11
(t) 803 327-5005 • (f) 803 327-5097
rev. 02/09
Position the pump on its end with the shaft up. The work surface should be level, capable of supporting the motor.
Make certain the motor is not connected to a power source. Do not install or assemble the pump on a motor
connected to a power source. Serious injury could occur if the motor activates during pump assembly.
Assembling the Pump – Models 3HP - 15HP
(see page 7 for sectional view)
1. Position a Nylon gasket (117-3) over the motor shaft.
2. Carefully press the rotating seal assembly onto the shaft sleeve (041). The smooth face of the
rotating ring must make good contact with the seal seat and the seal retainer must seal against the shaft sleeve.
Note: Seal faces should be wiped clean with non-oil based solvent or alcohol.
3. Using finger pressure only, insert the seal seat into the casing cover (011). Press the seal until it evenly
bottoms out in the seal cavity.
4. Position the cast iron motor bracket (018) over the shaft. Fasten the bracket to the motor, tightening bolts
using a cross-tightening pattern. (Tighten the bolts to the factory recommended torque specifications of 8 ft. lbs.)
Overtightening may cause stripping of threads.
5. Carefully position the casing cover (011) and seal over the shaft. Be careful not to damage the stationary
seal seat.
6. Slide the stainless steel shaft sleeve, with rotating assembly, over the motor shaft.
7. Position the O-ring (115) around the casing cover (011). Do not cut, nick, or damage the O-ring during the
installation.
8. Install the impeller shaft key (
3
/16" x 3/16" x 1 3/16").
9. Place the seal spring assembly over the rotating piece of the seal in position to receive the impeller.
10. Place a Nylon gasket (117-2) on top of spring retainer.
11. Firmly press the impeller (021) into position by aligning the slot over the shaft key. Press the impeller down
the shaft until it bottoms and seats squarely against the Teflon gasket (117-2) and shaft sleeve (041).
12. Place a Nylon gasket (117-1) over the impeller hub and into the impeller eye. Install the impeller bolt (125) to
secure the impeller to the shaft. Do not overtighten the shaft bolt. (Use a thread compound or cement to
secure the shaft bolt and prevent it from working loose.)
13. Tighten the impeller bolt. (Tighten the bolts to the factory recommended torque specifications of 11 ft. lbs.)
14. Install the pump volute (001) over the seal plate. Rotate the volute to align with the bolt holes and secure it
with the bolts, washers, and nuts. Cross-tighten the bolts to the factory recommended torque specifications
(8 ft. lbs.).
15. With a socket wrench, rotate impeller to check for alignment. If rubbing against casing, loosen bolts on
casing and retighten.
3U / 3UB Assembly Instructions
WARNING
Page 12

EBARA End Suction Centrifugal 3U / 3UB
Operating, Installation, and Maintenance
EBARA Fluid Handling
www.pumpsebara.com
12
(t) 803 327-5005 • (f) 803 327-5097
rev. 02/09
Assembling the Pump – Models 20HP - 30HP
(see page 8 for sectional view)
1. Apply a coat of anti-seize lubricant to the inside of the coupling (005).
2. Insure that key is installed in motor shaft keyway, slide coupling (005) onto shaft. (
Tip:
To ease the installation
of the coupling tighten the set screw on the side of the coupling. Tightening this screw will cause the coupling
to open slightly allowing for easier installation. After the coupling is in place be sure to loosen the set screw
to release the pressure and allow the coupling to close down on the motor shaft.)
3. Secure the coupling to the motor shaft by tightening the socket head bolts in the side of the coupling. Torque
to 11ft. lbs.
4. Fasten the adapter ring (003A) to the motor using a cross tightening pattern.
5. Fasten the motor bracket (003) to the adapter ring.
6. Apply a thin coat of non-petroleum based lubricant (i.e. dish soap) to the stationary seal seat in the casing
cover (004), using finger pressure only press the stationary seal into the seal seat. Wipe the seal face clean
with alcohol and a soft cloth.
7. Position the o-ring ( 026 ) around the casing cover.
8. Using hand pressure or a rubber mallet, press fit the casing cover ( 004 ) onto the motor bracket (003).
9. Apply a thin coat of non-petroleum based lubricant (i.e. dish soap) to the inside of the rubber boot on the
rotating seal. Slide the seal onto the coupling pushing it gently until it contacts the stationary seal that was
installed in step 6. Place the spring and spring retainer over the coupling and onto the rotating seal.
10. Place the stainless steel lip seal (234) onto the spring retainer insuring that the raised surface of the lip seal
seats into the spring retainer.
11. Install the impeller shaft key (032) into the coupling shaft.
12. Slide impeller (007) over the key and shaft.
13. Tighten the impeller nut (034) to secure the impeller in place. Tighten to 11 ft.lbs
14. Install Casing (001). Take care to align the bolt holes. Cross tighten the bolts to 8 ft. lbs.
15. With a socket wrench, rotate impeller to check for proper casing alignment. If rubbing against casing occurs
loosen casing bolts and retighten taking care to cross-tighten and use equal torque.
16. Install motor support (042) or casing support (042A) as required.
Page 13

EBARA End Suction Centrifugal 3U / 3UB
Operating, Installation, and Maintenance
EBARA Fluid Handling
www.pumpsebara.com
13
(t) 803 327-5005 • (f) 803 327-5097
rev. 02/09
TROUBLE
Pump does not run.
Pump does not pump water.
Inadequate quantity.
Overcurrent
Pump vibrates, excessive operating
noise
Pressurizing application.
Pump starts and soon stops
Pump does not stop
POSSIBLE CAUSE
Faulty connection of power supply circuit.
Wrong wiring of control circuit.
Bound shaft
Mechanical seal faces stuck together
Faulty motor
Damage to bearing
Considerable voltage drop.
Rotation direction reversed.
Lack of priming.
High discharge head.
Large piping loss.
Clogged foot valve.
Leakage from suction piping.
Too high suction lift.
Low water level.
Considerable fluctuation of power supply
voltage.
Considerable voltage drop.
Low head and overflow rate.
Damaged bearing.
Beyond rated capacity.
Cavitation.
Improper piping.
Damaged bearing.
Foreign matter clogging cooling fan.
Too limited pressure switch setting.
Leakage in system.
Too high pressure setting.
TROUBLESHOOTING
Check power supply circuit.
Correct control circuit.
Remove cause of obstruction.
Release seal by turning shaft.
Repair or replace motor.
Repair or replace any damaged bearing.
Correct rotation direction.
Re-prime the pump.
Re-examine the plan.
Re-examine the plan.
Clear foot valve suction.
Check and repair suction piping.
Re-install as per our instructions.
Foot valve in ample immersion.
Throttle flow rate at outlet.
Replace any damage bearing.
Reduce flow rate.
Consult distributor
Secure piping again.
Replace any damaged bearing.
Remove foreign matter.
Replace pressure switch to wider range.
Check and repair leaks.
Reduce max pressure setting to the
lower in pressure switch.
MAINTENANCE:
The pump does not require special maintenance.
The following rules must be observed for safe operation:
If the pump is not going to be used for a long period, the pump should be drained of water and flushed with clean water.
Where the pump is exposed to freezing temperatures, it should always be left drained when not in use.
*All specifications subject to change without notice.
Troubleshooting
Page 14

Page 15

Page 16

EBARA Fluid Handling
1651 Cedar Line Drive • Rock Hill, SC 29730
(t) 803 327 5005 • (f) 803 327 5097
www.pumpsebara.com
© 2005 EBARA International Corporation EFH 3U_3UB0209
Contact your dealer or supplier
for more information about other EBARA products
 Loading...