

EAW JFX100i, JFX100 Installation Instructions Manual
1. Inventory
Before beginning installation, inventory your
JFX100 bracket kit to items listed.
Item
Qty Description
A 1 Bracket/Wallmount
B 1 Plate/Top Hat Span
C 2 Screw, 3/8-16 x 1-1/2 inch Lg
D 2 Rubber Washer
E 2 Lock Washer
F 2 Flat Washer
Warning: Installation should only be done by an experienced technician. Improper installation
may cause damage, serious injury, or death.
2. Mounting the Bracket
Due to various construction methods and
materials, the hardware for securing the bracket
to the mounting surface is not supplied.
It is recommended that you consult a building
professional for the proper mounting hardware
before mounting the bracket (A). When horizontally
mounting an enclosure make sure the four
openings in the bracket arms face upward.
3. Installing the Plate/Top Hat Span
Remove the 2 screws (G) on each side of the top
hat. Fit the span plate (B) into the recess and
secure it to the cabinet with the same 2 screws
(G) just removed.
4. Removing the Threaded Plug
In the center of the top fly mount is a
3/8-16 plug (H). Remove it using a Phillips head
screwdriver.
5. Choosing which Slot to Use
There are two slots in the bracket arm. The
forward slot is used in these instructions. The
forward slot is intended for use with weather
protected cabinets. The back slot is intended
for indoor installations where cable connections
are made to the terminal strip.
Installation Instructions
JFX100 Bracket Kit
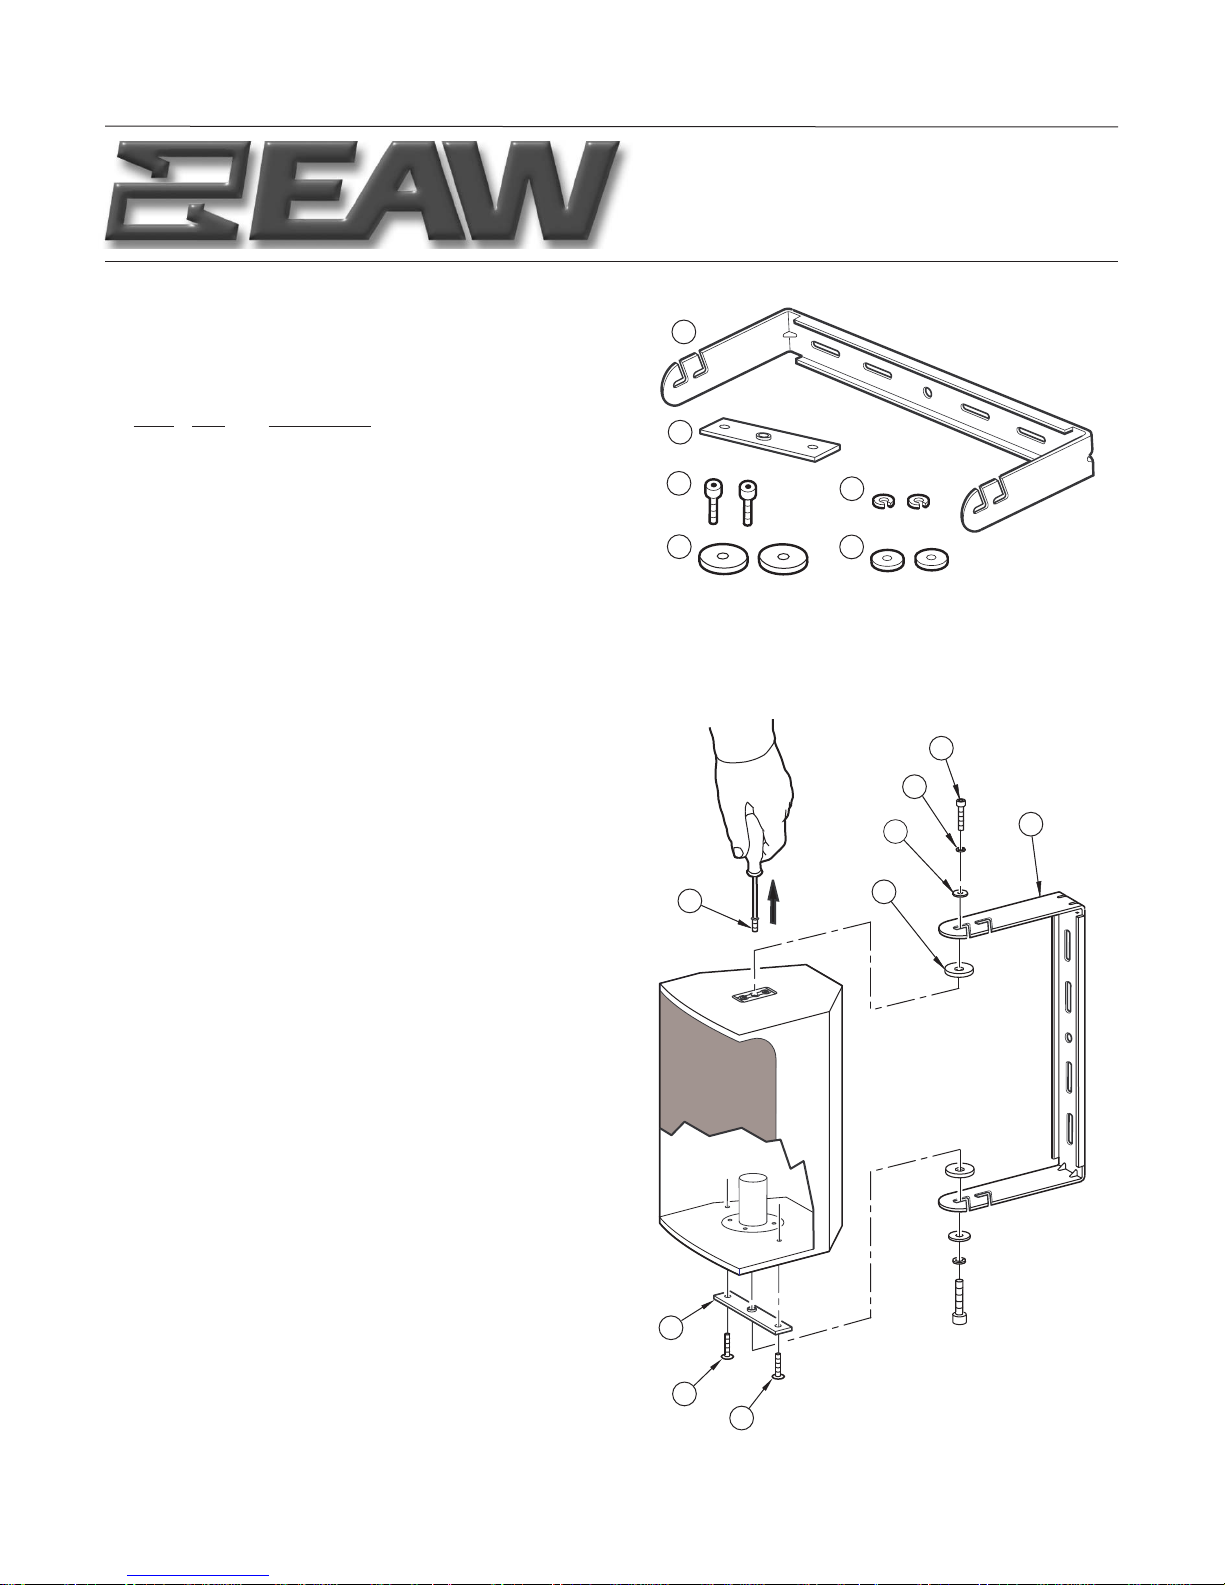
A
B
C
D
E
F
H
C
E
F
D
A
B
G
(2) SCREWS (G) ORIGINALLY INSTALLED
IN CABINET TO BE REUSED
(1/4-20 X 1-1/4 LG PH FHMS)
G

6. Hanging the Cabinet
a. Place a rubber washer (D) on the bracket's (A) lower arm. Center it on the appropriate slot.
b. Position the cabinet between the bracket arms.
c. Hold the cabinet in position and insert the screw (C) with its lock washer (E) and flat washer (F) through
the bracket's bottom slot and into the threaded hole in the top hat spanning plate (B) and hand tighten.
c. Align the appropriate slot in the bracket’s top arm to the cabinet's 3/8-16 threaded hole.
d. Position a rubber washer (D) between the slot in the bracket’s (A) top arm and the cabinet’s top 3/8-16
threaded hole.
e. Hold the cabinet in position and insert the screw (C) with its lock washer (E) and flat washer (F) through the
bracket's slot and into the cabinet's top threaded hole and hand tighten.
f. Position cabinet and tighten both screws (C) with a 5/16 Allen wrench.
7. Pipe Clamp Installation
A user-supplied, heavy duty pipe clamp with
1/2 inch instrument yoke attachment bolt may
be affixed (Altman 510-HD or similar). Assemble
the pipe clamp to the bracket (A) as shown.
If you have questions about the JFX100 bracket installation please contact the EAW Application Support Group:
Tel 800-992-5013 (USA only)
Tel 508-234-6158
Fax 508-234-8251
E-mail asg@eaw.com
Thank you for purchasing
EAW products
The Laws of Physics |
The Art of Listening
RD0408 (A) MAR 06 EAW is the worldwide technological and market leader in the design and manufacture of high-performance, professional loudspeaker systems
.
 Loading...