

Page 1

QUICK START GUIDE
VERSION 1.0
QUICK START GUIDE
ELITE 3D PRINTER
Please read this User’s Manual carefully before use.
Please keep this User’s Manual properly for future reference.
Pictures are for reference only, subject to our available products.
Page 2

QUICK START GUIDE
1 Table of Contents
2 SAFETY INSTRUCTIONS
2.1 Machine placement
2.2 Specification for use of power supply
2.3 Instructions during printing
3 PRODUCT INTRODUCTION
3.1 Name of main components
3.2 Basic Parameter
4 UNPACKING AND INSTALLATION
5 INTRODUCTION OF STARTING UP THE PRINTER
5.1 Power On
............................................................................................................................................
.................................................................................................................................
....................................................................................................................
......................................................................................................................................
....................................................................................................................
.......................................................................................................................................
.............................................................................................................................
.................................................................................................................................................
....................................................................................................
....................................................................................................
1
1
1
1
1
1
2
3
4
4
5.2 Printing
5.3 Instruction of LCD Display
6 MAINTANANCE
7 LIST OF ACCESSORIES
8 FAQ
...........................................................................................................................................................................
.....................................................................................................................................................
........................................................................................................................................................
...............................................................................................................................................
.......................................................................................................................
6
7
7
7
8
Page 3

QUICK START GUIDE
2 SAFETY INSTRUCTIONS
2.1 Machine placement
When moving the machine, pay attention to handle it gently to avoid touching the interior structure
This machine is suitable for placed in a ventilated, cool, dry and dustless environment.
When using the printer, pay attention to the heat dissipation of its surrounding environment and
Please do not put the machine near explosives and high heat sources.
Please do not put this machine in an unstable working environment or a working environment with
Please do not pile weights on this machine.
2.2 Specification for use of power supply
Please use the power cord supplied with this machine.
This machine applies to 220V power supply.
Please do not plug and unplug the power connector with wet hands.
Please make sure to insert the plug completely into the socket.
Please do not deliberately pull and excessively bend the wire supplied with this machine to avoid
2.3 Instructions during printing
Please do not operate this printer in the absence of personnel supervision.
During the printing process and right after the printing process, please do not touch the interior
If the printer discharges smoke when printing, please turn off power switch immediately to stop
PRODUCT INTRODUCTION
2.4 Name of main components
Cable quick Coupler
Teflon Feeding Tube
LCD display
Printing Platform
Print head
Before installing and using this machine, make sure to read the following contents. Please do not use this
machine with the methods not described in this User’s Manual. Try you best to avoid possible physical
injury and property losses.
of the printer.
avoid placing it on thick carpeting or close to wall.
large vibration.
open circuit or short circuit.
structure and accessories of the printer to avoid scalding.
printing and contact the dealer.
1 | P a g e
Page 4

QUICK START GUIDE
2.5 Basic Parameter
Print parameters
Electric parameters
Nozzle diameter
0.4mm
Print material
PLA/ABS
Extrusion temperature
180-240°C
Recommended
temperature
PLA: 190-210°C
ABS: 210-230°C
Print speed
10-60 mm/S
Layer thickness
0.05-0.2mm
Molding size
L200*W185*H200mm
Machine size
L393*W371.6*H406.6m
Compatible systems
Windows
Connection
SD Card USB connection for
printing
3D format supported
STL,OBJ
Print conversion
software
EASYWARE, CURA
Machine recognition
format
gcode
Net weight of the
product
18.5Kg
Ribbon Cable
Power Switch
Power Socket
Filament spool
Cable Locker
Working environment - Working temperature: 5 °C- 35°C, Relative humidity: 30%-90%
Power input: 110-240V AC, 50/60Hz;
Power output: 24V/DC, 8A
Maximum power: 350W
2 | P a g e
Page 5
QUICK START GUIDE
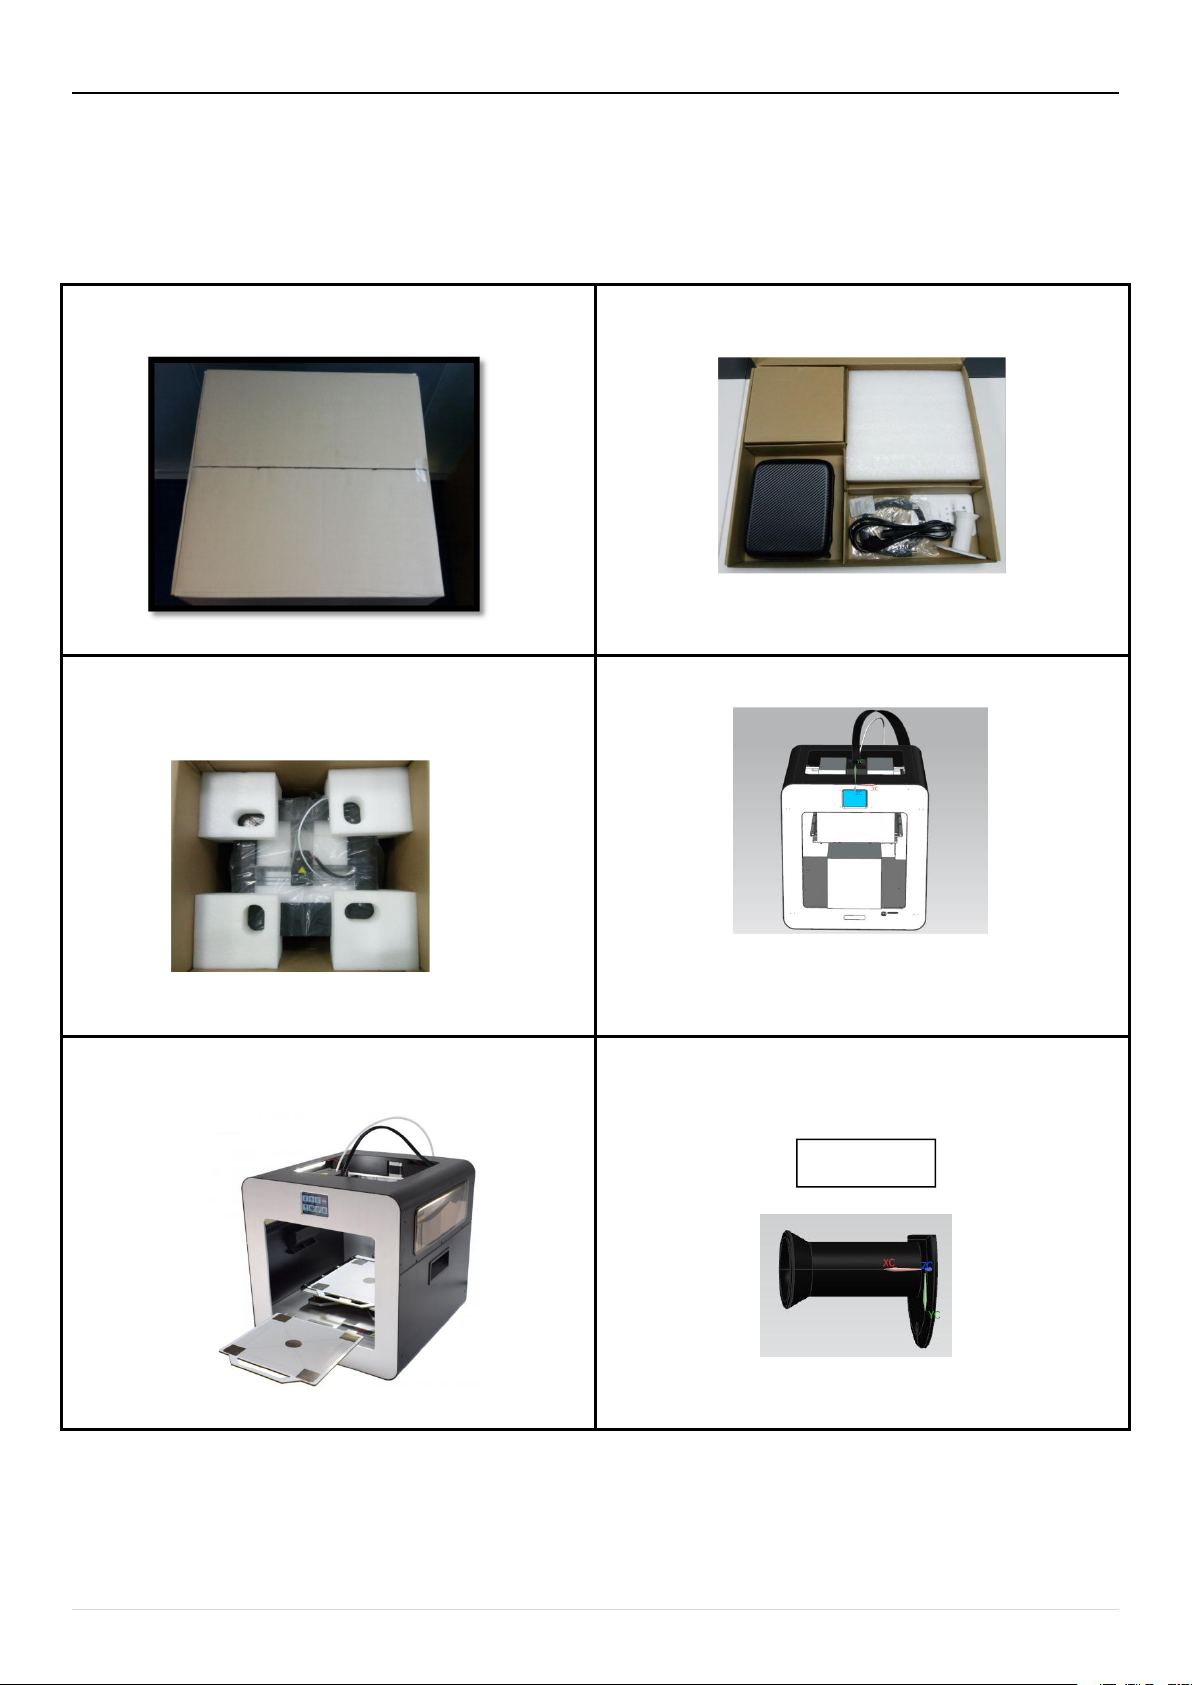
3 UNPACKING AND INSTALLATION
1. Open the packing box and check if it is sealed.
2. Unwrap the packing box to take out the manual
and check if the accessories are complete.
3.Take out the top accessory box and then take out 3D
Printer. Remove all packing foam and put printer on a level
table.
4.Take out the foam inside the printer
5. Put theglass-reinforced epoxy laminate sheet
into the platform
6. Fix the material holder on the hole at the back of the 3D
printer with the screws. Take out the printing Filament and
hang them on the material rest.
Rocker arm
3 | P a g e
Page 6
QUICK START GUIDE
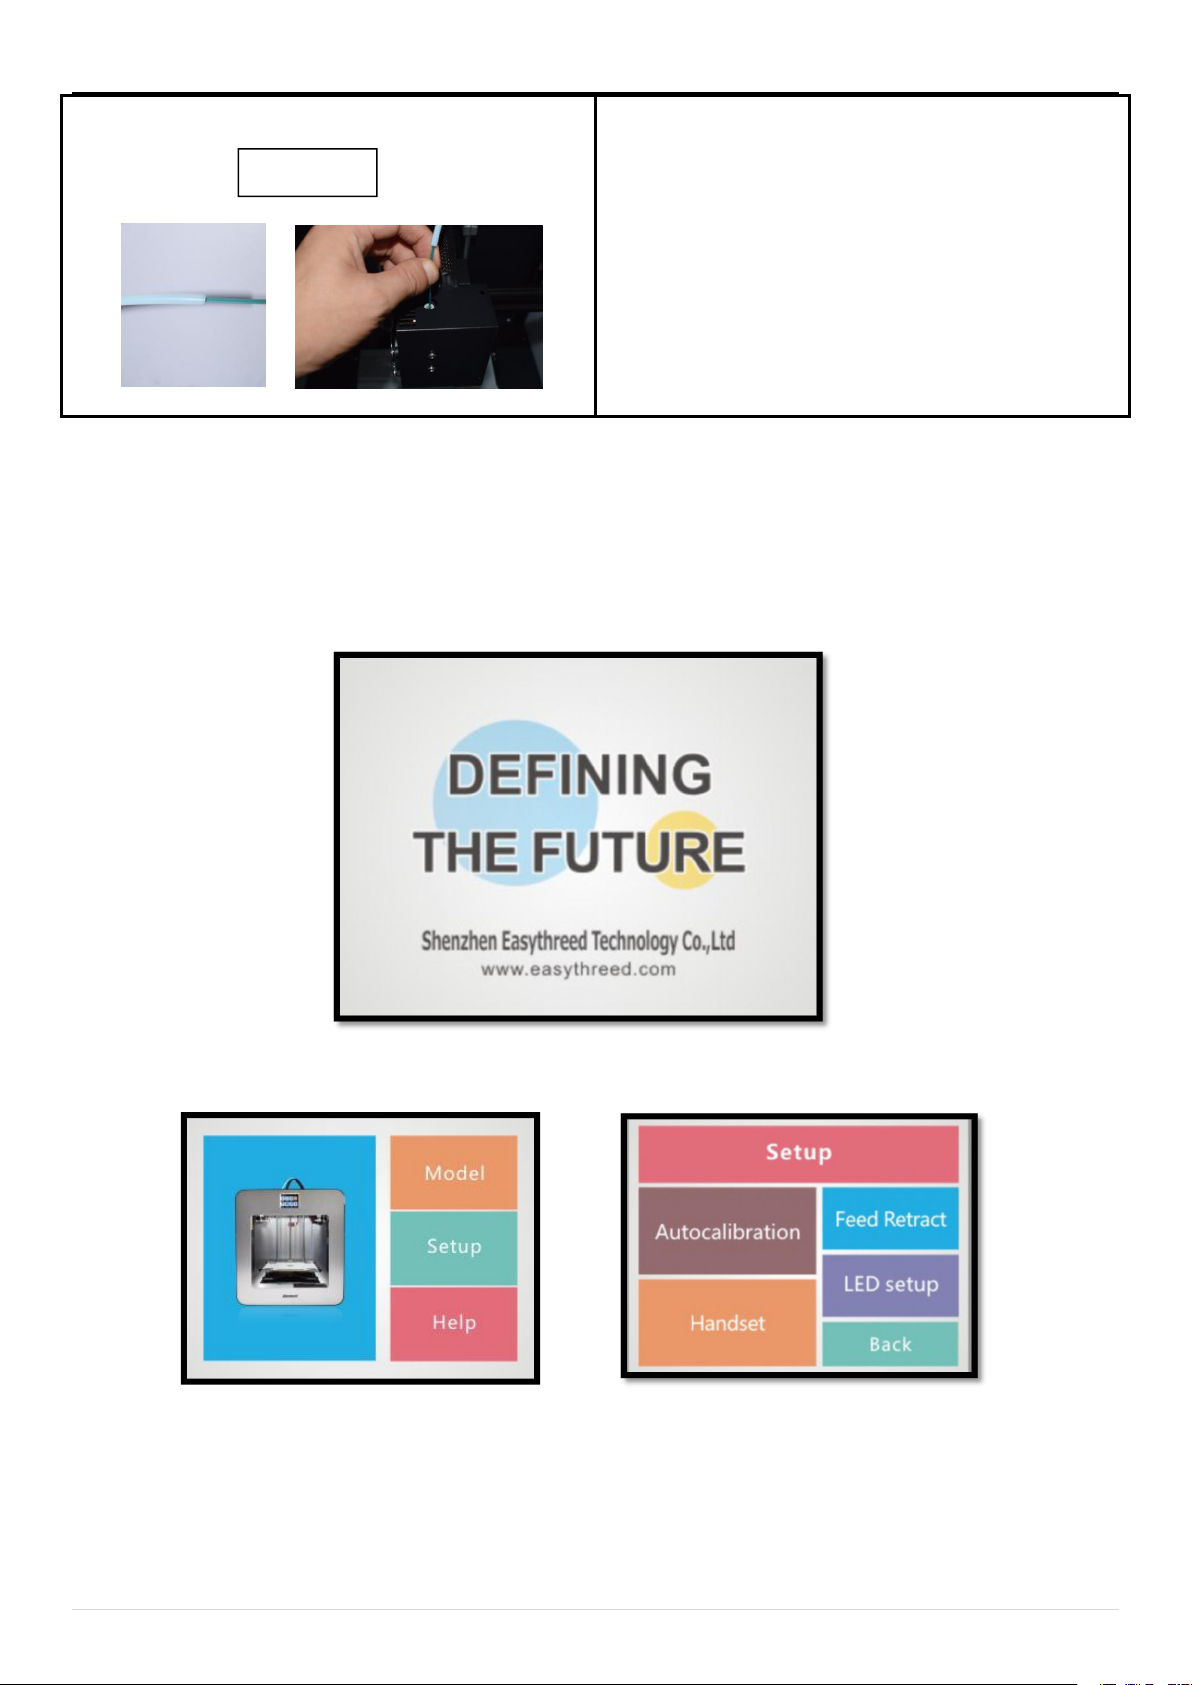
7. Put the material through the Teflon hose.
8. Start to print.
4 INTRODUCTION OF STARTING UP THE PRINTER
4.1 Power On
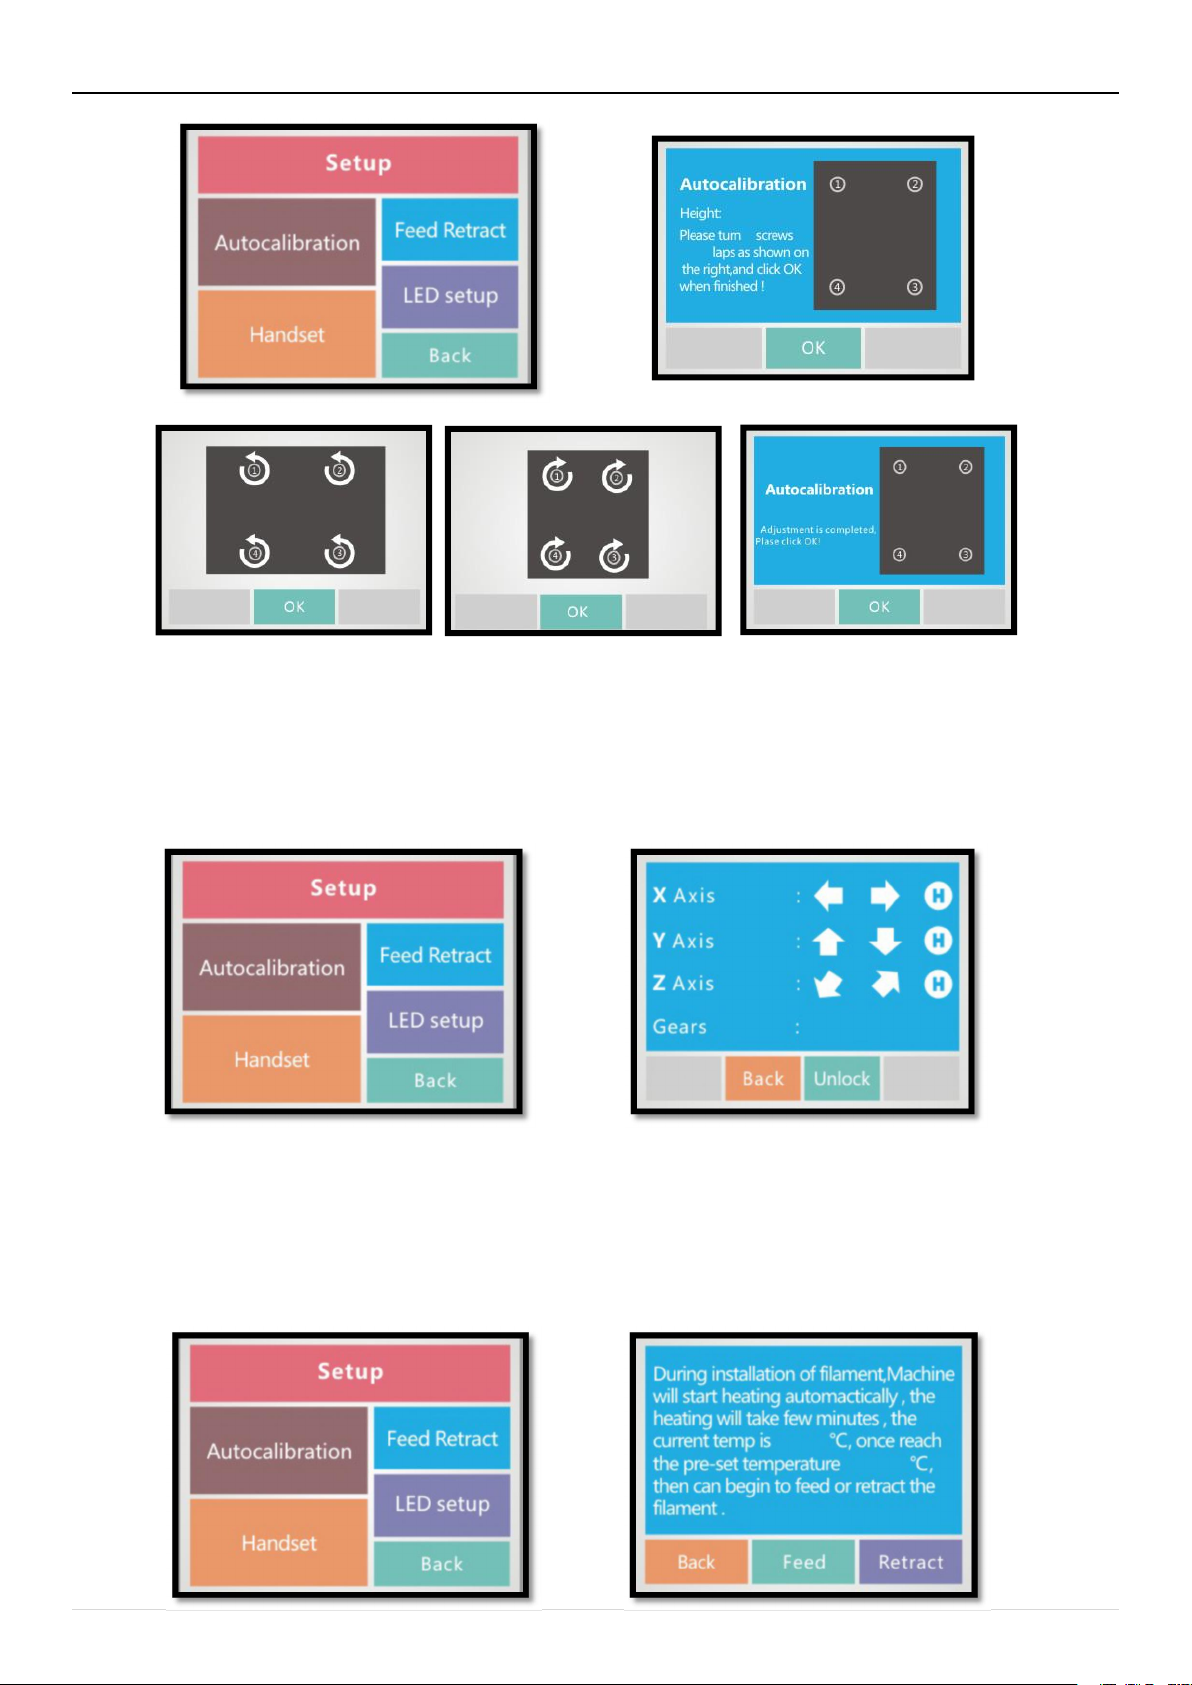
Plug the power cord->Insert SD card->Power Switch on. The 3d printer starts up, as follows,
Touch LCD Display, goes to operation page, click setup, it comes the following.
Click Auto calibration, goes to auto calibration page, operate per instruction, click back after operation completed.
Teflon hose
4 | P a g e
Page 7
QUICK START GUIDE
Click handset, goes to XYZ adjustment operation page, click back after operation completed.
Click Feed/Retract, goes to Filament operation page, operate per instruction, click back after operation completed.
“+” means the forward direction ,“-”means the reverse direction, “H”accordance axis to be zero,“Back”mean to the
setup auto page,“Unlock”means unlock the motor and can move by hand
Put filament to the hose, Once reach to the preset temperature, then click Feed, filament comes out from nozzle,
means feed successfully. Put filament to the hose, once reach to the preset temperature, then click retract, filament
comes out form the hose, means retract successfully.
5 | P a g e
Page 8
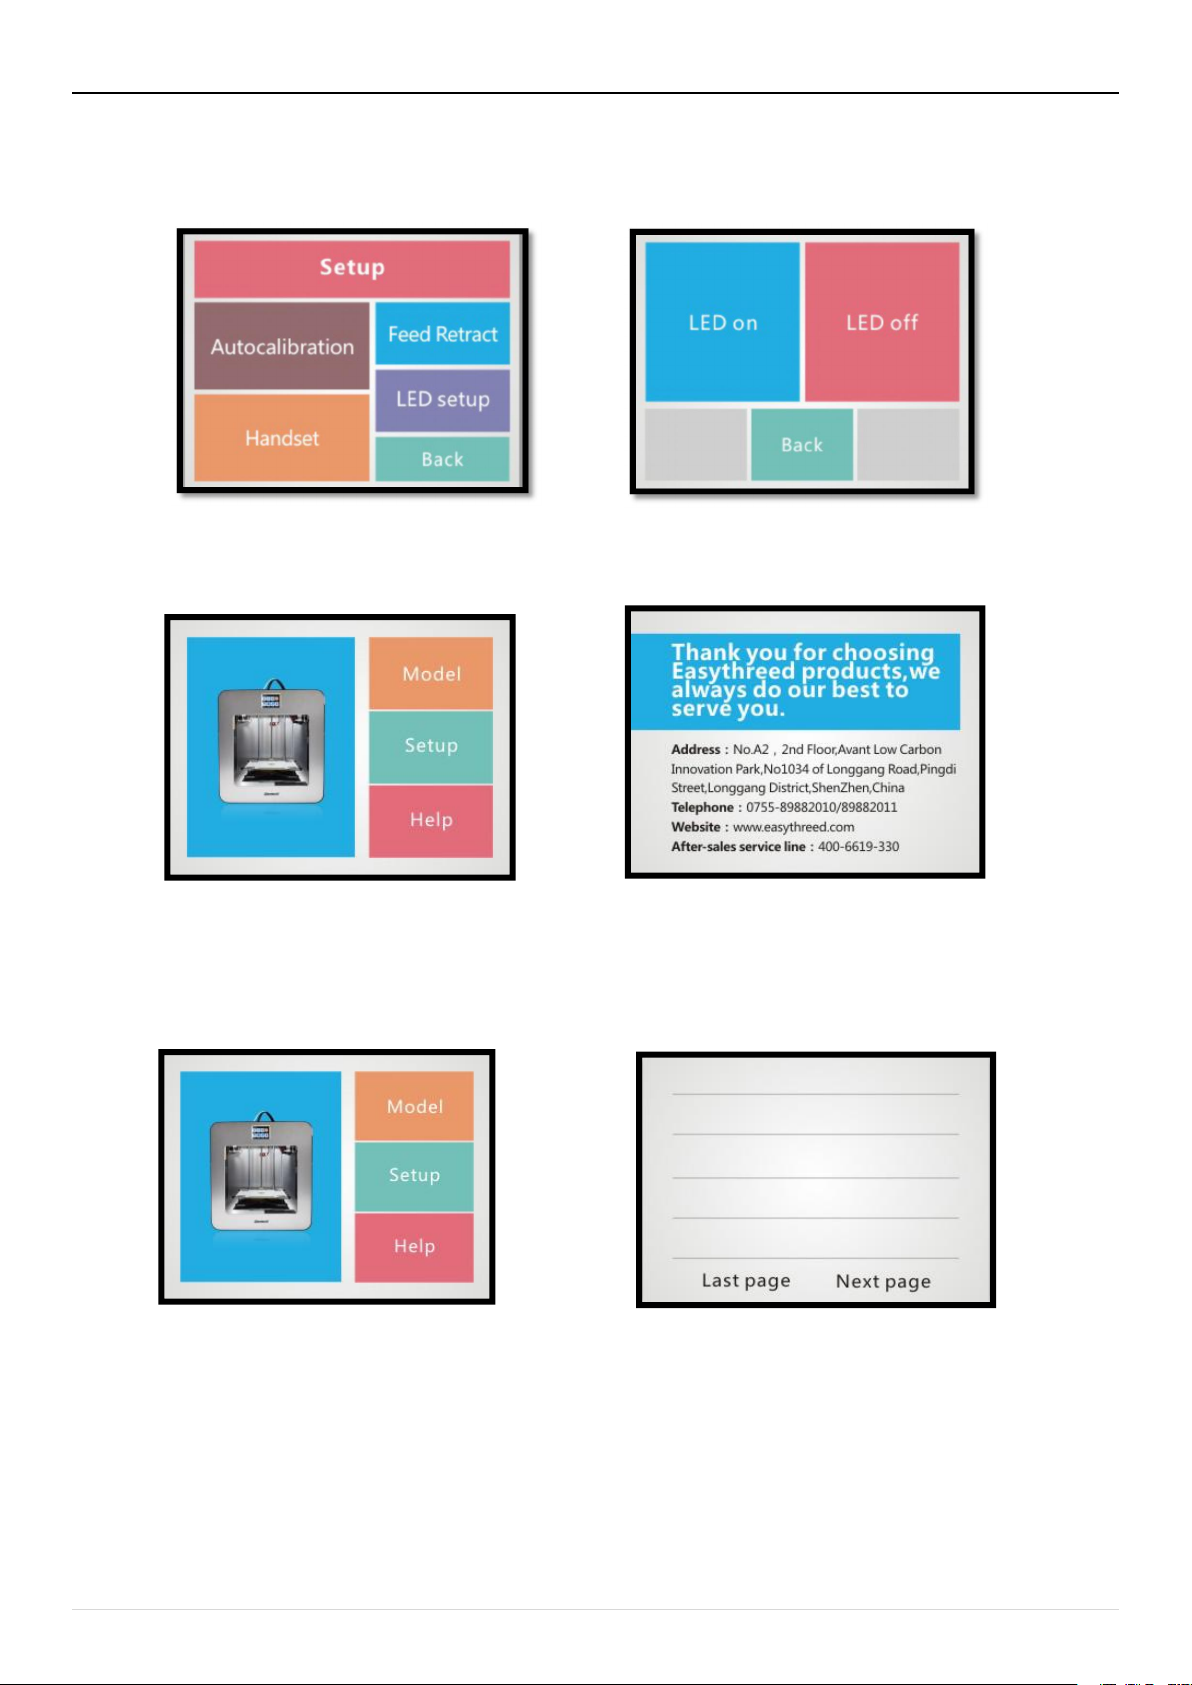
Click LED Setup, goes to LED operation page, click back after operation completed. Then click back again to the
home page.
Click help goes to help operation page, click back after operation completed and goes to home page.
4.2 Printing
pulunte
Fan
01
QUICK START GUIDE
① Select the Model icon to go to Model page, select the desired model to print from the list. It takes a few minutes to
wait for the temperature goes to the preset temperature. Once it reach, it would start to print automatically
② Reloading filament during printing.
Once click reloading button, the printing would be pause and goes to the reloading page, once reach the preset
temperature, click Retract, the filament would come out from the print head. Then put filament into the hose, once
temperature reach to the preset temperature, click Feed, material will feed successfully.then it will go on printing after
clicking continue printing.
6 | P a g e
Page 9
QUICK START GUIDE
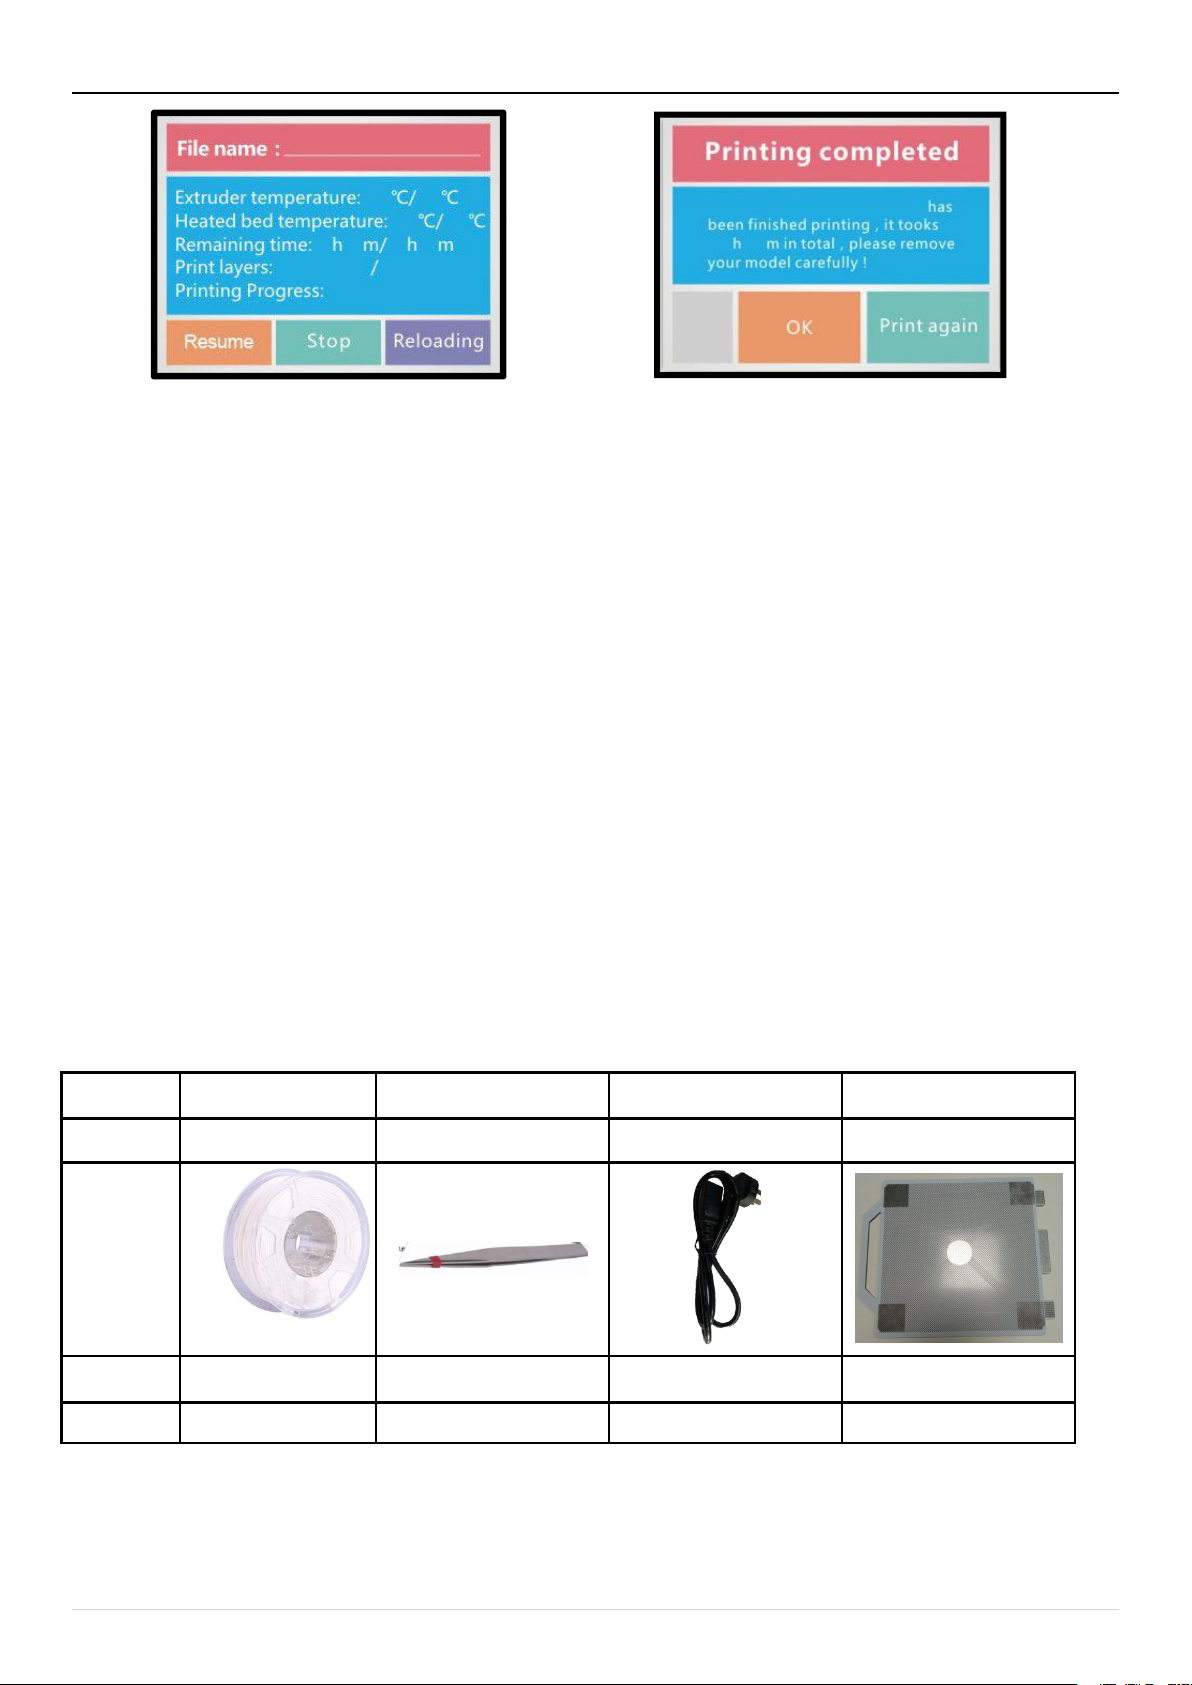
4.3 Instruction of LCD Display
5 MAINTANANCE
Do not try to use the methods those not described in this manual to disassembly or modify this machine, in order
When power is cut off, regularly clean the printer with a cloth to wipe off dust and residue. If a wet cloth is
After printing, try to discharge the residual print material in the nozzle and the extruder to avoid the nozzle from
The guide rail can be added with engine oil for one time every half a year for anti-rusting and lubrication.
Recommended temperature for the working environment: 5℃-30℃, do not air the machine body with a fan
Recommended humidity for the working environment: 20%-80%.
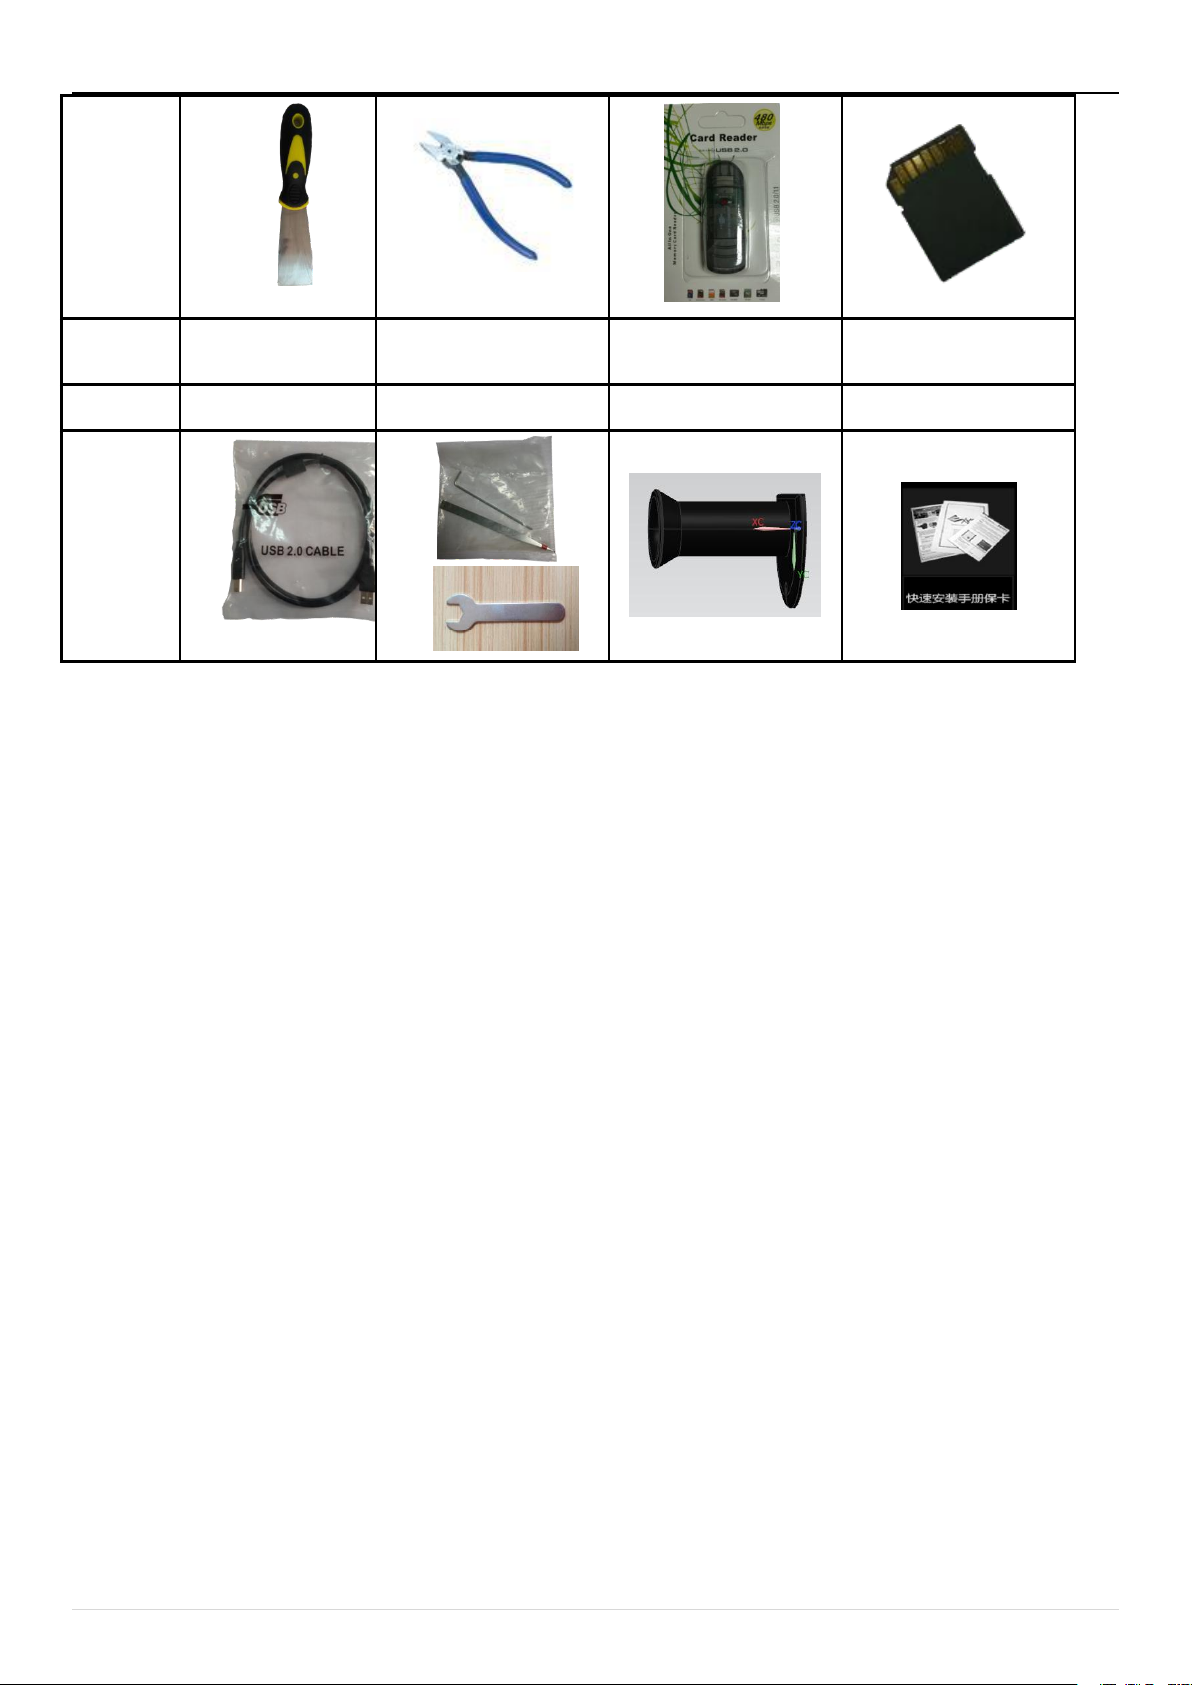
6 LIST OF ACCESSORIES
Directory
1. Print material
2. Tweezer
3. Power cord
4. Platform mat
Quantity
1 roll
1 pcs
1 pcs
1 pcs
Remark
Directory
5. Flat head shovel
6. Plastic nippers
7. Card reader
8. SD card
Quantity
1 pcs
1 pcs
1 pcs
1 pcs
The above images shows the common control function, Customer could adjust per their own need, if any questions, please
contact our after-sales department.
to avoid damage to the printer or other more serious accidents.
needed, do not use flammable solvents to touch the internal circuit of the printer to avoid fire or electric shock.
blockage when printing for the next time! This is the basic maintenance for a 3D printer.
during the printing process.
7 | P a g e
Page 10
QUICK START GUIDE
Remark
Directory
9. Data cable
10. Small wrench and
tweezers
11.Filament blanket
12、Instruction manual
Quantity
1 pcs
1 set
1 pcs
1 pcs
Remark
7 FAQ
Q1: Why is the printing model not adhesive to the platform?
A1: The nozzle is too far away from the platform, Adjust the distance between them to assure that the distance is just
enough to get through a calibrated film.
Q2: Why the filament do not come out from the nozzle?
A1: Check the filament feeder, heating and feeding filament, if there is external gear structure feeder, then to observe if
gear rotates or not, if there is built-in stepper motor feeder, then to observe if the motor is vibrating and working sound or
not, if no. Then check if the wire of filament feeder and motherboard is completed or not. Please repair timely if its
in-completed.
A2, Check temperature.
Printing nozzle temperature of PLA material range s from 195℃-210℃.
A3, Check if the nozzle is blocked.
If PLA filament is already heated to then use force to push the filament, if it does not come out, then disassemble the
nozzle and clean it or replace the nozzle.
A4, Check if nozzle is too close to the platform, if yes, then filament can not come out, so adjust the distance between
platform and nozzle to assure it can just enough to get through a calibrated film.
Q3, The problem of print model misplaced
A1, Mistake of slicing, re-slice, Or the software to reproduce GCode printing.
A2,The model drawings problem. If the model still misplaced after re-slicing the models, then its drawing has problem.
A3, the nozzle is forced to stop printing Path:
First, You can not touch the moving nozzle with your hands during the printing process. S
A4, motherboard problem:
If the above problems can not solve the dislocation, and if all dislocation happens at the same height of any model then
replace the motherboard. There is big gap between actual and theory printing accuracy
8 | P a g e
Page 11

QUICK START GUIDE
Q4, There has lots of filament piled up on the model surface,
A1, nozzle temperature is too high, consumables melt too fast to cause overflowing .
A2, The filament flow is too large, Software has filament flow settings, the general default value is 100%. Please down it
to 80% printing.
Q5, Poor surface after removing the support of FDM printing technology.
A1, The support can be set up to the 10% density. Then its easy to remove the support.
A2, can be slightly trimmed with a grinding tool, and then rubbed with a towel which dipped into acetone. Note to Wear
gloves, do not wipe too long so could avoid affecting the appearance and size of the model.
Q6, The inappropriate distance between the platform and nozzle.
The first layer is not formed because of large distance, if the distance is too small, the nozzle will scratch the
platform, . The distance between the nozzle and the platform must be adjusted to get through a calibrate film.
Q7. Printing supplies difference:
With the maturity of 3D printing, FDM printing supplies on the market is rich and multiple color, But the compatibility of
supplies and printers is particularly important.
Thank you for choosing EasyThreed 3D Printer!
Shenzhen EasyThreed Technology Co., Ltd.
Website: http://www.easythreed.com
Tel: 86-755-89882011
Address: No. A2, 2nd Floor, Avant Low Carbon Innovation Park,
No1034 of Longgang Road, Pingdi Street, Longgang District, ShenZhen,China
9 | P a g e
 Loading...