

Page 1
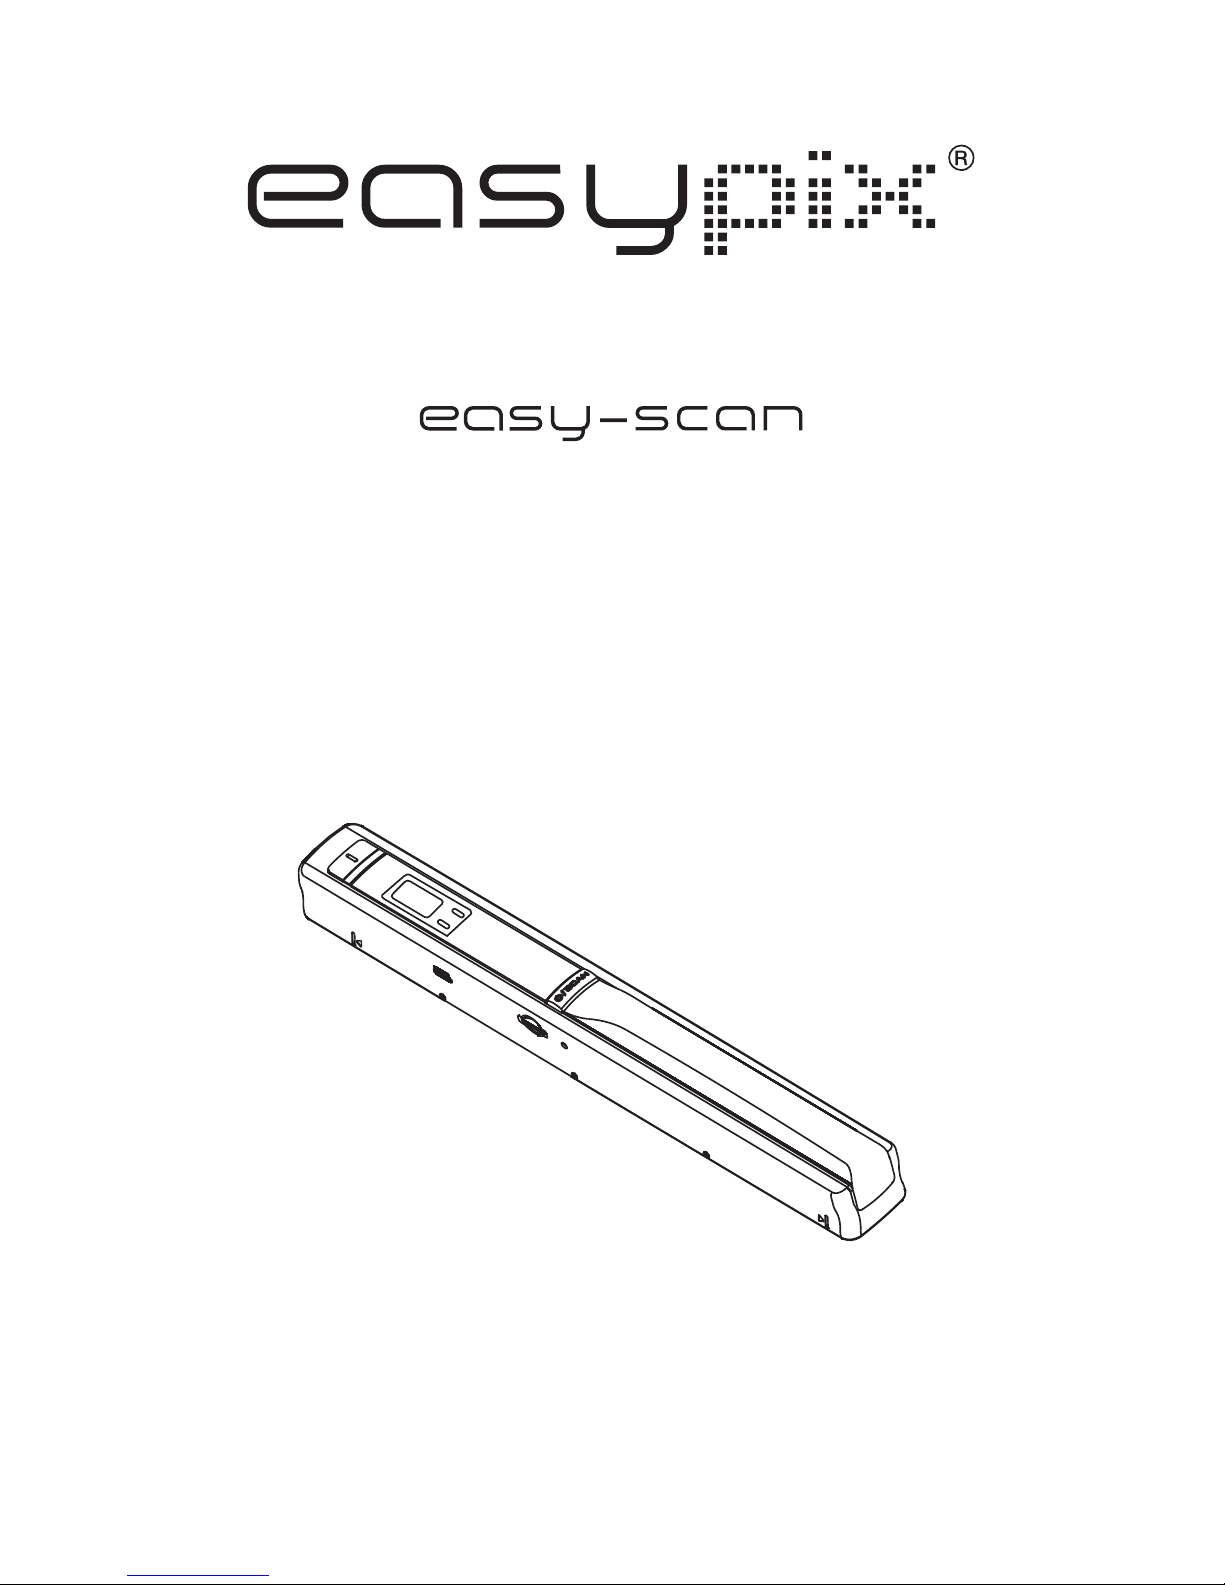
HANDY SCANNER
Instruction Manual
Page 2
1. Key features
Color JPG/PDF scan selection
900/600/300 dpi scan selection
Direct save JPG/PDF file to microSD card
Support microSD card up to 32GB
Driver free to download for Windows 7 / Vista / XP and
Mac OS10.4 or above (direct plug-in, driver installation not required)
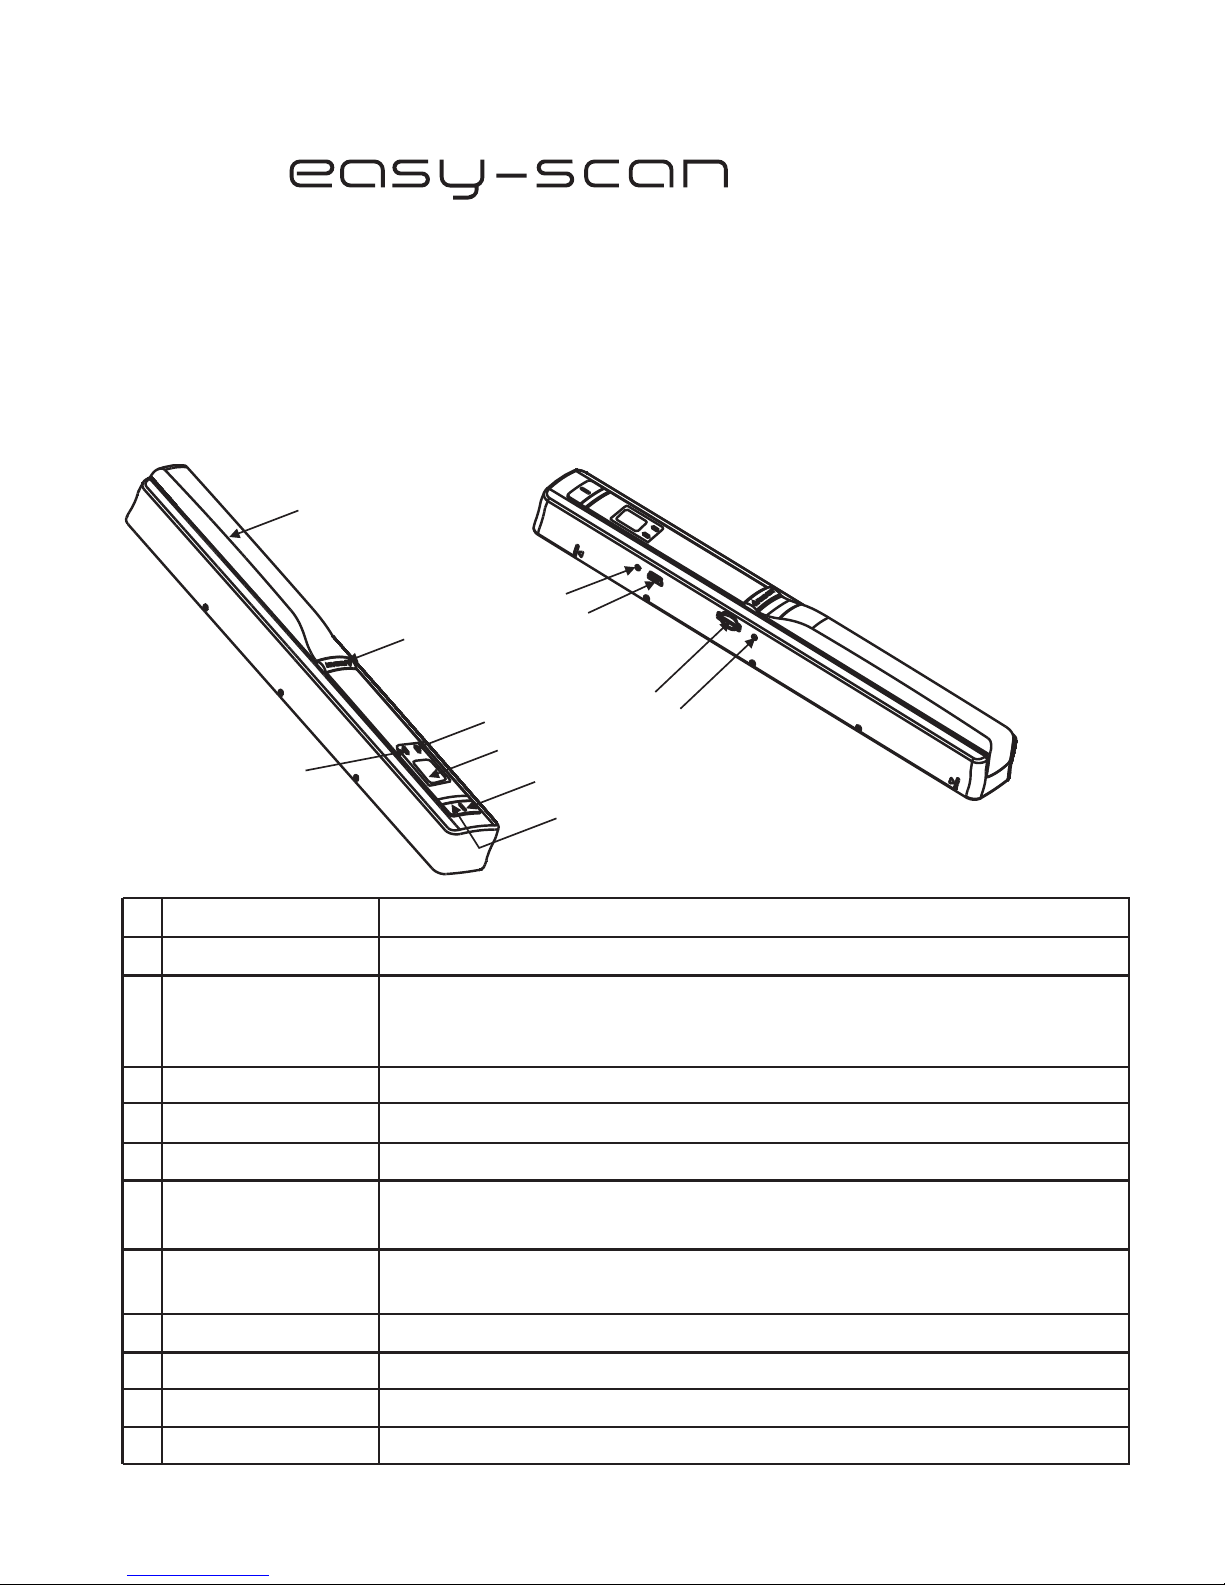
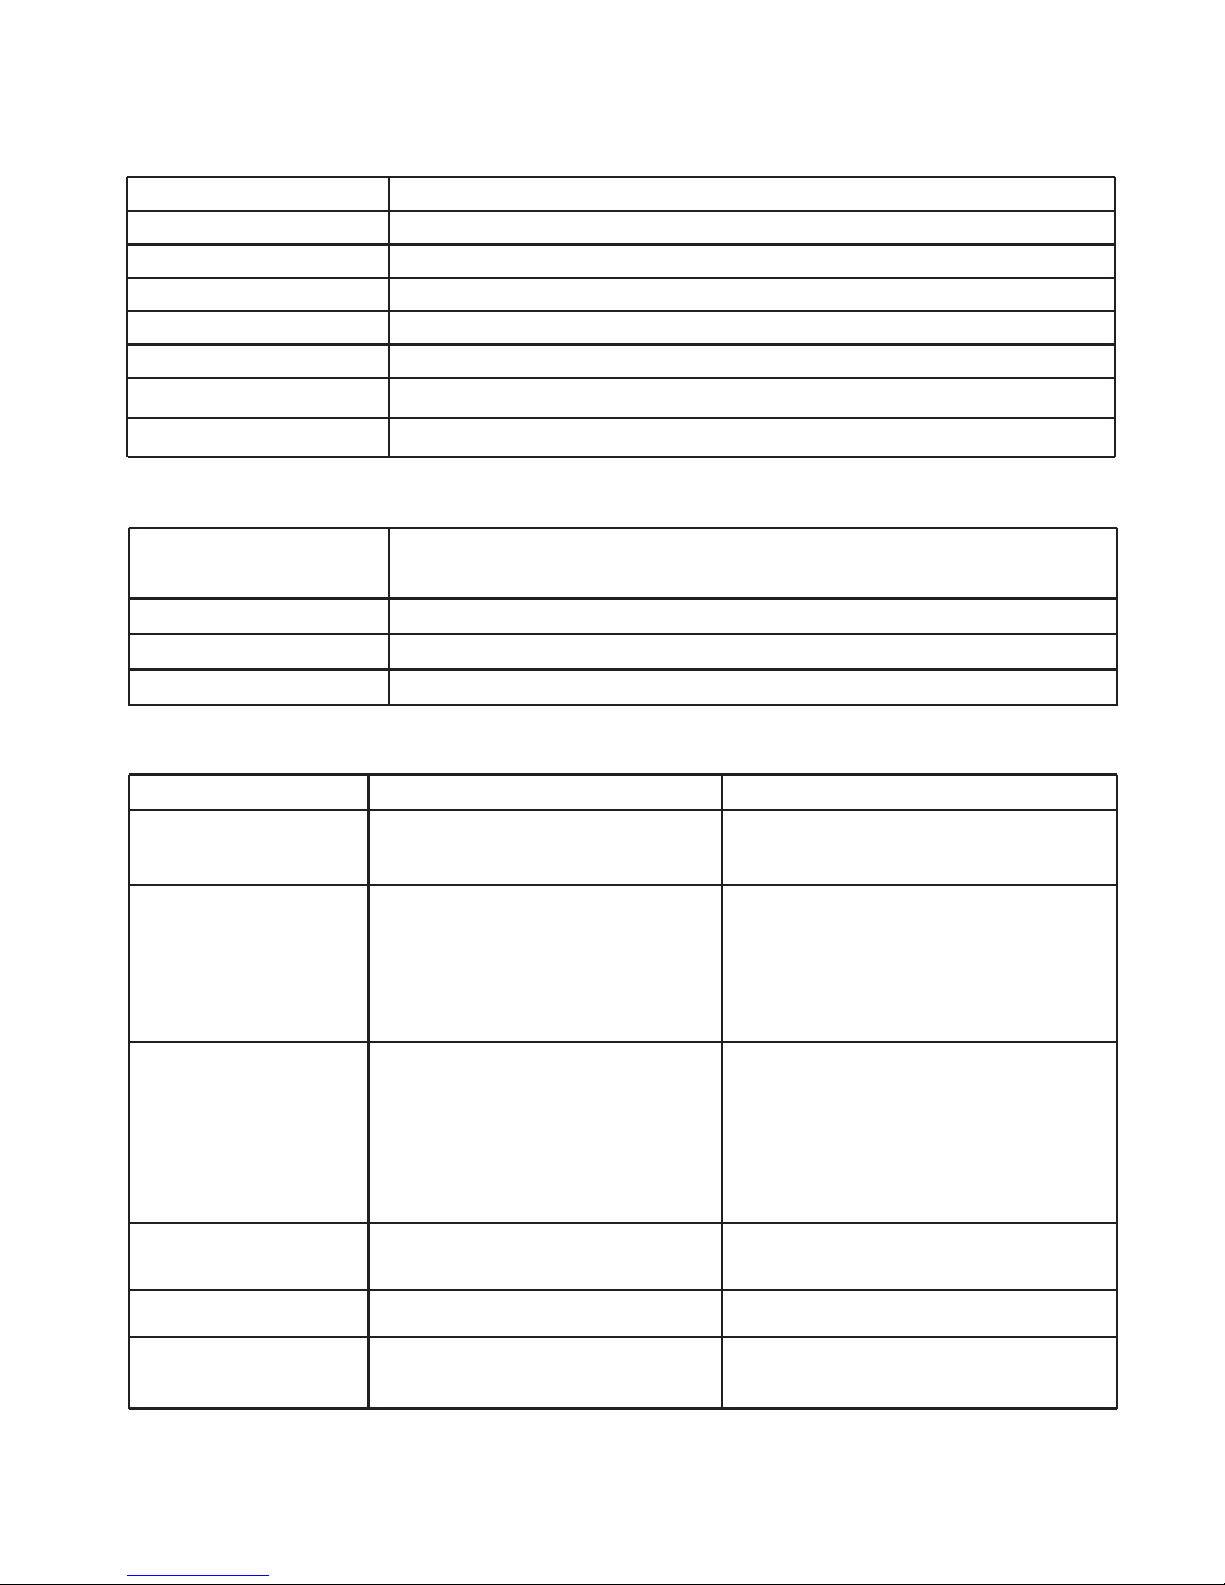
Part Function
1
2
3
4
5
6
7
Battery door
For 2x AA alkaline batteries
Power/Scan
Power On/ Off: Press and hold this key for 2 seconds to turn
power on or off. In power on mode, press this button to start scan,
press this button again to stop
LCD screen
Scanning status display
Resolution
JPG/PDF
Select High(900dpi)/Middle(600dpi/)Low(300dpi) resolution;
High/ /Low resolution mode icon will be displayed on status LCDMiddle
Select scan, JPG/PDF
mode icon will bedisplayed on status
LCD
JPG/PDF
USB interface
SD card slot
MicroSD card storage location.
Download photo to a computer via USB cable provided.
Scan LED indicator
8
2. Functional parts
Ready for scan: Green LED on
Error LED indicator
Over speed: Red LED on
9
10
Format button
Press this button to format the microSD card.
Manual
11
Time set
Press to enter Time setting mode
1
2
3
5
7
6
4
8
9
10
11
Page 3
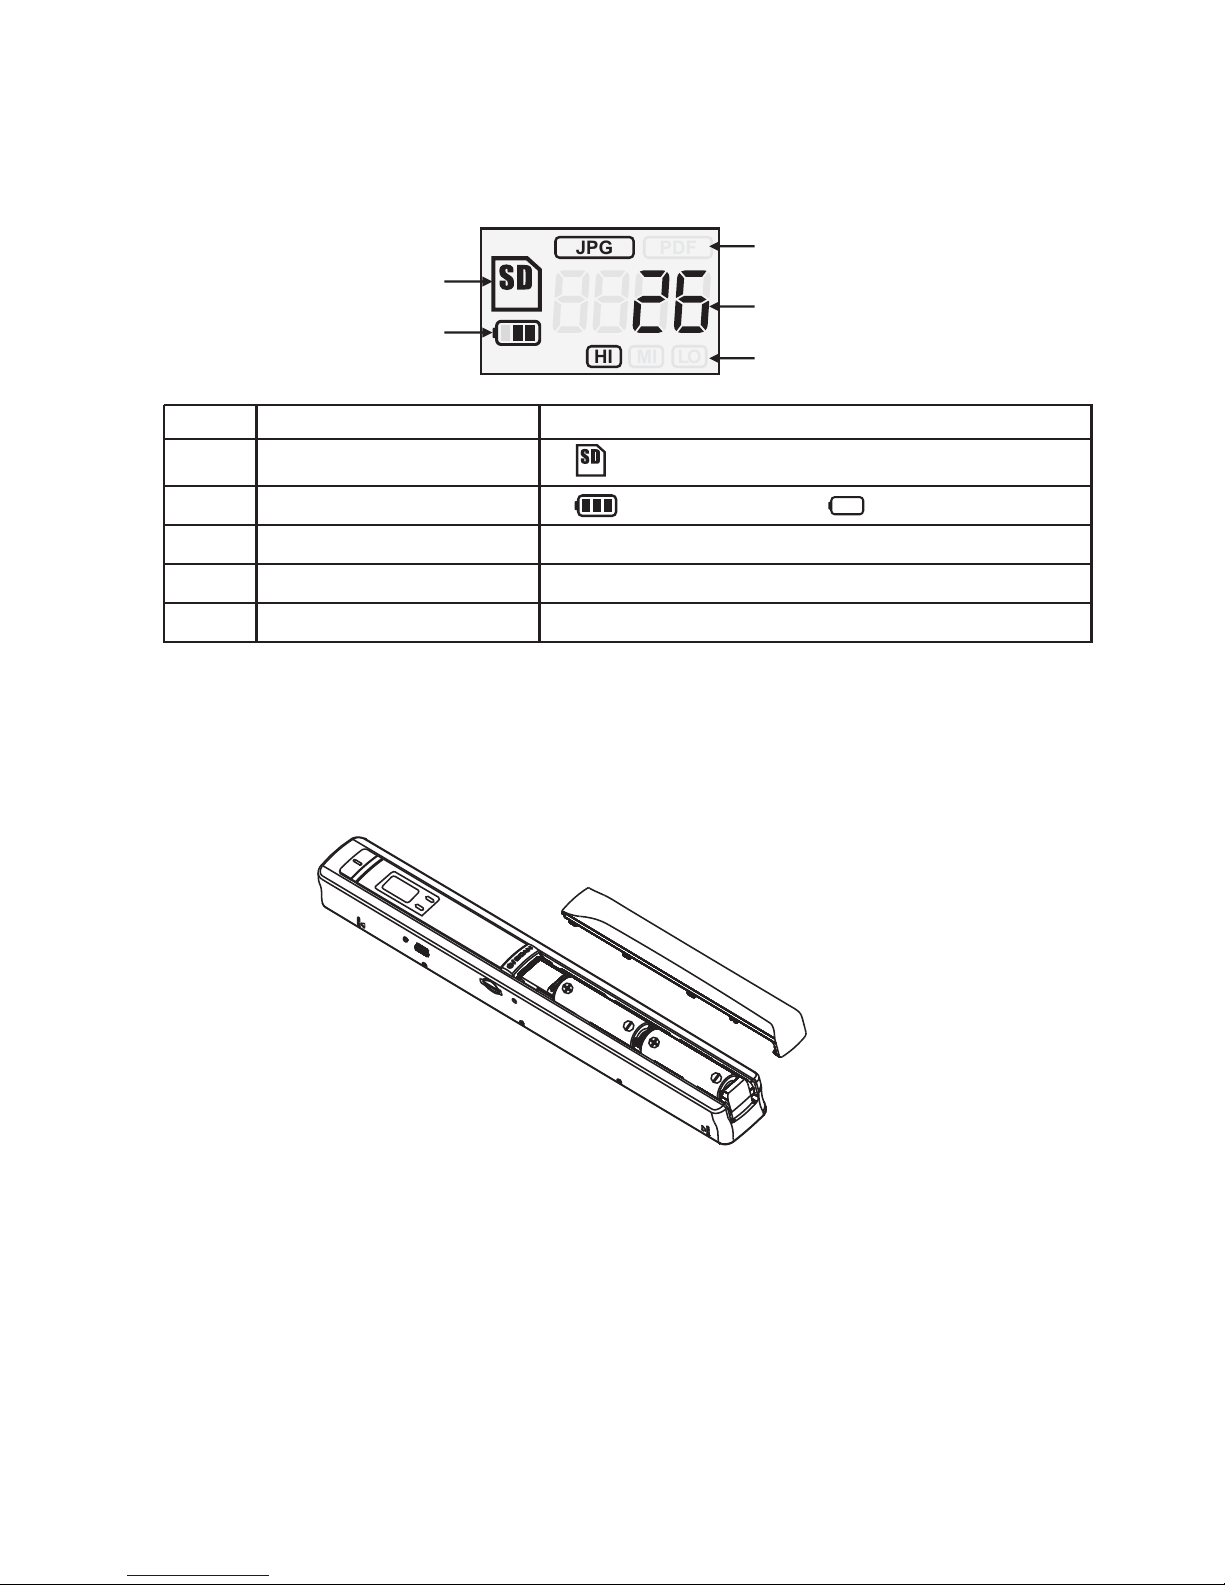
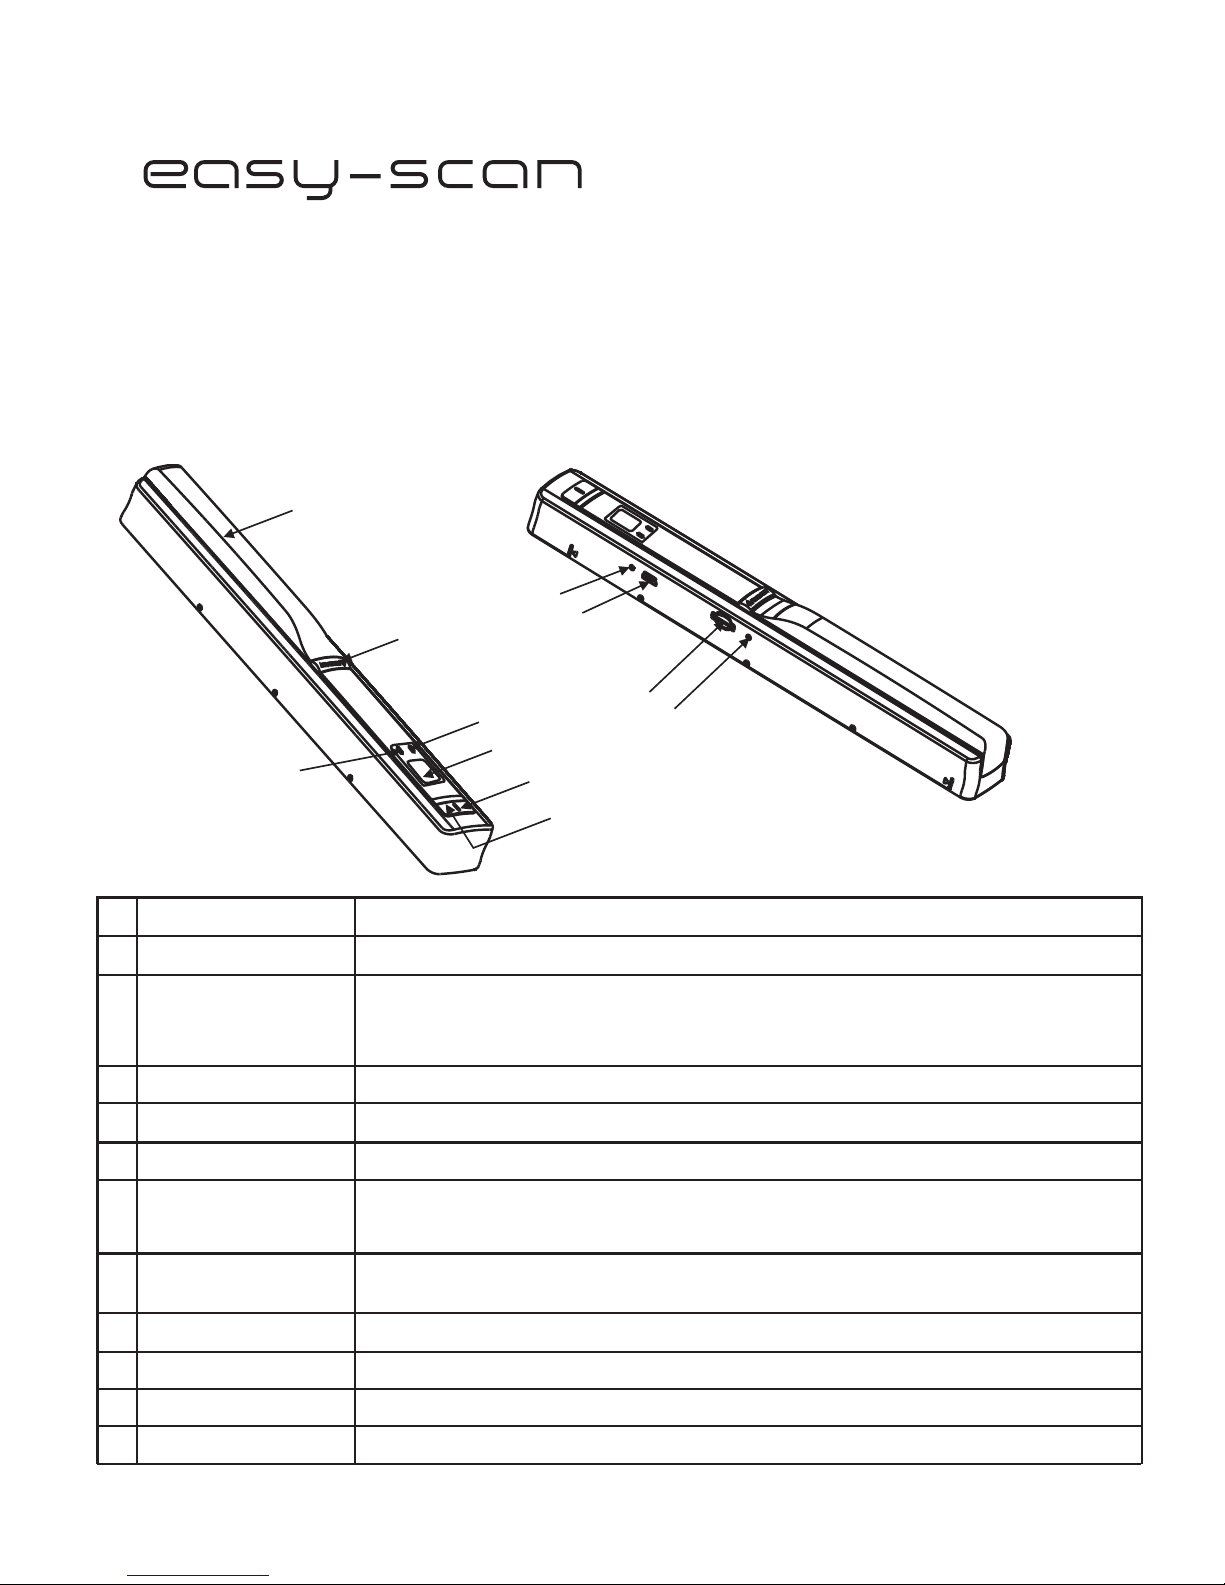
3. Explanation of the status icons
RESOLUTION
HI MI LO
JPG PDF
FULL
EFFECT
1
2
3
4
5
Item Function
Description
SD card indicator Photos will be stored in m SD card icro
Battery indicator
Battery is full Empty battery
Effect indicator
JPG PDFor
Counting indicator
Show scanned files in SD cardmicro
Selected resolution
High(900dpi)/Middle(600dpi/)Low(300dpi)
1
2
3
4
5
4. Using the scanner
4.1 Installing the battery
1. Open the battery door.
2. Insert 2x AA alkaline batteries into the battery compartment.
3. Turn on the by pressing the [POWER] button for 2 seconds.scanner
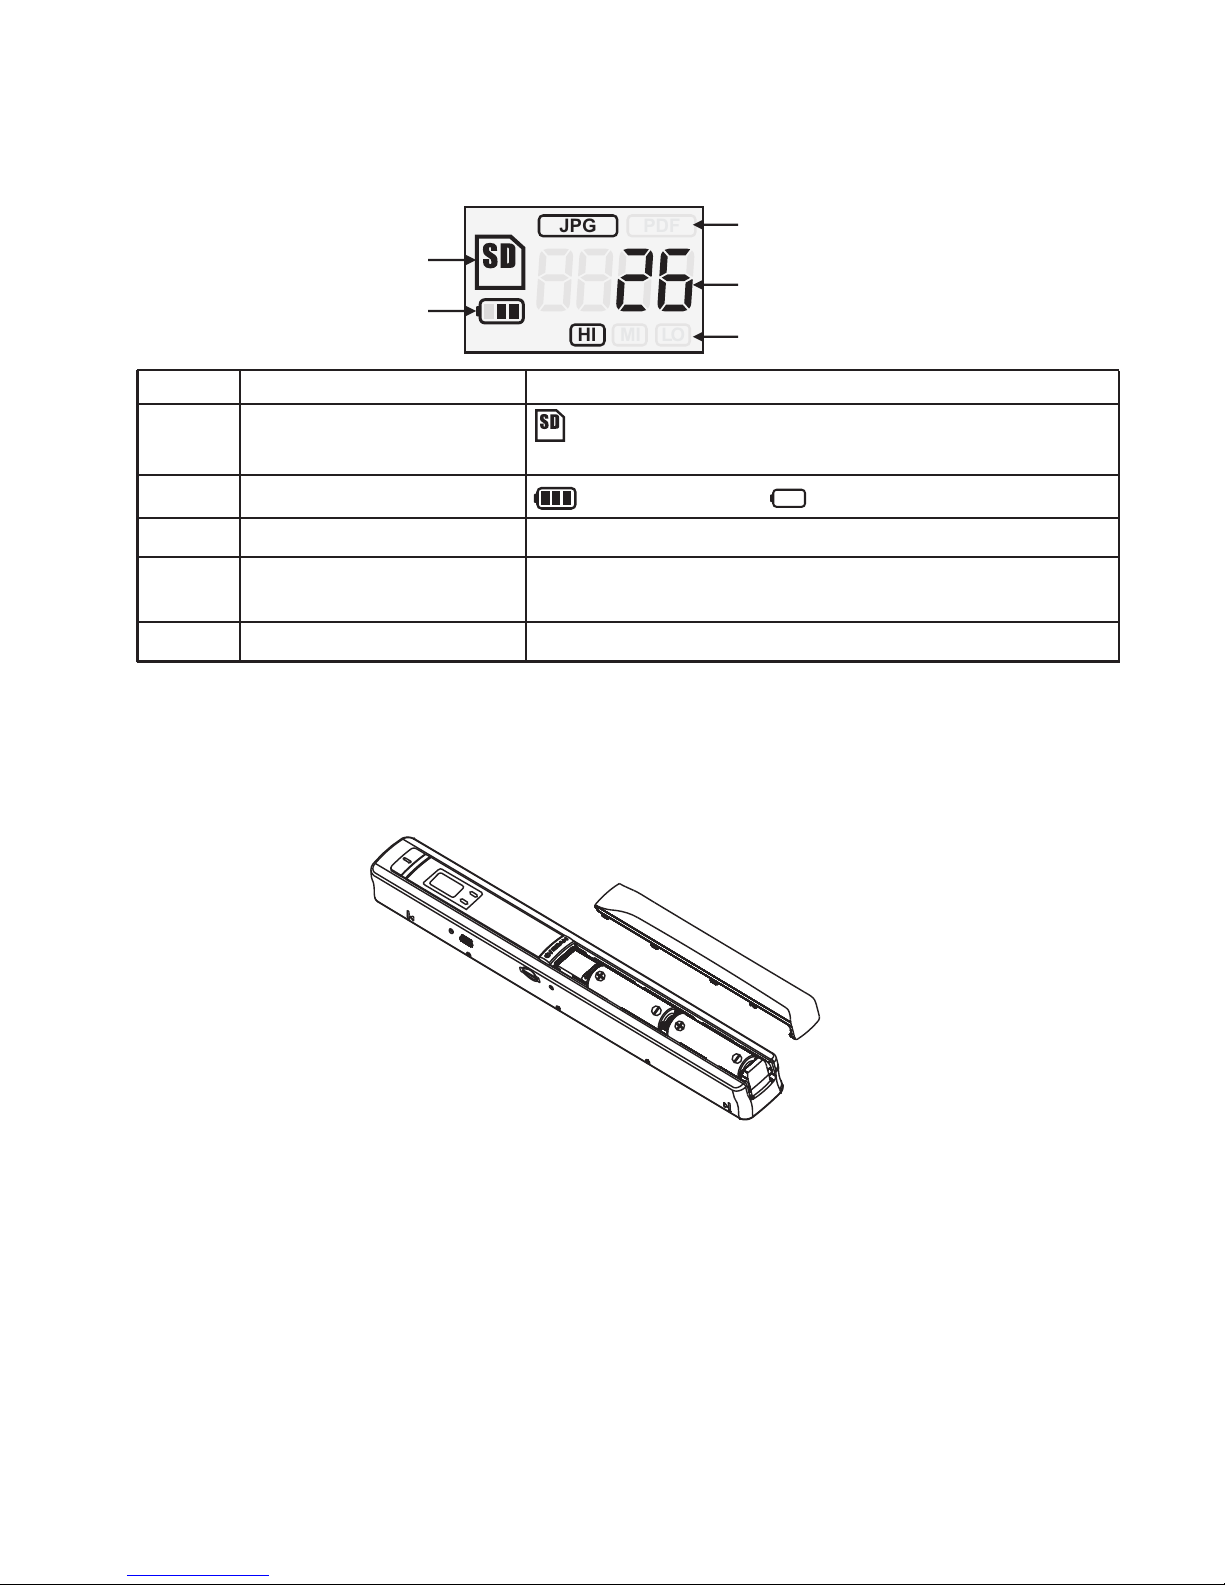
4.2 Inserting a microSD memory card (not included)
You must insert a microSD Card (not supplied) to record and store your pictures.
Inserting the microSD memory card:
1. Turn OFF the scanner.
2. Insert the microSD card into the microSD card slot, gently press in until card
is latched.
Note: -Do not force the card into the slot; forcing may damage scanner and
the microSD memory card. Align microSD card position (as marked)
and try again.
-The microSD memory card must be formatted before scanning.
See the following instruction.
Page 4

4.5 Setting the resolution
Press the [DPI] button to select High/ Low resolution. Middle/
resolution icon will be displayed on status LCD.High/Middle/Low
4.6 Setting the scan mode
Press the [ ] button to select mode. JPG/PDF JPG/PDF
icon will be displayed on status LCD.JPG/PDF
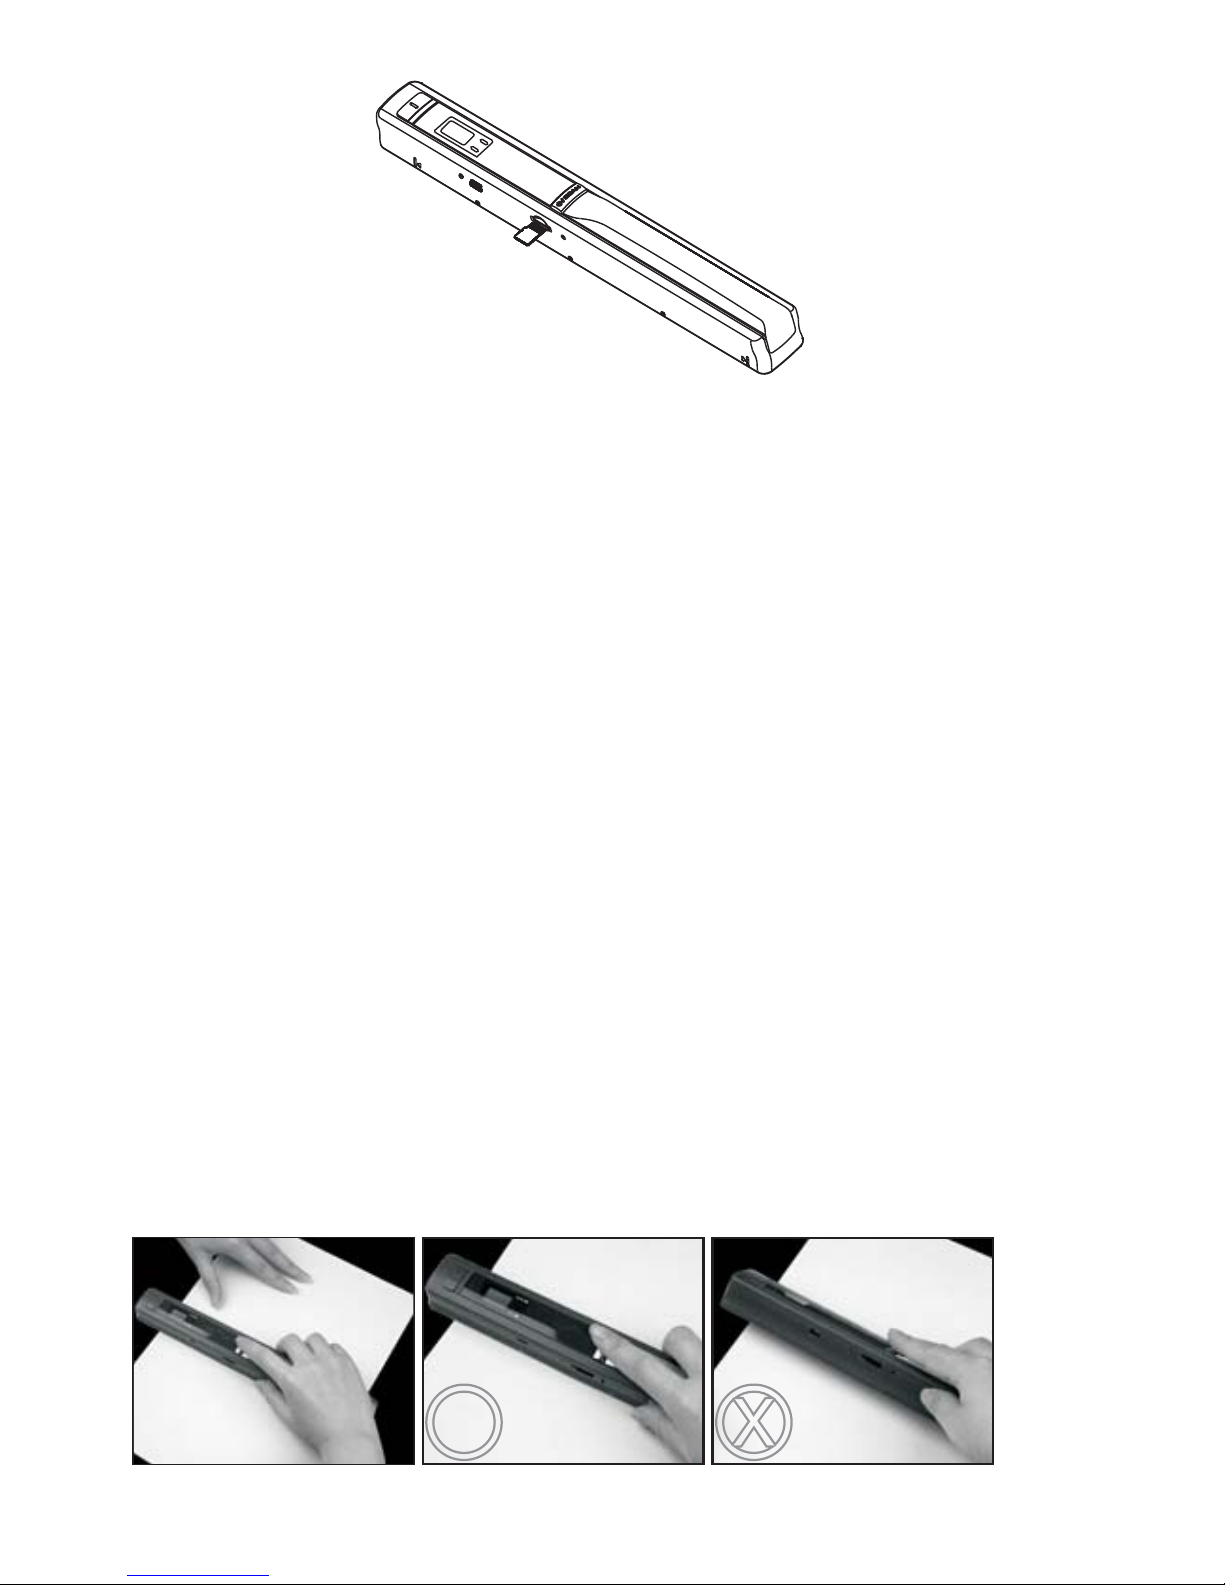
4.7 How to scan
Hold the document firmly by one hand.
Place the scanner on the start-scanning position.
Hold the scanner tight and press the scan button once.
Slide the scanner slowly and keep your hand stable to get the best quality picture.
Press again to stop scanning.
4.4 Formatting the microSD memory card
1. Insert a new SD card into the scanner, then turn on the scanner.
2. Press the format button into format mode. “F” shows on the LCD.
3. Press the Power/Scan button to start formatting the SD card.
4. SD card indicator will blink until format is complete.
micro
micro
4.3 Time setting
1. Press [TIME SET] to enter time setting mode
2. In the LCD, it shows 1 XX, and press ( & DPI) buttons for up & down
number selection
JPG/PDF
3. Press ( SCAN ) button to confirm setting
4. In the LCD, it jumps to next setting mode as below sequence
1 XX year setting
2 XX month setting
3 XX date setting
4 XX hour setting
5 XX minute setting
5. After all the information has been set, press ( TIME SET ) button again to exit
OK
Page 5
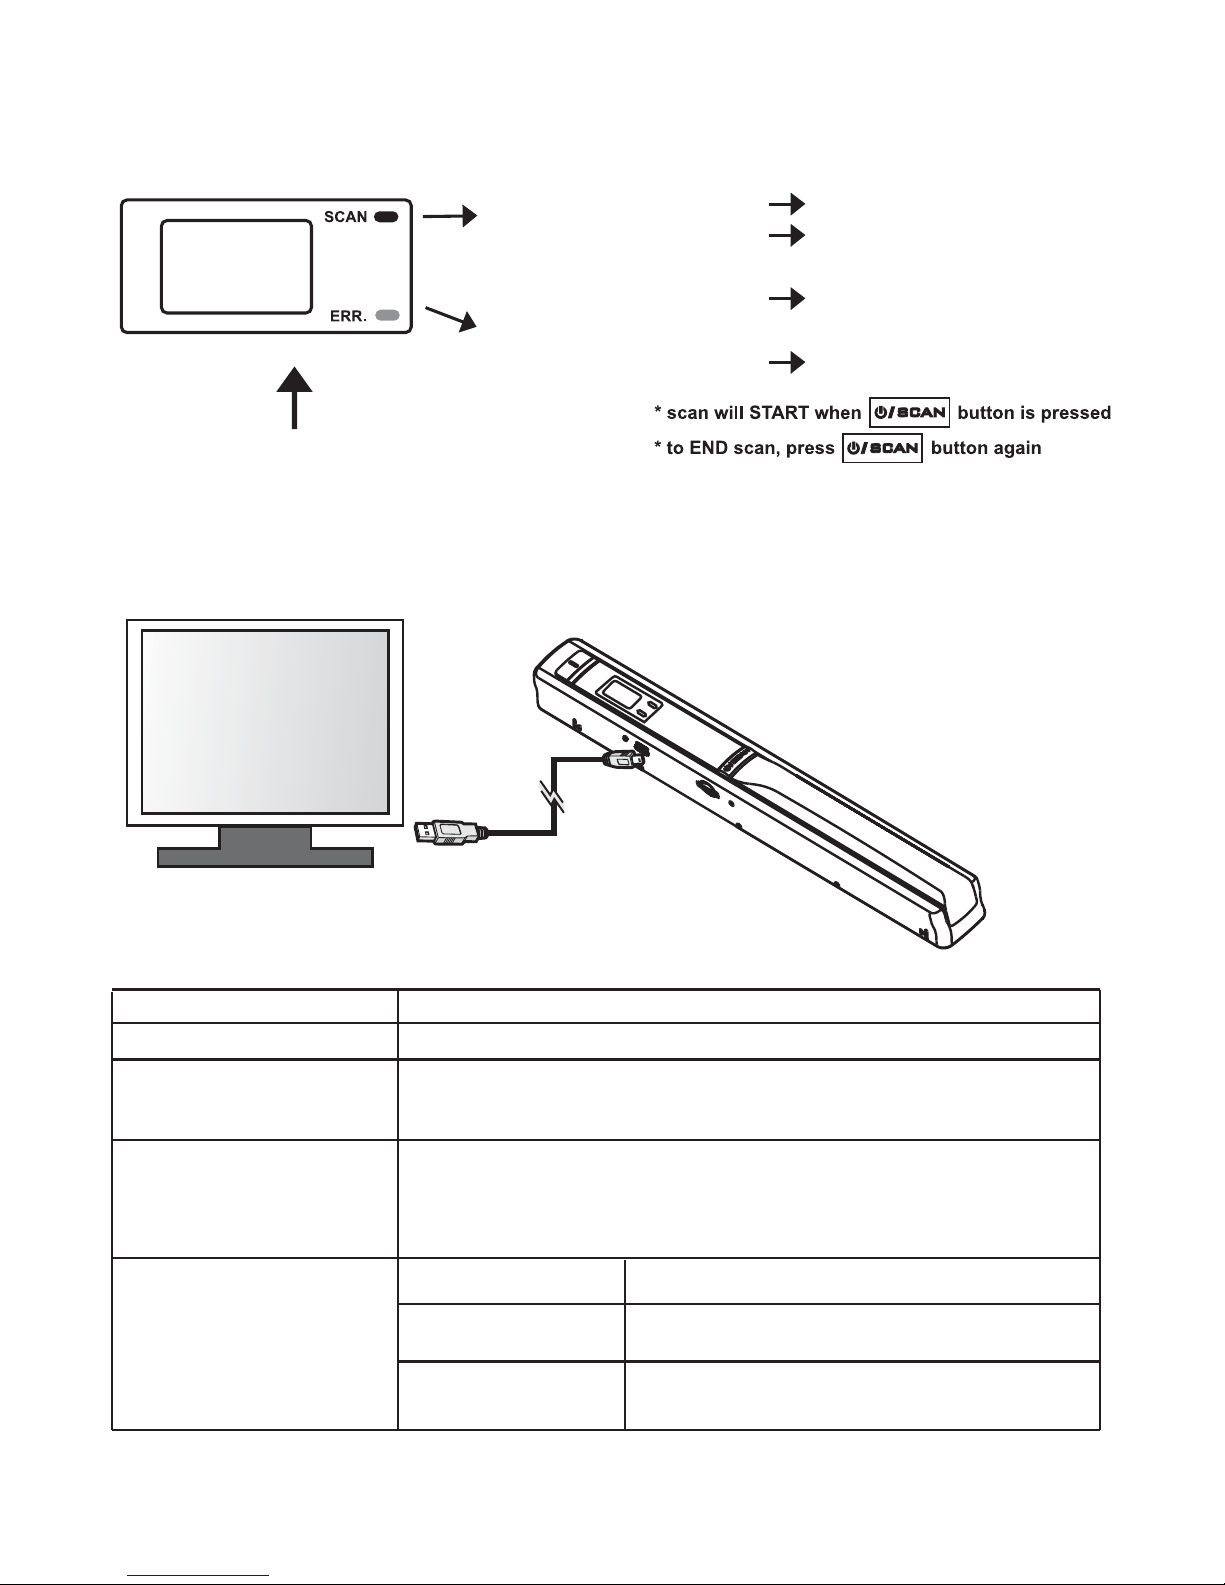
5. LED light indications
“GREEN” SCAN LED ON
“GREEN” SCAN LED OFF
Scan in progress.
Standby/Scan is complete.
Scanning too fast.
May cause scanning error.
Restart and scan again.
“RED” ERROR LED ON
“RED” ERROR LED OFF
No error in scanning speed.
Continue scanning process.
6. Connect to computer
You may also connect your scanner to your computer and view p on the
computer monitor .
ictures
7. Specification
Image sensor
A4 Color Contact Image Sensor
Number of sensor
5136 dots(1st~5104 dots available)
Resolution
Low resolution : 300x300 dpi(default)
High resolution: 900x900 dpi
Maximum scanning
speed for A4 size
document
Color High resolution:12 Seconds
Color Middle resolution:8 Seconds
Color Low resolution:3 Seconds
Capacity (Based on
1GB microSD card.
Scan A4 size file,
the quantity of scans
varies depending on
the content complexity)
900dpi color
600dpi color
300dpi color
110pcs/JPG or PDF (Min.)
250pcs/JPG or PDF (Min.)
850pcs/JPG or PDF (Min.)
Computer
USB
Middle resolution : 600x600 dpi(default)
Page 6
Scan width
21cm (8.27”)
Scan length
File format
JPEG(default)/PDF
LCD
Scanning status display
Auto Power Off
3 Minutes
USB Port
USB 2.0 high speed
External memory
microSD Card
Standard Battery
2XAA alkaline batteries
8. Computer system minimum requirement
Operating system Windows 7 / Vista / XP and Mac OS 10.4 or above
(direct plug-in, driver installation not required)
Interface USB port
CPU
Pentium II or above
RAM
64MB
9. Troubleshooting
Problem
Cause
Solution
Cannot turn on the
scanner
1. Low battery power
2. Battery not inserted properly
Replace or install the
battery correctly
Pictures cannot be
saved when you are
scanning them
1. SD card has not been
installed
2. Memory is full
3. The SD card has not
been formatted properly
Micro
micro
1. Install SD card
2. Download the pictures from
the scanner to the computer
to create storage space
3. Please refer to section 4.4
micro
Blurry images
The lens of scanner is dirty
Clean the lens with soft dry cloth
Computer does not
recognize your
scanner when
connected. (You
cannot find
removable disk)
Connection failure Make sure all cable connections
are secured. Restart the computer
if necessary
The battery life is
very short
Use wrong type of battery
Replace with new 2x AA alkaline
batteries
ERR. LED is on when
scanning a document
Scanning speed is too fast Press the button to
reset and scan again the document
Power/Scan
High resolution:35” Middle resolution:45” Low resolution:98”
Page 7
1.Eigenschaften
Komponente Funktion
1
2
3
4
5
6
7
Batteriefachdecke
Für 2x AA Alkali-Batterien
Power/Scan
(Ein/Scannen)
Ein-/Ausschalten: Zum Ein- oder Ausschalten diese Taste für
2 Sekunden gedrückt halten. Im eingeschalteten Zustand den
Scanvorgang starten und mit einem erneuten Tastendruck beenden.
LCD-Bildschirm
Anzeige des Scanstatus.
Auflösung
JPG/PDF
Auswahl: Hohe (900 DPI), mittlere (600 DPI) und niedrige (300 DPI)
Auflösung. Das Modussymbol für die hohe / mittlere / niedrige
Auflösung wird auf dem Status-LCD angezeigt.
Auswahl: Scan im JPG-/PDF-Format.
Das JPG-/PDF-Symbol wird auf dem Status-LCD angezeigt.
USB-Schnittstelle
Schlitz für SD Card
Steckplatz für Mikro-SD-Karte
Downloaden eines Fotos mittels des mitgelieferten USB-Kabels.
Scan-LED
8
2. Aufbau
Bereit zum Scannen: Die grüne LED leuchtet auf.
Fehler-LED
Zu hohe Geschwindigkeit: Die rote LED leuchtet auf.
9
10
Format
Taste zum Formatieren der Mikro-SD-Karte.
Bedienungsanleitung
11
Time Set
Drücken Sie die Taste um in den Zeiteinstellungsmodus zu gelangen
1
2
3
5
7
6
4
8
9
10
11
- Farbauswahl
- Auflösung 900/600/300
- Direktes Speichern als JPG/PDF-Datei auf eine Mikro-SD-Karte
- Unterstützt Mikro-SD-Karten bis zu 32GB
- Kostenloser Software-Download für Windows 7 / Vista / XP und Mac OS 10.4
oder höher (direkt einstecken, Treiberinstallation nicht erforderlich)
Page 8
3. Erläuterung der Statussymbole
Element Funktion
Beschreibung
Anzeige SD-Karte Fotos werden auf der Mikro-SD-Karte
gespeichert.
Batterieanzeige
Batterie ist voll Batterie ist leer
Effektanzeige
JPG/PDF
Zähler
Zeigt die Anzahl der gescannten Dateien auf
der Mikro-SD-Karte an.
Gewählte Auflösung
Hoch: 900 DPI Mittel / Niedrig: 300 DPI: 600 DPI
1
2
3
4
5
4.
4.1
Betrieb des Scanners
Einlegen der Batterien
1.Öffnen Sie die Batteriefachklappe.
2.Setzen Sie 2 AA Alkali-Batterien in das Batteriefach ein.
Schalten Sie den Scanner ein, indem Sie [POWER] (Ein/Aus) für 2 Sekunden gedrückt
halten.
4.2
Einsetzen einer Mikro-SD-Karte (nicht mitgeliefert)
Sie müssen eine Mikro-SD-Karte einsetzen (nicht im Lieferumfang enthalten), um Ihre Bilder
zu aufzunehmen und zu speichern. Einsetzen der Mikro-SD-Speicherkarte:
1.Schalten Sie den Scanner aus.
2.Stecken Sie die Mikro-SD-Karte in den Schlitz für die SD-Karte und drücken vorsichtig auf
die Karte, bis sieeinrastet.
Anmerkung:
- Die Karte nicht mit Gewalt in den Schlitz drücken. Gefahr einer Beschädigung des Scanner
und der Mikro-SD-Speicherkarte. Richten Sie die Position der Mikro-SD-Karte (wie
dargestellt) aus und versuchen Sie es erneut.
- Die Mikro-SD-Speicherkarte muss vor dem Scannen formatiert werden.
Siehe folgende Anweisung.
5
RESOLUTION
HI MI LO
JPG PDF
FULL
EFFECT
1
2
3
4
Page 9
4.5 Einstellen der Auflösung
Drücken Sie [DPI], um die hohe, mittlere oder niedrige Auflösung auszuwählen.
Das Symbol für die hohe, mittlere oder niedrige Auflösung wird auf dem Status-LCD angezeigt.
4.6 Einstellen des Scanmodus
Wählen Sie mit [ ] den Farb- oder JPG/PDF den JPG-/PDF-Modus aus
Das Symbol für wird auf dem Status-LCD angezeigt.JPG/PDF
4.7
Scannen
Halten Sie das Dokument mit einer Hand fest.
Setzen Sie den Scanner auf die Startposition für das Scannen.
Halten Sie den Scanner fest und drücken Sie einmal die Taste „Scan“.
Schieben Sie den Scanner langsam und halten Sie Ihre Hand ruhig, damit Sie die beste
Bildqualität erhalten.
Um das Scannen zu beenden, drücken Sie erneut „Scan“.
4.4 Formatieren der Mikro-SD-Speicherkarte
Stecken Sie eine neue Mikro-SD-Karte in den Scanner und schalten ihn anschließend ein.
2.Rufen Sie mit der Taste „Format“ den Formatiermodus auf. Auf dem Display wird „F“ angezeigt.
3.Starten Sie die Formatierung der Mikro-SD-Karte mit der Taste „Power / Scan“.
4. Die SD-Karten-Anzeige blinkt, bis das Formatieren abgeschlossen ist.
1.
4.3 Zeiteinstellung
1. Drücken Sie [TIME SET], um in den Einstellungsmodus zu gelangen
2. In der LCD zeigt es 1 XX, und drücken Sie (JPG/PDF & DPI) Tasten für up & down um die
Zahlen auszuwählen
3. Press (SCAN)-Taste um die Einstellung zu bestätigen
4. In der LCD, springt es zum nächsten Einstellmodus
1 XX Einstellung der Jahreszahl
2 XX Monatseinstellung
3 XX Datumseinstellung
4 XX Stunden einstellen
5 XX Minuten-Einstellung
5. Nachdem die Informationen festgelegt wurden, drück en Sie die TIME SET-Taste erneut, um zu
beenden.
OK
Page 10
5. LED-Anzeigen
„GRÜNE“ SCAN LED LEUCHTET
„GRÜNE“ SCAN LED LEUCHTET
NICHT
Scan-Vorgang läuft.
Standby oder das Scannen
ist beendet.
Scannen erfolgt zu schnell.
Kann zu Scan-Fehlern führen.
Den Scan-Vorgang erneut
starten.
„ROTE“ FEHLER-LED LEUCHTET
„ROTE“ FEHLER-LED LEUCHTET
NICHT
Kein Fehler bei der Scan-
Geschwindigkeit.
Setzen Sie der Scan-Vorgang
fort.
6.
Anschluss an einen Computer
Sie können Ihren Scanner auch an einen Computer anschließen und die Bilder auf dem
Computermonitor anzeigen.
7. Spezifikationen
Bildsensor
A4 Farb-Kontakt-Bildsensor
Anzahl Sensoren
5136 Punkte (1,5104 Punkte verfügbar)
Auflösung
Niedrige Auflösung: 300 x 300 DPI (Standard)
Hohe Auflösung: 900 x 900 DPI
Maximale
Scangeschwindigkeit
für ein A4-Dokument.
Hohe Auflösung in Farbe;12 Sekunden
MittlereAuflösung in Farbe: 8 Sekunden
Niedrige Auflösung in Farbe:3 Sekunden
Kapazität (Auf
Grundlage einer 1 GB
Mikro-SD-Karte.
Dateigröße eines A4Scans. Die Anzahl der
Scans hängt von der
Komplexität des
Inhalts ab)
900 DPI Farbe
600 DPI Farbe
300 DPI Farbe
110pcs/JPG or PDF (Min.)
Der Scan-Vorgang beginnt, wenn gedrückt wird.
Zum Beenden des Scan-Vorgangs erneut drücken.
Computer
USB
M Auflösung: 600 x 600 DPIittlere
250pcs/JPG or PDF (Min.)
850pcs/JPG or PDF (Min.)
Page 11
Scanbreite
21cm
Scanlänge
High resolution:35” Middle resolution:45” Low resolution:98”
Dateiformat
JPEG/PDF
LCD
Anzeige des Scanstatus
Automatisches Ausschalten
3 Minuten
USB-Port
USB 2.0 Hochgeschwindigkeit
Externer Speicher
Mikro-SD-Karte
Standardbatterie
2x AA Alkali-Batterien
8. Mindestanforderungen an den Computer
Betriebssystem Windows 7 / Vista / XP und Mac OS 10.4 oder höher
(direkt einstecken, Treiberinstallation nicht erforderlich)
Schnittstelle USB-Port
CPU
Pentium II oder höher
RAM
64MB
9. Störungserkennung
Problem
Ursache
Der Scanner lässt
sich nicht einschalten.
1.Schwache Batterien.
2.Batterien nicht richtig herum
eingelegt.
Ersetzen Sie die Batterien oder
legen Sie die Batterien richtig
herum ein.
Die Bilder können
beim Scannen nicht
gespeichert
werden.
1.Es wurde keine Mikro-SDKarte eingesetzt.
2.Der Speicher ist voll.
3.Die Mikro-SD-Karte wurde
nicht richtig formatiert.
1. Setzen Sie eine Mikro-SDKarte ein.
2.Downloaden Sie die Bilder
vom Scanner in einen
Computer, damit wieder Platz
frei wird.
3.Siehe Abschnitt 4.4
Verschwommenes
Bild
Die Scannerlinse ist
verschmutzt.
Reinigen Sie die Linse mit einem
weichen, trockenen Tuch.
Der Computer
erkennt den Scanner
nach dem Anschließen
nicht. (Sie finden
keinen
Wechseldatenträger)
Anschlussfehler Vergewissern Sie sich, dass alle
Kabel gut angeschlossen sind.
Starten Sie ggf. den Computer
erneut.
Die Batterien halten
nur kurze Zeit.
Falscher Batterietyp
Ersetzen Sie die Batterien mit
neuen Alkali-Batterien.
Die Fehler-LED
leuchtet beim
Scannen eines
Dokuments auf.
Die Scangeschwindigkeit
ist zu hoch.
Drücken Sie erneut die Taste
„Power/Scan“ zum
zurücksetzen und starten Sie
den Scan erneut.
Lösung
Page 12

Entsorgungshinweise
Altbatterie- Rücknahme
Altbatterien dürfen nicht in den Hausmüll. Verbraucher sind
verpflichtet, Batterien zu einer geeigneten Sammelstelle bei
Handel oder Kommune zu bringen.
Bitte kleben Sie bei Lithiumbatterien die Pole ab und achten
bitte auf völlige Entladung der Batterie.
Altbatterien enthalten möglicherweise Schadstoffe oder
Schwermetalle, die Umwelt und Gesundheit schaden können.
Batterien werden wieder verwertet, sie enthalten wichtige
Rohstoffe wie Eisen, Zink, Mangan oder Nickel.
Die Umwelt sagt Dankeschön.
Die Mülltonne bedeutet: Batterien und Akkus dürfen nicht in den Hausmüll.
Die Zeichen unter den Mülltonnenstehen für:
Pb: Batterie enthält Blei
Cd: Batterie enthält Cadmium
Hg: Batterie enthält Quecksilber
Hinweise zum Umweltschutz
Dieses Produkt darf am Ende seiner Lebensdauer nicht über den normalen Haushaltsabfall
entsorgt werden, sondern muss an einem Sammelpunkt für das Recycling von elektrischen
und elektronischen Geräten abgegeben werden. Das Symbol auf dem Produkt, der
Gebrauchsanleitung oder der Verpackung weist darauf hin.
Die Werkstoffe sind gemäß ihrer Kennzeichnung wiederverwertbar. Mit der Wiederverwendung, der
stofflichen Verwertung oder anderen Formen der Verwertung von Altgeräten leisten Sie einen wichtigen
Beitrag zum Schutze unserer Umwelt.
Page 13

1.Fonctions clé
Sélection de numérisation en Couleur
Sélection de numérisation 900/600/300 dpi
Sauvegarde directe de fichier JPG/PDF vers la carte MicroSD
Supporte une carte microSD jusqu'à 32Go
Pilote à télécharger gratuitement pour Windows 7 / Vista / XP et Mac OS10.4 ou au-dessus
(plug-in direct, installation pilote non requis)
Partie Fonction
1
2
3
4
5
6
7
Compartiment à piles
Pour 2 piles alcalines AA
Power/Scanner
Allumer/Éteindre : appuyer et maintenir ce bouton enfoncé
pendant 2 secondes pour allumer ou éteindre. En mode sous
tension, appuyer sur ce bouton pour démarrer la numérisation,
réappuyer sur ce bouton pour arrêter.
Écran LCD
Afficher l'état de la numérisation
Résolution
JPG/PDF
Sélectionner Haute(900dpi) Basse(300dpi) résolution; Middle(600dpi)
l'icône du mode Haute/Basse résolution s'affichera sur l'écran LCD
Sélectionner numérisation en , l'icône du JPG/PDF
mode s'affichera sur l'écran LCDJPG/PDF
Interface USB
Fente pour carte SD Emplacement de la carte mémoire MicroSD
Télécharger des images vers un ordinateur via un câble USB fourni.
Voyant LED Scanner
8
2. Parties fonctionnelles
Prêt pour numériser : LED verte allumée
Voyant LED Erreur
Survitesse: LED rouge allumée
9
10
Bouton Formater
Appuyer sur cette touche pour formater la carte MicroSD
Manuel
11
1
2
3
5
7
6
4
8
9
10
11
Temps de jeu
Appuyez sur pour entrer dans le temps le mode de réglage
Page 14

3. Explication des icônes d'état
Elément Function
Description
Indicateur de carte SD Les images seront stockées dans la carte
MicroSD
Indicateur de pile
Piles pleines Piles vides
Indicateur d'effet
JPG/PDF
Compteur
Affiche le nombre de fichiers numérisés dans
la carte MicroSD
Résolution sélectionnée
Haute : 900dpi ou Basse : 300dpi Middle : 600dpi
1
2
3
4
5
4. Utilisation du scanner
4.1 Installation des piles
1. Ouvrir le compartiment à piles.
2. Insérer 2 piles alcalines AA dans le compartiment à piles.
3. Allumer le scanner en appuyant sur le bouton [POWER] pendant 2 secondes.
4.2
Insertion d'une carte mémoire microSD (non fournie)
Vous devez insérer une carte MicroSD (non fournie) pour enregistrer et stocker vos
images. Insertion d'une carte mémoire MicroSD :
Mettre le scanner HORS TENSION.
Insérer la carte MicroSD dans la fente à carte MicroSD, appuyer doucement jusqu'à
ce que la carte soit enclenchée.
1.
2.
Remarque :
- Ne pas insérer la carte de force dans la fente; cela peut endommager le scanner et la carte
mémoire MicroSD. S’aligner sur la position de la carte MicroSD (comme indiqué) et réessayer.
- La carte mémoire MicroSD doit être formatée avant la numérisation.
Voir l’instruction suivante.
5
RESOLUTION
HI MI LO
JPG PDF
FULL
EFFECT
1
2
3
4
Page 15

4.5 Réglage de résolution
Appuyer sur le bouton [DPI] pour sélectionner une Haute ou Basse résolution. Middle
L’icône Haute Middle Basse résolution s’affichera sur l’écran LCD.
4.6
Appuyer sur le bouton [ ] pour sélectionner le mode JPG/PDF JPG/PDF
L’icône s’affichera sur l’écran LCD.JPG/PDF
Réglage du mode de numérisation
4.7
Comment numériser
Maintenir le document fermement d’une seule main.
Placer le scanner en position de démarrage de numérisation.
Tenir le scanner fermement et appuyer une fois sur le bouton Scanner.
Faire glisser le scanner tout doucement et maintenir votre main stable pour obtenir la
meilleure qualité d’image possible.
Réappuyer pour arrêter la numérisation.
4.4 Formatage de la carte mémoire MicroSD
1. Insérer un nouvelle carte MicroSD dans le scanner, puis allumer le scanner.
2. Appuyer sur le bouton Formatage pour entrer en mode formatage. “F” s’affiche sur le LCD.
3. Appuyer sur le bouton Power/Scanner pour démarrer le formatage de la carte MicroSD.
4. L’indicateur de carte SD clignotera jusqu’à la fin du formatage.
OK
4.3 Impostazione del tempo
1. Appuyez sur [TIME SET] pour entrer en mode de réglage
2. Dans le LCD, il affiche 1 XX, et appuyez sur ( & DPI) pour les boutons haut et bas
de sélection numéro
JPG/PDF
3. Appuyez sur (SCAN) pour confirmer le réglage
4. Dans le LCD, il saute au mode réglage suivant la séquence ci-dessous
1 XX ans fixant
2 XX Réglage du mois
3 XX Date de mise en
4 XX réglage de l'heure
5 XX réglage des minutes
5. Après toutes les informations a été réglée, appuyez sur (TIME SET) pour quitter
Page 16

5. Indications des voyants LED
LED “VERTE” SCANNER ALLUMÉE
LED “VERTE” SCANNER ÉTEINTE
Numérisation en cours.
En Veille ou la
numérisation est terminée.
Numérisation trop rapide.
Peut causer une erreur
de numérisation.
Redémarrer et scanner
à nouveau.
LED “ROUGE” ERREUR ALLUMÉE
LED “ROUGE” ERREUR ÉTEINTE
Pas d'erreur concernant la
vitesse de numérisation.
Continuer le processus
de numérisation.
6.
Connecter à l'ordinateur
Vous pouvez également connecter le scanner à votre ordinateur et visionner des images
sur l'écran d'ordinateur.
7. Spécification
Capteur d'image
Capteur d'image à contact en couleurs A4
Nombre de capteur
er
5136 points (1 ~5104 points disponibles)
Résolution
Basse résolution : 300x300dpi (par défaut)
Middle résolution : 600x600dpi
Vitesse maximale de
numérisation pour un
document A4
Couleur Haute résolution
Couleur Basse résolution
Couleur Middle résolution
Capacité (basée sur la
carte MicroSD 1Go.
Numérisons un fichier
de taille A4, la quantité
de numérisation varie
selon la complexité
du contenu)
900dpi couleur:110pcs/JPG or PDF (Min.)
600dpi couleur:250pcs/JPG or PDF (Min.)
300dpi couleur:850pcs/JPG or PDF (Min.)
La numérisation va DÉMARRER lorsque l'on appuie sur le bouton
Pour ARRÊTER la numérisation, réappuyer sur le bouton
12 secondes
8 secondes
3 secondes
Computer
USB
Haute résolution : 900x900dpi
Page 17

Largeur de numérisation
21cm (8.27”)
Longueur de numérisation
Format de fichier
JPEG/PDF
LCD
Écran affichant l’état de numérisation
Mise hors tension Auto
3 Minutes
Port USB
USB2.0 grande vitesse
Mémoire externe
Carte MicroSD
Pile standard
2 piles alcalines AA
8. Configuration minimum requise pour l’ordinateur
Système
d’exploitation
Windows 7 / Vista / XP et Mac OS 10.4 ou au-dessus
(plug-in direct, installation pilote non requis)
Interface Port USB
CPU
Pentium II ou au-dessus
RAM
64Mo
9. Diagnostic des pannesg
Problème
Cause
Solution
Le scanner ne
s’allume pas
1. Piles faibles
2. Les piles sont mal insérées
Remplacer ou installer les piles
correctement
Les images ne
peuvent être
sauvegardées lors
de leur
numérisation
1. La carte MicroSD n’a pas
été installée.
2. La mémoire est pleine.
3. La carte MicroSD n’a pas
été formatée correctement
1. Installer une carte MicroSD.
2. Télécharger les images depuis
le scanner vers l’ordinateur
pour créer un espace de
stockage.
3. Veuillez vous reporter à la
section 4.4
Images floues
La lentille du scanner est sale
Nettoyer la lentille avec un
chiffon doux et sec
L’ordinateur ne
reconnaît pas votre
scanner lors de la
connexion. (vous
n’arrivez à retrouver
aucun disque
amovible)
Échec de connexion S’assurer que tous les câbles
soient bien connectés.
Redémarrer l’ordinateur si
nécessaire.
La longévité des
piles est très courte
Un mauvais type de piles est
utilisé
Remplacer par deux piles
alcalines AA neuves.
La LED ERR. est
allumée lors de la
numérisation de
document
La vitesse de numérisation
est trop grande
Appuyer sur le bouton
Power/Scanner pour réinitialiser
et scanner à nouveau le
document
Haute résolution:35” Middle résolution:45” Basse résolution:98”
Page 18

1.Características principales
Selección de exploración color
Selección de exploración 900/600/300 dpi
Guarda directamente los archivos JPG/PDF en una tarjeta MicroSD
Soporte de tarjeta microSD hasta 32Gb
Descarga sin controladores para Windows 7 / Vista / XP y MacOS 10.4 o superior
(conexión directa, no necesita instalar controlador).
Pieza Función
1
2
3
4
5
6
7
Compuerta de baterías
Para 2 baterías AA alcalinas
Encendido/escanear
Encender/apagar: presione y mantenga la tecla durante 2 segundos
para encender o apagar. En modo encendido, pulse el botón para
iniciar el escaneado, pulse el botón de nuevo para detenerlo.
Pantalla LCD
Indicación de estado de escaneo
Resolución
JPG/PDF
Seleccione una resolución Alta(900dpi) Baja(300dpi); Middle(600dpi)
modo de resolución alta/baja se mostrará en el
Seleccione el escaneado , el icono de modo JPG/PDF JPG/PDF
se mostrará en el LCD de estado
Interfaz USB
Ranura de tarjeta SD Ubicación de almacenamiento de tarjeta MicroSD
Descargue fotos a un ordenador mediante el cable USB incluido.
Testigo LED de
escaneo
8
2. Piezas funcionales
Listo para explorar: LED verde encendido
Testigo LED de error
Velocidad excesiva: LED rojo encendido
9
10
Botón de formato
Pulse este botón para formatear la tarjeta MicroSD
Manual
11
Tempo impostato
Premere per entrare in modalità di impostazione del tempo
1
2
3
5
7
6
4
8
9
10
11
el icono de
LCD de estado
Page 19

Nota:
- No fuerce la tarjeta en la ranura; forzarla puede dañar el escáner y la tarjeta de memoria
microSD. Alinee la posición de la tarjeta MicroSD (según está indicado) y pruebe de nuevo.
- La tarjeta de memoria MicroSD debe formatearse antes de escanear.
Ver las instrucciones siguientes.
3. Explicación de los iconos de estado
Objeto Función
Descripción
Indicador de tarjeta SD Las fotos se guardarán en la tarjeta microSD
Indicador de batería
Batería llena
Indicador de efecto
JPG/PDF
Contador
Muestra los archivos escaneados de la
tarjeta MicroSD
Resolución seleccionada
Alta: 900dpi Baja:300dpi Middle: 600dpi
1
2
3
4
5
4.
4.1
Uso del escáner
Instalación de las baterías
1. Abra la tapa de baterías
2. Introduzca dos baterías alcalinas tipo 'AA' en el compartimiento de baterías.
3. Encienda el escáner pulsando el botón [ENCENDIDO] durante 2 segundos.
4.2 Introducir una tarjeta de memoria MicroSD (no incluida)
Debe introducir una tarjeta MicroSD (no incluida) para grabar y guardar sus imágenes.
Introducción de la tarjeta de memoria MicroSD:
1. Apague el escáner.
2. Introduzca la tarjeta microSD en la ranura de tarjeta microSD,
presiónela suavemente hasta que encaje.
Batería vacía
5
RESOLUTION
HI MI LO
JPG PDF
FULL
EFFECT
1
2
3
4
Page 20

5 XX impostazione dei minuti
1 XX anno impostazione
2 XX impostazione del mese
3 XX Data di impostazione
4 XX impostazione delle ore
5. Dopo tutte le informazioni è stata impostata, premere (TIME SET) di nuovo il pulsante
per uscire
4.3 Impostazione del tempo
1. Premere [TIME SET] per accedere alla modalità di impostazione tempo
2. Sul display LCD, mostra uno XX, e premere (JPG/PDF e DPI) pulsanti per l'up & down di
selezione numero
3. Premere (SCAN) per confermare l'impostazione
4. Sul display LCD, si passa alla modalità di impostazione successiva come qui di seguito
la sequenza
4.5
Configurar la resolución
Pulse el botón [DPI] para seleccionar la resolución Alta Middle Baja.
El icono de modo de resolución alta /baja se mostrará en el LCD de estadoMiddle
4.6
Configurar el modo de escaneo
Pulse el botón [ ] para seleccionar el modo JPG/PDF.JPG/PDF
El icono se mostrará en el LCD de estado.JPG/PDF
4.7
Cómo escanear
Aguante firmemente el documento con una mano.
Ponga el escáner en la posición de inicio de escaneo.
Aguante firmemente el escáner y pulse una vez el botón de escaneo.
Deslice lentamente el escáner y mantenga la mano firme para obtener la mejor calidad
de imagen.
Pulse de nuevo para dejar de escanear.
4.4 Formatear la tarjeta MicroSD
Introduzca una nueva tarjeta microSD en el escáner y enciéndalo.
2. Pulse el botón de formato en modo formateado. Se mostrará "F" en la LCD.
3. Pulse el botón de encendido/escanear para comenzar a formatear la tarjeta MicroSD.
4. El indicador de la tarjeta SD parpadeará hasta que termine el formateado..
1.
OK
Page 21

5. Testigos LED
LED “VERDE”DE ESCANEO ENCENDIDO
LED “VERDE” DE ESCANEO APAGADO
Escaneo en curso.
Espera/Escaneo
finalizado.
Escaneo demasiado rápido.
Puede provocar un error en el
escaneo.
Reinicie y escanee de nuevo.
LED “ROJO” DE ERROR ENCENDIDO
LED “ROJO” DE ERROR APAGADO
No hay errores de velocidad de
escaneo.
Prosiga el proceso de escaneo.
6.
Conexión al ordenador
También puede conectar el escáner al ordenador y ver imágenes en el monitor.
7. Especificaciones
Sensor de imagen
Sensor de imagen de contacto a color A4
Número de sensor
º
5136 puntos (1~5104 puntos disponibles)
Resolución
Baja resolución: 300x300dpi(por defecto)
Middleresolución: 600x600dpi
Velocidad máxima de
escaneo para un
documento tamaño A4
Alta resolución a color
Middle a colorresolución
Baja resolución a color
Capacidad (con una
tarjeta microSD de 1 Gb).
Escaneo de archivo
tamaño A4, la cantidad
de escaneos varía según
la complejidad del
contenido)
900dpi color :110pcs/JPG or PDF (Min.)
600dpi color:250pcs/JPG or PDF (Min.) r
300dpi color:850pcs/JPG or PDF (Min.)
el escaneo comenzará cuando se pulse el botón
para finalizar el escaneo, pulse el botón de nuevo
12 segundos
8 segundos
3 segundos
Computer
USB
Alta resolución: 600x600dpi
Page 22

Anchura de escaneo
8.27”
Longitud de escaneo
Alta resolución :35” Middle résolution:45” Baja resolució:98”
Formato de archivo
JPEG/PDF
LCD
Indicación de estado de escaneo
Apagado automático
3 Minutos
Puerto USB
USB2.0 de alta velocidad
Memoria externa
tarjeta microSD
Batería estándar
2 baterías AA alcalinas
8. Requisitos mínimos del sistema informático
Sistema operativo Windows y Mac OS 10.4 o superior
(conexión directa, instalación de controlador no necesaria)
7 / Vista / XP
Interfaz Puerto USB
CPU
Pentium II o superior
RAM
64MB
9. Solución de problemas
Problema
Causa
No se puede
encender el escáner
1.Baja potencia de baterías
2.Batería introducida
incorrectamente
Cambie o instale correctamente
la batería
No pueden
guardarse imágenes
al escanearlas
1.No se ha instalado la
tarjeta MicroSD.
2.Memoria llena.
3.La tarjeta microSD no se
ha formateado correctamente.
1.Instale la tarjeta microSD.
2.Descargue las imágenes
del escáner al ordenador para
crear más espacio de
almacenamiento.
3. Consulte la sección 4.4
Imágenes borrosas
La lente del escáner está
sucia
Limpie la lente con un trapo
seco y suave
El ordenador no
reconoce el escáner
cuando está
conectado
(no se encuentra el
disco extraíble)
Fallo de conexión Asegúrese de que las
conexiones de cable estén
firmes. Reinicie el ordenador
si es necesario.
La duración de la
batería está muy
limitada
Usa el tipo incorrecto de la
batería
Cambie las baterías por otras
2 baterías alcalinas AA.
LED de error
encendido al
escanear un
documento
Velocidad de escaneo
excesiva
Pulse el botón Encendido/
Escaneo para reiniciar y
escanear el documento de
nuevo
Solución
Page 23

1.Características chave
Seleção de Cor
Seleção de escaneamento 900/600/300 dpi
Salvamento direto arquivo JPG/PDF para micro cartão SD
Suporta micro cartão SD até 32GB
Drive livre para baixar para Windows 7 / Vista / XP e Mac OS10.4 ou acima
(plug-in direto, a instalação de driver não requerida)
Parte Função
1
2
3
4
5
6
7
Porta bateria
Para baterias alcalinas 2xAA
Ligar/escanear
Ligar/desligar: pressione e segure esta tecla por 2 segundos para
ligar ou desligar. No modo de ligar, pressione este botão para
começar escaneamento, pressione este botão outra vez para parar.
Tela LCD
Mostra estado escaneamento
Resolução
JPG/PDF
Seleciona Alta (900dpi) /Baixa(300dpi) resolução; Middle (600dpi)
Ícone Modo resolução Alta/Baixa estará exibido no estado LCD.
Selecione escanear , ícone modo será JPG/PDF JPG/PDF
exibido em estado LCD.
Interface USB
Alojamento cartão SD
Localização de armazenamento do micro cartão SD
Baixe foto para um computador via cabo de USB fornecido.
LED indicador de
escaneamento
8
2. Partes funcionais
Pronto para escanear: LED verde ligado
LED Indicador de erro
Sobre velocidade: LED vermelho ligado
9
10
Botão formatar
Pressione este botão para formatar o micro cartão SD
Manual
11
1
2
3
5
7
6
4
8
9
10
11
Time definido
Pressione para entrar Time configuração do modo de
Page 24

3. Explicação dos ícones de estado
Item Função
Descrição
Indicador SD As fotos serão armazenadas em micro
cartão SD
Indicador de Bateria
Bateria cheia
Indicador efeito
JPG/PDF
Indicador contagem
Exposição arquivos escaneados em micro
cartão SD
Resolução selecionada
Alta: 900dpi Baixa:300dpi Middle : 600dpi
1
2
3
4
5
4.
4.1
Usando o scanner
Instalação da bateria
1. Abra a porta da bateria
2. Insira 2xAA pilhas alcalinas no compartimento da bateria
3. Ligue o scanner pressionando o botão [POWER] por 2 segundos.
4.2
Inserindo um micro cartão SD de memória (não incluído)
Deve inserir um micro cartão SD (não fornecido) para registrar e armazenar suas fotos.
Inserir o micro cartão de memória SD:
1. Desligue o scanner.
2. Insira o micro cartão SD na ranhura de micro cartão SD, suavemente pressione
até que cartão esteja preso.
Bateria vazia
Nota:
- Não force o cartão na ranhura; forçar pode causar dano ao scanner e ao micro cartão de
memória SD. Alinhe a posição do micro cartão SD (como marcado) e tente outra vez.
- O micro cartão de memória SD deve ser formatado antes de escanear.
Veja a seguinte instrução.
5
RESOLUTION
HI MI LO
JPG PDF
FULL
EFFECT
1
2
3
4
Page 25

4.5 Ajustar a resolução
Pressione o botão [DPI] para selecionar resolução Alta Middle Baixa.
Ícone resolução alta /baixa será exibido no estado LCD.Middle
4.6 Ajustar o modo de escaneamento
Pressione o botão [ ] para selecionar modo JPG/PDF JPG/PDF
Ícone será exibido no estado LCD.JPG/PDF
4.7
Como escanear
Segure o documento firmemente com uma mão.
Coloque o scanner na posição de início-escaneamento
Segure o scanner firmemente e pressione o botão de escaneamento uma vez.
Deslize o scanner lentamente e mantenha sua mão estável para obter a melhor
qualidade de imagem.
Pressione outra vez parar escanear.
4.4 Formatar o micro cartão de memória SD
1. Insira um novo micro cartão SD no scanner, então ligue o scanner.
2. Pressione o botão de formatar em modo de formatar. "F" aparece no LCD.
3. Pressione o botão de Ligar/Escanear para começar a formatar o micro cartão SD.
4. O indicador de micro cartão SD piscará até que a formatação está completa.
4.3 Ajuste do tempo
1. Pressione [TIME SET] para entrar no modo de ajuste de tempo
2. No LCD, que mostra uma XX, e prima ( & DPI) botões para cima e para baixo
número de seleção
JPG/PDF
3. Press (SCAN) para confirmar a definição
4. No LCD, ele salta para o modo de configuração que vem como seqüência abaixo
1 XX anos configuração
2 XX meses definição
3 XX configuração de data
4 XX configuração horas
5 XX configuração minutos
5. Depois de todas as informações que tiver sido definida, pressione (TIME SET)
novamente para sair
OK
Page 26

5. Indicações Luz de LED
“VERDE” LED SCANEAMENTO LIGADO
“VERDE” LED ESCANEAMENTO DESLIGADO
Escaneamento em progresso
Standby/Scaneamento
está completo.
Escaneamento rápido
Pode causar erro de
escaneamento.
Reinicie e escaneie de novo.
“VERMELHO” LED ERROR LIGADO
“VERMELHO” LED ERROR DESLIGADO
Nenhum error em velocidade de
escaneamento.
Continue o processo de
escaneamento.
6.
Conectar ao Computador
Você também pode ligar seu scanner a seu computador e ver as imagens no monitor
do computador.
7. Especificação
Sensor de Imagem
Sensor de imagem de Contato de Cor A4
Número de sensor
st
5136 pontos(1 ~5104pontos disponíveis)
Resolução
Baixa resolução: 300x300dpi(padrão)
Middle resolução: 600x600dpi
Velocidade máxima de
escaneamento para
tamanho Tamanho
documento A4
Alta resolução cor
Resolução Baixa cor
Capacidade (Baseado
em um micro cartão SD
1GB. Arquivo de
escaneamento de
tamanho A4, a quantidade
de escaneamentos varia
dependendo da
complexidade do conteúdo)
900dpi cor:110pcs/JPG or PDF (Min.)
600dpi cor:250pcs/JPG or PDF (Min.)
300dpi cor:850pcs/JPG or PDF (Min.)
escaneamento COMEÇARÁ quando o botão for pressionado
para FINALIZAR escaneamento, pressione o botão novamente.
12 segundos
8 segundos
3 segundos
Computer
USB
Middle resolução cor
Alta resolução: 900x900dpi
Page 27

Largura Escaneamento
8.27”
Comprimento Escaneamento
Alta resolução :35”Middle resolução:45” Resolução Baixa:98”
Formato arquivo
JPEG/PDF
LCD
Exibição estado escaneamento
Auto Desliga
3 Minutos
Porta USB
USB2.0 alta velocidade
Memória Externa
Micro cartão SD
Bateria padrão
2xAA baterias alcalinas
8. Requisitos Mínimos Sistema de Computador
Sistema
Operacional
Windows e Mac OS 10.4 ou superior
(plug-in direto, instalação driver não exigida).
7 / Vista / XP
Interface Porta USB
CPU
Pentium II ou superior
RAM
64Mo
9. Diagnosticando Problemas
Problema
Causa
Não posso ligar o
scanner
1.Carga baixa da bateria
2.Bateria não colocada
corretamente
As imagenss não
podem ser salvas
quando você as
escaneia
1.O micro cartão SD não foi
instalado.
2.Memória está cheia
3.O micro cartão SD não foi
formatado corretamente
Imagens obscuras
A lente de scanner está suja
O computador não
reconhece seu
scanner quando
conectado. (você
não pode achar
disco removível)
Falha de conexão
A vida de bateria é
muito curta
Uso do tipo de bateria errado
ERR.LED fica
ligado ao escanear
um documento
A velocidade do
escaneamento está demais
rápida
Solução
Recoloque ou instale a bateria
corretamente
1.Instale o micro cartão SD
2.Baixe as imagens do scanner
ao computador para criar
espaço de armazenamento.
Por favor, vá seção 4.4
Limpe a lente com pano seco
macio
Assegure-se que todas as
conexões de cabo estão firmes.
Comece de novo o computador
se for necessário.
Substitua com 2xAA baterias
alcalinas novas.
Pressione o botão de Ligar/
Escanear para reajustar e
escanear outra vez o documento
Page 28

1.Caratteristiche principali
Scelta tra scansione a colori
Scelta tra scansione a 900 600 o 300 dpi
Salvataggio diretto dei file JPG/PDF su micro scheda SD
Supporto micro scheda SD fino a 32GB
Driver scaricabile gratuitamente per Windows 7 / Vista / XP e Mac OS10.4 o superiori
(plug-in diretto, installazione del driver non necessaria)
Oggetto Funzione
1
2
3
4
5
6
7
Sportel
lino pile
Per 2 pile alcaline AA
Accensione/
Scansione
Acceso/Spento: tenere premuto questo tasto per 2 secondi per
accendere o spegnere lo scanner. In modalita accesa, premere
questo tasto per far partire la scansione, premere di nuovo questo
tasto per interromperla
Schermo LCD
Mostra lo stato della scansione
Risoluzione
JPG/PDF
Scegliere tra risoluzione Alta (High-900dpi) o (Mid-300dpi); Middle
l'icona della modalità di risoluzione apparirà sullo schermo LCD
Scegliere tra scansione a , l'icona della modalità JPG/PDF
JPG/PDF apparirà sullo schermo LCD
Interfaccia USB
Ingresso scheda SD
Fessura dove va inserita la micro scheda SD
Per scaricare foto su computer usando il cavo USB incluso
Indicatore scansione
8
2. Parti funzionali
Pronto per la scansione: spia Verde accesa
Indicatore errore
Velocità eccessiva: spia Rossa accesa
9
10
Manuale
11
Tasto formato
Premere questo tasto per formattare la micro scheda SD
Tempo impostato
Premere per entrare in modalità di impostazione del tempo
1
2
3
5
7
6
4
8
9
10
11
o Bassa (Low-300dpi);
Page 29

Nota bene:
- Non forzare l'inserimento della scheda; si potrebbe danneggiare lo scanner e la micro
scheda stessa. Allineare la micro scheda SD come indicato dalla posizione e riprovare.
- La micro scheda SD deve essere formattata prima di effettuare scansioni.
Seguire le seguenti istruzioni.
3. Descrizione delle icone
Icona Funzione
Descrizione
Indicatore scheda SD Le foto vengono salvate su micro schedaSD
Indicatore batteria
Batteria carica Batteria scarica
Indicatore effetti
JPG/PDF
Contatore
Mostra il numero di file scansiti contenuti
nella micro acheda SD
Indicatore risoluzione
(High): 900dpi (Low): 300dpi (Middle): 600dpi
1
2
3
4
5
4.
4.1
Utilizzo dello scanner
Installazione delle pile
1. Aprire lo sportellino.
2. Inserire 2 pile alcaline AA dentro lo scomparto.
3. Accendere lo scanner tenendo premuto il tasto di accensione per 2 secondi.
4.2 Inserimento della micro scheda di memoria SD (non inclusa)
È necessario inserire una micro scheda SD (non fornita) per registrare e archiviare le
immagini. Inserimento della micro scheda di memoria SD:
1. Spegnere lo scanner.
2. Inserire la micro scheda SD nell'ingresso per micro scheda SD, spingere la scheda
con cautela fino a che é inserita del tutto.
5
RESOLUTION
HI MI LO
JPG PDF
FULL
EFFECT
1
2
3
4
Page 30

4.3 Impostazione del tempo
1. Premere [TIME SET] per accedere alla modalità di impostazione tempo
2. Sul display LCD, mostra uno XX, e premere (JPG/PDF e DPI) pulsanti per l'up & down di
selezione numero
3. Premere (SCAN) per confermare l'impostazione
4. Sul display LCD, si passa alla modalità di impostazione successiva come qui di seguito
la sequenza
1 XX anno impostazione
2 XX impostazione del mese
3 XX Data di impostazione
4 XX impostazione delle ore
5 XX impostazione dei minuti
5. Dopo tutte le informazioni è stata impostata, premere (TIME SET) di nuovo il pulsante per uscire
4.5 Selezione della risoluzione
Premere il tasto [DPI] per scegliere tra Alta (High) o Bassa (Low) risoluzione.Middle (Middle)
Sullo schermo LCD apparirà il tipo di risoluzione scelta.
4.6 Selezione della modalità di scansione
Premere il tasto [ ] per scegliere tra modalità a JPG/PDF JPG/PDF
Sullo schermo LCD apparirà l'icona JPG/PDF
4.7
Come effettuare la scansione
Con una mano, tenere il documento ben fermo.
Sistemare lo scanner in posizione inizio scansione.
Tenere lo scanner ben saldo e premere il tasto scansione una sola volta.
Far scivolare lo scanner lentamente e tenere la mano ferma così da ottenere la miglior
qualità d'immagine.
Premere nuovamente il tasto per terminare la scansione.
4.4 Formattazione della micro scheda di memoria SD
1. Inserire una micro scheda SD nuova nello scanner, quindi accendere lo scanner.
2. Premere il tasto formato per attivare la modalità. Sullo schermo LCD apparirà la lettera“F”.
3. Premere il tasto Accensione/Scansione per iniziare a formattare la micro scheda SD.
L'indicatore della scheda SD continuerà a lampeggiare fino a che la formattazione é completata.
OK
Page 31

5. Indicatori luminosi
Spia di scansione“VERDE” accesa
Spia di scansione“VERDE spenta
Scansione in corso.
Standby/Scansione
completata.
Scansione troppo veloce.
Potrebbe causare un errore
di scansione.
Rifare la scansione.
Spia di errore“”ROSSA” accesa
Spia di errore“”ROSSA” spenta
Nessun errore di velocità.
Continuarecon la scansione.
6.
Connessione a computer
È possibile collegare lo scanner al proprio computer e visualizzare le immagini
sullo schermo.
7. Specifiche
Sensore immagine
Sensore immagine A4 Color Contact
Numero di sensori
5.136 punti (1°~5.104 punti disponibili)
Risoluzione
Bassa risoluzione: 300x300dpi (predefinita)
Middle risoluzione: 600x600dpi
Velocità massima di
scansione per
documenti formato A4
Alta risoluzione a Colori
Middle a Coloririsoluzione
Bassa risoluzione a Colori
Capacità (basata su
una micro scheda SD
da 1GB. Scansione di un
file formato A4, la quantità
di scansioni varia a
seconda della complessità
del contenuto)
900dpi a colori:110pcs/JPG or PDF (Min.)
600dpi mono:250pcs/JPG or PDF (Min.)
300dpi a colori:850pcs/JPG or PDF (Min.)
la scansione INIZIA quando si preme il tasto
per TERMINARE la scansione, premere il tasto di nuovo.
12 secondi
8 secondi
3 secondi
Computer
USB
Alta risoluzione: 900x900dpi
Page 32

Ampiezza scansione
8,27 pollici
Lunghezza scansione
Alta risoluzione :35” Middle risoluzione:45” Bassa risoluzione:98”
Formato file
JPEG/PDF
LCD
Mostra lo stato della scansione
Auto-spegnimento
3 minuti
Porta USB
USB 2.0 alta velocità
Memoria esterna
Micro scheda SD
Batteria standard
2 pile alcaline AA
8. Computer: requisiti minimi di sistema
Sistema operativo Windows 7 / Vista / XP e Mac OS 10.4 o superiori
(plug-in diretto, installazione driver non necessaria)
Interfaccia Porta USB
CPU
Pentium II o superiori
RAM
64MB
9. Risoluzione dei problemi
Problema
Causa
Soluzione
Lo scanner non si
accende
1.Pile scariche
2.Pile non inserite
correttamente
Sostituire o inserire le pile
correttamente.
Le immagini non
vengono archiviate
durante la scansione
delle stesse
1.Non è stata inserita la micro
scheda SD.
2.La memoria è piena.
3.La micro scheda SD non è
stata formattata
correttamente.
1.Inserire la micro scheda SD.
2.Scaricare le immagini dallo
scanner al computer per
creare spazio di archiviazione.
Si veda la sezione 4.4.
Immagini sfocate
La lente dello scanner è
sporca
Pulire la lente con un panno
morbido
Il computer non
riconosce lo scanner
connesso (non si
riesce a trovare il
disco rimovibile)
Mancata connessione Assicurarsi che tutte le
connessioni via cavo siano a
posto. Se necessario, far
ripartire il computer.
La batteria dura
poco
Si sta usando un tipo di pila
sbagliato
Sostituire le pile con un altro
paio di pile alcaline AA nuove.
La spia di errore
(ERR.) si illumina
durante la scansione
di un documento
La scansione è troppo veloce Premere il tasto Acceso/Spento
per ripristinare lo scanner e
scansire nuovamente il
documento
Page 33

1.Functies
Selectie voor scannen en kleur
Selectie voor scannen met 900/600/300 dpi
Direct opslaan van JPG/PDF-bestanden in de micro SD geheugenkaart
Ondersteunde micro SD kaart tot 32 GB
Kostenloze download van besturingen voor Windows 7 / Vista / XP en
Deel Functie
1
2
3
4
5
6
7
Batterijafdekking
Voor 2 x AA alkaline batterijen
Toets
Apparaat in/uitschakelen: Deze toets 2 seconden gedrukt
houden om de scanner in of uit te schakelen. In de
ingeschakelde toestand drukt u op deze toets om het
scannen te starten. Opnieuw op de toets drukken om het
scannen te beëindigen.
LCD-venster Statusindicatie voor het scannen
Toets DPI
Toets JPG/PDF
Selectie voor hoge resolutie (HIGH; 900 dpi) Middle
of geringe resolutie (LOW; 300 dpi).
De desbetreffende modus wordt in het LCD-venster geaccentueerd
resolutie
(Middle; 600 dpi)
Selectie voor scannen en kleur
De desbetreffende modus wordt in het
LCD-venster geaccentueerd.
JPG/PDF
USB-interface
SD-kaartensleuf Sleuf voor de micro SD-kaart
Scanbestanden met de meegeleverde USB-kabel naar een
computer overdragen
LED-indicator voor scannen
8
2. Componenten
Scanbereid: Groene LED brandt
LED-indicator voor fouten
Scannen te snel: Rode LED brandt
9
10
Gebruiksaanwijzing
11
Toets voor formatteren Druk op de toets om de micro SD-kaart te formatteren
Toets voor tijdinstelling
Druk op de toets om datum en klok in te stellen
1
2
3
5
7
6
4
8
9
10
11
Page 34

Aanwijzing:
- Kaart niet met geweld invoeren. Hierdoor kunnen de scanner en de micro SD-geheugenkaart
worden beschadigd. Die micro SD-kaart correct richten (op markering letten) en opnieuw
proberen.
- Voor het scannen moet de micro SD-geheugenkaart geformatteerd worden
(zie volgende paragraaf).
3. Statusindicaties
Nummer Functie
Beschrijving
SD-kaartindicatie Scan-bestanden worden op de micro SD-kaart
opgeslagen
Batterij-indicatie
Batterijen vol Batterijen leeg
Modus-indicatie JPG/PDF
Teller
Geeft het aantal opgeslagen bestanden op de
micro SD-kaart aan
Geselecteerde resolutie
HI (900 dpi) LO (300 dpi)MI (600 dpi)
1
2
3
4
5
4.
4.1
Scanner gebruiken
Batterijen inleggen
1. Batterijafdekking afnemen.
2. 2 AA alkaline batterijen in het vak inleggen.
3. Houdt de toets 2 seconden ingedrukt om de scanner aan te schakelen.
4.2 micro SD-geheugenkaart inleggen (niet in omvang van de levering)
Om de gescande gegevens te registeren en op te slaan is een micro SD-kaart nodig
(niet in omvang van de levering).
1. Scanner uitschakelen.
2. micro SD-kaart in de kaartensleuf steken. Voorzichtig drukken tot de kaart vastklikt.
5
RESOLUTION
HI MI LO
JPG PDF
FULL
EFFECT
1
2
3
4
Page 35

4.3 Datum en klok instellen
1. Op de toets voor de tijdinstelling drukken om de instelmodus te openen.
2. In het LCD-venster verschijnt 1 XX. Met de toetsen JPG/PDF en DPI de betreffende
waarde selecteren.
3. De toets drukken, om de instelling te bevestigen
4. Het LCD-venster geeft de parameters in de volgende volgorde weer:
1 XX Jaar
2 XX Maand
3 XX Dag
4 XX Uur
5 XX Minuut
5. Wanneer alle gegevens ingesteld zijn, drukt u opnieuw de toets voor de tijdinstelling om de
modus te verlaten.
4.5 Resolutie instellen
Druk op de toets DPI om een hoge (HIGH) of geringe (LOW) resolutie te selecteren.Middle (MID)
De desbetreffende modus wordt in het LCD-venster geaccentueerd.
4.6 Scan-modus instellen
Druk op de toets om in te scannen.JPG/PDF JPG/PDF
De desbetreffende modus wordt in het LCD-venster geaccentueerd.
4.7
Scannen
Het voorbeeld met een hand fixeren.
De scanner op de startpositie leggen.
De scanner vasthouden en de toets eenmaal indrukken.
De scanner langzaam over het voorbeeld bewegen. Voor de beste kwaliteit mag de scanner niet
worden verdraaid.
Om het scannen te beëindigen, drukt u opnieuw op de toets
4.4 Micro SD-geheugenkaart formatteren
1. Nieuwe micro SD-kaart in de scanner leggen en de scanner inschakelen.
2. Druk op de toets voor formatteren. In het LCD-venster verschijnt F.
3. Druk op de toets om de formatteerproces te starten
4 Tijdens het formatteren knippert de micro SD-kaart-indicatie..
OK
Page 36

5. LED-indicaties
Groene LED SCAN aan
Groene LED SCAN uit
Er wordt gescand.
Standby, scanproces beëindigd
Scanproces te snel.
Foutieve scan mogelijk.
Opnieuw starten en opnieuw scannen.
Rode LED ERR. aan
Rode LED ERR. uit
Scansnelheid correct.
Scanproces voortzetten.
6.
Aan een computer aansluiten
De scanner kan op een computer aangesloten worden om de gescande bestanden op een
PC-monitor te bekijken.
7. Technische gegevens
Beeldsensor
A4-Contactkleurenbeeldsensor
Aantal sensoren
5136 Beeldpunten (ca. 5104 beeldpunten beschikbaar)
Resolutie
Geringe resolutie: 300x300 dpi (standaard)
resolutie: 600x600 dpiMiddle
Hoge resolutie: 900x900 dpi
Maximale scansnelheid
voor A4 document
Hoge resolutie, kleur 12 seconden
resolutie, 8 seconden
Geringe resolutie, kleur 3 seconden
Middle kleur
Capaciteit (voor 1 GB
micro SD-kaart, scannen
van een A4-document,
aantal scanbestanden
hangt af van de
datacomplexiteit van het
voorbeeld)
900dpi kleur:110pcs/JPG or PDF (Min.)
600dpi kleur:250pcs/JPG or PDF (Min.)
300dpi kleu:850pcs/JPG or PDF (Min.)
Scanproces begint, wanneer u op de toets drukt
Om het scannen te beëindigen, drukt u opnieuw op de toets
Computer
USB
Page 37

Scanbreedte
21 cm
Scanlengte
Hoge resolutie:35”Middle resolutie:45” Geringe resolutie:98”
Bestandsformaat
JPEG/PDF
LCD
Statusindicatie voor het scannen
Autom. uitschakelen
3 minuten
USB-aansluiting
USB 2.0 High Speed
Extern geheugenmedium
micro SD-kaart
Batterijen
2 x AA alkaline batterijen
8. Minimum systeemeisen
Bedrijfssysteem Windows 7 / Vista / XP en Mac OS 10.4 of hoger
(directe plug-in, geen installatie van besturingen nodig)
Interface USB-aansluiting
CPU
Pentium II of hoger
Werkgeheugen
64MB
9. Probleemoplossing
Probleem
Oorzaak
Oplossing
Scanner kan niet
ingeschakeld worden.
1. Zwakke batterijen.
2. Batterijen niet correct
ingelegd.
Batterijen vervangen of correct
inleggen.
Bestand kan bij het
scannen van het
voorbeeld niet
worden opgeslagen.
1. Geen micro SD-kaart ingelegd.
2. Geheugen vol.
3. Micro SD-kaart niet correct
geformatteerd.
1. Micro SD-kaart inleggen.
2. Bestanden van de scanner op
de computer laden om vrije
geheugenplaats te krijgen.
3. Zie paragraaf 4.4.
Wazig beeld Lens van de scanner is
verontreinigd.
Lens met een zachte, droge
doek reinigen.
Computer herkent
niet de aangesloten
scanner (wisselschijf
wordt niet gevonden)
Geen verbinding Kabelverbindingen controleren.
Computer opnieuw starten als
nodig.
Batterijen hebben
een korte levensduur.
Verkeerd batterijtype gebruikt.
2 nieuwe AA alkaline batterijen
inleggen.
LED ERR. brandt
tijdens het scannen.
Scanbeweging te snel. Druk op de toets
voor reset en scan het
document opnieuw.
Page 38

AM-N410-GDFEPI-CLV-R
 Loading...