

Page 1

i
Preface
Congratulations on your purchase of this advanced digital camera /
video, which is also a music player. Ensure that you read this manual
carefully and keep it in a safe place for future reference.
About this manual
Every effort has been made to ensure that the contents of this
manual are correct and up-to-date. However, no guarantee is made
regarding the accuracy of the contents, and the manufacturer
reserves the right to make changes without notice.
Copyright
© Copyright 2006.
All rights reserved. No part of this publication may be reproduced,
transmitted, transcribed, stored in a retrieval system or translated
into any language or computer language, in any form or by any
means, electronic, mechanical, magnetic, optical, chemical, manual
or otherwise, without the prior written permission of the
manufacturer.
Page 2

i
Safety
• Do no use or store the product in dusty, dirty, or sandy areas, as
its components may be damaged.
• Do not store the product in hot areas. High temperatures can
shorten the life of electronic devices, and warp or melt certain
plastics.
• Do not store the product in cold areas. When the product warms
up to its normal temperature, moisture can from inside, which
may damage the electronic circuits.
• Do not attempt to open the casing.
• Do not drop or knock the product. Rough handing may damage
the internal components.
• Do not use harsh chemicals, cleaning solvents or strong
detergents to clean the product. Wipe the product with a soft
cloth slightly dampened.
• If the product or any of its accessories are not working properly,
take them to your nearest qualified service center. The
personnel there will assist you, and if necessary, arrange for the
product to be repaired.
i
Page 3

Table of contents
Preface ...................................................................................................... i
About this manual ....................................................................................i
Copyright................................................................................................... i
Safety........................................................................................................ii
1 Introducing the Camera................................................... 1
1.1 System requirements ................................................................... 1
1.2 Features ....................................................................................... 1
1.3 Unpacking.................................................................................... 2
1.4 About the camera ........................................................................ 3
1.4.1 Front view.............................................................................. 3
1.4.2 Right view.............................................................................. 3
1.4.3 Left view................................................................................ 4
1.4.4 Top view................................................................................ 4
1.4.5 Bottom view........................................................................... 4
1.4.6 Button functions..................................................................... 5
1.4.7 Rotating the LCD monitor...................................................... 6
2 Getting Started ................................................................. 7
2.1 Charging ...................................................................................... 7
2.2 Installing an SD card .................................................................. 8
2.3 Turning on/off the camera ......................................................... 8
3 Using the Camera............................................................. 9
3.1 Using the LCD display ................................................................ 9
3.2 About the LED............................................................................. 9
3.3 Setup menu ................................................................................ 10
3.3.1 Sound effect ........................................................................ 10
3.3.2 USB mode........................................................................... 10
3.3.3 Date and time...................................................................... 11
3.3.4 Welcome picture.................................................................. 11
3.3.5 Auto power off ..................................................................... 11
3.3.6 LCD brightness.................................................................... 11
3.3.7 Language ............................................................................ 12
Page 4

3.3.8
3.3.9 Format................................................................................. 12
3.3.10 Default................................................................................. 12
3.4 Setting menu .............................................................................. 12
3.4.1 Video mode setting.............................................................. 13
3.4.2 Photo mode setting ............................................................. 14
4 Preview mode.................................................................. 17
4.1 Preview mode icons ................................................................... 17
4.2 Using the self-timer function .................................................... 18
4.3 Setting the Flash mode.............................................................. 18
4.4 White balance ............................................................................ 19
4.5 Using the zoom function ........................................................... 19
5 Shooting your first video................................................ 20
5.1 DV mode settings....................................................................... 20
5.2 Using the zoom function ........................................................... 20
5.3 Using the self-timer function .................................................... 20
6 Taking your first picture................................................ 21
6.1 Photo mode settings................................................................... 21
6.2 Using the zoom function ........................................................... 21
6.3 Setting the Flash mode.............................................................. 21
6.4 Using the self-timer function .................................................... 21
7 Voice recorder mode ...................................................... 22
7.1 Voice recorder buttons .............................................................. 22
8 Play Mode ....................................................................... 23
8.1 Playback mode........................................................................... 23
8.1.1 Viewing photos.................................................................... 23
8.1.2 Photo playback menu.......................................................... 23
8.1.3 Viewing videos .................................................................... 24
8.1.4 Video playback menu .......................................................... 24
8.1.5 Listening to audio clips ........................................................ 24
8.1.6 Voice playback menu .......................................................... 25
2
TV system ........................................................................... 12
Page 5

8.2 Music mode................................................................................ 25
8.2.1 Music mode menu............................................................... 25
8.3 Game mode ................................................................................25
9 Remote control................................................................ 26
10 Installing the Applications............................................. 28
10.1 Drivers.................................................................................... 28
10.1.1 Camera Driver..................................................................... 28
Appendix.................................................................................... 29
Specifications......................................................................................... 29
3
Page 6

1 Introducing the Camera
Read this section to learn about the features and functions of the
camera. This chapter also covers system requirements, package
contents, and the camera views.
1.1 System requirements
The camera requires a host PC with the following specifications:
• Windows® XP, 2000, ME, 98SE operating system
• Intel® Pentium III 1 GHz CPU or higher
• At least 256 MB of RAM or higher
• Standard USB 1.1 port or higher
• 4x speed CD-ROM drive or higher
• At least 200 MB of available disk space
A USB 1.1 port will enable you to transfer files to and from the host PC, but
transfer speeds will be much faster with a USB 2.0 port.
1.2 Features
The camera offers a variety of features and functions including:
• Digital Video Camera
• Digital still camera (with 8 x digital zoom, 6 Mega pixels)
• Music player
• Voice recorder
• TV/VCD/DVD recorder
• Game player
1
Page 7
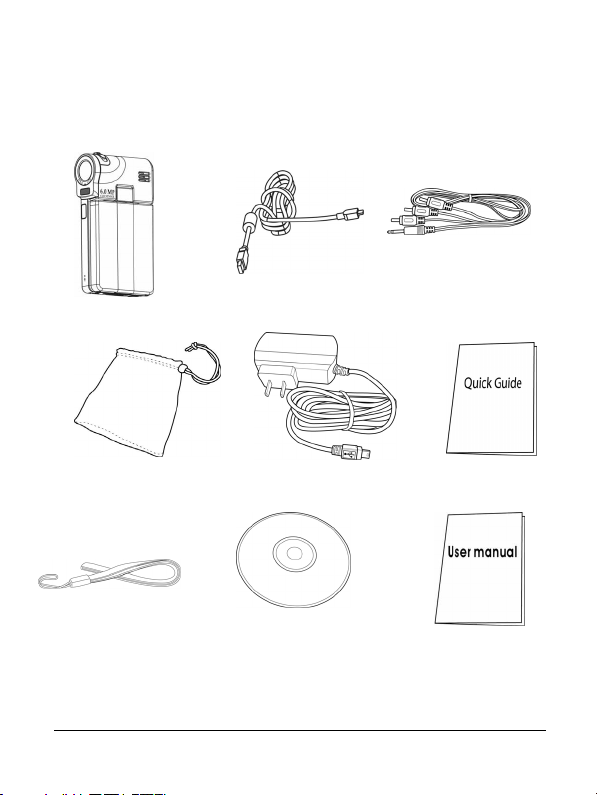
1.3 Unpacking
USB cable
All the following items should be present in the camera package. If
any of them is missing or appears damaged, contact your dealer
immediately.
AV cable
Camera
Pouch
Strap
AC-in cable
CD-ROM
Quick Guide
User manual
2
Page 8
1.4 About the camera
p
Refer to the following diagrams to familiarize yourself with the
buttons and controls of the camera.
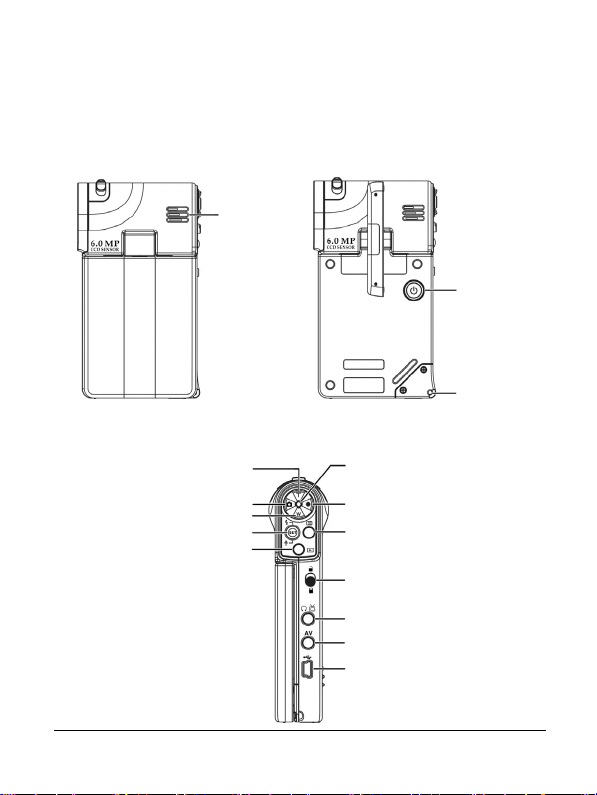
1.4.1 Front view
Speaker
Power button
1.4.2 Right view
3
Zoom in button
ture button
Ca
Zoom out button
5-way controller
Play button
Hand Strap
buckle
LED
Video button
Menu button
Holder button
Earphone jack/TV out
AV jack
USB port
Page 9
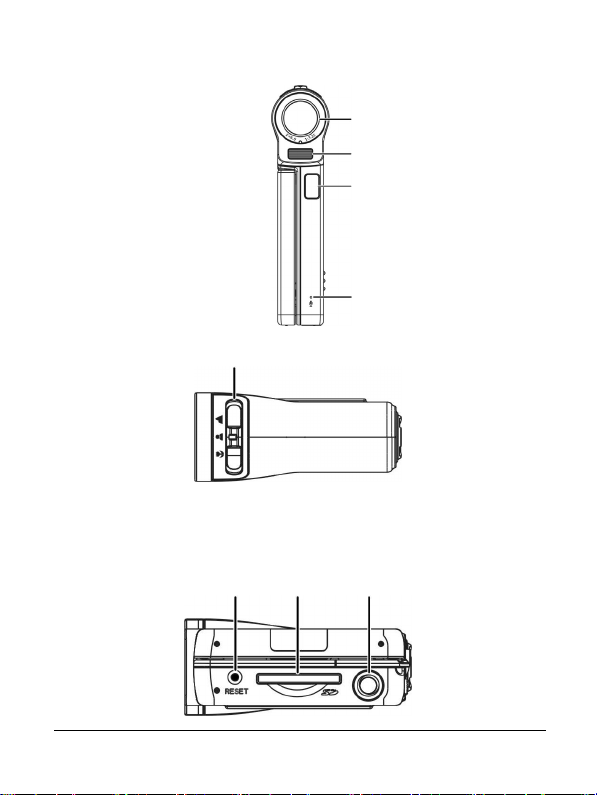
1.4.3 Left view
1.4.4 Top view
Focus button
1.4.5 Bottom view
Reset button
SD card
compartment
Lens
Flash
IR
Microphone
Tripod nut
4
Page 10
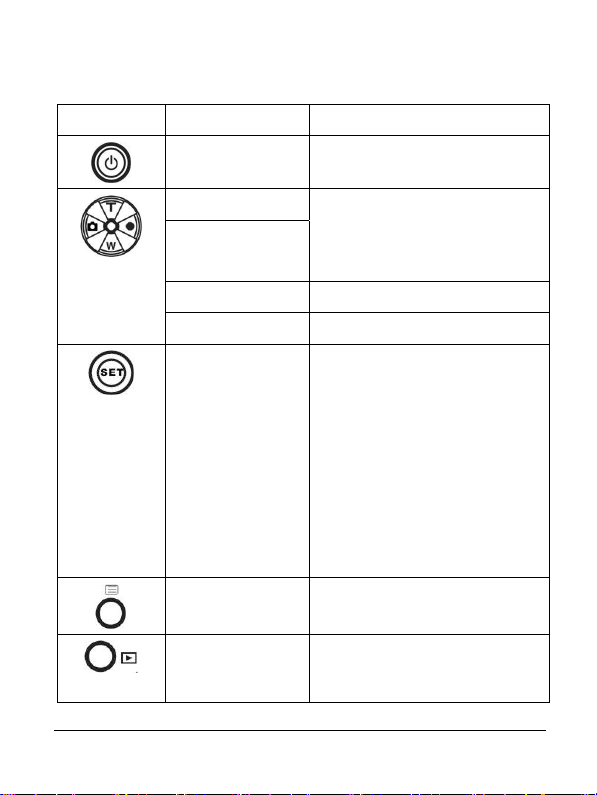
1.4.6 Button functions
Refer to the table below for detail function of each button:
Icon Button Function
Power on / off Turns the camera on or off.
T (Zoom in)
W (Zoom out)
Capture Press to capture image
Video Press to start video recording
5-way controller
(left / right / up /
down/ OK)
Menu Press menu button to
Play To enter a play menu (includes
1. Use to zoom in / out.
2. Use to adjust volume in
Music and Voice play
modes.
1. Use to navigate the OSD
menus.
2. Press the 5-way controller
left/right/up to set self-timer,
White balance and Flash
mode.
3. Press the 5-way controller
down to enter Voice recorder
mode.
4. Press in the 5-way controller
to execute item
enter/exit setting menu.
Playback, Music and Games
play modes.
5
Page 11

Icon Button Function
Holder When in Music play mode, use
this button to deactivate all
buttons.
Focus Push to change focus mode
between Macro, Normal or
Infinity.
1.4.7 Rotating the LCD monitor
Open the LCD monitor in left side of the Camera carefully.
The directions and lock position of the LCD monitor is shown as
follows:
Note: Do not rotate the LCD monitor in the wrong direction to avoid
damaging the LCD monitor!
6
Page 12

2 Getting Started
Read this section to learn how to start using the camera. This section
covers only basic functions.
2.1 Charging
The camera is designed to use a build-in rechargeable battery. Only
simply use the USB cable in the package to connect the camera and
your PC, and the charging process will be started.
When traveling, you can also bring the AC-in power cable. By
plugging the AC-in power cable into the outlet, the camera also can
be charged.
7
Page 13

2.2 Installing an SD card
An SD card can be inserted into the camera to provide additional
storage space.
To install an SD Card:
1. Insert the SD card in to the SD card
compartment.
2. Press gently to ensure a firm
connection.
2.3 Turning on/off the camera
There are two ways to turn on/off the Camera:
1. Open or close the LCD monitor.
2. Press and hold the Power button.
Power button
8
Page 14

3 Using the Camera
Read this section to learn how to use the basic setup menu of this
camera.
3.1 Using the LCD display
Use the LCD display to compose and review your pictures and
videos stored in memory, and navigate the OSD (On Screen Display)
menu.
Icons displayed on the LCD display also show the current
configuration.
Video recording mode
LCD display
3.2 About the LED
Power off OFF OFF
Power on / Standby ON OFF
Processing Flick (1HZ) Flick (1HZ)
Battery low OFF Flick (1Hz)
USB connection ON OFF
Video recording Flick (1HZ) Flick (1HZ)
Preview/Capture mode
LCD display
LED
Blue Red
9
Page 15

Capture ON OFF
Charging OFF Flick (1HZ)
Music/Voice play mode Flick Flick
MPEG play mode Flick Flick
Flash charge OFF Flick (1HZ)
3.3 Setup menu
The setup menu includes a number of settings
to configure your camera.
To access the Setup menu:
1. Turn the camera on.
2. Press the Menu button and press
the 5-way controller down to enter Setup menu.
To leave the Setup menu while over configuring the camera, press
the Menu button again to leave the Setup menu.
3.3.1 Sound effect
Use this option to turn on or off the sound
effect of the camera.
3.3.2 USB mode
Use this option when the camera was
connected as a USB device.
3.3.2.1 Mass storage
Press the 5-way controller left or right to select the Mass storage.
10
Page 16

Connect the camera to the PC with the USB cable. Now the camera
will present as a removable disk.
3.3.2.2 PC Camera
Connect the camera to the PC with the USB
cable, and then the camera can be used as a
PC camera, used in the Net-meeting or any
on-line communication tools.
Note: Before connecting the camera as a PC-Camera, please install the driver
on the CD-ROM first.
3.3.3 Date and time
Use this option to set the date and time
3.3.4 Welcome picture
Use this option to set a welcome screen when
turning the camera on.
3.3.5 Auto power off
Use this option to set a period of inactivity after
which the camera will switch itself off. This
function can save the battery power
consumption.
3.3.6 LCD brightness
Use this option to set the brightness of the
LCD.
11
Page 17

3.3.7 Language
Use the option to set a language for OSD
menu of the camera.
3.3.8 TV system
Use this option to set the camera video output
to match the TV system in your area.
3.3.9 Format
Use this option to format the data stored on
the memory card or in the internal memory.
Note: When this function is preceded, all stored data will be erased and
cannot be recovered. Make sure you backup all data before formatting.
3.3.10 Default
Use the option to reset all settings to the
factory default.
3.4 Setting menu
The setting menu includes both Video and Photo Modes settings.
To access the Setting menu:
1. Turn the camera on.
2. Press the Menu button and press the 5-way controller
left or right to choose between Video Mode and Photo
Mode.
12
Page 18

To leave the Setting menu while over configuring the camera, press
the Menu button to leave the Setting menu.
3.4.1 Video mode setting
Read this section to configure the settings in Video recording mode.
To access the Video mode:
1. Turn the camera on and press
Menu button.
2. Press the 5-way controller left
or right to highlight the Video
Mode.
3. Press the 5-way controller up to enter the Video mode
setting menu.
3.4.1.1 Resolution
Use this option to set the resolution for each
video shooting.
3.4.1.2 EV adjust
Use this option to change the exposure for
your video. Usually this value would be set to
0.0, but you might want to increase the
exposure to light up a subject with black
lighting, or decrease the exposure if taking a video in a very bright
area.
3.4.1.3 Digital filter
Use this option to convert video image to
different color areas.
13
Page 19

3.4.1.4 Stabilization
Use this option to counteract camera shake
and help you to shoot clearer videos.
3.4.1.5 Monitor Video
Use this option to control your camera not to
start shooting a video until the image within
the focusing area is moving.
3.4.2 Photo mode setting
Read this section to configure the settings in Capture mode.
To access the Photo mode settings:
1. Turn the camera on and press Menu button.
2. Press the 5-way controller left or right to highlight the
Photo Mode.
3. Press the 5-way controller up to enter the Photo Mode
setting menu.
3.4.2.1 Scene
Use this option to select a proper scene mode
to take a picture.
3.4.2.2 Resolution
Use this option to determine the resolution of
the picture that going to be taken. A larger
resolution will occupy more memory storage
space.
14
Page 20

3.4.2.3 Image quality
Use this option to set the image quality for the
picture you’re going to capture. A high quality
picture occupies more memory space.
3.4.2.4 Continuous shots
Three pictures will be taken continuously
when this function is activated. Use this
function to take continuous pictures with a
short delay between each.
3.4.2.5 Couple shot
Use this option to combine two different
images in one photo.
3.4.2.6 Date stamp
Use this option to set the date stamp shown
on the images.
3.4.2.7 Picture frame
Use this option to add a picture frame to your
pictures when they are taken. There are 16
picture frames to choose from.
3.4.2.8 EV adjust
Use this option to change the exposure for
your photo. Usually this value would be set to
0.0, but you might want to increase the
15
Page 21

exposure to light up a subject with black lighting, or decrease the
exposure if taking a video in a very bright area.
3.4.2.9 ISO
ISO (Sensitivity) settings control the camera's
sensitivity to light. The lower sensitivity is, the
higher exposure value is needed. When you
increase the sensitivity, the shutter speed will
be faster and exposure value will be reduced.
There might be noises on the images.
3.4.2.10 Digital filter
Use this option to convert image to different
color areas.
3.4.2.11 Metering
This camera provides 3 metering modes
(Matrix, Center-weighted and Spot) to
support you to take photos in different
situations.
3.4.2.12 Histogram
Use this option to show a graph that displays
how light is distributed in your picture.
3.4.2.13 Icon
Use option to turn on or off all of the icons on
the LCD.
16
Page 22

7
4 Preview mode
Read this section for detailed functional operating of Preview mode.
4.1 Preview mode icons
Number Icon Description
1
2
3
4
5
6
7
8
Photo r-esolution
Image quality
Flash mode
White balance
Video resolution
Video mode icon
Focus area
Present time
1
Page 23

Number Icon Description
9
10
11
12
Battery indicator
Zoom bar
Picture remain
Capture mode icon
4.2 Using the self-timer function
Use the self-timer function to set a delay between the moment you
press the shutter and the moment the picture is actually captured. A
delay of 3 or 10 seconds can be set. This function can be used in
both capture and recorder mode.
To set the Self-timer:
1. Turn the camera on.
2. Press the 5-way controller
left to select from Off, 3 sec,
or 10 sec. The selected
timer will be shown on the
center of the LCD screen.
3. Press the Capture or Record button to start counting
down.
4.3 Setting the Flash mode
When you start to take a picture, presses the 5-way controller up to
switch between Flash modes.
18
Page 24

See the table below for a detailed description and symbol of each
Flash mode.
Note: This function will be activated only when you are taking a picture.
Icon Description
Flash is turned off.
Auto flash, fires only when needed.
Force flash, flash is always on.
Slow sync flash
4.4 White balance
Use this option to correct color for different lighting conditions.
Turn on the camera and the press the 5-way controller right to select
from Auto, Daylight, Cloudy, Tungsten, or Fluorescent. (Each
press will just change the mode once)
4.5 Using the zoom function
This function works in both Capture and Video modes.
To control the zoom function press the T (Zoom in) button which
getting closer to the subject, or W (Zoom out) button which moving
away from the subject.
The zoom bar on the LCD screen indicates the zoom status.
19
Page 25

5 Shooting your first video
Before shooting your first video, ensure you have read “1
Introducing the Camera”, “2 Getting Started”, and “3 Using the
Camera” carefully.
To shoot a video:
1. Turn on the camera.
2. Use the focus area on the
LCD screen to frame the
subject.
3. Press the Video button to
shoot the video.
The video clip will be saved either on the SD card or in
the internal memory with a unique file name.
5.1 DV mode settings
Please refer to”3.4.1 Video mode” for detailed information.
5.2 Using the zoom function
Please refer to”4.5 Using the zoom function” for detailed
information.
5.3 Using the self-timer function
Please refer to “4.2 Using the self-timer function” for detailed
information.
Video
button
20
Page 26

6 Taking your first picture
Before shooting your first picture, ensure you have read “1
Introducing the Camera”, “2 Getting Started”, and “3 Using the
Camera” carefully.
To take a picture:
1. Turn on the camera.
2. Use the focus area on the LCD
screen to frame the picture.
3. Press the Capture button to capture
the picture.
The picture will be saved either on the SD card or
in the internal memory with a unique file name.
6.1 Photo mode settings
Please refer to”3.4.2 Photo mode” for detailed information.
6.2 Using the zoom function
Please refer to”4.5 Using the zoom function” for detailed
information.
6.3 Setting the Flash mode
Please refer to”4.3 Setting the Flash mode” for detailed
information.
6.4 Using the self-timer function
Please refer to “4.2 Using the self-timer function” for detailed
information.
Capture button
21
Page 27

7 Voice recorder mode
Read this section and learn how to operate the camera as a voice
recorder. Turn on the camera, and press the 5-way controller down
to enter the Voice recorder mode.
7.1 Voice recorder buttons
Refer to the table below for button function
.
5-way controller
Icon Button Function
5-way controller
Press in the 5-way controller to
start/stop recording.
22
Page 28

8 Play Mode
Read this section for detailed information of Play mode.
Turn on the camera, and press the Play button to enter Play mode.
This mode includes Playback,Music and Game modes.
8.1 Playback mode
After entering the Playback mode, the photos, videos and voices
saved either on the SD card or in the internal memory, will be shown
in order.
To enter Playback mode:
1. Press the 5-way controller left or
right in Play mode and highlights
the Playback option.
2. Press in the 5-way controller to
confirm.
Press the 5-way controller left or right to show next or previous file.
8.1.1 Viewing photos
When viewing an image:
1. Press the T or W button to zoom in or out the photo.
2. Press the 5-way controller down to record a 20s voice
memo.
3. Press Play button again to return to
Play menu.
8.1.2 Photo playback menu
While viewing the images, press the Menu
button to configure the photo playback
settings.
Use the 5-way controller up or down to choose an option.
23
Page 29

Note: This function will be activated only when there is at least one image file
in the SD card or the internal memory.
8.1.3 Viewing videos
When browsing a video file, the first frame of the whole video will be
shown on the screen.
To view a video:
1. Press in the 5-way controller to start playing, and press it
again to stop.
2. Press the 5-way controller left or right to play fast
backward (2X, 4X, 8X, 10X) or fast forward (2X, 4X, 8X,
10X) when you are playing a video. Each press will
change a playing speed.
3. Press the T or W button to adjust the volume.
Note: You must stop playing the file, then you can view next or previous file.
8.1.4 Video playback menu
While viewing the video in Playback mode,
press the Menu button to configure the video
playback settings.
Use the 5-way controller up or down to
choose an option.
Note: This function will be activated only when there is at least one video file
in the SD card or the internal memory.
8.1.5 Listening to audio clips
To play a voice file:
1. Press in the 5-way controller to play or pause the current
file.
2. Press the 5-way controller down to stop playing.
3. Press the T or W button to adjust the volume.
24
Page 30

Note: You must stop playing the current file, and then you can view next or
previous file.
8.1.6 Voice playback menu
When the voice file is in whole screen mode, press the Menu button
to configure the voice playback settings.
Note: This function will be activated only when there is at least one voice file
in the SD card or the internal memory.
8.2 Music mode
1. Turn on the camera, and press the
Play button to enter Play mode.
2. Press the 5-way controller left or
right to highlight the Music option.
3. Press in the 5-way controller to
confirm.
8.2.1 Music mode menu
In the file list mode, press the Menu button
and configure the Music settings.
Note: This function will be activated only when there is at least one Music file
in the SD card or the internal memory.
8.3 Game mode
1. Turn on the camera, and press the
Play button to enter Play mode.
2. Press the 5-way controller left or
right to highlight the Game option.
3. Press in the 5-way controller to confirm.
Press the 5-way controller left or right to select a game from Sodoku,
Tetris, Moving box or Lotto.
25
Page 31

9 Remote control
This camera provides IR remote control function.
Refer to the table below for button function:
Number Description
1 Use to start/stop video recording.
2
1. Use to zoom in / out.
2. Use to adjust volume in Music and Voice play
3
4
5
modes.
1. Use to navigate the OSD menus.
2. Use to set Flash mode.
1. Use to navigate the OSD menus.
2. Use to set White balance
26
Page 32

7
6
1. Use to navigate the OSD menus.
2. Use to enter voice recorder mode.
7 Use to enter/exit setting menu.
8 Use to enter/exit Music mode.
9 Use to enter/exit Game mode.
Use to execute item.
10
Use to set self-timer.
11
Use to enter voice recorder mode.
12
Use to enter play mode.
13
Use to capture image.
14
2
Page 33

10 Installing the Applications
10.1 Drivers
After installing the camera driver, you can use the camera as a
“Mass Storage device” on the PC.
10.1.1 Camera Driver
The camera offers Mass Storage function as a card reader device.
When the driver has been installed and the camera is connected, the
camera memory and any installed mini SD card will appear as Mass
Storage Device in Windows Explorer. Files can be dragged and
dropped in the same way as on an ordinary disk.
Before connecting the camera to the PC as a PC camera, please
also following the instruction to finish the driver installation.
Please follow the instructions below:
1. Insert the supplied CD-ROM in the CD-ROM drive.
2. Use Windows Explorer to execute the Setup.exe file in the
root directory.
3. The installation is configuring
the window settings.
28
Page 34

Appendix
Specifications
General
CMOS Sensor Format
DSP
Resolution (Image)
Resolution (Video)
Physical Size
Video Clips
Audio
DC-in
Image LCD
29
1/ 2.5-inch
COACH 8m
4032x3024
3648x2736
2816x2212
2048x1536
1600x1200
1280 x 960
640x480
320x240
640x480
63 (W) x 119 (H) x 23 (D)
30 fps @QVGA, 30 fps @VGA, 30 fps @D1
Microphone, Speaker
N/A
3.0” TFT LCD
Page 35

General
Battery
Interfaces
Internal memory
Removable memory
card
Case material
AC Adapter
TV out
TV in
Audio out
Boot-up time
Shot to shot time
Flash
Zoom
Focus distance
1300 mAH internal Li-Polymer
USB 2.0 high speed
32 MB NAND
Removable Secure Digital (SD) memory
Plastic
Yes
Video / Audio output (Stereo)
Video / Audio input (Stereo)
Music
<= 2 Secs, start from pressing the Power
button/open the LCD plate
<= 4.5 Secs
Flash off/Auto Flash/Force flash/Slow sync flash
8X digital zoom
People:70~200cm; Mountain:200cm
~infinity, Macro: 20cm
30
 Loading...