

Page 1
EN
-0-
Page 2

EN
WELCOME
Thank you for purchasing the Easypix Cyberscanner
View.
Please take a moment to read through this manual.
Before using the Cyberscanner, please ensure that you
read and understand the safety precautions described
below. Always ensure that the Cyberscanner is operated
correctly.
Never operate the Cyberscanner inside an aircraft or
anywhere where the operation of such devices is
restricted. Improper use creates the risk of serious
accident.
Do not try to open the case of the Cyberscanner or
attempt to modify the Cyberscanner in any way.
High-voltage internal components create the risk of
electric shock when exposed. Maintenance and repairs
should only be performed by authorized service providers.
Keep the Cyberscanner away from water and other
liquids. Do not use the Cyberscanner with wet hands.
Never use the Cyberscanner in the rain or snow.
Moisture creates the danger of fire and electric shock.
-1-
Page 3

EN
Keep the Cyberscanner and its accessories out of reach
of children and animals to prevent accidents or damage to
the Cyberscanner.
If you notice smoke or a strange odour coming from the
Cyberscanner, turn the power off immediately. Take the
Cyberscanner to the nearest authorized service center for
repair. Never attempt to repair the Cyberscanner by
yourself.
Only use the recommended power accessories. Use of
power sources not expressly recommended for the
Cyberscanner may lead to overheating, distortion of the
equipment, fire, electrical shock or other hazards.
The Cyberscanner may become slightly warm during use.
This does not indicate a malfunction.
If the exterior of the Cyberscanner requires cleaning, wipe
it with a soft, dry cloth.
FCC Notice
This equipment has been tested and found to comply with
the limits for a Class B Digitize device, pursuant to Part 15
of the FCC Rules. These limits are designed to provide
reasonable protection against harmful interference in a
residential installation. This equipment generates, uses
and can radiate radio frequency energy. If not installed
and used in accordance with the instruction, it may cause
-2-
Page 4

EN
harmful interference to radio communication. However,
there is no guarantee that interference will not occur in a
particular installation. If this equipment does cause
harmful interference to radio or television reception, which
can be determined by turning the equipment on to off, the
user is encouraged to try to correct the interference by
one or more the following suggestion.
l Reorient or relocate the receiving antenna.
l Increase the distance between the equipment and
the receiver.
l Connect the equipment to a different power outlet
other than the one where the receiver is connected.
l Consult an experienced television or radio
technician for help.
CAUTION:
l To comply with the limits for a Class B Digitize
device, pursuant to Part 15 of the FCC Rules, this
device must only be installed on computer
equipment certified to comply with the Class B limits.
This unit may contain a microcomputer for signal
processing and control function. In very rare situations,
severe interference, noise from an external source, or
static electricity may cause it to lockup. In the unlikely
event that this should happen, turn off the unit, wait at
least five seconds, and then turn it back on again.
-3-
Page 5
EN
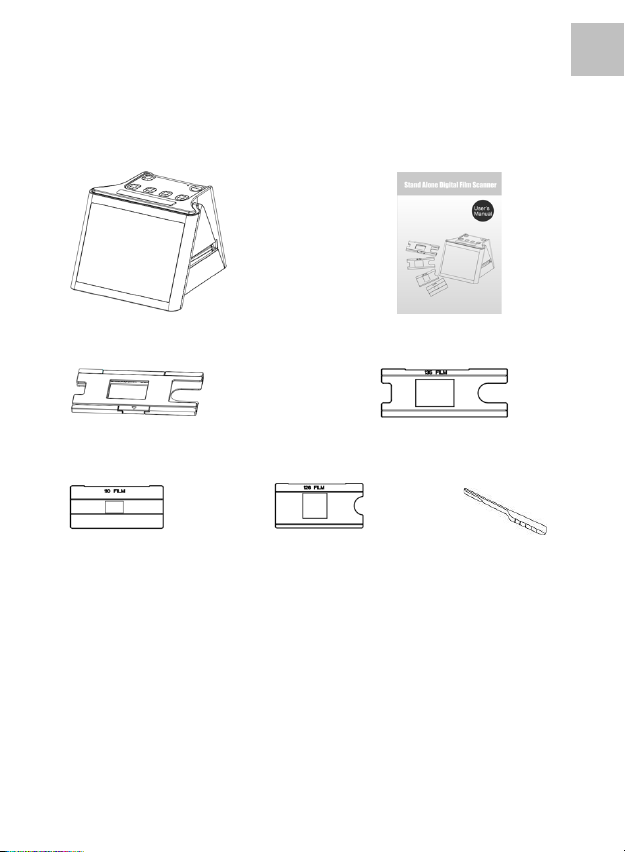
INCLUDING
Cyberscanner User’s Manual
135 Slide Holder /Main Holder 135 Film Adaptor
110 Film Adaptor 126 Film Adaptor Clean brush
-4-
Page 6
EN
Description
-5-
Page 7
EN
Note: We suggest using bundled brush to insert into the
Cyberscanner slot and clean the glass surface periodically to
produce a clear image. Please make sure your film negatives/
mounted slides and cover trays are clean before inserting into
the Cyberscanner as well. Dust or dirt from the negatives and
cover trays will affect the quality of your scanned images.
-6-
Page 8

EN
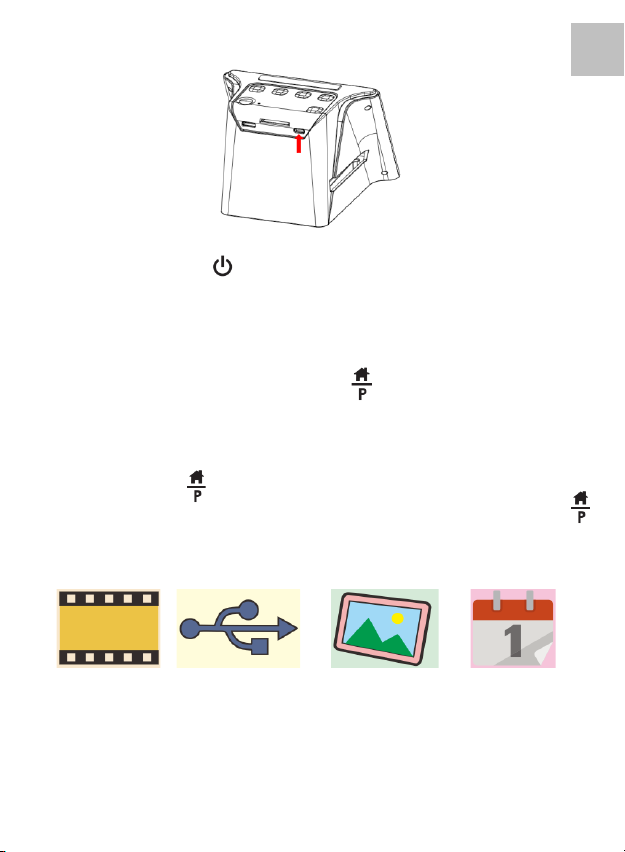
Start Using Your Cyberscanner
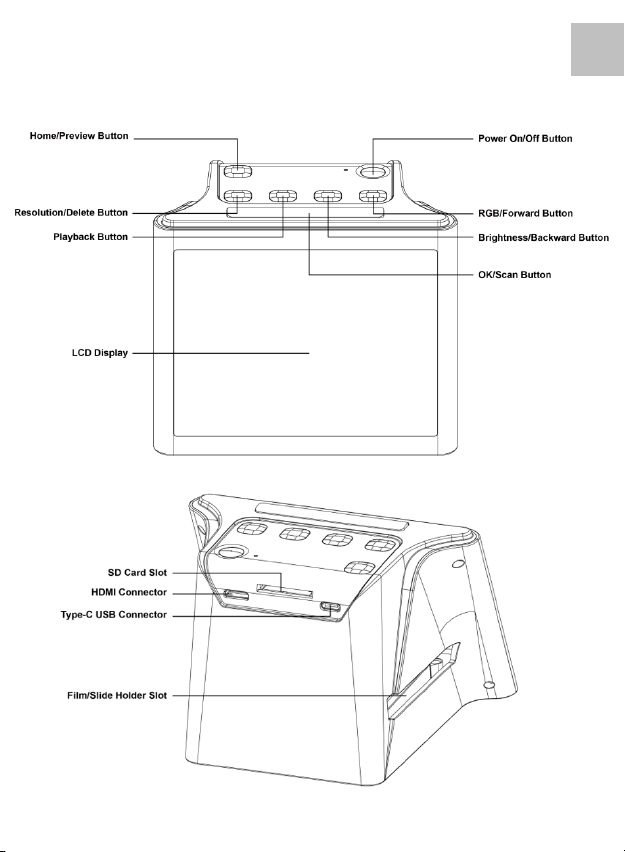
1. Insert the SD Card into the Cyberscanner.
Insert the SD card into the SD Card Slot located at the
back of the scanner. Make sure that the golden print
on the card is facing downward. The card will be
locked into place with a gentle push when correctly
inserted.
Note:
Only accepts SD and SDHC card (Maximum 32GB).
Card with SDXC class is not compatible.
2. Connect the electric power to your Scanner.
Connect the Type-C USB cable terminal to the
Type-C USB Connector of the Scanner.
Connect the USB plug to the Power Adaptor or the USB
port of your computer. Either device will supply the power
needed by the scanner.
-7-
Page 9
EN
Press the Power Button of your scanner to turn on the
scanner. You will see a pop up screen of Home Page on
the LCD, select the item you want to operate. There are 4
items (icons) for selection.
Note: The Home Page and the Button
The Home Page is an important page for the operation of
the scanner. From the Home Page you can go directly to
the preview mode of the scanner for scanning film by
pressing the button again, after all the settings for
the film are made. You may frequently use the
button while operating of the scanner.
Film Icon USB Icon Photo Gallery Calendar
-8-
Page 10

EN
Film Icon:
This is the main function of the scanner, and where you to
make all the settings for scanning film. For example the
setting the type and size of film, the selection for scanning
50x50mm transparent slide, or negative film for 135, 110
and 126 films. For more detail please see page 11:
“Operation of the Cyberscanner:
Settings for film scanning ”
USB Icon:
For downloading the image files from the SD Card to the
computer. For more detail please see page 20:
“Downloading the images from Card to Computer”
Photo Gallery Icon:
For you to review the scanned images from the card on
the
LCD screen. You may use it as a mini electronic Photo
Frame on your desk.
For more detail, please see description on page 17:
“Playback and Delete mode”
Calendar Icon:
For you to set the date and time you prefer to be shown in
your image files. For more detail please see page 21:
“The Date and Time setting:”
-9-
Page 11

EN
Operation of the Cyberscanner:
Settings for film scanning
On the home page of the LCD Screen, select the Film
icon (preset) by pressing the / Button, then
OK/( ) Button to confirm your selection.
You will then move to the 2nd page of options to select
the type of film:
50x50mm slide Colour Negative B&W Negative
Select the type of film you want to scan by pressing
the / Button, then OK/( ) Button to confirm your
selection.
You will then move to the 3rd page of options to select
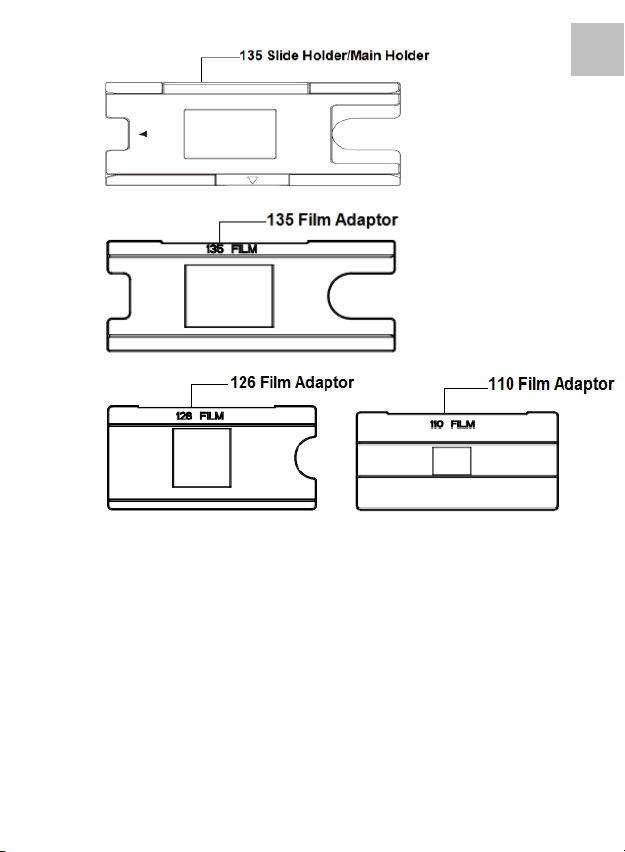
the size of film, they are:
135 Film: film with 24x36mm picture area
110 Film: film with 13x17mm picture area
126 Film: film with 28x28mm picture area.
-10-
Page 12

EN
Select the size of film you want to scan by pressing
the / Button, then OK/( ) Button to confirm your
selection.
A preview screen will appear on the LCD screen, you
may now insert the film into the scanner through the
film holder, and photo of the film will be shown on the
LCD Screen, ready for you to convert the photos into
digital images and store them on the SD Card.
Quick guide to Preview Mode for scanning film
From any screen pressing the Button will return to the
Home Page of the scanner. Pressing one more time from
the Home page will bring you directly to the preview mode
for scanning film. Pressing once again will return to the
Home Page.
Preview Screen:
-11-
Page 13

EN
Image Resolution:
There are 2 resolutions of scanning and storing your
image in the SD Card,14 mega pixels scan and 22 mega
pixel scan (by interpolation). The resolution is set by
pressing the ( ) button on the Preview mode. The set
value is shown on the lower right hand side of the preview
screen.
-12-
Page 14

EN
Place Slide / Film Into The Holder
The Cyberscanner supports 50X50mm transparent
slides, color negatives and B&W negative films, for
135/110/126 size films.
1. Scanning 50X50mm Transparent (Positive) Slide:
Insert the Main Holder (Slide Holder) according to the
triangular mark on the scanner and the holder, in to the
slot on the right hand side. You may now insert your slides
one by one into the scanner through the opening of the
slide holder, as shown in below diagram. You can keep
the slide in position by referring to the image shown on
the LCD screen. Press the OK/( ) button to scan the
image. The image is saved into the SD Card
automatically.
2. Scanning 135/110 and 126 negative films:
Open up the Main holder, select the Film Adaptor of the
type of film you want to scan, place it in the main holder,
ensuring that the 4 pins of the film adaptor are properly
inserted into the 4 holes of the Main Holder. Close the
-13-
Page 15

EN
Main Holder to its original position until it locks with a
click.
Insert the Main Holder (with selected negative Film
Adaptor) into the scanner as described in (1). Insert your
film strip from the right side of the Holder. Keep the film in
position by referring the image shown on the LCD screen.
Press the OK/( ) button to scan. The image is saved into
the SD Card automatically.
Note: Keep the glossy surface of the film facing upward.
-14-
Page 16

EN
Image Brightness and Color Adjustment
The brightness and color of the image are preset
automatically. Normally additional adjustment is not
needed however from time to time film brightness and
color fade out may need adjustment.
Depending on what you want to adjust press the
Brightness or RGB buttons and you will see the
following icons display on the LCD screen for adjustment.
Brightness Adjustment RGB Color Adjustment
To ad ju st RGB use the Playback( ) button to move to
the color you want to adjust. Press the or /
buttons to select the value of adjustment you want then
press the OK/( ) Button to confirm your selection. The
adjusting icons will disappear, Press the OK/( ) Button
once more to scan the adjusted picture.
Pressing the ‘return’ icon( ) resets the adjusted colors
to their default setting.
Important Notes:
After adjusting the brightness and/or RGB settings, these
settings will remain for all subsequent scans until adjusted
again or until the Cyberscanner power is turned off.
When the scanner is turned off the brightness and RGB
settings return to their default settings.
-15-
Page 17

EN
Playback and Delete mode
Playback:
In scanner Preview mode(Press the button if required),
you may review the previously captured images by
pressing the (Playback) button and then and
button for image selection. Pressing the OK/( ) button
will allow you to review the selected captured images
stored in the SD card. Pressing the (Playback) button
once again will display the images in a slide show mode.
The images will be displayed for 5 seconds per frame. In
Slide Show mode pressing the OK/( ) Button will return
to the Home Page of the scanner.
You may also select the Playback Mode from the Home
page of the scanner by selecting the Photo Gallery icon.
The operation of the Photo Gallery mode is the same as
described in the Playback mode.
The scanner with Playback (Photo Gallery) setting is a
good way to use it as a mini photo frame on your
desk.
-16-
Page 18

EN
Important Note:
The scanner’s Photo Gallery mode only displays images
scanned by the scanner. Images from other devices, for
example digital cameras or smartphones, may or may not
be displayed by the scanner, due to different file names or
image formats.
Delete:
To d elete a captured image, in Playback mode, select the
picture you want to delete using the or buttons.
Pressing the Delete Button ( )once will allow you to
delete the selected image. Pressing the delete button
twice will allow you to delete all captured images.
Selecting ‘No’ using the or button will exit Delete
Mode.
-17-
Page 19

EN
SD Card Formatting:
If the SD Card (maximum 32GB) used is not compatible
with the scanner and not able to perform a scan, your
card must be formatted using your computer.
Select file system FAT32 to format your card.
Formatting your SD Card will delete all the files in your
card. Please save any files you wish to keep (if any) into
your computer before completing the format process.
-18-
Page 20

EN
Reviewing the images on a TV screen
Connect your Scanner to your TV set using the HDMI
Cable. Select the correct HDMI input on your TV that you
are connected to, turn on the scanner power and press
the Home/Preview Button to allow you to preview the
image of your film. Alternatively, select the Gallery Icon
from the Home Page then press the OK/( )Button to
review your scanned images on the TV screen.
You may also connect the Scanner to your TV via the
USB setting, to review the captured images up to 4K/2K
image quality, depending on the maximum resolution of
your TV screen.
To ensure the correct USB connection to your TV set
please refer to your TV’s instruction manual, and treat
your USB and Scanner connection as a Card Reader.
Note:
When 22M scanning is selected, the preview resolution
on the TV screen will reduce to 480P due to the transfer
rate. However, the resolution of the scanned images
saved in the SD card will remain at 22M with no reduction.
-19-
Page 21

EN
8. Downloading the images from Card to Computer
Connect the Type-C USB cable to the scanner and
terminal of your computer USB port. Turn on the power of
both your computer and scanner. From the Home Page of
the scanner, select the USB Icon by / button
then press the OK/( ) button to activate the connection.
Use it as a mass storage device or card
reader to download the image files.
Connection success Connection fail
If the connection fails :
Please ensure the SD Card is inserted correctly,in the
Card Slot. Reload the SD Card and try again.
Try connecting the USB cable to a different USB port on
your computer as a defective USB port may cause
connection failure.
-20-
Page 22

EN
Date and Time settings:
You may set the Date and Time in the image file before
scanning the image. The Date and Time set will not be
printed on the picture of the scanned image, it will only be
stored in the electronic file of the image.
From the Home Page of the scanner, select the Calendar
icon using the / buttons and then the OK/( )
button to confirm your selection. You will see a date
adjustment table as shown below.
Press the Playback Button( ) to select the item you
want to adjust. Use the / Button to increase or
reduce the values, then press the Home Button to
confirm your selection and exit the Date and Time settings
menu.
-21-
Page 23

EN
Specifications
Image Sensor
1/2.33” 14 Mega CMOS Sensor,
Preview and Review
5” all angle Color LCD Display
Lens Specification
F/No. 3.5, 5 elements lens
Color Balance
Automatic
Exposure Control
Automatic & Manual adjustment
Support Film Size
Auto Cropping
135 Negative & Slide (3:2)
110 Neg ativ e & Slide (4:3)
126 Negative & Slide (1:1)
Support Film Type
Auto Converting
50x50mm Slide (135 , 110 &126)
Color Negative Film (135 ,110 & 126)
Black & White Negative Film
Focusing
Fixed Focus
EV adjustment
Yes , + - 2.0 EV
RGB Color adjustment
Yes
PC Interface
USB 2.0
Image Format
135 Negative 3:2 Ratio
110 Negative 4:3 Ratio
126 Negative, 1:1 Ratio
Light Source
White LED Panel
Power Source
From computer USB port,
5V/1A Power adaptor / Power Bank
USB Connector
Typ e-C
TV Connection
HDMI
Dimension
95 (H) x 135 (W) x 125 (D) mm
Specifications are subjected to change without prior notice.
The purpose of having Time and Date settings:
This setting is useful if you want to apply an estimated
time or date to when the images were originally taken.
-22-
Page 24

EN
Scanning films
Connect SD Card to Computer
Reviewing scanned photos in the SD card
Setting date and time
For transparent film and 50X50mm slides
For color negative film
For black and white film
For 135 film, 24X36mm picture size film
For 110 film, 13X17mm picture size film
For 126 film, 28X28mm picture size film
Selected film type shown on preview: Transparen t fi lm
Selected film type shown on preview: Color negative film
Selected film type shown on preview: B&W negative film
Selected film size shown on preview: 135 f ilm
Selected film size shown on preview: 110 film
Selected film size shown on preview: 126 f ilm
Brightness setting: -2EV to +2EV
Resolution setting: 14M or 22M
Capacity of card: Full=3GB+, 3/4=2GB, 2/4=1GB, 1/4= 0.5GB
Icons and their functions:
Icons Functions and Indication
-23-
Page 25

EN
SD card malfunctio n: Not loaded, locked, or not compatible
Reviewing picture from card: single picture
Reviewing pictures from card: Slide show
Brightness(EV) adjustment scale
RGB color adjustment scale
RGB color adjustment recover to default setting
RGB color selection and reset
Single image delete selection
All scanned images delete selection
Indicate SD card and computer successfully connected
Indicates computer connection fail
Wait fo r s canne d image to be stor ed into the SD card
PC System Requirements
l Pentium® P4 1.6GHz or equivalent AMD Athlon
l Free USB2.0 port
l 512MB RAM
l 500MB free hard disk space
l 1024 x 768 pixel color monitor
l Windows® XP Service Pack II / Vista™, 32/64 bits
Windows 7/Windows 8 / Windows 10
-24-
Page 26

EN
Mac System Requirements
l Power PC G5 or Intel Core Duo processor recommended
l Free USB2.0 port
l 768MB RAM
l 500MB free hard disk space
l 1024 x 768 color monitor
l Mac 10.5 and up
This symbol on the product or in the instructions
means that your e lectrical and e lectronic equip ment
should be disposed at the end of its life separately
from your household waste. There are separate
collection systems for recycling in the EU.
For more information, please contact the local authority
or your retailer where you purchased the product.
All product specifications are correct at time of print and are subject to
change without prior notice.
Easy pix GmbH reser ve the rig ht for errors or omissions .
For technical help please visit our support area on www.easypix.eu.
V1.0
-25-
Page 27

EN
CONFORMITY
The manufacturer hereby declares that the CE marking was applied to the
product Cyberscanner View in accordance with the basic requirements and
other relevant provisions of the following CE Directives:
2014/53/EU
2011/65/EC RoHs
2014/30/EU EMV
2012/19/EC WEEE
The EC Declaration of Conformity can be downloaded here:
http://www.easypix.info/download/pdf/doc_cyberscanner_view.pdf
DISPOSAL
Dispose of packaging
For disposal, separate packaging into different types.
Cardboard and board must be disposed of as paper and foil must be recycled.
This product is not suitable for children under 3 years
because of choking hazard.
-26-
 Loading...