

Page 1

EN
User’s manual
Warning
1. Always take the appropriate steps to protect your camera from falls, shock or
impact.
2. Ensure a suitable distance is kept from any objects with strong magnetic
interference such as electrical machinery in order to avoid strong radio waves that
may be damaging to the product and affect the sound or image quality.
3. Never expose the product directly to high temperatures and prolonged strong
sunlight.
4. We recommend using high quality, class 10 or above Micro SD Card for the best
results.
5. To avoid potential data error, avoid placing your Micro SD card near strong
magnetic objects.
Page 2

EN
6. In the unlikely event of overheating, unwanted smoke or unpleasant smell from
the device, unplug it immediately from the power outlet to prevent hazardous fire.
7. Keep the device out of reach of children while charging.
8. The device should be stored in a dry and dust free location at normal room
temperature and out of direct sunlight.
9. The product should only be charged via laptop or computer USB port.
10. Before using your camera in the water please verify that all lids and locks are
tightly closed and sealed on the camera and the underwater case.
11. After use, clean the housing of salt and chlorine water and then let it dry.
12. The camera should not be exposed to large temperature and humidity
differences to avoid condensation inside the housing or behind the lens.
13. After underwater use, the case must be kept open to avoid condensation or rust.
14. Recording times are depending on resolution.
15. Battery life time - depending on settings and outdoor temperature - up to 90 min.
under optimal conditions.
16. After reaching a max. video recording time of max. 29 minutes the camera
will automatically stop. It can only be restarted manually.
Page 3
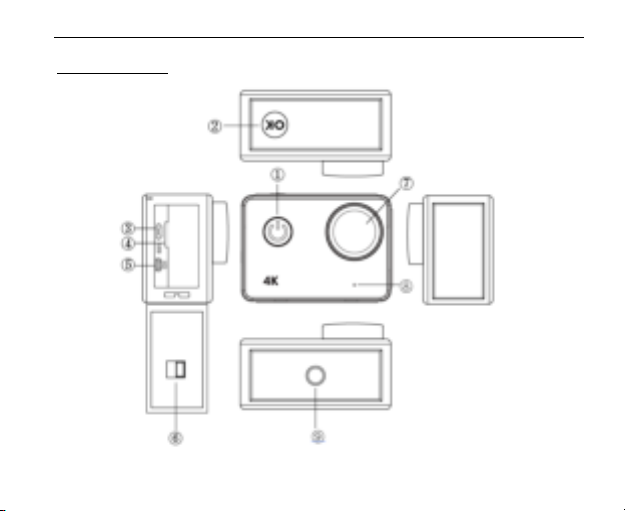
The camera
EN
Page 4

1.Power button:
Short press to turn on camera, long press to turn off camera;
Short press to capture a photo while recording video.
2.OK button:
In Standby mode - short press to start/stop the recording;
In Picture mode - short press to take a picture;
In Playback mode - short press to start/pause playback;
Confirm menu setting and time setting;
Long press to enter/exit WIFI setting.
3.USB port
4.Micro SD card slot
5.HDMI port
6.Lock of battery door
7.Lens
8.Microphone
9.1/4” screw hole
EN
Page 5
EN
Camera operation
Power on/off
Power on: Short press the power button, screen shows start up picture, the blue
working indicators will light up and the camera enters standby mode.
Power off: When camera is on, long press power button to switch the camera off.
Battery charging
Connect camera with power charger via USB cable, the red light will illuminate. Once
the battery is full, the red light will automatically turn off.
Please note: Leaving the camera turned off while charging will allow for a shorter
charging period.
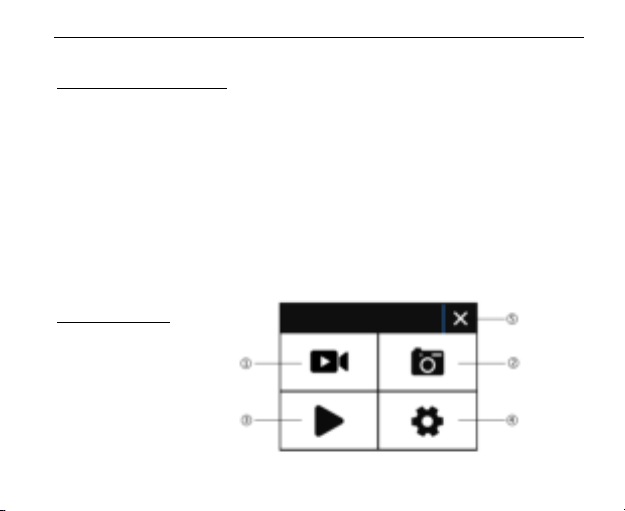
Video mode
Main menu interface
1.Video mode
2.Picture mode
3.Playback mode
4.Setting Menu
5.Exit
Page 6

Video interface
1.Recording mode icon
2.Frame rate
3.Video resolution
4.Remaining memory card capacity
(Hrs, Mins, Secs)
5.Battery icon
6.Menu (Menu options will appear or hide
by tapping this icon)
Please note:
4K resolution doesn’t support “WIFI, zoom function and time lapse”.
Please set “capture timing” to OFF when “Time lapse” in the menu is used.
EN
Page 7

Picture mode
Picture interface
1.Photo mode icon
2.Picture size
3.Memory card capacity remaining
(No. of photos that can still be captured)
4.Battery icon
5. Menu (Menu options will appear or
hide by tapping this icon)
EN
Page 8

EN
Camera default setting is Video mode, click on the screen to enter Main menu and
choose Picture mode. Point at the object you want to capture and press the OK
button. The camera will save pictures automatically.
Capture function
1. Capture manually: Press power button to take a picture under recording when
“Capture timing” in system menu is off.
2. Capture timing: when “Capture timing” in system menu is set “5s/10s/15s/30s/60s”,
the camera will capture and save automatically under normal recording.
Note:
4k resolution doesn’t support the capture function.
Camera doesn’t support capture function when “time lapse” and “slow motion” is on.
Please set “capture timing” off when “time lapse/slow motion” will be used.
Page 9

EN
Playback mode
1.Picture files
2.Video files
Selects the picture or video you need to
view.
Swipe across camera’s screen in order
to access the last or the next file.
Tap the menu icon to enter the
corresponding file protect or delete.
Menu Setting
In standby mode, click to enter the menu setting, click to exit menu.
Video mode, Picture mode and Playback mode each have two menus: Mode menu
and System menu.
All system menus are the same.
Page 10

EN
Install and use WIFI
l Search for the "iSmart DV" in Google Play or IOS APP store to download the
correct WIFI APP.
l Install the APP in your smart phone.
l Long press the camera’s OK Button to activate the camera’s WIFI, the camera
screen will display ”Barracuda”.
l In your smartphone WiFi settings screen, find the WiFi network named
“barracuda” and enter the default password “1234567890” to connect.
l Once connected, open the “iSmartDV” app on your smart phone, which
will provide a live view and remote control of your camera.
l Short press OK Button of camera to exit WIFI setting screen.
Note:
l Before you open WIFI function, please make sure micro SD card is inserted in
the camera.
l The effective distance of the WiFi operation is influenced by environment.
The decrease of the WIFI signal and operation delay are normal.
l The “Power Saving Mode” in mobile should be set to “Off”.
Page 11

EN
Connect HDMI
Connect your camera to a HDMI equipped TV using a HDMI cable.
All operations will be displayed on your TV screen.
Note: Viewing of 20MP pictures is not supported via the HDMI connection.
Playback on PC
Connect your camera to your PC and open the camera icon, the screen will display:
“MSDC” / “PCCAM” / “Working”.
Use the camera’s Up button and Down buttons to choose the option required.
Press the Power button to confirm.
MSDC: Enter MSDC to check files. The camera will function as a removable disk.
PCCAM: The camera will function as a PCCAM.
Working: The camera can be used normally while being powered by your PC.
Page 12

Technical specification
Waterproof 10m without waterproof case
Sensor 16MP CMOS Sensor
Image size 20M (interpolated) / 16M / 12M / 8M / 5M / 3M
Resolution 4k 25fps/2.7k 30fps/1080p 60fps/1080p 30fps
720p 120fps/720P 60fps/720p 30fps
Video quality Super fine / Fine / Normal
Slow Motion Off / Auto
Time Lapse Off / 0.5sec / 1sec / 3sec / 5sec / 10sec / 30sec / 1min
Capture timing Off / 5s / 10s / 15s / 30s / 60s
Motion detect Off / On
PC CAM Supported
Snapshot Supported
Timer Shot Off / 2s / 10s / 30s / 60s / Double
Photo Burst Off / 3 photos / 5 photos / 10 photos
Exposure -2.0 -1.0 +0.0 +1.0 +2.0
White Balance Auto / Daylight / Cloudy / Tungsten / Fluor
Lens 170° wide angle, F=2.5, f=3.0mm
Screen 2 inch touch screen*
Wifi frequency 2.4GHz-2.4835GHz
EN
Page 13

EN
Wifi distance 15m in open space
Audio Built-in Microphone
Battery Replaceable lithium battery 1050mAh/3.7V 3.885Wh
File format MOV H.264 / JPG
Memory card 4GB to 64GB (micro SD Card Class10 minimum)
HDMI output Real time output
USB port USB 2.0 high-speed interface
Power frequency 50Hz / 60Hz / Auto
Power save Off / 1 min / 3 min / 5 min
Dimension 65x46x28.5mm (not including lens)
*Under water you need to use the buttons to operate the camera.
NOTE:
Easypix GmbH reserve the right to upgrade any aspect of this product without prior
notification).
Please use Micro SD cards up to 64GB, minimum Class10 (not included).
Recording times are depending on resolution.
Battery life time - depending on settings and outdoor temperature - up to 90 min.
under optimal conditions.
Page 14

EN
Before using your camera in the water please verify that all lids and locks are tightly
closed and sealed on the camera and the underwater case.
After use, clean the housing of salt and chlorine water and then let it dry.
The camera should not be exposed to large temperature and humidity differences in
order to avoid condensation inside the housing or behind the lens.
After underwater use, the case must be kept open to avoid condensation or rust.
DECLARATION OF CONFORMITY
Easypix hereby declares that the product GoXtreme Barracuda 4K is in conformity
with all the essential requirements of Directive 1999/5/EC.
The declaration of conformity can be downloaded here:
http://www.easypix.info/download/pdf/doc_goxtreme_barracuda4k.pdf
For technical help please visit our support area on www.easypix.eu.
!
!
!
Only!EU! ! ! ! ! ! ! ! ! ! ! ! ! ! ! ! !
 Loading...