

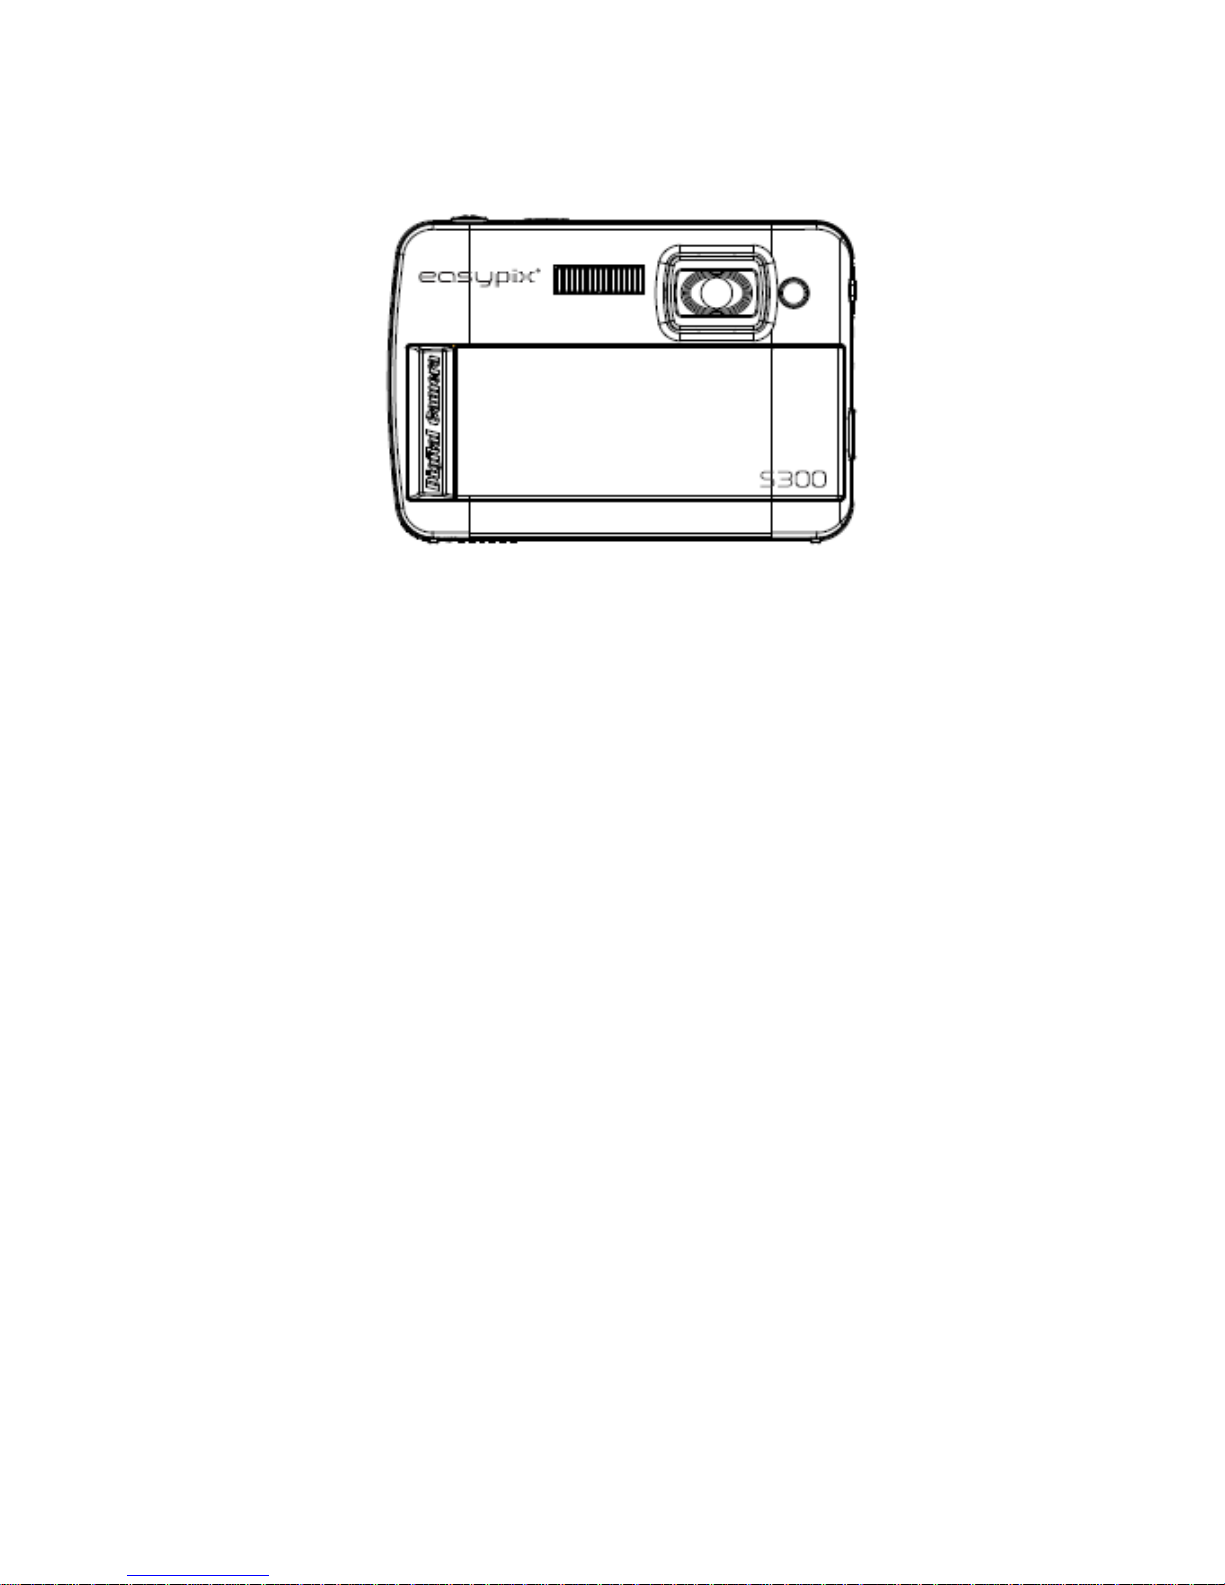
Page 1
English Manual………………………P2
German Manual………………………P14
French Manual…………………….....P28
Spanish Manual………………………P41
Portuguese Manual……………….....P54
Italian Manual…………………………P67
Page 2

2
INSTRUCTION MANUAL
Table of Content
Table of Content.........................................................................................2
Introduction ................................................................................................3
Key Features..............................................................................................3
What your camera includes........................................................................3
Computer System Requirements for Windows 2000/XP ...........................3
Computer System Requirements for Windows Vista .................................3
Computer System Requirements for Macintosh ........................................3
A Quick Look at Your Camera....................................................................4
Preparing Your Camera for Use.................................................................4
Installing SD Memory Card........................................................................5
Starting Your Camera.................................................................................5
Camera Mode ............................................................................................5
Taking photos.............................................................................................5
Video Mode................................................................................................7
Playback Mode ...........................................................................................7
Installing PhoTags Express Software.........................................................8
Everything you need to get the most from your photos ..............................9
Transferring photos to your PC................................................................10
PhoTags Express software owner manual...............................................12
Run the PCCAM software........................................................................12
Appendix : Specifications.........................................................................13
Page 3

3
Introduction
Thanks for purchasing this Digital Camera. You can not only take good quality digital photos, but
also can use it as a removable disk. For more quality and function setting, please read this manual
carefully before using.
Key Features
¾ Digital Image Resolution- 5M by the interpolation (2592x1944pixels 4:3), 3M
(2048x1536pixels 4:3), 2M (1920x1080pixels 16:9 ), VGA (640x480pixels 4:3)
¾ SD RAM 8MB, support SD/MMC memory card (not included) up to 8GB.
¾ 4.5cm / 1.8” TFT Color LCD
¾ PhoTags Express software for managing and enhancing your photos, add captions, send
E-mail, printing and much more.
What your camera includes
¾ Digital Camera
¾ PhoTags Express software Installation CD
¾ USB cable
¾ User’s manual
¾ Strap
Computer System Requirements for Windows 2000/XP
To be able to download photos to your PC, you will need the following minimum configuration:
¾ Pentium process or above with windows 2000, XP
¾ 64 MB RAM, more than 250MB free disk space
¾ Available USB interface
¾ CD-ROM Drive
¾ Recommended screen resolution 24 bit or higher
¾ 256 color or higher display adaptor
Computer System Requirements for Windows Vista
To be able to download photos to your PC your will need the following minimum configuration:
¾ Windows Vista
¾ 800MHz processor and 512 MB of system memory
¾ 20GB hard driver with at least 15GB of available space
¾ Support for Super VGA graphics
¾ Available USB Interface
¾ CD-ROM drive
Computer System Requirements for Macintosh
¾ Power Macintosh G3 500 MHz or higher
¾ Mac OS X version 10.2.6 or later
¾ 128 MB or more available system RAM (256 MB recommended), 150 MB free disk space
¾ 800 x 600 or higher-resolution monitor displaying millions of colors
Note: This hardware is plug and play compatible when used on a Mac, however, the included
software can be used on Windows operating systems only.
Page 4
4
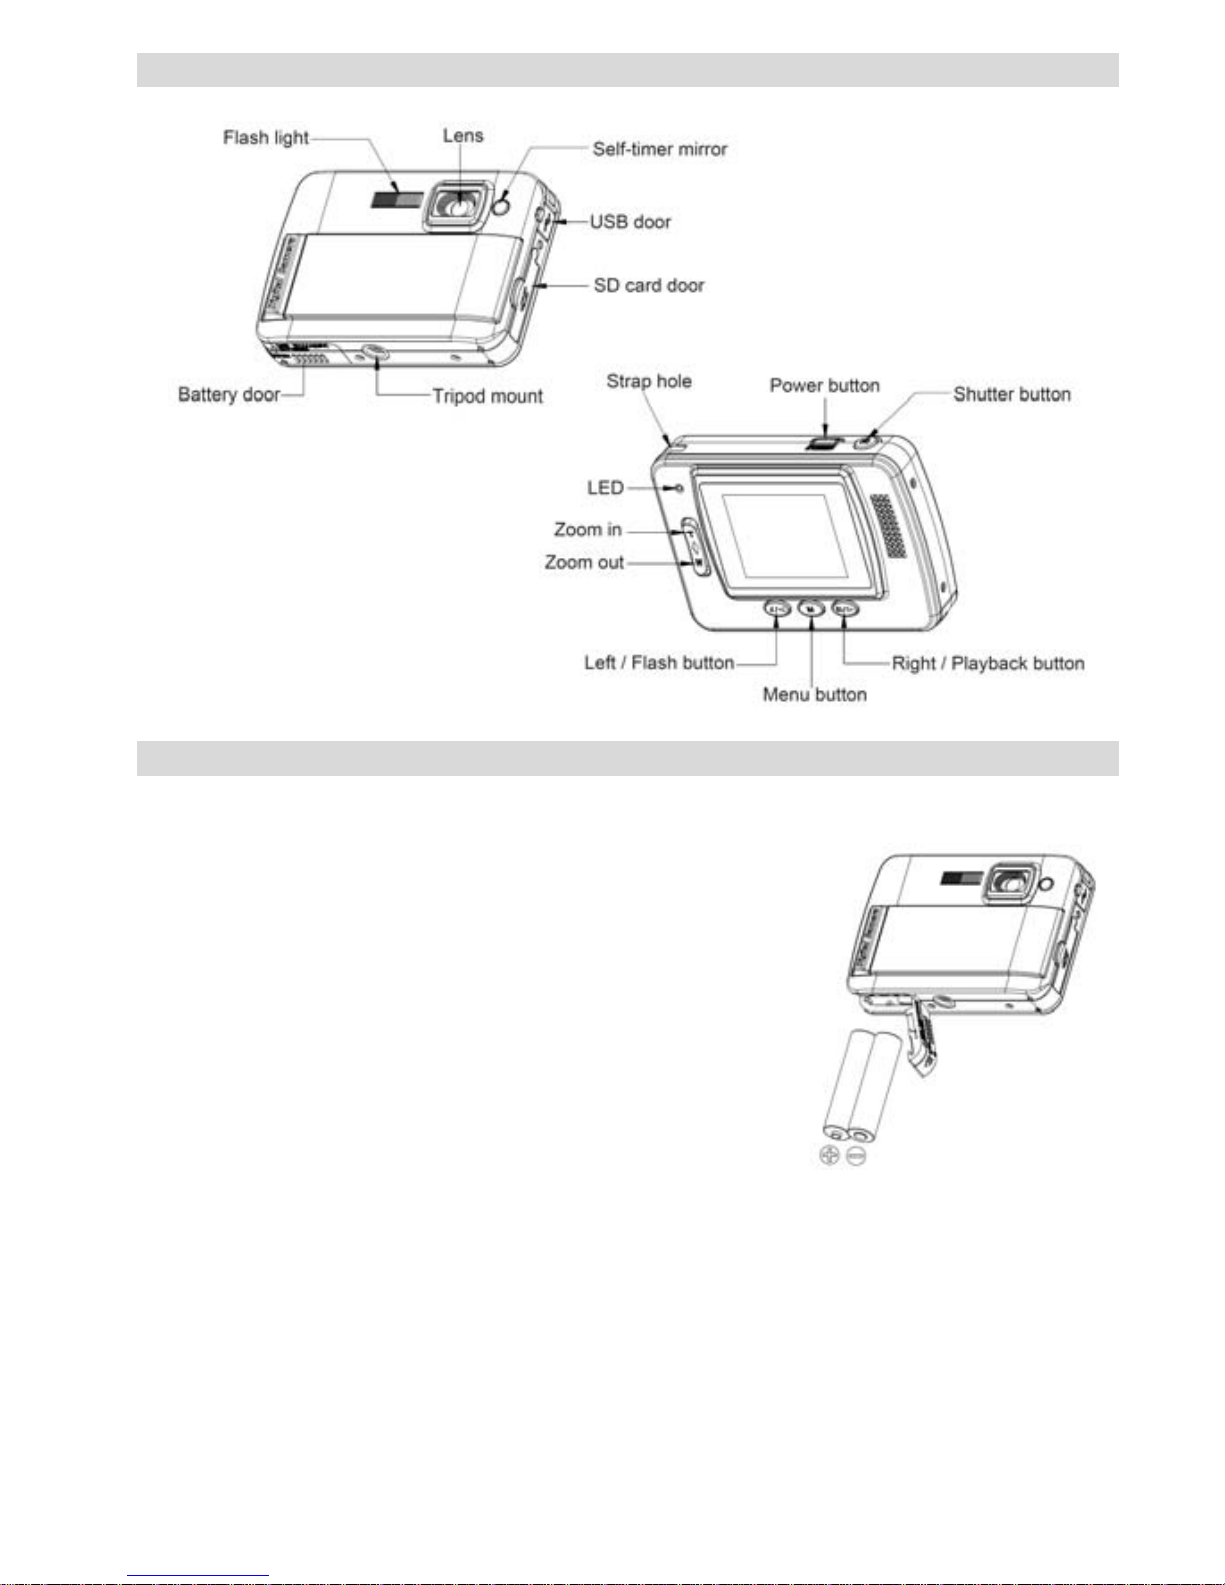
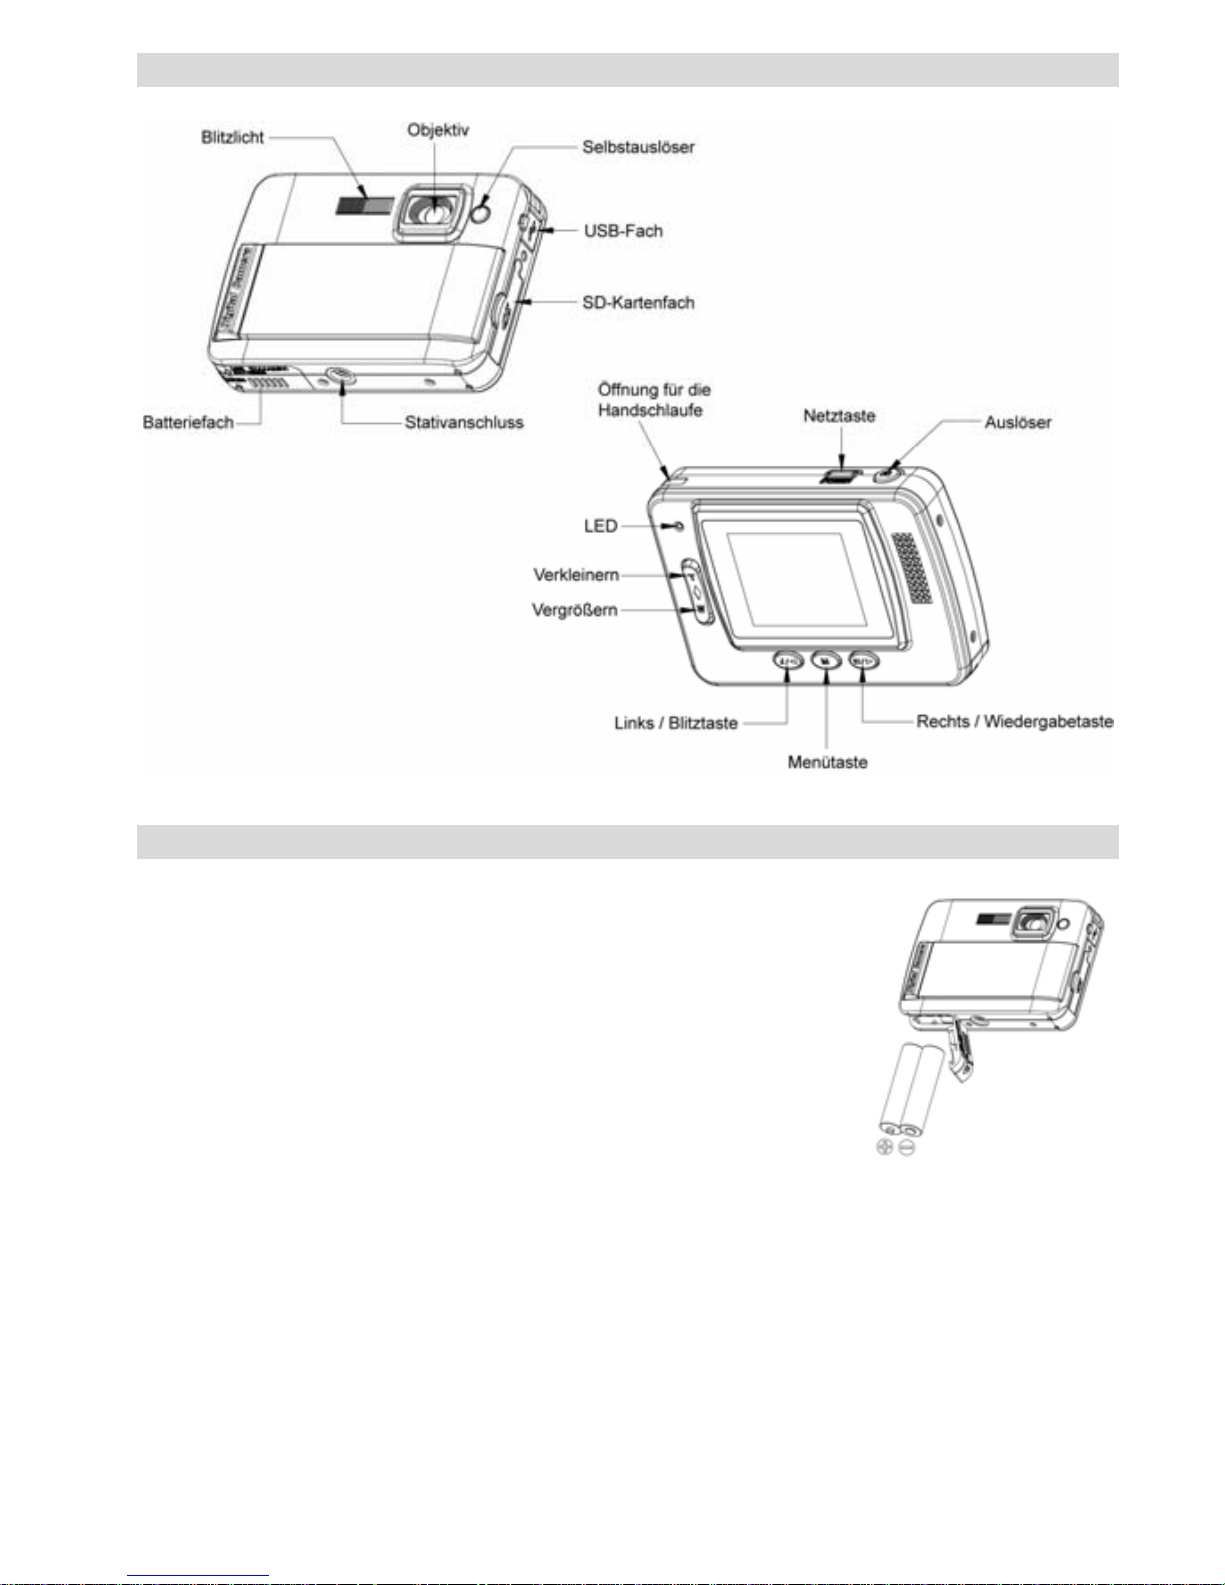
A Quick Look at Your Camera
Preparing Your Camera for Use
Battery Installation
Your camera requires 2 AAA batteries. Insert the battery into the
camera as following description:
1. Slide and open the battery compartment.
2. Please make sure that the correct battery is inserted with
the correct polarity facing up.
3. Close battery door.
When the “No Powe r” is d isp laying o n the L CD, it in dica tes yo ur
camera has insufficient battery lever and it will be off, you need
to download photos to y our PC i f there is no SD card inserted in.
Note: 1. if you don’t intend to use your camera for an extended
period, please remove the batter ies t o avoi d batter y l eakage and
corrosion.
2. Please don’t remove the battery away or power off your camera at will, otherwise the test
photo in your Digital Camera will be lost if without SD memory card, so please download your test
photo to PC as soon as possible.
3. Do not mix old and new batteries.
4. Do not mix alkaline, standard (carbon-zinc), or rechargeable (nickel-cadmium metal
hydride) batteries.
Page 5
5
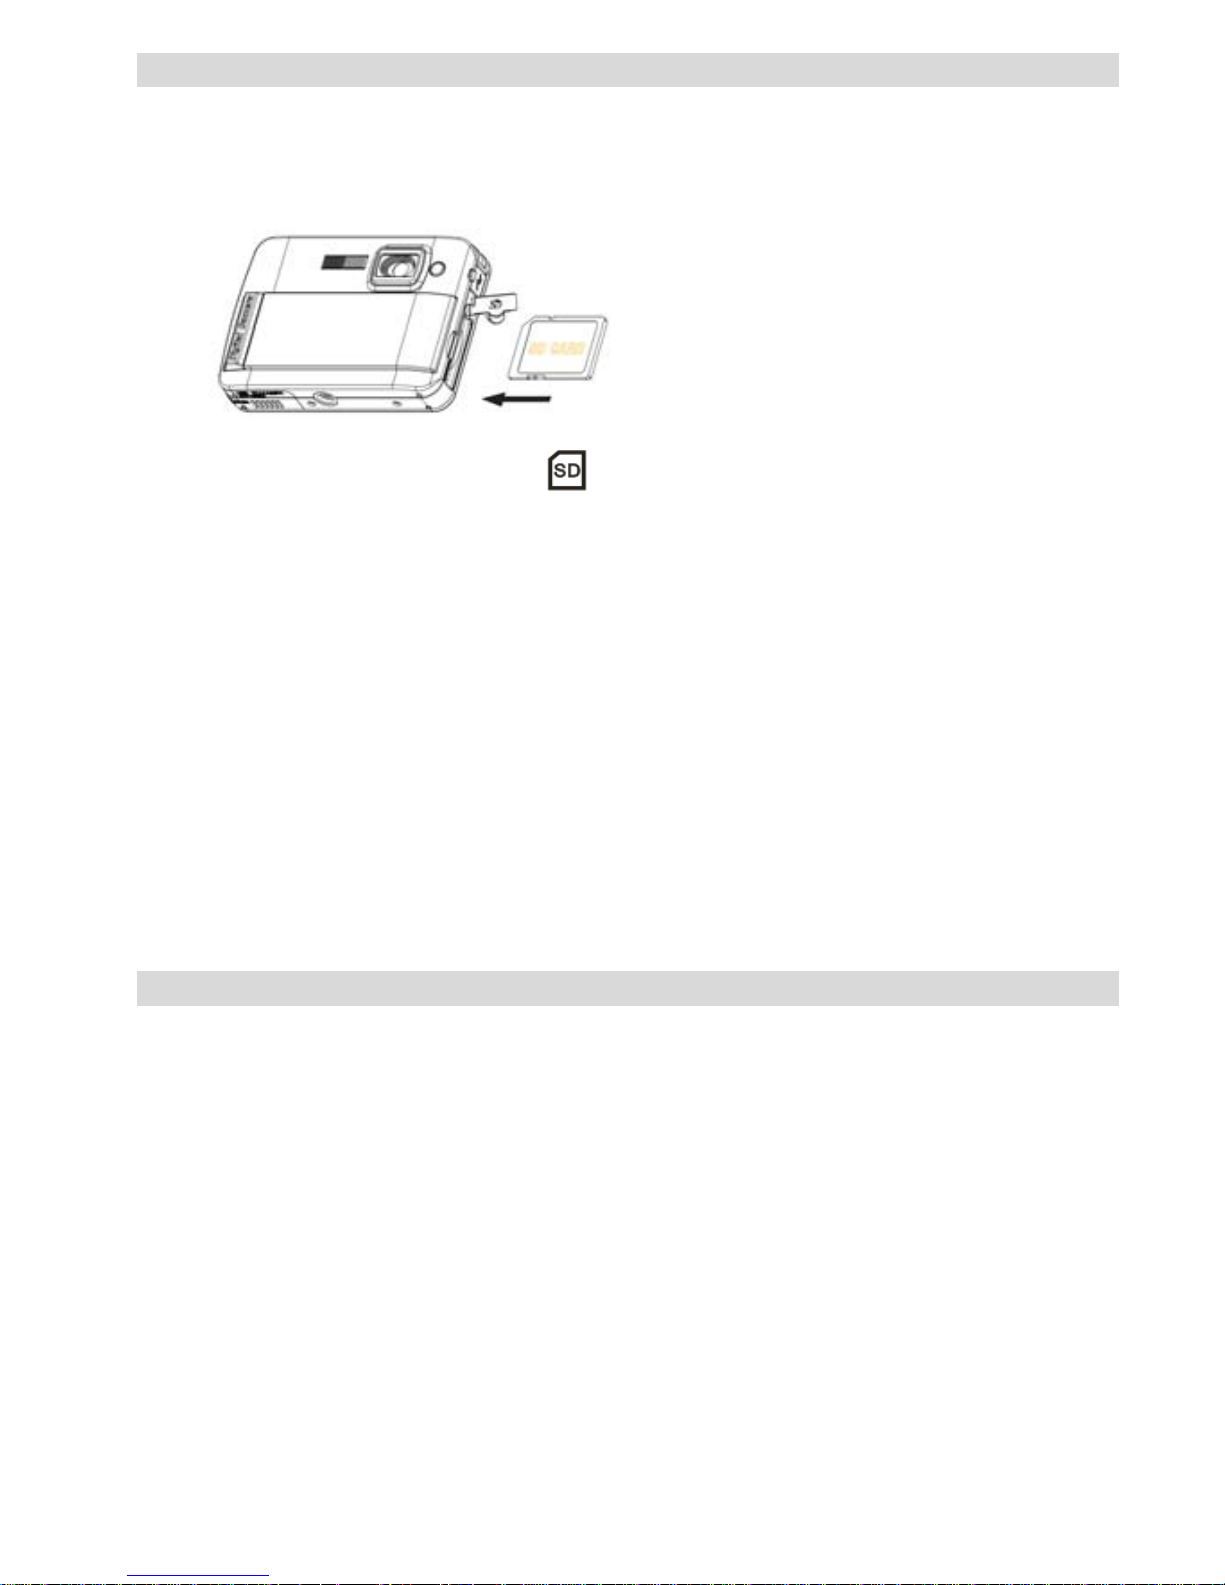
Installing SD Memory Card
Your camera has a memo ry card slot that enables you to insert any “SD” compatible memory card.
Adding a memory card will allow you to in crease the capacity of your camera before you have to
transfer photos to PC. Installing the SD memory card as below:
1. Locate the Memory Card slot.
2. Insert the Memory card into the slot as correct direction. (look on the photos as below)
3. Push the card in unti l y ou feel it “cl ick” i nto po sition. The top of th e c ard shoul d be flus hed w ith
the surface of the camera. An icon will appear on the LCD screen after you turn on your
camera.
4. Once an external memory card is inserted in the camera all the images taken will be stored on
the external memory card.
Note:
1. Limited internal memory is provided for test images. The image will be deleted when
camera power is turned off. Please download the images before power off .SD memory
card is required for normal use.
2. An external memory card is required for normal use; your camera supports any compatible
SD memory card.
3. “Card inserted, change to SD card” will show on the screen when you inserted the card
indicating that photos will be store in the SD memory card, reversely, “Card removed, change
to internal memory” will appear on the LCD screen when you take out the card.
4. If there are photos in the internal memory when you insert the card to your camera, “copy
SDRAM file to your card, please wait…” will show on the screen.
5. When you take out the SD memory card, “Card remo ved, change to Internal RA M” will be
appeared on the LCD screen, now you can only take 1 test photo.
St arting Your Camera
Press and hold the Power button to turn on your camera, the LCD screen will be light up; This will
confirm that your camera is on and ready for use.
Press and hold the Power button about 3 seconds to power off your camera.
Camera Mode
1. Press Menu button.
2. Press Right/Left button to select Mode.
3. Press Shutter button.
4. Press Right/Left button to select SINGLE
5. Press Shutter button to confirm. Now you are in camera mode (default).
Taking photos
Power on your camera, the default mode is camera mode.
Hold the camera steady and compose your object with LCD screen. Press Shutter button, a
moment later, one photo is taken.
Note
: When the internal memory is full, the LCD screen will display “
Memory Full! Insert a SD
Memory Card to Transfer and Take More Photos!
” If you attempt to take videos when camera
internal memory is full, the camera will beep continuously. Now please download test photo to your
Page 6
6
computer as soon as possible or insert an SD memory card for taking more photos!
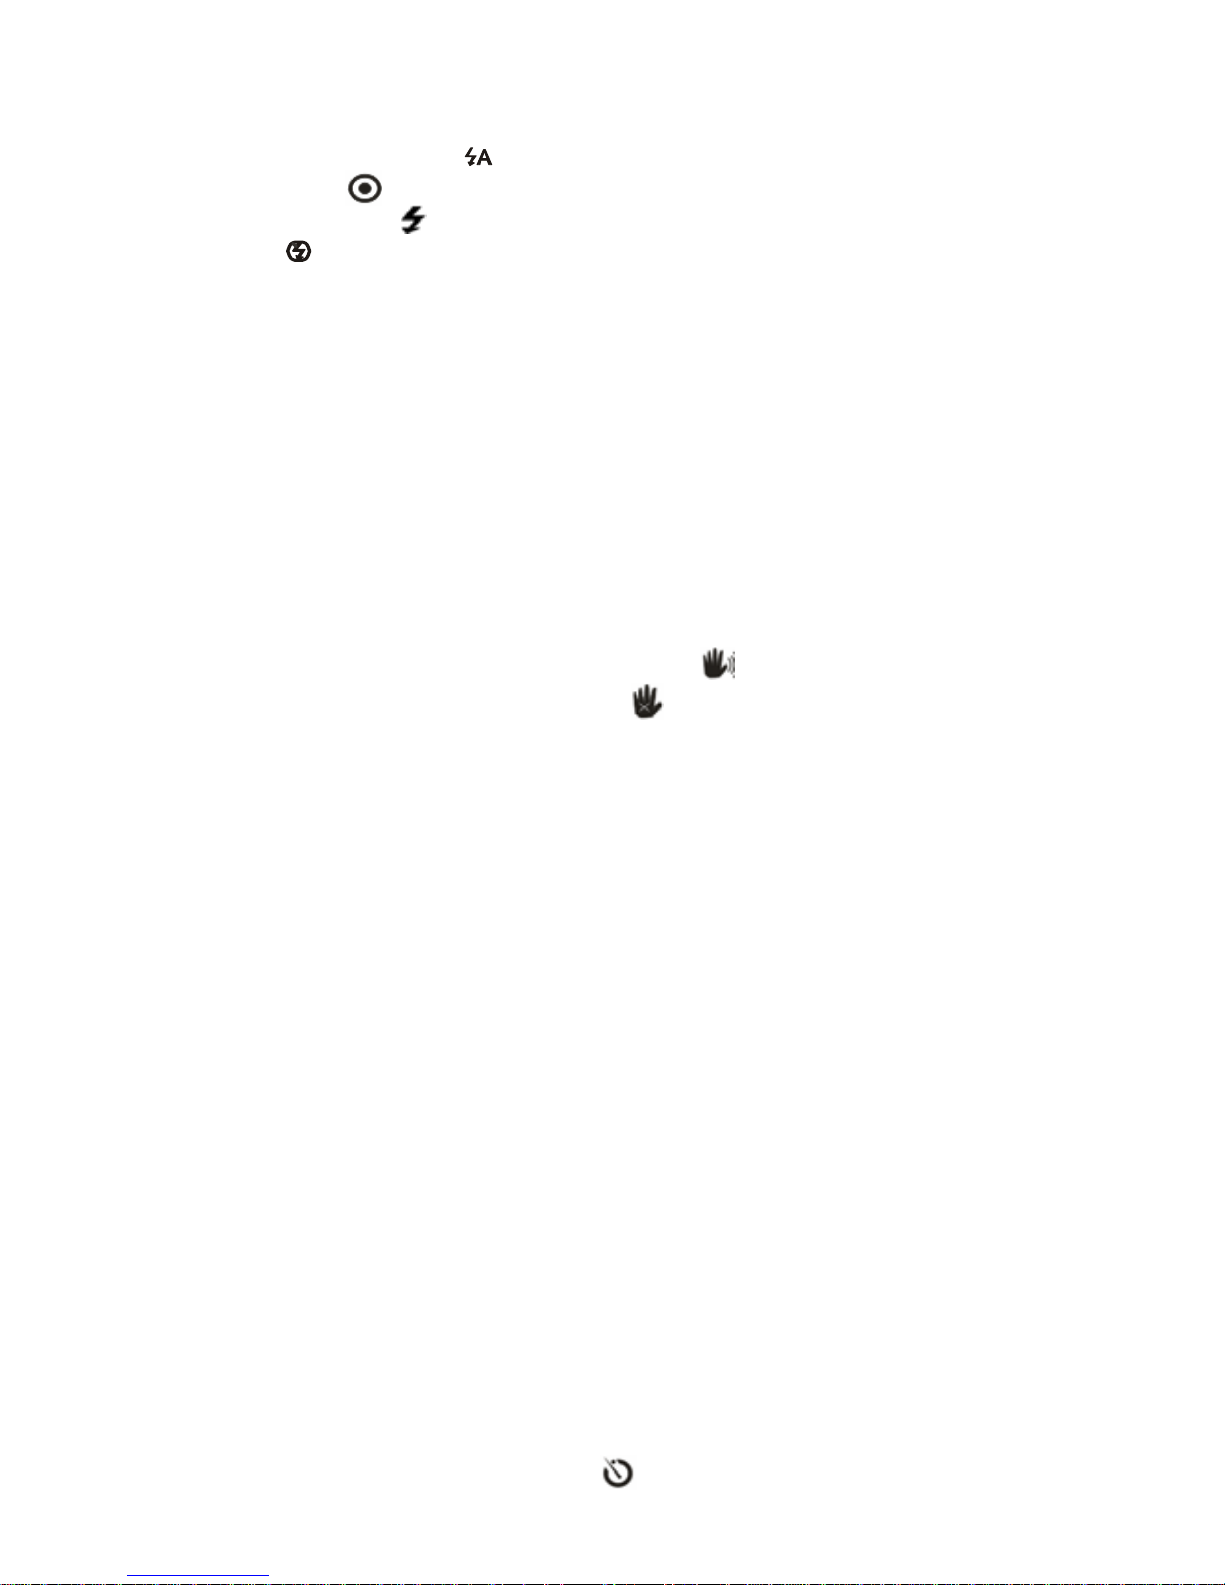
Flash
Your camera has a flash function enables you to take photos when the light condition is not good.
Press Left button, until the icon will appear on the LCD, the auto flash is turned on, press Left
button until the icon will show on the LCD, the red eye reduction function is on. Press Left
button until you see icon appear on the LCD screen the flash is forced on. Press Left button
until the icon display on the LCD, it means the flash function is turned off.
Note:
“Low Power” will show on the LCD, if you change flash function when the battery power is
insufficient. Now please reinstall new batteries for flash function.
Digital Zoom function
You can magnify your subject using the digital zoom. Use the T and W buttons to adjust the zoom
up to 4X. Press the T button to zoom in on your subject. Push the W button to zoom back out.
Anti-shake function
Your Digital Camera has a function that prevents photos coming out blurry as a result of trembling
or shaking when t aki ng th e pho to. B ecause o f this functio n, you ar e not req uired t o use a tri pod and
take good quality photos. To set as below:
1. Press Menu button.
2. Press Right/Left button to select Anti-shake.
3. Press Shutter button.
4. Use Right/Left button to select:
“Yes” - to activate and turn the anti-shake on. Icon will show on the screen.
“No” - to exit or turn the anti-shake off. Icon will appear on the screen.
5. Press Shutter button to confirm.
Change Image Resolution
The build-in memory all ow s you to t ak e one 3. 1 Meg a-Pix el testing photo w i thout SD memo ry car d,
inserted a SD memory card to get mo re image size selections.
1. Press the Menu button.
2. Press the Right/Left button to select the RESOLUTION option.
3. Press the Shutter button.
4. Press the Right/Left button to select one of the following resolutions :
(5M) 2592x1944 pixels
(3M) 2048x1536 pixels
(2M) 1920x1080 pixels
(VGA) 640x480 pixels
5. Press the Shutter button again to confirm your selection.
Note:
Different image resolutions will affect the photo quality. High resolution photos will be of better
picture quality and therefore will take up more camera memory capacity than lower resolution
photos.
Self Timer
You can include yourself in a photo by using this feature to delay the time between your pressing
the shutter and when the p hot o is actual ly tak en. It is rec om mended that you use a tr ipod when y ou
use the self-timer.
1. Press Menu button.
2. Press Right/Left button to select MODE.
3. Press Shutter button
4. Press Right/Left button to select SELF.
5. Press Shutter button again to confirm. A icon will appear on the left corner of the LCD.
Page 7

7
6. Press Shutter button to take photos, your camera sound beeps and will count down 10
seconds until the photo is taken.
Video Mode
You can shoot movies in this mode. Before shooting, you need insert a SD card to expand camera
capacity for shooting movies.
1. Insert a compat ible SD memory card.
2. Power on your camera.
3. Press Menu button.
4. Press Right/Left button to select MODE.
5. Press Shutter button.
6. Press Right/Left button to select AVI.
7. Press Shutter button again to confirm. A icon will show on the left corner of the LCD.
8. Press Shutter button to start shoo ting v i deos. The elapse time will show on the rig ht bott om o f
the LCD and the LED indicator will keep flickering.
9. Press Shutter button to stop and save it to AVI file.
Note
:
1. “Insert a SD memory Card” will be shown on the screen when you press the shutter button if
without SD memory card inserted.
2. You can playback the AVI file in your computer by using Quick time or Media Player.
Playback Mode
You can preview your photos in this mode.
1. Power on your camera.
2. Press Right button to enter Playback Mode. An icon will show on the left corner of the
LCD. Press Shutter button to exit to the standby mode.
Note:
“NO FILE” will show on the LCD when there is no photos/videos in your camera. You can
press Shutter button to exit to the camera mode.
Preview photos
Press Right/Left button to select and view your photos/videos. “JPG” will show on the LCD if you
selected a photo. “AVI” will appear on the LCD when you select an AVI file.
Delete photo/videos
1. In playback mode, press Menu button.
2. Press Right/Left button to select Delete.
3. Press Shutter button.
4. Press Right/Left button to select Delete one/Delete all.
5. Press Shutter button again to confirm.
Format
This function will delete all of the files in your camera memory (internal memory or SD memory
card, depends on the device selection), please take care using this function:
1. Press Menu button.
2. Press Right/Left button to select Format.
3. Press Shutter button.
4. Press Shutter button again to confirm your selection, “Format OK” will show on the LCD.
Print your photos
Your camera supports printing function that allows you to print photos in any time.
1. Select a photo you want to print out by pressing Right/Left button.
2. Press Menu button.
3. Press Right/Left button to select Printer.
4. Press Shutter button, “Please connect your DSC to printer” will appear on the LCD.
5. Now you can connect your camera to any compatible printer for printing.
Page 8
8
Play back AVI file
1. Select an AVI file in your SD memory card by pressing Right/Left button.
2. Press Menu button.
3. Press Right/Left button to select Play.
4. Press Shutter button to start playing.
5. Press Shutter button again to stop playing.
Installing PhoTags Express Software
NOTE: Make sure that your camera is not connected to the computer.
Insert software CD to your computer. After a few seconds, there will be sho wn an installing main
window on the screen.
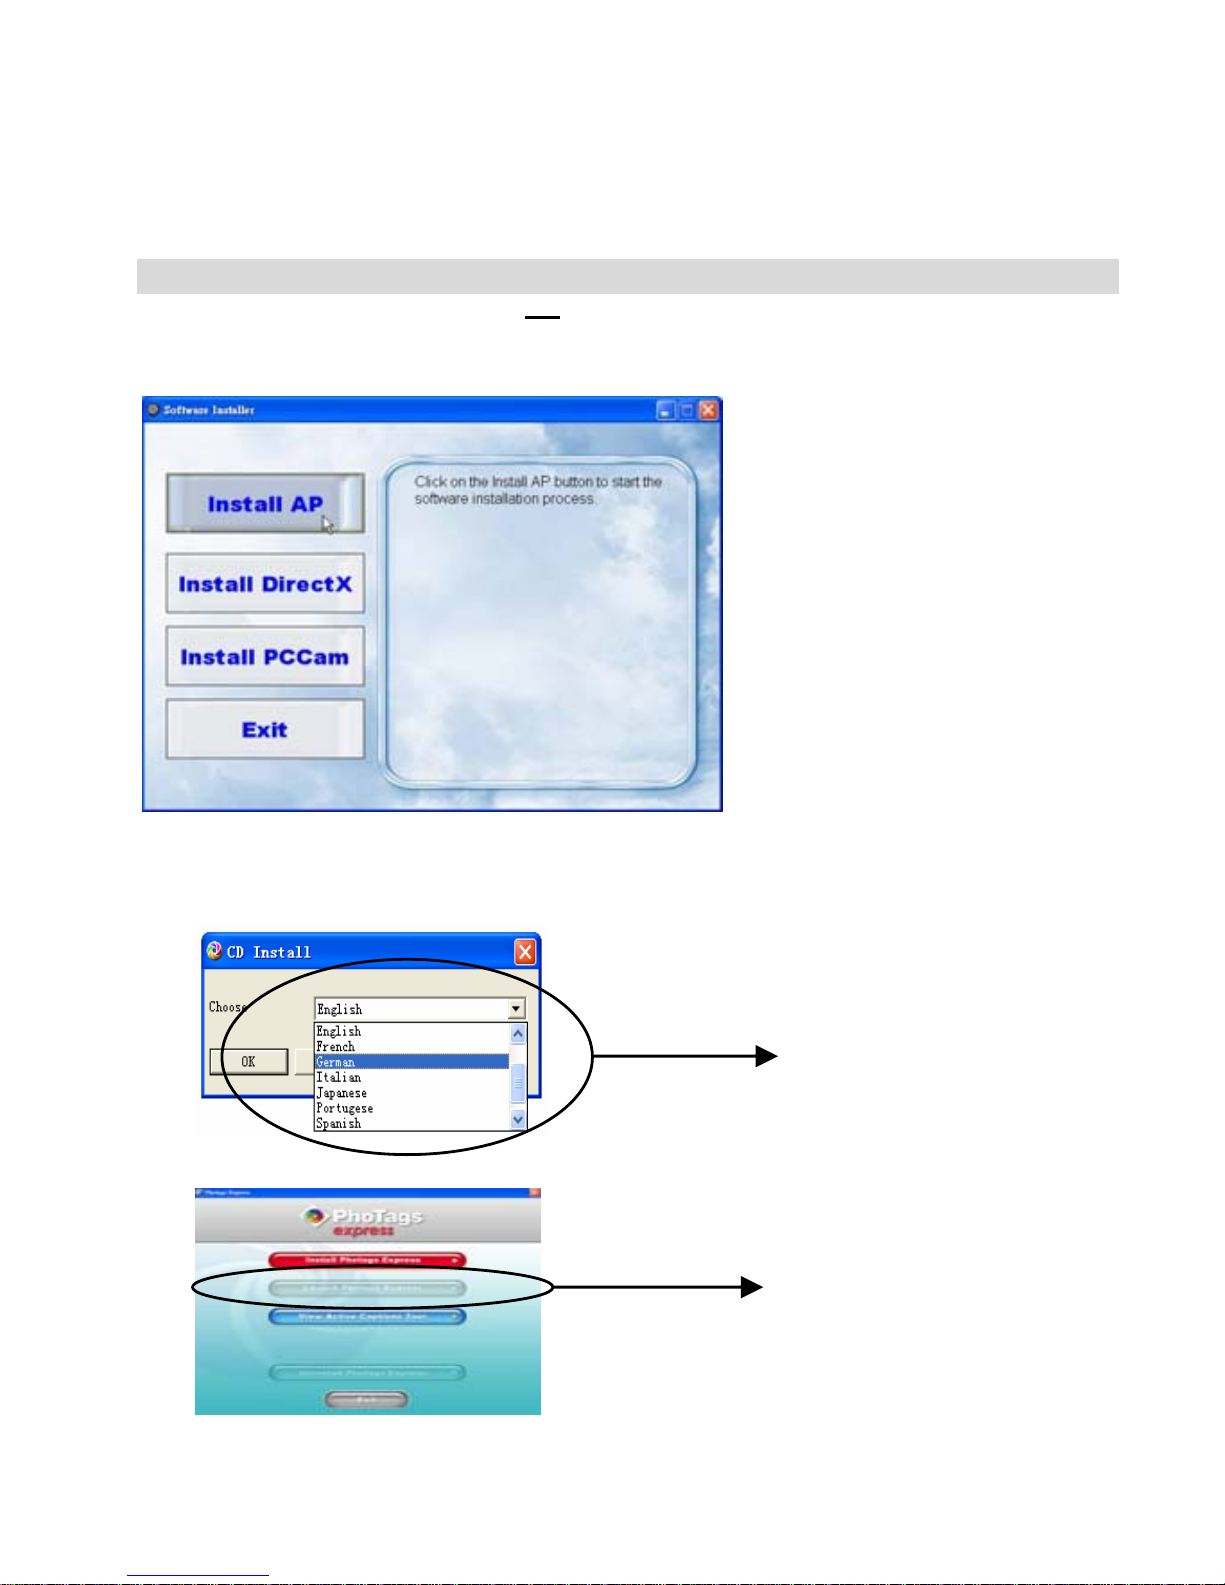
You can “install AP”, “Install DirectX”, “Install PC Cam”, and “Exit” in this installing main window.
1. Install PhoTags Express
Click on the “Inst all A P” to st art installing process. The language window will be shown on the
screen and you can choose the language you want to use.
And then the installer window will be shown as below.
After you click “Install PhoTags Express” button, there will be showing some windows that
help you to finish the installing. You are only required to follow the description and click the
Click to start installing
Choose your language
Page 9
9
buttons that it’s defaulted by the software.
Register online
Click “Register online” button to have a registration. Or you can directly click “Continue” for
registration next time.
After this step, the main window will appear on the screen.
2. Install DirectX
Click “Install DirectX” on the mai n window, the
DirectX will be installed to your computer.
3. Install PCCam
Click “Install PCCam” on the main window,
the PCCam software/driver will be in stalled to
your computer.
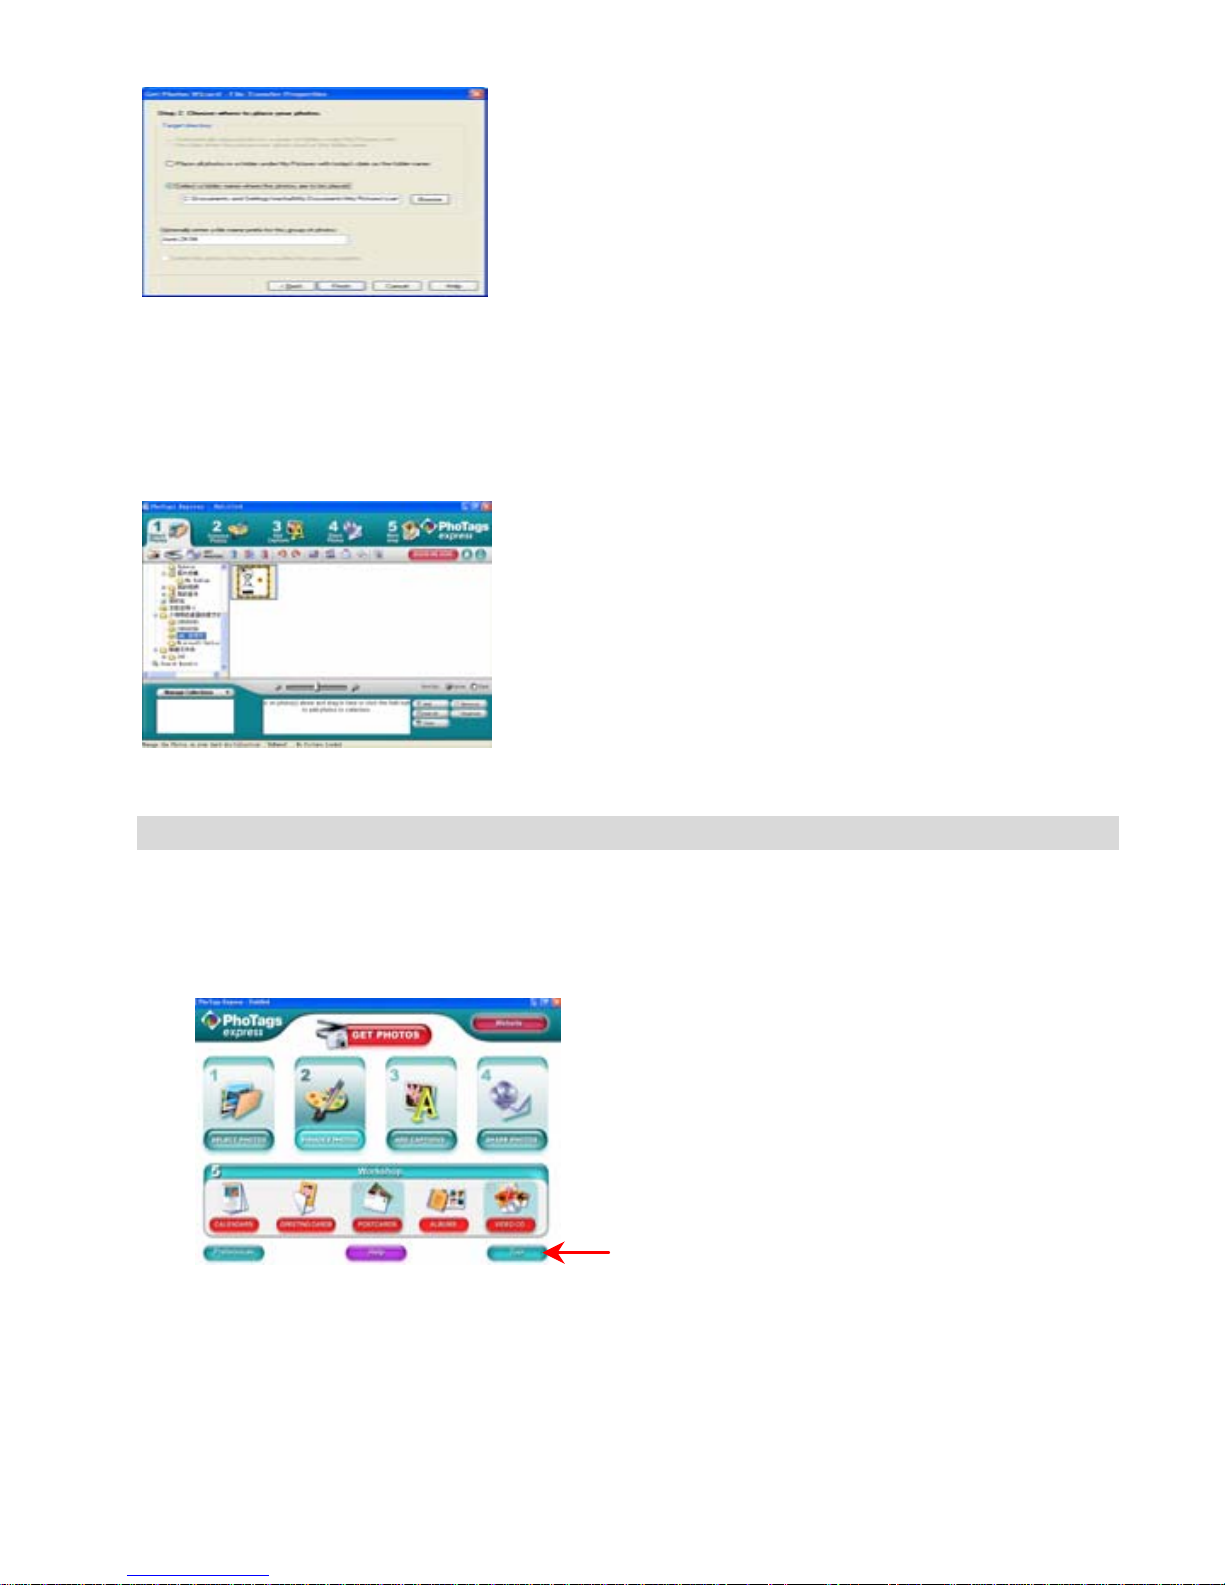
Everything you need to get the most from your photos
1. Select photos
Select the photos that you download from your
camera. And edit it in the software.
2. Edit photos
Click the “Enhance photos”, “Add captions” from the
main window to edit your ideal photos.
3. Share photos
Share your photos via “E-mail”, “Printing”, and
“Create HTML web” to uploading online.
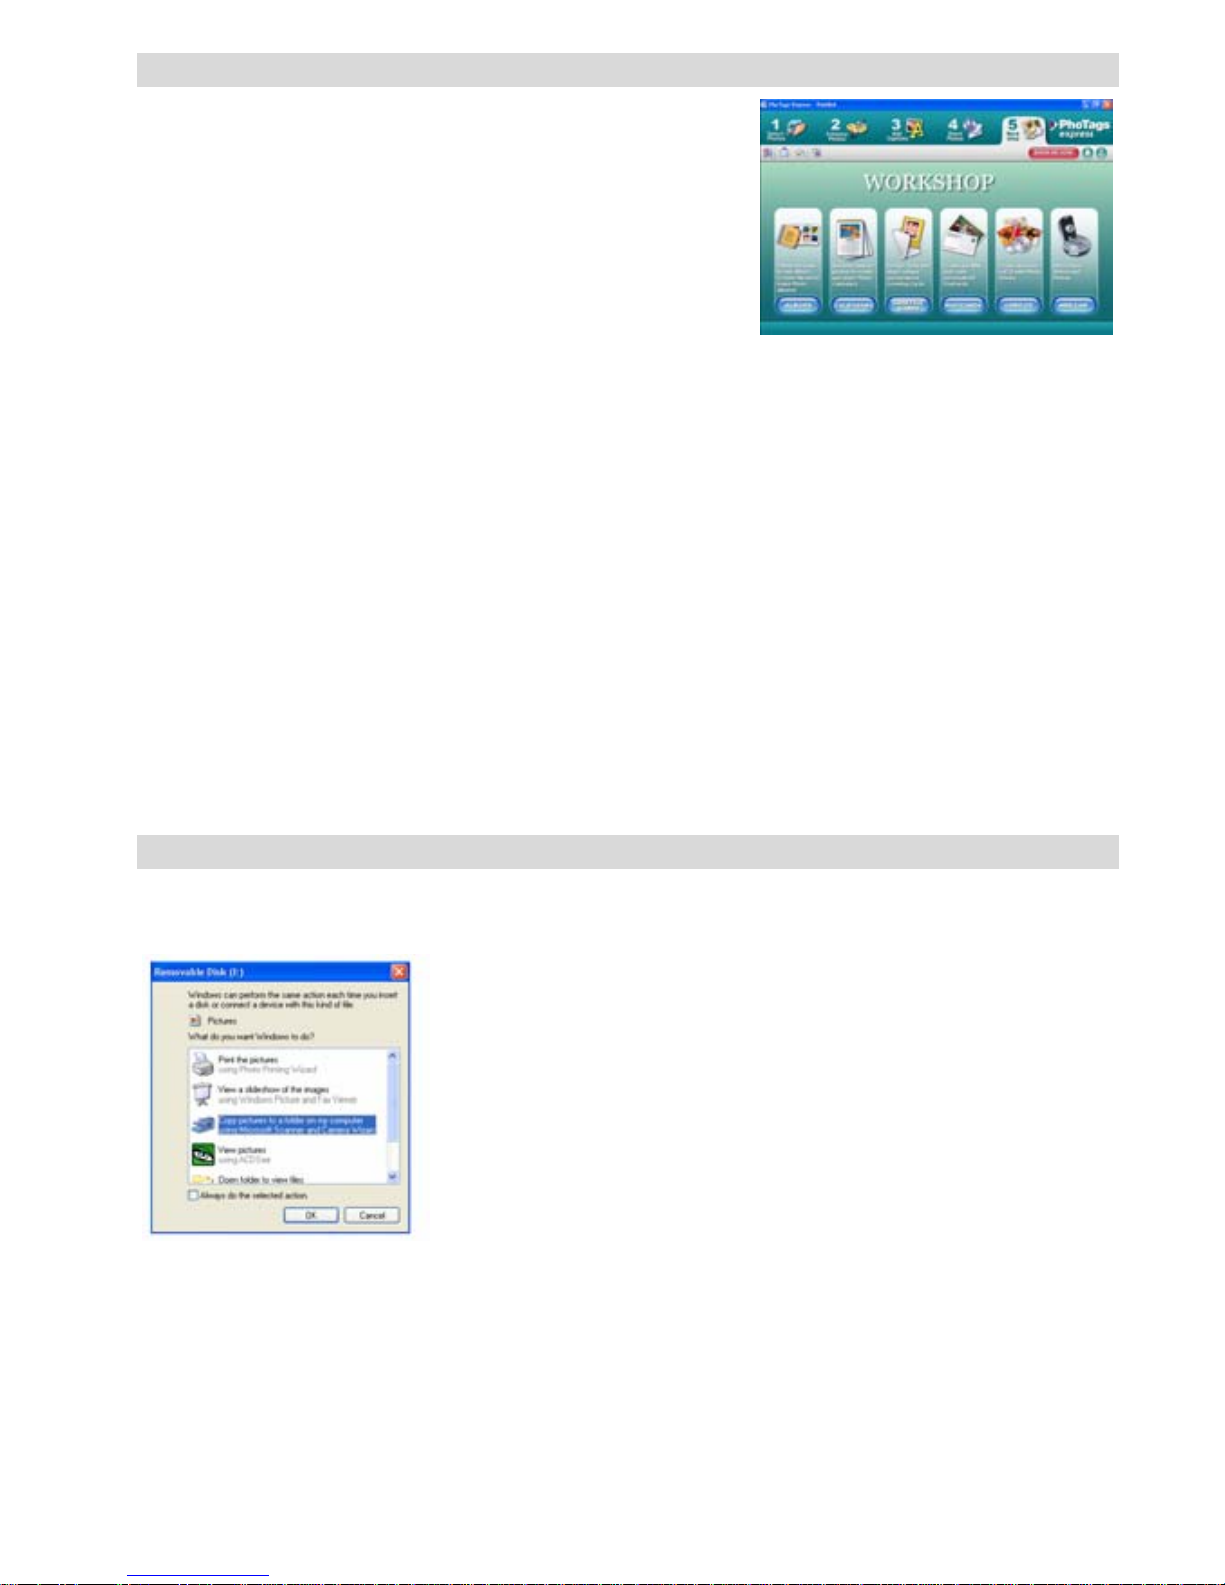
4. Workshop
Create “Calendars”, two sides “Greeting car ds” and “Postcards” on standard photo paper.
You can purchase “Album” and “Video CD”. Two additional workshop project online at any
time and create Photo Album and slide show s on CD that can be view ed on your PC and VCD
for viewing on your TV using your DVD player.
How to purchase additional “Workshop” projects
In addition to the free Calend ars, tw o-si ded Greeting Cards a nd Po stcards Work shop proj ect s
Page 10
10
you have the ability to p urchase two a dditional Workshop projects: "Alb ums" and " Video CD"
online, at anytime.
1. To purchase the “Workshop Project” simply click the one you wish to purchase and you
will be referred to an online website where you can purchase them.
2. Once you purchase the “Workshop projects” they will be automatically activated in the
software.
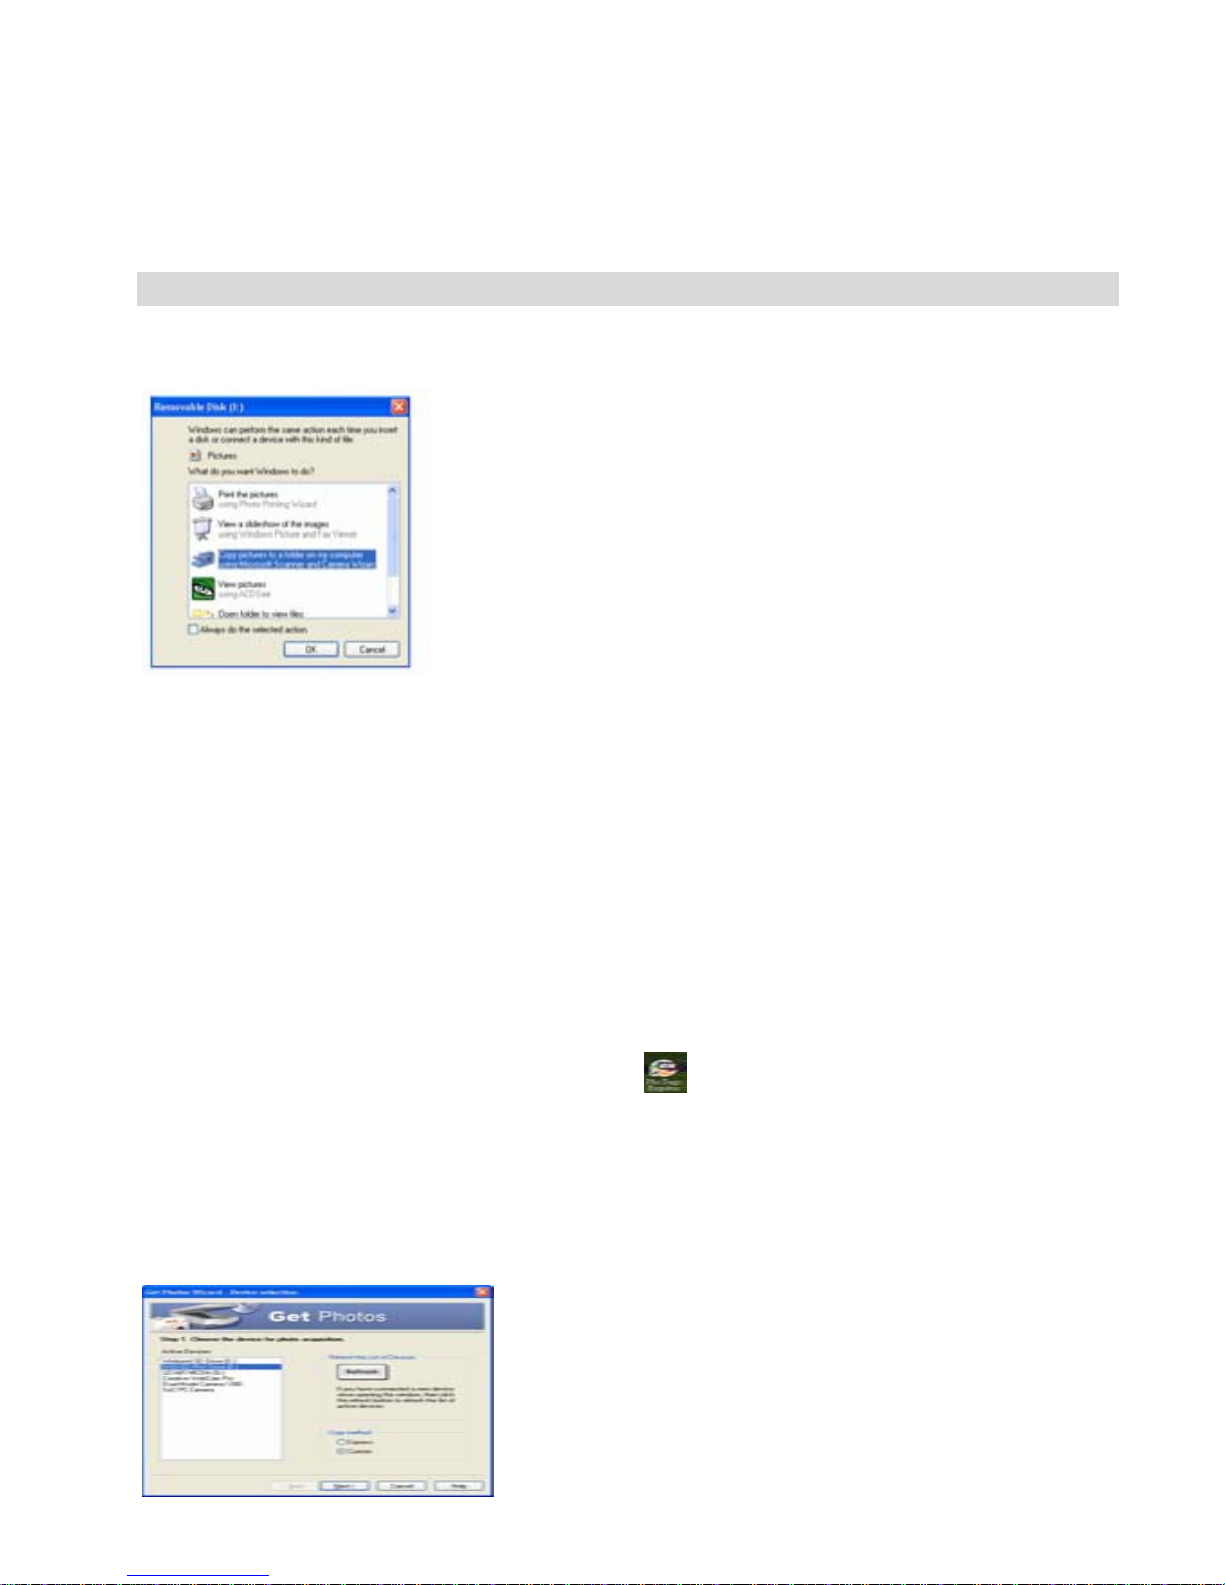
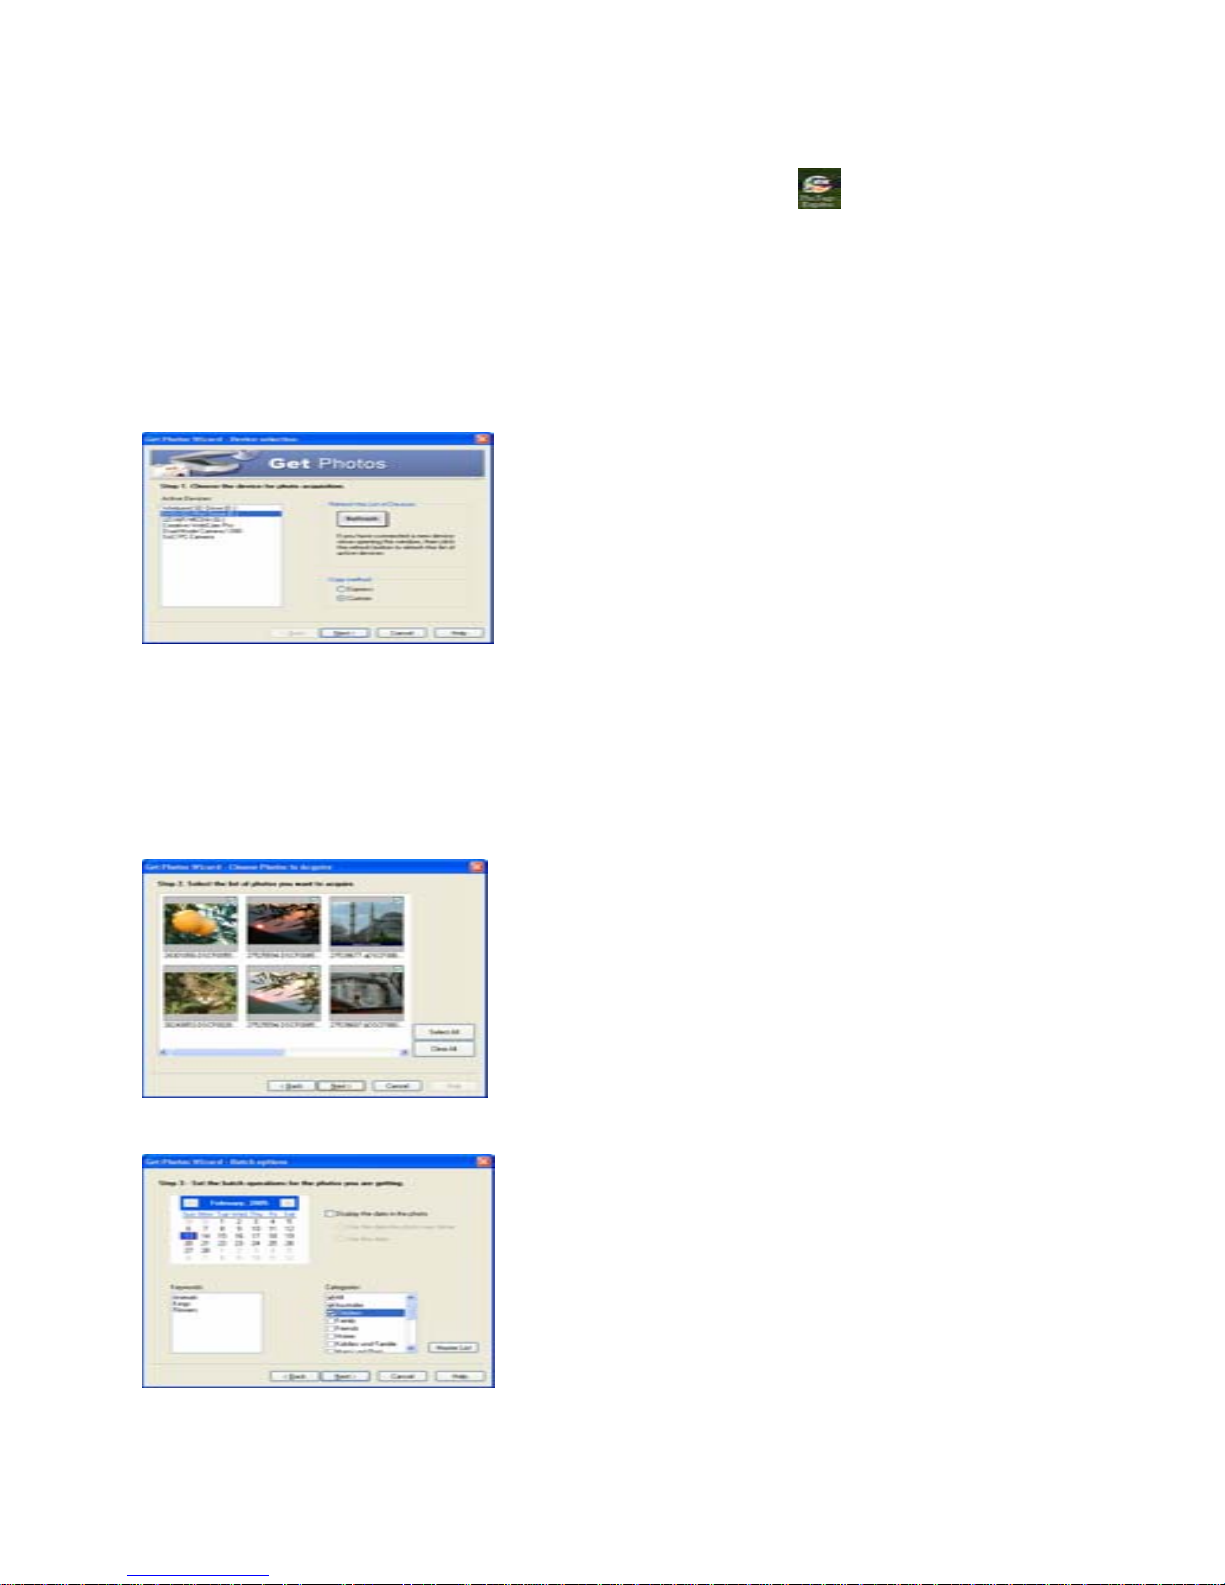
Transferring photos to your PC
Turn on your camera, Change your camera mode to Playback and connect your camera to the
computer correctly with USB cable, the screen will be shown a window (Removable Disk H:)
as below:
NOTE: Now you can download the photos to your computer with two methods as below:
1. Download photos directly from windows
Choose “copy pictures to a folder on my computer” on the Removable Disk (H:) window.
After you click “OK”, there will be shown some windows on the screen step by step, you are
only required to follow the descr iption a nd click the butto ns that are de faulted by the system to
finish transferring. Or you can:
1. Click on the START button in Windows.
2. Click on the MY COMPUTER Icon on the desktop.
3. Your memory card will appear a s a REMOVABLE STORAGE DEVICE.
4. Click on the REMOVABLE STORAGE DEVICE to view the images. The mages are
stored in the subfolder called DCM100.
5. You can now copy and paste the images to any directory you choose.
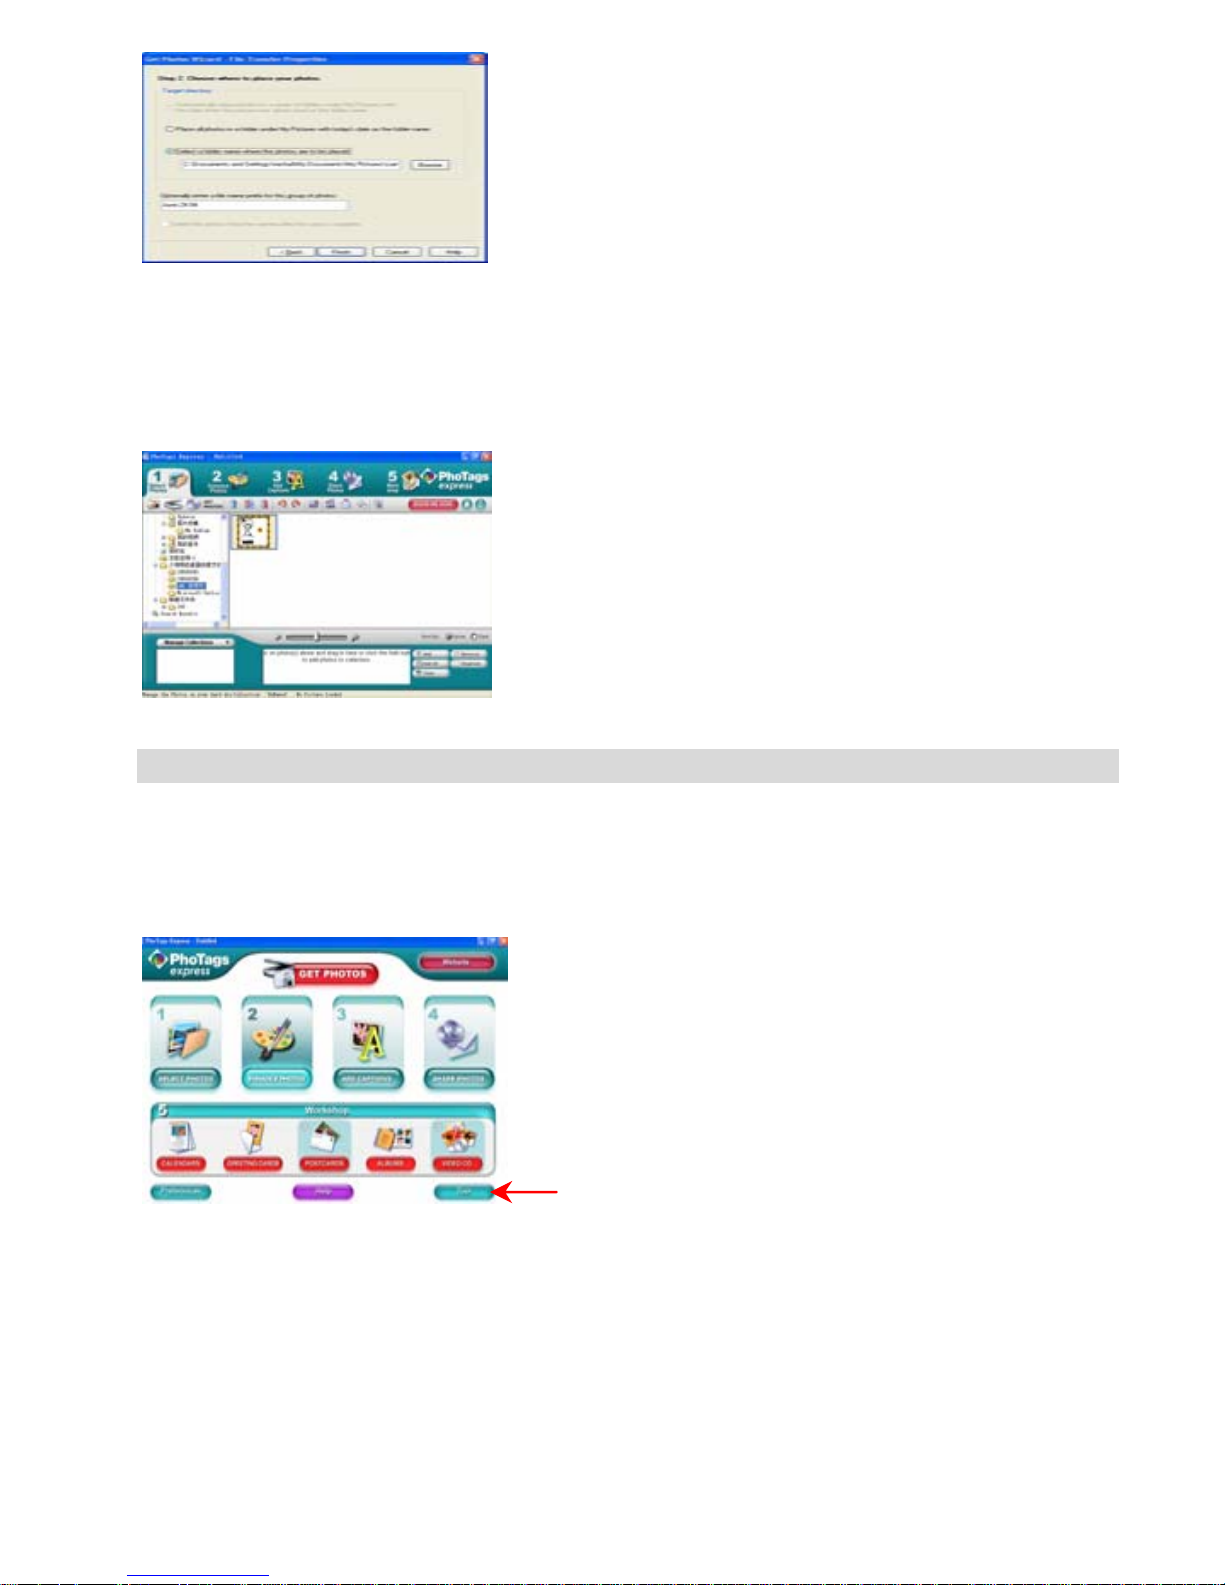
2. Download photos using PhoTags Express
a. Double click the PhoTags Express icon on the desktop to launch the application.
b. Click the “
Get Photos
” button on the main window.
c. The “
Get Photos
” wizard mode will appear on the screen, you can select “
custom
copy
” to download photos with your individuation.
Or you can select “Express” option to download all photos to the computer without the option of
selecting photos. In this mode you will not see a preview of the photos transferred.
Custom copy
Page 11
11
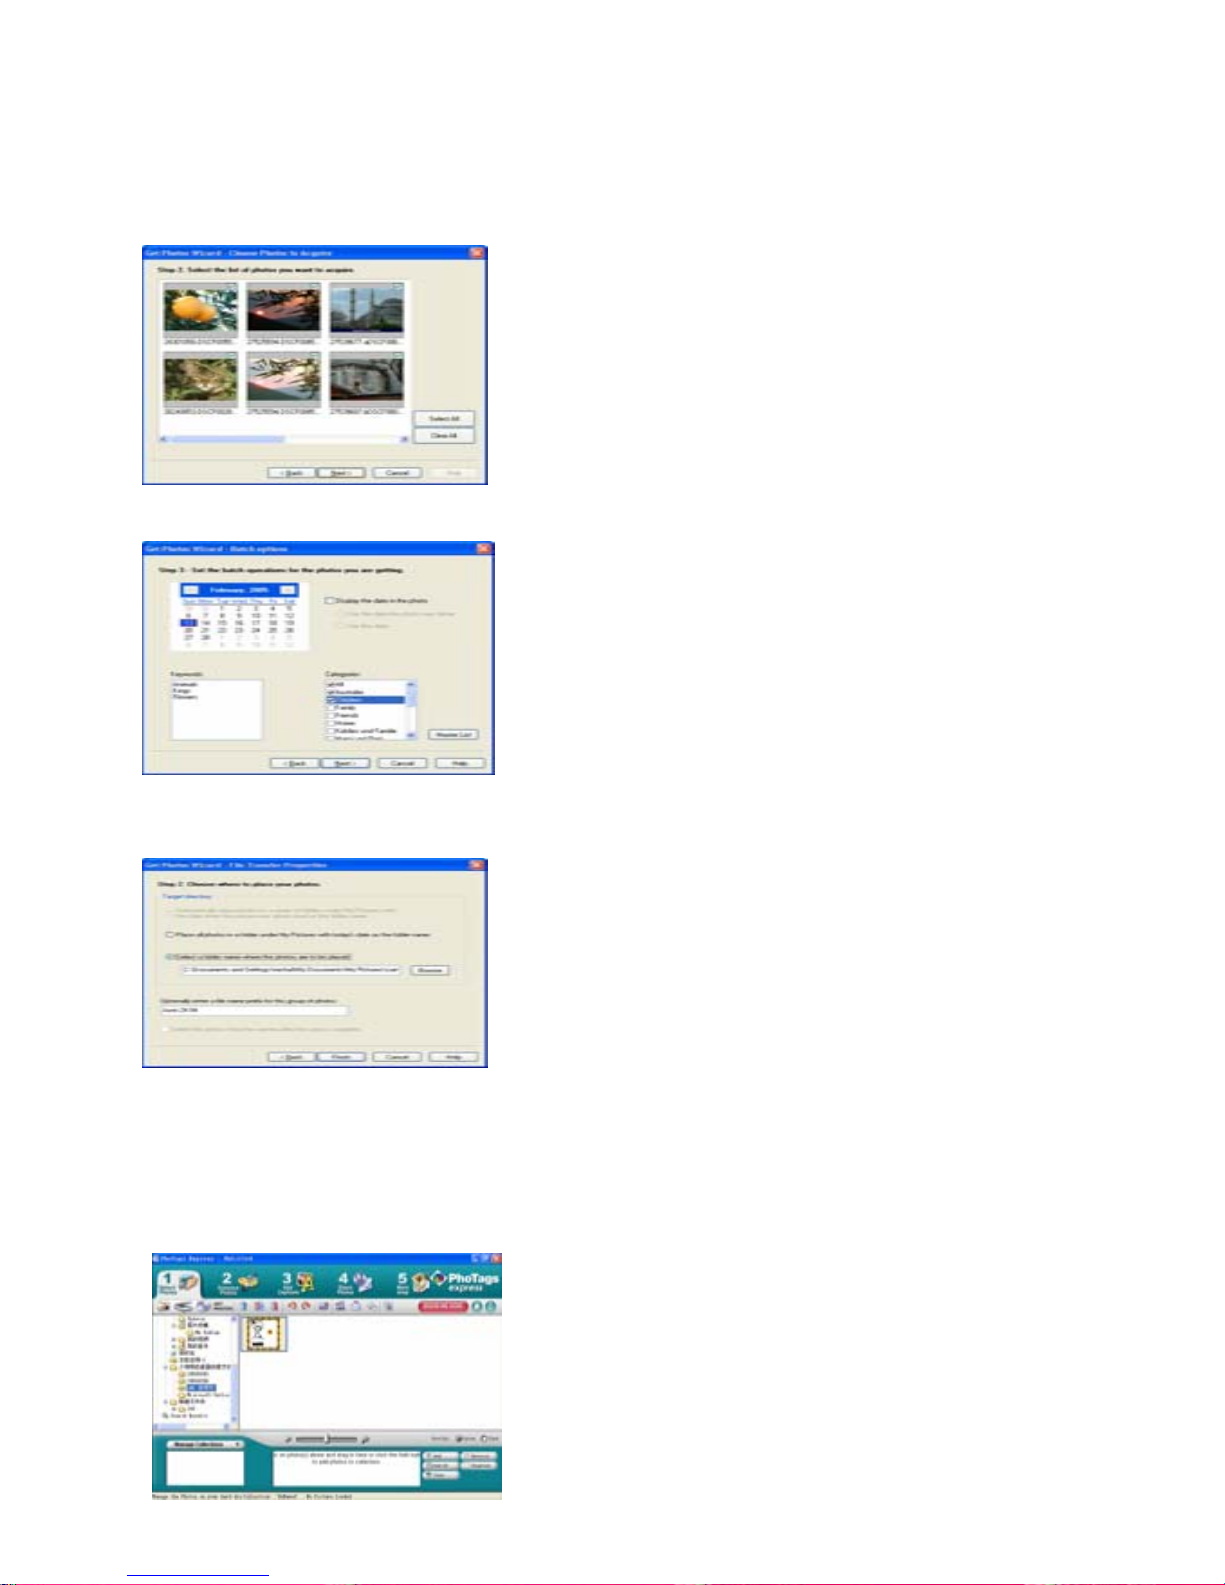
This mode is used to manually select the photos you wish to copy to your computer.
The “Device selection” mode will appear. Both your camera and the memory card will each
appear in the “Active Devices ” list. Se lect “Custom copy” click “Next” to continue.
Note: At this moment, you can select “Express” option to copy all photos to your computer in one
time without any prompt.
Select your photos click “Next” to continue.
Add active captions to the picture. With this feature you can add a date, keywords and categories.
Click “Next” to continue.
Choose a position where you want to place the photos. Click “Finish” to copy the photos to the
location you selected.
Note:
All of the picture you imported will appear in the “Se lect Photos” main w i ndow. And now, you can
edit your photos per your idea, and then download it to your computer. For how to edit the photos,
you can refer to the Quick Start guide in the PhoTags Express.
Page 12

12
PhoTags Express software owner manual
You can edit, printing, sharing photos with PhoTags Express. You can operate it as following step to
know how to use PhoTags Express:
1. Launch the PhoTags Express.
2. Click “tour” button on the main window to view how to use the PhoTags Express in detail.
Attention:
If PhoTags Express can not promote th e Dir ectX automa ticall y, you can manually install th e Dir ectX
in the CD before using the Camera, otherwise ,if the edition of DirectX in the windows operation is
less than 8.1,then the AVI file can not be played.
Run the PCCAM software
1. After the PC CAM softw are/dr iver is inst all ed, press t he shu tter k ey and plug -in th e USB cable,
the Windows will show a “Digital Camera” device is installed to your system.
2. Double click the PC Camera icon on the Windows desktop.
3. PC Camera software will display as,
4. They are 4 sections in the main window, (1) menu, (2) toolbar, (3) thumbnail of the captured
image, (4) image playback
(1) Menu – including File, Preview, Option, Capture, Help menu
File menu:
Save Active Item – save the selected image to file.
Save All Items – save all the captured images to files
Set Capture File – select a file name which is used to save the captured video
Allocate File Space – preserved a disk space which is used to save the captured
video
Exit – quit this program
Click here
Page 13

13
Preview menu:
Start Preview – open a window and start the video preview
Stop Preview – stop the video preview, close the video window
Option menu:
Video Format – change video preview resolution, VGA (640x480) or QVGA
(320x240)
Capture Frame – snap one or more video frames to image
Self Timer (3 seconds) – snap one or more video frames automatically after 3
seconds
Continuous shots – select one or 3 shots for each snap
Capture menu:
Start Capture – start capturing pc cam frames to the AVI file
Stop Capture – stop capturing AVI file
Capture Audio – select capturing audio data into AVI file or not
Help menu:
About -- display the software version.
(2) Toolbar – for some usual menu operations
-- Save Active Item -- Save All Items
-- Start Preview -- Stop Preview
-- Capture Frame -- Self Timer to capture frames
(3) thumbnail of the captured images
used to store the captured images
(4) image playback
used to display the active image by clicking a image in thumbnail section
Appendix : Specifications
Sensor CMOS sensor
Image resolution 5M, 3M, 2M, VGA
Lens f=7.23mm, F2.8
Internal memory SD RAM 8MB
External memory Support SD card up to 8GB
Flash Auto/force on/red eye reduction/off
Self-timer 10S
Power saving 60S
Battery 2*AAA batteries
Transmission interface USB V1.1
Working temperat ure
0~40℃
Computer system Window 2000/XP/ Vista/ Mac OS X (10.2.6 or higher)
Page 14

14
BENUTZERANLEITUNG
Inhalt
Einführung................................................................................................15
Wichtige Funktionsmerkmale...................................................................15
Lieferumfang der Kamera ........................................................................15
Computer-Systemanforderungen für Windows 2000/XP .........................15
Computer-Systemanforderungen für Windows Vista...............................15
Computer-Systemanforderungen für Macintosh......................................15
Ein Blick auf Ihre Kamera .........................................................................16
Die Kamera für die Benutzung vorbereiten..............................................16
Installation der SD-Speicherkarte.............................................................17
Mit der Benutzung der Kamera beginnen ................................................17
Kameramodus..........................................................................................17
Fotoaufnahmen........................................................................................17
Videomodus .............................................................................................19
Wiedergabemodus...................................................................................19
Installation der PhoTags Express Software..............................................20
So machen Sie das Beste aus Ihren Fotos..............................................22
Fotos in Ihren PC transferieren................................................................22
PhoTags Express Software Benutzerhandbuch.......................................24
Die PCCAM Software ausführen..............................................................25
Anhang: Technische Angaben..................................................................26
Page 15

15
Einführung
Vielen Dank für den Erwerb dieser Digitalkamera. Sie dient zur Aufnahme qualitativ hochwertiger
digitaler Fotos, und kann als entfernbarer Datenträger benutzt werden.
Um mehr über Features und Funktionen zu erfahren, lesen Sie sich vor der Benutzung diese
Benutzeranleitung sorgfältig durch.
Wichtige Funktionsmerkmale
¾ Bildauflösung- 5 M durch Interpolation (259 2x1944 Pixel 4:3), 3 M ( 2048x1536 Pixel 4:3), 2 M
(1920x1080 Pixel 16:9 ), VGA (640x480 Pixel 4:3)
¾ SD-RAM 8 MB, unterstützt SD/MMC-Speicherkarte (nicht im Lieferumfang) bis zu 8 GB.
¾ 4.5cm / 1,8“ TFT Farb-LCD
¾ PhoTags Express Software zur Verwaltung und Verbesserung Ihrer Fotos, zum Hinzufügen
von Bilduntertiteln, verschicken von E-Mail, Ausdrucken und vielem mehr.
Lieferumfang der Kamera
¾ Digitalkamera
¾ PhoTags Express Software Installations-CD
¾ USB-Kabel
¾ Benutzeranleitung
¾ Handschlaufe
Computer-Systemanforderun gen für Windows 2000/XP
Zum Herunterladen von Fotos in Ihren PC sind folgende Mindestvoraussetzungen erforderlich:
¾ Pentium Prozessor oder höher mit Windows 2000, XP
¾ 64 MB RAM, mehr als 250 MB freier Speicherplatz.
¾ Verfügbare USB-Schnittstelle
¾ CD-ROM-Laufwerk
¾ Empfohlene Bildschirmauflösung 24 Bit oder mehr
¾ Grafikkarte mit 256-Bit Farben oder mehr
Computer-Systemanforderungen für Windows Vista
Zum Herunterladen von Fotos in Ihren PC sind folgende Mindestvoraussetzungen erforderlich:
¾ Windows Vista
¾ 800 MHz Prozessor und 512 MB Systemspeicher
¾ 20 GB Festplatte mit mindestens 15 GB freiem Speicherplatz
¾ Unterstützung für Super VGA Grafik
¾ Verfügbare USB-Schnittstelle
¾ CD-ROM-Laufwerk
Computer-Systemanforderungen für Macintosh
¾ Power Macintosh G3 500 MHz oder höher
¾ Mac OS X Version 10.2.6 oder höher
¾ 128 MB oder mehr verfügbares System RAM (256 MB empfohlen), 150 MB freier
Festplatten-Speicher
¾ Monitor mit 800 x 600 oder höherer Auflösung zur Anzeige von Millionen von Farben
Hinweis: Diese Hardware ist bei der Nutzung mit einem Mac Plug & Play kompatibel, die
beigelegte Software kann jedoch nur mit Windows-Betriebssystemen benutzt werden.
Page 16
16
Ein Blick auf Ihre Kamera
Die Kamera für die Benutzung vorbereiten
Batterie-Installation
Ihre Kamera benötigt 2 AAA-Batterien. Legen Sie die Batterien in wie
folgend gezeigt in die Kamera:
1. Schieben und öffnen Sie das Batteriefach.
2. Achten Sie beim Einlegen der Batterien auf korrekt
ausgerichtete Polarität.
3. Schließen Sie die Batteriefachabdeckung.
Wird im LCD “Leer” angezeigt, bedeutet das, dass der Ladezustand
der Batterie kritisch ist und sich die Kamera ausschaltet, Sie müssen
Fotos in Ihren PC laden, falls keine SD-Karte eingelegt ist.
Hinweis: 1. Fall Sie die Kamera einen längeren Zeitraum nicht benutzen wollen, entfernen Sie
die Batterien aus dem Gerät, um einem Auslaufen und Korrosion vorzubeugen.
2. Vermeiden Sie es die Batterien zu entfernen oder die Kamera willkürlich
auszuschalten, da dadurch die Testaufnahme in Ihrer Digitalkamera verloren geht, falls Sie keine
SD-Karte benutzen, es rät sich die Testaufnahme unverzüglich im PC zu speichern.
3. Alte und neue Batterien nicht gemeinsam verwenden.
4. Alkaline. Standard (Kohle-Zink), oder wiederaufladbare (Nickel-Cadmium
Metall-Hydrid) Batterien nicht gemeinsam verwenden.
Page 17
17
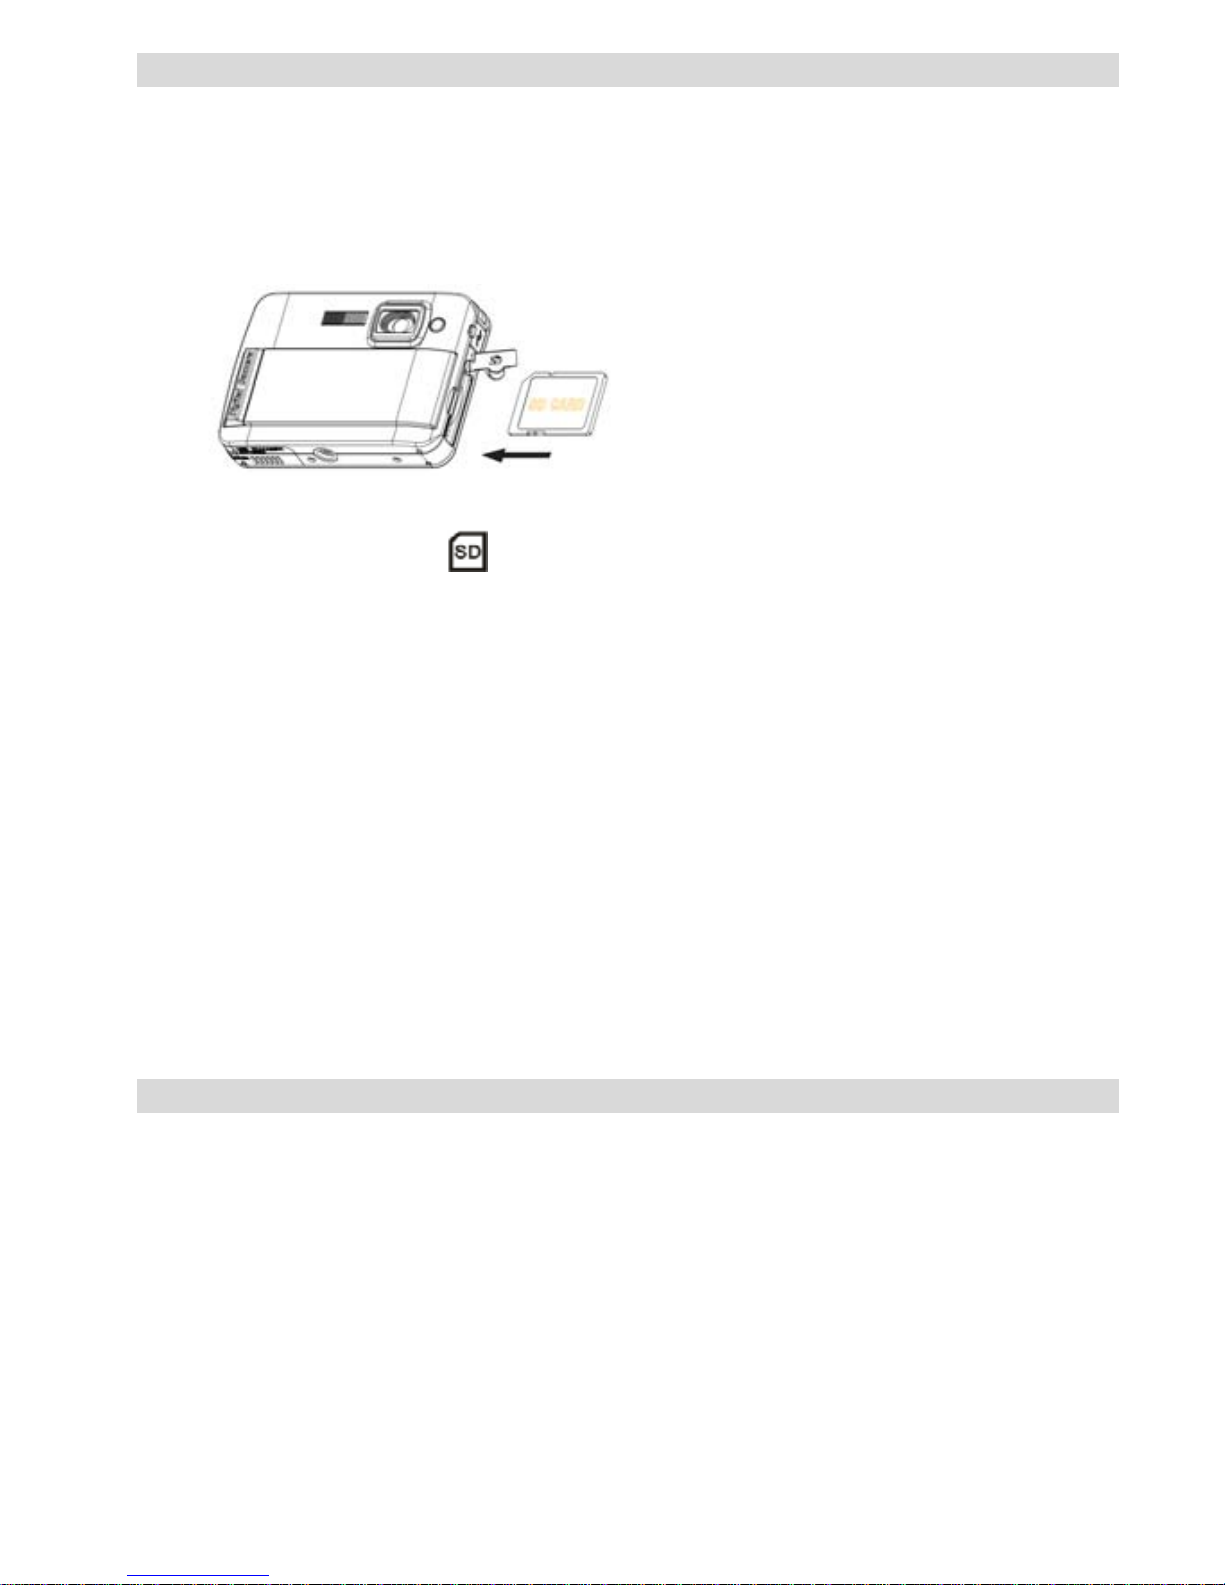
Installation der SD-Speicherkarte
Ihre Kamera ist mit einem Steckplatz ausgestattet, der dem Einstecken jeder „SD“ kompatiblen
Speicherkarte dient. Die Nutzung einer Speicherkarte verbessert die Speicherkapazität Ihrer
Kamera und ermöglicht das Herauszögern der Fototransfers in den PC. Installieren Sie die
SD-Speicherkarte wie folgend gezeigt:
1. Suchen Sie den Speicherkarten-Steckplatz.
2. Stecken Sie die korrekt ausgerichtete Speicherkarte in den Steckplatz. (wie auf folgenden
Fotos gezeigt).
3. Drücken Sie die Karte ein, bis sie „einklickt“. Die Oberkante der Karte sollte mit der
Kameraoberfläche bündig abschließen. Nach dem Einschalten der Kamera erscheint auf
dem LCD-Bildschirm ein Symbol.
4. Wenn eine externe Speicherkarte in die Kamera eingesteckt ist, werden alle Bilder in dieser
externen Speicherkarte gespeichert.
Hinweis:
1. Begrenzter interner Speicher dient ausschließlich für Testbilder. Das Bild wird beim
Ausschalten der Kamera gelöscht. Laden Sie gemachte Bilder vor dem Ausschalten. Für
eine normale Nutzung wird eine SD-Speicherkarte benötigt.
2. Für eine normale Benutzung wird eine externe Speicherkarte benötigt; Ihre Kamera
unterstützt alle kompatiblen SD-Speicherkarten.
3. Nach dem Einstecken der Karte erscheint auf den Bildschirm „Karte eingesteckt, zur
SD-Karte wechseln“, und zeigt so an, dass Fotos auf der SD-Karte gespeichert werden,
ebenso erscheint „Karte entfernt, zum internen Speicher wechseln“ auf dem LCD-Bildschirm,
wenn Sie die Karte entfernen.
4. Falls sich beim Einstecken der Karte bereits Fotos im internen Speicher befinden, erscheint
„Ein Moment bitte, die SDRAM-Datei wird in Ihre Karte kopiert…“ auf dem Bildschirm.
5. Beim Herausnehmen der SD-Speicherkarte erscheint „Karte wurde entfernt, zum Internen
RAM wechseln“ auf dem LCD-Bildschirm, Sie können nun nur 1 Testaufnahme machen.
Mit der Benutzung der Kamera beginnen
Schalten Sie Ihre Kamera ein, indem Sie die Netztaste gedrückt halten; der LCD-Bildschirm
leuchtet und zeigt so an, dass die Kamera eingeschaltet und betriebsbereit ist.
Halten Sie die Netztaste zum Ausschalten Ihrer Kamera etwa 3 Sekunden lang gedrückt.
Kameramodus
1. Drücken Sie die Menütaste.
2. Wählen Sie mit der Rechts/Links Taste einen Modus:
3. Drücken Sie den Auslöser.
4. Wählen Sie mit der Rechts/Links Taste EINZEL:
5. Drücken Sie zur Bestätigung den Auslöser. Der Kameramodus ist nun aktiviert (Standard).
Fotoaufnahmen
Nach dem Einschalten der Kamera ist standardmäßig der Kameramodus aktiviert.
Halten Sie die Kamera ruhig und fangen Sie das Motiv mit dem LCD-Bildschirm ein. Kurz nach
Drücken des Auslösers wird die Aufnahme gemacht.
Page 18

18
Hinweis: Ist der interne Speicher der Kamera voll , er scheint „Speicher voll“ im LCD-Bildschirm.
Benutzen Sie eine SD-Speicherkarte zum Transfer und um weitere Fotos machen zu können!
Bei dem Versuch eine Aufnahme bei einem vollen internen Speicher zu machen ertönt ein
kontinuierlicher Signalton. Laden Sie die Testaufnahme sofort in Ihrem Computer oder benutzen
Sie eine SD-Speicherkarte, um weitere Fotos machen zu können!
Blitz
Die Blitzfunktion Ihrer Kamera ermöglicht Aufnahmen bei schlechten Lichtbedingungen.
Drücken Sie die Links Taste bis das Symbol auf dem LCD erscheint, der Auto- Blitz is t aktiv iert,
drücken Sie die Links Taste bis das Symbol auf dem LCD erscheint, um die
Rote-Augen-Reduzierung zu aktivieren. Drücken Sie die Links Taste bis das Symbol auf dem
LCD erscheint, sodass der Blitz automatisch gesetzt wird. Drücken Sie die Links Taste bis
das Symbol auf dem LCD erscheint, um die Blitzfunktion zu deaktivieren.
Hinweis: „Niedriger Ladezustand“ erscheint auf dem LCD, wenn Sie bei ungenügender
Batterieleistung zur Blitzfunktion wechseln. Legen Sie neue Batterien ein, um die Blitzfunktion
nutzen zu können.
Digitale Zoomfunktion
Sie können Ihr Motiv mit dem Digitalzoom vergrößern. Regeln Sie den Zoom mit den T-und
W-Tasten bis auf maximal 4x. Drücken Sie die T-Taste zum Vergrößern des Motivs. Mit der
W-Taste zoomen Sie wieder heraus.
Verwacklungsschutzfunktion
Ihre Digitalkamera verfügt über eine Funktion, die unscharfe Fotos durch Verwackeln der Kamera
bei der Aufnahme verhindert. Diese Funktion macht den Einsatz eines Stativs für gute Aufnahmen
überflüssig. Gehen Sie wie folgt vor:
1. Drücken Sie die Menütaste.
2. Wählen Sie mit der Rechts/Links Taste Verwacklungsschutz.
3. Drücken Sie den Auslöser.
4. Wählen Sie mit der Rechts/Links Taste:
„Ja“ – um den Verwacklungsschutz zu aktivieren. Auf dem Bildschirm erscheint das
Symbol.
„Nein“ – um den Verwacklungsschutz zu verlassen. Auf dem Bildschirm erscheint das
Symbol.
5. Drücken Sie zur Bestätigung den Auslöser.
Ändern der Bildauflösung
Der eingebaute Speicher bietet Platz für eine 3,1 Megapixel Testaufnahme, stecken Sie eine
SD-Speicherkarte ein, um mehr Speicherplatz zu erhalten.
1. Drücken Sie die Menütaste.
2. Wählen Sie mit der Rechts/Links Taste die Option AUFLÖSUNG.
3. Drücken Sie den Auslöser.
4. Wählen Sie mit der Rechts/Links Taste eine der folgenden Auflösungen:
(5 M) 2592x1944 Pixel
(3 M) 2048x1536 Pixel
(2 M) 1920x1080 Pixel
(VGA) 640x480 Pixel
5. Drücken Sie den Auslöser erneut, um die vorgenommene Auswahl zu bestätigen.
Hinweis:
Die Bildauflösung beei n flusst die Fotoqualität. Hochauflösende Fotos bi eten ei ne b esser e Quali tät,
benötigen jedoch mehr Speicher als niedrigauflösende Fotos.
Selbstauslöser
Sie können sich selbst mit auf ein Foto bringen, indem Sie dieses Feature nutzen, um Zeit
Page 19

19
zwischen dem Drücken des Auslösers und der eigentlichen Aufnahme zu gewinnen. Es ist
angebracht bei der Benutzung eines Selbstauslösers ein Stativ zu benutzen.
1. Drücken Sie die Menütaste.
2. Wählen Sie mit der Rechts/Links Taste einen MODUS:
3. Drücken Sie den Auslöser
4. Wählen Sie mit der Rechts/Links Taste SELBST:
5. Drücken Sie zur Bestätigung erneut den Auslöser. Das Symbol erscheint in der linken
Ecke des LCD.
6. Drücken Sie den Auslöser, um Aufnahmen zu machen, Sie hören den Kamera-Signalton und
nach einem 10 Sekunden Countdown wird die Aufnahme geschossen.
Videomodus
In diesem Modus können Sie Videos aufnehmen Vor dem Start einer Aufnahme müssen Sie eine
SD-Karte einstecken, um die Speicherkapazität der Kamera zu erweitern.
1. Nutzen Sie eine kompatible Speicherkarte.
2. Schalten Sie die Kamera ein.
3. Drücken Sie die Menütaste.
4. Wählen Sie mit der Rechts/Links Taste einen MODUS:
5. Drücken Sie den Auslöser.
6. Wählen Sie mit der Rechts/Links Taste einen AVI:
7. Drücken Sie zur Bestätigung erneut den Auslöser. Ein Symbol erscheint in der linken
Ecke des LCD.
8. Drüc ken Sie den Auslöser, um eine Videoaufnahme zu be ginnen. In der rechten Ecke des
LCD wird die abgelaufene Zeit angezeigt während die LED-Anzeige blinkt.
9. Drücken Sie den Auslöser, um die Aufnahme zu stoppen und die AVI-Datei zu speichern.
Hinweis
:
1. „Setzen Sie eine SD-Speicherkarte“ erscheint auf dem Bildschirm, wenn der Auslöser
gedrückt wird, ohne dass eine SD-Speicherkarte eingesteckt ist.
2. Sie können die AVI-Datei in Ihrem Computer mit Quick Time oder dem Media Player
wiedergeben.
Wiedergabemodus
In diesem Modus können Sie eine Vorschau Ihrer Fotos sehen.
1. Schalten Sie die Kamera ein.
2. Drücken Sie die Rechts Taste, um den Wiedergabemodus aufzurufen. Das Symbol
erscheint in der linken Ecke des LCD. Drücken Sie den Auslöser, um den Standby-Modus
zu verlassen.
Hinweis: Im LCD erscheint “KEIN E DATEI”, wenn sich in der Kamera keine Fotos/Videos befinden.
Drücken Sie den Auslöser, um den Kameramodus zu verlassen.
Vorschau der Fotos
Wählen Sie mit der Rechts/Links Taste Fotos/Videos zur Ansicht. Wenn Sie ein Foto wählen,
erscheint „JPG“ im LCD. Wenn Sie eine AVI-Datei wählen, erscheint „AVI“ im LCD.
Fotos/Videos löschen
1. Drücken Sie im Wiedergabemodus die Menü-Taste.
2. Wählen Sie mit der Rechts/Links Taste Löschen.
3. Drücken Sie den Auslöser.
4. Wählen Sie mit der Rechts/Links Taste Löschen/Alle Löschen.
5. Drücken Sie zur Bestätigung erneut den Auslöser.
Formatieren
Diese Funktion löscht alle im Kameraspeicher befindlichen Dateien (interner Speicher oder
SD-Speicherkarte, je nach Auswahl), gehen Sie vorsichtig mit der Funktion um:
Page 20
20
1. Drücken Sie die Menütaste.
2. Wählen Sie mit der Rechts/Links Taste die Option Formatieren:
3. Drücken Sie den Auslöser.
4. Drücken Sie den Auslöser erneut, um die vorgenommene Auswahl zu bestätigen, im LCD
erscheint „Formatieren OK“.
Fotos ausdrucken
Ihre Kamera unterstützt eine Druckfunktion, mit der Sie jederzeit Ihre Fotos ausdrucken können.
1. Wählen Sie mit der Rechts/Links Taste ein Foto aus, das Sie ausdrucken möchten.
2. Drücken Sie die Menütaste.
3. Wählen Sie mit der Rechts/Links Taste die Option Drucker:
4. Drücken Sie den Auslöser, im LCD erscheint “Verbinden Sie Ihre DSC mit einem Drucker”.
5. Jetzt können Sie Ihre Kamera mit einem beliebigen kompatiblen Drucker zum Drucken
verbinden.
Wiedergabe einer AVI-Datei
1. Wählen Sie mit der Rechts/Links Taste eine AVI-Datei in der SD-Speicherkarte.
2. Drücken Sie die Menütaste.
3. Wählen Sie mit der Rechts/Links Taste die Option Wiedergabe.
4. Drücken Sie zur Wiedergabe den Auslöser.
5. Drücken Sie den Auslöser erneut, um die Wiedergabe zu stoppen.
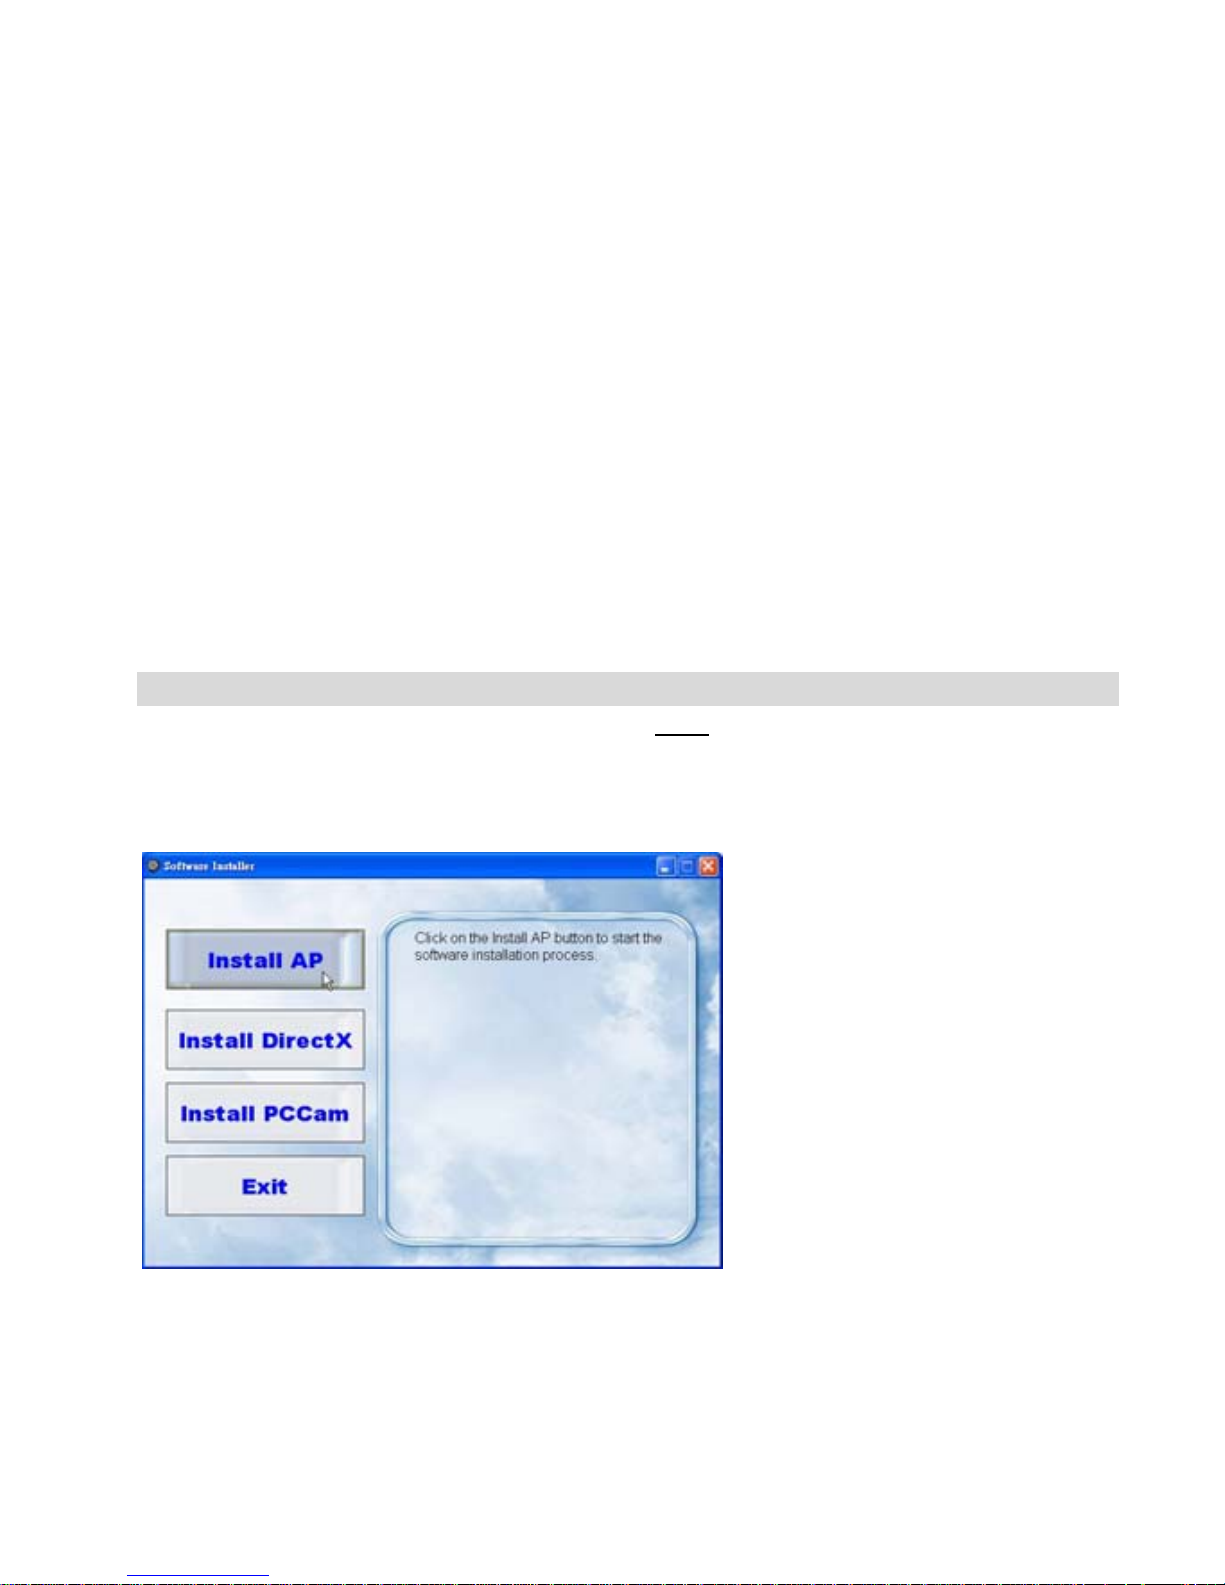
Installation der PhoTags Express Software
HINWEIS: Vergewissern Sie sich, dass die Kamera nicht mit dem Computer verbunden ist.
Legen Sie die Software-CD in Ihren Computer. Nach ein paar Sekunden erscheint das
Installations-Hauptfenster auf dem Bildschirm.
In diesem Installations- Haup tfenster kön nen Si e zwischen „AP Installation“, „DirectX Installation“,
„PC-Kamera Installation“ und „Verlassen“ wählen.
1. Installation von PhoTags Express
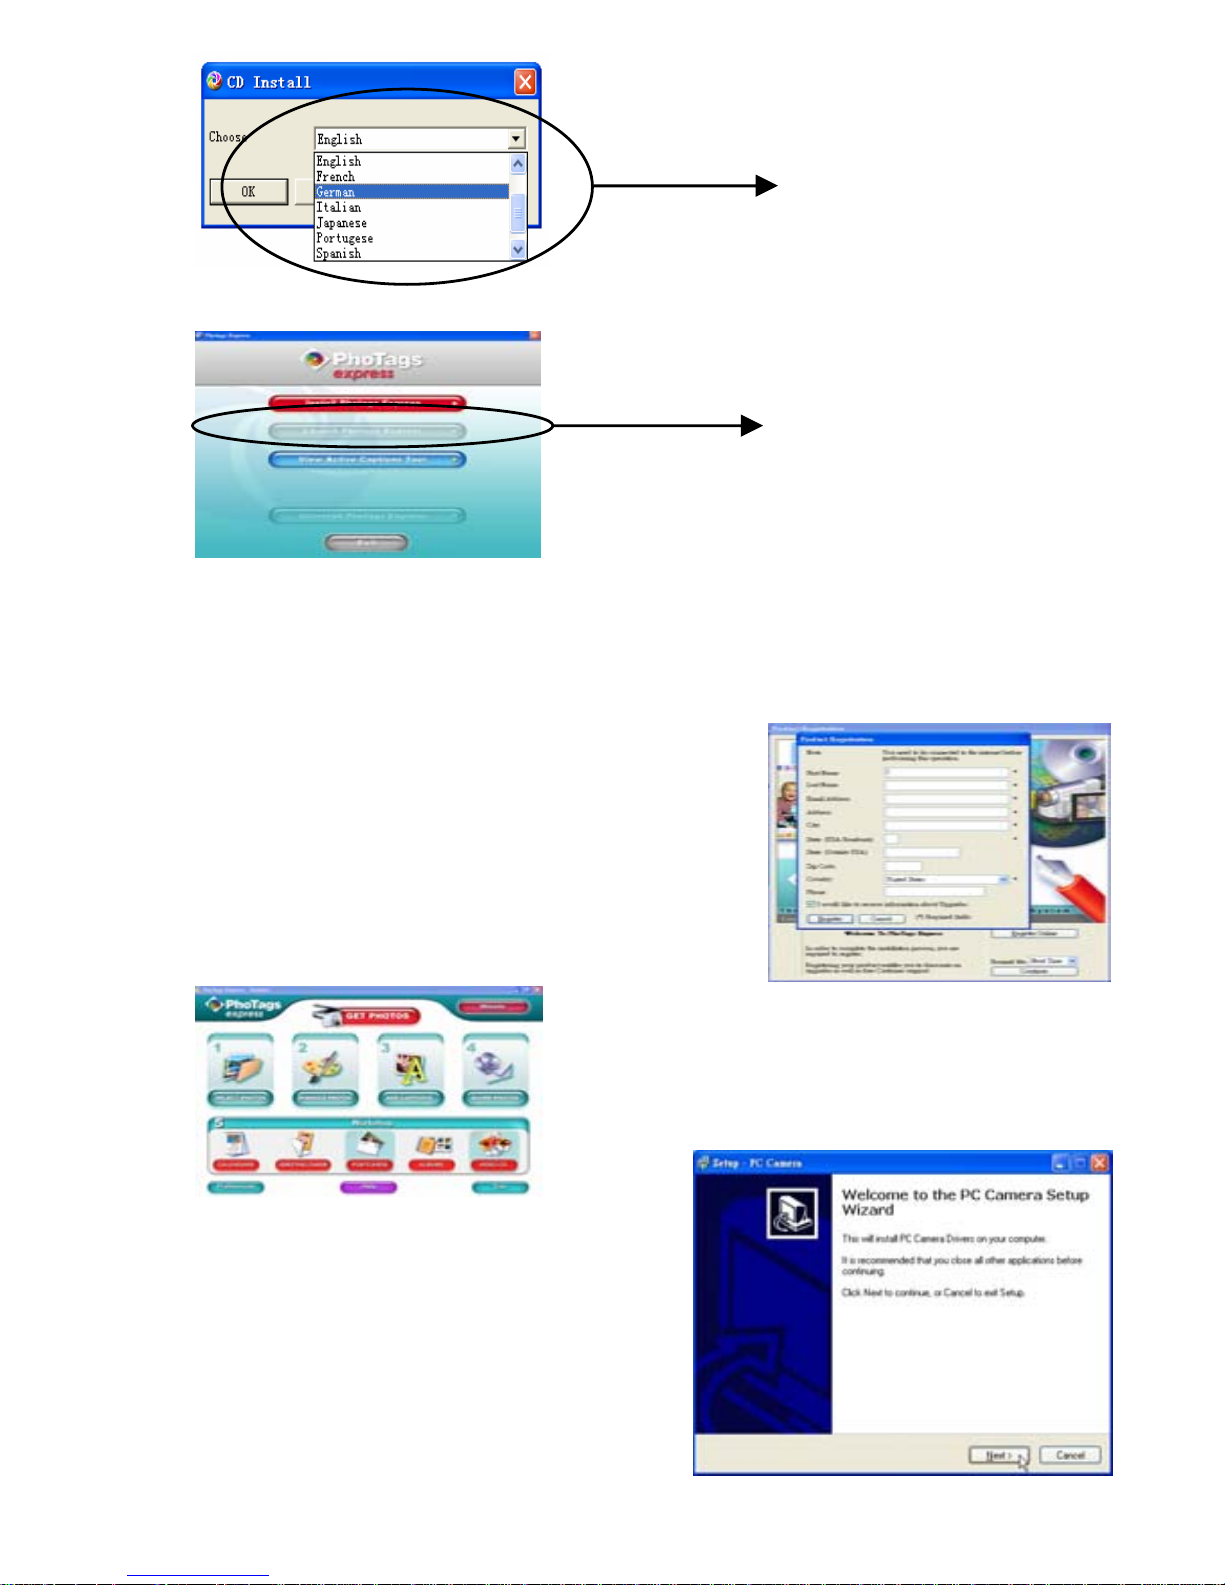
Klicken Sie auf „AP Installieren“, um den Installationsvorgang zu starten. Das sich öffnende
Sprachfenster bietet die Möglichkeit der Wahl der bevorzugten Sprache.
Page 21
21
Danach zeigt sich folgendes Installationsfenster.
Nachdem Sie auf die „PhoTags Express Installation.“ Taste gedrückt haben, öffnen sich
einige Fenster, die Ihnen bei der Durchführung der Installation helfen. Sie müssen nur den
Hinweisen folgen und auf die von der Software standardmäßig hervorgehobenen Tasten
klicken.
Online-Anmeldung
Klicken sie auf „Online-Anmeldung“ um sich zu
registrieren. Oder klicken Sie direkt auf „Weiter“, um
sich beim nächsten Mal anzumelden.
Nach diesem Schritt erscheint das Hauptfenster auf
dem Bildschirm.
2. DirectX Installation
Klicken Sie im Hauptfenster auf „DirectX
Installieren“, um DirectX auf Ihrem
Computer zu installieren.
3. PCCam Installation
Klicken Sie im Hauptfenster auf „PCCam
Installieren“, um die PCCam
Software/Treiber auf Ihrem Computer zu
installieren.
Zum Installationsstart anklicken
Wahl der Sprache
Page 22
22
So machen Sie das Beste aus Ihren F otos
1. Fotos auswählen
Wählen Sie die Fotos die Sie von der Kamera
herunterladen wollen und bearbeiten Sie sie mit der
Software.
2. Fotos bearbeiten
Klicken Sie auf „Fotos verbessern“, „Untertitel
hinzufügen“ im Hauptfenster, um Ihre Fotos zu
verbessern.
3. Fotos mit anderen teilen
Teilen Sie Ihre Fotos per „E-Mail“, „Ausdrucken“ und „HTML Web erstellen“, um sie Online
hochzuladen.
4. Workshop
Erstellen Sie „Kalender“, zweiseitige „Grußkarten“ und „Postkarten“ auf
Standard-Fotopapier. Sie können „Album“ und „Video CD“ jederzeit online erwerben. Dies
sind zwei zusätzliche Workshop-Projekte zum Erstellen von Fotoalben und Slideshows auf
CD, die Sie auf Ihrem PC, oder per VCD mit Ihrem DVD-Player auch auf dem Fernseher
ansehen können.
Wie Sie weitere „Workshop“ Projekte erwerben können
Zusätzlich zu den freien Kalender-, doppelseitigen Grußkarten- und
Postkarten-Workshop-Projekten gibt es noch zwei weitere Workshop-Projekte : „Alben“ und
„Video-CD“ sind jederzeit online erhältlich.
1. Klicken Sie einfach auf das gewünschte „Workshop-Projekt“ und erledigen Sie den
Online-Kauf auf der erscheinenden Webseite.
2. Ein gekauftes „Workshop-Projekt“ wird automatisch in der Software aktiviert.
Fotos in Ihren PC transferieren
Schalten Sie Ihre Kamera ein, wechseln Sie dann in den Wiedergabemodus der Kamera und
verbinden Sie Kamera und Computer mit einem USB-Kabels, auf dem Bildschirm erscheint
folgendes Fenster (Entfernbarer Datenträger H:):
HINWEIS: Es gibt zwei Möglichkeiten Fotos nun in Ihren Computer zu laden:
1. Fotos direkt über Windows herunterladen
Wählen Sie „Fotos in einen Ordner auf meinem Computer kopieren“ im Entfernbaren
Datenträger Disk (H:) Fenster. Nachdem Sie auf „OK“ geklickt ha ben, erscheint eine Folge
von Fenstern auf dem Bildschirm, eins nach dem anderen, Sie müssen nur den Hinweisen
folgen und auf die hervorgehobenen Tasten klicken, um den Transfer abzuschließen. Oder:
1. Klicken Sie auf die Windows START Taste.
2. Klicken Sie auf das ARBEITSPLATZ Symbol auf dem Desktop.
3. Die Speicherkarte erscheint als ENTFERNBARES SPEICHERGERÄT.
Page 23
23
4. Klicken Sie auf ENTFERNBARES SPEICHERGERÄT, um die Fotos zu sehen. Die
Bilder werden im Unterordner DCM100 gespeichert.
5. Jetzt können Sie Fotos in ein Verzeichnis Ihrer Wahl kopieren und einfügen.
2. Fotos mit PhoTags Express herunterladen
a. Doppelklicken Sie auf das PhoTags Express Symbol auf dem Desktop, um die
Anwendung zu starten.
b. Klicken Sie auf die „Fotos übertragen“ Taste im Hauptfenster.
c. Der „Fotos Übertragen“ Assistent erscheint, Sie können „Benutzerdefiniertes
Kopieren“ wählen, um die Fotos Ihren Vorstellungen entsprechend herunterzuladen.
Oder wählen Sie die „Express“ Option, die alle Fotos in den Computer lädt, ohne die Möglichkeit
einer Auswahl anzubieten. Dieser Modus bietet keine Vorschau der transferierten Fotos.
Benutzerdefiniertes Kopieren
Dieser Modus ermöglicht die manuelle Auswahl der in den Computer zu kopierenden Fotos.
Es erscheint der „Geräteauswahl“ Modus. Kamera und Speicherkarte erscheinen beide in der
„Aktive Geräte“ Liste. Wählen Sie „Benutzerdefiniertes Kopieren“ und klicken Sie dann zum
Fortfahren auf „Weiter“.
Hinweis: Jetzt können Sie die „Express“ Option wählen, um alle Fotos ohne Unterbrechung in
Ihren Computer zu kopieren.
Wählen Sie Ihre Fotos und klicken Sie dann zum Fortfahren auf „Weiter“.
Den Fotos Bildunterschriften hinzufügen. Mit diesem Feature können Sie das Datum, Stichwörter
und Kategorien hinzufügen. Klicken Sie zum Fortfahren auf „Weiter“.
Page 24
24
Wählen Sie den Ort für die Fotos. Klicken Sie auf „Fertig stellen“, um die Fotos an den gewählten
Ort zu kopieren.
Hinweis:
Alle importierten Fotos erscheinen im „Fotos Auswählen“ Hauptfenster. Jetzt können Sie Ihre
Fotos nach Wunsch bearbeiten und sie dann in Ihren Computer laden. Informationen zum
Bearbeiten der Fotos finden Sie in der PhoTags Express Schnellanleitung.
PhoTags Express Software Benutzerhandbuch
Mit PhoTags Express können Sie Fotos bearbeiten, ausdrucken und mit anderen teilen. Es folgt
eine kurze Vorstellung von PhoTags Express:
1. Starten Sie PhoTags Express.
2. Klicken Sie auf die „Tour“ Taste im Hauptfenster, um Details zur Benutzung von PhoTags
Express zu erhalten.
Achtung:
Falls PhoTags Express DirectX nicht automatisch aktualisiert, installieren Sie DirectX manuell
mithilfe der CD, bevor Sie die Kamera benutzen. Zur Wiedergabe von Avi-Dateien wird bei
Windows-Betriebssystemen zumindest die DirectX Version 8.1 benötigt.
Hier klicken
Page 25

25
Die PCCAM Software ausführen
1. Nachdem PC-CAM Software/Treiber installiert wurden, drücken Sie den Auslöser und
stecken Sie das USB-Kabel ein, sodass Windows anzeigt, dass eine „Digitalkamera“ im
System installiert ist.
2. Doppelklicken Sie auf das PC-Kamera Symbol im Windows Desktop.
3. Die PC-Kamera-Software wird wie folgt angezeigt,
4. Im Hauptfenster finden Sie 4 Bereiche, (1) Menü, (2) Symbolleiste, (3) Thumbnail des
aufgenommenen Bildes, (4) Bildwiedergabe
(1) Menü – einschließlich Datei, Vorschau, Option, Aufnahme, Hilfsmenü
Dateimenü:
Aktive Auswahl Speichern – speichert das gewählte Bild als Datei.
Alles Speichern – speichert alle aufgenommenen Bilder als Dateien
Aufnahmedatei Bestimmen – bestimmt den zum Speichern des aufgenommenen
Videos benutzten Date i nam en
Dateigröße Zuweisen – bestimmt die Dateigröße für das zu speichernde Video
Verlassen – verlässt das Programm
Vorschaumenü:
Vorschau Starten – öffnet eine Fenster und startet die Video-Vorschau
Vorschau Stoppen – stoppt die Video-Vorschau und schließt das Videofenster
Optionsmenü:
Videoformat – ändert die Auflösung der Video-Vorschau, VGA (640x480) oder QVGA
(320x240)
Bild Erfassen – nimmt eine oder mehrere Videoszenen auf
Selbstauslöser (3 Sekunden) – nimmt automatisch eine oder mehrere Videoszenen im
Abstand von 3 Sekunden auf
Fotoserie – einen oder 3 Aufnahmen pro Auslöser
Aufnahmemenü:
Aufnahme Starten – startet die Aufnahme von PC-Kam Bildern als AVI-Datei
Aufnahme Stoppen – stoppt die Aufnahme der AVI-Datei
Audio Aufnehmen – bestimmt ob Audiodaten als AVI-Datei aufgenommen werden
Hilfsmenü:
Info zu – zeigt die Softwareversion an.
Page 26

26
(2) Symbolleiste – für häufig benutzte Menüfunktionen
-- Aktive Auswahl speichern -- Alles speichern
-- Vorschau starten -- Vorschau stoppen
-- Bild erfassen -- Selbstauslöser zur Bilderfassung
(3) Thumbnail der au fgenommenen Bilder
zum Speichern aufgenommener Bilders
(4) Bildwiedergabe
zum Anzeigen des aktiven Bildes, durch Anklicken eines Bildes im
Thumbnailbereich
Anhang: Technische Angaben
Sensor CMOS-Sensor
Bildauflösung 5 M, 3 M, 2 M, VGA
Objektiv f=7.23mm, F 2.8
Interner Speicher SD RAM 8 MB
Externer Speicher SD-Karte bis 8 GB unterstützt
Blitz Auto/Erzwungen/Rote-Augen-Reduzierung/Aus
Selbstauslöser 10 S
Energiesparen 60 S
Batterie 2*AAA Batterien
Übertragungsschnittstelle USB V1.1
Arbeitstemperatur 0~40℃
Computersystem Windows 2000/XP/ Vista/ Mac OS X (10.2.6 oder höher)
Page 27

27
Entsorgungshinweise
Altbatterie- Rücknahme
Altbatterien dürfen nicht in den Hausmüll. Verbraucher sind
verpflichtet, Batterien zu einer geeigneten Sammelstelle bei
Handel oder Kommune zu bring en.
Bitte kleben Sie bei Lithiumbatt er i en die Pol e ab und acht en
bitte auf völlige Entladung der Batterie.
Altbatterien enthalten möglicherweise Schadstoffe oder
Schwermetalle, die Umwelt und Gesundheit schaden können.
Batterien werden wieder verwertet, sie enthalten wichtige
Rohstoffe wie Eisen, Zink, Mangan oder Nickel.
Die Umwelt sagt Dankeschön.
Die Mülltonne bedeutet: Batterien und Akkus dürfen nicht in den Hausmüll.
Die Zeichen unter den Mülltonnenstehen für:
Pb: Batterie enthält Blei
Cd: Batterie enthält Cadmium
Hg: Batterie enthält Quecksilber
Hinweise zum Umweltschutz
Dieses Produkt darf am Ende seiner Lebensdauer nicht über den normalen Haushaltsabfall
entsorgt werden, sondern muss an einem Sammelpunkt für das Recycling von elektrischen
und elektronischen Geräten abgegeben werden. Das Symbol auf dem Produkt, der
Gebrauchsanleitung oder der Verpackung weist darauf hin.
Die Werkstoffe sind gemäß ihrer Kennzeichnung wiederverwertbar. Mit der Wiederverwendung,
der
stofflichen Verwertung oder anderen Formen der Verwertung von Altgeräten leisten Sie einen
wichtigen
Beitrag zum Sc hutze unserer Umwelt.
Bitte erfragen Sie bei der Gemeindeverwaltung die zuständige Entsorgungsstelle.
Page 28

28
MANUEL DE L'UTILISATEUR
TABLES DES MATIERES
Introduction ..............................................................................................29
Caractéristiques clés................................................................................29
Les avantages de votre appareil photo....................................................29
Exigences du système informatique pour Windows 2000/XP..................29
Exigences du système informatique pour Windows Vista........................29
Exigences du système informatique pour Macintosh...............................29
Un coup d'œil à votre appareil photo .......................................................30
Préparation à l'utilisation de l'appareil......................................................30
Installation de la carte mémoire SD.........................................................31
Mise sous tension ....................................................................................31
Mode Appareil photo................................................................................31
Prises de vue ...........................................................................................31
Mode Vidéo..............................................................................................33
Mode Lecture ...........................................................................................33
Installation du logiciel PhoTags Express..................................................34
Tout ce qu'il vous faut pour obtenir le meilleur de vos photos..................36
Transférer des photos vers votre PC.......................................................36
Guide de l'utilisateur du logiciel PhoTags Express...................................38
Exécuter le logiciel PCCAM.....................................................................39
Annexe : Spécifications............................................................................40
Page 29

29
Introduction
Merci d'avoir acheté cet appareil photo numérique. Vous pouvez non seulement prendre des
photos numériques de bonne qualité mais également vous en servir de disque amovible. Lire
attentivement ce manuel avant utilisation.
Caractéristiques clés
¾ Résolution de l'image numérique- 5M par interpolation (2592x1944pixels 4:3), 3M
(2048x1536pixels 4:3), 2M (1920x1080pixels 16:9 ), VGA (640x480pixels 4:3)
¾ SD RAM 8MB, supporte la carte mémoire SD/MMC (non comprise) jusqu'à 8GB.
¾ LCD couleurs 4.5cm / 1,8” TFT
¾ Logiciel PhoTags Express de gestion et d'enrichissement des photos, ajout de légendes,
envoi de courriels, impression et plus encore.
Les avantages de votre appareil photo
¾ Appareil photo numérique
¾ CD d'installation du logiciel PhoTags Express
¾ Câble USB
¾ Manuel de l'utilisateur
¾ Dragonne
Exigences du système informatique pour Windows 2000/XP
Pour télécharger les photos sur votre PC, votre ordinateur doit avoir la configuration minimum
suivante :
¾ Processeur Pentium ou supérieur avec Windows 2000, XP
¾ 64 MB RAM, espace disque disponible de plus de 250Mo
¾ Interface USB disponible
¾ Ø Lecteur de CD ROM
¾ Résolution d'écran recommandée 24 bit ou plus
¾ Adaptateur d'affichage 256 couleurs ou plus
Exigences du système informatique pour Windows Vista
Pour télécharger les photos sur votre PC, votre ordinateur doit avoir la configuration minimum
suivante :
¾ Windows Vista
¾ Processeur 800MHz et mémoire système de 512 Mo
¾ Disque dur 20Go avec au moins 15Go d'espace disponible
¾ Supporte les Super graphiques VGA
¾ Interface USB disponible
¾ Lecteur de CD ROM
Exigences du système informatique pour Macintosh
¾ Power Macintosh G3 500 MHz ou plus
¾ Mac OS X version 10.2.6 ou ultérieur
¾ 128 Mo ou plus système disponible RAM (256 Mo recommandé), 150 Mo d'espace disque
disponible
¾ Ecran 800 x 600 ou résolution su périeure avec affichage de millions de couleurs
Note: ce matériel est compatible plug and play lorsqu'il est utilisé sur un Mac, cependant, le logiciel
fourni peut être utilisé uniquement sur les systèmes d 'exploitation Windows.
Page 30

30
Un coup d'œil à votre appareil photo
Préparation à l'utilisation de l'appareil
Installation des piles
Votre appareil fonctionne avec 2 piles AAA. Insérer les piles dans
l'appareil comme suit :
1. Faire glisser et ouvrir le compartiment.
2. Vérifier que les piles insérées sont correctes et respectent le
sens de la polarité.
3. Refermer le couvercle.
Lorsque “Pas d'alimentation” s'affiche sur l'écran LCD, cela indique
que le niveau des piles de votre appareil photo est bas et qu'il va
bientôt s'éteindre. Vous devez télécharger les photos vers votre PC si
l'appareil ne contient aucune carte SD.
Note: 1. si vous ne pensez pas utiliser votre appareil photo pendant une période prolongée,
veuillez retirer les piles pour éviter une fuite ou une corrosion.
2. Veuillez ne pas retirer les piles ou éteindre votre appareil sans quoi la photo test de votre
appareil photo numérique échouera s'il ne contient pas de carte mémoire SD, donc téléchargez
votre photo test vers votre PC dès que possible.
3. Ne pas mélanger piles neuves et piles usées.
4. Ne pas mélanger des piles alcalines, standard (carbone-zinc), ou rechargeables
(nickel-cadmium métal hydride).
Page 31

31
Installation de la carte mémoire SD
Votre appareil photo est équipé d'une fente qui permet d'accueillir n'importe quelle carte mémoire
compatible “SD”. L'ajout d'une carte mémoire vous permet d'augmenter la capacité de votre
appareil avant de transférer les photos vers le PC. Installer la carte mémoire SD comme suit :
1. Localiser la fente de la carte mémoire.
2. Insérer la carte mémoire dans la fente dans la bonne direction. (regardez les photos
ci-dessous)
3. Appuyer sur la carte jusqu'à ce que vous entendiez un “clic”. Le haut de la carte doit être au
même niveau que la surface de l'appareil photo. Une icône apparaîtra sur l'écran LCD
une fois l'appareil photo allumé.
4. Dès qu'une carte mémoire externe est insérée dans l'appareil, toutes les images prises
seront stockées sur cette même carte.
Note:
1. Une mémoire interne limitée est fournie pour les images test.
L'image sera supprimée
quand l'appareil sera éteint.
Transférer les images avant d'éteindre l'appareil, la carte
mémoire SD est nécessaire pour un usage normal.
2. Une carte mémoire externe est nécessaire pour un usage normal ; votre appareil prend en
charge n'importe quelle carte mémoire SD compatible.
3. "Carte insérée, changer vers la carte SD” apparaîtra sur l'écran lorsque vous insérerez la
carte, cela indique que les photos seront stockées sur la carte mémoire SD. “Carte retirée,
changer vers la mémoire interne” apparaîtra sur l'écran LCD lorsque vous enlevez la carte.
4. Si la mémoire interne contient des photos quand vous insérez la carte dans l'appareil, “copie
du fichier SDRAM vers votre carte, patientez…” apparaîtra sur l'écran.
5. Lorsque vous enlevez la carte mémoire SD, “Carte retirée, changer vers la RAM interne”
apparaîtra sur l'écran LCD, maintenant vous ne pouvez pendre qu'une seule photo test.
Mise sous tension
Appuyer sans relâcher sur la touche Power pour allumer l'appareil, l'écran LCD s'allume. Ceci
confirme que votre appareil est sous ten s ion et prêt à utiliser.
Appuyer sans relâcher sur la touche Power pendant 3 secondes pour éteindre l'appareil photo.
Mode Appareil photo
1. Appuyer sur la touche Menu.
2. Appuyer sur la touche Droite/Gauche pour choisir Mode.
3. Appuyer sur la touche Obturateur.
4. Appuyer sur la touche Droite/Gauche pour choisir SINGLE
5. Appuyer sur la touche Obturateur pour confirmer. Vous êtes maintenant en mode Appareil
photo (par défaut).
Prises de vue
Allumer l'appareil, le mode par défaut est le mode Appareil photo.
Tenir l'appareil sans bouger et fix er l' objet av ec l' écran LCD . Appuyer sur la touche Obtur ate ur pour
Page 32

32
prendre la photo.
Note
: quand la mémoire interne est pleine, l'écran LCD affiche “
Mémoire pleine! Insérer une
carte mémoire SD pour transférer et prendre plus des photos !
” Si vous tentez de pren dr e des
vidéos quand la mémoire interne est pleine, l'appareil photo émettra un signal sonore. Veuillez à
présent télécharger la photo test vers votre ordinateur dès que possible ou insérer une carte
mémoire SD pour prendre d'autres photos!
Flash
Votre appareil est équipé d'une fonction flash qui vous permet de prendre des photos lorsque les
conditions d'éclairage ne sont pas bonnes.
Appuyer sur la touche Gauche jusqu'à ce que l'icône
Erreur ! Des objets ne peuvent pas être
créés à partir des codes de champs de mise en forme.
apparaîtra sur l'écran LCD. Le flash
automatique est activé, appuyer sur la touche Gauche jusqu'à ce que l'icône apparaisse sur
l'écran LCD, la fonction réducti on y eux rouges est acti ve. Appuyer sur la touche Gauche ju squ'à ce
que l'icône apparaisse sur l'écran LCD, le flash est actif forcé. Appuyer sur la touche Gauche
jusqu'à ce que l'icône
Erreur ! Des objets ne peuvent pas être créés à partir des codes de
champs de mise en forme.
apparaîtra sur l'écran LCD, la fonction flash est désactivée.
Note:
“Alimentation basse” apparaît sur l'écran LCD si vous changez la fonction flash quand les
piles sont faibles. Veuillez remplacer les piles pour activer la fonction flash.
Fonction Zoom numérique
Vous pouvez amplifier votre sujet en utilisant le zoom numérique. Utiliser les touches T et W pour
faire un zoom jusqu'à 4X. Appuyer sur la touche T pour faire un zoom avant sur votre sujet.
Appuyer sur la touche W pour faire un zoom arrière.
Fonction anti-secousse
Votre appareil photo numérique est équipé d'une fonction qui empêche que les photos soient
floues à cause d'un tremblement ou d'une secousse de l'appareil. Grâce à cette fonction,
l'utilisation d'un trépied est inutile et les photos restent de bonne qualité. Procédez aux étapes
suivantes:
1. Appuyer sur la touche Menu.
2. Appuyer sur la touche Droite/Gauche pour choisir Anti-secousse.
3. Appuyer sur la touche Obturateur.
4. Utiliser la touche Droite/Gau che pour choisir :
“Oui” - activer la fonction anti-secousse. L'icône apparaît sur l'écran.
“Non” - quitter ou désactiver la fonction anti-secousse. L'icône apparaît sur l'écran.
5. Appuyer sur la touche Obturateur pour confirmer.
Modifier la résolution de l'image
La mémoire intégrée vous permet de prendre une photo test de 3,1 méga-pixel sans carte
mémoire SD, insérer une carte mémoire SD pour élargir la sélection des tailles de l'image.
1. Appuyer sur la touche Menu.
2. Appuyer sur la touche Droite/Gauche pour choisir l'option RESOLUTION.
3. Appuyer sur la touche Obturateur.
4. Appuyer sur la touche Droite/Gauche pour choisir l'une des résolutions suivantes :
(5M) 2592x1944 pixels
(3M) 2048x1536 pixels
(2M) 1920x1080 pixels
(VGA) 640x480 pixels
5. Appuyer encore une fois sur la touche Obturateur pour confirmer votre choix.
Note:
Les différentes résolutions d'image affecteront la qualité de la photo. Les photos en haute
résolution seront d'une meill eure q ual ité et occuper ont pl us d'es p ace de la mémoi re q ue les phot os
à faible résolution.
Page 33

33
Retardateur
Vous pouvez vous prendre en photo en utilisant cette fonction pour créer un intervalle de temps
entre le moment où vous appuyez sur l'obturateur et le moment où la photo est prise. Nous vous
conseillons d'utiliser un trépied pour mettre en œuvre le retardateur.
1. Appuyer sur la touche Menu.
2. Appuyer sur la touche Droite/Gauche pour choisir le MODE.
3. Appuyer sur la touche Obturateur.
4. Appuyer sur la touche Droite/Gauche pour choisir SELF.
5. Appuyer encore une fois sur la touche Obturateur pour confirmer. L'icône apparaît dans
l'angle gauche de l'écran LCD.
6. Appuyer sur la touche Obturateur pour prendre des photos, votre appareil émet un signal
sonore et décompte jusqu'à 10 avant de prendre la photo.
Mode Vidéo
Vous pouvez faire des vidéos dans ce mode. Avant de filmer, vous devez insérer une carte SD
pour augmenter la capacité de l'appareil.
1. Insérer une carte mémoire SD compatible.
2. Allumer l'appareil photo.
3. Appuyer sur la touche Menu.
4. Appuyer sur la touche Droite/Gauche pour choisir MODE.
5. Appuyer sur la touche Obturateur.
6. Appuyer sur la touche Droite/Gauche pour choisir AVI.
7. Appuyer encore une fois sur la touche Obturateur pour confirmer. L'icône apparaît dans
l'angle gauche de l'écran LCD.
8. Appuyer sur la touche Obturateur pour commencer à prendre des vidéos. La durée écoulée
apparaît en bas à droite de l'écran LCD et le voyant DEL clignote.
9. Appuyer sur la touche Obturateur pour arrêter et enregistrer la vidéo au format AVI.
Note
:
1. “Insérer une carte mémoire SD” apparaîtra sur l'écran quand vous appuierez sur la touche
Obturateur sans avoir inséré la carte mémoire.
2. Vous pouvez lire le fichier AVI sur votre ordinateur en utilisant Quick time ou Media Player.
Mode Lecture
Vous pouvez prévisualiser vos photos dans ce mode.
1. Allumer l'appareil photo.
2. Appuyer sur la touche Droi te p our entr er en Mode Lecture. L'icône apparaît dans l ' ang l e
gauche de l'écran LCD. Appuyer sur la touche Obturateur pour quitter le mode de veille.
Note:
“PAS DE FICHIERS” apparaît sur l'écran LCD s'il n'y a pas de photos/vidéos dans votre
appareil. Vous pouvez appuyer sur la touche Obturateur pour quitter le mode caméra.
Prévisualiser des photos
Appuyer sur la touche Droite/Gauche pour sélectionner et voir vos photos/vidéos. “JPG” apparaît
sur l'écran si vous avez choisi une photo. “AVI” apparaît sur l'écran quand vous choisissez un
fichier A VI.
Supprimer une photo et/ou une vidéo
1. En Mode Lecture, appuyer sur la touche Menu.
2. Appuyer sur la touche Droite/Gauche pour choisir Supprimer.
3. Appuyer sur la touche Obturateur.
4. Appuyer sur la touche Droite/Gauche pour choisir Supprimer une seule/Supprimer toutes.
5. Appuyer encore une fois sur la touche Obturateur pour confirmer.
Format
Cette fonction permet de supprimer tous les fichiers contenus dans la mémoire de votre appareil
Page 34

34
(mémoire interne ou carte mémoire SD, selon le cho ix du dispositif). Veuillez faire attention en
utilisant cette fonction :
1. Appuyer sur la touche Menu.
2. Appuyer sur la touche Droite/Gauche pour choisir Format.
3. Appuyer sur la touche Obturateur.
4. Appuyer encore une fois sur la touche Obturateur pour confirmer votre choix. “Format OK”
apparaît sur l'écran LCD.
Imprimer vos photos
Votre appareil photo prend en charge l'impression qui vous permet d'imprimer vos photos à
n'importe quel moment.
1. Sélectionner une photo en appuyant sur la touche Droite/Gauche.
2. Appuyer sur la touche Menu.
3. Appuyer sur la touche Droite/Gauche pour choisir Imprimante.
4. Appuyer sur la touche Obturateur, “Veuillez connecter votre DSC à l'imprimante” apparaîtra
sur l'écran LCD.
5. Maintenant, vous pouvez connecter votre appareil à n'importe quelle imprimante compatible.
Lecture de fichiers AVI
1. Sélectionner un fichier AVI sur votre carte mémoire SD en appuyant sur la touche
Droite/Gauche.
2. Appuyer sur la touche Menu.
3. Appuyer sur la touche Droite/Gauche pour choisir Lecture.
4. Appuyer sur la touche Obturateur pour démarrer la lecture.
5. Appuyer encore une fois sur la touche Obturateur pour arrêter la lecture.
Installation du logiciel PhoTags Express
NOTE: vérifier que votre appareil photo n'est pas connecté à l'ordinateur.
Insérer le CD du logiciel dans votre ordinateur. Après quelques secondes, une fenêtre principale
apparaît sur l'écran.
Vous pouvez “installer AP”, “Installer DirectX”, “Installer PCCam”, et “Quitter” dans cette fenêtre
principale d'installation.
1. Installer PhoTags Express
Cliquer sur “Installer AP” pour démarrer le processus d'installation. La fenêtre de la langue
apparaît sur l'écran et vous pouvez sélectionner la langue que vous souhaitez utiliser.
Page 35

35
Puis la fenêtre d'installateur apparaît comme suit.
Après avoir cliqué sur la touche “Installer PhoTags Express", plusieurs fenêtres
apparaissent pour vous aider à terminer l'installation. Vous êtes invité à suivre la description
et à cliquer sur les touches qui sont proposées par défaut par le logiciel.
Enregistrement en ligne
Cliquer sur la touche “Enregistrement en ligne” pour vous enregistrer. Ou vous pouvez
directement cliquer sur “Continuer” pour vous enregistrer la prochaine fois.
Après cette étape, la fenêtre principale apparaît sur l'écran.
2. Installer DirectX
Cliquer sur “Installer DirectX” sur la fenêtre
principale, DirectX s'installera sur votre
ordinateur.
3. Installer PCCam
Cliquer sur “Installer PCCam” sur la fenêtre
principale, le logiciel/pilote PCCam
software/driver s'installera sur votre ordinateur.
Cliquer sur démarrer l'installation.
Choisir votre langue.
Page 36

36
Tou t ce qu'il vous faut pour obt enir le meilleur de vos photos
1. Sélectionner des photos
Sélectionner les photos que vous voulez télécharger
depuis votre appareil photo. Et les éditer dans le
logiciel.
2. Editer des photos
Cliquer sur “Enrichir les photos”, “Ajouter des
légendes” depuis la fenêtre princi p al e pour é dit er vos
photos idéales.
3. Partager des photos
Partager vos photos via “Courriel”, “Impression”, e t
“Créer un web HTML” pour charger en ligne.
4. Atelier
Créer des “Calendriers”, des “Cartes de vœux” double face et des “Cartes postal es” sur du
papier photo standard. Vous pouvez acheter “Album” et “Video CD”. Deux projets d'atelier
supplémentaires en ligne à n'importe quel moment et créer un Album Photos et des
Diaporamas sur un CD que vous pouvez voir sur votre ordinateur et votre magnétoscope ou
votre téléviseur par votre lecteur DVD.
Comment acheter des projets "Atelier" supplémentaires
En plus des projets d'atelier Calendriers, Cartes de vœux double face et Cartes postales
gratuits, vous avez la possibilité d'achete r deux projets d'atelier supplémentaires : "Albums"
et "Video CD" en ligne, à tout moment.
1. Pour acheter le “Projet d'atelier”, cliquez simplement sur celui que vous désirez acheter
et vous serez diriger vers un site web en ligne où vous pourrez l'acheter.
2. Une fois que vous aurez acheté l e "Pr oje t d'at eli er", il ser a aut omatiq uement ac tiv é dans
le logiciel.
Transférer des photos vers votre PC
Allumer l'appareil photo, changer le mode caméra vers Lecture et connecter votre appareil sur
l'ordinateur avec le câble USB, l'écran affiche la fenêtre (Disque amovible H:)
suivante :
NOTE: vous pouvez maintenant transférer les photos vers votre ordinateur selon deux
méthodes différentes :
1. Télécharger les photos directement depuis Windows
Choisir “copier des photos vers un dossier de mon ordinateur” vers la fenêtre Disque
amovible (H:). Après avoir cliqué sur “OK”, quelq ues fenêtr es a pp araissent sur l 'écr an av ec
des instructions pas à pas. Vous êtes invité à suivre la description et à cliquer sur les touch es
qui sont mis par défaut par le système pour terminer le transfert. Ou vous pouvez :
1. Cliquer sur la touche DEMARRER dans Windows.
2. Cliquer sur l'icône ORDINATEUR sur le bureau.
3. Votre carte mémoire apparaît en tant que PERIPHERIQUE DE STOCKAGE
Page 37

37
AMOVIBLE.
4. Cliquer sur le PERIPHERIQUE DE STOCKAGE AMOVIBLE pour voir les images. Les
images sont stockées dans le sous-dossier appelé DCM100.
5. Vous pouvez à présent copier/coller les images vers n'importe quel répertoire désiré.
2. Télécharger les photos avec PhoTags Express
a. Double-cliquer sur l'icône PhoTags Express sur le bureau pour lancer
l'application.
b. Cliquer sur la touche “
Get Photos
” sur la fenêtre principale.
c. L'assistant “
Get Photos
” apparaît sur l'écran, vous pouvez sélectionner “
personnaliser
la copie
” pour télécharger des photos avec votre personnalisation.
Ou vous pouvez sélectionner l'option “Express” pour télécharger toutes les photos vers
l'ordinateur sans l'option de choix des photos. Dans ce mode, vous ne pouvez pas obtenir une
prévisualisation des photos transférées.
Personnaliser la copie
Ce mode est utilisé pour sélectionner manue llement les photos que vous dé sirez cop ier vers votre
ordinateur.
Le mode “Choix du périphérique” apparaîtra. Votre appareil photo et votre carte mémoire
apparaîtront chacun dans la liste “Périphériques actifs". Sélectionner “Personnaliser la copie”
cliquer sur “Suivant” pour continuer.
Note: à ce moment-là, vous pouvez sélectionner l'option “Express” pour copier toutes les photos
vers votre ordinateur en une seule fois sans invit.
Sélectionner les photos, cliquer sur “Suivant” pour continuer.
Ajouter des légendes actives à la photo. Cette fonction vous permet d'ajouter une date, des
mots-clés et des catégories. Cliquer sur “Suivant” pour continuer.
Page 38
38
Choisir l'emplacement où vous désire z placer les photos. Cliquer sur “Terminer” pour copier les
photos vers l'emplacement sélectionné.
Note:
Toutes les photos importées apparaîtront sur la fenêtre principale “Sélectionner des photos”.
Maintenant, vous pouvez éditer vos photos selon vos idées, puis les télécharger vers votre
ordinateur. Pour savoir comment éditer les photos, consulter le guide Démarrage rapide dans
PhoTags Express.
Guide de l'utilisateur du logiciel PhoTags Express
Vous pouvez éditer, imprimer et partager des photos avec PhoTags Express. Suivre les étapes
ci-après pour savoir comment utiliser le logiciel Ph oTags Express :
1. Lancer PhoTags Express.
2. Cliquer sur la touche “tour” sur la fenêtre principale pour savoir comment utiliser le logiciel
PhoTags Express en détails.
Attention:
Si PhoTags Express ne peut pas lancer automatiquement DirectX, vous pouvez installer
manuellement DirectX dans le CD avant d'utiliser l'appareil photo . Si la v ersion de DirectX inst allé e
dans le système d'exploitati on est in féri eur e à 8.1, le fichi er AVI ne pourra pas être lu.
Cliquer ici
Page 39

39
Exécuter le logiciel PCCAM
1. Une fois le logiciel/pilote PC CAM installé, appuyer sur la touche Obturateur et brancher le
câble USB, Windows affiche que le périphérique “App arei l p hot o n u mér i q ue” est installé dans
votre système.
2. Double-cliquer sur l'icône PC Camera sur le bureau Windows.
3. Le logiciel PC Camera s'affiche comme suit.
4. La fenêtre principale contient 4 sections : (1) menu, (2) barre d'outils, (3) vignette de l'image
capturée, (4) lecture de l'image
(1) Menu – Fichier, Prévisualiser, Option, Capturer, menu Aide
Menu Fichier:
Enregistrer l'élément actif – enregistrer l'image sélectionner vers le fichier.
Enregistrer tous les éléments – enregistrer toutes les images capturées vers les
fichiers
Régler le fichier capture – sélectionner le nom d'un fichier qui est utilisé pour
enregistrer la vidéo capturée
Affecter l'espace fichier – préserver un espace de disque qui est utilisé pour
enregistrer la vidéo capturée
Quitter – quitter ce programme
Menu Prévisualiser:
Démarrer prévisualisation – ouvrir une fenêtre et démarrer la prévisualisation de la
vidéo
Arrêter prévisualisation - arrêter la prévisualisation de la vidéo, fermer la fenêtre de
la vidéo
Menu Option:
Format Vidéo – changer la résolution de la prévisualisation de la vidéo, VGA
(640x480) ou QVGA (320x240)
Trame de la capture – instantané d'une ou plusieurs trames vidéos de l'image
Retardateur (3 secondes) – instantané d'une ou plusieurs trames vidéos
automatiquement après 3 secondes
Rafale – sélectionner une ou 3 prises pour chaque instantané
Menu Capture:
Démarrer la capture – démarrer la capture des trames pccam vers le fichier AVI
Arrêter la capture – arrêter la capture du fichier AVI
Capture Audio – sélectionner ou non la capture des données audio dans le fichier
AVI
Page 40

40
Menu Aide:
A propos de -- afficher la version du logiciel.
(2) Barre d'outils – pour certaines opérations de menu usuelles
-- Enregistrer l'élément actif -- Enregistrer tous les éléments
-- Démarrer la prévisualisation -- Arrêter la prévisualisation
-- Capturer la trame -- Retardateur de capture de trames
(3) vignette des images capturées
utilisé pour stocker les images capturées
(4) lecture de l'image
utilisé pour afficher l'image active en cliquant sur une image dans la section des
vignettes
Annexe : Spécifications
Capteur Capteur CMOS
Résolution de l'image 5M, 3M, 2M, VGA
Objectif f=7,23mm, F2.8
Mémoire interne SD RAM 8Mo
Mémoire externe Supporte la carte SD jusqu'à 8Go
Flash Auto/force on/réduction yeux rouges/off
Retardateur 10s
Economie d'énergie 60S
Piles 2 piles AAA
Interface de transmission USB V1.1
Température de fonctionnement
0~40℃
Système d'exploitation Windows 2000/XP/ Vista/ Mac OS X (10.2.6 ou supérieur)
Page 41

41
MANUAL DE INSTRUCCIÓN
Índice
Introducción ..............................................................................................42
Características .........................................................................................42
Su cámara incluye....................................................................................42
Requisitos del Sistema para Windows 2000/XP......................................42
Requisitos del Sistema para Windows Vista............................................42
Requisitos del Sistema para Macintosh...................................................42
Mirada Rápida en Su Cámara..................................................................43
Preparar a Usar Su Cámara ....................................................................43
Instalar Tarjeta de Memoria SD................................................................44
Iniciar Su Cámara ....................................................................................44
Modo Cámara ..........................................................................................44
Tomar fotos ..............................................................................................44
Modo Vídeo..............................................................................................46
Modo Reproducción.................................................................................46
Instalar PhoTags Express Software.........................................................47
Todo lo que necesita para aprovechar al máximo de sus fotos ...............49
Transferir fotos a su PC ...........................................................................49
Manual de PhoTags Express Software ....................................................51
Ejecutar el PCCAM software ....................................................................52
Anexo : Especificaciones.........................................................................53
Page 42

42
Introducción
Gracias por comprar esta cámara digital. No solamente puede tomar fotos digitales de buena
calidad, también puede usarla como un disco removible. Para más calidad y configuración de
funciones, lea este manual con atención ant e s de usar.
Características
¾ Resolución de Imagen Digital - 5M por la interpolación (2592x1944pixeles 4:3), 3M
(2048x1536pixeles 4:3), 2M (1920x1080pixeles 16:9 ), VGA (640x480pixeles 4:3)
¾ SD RAM 8MB, soporta tarjeta de memoria SD/MMC (no incluída) hasta 8GB.
¾ LCD TFT Color 4.5cm / 1.8”
¾ PhoTags Express software para manejar y mejorar sus fotos, añadir subtítulos, enviar Email,
imprimir y mucho más.
Su cámara incluye
¾ Cámara Digital
¾ CD de instalación PhoTags Express software
¾ Cable USB
¾ Manual de usuario
¾ Cinta
Requisitos del Sistema para Windows 2000/XP
Para bajar las fotos a su PC, necesita la sigte. configuración mínima:
¾ Procesador Pentium o superior con Windows 2000, XP
¾ 64 MB RAM, más de 250MB de espacio del disco libre
¾ Interfaz USB disponible
¾ Lector CD-ROM
¾ 24 bit de resolución de pantalla recomendada, o superior
¾ Color 256 o adaptador de mues tr a superi or
Requisitos del Sistema para Windows Vista
Para bajar las fotos a su PC, necesita la sigte. configuración mínima:
¾ Windows Vista
¾ Procesador 800MHz y 512 MB de memoria de sistema
¾ Disco duro 20GB con mínimo de 15GB de espacio disponible
¾ Soporte para las gráficas Super VGA
¾ Interfaz USB disponible
¾ Lector CD-ROM
Requisitos del Sistema para Macintosh
¾ Power Macintosh G3 500 MHz o superior
¾ Mac OS X versión 10.2.6 o más reciente
¾ 128 MB o más RAM de sistema disponible (256 MB recomendado), 150 MB de espacio del
disco libre
¾ Monitor de resolución 800 x 600 o más mostrando millones de colores
Nota: Este hardware es plug and play compatible al ser usado en una Mac, sin embargo, el
software incluído sólo se usa en sistemas operativos W indows.
Page 43

43
Mirada Rápida en Su Cámara
Preparar a Usar Su Cámara
Instalación de Pila
Se requiere 2 pilas AAA para su cámara. Inserte la pila en la
cámara de esta manera:
1. Deslice y abre el compartimento de pila.
2. Asegúre de inserter la pila correcta con la polaridad correcta
hacia arriba.
3. Cierre la puerta de pila.
Cuando aparece “No Power” (Sin Energía) en el LCD, indica que
su cámara tiene el nivel de pila insuficiente y se apagará. Necesita
bajar sus fotos al PC si no hay tarjeta SD insertada.
Nota: 1. si deja de usar la cámara por un período prolongado, quite las pilas para evitar pérdida y
corrosión.
2. No quite las pilas o apague su cámara porque sí, la foto de test en su Cámara Digital se
perderá sin la tarjeta de memoria SD, baje sus foto de test al PC lo antes posible.
3. No mezcle pilas viejas y nuevas.
4. No mezcle pilas alcalinas, estándares (carbón-zinc), o recargables (hidrido metálico
de níquel-cadmio).
Page 44

44
Instalar Tarjeta de Memoria SD
Hay una ranura e n s u cámar a q ue l e per mite i nserter cual quier t arj et a d e me moria com pati bl e “SD” .
Añadir una tarjet a de memor ia le per mi tirá a umentar la capacidad de la cámara ant es de tener que
transferor las fotos al PC. Instale la t arj eta de memoria SD de esta manera:
1. Ubique la ranura de Tarjeta de Memoria.
2. Inserte la tarjeta de memoria en la ranura con la dirección correcta. (fijese en la foto abajo)
3. Empuje la tarjeta hasta sentir un “clic” en su posición. El arriba de la tarjeta debe seguir la
superficie de la cámara. El ícono aparecerá en la pantalla LCD después del encendido.
4. Cuando se inserta una tarjeta de memoria externa, todas las imágenes tomadas se
almacenarán en ella.
Nota:
1. La memoria interna limitada es para las imágenes de test. La imagen se borrará cuando la
cámara se apaga. Baje las imágenes antes del apagado. Se requiere la tarjeta SD para el
uso normal.
2. Se requiere una tarjeta de memoria externa para el uso normal; su cámara soporta cualquier
tarjeta de memor i a SD .
3. Aparecerá “Card inserted, change to SD card” (tarjeta insertada, cambiar a tarjeta SD) en la
pantalla con la tarjeta insertada que indica que las fotos serán almacenadas en la tarjeta de
memoria SD. A la inverse, aparecerá “Card removed, change to internal memory” (tarjeta
removida, cambiar a memoria interna) en la pantalla LCD cuando quita la tarjeta.
4. Si hay fotos en la memoria interna cuando inserta la tarjeta en la cámara, aparecerá “copy
SDRAM file to your card, please wait…” (copiar archivo SDRAM a su tarjeta, aguarde…) en
la pantalla.
5. Cuando quita la tarjeta de memoria SD, aparecerá “Card removed, change to Internal RAM”
(tarjeta rem ov i da, cam bi ar al R AM i nterno) e n l a p antalla LCD, ahora puede tom ar 1 sola foto
de test.
Iniciar Su Cámara
Oprima y sostenga el Interruptor al encender su cámara, se iluminará la pantalla LCD,
confirmando que su cámara está encendida y lista para usar.
Oprima y sostenga el Interruptor por unos 3 segundos para apagar su cámara.
Modo Cámara
1. Oprima el botón Menú.
2. Oprima el botón Derecha/Izquierda para seleccionar Modo.
3. Oprima el Obturador.
4. Oprima el botón Derecha/Izquierda para seleccionar SINGLE
5. Oprim a el Obturador para confirmar. Ahora está en el Modo Cámara (predefinido).
Tomar fotos
Encienda su cámara, el modo predefinido es Modo Cámara.
Sostenga la c ámara f irmemen te y comp onga su objet o con la pantalla. Oprim a el Obtu rador, y en
un momento, la foto está tomada.
Page 45

45
Nota:
Cuando la memoria interna está llena , la pantalla LCD mostrará “
Memory Full! Insert a SD
Memory Card to Transfer and Take More Photos!
” (¡memoria llena! ¡Inserte una tarjeta de
memoria SD y tome m ás fotos!) si intenta de tomar videos cuando la memor ia int erna es tá llena, l a
cámara sonará conti nu amente . Ahora, baje la foto d e test al PC c uan to ant es, o ¡ inserte u na t arjeta
de memoria SD para tomar más fotos!
Flash
Su cámara tiene una función flash que le permite tomar fotos cuando la condición de luz no es
buena.
Oprima el botón Izquierda, hasta que el ícono aparezca en el LCD, el auto flash encendido,
oprima el botón Izq uier da hasta que el ícono aparezca en el LCD, l a funci ón r ed ucción de ojo
rojo encendida. Oprima el botón Izquierda hasta ver el ícono en la pantalla LCD y el flash está
obligado a encender. Oprima el botón Izquierda hasta que el ícono aparezca en el LCD,
significa que la función flash está apagada.
Nota:
“Low Power” (Energía Baja) aparecerá en el LCD, si usa la función flash cuando la pila está
con energía insuficiente. Instale pilas nuevas para la función flash.
Función Zoom Digital
Puede ampliar el sujeto con el zoom digital. Use los botones T y W para ajustar el zoom hasta 4X.
Oprima el botón T para acercar en el sujeto. Empuje el botón W para alejar.
Función Anti-sacudido
Su cámara digital tiene una función que previene que las fotos salgan borrosas como resultado de
sacudidos al tomar la foto. Gracias a esta fun ci ón, no necesita usar un trípode para tomar fotos de
buena calidad. Para configurar:
1. Oprima el botón Menú.
2. Oprima el botón Derecha/Izquierda para seleccionar Anti-sacudido.
3. Oprima el Obturador.
4. Use el botón Derecha/Izquierda para seleccionar:
“Yes” – (Sí) para activar y encender el anti-sacudido. Aparecerá el ícono en la pantalla.
“No” – (No) para salir o apagar el anti-sacudido. Aparecerá el ícono en la pantalla.
5. Oprima el Obturador para confirmar.
Cambiar Resolución de Imagen
La memoria incorporada le permite tomar una foto de test de 3.1 Mega-Pixel sin la tarjeta de
memoria SD, inserte una tarjeta de memoria SD para obtener más selecciones de tamaño de
imagen.
1. Oprima el botón Menú.
2. Oprima el botón Derecha/Izquierda para seleccionar la opción RESOLUTION (resolución).
3. Oprima el Obturador.
4. Oprima el botón Derecha/Izquierda para seleccionar las sigtes resoluciones :
(5M) 2592x1944 pixeles
(3M) 2048x1536 pixeles
(2M) 1920x1080 pixeles
(VGA) 640x480 pixeles
5. Oprima el Obturador otra vez para confirmar su sele cción.
Nota:
Diferentes resoluciones de imagen afectarán la calidad de foto. Fotos de resolución alta son de
mejor calidad de foto y por lo tanto ocuparán más capacidad de memoria de cámara que las fotos
de resolución baja.
Auto-cronómetro
Puede incluir a Ud. mismo en una foto con usar esta característica para demorar el tiempo entre
oprimir el obturador y la toma real de la foto. Se le recomienda usar un trípode cuando usa el
Page 46

46
auto-cronómetro.
1. Oprima el botón Menú.
2. Oprima el botón Derecha/Izquierda para seleccionar MODE.
3. Oprima el Obturador
4. Oprima el botón Derecha/Izquierda para seleccionar SELF.
5. Oprima el Obturador otra v ez par a c onfirm ar. Aparecerá el íc ono en la esquina izquierda
del LCD.
6. Oprima el Obturador para tomar fotos, su cámara emitirá pitos y contará 10 segundos hasta
tomar la foto.
Modo Vídeo
Puede filmar películas en este modo. Antes de filmar, debe inserter una tarjeta SD para ampliar la
capacidad de cámara.
1. Inserte una tarjeta de memoria SD compatible.
2. Encienda su cámara.
3. Oprima el botón Menú.
4. Oprima el botón Derecha/Izquierda para seleccionar MODE.
5. Oprima el Obturador.
6. Oprima el botón Derecha/Izquierda para seleccionar AVI.
7. Oprima el Obturador otra vez par a confir mar. Aparecerá el ícono en la esquina izquierda
del LCD.
8. Oprima el Obturador para empezar a filmar. El tiempo elapsado se mostrará en el fondo
derecho del LCD y el indicador LED seguirá titilando.
9. Oprima el Obturador para detener y guardarlo en archivo AVI.
Nota:
1. “Insert a SD memory Card” (Inserte una Tarjeta de memoria SD) aparecerá en la pantalla
cuando oprima el obturador si no hay tarjeta de memoria SD insertada.
2. Puede reproducer el archive AVI en su PC con Quick time o Media Player.
Modo Reproducción
Puede previsualizar las fotos en este modo.
1. Encienda su cámara.
2. Oprima el botón Derecha para ingresar al Modo Reproducción. Aparecerá un ícono en
la esquina izquierda del LCD. Oprima el Obturador para salir y entrar en el modo espera.
Nota:
“NO FILE” (Sin Archivo) aparecerá en el LCD cuando no hay foto/vídeos en su cámara.
Puede oprimir el Obturador para salir del Modo Cámara.
Previsualizar fotos
Oprima el botón Derecha/Izquierda para seleccionar y visualizar sus fotos/vídeos. “JPG”
aparecerá en el LCD si ha selecci onad o una foto. “AVI” aparecerá en el LC D cuand o sel ecci ona un
archivo A VI.
Suprimir fotos/vídeos
1. En el Modo Reproducción, Oprima el botón Menú.
2. Oprima el botón Derecha/Izquierda para seleccionar Suprimir.
3. Oprima el Obturador.
4. Oprima el botón Derecha/Izquierda para seleccionar Suprimir uno/Suprimir todo.
5. Oprima el Obturador otra vez para confirmar.
Formateo
Esta función suprimirá todos los archivos en la memoria de cámara (memoria interna o tarjeta de
memoria SD, depende de la selección de dispositivo), preste atención al usar esta función:
1. Oprima el botón Menú.
2. Oprima el botón Derecha/Izquierda para seleccionar Formateo.
Page 47

47
3. Oprima el Obturador.
4. Oprima el Obturador otra vez para confirmar su selección, “Format OK” (Formateo OK)
aparecerá en el LCD.
Imprimir sus fotos
Su cámara soporta la función imprimir que le permite imprimir fotos en cualquier momento.
1. Seleccione una foto que desea imprimir con oprimir el botón Derecha/Izquierda.
2. Oprima el botón Menú.
3. Oprima el botón Derecha/Izquierda para seleccionar Impresora.
4. Oprima el Obturador, “Please connect your DSC to printer” (Conecte su DSC a impresora)
aparecerá en el LCD.
5. Ahora puede conectar su cámara a cualquier impresora compatible para imprimir.
Reproducir archivo AVI
1. Seleccione un archivo AVI en su tarjeta de memoria SD con oprimir el botón
Derecha/Izquierda.
2. Oprima el botón Menú.
3. Oprima el botón Derecha/Izquierda para seleccionar Reproducir.
4. Oprim a el Obturador para empezar a reproducir.
5. Oprima el Obturador otra vez para detener la reproducción.
Instalar PhoTags Express Software
NOTA: Asegure de que su cámara NO está conectada al PC.
Inserte el software CD al PC. Después de unos segundos, aparecerá una ventana principal de
instalación en la pantalla.
Puede “install AP” (Instalar AP), “Install DirectX” (Instalar DirectX), “Install PC Cam” (Instalar PC
Cam), y “Exit” (Salir) en esta ventana principal de instalación.
1. Instalar PhoTags Express
Haga clic en “Install AP” (Instalar AP) para empezar la instalación. La ventana de idiomas
aparecerá en la pantalla, y puede elegir el idioma que quiere usar.
Page 48

48
Después la ventana de instalador aparecerá de esta manera.
Después de hacer clic en el botón “Install PhoTags Express” (Instalar PhoTags Express),
aparecerán algunas ventanas que le ayudarán a terminar la instalación. Sólo se le requiere
seguir la descripción y hacer clic en los botones predefinidos por el software.
Registrar online
Haga clic en el botón “Register online” (Registrar online) para obtener un registro. O puede
hacer clic directamente en “Continue” (Continuar) para registrar la próxima vez.
Después de este paso, la ventana principal aparecerá en la pantalla.
2. Instalar DirectX
Haga clic en “Install DirectX” en la ventana
principal, se instalará el DirectX en su PC.
3. Instalar PCCam
Haga clic en “Install PCCam” en la ventana
principal, se instalará el PCCam
software/driver en su PC.
Haga clic para empezar a
instalar
Elija su idioma
Page 49

49
Todo lo que necesita para aprovechar al máximo de sus fotos
1. Seleccionar fotos
Seleccione las fotos que baja de su cámara. Y
editelas en el software.
2. Editar fotos
Haga clic en “Enhance photos” (reforzar fotos),
“Add captions” (añadir subtítulos) de la ventana
principal para editar sus fotos ideales.
3. Compartir fotos
Comparta sus fotos vía “E-mail”, “Printing” (Imprimir),
y “Create HTML web” (Crear HTML web) para
subirlas online.
4. Taller
Crea “Calendars” (calendarios), “Greeting cards” (Tarjeta de saludos) de ambos lados y
“Postcards” (Postales) en el papel de foto estándar. Puede comprar “Album” y “Video CD”.
Dos poryectos de tal ler adici onales o nli ne en cualq uier mo ment o y crear Pho to Album (Album
de Fotos) y diapositivas en CD que se lo puede visualizar en su PC y VCD para visualizar en
su TV con el reproductor DVD.
Cómo comprar proyectos de “Workshop” (taller) adicionales
Además de proyectos de Taller como Calenadrios, Tarjetas de saludo de ambos lados y
Postales gratuitos, puede comprar dos proyectos de Workshop adicionales: "Albums"
(Albumes) y "Video CD" online, en cualquier momento.
1. Para comprar el “Workshop Project” (Proyecto de Taller), simplemente haga clic en el
deseado y se le referirá a un sitio web donde puede comprarlo(s).
2. Una vez comprados los “Workshop projects” (Proyectos de Taller), se activarán
automáticamente en el softwar e.
Transferir fotos a su PC
Encienda su cámara, cambie el Modo Cámara a Playback (reproducer) y conecte su cámara al
PC correctamente con el cable USB, en la pantalla aparecerá una ventana (Removable Disk H:)
(Disco H Removible) como la del abajo:
NOTA: Ahora puede bajar las fotos al PC con dos métodos:
1. Bajar fotos directamente de Windows
Elija “copy pictures to a folder on my computer” (copiar fotos a una carpeta en mi PC) en
la ventana Removable Disk (H:) (Disco removible ( H:)). Después de hacer el clic en “OK”
(Aceptar), aparecerán algunas ventanas en la pantalla paso por paso, sólo se le requiere
seguir la descripción y hacer clic en los botones predefinidos por el sistema para terminar la
transferencia. O puede:
1. Hacer clic en el botón INICIO en Windows.
2. Hacer clic en el ícono MI PC en el escritorio.
Page 50

50
3. Su tarjeta de memoria aparecerá como un DISPOSITIVO DE ALMACENAJE
REMOVIBLE.
4. Hacer clic en DISPOSITIVO DE ALMACENAJE REMOVIBLE para visualizar las
imágenes. Las imágenes están almacenadas en la subcarpeta llamada DCM100.
5. Ahora puede copiar y pegar las imágenes en cualquier directorio que elige.
2. Bajar fotos con PhoTags Express
a. Doble clic en el ícono PhoTags Express en el escritorio para lanzar la aplicación.
b. Haga clic en el botón “
Get Photos
” (Obtener fotos) en la ventana principal.
c. El modo mago “
Get Photos
” (Obtener Fotos) aparecerá en la pantalla, puede
seleccionar “
custom copy
” (personalizar copia) para bajar las fotos con su indicación
personalizada.
O puede seleccionar la opción “Express” (Expreso) para baja r todas las foto s al PC sin la op ción
de seleccionar las fotos. En este modo no verá una previa de las fotos transferidas.
Custom copy (Personalizar copia)
Se usa este modo para manualmente seleccionar las fotos que desea copiar al PC.
El modo “Device selection” (Selección de dispositivo) aparecerá. Aparecerán su cámara y la
tarjeta de memoria en la lista “Active Devices ” (Disp ositivos Acti vos). Se leccione “Custom c opy”
(Personalizar copia) y haga clic en “Next” (Próximo) para continuar.
Nota: En este momento, puede seleccionar la opción “Express” (Expreso) para copiar todas las
fotos al PC juntas sin recordatorio.
Seleccione sus fotos y haga clic en “Next” (Próximo) para continua r.
Añade subtítulos activos en la foto. Con esta característica puede añadir una fecha, palabras
Page 51

51
claves y categorías. Haga clic en “Next” (Próximo) para cont inuar.
Elija una posición donde desea colocar las fotos. Haga clic en “Finish” (Terminar) pa ra copiar las
fotos al lugar seleccionado.
Nota:
Todas las fotos importadas aparecerán en la ventana principal “Select Photos” (Seleccionar
Fotos). Ah or a pu ede editar las fotos con sus ideas, y después bajar las al PC . Para editar las fotos,
refiera a la guía Rápida en el PhoTags Express.
Manual de PhoTags Express Software
Puede editar, imprimir, compartir fotos con PhoTags Express. Puede operar PhoTags Express con
el sigte. paso:
1. Lanzar el PhoTags Express.
2. Haga clic en el botón “tour” en la ventana principal para ver cómo usar PhoTags Express en
detalle.
Atención:
Si PhoTags Express no puede lanzar DirectX automáticamente, puede instalar DirectX
manualmente en el CD antes de usar la cámara, de lo contrario, si la edición de DirectX en
Windows es inferior de 8.1, entonces no se puede reproducer el archivo AVI.
Pulse aquí
Page 52

52
Ejecutar el PCCAM software
1. Después de instalar el software/driver PC CAM, oprima el obturador y conecte el cable USB,
Windows mostrará un dispositivo “Cámara Digital” instalada en su sistema.
2. Doble clic en el ícono PC Camera en el escritorio de Windows.
3. Se muestra el software PC Camera así,
4. Hay 4 secciones en la ventana principal, (1) menú, (2) barra de herramientas, (3) miniatura
de la imagen capturada, (4) reproducción de imagen
(1) Menú – incluye Archivo, Previsualizar, Opción, Capturar, Ayuda
Menú Archivo:
Guardar Ítem Activo – guarda la imagen seleccionada en archivo.
Guardar Todos Ítems – guarda todas las imágenes capturadas a los archivos.
Configurar Capturar Archivo – seleccione un nombre de archivo que se usa para
guardar el vídeo capturado.
Ubicar Espacio de Archivo – preservar un espacio de disco que se usa para guardar
el vídeo capturado.
Salir – deja este programa.
Menú Previsualizar:
Empezar Previsualizar – abre una ventana y empieza previsualizar el vídeo.
Parar Previsualizar – detiene la previsualización de vídeo, cierra la ventana de
vídeo.
Menú Opción:
Formato de Vídeo – cambia la resolución de previsualización de vídeo, VGA
(640x480) o QVGA (320x240)
Capturar Cuadro – toma uno o más cuadros de vídeo a la imagen.
Auto-cronómetro (3 segundos) – toma uno o más cuadros de vídeo
automáticamente después de 3 segundos.
Tomas contínuas – seleccione una o 3 tomas para cada toma.
Menú Capturar:
Empezar Capturar – empieza capturar cuadros de PC Cam al archivo AVI.
Parar Capturar – detiene capturar archivo AVI.
Capturar Audio – seleccione capturar o no datos de audio en el archivo AVI.
Menú Ay uda:
Acerca de – muestra la versión del software.
Page 53

53
(2) Barra de herramient as – p ar a al g unas ope r aci ones de me nú c omúnes.
-- Guardar Ítem Activo -- Guardar Todos Ítems
-- Empezar Previsualizar -- Parar Previsualizar
-- Capturar Cuadro -- Auto-cronómetro para capturar
cuadros
(3) miniatura de las imágenes capturadas
usado para almacenar las imágenes capturadas
(4) reproducción de imagen
Usado para mostrar la imagen activa con hacer clic en una imagen en la sección de
miniatura
Anexo : Especificaciones
Sensor Sensor CMOS
Resolución de imagen 5M, 3M, 2M, VG A
Lente f=7.23mm, F2.8
Memoria interna SD RAM 8MB
Memoria externa Soporta tarje t a SD hasta 8GB
Flash Auto/obligado/reducción de ojo rojo/apagado
Auto-cronómetro 10S
Ahorro de energía 60S
Pila 2 pilas *AAA
Interfaz de Transmisión USB V1.1
Temperatura de operación 0~40℃
Sistema operativo Window 2000/XP/ Vista/ Mac OS X (10.2.6 o superior)
Page 54

54
MANUAL DE INSTRUÇÕES
Tabela de Conteúdo
Introdução ................................................................................................55
Características Princip
ais.........................................................................55
O que a câmera incluido ..........................................................................55
Requisitos de Sistema Computador para Windows 2000/XP..................55
Requisitos de Sistema de Computador para Windows Vista...................55
Requisitos de sistema de Computador para Macintosh...........................55
Um rápido olhar para a Câmera...............................................................56
Preparar a Câmera para uso....................................................................56
Instalar o Cartão de Memória SD.............................................................57
Iniciar a Câmera.......................................................................................57
Câmera Modo ..........................................................................................57
Tirar fotos.................................................................................................57
Video Modo..............................................................................................59
Modo de Reprodução...............................................................................59
Instalar PhoTags Express Sof
tware .........................................................60
Tudo que você precisa obter maioria fotos..............................................62
Transferindo fotos para o PC...................................................................62
PhoTags Express software owner manual...............................................64
Execute o software PCCAM.....................................................................65
Anexo: Especificações.............................................................................66
Page 55

55
Introdução
Obrigado por ter adquirido esta câmara digital. Você não só pode ter boa qualidade de
fotos digitais, mas também pode usá-lo como um disco removível. Para obter mais
qualidade e definição de funções, por favor leia atentamente este manual antes de usar.
Características Principais
¾ Resolução de Imagem Digital-5M pela interpolação (2592x1944pixels 4:3), 3M
(2048x1536pixels 4:3), 2M (1920x1080pixels(16:9), VGA (640x480pixels 4:3)
¾ SD RAM 8MB , suporte para cartão SD / MMC de memória (não incluído) de até 8GB.
¾ 4.5cm / 1.8” TFT LCD colorido
¾ PhoTags Express software para gerenciar e melhorar suas fotos, adicionar legendas,
envie um e-mail, impressão e muito de mais.
O que a câmera incluido
¾ Câmera Digital
¾ instalação de CD do PhoTags Express software
¾ Cabo USB
¾ Manual do Usuário
¾ Correia
Requisitos de Sistema Computador para Windows 2000/XP
Para ser capaz de fazer download de fotos para o seu PC, você terá a seguinte
configuração mínima:
¾ Processo de Pentium ou superior que Windows 2000, XP
¾ 64 MB RAM, mais de 250MB de espaço livre em disco
¾ Disponível interface USB
¾ Drive de CD-ROM
¾ Resolução de tela recomendada 24 bits ou superior
¾ 256 cores ou adaptador superior a display
Requisitos de Sistema de Com putador para Windows Vista
Para ser capaz de fazer download de fotos para o seu PC, você terá a seguinte
configuração mínima:
¾ Windows Vista
¾ Processador de 800MHz e 512 MB memória do sistema
¾ 20GB driver de disco rígido com pelo menos 15GB de espaço disponível
¾ Suporte para gráficos Super VGA
¾ Interface USB disponível
¾ CD-ROM drive
Requisitos de sistema de Computador para Macintosh
¾ Power Macintosh G3 500 MHz ou superior
¾ Mac OS X versão 10.2.6 ou posterior
¾ 128 MB RAM ou mais disponível sistema de RAM (256 MB recomendado), 150 MB de
espaço livre em disco
¾ 800 x 600 ou resolução superior monitor exibir milhões de cores
Nota: Este equipamento é plug and play compatível, quando usado em um Mac, no
entanto, o software incluído pode ser utilizado em sistemas operacionais Windows
somente.
Page 56

56
Um rápido olhar para a Câmera
Preparar a Câmera para uso
Instalação da Bateria
Sua câmera requer duas pilhas AAA. Insira a bateria na câmara,
como abaixo descrito:
1. Slide e abrir o compartimento da bateria.
2. Por favor, certifique-se que a bateria correta é inserida com
a polaridade voltada para cima.
3. Feche a porta da bateria.
Quando o "nenhum power" é exibida na tela LCD, indica a
bateria de sua câmara que é insuficiente e será desligado, você
precisará baixar fotos para o PC, se não houver um cartão SD
inserido dentro
Nota: 1. Se você não pretende usar a câmera por um longo
período, retire as pilhas para evitar vazamento e corrosão.
2. Por favor, não remova a bater ia fora ou desli gar a câmera à von t ade, caso con trári o o
teste foto em sua câmera digital serão perdidas se sem cartão de memória SD, por isso, baixar
sua foto de ensaio a PC mais rapidamente possível.
3. Não misture pilhas velhas e novas.
4. Não misture pilhas de alcalinas com pilhas normais (carbono-zinco) ou
recarregáveis (níquel-cádmio, hidreto de metal).
Page 57
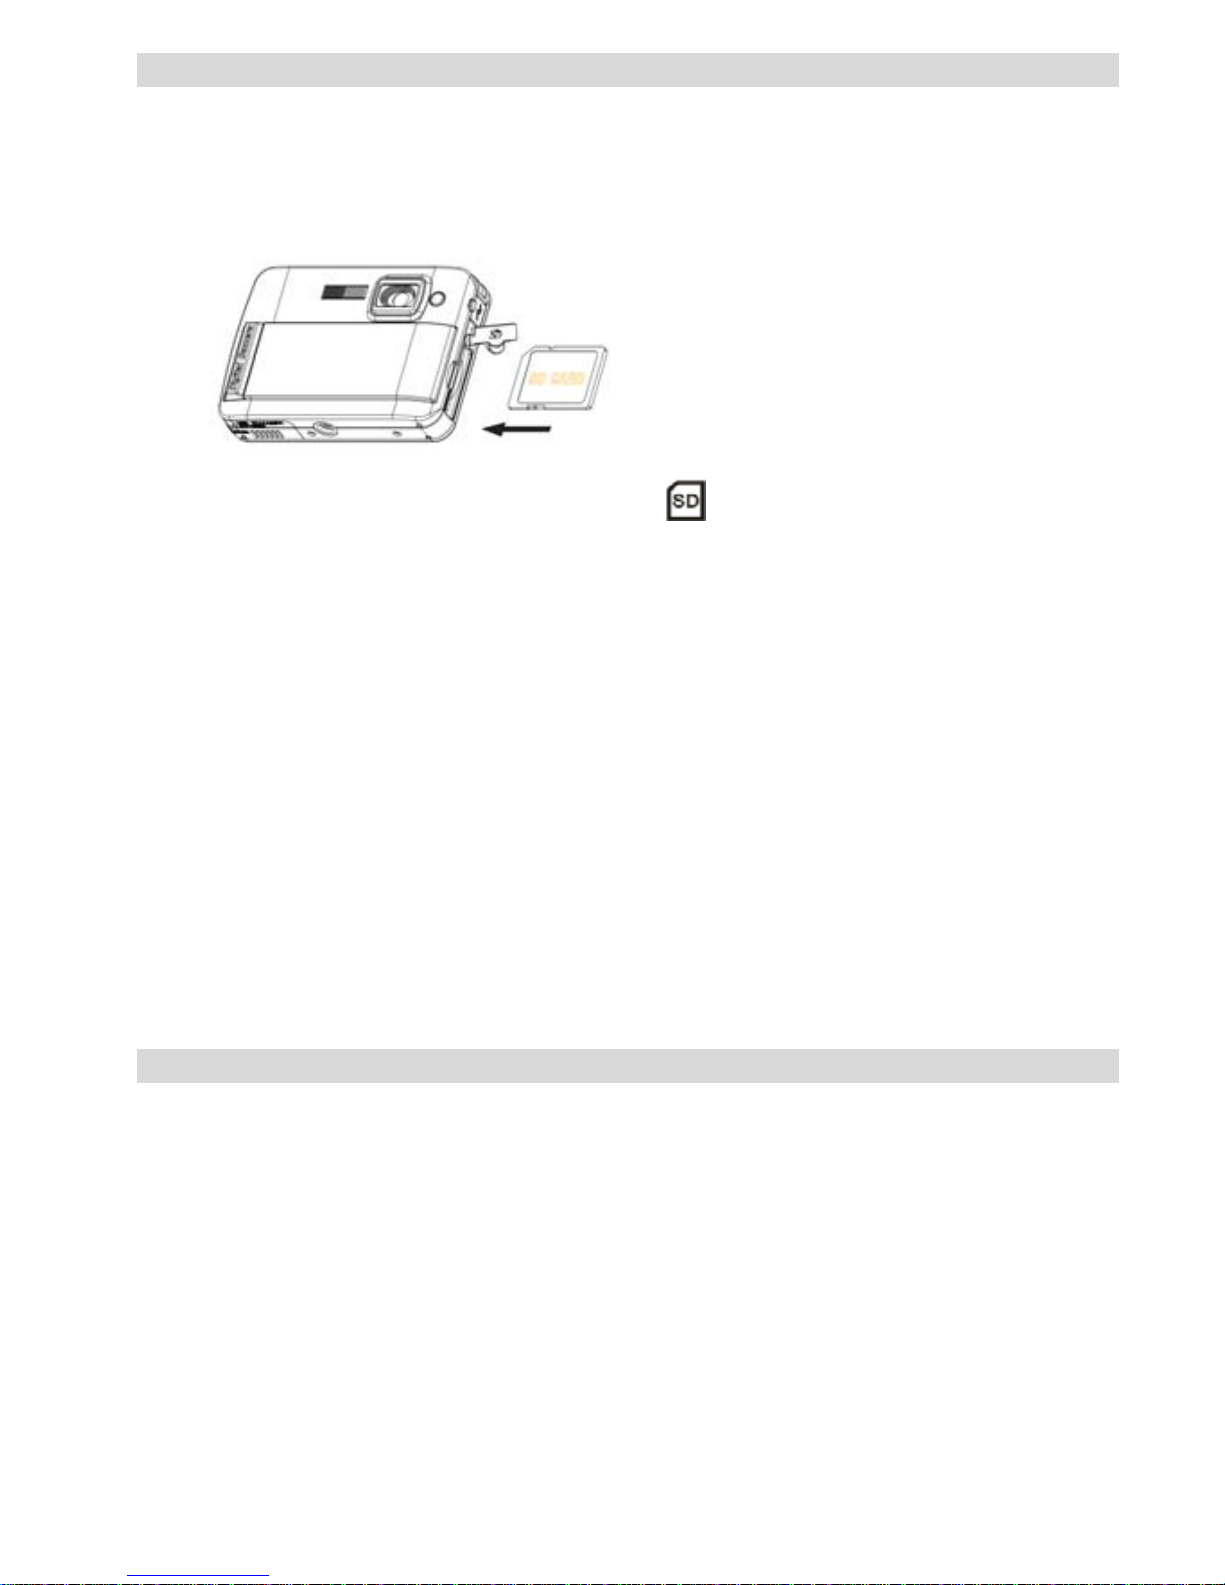
57
Instalar o Cartão de Memória SD
Sua câmera tem um slot para cartão de memória que permite inserir qualquer "SD" cartão de
memória compatível. Adicionando um cartão de memória permite-lhe aumentar a capacidade de
sua câmera antes de você ter de transferir fotos para o PC. Instalando o cartão de memória SD
como abaixo:
1. Localize o slot de Memory Card.
2. Insira o cartão de memória no slot como direção correta. (Veja nas fotos a seguir)
3. Empurre o cartão até que você sente "click" na posição. A parte superior do cartão deve ser
lavada com a superfície da câmera. Um ícone aparecerá na tela LCD depois de ligar a
câmera.
4. Uma vez que um cartão de memória externa, é inserido na câmara todas as imagens
captadas serão armazenadas no cartão de memória externa.
Nota:
1. Limited memória interna é prevista imagens de teste. A imagem será apagado quando a
energia da câmera está desligada. Faça o download das imagens antes de desligar a
energia. Cartão de memória SD é necessário para o uso normal.
2. Um cartão de memória externa é necessária para o uso normal; sua câmera é compatível
com qualquer cartão de memória SD.
3. "Cartão inserido, a mudança para o cartão SD" aparecerá na tela quando você inseriu o
cartão que indica que as fotos serão armazenar no cartão de memória SD, inversamente,
"Card removido, a mudança para a memória interna" aparecerá na tela LCD quando você
retire o cartão.
4. S e há fotos na memória inte rna quando você insere o cartão a sua câmera, SDRAM "cópia
de arquivo para o seu cartão, por favor aguarde ..." aparecerá na tela.
5. Quando você tirar o cartão de memória SD, "Card removida, alteração RAM interna" será
apresentada na tela LCD, agora você pode ter apenas uma foto de teste.
Iniciar a Câmera
Pressione e segure o botão Power para ligar a câmera, a tela LCD será até a luz, o que confirma
que a câmera está ligada e pronta para uso.
Pressione e segure o botão Power cerca de 3 segundos para desligar a câmera.
Câmera Modo
1. Pressione o botão Menu.
2. Pressione o botão Direito / Esquerda para selecionar o Modo.
3. Pressione o botão do obturador.
4. Pressione o botão direito / botão esquerdo para selecion ar INDIVIDUAL
5. Pressione o botão do obturador para confirmar. Agora você está no modo de câmera
(default).
Tirar fotos
Ligue a câmera, o modo padrão é o modo de câmera.
Segure firmemente a câmera e compor o seu objeto com tela LCD. Pressione o botão do
Page 58

58
obturador, um segundo momento, uma foto é tirada.
Nota: Quando a memória interna está cheia, a tela de LCD exibirá "Memória Cheia! Insira um
cartão de memória SD para transferência e tirar mais fotos! "Se você tentar gravar vídeos quando
a memória interna da câmera é completa, a câme ra emite um sinal sonoro con tínuo. Agora, por
favor teste foto d ownl oad p ar a s eu co mput ad or, logo que possível ou inseri r um c art ão d e me mória
SD para tirar mais fotos!
Flash
Sua câmera tem uma função flash permite tirar fotos quando as condições de luz não é boa.
Pressione o botão esquerdo, até que o ícone irá aparecer no LCD, o flash automático está
ligado, pressione o botão esquerdo até que o ícone será exibido no LCD, a função de
redução de olho vermelho está ligado. Pressione o botão à esquerda até ver o ícone
aparecerá na tela LCD do flash é forçado por diante. Pressione o botão à esquerda até a
visualização do ícone no LCD, isso significa que a função de flash é desligado.
Nota:
"Low Power" irá mostrar no LCD, se você alterar a função flash quando a bateria é
insuficiente. Agora reinstale pilhas novas para a função de flas h.
Função de zoom digital
V ocê pod e a mpli ar o seu assunto com o zoom dig i t al . Use os botões T e W para ajustar o z oom de
até 4X. Pressione o botão T para fazer zoom no seu assunto. Aperte o botão W de zoom out.
Função Anti-shake
Sua câmera digital tem uma função que previne fotos borradas que saem como resultado do
tremor ou agitação quando tirar a foto. Devido a esta função, você não é obrigado a usar um tripé
e tirar fotos de boa qualidade. Para definir como abaixo:
1. Pressione o botão Menu.
2. Pressione Direita / Esquerda para selecionar o botão Anti-shake.
3. Pressione o botão do obturador.
4. Use o botão direito / esquerda para selecionar:
"Sim" - para ativar e transformar o anti-shake em. Ícone será exibido na tela.
"Não" - para sair ou virar o anti-shake off. Ícone aparecerá na tela.
5. Pressione o botão do obturador para confirmar.
Alterar a resolução da imagem
A construção da memória permite que você tire uma foto de teste de 3,1 Mega Pixel, sem cartão
de memória SD, inserido um cartão de memória SD para obter mais seleções tamanho da
imagem.
1. Pressione o botão Menu.
2. Pressione o botão direito / esquerda para selecionar a opção RESOLUÇÃO.
3. Pressione o botão do obturador.
4. Pressione o botão direito / esquerda para selecionar uma das seguintes resoluções:
(5M), 2592x1944 pixels
(3M), 2048x1536 pixels
(2M) 1920x1080 pixels
(VGA) 640x480 pixels
5. Pressione o botão do obturador de novo para confirmar a sua selecção.
Nota :
Resoluções de imagem diferentes afetará a qualidade da foto. fotos de alta resolução será de
melhor qualidade de imagem e, portanto, vai ocupar mais capacidade de memória da câmera de
fotos de baixa resolução.
Auto-Temporizador
Você pode incluir-se em uma foto usando esse recurso para atrasar o tempo entre o pressionar o
botão do obturador e quando a foto é realmente tirada. É recomendável que você use um tripé
Page 59

59
quando você usa o auto-temporizador.
1. Pressione o botão Menu.
2. Pressione o botão Direito / Esquerda para selecionar o botão MODE.
3. Pressione o botão do obturador
4. Pressione o botão direito / esquerda para selecionar AUTO.
5. Pressione o botão do obturador novamente para confirmar. Um ícone aparecerá no
canto esquerdo do LCD.
6. Pressione o botão do obturador para tirar fotos, o som da câmera emite um sinal sonoro e
contagem regressiva de 10 segundos até a foto é tirada.
Video Modo
Você pode gravar filmes neste modo. Antes de filmar, você precisa inserir um cartão SD para
expandir a capacidade da câmera de filmagem.
1. Insira um cartão de memória SD compatível.
2. Ligue a câmera.
3. Pressione o botão Menu.
4. Pressione o botão Direito / Esquerda para selecionar o botão MODE.
5. Pressione o botão do obturador.
6. Pressione Direita / Esquerda para selecionar o botão AVI.
7. Pressione o botão do obturador novamente para confirmar. Um ícone aparecerá no
canto esquerdo do LCD.
8. Pressione o botão do obturador para começar a gravar vídeos. O tempo decorrido será
exibido no canto inferior direito do LCD e LED indicador irá manter a cintilação.
9. Pressione o botão do obturador para parar e salve-o arquivo AVI.
Nota :
1. "Inserir uma memória SD Card" será mostrado na tela quando você pressiona o botão do
obturador se sem cartão de memória SD inserido.
2. Você pode reproduzir o arquivo AVI em seu computador usando o tempo rápido ou Media
Player.
Modo de Reprodução
Você pode visualizar suas fotos neste modo.
1. Ligue a câmera.
2. Pressione o botão direito para entrar Reprod u ção. U m ícone aparecerá no canto
esquerdo do LCD. Pressione o botão do obturador para sair do modo de espera.
Nota :
"NO FILE" será exibido no LCD quando não há fotos e vídeos em sua câmera. Você pode
pressionar o botão do obturador para sair do modo de câmera.
Pré-estréia fotos
Pressione o botão direi to / bot ão esqu erdo pa ra seleci onar e ex ibir suas fotos e v í deos. "JPG" ser á
exibido no LCD, se você selecionou uma foto. "AVI" irá aparecer no LCD quando você seleciona
um arquivo A VI.
Deletar foto / videos
1. Em modo de reprodução, pressione o botão Menu.
2. Pressione o botão Direito / Esquerda para selecionar o botão Deletar.
3. Pressione o botão do obturador.
4. Pressione o botão Direito / Esquerda para selecionar o botão Deletar. um / Deletar todos.
5. Pressione o botão do obturador novamente par a confirmar.
Formato
Esta função irá apagar todos os arquivos na memória da câmera (memória interna ou cartão de
memória SD, depende da seleção do dispositivo), por favor, tome cuidado com essa função:
1. Pressione o botão Menu.
Page 60

60
2. Pressione o botão Direito / Esquerda para selecionar o botão Formatar.
3. Pressione o botão do obturador.
4. Pressione o botão do obturador para confirmar sua seleção, "Format OK" será exibido no
LCD.
Imprima suas fotos
Sua câmera é compatível com a função de impressão que permite imprimir fotos em qualquer
tempo.
1. Selecione uma foto que você deseja imprimir pelo pressionando o botão direito / esquerda.
2. Pressione o botão Menu.
3. Pressione o botão Direito / Esquerda para selecionar impressora.
4. Pressione o botão do obturador, "Por favor, ligue o DSC para impressora", aparecerá na tela
LCD.
5. Agora você pode conectar sua câmera a qualquer impressora compatível para a impressão.
Reproduz a arquivo de AVI
1. Selecione um arquivo de AVI em seu cartão de memória SD, premindo o botão direito /
esquerda.
2. Pressione o botão Menu.
3. Pressione o botão Direito / Esquerda para selecionar o botão Play.
4. Pressione o botão do obturador para começar a jogar.
5. Pressione o botão do obturador para parar de jogar.
Instalar PhoTags Express Software
NOTA: Certifique-se que a câmera não está conectada ao computador.
Insira o CD do software no seu computador. Após alguns segundos, não será mostrada uma
janela de instalação pri ncipal na tela.
Você pode "instalar AP", "Ins talar DirectX", "Instalar PC Cam" e "Exit" nesta instalação janela
principal.
1. Instalar PhoTags Express
Clique no botão "Install AP" para iniciar a instalação do processo. A janela de idioma será
exibida na tela e você pode escolher o idioma que você deseja usar.
Page 61
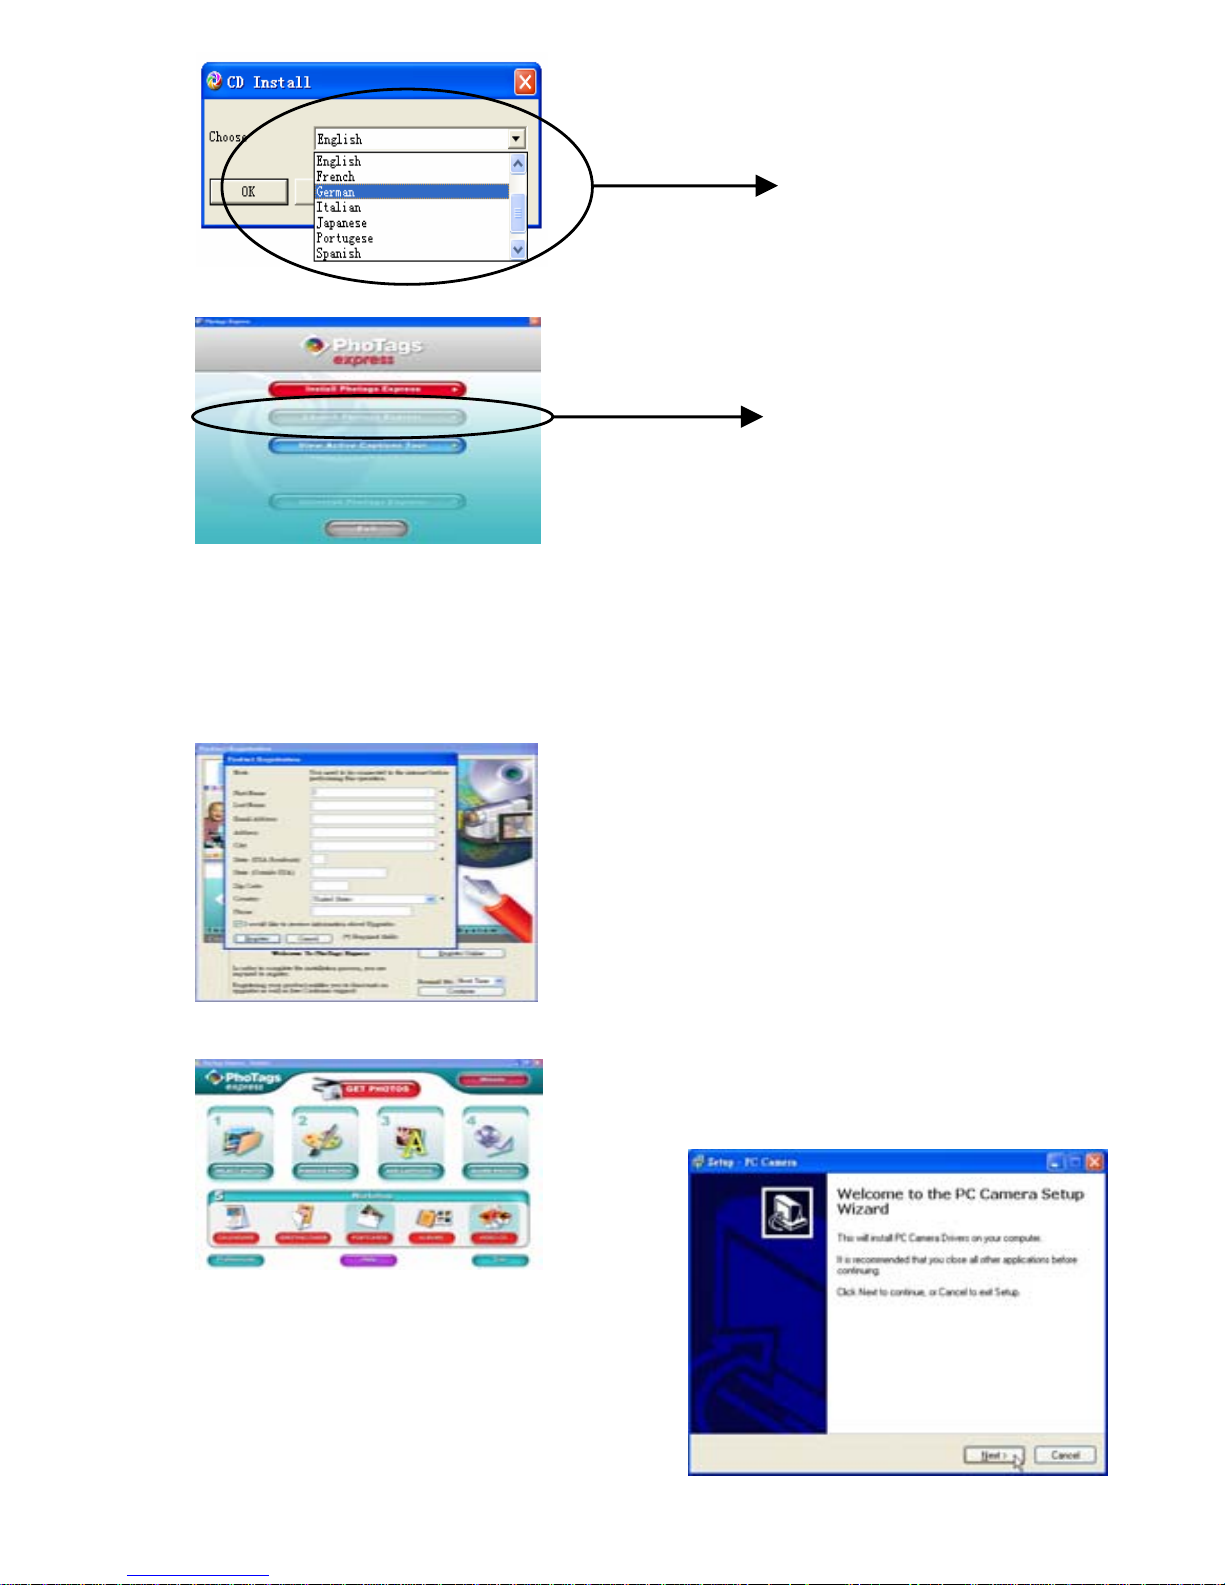
61
e então a janela do instalador será como mostrado abaixo.
Depois de clicar no botão de "Install PhoTags Express", lá estará mostrando algumas
janelas que ajudam você a terminar a instalação. Você só é obrigado a seguir a descrição e
clique nos botões que está inadimplente com o software.
Registre-se online
Clique em "Cadastre-se online" para ter um registo. Ou você pode diretamente clicar em
"Continue” para registo a próxima vez.
Após este passo, a janela principal aparecerá na tela.
2. Instalar o DirectX
Clique em "Instalar DirectX" na ja nela principal,
o DirectX será instalado no seu computador.
3. Instale PCCam
Clique em "Instalar PCCam" na jane la principal,
o PCCam software / dr iv er será inst alado no s eu
computador.
Clique para iniciar a instalação
Escolha o seu idioma
Page 62
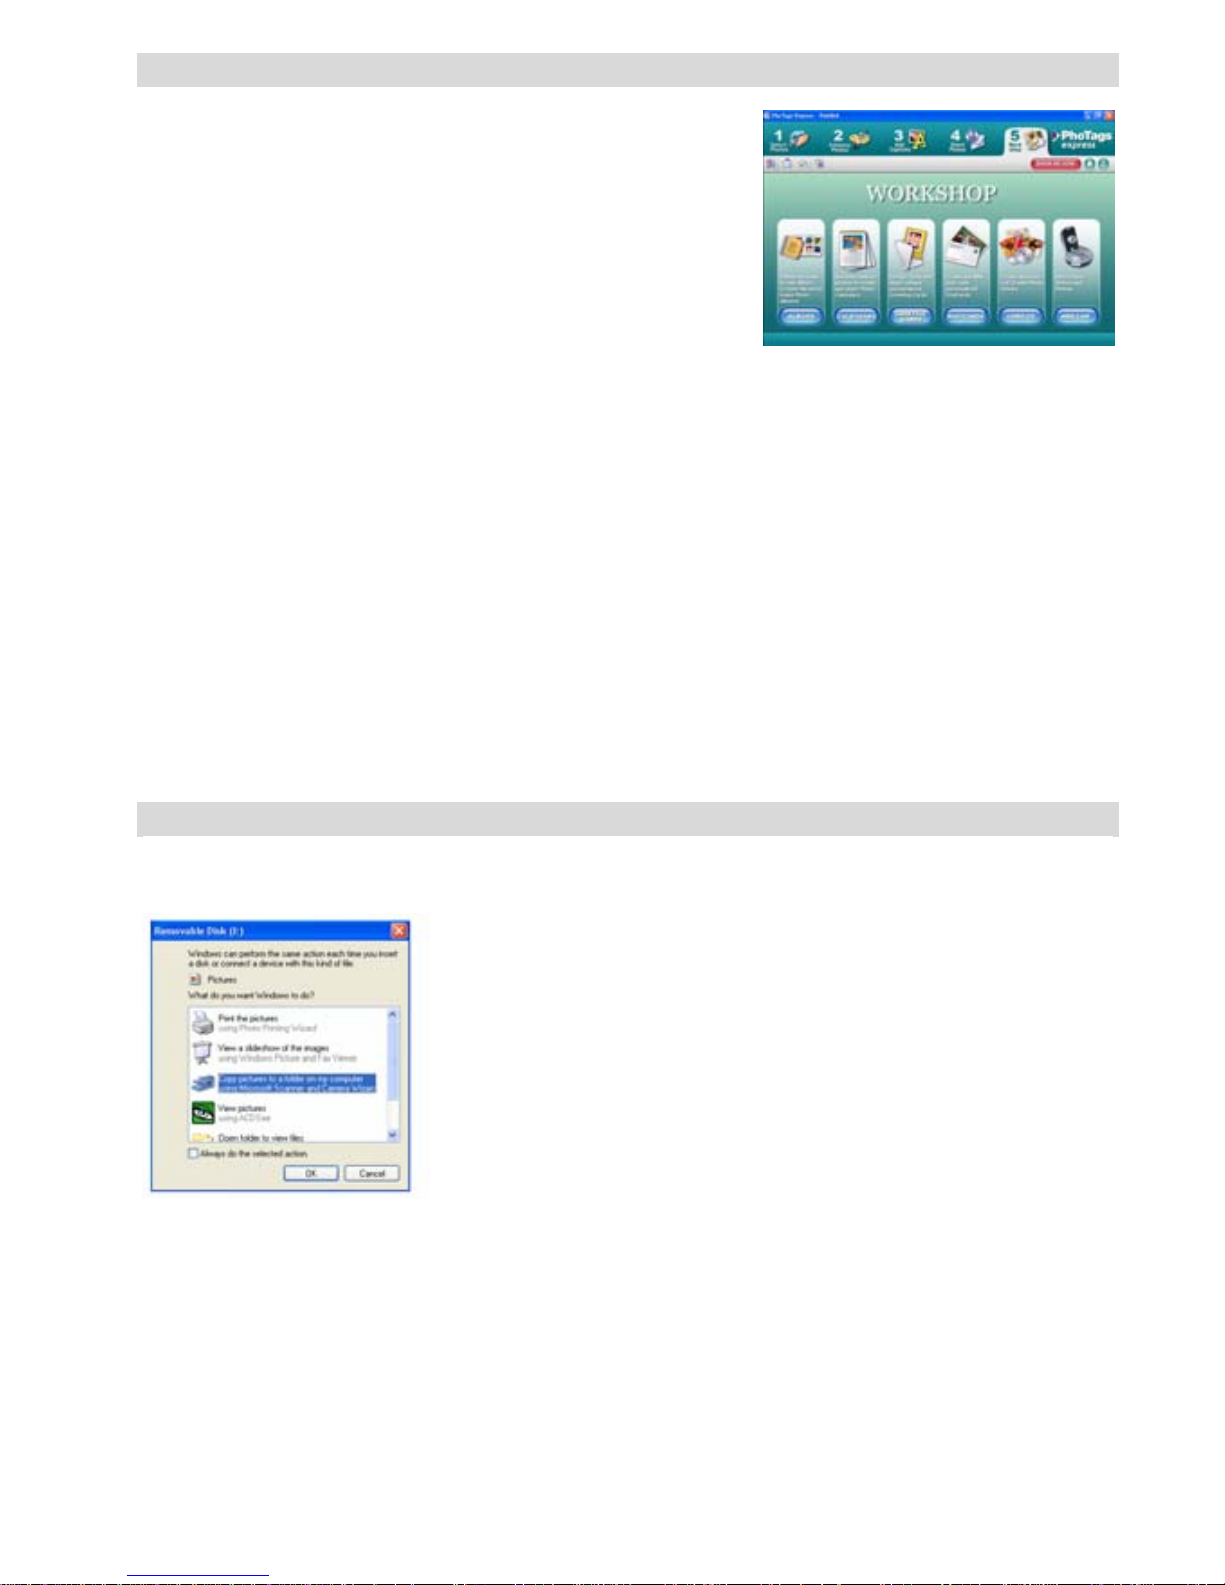
62
Tudo que você precisa obter maioria fotos
1. Selecione as fotos
Selecione as fotos que você download a partir de sua
câmera. E editá-lo no software.
2. Edite fotos
Clique nas fotografias "Enhance", "Adicionar
legendas" a partir da janela princip al p ar a ed i t ar suas
fotos ideal.
3. Compartilhe fotos
Compartilhe suas fotos via "e-mail," Imprimir "e" Criar
HTML web "para enviar online.
4. Oficina
Criar "Agendas", os dois lados "Cartões Postais" e "Postais" em p a pel fotog r á fic o norm al .
Você pode comprar o "Álbum" e "Video CD". Dois projetos adicionais workshop online a
qualquer momento e criar Photo Album e apresentações de slides em CD que pode ser visto
em seu PC e VCD para ver em sua TV usando o seu leitor de DVD.
Como comprar adicionais "Workshop" projectos
Além dos Calendários livre, frente e verso Cartões Postais Workshop e projetos que têm a
capacidade de compra de dois projectos complementares Workshop: "Albums" e "Video CD
online", a qualquer momento.
1. Para adquirir o "Workshop" Projeto basta clicar no que você deseja comprar e você
será encaminhado para um site online onde você pode comprá-los.
2. Quando você compra o "Workshop" projectos vão ser activada automaticamente no
software.
Transferindo fotos para o PC
Ligue a câmera, alterar seu modo de câmera para reprodução e conectar a câmera ao
computador com cabo USB corretamente, a tela será exibida uma janela (disco removível H:)
como abaixo:
NOTA: Agora você pode baixar as fotos para o computador com dois métodos abaixo:
1. Transfira fotos directamente a partir do Windows
Escolhe “copy pictures to a folder on my computer no meu computador" no disco
removível (H: janela). Depois de clicar em "OK", não serão mostradas algumas janelas na
tela passo a passo, você só são obrigados a seguir a descrição e clique nos botões que
estão inadimplentes com o sistema para concluir a transferência. Ou você pode:
1. Clique no botão Iniciar do Windows.
2. Clique no ícone Meu computador no ambiente de trabalho.
3. Seu cartão de memória aparecerá como um dispositivo de armazenamento removível.
4. Clique no dispositivo de armazenamento removível para visualizar as imagens. Os
Page 63

63
magos são armazenados na subpasta chamada DCM100.
5. Agora você pode copiar e colar as imagens em qualquer diretório que você escolher.
2. Download as fotos usando PhoTags Express
a. Clique duas vezes no ícone PhoTags Express no desktop para iniciar o aplicativo.
b. Clique no botão
"Get Photos
" botão na janela p r incipal.
c. O "
Get Photos
" modo assistente irá aparecer na tela, você pode selecionar "
custom
cópia
" para fazer download de fotos com a sua individuação.
Ou você pode selecionar
"Express"
opção para baixar todas as fotos para o computador sem a
opção de selecionar as fotos. Neste modo, você não vai ver um preview das fotos transferidas.
Custom copy
Este modo é usado para selecionar manualmente as fotos que deseja copiar para o seu
computador.
O modo de “seleção do dispositivo " será exibido. Tanto a câmera eo cartão de memória cada
um aparecem na lista de” Active Devices". Selecione “Custom copy”", clique em "Next" para
continuar.
Nota: Neste momento, você pode selecionar "Express" opção para copiar todas as fotos de seu
computador em um momento sem qualquer aviso.
Selecione sua fotos clique em "Nex" para continuar.
Adicionar legendas para a imagem ativa. Com este recurso você pode adicionar uma data,
palavras-chave e categorias. Clique em "Next" para continuar.
Page 64
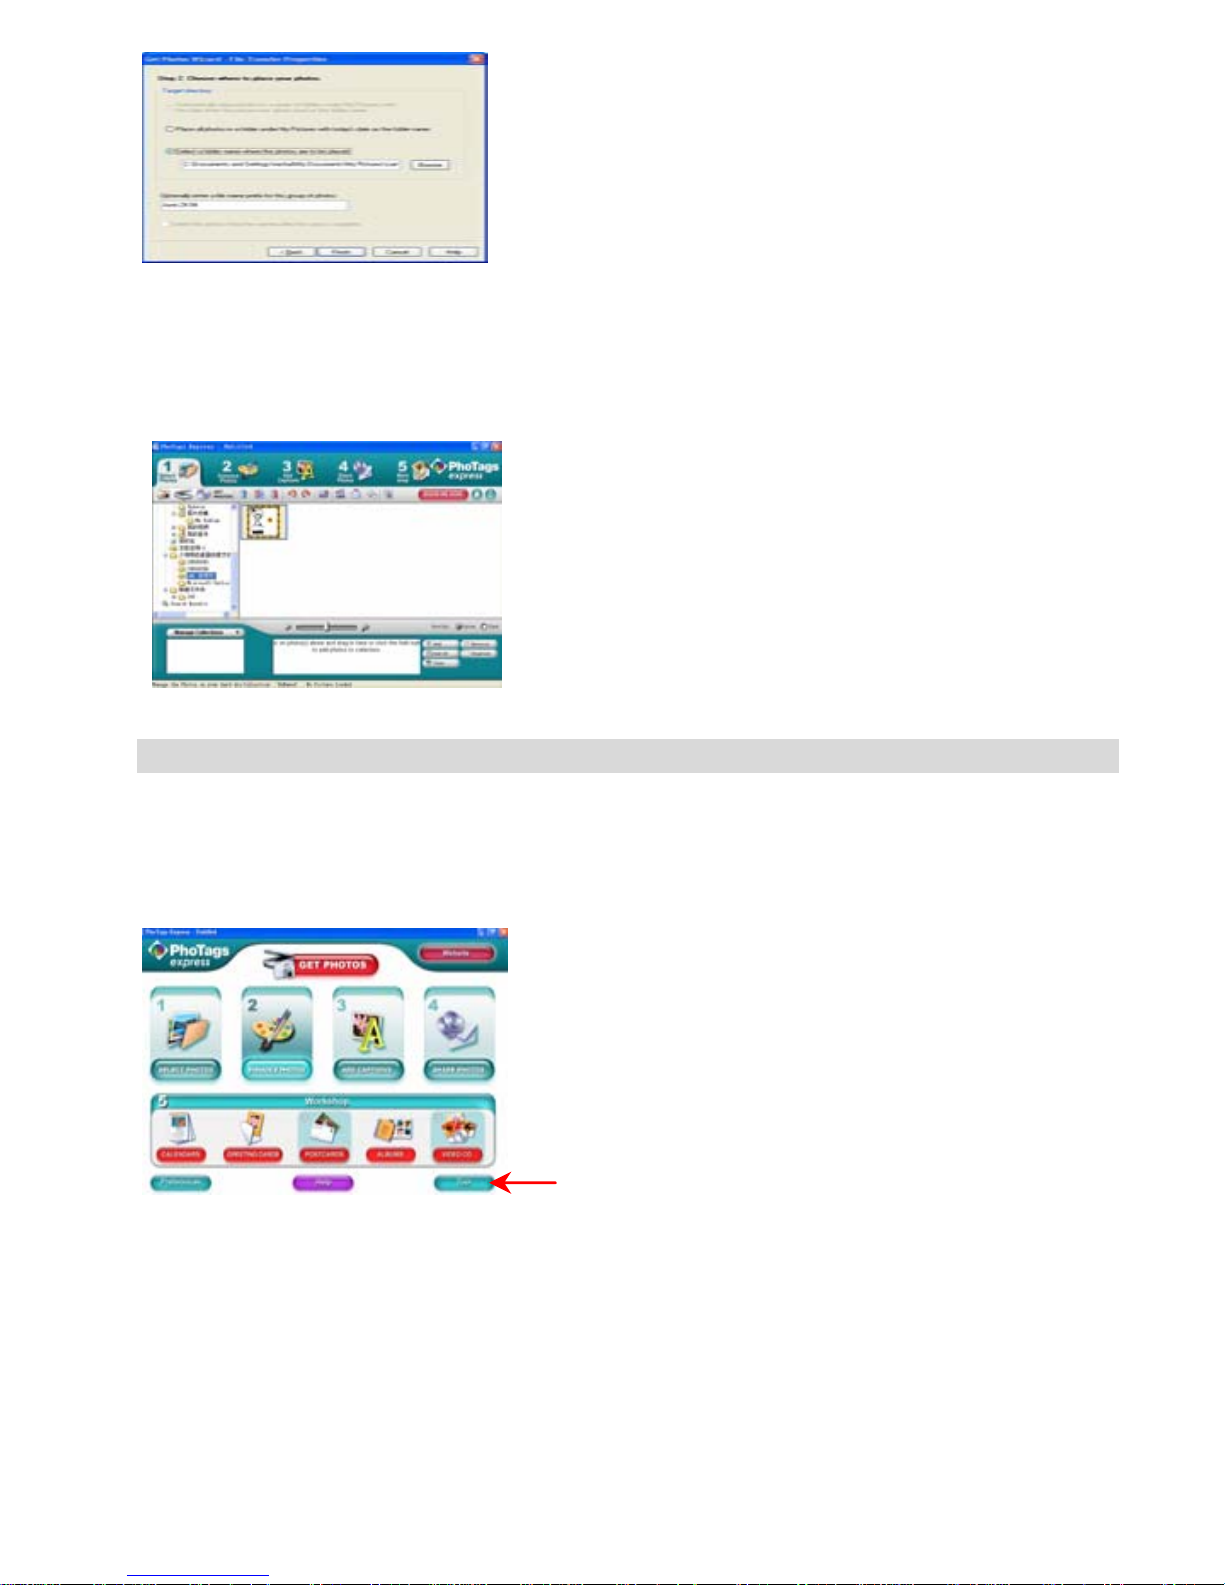
64
Escolha uma posição onde você deseja colocar a s fotos. Clique em "Finish" para copiar a s fotos
para o local selecionado.
Nota:
Todas as imagens que você importou aparecerá no "Select Fotos" janela principal. E agora, você
pode editar as suas fotos por sua idéia, e então fazer o download para seu computador. Para
saber como editar as fotos, você pode consultar o Guia de Início Rápido no PhoTags Express.
PhoTags Express software owner manual
Você pode editar, imprimir, compartilhar fotos com PhoTags Express. Vo cê pode operar como
passo seguinte para saber como usar PhoTags Express:
1. Lançamento do PhoTags Express.
2. Clique em "tour" botão na janela principal para ver como usar o PhoTags Express em
detalhe.
Atenção:
Se PhoTags Express não pode promover o DirectX automaticamente, você pode instalar
manualmente o DirectX no CD antes de usar o Câmara, caso contrário, se a edição d o Di r ectX
no Windows operação for inferior a 8,1, então o arquivo AVI não podem ser reproduzidos.
Clique aqui
Page 65

65
Execute o software PCCAM
1. Depois que o software PC CAM / driver estiver instalado, pressione a tecla do obturador e
plug-in do cabo USB, o Windows irá mostrar uma "câmara digital" dispositivo está instalado
em seu sistema.
2. Dê um duplo clique no ícone da câmera do PC no Windows desktop.
3. PC software da câmera irá mostrar como.
4. São quatro seções na janela principal (1) menu (2), barra de ferramentas (3) miniatura da
imagem capturada (4), reprodução de imagem
(1) Menu - incluindo arquivo, visualização, Option, Capture, menu Ajuda
File menu:
Salvar Active Item - guardar a imagem seleccionada para o arquivo.
Salvar Todos os itens - guardar todas as imagens capturadas em arquivos
Set Capture File - selecione um nome de arquivo que é usado para salvar o vídeo
capturado
Alocar File Space - preservou um espaço em disco que é usado para salvar o vídeo
capturado
Exit - sair deste programa
Preview menu:
Start Preview - abrir uma janela e iniciar a visualização de vídeo
Stop Preview - parar a visualização de vídeo, feche a janela de vídeo
Option menu:
Formato de Vídeo - alterar a resolução de visualização de vídeo, VGA (640x480) ou
QVGA (320x240)
Capture Frame - encaixe um ou mais quadros de imagem de vídeo
Temporizador (3 segundos) - snap quadros um ou mais vídeos automaticamente
após 3 segundos
disparos contínuos - selecione uma ou 3 tiros para cada snap
Capture menu:
Start Capture - começar a capturar frames cam pc para o arquivo AVI
Stop Capture - interromper a captura de arquivos AVI
Capture Audio - selecione a captura de dados de áudio em AVI ou não
Help menu :
Sobre - exibir a versão do software.
Page 66

66
(2), Toolbar - para algumas operações do menu habitual
-- Save Active Item -- Save All Items
-- Start Preview -- Stop Preview
-- Capture Frame -- Self Timer to capture frames
(3) de miniaturas das imagens capturadas
utilizados para armazenar as imagens capturadas
(4), reprodução de imagem
usado para exibir a imagem ativa clicando em uma imagem em miniatura seção
Anexo: Especificações
Sensor Sensor CMOS
A resolução da imagem 5M, 3M, 2M, VGA
Lente f = 7,23 milímetros, F2.8
A memória interna SD RAM 8MB
A memór ia externa Suporte cartão SD de até 8GB
Flash Auto / vigor/ on / redução de olhos vermelhos / off
Auto-temporizador 10S
Economia de energia 60S
Bateria * 2 pilhas AAA
Interface de transmissão USB V1.1
Temperatura de trabalho
0 ~ 40℃
Sistema de computador Janela 2000/XP / Vista / Mac OS X (10.2.6 ou superior)
Page 67

67
MANUALE D’ISTRUZIONI
Indice
Introduzione .............................................................................................68
Caratteristiche principali...........................................................................68
Che cosa comprende la fotocamera........................................................68
Requisiti del sistema di computer per Windo
ws 2000/XP........................68
Requisiti del sistema di computer per Windo
ws Vista..............................68
Requisiti del sistema di computer per Macintosh
.....................................68
Un’occhiata veloce alla fotocamera .........................................................69
Come preparare la fotocamera per l’uso..................................................69
Istallazione della scheda di memoria SD
.................................................70
Come avviare la fotocamera....................................................................70
Modalità della fotocamera........................................................................70
Come scattare le foto...............................................................................70
Modalità video..........................................................................................72
Modalità Riproduzione .............................................................................72
Istallazione del software PhoTags Express..............................................73
Tutto quello che dovete sapere per ottenere il meglio dalle vostre foto...75
Come trasferire le foto nel PC..................................................................75
Manuale dell’utente del Software PhoTags Express................................77
Come eseguire il software PCCAM ..........................................................78
Appendice: Specificazioni........................................................................79
Page 68

68
Introduzione
Noi vi siamo grati per l’acquisto di questa fotocamera digitale. Voi potete non solo scattare delle
foto digitali di buona qualità, ma potete anche usarla come disco asportabile. Per conoscere di più
sulle sue impostazioni della qualità e delle funzioni, leggete attentamente questo manuale prima
dell’uso.
Caratteristiche principali
¾ Risoluzione Immagine Digitale- 5M per interpolazione (2592x1944pixel 4:3), 3M
(2048x1536pixel 4:3), 2M (1920x1080pixel 16:9 ), VGA (640x480pixel 4:3)
¾ SD RAM 8MB, supporta scheda di memoria SD/MMC (non inclusa) fino a 8GB.
¾ LCD a colori TFT 4.5cm / 1.8”
¾ Software PhoTags Express per la gestione e il potenziamento delle foto, per aggiungere
diciture, inviare email, stampare e fare altre cose ancora.
Che cosa comprende la fotocamera
¾ Fotocamera digitale
¾ CD d’istallazione del Software PhoTags Express
¾ Cavo USB
¾ Manuale dell’utente
¾ Cinturino
Requisiti del sistema di computer per Windows 2000/XP
Per essere in grado di scaricare le foto nel PC, avete bisogno della seguente configurazione
minima:
¾ Processore Pentium o superiore con windows 2000, XP
¾ 64 MB RAM, più di 250MB di spazio libero nel disco
¾ Interfaccia USB disponibile
¾ Lettore CD-ROM
¾ Risoluzione schermo consigliata 24 bit o superiore
¾ Adattatore display 256 colori o superiore
Requisiti del sistema di computer per Windows Vista
Per essere in grado di scaricare le foto nel PC avete bisogno della seguente configurazione
minima:
¾ Windows Vista
¾ Processore 800MHz e 512 MB di memoria del sistema
¾ Hard driver 20GB con almeno 15GB di spazio disponibile
¾ Supporto per grafica Super VGA
¾ Interfaccia USB disponibile
¾ Lettore CD-ROM
Requisiti del sistema di computer per Macintosh
¾ Power Macintosh G3 500 MHz o superiore
¾ Mac OS X versione 10.2.6 o posteriore
¾ 128 MB o più di RAM disponibili del sistema(consigliati 256 MB), 150 MB di spazio libero nel
disco
¾ Monitor di risoluzione 800 x 600 o superiore che mostra milioni di colori
Nota: Questo hardware è compatibile plug e play quando è usato su un Mac, però il software
incluso si può usare soltanto sui sistemi operativi Windows.
Page 69

69
Un’occhiata veloce alla fotocamera
Come preparare la fotocamera per l’uso
Istallazione della batteria
La fotocamera ha bisogno di 2 batterie AAA. Inserire la batteria
nella fotocamera nel modo seguente:
1. Spostare e aprire il comparto batteria.
2. Accertarsi che la batteria sia inserita con la polarità corretta
rivolta verso l’alto.
3. Chiudere il coperchio della batteria.
Quando sull’LCD viene mostrato “No Power (Non c’è corrente)”,
indica che la fotocame ra ha un l i vello di batteria non suffici e nte e si
spegne, dovete scaricare le foto nel vostro PC se non c’è una
Scheda SD inserita.
Nota: 1. Se prevedete di non dover usare la fotocamera per un periodo prolungato, rimuovere le
batterie onde evitare perdite delle batterie e corrosione.
2. Non togliete fuori la batterie o spegnete la fotocamera a piacimento, altrimenti la foto di
test nella fotocamera digitale andrà perduta se non c’è una Scheda di memoria SD, quindi
scaricate la vostra foto di test nel PC quanto prima possibile.
3. Non mescolate le batterie vecchie con delle batterie nuove.
4. Non mescolate batterie alcaline con batterie standard (carbone-zinco) o ricaricabili
(idruro di metallo nichel-cadmio).
Page 70
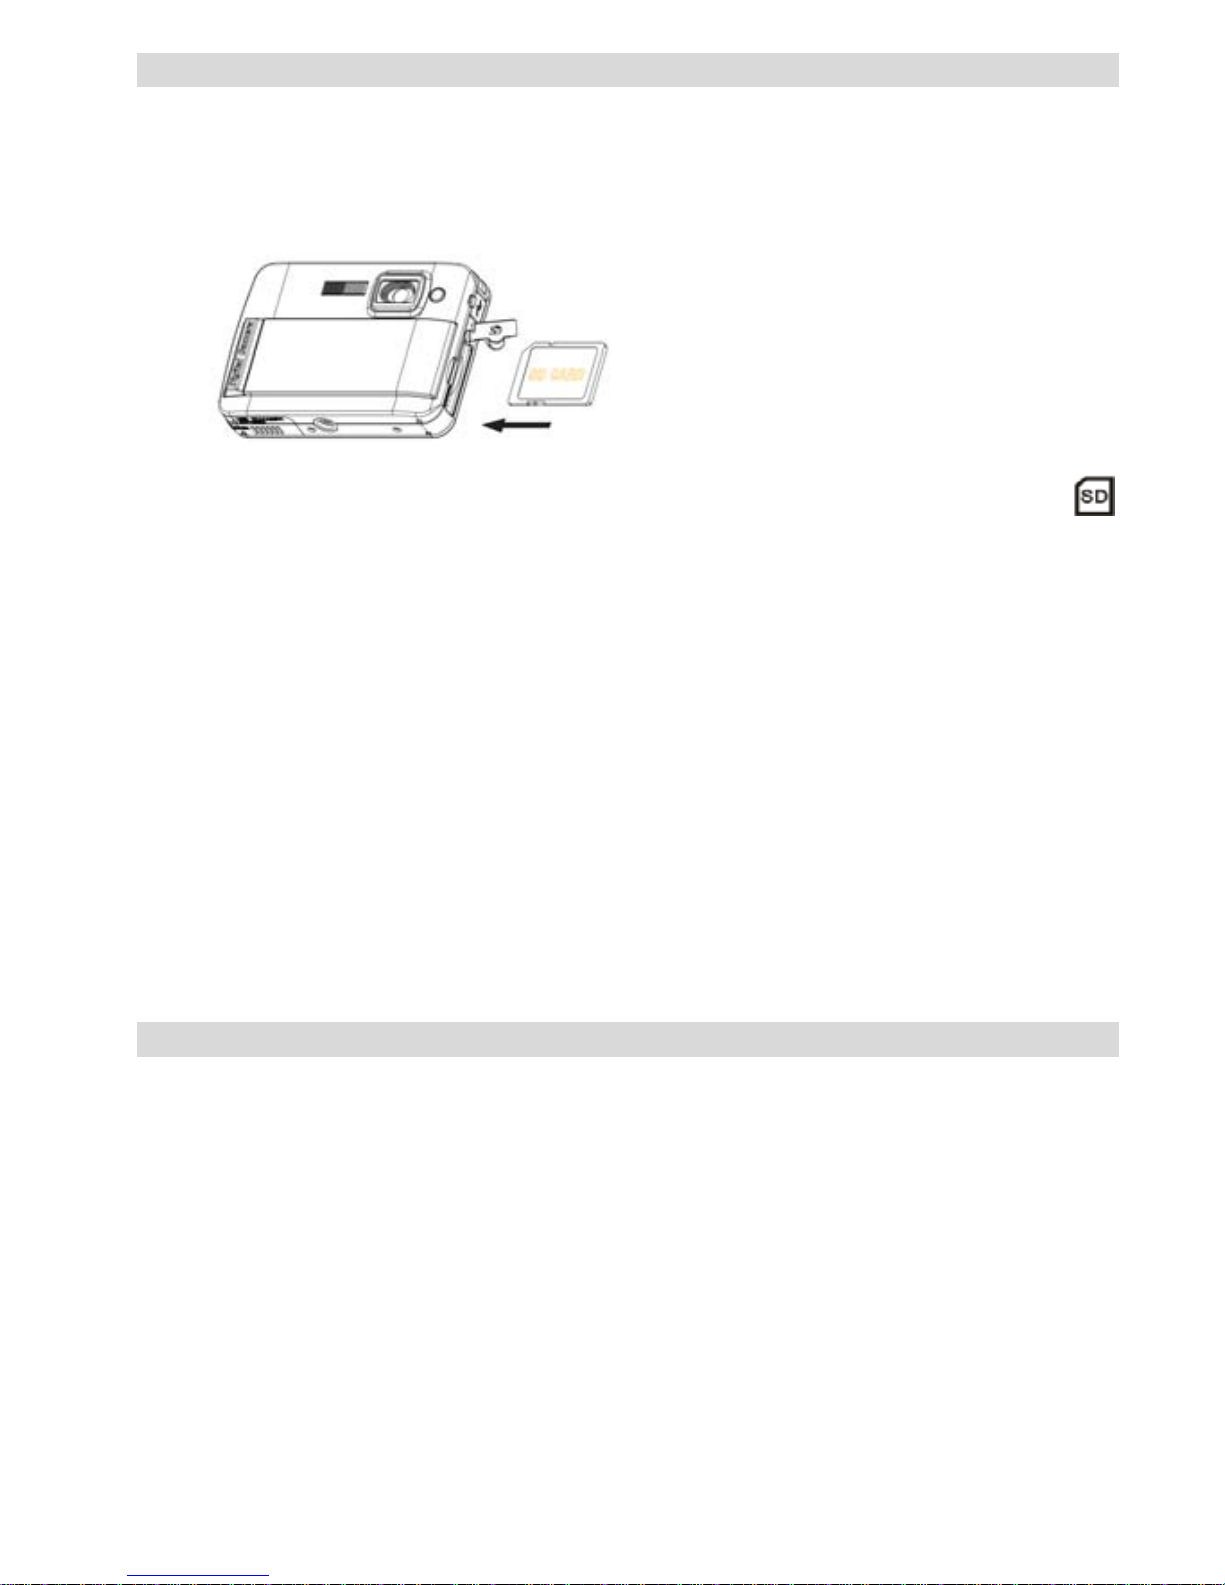
70
Istallazione della scheda di memoria SD
La fotocamera ha uno slot per la scheda di memoria che vi permette di inserire qualsiasi scheda di
memoria “SD” compatibile. L’aggiunta di una scheda di memoria vi permette di aumentare la
capacità della fotocamera prima di effettuare il trasferimento delle foto nel PC. L’istallazione della
Scheda di memoria SD si fa in questo modo:
1. Individuare lo slot della Scheda di Memoria.
2. Inserire la Scheda di Memoria nello slot nella direzione corretta. (vedere le foto qui sotto)
3. Spingere dentro la scheda fino a quando sentite che fa “click” nella sua posizione. La parte
superiore della scheda dovrebbe entrare dentro la superficie della fotocamera. Un’icona
appare sullo schermo LCD dopo che avete acceso la fotocamera.
4. Quando una Scheda di Memoria esterna è inserita nella fotocamera, tutte le foto scattate
verranno memorizzate nella Scheda di Memoria esterna.
Nota:
1. Viene fornita una mem or i a i nterna l imitata per le foto di test. La foto verrà eliminata quando
la corrente della fotocamera viene spenta. Scaricate le foto prima di spegnere. La Scheda
di memoria SD è necessaria per l’uso normale.
2. Per l’uso normale è richiesta una Scheda di Memoria esterna; la fotocamera supporta
qualsiasi Scheda di memoria compatibile SD.
3. “Scheda inserita, gira su Sc heda SD” vi ene mostr ato sull o scher mo q uando i nserite la sche da
ad indicare che le foto verranno memorizzate sulla Scheda di memoria SD, inversamente
“Scheda rimossa, gira su memoria interna” appare sullo schermo LCD quando estraete la
scheda.
4. Se ci sono delle foto nella memoria interna quando inserite la scheda nella fotocamera,
appare sullo schermo “copia File SDRAM sulla scheda, attendere…”.
5. Quando estraete la Scheda di memoria SD, app are sullo sch ermo L CD “Scheda ri mossa, gi ra
su RAM interna”, ora voi potete scattare solo 1 foto di test.
Come avviare la fotocamera
Premere e tenere premuto il pulsante Corrente per accendere la fotocamera, lo schermo LCD si
accende; Questo conferma che la fotocamera è accesa e pronta per l’uso.
Premere e tenere premuto il pulsante Corrente circa 3 secondi per spegnere la fotocamera.
Modalità della fotocamera
1. Premere Pulsante Menu.
2. Premere il pulsante Destro/Sinistro per selezionare la Modalità.
3. Premere il pulsante Otturatore.
4. Premere il pulsante Destro/Sinistro per selezionare SINGLE
5. Premere il pulsante Otturatore per confermare. Ora siete nella modalità della fotocamera
(predefinito).
Come scattare le foto
Accendere la fotocamera, la modalità predefinita è la mo dali tà della fotocamera.
Tenere ferma la fotocamera e comporre l’oggetto con lo Schermo LCD. Premere il pulsante
Otturatore, un momento più tardi un a foto è sc attata.
Page 71

71
Nota
: Quando la memoria interna è piena, lo schermo LCD mostra “
Memoria Piena! Inserire una
Scheda di memoria SD per Trasferire e Scattare Altre Foto!
” Se cercate di riprendere dei video
quando la memoria interna della fotocamera è piena, la fotocamera emette un segnale acustico in
continuazione. Allora scaricate la foto di test nel computer quanto prima possibile oppure inserire
una Scheda di memoria SD per scattare altre foto!
Flash
La fotocamera ha una funzione di flash che vi abilita a scattare le foto quando le condizioni di luce
non sono buone.
Premere il pulsante Sinistro, fino a quando l’icona appare sullo schermo LCD, il flash
automatico è acceso, premere il pu lsante Sinistro fino a quando l’icon a appare sullo schermo
LCD, la funzione riduzione occhio rosso è accesa. Premere il pulsante Sinistro fino a che vedete
l’icona sullo schermo LCD il flash è imposto. Premere il pulsante Sinistro fino a quando l’icona
si mostra sullo schermo LCD, significa che la funzione di flash è spenta.
Nota:
“Corrente Bassa” appare sullo schermo LCD, se girate sulla funzione di flash quando la
corrente della batteria è insufficiente. Allora mettete delle batterie nuove per la funzione di flash.
Funzione di zoom digitale
Voi potete ingrandire il soggetto usando lo zoom digitale. Usare i pulsanti T e W per regolare lo
zoom fino a 4X . Pr eme re il pul sante T per fare zoom av anti sul sog getto. Pre mere i l pulsante W per
fare zoom indietro.
Funzione antiscossa
La fotocamera digitale ha una funzione che impedisce che le foto vengano fuori sfocate come
risultato di tremore o scosse nel riprendere le foto. Grazie a questa funzione non avete bisogno di
usare un treppiede e potete scattare delle foto di buona qualità. La funzione si imposta in questo
modo:
1. Premere il Pulsante Menu.
2. Premere il pulsante Destro/Sinistro per selezionare Antiscossa.
3. Premere il pulsante Otturatore.
4. Usare il pulsante Destro/Sinistro per selezionare:
“Sì” – per attivare ed accendere l’antiscossa. L’icona appare sullo schermo.
“No” – per uscire o spegnere l’antiscossa. L’icona appare sullo schermo.
5. Premere il pulsante Otturatore per confermare.
Cambia Risoluzione Immagine
La memoria incorporata vi permette di scattare una foto di test di 3.1 Mega-Pixel senza Scheda di
memoria SD, inserite una Scheda di memoria SD per avere più possibilità di selezione di
dimensione dell’immagine.
1. Premere il Pulsante Menu.
2. Premere il pulsante Destro/Sinistro per selezionare l’opzione RISOLUZIONE.
3. Premere il pulsante Otturatore.
4. Premere il pulsante Destro/Sinistro per selezionare una delle seguenti risoluzioni :
(5M) 2592x1944 pixel
(3M) 2048x1536 pixel
(2M) 1920x1080 pixel
(VGA) 640x480 pixel
5. Premere il pulsante Otturatore di nuovo per confermare la selezione.
Nota:
Le diverse risoluzioni dell’immagine influiscono sulla qualità delle foto. Le foto con alta risoluzione
hanno una migliore qualità e quindi prendono anche più capacità di memoria che non le foto a
bassa risoluzione.
Autoscatto
Page 72

72
Voi potete includervi in una foto usando questa funzione per dilazionare il tempo fra la premuta
dell’otturatore e quando la foto viene davvero scattata. Quando usate l’autoscatto, si consiglia di
usare un treppiede.
1. Premere il Pulsante Menu.
2. Premere il pulsante Destro/Sinistro per selezionare la Modalità.
3. Premere il pulsante Otturatore
4. Premere il pulsante Destro/Sinistro per selezionare SELF.
5. Premere il pulsante Otturatore di nuovo per confermare. Appare un’icona nell’angolo
sinistro dell’LCD.
6. Premere il pulsante Otturatore per scattare la foto, il segnale acustico della fotocamera si
sente e conta per 10 secondi fino a quando la foto viene scattata.
Modalità video
Voi potete in questa modalità riprendere dei filmati. Prima della ripresa dovete inserire una Scheda
SD per espandere la capacità della fotocamera per la ripresa dei filmati.
1. Inserire una Scheda di memoria compatibile SD.
2. Accendere la fotocamera.
3. Premere Pulsante Menu.
4. Premere il pulsante Destro/Sinistro per selezionare la Modalità.
5. Premere il pulsante Otturatore.
6. Premere il pulsante Destro/Sinistro per selezionare AVI.
7. Premere il pulsante Otturatore di nuovo per confermare. Appare un’icona nell’angolo
sinistro dell’LCD.
8. Premere il pulsante Otturatore per cominciare a riprendere i filmati. Il tempo passato si vede
in fondo a destra sull’LCD e l’indicatore LED continua a lampeggiare.
9. Premere il pulsante Otturatore per fermare e salvarlo in un file AVI.
Nota
:
1. “Inserire una Scheda di memoria SD” viene mostrato sullo schermo quando premete il
pulsante Otturatore se non c’è una Scheda di memoria SD inserita.
2. Voi potete riprodurre il file AVI nel computer usando Quick time o Media Player.
Modalità Riproduzione
Voi potete in questa modalità vedere le vostre foto in anteprima.
1. Accendere la fotocamera.
2. Premere il pulsante Destro per accedere a Modalità riproduzione. Un’icona viene
mostrata nell’angolo sinistro dell’LCD. Premere il pulsante Otturatore per lasciare la modalità
standby.
Nota:
“NO FILE” viene mostrato sullo schermo LCD quando non ci sono foto/video nella
fotocamera. Voi potete premere il pulsante Otturatore per lasciare la modalità della fotocamera.
Anteprima delle Foto
Premere il pulsante Destro/Sinistro per selezionare e visualizzare le foto/video. “JPG” viene
mostrato sullo schermo LCD se avete selezionato una foto. “AVI” appare sullo schermo LCD
quando selezionate un file AVI.
Elimina foto/video
1. Nella modalità Riproduzione, premere il Pulsante Menu.
2. Premere il pulsante Destro/Sinistro per selezionare Elimina.
3. Premere il pulsante Otturatore.
4. Premere il pulsante Destro/Sinistro per selezionare Elimina uno/Elimina tutti.
5. Premere il pulsante Otturatore di nuovo per confermare.
Formatta
Questa funzione elimina tutti i file nella memoria della fotocamera (memoria interna o Scheda di
Page 73

73
memoria SD, dipende dalla selezione del dispositivo), fare attenzione a usare questa funzione:
1. Premere il Pulsante Menu.
2. Premere il pulsante Destro/Sinistro per selezionare Formatta.
3. Premere il pulsante Otturatore.
4. Premere il pulsante Otturatore di nuovo per confermare la selezione, “Formatta OK” viene
mostrata sullo schermo LCD.
Stampa delle Foto
La fotocamera supporta la funzione di stampa che vi permette di stampare le foto in qualsiasi
momento.
1. Selezionate la foto che desiderate stampare premendo il pulsante Destro/Sinistro.
2. Premere il Pulsante Menu.
3. Premere il pulsante Destro/Sinistro per selezionare Stampante.
4. Premere il pulsante Otturatore, “Collega DSC a stampante” appare sullo schermo LCD.
5. Ora voi potete collegare la fotocamera a qualsiasi stampante compatibile per la stampa.
Riproduzione di file AVI
1. Selezionare un file AVI nella Scheda di memoria SD premendo il pulsante Destro/Sinistro.
2. Premere il Pulsante Menu.
3. Premere il pulsante Destro/Sinistro per selezionare Play.
4. Premere il pulsante Otturatore per cominciare ad eseguire.
5. Premere il pulsante Otturatore di nuovo per fermare l’esecuzione.
Istallazione del softw are PhoTags Express
NOTA: Assicurarsi che la fotocamera non sia collegata al computer.
Inserire il CD del software nel computer. Dopo pochi secondi verrà mostrata una finestra principale
d’istallazione sullo schermo.
Voi potete fare “installa AP”, “Installa DirectX”, “Installa PC Cam”, e “Esci” in questa finestra
principale d’istallazione.
1. Istalla PhoTags Express
Cliccare su “Istalla AP” per iniziare il processo d’istallazione. La finestra della lingua viene
mostrata sullo schermo e voi potete scegliere la lingua che desiderate usare.
Page 74

74
E poi la finestra dell’istallatore viene mostrata come segue.
Dopo che cliccate il pulsante “Istalla PhoTags Express” verranno mostrate alcune finestre
che vi aiutano a finire l’istallazione. Vi si richiede solamente di seguire la descrizione e
cliccare i pulsanti predefiniti dal software.
Registrati in linea
Cliccate il pulsante “Registrati in linea” per avere la registrazione. Oppure potete cliccare
direttamente “Continua” per fare la registrazione la prossima volta.
Dopo questo passo, appare sullo schermo la finestra principale.
2. Istalla DirectX
Cliccare “Istalla DirectX” nella finestra
principale, DirectX verrà istallato nel
computer.
3. Install PCCam
Cliccare “Install PCCam” nella finestra
principale, PCCam software/driver verrà
istallato nel computer.
Cliccare per iniziare a
istallarelling
Scegliere la lingua
Page 75

75
Tutto quello che dovete sapere per ottenere il meglio dalle vostre
foto
1. Seleziona foto
Selezionate la foto che scaricate dalla fotocamera. E
modificatela nel software.
2. Modifica foto
Cliccare “Potenzia foto”, “Aggiungi diciture” dalla
finestra principale per modificare le vostre foto id eali.
3. Condividi foto
Condividete le vostre foto attraverso “Email”,
“Stampa”, e “Crea rete HTML” per caricarle in linea.
4. Workshop
Create “Calendari”, “Cartoline di auguri” a doppia faccia e “Cartoline di vedute” su carta
da foto standard. Voi potete acquistare “Album” e “Video CD”. Due progetti supplementari di
workshop in linea in qual si asi momento e creare Al bu m Foto e pr oi e zioni di diapositive su CD
che possono essere visualizzati sul PC e VCD per la visualizzazione sulla TV usando il DVD
player.
Come acquistare progetti “Workshop” supplementari
In aggiunta ai progetti di Workshop gratuiti di Calendari, Cartoline di auguri a doppia faccia e
Cartoline di Ved ute, av ete la possibilità di acq uist are due progetti di Workshop supplement ari:
"Album" e "Video CD" in linea in qualsiasi momento.
1. Per acquistare i “Progetti Workshop” cliccare semplicemente quello che si desidera
acquistare vi si rimanderà ad un sito web in linea dove potete acquistarlo.
2. Quando avete acquistato i “Pr ogetti Worksh op” questi v engono aut omatica ment e atti vati
nel software.
Come trasferire le foto nel PC
Accendere la fotocamera, andare nella modalità della fotocamera per fare la riproduzione
Playback e collegare la fotocamera al co mputer in mo do corretto con il Cavo USB, su llo schermo
verrà mostrata una finestra (Disco Asportabile H:) come segue:
NOTA: Ora voi potete scaricare le foto nel computer con due metodi coem segue:
1. Scarica le foto direttamente da windows
Scegliere “copia foto in cartella nel mio computer” nella finestra Disco Asportabile (H:).
Dopo che avete cliccato “OK”, delle finestre verranno mostrate sullo schermo passo per
passo, vi si richiede solamente di seguire la descrizione e cliccare i pulsanti che sono
predefiniti dal sistema per finire il trasferimento. Oppure voi potete:
1. Cliccare sul pulsante START in Windows.
2. Cliccare sull’Icona MIO COMPUTER sul desktop.
Page 76

76
3. Appare la vostra Scheda di Memoria come dispositivo di memorizzazione asportabile
(REMOVABLE STORAGE DEVICE).
4. Cliccare sul REMOVABLE STORAGE DEVICE per visualizzare le foto. Le foto sono
memorizzate nella cartella chiamata DCM100.
5. Voi potete ora copiare e incollare le foto in qualsiasi directory che scegliete.
2. Scarica le foto usando PhoTags Express
a. Cliccare due volte l’icona PhoTags Express sul desktop per lanciare
l’applicazione.
b. Cliccare il pulsante “
Ottieni Foto
” nella finestra principale.
c. La modalità del mago “
Ottieni Foto
” appare sullo schermo, voi potete selezionare
“
copia personalizzata
” per scaricare le foto con la vostra personalizzazione.
Oppure voi potete selezionare l’opzione “Express” per scaricare tutte le foto nel computer senza
l’opzione di selezionare le foto. In questa modalità non vedrete un’anteprima delle foto trasferite.
Copia personalizzata
Questa modalità si usa per selezionare manualmente la foto che desiderate copiare nel computer.
Appare la modalità “Selezione Dispositivo”. Sia la fotocamera che la Scheda di Memoria
appariranno nell’elenco “Dispositivi Attivi”. Selezionare “Copia personalizzata” e cliccare
“Avanti” per continuare.
Nota: In questo momento voi potete selezionare l’opzione “Express” per copiare tutte le foto nel
computer in una volta senza alcun sollecito.
Selezionare la foto e cliccare “Avanti” per continuare.
Aggiungi didascalie alla foto. Con questa funzione voi potete aggiungere una data, parole chiave e
categorie. Cliccare “Avanti” per continuare.
Page 77

77
Scegliere una posizione dove volete mett ere la foto. Cliccare “ Finisci” per copiare la foto nel posto
che avete selezionato.
Nota:
Tutte le foto che avete importato appaiono nella finestra principale di “Seleziona foto”. E ora voi
potete modificare la vostra foto secondo la vostra idea e poi scaricarla nel computer. Per come
modificare le foto, voi potete consultare la guida all’Avvio Veloce in PhoTags Express.
Manuale dell’utente del Software PhoTags Express
Voi potete modificare, stampare e condividere le foto con PhoTags Express. Voi potete operare
secondo i passi seguenti per conoscere come usare PhoTags Express:
1. Lanciare PhoTags Express.
2. Cliccare il pulsante “tour” nella finestra principale per visualizzare come usare PhoTags
Express in dettaglio.
Attenzione:
Se PhoTags Express non riesce ad attivare DirectX automaticamente, voi potete istallare DirectX
manualmente nel CD prima di usare la fotocamera, diversamente, se l’edizione di DirectX
nell’operazione di windows è inferiore a 8.1, i File AVI non si possono eseguire.
Cliccare here
Page 78

78
Come eseguire il software PCCAM
1. Dopo che il PC CAM software/driver è stato istallato, premere il tasto otturatore e inserire il
Cavo USB, Windows mostra che un dispositivo “Fotocamera digitale” è istallato nel vostro
sistema.
2. Cliccare due volte l’icona PC Camera sul desktop di Windows.
3. Il software della PC Camera si mostra come,
4. Ci sono 4 sezioni nella finestra principale, (1) menu, (2) toolbar, (3) anteprima della foto
catturata, (4) riproduzione immagine
(1) Menu – comprende i menu File, Anteprima, Opzione, Cattura, Guida
Menu File:
Salva Voce Attiva – salva la foto selezionata nel file.
Salva Tutte le Voci – salva tutte le foto catturate nei file
Imposta File di Cattura – seleziona un nome di file che viene usato per salvare il
video catturato
Assegna S paz io File – conserv a spaz io nel disco che v iene us ato per sal vare il video
catturato.
Esci – lascia questo programma
Menu Anteprima:
Avvia Anteprima – apre una finestra e comincia l’anteprima del video
Ferma A nte pr i ma – ferma l’a nte pr i ma del v i deo, chi ud e la finestr a d el vi deo
Menu Opzioni:
Formato Video – cambia la risoluzione anteprima video, VGA (640x480) o QVGA
(320x240)
Cattura Fotogramma – prende uno o più fotogrammi del video nell’immagine
Autoscatto (3 secondi) – prende uno o più fotogrammi del video automaticamente
dopo 3 secondi
Scatti continui – seleziona uno o 3 scatti per ciascuna presa
Menu Cattura:
Inizia Cattura – avvia la cattura dei fotogrammi pc cam nel File AVI
Ferma Cattura – ferma la cattura del File AVI
Cattura Audio – seleziona la cattura dei dati audio nel File AVI o meno
Menu Guida:
Informazioni – mostra la versione del software.
Page 79

79
(2) Toolbar – per certe operazioni usuali del menu
-- Salva Voce Attiva -- Salva Tutte le Voci
-- Inizia Anteprima -- Ferma Anteprima
-- Cattura Fotogramma -- Cattura automatica fotogrammi
(3) anteprima delle foto catturate
usato per memorizzare le foto catturate
(4) riproduzione foto
usato per mostrare la foto attiva cliccando una foto nella sezione anteprime
Appendice: Specificazioni
Sensore Senzore CMOS
Risoluzione immagine 5M, 3M, 2M, VGA
Obiettivo f=7.23mm, F2.8
Memoria interna SD RAM 8MB
Memoria esterna Supporta Scheda SD fino a 8GB
Flash Auto/imposto/riduzione occhio rosso/spento
Autoscatto 10S
Risparmio corrente 60S
Batteria 2* batterie AAA
Interfaccia di trasmissione USB V1.1
Temperatura di operazione
0~40℃
Sistema di computer Window 2000/XP/ Vista/ Mac OS X (10.2.6 o superiore)
 Loading...