

EasyHeat Installation and Operation Manual: SR, TSR, HSR and HW Series Heating Cables, 14030-001 Manuals & Guides

SELF-REGULATING PIPE TRACING
HEATER CABLE
Installation & Operation Manual
For SR, TSR, HSR and HW Series Heating Cables
©2020 EasyHeat www.easyheat.com 14030-001 Rev. 6

TABLE OF CONTENTS
GENERAL INFORMATION .......................................................................................................... 1
How Heating Systems Work .................................................................................................. 1
PRODUCT SELECTION ................................................................................................................ 1
RECEIPT & STORAGE .................................................................................................................. 1
Receipt ..................................................................................................................................... 1
Storage ..................................................................................................................................... 1
Withdrawal from Storage .....................................................................................................1
INSTALLATION ............................................................................................................................. 2
Warnings ....................................................................................................................................... 2
Scheduling ............................................................................................................................... 2
Pre-Installation Check ...........................................................................................................2
Heater Handling .....................................................................................................................2
Heater Cable Placement on Pipe ......................................................................................2
Straight Tracing .......................................................................................................................2
Spiraling .................................................................................................................................... 3
Attachment ............................................................................................................................. 4
Cutting the Heater Cable ....................................................................................................5
Installation Details ..................................................................................................................5
Power Connections, Splices and Terminations ....................................................................7
THERMAL INSULATION ............................................................................................................... 7
Pre-Installation Checks .........................................................................................................7
Installation ...............................................................................................................................7
Marking ....................................................................................................................................8
Thermostats & Sensors .............................................................................................................. 8
Electrical Requirements ........................................................................................................... 9
Voltage Rating ............................................................................................................................ 9
Electrical Loading ..................................................................................................................9
Ground Fault Protection .......................................................................................................9
Waterproong .........................................................................................................................9
Testing ........................................................................................................................................... 9
Recommendations ................................................................................................................ 9
Procedure ................................................................................................................................ 9
Periodic inspection record form ................................................................................... 10 – 11
Start-up .......................................................................................................................................12
Heat-up Time .............................................................................................................................12
Diversity Factor .........................................................................................................................12
OPERATION & MAINTENANCE ................................................................................................12
System Design, Installation & Documentation ...................................................................12
Preventive Maintenance ........................................................................................................12
Visual Inspections .....................................................................................................................12
Frequency ..................................................................................................................................12
Personnel Training ....................................................................................................................12
Maintenance.............................................................................................................................12
Piping Repairs ............................................................................................................................13
Damaged products .................................................................................................................13
TROUBLESHOOTING ................................................................................................................. 14
Heat Trace Installation Record ..............................................................................................15

1
GENERAL INFORMATION
This manual is designed for use with Easy Heat self-regulating pipe tracing heater cable
products. Applications include freeze protection and temperature maintenance, includ-
ing hot water supply. For applications not specically addressed, please contact your local
representative.
How Heating Systems Work
An electric heating cable system uses the electric heater cable to replace the heat that
is lost through the thermal insulation system. Replacing the lost heat allows the pipe and
uid inside the pipe to be maintained at a constant temperature. This will keep water from
freezing and bursting a pipe, or a liquid from setting up (congealing) and plugging the pipe.
Simple systems may turn the entire system on with a contactor or switch, while others will use
a thermostat with each heater cable to control the temperature.
INSULATION
HEATER CABLE
PIPE
Figure 1
PRODUCT SELECTION
Check and verify that the proper heater cables are being installed on each pipe and vessel.
If no design/installation documents exist, check the appropriate Easy Heat Heat Application
Guide to determine the proper equipment for the application.
RECEIPT & STORAGE
Receipt
• Compare the materials against the shipping bill to verify receipt of proper materials.
• Inspect heating cable and components for transit damage. Insulation resistance tests
on each spool of cable are recommended.
• If design documents (line lists or per circuit bills of material) exist, check the received
materials against the lists to verify all needed materials. If no design documents exists,
keep a receipt log of all materials received.
Storage
Cables and system components should be stored in a clean, dry area. The equipment should
be protected from mechanical damage during storage. The storage temperature range is
-40 °F to 140 °F (-40 °C to 60 °C).
Withdrawal from Storage
It is recommended that a check out record be kept (in conjunction with the receipt records)
on equipment as it is removed from storage. This will serve to identify developing material
shortages before they happen - since project additions often cause the use of material for
other than designated piping.

2
INSTALLATION
Warnings!
While there are many acceptable ways of installing Easy Heat electric heating equipment,
certain actions can be dangerous to personnel and your installations. Please take care
to avoid the following problems:
• DO NOT TWIST THE BUS WIRES TOGETHER AT EITHER END OF THE CABLE. Each of these
wires has either voltage or neutral applied to it; twisting them together will cause a
short circuit.
• INSULATE BLACK POLYMER SURROUNDING BUS WIRES. The black compound extruded
around the bus wires is electrically conductive and should be treated as a conductor.
Follow connection kit installation instructions carefully.
• ALL ELECTRICAL CONNECTIONS IN THE SYSTEM SHOULD BE SEALED AGAINST MOISTURE.
To prevent electrical arcing and re hazard, all cable connections and electrical
wiring connections should be sealed against moisture. This includes the use of proper
cablesealingkitsand the moisture proong of all wire connections. Use only Easy
Heat connection kits.
• DO NOT EXPOSE HEATER CABLES TO TEMPERATURES ABOVE THEIR MAXIMUM RATINGS.
Higher temperatures can greatly shorten the life of a heater.
• IMMEDIATELY REPLACE ANY DAMAGED HEATER CABLE OR COMPONENTS. Failure to replace
any damaged components (heater cable, components, or thermal insulation) will
result in system failure.
• CLASSIFIED AREAS (EXPLOSIVE DUST OR GAS) REQUIRE THE USE OF SPECIAL ELECTRICAL
COMPONENTS. Any area having explosive gases (such as chemical/petrochemical
installations) or explosive dusts (such as coal handling or graineries) require special
cable, connection components and control components that are approved for use
intheseareas.Installationofnon-approvedproductscanresultinresorexplosions.
• INSTALLATION ON PLASTIC PIPE REQUIRES SPECIAL CONSIDERATIONS IN SELECTION AND
INSTALLATION. Refer to cable Application Guide for details in design and selection.
• MINIMUMINSTALLATIONTEMPERATURE-40°C(-40°F).
Scheduling
The installation of the electric heat tracing must be coordinated with the piping, insulation,
electrical and instrument installers. Cable installation should begin only after the majority
of mechanical construction is complete. Pressure testing of the pipe and installation of the
instruments should be complete prior to the start of the heater cable installation.
Pre-Installation Check
Walk the piping system and plan the routing of the heater cable. Use this check to verify
completion of instrumentation and mechanical work. All coatings (paint, etc.) must be
dry before attempting the heater cable installation.
Heater Handling
• Use a reel holder to roll out the heater cable.
• Keep the cable strung loosely, but close to the pipe being traced. This will avoid interfer-
ence with supports and other equipment.
• Leave an extra 12-18" (305-457mm) of heater cable at all power connections, tee splices
and end seal connections to facilitate easy completion of connections.
• ADDITIONAL HEATER CABLE IS REQUIRED ON VALVES, PIPE SUPPORTS AND OTHER EQUIPMENT.
See the installation detail section for exact lengths and method of installation.
• When handling the heater cable, avoid pulling it over or installing against sharp edges.
• Do not kink or crush the cable, including walking on it or driving over it with equipment.

Heater Cable Placement on Pipe
The heating cable may be installed either straight along the pipe or spiraled around the
pipe. Due to the increased labor and space requirements associated with spiraling cable
on pipe, spiraling is not normally recommended. Spiraling does, however, enable the pipe
heat loss to be very closely matched by the cable. Spiraling may thus reduce the amount
of cable required on a pipe. Spiraling also limits the ability to service pipe system components. If spiraling is necessary, appropriate information is provided herein.
Install heating cable at
8o’clockor4o’clock
positions
Figure 2
Straight Tracing
When straight tracing is used, install the heater cable in the lower half of the pipe. This helps
prevent physical damage to the heater cable from falling objects and being stepped on by
service personnel.
3
Spiraling
Spiraling increases the length of heater cable installed per foot of pipe.
Installed cable length = Pipe Length X Spiral Factor.
The following example and table will allow you to determine the correct pitch for each
pipe size and spiral factor:
Example: If 140' of cable are to be installed on 100' of 4" IPS pipe (spiral factor of 1.4), the
Pitch (P) would be 356mm (14”).
PITCH (P)
IN INCHES
Figure 3

4
Table 1
Spiral Pitch Table (Inches)
Pipe Spiral Factor
Size (feetofheatercableperfootofpipe)
(IPS) 1.1 1.2 1.3 1.4 1.5
1.0 NR NR NR NR NR
1.5 NR NR NR NR NR
2.0 17 NR NR NR NR
2.5 20 14 NR NR NR
3.0 24 17 13 NR NR
3.5 28 19 15 13 NR
4.0 31 21 17 14 NR
4.5 35 24 19 16 14
5.0 39 26 21 18 15
6.0 46 31 25 21 18
8.0 59 41 33 28 24
1inch=25mm
Attachment
For regular installations, the heater cable may be attached with berglass tape. Plastic wire
ties may also be used, provided the plastic has a maximum temperature rating equal to or
greater than the system requirements. The cable should t snugly against the pipe and be
secured at 305mm (12") intervals, as shown in Figure 5.
Figure 4
ALUMINUM
FOIL TAPE
INTERVALS
Figure 5
Notes
1) To prevent possible damage to the heater cable, do not fasten with metal straps, wire,
vinyl electrical tape or duct tape.
2) Aluminum foil tape should only be used if specied by design. The foil is most often
used on plastic pipe to offset the insulation effect of the plastic. See the Easy Heat Pipe
Tracing Systems’ Design Guide for details.
FIBERGLASS
TAPE
1 FOOT

Cutting the Heater Cable
Do not cut the cable until it is attached to the pipe. Conrm the allowances for terminations,
connections and heat sinks (valves, support, etc.) before cutting the cable. Heater cable
power is not affected by cutting to length. Protect all heater cable ends from moisture or
mechanical damage if exposed for long periods of time.
Installation Details
Heater cables should be applied in a manner to facilitate cable servicing and the easy
removal of valves and small in-line devices without the need to remove excessive thermal
insulation or having to cut the heater cable. The best way to accomplish this is to loop the
cable in the area of power connections, splices and piping devices. See diagram. The
amount of heater cable installed on each valve, hanger, etc. varies with the pipe size and
type of device. Table 2 gives the correct additional cable to be installed on each device.
Table 2—Extra Cable at Devices, Feet
PIPE FITTING TYPE
Pipe Flange Vent & Pipe Globe, Ball & Gate
Size(in) Pair Drain Support ButteryValves Valve
.50 .30 1.0 1.0 1.0 1.0
.75 .30 1.0 1.5 1.0 1.5
1.00 .30 1.0 1.5 1.0 2.0
1.50 .30 1.0 2.0 1.5 2.5
2.00 .30 1.0 2.0 2.0 2.5
3.00 .30 1.0 2.0 2.5 3.0
4.00 .50 1.0 2.5 3.0 4.0
6.00 .80 1.0 2.5 3.5 5.0
8.00 .80 1.0 2.5 4.0 7.0
10.00 .80 1.0 3.0 4.5 8.0
12.00 .80 1.0 3.0 5.0 9.0
14.00 1.0 1.0 3.0 5.5 10.0
16.00 1.0 1.0 3.5 6.0 11.0
18.00 1.0 1.0 3.5 7.0 12.0
20.00 1.0 1.0 3.5 7.5 13.0
24.00 1.0 1.0 4.0 8.0 15.0
5
Notes
1) Nominal cable length in feet. Extra cable is minimum required for various in-line pipe
ttings to compensate for greater areas of heat loss and to allow servicing of device.
2) Values above are based on area average of various ttings available, with the assumption that tting insulation will be equivalent to pipe insulation. The nominal length
of tracer to be applied to a particular tting would be the value shown in this chart plus
the ange-to-ange length of the tting.
3) For a Flanged Valve Adder choose Valve Type then add one Flange Pair for total adder
length.
6
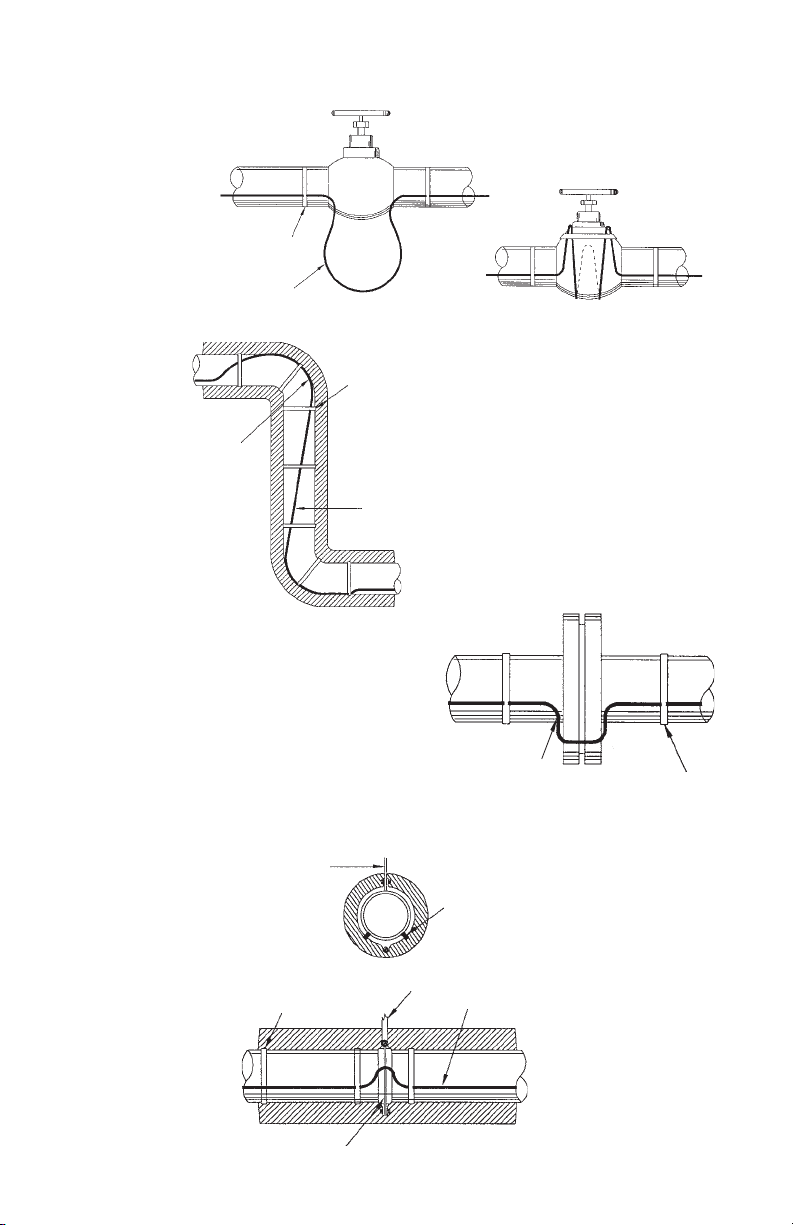
The following gures show installation details for various typical situations:
Figure 6
Figure 7
Heater cable should
be positioned on
the outside radius of
all elbows on pipes
2" in diameter and
larger.
FIBERGLASS
TAPE
HEATER
CABLE
ELBOW
VALVE: TYPICAL
INSTALLATION METHOD
(may vary for different valve shapes)
FIBERGLASS
TAPE
HEATER
CABLE
Figure 8
FLANGE
Figure 9
BAR HANGER
FIBERGLASS TAPE
Do not clamp heater
cable under hanger bracket.
HEATER
CABLE
FIBERGLASS
TAPE
HANGER SUPPORTBAR HANGER
HEATER
CABLE
HEATER CABLE

Figure 10
SHOE SUPPORT
7
Side
View
FIBERGLASS TAPE
PIPE SHOE SUPPORT
FIBERGLASS TAPE
Bottom
View
Power connections, splices and terminations
Only Easy Heat approved termination, connection and splice kits may be used. Failure
to do so will void warranties and agency approvals. Installation instructions in each
component kit must be followed regarding heater cable preparation and assembly.
Make end seals (terminations) and splice connections before making the power
connections. It is recommended that all heater cables be labeled as they are installed
with a discrete circuit number. This will facilitate identication, components needed
and electrical wiring during later phases of the installation. Power connection kits
utilize an adapter plate kit for installation on instrument tubing and tanks. Installation
instructions for mounting are included in each kit.
Figure 11
POWER
CONNECTION
KIT
CABLE LOOP
HEATER
CABLE
END SEAL
IN-LINE SPLICE
UNDER INSULATION
(SHOWN)
INSULATION
HEATER CABLE
PIPE SHOE
SUPPORT
HEATER
CABLE
HEATER
CABLE
LOOP
PIPE CLAMPS
Note
Heater cable power connections and end seals are required for each heater cable.
Heater cable splices, tees, and thermostats are used as needed.
FIBERGLASS
TAPE
TEE SPLICE UNDER
INSULATION (SHOWN)
THERMAL INSULATION
Pre-Installation Checks
Inspect the heater cable and components for correct installation and possible damage. In particular, verify that:
• The proper extra amount of heater cable has been installed at each valve, ange,
pipe support, etc. and that all cables are free from physical nicks, tears or gouging.
• Connections, splices and end seals are correctly installed, including cable seals at
power connection enclosures.
Installation
Check the thermal insulation type and thickness against the design criteria. Changes
in insulation type or thickness may require a different wattage heater cable. Verify that
all pipe work, including wall penetrations, ttings, etc. has been completely insulated.

8
Check the system to verify that:
• Insulation is not wet from rainfall or other moisture sources prior to the application of
waterproong.
• Lap joints on vertical piping are properly overlapped–higher piece lapped over the top
of lower piece.
• Band seals are used at lap joints to prevent the ingress of water.
• All penetrations of lagging (valve stems, hanger rods, etc.) are properly water proofed.
• Irregular shaped items (i.e. pumps, etc.) are properly waterproofed.
To minimize potential damage to the heater cable, install the insulation as soon as possible. It is recommended that another insulation resistance (megger) test be done after
the insulation has been installed to verify that the heater cable was not damaged during
the insulation installation.
Marking
Install “Electric Trace” signs on alternate sides of the piping at regular intervals, as a warning
to maintenance personnel. Permanently mark the outside of the insulation lagging with the
location of heater cable components. This will facilitate any future servicing requirements.
Thermostats & Sensors
Temperature sensitive applications will require the use of a thermostatic control. Selection
of the proper thermostat must consider voltage and amperage ratings of the device as
well as the suitability of housing for the environment (explosion proof, rain tight, corrosion resistance, etc.). Thermostat sensor bulb must be attached to the pipe at a location
representative of the entire length of pipe being protected by heating cable. If possible,
thermostat housing should be mounted as close as possible to the power connection kit.
It may be attached to the power connection kit provided code requirements are met with
regard to conduit connections seals, etc. To sense the coolest air temperature, ambient (air
sensing) thermostats should be mounted in the shade when possible. When using pipe-sensing
thermostats, the bulb (sensor) should be mounted on the opposite side of the pipe from the
heater, or at least 90° away from cable. This will allow the thermostat to sense the actual
pipe temperature and not be inuenced by the heater temperature. Mount the bulb at
least three (3) feet from the closest heat sink if possible.
Moisture inside thermostat enclosure will cause both corrosion and electrical shorting
problems. The potential for this type of problem, can be greatly reduced by:
• Proper sealing of all enclosures openings.
• Keeping enclosure cover closed and secured as much as possible during installation
sequence
• Proper closing and sealing of the cover to prevent leaking into the housing.
• Use of a moisture proong/electrical spray (aerosol) sealant on thermostat and electrical
connections (including all metal parts) at completion of installation.
• Connection and use of space heater if thermostat is so equipped. Do not de-energize
space heater during summer months.

Electrical Requirements
Voltage Rating
Verify that the heater cable voltage rating is suitable for the service being used. Refer to
Easy Heat Application Guide if further information is required.
Electrical Loading
Size over-current protective devices according to Easy Heat Application Guide. If devices
are other than standard thermal magnetic circuit breakers, consult Easy Heat.
Ground Fault Protection
Ground fault circuit breakers are required on all heater constructions per the National Electric
Code. Typically, 30mA trip devices are required due to the capacitive leakage of the heater
cable construction. Devices with lower trip levels can result in nuisance tripping. Consult Easy
Heat for further information.
Waterproong
Moisture penetration of the electrical system is the single largest source of problems in a heater
cable system installation. Therefore, particular care must be given to the proper sealing of all
electrical connections and splices. Heater cable connection kits will provide a proper seal
for the heater cable itself, when installed as per kit instructions. All other electrical connections (power wiring, thermostat connections, panel and breaker connections, etc.) must be
sealed or moisture proofed appropriately. Either mastic shrink tube or an aerosol electrical
insulative sealant should be used on all connections to reduce any moisture penetration.
The sealant will also reduce the potential for corrosion on exposed metal parts.
Testing
Recommendations
Electrical tests are recommended at specic points in the receipt and installation of the
heater cable. This periodical testing is designed to provide early warning in the event of
damage to the heater cable during installation. Installation costs of the cable and thermal
insulation can be signicant. Early identication of any heater cable damage is the most
economic approach to an installation. An insulation resistance test is recommended at
the following point of the installation process:
• UPON RECEIPT of the heater cable
• BEFORE thermal INSULATION installation
• IMMEDIATELY AFTER thermal insulation installation
• As part of a PERIODIC MAINTENANCE program
9
Procedure
The insulation resistance test is used to check for damage to extruded jackets. Connections
for the megger are made as shown in Figures 12 & 13.
FOR HEATER CABLES WITH BRAID, TEST
FROM HEATING CABLE BUS TO BRAID
Note
Test should use at least a 500
VDC megger. Do not use a meg-
Figure 12
ger with an excess of 2500 VDC.
Minimum acceptable readings
should be 20 megohms per circuit, regardless of length.

10
Figure 13
A record should be kept of the readings taken from the time the cable is rst installed on
the pipe. A history of the insulation resistance reading can be helpful in spotting moisture
ingress into the electrical system (by seeing a gradual decline in the insulation resistance or
physical damage to the heater cable (sharp decline in the insulation resistance). A sample
record for this is shown in Figure 14.
Periodic Inspection Record Form
The Periodic Inspection Record Form may be used in one of two ways:
1) One sheet per circuit. The results of periodic tests of a single circuit are posted in ver-
tical columns, beginning on the left and working toward the right. This allows easy
comparison of test values for up to seven test sequences on an individual circuit.
2) One circuit per column. Test data for a single test sequence on as many as seven
circuits can be recorded on a single sheet.
FOR HEATER CABLES WITH BRAID AND
OUTER JACKET
Test A – From heating cable bus wires
to braid
Test B – From braid to metal pipe
Circuit Number
Heater Type
Circuit Length
Periodic Inspection Record
Freeze Protection Circuits
Perform these checks as season requiring use
approaches.
Temperature Maintenance Controls
Perform these checks at least twice per year.
Maintenance Checks for ______________Month ____________Year _____
Visual inspection inside connection
box corrosion, moisture, etc.
Damage or cracks (leaks) in insulation
seals at valves, hangers, pumps, etc.
Heater cable properly connected and
grounded. Heater cable and connections
insulated from connection box.
Thermostat checked for moisture,
corrosion, set point, switch operation,
and capillary damage.
Megger tests performed at power
connection with both bus wires
disconnected from power wiring
Circuit voltage at power connection.
Circuit amperage after 5 minutes.
Pipe temperature at time amps
were measured.
Watts/Ft.
Volts × Amps = w/ft.
feet
All connections, boxes, and thermostats
have been resealed.
End seals, covered splices and tees
marked on insulation cladding.
Initial
Date
Initial
Date
Initial
Date
Set Point
Initial
Date
Reading
Initial
Date
Reading
Reading
Reading
Initial
Date
Initial
Date
Initial
Date
11
Remarks & Comments
Periodic Inspection Record Form
Figure 14

12
Start-up
Heat-up Time
Heat-up capacity (the ability to heat the pipe and it’s contents rapidly) is not normally designed into the system. Cold start-ups should allow adequate time for the pipe to come up
to temperature.
Diversity Factor
If the electrical supply capability is limited, then a diversity factor may be used in a cold start
situation (trying to start the entire system up in very cold weather). This is accomplished by
staggering the initial turn on of the various heater cable circuits such that the inrush currents
occur in a sequential fashion rather than all at once.
OPERATION & MAINTENANCE
System Design, Installation & Documentation
The heater cable system must be properly designed, installed and documented. This docu-
mentation should at least included line lists and location identication documentation. As
built installation drawings provide the optimum maintenance tool. Test records should also
be considered as part of the system documentation requirements. See Figure 15.
Preventive Maintenance
A preventive maintenance program is needed which will encompass both visual and
electrical checks of the system. These should be done not only before initial operation
of the system, but also on a scheduled basis. The checks should also be done after any
maintenance has been performed.
Visual Inspections
• Thermal insulation. Check weatherproong for damage, missing seals, cracks or gaps in
caulking and mastic coatings, damaged or missing lagging. When damage does exist, the
insulation will need to be repaired or replaced, and then resealed. WET INSULATION HAS
POOR INSULATING PROPERTIES, THEREFORE THE INSULATION MUST BE KEPT DRY. If insulation
has been damaged, check the heater cable for damage– replace any damaged sections.
• Inspect junction boxes, connection boxes and thermostats for corrosion, moisture or foreign
matter.
• Tightness of electrical connections, proper electrical insulation of heater cable wires, adequacy of moisture seal on electrical connections and that a minimum of one (1) inch of
electrically insulated heater extends above the grounding connection. No strands of the
ground braid should extend above this connection.
• Check all thermostats or sensor capillary leads to verify they are tied back and shielded
from physical damage.
• Verify all enclosure, connection box, etc. covers are properly closed and that the thermostat is switching off and on by measuring current ow in the circuit when the unit switches
on. Reset the knob to the proper temperature after completion of the test.
Frequency
Inspections should be made prior to the start of the freeze season on freeze protection systems.
Process maintenance systems should be checked on a frequent base, at least twice a year.
Personnel Training
Qualied maintenance personnel must maintain the system. It is recommended that periodic training programs be utilized to assist in keeping maintenance personnel up to date
on equipment and procedures.
Maintenance
The heater cables will not require any maintenance. Mechanical temperature controls
should be sprayed with a moisture repellent/corrosion inhibitor once a year on all metal parts.

Piping Repairs
Disconnect the electrical connection for the heater cable and protect it from mechanical or thermal damage during the repair. Check the heater cable installation after the
repairs per established procedures. Replace and water seal the thermal insulation system.
Damaged Products
Do not attempt to repair a damaged heater cable; replace the entire section. Fault currents will often destroy the connection between the bus wires and the heater core material
from the fault location to the power supply end of the circuit.
Replace the damaged heater cable immediately. If cable core is left exposed, moisture
migration into the undamaged section of the heater cable may cause electrical shorting
in that cable after repair of the damaged section.
Any heater cable exposed to ame should be removed from service immediately and
replaced. Further re damage could result if energized.
Troubleshooting
SYMPTOMS PROBABLE CAUSE CORRECTION
A. Circuit Breaker
Trips (Standard)
B. Circuit Breaker
Trips (Ground
Leakage Type)
1. Circuit breaker undersized.
2. Circuit oversized.
3. Start-up at too low temp.
1, 2, 3. Re-establish what the current
loads are going to be and resize the
breakers.*
4. Defective circuit breaker. 4. Replace circuit breaker.
5. Connection and/or splices
may be shorting out.
6. Physical damage to the
heater cable may be
5, 6. Locate and repair incorrect
connections, splices, or damaged
sections of heater cable.** Megger
per installation instructions.
causing a short.
7. Wires connected at end
seal.
7. Disconnect wires and perform
a current check for possible other
damage.
1. All of section A. 1. All of section A.
2. Excessive moisture in connection boxes or splices. This
can usually be veried by
Megger test.
2. Dry out and re-seal connections
and splices. Megger per Installation Instructions (20 megohms min.).
Work on connections outside the
thermal insulation rst, going to the
the thermal insulation rst, going to
the below insulation connections
and seals after the others have been
eliminated.
3. Nick or cut in heater or
moisture present.
3. Locate and repair or replace damaged heater cable or power wire.**
13
* Check to see if existing power wire sizing is compatible with larger sized breakers.
** To locate shorting problems, follow these steps:
1) Visually inspect the power connections and splices that are outside of the thermal insulation for proper
installation.
2) Check around the valves, pumps, and any area where there may have been maintenance work done, for
visual indications of damage.
3) Look for crushed or damaged insulation lagging along the pipe.
4) Inspect heater cable splices under the thermal insulation.
5) If you have not located the problem by now, you will have to isolate one section of the heater cable at a
time until you determine the general area of damage. First, isolate by disconnecting any tees or splices then
remove insulation from that area until the specic damage is found. For long runs of cable, it may be neces
sary to cut the cable in half to isolate the shorted section.
-

14
Troubleshooting
SYMPTOMS PROBABLE CAUSE CORRECTION
C. Power output is
zeroorlowerthan
rated.***
D. Power output
appears correct
but pipe temps.
are below design
value.
1. Low or no input voltage. 1. Repair electrical supply lines
equipment.
2. Circuit is shorter than 2. Check routing and length
cable (use “as builts”),
power requirements.
a. splices or tees may not
a. connect and recheck the power.
have been connected.
b. Heater cable may have
been severed.
3. Improper crimping
b. Locate and repair the damaged
heater cable. Recheck the power.
3. Re-crimp using correct procedure.
causing a high resistance
connection.
4. Control thermostat is wired
in the opened position.
5. Pipe is at an elevated
temp.
6. Heater cable has been
Rewire in the normally closed
position.
5. Check pipe temperature and
recalculate the output.***
6, 7. Replace the heater
exposed to excessive
moisture.
7. Heater cable has been
exposed to excessive
temperatures.
1. Insulation is wet. 1. Remove and replace with dry
insulation and insure proper weather-
proong.
2. Insufcient heater cable
was used on valves,
supports, and other heat
Splice in additional heater cable
but do not go over maximum circuit
length.
sinks.
3. Thermostat was set
3. Reset the thermostat.
incorrectly.
4. There are thermal design
inconsistencies.
4. Check with the local or factory
representatives for design conditions.
Modify as recommended.
heater
and recalculate
*** The power output on lower resistance heater cables is temperature sensitive and requires a special procedure to determine its value.
1) Check the pipe temperature under the thermal insulation.
2) Allow heater cable to stabilize for 10 minutes and then measure the current.
3) Calculate the power (watts/ft) of the heater cable by multiplying the current by the input voltage and divid
ing by the actual circuit length, l × V / Ft = Watts/Ft.
4) Compare the measured value to the power output curves for the heater cable at the measured pipe
temperature. If the heater cable’s actual output is substantially below the theoretical output, the bus wire
interface with the core has been damaged by the fault current and the cable must be replaced. This is not
a highly accurate method of analysis, so use discretion in comparing theoretical and actual values.
-

Heat Trace Installation Record
1. Circuit No. ___________________________
2. Receiving Documentation Date____________________
Item DESIGN ACTUAL
A. Cable Type ________________ _________________
B. Cable Length ________________ _________________
3. Receiving Testing Date____________________
A. Check for physical damage.
O.K.____________ Damage____________
B. Continuity Check
Check for continuity between power leads.
O.K.____________ Damage____________
C. 500VDC min., 2500 VDC recommended, megger
check between leads and sheath, 20 megohms min.
Megohms____________________________
D. Lot No. No._________________________________
4. Post Installation Testing Date____________________
15
A. Check for continuity between cold leads.
O.K.____________ Open____________
B. 500VDC min., 2500 VDC recommended, megger
check between leads and sheath, 20 megohms min.
Check for continuity between power leads.
O.K.____________ Damage____________
C. Visually Check Cable Installation Prior to Release
for Thermal Insulation.
Megohms____________________________
D. Lot No. No._________________________________

16
5. Final Testing & Commissioning Date____________________
A. Circuit approved for testing by client.
Approved____________________________
B. 500VDC min., 2500 VDC recommended, megger
check between leads and sheath, 20 megohms min.
Megohms____________________________
C. Energized Testing DESIGN ACTUAL
(All test data to be within 10% of design data)
1. Circuit Voltage ________________ _________________
2. Initial Current ________________ _________________
3. Current after 15
mins. of operation ________________ _________________
4. Current after 30
mins. of operation ________________ _________________
5. Pipe temperature ________________ _________________
6. Circuit Acceptance
This circuit has been tested and documented in accordance with the above itemized
data. Ths circuit by:
Contractor __________________________________________________________
Date __________________________________________________________
Client __________________________________________________________
Date __________________________________________________________
The Heat Trace Installation Record can be used to monitor the initial installation
and check-out process. This form can be used in conjunction with the Periodic
Inspection Record Form shown in Figure 14.
Figure 15


©2020 EasyHeat www.easyheat.com 14030-001 Rev. 6
 Loading...