

EarthWay 1001-B PRECISION Assembly And Operating Instructions Manual
1001-B PRECISION GARDEN SEEDER®
EarthWay
EarthWay
E
a
r
t
h
W
ay
R
PRECISION GARDEN SEEDER
®
MODEL 1001-B
ASSEMBLY and OPERATING INSTRUCTIONS
Congratulations on the purchase of this new 1001-B Earthway Precision Garden Seeder. Please contact us if you have any
difculty with assembly or operation of this product. We can be reached via the telephone at 800-294-0671 or 574-848-7491
Monday - Friday 9:00am ~ 4:00pm or visit us online at www.earthway.com The 1001-B comes with lifetime technical
support, email us at techsupport@earthway.com.
HELPFUL HINTS: READ THE DIRECTIONS BEFORE ASSEMBLY
5 This seeder comes partially assembled, requiring you to install the wheels, handle assembly and row marker.
5 Assembly time is approximately 15 minutes with basic hand tools.
5 Clean and dry your seeder thoroughly after each use.
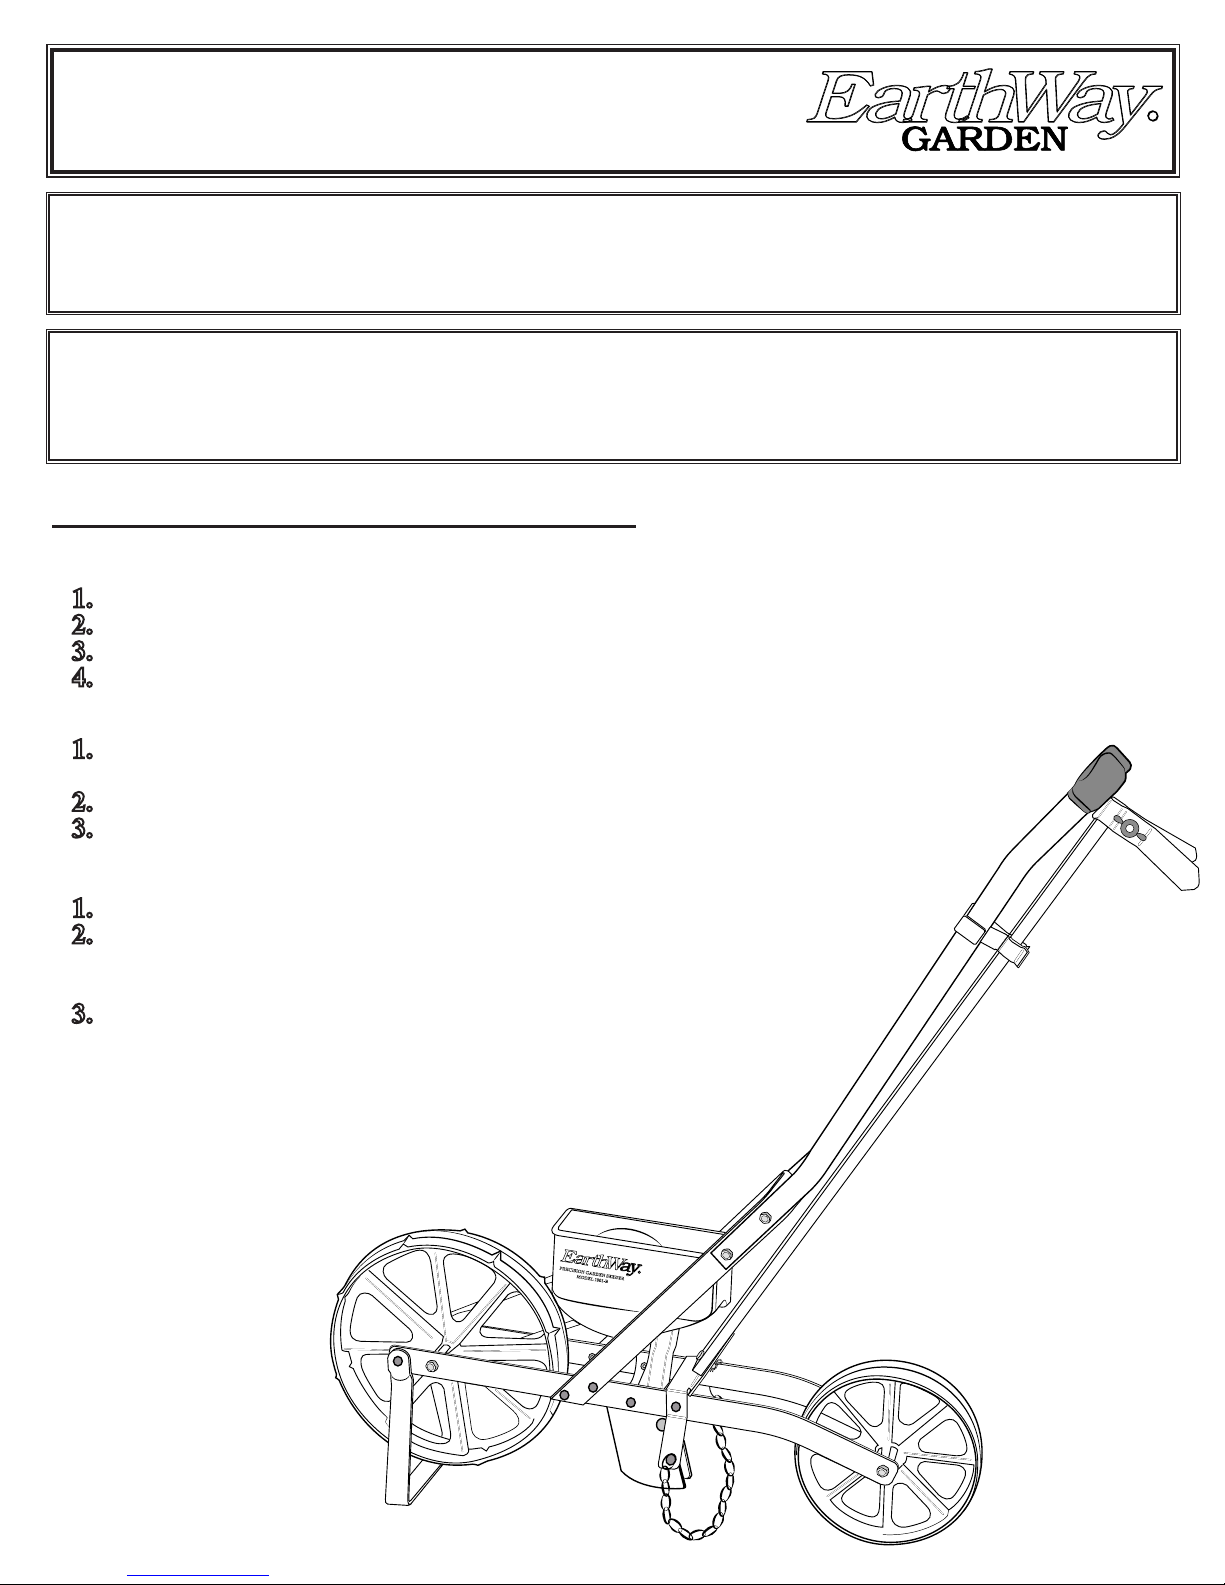
PRECISION GARDEN SEEDER ~ Assembly
Model 1001-B (Refer to Figure 1, Page 3 for illustration)
REAR WHEEL
Lower kick stand at front to hold planter upright.
Remove nut, bolt, and axle (22, 18, & 25) from frame.
Insert axle through rear wheel (17), place between frame, and line up with holes in end of frame.
Reinstall bolt and nut (18 & 22), and tighten.
R
R
HANDLE
Remove nuts and bolts from Plastic Bag. (These are special lock nuts. A wrench will be required to remove
and install them).
Bolt handle (8) in place using bolt & nut (13 & 14) as shown in Figure 1, Page 3 for illustration.
Install the Row Marker Retainer Clip (10) from the front to the back and press into place in the holes
on the handle.
ROW MARKER
Place row marker shaft (1) in front of row marker bracket and line up holes.
Insert clevis pin (7) through row marker shaft (1) and row marker bracket, and
insert hair pin clip (6) through clevis pin. When not in use, secure the row marker
shaft to the New Row Marker Retainer Clip (10) to hold in place.
A cord may be tied to the handle bracket (24) and row marker shaft (1) for
lowering and raising the row marker.
1-2012 Pt. #52101
1001-B precision Garden seeder
OPERATION (Refer to Figure 1, Page 3 for illustration)
You will nd one seed plate in place in the hopper, the rest in the box. A. To remove the plate, hold pulley (12) and
belt (11) stationary with one hand and rotate the seed plate approximately 1/2” in the “OFF” direction as indicated by
an arrow on the seed plate. B. Push the seed plate off the hub through the hole just above the pulley. It will slip off
easily.
To select the desired seed plate, see the Seed Plate Guide if the seed is of similar size and shape as those listed. It is
best to experiment before planting. If more distance is desired between seeds, place a piece of masking tape over, or ll
with bees wax every other hole or as required in the seed plate.
To install the desired seed plate, hold the seed plate at an angle with the bottom against the straight wall in the seed
hopper. Line up the slots against the inside of the seed hopper and rotate it approximately 1/2” in the “ON” direction as
indicated by the arrow on top of the hopper until the cam action locks the seed plate in place on the hub. Do not force.
OFF or ON directions are also indicated on the seed plates.
Pour seeds in the seed hopper. CAUTION: Do not ll the hopper above the center of the seed plate.
NOTE: All the seed, especially small seed, will not be picked up by the plates leaving a small amount in the bottom of
the hopper. Tilt the seeder to the right as you move down the row to help remove most of the seed if required.
Next set the planting depth with the wedge-shaped ground opener (27) located directly under the hopper. Note that there
are graduations in both inches and millimeters on the front angles of the seed chute. Move ground opener until top edge
is in line with desired planting depth. Retighten wing nut after adjustment is made. Check the depth by moving the
seeder forward a few inches.
Mark out the rst row with string and stakes. Lower the row marker shaft and adjust the row marker to the proper width
for the next row. Lift the kick stand over the Front wheel. Be sure the cover chain (16) follows behind the ground opener.
You are now ready to plant.
To empty any remaining seeds, lower the kick stand and tip the seeder forward until all seeds are removed.
NOTE: When changing seed plates, be sure the seed hopper is completely empty.
NOTICE: Keep your seed hopper clean and free from dust, sand, dirt and seed treating materials.
MAINTENANCE (Refer to Figure 1, Page 3 for illustration)
Any accumulation of dust, dirt, or residue from chemically treated seeds in the seed hopper should be wiped out with a
cloth after each use. A build up of dirt may cause the seed plate to stick and seeds to pop out.
Under certain conditions static electricity may build up on the seed hopper and interfere with planting ne seeds. If this
situation should occur, wash the seed hopper and the seed plate with a mild dish washing detergent, and allow to dry.
 Loading...