

EarthQuake Beaver Owner's Manual
IDENTIFICATION
MODEL IDENTIFICA TION ........................................... 1
WARRANTY................................................................. 2
SAFETY RULES ......................................................... 3
General ..................................................................... 3
Setting Up................................................................. 3
Operating Location.................................................... 4
Safe Wearing Apparel ............................................... 4
Operating Safety....................................................... 5
T ransporting & Storage ............................................. 6
Service & Maintenance............................................. 6
ASSEMBL Y ................................................................. 7
General ..................................................................... 7
T ools Required .......................................................... 7
Hardware Description ................................................ 7
Chipper Cone ............................................................ 7
Handle ...................................................................... 7
Hopper ...................................................................... 8
Discharge Bag .......................................................... 8
Engine Oil................................................................. 8
CONTROLS & MAJOR COMPONENTS ...................... 9
Operating Controls .................................................... 9
Major Components.................................................... 9
OPERA TION.............................................................. 11
Description.............................................................. 11
Site Location........................................................... 11
Checks Before Starting .......................................... 12
Start-up .................................................................. 1 2
Operating Instructions............................................. 12
Material Processing ................................................ 14
Shutting Down ........................................................ 14
Waste Materials Guide............................................ 15
NORMAL CARE ........................................................ 16
Schedule ................................................................ 16
Servicing the Chipper/Shredder............................... 16
ST O RA G E..................................................................18
T emporary Storage.................................................. 18
Long T erm Storage.................................................. 19
TROUBLESHOOTING AND REPAIR ......................... 20
T roubleshooting....................................................... 20
Repair ..................................................................... 21
OPTIONS & ACCESSORIES .................................... 25
P ARTS LISTING........................................................ 26
MODEL IDENTIFICATION
Record your model number , manufacturer number , and
serial number in the space provided for easy reference.
The model and manufacturer numbers can be found on
the unit I.D . plate. Refer to the Engine Owner's Man ual
for location of engine serial number .
If you have a service problem requiring special
assistance and cannot contact a local dealer to help,
call the Customer Service Department at 715-822-2415.
CHIPPER/SHREDDER REFERENCE DA TA
Model Description/Number
M/N (Manufacturer's Number) S/N (Serial Number)
Dealer Name Date Purchased
ENGINE REFERENCE DA TA
Engine Make/Model Engine ID/Serial Number
WARNING
You must read, understand, and comply with all
safety and operating instructions in this manual
before attempting to setup and operate your
rototiller.
Failure to comply with all safety and operating
instructions can result in loss of machine control,
serious personal injury to you and/or bystanders,
and risk of equipment and property damage. The
triangle in the text signifies important cautions or
warnings which must be followed.
NOTICE
Upon start-up and shut down, you may hear the
metal-to-metal sound of the triangular hammers and
J-hammers positioning themselves on the rotor .
is a normal sound.
machine obtains full speed, please contact your dealer
for an inspection of your chipper/shredder .
If this sound continues after the
WARNING
This
Engine exhaust from this product contains
chemicals known, in certain quantities, to cause
cancer, birth defects, or other reproductive harm.
1
WARRANTY
Thank You . . .
for purchasing a Beaver chipper/shredder. We guarantee that this chipper/shredder conforms to
applicable North American safety standards, and have worked to ensure that it will meet your exacting
standards for usability and durability. With proper care, your chipper/shredder will provide many years of
service.
Please take time to read this manual carefully to learn how to operate and service your chipper/
shredder correctly. Failure to do so could result in personal injury or equipment damage. This manual
should be considered a permanent part of your chipper/shredder. Congratulations on your investment in
quality.
TWO YEAR
LIMITED WARRANTY
The Ardisam, Inc., Manufacturing Company warrants this chipper/shredder to be free from defects in material or
workmanship. Conditions of this warranty include:
What is covered under warranty:
For the first year from the date of purchase, Ardisam will furnish 100% par ts and labor to correct any defect
caused by faulty material or workmanship. During the second year of ownership, Ardisam will furnish 100% of the
parts to correct any defect caused by faulty material or workmanship. All repairs made under warranty must have
prior approval from Ardisam, Inc. Items subject to normal wear and tear, such as belts, batteries, tines, shear bolts
and tires, due to the nature of their function are not covered under this warranty. Any unit used in a commercial
application is covered for a period of 90 days after purchase. The engine is covered under a separate warranty
issued by the engine manufacturer as stated in the engine manual.
What is not covered under warranty:
This warranty applies only to products which have not been repaired or altered outside our factory. It covers only
defects resulting from normal use, and does not cover defects arising from misuse, alteration, negligence, or
accident. This warranty applies only to the original purchaser, and is not transferrable.
This warranty supersedes all other warranties either expressed or implied and all other obligations or liabilities
on our part. Ardisam, Inc., does not assume, and does not authorize any other person to assume f or us , an y
liability in connection with the sale of our products. This guarantee is v oid unless the warr anty card is properly
filled out and returned to Ardisam, Inc., Cumberland, Wisconsin, within two weeks of the purchase date.
ARDISAM
2
SAFETY RULES
GENERAL
The safety alert symbol shown here is used to
alert you to important safety information that
must be read, fully understood, and followed at
when handling, transporting, operating, servicing, or
storing your chipper/shredder unit.
Each safety alert symbol is followed by a "signal word"
that advised you of the relative intensity, or level, of the
hazard the safety alert instructions pertain to.
The following list of signal words is being provided to
help you understand the intensity levels associated with
each signal word used in this manual.
DANGER
The signal word "D ANGER" is used when a serious
injury or fatality will result if the safety instructions
that follow this signal word are not obeyed.
WARNING
The signal word "W ARNING" is used when a serious
injury or fatality could result if the safety
instructions that follow this signal word are not
obeyed.
CAUTION
The signal word "CA UTION" is used when personal
injury, or property or equipment damage could
result if the safety instructions that follow this
signal word are not obeyed.
DANGER
You must read and understand this manual and
all safety instructions and labeling completely,
before attempting to assemble, setup, transport,
operate, service, or install any options or
accessories on this unit.
This chipper/shredder is a powerful machine
designed for chipping of tree limbs and branches
up to 2-1/2” in diameter (3” on 8hp or 10hp model),
and is capable of amputating or causing serious
injury to fingers, hands, feet, and other extremities
if accidental contact with rotating chipper and
shredder blades should occur .
Always keep hands, feet, and other extremities out
of the shredder hopper, chipper cone, and
discharge area, and never wear loose fitting
clothing or jewelry that could get caught on tree
limbs, branches, or rotating parts, and pull your
hands, or other body parts into the rotating chipper/
shredder blades.
all
times
Safe operation of the chipper/shredder unit requires that
all operating and safety instructions be obeyed by
everyone who uses, services, or otherwise handles the
unit.
Although the instructions and warnings appearing in this
manual cover most normal operating conditions,
everyone using the chipper/shredder unit must also
always follow safe work practices while operating,
servicing, or handling the chipper/shredder unit under
any conditions not specifically covered in this manual.
SETTING UP
• Although most assembly has been done at the
factory , your chipper/shredder unit requires minor
assembly and the addition of engine oil before it can
be used. Nev er attempt to start or operate the unit
unless the chipper cone and shredder hopper have
been properly installed and engine oil has been
added.
• Perf orm the required assembly in an area where the
chipper/shredder can be handled comfortably . Nev er
attempt to assemble the unit unless the engine/base
assembly can be held or securely positioned for
assembly needs.
• Use proper hand tools for assembling the chipper/
shredder. Ne ver use tools such as adjustable openend wrenches that can slip off hardware as it’ s being
fastened. Never use toothed gripping pliers which
may damage hardware and make removal difficult.
• Always use only the hardware provided with this unit
for assembly. Never substitute parts, or mix the
proper position of parts during assembly . If a part is
missing, contact your local dealer for an exact
replacement.
• Assemble the unit in the sequence indicated in the
assembly instructions. Make sure all hardware is
properly tightened after assembly is completed and
before starting the unit.
• Make sure all required hardware has been installed.
Never attempt to start or operate the unit unless you
are sure that all required hardware has been used.
• Inspect the shredder hopper and chipper cone for any
debris, loose hardware, or other material that may
have f allen in during unpacking and assembly.
Always disconnect the spark plug wire from the
spark plug, before removing any objects.
• Never fill the fuel tank indoors! Gasoline vapors are
explosive, and can easily travel unnoticed to sources
of ignition, such as pilot lights or open flames on
water heaters, furnaces, stoves, or dryers, sparks
from electric motors and other electrical appliances,
3

SAFETY RULES
or unattended smoking materials. Contact with these
or any other ignition sources will cause an explosion
or fire, serious personal injury , and damage to
property and equipment.
• Never overfill the fuel tank. Fuel may run out of the
tank and contact hot surfaces on the chipper/
shredder motor and ignite, causing a fire and/or risk
of an explosion. Fill fuel tank to 1/2” below bottom of
filler neck only.
• Use only an approved container for fuel and always
handle the container with extreme care. Never smoke
while fueling the chipper/shredder or transporting the
fuel container.
• Never store the fuel container or chipper/shredder
indoors where there is a possibility of contact with
any ignition source such as a spark, open flame,
pilot light, heating element, or smoking materials.
• Never attempt to operate a unit indoors or in an
enclosed area. Engine exhaust contains Carbon
Monoxide, an odorless, colorless, and tasteless gas.
If inhaled, Carbon Monoxide can cause dizziness,
nausea, unconsciousness, and if contact is allowed
to continue, brain damage or death.
OPERATING LOCATION
• Always operate the chipper/shredder outdoors only,
on a firm, level, earthen or grassy area where the
unit will be stable and will stay in position. Never
attempt to operate the unit on a slope, or on wet or
slippery surfaces where you could slip and fall
toward the chipper cone or hopper openings.
• Never operate the chipper/shredder on asphalt,
concrete, or other hard or paved surfaces, as
material being ejected out of the discharge chute
could ricochet, causing injury to you or bystanders in
the immediate area.
• Never operate the chipper/shredder where children,
pets, or others who may be unaware of the potential
hazards associated with chipping and shredding
operations could enter the area unexpectedly and be
exposed to these hazards.
• Never operate the chipper/shredder on rocky or
gravel covered surfaces, as this surface debris could
enter the unit and cause extensive damage, or be
ejected out of the machine with sufficient force to
cause a serious injury to you or bystanders.
• Never operate the chipper/shredder in an area where
sparks from the muffler could ignite surrounding
brush or flammable materials. See following Fire
Hazard Warning!
DANGER
SP ARK/FIRE HAZARD
GAS ENGINES MA Y REQUIRE
A SP ARK ARRESTER FOR SAFE OPERA TION
If the engine on this unit is not equipped with a
spark arrester and is to be used on any forest,
brush, or grass-covered unimproved land, a spark
arrester must be added to the muffler before using
the engine on such land. The arrester must be
maintained in effective working order by the
operator. In the State of California, the above is
required by law (Section 4442 of the California
Public Resources Code.) Other states may have
similar laws. Federal laws apply on federal lands.
See your authorized engine service center for
muffler spark arrester options.
SAFE WEARING APPAREL
• Always wear safety goggles to protect your eyes
from flying debris when operating the chipper/
shredder. One pair of safety goggles has been
provided with the unit for your immediate use. All
others in and around the immediate area must also
wear approved safety glasses to protect their eyes
from flying debris.
• Wear hearing protection when the chipper/shredder is
to be used for prolonged periods of time, or whenever
noise reaches an uncomfortable lev el.
• When wearing work gloves, always wear only
properly fitted leather work gloves to protect your
hands from cuts and scratches caused by tree limbs
and branches. Never wear gloves with pull-ties or
straps, as these could get entangled with branches
and draw your hands into the chipper cone or
shredding hopper cutting areas.
• Never w ear loose fitting clothing, hanging jewelry ,
ties, scarves, or other items that could get caught on
tree limbs, branches, or moving parts, and draw y our
body parts into the cutting areas of the chipper cone
and shredder hopper.
• Always tie up long hair and prevent it from hanging
down, where it could become tangled in branches or
get caught in rotating parts and pull you into the
cutting areas.
• Even if you are wearing heavy-duty leather work
gloves, ne v er , e v er place y our hands in the chipper
cone or shredder hopper while the unit is running. If
you must reach in to clear a jam or free up branches,
shut the unit off, disconnect the spark plug wire at
the spark plug, and carefully remove or clear the
jammed material.
4

SAFETY RULES
OPERATING SAFETY
• Always obey the size limitations for tree limbs and
branches stated in the W aste Materials Guide portion
of this manual.
• Never leave the machine running unattended.
Always turn off the engine, wait for the rotor to come
to a complete stop, and disconnect and secure the
spark plug wire before leaving the area. Always
move the unit to a safe storage area when not in use.
• Always maintain secure footing and solid balance
while starting or operating the chipper/shredder.
Never lean directly over the machine.
• Always stand to the side of the chipper cone when
feeding tree limbs and branches into the unit, as tree
limbs, branches, and harder woods may whip around
while being chipped.
• Always keep hands out of the chipper cone and
shredder hopper when feeding materials. Never wrap
fingers tightly around branches as you are feeding
them into the unit, as a sudden inward surge could
pull your hands and arms into the unit.
- Check for loose parts, and loose or missing
hardware, and repair or replace as required.
- Check the oil level in the engine crankcase. See
the engine service manual shipped with your chipper/
shredder for additional information.
• Never attempt to clear clogs from the chipper cone,
shredder hopper or discharge chute while the unit is
running. Always shut the engine off, allow the rotor
to come to a complete stop, and remove the spark
plug wire from the spark plug before removing
excess materials.
• Never fill the fuel tank while the machine is running
or while the engine is hot. An unexpected spill of fuel
could contact a hot surface and ignite, causing fire or
explosion. Turn off the engine, and allow the engine to
cool before attempting refilling.
• Never attempt to perform any maintenance, repairs,
or attachment of accessories while the unit is
running. Always shut the unit off, allow the rotor to
come to a complete stop, and disconnect and secure
the spark plug wire from the spark plug before
beginning these activities.
• Always stand clear of the discharge area to avoid
being struck by ricochets or material being ejected
from the machine.
• Never allow material to build up in the discharge area
or shredding chamber, as this ma y cause new
material being fed into the machine to kick back with
sufficient force to injure you or other bystanders.
• Never allow material to build up around the engine
during chipper/shredder operation. This could result
in a fire or overheating of the engine.
• Never attempt to reposition or move the chipper/
shredder unit while it is running. Doing so could
cause the machine to tip over , and reaching to
steady the unit could result in accidental insertion of
your hands into the chipper cone or shredder hopper
areas.
• Never contin ue to operate the machine if it starts
making unusual noise or vibration. Shut the engine
off immediately, allow the rotor to stop, disconnect
the spark plug wire from the spark plug, and do the
following:
• Never remove guards, deflectors, or warning labels
from the unit. If any of these are found to be
missing, take the unit out of service until the
appropriate repairs can be made. Tag the machine so
others do not mistakenly attempt to use it while
awaiting parts or repairs.
• Always mak e sure that the shredding chamber ,
shredder hopper, and chipper cone are empty bef ore
restarting the unit after it has been idle. Attempting
to start the unit with material in these areas could
cause the engine starting cord to stop suddenly,
injuring your hand and fingers, or toppling the unit
over.
• Never tamper with any engine controls to alter or
increase maximum unit running speed. An over
speeding condition could cause the engine to
overheat, resulting in risk of fire, permanent engine
damage, and voiding of your product w arranty .
• Always comply with the engine manual instructions
for operating and periodic maintenance requirements.
Make sure the oil level is always in the safe zone,
and keep the air filter element clean.
- Inspect the unit for any signs of damage or foreign
material in the chipping or shredding areas.
Remove any solid material that may be preventing
the unit from operating properly .
• Never allow children to operate the machine. Do not
allow adults to operate it without proper instruction.
5

SAFETY RULES
• The unit must be shut off before attaching or
removing the bag. Shut the engine off, wait for all
moving parts to stop, remove and secure the spark
plug wire, then attach or remove the bag.
• Make certain that pieces of metal, rocks, bottles,
cans, or other foreign objects are not accidentally
included when feeding material into the chipper/
shredder.
TRANSPORTING AND STORAGE
• Always use the hopper handle and built-in wheels to
move the chipper/shredder . Never lift the unit using
the fuel tank for support. If the unit must be lifted ,
always use at least two people, and always grip the
unit securely using the front leg and hopper handle.
• If the unit must be tilted for transporting, consult the
engine manual for required preparation. Normally ,
fuel and oil must be drained to prevent dangerous
fuel leakage, and unwanted transfer of the sump oil
into the cylinder head area.
• Always refill the engine with the recommended oil
before attempting to use the unit again after it has
been drained for transportation.
• Only factory authorized service locations should
perform major service and repairs.
• Never attempt to make major repairs on this unit
unless you hav e been properly trained and certified
to work on large capacity chipper/shredder units.
Improper service procedures can result in hazardous
operation, equipment damage, and voiding of
manufacturer’ s warranty .
• Always observe safe refueling and fuel handling
practices when refueling the unit after transportation
or storage.
• Always follow the engine manual instructions for
storage preparations before storing the unit for
prolonged periods.
• Always follow the engine manual instructions for
proper start-up procedures when returning the unit to
service.
SERVICE AND MAINTENANCE
• Before performing any service or repair, shut the
engine off, wait for all moving parts to stop, then
disconnect and secure the spark plug wire.
• Always follow recommended engine and chipper/
shredder procedures when performing required
service and maintenance on the unit.
• Use only factory authorized replacement parts when
making repairs.
• Always comply with recommended factory
specifications on all settings and adjustments.
6
ASSEMBLY
GENERAL
All of the major assembly procedures on your new
Chipper/Shredder were performed at the factory , and
only the items listed in this section need to be taken
care of to make your unit fully operational.
TOOLS REQUIRED
• 1/2" Box Wrench or Socket
• 7/16" Box Wrench or Socket
• 1/4" Hex Wrench
• Phillips Screw Driver
• Hex (Allen) Wrench
HARDWARE DESCRIPTION
The hardware pack included with your unit contains the
items listed below . (Additional hardware ma y be involv ed
for other models.)
Description Qty .
• BOLT , He x Head 5/16-18 x 1 1
• BOLT , Hex Head 5/16-18 x 3/4 2
• BOLT , Hex Head 5/16-18 x 1/2 2
• W ASHER, Flat 5/16 4
• LOCKWASHER, 5/16 2
• CAPSCREW, Hex Sock et 1/4-20 x 3/4 6
• NUT , Flange (Whiz-lock) 1/4-20 6
• WASHER, 1/4 4
Figure 1. Installing the Chipper Cone
Figure 2. Installing the Hopper Handle
Be sure to clean all hardware threads of paint and debris
before assembling.
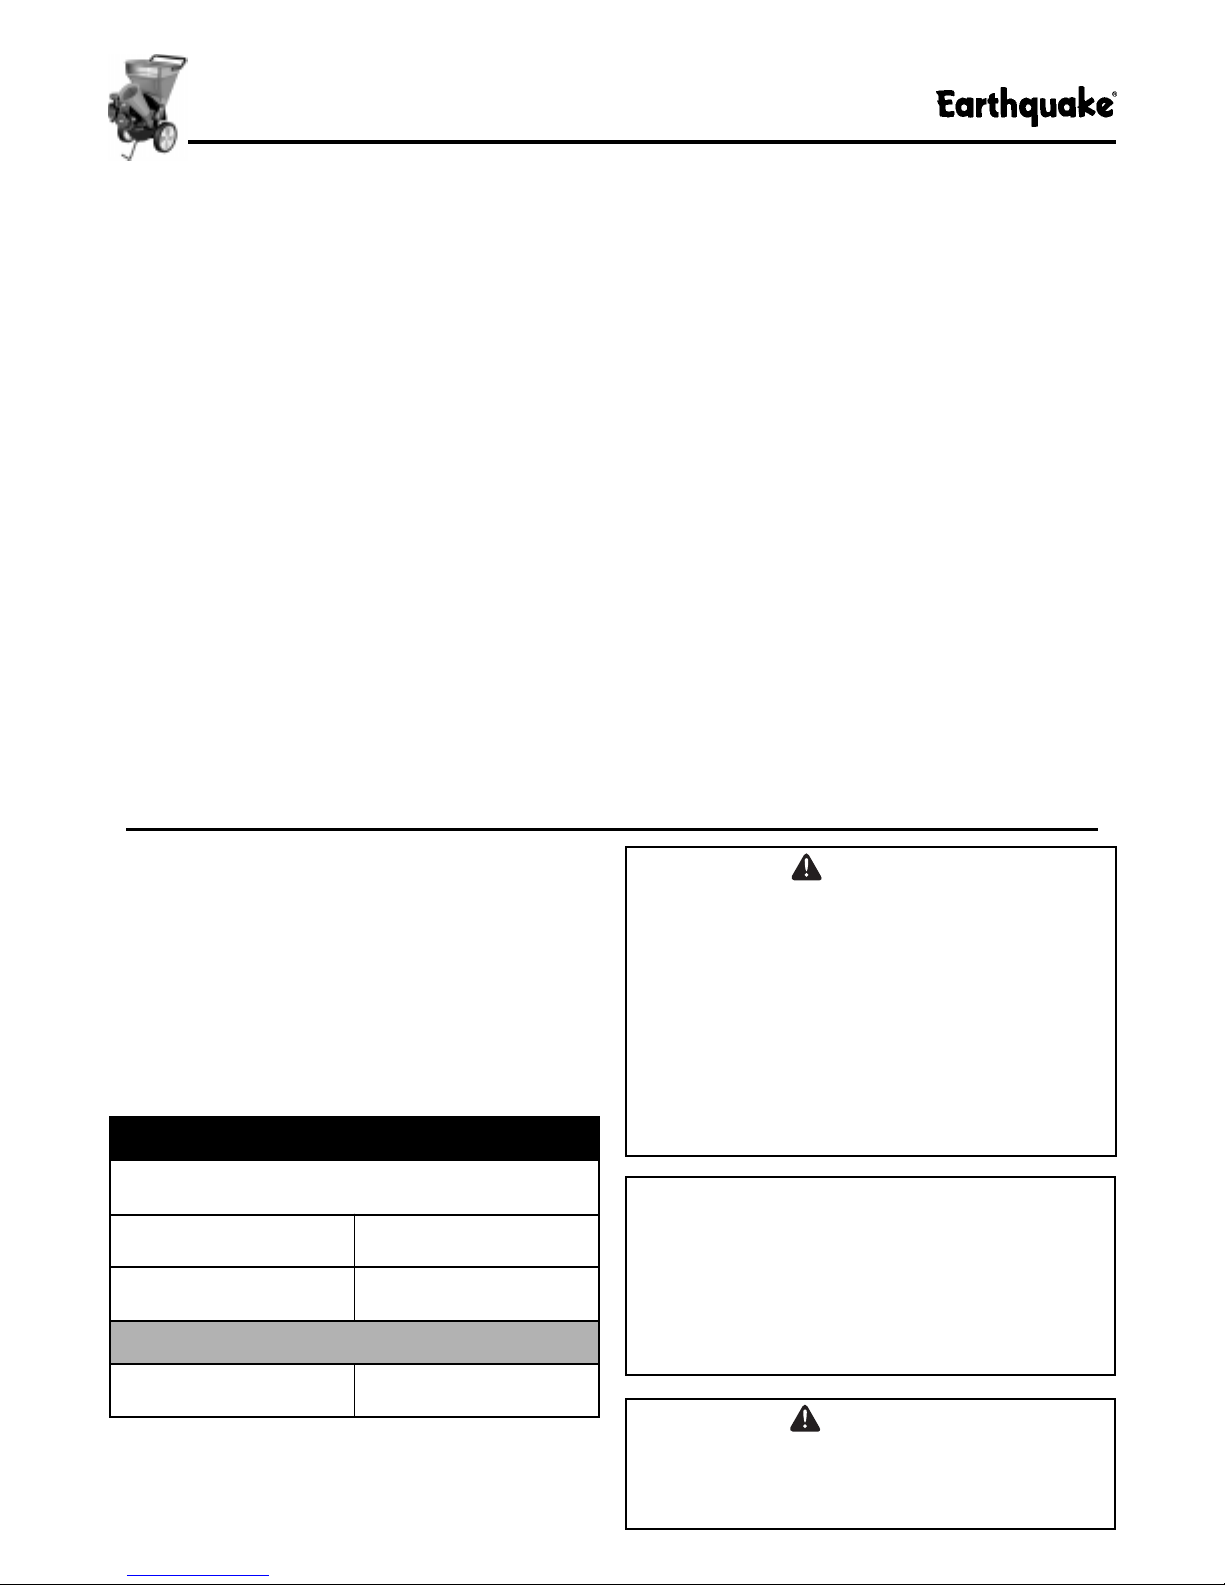
CHIPPER CONE
1. See Figure 1. P osition the chipper cone assemb ly
base over the three 5/16-18 threaded studs protruding
from the engine plate, and attach using (3) 5/16-18
whiz nuts.
2. Tighten whiz nuts securely using a box or socket
wrench.
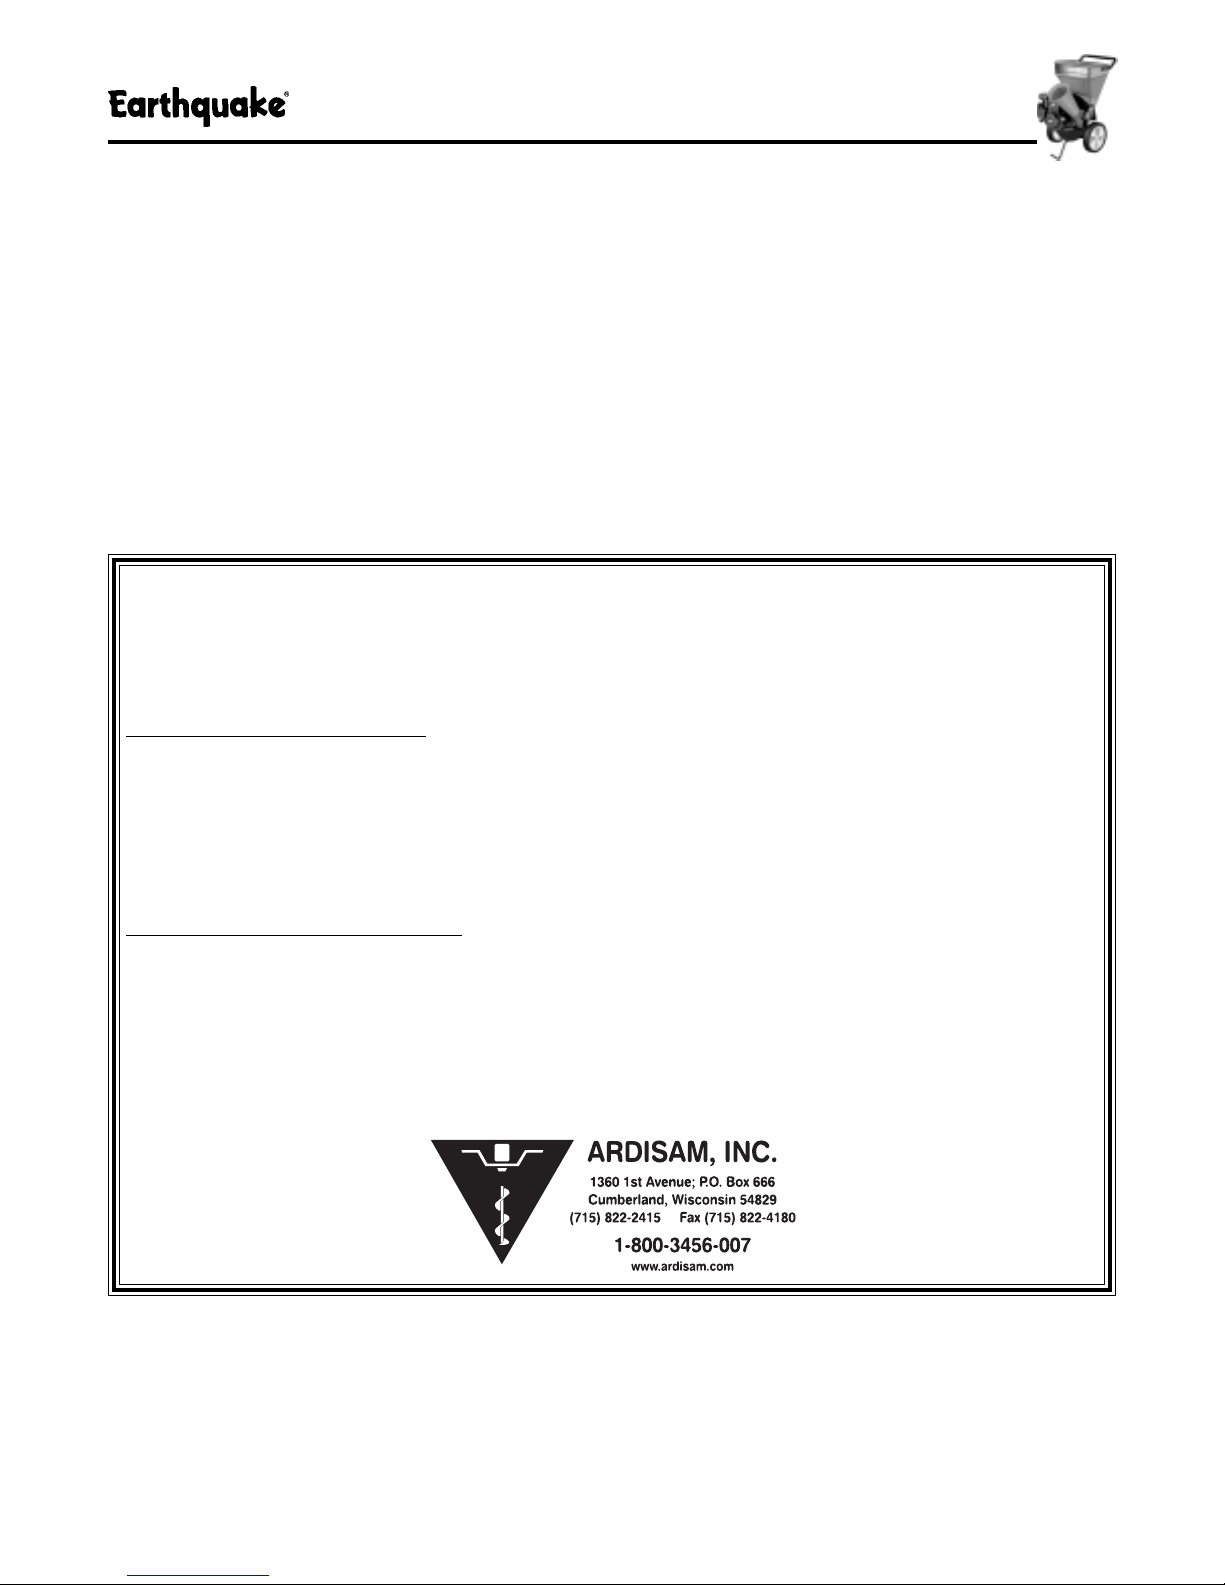
HANDLE
1. See Figure 2.Lift the Hopper Handle up until the outer
holes in the handle align with the holes in the
shredder hopper.
2. Secure the Hopper Handle in position using 1/4-20 x
3/4 hex socket screws, and 1/4-20 whiz nuts,
inserting the screws from the outside of the hopper.
3. Tighten all four screws securely.
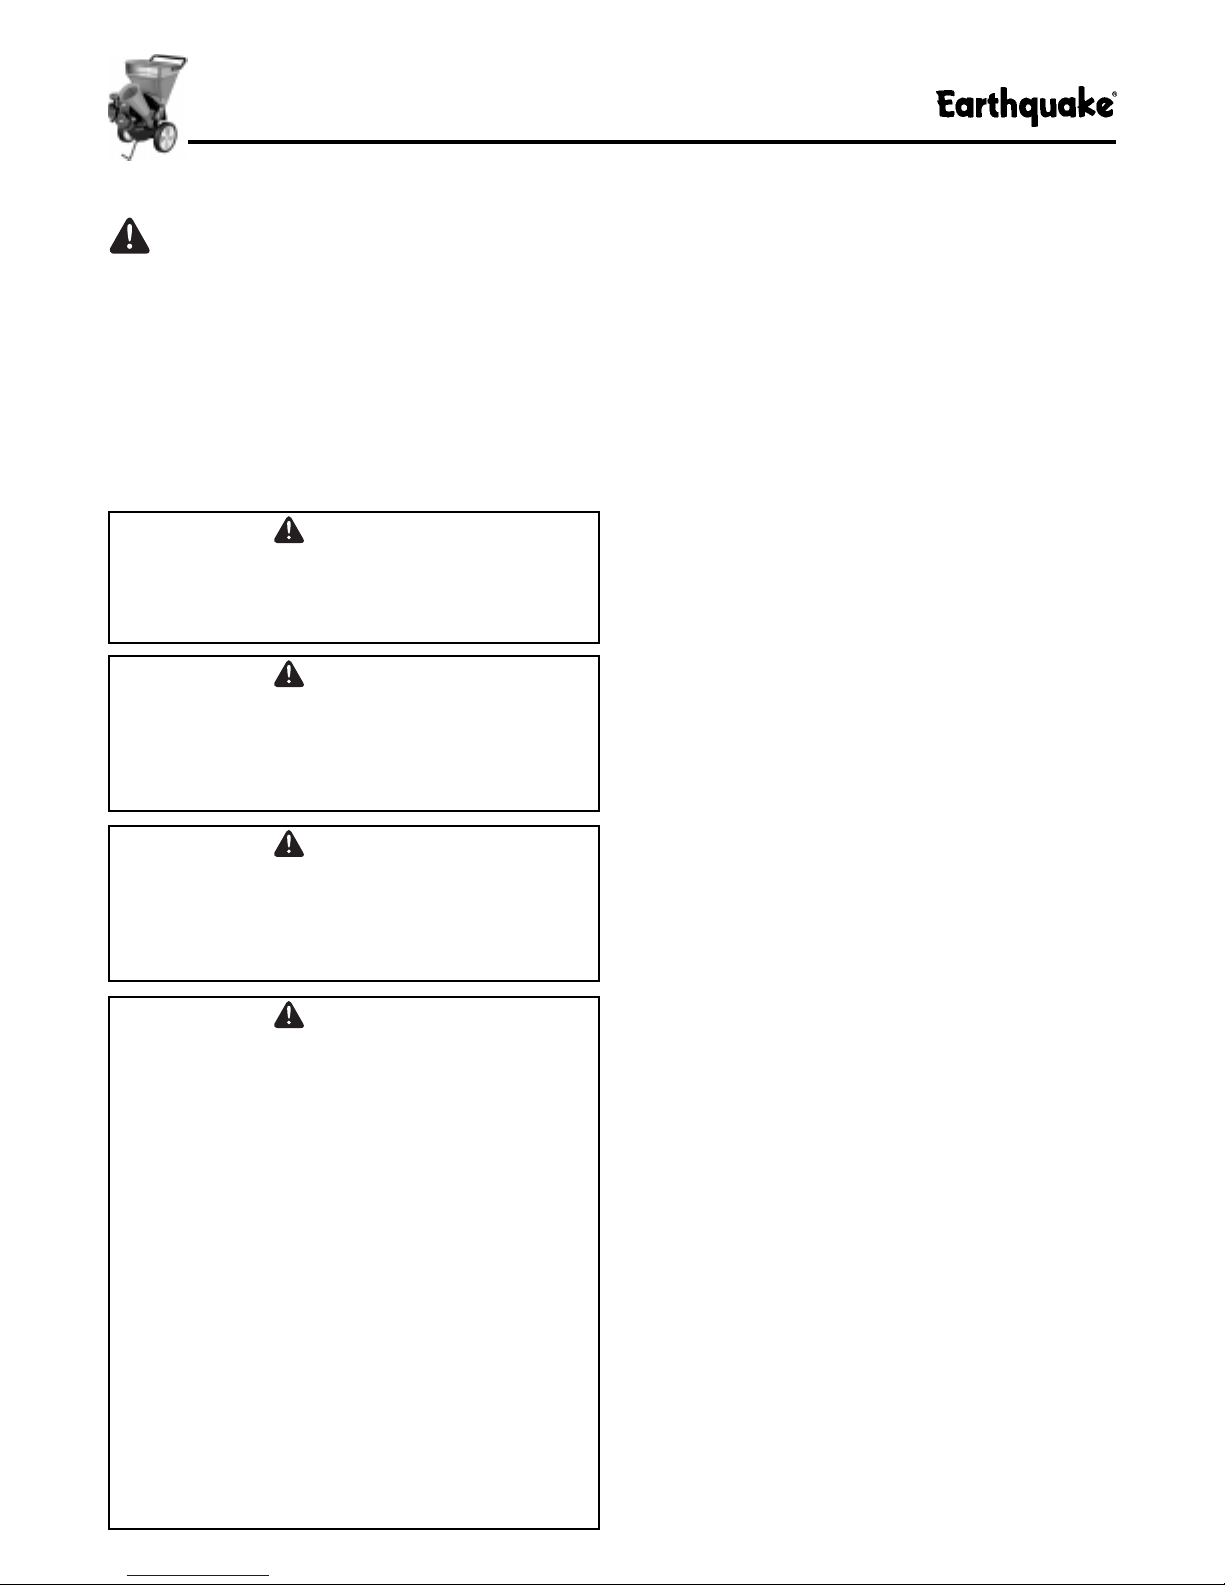
Figure 3. Attaching Hopper to the Rotor
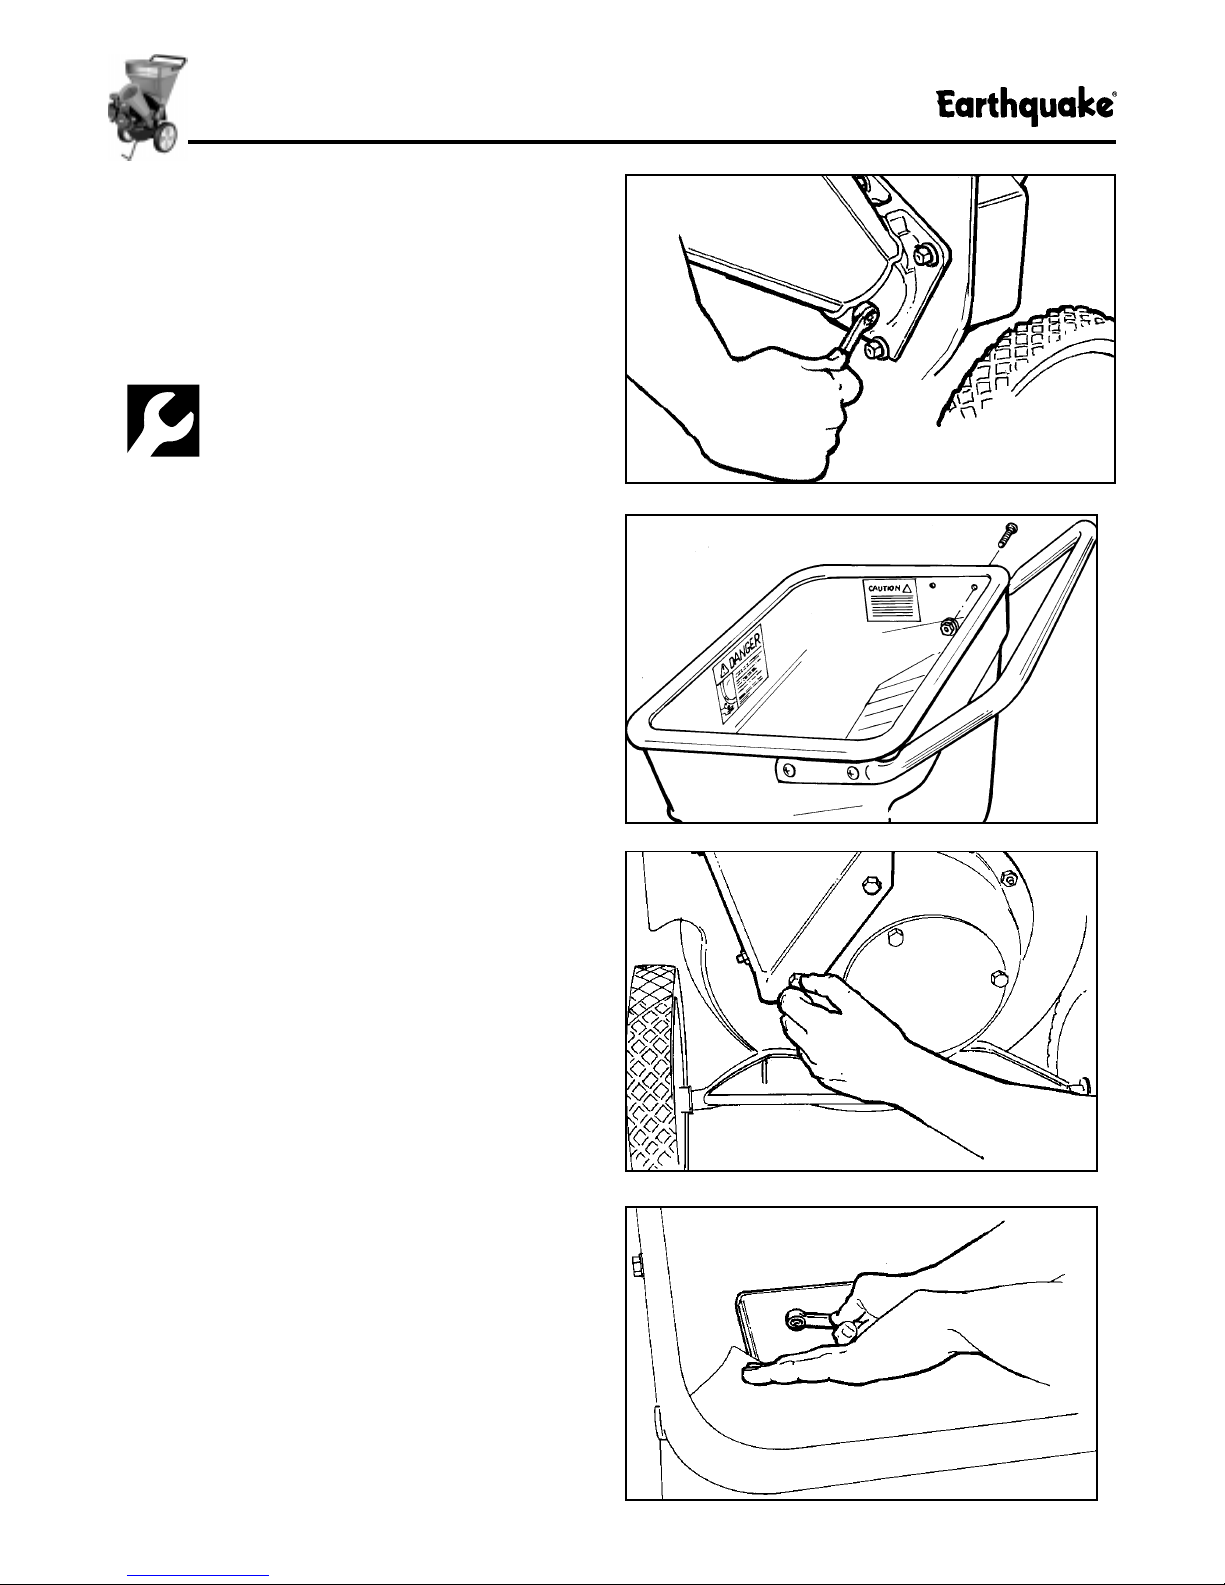
Figure 4. Installing Hardware Inside Hopper
7

ASSEMBLY
HOPPER
1.See Figure 3. Attach the hopper to the rotor housing,
using care to engage the metal lip of the hopper liner
to the inside of the housing.
2.Secure the hopper to the rotor housing using (2) 5/16
x 1/2 hex head bolts and (2) 5/16 flat washers. Do not
tighten hardware at this time.
3.See Figure 4. F rom the inside of the hopper, install (1)
5/16-18 x 3/4 hex head bolt, 5/16 lockw asher , and
5/16 flat washer into each of the upper and lower
holes of the metal hopper liner. Do not tighten at this
time.
4.Make sure the hopper is properly seated on the rotor
housing, and then tighten all hardware securely .
DISCHARGE BAG
Your unit comes equipped with a bag for collecting
debris as it exits the discharge chute.
See Figure 5.
Lift discharge
chute and slide
bag over chute.
Make sure bag
noose fits over
top of discharge
chute and notch
in chute bottom.
Pull drawstring tight
ENGINE OIL
Fill the engine oil sump with the appropriate type of oil
required by that type of engine. See the engine service
manual shipped with your chipper/shredder for additional
information.
Figure 5. Discharge Bag Installation
8

CONTROLS & MAJOR COMPONENTS
OPERATING CONTROLS
Your new chipper/shredder has been designed for both
ease of use and lasting reliability, and features a
simplified control system that required just two operating
controls.
These two operating controls, the Choke and the
Throttle, are conveniently located on the chipper/
shredder engine where they can be easily adjusted to
start and run the unit under a variety of operating
conditions.
Choke
The choke controls the fuel to air ratio, and helps make
cold starts easier by providing a rich, easily ignited fuel
mixture.
Throttle
The throttle controls engine speed, and allows you to
conserve fuel when idling, or to run the unit at maximum
speed for optimal chipping and shredding performance.
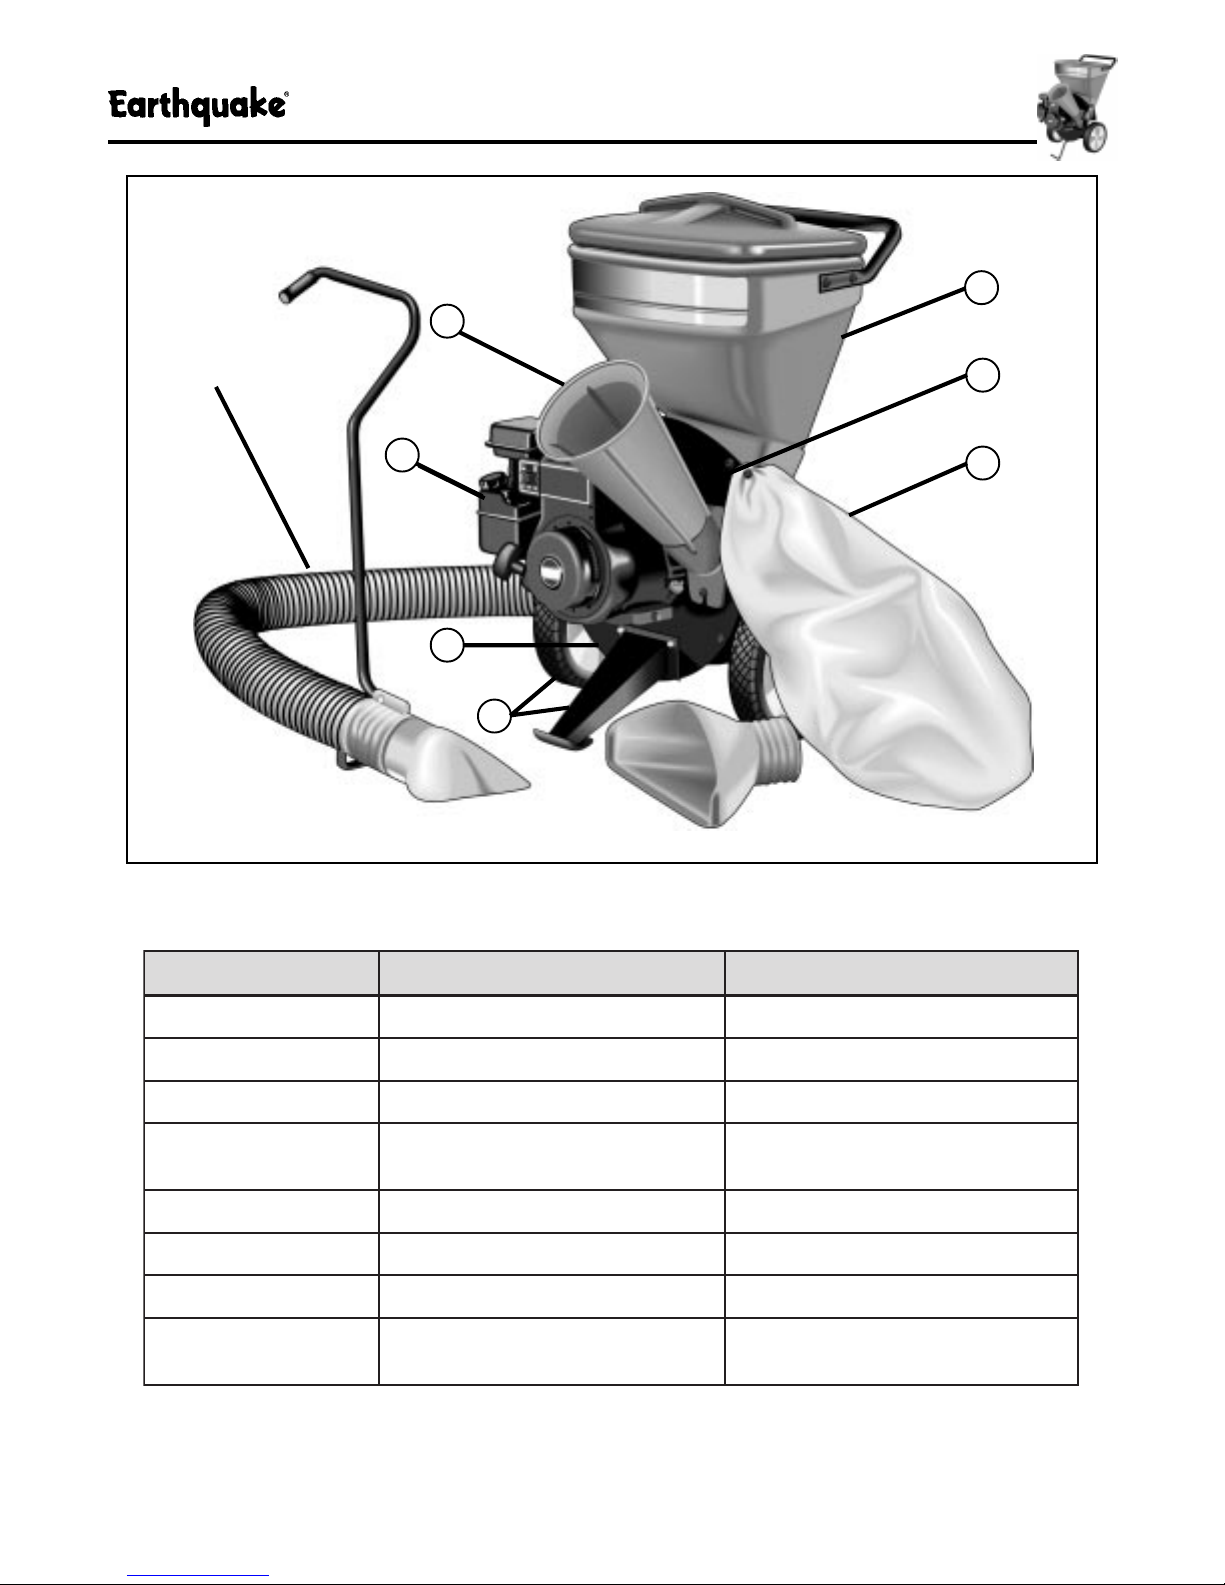
MAJOR COMPONENTS
C. Bag
The two-bushel bag is standard equipment and attaches
in seconds for direct, one-step bagging.
D. The Support Leg and Wheels
The sturdy support leg and wide-track wheels give your
chipper/shredder a stable, three-point stance, allowing
solid positioning on virtually all surfaces. The large
wheel diameter and durable rubber tread design make
transporting the unit easy, and the low center of gravity
helps prevent tipping while moving over bumpy or
uneven terrain.
E. Fan/Rotor Housing
This housing assembly contains the chipper knives and
shredding hammers that process the materials you’ll be
chipping and shredding
F. Engine
The rugged, four-cycle, air cooled engine provides all
the power necessary to readily chip or shred a wide
variety of materials. See the engine service manual
shipped with your chipper/shredder for additional
information.
The major components of your chipper/shredder are:
• Shredder Hopper • Engine
• Discharge Chute • Chipper Cone
• Bag Shredding Hammers
• The Support Leg & Wheels • Chipper Knives
• Fan/Rotor Housing
Each of these major components serves a specific
function on the chipper/shredder. Please take a moment
and familiarize yourself with the name, location, and
function of these components so that you will better
understand the safety and operating instructions
provided in this manual. See Figure 6.
A. Shredder Hopper
The durable, low-profile design of the shredder hopper
makes shredding convenient, yet holds a full size load
of material for maximum processing capability.
B. Discharge Chute
The discharge chute ejects the material out of the
chipper/shredder, delivering processed materials to a
specific area. The pivoting deflector shield directs debris
down, while allowing soft materials to be ejected freely
from the machine.
G. Chipper Cone
The rugged chipper cone helps guide tree limbs and
branches directly into the chipper knives, and it’s unique
angled mounting helps pull the material in quickly for
aggressive chipping action.
Shredding Hammers (Not Shown)
The unique design of the patented free-swinging,
triangular shredding hammers and “J” hammers helps
pull material into the shredding chamber, and increases
volume-reduction efficiency more than most other
brands.
The revolutionary design of these triangular hammers
also provides 300% more shredding power than conventional fixed rectangular hammers, and since they can be
rotated, their six different usable cutting edges help
extend service life dramatically.
Chipper Knives (Not Shown)
Our chipper/shredder line also features high quality,
precision-tempered, solid steel chipper knives, which
can be sharpened again and again to extend their useful
life for many seasons to come.
9
CONTROLS & MAJOR COMPONENTS
G
A
Optional Vacuum Kit
F
Figure 6. Component Locations
MODEL SPECIFICATIONS
B
C
E
D
SNOITACIFICEPSSNOITACIFICEPS
SNOITACIFICEPSSNOITACIFICEPS
SNOITACIFICEPS
rewopesroHph6&ph5.5ph01&ph8
yticapaCgnippihC"2/12"3
sevinKgnippihC2 2
sremmaHgnidderhSralugnairT-2
yticapaCredderhSgnoL"81x"2/1gnoL"81x"2/1
oitaRnoitcudeRetsaW1:02otpU1:02otpU
thgieWetamixorppA.sbl79.sbl911
tnempiuqElanoitpOtiKcaV
sremmaHJ-2
raBwoT&,dnEmuucaV,yarTfaeL/w
10
ralugnairT-2
sremmaHJ-2
tiKcaV
raBwoT&,dnEmuucaV,yarTfaeL/w
 Loading...