

Page 1

Instruction Manual for GuardianTM Stabilization Expander
Corresponds to Eagle Tree Software Version 10.01 or higher
Document Version 1.9
Contents
Introduction ............................................................................................................................................................................ 1
Connection and Mounting ...................................................................................................................................................... 2
Important Differences in OSD Pro Configuration when using Stabilization ........................................................................... 2
Guardian Stabilization On-screen Menus ............................................................................................................................... 3
Guardian Configuration .......................................................................................................................................................... 4
The Servo Analysis Wizard ................................................................................................................................................................................................................ 4
Reset Cruise Sticks/Throtl .................................................................................................................................................................................................................. 4
Tuning Stabilization Gains ....................................................................................................................................................... 4
Stabilization Theory ........................................................................................................................................................................................................................... 4
Stabilization “Master Gain” Knob ...................................................................................................................................................................................................... 5
Displaying the Master Gain Onscreen ................................................................................................................................................................................................ 5
Oscillations ........................................................................................................................................................................................................................................ 5
Additional Features ................................................................................................................................................................. 5
Center-Stick Only Stabilization .......................................................................................................................................................................................................... 5
Heading Hold (Recommended) .......................................................................................................................................................................................................... 6
Preflight ................................................................................................................................................................................... 6
First Flight ................................................................................................................................................................................ 6
Troubleshooting ...................................................................................................................................................................... 6
Introduction
Thank you for your purchase! This instruction manual will guide you through the installation and operation of your Guardian Stabilization Expander. The latest
version of this manual is available in the Product Manuals section of the Support tab on http://www.eagletreesystems.com. The online manual includes any updates that
were made after your Guardian was purchased. Please read the entire manual carefully before proceeding. If, after you read the manual, you have further questions or
problems, see the “Have Questions or Feedback?” section below.
What the Guardian Does
When used with the Eagle Tree OSD ProTM, the Guardian provides full featured inertial stabilization, and an on-screen Artificial Horizon display. No additional
sensors are required.
The Guardian requires no warm-up period after your model is powered. The Guardian’s advanced features make it easy for you to perform aerobatic maneuvers (if you
are capable!) and immediately return to stabilized flight when desired.
The Guardian is a stabilizer, not a stall-preventer! In some airframes, stalling can create unrecoverable conditions, such as spins, that may result in a crash.
Intended Uses
The Guardian is intended to be used exclusively for recreational purposes in model planes, boats and cars. Any other use is not supported.
Packing List
Your package should include the following: The Guardian, and a printed version of this manual.
Other Things You Need
To utilize the Guardian, you will need the OSD Pro system with an eLogger V3 or V4. NOTE: The Guardian is NOT compatible with our Flight Data Recorder
products! Though stabilization will work without them, a video camera and video transmitter on your model, and a video receiver and video display on the ground are
normally required. Many Eagle Tree FPV dealers sell the required video equipment. A list of our FPV dealers can be found on our website at
http://www.eagletreesystems.com/OSD/OSD-Pro.htm.
Steps to Follow
Installation and use of your Guardian should be quite easy and enjoyable if you follow these few steps:
1. First, if you have not done so already, read through the manuals for your OSD Pro, eLogger, GPS Expander, and any other Eagle Tree sensors, to familiarize
yourself with the connection and function of these devices, and set this equipment up.
2. Read through this manual to understand the warnings, determine the installation and setup sequence, pre-flight tests, etc., of the Guardian.
3. If anything is unclear, see the “Have Questions or Feedback?” section below.
4. Range test and enjoy!
Copyright © 2011 Eagle Tree Systems, LLC 1 http://www.eagletreesystems.com
Page 2
Have questions or Feedback?
Eagle Tree is committed to providing great customer service. If you’ve read the manual and something is not clear, just ask. We’d much prefer to take the time to
answer your questions, rather than having you waste your valuable time struggling with an issue.
To get help, visit the Eagle Tree Guardian support thread at http://www.rcgroups.com/forums/showthread.php?t=1399687
to your problem already. If not, posting your problem there will get a very quick response from the Eagle Tree community.
If you prefer to not post on the forum, or you feel there is a problem with your Eagle Tree hardware, please open a support ticket with us at
http://ticket.eagletreesystems.com and we will respond to your support ticket as soon as we can (normally 1-3 business days). Note that you may receive an answer to
your question more quickly from our forum above, since many other Eagle Tree customers also monitor the forum. Note that when you create a support ticket, you will
be emailed a link that will let you check the status of the ticket. If you do not receive the email, this most likely means that a spam filter is intercepting emails from
Eagle Tree.
Also Eagle Tree greatly values your feedback on how we can improve our products. To leave us feedback for a new feature request or improvement, either post the
feedback on our support thread above, create a support ticket with your feedback, or send feedback at http://www.eagletreesystems.com/Feature/feature.html
.
Chances are someone has posted a solution
Connection and Mounting
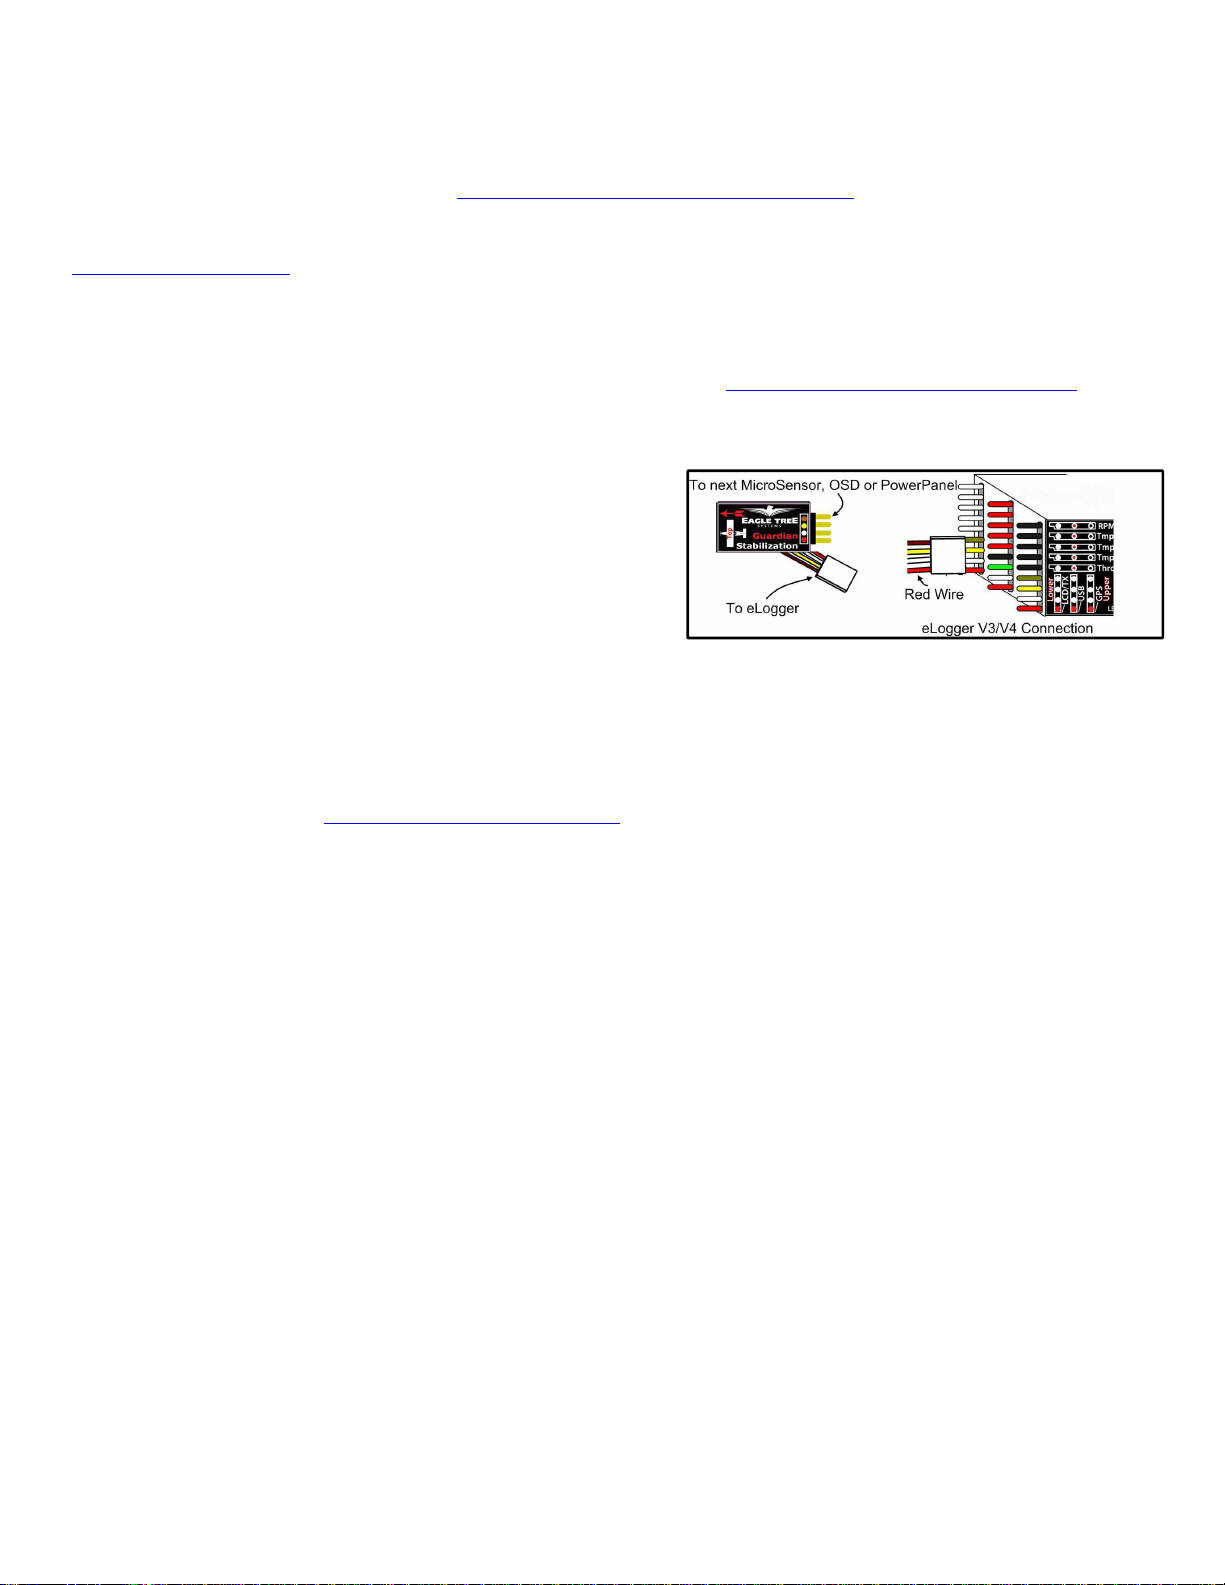
Connecting the Guardian to the eLogger V4 or V3
The Guardian plugs into the “LCD/OSD” or “LCD/TX” port of your eLogger V4 or V3, as
shown in Figure 3, or it can connect to the 4 pin expansion port of the OSD Pro. If you
have a PowerPanel or other MicroSensors, those can “daisy chain” connect to the pins on the
side of your Guardian, with the polarity as indicated on the Guardian label. Note that the
Guardian can connect anywhere in the chain of sensors. Once the Guardian has been
powered, its status light should begin blinking rapidly to indicate correct operation.
Connecting the Servos
Connect your receiver’s Aileron output (or Rudder receiver output, if the plane does not have Ailerons) and the Elevator receiver output to the OSD Pro’s Aileron and
Elevator servo inputs. Then, connect your servos to their corresponding OSD Pro servo outputs.
Note that when using the Guardian, the ailerons should be routed through the OSD Pro if the model has both ailerons and rudder, for proper stabilization and RTH.
Note that this is a change from the recommendation that the rudder be routed through the OSD Pro, when the Guardian is not present.
Windows Software and Firmware Update
To use the Guardian, you must update your software to Eagle Tree Windows Software version 9.76 or later. To update, download the latest software from the
support page of our website, located at http://eagletreesystems.com/Support/apps.htm. After downloading and installing the software, the firmware of your Guardian
may need to be updated. To upgrade your firmware, connect your eLogger to USB, and just click “Hardware, Firmware Control” and click the Update button for the
Guardian if the present firmware version is a higher number than the firmware stored in your Guardian.
Mounting the Guardian in your Model
Mount the Guardian in your model, placing it so the label is facing up and the “airplane” drawing on the label corresponds to the orientation of your aircraft. A properly
mounted sensor will be perfectly flat with its front facing the direction of flight, when the aircraft is in level flight.
We recommended mounting the Guardian with a piece of two-sided foam tape or Velrco to hold it firmly to your airframe while reducing vibrations. To reduce the risk
of the Guardian coming loose, tape, adhesive, or a mechanical restraint may be used.
Mounting the Guardian flat relative to level flight is important. However, minor mounting offsets can be compensated for by invoking your OSD Pro menu and using
the “Configure Guardian Stabilizer” -> “Reset Level Flight” option described below.
IMPORTANT! When viewing the AHI through the OSD Pro as provided by the Guardian Expander after resetting level flight, the line should closely follow
the horizon as the plane is pitched and rolled. If the AHI appears to be moving in the opposite direction of the horizon in the pitch and roll axes, then you
likely have the Guardian Expander mounted backwards. If just the pitch axis is moving in the incorrect direction as the plane is moved, then the Guardian
Expander may have been mounted upside down. Ensure that the label is facing towards the sky and the 4-conductor wire is pointing towards the tail of your
model.
Vibrations
The Guardian is able to reject most levels of vibration. However, very strong vibrations can impact stability. To check for this issue after mounting the sensor, perform
a vibration test by securing your model to a test bench or stand and ramping up the throttle slowly while watching the AHI on your OSD Pro. If the AHI begins to pitch
or roll significantly during this test, remount your Guardian sensor further away from the motor, wires and any other sources of vibration or electromagnetic
interference.
Important Differences in OSD Pro Configuration when using Stabilization
There are a few differences in how you configure the OSD Pro, when stabilization is enabled vs disabled. These are described elsewhere in the document in more
detail:
• When running the Servo Analysis Wizard, full elevator and aileron stick deflection should be given, rather than partial stick deflection. Partial stick
deflection is recommended when stabilization is disabled, to limit RTH servo deflections.
• If your model has both ailerons and a rudder, the ailerons should be routed through the OSD Pro when stabilization is turned on, rather than rudder.
Copyright © 2011 Eagle Tree Systems, LLC 2 http://www.eagletreesystems.com
Page 3

• In Elevon mode, with stabilization enabled, the Guardian performs the servo mixing, so you must turn off mixing in your radio. But, if you disable
stabilization, the OSD Pro will again expect mixed inputs from your radio. Never turn stabilization off or on during flight if you have an elevon
model! Use the stabilization gain setting instead.
• If you have previously configured RTH with your OSD Pro, it is recommended that you return all RTH gains/limits to their default values when stabilization
is enabled. Note that you may still need to tune the RTH gains/limits with the Guardian installed, but the defaults should work well with most models.
Guardian Stabilization On-screen Menus
Guardian configuration is done via the On-screen OSD Pro menus. Please see the OSD Pro manuals for more information on accessing the menus.
Here is a description of each menu item that may need to be adjusted for the Guardian. Note that additional information for each menu item is provided in the following
manual sections. Note also that the default values are shown in parentheses and where relevant, the range is displayed as (min-max: default).
Configure Radio Control Menu
• Reset Cruise Sticks/Throtl: recaptures the model’s aileron/rudder, elevator, and throttle settings for level flight. These settings are captured during the Servo
Analysis Wizard, but need to be recaptured if you have re-trimmed your plane. NOTE: the throttle needs to be set at “cruising speed” position when this
option is selected, if the RTH feature is enabled!
• Run Servo Analysis Wizard: lets the Guardian learn about your servo directions and extents. See the Guardian Configuration section below for more
information.
• Choose Model Wing Type (Fixed): This option lets you choose whether your model uses standard or elevon control. Note that when the wing type is set to
Elevon, and Guardian stabilization is enabled, the Guardian will do the servo mixing. So, your radio’s servo mixing must be disabled. But, if you later turn off
stabilization, the Guardian will no longer do the mixing! WARNING: Never change this option during flight!
• Stabilization / Elevn Mixing On? (No): Enables Guardian Stabilization and (if you have an elevon model) turns on Elevon Mixing. WARNING: Never turn
this option off or on during flight if you have an elevon model! Disabling stabilization will also disable the OSD Pro’s elevon mixing. Use the
stabilization gain setting instead to turn off stabilization.
•
Elevon Recvr Microsecs(0-3000: 1500): This sets the number of microseconds for a neutral pulse from your RC controller. Do not change this unless you know
the pulse length of your controller. Most people do not need to adjust this, and it is only relevant for elevon models.
Configure Guardian Stabilizer Menu
• Reset Level Pitch and Roll: Click this option while holding the model level after installing the Guardian, if the AHI line is not centered and level. It will
mitigate most mounting errors and provide a level AHI.
• Stabilizer Pitch Gain (0-10: 5): This controls the amount of stabilization in the pitch Axis. If your airframe is oscillating along its pitch axis, but never its roll
axis, it might help to reduce the Pitch gain.
• Stabilizer Roll Gain (0-10: 5): This controls the amount of stabilization in the roll Axis. If your airframe is oscillating along its roll axis, but never its pitch axis,
it might help to reduce the Pitch gain.
• Stabilizer Turn Gain (0-10: 5): This parameter helps counteract trim issues that can cause gradual turns. The higher the value, the more compensation is added
to normal flight.
• Stabilizer Overall Gain (0-10: 8): This scales the Pitch and Roll gains. When set to 10, both Pitch and Roll will be very strongly stabilized. When set to 0, all
stabilization will be disabled. This setting is overridden by the Aux2 input on the OSD Pro if the Menu Navigation Switch is configured for “3-Position” or
“None” and a valid servo signal is present on Aux2. If RTH is engaged, the menu’s “Stabilization Overall Gain” will be used. See Stabilization “Master Gain”
Knob section for more information.
• Max Stab Pitch/Roll Normal (0-90: 50): The maximum attitudes (pitch angle or bank angle) that the airplane is allowed to maneuver to in Stabilization mode.
• Max Stab Pitch/Roll RTH (0-90: 35): The maximum attitudes (pitch angle or bank angle) that the airplane is allowed to maneuver to when RTH is Engaged.
• Stabilizer Responsiveness (1-10: 7): How responsive you want your Fly-By-Wire to be with your model. A high value will provide very fast response, but could
accidentally stall your model on takeoff if the control stick is moved too quickly. A low value will yield a very smooth flight.
• Enable Heading Hold (Off): Locks onto your current heading and trims your plane to fly that heading until the stick is moved from its centered position. See:
“Heading Hold” section for more information.
• Center Stick Stabilize Only (Off): This advanced feature enables Guardian Stabilization only when the control stick is centered within the area defined by
“Center Stick Tolerance” Box, making it easier to do aerobatic maneuvers. Note that stabilization will be reduced or disabled when your sticks are not centered!
See: “Center-Stick Only Stabilization”
• Center Stick Box Size (1-10: 10): Defines the size of the Center Stick Box used by “Center-Stick Only Stabilization.” Small values make the area smaller and
vice versa. See: “Center-Stick Only Stabilization”.
Select Items to be Displayed Menu
• Servo Deflections Display: This turns on Servo Deflections display, which is useful for initial Guardian testing.
• Artificial Horizon Line: This turns on the AHI display, which is also useful for Guardian setup and testing, as well as in normal flight.
Trimming
It is recommended that the airplane be trimmed for level flight before running the Servo Analysis Wizard. This ensures that the Guardian Stabilizer will also be
trimmed.
If a change in trim occurs once Stabilization has been configured, make sure to execute the “Reset Cruise Sticks/Throtl” to inform the OSD Pro of your change.
Remember that your throttle needs to be in the “Cruise” position (the throttle position for level flight) if the RTH feature is enabled.
Copyright © 2011 Eagle Tree Systems, LLC 3 http://www.eagletreesystems.com
Page 4

Guardian Configuration
Before you can fly for the first time, it is necessary to tell the Guardian a few things about your model. These settings are made by using the OSD Pro menus described
above and in the OSD Pro manual.
1. Run the “Servo Analysis Wizard.” This step lets the Guardian know how much deflection it can use when stabilizing your airframe. Additionally, this
teaches the Guardian the directions of your servos. When the wizard asks you to “Mov Rudder/Aileron Stick Left,” deflect the aileron stick to the maximum
extent that you would normally use in flight (normally the maximum throw). Do the same with the elevator stick when requested to “Mov Elev Tx Stick
Back(Climb).” Note: When not using the Guardian, the amount of stick deflection during the wizard was used to set the maximum elevator and
aileron/rudder stick throws for RTH, so it was recommended to use only limited stick movement. However with the Guardian, the RTH limits are
set as angles, as described below, and giving the full stick movement during the wizard is necessary.
2. For initial testing, we recommend turning on “Servo Deflection Display”. When stabilization is turned on, the present Overall Gain setting is displayed as
“G” in the servo deflections, and the present pitch and roll of the model are also displayed. Further, we recommend enabling the Artificial Horizon display,
which will help to validate that the Guardian is mounted and operating correctly.
3. Choose your airframe type with the “Choose Model Wing Type” menu, by selecting either “Fixed Wing” or “Elevon” type. Both of these modes require
that your radio supplies un-mixed Aileron/Elevator signals. Mixed inputs to the OSD Pro are not supported with Guardian Stabilization enabled.
Note that the OSD Pro supports mixed elevon inputs when stabilization is disabled, but requires unmixed inputs when stabilization is enabled, to provide the
best stabilization experience.
4. Enable Stabilization by setting the “ Stabilization / Elevn Mixing On?” option in the Radio Control Configuration menu to “Yes.” Warning: Never turn
this option off or on during flight if you have an elevon model, since the mixing mode will change! Adjust the stabilization gain setting instead.
5. Orient your model as it would be during level flight. If the Artificial Horizon display is not centered on the Home indicator or is tilted, click “Reset Level
Pitch and Roll.” This step will minimize the impact of minor mounting errors with your Guardian.
6. Configure the “Max Stab Pitch/Roll Normal” angles that the Guardian will allow your airplane to attain. For greater maneuverability, set these values to 60
degrees. For easier flight behavior, set them to around 40 degrees.
Warning: Setting these values to greater than 60 degrees will result in very responsive flight characteristics from your airframe. Going into
maneuvers that your airframe is incapable of sustaining will still result in a stall! Additionally, setting the max angles too low may make your
airplane difficult to turn.
7. If you will be using the Return to Home feature, adjust the “RTH” Max Pitch/Roll angles. These parameters act the same as the Stabilizer Pitch/Roll angles,
but are only used for limiting the Return to Home. It is recommended that these values be around 25 degrees, depending on user preference, airframe
stability and wind conditions. Once again, a larger angle will result in a more maneuverable RTH, with a smaller turn radius, but may result in oscillations
depending on the RTH gain values.
Warning: A smaller number will result in smooth RTH behavior, but may prevent your airframe from returning in strong wind conditions or if the
Guardian is mounted improperly. It is recommended that you test RTH after changing these values.
8. It is recommended that your Safety Mode RTH gain settings be returned to their default values, if you have changed them in the past, when flying without
the Guardian. When the Guardian is properly configured, most airframes should work with the default RTH gains. But, it may still be necessary to adjust
the RTH settings with the Guardian installed.
Note: If the RTH does not turn quickly enough, increase the Max Stab Roll RTH value before changing the RTH gains. Do not exceed 35 degrees.
For further information, see the RTH tuning section of the OSD Pro manual.
9. The Stabilizer Pitch/Roll and Overall gains can be left at their default values of 5, 5 and 8 respectively. You will tune these gains later.
The Servo Analysis Wizard
Since Guardian Stabilization interprets your stick movements as attitude commands, rather than direct servo deflections, it is important to tell it how far your RC
controller’s sticks move in the pitch/roll axes. At the same time, the Guardian needs to know the trim conditions of your plane as well as the centered position of your
control stick. The Servo Analysis Wizard figures this out for you.
When requested to "Set Sticks for level flight,” your control stick should be centered (trimmed for level flight with stabilization turned down) and your throttle set to its
cruise level. The throttle levels are not required by the Guardian, but are required for Return to Home. Please see the OSD Pro manual for information regarding the
throttle / failsafe features of the Servo Analysis Wizard.
When asked to "Mov Rudder/Aileron Stick Left," make sure to assert maximum servo deflection on your RC controller. The same should be done when asked to "Mov
Elev TX STICK Back(Climb).” These steps tell your OSD Pro the maximum servo deflections allowed for Guardian Stabilization. If the stick is not moved to its
maximum extents for this portion of the wizard, your control commands may be clipped, impacting performance and stability.
Note: After trimming your airplane on your RC controller, it is important to run the “Reset Cruise Sticks/Throtl” to inform the controller of the change,
otherwise Heading Hold and Center-Stick Only Stabilization may be impacted.
Reset Cruise Sticks/Throtl
It can be cumbersome to re-run the Servo Analysis Wizard after changing the trim of your airplane. To let your OSD Pro know about changes to trim, it is important to
run the “Reset Cruise Sticks/Throtl” command. This resets the center position of your control stick, as well as the cruise position of your throttle, ensuring that features
like Heading Hold and Center-Stick Only Stabilization work optimally.
Tuning Stabilization Gains
Stabilization Theory
The Guardian Stabilizer works by measuring the orientation of your model airplane relative to the local direction of Earth’s gravity. In addition, it interprets pitch and
roll attitudes commanded by the servo signals received through your elevator and aileron channels respectively.
Copyright © 2011 Eagle Tree Systems, LLC 4 http://www.eagletreesystems.com
Page 5

With this information, it is able to determine the error b
etween your requested flight attitude and your plane’s true orientation. By passing this error through a controller
algorithm and sending it as servo commands through the elevator and aileron outputs on your OSD Pro, the Guardian
Each axis has a separate control gain used to tune stabilization. These are defined by, “Stabilizer Pitch Gain,” “Stabilizer
erall Gain to provide individual axis tuning while also providing On
In general, the higher the gain, the more responsive and resilient your plane will be to disturbances such as
however may result in oscillations of the airframe. It is recommended that the Overall Gain be used to tune the airframe unt
performance while preventing
Warning: Be careful while tuning the Overall Gain. Some airframes may oscillate very strongly
and reduce it as soon as oscillations are noticed.
When the OSD Pro’s “Choose Menu Receiver Inputs” option is set to “3
This overrides the OSD Pro’s menu option “Overall Gain” during normal flight (the “Overall Gain” setting is always used durin
multiplies the individual Pitch/Roll gains and serves as a way to easily tune both. If you have an RC c
Fly stabilization gain adjustment.
This knob gives the ability to transition smoothly from stabilized flight to un
characteristics, it is often helpful to be able to tune the controller in flight. Increasing its value will turn on stabili
When this feature is used, the stabilizer’s control characteristics given the Master Gain Knob’s position are as follows:
% (depending on Pitch/Roll gain values): Medium Stabilization. Your ai
still be rolled by strong stick movements or turbulence.
The Max Stabilized Pitch/Roll angles specified in the “Configure Guardian Stabilizer” menu may be exceeded in this
knob’s position, flight behavior of your model and type of maneuvers attempted.
100%: Maximum stabilization. The model should not roll over when in
Note that if you don’t have a knob available on your radio, you can also use the
. Then, depending on the endpoints programmed for your switch
switch.
Aux 2 input, or you have not configured your OSD switch mode to “3
Gain” setting is always used. The “Stabilizer Overall Gain” setting is also always u
behavior assumes a standard deflection controller, with
When RTH is enabled, the Guardian Overall Gain from the “Configure Guardian Stabi
provide the Overall Gain as well. If the menu value of Overall Gain in this menu is set too low,
on all OSD Pages, turn on the “Servo Deflections Display” as described above. With the Servo Deflection Display line enabled
Sometimes, when the controller gains are set very high or if there is a very high airspeed, oscillations can develop. If osc
or adjust
people looking for more aerobatic capabilities from their airplane prefer to disable the sta
they need it for crash avoidance or just to take a short break without needing to land. Center
Stabilization allows for a quick return to stabilized flight at any time by letting go of the control stick. It can
Stick Box by adjusting the “Center Stick Box
box to 10% of your control stick movement range
physical range of your control stick
stick away from its centered position will decrease your Overall Gain until it reaches zero at the edge of the
Stick Box will accomplish the same as turning your Overall
http://www.eagletreesystems.com
: Overall Gain vs. Stick Position
your squirrely m
Roll Gain” and “Stabilizer Overall Gain.”
Fly adjustment depending on conditions and
wind, balance and trim issues. Tuning the gains too high
il it oscillates and then be turned back
, possibly damaging themselves. To avoid
channel can be used as a Master Gain for the
ontroller that has an analog knob, this can be mapped
airspeed can change your airframe’s flight
zation, increasing the Guardian’s effect until a full
rframe is now inherently stable, but depending on your knob selection, may
range, depending on the Master Gain
Do not attempt maneuvers that may destabilize your airplane!
this range. Servo commands will become exaggerated, leading to tighter control of
stabilization. This is done by
in your radio
or “None”
100% being defined by a 1.1ms servo pulse and +100% being a 1.9ms pulse.
lizer” menu is used, even if the Aux2 input is configured to
then RTH will not be stabilized.
illations occur, turn down the Master Gain
the Overall Gain menu setting if a knob or switch is not being used, until the oscillations stop.
flying wing on rails!
The Pitch and Roll Gains are scaled by the Ov
aerodynamic performance.
-The-
can turn
odel into a smooth-
down. This will ensure the best
strong oscillations, increase the Overall Gain slowly
Stabilization “Master Gain” Knob
Guardian.
channel to allow for On-The-
fly-by-wire behavior is achieved.
• -100%: Stabilization is OFF. You can fly normally.
• -100%-~0
Note:
• ~0% -
the plane and true Fly-By-Wire functionality.
connecting a spare switch channel to the Aux 2 input
stabilization levels and turn off stabilization by flipping the
If no connection is made to the OSD Pro
Note: The described
Warning:
Displaying the Master Gain Onscreen
To display the Master Gain
parameter on that line represents the Overall Gain.
Oscillations
future oscillations.
-Position” or “None”, the OSD Pro’s Aux2 input
-stabilized flight. Additionally, since your
at higher gains
OSD Pro Aux 2 input as an “on/off” switch for
-position”
sed during RTH.
-
g RTH). This Master Gain
to the Aux2
, you can set the on and off
, the on-screen “Stabilizer Overall
, the “G”
knob, change the inputs of your master gain switch,
Additional Features
Center-Stick Only Stabilization
Some
be enabled in the “Configure Guardian Stabilizer” menu.
After turning on this feature, choose the size of the Center-
Size”. Choosing “1” will size the
while “10” will cover the entire
Center Stick Box as illustrated in Figure 1.
Moving the control stick outside the Center-
Copyright © 2011 Eagle Tree Systems, LLC
(best for 3D flight)
(smoother turns). Moving the control
5
bilizer until
-Stick Only
F
igure 1
Center Stick Box
within
Page 6

Gain Knob to 0%. Bringing the stick back to center will bring the Overall Gain back to its original value, set either by the “Stabilizer Overall Gain” parameter or by the
Aux2 servo input as explained in the section “Stabilization “Master Gain” Knob.”
IMPORTANT: Remember that when Center Stick stabilization is enabled, moving or trimming your control stick will reduce stabilization, including during
takeoff or hand launch! After trimming, remember to execute the “Reset Cruise Sticks / Throtl” command to ensure full stabilization.
Heading Hold (Recommended)
When the Guardian tries to stabilize an un-trimmed or off-balance airframe, a gradual turn can occur even if level flight is commanded. To counteract this, it is
recommended to enable the Heading Hold feature by ensuring the “Stabilizer Turn Gain” in the “Configure Guardian Stabilizer” menu is set to its default value of “5”
and setting “Enable Heading Hold” to “Yes.”
Once enabled, Heading Hold keeps track of your current heading and, when your control stick’s roll axis becomes centered, will lock onto that heading. As soon as the
control stick is moved to command any roll, the current heading will be reset. The pitch axis can still be commanded with Heading Hold enabled to allow for a heading
locked climb or descent.
At this time, the Heading Hold’s directional lock does not use GPS, so a small amount of drift over time can occur. Additionally for safety reasons, the Heading Hold
will not track yaw movements beyond 45 degrees from the locked heading. If the plane yaws further than this, the locked heading will be automatically adjusted so as
to be within 45 degrees of the current heading.
While the default of “5” for “Stabilizer Turn Gain” should work for most airframes, a higher number may be needed if the airplane does not track closely enough due to
trim issues. If, when flying at normal Pitch, Roll and Overall Gains, your airplane begins to oscillate in the Yaw axis during Heading Hold, reduce the Turn Gain until
no oscillation is detected.
After enabling Heading Hold on the ground, it is recommended that as part of your preflight checks you ”yaw” the model (rotate it gently so that the wings rotate
around like helicopter blades) and observe the Ailerons/Elevons. Confirm that the control surfaces are asserting a turn that would bring the airplane back to its original
heading. When the airplane is pointing directly at its currently locked heading, the control surfaces should be oriented for level flight.
Note: Remember to reset your current heading before takeoff to prevent an immediate turn. This is done by pointing your model in the direction of takeoff
and moving the Ailerons via the control stick.
Note: Heading Hold will not work with the Stabilization Overall Gain set to “0.”
Note: After trimming your Aileron / Roll axis control stick, remember to run “Reset Cruise Sticks / Throtl” or Heading Hold may become disabled.
Preflight
The Guardian requires no “warm up” period before flying. But, before every flight, it is strongly recommended that you perform the following steps:
1. Perform your normal preflight check. Ensure your servos respond correctly to your RC control stick commands.
2. To test that the Guardian is working, hold the airplane level. Now, pitch and roll the model. You should see the control surfaces deflecting appropriately to
level the airplane. If the control surfaces do not move at all, ensure that, if connected, the Master Gain knob or Gain switch is set so that stabilization will
occur. If the control surfaces are moving the wrong direction, it might be necessary to run the Servo Analysis wizard again, making sure to follow the
onscreen instructions closely.
First Flight
First, orient your model as it should be for level flight and execute the “Reset Level Pitch and Roll” command under the “Configure Guardian Stabilizer” menu. This
helps to compensate for any mounting errors with your Guardian.
On your first flight, it is recommended that you do an unpowered hand-toss of your airplane, if yours is capable of hand-toss launches. If the airplane safely glides to
the ground with little or no input, then your configuration is correct. If the model oscillates during the hand-toss, your Overall Gain is probably too high.
Once it has been shown that the Guardian has been correctly configured, perform one last preflight check and take off with power.
Warning: If taking off with stabilization turned up to a high gain, be very careful to avoid overcompensation. If the Max Pitch/Roll angles for Stabilization
are set to a large number, say 60 degrees, there could be a very strong response that might stall your airplane. Move your sticks smoothly at first to get the
feel for your more responsive airframe.
Once in the air and only when safe, release the control stick so it sits at zero input. Your airplane should fly straight and level. If not, your Guardian may be mounted
improperly. You can land and run the “Reset Level Flight” command again. This may be done in the air also, if your piloting skills permit it.
Troubleshooting
Below is a list of problems that may be encountered, and steps to remedy them. A good first step to troubleshooting is to download our latest software and update the
eLogger, OSD Pro and Guardian’s Firmware via “Hardware, Firmware Control.” Doing this will ensure that you have the latest software and firmware available. Just
click “Help, Download latest updates…” in the software to check to see if a newer version of our software is available.
If your particular issue is not addressed by this update, or by the suggestions below, please visit our web support page for additional support options, at
http://www.eagletreesystems.com/Support/support.html.
Issue: The message "Stabilizer Disabled in Menu!!" appears on the video screen during OSD Pro startup.
Solution: This message indicates that you need to turn on stabilization (if desired) by setting the “Stabilization / Elevn Mixing On?” setting to YES, as described in the
Guardian Configuration section above.
Copyright © 2011 Eagle Tree Systems, LLC 6 http://www.eagletreesystems.com
Page 7

Issue: The message "Ailron or Elevatr undetected!" appears on the video screen during OSD Pro startup.
Solution: This message indicates that receiver pulses from either Ailron or Elevator channel were not detected. Both of these channels are required for stabilizataoin
to work correctly. Make sure that the channels are connected correctly from your receiver. Also, note that some receivers will not send any pulses until the radio
transmitter is turned on.
Issue: The message "Run RC Wiz for Stabilize!" appears on the video screen during OSD Pro startup.
Solution: This message indicates that you need to run the Servo Analysis Wizard under the Configure Radio Control menu.
Issue: The message "Stabilizer using Menu Gain!" appears on the video screen during OSD Pro startup.
Solution: This message indicates that the Aux2 input for Overall Gain adjustment is not being used. The menu overall gain setting will be used instead.
Issue: The message "Stabilizer Disconnected!" appears on the video screen during OSD Pro startup.
Solution: This message indicates that the Guardian Expander is not detected by the system. Check your connections on the Guardian expander, and read further
troubleshooting steps below.
Issue: Guardian does not seem to be working correctly and the Guardian’s status LED IS flashing rapidly.
Solution: Make sure you have updated the OSD Pro, eLogger and Guardian firmware as described above.
Issue: Guardian does not seem to be working correctly and the Guardian’s status LED IS NOT flashing rapidly.
Solution: Make sure that the Guardian is connected correctly to the LCD/TX line on your eLogger and that your eLogger is powered. If the Guardian’s status LED is
blinking three times in a repeating fashion, then your unit has likely been damaged.
Issue: Servo deflections are limited, compared to when Stabilization is disabled.
Solution: Run the Servo Analysis Wizard under the Configure Radio Control menu. Make sure to assert full stick deflections when asked to turn and climb during the
wizard. See the section on the Servo Analysis Wizard under Guardian Stabilization.
Issue: Elevator or ailerons are unresponsive to radio commands
Solution: Make sure you have run the Servo Analysis Wizard after installing Guardian.
Issue: Servos are responding to control inputs, but not to movements of the airplane.
Solution: Ensure that the Guardian’s 4 pin cable is connected as described in the Connection and Mounting section above. Check that “Stabilizaton/Elevn Mixing On?”
is set to “YES” under the Configure Radio Control menu. Confirm that the Pitch, Roll and Overall Gains are set to their default values. If you are using the Aux2 input
for Overall Gain adjustment, ensure that your knob, switch, or slider is positioned to enable stabilization.
Issue: Heading Hold does not appear to be working or is drifting more than a few degrees per second.
Solution: If you have trimmed your airplane recently, you may need to execute the “Reset Cruise Sticks/Throtl” command under “Configure Radio Control.” The
Heading Hold feature only engages when your Roll command is very close to level flight. (Less than ~15% stick deflection)
Limited Warranty
Eagle Tree Systems, LLC, warrants the Guardian to be free from defects in materials and workmanship for a period of one (1) year from the date of original purchase.
This warranty is nontransferable. If your unit requires warranty service during this period, we will replace or repair it at our option. Shipping cost to us is your
responsibility. To obtain warranty service, email support@eagletreesystems.com for further instructions.
This limited warranty does not cover:
• The Software. See the Software license agreement for more information on Software restrictions.
• Problems that result from:
o External causes such as accident, abuse, misuse, or problems with electrical power
o Servicing not authorized by us
o Usage that is not in accordance with product instructions
o Failure to follow the product instructions
THIS WARRANTY GIVES YOU SPECIFIC LEGAL RIGHTS, AND YOU MAY ALSO HAVE OTHER RIGHTS WHICH VARY FROM STATE TO STATE (OR
JURISDICTION TO JURISDICTION). OUR RESPONSIBILITY FOR MALFUNCITONS AND DEFECTS IN HARDWARE IS LIMITED TO REPAIR AND
REPLACEMENT AS SET FORTH IN THIS WARRANTY STATEMENT. ALL EXPRESS AND IMPLIED WARRANTIES FOR THE PRODUCT, INCLUDING,
BUT NOT LIMITED TO, ANY IMPLIED WARRANTIES AND CONDITIONS OF MERCHANTABILITY AND FITNESS FOR A PARTICULAR PURPOSE,
ARE LIMITED IN TIME TO THE TERM OF THE LIMITED WARRANTY PERIOD AS DESCRIBED ABOVE. NO WARRANTIES, WHETHER EXPRESS OR
IMPLIED, WILL APPLY AFTER THE LIMITED WARRANTY PERIOD HAS EXPIRED. SOME STATES DO NOT ALLOW LIMITATIONS ON HOW LONG
AN IMPLIED WARRANTY LASTS, SO THIS LIMITATION MAY NOT APPLY TO YOU.
WE DO NOT ACCEPT LIABILITY BEYOND THE REMEDIES PROVIDED FOR IN THIS LIMITED WARRANTY OR FOR CONSEQUENTIAL OR
INCIDENTAL DAMAGES, INCLUDING, WITHOUT LIMITATION, ANY LIABILTY FOR THIRD-PARTY CLAIMS AGAINST YOU FOR DAMAGES, FOR
PRODUCTS NOT BEING AVAILABLE FOR USE, OR FOR LOST DATA OR LOST SOFTWARE. OUR LIABILITY WILL BE NO MORE THAN THE
AMOUNT YOU PAID FOR THE PRODUCT THAT IS THE SUBJECT OF A CLAIM. THIS IS THE MAXIMUM AMOUNT FOR WHICH WE ARE
RESPONSIBLE. SOME STATES DO NOT ALLOW THE EXCLUSION OR LIMITATION OF INCIDENTAL OR CONSEQUENTIAL DAMAGES, SO THE
ABOVE LIMITATION OR EXCLUSION MAY NOT APPLY TO YOU.
Copyright © 2011 Eagle Tree Systems, LLC 7 http://www.eagletreesystems.com
 Loading...