

Page 1
OPERATING MANUAL
MANUAL DE FUNCIONAMIENTO
REGISTER TODAY
2 easy ways to register your
5 year warranty.
REGISTRE HOY
2 manceras fáciles de registrar su
garantía de 5 años.
WASH FILTERS
Wash filters with cold water
at least every month.
LAVADO DE FILTROS
Lave los filtros con aqua fria
al menos cada mes.
month
mes
1
DC24 ALL FLOORS
clik
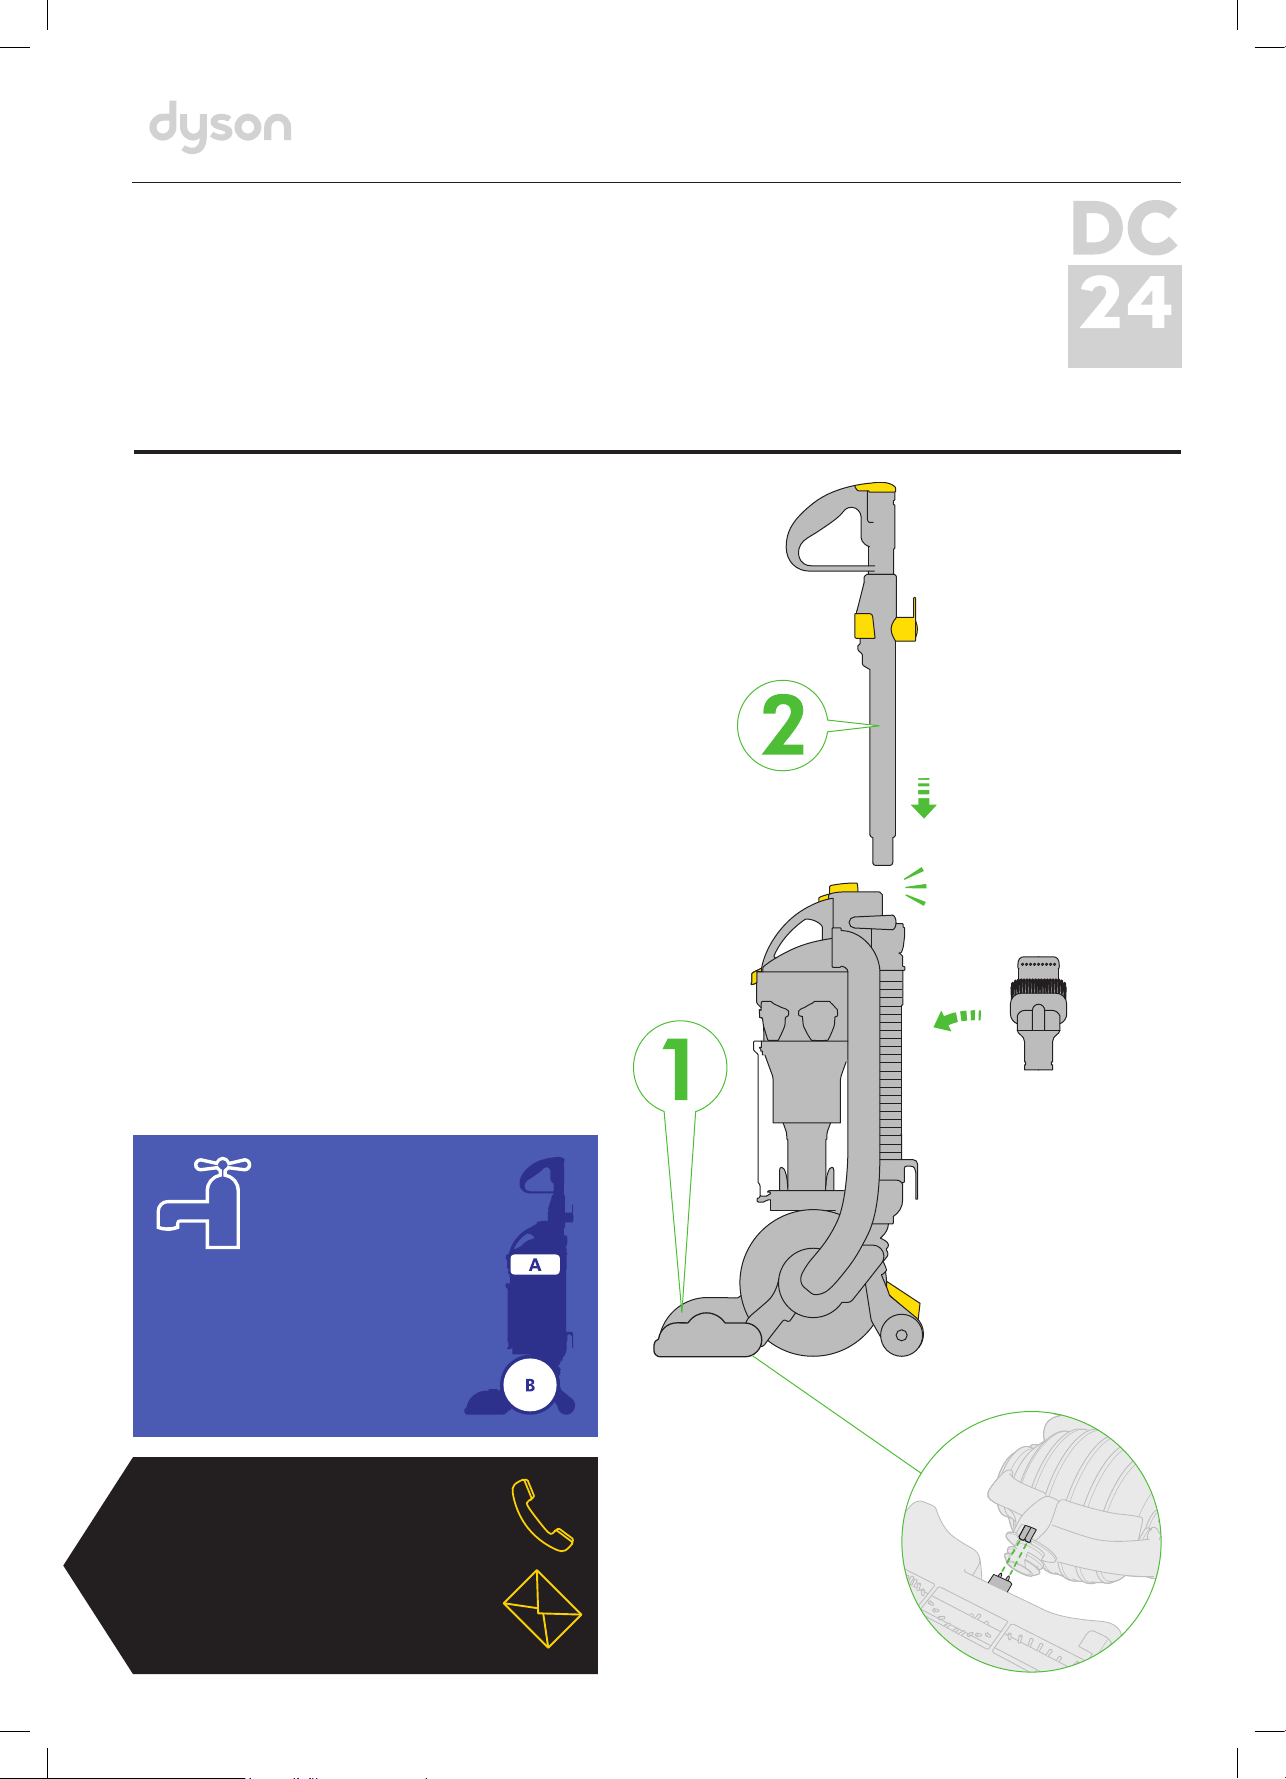
ASSEMBLY • ARMADO
Page 2
WARNING
If the power cord is damaged, it should only be replaced by the manufacturer or its agent or authorized
service center by a qualied technician, to avoid danger of electrocution.
IMPORTANT SAFETY INSTRUCTIONS
READ ALL INSTRUCTIONS BEFORE USING THIS VACUUM
When using an electrical appliance, basic precautions should always be followed, including the following:
WARNING
TO REDUCE THE RISK OF FIRE, ELECTRIC SHOCK, OR INJURY:
Do not leave vacuum when plugged in. Unplug from outlet when not in use and before servicing.1.
Do not use outdoors or on wet surfaces.2.
Do not allow to be used as a toy. Close attention is necessary when used by or near children.3.
Use only as described in this manual. Use only Dyson recommended attachments.4.
Do not use with damaged cord or plug. If vacuum is not working as it should, has been dropped, damaged, left 5.
outdoors, or dropped into water, contact the Dyson Helpline.
Do not pull or carry by cord, use cord as a handle, close a door on cord, or pull cord around sharp edges or 6.
corners. Do not run vacuum over cord. Keep cord away from heated surfaces.
Do not unplug by pulling on cord. To unplug, grasp the plug, not the cord.7.
Do not handle plug or vacuum with wet hands.8.
Do not put any object into openings. Do not use with any opening blocked; keep free of dust, lint, hair, and 9.
anything that may reduce air ow.
Keep hair, loose clothing, ngers, and all parts of body away from openings and moving parts, such as the 10.
brush bar.
Turn off all controls before unplugging.11.
Use extra care when cleaning on stairs.12.
Do not use to pick up ammable or combustible liquids, such as gasoline, or use in areas where they may be 13.
present.
Unplug before connecting accessory tools.14.
Do not pick up anything that is burning or smoking, such as cigarettes, matches, or hot ashes.15.
Do not use without clear bin16.
TM
and lters in place.
SAVE THESE INSTRUCTIONS
THIS APPLIANCE IS INTENDED FOR HOUSEHOLD USE ONLY
POLARIZATION INSTRUCTIONS
To reduce the risk of electric shock, this appliance has a polarized plug (one blade is wider than the other).
This plug will t in a polarized outlet only one way. If the plug does not t fully in the outlet, reverse the plug.
If it still does not t, contact a qualied electrician to install a proper outlet. Do not change the plug in any way.
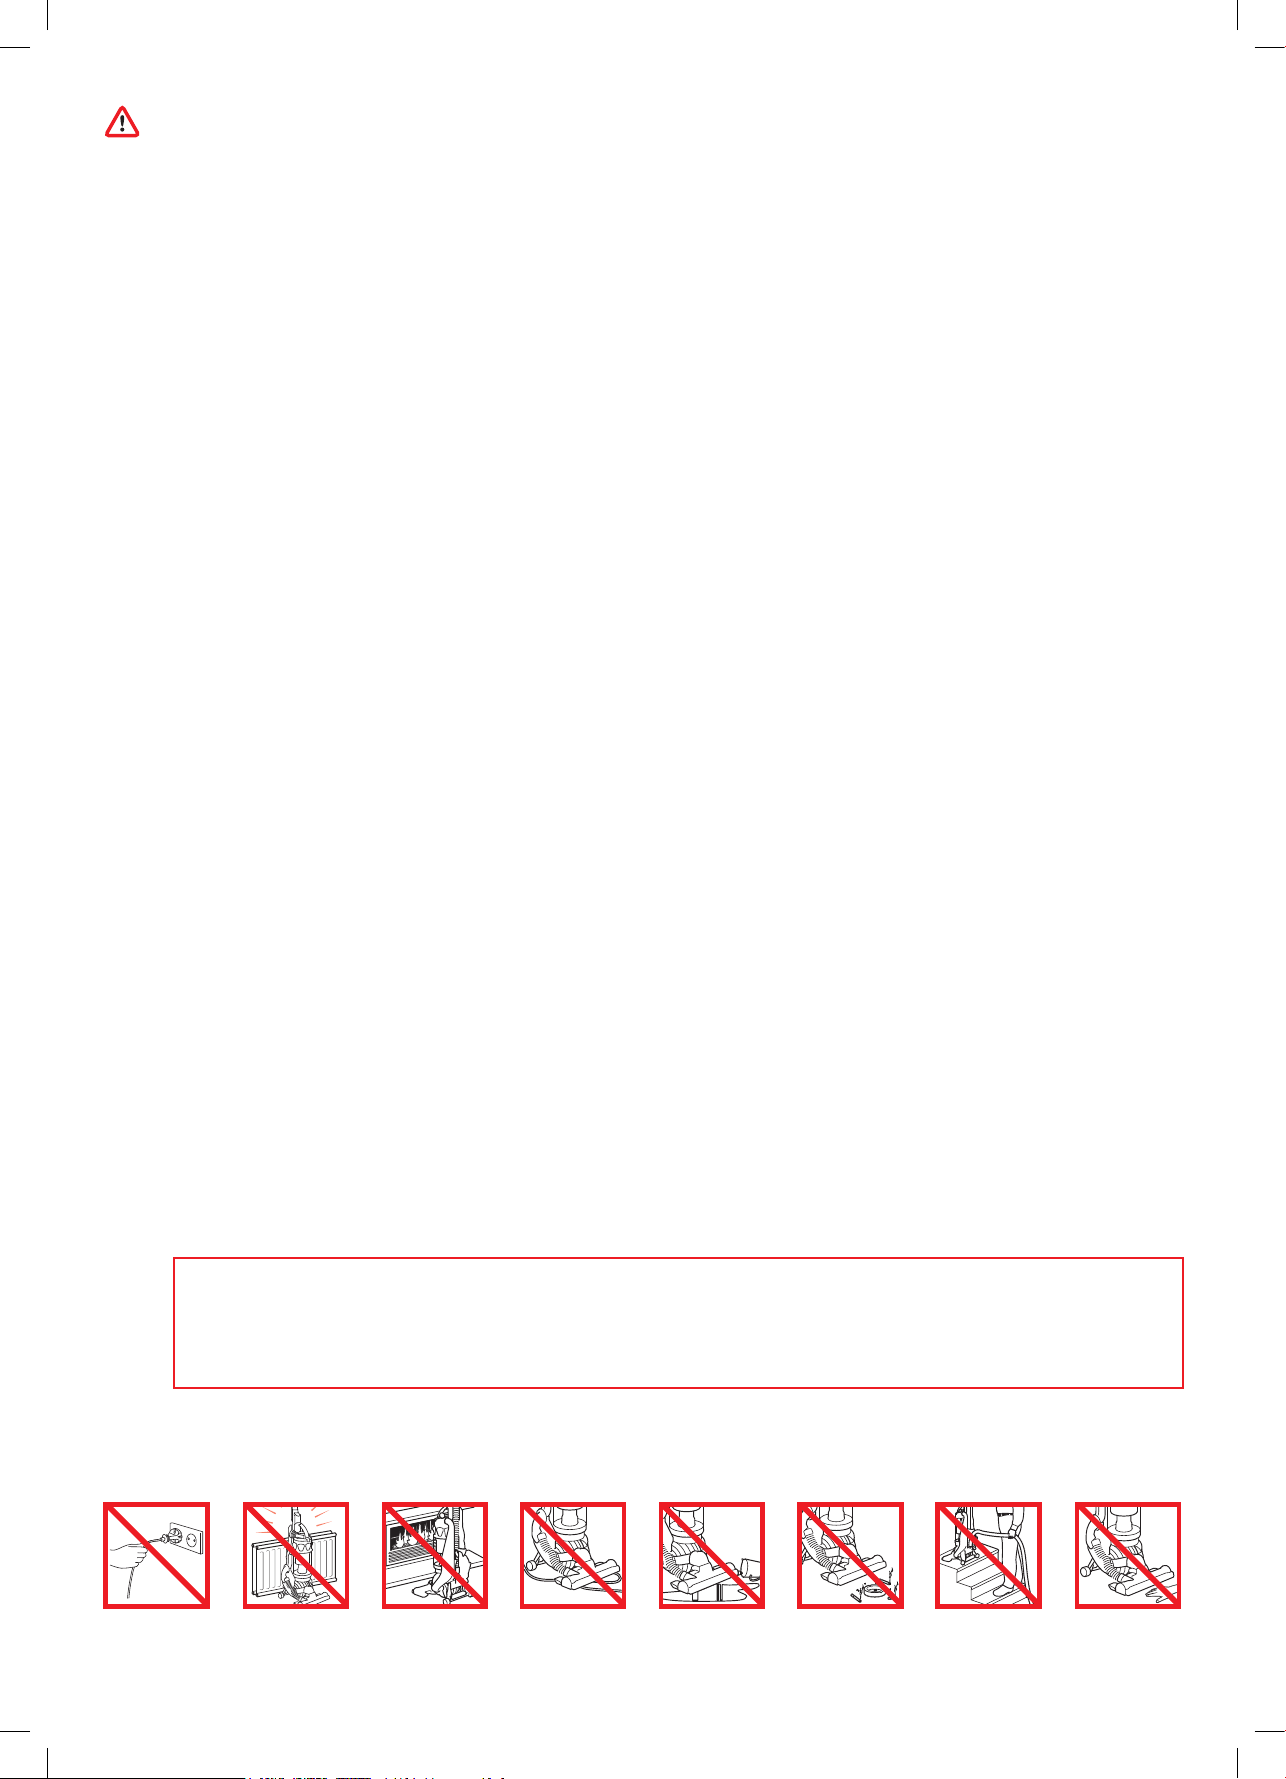
Do not pull on
the cord.
Do not store near
heat sources.
Do not use near
open a me.
Do not run over
the cord.
Do not pick up
water or liquids.
Do not pick up
burning objects.
Do not use above
you on the stairs.
Do not put hands
near the brush bar
when the vacuum
is in use.
2
Page 3

ADVERTENCIA
SI EL CORDÓN ES DAÑADO, ÉSTE DEBE SUSTITUIRSE POR EL FABRICANTE, POR SU AGENTE DE SERVICIO
AUTORIZADO O POR EL PERSONAL CALIFICADO PARA EVITAR RIESGO.
3
INSTRUCCIONES DE SEGURIDAD IMPORTANTES
LEA TODAS LAS INSTRUCCIONES ANTES DE UTILIZAR LA ASPIRADORA
Al utilizar un aparato eléctrico, siempre debe tener precauciones básicas, incluyendo las que se enumeran
a continuación:
PELIGRO
PARA DISMINUIR EL RIESGO DE PROVOCAR UN INCENDIO, RECIBIR UNA DESCARGA ELÉCTRICA
O LESIONES:
No deje la aspiradora enchufada. Desenchúfela cuando no la esté utilizando o antes de hacerle el mantenimiento.1.
No utilice el aparato al aire libre o sobre supercies húmedas.2.
No permita que el aparato sea utilizado como un juguete. Preste mucha atención si es utilizado por niños y cerca 3.
de ellos.
Utilice el aparato sólo como se describe en este manual. Utilice solamente los accesorios Dyson recomendados.4.
No utilice el aparato si el cable o el enchufe están dañados. Si la aspiradora no funciona como debería, si se 5.
cayó, fue dañada, dejada al aire libre o sumergida en agua, comuníquese con la línea de ayuda de Dyson.
No utilice el cable como una manija ni tire de él, evite también atrapar el cable al cerrar una puerta o tirar de 6.
éste alrededor de esquinas o bordes losos. No pise el cable con la aspiradora. Mantenga el cable alejado de
supercies calientes.
No desconecte el aparato tirando del cable. Para desconectar, tome el enchufe y no el cable.7.
No toque el enchufe o la aspiradora con las manos mojadas.8.
No obstruya las aberturas del aparato con ningún objeto. No utilice el aparato si tiene alguna abertura obstruida; 9.
manténgalas libres de polvo, pelusas, cabellos o cualquier otra cosa que pueda reducir la circulación del aire.
Mantenga el cabello, ropa suelta, los dedos y cualquier otra parte del cuerpo alejados de las aberturas y de las 10.
partes móviles, como el cepillo.
Apague todos los controles antes de desconectar el aparato.11.
Tenga mucho cuidado cuando utilice la aspiradora sobre una escalera.12.
No aspire líquidos inamables o combustibles como gasolina, ni la utilice en áreas dónde pueda haber este tipo 13.
de líquido.
Desconecte la aspiradora antes de colocar los accesorios.14.
No aspire nada que se esté quemando o que emita humo, como cigarrillos, fósforos o cenizas calientes.15.
No utilice la aspiradora si el compartimiento cubo transparente™ y los ltros no están colocados en su lugar.16.
CONSERVE ESTAS INSTRUCCIONES
ESTE APARATO ES PARA USO DOMÉSTICO SOLAMENTE
INSTRUCIONES DE POLARIZACIÓN
Para disminuir el riesgo de choque eléctrico, este aparato lleva un enchufe polarizado (una clavija es más ancha
que la otra). Este enchufe se conecta a una toma de corriente polarizada de una sola forma. Si el enchufe no
entra totalmente en la toma de corriente, dé la vuelta al enchufe. Si sigue sin entrar bien, póngase en contacto con
un electricista calicado para instalar una toma de corriente correcta. No cambie el enchufe de ninguna manera.
No tire del cable. No guarde la
aspiradora cerca
de fuentes de calor.
No utilice la
aspiradora cerca
de una llama.
No pise el cable. No aspire agua
ni ningún tipo
de líquido.
No aspire objetos
que es tén ardiendo.
No coloque la
aspiradora por
encima de usted
cuando esté en
una escalera.
No ponga sus
manos cerca del
cepillo cuando
esté utilizando
la aspiradora.
Page 4
clik
2
clik
ON/OFF
1
ON
OFF
Using your Dyson vacuum • Cómo utilizar su aspiradora Dyson
Clear binTM emptying • Cómo vaciar el cubo transparente
TM
Clearing brush bar obstructions • Cómo liberar las obstrucciones en el cepillo
Looking for blockages • Cómo buscar obstrucciones
Carpets or hard oors • Alfombras o pisos duros
4
Page 5

clik
clik
ON
OFF
Clearing brush bar obstructions • Cómo liberar las obstrucciones en el cepillo
High-reach cleaning • Tubo telescópico ajustable a la longitud requerida
Carpets or hard oors • Alfombras o pisos duros
5
Page 6

Filter
Filtro
A
Filter
Filtro
B
IMPORTANT!
¡IMPORTANTE!
1
WASH FILTERS
LAVADO DE FILTROS
month
mes
6
Page 7

10x
1
2
3
4
5
6
7
8
9
10
11
12
24
hours
horas
1
2
3
4
5
6
7
8
9
10
11
12
24
hours
horas
Rinse and shake lter under tap. Turn over and tap very rmly to remove motor emissions.
Repeat 10x or until water runs clear.
Enjuague y mueva el ltro debajo del grifo. De vuelta el ltro y golpéelo rmemente para
eliminar las emisiones del motor. Repita 10 veces o hasta que el agua corra limpia.
Wash lters with cold water at least every month.
Lave los ltros con aqua frio al menos cada mes.
Page 8

ASSEMBLY
Lie vacu um at and a ttach v acuum he ad by slidin g it on until it clicks.•
Stand vacuum up straight, attach wand to hose and push into place until it clicks.•
Attach tools to the side of the vacuum.•
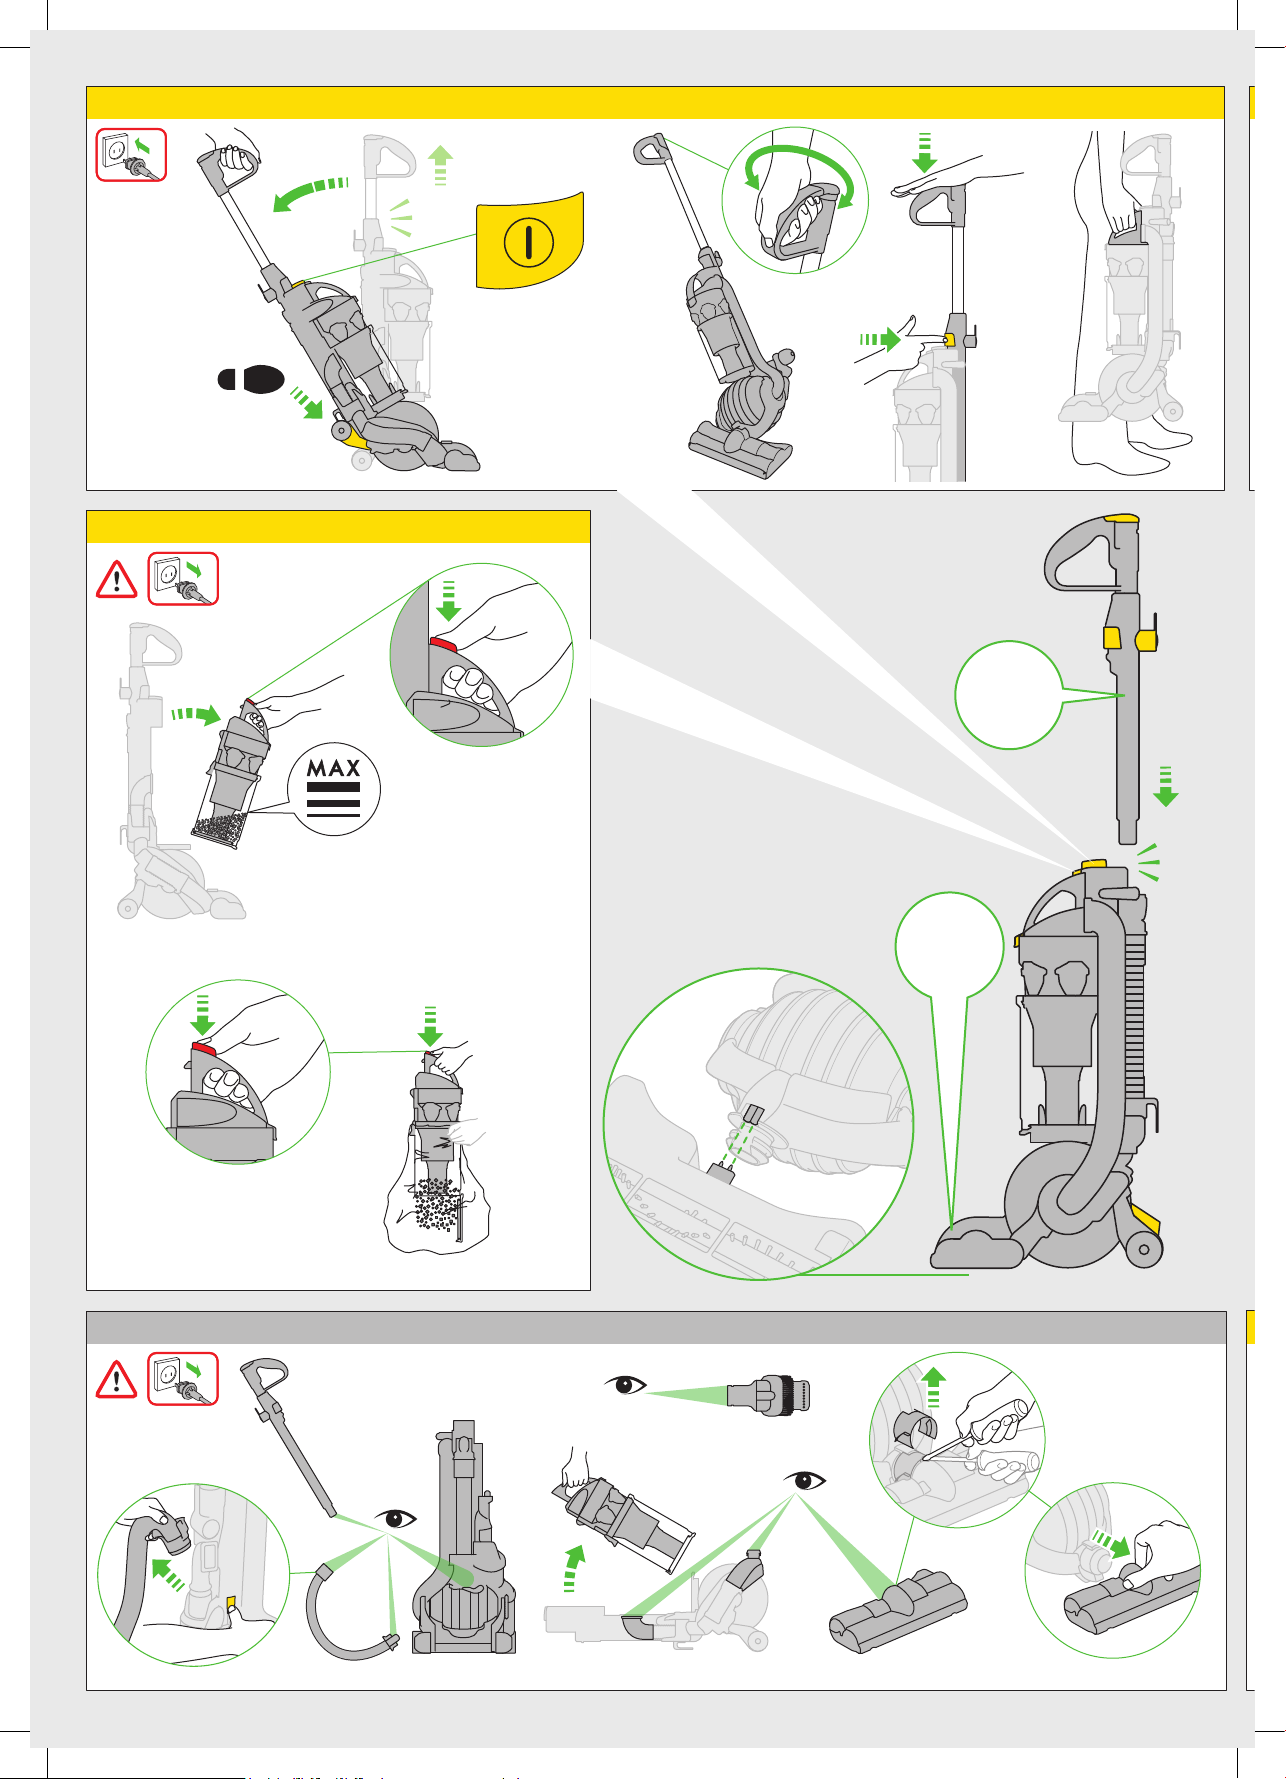
USING YOUR DYSON VACUUM
Press foot pedal and recline handle to use. The s tabilizer stand will automatically lift up.
To switch ‘ON’, depress power but ton in front of handle. After cleaning, push
vacuum into an upright position and stabilizer wheels will automatically drop.
Use the c yclone carry handle to carry the vacuum.
CAUTION:
If the vacuum is not functioning properly, has been dropped, damaged, left outdoors, or •
immersed in liquid, contac t the Dyson Helpline.
Do not allow the vacuum to be used by anyone who may not be able to operate it safely.•
The use of an extension cord is not recommended.•
Always switch off and unplug the vacuum before per forming maintenance on your vacuum.•
When returning to the upright position, ensure that the stabilizer wheels are fully engaged •
before releasing the vacuum.
Ensure the cyclone is secured to the vacuum. Do not press the cyclone release button or •
shake the vacuum while carr ying or it could fall and cause injury.
Store the vacuum indoors. Put the vacuum away after use with the cord coiled safely, to •
prevent tripping hazards.
Do not use your vacuum outdoors or on wet surfaces. Vacuum may be used inside a •
garage only when used with the Model 08909 D yson Car Cleaning Kit accessories. If used
in a garage, care should be taken to wipe the soleplate and wheels with a dry cloth after
vacuuming to clea n off any sand, dirt, o r pebble s that could damag e delicate oors .
Do not use outdoors or on wet surfaces or to vacuum water or other liquids – electric shock •
could occur.
Check to ensure your electricity supply corresponds to that shown on the rating plate, which •
can be found behind the clear bin
TM
. The vacuum must only be used as rated.
Do not lubricate any parts, or carr y out any maintenance or repair work other than that •
shown in this manual, or advised by the Dyson Helpline.
PLEASE NOTE:
This vacuum is inte nded for h ouseho ld use only. Fine dust s uch as plaster dus t or our •
should only be vacuumed in very small amounts.
Do not use the vacuum to pick up sharp hard objects, small toys, pins, paper clips, etc. •
They may damage the vacuum.
Consul t your ooring manu facturer’s recommended instr uctio ns before vacuumin g and •
caring f or your ooring, ru gs, and car pet. Some carpe ts will fuzz if a rotating brush bar is
used wh en vacuuming. If this happen s, we recom mend vacuuming in bare oors mode and
consul ting with your ooring manu factu rer.
When vacuuming, certain carpets may generate small static charges in the clear bin•
TM
or
wand. These are entirely harmless and are not associated with the electricit y supply.
To minimize any effect from this, do not put your hand or insert any objec t into the clear bin
TM
unless you have r st empt ied it and r insed it out with cold water.
CARPETS OR HARD FLOORS
The brush bar will always default to ‘ON’ (spinning) each time you switch on the vacuum
and recline it for cleaning. The brush bar will automatically stop if it becomes obs tructed. If
the brush bar stops during use, please refer to the ‘Clearing brush bar obs tructions’ section.
To switch the brush b ar ‘OFF’ (e.g. for hard oors), recline the vacuum and t urn it ‘ON ’, then
press the brush bar ‘ON/OFF’ button – the brush bar will stop spinning.
USING THE TOOLS – HIGH-REACH CLEANING
CAUTION:
Switch ‘OFF’ the vacuum before changing tools.•
Powerful suction can cause the hose to ‘pull back’ – please take care. •
Take extra care when vacuuming on stairs; do not work with the vacuum above you on the •
stairs. Do not put the vacuum on chairs, tables etc.
Ensure the vacuum is in upright position before using tools.•
PLEASE NOTE:
To release the wand, open the wand cap, press button and lift up. Rotate the wand and clip •
handle into hose. Tools can be at tached to either the hose or wand.
The brush bar will not rotate when the vacuum is in an upright position.•
Ensure wand cap is closed when not in use.•
CLEAR BINTM EMPTYING
CAUTION:
Switch ‘OFF’ vacuum and unplug the vacuum before emptying the clear bin•
TM
.
PLEASE NOTE:
Empty as soon as the dirt re aches the level of t he MA X mark – do not over ll.•
To remove the clear bin•
TM
from the vacuum press the button at rear of cyclone carrying
handle. To release the dirt, press the red clear bin
TM
release button.
Do not use the vacuum without the clear bin•
TM
in place.
Emptying in a bag is recommended for allergy sufferers.•
CLEAR BINTM CLEANING
CAUTION:
Do not immerse the whole cyclone in water or pour water into the cyclones.•
Ensure the clear bin•
TM
is completely dr y before replacing.
PLEASE NOTE:
Do not use detergents, polishes or air fresheners to clean the clear bin•
TM
.
Do not put clear bin•
TM
in a dishwasher.
WASHING YOUR FILTERS
CAUTION:
Switch ‘OFF’ and unplug th e vacuum before rem oving the lters.•
Ensure lters are complet ely dry before re tting to the vacuum. •
PLEASE NOTE:
This vacu um has two lters, locate d as shown. I t is impor tant to check your lters re gularl y •
and wash at least every month according to ins tructions, to maintain performance.
The lt er in the ball should b e rinsed a nd tappe d out until the water runs cle an, then tapped •
out again to ensure all excess water is removed. Please leave to dry completely for 24 hours.
It is nor mal for lt ers to tur n grey in col or. The lter s may require more frequent washing if •
vacuuming ne dus t.
Do not use detergents to clean the lters.•
Do not put the lters in a dishwasher, washing machin e, tumble dryer, oven, microwave or •
near an open ame.
LOOKING FOR BLOCKAGES
CAUTION:
Switch ‘OFF’ and unplug the vacuum before checking for blockages. Failure to do so could •
result in personal injury.
Please ensure vacuum is upright and switched off before removing hose or airway •
inspection parts.
Beware of sharp objects when clearing blockages.•
Ret all parts of the vacuum secure ly before using.•
PLEASE NOTE:
Clearing blockages is not covered by y our vacuum’s limited war ranty. Th is vacuum is tted •
with a thermal cut-out. If any part of your vacuum becomes blocked, it may overheat and
then automatically shut off. Switch ‘OFF’ and unplug the vacuum and leave to cool down
for at le ast 60 min utes before attemptin g to check lters or f or blocka ges. Cle ar blockage
before restar ting.
CLEARING BRUSH BAR OBSTRUCTIONS
CAUTION:
Switch ‘OFF’ and unplug the vacuum before clearing brush bar obstruc tions. Failure to do •
so could result in personal injury.
If your brush bar is obstructed, it may shut off. If this happens you will need to remove the •
brush b ar as shown and clear a ny obstr uctin g debris . Ret all p arts securely and press the
‘RESET’ button.
DYSON CUSTOMER CARE
THANK YOU FOR CHOOSING TO BUY A DYSON VACUUM
If you have a question about your Dyson vacuum, call the Dyson Helpline at
01-800-DYSONMX or 01-800-3976669 with your serial number and details of where and
when you bought the vacuum. Your serial number can be found on the rating plate, which is
behind the clear bin
TM
.
Most questions can be solved over the phone by one of our Helpline s taff. If your vacuum
needs service, call the Dyson Helpline so we can discuss the available options. If your
vacuum is under warranty, and it is a covered repair, it will be repaired at no cos t.
DYSON HELPLINE
Call 01-800-DYSONMX or 01-800 -3976669 toll free, 7 days a week.
PLEASE REGISTER AS A DYSON OWNER
To help us ens ure you rec eive prom pt and ef cient s ervice, pleas e register as a Dyson
owner. There are two ways to do this:
By calling the Dyson Helpline: 01-800-DYSONMX or 01-800-3976669.•
By completing and returning the enclosed form to us by mail.•
This will conrm ow nership of your Dy son vacuum in the event of an insurance los s, and
enable us to contact you if necessary.
5 YEAR WARRANTY
Terms and conditions of the Dyson 5 year limited warranty.
WHAT IS COVERED
Your Dyson vacuum is warranted against original defects in material and workmanship for a
perio d of ve years from the date of purchase, wh en used for privat e househ old purp oses in
accordance with the operating manual.
This warranty provides, at no extra cost to you, all labor and parts necessary to ensure your
vacuum is in proper operating condition during the warranty period. This limited warranty is
subject to the following terms:
WHAT IS NOT COVERED
Dyson shall not be liable for costs, damages or repairs incurred as a result of:
Vacuums purchased from an unauthorized dealer.•
Clearing blockages from your vacuum.•
Use of parts not in accordance with the operating manual.•
Careless operation or handling, misuse, abuse and/or lack of maintenance or use not in •
accordance with the operating manual.
External sources such as weather.•
Repairs or alterations carried out by unauthorized parties or agents.•
Use of the vacuum other than for normal domestic purposes within Mexico, e.g. for •
commercial or rental purposes.
Norma l wear and tear, includin g normal wearing parts such as belt, lter, brush b ar, hose •
assembly, and power cord (or where external damage or abuse is diagnosed).
Use of parts and accessories other than those produced or recommended by Dyson.•
WARRANTY SERVICE
Pleas e ll out and return the Warrant y Form.
Before service can take place, the terms of the limited warrant y require that you contact the •
Dyson Helpline with your model name/number, serial number, date and place of purchase.
Please keep your purchase receipt in a safe place to ensure you have this information. The
serial number is found on the vacuum’s rating plate, which is behind the clear bin
TM
.
All work will be carried out by Dyson or its authorized agents.•
Any replaced defective parts will become the property of Dyson.•
Service under this warranty will not extend the period of this warranty.•
If your vacuum is not functioning properly, please call the Dyson Helpline at •
01-800 -DYSONMX or 01-8 00- 3976669. Most issu es can be re ctie d over the t elepho ne by
our trained Dyson Helpline staf f. If this is not possible Dyson will arrange for your vacuum to
be repaired and returned in full working order at no extra cost to yourself.
WARRANTY LIMITATIONS AND EXCLUSIONS
Any implied warranties relating to your vacuum, including but not limited to warranty of •
merchantabili ty or warranty of tness f or a particular purpose, ar e limited t o the duration
of this warranty. This limitation is not allowed by some states and so this limitation may not
apply to you.
Your remedy for breach of this warranty is limited to the warranty service described above. •
Dyson will not be liable for any consequential damages or incidental damages you may
incur in connection with your purchase and use of your vacuum. This limitation is not
allowed by some states and so this limitation may not apply to you.
This limited warr anty gives you specic le gal rights. You may als o have oth er right s which •
vary by s tate.
This limited warranty is not transferable.•
8
Page 9

PRODUCT INFORMATION
Voltage: 120V~, 60Hz Rated current: 5,2 A
Please note: Small details may vary from those shown.
This product is protected by the following intellectual proper ty rights:
PATENT/PATENT APPLICATION NUMBERS:
JP 2004-537336; EP 1361812; AU 744408; EP 1119282; JP 2002-527132; US 6,519,807; AU 744362;
EP 1121043; JP 20 02-527131; US 6,572,078; GB 0326102.1; AU 2002-226556; EP 1370172;
JP 2004-528876; US 6,991,666; AU 2002-225207; EP 1361814; JP 2004 -520137; US 7,018,439;
AU 2001-240894; EP 1268076; JP 20 03-528704; US 6,835,222; AU 20 02-225232; EP 1361815;
JP 3940082; US 6,974,488; AU 2003-283157; EP 1526796; JP 2006-503607; US 2005-0235454;
AU 2003 -283159; EP 1526797; JP 2005-534442; AU 2003-283161; EP 1526798; JP 2006-503608;
AU 2004 -294771; EP 1680232; JP 2007-508934; US 2007-0079579; AU 2005-263889; EP 1768536.
Equivalent patents, registered designs and applications exis t in other countries.
9
Page 10

CÓMO ARMAR LA ASPIRADORA
Coloque el aparato en posición horizontal y conecte el cabezal limpiador deslizándolo •
hasta que haga clic.
Coloque la aspiradora en posición vertical, conecte el tubo a la manguera y empújelo hasta •
que haga clic.
Coloque las herramientas a un costado del aparato.•
CÓMO UTILIZAR SU ASPIRADORA DYSON
Para comenzar a usar el aparato, presione el pedal con el pie e incline la manija.
La base estabilizadora se elevará automáticamente. Para encender, presione el botón que
se encuentra enfrente de la manija. Cuando termine de utilizar la aspiradora, colóquela
en posición vertical y las ruedas del estabilizador dejarán de funcionar automáticamente.
Utilice la manija del extractor de polvo para trasladar la aspiradora.
ADVERTENCIA:
Si la asp iradora n o funcion a correc tamen te, se cayó, f ue d • añada, d ejada al aire libre o •
sumergida en algún líquido, comuníquese con la línea de ayuda de Dyson.
No permita que la aspiradora sea usada por alguien que no esté capacitado para operarla •
de manera segura.
No es recomendable utilizar una prolongación de cable.•
Siempre apague y desconecte el aparato antes de realizar cualquier tipo de mantenimiento.•
Cuando vuelva a colocar la aspiradora en posición vertical, asegúrese de que las ruedas •
del estabilizador estén engranadas por completo antes de soltar la aspiradora.
Asegúrese de que el extractor de polvo esté bien conectado a la máquina. No presione el •
botón para soltar el extractor de polvo ni sacuda el aparato mientras lo transporta porque
el mismo podría caerse y dañarse.
Guarde la aspiradora bajo techo. Luego de ser utilizada, guarde la aspiradora con el cable •
apropiadamente enrollado para evitar posibles tropezones.
No utilice la aspiradora al aire libre ni sobre supe r cies húmedas. La aspiradora puede •
usarse dentro de un garaje, únicamente con los accesorios del Kit de limpieza para el coche
Dyson Modelo 08909. Si se utiliza en un garaje, tenga extremo cuidado de limpiar la placa
base y las ruedas con un paño seco después de aspirar, para quitarles la arena, suciedad o
piedritas que podrían dañar los pisos delicados.
No la utilice al aire libre, ni sobre super cies húmedas, ni p ara aspirar agua u otros •
líquidos, ya que podría recibir un choque eléctrico.
Compruebe que l a corrie nte eléctrica s e corres ponda co n la que gura en la placa de cali •
cación, la cual se encuentra detrás del cubo transparente
TM
. La máquina sólo debe utilizarse
conforme a las características técnicas.
No lubrique ninguna parte del aparato ni intente repararlo o realizar cualquier otro tipo •
de mantenimiento que no se encuentre en este manual o que no haya sido indicado por la
línea de ayuda de D yson.
RECUERDE:
Este aparato es para uso doméstico solamente. Sólo deben aspirarse cantidades pequeñas •
de polvo no como por e jemplo re siduos d e yeso o harina.
No utilice la máqu ina para re coger ob jetos duros cort antes, ju guetes pequeñ os, al leres, •
sujetapapeles, etc., ya que podrían dañar la máquina.
Consulte las instrucciones recomendadas por el fabricante de su piso antes de aspirar •
y cuidar sus pisos y alfombras. Algunas alfombras formarán pelusa si utiliza el cepillo
rotatorio mientras aspira. Si esto sucede, recomendamos aspirar en el modo de pisos
expuestos y consultar con el fabricante de su piso.
Al aspirar, algunas alfombras pueden generar pequeñas descargas de estática en el •
cubo transparente o en el tubo. Éstas son totalmente inofensivas y no están asociadas
al suministro de corriente eléctrica. Para minimizar sus efectos, no coloque su mano ni
introduzca ningún objeto en el cubo transparente, a menos que primero lo haya vaciado y
lavado con agua fría.
ALFOMBRAS O PISOS DUROS
El cepillo estará en “ON” (girar) por defecto cada vez que encienda la aspiradora
y la recline para limpiar. El cepillo se detendrá automáticamente si se obstruye con
algo. Si el cepillo se detiene mientras la aspiradora está en funcionamiento, vea la
sección “Cómo liberar las obstrucciones del cepillo”.
Para apagar el cepillo (por ejemplo, para limpiar pisos duros), recline la aspiradora
y enciéndala, luego presione el botón “ON/OFF” del cepillo y éste dejará de girar.
CÓMO UTILIZAR LAS HERRAMIENTAS – TUBO
TELESCÓPICO AJUSTABLE A LA LONGITUD REQUERIDA
ADVERTENCIA:
Apague la aspiradora antes de cambiar las herramientas.•
Si el aparato aspira a la máxima potencia, la manguera puede retraerse. Tenga mucho •
cuidado.
Tenga mucho cuidado cuando utilice la aspiradora sobre una escalera y no la coloque •
encima suyo. No suba la aspiradora a sillas, mesas, etc.
Asegúrese de que la máquina esté en posición vertical antes de usar las herramientas.•
RECUERDE:
Para soltar el tubo, abra la tapa, presione el botón y levántelo. Gire el bubo y sujete la •
manija dentro de la manguera.
El cepillo no rotará cuando la máquina es tá en posición ver tical.•
Asegúrese de que la tapa del tubo esté cerrada cuando no se use.•
CÓMO VACIAR EL CUBO TRANSPARENTE
TM
ADVERTENCIA:
Apague la máquina aspiradora y desconéctela (“OFF”) antes de vaciar el compartimiento •
cubo transparente
TM
.
RECUERDE:
Vacíe el compartimiento cuando la basura llegue al nivel máximo. Evite sobrecargarlo.•
Para quitar el cubo transparente•
TM
de la máquina, presione el botón que está detrás de la
manija extractora de polvo para trasladar la aspiradora. Para tirar la basura, presione el
botón rojo para soltar el extractor de polvo.
No utilice la aspiradora si el cubo transparente•
TM
no está colocado.
Se recomienda que las pessonos alérgicas vacien el cubo transparente•
TM
en una balsa.
CÓMO LIMPIAR EL CUBO TRANSPARENTE
TM
ADVERTENCIA:
No sumerja totalmente el extrac tor de polvo en agua ni ponga agua dentro de éste.•
Asegúrese de que el compartimiento cubo transparente•
TM
esté totalmente seco antes de
colocarlo.
RECUERDE:
No utilice detergente, líquido para encerar ni desodorante de ambientes para limpiar el •
compar timiento cubo transparente
TM
.
No limpie el compartimiento cubo transparente•
TM
en un lavavajillas.
CÓMO LAVAR LOS FILTROS
ADVERTENCIA:
Apague la aspiradora y desconéc tela antes de quit ar los ltros.•
Aseg úrese de q ue los ltros esté n totalme nte seco s antes de volver a col ocarlos en la •
aspiradora.
RECUERDE:
Esta aspiradora tiene do s ltros, ubicados c omo se mue stra en las ilustraciones. •
Es importante controlar los ltros con regularidad y lavarlos al menos un a vez al mes de
acuerdo con las instrucciones, para mantener el funcionamiento del aparato.
El ltro que se encu entra en la parte i nferior debe ser enjuaga do y vaciad o hasta que el •
agua corra limpia, y luego debe vaciarse una vez más para asegurarse de que no quede
nada de a gua en el interior. Para ello, el ltro d eberá se r enjuagado hasta diez veces.
Déjelo secar por completo durante 24 horas.
Es norm al que el ltro que se en cuentra en la par te infer ior se vue lva de color gris. Si se •
aspira p olvo no, se rá necesario lavar los ltros con mayo r frecue ncia.
No use de tergen tes para limpiar los ltros.•
No colo que los lt ros en el la vavajillas, el lava rropas, l a secadora, el horn o, el microondas •
o cerca del fuego.
CÓMO BUSCAR OBSTRUCCIONES
ADVERTENCIA:
Apague la aspiradora y desconéc tela antes de buscar obstrucciones. Si no lo hace, podría •
sufrir lesiones.
Por favor asegúrese de que el aparato esté en posición vertical y apagado antes de quitar el •
tubo o las partes de ventilación.
Tenga cuid ado al utilizar obje tos loso s para sacar las obs trucciones.•
Coloque todas las partes de la aspiradora correctamente antes de utilizarla.•
RECUERDE:
Su garantía limitada no cubre la eliminación de obstrucciones. Este aparato posee un •
sistema de desconexión térmica. Si alguna parte de la aspiradora se obstruye, ésta puede
recalentarse y apagarse automáticamente. Apague la aspiradora con la opción “OFF”,
desco nécte la y deje qu e se enfríe durante por lo menos 60 minutos antes de c ontrola r los
ltros o buscar obstrucciones.
CÓMO LIBERAR LAS OBSTRUCCIONES DEL CEPILLO
ADVERTENCIA:
Apague la aspiradora y desconéc tela antes de liberar las obstrucciones del cepillo. Si no lo •
hace, podría sufrir lesiones.
Si el cepillo se encuentra obstruido, la aspiradora puede apagarse. Si esto sucede, deberá •
quitar el cepillo como se muestra en las ilustraciones y quitar todo desecho que esté
obstruyéndolo. Coloque todas las partes correctamente antes de usarlo.
ATENCIÓN AL CLIENTE DE DYSON
GRACIAS POR HABER ADQUIRIDO UN PRODUC TO DYSON.
Si tiene alguna duda acerca de su aspiradora Dyson, llame a la línea de ayuda de Dyson
al 01-800 -DYSONMX o 01-800-3976669 con el número de serie y detalles de cuándo y
dónde adquirió el producto. Encontrará el número de serie en la placa de datos de servicio
que se encuentra detrás del cubo transparente
TM
.
Si tiene más preguntas, puede consultar por teléfono a algún miembro de la línea de
ayuda. Si su aspiradora necesita ser reparada, comuníquese con la línea de ayuda de
Dyson para poder ver las opciones disponibles. Si su aspiradora tiene garantía y la
reparación necesaria está incluida dentro de esa garantía, será reparada sin costo alguno.
LÍNEA DE AYUDA DYSON
Llame gratis al 01-80 0-DYSONM X o 01-800-3976669 durante los siete días de la semana.
REGÍSTRESE COMO DUEÑO DE UN PRODUCTO DYSON
GRACIAS POR HABER ADQUIRIDO UN PRODUC TO DYSON.
Para poder recibir un serv icio rápido y e cient e, regístrese como Dueño d e un produc to
Dyson. Hay dos maneras de registrarse:
Llamanda gratis a la línea de ayuda de Dyson: 01-80 0-DYSONM X o 01-800 -3976669.•
Completando y enviándonos por correo el formulario que se adjunta.•
Esto conrmar á que la aspiradora D yson es de su propie dad en cas o de que ocurra una •
pérdida cubier ta por el seguro, y nos permitirá contac tarle si fuese necesario.
DE 5 AÑOS DE GARANTÍA.
Términos y condiciones de la garantía limitada de 5 años de Dyson.
QUÉ CUBRE
Su aspiradora Dyson tiene garantía por defectos en el material o su fabricación por un
período de cinco años desde la fecha de adquisición del producto. La garantía es válida
si el prod ucto es u tilizado con nes domésticos y priv ados de acuerdo con l o expuesto en
el manual del usuario de Dyson. Esta garantía cubre, sin ningún costo adicional todo el
trabajo y las partes necesarias para asegurar que su aspiradora funcione correctamente.
Esta garantía limitada está sujeta a los siguientes términos:
QUÉ ES LO QUE NO CUBRE
Dyson no será responsable por los gastos, daños o reparaciones ocasionados como
resultado de:
Aparatos comprados a un representante no autorizado.•
Liberar obstrucciones de su aspiradora.•
Utilizar las partes del producto de alguna manera que no esté en conformidad con lo •
expresado en el manual del usuario.
Uso y manejo descuidado, uso incorrecto, mantenimiento excesivo o falta de éste o •
cualquier uso que no esté en conformidad con lo expresado en el manual del usuario.
Acción de agentes externos tales como el clima.•
Reparaciones o alteraciones del producto realizadas por personas no autorizadas.•
Cualquier uso que se le dé a la aspiradora q ue no teng a nes doméstico s dentro de los •
Mexico, por ejemplo, uso comercial o alquiler del producto.
Uso y des gaste normal, inc luido desgaste n ormal de p artes como banda, ltro, cepillo, •
ensamble de la manguera, y cable de corriente (o donde se diagnostique daño o abuso
externo).
Cualquier uso que se le dé a las partes y accesorios que no haya sido recomendado por •
Dyson.
SERVICIO DE GARANTÍA
Complete el formulario de registro del producto y envíelo por correo.•
De acuerdo con lo expresado en la garantía limitada, antes de realizar el servicio usted •
debe comunicarse con la línea de ayuda de Dyson y proporcionar el nombre o número del
produc to, número de serie, fecha y lugar en donde compró el producto. Conserve su recibo
de compra en un lugar seguro para así tener la información requerida. El número de serie
se encuentra en la placa de datos de servicio ubicada detrás del cubo transparente
TM
.
Todo el trabajo será realizado por Dyson o por sus agentes autorizados.•
Cualquier parte defectuosa que sea reemplazada se convertirá en propiedad de Dyson.•
El mantenimiento realizado bajo esta garantía limitada no extiende el período de la misma.•
Si su aspiradora no funciona correc tamente, llame a la línea de ayuda de Dyson al •
01-800-DYSONMX o 01-800-3976669. La mayoría de los problemas pueden resolverse
por teléfono con la ayuda de nuestro personal capacitado de atención al cliente. En caso
contrario, Dyson se encargará de reparar su aspiradora y devolverla funcionando sin
ningún costo.
10
Page 11

INFORM ACIÓN ACERC A DEL PRODUC TO:
Voltaje Nominal 120V~, Frecuencia 60 HZ, Corriente máxima 5,2 A.
Recuerde: El producto puede diferir en algunos pequeños detalles en comparación con las ilustraciones.
Este producto se encuentra bajo la protección de los siguientes derechos de propiedad intelec tual:
PATENTE/NÚMEROS DE SOLICITUD DE PATENTE:
JP 2004-537336; EP 1361812; AU 744408; EP 1119282; JP 2002-527132; US 6,519,807; AU 744362;
EP 1121043; JP 20 02-527131; US 6,572,078; GB 0326102.1; AU 2002-226556; EP 1370172;
JP 2004-528876; US 6,991,666; AU 2002-225207; EP 1361814; JP 2004 -520137; US 7,018,439;
AU 2001-240894; EP 1268076; JP 20 03-528704; US 6,835,222; AU 20 02-225232; EP 1361815;
JP 3940082; US 6,974,488; AU 2003-283157; EP 1526796; JP 2006-503607; US 2005-0235454;
AU 2003 -283159; EP 1526797; JP 2005-534442; AU 2003-283161; EP 1526798; JP 2006-503608;
AU 2004 -294771; EP 1680232; JP 2007-508934; US 2007-0079579; AU 2005-263889; EP 1768536.
En otros países existen patentes equivalentes, diseños y aplicaciones registrados.
LIMITACIONES Y APARTADOS EXCLUYENTES DE LA
GARANTÍA
Cualquier garantía implícita relacionada con su aspiradora, que incluya pero que no esté •
limitada a la garantía de aptitud e idoneidad para un propósito en particular, es válida
dentro del tiempo de duración de esta garantía. Esta limitación no está permitida en
algunos estados. Por lo tanto, podría no aplicarse en su caso.
Sus derechos por el incumplimiento de esta garantía están limitados al servicio de garantía •
descrito anteriormente. Dyson no será responsable por ningún daño consiguiente o
accidental que esté relacionado con la adquisición y el uso del producto. Esta limitación no
está permitida en algunos estados. Por lo tanto, podría no aplicarse en su caso.
Esta garantía limitada le otorga de rechos legales e specí cos. Ust ed puede tener otros •
derechos que varían según el estado.
Esta garantía no es transferible. •
11
Page 12

www.dyson.com
JN.22942 PN .14492-08-0 2 23.09.08
Distributed for Dyson UK by Corporativo Valsi, Jalisco C.P. 44440
Distribuida por Corporativo Valsi, Jalisco C.P. 44440, para Dyson UK
Corporativo Valsi
Av. Heroes Ferrocarrileros No. 285
Col. Ferrocarril
Guadalajara
Jalisco C.P. 44440
Mexico
01-8 00-DYSONMX
01-800-3976669
Toll free, 7 days a week
Llamada sin costo, 7 días a la semana
IMPORTANT!
¡IMPORTANTE!
WASH FILTERS
LAVADO DE FILTROS
1
Wash lters with cold water at least every month.
Lave los ltros con aqua fría al menos cada mes.
month
mes
 Loading...