

Page 1
click
OPERATING MANUAL
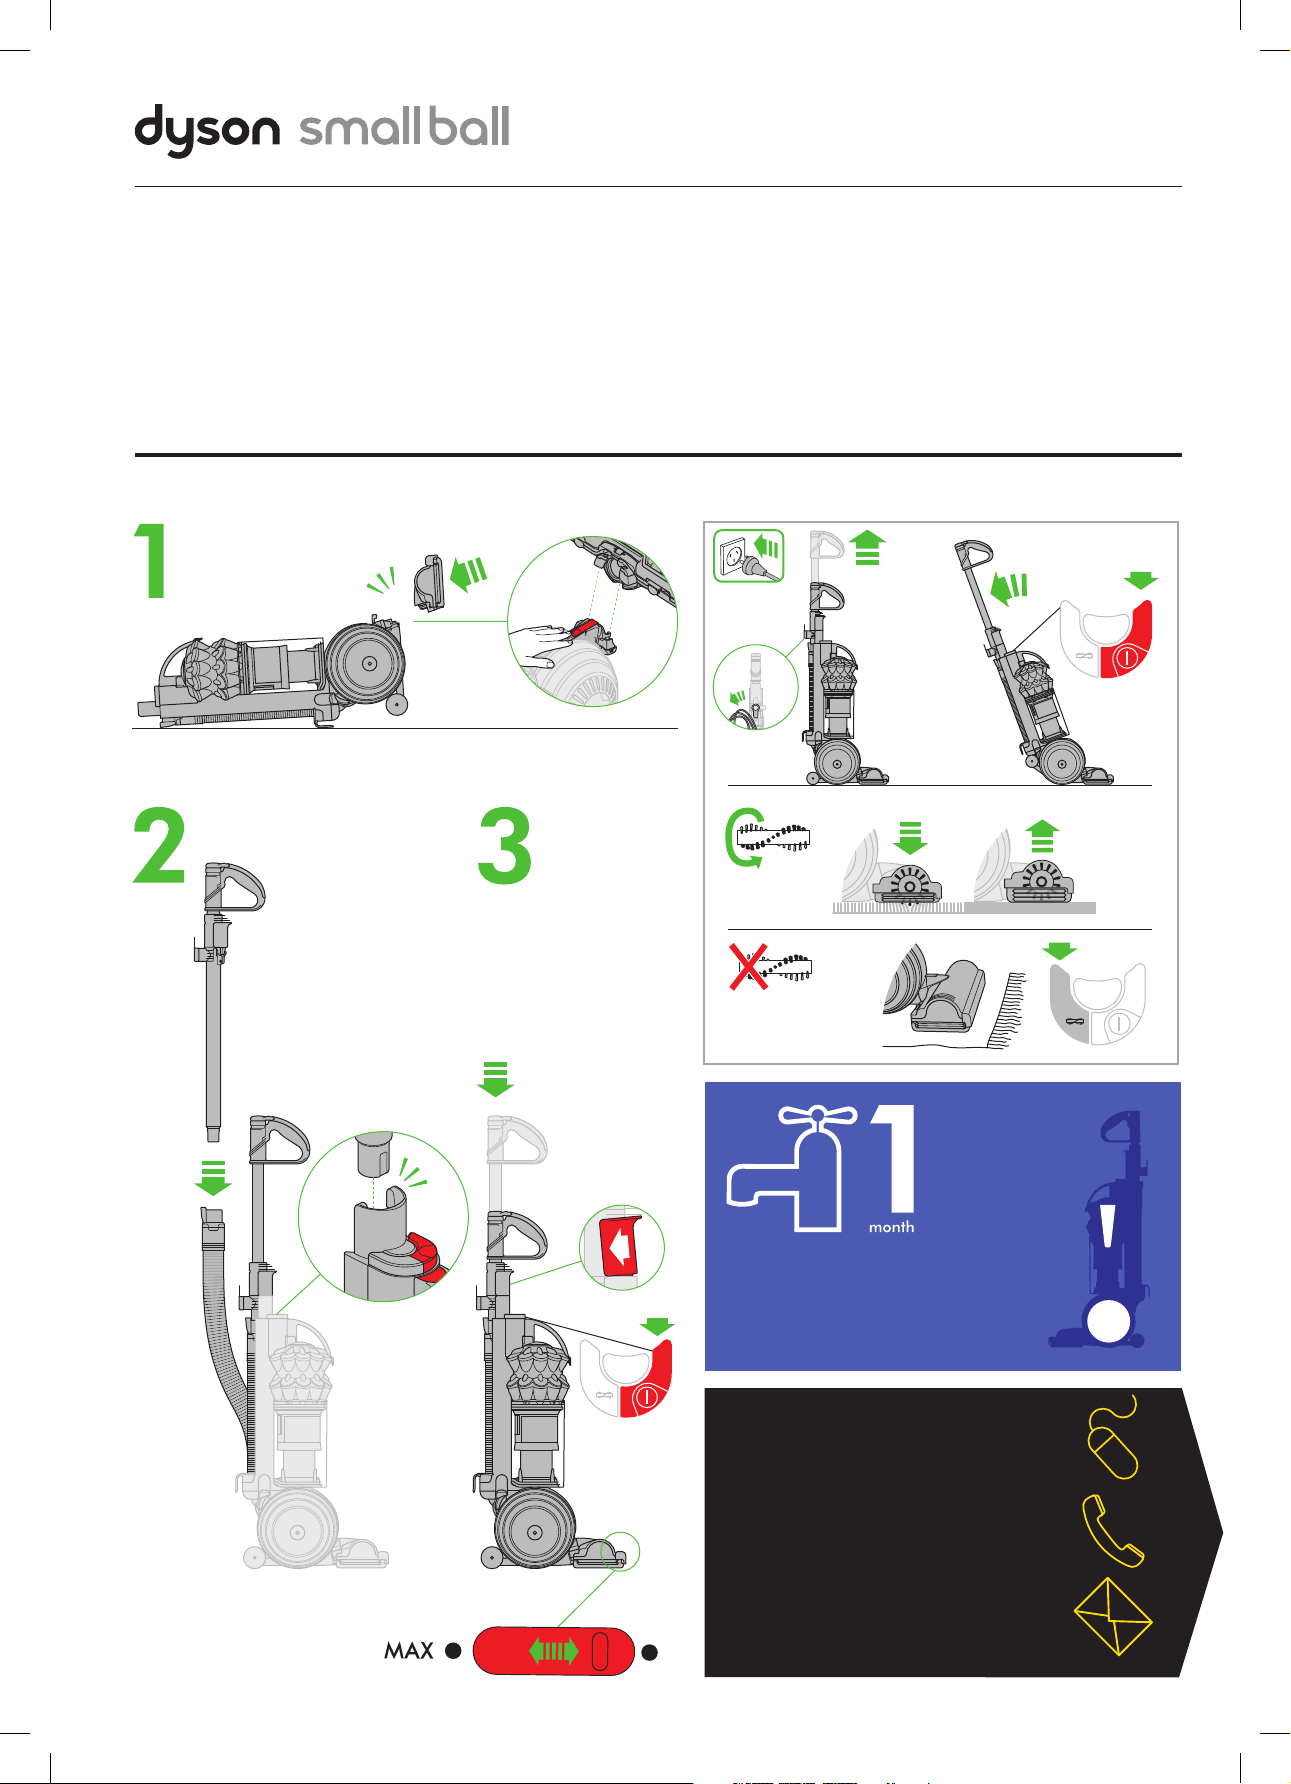
ASSEMBLY
OPERATION
click
Automatic
WASH FILTERS
Wash filters with cold water
regularly or as required.
REGISTER
YOUR DYSON
2 YEAR
GUARANTEE
TODAY
UP15
Page 2
DYSON CUSTOMER CARE
THANK YOU FOR CHOOSING TO BUY A
DYSON APPLIANCE
Your Dyson appliance will be covered for parts
and labour for 2 years from the date of purchase,
as detailed in the terms of the Dyson guarantee in
this Dyson Operating Manual.
If you have a query about your Dyson appliance, call
the Dyson Customer Care Helpline quoting your serial
number and details of where and when you bought the
appliance. Alternatively, contact us via the website.
Your serial number can be found on your rating plate
which is behind the clear bin.
Most queries can be solved over the phone by one of
our Dyson Customer Care Helpline staff (details below).
Visit our website to register your Dyson full parts and
labour guarantee online, and for online help, support
videos, general tips and useful information about Dyson.
AU: www.dyson.com.au/register
NZ: www.dyson.co.nz/register
DYSON CUSTOMER CARE
ONLINE SUPPORT
For online help, general tips, videos and useful information about Dyson.
AU: www.dyson.com.au/support
NZ: www.dyson.co.nz/support
Australia
Website: www.dyson.com.au
Email: aucustomercare@dyson.com
Dyson Customer Care: 1800 239 766
(Mon-Fri 8:00am to 6:00pm EST, Sat-Sun 8:30am to 4:00pm EST).
Address: Dyson Appliances (Aust) Pty Ltd., PO Box 2835, Taren Point,
NSW 2229 Australia.
New Zealand
Website: www.dyson.co.nz
Email: dyson@averyrobinson.co.nz
Dyson Customer Care: 0800 397 667 (Mon-Fri 8:30am to 5:00pm).
Address: Avery Robinson Ltd., Unit F, 151D Marua Road, Ellerslie,
Auckland, 1051 New Zealand.
Note your serial number for future reference.
This illustration is for example purposes only.
3 EASY WAYS TO REGISTER YOUR DYSON 2 YEAR GUARANTEE
REGISTER
ONLINE
Visit our website to register your
Dyson full parts and labour
guarantee online.
AU: www.dyson.com.au/register
NZ: www.dyson.co.nz/register
2
REGISTER
BY PHONE
Call our dedicated Helpline.
AU 1800 239 766
NZ 0800 397 667
REGISTER
BY MAIL
Complete and return
the form to Dyson in the
envelope supplied.
Page 3

IMPORTANT SAFETY INSTRUCTIONS
BEFORE USING THIS APPLIANCE READ ALL INSTRUCTIONS AND CAUTIONARY MARKINGS IN THIS
MANUAL AND ON THE APPLIANCE
When using an electrical appliance, basic precautions should always be followed, including the following:
WARNING
These warnings apply to the appliance, and also where applicable, to all tools, accessories, chargers or
mains adaptors.
TO REDUCE THE RISK OF FIRE, ELECTRIC SHOCK, OR I N J U R Y:
1. This Dyson appliance is not intended for use by young children or infirm persons with reduced physical, sensory or
reasoning capabilities, or lack of experience and knowledge, unless they have been given supervision or instruction
by a responsible person concerning use of the appliance to ensure that they can use it safely.
2. Do not allow to be used as a toy. Close attention is necessary when used by or near children. Children should be
supervised to ensure that they do not play with the appliance.
3. Use only as described in this Dyson Operating Manual. Do not carry out any maintenance other than that shown in
this manual, or advised by the Dyson Customer Care Helpline.
4. Suitable for dry locations ONLY. Do not use outdoors or on wet surfaces.
5. Do not use to pick up water.
6. Do not handle any part of the plug or appliance with wet hands.
7. Do not use with a damaged cable or plug. If the supply cable is damaged it must be replaced by Dyson, its service
agent or similarly qualified person in order to avoid a hazard.
8. If the appliance is not working as it should, has received a sharp blow, has been dropped, damaged, left outdoors,
or dropped into water, do not use and contact the Dyson Customer Care Helpline.
9. Contact the Dyson Customer Care Helpline when service or repair is required. Do not disassemble the appliance as
incorrect reassembly may result in an electric shock or fire.
10. Do not stretch the cable or place the cable under strain. Keep the cable away from heated surfaces. Do not close a
door on the cable, or pull the cable around sharp edges or corners. Arrange the cable away from traffic areas and
where it will not be stepped on or tripped over.
Do not run the appliance over the cable.
11. Do not unplug by pulling on the cable. To unplug, grasp the plug, not the cable. The use of an extension cable is
not recommended.
12. Do not use to pick up flammable or combustible liquids, such as petrol, or use in areas where they or their vapours
may be present.
13. Do not pick up anything that is burning or smoking, such as cigarettes, matches, or hot ashes.
14. Keep hair, loose clothing, fingers, and all parts of the body away from openings and moving parts, such as the
brush bar. Do not point the hose, wand or tools at your eyes or ears or put them in your mouth.
15. Do not put any object into openings. Do not use with any opening blocked; keep free of dust, lint, hair, and anything
that may reduce airflow.
16. Use only Dyson recommended accessories and replacement parts.
17. To avoid a tripping hazard wind the cable when not in use.
18. Do not use without the clear bin and filter in place.
19. Do not leave the appliance when plugged in. Unplug when not in use and before servicing.
20. Do not pull or carry by the cable or use the cable as a handle.
21. Use extra care when cleaning on stairs. Do not work with the appliance above you on the stairs.
22. Turn off all controls before unplugging. Unplug before connecting any tool or accessory.
READ AND SAVE THESE INSTRUCTIONS
THIS DYSON APPLIANCE IS INTENDED FOR HOUSEHOLD USE ONLY
Do not pull on
the cable.
Do not store near
heat sources.
Do not use near
naked flames.
Do not run over
the cable.
Do not pick up
water or liquids.
Do not pick up
burning objects.
Do not use above
you on the stairs.
Do not put hands
near the brush bar
when the appliance
is in use.
3
Page 4
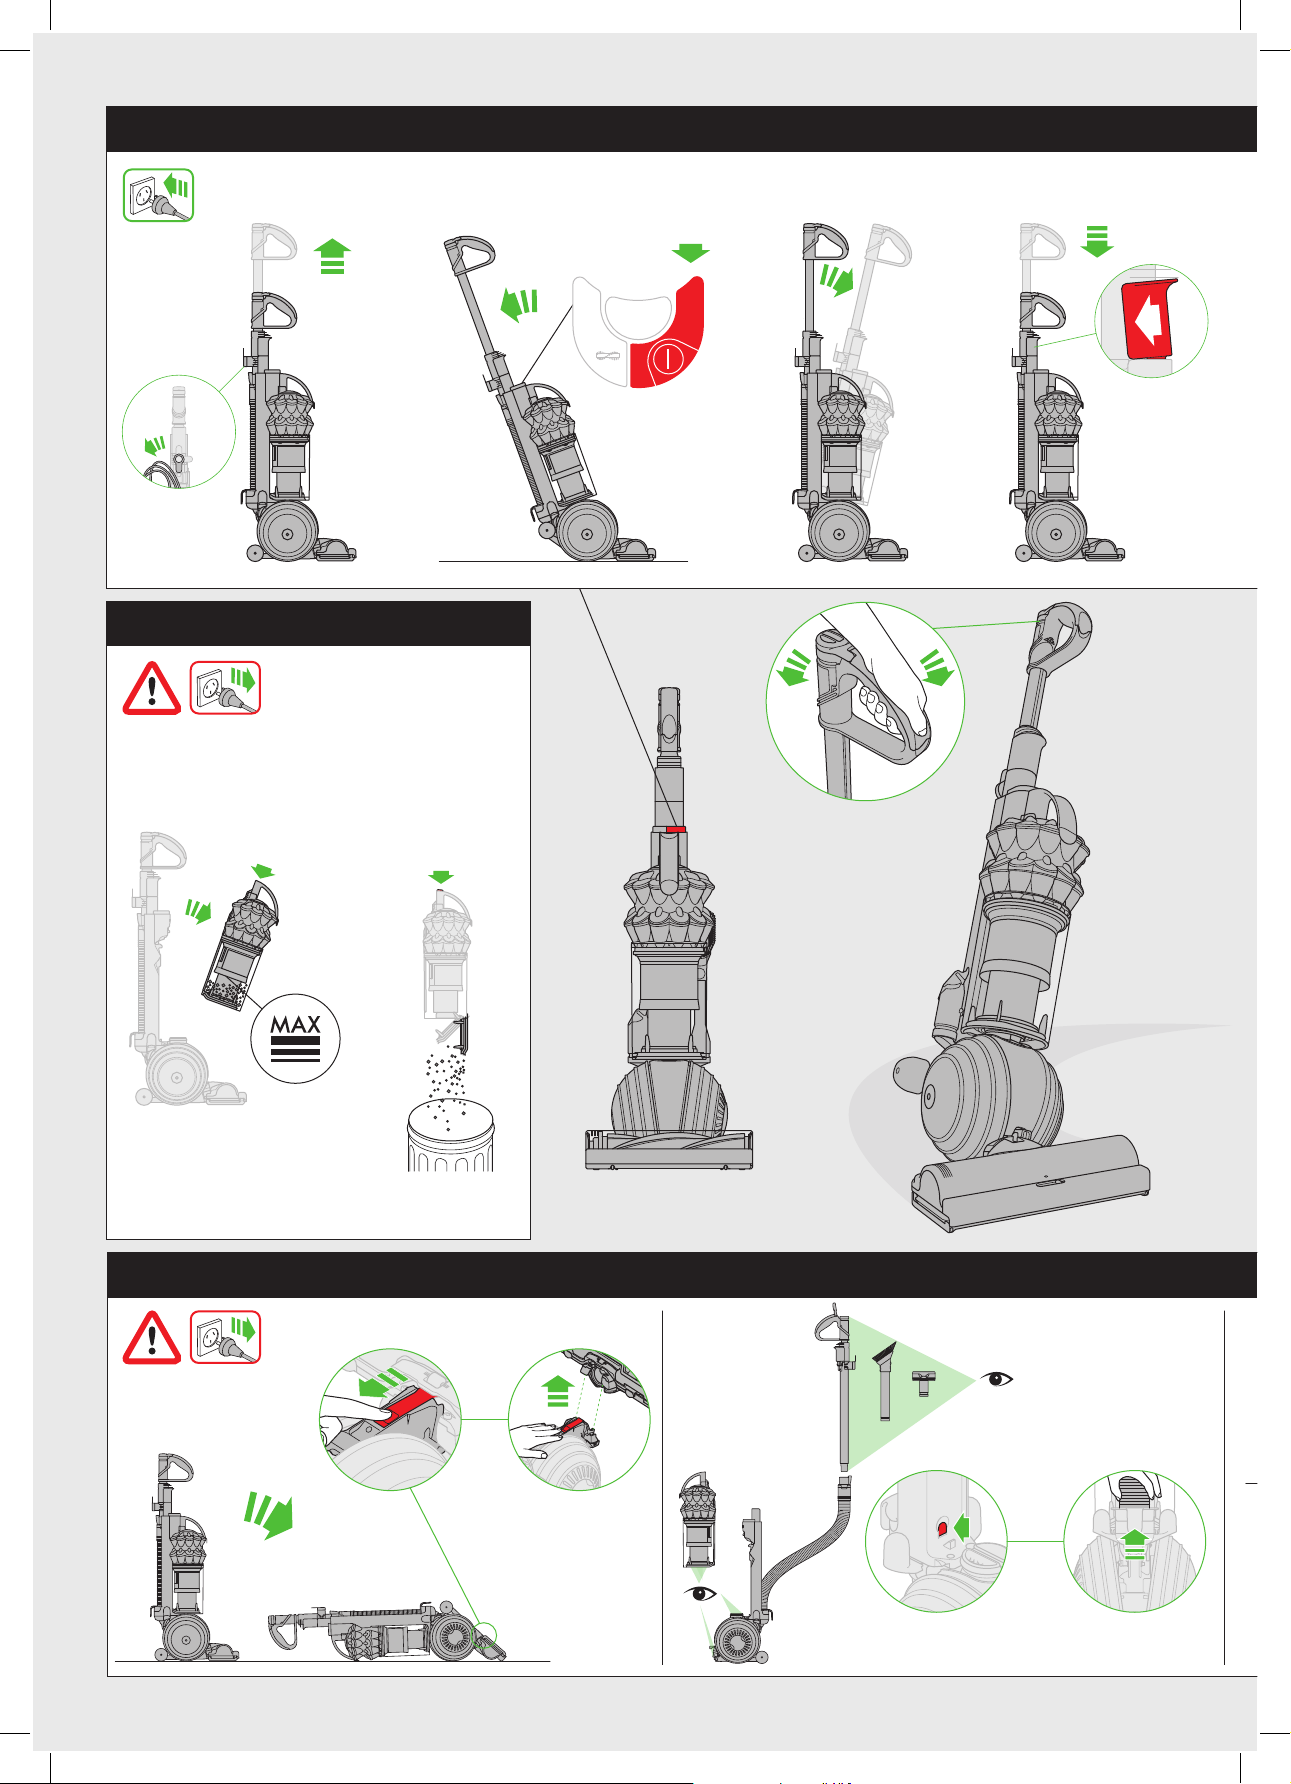
Operation
Emptying the clear bin
Storage
Looking for blockages
4
Page 5

Carrying the appliance
Attaching wand and toolsCarpets or hard floors
Automatic
Self-adjusting cleaner head with suction control
Brush bar – clearing obstructions
5
Page 6

click
click
click
1
2
3
IMPORTANT!
WASH FILTERS
A
B
x10
6
Page 7

click
click
click
Wash filters with cold water regularly or as required.
The filters may require more frequent washing if vacuuming fine dust.
click
7
Page 8

A
B
click
click
x10
Base plate disassembly
USING YOUR DYSON APPLIANCE
PLEASE READ THE 'IMPORTANT SAFETY INSTRUCTIONS' IN THIS DYSON
OPERATING MANUAL BEFORE PROCEEDING.
ASSE M B LY
• Lie the appliance on its back.
• Attach the cleaner head by sliding it on to the conne ctions on the lower front
part of the ball. Ensure the electrical plug on the cleaner head fits into the twin
- block connection on the body of the appliance, which is directly above the
airwa y. Push firmly: the cleaner head will click into place.
• Stand the appliance up straight.
• Slide wand into the hose.
• Push handle down until the red bu tton clicks into the appliance.
• To fit the tool holder, firs t remove the cyclone and clear bin assembly: release it
by pressing the red button at the top of the cyclone.
• Slide the tool holder onto the back of the appliance, just above the ball, as
shown. Press the tool holder on with your thumbs, while holding the front of the
appliance with your fingers. The fit ting is tight, so use a constant, firm pressure.
(Please note: The tool holder is not designed to be removed.)
• Refit the cyclone and clear bin unit.
• Attach the tools.
• Wind the cable around the cable hooks. Secure with the clip.
OPERATION
• Unwind the cable.
• Plug the appliance into the mains electricity supply.
• To switch ‘ON’ or ‘OFF’ press the red power button, located as shown.
• To use, recline the handle. The stabiliser stand will automatically lift up.
• The brush bar will not rotate when the vacuum is in an upright position.
• To release the wand, open the wand cap, press the red button and lift up.
Rotate the wand and clip handle into hose. Tools can be attached to either the
hose or wand.
• After use, return the appliance to the upright position, pushing it firmly into
place. The stabiliser wheels will automatically lower.
• Then unplug the appliance, coil the cable safely and put the appliance away.
• Switch 'OFF' the appliance, unplug and ensure it is upright before:
– Changing or using tools.
– Removing the hose or air way inspection p arts.
• Use the c yclone carry handle to carr y the appliance.
SELF-ADJUSTING CLEANER HEAD WITH
SUCTION CONTROL
EASY MODE
Reduced push force for effortless cleaning.
• For vacuuming of lightly soiled carpets, r ugs and hard flooring.
• Your appliance is pre-set to this level of suction when you take it out of the box.
MAX MODE
Maximum suction for powerful dus t and dirt removal.
• For vacuuming durable floor coverings, hard floors and heavily soiled carpets
and rugs.
• To switch to this setting, move the suction control slider on top of the cleaner
head as shown.
• CAUTION: The suction of this mode can damage delicate flooring.
Before vacuuming, check the flooring manufacturer’s
cleaning recommendations.
• If the suction power of Max mode prevents easy maneuverability, switch to
Easy mode.
CARPETS OR HARD FLOORS
• The brush bar will always default to ‘ON’ (spinning) each time you s witch the
appliance ‘ON’ and recline it for cleaning.
• The brush bar will not rotate when the appliance is upright.
• To switch the brush bar 'OFF' (e.g. for delicate rugs and delicate flooring):
– Switch the appliance ‘ON’.
– Re cline the appliance.
– Press the brush bar ‘ON/OFF’ but ton – the br ush bar will stop spinning.
• The brush bar will au tomatically stop if it becomes obstructed. See ‘Brush bar –
clearing obstructions’.
• Before vacuuming your flooring, rugs and carpet s, check the manufacturer 's
recommended cleaning instructions.
• Some carpets may fuzz if a rotating br ush bar is us ed when vacuuming. If this
happens, we recommend vacuuming with the brush bar switched 'OFF ' and
consulting with the flooring manufacturer.
• The brush bar on the appliance may damage some carp et typ es. If you are
unsure, turn ‘OFF’ the brush bar.
LOOKING AFTER YOUR DYSON APPLIANCE
• Do not carry out any maintenance or repair work other than that shown in this
Dyson Operating Manual, or advised by the Dyson Customer Care Helpline.
• Only use p arts recommended by Dyson. If you do not this could invalidate your
Dyson guarantee.
• Store th e appliance indoors. Do not use or store it below 3°C (37.4°F).
Ensure the appliance is at room temperature before operating.
• Clean the appliance only with a dry cloth. Do not use any lubricants, cleaning
agents, polishes or air fresheners on any part of the appliance.
• If used in a garage, always wipe the base pla te and ball with a dry cloth
after vacuuming to clean of f any sand, dirt, or pebbles that could damage
delicate floors.
VACUUMING
• Do not use without the clear bin and filters in place.
• Fine dir t such as flour should only be vacuumed in ver y small amounts.
• Do not use the appliance to pick up sharp hard objects, small toys, pins, paper
clips, etc. They may damage the appliance.
• When vacuuming, certain carpets may generate small static charges in the
clear bin or wand. The se are harmless and are not associated with the mains
electricity supply. To minimise any effect from this, do not put your hand or
inser t any object into the clear bin unless you have first emptied it and rinsed it
out with cold water (see ‘Cleaning the clear bin’).
• Powerful suction can cause the hose to ‘pull back’ – please take care.
• Do not work with the appliance above you on the stairs. W hen cleaning stairs it
is recommended that the handle is not ex tended and that you use a tool on the
end of the hose rather than the wand.
• Do not put the appliance on chairs, tables, etc.
• Before vacuuming highly polished floors, such as wood or lino, first check that
the underside of the floor tool and its brushes are free from foreign obje cts tha t
could cause marking.
• Do not leave the cleaner head in one place on delicate floors.
EMPTYING THE CLEAR BIN
• Empty as soon as the dirt reaches the level of the M AX mark – do not overfill.
• Switch ‘OFF’ and unplug before emptying the clear bin.
• To remove the c yclone and clear bin unit, press dow n on the red button on the
top of the carrying handle on the cyclone.
• To release the dirt, press all the way down on the same red button on the top of
the carrying handle on the cyclone.
• To minimise dust/allergen contact when empt ying, encase the clear bin tightly in
a plastic bag and empt y.
• Remove the clear bin carefully from the bag.
• Seal the bag tightly, dispose as normal.
• To refit:
– Ensure the air way in the bin base is clear of dust and dirt.
– Close the clear bin base so it clicks into place.
– Push the cyclone and clear bin unit into the main body of the appliance; it will
click into place.
– Ensure the cyclone and clear bin unit is secure.
CLEANING THE CLEAR BIN
• Remove c yclone and clear bin (see 'Emptying the clear bin' ).
• To separate the cyclone unit from the clear bin press the red button to open
the clear bin base. This exposes a small silver button behind the red opening
mechanism. Press the silver button (on its ribbe d area) and separate the cyclone
unit from the clear bin.
• Clean the clear bin with cold water only.
• Do not use detergents, polishes or air fresheners to clean the clear bin.
• Do not put the clear bin in a dishwasher.
• Do not immerse the c yclone in water or pour water into the cyclones.
8
Page 9

click
click
click
Base plate reassembly
click
• Clean the cyclone shroud with a dry cloth or dry brush to remove lint and dus t.
• Ensure the clear bin is completely dry before replacing.
• To refit:
– Fit the cyclone shroud into the clear bin so that the silver button clicks
and engages.
– Close the clear bin base so it clicks into place.
– Push the cyclone and clear bin unit into the main body of the appliance; it will
click into place.
– Ensure the cyclone and clear bin unit is secure.
WASHING YOUR FILTERS
• Your appliance has two washable f ilters, located as shown.
• Check and wash the filters regularly according to instruc tions to
maintain performance.
• Switch ‘OFF’ and unplug before checking or removing the filters.
• The filters may re quire more frequent washing if vacuuming fine dust.
• Wash with cold water only. Do not use detergents.
• Do not put the filters in a dishwasher, washing machine, tumble dryer, oven,
microwave or near a naked flame.
Filter A
• Remove the cyclone and clear bin (instructions above).
• Release the catch on the front of the cyclone handle. Swing the handle back.
• Lift out the f il te r.
• Wash the filter with cold water only. Do not use detergents. Hold under a tap
and run water through the open end until the water runs clear. Turn upside down
and tap out.
• Squeeze and twist with both hands to make sure the excess water is removed.
• Run water over the outside of the filter until the water runs c le ar.
• Squeeze and twist with both hands to make sure the excess water is removed.
• Stand the filter on its wide, open end to dr y. Leave to dry completely for a
minimum of 24 hours.
• Replace the filter into the c yclone. Swing the handle back into place. Ensure the
latch clicks to engage and is secure. Fit the cyclone and clear bin unit onto the
appliance (instructions above).
Filter B
This machine has a baffle that helps to reduce noise emissions. It is important to
remove the baffle before washing the fi lt er.
• Lie the appliance on its side.
• To remove filter B:
– Turn the blue central locking dial on the outer cover of the ball anti-clockwise
until the cover is released.
– Lift off the cove r.
– Turn the filter one-quarter anti-clockwise to release.
• Remove the baffle by pressing down firmly on each of the release clips and push
from underneath to release filter B as shown in the " WASH ING YOUR FILTERS"
section.
• To avoid damage; do not use sharp tools to remove baf fle.
• Wash the filter with cold water only.
• Filter B should be rinsed and tapped out until the water runs clear, then tappe d
out again to ensure all excess water is removed. (Tap on the plastic rim, not the
filter material.) Leave to dr y completely for a minimum of 24 hours.
• It is normal for the filter in the ball to turn grey in colour.
• To refit filter B:
– align the arrow on the baffle with the arrow on the filter, press firmly until all
three clips click into place
– refit the filter on to the ball
– se cure the filter by turning it clockwise so the arrows align.
• When refitting the outer cover of the ball, keep turning the central locking dial
clock wise. When it star ts to click it is locked.
BLOCKAGES - THERMAL CUT-OUT
• This appliance is fitted with an automatically resetting thermal cut-out.
• Large items may block the tools or wand inlet. If any par t becomes blocked the
appliance may overheat and automatically cut-ou t.
• If this happens, follow the instructions below in 'Looking for blockages'.
LOOKING FOR BLOCK AGES
• Switch ‘OFF’ and unplug before looking for blockages. Failure to do so could
result in personal injury.
• Leave to cool down for 1-2 hours before checking the f ilters or for blockages.
• Clear any blockage before res tarting.
• Look for blockages in the wand, airways and cleaner head.
• To release the hose from the machine, you will need to remove the wand.
• Open the wand release cap.
• Pull the wand up and awa y from the handle.
• Press the red release button in the connecting collar and remove the wand from
the hose.
• Remove the clear bin and cyclone unit. Then release the hose from the appliance
by pressing the red tab on the bas e of the hose –you can see it from the front of
the appliance.
• Check for blockages in the hose.
• Beware of sharp objects when checking for blockages.
• To refit the hose, align the guides on the base of the hose with the channels in
the neck of the airway. Ensure the red tab faces the front of the appliance.
Push the hose on. It will click into place. To refit the wand follow the instructions
above in the 'Operation' section.
• To remove the base plate to access an obstruction, se e ‘Base plate –
disassembly/reassembly’.
• To look for blockages in the front air way between the ball and the cleaner
head you will need to remove the cleaner head: see ‘Base plate – disassembly/
reassembly’ b elow on how to do this.
• To look for blockages in the rear air way bet ween the ball and the cleaner
head you will need to release the elasticated rear connection. Pull the plastic
connector towards you to release from the upper air way. To replace it, pull it a
little way out on the horizontal so that it aligns with the upper airway.
Gently release it so it pulls itself back into place.
• Beware of sharp objects when checking for blockages.
• Refit all parts securely before using.
• Clearing blockages is not covered by your Dyson guarantee.
BRUSH BAR – CLEARING OBSTRUCTIONS
• If your brush bar is obstruc ted, it may shut 'OFF'. If this happens, you w ill need
to remove the blockage.
• Switch ‘OFF’ and unplug before procee ding. Failure to do so could result in
personal injury.
• Beware of sharp objects when clearing obstructions.
• If you still cannot clear the obstruction, please follow the instructions below to
remove the base plate. This gives more access to the obstruc tion. Alternatively,
contac t a Dyson expert on the Dyson Customer Care Helpline or visit the
website. Clearing brush bar obstructions is not covered by your guarantee.
BASE PLATE – DISASSEMBLY/REASSEMBLY
• Switch ‘OFF’ and unplug before procee ding. Failure to do so could result in
personal injury.
• Lay the appliance on its front.
• There is a red latch on the connection between the ball and cleaner he ad.
Slide it towards the b all, suppor ting the appliance as you do so.
• Pull the cleaner he ad away from the appliance. Use a constant, firm pressure.
• At each end of the cle aner head there are t wo red levers:
– pivot the levers up and out towards the end of the cleaner head until they click
– swing the base plate op en.
• Beware of sharp objects when clearing obstructions.
• To refit the b ase plate:
– fit the lugs on the lower edge of the base plate behind the lip on the base of
the cleaner head
– swing the base plate down, ensuring it fits correctly; it will click into place.
• To secure the base plate pivot both levers back into position so they are flush
with the surface of the cleaner head.
• Lay the appliance on its back.
• Attach the cleaner head by sliding it on to the conne ctions on the lower front
part of the ball. Ensure the electrical plug on the cleaner head fits into the
twin-block connection on the body of the appliance, which is directly above the
airwa y. Push firmly: the cleaner head will click into place.
BRUSH BAR – TROUBLESHOOTING
• If the brush bar has s topped spinning, follow the ins tructions above on clearing
obstr uctions. Alternatively, contact a Dyson expert on the Dyson Helpline or visit
the website.
9
Page 10

ONLINE SUPPORT
• For online help, general tips, videos and useful information about Dyson.
AU: www.dyson.com.au/support
NZ: www.dyson.co.nz/support
replacement is covered, it will be repaired or replaced at no cost. If the repair or
replacement is found not to be covered under the Dyson guarantee, the repair
or replacement of the Dyson appliance and any associated delivery charges
(both to and from us) will be at your cost, subjec t to your statutor y rights and
remedies as a consumer.
AUSTRALIAN CONSUMER L AW
The details of the Dyson guarantee are set out below. In addition to your right s
under the Dyson guarantee, we also provide the following statement as required
by the Aus tralian Consumer Law: In Australia, your D yson appliance comes with
statutory guarantees that cannot be excluded under the Australian Consumer
Law. You are entitled to a replacement or refund for a major failure and for
compensation for any other reasonably forese eable loss or damage. You are
also entitled to have your Dyson appliance repaired or replaced if it fails to be of
acceptable quality and the failure does not amount to a major failure.
DYSON 2 YEAR GUARANTEE
TER MS AND CONDITIONS OF YOUR DYSON 2 YEAR GUARANTEE.
• The Dyson guarantee becomes effective from the date of purchase.
• All work w ill be carried out by Dyson Appliances (Aust) Pty Ltd., Avery Robinson
Ltd. (NZ) or their authorised agents.
• Any par ts replaced by Dyson or its service agents will become the property of
Dyson Appliances (Aus t) Pty Ltd. or Aver y Robinson Ltd. (NZ ).
• The repair or replacement of your Dyson appliance under the Dyson guarantee
will not ex tend the period of the Dyson guarantee.
• The Dyson guarantee provides benefits which are additional to and do not affect
your statutor y rights as a consumer.
• You must provide proof of (b oth the original and any subsequent) delivery/
purchase before any work can be carried out on your Dyson appliance.
Without this proof, any work carried out pursuant to the Dyson guarantee and
any associated delivery charges (both to and from us) will be at your cost,
subjec t to your statutor y rights and remedies as a consumer. Please keep your
receipt or delivery note.
WHAT IS COVERED
Your Dyson guarantee covers:
• The repair or replacement of your Dyson appliance if your Dyson appliance is
found to b e defec tive due to faulty materials, workmanship or func tion within
2 years of purchase or deliver y (if any par t is no longer available or out of
manufacture, Dyson will replace it with a functional replacement part).
• This Dyson guarantee will only be valid if the appliance is used in the countr y in
which it was sold.
DISPOSAL INFORMATION
Dyson product s are made from high grade recyclable materials. Ple ase dispose
of this product responsibly and recycle where possible.
When your Dyson appliance reaches the end of its life, we are responsible for
its safe disposal. You can send your old Dyson appliance back to us (at our cost)
and we will organise for it to be rec ycled.*
*Please note that not all par ts are recyclable. Recycling of parts is subje ct to the
capabilities of 3rd p arty suppliers. Available in Australia only.Simply:
1. Box up your old Dyson appliance.
2. Take the package to your local post of fice and send to the address below:
Dyson We Recycle
Reply Paid 83215
Dyson Service Centre
8–10 Mangrove Lane
Taren Point, NSW 2229
ABOUT YOUR PRIVACY
• Dyson may use this information for future marketing and research purposes
(including sending commercial electronic messages) and may disclose it to third
parties for the purposes of providing the ser vices you have requested or to our
business partners or professional advisers.
• If you wish to access your personal information or see our full privacy policy,
please contact us at: aucustomercare@dyson.com
PRODUCT INFORMATION
Please note: Small details ma y vary from those shown.
WHAT IS NOT COVERED
Under your Dyson guarantee, Dyson shall not be liable for cos ts of repair or
replacement of a product incurred as a result of:
• Accidental damage, faults caused by negligent use or care, misuse, neglect,
careless operation or handling of the Dyson appliance which is not in
accordance with this Dyson Operating Manual.
• Use of the Dyson appliance for anything other than normal domestic purposes
in the country of purchase.
• Use of parts not assemble d or installed in accordance with the instructions
of Dyson.
• Use of parts and accessories other than those produced or recommended
by Dyson.
• Repairs or alterations carried out by parties other than Dyson or its
authorised agents.
• Damage from external sources such as transit, weather, electrical outages or
power surge s.
• Failures caused by circumstances outside Dyson’s control.
• Blockages – please refer to the illustrations and the section ’Looking for
Blockages‘ in this Dyson Operating Manual for details of how to look for and
clear blockages.
• Normal wear and tear (e.g. fuse, brush bar etc.).
• Use of this appliance on rubble, ash, plaster.
• Reduc tion in battery discharge time due to batter y age or use (cordless
machines only).
• If your Dyson guarantee does not apply, you may have statutor y rights
and reme dies available to you as a consumer. If you are in any doubt as to
what is covered by your Dyson guarantee, please call the Dyson Customer
Care Helpline.
REGISTERING YOUR DYSON GUARANTEE
To help us ensure you receive prompt and efficient ser vice, please register as a
Dyson appliance owner. There are three way s to do this:
• Online:
AU: www.dyson.com.au/register
NZ: www.dyson.co.nz/regist er
• By calling the Dyson Customer Care Helpline.
• By completing and returning the enclosed form to us by mail.
This will confirm ownership of your Dyson appliance in the event of an insurance
loss, and enable us to contact you if necessary.
DYSON CUSTOMER CARE
Your Dyson appliance w ill be covered for par ts and labour for 2 years from the
date of purchase, as detailed in the terms of the Dyson guarante e in this Dyson
Operating Manual.
If you have a query about your D yson appliance, call the Dyson Customer Care
Helpline quoting your serial number and details of where and when you bought
the appliance. Alternatively, contac t us via the website.
• Most queries can be solved over the phone by one of our D yson Cus tomer Care
Helpline staff.
• If your Dyson appliance nee ds a service, call the Dyson Customer Care Helpline
so we can discuss the available options.
• To enable us to carry out work on your appliance, please contact the Dyson
Customer Care Helpline to obtain a reply paid delivery address in your state
(available in Australia only).
If your Dyson appliance is under Dyson guarantee and the rep air or
10
Page 11

111213
Page 12

Page 13

Page 14

IMPORTANT!
WASH FILTERS
Wash filters with cold water at least every month.
The filters may require more frequent washing if vacuuming fine dust.
Your Dyson a ppliance w ill be covere d for par ts and labour for 2 years f rom the dat e of
purchase, as detail ed in the ter ms of the Dyson guarant ee in this Dy son Operating Manu al.
If you hav e a query ab out your Dy son appliance, call the D yson Cus tomer Care Helpline
quoting y our serial n umber and d etails of wh ere and whe n you bought t he applian ce.
Alternatively, contact us via the website.
DYSON CUSTOMER CARE
AUSTRALIA
Website: www.dyson.com.au
Email: aucustomercare@dyson.com
Dyson Customer Care: 1800 239 766 (Mon-Fri 8:00am to 6:00pm EST,
Sat-Sun 8:30am to 4:00pm EST).
Address: Dyson Appliances (Aust) Pty Ltd., PO Box 2835, Taren Point,
NSW 2229 Australia.
NEW ZEALAND
Website: www.dyson.co.nz
Email: dyson@averyrobinson.co.nz
Dyson Customer Care: 0800 397 667 (Mon-Fri 8:30am to 5:00pm).
Address: Avery Robinson Ltd., Unit F, 151D Marua Road, Ellerslie,
Auckland, 1051 New Zealand.
ONLINE SUPPORT
For online help, general tips, videos and useful information about Dyson.
AU: www.dyson.com.au/support
NZ: www.dyson.co.nz/support
JN.74891 PN.214105-05 -02 13.05.16
Page 15

Page 16

GUARANTEE FORM
2 year guarantee – plus option to extend to 5 years.
Section 1: Dyson 2 year guarantee
Please complete Section 1 to register as a Dyson appliance owner, and return it in the envelope provided. Alternatively, register online (Australia and New Zealand only).
Serial number
Date of purchase
Store of purchase
Did you purchase an extended warranty from the retailer?
If yes, for what additional period?
Title
Address
email Contact number
Privacy Act
Dyson may use this information for future marketing and research purposes (including sending commercial electronic messages) and may disclose
it to third parties for the purposes of providing the services you have requested or to our business partners or professional advisers. If you wish to
access your personal information or see our full privacy policy, please contact us at aucustomercare@dyson.com
If you wish to receive marketing information by these methods from Dyson please tick this box.
/ /
Yes No
1 year
First name Surname
Country of purchase AU NZ
2 years 3 years
Postcode
REGISTER ONLINE
Visit our website to register your
Dyson full parts and labour
guarantee online.
REGISTER BY PHONE
Call our dedicated Helpline.
REGISTER BY MAIL
Complete and return the form
to Dyson in the envelope supplied.
AU: www.dyson.com.au/register
NZ: www.dyson.co.nz/register
AU 1800 239 766
NZ 0800 397 667
Section 2: Dyson 2+3 year guarantee
Increase your Dyson 2 year guarantee cover to 5 years when you purchase an extended guarantee from Dyson (Australia only). This option is just AU$75.00. Dyson is committed to providing the best
Aftersales Service, which is why we offer the option to extend your Dyson 2 year guarantee to 5 years. The terms of the Dyson 2 year guarantee on page 9 of this Dyson Operating Manual will apply to
the Dyson extended guarantee. The Dyson extended guarantee is underwritten by Dyson Appliances (Aust) Pty Ltd. To purchase, just complete the fields below. Send both sections to us, together with your
cheque/money order or credit card details, within 2 years of your vacuum cleaner purchase. Offer to purchase the Dyson extended guarantee is only available within 2 years of customers purchasing their
vacuum cleaner. Offer not available to customers who have purchased an extended warranty from a retailer. The Dyson extended guarantee provides benefits which are additional to, and do not affect,
your statutory rights and remedies as a consumer. If you decide not to extend your Dyson 2 year guarantee, you may have statutory rights and remedies available to you as a consumer.
Cheque/money order made payable to: Dyson Appliances.
Credit card Mastercard Visa
Card Number
Declaration
I hereby apply for the Dyson vacuum cleaner extended guarantee in accordance with the terms and conditions of your plan. I confirm the vacuum
cleaner is in good working order and used for domestic purposes only and declare that the details on this proposal are true and complete to the best of
my knowledge and belief.
Signature Date
/ / /
/ /
Expiry Date M/M Y/Y
WARNING Any false statement may
render this plan invalid
 Loading...