

Page 1

Page 2

Page 3

Copyright
D3 Pilot’s User Guide, Rev A, 103538-000, October 2018
2018 Dynon Avionics, Inc. All rights reserved. No part of this manual may be reproduced,
copied, transmitted, disseminated or stored in any storage medium, for any purpose without the
express written permission of Dynon Avionics. Dynon Avionics hereby grants permission to
download this manual and of any revision to this manual onto a hard drive or other electronic
storage medium to be viewed for personal use, provided that such electronic or printed copy of
this manual or revision must contain the complete text of this copyright notice and provided
further that any unauthorized commercial distribution of this manual or any revision hereto is
strictly prohibited.
Information in this document is subject to change without notice. Dynon Avionics reserves the
right to change or improve its products and to make changes in the content without obligation to
notify any person or organization of such changes. Visit the Dynon Avionics website
(www.dynonavionics.com
and operation of this and other Dynon Avionics products.
) for current updates and supplemental information concerning the use
Contact Information
Dynon Avionics, Inc.
st
19825 141
Place NE
Woodinville, WA 98072
Phone: (425) 402-0433 - 7:00 AM – 5:00 PM (PST, M-F)
Fax: (425) 984-1751
Email: [email protected]
D3 Pilot’s Guide i
Page 4

Dynon Avionics offers online sales, extensive support, and continually-updated information on its
products via its Internet sites:
www.dynonavionics.com: Dynon Avionics primary web site; including:
•
• docs.dynonavionics.com: Complete product documentation.
• downloads.dynonavionics.com: Software downloads.
• support.dynonavionics.com: Support resources.
• forum.dynonavionics.com: Dynon Avionics’ Internet forum where Dynon customers can
interact outside of telephone support hours.
• newsletter.dynonavionics.com: Dynon Avionics’ email newsletter.
• blog.dynonavionics.com: The Dynon Avionics blog, where you can find new and interesting
Dynon-related content.
Registering Your D3
Please take a moment to register your D3 Pocket Panel at register.dynonavionics.com. Registering
your product with Dynon ensures that your contact information is up-to-date. This helps verify
product ownership, can expedite warranty claims, and allows us to notify you in the event a
service bulletin is published for your product. You can also optionally sign up to receive other
Dynon news and product announcements. Dynon will not share your contact information with
third parties or send you announcements without your explicit consent.
D3 Pilot’s Guide ii
Page 5

Limited Warranty
Dynon Avionics warrants this product to be free from defects in materials or workmanship for one (1) year
from date of shipment. Dynon Avionics will, at its sole option, repair or replace any components that fail in
normal use. Such repairs or replacement will be made at no charge to the customer for parts or labor. The
customer is, however, responsible for any transportation cost. This warranty does not cover failures due to
abuse, misuse, accident, improper installation or unauthorized alteration or repairs.
THE WARRANTIES AND REMEDIES CONTAINED HEREIN ARE EXCLUSIVE, AND IN LIEU OF ALL OTHER
WARRANTIES EXPRESSED OR IMPLIED, INCLUDING ANY LIABILITY ARISING UNDER WARRANTY OF
MERCHANTABILITY OR FITNESS FOR A PARTICULAR PURPOSE, STATUTORY OR OTHERWISE. THIS WARRANTY
GIVES YOU SPECIFIC LEGAL RIGHTS, WHICH MAY VARY FROM STATE TO STATE.
IN NO EVENT SHALL DYNON AVIONICS BE LIABLE FOR ANY INCIDENTAL, SPECIAL, INDIRECT OR
CONSEQUENTIAL DAMAGES, WHETHER RESULTING FROM THE USE, MISUSE OR INABILITY TO USE THIS
PRODUCT OR FROM DEFECTS IN THE PRODUCT. SOME STATES DO NOT ALLOW THE EXCLUSION OF
INCIDENTAL OR CONSEQUENTIAL DAMAGES, SO THE ABOVE LIMITATIONS MAY NOT APPLY TO YOU.
Dynon Avionics retains the exclusive right to repair or replace the instrument or firmware or offer a full refund
of the purchase price at its sole discretion. SUCH REMEDY SHALL BE YOUR SOLE AND EXCLUSIVE REMEDY FOR
ANY BREACH OF WARRANTY.
Dynon Avionics’ products incorporate a variety of precise, calibrated electronics. Except for external
accessories, this device does not contain any field/user-serviceable parts.
Units that have been found to have been taken apart may not be eligible for repair under warranty.
D3 Pilot’s Guide iii
Page 6

Page 7

Table of Contents
COPYRIGHT .................................................................................................................... I
CONTACT INFORMATION ................................................................................................... I
REGISTERING YOUR D3.................................................................................................... II
LIMITED WARRANTY .......................................................................................................III
1. SAFETY INFORMATION ........................................................................................ 1-1
IMPORTANT SAFETY INFORMATION ................................................................................. 1-1
2. INTRODUCTION ................................................................................................... 2-1
FEATURES .................................................................................................................. 2-1
3. PRODUCT LIMITATIONS ...................................................................................... 3-1
4. PRODUCT TOUR .................................................................................................. 4-1
LEFT SIDE ................................................................................................................... 4-1
FRONT ....................................................................................................................... 4-1
ON-SCREEN ELEMENTS ................................................................................................. 4-3
5. GETTING STARTED .............................................................................................. 5-1
UNPACKING ................................................................................................................ 5-1
BEFORE FIRST USE ....................................................................................................... 5-2
TURN THE D3 ON AND OFF ........................................................................................... 5-2
CHARGING THE BATTERY ............................................................................................... 5-2
MOUNTING YOUR D3 .................................................................................................. 5-4
GENERAL USAGE ......................................................................................................... 5-5
D3 Pilot’s Guide v
Page 8

ALIGN THE D3 FOR FLIGHT ............................................................................................ 5-7
ADJUSTING BRIGHTNESS FOR NIGHT FLIGHT ..................................................................... 5-8
OTHER DISPLAY OPTIONS .............................................................................................. 5-8
SETTINGS ................................................................................................................... 5-9
6. PERFORMANCE NOTES ........................................................................................ 6-1
ATTITUDE PERFORMANCE ............................................................................................. 6-1
7. SOFTWARE UPDATES .......................................................................................... 7-1
8. ADDITIONAL MOUNTING OPTIONS ..................................................................... 8-1
OTHER RAM® MOUNTS ............................................................................................... 8-1
INCLUDED RAM® MOUNT COMPONENTS ........................................................................ 8-1
9. TROUBLESHOOTING ............................................................................................ 9-1
10. SPECIFICATIONS ................................................................................................ 10-1
11. SCREEN CARE .................................................................................................... 11-1
12. REQUESTING SUPPORT / REPAIR ...................................................................... 12-2
13. NOTES ............................................................................................................... 13-1
vi D3 Pilot’s Guide
Page 9

1. SAFETY INFORMATION
Important Safety Information
Your Dynon Avionics D3 Pocket Panel contains a Li-Ion battery. Li-Ion batteries are safe when used as
directed, but can also be hazardous if they are not used in accordance with their instructions.
Do not expose the D3’s Li-Ion battery to fire or otherwise expose them to excessive heat.
Please dispose of non-functional batteries in a responsible manner. The battery for your D3 is very
similar to mobile phone batteries and can likely be recycled wherever mobile phone battery recycling is
available. For a list of recycling locations in your area (USA only), call 1-800-8-BATTERY or see the Call 2
Recycle website at www.rbrc.org.
This device is designed to charge via included USB-C chargers. Some third-party USB-C chargers may not
charge the D3.
This device is not waterproof. It is not designed to be used in wet conditions.
Do not operate this device below -20˚C (-4˚F) or above 60˚C (140˚F). Prolonged sunlight exposure may
result in excessively high temperatures.
Do not drop this device, especially onto hard surfaces or from great height.
Do not attempt to modify or repair this device. There are no user-serviceable parts inside. Doing so will
void the warranty.
D3 Pilot’s Guide 1-1
Page 10

Page 11

2. INTRODUCTION
Welcome to your new Dynon portable EFIS - the D3 Pocket Panel. Featuring improved brightness,
an intuitive touchscreen interface, and a new synthetic vision display, the D3 is the most advanced
portable safety device Dynon has ever made.
D3 lets you supplement your unreliable legacy instrumentation with an affordable, portable
electronic attitude indicator that works. The D3 features the same reliable, proven AHRS engine
from Dynon’s best-selling panel-mounted products for experimental, light sport, and type
certificated aircraft
Features
• Synthetic Vision
• Intuitive Touchscreen Interface
• Improved Brightness for Superior Sunlight Readability
• 6+ hours of battery life at full brightness
• Auto-adjusting brightness and manual dimming capabilities
• Accurate pitch and roll: A true artificial horizon
• Internal high capacity Li-Ion battery and GPS for hours of portable use
• Versatile portable mounts: RAM suction mount and 3 1⁄8” panel hole “pinch” mounts included
• GPS ground speed
• GPS ground track (direction)
• GPS altitude and vertical speed
• Turn rate
• Slip/skid ball
• Truly pocket sized - approximately 3 1⁄2” Width x 3 1⁄4” Height x 1” Depth
D3 Pilot’s Guide 2-1
Page 12

Page 13

3. PRODUCT LIMITATIONS
The D3 Pocket Panel is a portable device that aids situational awareness. As the D3 does not have
TSO authorization from the FAA or other regulatory body, it can not be used to replace any
required flight instruments in type certificated aircraft.
The D3’s Ground Speed, Altitude, Vertical Speed, and Ground Track (direction) instruments are
GPS-derived. Their indications WILL BE DIFFERENT from the airspeed, altimeter, VSI, and heading
instruments in your aircraft panel. The D3’s GPS-based indications should not be considered
replacements for any of these primary aircraft instruments. Details about each of these
differences are described in the Product Tour section of this guide.
D3 Pilot’s Guide 3-1
Page 14

Page 15
4. PRODUCT TOUR
Left Side
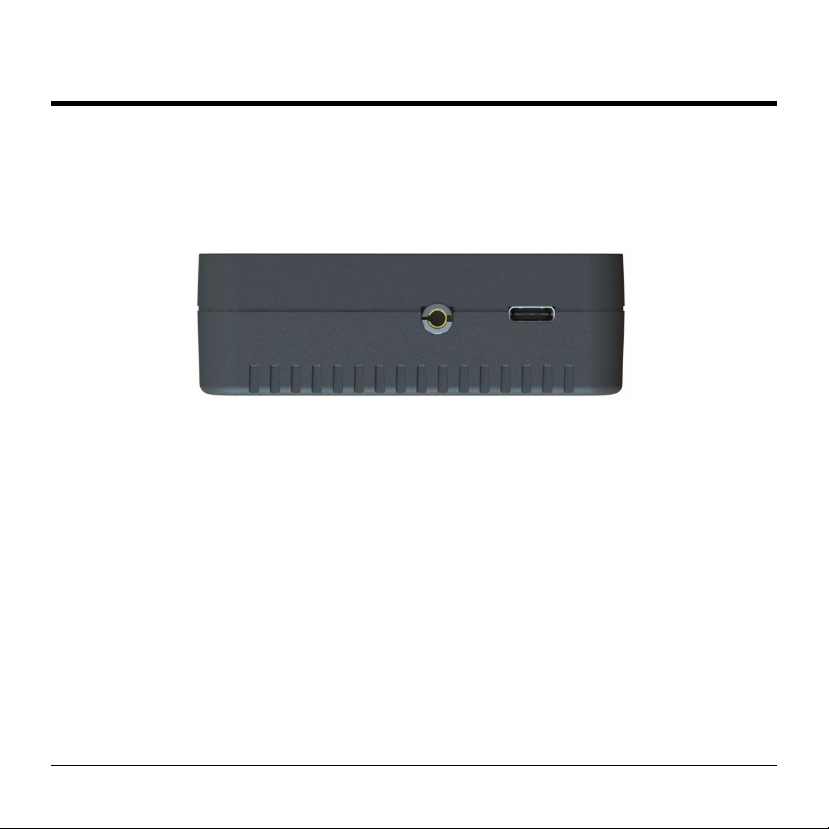
GPS: Connection port for optional external GPS antenna.
USB-C Port: Can be used to charge unit from any USB-C power source.
Figure 1 - D3 Left Side (left to right): GPS, USB-C
Front
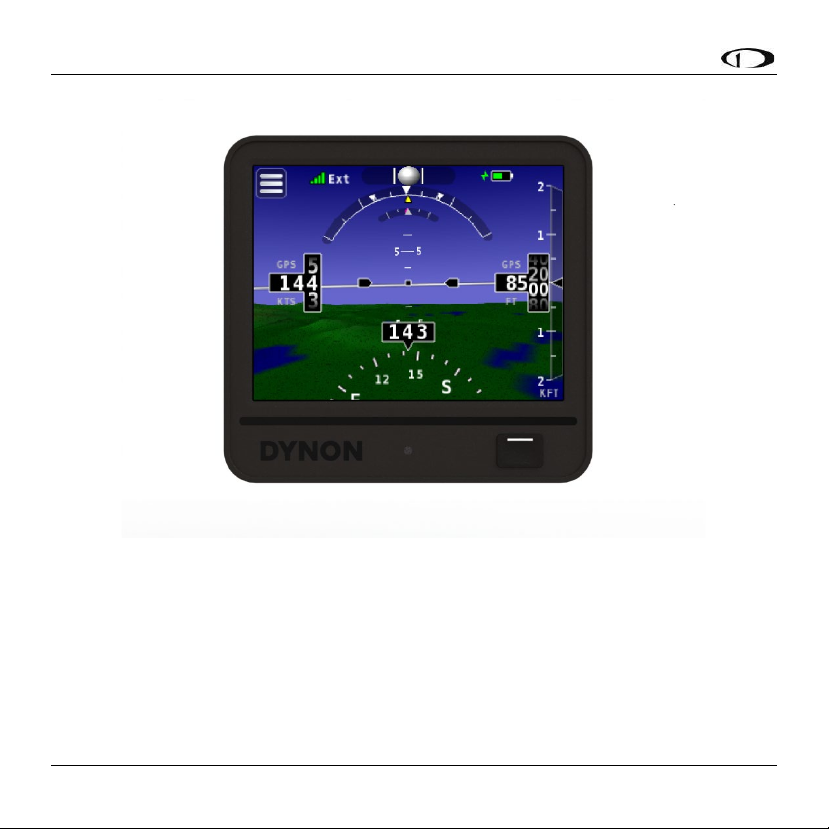
Power Button: Hold to power on and off.
Touchscreen: The D3 is controlled through a touchscreen interface. Touch the menu icon on the
upper left corner of the screen to access most controls and settings. Swipe left and right on the
main display to choose between various displays.
D3 Pilot’s Guide 4-1
Page 16
Using Your D3
Figure 2 - D3 Front: Power Button (lower right)
4-2 D3 Pilot’s Guide
Page 17
Using Your D3
On-Screen Elements
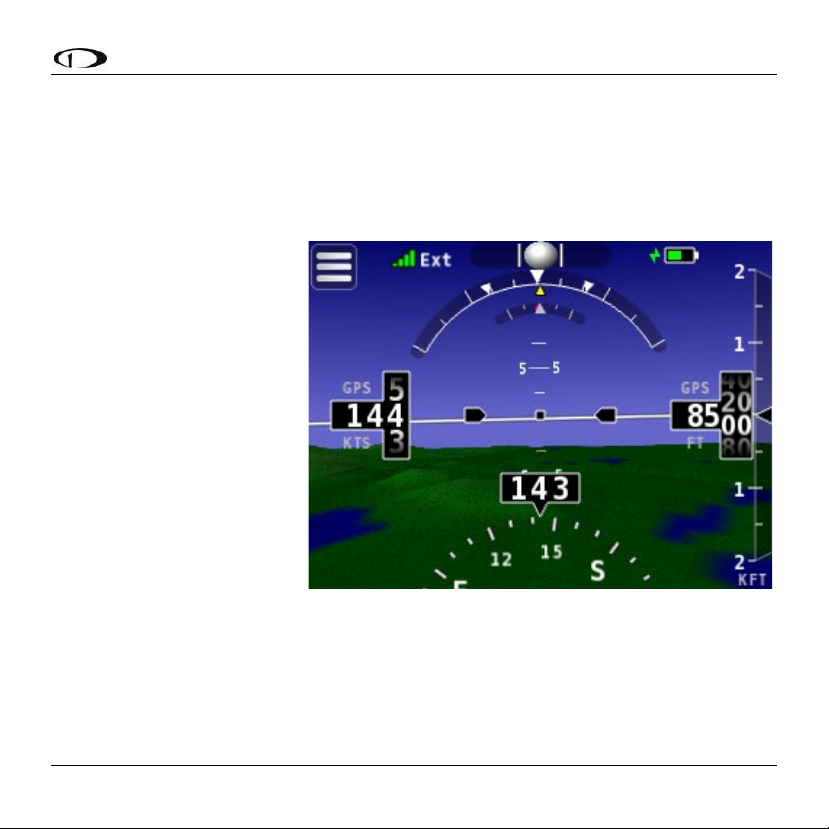
The D3 is primarily a portable backup attitude indicator but also has a variety of other useful
information to improve situational awareness.
Aircraft Attitude is determined by combining information from internal solid-state rotation rate
sensors (gyros) and accelerometers. GPS-based ground speed is additionally used to ensure the
quality of the displayed attitude
indication. Like a mechanical
attitude indicator, the artificial
horizon depicted on the D3
screen displays both the pitch
and roll of the aircraft. The D3’s
attitude depiction is not GPSbased, but a GPS fix is required
for the attitude to work
properly.
Figure 3 - Full D3 Display with Attitude
D3 Pilot’s Guide 4-3
Page 18
Using Your D3
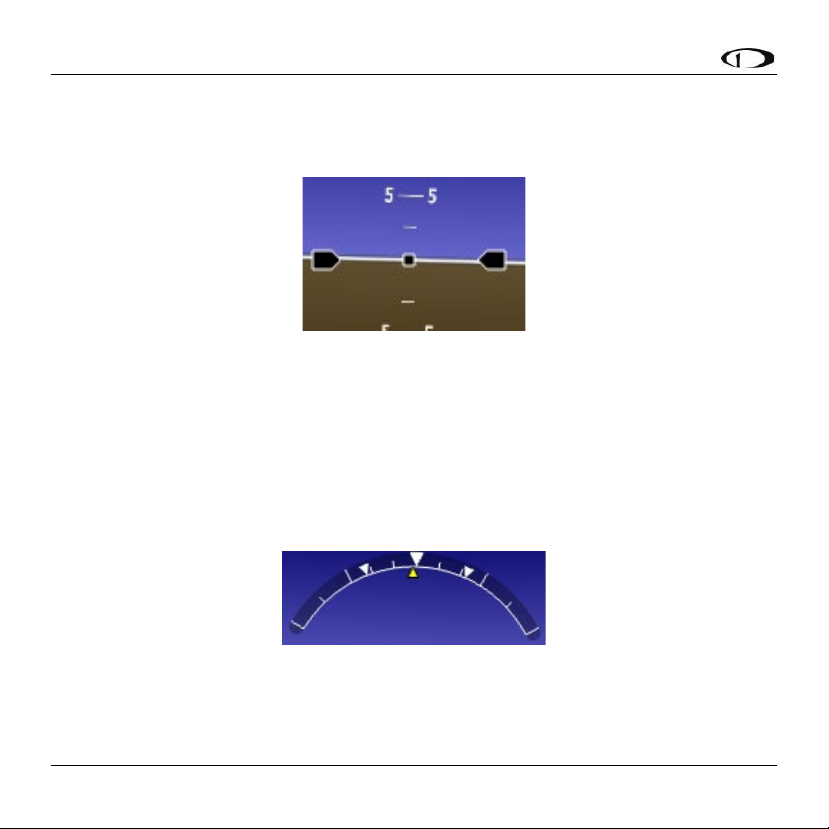
Pitch angle is read by noting the position of the indexed pitch ladder against the centered whiteoutlined black square. There are extended pitch cues, also in white-outlined black to the left and
right of the primary aircraft pitch indication. In the example below, the aircraft is level in pitch.
Figure 4 - Pitch
Roll angle is indicated by the position of the yellow triangular roll pointer with respect to the arc
above it. There are tick marks on the roll arc at 10, 20, and 30, 45, and 60 degrees of bank. The
triangle pointers are a dynamic estimate of the roll angle that would be required to achieve a
standard rate turn at the current speed. In the example below, the aircraft is banked
approximately 1 degrees to the left. It would take approximately 22 degrees of bank to achieve a
standard rate turn.
Figure 5 - Roll
4-4 D3 Pilot’s Guide
Page 19
Using Your D3
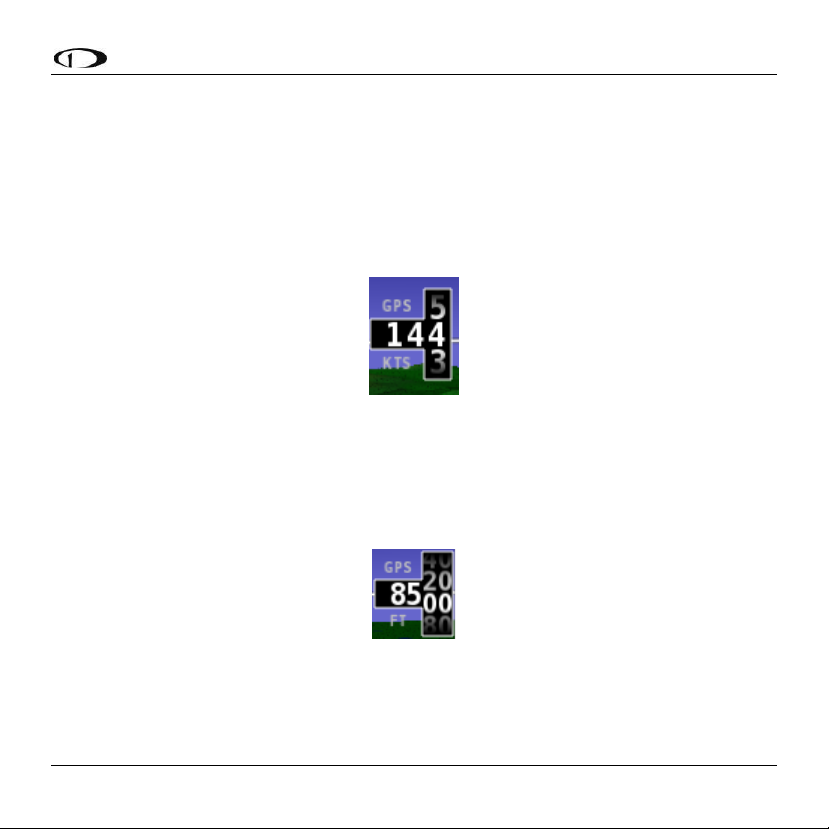
GPS Ground Speed is the aircraft’s speed over the ground in knots, miles per hour, or kilometers
per hour as determined by the D3’s GPS. GPS ground speed will not match your pitot/static
airspeed instruments due to wind. Since GPS ground speed does not take into account the
dynamic pressure of the air acting on the aircraft, it does not provide the information necessary to
determine if the aircraft is close to stalling. It should not be used as a reference when landing the
aircraft.
Figure 6 - GPS Ground Speed
GPS Altitude is the aircraft’s altitude in either feet or meters as determined by the D3’s GPS. GPS
altitude will not always match your aircraft’s static system-based barometric altimeter, and should
not be used as a replacement for one.
Figure 7 - GPS Altitude
D3 Pilot’s Guide 4-5
Page 20
Using Your D3
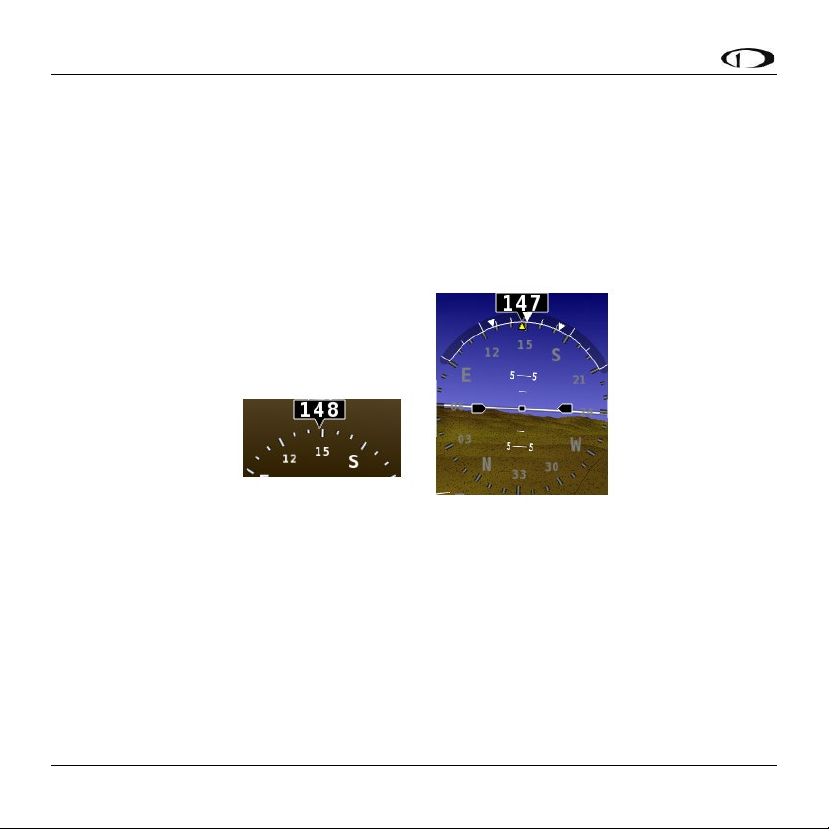
GPS Ground Track is the direction that the aircraft is moving over the ground as determined by
the D3’s GPS. It is displayed both numerically and as a graphical arc when using the Classic style. In
TRK Overlaid mode, it is depicted as a circular compass-style indicator overlaid on the attitude
indicator, with the numerical track above the roll scale. GPS ground track is oriented to magnetic
north - not true north - similar to your magnetic compass. However, due to winds, GPS ground
track will usually not match the heading provided by your aircraft’s magnetic heading
compass/instrument. Therefore, the GPS Ground Track indication should not be used as a
replacement for a magnetic heading instrument.
Figure 8 - GPS Ground Track Arc Classic (left) / Track Overlaid (right)
4-6 D3 Pilot’s Guide
Page 21
Using Your D3
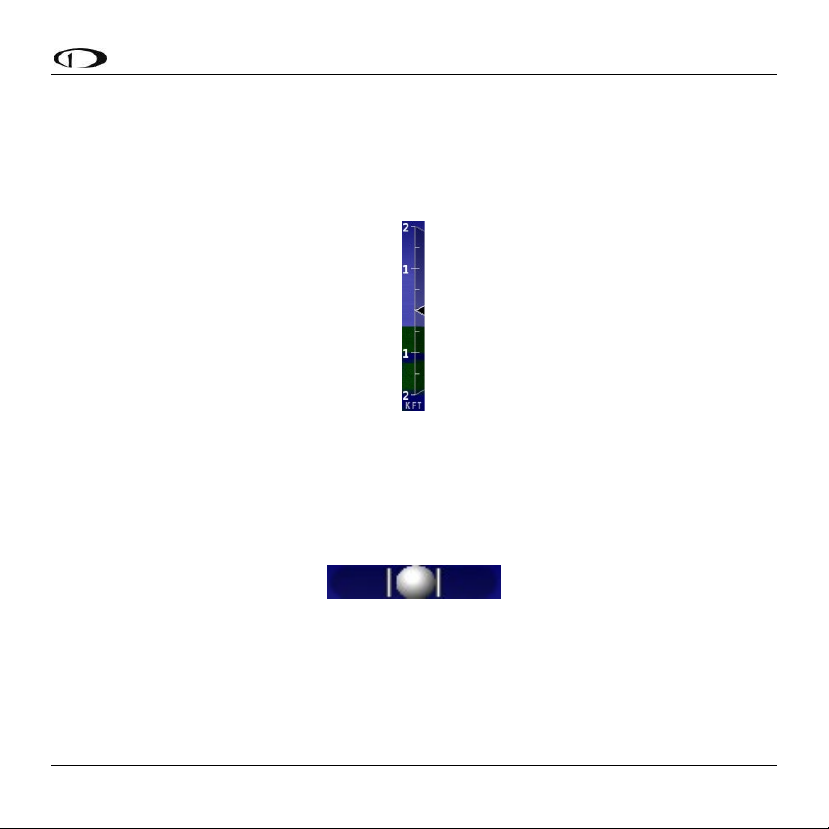
GPS Vertical Speed depicts the rate of climb or descent of the aircraft in thousands of feet per
minute or meters per second as determined by the D3’s GPS. GPS vertical speed will not always
match the indication provided by your aircraft’s static-based vertical speed indicator, and should
not be used as a replacement for one. In the example above, the GPS Vertical Speed is indicating
no climb or descent.
Figure 9 - GPS Vertical Speed
The Slip/Skid Ball provides a visual representation of lateral acceleration. When the ball is within
the two vertical lines, the aircraft is in coordinated flight. The slip/skid ball operates
independently of GPS reception.
Figure 10 - Slip / Skid Ball
D3 Pilot’s Guide 4-7
Page 22
Using Your D3
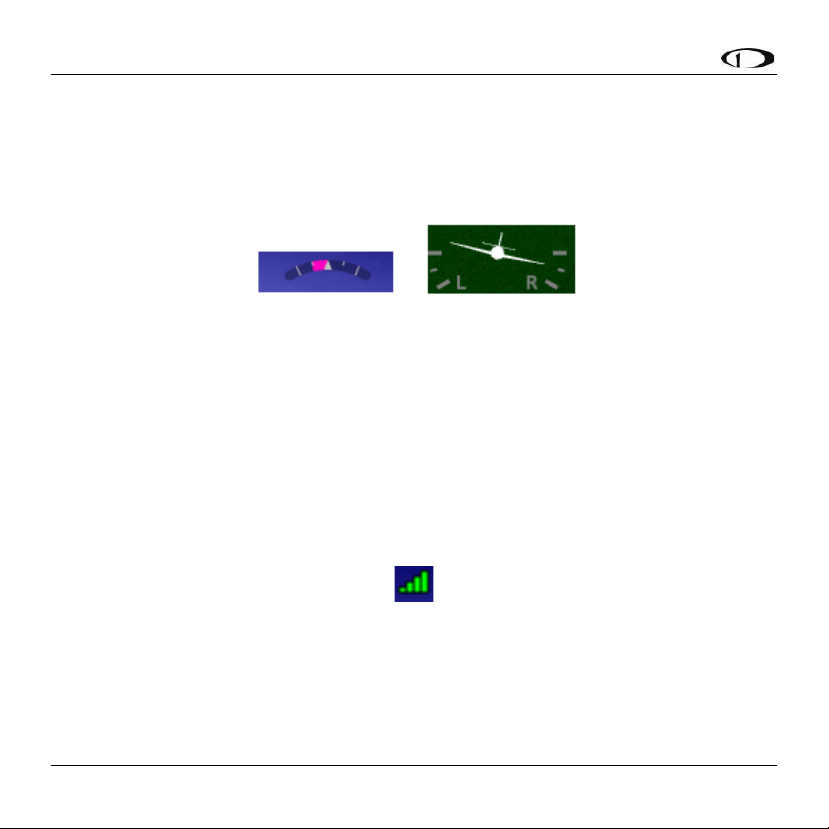
Turn Rate is displayed as a curved magenta bar just within the roll scale when the Turn Rate
display setting is set to “Magenta Bar”. The bar grows in the direction that the aircraft is currently
turning. The inner white markings on the turn rate indicator indicate a half standard-rate turn of
1.5 degree per second. The outer white markings indicate a standard rate turn of 3 degrees per
second. The turn rate arc example below depicts a half-standard rate turn to the left.
Figure 11 - Turn Rate Arc (left) / Airplane (right)
When the Turn Rate display setting is set to “Airplane”, turn rate is depicted as a more
conventional-style miniature airplane icon that behaves like the airplane in a classic turn
coordinator instrument. There are half-rate and standard rate markings. Like a conventional turn
coordinator, this depiction indicates turn rate, not bank angle. The airplane style depiction above
shows a half-standard turn to the right.
GPS Signal Strength is depicted in the upper left corner of the display. “Ext” is displayed alongside
the GPS Signal Strength indication when the external GPS antenna is connected.
Figure 12 - GPS Signal Strength
4-8 D3 Pilot’s Guide
Page 23
Using Your D3
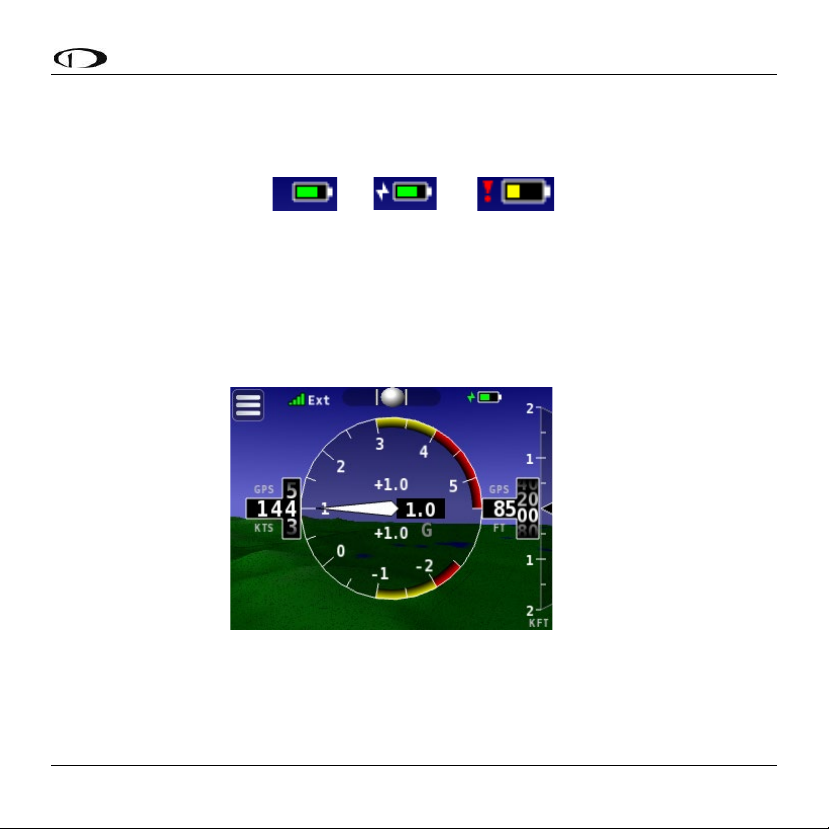
Battery Charge Level is depicted in the upper right corner of the display. The red exclamation
point that signals that the device is not charging may appear if the D3 is operated at extreme
temperature or if there is some other problem with the battery or charging circuit.
Figure 13 - Battery Charge Level / Charging External Power Source / Not Charging Icons
Load Factor (G Meter) can be depicted instead of attitude by swiping left or right across the
screen. Gs are determined by internal accelerometer sensors and are displayed as an analog-style
gauge. Configurable settings (under Menu > Settings > G Meter) are provided for the color coded
(red/yellow) ranges for both positive and negative G loads.
Figure 14 - G Meter
D3 Pilot’s Guide 4-9
Page 24

Using Your D3
The D3 Load Factor (G meter) display has two selectable ranges to meet the needs of Normal
Category aircraft and Aerobatic Category aircraft.
Minimum and maximum Gs can be reset under Menu > Display > Reset Gmeter.
The caution (yellow) and warning (red) ranges are selectable from the settings menu in 0.1 G
steps.
The yellow range will always end at the start of the red range.
4-10 D3 Pilot’s Guide
Page 25

5. GETTING STARTED
Unpacking
Carefully unpack the box and confirm the following parts are included:
• D3 Device
o Main button: Powers the D3 on and off.
o USB-C port: Powers the D3, charges the battery, and enables software updates.
• USB-C Charging cable
• AC Wall Charger
• DC 14/28V DC Vehicle Charger
• USB-C adapter: Enables connection to thumb drive for software updates.
• Mounting options
o Pinch mount
o RAM suction cup mount
• External GPS antenna
• Matte finish screen protector
D3 Pilot’s Guide 5-1
Page 26

Using Your D3
Before First Use
Before you use your D3 for the first time, please complete the following initial setup and
configuration steps:
• Fully charge the battery (see following section).
• Check for D3 software updates at www.dynonavionics.com.
• Choose settings (see following section).
Turn the D3 On and Off
Turn the D3 on and off by holding the power button on the top of the device for about two
seconds. The D3 will also automatically power on any time an external power source is connected.
Turn the D3 off by pressing and holding the power button for three seconds.
Charging the Battery
BATTERY INFORMATION
The D3 is powered by an internal Li-Ion battery that provides at least 5.5 hours of use from full
charge when not connected to an external power source. The amount of time that the battery will
operate the D3 from a full charge will vary with temperature, GPS visibility, use of the external
GPS antenna, and the brightness setting. You can decrease the brightness and disable synthetic
vision to maximize battery life.
5-2 D3 Pilot’s Guide
Page 27

Using Your D3
CHARGE USING THE AC POWER ADAPTER OR VEHICLE POWER ADAPTER
• Plug the AC Power Adapter into a standard wall plug, or the Vehicle Power Adapter into a
vehicle DC socket. The Vehicle Power Adapter is designed to work in cars, 14V aircraft, and 28V
aircraft.
• Connect the Power Adapter to the USB-C port on the left side of the D3.
• Leave connected for approximately 6 hours to completely charge from empty (with a USB-C
power source that can supply 1.5 amps or more). Less time will be needed if the battery is
partially charged.
• When powered on, a full charge is indicated by a full battery gauge on the display.
• To charge the D3 faster, turn the unit off after power is connected. A red indicator light on the
power button illuminates to indicate charging is in progress. The light turns green when the D3
is fully charged.
•
ADJUSTING SETTINGS AND PREFERENCES
You can adjust settings such as ground speed units (KTS / MPH / KPH), altitude units (feet /
meters), whether the D3 automatically shuts down after a period of inactivity, and other display
settings. To adjust settings on your D3:
• Touch the Menu icon in the upper left corner of the display.
• Touch “Settings” to enter the settings menu.
• When you are finished, touch anywhere outside the settings menu to completely exit the menu
system. You may also use the “back” arrow to navigate back to other settings.
• Other preferences, such as brightness control and a toggle for synthetic vision, can be found in
the Main Menu.
D3 Pilot’s Guide 5-3
Page 28

Using Your D3
Mounting Your D3
Mount in the aircraft using one of the provided removable, portable mounts. When mounting the
D3, the following alignment constraints must be met:
• A small amount of roll install error (+/- 6 degrees) can be corrected during the software-based
alignment process.
• A larger amount of pitch (+/- 30 degrees) can be accommodated via software alignment.
• For proper yaw alignment, the unit must be aligned so that the surface of the display is parallel
with the lateral axis (wingtip to wingtip) of the aircraft. In other words, the D3 must not be
pointed left or right to face you if it is not directly in front of you. Pointing the D3 left or right
will cause the attitude, turn rate, and slip/skid ball indications to be degraded.
RAM Suction Cup Mount
• Attach the square RAM mount plate to the plastic D3 cradle using the included hardware.
• Connect the above assembly to the suction base via the included short connecting arm.
• Mount the suction cup to a surface that is capable of supporting the weight of the assembly. A
canopy or windscreen that has a minimal amount of curvature is ideal.
• Loosen the knob on the arm to align the cradle so that it meets the roll, pitch and yaw
mounting criteria above.
• Tighten the knob to set the orientation of the cradle. Check that the mount and cradle are
secure.
• Clip the D3 into the cradle. Start with the bottom of the D3. The D3 will positively snap into the
cradle as you press the top side in. The cradle’s wings will sit flush along the top and bottom
faces of the D3 when it is fully clipped in.
• Check that the D3 is secure.
5-4 D3 Pilot’s Guide
Page 29

Using Your D3
• If you are using the Vehicle Power Adapter to provide continuous power to the D3, route the
wire through the channel along the bottom right of the cradle.
Pinch Mount
• The pinch mount is designed to allow portable use of the D3 in an empty standard 3 ⅛” aircraft
instrument hole.
• Retract the mount’s retention arms by pinching together the finger holes on the front of the
mount.
• With the retention arms pinched together, place the pinch mount flush against the panel over
the instrument hole.
• Let go to wedge the arms in the instrument hole.
• Ensure that the mount meets the roll, pitch and yaw mounting criteria above.
• Check that the mount and cradle are secure.
• Clip the D3 into the cradle. Start with the bottom of the D3. The D3 will positively snap into the
cradle as you press the top side in. The cradle’s wings will sit flush along the top and bottom
faces of the D3 when it is fully clipped in.
• Check that the D3 is secure.
• If you are using the Vehicle Power Adapter to provide continuous power to the D3, route the
wire through the channel along the bottom right of the cradle.
• When using the pinch mount, Dynon highly recommends using the optional external GPS
antenna as the D3’s view of the sky is likely to be obscured by aircraft structure.
General Usage
D3 Pilot’s Guide 5-5
Page 30

Using Your D3
• Swipe across the face of the device to switch between attitude and G-meter display
modes.
• Press the Menu button on the top left of the display to access settings, preferences, and
all other features.
• When you are in a menu, you can “back up” through the menu to adjust other settings
or features by pressing the arrow in the upper left hand corner.
• To completely close the menu, touch anywhere on the right half of the screen.
5-6 D3 Pilot’s Guide
Page 31
Using Your D3
Align the D3 for Flight
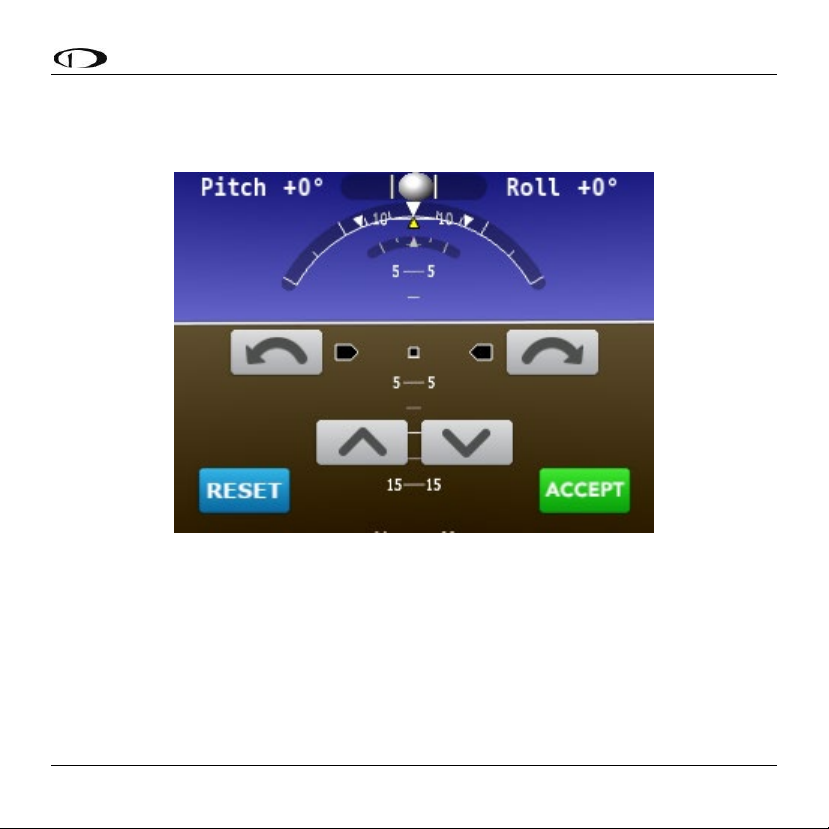
Figure 15 - Pitch / Roll Adjust
• With the D3 powered on, Press the Menu button, and then go to “Pitch/Roll Adjust”.
• Press the up/down arrows until the displayed pitch matches the current pitch of the aircraft.
Note that this won’t necessarily be “level”, particularly for taildraggers that are being aligned
on the ground.
• Press the roll left and roll right arrows until the displayed roll angle indication matches the
actual roll angle of the aircraft. If your aircraft is perfectly level, this means that the horizon
should level and the ball centered.
D3 Pilot’s Guide 5-7
Page 32

Using Your D3
• Touch “Accept” to complete the alignment.
• Wait for a GPS fix. When a GPS fix is attained, the upper left corner of the display will show GPS
signal strength, and the main display will display flight instruments.
• If GPS lock takes too long to achieve, or you have the D3 installed in a place where its internal
GPS antenna is unlikely to get a lock (such as in the panel), plug in the external GPS antenna
and ensure it has a clear view of the sky. The top of the panel glare shield is usually a good
choice for GPS antenna placement.
• Go Fly! ™
• You may find that you need to re-adjust the roll and pitch a bit more in flight.
Adjusting Brightness for Night Flight
Enter the Menu to adjust the brightness settings. When “Auto” is enabled, brightness will adjust
automatically to match the ambient light.
You can also move the brightness slider to manually adjust brightness. When you adjust the
brightness manually via the slider, auto-dimming is turned off.
Other Display Options
Other display options can be changed by going to the Display menu. These include:
• Synth Vision: Toggles the display of synthetic vision on and off.
• Turn Rate: Choose between the modern “EFIS” style magenta bar below the roll scale, or a
more conventional-style miniature airplane icon that behaves like the airplane in a classic turn
coordinator instrument.
5-8 D3 Pilot’s Guide
Page 33

Using Your D3
• Style: “Classic” style depicts GPS ground track information as an arc along the bottom of the
screen. “TRK Overlaid’ mode depicts GPS ground track information as a full circular compass
that is inset within the attitude indicator.
• Reset Gmeter resets the G-meter minimums and maximums.
Settings
To adjust unit settings, go to Main Menu > Settings. Settings that can be adjusted include:
• Units: Changes speed and altitude units
• G Meter: Change between normal and aerobatic display ranges, as well as set your own
customer yellow and red lines for G gauge markings.
• Inactivity: The D3 can be configured to automatically power down after a period of inactivity /
nonmovement.
• Version: Displays the current software version of the D3. Compare with the version available
on the Dynon website to determine if newer software is available.
D3 Pilot’s Guide 5-9
Page 34

Page 35

6. PERFORMANCE NOTES
Attitude Performance
Optimal attitude performance depends on a number of environmental factors:
GPS REQUIRED
The attitude indication provided by the D3 is primarily created by combining information from
solid state MEMS-type accelerometers and rotation rate sensors, and supplemented by GPS
ground speed. In order to display as reliable an indication as possible, a GPS fix is required. The D3
will not display attitude until it has obtained a GPS fix. Once a GPS fix is obtained, it is important
that the GPS fix be maintained by either mounting the D3 in a position that affords it a good view
of the sky, or, if that is not possible (such as when using the pinch mount to panel-mount the D3),
using the included external GPS antenna.
LOSS OF GPS
The D3 requires a GPS fix to display attitude, speed, altitude, vertical speed, ground track, and
vertical speed. The D3 can cope with momentary degradations in GPS signal quality. After
approximately 2 after the loss of GPS signal, the above flight instruments will become inoperative
and removed from view.
ROTATION RATE LIMIT
The D3 will operate normally with rotational rates of up to 150 degree per second around any
axis. If a rate of 150 degrees per second is exceeded, HORIZON RECOVERING will be displayed
along the bottom of the display. The D3 will continue to display attitude information, but it should
be cross-checked against other instruments while in this recovery mode. After a few seconds of
D3 Pilot’s Guide 6-1
Page 36
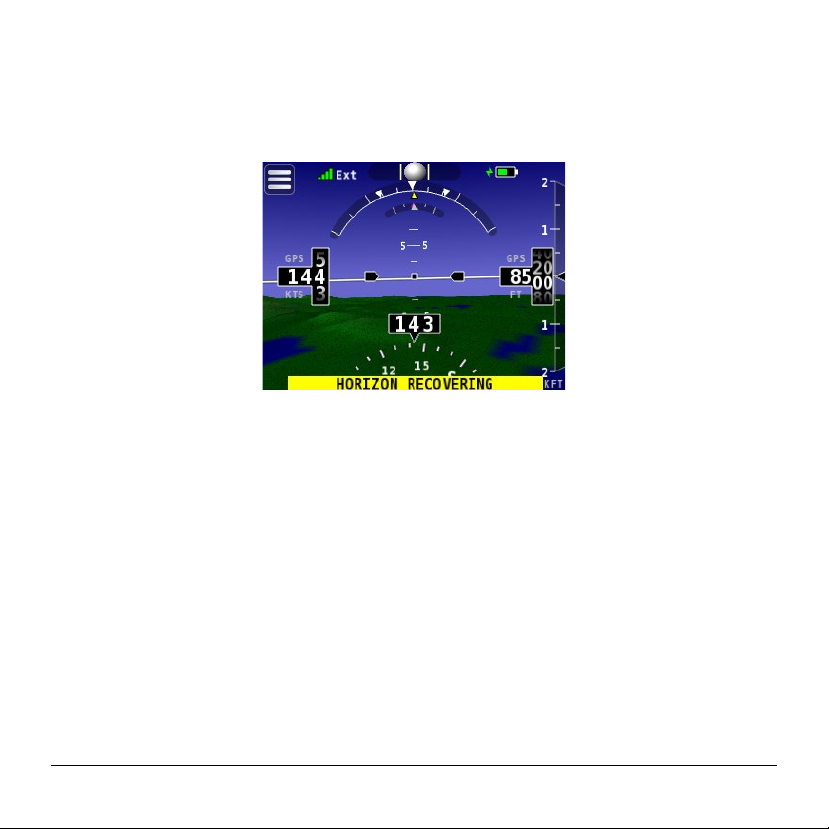
straight and level flight, the HORIZON RECOVERING message will automatically disappear when
the D3 is confident that it is showing the correct attitude.
Figure 16 - Horizon Recovering After Rate Limit Exceeded
AEROBATICS AND NON-STANDARD MANEUVERS
The D3’s attitude sensing algorithm is based on fixed wing aircraft flight dynamics. Using the D3
during aerobatics or other maneuvers that are not encountered during normal fixed wing aircraft
flight may cause the D3’s attitude indicator to lag the actual horizon or be otherwise incorrect.
This will especially be true if the maneuvers being performed exceed 150 degrees per second as
described above. However, once straight and level flight is resumed for a short period, the D3 will
automatically recover and display the correct attitude. Additionally, no aerobatic flight maneuver
will cause any permanent damage to the D3’s attitude sensing ability.
6-2 D3 Pilot’s Guide
Page 37

7. SOFTWARE UPDATES
You should periodically check our website for software updates.
• Verify the battery is charged before updating.
• Check the version of your current software, go the Menu > Settings > Version.
• Check http://www.dynonavionics.com
• If the version number on the Dynon website is higher than the one your D3 currently has,
download the current version from the Dynon website.
• Copy the downloaded file to a USB drive (not included). The drive may be formatted in the FAT,
FAT32, or exFAT (most drives come preformatted in one of these formats).
• While the D3 is powered off, use the USB-C adapter (included) to connect the USB drive to the
D3.
• Power on the D3.
• The D3 will automatically update and display further instructions and status.
• Remove the USB drive and adapter once the update is complete and restart the D3.
• Confirm that the software is up to date by confirming that the version number under Menu >
Settings > Version matches the version you downloaded from the Dynon website.
for the latest software version.
D3 Pilot’s Guide 7-1
Page 38

Page 39

8. ADDITIONAL MOUNTING OPTIONS
Other RAM® Mounts
The RAM® suction cup mounting system that is included with your D3 can be adapted and
customized with the use of other components. These can be purchased directly from
www.rammount.com or from any of RAM’s authorized dealers. The RAM® components that come
with the D3 use the B size (1" diameter) ball. Some specific RAM® components that may be useful
in aircraft include:
RAM-B-259U: 1” x 1” glare shield clamp base with 1” ball (finger screws)
RAM-B-247U-15/17/2/25/3/4: Square rail clamp base with 1” ball, available in various widths
(designated by numerical suffix)
Note that the FAA and other regulatory agencies do not permit permanent mounting of portable
products in type certificated aircraft. All of the mounts included with the D3 can be fixed and removed
without the use of tools.
Included RAM® Mount Components
Replacements for the included RAM® mounting system can be purchased directly from RAM®
Mount and their authorized dealers. The RAM® components that come included with the D3 are:
RAP-224-1U: Suction cup base (3.3” diameter) with twist lock
RAM-B-201U-A: Short double socket arm for 1” ball bases
RAM-B-347U: AMPS square base with 1” ball
D3 Pilot’s Guide 8-1
Page 40

Page 41

Problem Description
Possible Cause
Solution
9. TROUBLESHOOTING
The D3 does not power on Battery is
completely
discharged
The brightness is
turned all the way
down
The D3 does not power on,
even when power is
applied to the charging port
on the right side of the unit
Battery life is too short Battery is either not
Battery display does not
change to the plug icon
when plugged in to the wall
D3 may be damaged Contact Dynon Avionics technical
being fully charged,
or is worn out
No power at wall
outlet
Charge the battery; Additionally, the
D3 will automatically power on
when external power is applied via
the power port on the right side of
the unit
Navigate to the display menu via the
menu button in the upper left of the
screen and adjust the brightness.
support staff
Confirm that you are fully charging
the D3 before use. If this does not
solve the issue, contact Dynon
Avionics technical support staff
Check that power source is
supplying power
D3 Pilot’s Guide 9-1
Page 42

Troubleshooting
Problem Description
Possible Cause
Solution
Battery display does not
change to the plug icon
when plugged in to a
vehicle
The D3’s attitude indication
is incorrect
The ball is not centered,
but the D3/aircraft is
definitely level
The horizon zero pitch line
is not centered on the zero
pitch indication, but the
D3/aircraft is definitely
level
No power coming
from vehicle
Improper alignment Ensure that the D3 is correctly
Roll adjust is not
correct for the
current mounting
position
Pitch adjust is not
correct for the
current mounting
position
Check that vehicle is supplying
power
oriented in the yaw axis and is NOT
pointed left or right towards the
pilot
Redo the alignment process to
ensure that the displayed attitude is
correct
Go to Menu > Pitch/Roll Adjust to
align.
Go to Menu > Pitch/Roll Adjust to
align. Adjust until the displayed pitch
matches the aircraft pitch attitude
9-2 D3 Pilot’s Guide
Page 43
Troubleshooting
Problem Description
Possible Cause
Solution
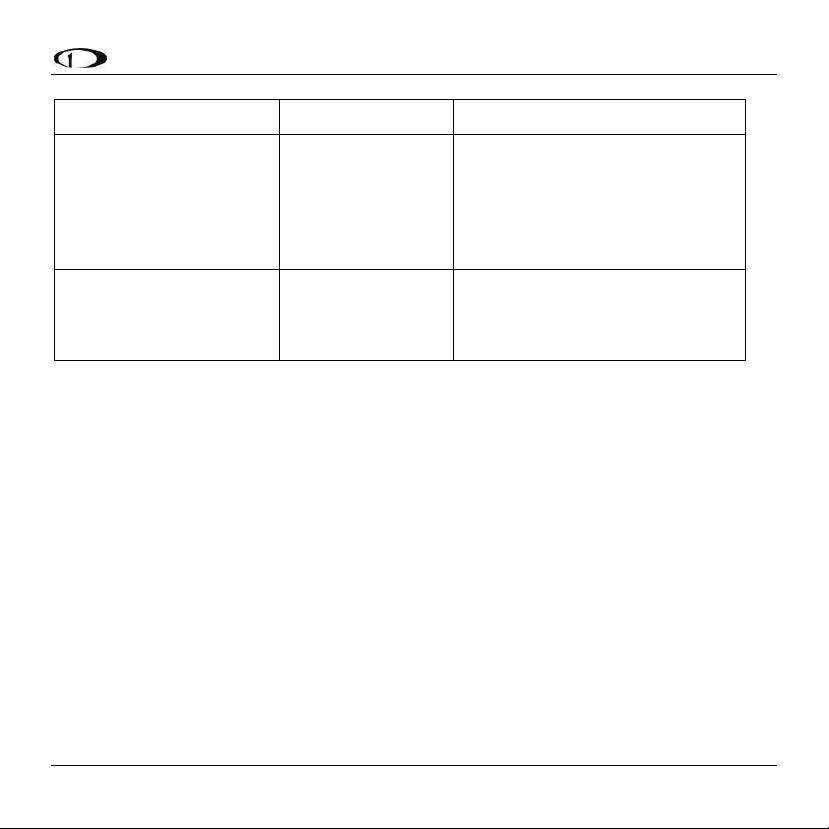
The D3’s speed, altitude,
and/or track indication
does not match my other
aircraft instruments
The D3’s screen is too dim Display brightness
This is expected
behavior
has been turned
down
The D3’s instruments are GPS based
and will not match the other
permanently-mounted pneumatic
and magnetic instruments in your
aircraft
Adjust the brightness under the
main menu.
D3 Pilot’s Guide 9-3
Page 44

Page 45

10. SPECIFICATIONS
All specifications are subject to change without notice or obligation.
PHYSICAL
Dimensions (exclusive of projections/buttons/switches)
3.63 inches (92mm) W
3.26 inches (83mm) H
1.16 inches (29mm) D
Weight
8 oz (227g)
Temperature Range
Operating/Charging (allowable): -20˚C (-4˚F) to 60˚C (140˚F)
Operating/Charging (for best battery lifespan): -15˚C (5˚F) to 45˚C (113˚F)
Short Term Storage (<3 months): -10˚C (14˚F) to 45˚C (113˚F)
Long Term Storage (>3 months): 18˚C (64˚F) to 28˚C (82˚F)
POWER
Internal Li-Ion Battery
5.5+ Hours Run Time (worst case from full charge, full brightness). 7+ hours without
synthetic vision at 60% brightness.
D3 Pilot’s Guide 10-1
Page 46

Specifications
Charging
USB-C. Use included chargers for best performance. Some third-party chargers may not
charge the D3.
10-2 D3 Pilot’s Guide
Page 47

11. SCREEN CARE
The D3 features a display which with normal care will provide years of problem free use.
Use a dry, clean, soft cloth to clean the screen. Do not use soap, chemicals, or abrasives to avoid
damaging the screen.
specifically for LCD screen cleaning. soft cloth. Never use water or solvents when attempting to
clean the display.
Avoid excessive pressure to the display to prevent damage to the LCD (Liquid Crystal Display).
Take care to prevent impacts to the screen to prevent cracking the display.
The D3 also comes with an optional screen protector. In addition to protecting against scratches,
it affords a matte finish that some pilots prefer.
You may also use commercially available wipes that are designed
D3 Pilot’s Guide 11-1
Page 48

12. REQUESTING SUPPORT / REPAIR
Before contacting Dynon Avionics Technical Support, please consult the Troubleshooting section
of this guide for solutions to common issues.
When contacting Dynon Technical Support, have your D3 at hand. If possible, have the AC Adapter
(charger) also at hand to provide power if there is a battery issue.
DYNON AVIONICS TECHNICAL SUPPORT CONTACT INFORMATION
Phone: (425) 402-0433 7:00 AM - 5:00 PM (Pacific), Monday - Friday
Email: [email protected]
Web: www.dynonavionics.com
12-2 D3 Pilot’s Guide
Page 49

13. NOTES
D3 Pilot’s Guide 13-1
Page 50

 Loading...