

Page 1
INSTALLATION GUIDE
www.dynojetwb2.com
Dynojet Research 2191 Mendenhall Drive Suite 105, North Las Vegas NV, 89081 1-800-992-4993
Page 2

©2008 Dynojet Research, Inc. All Rights Reserved.
Wideband 2 Installation Guide
This manual is copyrighted by Dynojet Research, Inc., hereafter referred to as Dynojet,
and all rights are reserved. This manual, as well as the software described in it, is
furnished under license and may only be used or copied in accordance with the terms of
such license. This manual is furnished for informational use only, is subject to change
without notice, and should not be construed as a commitment by Dynojet. Dynojet
assumes no responsibility or liability for any error or inaccuracies that may appear in this
manual. Except as permitted by such license, no part of this manual may be reproduced,
stored in a retrieval system, or transmitted, in any form or by any means, electronic,
mechanical, recording, or otherwise, without the prior written permission of Dynojet.
The Dynojet logo is a trademark of Dynojet Research, Inc.
Any trademarks, trade names, service marks, or service names owned or registered by any
other company and used in this guide are the property of their respective companies.
Dynojet Research, Inc., 2191 Mendenhall Drive, North Las Vegas, Nevada 89081, USA.
Printed in USA.
Part Number: 98200017 Version 03 (10/2008)
Page 3

INSTALLATION
PARTS LIST
WIDEBAND 2 SPECIFICATIONS
ELECTRICAL LAYOUT
REQUIRED CONNECTIONS
Section 1 - Weld Boss and Oxygen Sensor Installation
Section 2 - Wideband 2 Module Installation
Section 3 - Power and Ground Wire Installation
O
PTIONAL CONNECTIONS
Section 4 - Digital Input (RPM) Wire
Section 5 - Analog Input Wire
Section 6 - Data Acquisition Output Wires
Section 7 - Simulated Narrow Band Output Wire
O
PTIONAL ACCESSORY CONNECTIONS
Section 8 - Optional Electrical Gauge In Vehicle Dash Installation
Section 9 - Optional LCD
Section 10 - Optional Data Acquisition/Gauge Harness Installation
S
ENSOR TEST
Section 11 - Sensor Condition Test
PARTS LIST
quantity description
1 Wideband 2 Module
1 Data Acquisition Cable (optional with 15-7011 kit)
1 Bosch LSU 4.2 Wide Band Oxygen Sensor
1 Oxygen Sensor Cable
1 Oxygen Sensor Weld Bung, Plug, and Copper Washer
2 Dynojet CAN-Link Port Seals
3Wire Tap
1Blade Fuse Tap
1Mini Blade Fuse Tap
1Quick Lug
1 Terminal Strip Plug
2Dual Lock Strips
1 Alcohol Swab
3Zip Ties
1 Warranty Registration Card
2Dynojet Decals
98200017.03
Wideband 2 Installation Guide- 1
Page 4
WIDEBAND 2 SPECIFICATIONS
ctio
description specification
Power Requirement 11.5 - 15 VDC, 3A
Dimensions 2.80"w x .56"h x 1.488"d
Range .68 lambda - ambient air
Inputs
Analog 0 - 5 VDC
Digital Square wave, 0 - 12 V nominal (coil (-) tachometer signal)
Outputs
Gauge Driver 0 - 5 VDC analog
Calibrated AFR 0 - 5 VDC analog
Simulated Narrow Band
Expansion Connectivity Dynojet CAN-Link (accessory cable required)
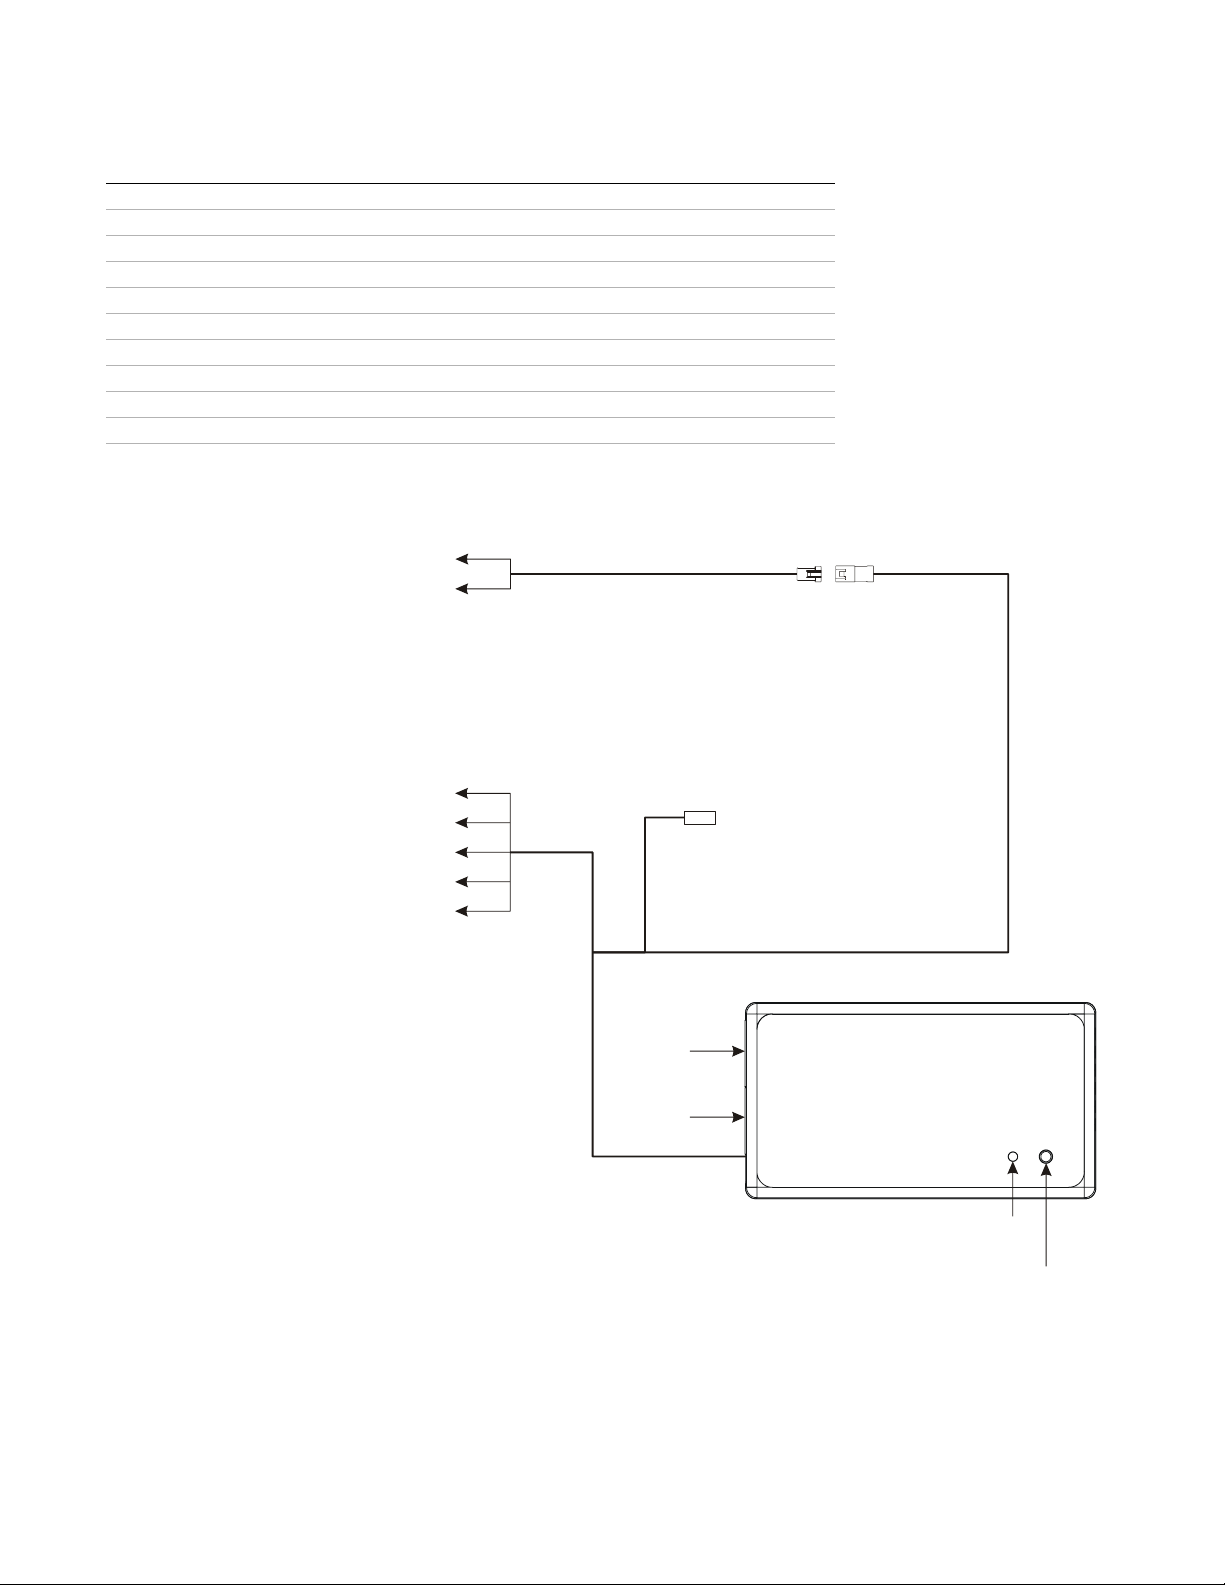
ELECTRICAL LAYOUT
violet - Data Acq. Output Signal (0-5v)
white/violet - To Data Acq. Signal Ground
(optional with 15-7011 kit)
76950114
Data Acquisition Cable
white/blue - RPM
grey - Analog Input (0-5v)
black/white - Digital Ground
red - 12v
black - Ground
CAN
CAN
green - Narrow Band O2 Out
LED
Fun
n Button
98200017.03
Wideband 2 Installation Guide- 2
Page 5

Figure AFigure BFigure C
REQUIRED CONNECTIONS
SECTION 1 - WELD BOSS AND OXYGEN
SENSOR INSTALLATION
INSTALLING THE WELD BOSS—AUTOMOTIVE
1 Find a suitable location to install the included
M18 x 1.5mm weld boss on the exhaust system
as shown in Figure A.
On vehicles equipped with catalytic converters,
Dynojet recommends installing the weld boss
before the converters. Vehicles that do not
utilize catalytic converters are free to install the
boss anywhere in the exhaust, but we
recommend keeping it within thirty inches of
the exhaust port.
Turbocharged vehicles have rather high
exhaust gas temperatures and pressures.
In these applications, it is best to install the
weld boss in the down pipe as far away from
the exhaust turbine as possible.
Note: Never install the sensor in the exhaust
manifold between the cylinder head and the
turbo.
2 Mount the weld boss in a manner that reduces
the risk of moisture contamination on the
sensor. Condensation can build up in the
exhaust pipes and potentially damage the
sensor.
98200017.03
3 Ideally, you should orient the weld boss so the
sensor is between the 9 o'clock and 3 o'clock
position (reading clockwise) as shown in
Figure B. A 10° inclination off the horizontal
plane should be considered a minimum.
Note: Verify you have adequate clearance for
the sensor and wiring harness.
I
NSTALLING THE OXYGEN SENSOR—AUTOMOTIVE
1 Thread the sensor into the weld boss as shown
in Figure C.
Wideband 2 Installation Guide - 3
Page 6

2 Connect the O2 Sensor to the supplied wiring
harness as shown in Figure D.
Figure DFigure EFigure F
3 Find a suitable location to run the wiring to
the Wideband 2 control module as shown in
Figure E.
Note: Verify the wiring is free and clear of
abrasion and heat sources.
98200017.03
4 Route the wiring through a factory grommet as
shown in Figure F.
If you are unable to find a factory grommet to
pass the wiring through, drill a hole large
enough to accommodate the wiring. Make sure
to use a grommet to protect the wiring.
Note: It is very important that the Wideband 2
Sensor is powered up when the vehicle is
running. The sensor may become damaged if
the vehicle is running and the Wideband 2 is
not receiving power. In the event that you do
not have power running to the sensor, remove
the sensor and install the weld boss plug
included in the Wideband 2 kit.
Note: Running the sensor in leaded fuel
applications decreases the service life of the
sensor.
Wideband 2 Installation Guide - 4
Page 7

INSTALLING THE WELD BOSS—MOTORCYCLE
1 Find a suitable location to install the included
M18 x 1.5mm weld boss on the exhaust system
as shown in Figure G.
On vehicles equipped with catalytic converters,
Dynojet recommends installing the weld boss
before the converters. Vehicles that do not
utilize catalytic converters are free to install the
Figure GFigure HFigure I
boss anywhere in the exhaust, but we
recommend keeping it within thirty inches of
the exhaust port.
Turbocharged vehicles have rather high
exhaust gas temperatures and pressures.
In these applications, it is best to install the
weld boss in the down pipe as far away from
the exhaust turbine as possible.
Note: Never install the sensor in the exhaust
manifold between the cylinder head and the
turbo.
2 Mount the weld boss in a manner that reduces
the risk of moisture contamination on the
sensor. Condensation can build up in the
exhaust pipes and potentially damage the
sensor.
98200017.03
3 Ideally, you should orient the weld boss so the
sensor is between the 9 o'clock and 3 o'clock
position (reading clockwise) as shown in
Figure H. A 10° inclination off the horizontal
plane should be considered a minimum.
Note: Verify you have adequate clearance for
the sensor and wiring harness.
I
NSTALLING THE OXYGEN SENSOR—MOTORCYCLE
1 Thread the sensor into the weld boss as shown
in Figure I.
Wideband 2 Installation Guide - 5
Page 8

2 Connect the O2 Sensor to the supplied wiring
harness as shown in Figure J.
3 Route the wiring to the Wideband 2 module.
Use the supplied zip ties to secure the wire
bundle to the motorcycle.
Note: Verify the wiring is free and clear of
abrasion and heat sources.
Note: It is very important that the Wideband 2
Sensor is powered up when the vehicle is
Figure JFigure KFigure L
running. The sensor may become damaged if
the vehicle is running and the Wideband 2 is
not receiving power. In the event that you do
not have power running to the sensor, remove
the sensor and install the weld boss plug
included in the Wideband 2 kit.
Note: Running the sensor in leaded fuel
applications decreases the service life of the
sensor.
SECTION 2 - WIDEBAND 2 MODULE
INSTALLATION
AUTOMOTIVE
1 The module is robust and water resistant and
can be mounted inside the vehicle or under
the hood. Verify the CAN-Link Ports are
accessible for data transfer.
Note: Install the CAN-Link Expansion Port
seals when the ports are not in use.
2 Mount the module using the supplied dual
lock strips or other suitable means as shown in
Figure K.
When using the dual lock strips, please clean
the surfaces thoroughly with the supplied
alcohol swab.
98200017.03
M
OTORCYCLE
1 On most motorcycle applications the best
place to mount the Wideband 2 module is
under the seat or in the tail section of the
motorcycle. Verify the CAN-Link Ports are
accessible for data transfer.
Note: Install the CAN-Link Expansion Port
seals when the ports are not in use.
2 Mount the module using the supplied dual
lock strips or other suitable means as shown in
Figure L.
When using the dual lock strips, please clean
the surfaces thoroughly with the supplied
alcohol swab.
Wideband 2 Installation Guide - 6
Page 9

install the wire tap
SECTION 3 - POWER AND GROUND WIRE
INSTALLATION
CONNECTING THE POWER WIRE—AUTOMOTIVE AND
M
OTORCYCLE
Figure MFigure NFigure O
choose a fuse tap based
on fuse type
fuse tap installed on fuse
Connect the red power wire to a 12 volt "Fused Key
On" power source.
This type of power source only has power when
the ignition switch is turned on. A wire tap, along
with two different sizes of blade fuse taps and a
quick lug, is included for easy installation. Refer to
Figure M.
Note: If you are not sure, please refer to a
workshop manual or electrical diagram for
your vehicle or consult a specialist.
C
ONNECTING THE GROUND WIRE—AUTOMOTIVE
Connect the black and the black/white wires to a
good ground location with the eyelets provided.
Refer to Figure N.
When using the Analog Input on the Wideband 2,
you may need to run the black/white wire to the
sensor ground. For example, using the Analog
Input to measure TPS voltage, you would tie the
black/white wire to the TPS sensor ground.
98200017.03
Never connect the black wire to a sensor
ground.
Note: Verify the wiring is free and clear of
abrasion and heat sources.
C
ONNECTING THE GROUND WIRE—MOTORCYCLE
Connect the black and the black/white wires to a
good ground location with the eyelets provided.
Refer to Figure O.
When using the Analog Input on the Wideband 2,
you may need to run the black/white wire to the
sensor ground. For example, using the Analog
Input to measure TPS voltage, you would tie the
black/white wire to the TPS sensor ground.
Note: Consult your motorcycle’s service
manual for more information on wire
definitions and colors.
Never connect the black wire to a sensor
ground.
Note: Verify the wiring is free and clear of
abrasion and heat sources.
Wideband 2 Installation Guide - 7
Page 10

Figure PFigure QFigure R
white/blue - RPM
grey - Analog Input
black/white - Digital Ground
black - Ground
red - 12v
white
grey
black
yellow
red
blue
green - Narrow Band O2 Out
CONNECTING THE O2 SENSOR CABLE
Attach the O2 Sensor wiring harness wires to the
screw terminal as shown in Figure P.
Using the color coded decal on the Wideband
2 module, install the wires into the correct
location. The wires pierce a foam gasket.
Note: Be sure to install the supplied terminal
strip plug when mounting the Wideband 2
under the hood or in an area that may be
exposed to moisture or dirt.
OPTIONAL CONNECTIONS
SECTION 4 - DIGITAL INPUT (RPM) WIRE
There is one digital RPM input channel built into
the Wideband 2.
1 Locate the white/blue wire in the main harness
as shown in Figure Q.
2 Using a supplied wire-tap, connect the
white/blue wire to the negative side of the
ignition coil.
This provides a stable RPM signal without the
need for a special "tach adaptor".
black/white - Digital Ground
98200017.03
white/blue - RPM
grey - Analog Input
red - 12v
black - Ground
green - Narrow Band O2 Out
SECTION 5 - ANALOG INPUT WIRE
There is one analog input channel built into the
Wideband 2.
1 Locate the grey wire in the main harness as
shown in Figure R.
2 Connect the grey wire to a 0-5v "variable
voltage" analog signal.
Most 0-5v type sensors (such as TPS, MAF, or
MAP) have three wires:
•+5 volt reference
• ground
•0 - 5 volt signal
Wideband 2 Installation Guide - 8
Page 11

Data Acquisition
data acq. unit must
be grounded to vehicle
Figure S
+
input
-
Ground
white/blue - RPM
grey - Analog Input
black/white - Digital Ground
black - Ground
violet - Data Acq. Output Signal (0-5v)
white/violet - To Data Acq. Signal Ground
use jumper if data acq.
input (-) is floating
red - 12v
Data Acquisition Cable
green - Narrow Band O2 Out
Wideband 2
76950114
SECTION 6 - DATA ACQUISITION OUTPUT
W
IRES
The Data Acquisition cable is designed to produce
a calibrated lambda/AFR output voltage that ranges
from 0 - 5 volts.
Your data acquisition device, or flash tuner device,
should have a provision in their software to define
the analog input. Enter the following formula:
(Volts * 1.6)+10 = AFR.
The Data Acquisition cable has two wires as shown
in Figure S:
• violet wire is the 0 - 5 volt signal
• white/violet wire connects to the data
acquisition device ground reference
Note: The white/violet wire is not a ground;
however, it needs to be connected to a ground.
It is important the data acquisition device has
its own ground to the vehicle.
Data acquisition device types are varied. Some may
be grounded by connecting to the vehicle's
diagnostic port. If no other ground exists, you
must run a ground wire from the data acquisition
system to the vehicle chassis ground as shown in
Figure S.
white/blue - RPM
grey - Analog Input
black/white - Digital Ground
black - Ground
Figure T
red - 12v
Refer to the data acquisition documentation for
more information.
SECTION 7 - SIMULATED NARROW BAND
OUTPUT WIRE
The Wideband 2 provides a Simulated Narrow
Band Output signal as shown in Figure T.
Contact Dynojet for more details on this feature.
green - Narrow Band O2 Out
98200017.03
Wideband 2 Installation Guide - 9
Page 12

Figure UFigure VFigure W
yellow, warning
orange, dimming
gauge
76950060
Gauge Cable
OPTIONAL ACCESSORY CONNECTIONS
SECTION 8 - ELECTRICAL GAUGE IN VEHICLE
DASH INSTALLATION
A 2 1/16th diameter hole is required for the gauge,
as shown in Figure U, which can be mounted indash or in an aftermarket gauge pod.
The gauge cable must be routed to the Wideband 2
Module and connected to the four pin connector
or to the optional Data Acquisition/Gauge Cable
(P/N 76950118).
When the yellow wire is grounded, as shown in
Figure V, the warning light will turn on and the
alarm will sound. The alarm is selectable with a dip
switch on the back of the gauge.
Apply 12v to the orange wire to dim the
backlighting to nighttime intensity as shown in
Figure V.
Gauge Part Numbers:
part number description
49600000 analog, white face
49600001 analog, black face
49600002 digital, white face
49600003 digital, black face
98200017.03
SECTION 9 - OPTIONAL LCD
Visit www.DynojetWB2.com for more information.
Wideband 2 Installation Guide - 10
Page 13

Data Acquisition
G
S
data acq. unit must
be grounded to vehicle
Figure XFigure Y
+
input
-
Ground
white/blue - RPM
grey - Analog Input
black/white - Digital Ground
black - Ground
violet - Data Acq. Output Signal (0-5v)
white/violet - To Data Acq. Signal Ground
use jumper if data acq.
input (-) is floating
red - 12v
black - Gauge Ground
auge Connector
Data Acquisition/Gauge Cable
green - Narrow Band O2 Out
Wideband 2
76950118
SECTION 10 - OPTIONAL DATA
ACQUISITION/GAUGE HARNESS INSTALLATION
The Data Acquisition/Gauge Cable (P/N 76950118)
allows you to use the data acquisition output and
one of the optional gauges at the same time. Refer
to Figure X.
Note: Before connecting the Data
Acquisition/Gauge cable, be sure to read and
understand “Section 6 - Data Acquisition
Output Wires”.
The Data Acquisition/Gauge cable has three wires
as shown in Figure X:
• violet wire is the 0 - 5 volt signal
• white/violet wire connects to the data
acquisition device ground reference
• black wire is the ground for the gauge
Note: This black wire is the ground for the
gauge and is not a ground coming from the
module. The data acquisition device needs to
have its own ground to the vehicle.
Data acquisition device types are varied. Some may
be grounded by connecting to the vehicle's
diagnostic port. If no other ground exists, you
must run a ground wire from the data acquisition
system to the vehicle chassis ground as shown in
Figure X.
Refer to the data acquisition documentation for
more information.
8000
7000
6000
5000
(in feet)
4000
3000
LEVATION
E
2000
1000
98200017.03
SENSOR TEST
SECTION 11 - SENSOR CONDITION TEST
The Wideband 2 has a built in circuit which allows
you to test the sensor accuracy and condition.
sensor ok
0
LASHE
F
5
0
234
1
7
8
6
9 10
1 Verify the sensor is exposed to clean ambient
air.
2 Verify the Wideband 2 has been on for at least
one minute.
3 Press and hold the function button for three
seconds and release the button.
The LED light will blink rapidly, pause for a
moment, and then begin to flash.
4 Count the number of flashes and refer to the
Sensor Condition Chart as shown in Figure Y.
5 Retest the sensor if there is any question as to
the purity of the air during the test.
Wideband 2 Installation Guide - 11
 Loading...