

FM/AM Pocket Radio - DX-RAD01
Package contents
• Radio • Wrist Strap
• Earphone • Quick Setup Guide
Features
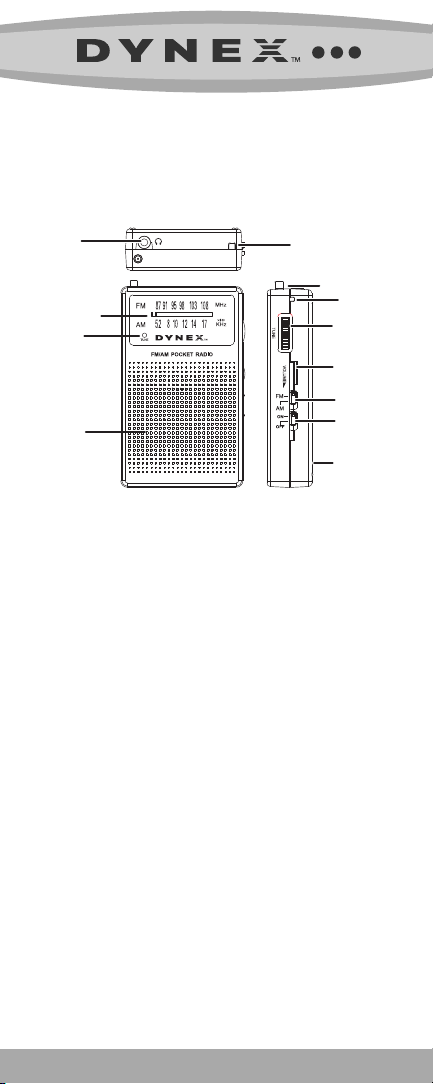
Earphone jack
Tuning display bar
Tuning LED
Speaker
Installing the batteries (Not Supplied)
1 Open the battery compartment door located at the back of your radio.
Insert two AAA batteries into the battery compartment. Make sure the +
2
and - on the batteries match the + and - inside the battery compartment.
3 Replace the battery door.
Battery precautions
The radio will not work when the batteries are low. If this occurs, replace the
batteries.
• Danger of explosion if batteries are
incorrectly replaced. Replace only with
the same or equivalent type.
• Use only the size and type of battery specied.
• Be sure to follow the correct polarity when installing the batteries
as indicated in the battery compartment. A reversed battery may
cause damage to the device.
• Do not mix different types of batteries together (e.g.Alkaline,
Rechargeable, and Carbon-zinc) or old batteries with fresh ones.
• If the radio is not to be used for a long period of time, remove the
batteries to prevent damage or injury from possible battery leakage.
• Do not try to recharge a battery not intended to be recharged; it can
overheat and rupture. (Follow the battery manufacturer's directions.)
Exhausted batteries must be removed to prevent any battery leakage.
•
• Dispose of batteries properly according to environmental regulations.
• Battery (installed battery or battery pack) should not be exposed to
excessive heat, such as sunshine, re, or the like.
Wrist strap hole
FM antenna
Wrist strap hole
Tuning dial
Volume switch
Band switch
Power ON/OFF
Battery door
QUICK SE T U P G U I D E

Radio operation
1 Slide the POWER switch to the ON position.
2 Select the radio band by sliding the switch to FM or AM.
3 Select your station using the Tuning dial.
FM : Extend the telescopic FM antenna at the top of the radio.
AM : Antenna is inside unit. Turn the set to nd the best position.
4 Adjust the sound with the VOLUME control.
5 To turn off the radio , slide the POWER switch to the OFF position.
NOTE: To listen to the radio using the earphone, insert the earphone
into the earphone jack on the top of the radio. When earphones are not
connected, sound will come from the speaker on the front of the radio set.
CAUTION: Start your volume control at a low setting.
Slowly increase the sound until you can hear it comfortably and clearly,
and without distortion. High volume can impair you hearing!
Maintenance
Do not expose the radio to rain, moisture, high humidity, sand or
excessive heat, such as heating equipment. Use a damp lint-free cloth to
wipe dust, dirt, and ngerprints from the radio. Do not use cleaning agents
or abrasives as these may damage your radio.
Dimension (WxHxD) 2.2” x 3.6“ x .8”
(without batteries) 2.1oz (approx)
Weight
Frequency Range FM:
Antenna FM: Telescopic antenna
AM: Built in ferrite bar antenna
Battery 3V DC (1.5V x 2) AAA/R03/UM4
87.5-108 MHz, AM: 520-1710 KHz
90-day limited warranty
Visit www.dynexproducts.com for details.
We’re here for you
www.dynexproducts.com
For customer service, call:
800-305-2204 (U.S./Canada markets)
Distributed by Best Buy Purchasing, LLC
7601 Penn Avenue South, Richeld, MN USA 55423-3645
RFC#BBI0802114Q2
© 2011 BBY Solutions, Inc., All Rights Reserved.
DYNEX is a trademark of BBY Solutions, Inc. Registered in some countries. All other products and
brand names are trademarks of their respective owners.
11-0815
 Loading...