

Page 1
DynaVox Maestro Quick Start Guide
Copyright © 2011 DynaVox Systems LLC
All rights reserved. No part of this book may be rep rodu ced , sto r ed in a retrieva l system, or tran smitted in a ny form, b y an y
means (electronic, photocopying, recording, or otherwise) without the prior written permission of the publisher.
Copyright protection claimed includes all forms and matters of copyrightable material and information allowed by statutory
or judicial law or hereafter granted, including without limitation, material generated from the software programs which are
displayed on the screen such as screen displays, menus, etc.
Although every precaution has b een taken in the prep aration of this book, the publis her assumes no responsibilit y for errors
or omissions.
In North America:
For information, write to:
DynaVox Systems LLC
2100 Wharton Street, Suite 400
Pittsburgh, Pennsylvania 15203 USA
The European Authorized Representative is:
DynaVox Systems Ltd.
Units 5 & 6 Benford Court
Lower Cape
Warwick
CV34 5DA
England
DynaVox® is a registered trademark of DynaVox Systems LLC.
DynaVox Maestro™ is a registered trademarks of DynaVox Systems LLC.
All other brand and product names mentioned are trademarks or registered trademarks of their respective holders.
Part # 401124-E
Fifth Edition
Published October 2011
Created in the United States of America
Page 2

2 DynaVox
Table of Contents
Introduction . . . . . . . . . . . . . . . . . . . . . . . . . . . . . . . . . . . . . . . . . . .3
Resource List/Getting Additional Help . . . . . . . . . . . . . . . . . . . . . .3
Hardware Overview . . . . . . . . . . . . . . . . . . . . . . . . . . . . . . . . . . . .4
Installing The Battery . . . . . . . . . . . . . . . . . . . . . . . . . . . . . . . . . . .7
Charging The Battery . . . . . . . . . . . . . . . . . . . . . . . . . . . . . . . . . . .8
Temperature Ranges . . . . . . . . . . . . . . . . . . . . . . . . . . . . . . . . . . .8
Mounting/Transporting Your Maestro . . . . . . . . . . . . . . . . . . . . . . .9
Product Cleaning/Handling . . . . . . . . . . . . . . . . . . . . . . . . . . . . . . .9
Turning the Maestro On For The First Time . . . . . . . . . . . . . . . . .10
The Customized Page Set . . . . . . . . . . . . . . . . . . . . . . . . . . . .11
The Title Bar . . . . . . . . . . . . . . . . . . . . . . . . . . . . . . . . . . . . . . . . .12
Important Software Menus . . . . . . . . . . . . . . . . . . . . . . . . . . . . . .13
Setup Menu . . . . . . . . . . . . . . . . . . . . . . . . . . . . . . . . . . . . . . .13
Tools Menu . . . . . . . . . . . . . . . . . . . . . . . . . . . . . . . . . . . . . . . .13
Interface Features Menu . . . . . . . . . . . . . . . . . . . . . . . . . . . . .14
Page Navigator Menu . . . . . . . . . . . . . . . . . . . . . . . . . . . . . . . .14
Changing the Speaking Voice . . . . . . . . . . . . . . . . . . . . . . . . . . .15
Making/Editing A Page . . . . . . . . . . . . . . . . . . . . . . . . . . . . . . . . .16
Editing A Button On The New Page . . . . . . . . . . . . . . . . . . . . .16
Assigning Behaviors To A Button . . . . . . . . . . . . . . . . . . . . . . .17
Important Information About Your Device . . . . . . . . . . . . . . . . . . .19
Intended Use of This Product . . . . . . . . . . . . . . . . . . . . . . . . . . . .20
Page 3

Maestro Quick Start Guide 3
NOTE
Introduction
Welcome to the Maestro Quick Start Guide! This booklet provides instructions on
the basic operation of your Maestro device. It points out key hardware features,
explains how to customize the pages and their content, and describes the most
frequently-used features and functions of your Maestro.
Resource List/Getting Additional Help
This Quick Start Guide is only a brief, introductory reference for your Maestro
device. There are other instructional resources available for the Maestro and for
the DynaVox Series 5 Page Editing software. Please take advantage of this vast
library of information, tutorials, and instructions that is at your fingertips.
Additional Documentation
Available on the electronic media (CDs and/or DVD) shipped with your Maestro.
• User’s Guide
• Comprehensive Guide
• Release Notes
• Searchable Help (also available on the Maestro device)
• Library of training modules
Online Support (www.dynavoxtech.com)
• Knowledge Base
• Application ideas and page sharing
• Implementation Toolkit
Technical Support
United States & Canada
1-866-DYNAVOX (396-2869)
M - F, 8:00 a.m. - 7:00 p.m. (EST)
www.dynavoxtech.com
Your DynaVox Sales Consultant:
1-888-697-7332
United Kingdom
+44 (0) 1384 446789
enquiries@dynavox.co.uk
If you are not a resident of North America or the United Kingdom,
please call the dealer from whom you purchased your device.
Before you contact DynaVox Technical Support, you must write down the
serial number of your device. It can be found on the back of your device.
My Maestro serial number is:___________________________________
Page 4
2
1
3
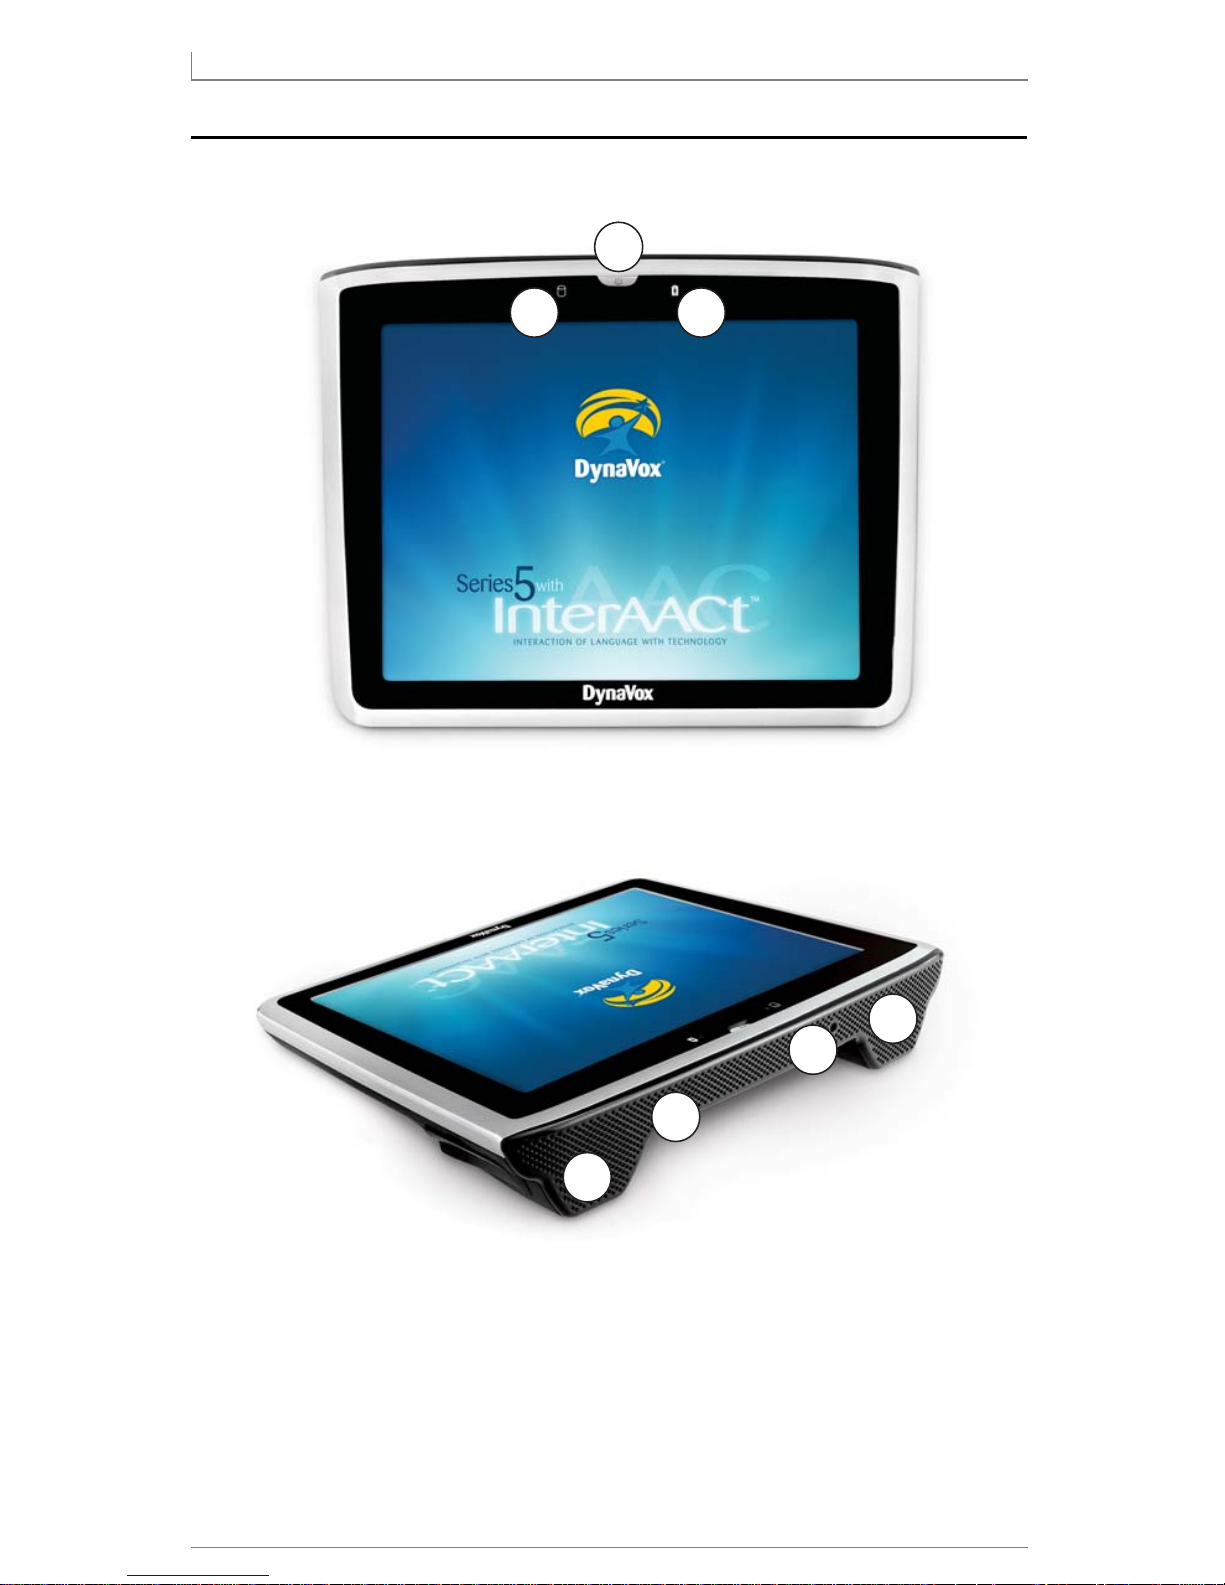
Top:
5
4
6
7
Front:
4 DynaVox
Hardware Overview
This section describes the key features on your Maestro device.
Page 5
NOTE
9
9
8
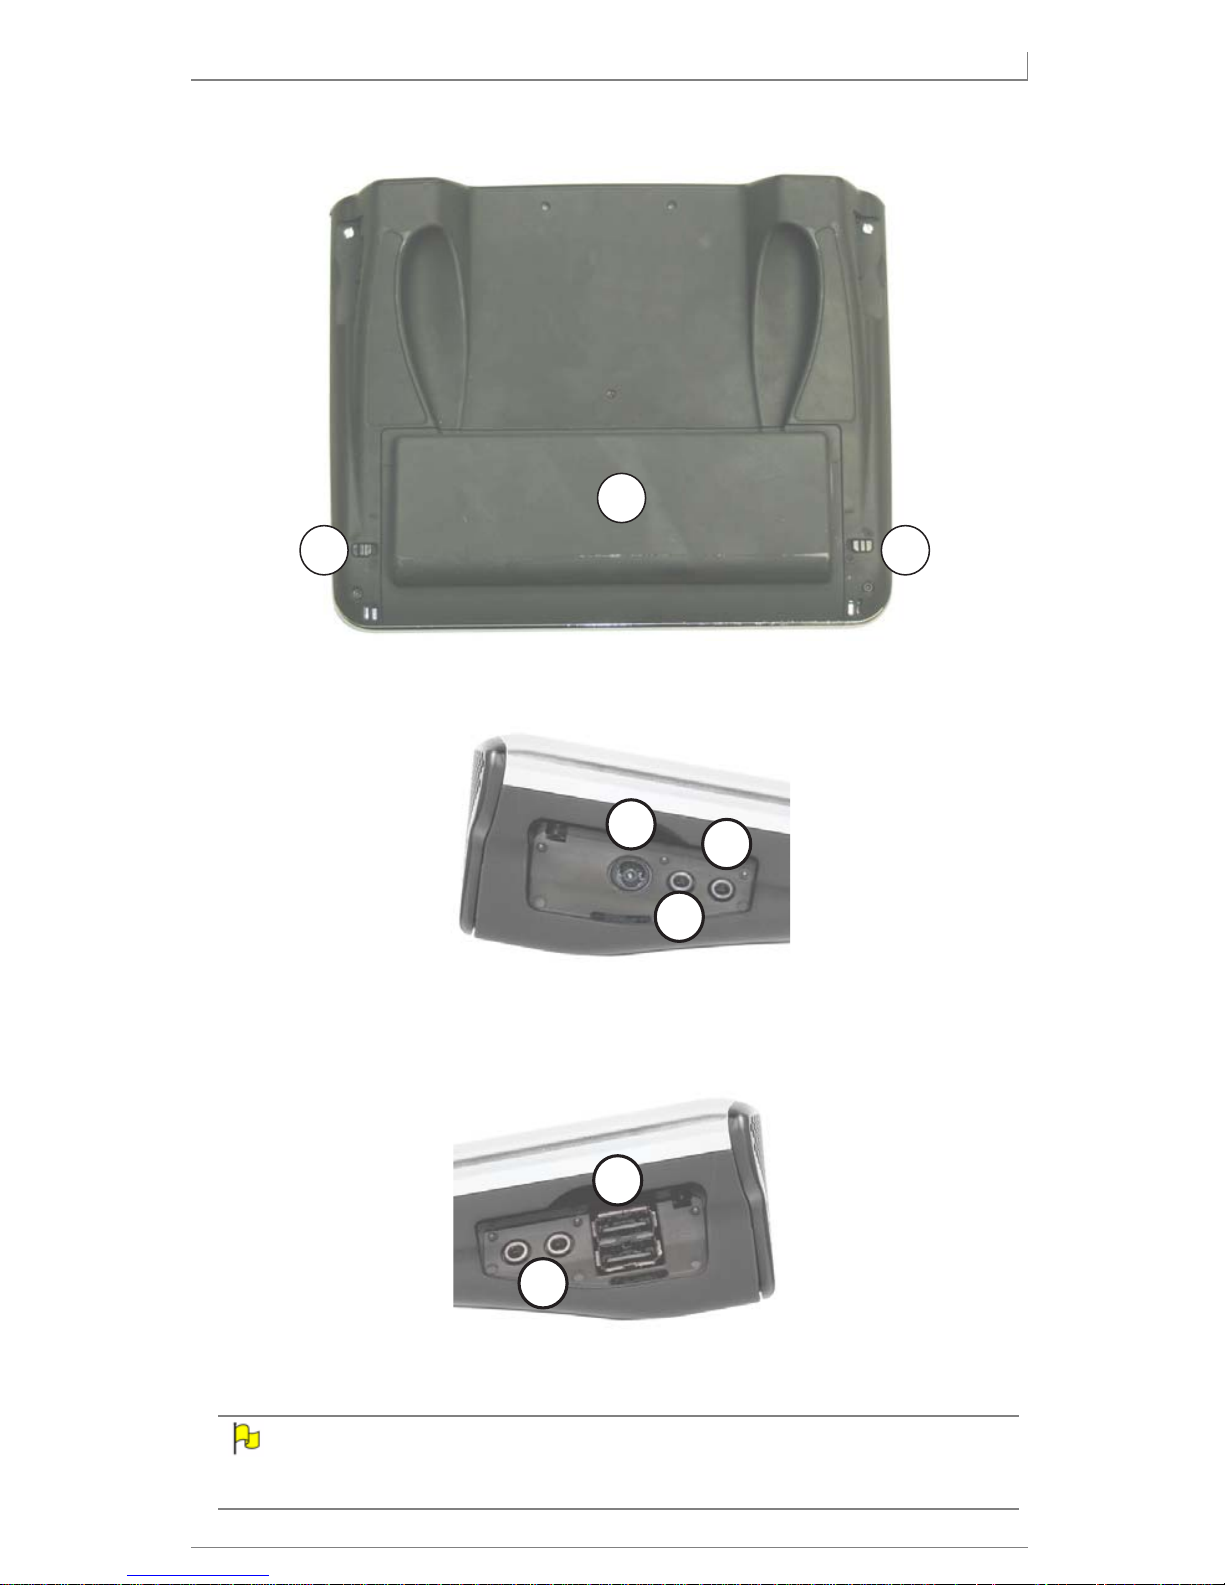
Back:
Left Side Ports:
Right Side Ports:
11
10
12
14
13
Maestro Quick Start Guide 5
The covers on the left and right sides were removed for illustrative
purposes, to show the available ports.
Page 6

6 DynaVox
NOTE
Top:
Front:
Back:
1 Power Button: Press to turn the Maestro on. The button
glows blue when the device is turned on.
(To turn the Maestro off, select Main Menu > Setup >
Setup Menu > Shut Down.)
2 Charging Indicator: Lit when the battery is charging.
Turns off when the battery is fully charged.
3 Hard Drive Indicator: Blinks when accessing the hard
drive.
4 Speakers: Front-firing speakers provide an impressive
range of volume.
5 Infrared Device: Sends & receives IR signals. Use your
Maestro like a universal remote control.
6 Camera: Use for taking custom pictures.
7 Microphone: Use for recording custom sounds.
8Battery: (extended battery pictured here)
Provides power to the Maestro.
9 Battery Buttons: Hold battery in place. Use these to
remove the battery for external charging.
Left Side
Ports:
Right Side
Ports:
10 Charger Port: Plug in the DC adapter/charger to charge
the Maestro battery.
11 Speaker/Headphone Jack: Connect external speaker to
increase volume, or headphones for private audio.
12 Microphone Jack: Connect external microphone for
recording custom sounds.
13 Switch Jacks (2): Connect external switch(es) for
scanning access.
14 USB Ports (2): Connect to any USB-enabled accessory,
such as a USB flash drive ("thumb drive"), a CD/DVD
drive (for file sharing/backup purposes), a USB keyboard,
or a USB mouse.
For ease of use while customizing the Maestro, you may choose to connect
a USB mouse and/or USB keyboard.
Page 7

Maestro Quick Start Guide 7
NOTE
NOTE
NOTE
The touch screen may show "image persistence" if the same image or page
is displayed for four (4) consecutive hours or longer. The visual artifacts
may or may not be noticeable or distracting. They will not cause permanent
damage to the touch screen.
The Series 5 software provides settings and tools to prevent image
persistence. To learn more, launch the Searchable Help and perform a
keyword search on "backlight timeout."
Installing The Battery
Your Maestro came with one of two battery options:
• Slim battery - provides ~3 hours of continuous use
• Extended battery - provides ~9.5 hours of continuous use
These times may vary for actual use.
To install the battery:
1. Lay the Maestro face down on top of a soft cloth on a flat surface.
Before you install the battery, write down the serial number shown on the
back of the Maestro (use the space provided in the How to Get Additional
Help section in this Quick Start Guide). You will need this serial number in
case you need to contact DynaVox Technical Support.
2. Make sure that the 2 battery buttons (p. 5, #9) are in the "outside"
(unlocked) position.
3. Place the battery in the battery well, lining up the small horizontal lines on
the battery with those on either side of the battery well.
4. Slide the battery "up" (towards the front of the Maestro). Make sure that
the battery is in complete contact with the Maestro, along the entire front
wall of the battery well.
5. While holding the battery securely in this position, slide the 2 battery
buttons to the "inside" (locked) position.
After you install the battery, you should charge your Maestro for the time interval
shown below:
• Slim battery - charge for 2 hours
• Extended battery - charge for 4 hours
Page 8

8 DynaVox
REFERENCE
CAUTION
Charging The Battery
When the battery charge is low, a "low battery" icon will appear in
the title bar on the Maestro touch screen. You should plug in your
Maestro and recharge the battery immediately.
1. Connect the power cord to the DC adapter/charger.
2. Plug the adapter into a wall outlet.
3. Plug the charger cord into the charger port (p. 5, #10) on the left side of
your Maestro.
The charging indicator (p. 4, #2) will be lit while the battery is charging. When th e
battery is fully charged, the charging indicator will go out. You can unplug the
charger from the Maestro and from the wall outlet.
You cannot overcharge the battery. It is fine to charge the battery overnight.
You can use the Maestro while the battery is charging.
The Searchable Help lists several ways you can extend the battery life on
your Maestro. To learn more, perform a keyword search on "battery life" or
"low battery."
Due to internal chemical reactions, battery performance may deteriorate
over time. In addition, failure to keep the conditions of use (charge,
discharge, ambient temperature, etc.) within specified ranges may shorten
the battery life expectancy, or damage your Maestro. If the battery cannot
maintain a charge for long periods of time, even when it is charged correctly ,
it may need to be replaced.
Temperature Ranges
For optimal device performance, the Maestro should be kept within the following
temperature ranges:
Activity Temperature Range
Using the Maestro -10°C - 50°C
Charging the Maestro battery 0°C - 50°C
Storing the Maestro -10°C - 50°C
Page 9

Maestro Quick Start Guide 9
CAUTION
Mounting/Transporting Your Maestro
If you use your Maestro device while in a wheelchair, you should have it properly
mounted for both communication and transportation purposes. Wheelchair
mounting systems are available through DynaVox.
Protective and accessible carrying cases are also available for your device and its
accessories. Consult the DynaV ox website (www.dynavoxtech.com) or your
DynaVox sales consultant for more information.
Product Cleaning/Handling
To clean your Maestro, first turn off the unit and then wipe it gently with a damp
cloth or soft paper towel. Y ou may dampen the towel with a mild window cleaner to
remove fingerprints, food particles and dust.
Do not use tape or stickers on either the touch screen or the metal case, as they
are difficult to remove and may damage the device surface. Tape, stickers and
other sticky materials can damage the touch screen and interfere with the
operation of the device.
Be sure to avoid getting your Maestro wet. Never submerge it in water (e.g.,
dishwasher). If your unit accidentally gets wet, be sure to shut it down and allow it
dry thoroughly. If after 24 hours you find that the device seems to function
normally, there is proba bly no damage. If the device fails to function or behaves
abnormally, contact DynaVox Technical Support at 1-800-344-1778 for
instructions. You may need to ship the device to DynaVox for repairs.
Be careful not to drop the unit. Such treatment is not recommended and can
shorten the life of your device.
Do not use a sharp object to make selections on the touch panel, as this can
cause damage. If you need to use a pointer to make selections, be sure that it has
a cushioned tip.
Never, under any circumstances, disassemble your Maestro device. Doing
so for any reason will void the warranty, and you will be responsible for the
cost of any required repairs.
Page 10

10 DynaVox
NOTE
Turning the Maestro On For The First Time
1. Press the Power button (p. 4, #1) to turn the Maestro on. After the software
boots up, you will see the Introductory (Welcome) screen.
If you see a different screen, navigate to the first introductory page. See
User’s Guide: Appendix C for step-by-step instructions.
2. Press Select Here to Continue to move on.
3. Learn about the additional resources available both on the device and in
the box (on CD and/or DVD, in print, etc.). Keep selecting Next to
continue.
After a few screens, the User Setup Wizard will appear. It will help you to quickly
and easily create a .user file - a set of communication pages and other files - and
choose a page set.
4. To begin the User Setup Wizard, select Next.
5. Follow the on-screen prompting from the User Setup Wizard. Some of the
questions you will be asked include:
• what to name the .user file
• personal information about the user (address, hobbies, names of
family members, pets, teachers, clinicians, etc.)
• selecting a speaking voice for the Maestro
Answer each question to the best of your ability.
6. The Confirmation Page of the User Setup Wizard lets you look over (and
change) all of the settings that you previously entered in the User Setup
Wizard. Make any final changes, and then select Save and Exit.
Page 11

Maestro Quick Start Guide 11
REFERENCE
The software will close the User Setup Wizard and open the User Manager
menu. All available .user files (including the one that you just created) will
be listed alphabetically in the viewport on the right.
7. Select the .user that you just
created in the viewport and
then select the Change to
Selected User button.
• If prompted to confirm the
change, select the Yes
button.
• If prompted to keep
languages and/or symbol
sets available, select the
Yes button.
8. Select the Exit DynaVox
button when prompted.
When the software finishes the restart process, the Home Page of your
custom .user file will be active.
The Customized Page Set
The DynaVox Series 5 software used data and feedback from the User Setup
Wizard to choose and customize one of the InterAACt page sets for you. Refer to
Section 3 of the User’s Guide for information on additional page sets.
You are not limited to the page set that was selected by the User Setup
Wizard. Refer to the Searchable Help for information about other page sets
(including how to navigate to a new page set).
Page 12

12 DynaVox
REFERENCE
The Title Bar
The white bar that stretches across the top of the touch screen is the title bar. It
contains tools for using the DynaVox Series 5 software:
The title bar tools are as follows:
Page Back/Page Forward: Move backwards and
forwards through your page history.
Home Page: Return to your designated Home Page
(starting point).
Undo: Undo the most recent action performed in the
Message Window (supports multiple levels of undo).
My Phrases: Provides access to frequently-used
phrases in the My Phrases menu.
Main Menu: Opens a series of drop-down menus that
give you access to all features, menus, and commands.
Modify: Enables you to quickly and easily customize
any selected object on a page or popup.
Describe: Simple help feature that provides a brief
description of the next selected screen element.
Minimize: (open device only) Hide the Series 5
software window on the WIndows Desktop.
Maximize: (open device only) Toggle the Series 5
software window between actual size and full screen.
Close: (open device only) Clo se the DynaV ox software.
(You have a chance to save your changes.)
To find more information about each item in the title bar, open the
Searchable Help and perform a keyword search on “using the title bar
tools."
Page 13

Maestro Quick Start Guide 13
Important Software Menus
Setup Menu
The Setup menu provides easy
access to many aspects of the
device software that you can
customize for your personal
use. You can use the Setup
menu to access the speaking
voice settings, selection
method settings, various
system settings and other
helpful tools that are available
on your device.
T o open the Setup menu, select
Main Menu > Setup > Setup Menu.
Tools Menu
The Tools menu provides
easy access to many
aspects of the device
software that you can
customize for your personal
use. You can use the Tools
menu to access the various
rate enhancement
components, environmental
control features and other
powerful and helpful tools
that are available on your
device.
To open the Tools menu,
select Main Menu >
Setup > Tools Menu.
Page 14

14 DynaVox
REFERENCE
Interface Features Menu
The Interface Features
menu enables you to adjust
or define how certain objects
are presented on the touch
screen. The Interface
Features menu is organized
by tabs, with each tab pane
containing a different group
of controls and options.
To open the Interface
Features menu:
1. Select Main Menu > Setup > Setup Menu. The Setup menu will open.
2. Select the Interface Features button. The Interface Features menu will
open, with the Message Window tab active by default.
Page Navigator Menu
The Page Navigator
menu is the quickest way
to open a new page. You
can search for a page by
name, or look through
the folders on your
device and see preview
images of pages and
popups before opening
them.
To open the Page
Navigator menu, select
Main Menu > Setup >
Page Navigator.
The left viewport displays the available page sets (yellow folders). You can view
the sub-folders by selecting the expansion box [+] to the left of the icon. Select the
folder itself to display its contents in the right viewport. Selecting a page in the
right viewport will display a preview image of the page.
When the Page Navigator menu opens, the active page set and current page are
highlighted in their respective viewports.
For more information on all of these menus, open the Searchable Help and
perform keyword searches, using the menu names.
Page 15

Maestro Quick Start Guide 15
NOTE
Changing the Speaking Voice
1. Select Main Menu > Setup >
Speech Controls. The Speech
Controls menu will open.
2. Select the Language drop-down
menu, and choose the appropriate
language.
3. Select the Manufacturer dropdown menu, and choose one of
the speech engine manufacturer
options.
4. Select the Voice drop-down menu
and select the voice that you want
to use.
If you don’t see the desired voice listed, you may have to change the
Language or Manufacturer settings.
5. Use the Volume slider to adjust the speaking volume. Slide to the left to
make the voice speak more quietly, or slide to the right to make the voice
speak louder.
6. Use the Rate slider to adjust the rate of speech. Slide to the left to slow the
speech down, or slide to the right to speed the speech up.
7. Select T est Voice to check the voice settings. If more adjustments are
necessary, repeat steps 4 - 7.
8. When the speaking voice is set to your liking, select OK.
Page 16

16 DynaVox
REFERENCE
REFERENCE
Making/Editing A Page
There are several ways to create a new page. This Quick Start Guide shows you
how to copy an existing page, make it a new page, and make changes to the
buttons on the new page.
1. Open the page that you want to copy.
2. Select Main Menu > Page Editing > Page Editor.
3. Select Main Menu > File > Save As. The system keyboard will open.
4. Enter the name of the new page and select OK.
You can use the Page Editor to change the new page. For more information
and in-depth explanations of the Page Editor tools, refer to Chapter 10 in
the Searchable Help.
5. To edit the buttons outside of the Page Editor, select File > Exit Page
Editor.
Chapter 6 of the Searchable Help describes the other methods available
for creating pages:
- Using the Quick Page templates
- Using the Page Wizard
- Creating a blank page from scratch
Editing A Button On The New Page
The fastest and most common way to edit a button on a page is to use the Modify
button in the title bar. This will open the Modify Button menu, which provides a
wide array of settings for the button.
1. Select the green Modify button in the title bar. It will turn red.
2. Select the button that you want to modify. The Modify Button menu will
open.
Page 17

Maestro Quick Start Guide 17
3. Use the controls in the Modify
Button menu to change the
appearance and performance
of the button:
• Button type (shape &
function)
• Label & audio cue text
• Color scheme
• Symbol shown on the
button
• Font color, size, and style
• Button behaviors
Assigning Behaviors To A Button
Select the Behaviors button in the Modify Button menu. The Behavior Editor
menu will open.
1. Find a behavior to assign to the button (one of two ways):
• Choose a category from the Behaviors drop-down menu. The
behaviors in that category are shown in the viewport.
• Select Search and enter a word in the behavior name. The software
returns a list of behaviors that match your criteria.
Page 18

18 DynaVox
NOTE
REFERENCE
2. Select the behavior name and then select Add. The behavior appears in
the Steps viewport.
You may be prompted to supply additional information for the behavior (i.e.,
a page name, a text message to speak, etc.). If so, enter that information
and select OK.
3. Select a behavior in the Steps viewport, and then use the buttons on the
right to change the order of behaviors, to edit the additional information for
a behavior, or to remove a behavior from the list.
4. When finished, select the OK button to close all open menus (Behavior
Editor menu, Modify Button menu).
For more information about assigning behaviors to buttons or general page
modifications, see these resources:
- Section 5 of the Users Guide
- Chapter 8, Chapter 10, and Appendix A of the Searchable Help
Page 19

Maestro Quick Start Guide 19
CAUTION
CAUTION
CAUTION
CAUTION
CAUTION
CAUTION
Important Information About Your Device
Your Series 5 device meets all necessary international safety standards and has
been tested to meet IEC 601-1, UL/CSA 60950 and AS/NZ 60950 requirements.
The Series 5 system is considered to be a portable device that is intended for
continuous operation, not intermittent use. This device has electrical input ratings
of 19 VDC/3.1 Amps. The device complies with Part 15, Class B of the FCC
Rules. Operation is subject to the following two conditions: (1) this device may not
cause harmful interference, and (2) this device must accept any interference
received, including interference that may cause undesired operation. The device
is also tested to Canadian standard ICES-003. To ensure safe operation of your
device, you should take care to note the following cautionary items
Your DynaVox Series 5 device contains a Lithium Ion battery. A safety
hazard may develop when the battery is placed in or near fires or stoves,
or in locations with temperatures above 113 degrees F (45 degrees C).
These conditions may cause the battery to generate heat, explode.
:
Do not perforate, disassemble or modify the battery. If you must dispose
of the battery, do so in accordance with the local laws that apply to the
area where you live.
For safe and proper operation of your DynaVox Series 5 device, use only
chargers, batteries and accessories which have been approved by
DynaVox Technologies.
Be sure to disconnect all power sources before changing the battery.
Except for the battery, the DynaVox Series 5 devices contain no userserviceable parts.
This device presents a risk of electrical shock if the metal casing is opened.
Do not open the metal casing that surrounds the device.
The DynaVox Series 5 devices are not suitable for use in the prese nce of
flammable anesthetics.
Page 20

20 DynaVox
When you are charging your DynaVox Series 5 device, rem em be r th at the main
outlet that you will be using to power the adapter must be accessible from within
10 feet (3 meters) of the device. There should be no switches or disconnect
devices in the earth conductor. The Series 5 devices require no routine
maintenance other than a periodic inspection of the power cords for signs of wear
and damage. If the power cords show signs of wear and damage, they should be
replaced.
Intended Use of This Product
Your DynaVox Series 5 device is intended for everyday communication situations.
It should not be relied upon as a means of communicating emergency medical
information. We recommend having multiple ways to communicate information
during a medical emergency.
 Loading...