


Copyright © 2013 DynaVox Systems LLC
All rights reserved. No part of this publication may be r epro duce d, sto red in a ret r ieval syst em , o r tr an smitt ed in an y fo r m, b y
any means (electronic, photocopying, recording , or o the rwise) w ith out t he pr ior wr itten pe rm issio n of th e p ublisher.
Copyright protection claimed includes all for ms an d m atter s of cop yrig htable mate ria l an d infor mat ion allo we d by statutory or
judicial law or hereafter granted, includ ing w itho ut limitation, ma ter ial ge ner a ted f ro m t he softwar e prog r ams wh ich a r e
displayed on the screen such as screen displays, menus, etc.
Although every precaution has been taken in the preparation of this publication, the publisher assumes no responsibility for
errors or omissions.
For information, write to:
In North America:
DynaVox Systems, LLC
2100 Wharton Street, Suite 400
Pittsburgh, Pennsylvania 15203 USA
The European Authorized Representative is:
DynaVox and Mayer-Johnson
Pure Offices
Plato Close
Lower Cape
Tachbrook Park
Leamington Spa
Warwickshire
CV34 6WE
United Kingdom
United Kingdom
DynaVox® is a registered trademark of DynaVox Systems, LLC. DynaVox EyeMax and DynaVox Vmax+ are registered
trademarks of DynaVox Systems LLC.
All other brand and product names men tio ned a re t rade mar ks o r r egist ered tr adem ar ks o f t hei r respe c tive holder s.
Part # 401216-C
Third Edition
Published March 2013
Created in the United States of America
ii DynaVox

Table of Contents
Table of Contents
Chapter 1: Introduction . . . . . . . . . . . . . . . . . . . . . . . . . . . . . . . . . . . . . . . . . . . 1
System Requirements . . . . . . . . . . . . . . . . . . . . . . . . . . . . . . . . . . . . . . . . . . . . . . . . . . . 2
About this User’s Guide . . . . . . . . . . . . . . . . . . . . . . . . . . . . . . . . . . . . . . . . . . . . . . . . . . 2
Emergency Use (Intended Use of This Product) . . . . . . . . . . . . . . . . . . . . . . . . . . . . . . . 3
Physical Strains . . . . . . . . . . . . . . . . . . . . . . . . . . . . . . . . . . . . . . . . . . . . . . . . . . . . . . . . 3
Light Exposure . . . . . . . . . . . . . . . . . . . . . . . . . . . . . . . . . . . . . . . . . . . . . . . . . . . . . . . . . 4
Chapter 2: Hardware Overview . . . . . . . . . . . . . . . . . . . . . . . . . . . . . . . . . . . . . 5
What’s In The Box? . . . . . . . . . . . . . . . . . . . . . . . . . . . . . . . . . . . . . . . . . . . . . . . . . . . . . 5
Hardware Features . . . . . . . . . . . . . . . . . . . . . . . . . . . . . . . . . . . . . . . . . . . . . . . . . . . . . . 6
Front . . . . . . . . . . . . . . . . . . . . . . . . . . . . . . . . . . . . . . . . . . . . . . . . . . . . . . . . . . . . . . 6
Left Side . . . . . . . . . . . . . . . . . . . . . . . . . . . . . . . . . . . . . . . . . . . . . . . . . . . . . . . . . . . 7
Product Care & Handling . . . . . . . . . . . . . . . . . . . . . . . . . . . . . . . . . . . . . . . . . . . . . . . . . 8
Chapter 3: Installation & Setup . . . . . . . . . . . . . . . . . . . . . . . . . . . . . . . . . . . . . 9
Connecting EyeMax to Maestro . . . . . . . . . . . . . . . . . . . . . . . . . . . . . . . . . . . . . . . . . . . . 9
Connecting EyeMax to Vmax . . . . . . . . . . . . . . . . . . . . . . . . . . . . . . . . . . . . . . . . . . . . . 13
Charging the Batteries . . . . . . . . . . . . . . . . . . . . . . . . . . . . . . . . . . . . . . . . . . . . . . . . . . 16
Mounting the EyeMax System . . . . . . . . . . . . . . . . . . . . . . . . . . . . . . . . . . . . . . . . . . . . 18
Proper Mounting Position . . . . . . . . . . . . . . . . . . . . . . . . . . . . . . . . . . . . . . . . . . . . . 18
Eye Track Status Window . . . . . . . . . . . . . . . . . . . . . . . . . . . . . . . . . . . . . . . . . . . . 20
Mounting Options . . . . . . . . . . . . . . . . . . . . . . . . . . . . . . . . . . . . . . . . . . . . . . . . . . . 21
Chapter 4: Series 5 Software Settings. . . . . . . . . . . . . . . . . . . . . . . . . . . . . . . 23
Adjusting the Eye Tracking Selection Method Settings . . . . . . . . . . . . . . . . . . . . . . . . . 23
Modify Zoom Settings . . . . . . . . . . . . . . . . . . . . . . . . . . . . . . . . . . . . . . . . . . . . . . . 29
Modify Highlight Rules Settings . . . . . . . . . . . . . . . . . . . . . . . . . . . . . . . . . . . . . . . . 32
Modify Eye Tracking Assistance Settings . . . . . . . . . . . . . . . . . . . . . . . . . . . . . . . . 34
Modify Advanced Eye Tracking Settings . . . . . . . . . . . . . . . . . . . . . . . . . . . . . . . . . 37
Modify Eye Tracking Calibration Settings . . . . . . . . . . . . . . . . . . . . . . . . . . . . . . . . 39
Modify Additional Desktop Settings (Open Devices Only) . . . . . . . . . . . . . . . . . . . . 42
Using Hotspots . . . . . . . . . . . . . . . . . . . . . . . . . . . . . . . . . . . . . . . . . . . . . . . . . . . . . . . . 44
Using the Dashboard Hotspot . . . . . . . . . . . . . . . . . . . . . . . . . . . . . . . . . . . . . . . . . 46
Using the Pause Selection Hotspot . . . . . . . . . . . . . . . . . . . . . . . . . . . . . . . . . . . . . 48
Using the Zoom Hotspot . . . . . . . . . . . . . . . . . . . . . . . . . . . . . . . . . . . . . . . . . . . . . 49
Define the Hotspot Settings . . . . . . . . . . . . . . . . . . . . . . . . . . . . . . . . . . . . . . . . . . . 50
Speak Button in the Message Window . . . . . . . . . . . . . . . . . . . . . . . . . . . . . . . . . . . . . . 53
Define the Speak Button Settings . . . . . . . . . . . . . . . . . . . . . . . . . . . . . . . . . . . . . . 53
EyeMax User’s Guide iii
Part # 401216-C

Table of Contents
Chapter 5: Calibration . . . . . . . . . . . . . . . . . . . . . . . . . . . . . . . . . . . . . . . . . . . 55
General Calibration Notes . . . . . . . . . . . . . . . . . . . . . . . . . . . . . . . . . . . . . . . . . . . . . . . 55
Calibrate Eye Tracking (via Eye Tracking Dashboard) . . . . . . . . . . . . . . . . . . . . . . . . . . 56
Calibrate Eye Tracking (via System Menus) . . . . . . . . . . . . . . . . . . . . . . . . . . . . . . . . . . 58
Chapter 6: Navigator User . . . . . . . . . . . . . . . . . . . . . . . . . . . . . . . . . . . . . . . . 59
Navigator Introduction . . . . . . . . . . . . . . . . . . . . . . . . . . . . . . . . . . . . . . . . . . . . . . . . . . 59
Select a Keyboard Layout . . . . . . . . . . . . . . . . . . . . . . . . . . . . . . . . . . . . . . . . . . . . . . . 61
Navigator Main Page . . . . . . . . . . . . . . . . . . . . . . . . . . . . . . . . . . . . . . . . . . . . . . . . . . . 63
Opening the Navigator User . . . . . . . . . . . . . . . . . . . . . . . . . . . . . . . . . . . . . . . . . . . 65
Chapter 7: Troubleshooting. . . . . . . . . . . . . . . . . . . . . . . . . . . . . . . . . . . . . . . 67
Calibration Issues . . . . . . . . . . . . . . . . . . . . . . . . . . . . . . . . . . . . . . . . . . . . . . . . . . . . . . 67
General Issues . . . . . . . . . . . . . . . . . . . . . . . . . . . . . . . . . . . . . . . . . . . . . . . . . . . . . . . . 69
iv DynaVox

1
Maestro with EyeMax
Vmax+ with EyeMax
This document describes the installation and use of the DynaVox EyeMax for eye tracking.
The EyeMax enables a user to make selections by fixing his or her gaze at specific objects on
the device screen. Once the EyeMax is properly connected and calibrated, conversation,
environmental control, and even email and the Internet are only a blink (or gaze) away.
Be sure to read through the step-by-step instructions in this document to learn the proper
installation methods and ways to customize the software to best suit the needs and
capabilities of the device user.
DYNAVOX EYEMAX SYSTEM OPTIONS
Introduction
EyeMax User’s Guide 1
Part # 401216-C

Chapter 1: Introduction
NOTE
NOTE
CAUTION
REFERENCE
SYSTEM REQUIREMENTS
In order to use the EyeMax properly, you must have the following:
• DynaVox speech generating device. The EyeMax connects to two different models of
speech generating device:
• DynaVox Maestro
• DynaVox Vmax+ Dual Core
See the picture on the previous page for reference.
• DynaVox Series 5 Software: No matter if you use a Maestro or a Vmax+, your speech
generating device must be running version 1.07.2 (or later) of the Series 5 Software.
• Mounting system. The EyeMax System (EyeMax + speech generating device) is not a
hand-held system. It must be securely mounted for proper positioning.
ABOUT THIS USER’S GUIDE
This document contains descriptions of and instructions for performing the basic operations of
your EyeMax. Throughout the text, you will find the following kinds of comments:
This document offers notes on making the most of your communication system. These notes are
designed to highlight features that can be used to make the device a better fit for an individual
user, or point out other important considerations.
Y ou should always be sure to read the notes beside the caution symbol. These notes contain very
important information to help you use your DynaVox hardware safely, and to prevent device
damage and loss of information.
Many of the topics in this document are explained in more detail in the Series 5 Searchable Help
that can be launched on your Maestro/Vmax (or the CD and/or DVD that came with your Maestro/
Vmax). The reference notations include a key word or phrase that can be used to quickly find the
topic in the Searchable Help.
2 DynaVox

EMERGENCY USE (INTENDED USE OF THIS PRODUCT)
CAUTION
The Maestro/Vmax and EyeMax are intended for everyday communication situations. They
should not be relied upon as a means of communicating emergency medical information. We
recommend having multiple ways to communicate information during a medical emergency.
The EyeMax emits infrared light, which may interfere with infrared-controlled devices. Do not use
the EyeMax in the same room with any infrared-controlled device if device failure could affect the
safety or health of the user.
PHYSICAL STRAINS
Chapter 1: Introduction
There are two types of strain that can occur from using any kind of eye tracking device: neck
strain and eye strain. This is true for using computer monitors as well. Recommendations for
alleviating such ‘monitor eye strain’ may be found by browsing to this Web site:
www.mayoclinic.com/health/eyestrain/WL00060.
If, at any time, you notice discomfort, pain, or fatigue in either your neck or your eyes, stop
using the EyeMax and rest until you feel well again.
The length of time that the EyeMax can be used before feeling strain or fatigue will vary from
person to person. You should listen to your body and rest when it tells you.
Trying out the EyeMax may initially be fa tiguin g to new use rs. This may be because the y tend
to strain their eyes to reach and concentrate upon each target. A typical user will quickly grow
accustomed to the eye tracking process, and use of the system will soon become less
fatiguing.
EyeMax User’s Guide 3
Part # 401216-C

Chapter 1: Introduction
LIGHT EXPOSURE
The EyeMax contains light-emitting diodes (LEDs) that emit light in the near-infrared spectra.
This type of infrared (IR) light occurs naturally in sunlight and also in light from incandescent
lamps.
Several national and international organizations provide guidelines for human exposure to
optical radiation, and recommend exposure limits for the eye and skin. The most prominent
are: the American Conference of Governmental Industrial Hygienists (ACGIH)1-2 in North
America, and the International Commission for Non-Ionizing Radiation Protection (ICNIRP,
1997). In the European Union, there is an Optical Radiation Directive that employs the ICNIRP
exposure limits in the workplace. Other organizations recommend product-safety emission
limits (ANSI, 2005, 2000, 2007; CIE, 2002; CENELEC, 2002; IEC, 2007; CDRH, 1995).
Currently, there are two sets of product safety standards that apply to the use of lamps—
including solid-state lamps (LEDs) worldwide. These are:
• The CIE Lamp Safety Standard: CIE Standar d S009/E-2002, Photobiological Safety of
Lamps and Lamp Systems.
• The EN 60825-1 Laser Product Safety Standard
The maximum level possible with the EyeMax in any setting ne ve r ge ts close to the em issio n
limits set by these standards. A person using the EyeMax during regular oper ation is exposed
to less than 0.1% of the accepted long-time exposure according to EN 60825-1/A1-A2. This
exposure is also well within the safety guidelines given in the book, 1996 TLVs and BEIs, by
the American Conference of Governmental Industrial Hygienists.
4 DynaVox

Hardware Overview
2
This section describes the physical features of the EyeMax, including each of the items in the
shipping box. It also identifies each part of the device and its purpose, and also contains tips
on properly handling and cleaning the EyeMax.
WHAT’S IN THE BOX?
When you open the EyeMax box, carefully remove the EyeMax and other items. Make sure
that you have received all of the accessories that ship with the EyeMax:
• Single sheet describing the contents of the box (EyeMax and accessories)
• Allen Wrench: for removing the support leg fr om the Vmax and inst alling the hand le for the
EyeMax (Vmax kit only)
• EyeMax Handle: a metal handle to make it easier to carry the DynaVox EyeMax System
and help when removing the system from a mount
• EyeMax: the EyeMax itself (If you are using the EyeMax with a Vmax, the EyeMax will
already be mounted to a Vmax battery door)
• USB cable (already connected to the EyeMax)
• Power transfer cable (already connec te d to the EyeM ax)
• EyeMax power supply/charger
• EyeMax User’s Guide (this document)
EyeMax User’s Guide 5
Part # 401216-C
Chapter 2: Hardware Overview
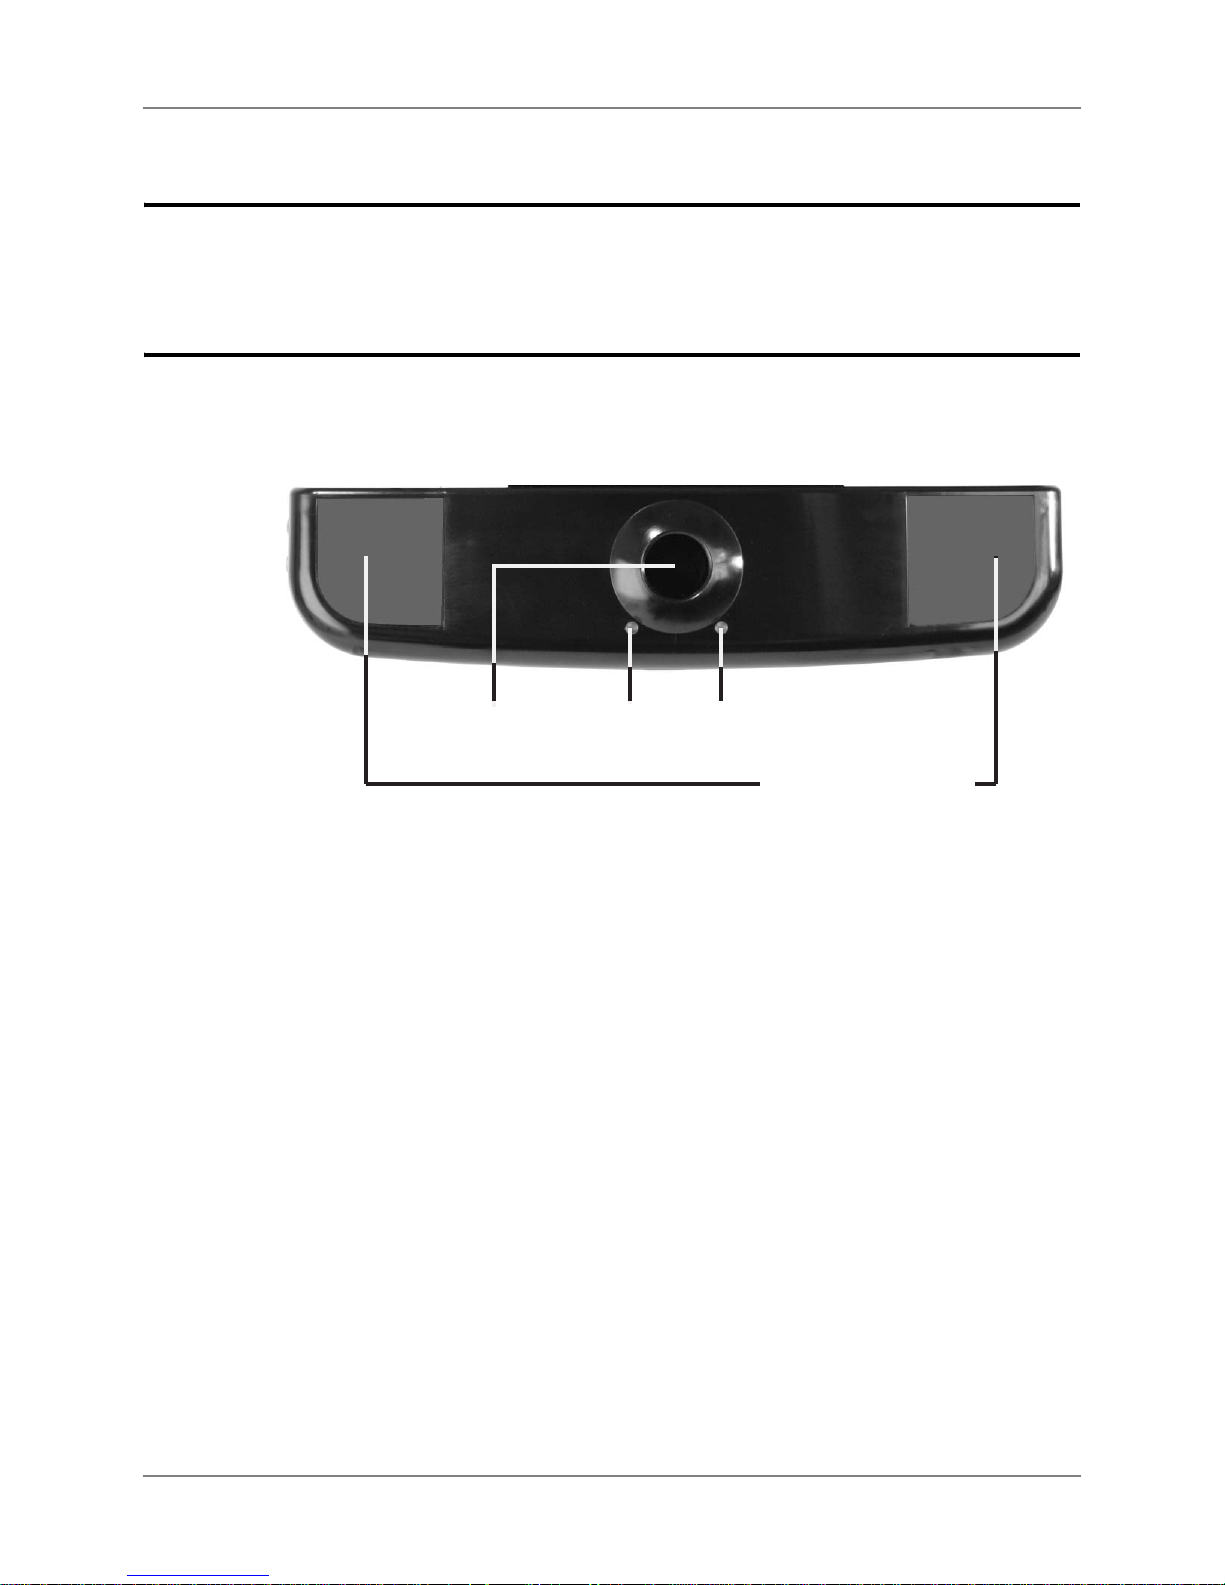
Infrared Transmitters
Camera
Eye Lock LEDs
HARDWARE FEATURES
This section describes the physical features of the EyeMax.
Front
The front of the EyeMax contains the following features:
EYEMAX - FRONT
• Camera: The camera is mounted in the center of the EyeMax. It works with the IR
transmitters to track the movement of the us er’s eyes.
• Eye Lock LEDs: These green LEDs will light up when the EyeMax has a lock on the
position of the user’s eye.
• Infrared Transmitters: An IR transmitter is located on each side of the EyeMax. Thes e
transmitters help the camera track the movement of the user’s eyes.
6 DynaVox

Left Side
NOTE
Charger Port
Power Out Port
USB Port
Power Indicator
Charging Indicator
Chapter 2: Hardware Overview
The left side of the EyeMax contains a variety of connector port s that you can use to conne ct it
to your Maestro/Vmax. It also contains power and charging indicators. Refer to the picture
below:
EYEMAX - LEFT SIDE (ATTACHED TO VMAX)
•Power Out Port: This port connects to the charger port of the Maestro/Vmax. It supplies
power to the Maestro/Vmax when both batteries are being charged.
• USB Port: This port connects to one of the USB ports on your Maestro/Vmax.
•Charger Port: This port connects to the charger that was shipped with your EyeMax.
• Power Indicator: This green LED will light up when the EyeMax is powered on.
• Charging Indicator: This amber LED will light up when you are charging the batteries of
the EyeMax and Maestro/Vmax. When both batteries are fully charged, the LED will go
out.
If the charging indicator LED blinks, that means that the EyeMax battery is low, and should be
charged immediately. Refer to Charging the Batteries on page 16 for step-by-step instructions.
EyeMax User’s Guide 7
Part # 401216-C

Chapter 2: Hardware Overview
CAUTION
PRODUCT CARE & HANDLING
To clean your Maestro/Vmax and EyeMax, first turn the Maestro/Vmax off and then wipe all
the hardware gently with a damp cloth or soft paper towel. You may dampen the towel with a
mild window cleaner to remove fingerprints, food particles, and dust.
Do not use tape or stickers on the Maestro/Vmax touch screen or on any of the plastic cases.
Additionally, do not cover the glass over the EyeMax camera or either of the infrared
transmitters. They are difficult to remove a nd may damage the device surfaces. Tape, stickers
and other sticky materials can damage the touch screen and interfer e with the operation of th e
devices.
Be sure to avoid getting any of your DynaVox devices wet. Never submerge them in water ( for
example, in dishwater). If your devices accidentally get wet, shut them down immediately and
allow them to dry thoroughly. If after 24 hours you find that the devices seem to function
normally, there is probably no damage. If the devices fail to function or behave abnormally,
contact DynaVox Technical Support:
• US and Canada - Monday through Friday, 8:00 a.m. until 7:00 p.m. (Eastern Standard
Time): 1-800-344-1778.
• UK and Ireland - Monday through Friday, 8:30 a.m. until midnight: +44 (0) 1926 516250.
• Other European Countries, Asia Pacific, and the Middle East: please call the dealer from
whom you purchased your device.
You may need to ship the devices to DynaVox for repairs.
Never, under any circumstances, disassemble any of your DynaV ox hardware - Maestro, Vmax, or
EyeMax. Doing so for any reason will void the warranty, and you will be responsible for the cost of
any required repairs.
8 DynaVox
Installation & Setup
NOTE
REFERENCE
NOTE
NOTE
3
This section describes how to properly attach and connect the EyeMax to your DynaVox
device (Maestro or Vmax).
Since the device mount and mounting plate may be shipped separately, you may receive your
EyeMax kit from DynaVox before you receive the mount. If that is the case, the caregiver can still
connect the EyeMax to your Maestro/Vmax, charge the batteries, and begin to get familiar with
the Series 5 software. However, the entire system (EyeMax + Maestro/Vmax) must be properly
mounted before it can truly be put into use.
CONNECTING EYEMAX TO MAESTRO
If you want to connect your EyeMax to a Vmax device, see Connecting EyeMax to Vmax on
page 13.
Installing the Maestro Battery
When your Maestro is shipped, the battery is not installed. Before you can turn on your
Maestro (or connect the EyeMax and its bracket), you must install the ba ttery.
If your Maestro battery is already installed, skip to Connecting the Bracket, EyeMax, &
Mounting Plate on page11.
1. Lay the Maestro face down on top of a soft cloth on a flat surface.
Before you install the battery, write down the serial number shown on the back of the Maestro (use
the space provided in the How to Get Additional Help section the Quick Start Guide that
shipped with your Maestro). Y ou will need this serial number in case you need to contact DynaV ox
Technical Support.
EyeMax User’s Guide 9
Part # 401216-C
Chapter 3: Installation & Setup
Battery
Buttons
2. Make sure that the 2 battery buttons (p. 5, #9) are in the "outside" (unlocked) position.
MAESTRO BATTERY BUTTONS
3. Place the battery in the battery well, lining up the small horizont al lin es on the ba ttery with
those on either side of the battery well.
4. Slide the battery "up" (towards the front of the Maestro). Make sure that the battery is in
complete contact with the Maestro, along the entire front wall of the battery well.
5. While holding the battery securely in this position, slide the 2 battery buttons to the "inside"
(locked) position.
10 DynaVox

Connecting the Bracket, EyeMax, & Mounting Plate
1. With the Maestro laying screen down (on a sof t cloth), place the bracket on the back of the
Maestro. Use a Phillips-head screwdriver to tighten the screw in the center of the device,
just above the battery (circled in the picture below).
BRACKET ON BACK OF MAESTRO
Chapter 3: Installation & Setup
2. Connect the EyeMax to the bracket, below the Maestro. Use a Phillips-head screwdriver
to tighten the 4 screws in the back of the EyeMax (circled in the picture below).
EYEMAX CONNECTED TO BRACKET
3. Connect the mounting plate to the bracket, just below the handle. Use a Phillips-head
screwdriver to tighten the 2 screws at the top of the mounting plate (circled in the picture
below).
EyeMax User’s Guide 11
Part # 401216-C

Chapter 3: Installation & Setup
Maestro
USB Port
EyeMax
USB Port
Maestro
Charger Port
EyeMax
Power Out
Port
MOUNTING PLATE (EXAMPLE) CONNECTED TO BRACKET
Making the Power & USB Connections - EyeMax to Maestro
1. Connect the cable coming from the USB port on the EyeMax to one of the USB ports on
the right side of your Maestro (as indicated in the picture be low).
2. Connect the cable coming from the Power Out port on the EyeMax to the charger port on
your Maestro (as indicated in the picture below).
POWER & USB CONNECTIONS BETWEEN EYEMAX & MAESTRO
Now that the EyeMax and the Maestro have been connected, you can charge the batteries in
both devices. You should charge the batteries for at least 4 hours before turning the Maestro
on (see Charging the Batteries on page 16).
12 DynaVox

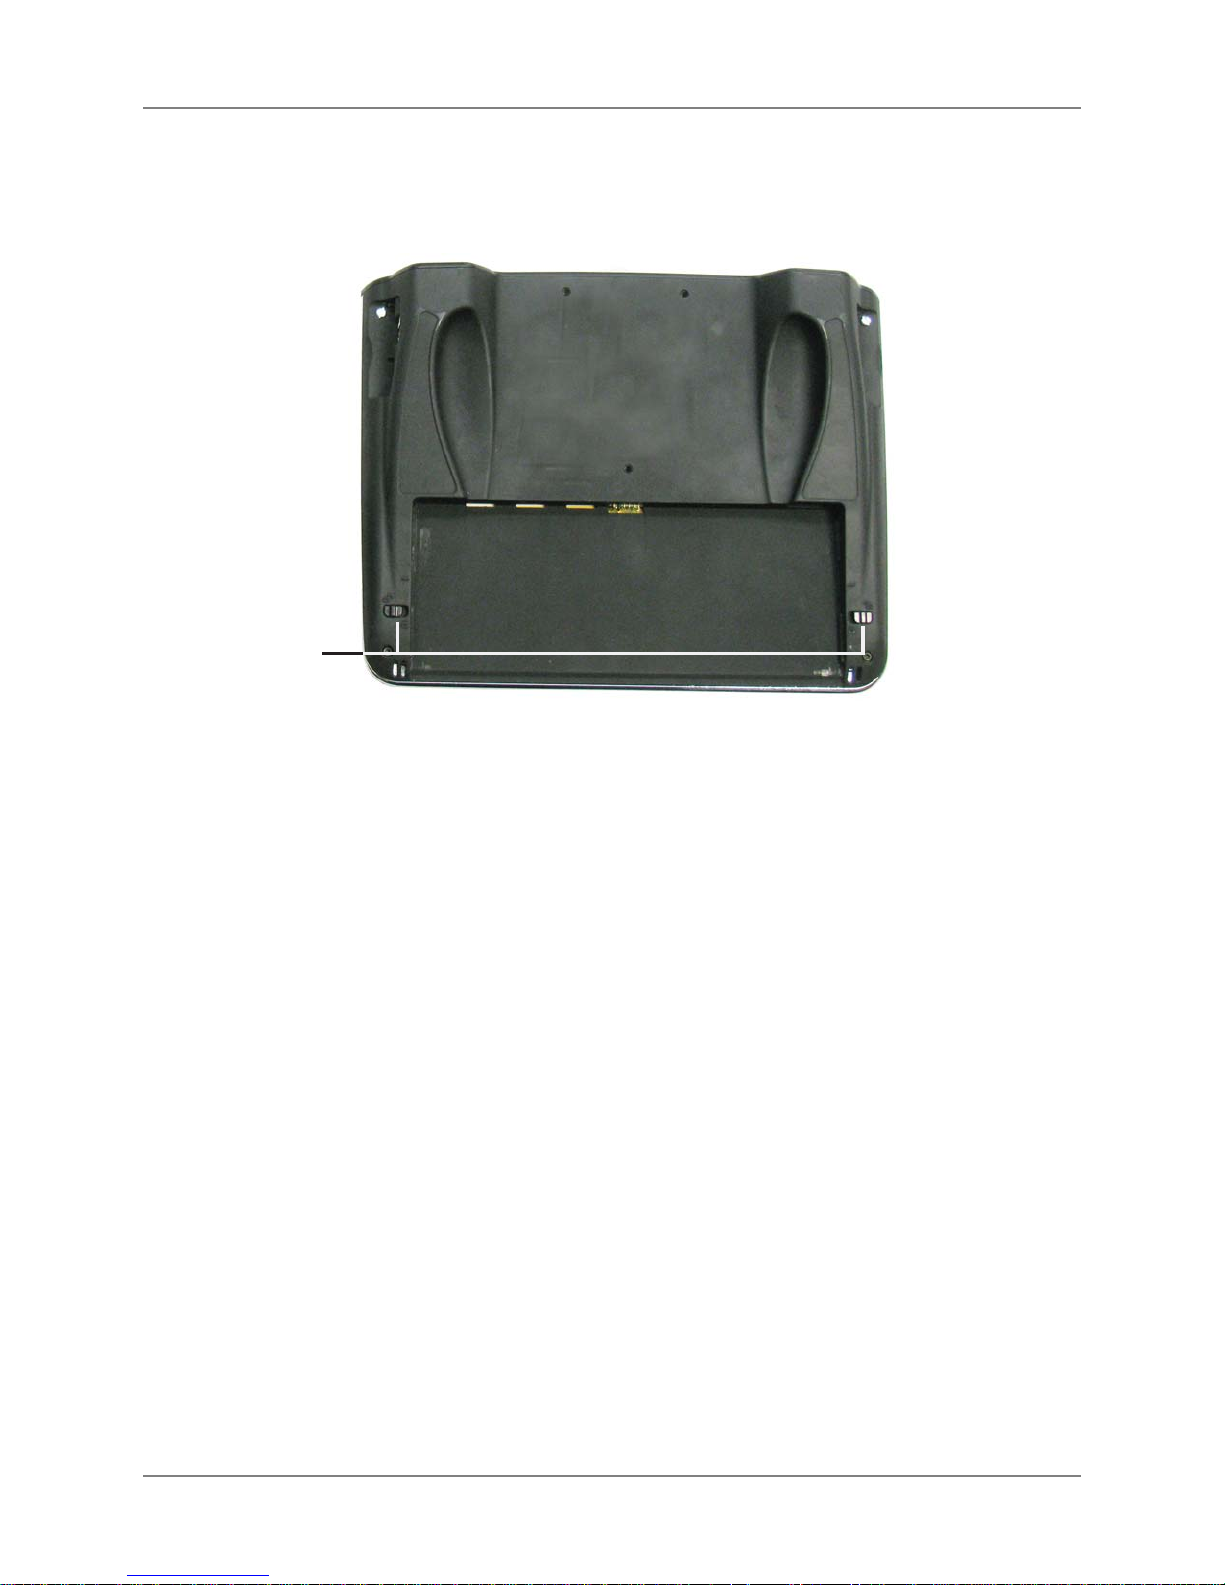
CONNECTING EYEMAX TO VMAX
REFERENCE
NOTE
Battery
Door
Screws
If you want to connect your EyeMax to a Maestro device, see Connecting EyeMax to Maestro
on page 9.
Installing/Replacing the Vmax Battery
When your Vmax is shipped, the battery is not installed. Before you can turn on your Vmax,
you must install and charge the battery.
You may also follow the steps below if you need to replace the battery in your device with a new
battery from DynaVox Technologies. If the battery in your Vmax becomes unable to maintain
power after being charged, it could need to be replaced. You can order a replacement battery by
contacting DynaVox Customer Service/Sales Support.
Chapter 3: Installation & Setup
To install (or replace) the battery in your Vmax:
1. If you are replacing a battery, turn the device off and, if necessary, disconnect the charger.
2. Lay your device face down on top of a soft cloth on a flat surface. You should be looking at
the support leg and the battery door on the back of the device.
3. Extend the support leg to uncover the battery door.
4. Using a flat-head screwdriver (or a coin), loosen the two screws that hold on the battery
door by turning them to the left (counter-clockwise). The screws cannot be removed
completely; when they are loose, they will spring up slightly from the battery door.
VMAX BATTERY DOOR SCREWS (SUPPORT LEG NOT SHOWN)
EyeMax User’s Guide 13
Part # 401216-C

Chapter 3: Installation & Setup
NOTE
NOTE
5. Lift the battery door away from the device’s case and put it in a safe place (you will need it
again if you ever disconnect the EyeMax from your Vmax).
If you are replacing the current battery, lift it out of the battery well and set it aside.
6. Locate the connector slots on the bottom of the battery and the connector in the lef t side of
the battery well on the device case. Then, place the battery into the device case so that
the connectors fit together. The battery should lie flat in the battery well.
At this point, you must connect the battery door that is attached to the EyeMax, and make the
necessary cable connections between the two devices. Continue with Connect ing EyeMax to
Vmax on page 14.
Connecting EyeMax to Vmax
The EyeMax is already attached to a replacement battery door for your Vmax. After you have
installed the battery, you should set aside the original battery door that came with the Vmax,
and attach the replacement battery door with the EyeMax.
After the battery door is in place, you can then make the necessary cable connections
between your EyeMax and your Vmax.
These instructions pick up where Installing/Replacing the Vmax Bat tery on p age 13 left off.
To continue:
1. Place the EyeMax battery door on your Vmax and tighten the screws by turning them
clockwise (to the right). You should only have to turn them a quarter-turn or half-turn.
After you replace the battery door, make a note of both your Vmax’s serial number, and the
EyeMax’s serial number. They are printed on the label on the battery door. Pull the Vmax+ Quick
Start guide out of the Vmax shipping box, and write the two serial numbers in the space provided
on the last page. This information will be handy if you ever need to contact DynaVox Technical
Support about your Vmax or your EyeMax. You will also need to write the Vmax serial number on
the registration card. Set the registration card aside. You can fill it out while the battery is charging.
2. If you plan to keep the EyeMax connected to your Vmax for an ex tended per iod, complete
this step. (If you plan to disconnect the EyeMax after a brief period, proceed to step 3.)
a. Use the supplied Allen wrench to loosen the black plastic “feet” that hold the support
leg in place on the back of the Vmax.
b. Remove the feet and set them aside.
c. Lift the support leg away from the Vmax and set it asid e.
d. Place the supplied metal handle in the grooves that originally held the suppo rt leg.
e. Replace the black plastic “fee t” to hold th e handle in place.
f. Unclasp the nylon handle on the bottom of the Vmax, and remove both halves from
the strap attachment points (once the EyeMax is installed, this handle is not needed).
14 DynaVox

Making the Power & USB Connections - EyeMax to Vmax
USB Port Power Out Port
Charger Port USB Port
1. Connect the cable coming from the USB port on the EyeMax to one of the USB ports on
the left side of your Vmax (as indicated in the picture below).
2. Connect the cable coming from the Power Out port on the EyeMax to the charger port on
the Vmax (as indicated in the picture below).
POWER & USB CONNECTIONS BETWEEN EYEMAX & VMAX
Chapter 3: Installation & Setup
Now that the EyeMax and the Vmax have been connected, you can charge the batteries in
both devices. You should charge the batteries for at least 4 hours before turning the Vmax on
(see Charging the Batteries on page 16).
EyeMax User’s Guide 15
Part # 401216-C

Chapter 3: Installation & Setup
NOTE
NOTE
CHARGING THE BATTERIES
Each of the DynaVox devices (Maestro/Vmax and EyeMax) has an internal battery, and they
must all be charged. It can take up to 4 hours to completely charge the batteries. There are
three things to remember about these batteries:
• They will both charge at the same time.
• You cannot overcharge the batteries. You can leave the charger plugged in continuously,
and this will not harm the batteries in any way.
• You can still use the EyeMax system to communicate while the batteries are charging.
When your Maestro/Vmax battery begins to run out of power, the low battery icon will appear
on the right side of the title bar on the touchscreen (refer to the picture below). If you see this
icon, you should plug in your device to conserve the remaining power, and you should
recharge the batteries as soon as possible. The icon will remain visible until the batteries are
recharged.
LOW BATTERY ICON IN THE TITLE BAR
If the EyeMax battery begins to run out of power, the charging indicator LED on the left side of the
EyeMax will blink (see Left Side on page 7). You should recharge the batteries as soon as
possible.
If the batteries completely run out of power, your DynaVox devices will automatically shut
down. Any unsaved programming will be automatically saved before the devices shut down.
You will need to either charge the batteries or plug in the charger before you can turn the
devices on again.
It is important to make sure that you use the EyeMax power supply/charger that shipped in the
EyeMax box. The Maestro/Vmax charger will not work with the EyeMax.
To charge the device’s battery:
1. The EyeMax power supply/charger is shipped in two pieces – the power cord and the DC
adapter . Connect these two pieces.
2. Plug the charger jack into the charger port on the left side of the EyeMax.
16 DynaVox

EYEMAX CHARGER PORT AND CHARGING INDICATOR
CAUTION
NOTE
Charger Port
Charging Indicator
Chapter 3: Installation & Setup
Never connect any other power adapter to your EyeMax. Doing so could cause serious damage to
your device.
3. Plug the adapter into an electrical outlet.
4. When the batteries are charging, the amber charging indicators will light up. These
indicators are located just above the touch screen on your Maestro/Vmax and on the left
side of the EyeMax.
5. When the batteries are fully charged, the charging indicators will go out. You may unplug
the charger jack from the EyeMax and unp lug the adapter from the electrical outlet.
You can use the devices while they are charging. You cannot overcharge the batteries, so do not
be concerned about leaving the devices plugged in overnight.
EyeMax User’s Guide 17
Part # 401216-C

Chapter 3: Installation & Setup
NOTE
NOTE
MOUNTING THE EYEMAX SYSTEM
The EyeMax System (Maestro/Vmax and EyeMax) must be mounted at the appropriate
distance from and angle to the user in order to work properly.
If you are connecting your EyeMax to a Vmax, you should remove the support leg from the back of
the Vmax if you intend to keep the EyeMax attached to it for a long time. Refer to Installing/
Replacing the Vmax Battery on page 13.
Proper Mounting Position
The following specifications describe the “proper mounting” of the EyeMax System:
•Distance: 17 - 28 inches from the user’s face (20 - 24 inches is the “optimal distance”)
• Angle: parallel to the user’s face
• Tilt: tilted to match the user’s head position
The number of different head positions the user has throughout the day should be an important
consideration when considering mounting components and options.
To set the proper height for the Maestro/Vmax: imagine a line, perpendicular to the user’s
face, extending out from the user’s eye. This line should intersect the top of the Maestro/Vmax
touch screen. Refer to the diagram below.
GUIDELINES FOR PROPER HEIGHT, DISTANCE, AND ANGLE SETTINGS
Make sure that the user’s eyes are approximately 17 - 28 inches away from the Maestro/Vmax
touch screen. This is the acceptable distance for pr oper focus of the Eye Max (20 - 24 inches is
the “optimal distance”).
18 DynaVox

Chapter 3: Installation & Setup
NOTE
NOTE
If the user is wearing glasses, positioning the MaestroVmax below the user’s eyeline may help to
reduce the possibility of glare reflecting off of the glasses’ lenses. Refer to the alternate angle
diagram below as a guideline. You should adjust the height and the tilt of the device to best suit
the user’s needs.
ALTERNATE ANGLE FOR USERS WITH GLASSES
For users leaning to the side, it is helpful to t ilt the EyeMax System sideways as well . Rotating
the EyeMax System to match the user’s head angle will greatly increase the allowed head
movement.
PROPER TILT DIAGRAM
The mount that you choose should be easily adjustable for situations when the user or the
EyeMax System frequently need to change position.
EyeMax User’s Guide 19
Part # 401216-C
 Loading...