

Dyna-Glo RMC- 95C6, RMC- 95C6B, WK95C6R Owner's Manual
PORTABLE
K EROSE N E -HE AT E R
“OWNER’S MANUAL”
MODEL : RMC- 95C6
RMC- 95C6B
Before the first use of this heater, please read this OWNER'S MANUAL very
carefully. This OWNER'S MANUAL has been designed to instruct you as to the
proper manner in which to assemble the heater, maintain the heater, store the
heater, and most importantly, how to operate the heater in a safe and efficient
manner, please keep this manual for future reference.
GHP Group, Inc.,
Niles, IL 60714-3302, USA
TELEPHONE : 1-877-447-4768
4221- 0082-00
05/13 Rev. 06
1
NEVER LEAVE THE HEATER
UNATTENDED WHILE BURNING!
CAUTIONS
- SAFETY GUIDE -
WARNING!! RISK OF EXPLOSION / RISK OF FIRE
! NEVER use any fuel other than water-clear 1-K
kerosene or red dyed 1-K kerosene.
! NEVER
use fuel such as gasoline, benzene, paint
thinners or other oil compounds in this heater.
! NEVER
refill heater fuel tank when heater is operating
or still hot.
! NEVER
use heater in areas where flammable vapors
or gases may be present.
! NEVER fill heater fuel tank in living space; fill tank
outdoors.
! NEVER
store or transport kerosene in other than a
metal or plastic container that is (1)
acceptable for kerosene, (2) non-red in color,
and (3) clearly marked “Kerosene”. NEVER
store kerosene in the living space; kerosene
should be stored in a well ventilated place
outside the living area.
! The unit is EXTREMELY HOT while in operation.
Due to high surface temperatures, keep children,
clothing, furniture, and other combustible objects at
least 36
away from top and front area.
!
RISK OF INDOOR AIR POLLUTION
USE HEATER ONLY IN WELL VENTILATED
AREAS.
People with breathing problems should consult a
physician before using the heater. In a house of typical
construction, that is, one that is not of unusually tight
construction due to heavy insulation and tight seals
against air infiltration, an adequate supply of air for
combustion and ventilation is provided through infiltration;
however, if the heater is used in a small room where less
than 200 cubic feet (5.7 m of air space is provided for each
1,000 BTU per hour of heater rating (considering the
maximum burner adjustment), the door(s) to adjacent
room(s) should be kept open or the window to the outside
should be opened at least 1 inch (25.4 mm) to guard
against potential buildup of indoor air pollution. DO NOT
use the heater in a bathroom or any other small room with
the door closed.
! NEVER use heater to heat or boil water or use as a
cooking appliance.
WARNING!!
FAILURE TO INSTALL, MAINTAIN, AND/OR
OPERATE THIS KEROSENE HEATER ACCORDING
TO MANUFACTURER’S INSTRUCTIONS MAY
RESULT IN CONDITIONS WHICH CAN PRODUCE
BODILY INJURY AND/OR PROPERTY DAMAGE.
NOTE: The WARNING and IMPORTANT instructions
appearing in this manual are not meant to cover all
possible conditions and situations that may occur. It must
be understood that common sense, caution, and
carefulness are factors which cannot be built into this
heater. These factors must be supplied by the person(s)
installing, maintaining, or operating the kerosene heater.
Always contact your dealer, distributor, service agent,
or the manufacturer on any problems or conditions
you do not understand.
! NEVER
leave heater operating if you intend to leave for
any period of time. Always make sure to turn heater off
and inspect to insure that it is completely extinguished
prior to going to bed.
! NEVER leave heater unattended.
! NEVER use as a source of heat for drying objects.
! NEVER place objects on the top plate.
WARNING!! RISK OF BURNS
! NEVER operate the heater without the guard or grill
completely attached.
IF POOR QUALITY KEROSENE is used a rapid
accumulation of carbon and tar is likely. This may cause
a strong odor and will destroy the wick. Additional heater
damage may occur as the wick becomes more difficult to
adjust. The use of poor quality fuel could also make the
wick very hard to extinguish. Always make sure the fire is
out. (See page 12, Extinguishing the Heater.)
ADJUSTMENT OF ROOM TEMPERATURE cannot be
changed by adjusting the heater. A Kerosene heater is
either on or off. There is no temperature adjustment. If
heater output is reduced by lowering the wick in any way,
improper combustion will occur producing odors and an
accumulation of tar and carbon. If your room becomes
too hot, open a door or a window or turn off the heater.
SAVE THESE INSTRUCTIONS FOR
FUTURE REFERENCE!!
NEVER LEAVE THE HEATER
UNATTENDED WHILE BURNING!
2
CAUTIONS-SAFETY GUIDE
INTRODUCTION
FEATURES
UNPACKING AND ASSEMBLY
KEROSENE (1-K ONLY)
FUELING YOUR HEATER
AUTOMATIC IGNITION SYSTEM
CHECKING THE IGNITION SYSTEM
ADJUSTING THE WICK
WICK MAINTENANCE
ITEM ITEMPAGE
1
2
2
3~4
4~5
5
6
7
7~8
8
CARBON REMOVAL / DRY BURNING
WICK ASSEMBLY
WICK REPLACEMENT
EXTINGUISHING THE HEATER
AUTOMATIC SAFETY SHUT-OFF DEVICE
LONG TERM STORAGE OF YOUR HEATER
TROUBLE SHOOTING GUIDE
PARTS LIST
EXPLODED PARTS DRAWING
SPECIFICATIONS
8
9
9~11
12
12~13
13
14
15
15
15
PAGE
CONTENTS OF OWNER'S MANUAL
INTRODUCTION
Please read this OWNER'S MANUAL carefully. It will show you how to assemble, maintain, and operate
the heater safely and efficiently to obtain full benefit from its many built-in features.
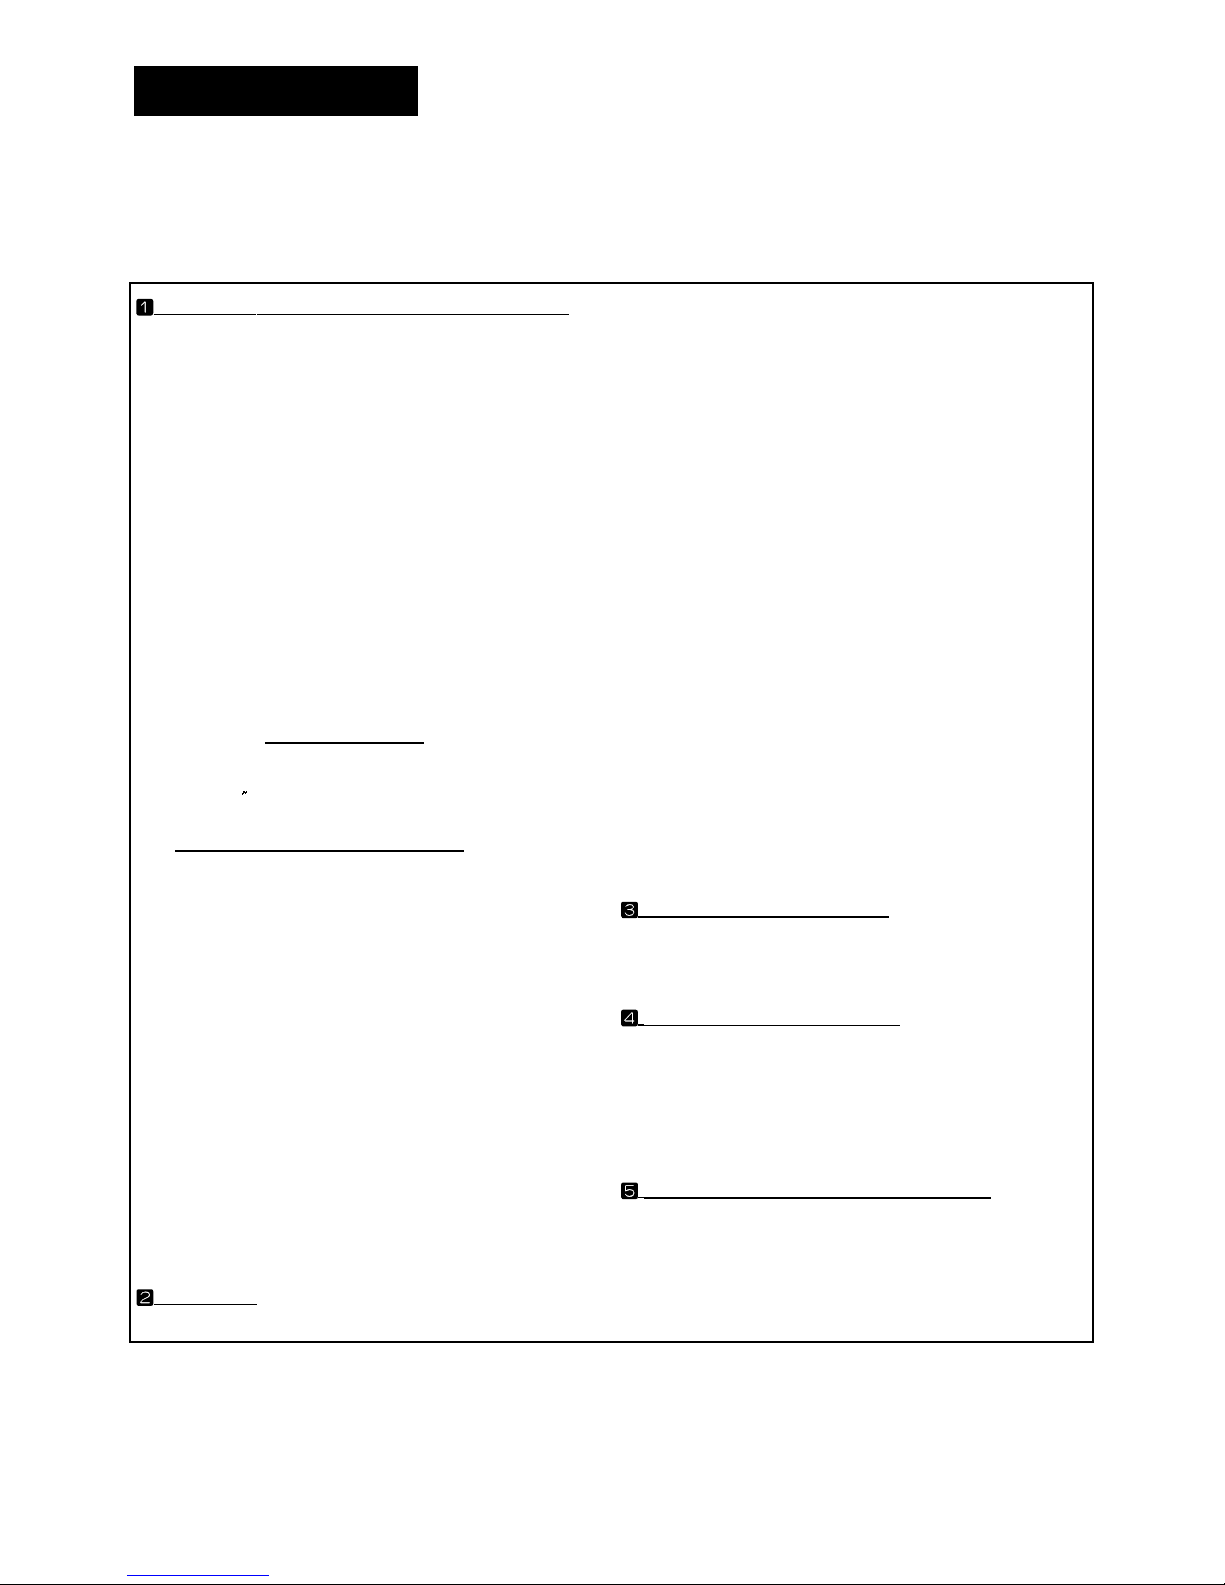
FEATURES
Carrying handle
Top guard grill
Top plate
Body
(Cabinet)
Front guard grill
Battery case (Back side)
Wick adjuster knob
Fuel cap
Ignition lever
Fig.1
Rear guard grill
Door
Manual shut-off knob
Fuel gauge
Drip tray
CAUTION: "RISK OF BURNS"
DO NOT OPERATE HEATER WITHOUT INSTALLING THE PROTECTIVE GUARD OR GRILL.
1. REMOVE THE HEATER AND ALL PACKING MATERIALS FROM THE BOX. (Fig.2)
NOTE : Save the shipping carton and packing
materials for future storage.
NEVER LEAVE THE HEATER
UNATTENDED WHILE BURNING!
3
UNPACKING AND ASSEMBLY
Heater.
Top guard.
Handle.
Top plate
2 “C” cell batteries.
Siphon pump.
Bag of screws for top grill assembly.
Owner's manual.
Safety Tips Manual.
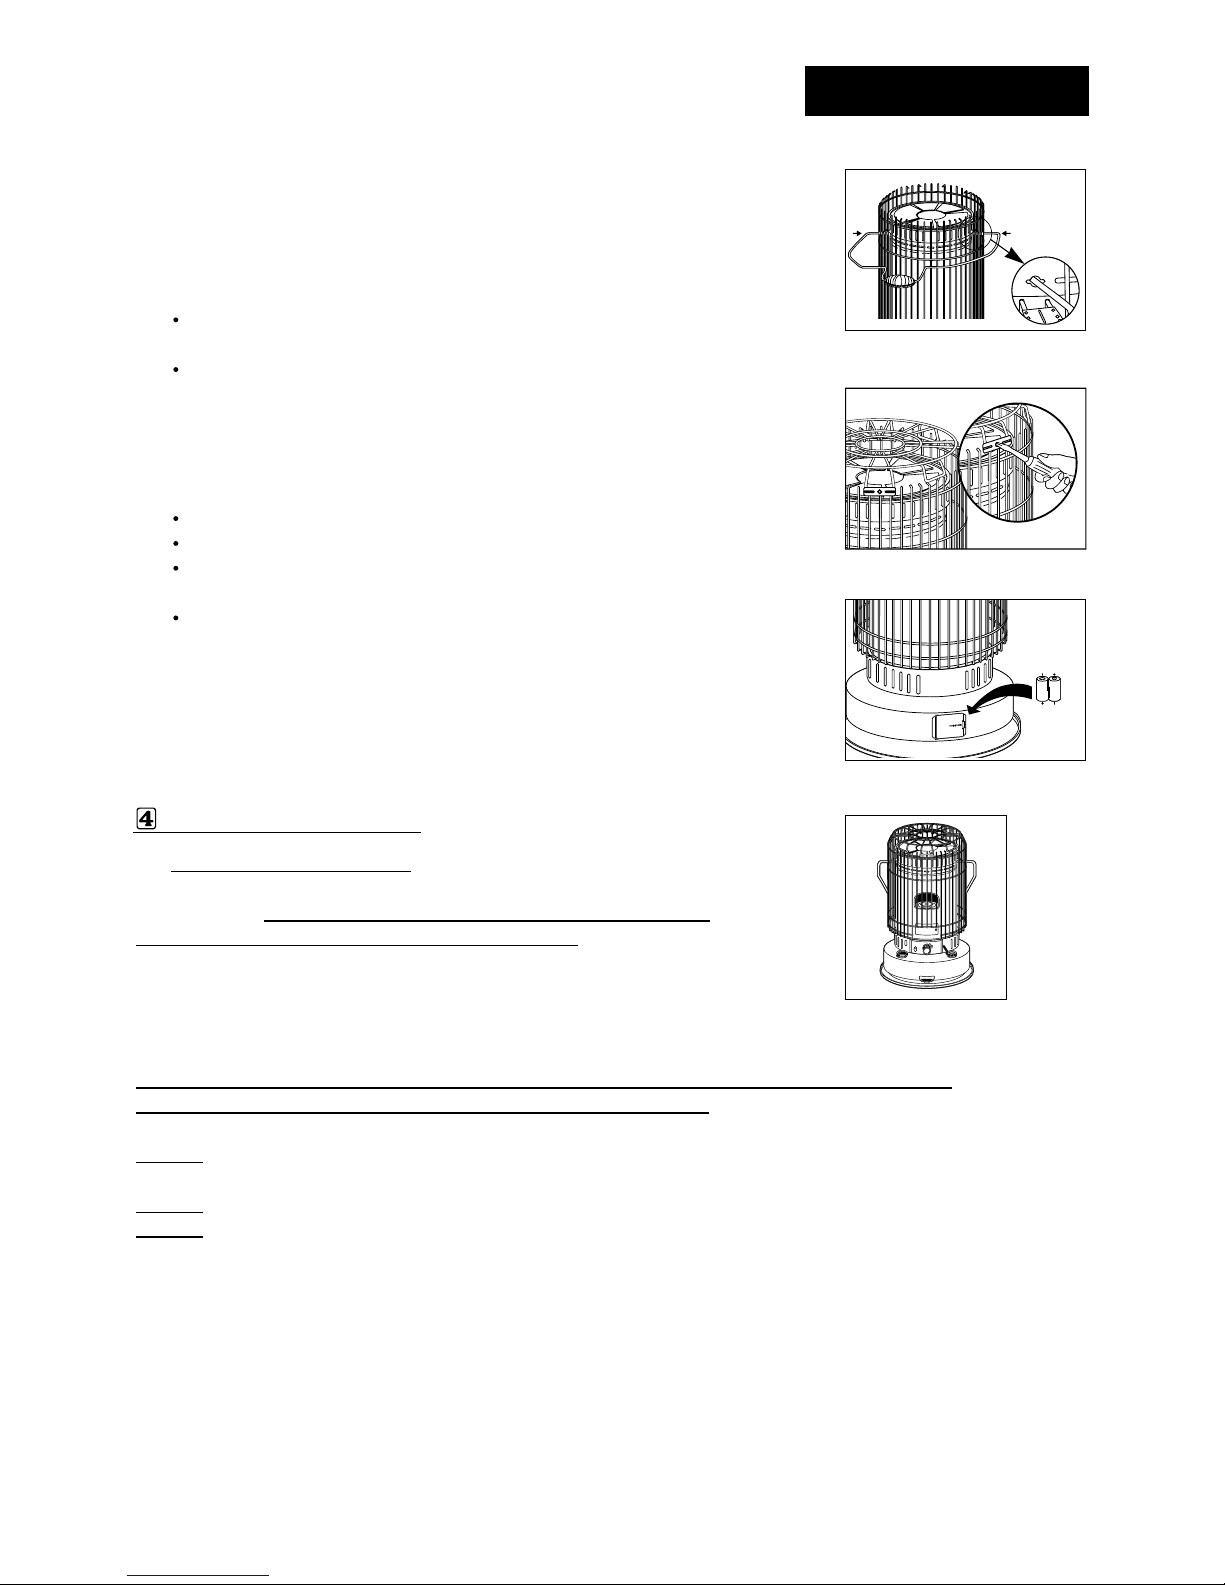
2. ASSEMBLING.
A) Remove all packing materials from heater: (Fig.3)
B) MOUNTING TOP PLATE: (Fig.4)
Align the arrow marking on the top plate with the carrying
handle hole on the cabinet and place the top plate on the
cabinet.
C) INSTALLING FRONT AND REAR GUARDS:
(Fig.5A and Fig.5B)
Hang the upper portion of the front guard (notched to
allow for the igniter door) on the Upper Grill brackets with
the downward hooked grill rods. (Fig.5A)
Snap the lower portion of the front guard into the holes in
the Lower Grill brackets with the inward hooked grill
rods. (Fig.5B)
Install the rear guard in the same way.
Top plate
Carrying handle
Top guard
Batteries
Rear guard
Front guard
Siphon Pump
Top guard Screws
Fig.2
Fig.4Fig.3
Fig.5B
Fig.5A
arrow marking
carrying handle hole
NEVER LEAVE THE HEATER
UNATTENDED WHILE BURNING!
4
KEROSENE SHOULD ONLY BE STORED IN A BLUE CONTAINER THAT IS CLEARLY MARKED
"KEROSENE". NEVER STORE KEROSENE IN A RED CONTAINER. Red containers are associated with gasoline.
NEVER store kerosene in the living space. Kerosene should be stored in a well ventilated place outside the
living area.
NEVER
use any fuel other than water-clear 1-K kerosene.
NEVER
use fuel such as gasoline, benzene, alcohol, white gas, camp stove fuel, paint thinners, or other oil
compounds in this heater. These are volatile fuels that can cause explosion or uncontrolled flames.
The best way to purchase kerosene is in a pre-packaged, metal or plastic, blue colored container.
The second choice would be to buy it from a dealer who stores it in a 55 gallon drum. The third choice is to
buy kerosene from a dealer who stores it in a large underground (or above ground) tank. Kerosene that is
contaminated with even a small amount of water will prevent a kerosene heater from functioning properly.
As you move from the first choice in purchasing kerosene (pre-packaged container) to the third choice (large
storage tank), the likelihood of water being present from condensation increases.
If you purchase kerosene in bulk, know your dealer.
It is EXTREMELY IMPORTANT
to the operation of this heater that
you use the proper grade of kerosene. The proper grade of kerosene
is identified as 1-K Kerosene.
DO NOT OPERATE THIS HEATER
WITH ANY FUEL OTHER THAN 1-K KEROSENE! 1-K Kerosene
has been refined to virtually eliminate contaminants such as sulphur,
which can cause a rotten egg odor during operation of the heater.
D) INSTALLING CARRYING HANDLE: (Fig.6)
Insert the carrying handle into the holes on the cabinet
by aligning holes on brackets of top plate.
E) INSTALLING TOP GUARD: (Fig.7)
Align the 2 brackets on the top guard with the 2 mounting
brackets on the front and rear guards.
Secure each bracket with a screw. Make sure that the
brackets on the top guard are positioned outside the
mounting brackets on the front and rear guards.
F) INSTALLING BATTERIES: (Fig.8)
Battery holder is located on the back of the heater.
Open the battery cover from the battery case.
Insert two(2) “C” cell batteries according to the plus(+)
and minus(-) markings inside of the holder.
Replace the battery cover to the heater.
G) Now your heater is completely assembled: (Fig.9)
KEROSENE (1-K ONLY)
Fig.8
Fig.9
Fig.6
Fig.7
Top Grill Screw
NEVER LEAVE THE HEATER
UNATTENDED WHILE BURNING!
5
It is normal for a kerosene heater to give off a slight odor upon start-up and shut-down.
After 5-10 minutes of operation, the heater should have reached its normal operating temperature and any
odor should be very slight.
NEVER store kerosene in direct sunlight or near a source of heat.
NEVER use kerosene that has been stored from one season to the next.
Kerosene deteriorates over time. "OLD KEROSENE" WILL NOT BURN PROPERLY IN
THIS HEATER.
A variety of problems can result from using poor quality kerosene --- smoke, odor, low flame, difficult ignition,
difficult shut-down, flame flickers and dies, excessive burning down of the wick, reduced wick life, wick
adjuster sticking, excessive deposits on the wick, etc.. If you encounter any of the problems listed above,
check your kerosene. If you discover that the kerosene is the problem, get a fresh supply of WATER-CLEAR
1-K KEROSENE OR RED DYED 1-K KEROSENE before using your heater again.
FUELING YOUR HEATER
NEVER FILL THE HEATER FUEL TANK IN THE LIVING SPACE:
FILL THE TANK OUTDOORS.
Before fueling the heater, take the heater, the kerosene, and the manual
siphon pump outdoors. To use the manual siphon pump, tighten the cap
on the top of the siphon, place the straight tube into the kerosene
container, and insert the flexible tube into the opening of the fuel tank. By
squeezing the bulb of the siphon pump, fuel will be transferred from the
kerosene container into the heater tank (Fig.10). Carefully watch the fuel
gauge on the base of the heater so that you will know when the tank is
getting full. When you approach the full mark, loosen the cap on top of the
siphon pump. This will stop the flow of kerosene. DO NOT OVERFILL
YOUR HEATER. Allow the siphon pump to drain thoroughly before you
remove it from the tank and the kerosene container.
After fueling the fuel tank of the heater by using siphon pump, make sure
that you loosen (counter clock wise) the cap on the siphon pump to drain
throughly the remaining kerosene in the siphon pump. For the reuse of siphon pump, make sure that you
tighten (clock wise) the cap on the siphon pump to transfer the kerosene into the fuel tank properly. (Fig.11)
IMPORTANT NOTICE REGARDING FUELING OF THE HEATER :
When fueling your heater for the first
time and any other time when the tank has been completely empty, as in
"
Dry Burning"(page 8) make sure
to allow the wick to soak a minimum 60 minutes before you attempt to light the heater. Take note of the
time you started to soak the wick or use a kitchen timer or wrist watch with an alarm feature. Failure to
properly soak the wick can trap air pockets in the wick causing the heater to burn poorly.
Premature ignition can destroy your wick.
IMPORTANT NOTICE REGARDING FIRST IGNITION OF HEATER
The first time you light your heater there may be some odor due to the burning off of oils used in the
manufacturing process. To avoid this you may wish to burn the heater outside on a calm and windless day.
If it
s windy consider a porch or garage or other room where the windows can be open to disperse the odor.
Fig.10
Fig.11
LOOSEN
TIGHTEN
 Loading...