

Page 1

Introduction
The Dymo LM100 Electronic Labelmaker enables you to
create a wide variety of high quality self-adhesive labels of
up to 100 characters.
The Labelmaker uses 9mm (
cassettes in a number of label colours. Labels are back
slit for easy removal from the backing tape. Text can be
printed horizontally or vertically in a variety of sizes and
styles and is always centered on the label.
3
/8") or 12mm (1/2") wide tape
Warranty Registration
Please complete the warranty registration card and return
it to the relevant customer service address, within seven
days– see the warranty booklet for details.
Power Supply
BATTERIES
• Apply pressure to thumb catch and open hinged access
door – see fig A, page 2.
• Insert six size AA alkaline or re-chargeable Nickel-
cadmium batteries, observing the polarity markings
A
➊, and close cover.
• Remove batteries if the Labelmaker is to be unused for
some time.
AC ADAPTOR (optional)
• Connect the AC adaptor to socket B
adaptor plug disconnects the supply from the batteries.
• Unplug the AC adaptor from the Labelmaker before
disconnecting the mains power to the adaptor,
➊. Inserting the
otherwise last label memory settings will be lost (see
also ON/OFF).
Changing the cassette
• Open hinged access door as above.
• Hold as shown, then lift cassette B
out.
• Ensure tape and ribbon B
cassette and tape passes between guideposts before
installing as shown. If necessary, turn spool B
clockwise to tighten ribbon.
• Insert cassette and push
place.
• Ensure tape and ribbon are positioned as shown
between pinch roller C
➊ and print head C➋.
➋ straight up and
➌ are taut across mouth of
➌
firmly
C until it clicks into
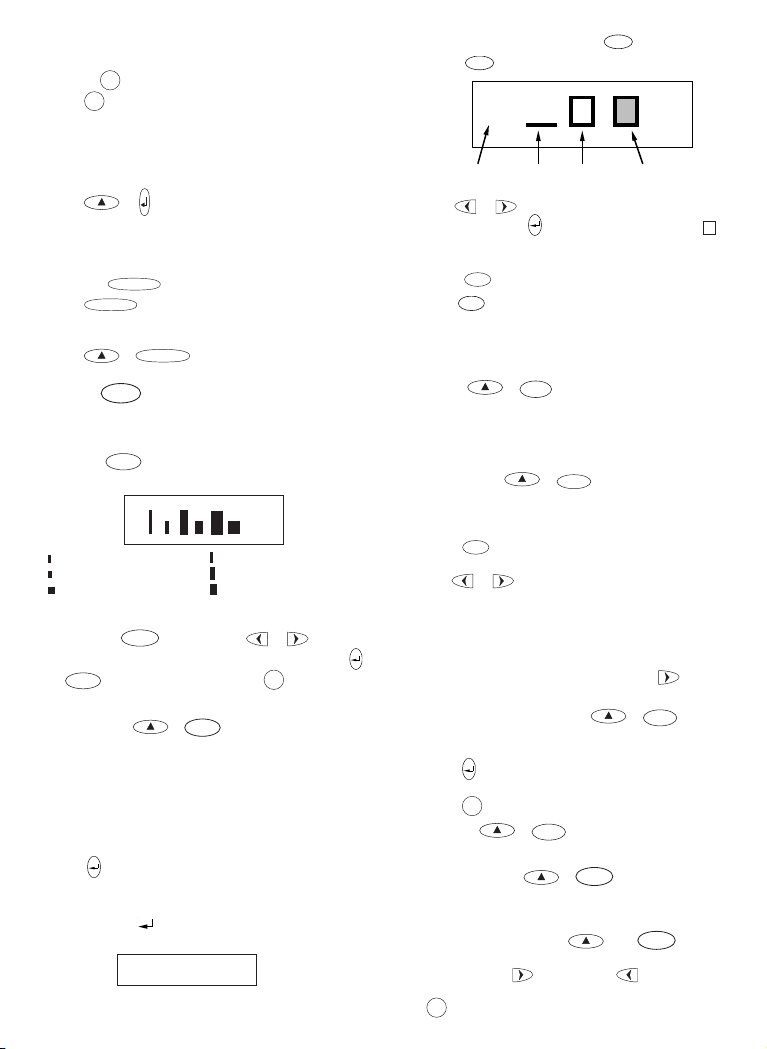
The Display
OUTLINE
▲
▲
Fixed label
length set
Vertical
text
VERT
LTH SET
Box Underline
CAPS on
CAPS
▲
▼
12345678
▲
Shift on
The display shows:
▲
Italic Outline
ITALIC
–
▲▲
▲
CURSOR
• Up to eight text characters, plus the cursor,
at one time.
Use
or to move along the text.
GB
• Eight indicators – as shown above.
• The display will flash if you press an incorrect key in a
function sequence.
Function keys
ON/OFF
Switches the power on and off.
• Switches off automatically after two minutes if no keys are
pressed. The last label created will be retained and
displayed when next turned on. Any stored label and
settings will be retained.
Note: If the batteries are removed for more than a few
seconds, all text and settings will be lost.
When power is restored, the display will show a flashing
cursor (no text) and the settings will be full height
standard width text with
CAPITALS
• Press for all subsequent characters in UPPER CASE
(CAPITALS), as confirmed by the CAPS indicator in the
display.
CAPS
• Press again to cancel and return to lower case.
SHIFT KEY
Dual action - either press and hold down or press and
release to remain in “shift” position. Press
to return to normal state.
• Use
an UPPER CASE (CAPS) character.
before pressing an alphabet key to produce
• For dual-purpose keys, press
the legend above the key.
• Pressing
while
character.
DELETE
• Press to delete the character to the left of the cursor, or to
CLEAR TEXT
• Press to clear all the current text and cancel any fixed
CURSOR KEYS
• Press to move the cursor along the text, one character
DEL
exit certain function key operations.
+
length setting, but leave the text size and other settings
unchanged. Also use to exit or clear certain function
key operations.
or
at a time.
• Press and hold to scan quickly through the text.
• Press
+ or to move the cursor to the
beginning or end of the text.
• When used in conjunction with certain function keys,
use
or to select options.
• To insert characters into the text, use
and all other settings off.
first to produce
CAPS
is set will give a lower case
CLEAR
DEL
again
or to
3
Page 2
position the cursor under the character to the right of
COPIES
SYMBOL
the insertion point, then type in the characters required.
PRINTING
• Press
PRINT
PRINT
to print the label.
• Use cutter lever E to release the label – see page 2.
PREVIEW
Allows you to preview your label before printing it.
• Press
PREVIEW
+
and the entire text will scroll across
the display.
Note with a 2 line label, the message will be previewed as
a single line message.
SPACE KEY
• Press to insert a space into the text.
FEED KEY
• Press
(1.37 inches) of blank tape
SYMBOLS
• Press to select a symbol character – see ‘Symbols and
special characters’ and the symbols table on page 2.
TEXT SIZE
+
SYMBOL
SIZE
FEED
to feed out 35mm
• Press to display the symbols for the six text print sizes:
half-height,
half-height, normal full height, normal
half-height,
condensed
extended
full height,
full height,
The cursor will be positioned over the current selection.
• Either press
DEL
to exit, or use or to move
the cursor over the size symbol required, then press
SIZE
or
to confirm the selection, or
the selection and print the label.
VERTICAL TEXT
• Rotates the text through 90° so that the label is printed
v
e
r
t
i
c
indicator, top right of the display.
VERT
+
BOX/UL
a
l
l
y
, as confirmed by the
PRINT
• Press again to cancel and return to horizontal text.
Note: Vertical text is not available on two-lines.
2-LINE PRINTING
• Press
to start the second line of text on a two-line
label. The two lines will be printed half-height and
ranged left, e.g.
This is a two
line label in the display will be
printed as:
This is a two
line label
condensed
extended
to confirm
VERT
BOXED/UNDERLINED PRINTING
BOX/UL
• Press
once to display the menu below.
BOX/UL
AA
Normal
Underlined Box
text
• Use or to move the cursor under the desired
option and press
to enter. (Confirmed by the or
— indicator displayed.
• To return to previously selected Box/Underline text
DEL
press
ITALIC
• Press once to set
ITALIC
.
italic
text (confirmed by the
indicator in the display).
Press again to cancel and return to normal text.
OUTLINE
OUTLINE
• Press shift followed by “outline” to print the label in
outline text (confirmed by the
display). Press shift and outline again to cancel and
return to normal text.
LABEL LENGTH
Displays the current label length. The length is normally
calculated automatically, according to the length of the
+
ITALIC
LENGTH
+
text on the label.
DEL
• Press
the length, or:
• Use
max.) or decrease the length in 2mm / 0.1 inch steps.
The display will flash if you try to make the label
shorter than the text.
• If the length displayed is preceded by the > symbol, the
length has already been fixed; the label is too short for
the text and it will not print. Either press
increase the length in 2mm / 0.2 inch steps until the >
to exit the length function without changing
or to increase (400mm / 15.6 inches
symbol disappears, or press
fixed length; the label is now long enough for the text
and can be printed.
• Press
• Press
• Pressing
to fix the length for all subsequent labels,
confirmed by the
PRINT
LTH SET
to fix the new length and print the label.
CLEAR
+
DEL
and restore the automatic length.
MULTIPLE COPIES +
• Your Labelmaker can provide multiple copies within the
range 1-99.
• To use this facility press
n = 1 on the display. To increase the number of copies
required press
backwards from 99. To print the desired quantity press
PRINT
4
.
. By pressing you can work
Shaded box
around
around
OUTLINE
indicator in the
SIZE
CLEAR
+
DEL
indicator in the display, or
will cancel the fixed length
COPIES
SYMBOL
then
ITALIC
to
to cancel
to show
Page 3
Note: A row of vertical dots will print between each label
as a cutting guide.
INCREMENTAL NUMBERING
Labels can be printed in increments of 1-99 automatically.
• Key in your starting number as the right most digit on
the label. Press
automatically move up a digit to the next number.
Press
• It is also possible to include automatic incremental
numbering when printing multiple copies.
then
• Key in your starting number, eg. LABEL 1 .
• Next press
then
desired number of copies are displayed eg.10.
Now press
LABEL 1 to LABEL 10. At fixed length setting, the
Labelmaker will stop printing when the label exceeds
the fixed length. While using fixed length setting, the
labelmaker will stop printing when the label exceeds the
fixed length.
• It is possible to print up to 99 sequentially numbered
labels at any one time.
then
PRINT
then
the display will
PRINT
to continue the sequence.
COPIES
followed by until the
SYMBOL
PRINT
this will print ten labels -
LAST LABEL MEMORY
• The unit will store the last label text and settings when
turned off. Upon power-up, these will be restored and
displayed. Removal of the batteries for more than a few
seconds will cause this information to be lost.
Symbols and special characters
INTERNATIONAL CHARACTERS
To add a diacritical (accent) to create an international
character, enter the character first, followed immediately
by the diacritical, e.g. press
get é.
To add a diacritical to an existing character, use
to place the cursor under the character to be
changed, then press the appropriate diacritical key.
SYMBOLS
Press
some of which are not available direct from the keyboard.
The display will show: A–C
SYMBOL
SYMBOL
to show symbols and special characters,
Each letter selects a line of symbol characters, as shown
in the table on page 2.
DEL
Press
you find the line of symbols required.
Use
to cancel, or press a letter key ‘A’ to ‘C’ until
or to select a symbol. Press to place the
symbol in the label.
PRINT CONTRAST — may be adjusted by pressing
followed by ‘Y’ to display the five contrast symbols
.
• Use
• Press
or to select lighter or darker print.
to confirm the setting. The contrast level will
revert to the mid-setting when the Labelmaker is turned
off and on again.
Note: This function enables you to adjust the print
quality under extreme temperature conditions.
followed by / to
E
or
SYMBOL
Cleaning
• Clean the cutter blade regularly: Remove the cassette,
then insert the tip of a ball pen or pencil between Lshaped piece D
• Press and hold down cutter lever E to expose cutter
blade D
both sides of the blade. Release cutter lever E.
• Check and clean print head face D
cotton bud and alcohol ONLY.
➊ and the guide pin – see page 2.
➋, then use a cotton bud and alcohol to clean
➌ regularly using a
Troubleshooting
No display
• check machine is on
• replace discharged batteries
• check AC adaptor.
No printing or poor text
• replace discharged batteries
• check tape cassette installed correctly
• clean the print head
• replace the tape cassette.
Tape jammed
• lift out tape cassette carefully
• remove/release jammed tape
• DO NOT cut the ink ribbon – turn spool
• cut off excess label tape
• refit/replace the tape cassette.
Poor cutter performance
• clean the cutter blade regularly
No response to print key
• !!!!!!!! in the display indicates a printer jam. Press any
key to return to normal display. Open the cassette
compartment and free the jam.
•
discharged batteries. Press any key to return to normal
display. Replace the batteries.
No success?
• Call the DYMO customer service hotline telephone
number in your country – see the warranty booklet.
flashing in the display indicates
5
B➎ to tighten
Page 4

6
 Loading...