

Page 1
DxO Optics Pro 8
PUSH THE LIMITS OF YOUR CAMERA
Guide de démarrage rapide
Quick start guide
Kurzanleitung zum schnellen Einstieg
FRENDE
Page 2
Sommaire
1. Présentation de DxO Optics Pro 8........................ 3
1.1. Bienvenue ! ......................................3
1.2. Les principes de base d’une session de travail .........4
2. Corrigez et traitez vos images en quelques minutes .......6
2.1. Étape 1 : l’onglet Organiser ..........................6
2.2. Étape 2 : l’onglet Personnaliser ......................7
2.3. Étape 3 : l’onglet Traiter............................10
3. Les autoréglages .................................... 12
3.1. Qu’est-ce qu’un autoréglage ? ......................12
3.2. Appliquer des autoréglages ........................13
4. En savoir plus sur l’onglet Personnaliser................ 14
4.1. Description des fonctionnalités de la fenêtre Image ....14
4.2. Les copies virtuelles ..............................17
5. Personnaliser DxO Optics Pro.......................... 18
6. Imprimer ses images ................................. 19
2
Merci d’avoir choisi DxO Optics Pro.
Ce guide de démarrage rapide, en
vous présentant les principales fonctions du logicel, vous permettra une
prise en main rapide.
Documentation en ligne :
Si vous vous posez la moindre
question sur ce logiciel, consultez la documentation complète,
disponible sur notre site Web
(www.dxo.com/doc).
Photos : Hector Martinez - Mike & Tammy Rice
Design : Stéphanie Morin (Arkyda)
Page 3
Présentation de DxO Optics Pro 8
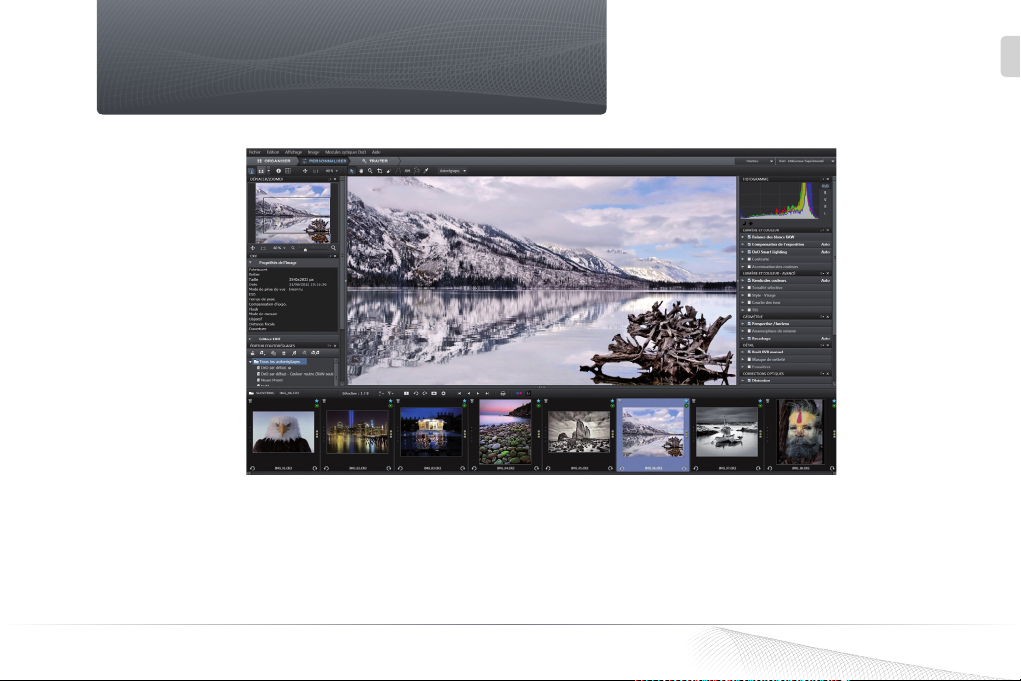
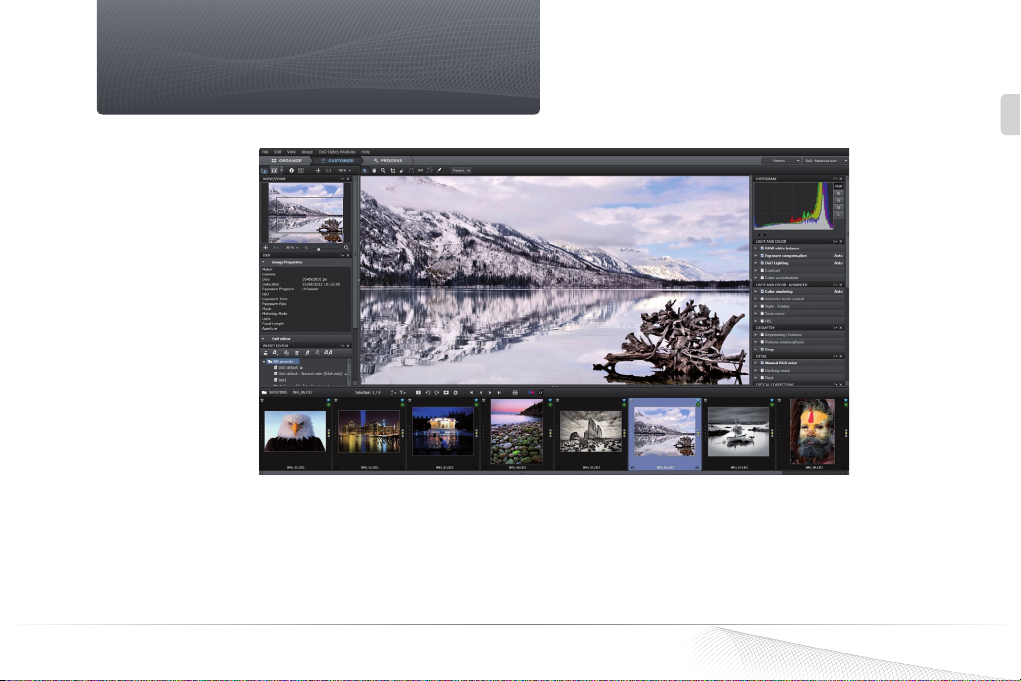
L’interface de DxO Optics Pro.
1.1. Bienvenue !
Bienvenue dans un monde logiciel qui vous offre d’innombrables
opportunités d’amélioration de vos images, automatiquement ou en
ajustant vous-même les paramètres des corrections.
FR
Découvrez comment traiter vos images dès la première utilisation
de votre logiciel, pour améliorer la qualité de vos photos, selon votre
approche de la photographie et de vos sujets préférés.
DxO Optics Pro 8 - Guide de démarrage rapide ©DxO Labs 2012 - Tous droits réservés
3
Page 4
Contrairement à de nombreux logiciels de postproduction qui
nécessitent l’application de nombreux réglages à une image non
corrigée, DxO Optics Pro corrige automatiquement et avec une
grande précision chacune de vos images.
DxO Labs a calibré et mesuré le comportement de plus de 160
boîtiers (réflex et compacts experts) et les caractéristiques de plus
de 8 600 combinaisons boiter/objectif. Les mesures réalisées pour
chacune de ces combinaisons sont modélisées dans des modules
optiques DxO, qui sont utilisés par DxO Optics Pro pour corriger
automatiquement les défauts de votre matériel. Ainsi, il existe
autant de modules que de combinaisons boiter/objectif.
Dès lors que votre matériel a été préalablement calibré par
DxO Labs, DxO Optics Pro peut :
Convertir les fichiers au format RAW (par exemple CR2,
NEF, RAF, etc.) en différents formats de sortie (JPEG, TIFF,
DNG).
Réduire automatiquement le bruit numérique présent
dans vos photos.
De plus, si le module optique DxO de votre combinaison
boîtier / objectif est disponible, vous avez accès à l’ensemble des
corrections optiques automatiques de DxO Optics Pro. Si le module
optique DxO n’est pas encore disponible, les corrections optiques
peuvent être faites manuellement (si nécessaire).
Si le modèle d’appareil photo que vous utilisez n’a pas été calibré
par DxO Labs, DxO Optics Pro ne peut pas lire les fichiers RAW. Toutefois, vous pouvez effectuer manuellement des corrections sur les
fichiers JPEG, notamment les corrections optiques et la réduction
de bruit.
4
1.2. Les principes de base d’une session de
travail
DxO Optics Pro a été conçu pour vous donner une grande liberté
dans le traitement de vos images : vous pouvez soit travailler sur vos
images telles qu’elles sont classées sur votre disque dur, soit les
regrouper dans un projet. Un projet est un moyen simple de rassem-
bler et de gérer les images que vous souhaitez traiter.
DxO Optics Pro ne modifie pas vos fichiers originaux. Ces derniers
sont associés à un ensemble de réglages enregistrés dans un fichier
annexe (portant l’extension « .dop »). De cette manière, vous pouvez
revenir à tout moment sur vos corrections ou les modifier.
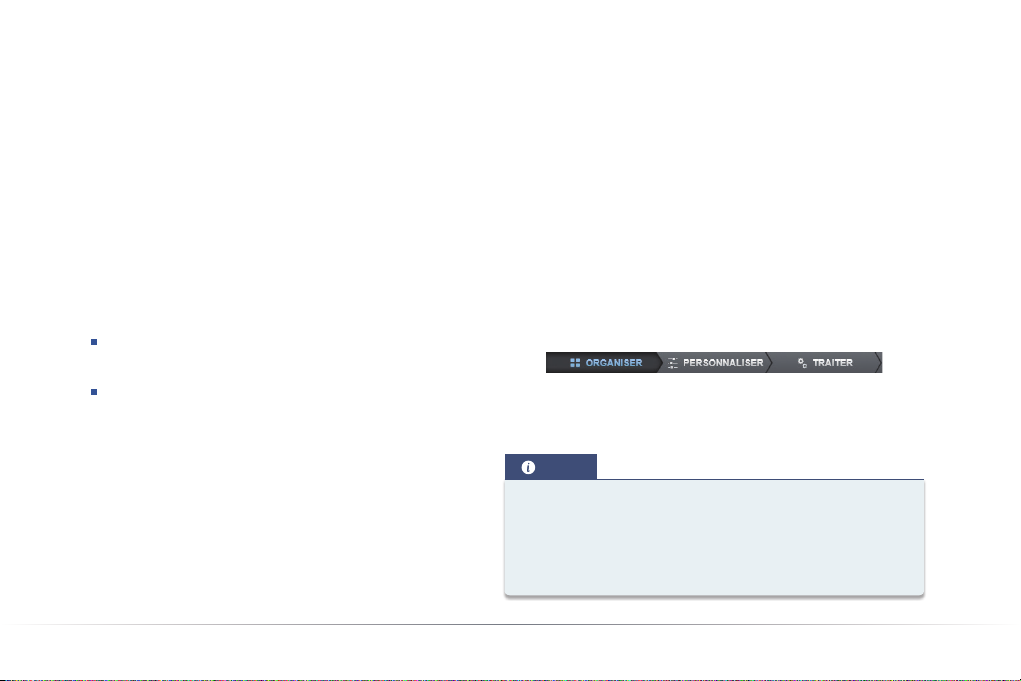
Une session de travail dans DxO Optics Pro se déroule en trois
étapes, matérialisées chacune par un onglet :
Dès le démarrage du programme, l’onglet Organiser vous permet de
travailler directement sur vos images, en naviguant dans l’arborescence des dossiers de votre ordinateur.
NOTE
L’ Explorateur d’images, situé en bas de la fenêtre, affiche les
vignettes des photos contenues dans le dossier ou le projet
que vous avez sélectionné. Le panneau central, appelé Image,
affiche un aperçu des photos avec les corrections qui seront
appliquées lors du traitement.
Page 5
L’onglet Personnaliser vous permet de corriger automatiquement
ou manuellement vos images et d’en prévisualiser immédiatement
le résultat. Ces réglages seront appliqués de manière définitive lors
du traitement de l’image, dans l’onglet Traiter. Vous pouvez enregis-
trer vos corrections et réglages sous forme d’autoréglages, que vous
pourrez appliquer ultérieurement à d’autres photos.
NOTE
Toutes vos corrections sont enregistrées automatiquement en
temps réel : si vous fermez le logiciel, vous retrouverez tous les
réglages effectués sur vos images à la réouverture.
L’étape matérialisée par l’onglet Traiter vous permet de lancer un
traitement automatique de l’ensemble des images que vous avez
choisies.
ASTUCE
Le traitement des images peut être déclenché par clic-droit
sur l’une des vignettes dans l’explorateur d’images, ou grâce
au racourci Crtl + K / Cmd +K.
FR
DxO Optics Pro 8 - Guide de démarrage rapide ©DxO Labs 2012 - Tous droits réservés
5
Page 6
Corrigez et traitez vos images en quelques minutes
DxO Optics Pro lit les caractéristiques de l’appareil photo et de
l’objectif enregistrées dans les métadonnées EXIF. Ces informations servent à identifier le module optique DxO approprié, afin de
déterminer automatiquement les corrections optimales à appliquer
à chacune des images.
IMPORTANT : En utilisant DxO Optics Pro, partez toujours de l’image
originale non modifiée. En effet, certains programmes de gestion et de transfert d’images peuvent modifier les métadonnées
EXIF lors du déchargement sur le disque dur. Cela peut empêcher
DxO Optics Pro de trouver les informations nécessaires pour appliquer les corrections automatiques. Nous vous conseillons de transférer le contenu de vos cartes-mémoire par copier-coller, dans l’explorateur du système d’exploitation, au lieu d’utiliser un programme
spécialisé. Cependant, certains programmes, comme Adobe® Photoshop® Lightroom®, ne modifient pas les métadonnées lors de l’importation dans la base de données.
2.1. Étape 1 : l’onglet “Organiser”
En ouvrant DxO Optics Pro, vous découvrez le premier des trois
onglets, nommé Organiser. Il correspond à la première des trois
étapes du traitement de vos photos. Le panneau de navigation, situé
à gauche, vous permet de parcourir deux types de source d’images :
Les dossiers et les répertoires de votre système d’exploitation
(système de fichier).
Les projets créés dans DxO Optics Pro.
6
Lorsque vous sélectionnez Système de fichiers dans l’onglet
Organiser, le contenu de votre disque dur s’affiche dans la colonne
de gauche. Vous pouvez naviguer dans vos dossiers pour localiser
les images que vous souhaitez traiter. Lorsque vous sélectionnez
un dossier ou un projet, son contenu s’affiche sous forme de
vignettes dans l’Explorateur d’images situé en bas de la fenêtre du
programme. Ce panneau vous permet d’organiser et sélectionner
vos images : vous pouvez changer la taille des vignettes, attribuer
une note, pivoter ou effacer vos images.
ASTUCE
Vous pouvez utiliser le glisser/déposer pour déplacer ou copier
les images dans différents dossiers de votre disque dur : sélectionnez les vignettes dans l’explorateur d’images, puis glissezles vers le dossier de destination, dans le panneau de navigation (appuyez sur la touche Maj pour déplacer les images, et
Ctrl/Cmd pour les copier).
Un simple clic sur une vignette affiche l’image dans le panneau
Image. Un ensemble de réglages (appelé « autoréglage ») est automatiquement appliqué à l’image. L’autoréglage par défaut se nomme
DxO par défaut. Il traite les corrections optiques, le bruit numérique
et l’exposition. Si cet autoréglage par défaut ne vous convient pas,
vous pouvez en choisir un autre (fourni par DxO Labs ou créé par
vos soins).
Page 7
ASTUCE
Si vous travaillez avec des fichiers RAW, vous obtiendrez un
rendu plus naturel en sélectionnant l’autoréglage “DxO par
défaut - Couleur neutre”.
Une seconde icône, nommée Base de données projets , permet
d’accéder à la liste des projets créés dans DxO Optics Pro.
Un projet regroupe un certain nombre d’images à traiter. Cet outil
d’organisation est simple d’emploi et peut s’avérer très utile pour le
traitement d’un groupe d’images provenant de différents dossiers.
Pour en savoir plus sur la création et la gestion de projets, vous pou-
vez vous référer au guide utilisateur.
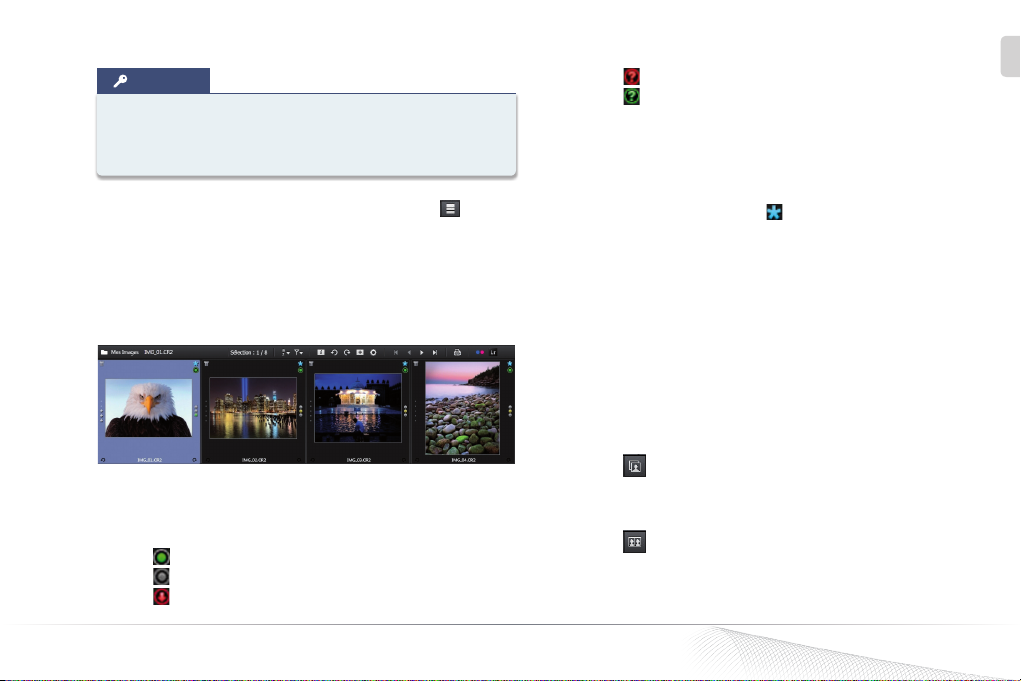
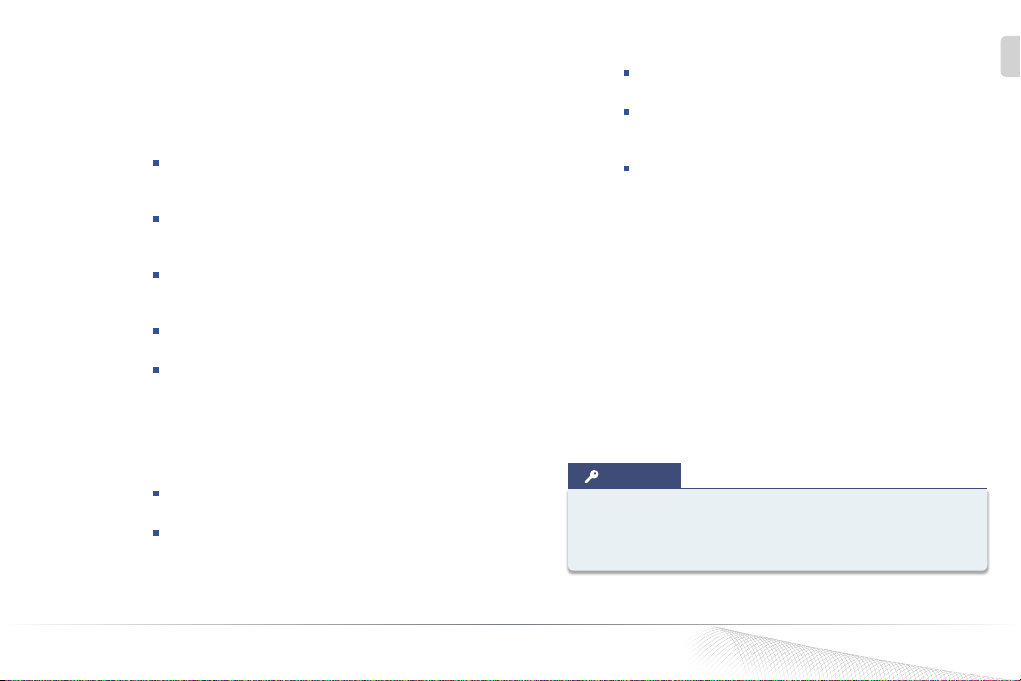
Ambiguïté de module optique DxO (devant être résolue).
Ambiguïté de module optique DxO (résolue).
Dans le 3e cas (« Module optique DxO disponible, à télécharger »),
DxO Optics Pro vous propose une liste de modules identifiés grâce
aux métadonnées EXIF de vos images, et vous demande de cocher
ceux que vous souhaitez effectivement télécharger.
L’icône bleue en forme d’étoile , placée au-dessus de l’icône de
statut des modules optiques, indique que le fichier est en attente de
traitement par DxO Optics Pro.
À ce stade, vous pouvez lancer le traitement, sans effectuer de
corrections manuelles, à partir d’un clic-droit sur une vignette, dans
l’Explorateur d’images, ou en vous rendant dans l’onglet Traiter.
2.2. Étape 2 : l’onglet “Personnaliser”
Dans l’onglet Personnaliser, vous retrouvez l’Explorateur d’images
ainsi que le panneau Image, qui vous permet de prévisualiser les
corrections appliquées à vos images. Vous pouvez également choisir
d’afficher côte à côte les images « avant » et « après » correction :
FR
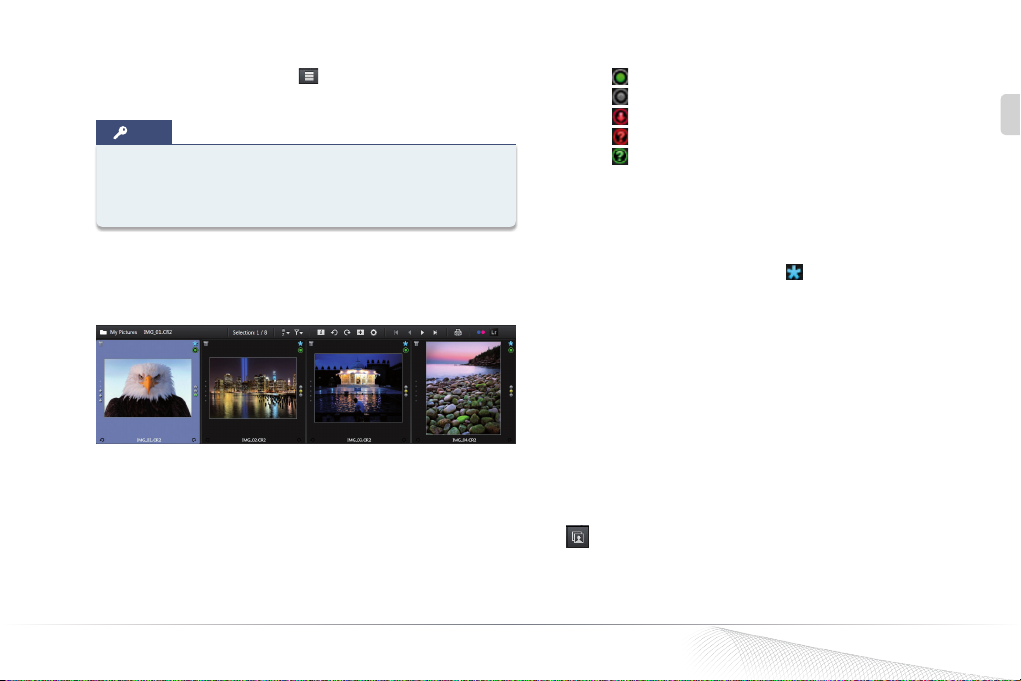
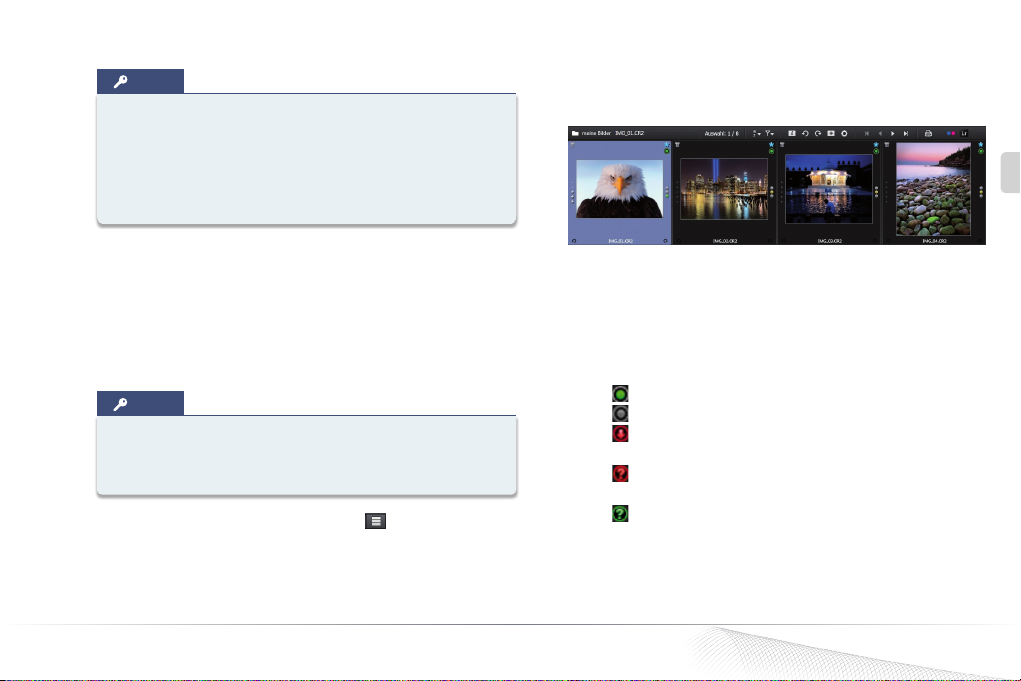
L’Explorateur d’images.
L’ Explorateur d’images permet de s’informer du statut des modules
optiques DxO, grâce à l’icône ronde placée dans le coin supérieur
droit de chaque vignette :
Module optique DxO activé et prêt à l’emploi.
Aucun module optique DxO disponible pour cette image.
Module optique DxO disponible, à télécharger.
DxO Optics Pro 8 - Guide de démarrage rapide ©DxO Labs 2012 - Tous droits réservés
Affichage mono-image : prévisualisation des
corrections faites à l’image. Lorsque vous cliquez sur
l’image, la version « avant correction » s’affiche tant que
vous gardez le bouton de la souris enfoncé.
Affichage côte à côte : affiche d’un côté l’image
originale avant correction, et, de l’autre, l’image après
correction. Vous pouvez également agrandir à l’aide du
zoom pour comparer les mêmes détails dans l’image.
7
Page 8
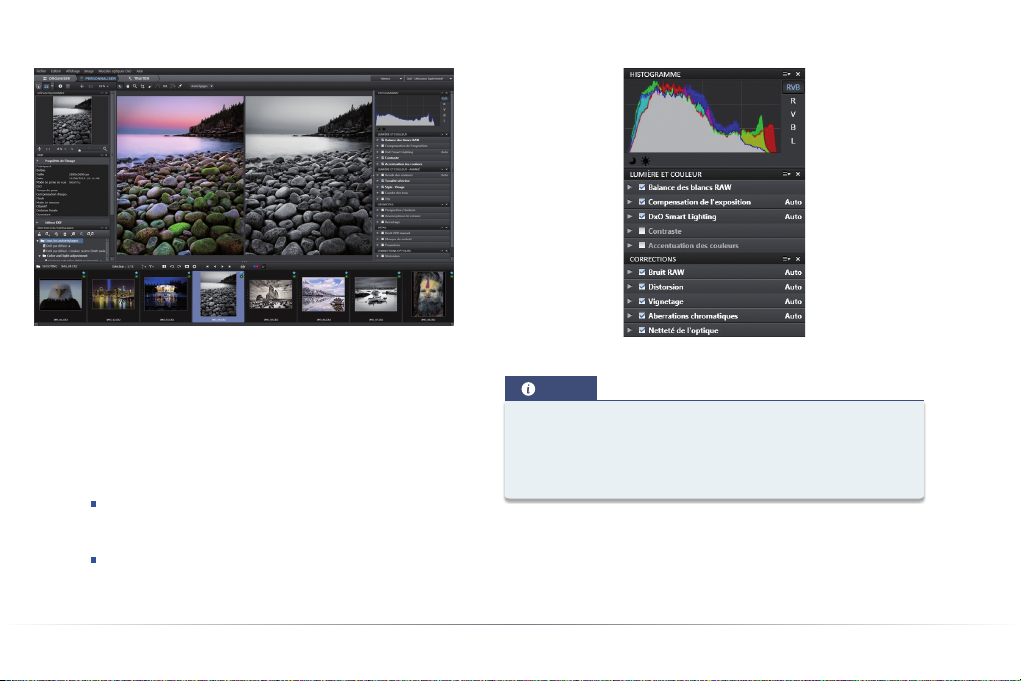
Onglet Personnaliser : comparaison d’image avant/après correction.
Si vous ne souhaitez pas appliquer la correction par défaut, vous
pouvez utiliser un autre autoréglage dans le menu déroulant de la
barre d’outils située au-dessus du panneau Image (voir chapitre 3
pour plus de détails).
Vous pouvez aussi corriger les images manuellement, à l’aide des
outils regroupés dans les palettes. Deux espaces de travail, contenant différentes palettes, sont disponibles :
DxO - Premiers pas, l’espace par défaut à la toute
première utilisation du programme, qui regroupe un
certain nombre d’outils basiques.
DxO - Utilisateur avancé, qui vous donne accès à la
totalité des outils.
Vous pouvez passer de l’un à l’autre à tout moment.
8
Les palettes disponibles dans l’espace de travail “DxO - Premiers pas”.
NOTE
Pour débuter, nous vous conseillons d’utiliser l’espace de travail DxO - Premiers pas, qui permet de découvrir comment une
simple action sur un curseur peut modifier votre photo (utilisez
le mode d’affichage « côte à côte »).
L’espace de travail DxO - Premiers pas vous permet d’accéder aux
palettes suivantes :
Histogramme : affiche la distribution et les niveaux de luminosité
pour chaque canal de couleur RVB (rouge, vert, bleu) présent
Page 9
dans l’image. Les canaux peuvent être présentés superposés ou
individuellement. Un mode luminosité est également disponible.
Lumière et couleur : permet la correction de l’exposition, du contraste
et de l’équilibre des couleurs grâce aux sous-palettes suivantes :
Balance des blancs : correction de dominantes colorées
(par exemple, une photo prise en intérieur et présentant
une forte dominante jaune).
Compensation de l’exposition : récupération et correction
des hautes lumières et des tons clairs ou correction d’une
image sous-exposée.
DxO Smart Lighting : éclaircissement automatique des
ombres et optimisation du contraste (trois modes automatiques disponibles).
Contraste : réglage du contraste local et du microcon-
traste (contraste local).
Accentuation des couleurs : amélioration globale des
couleurs (saturation) ou sélective (vibrance).
Corrections : permet de corriger les défauts liés au capteur et à
l’objectif. Les défauts suivants sont corrigés automatiquement si
votre matériel est pris en charge et peuvent, le cas échéant, être
corrigés manuellement :
Bruit : présence de grain et d’artefacts de couleur produits
par le boîtier, notamment aux sensibilités ISO élevées.
Distorsion : déformations touchant principalement les
objectifs grand angle et les zooms et se traduisant par la
courbure de lignes droites.
Vignetage : assombrissement des bords et des coins de
l’image, notamment aux grandes ouvertures.
Aberrations chromatiques : artefacts de couleur (souvent
violets ou verts) observés dans les transitions de deux
zones très contrastées, le long des contours.
Netteté de l’optique : manque de piqué de l’objectif (cette
correction apparaît uniquement si le module optique DxO
correspondant à l’objectif utilisé est chargé).
Pour visualiser le résultat de certaines de ces corrections (bruit,
aberrations chromatiques et netteté de l’optique), il faut afficher
l’image avec un ratio de zoom d’au moins 75%. Avec DxO Optics
Pro 8, l’affichage de la réduction du bruit est possible à tous les
niveaux de zoom, à condition d’activer l’option adéquate dans les
Préférences.
Essayez l’effet de ces corrections sur quelques images : un
faible déplacement des curseurs peut avoir des conséquences
importantes. Toutes ces corrections sont réversibles et n’affectent
pas votre image d’origine. Ainsi, pour vos premiers essais, vous
pouvez manipuler les curseurs à votre guise, pour en découvrir
l’incidence sur l’aspect de vos photos.
ASTUCE
Le raccourci clavier Ctrl + Z dans Windows ou Cmd + Z sur Mac
vous permet d’annuler la correction et de revenir aux réglages
précédents.
FR
DxO Optics Pro 8 - Guide de démarrage rapide ©DxO Labs 2012 - Tous droits réservés
9
Page 10
ASTUCE
Vous pouvez réinitialiser les réglages en faisant un double-clic
sur les curseurs. Vous pouvez également sélectionner l’autoréglage DxO par défaut qui remet tous les réglages à leur valeur
par défaut.
IMPORTANT : Si les corrections de distorsion, de manque de piqué
et de vignetage ne sont pas disponibles en mode automatique, cela
indique que DxO Optics Pro n’a pas pu associer de module optique
DxO à votre photo :
Soit parce qu’il n’existe pas de module optique DxO pour
le couple boîtier/objectif utilisé à la prise de vue (icône de
statut de module optique DxO : ).
Soit parce que la modification ou la corruption des
données EXIF du fichier ont empêché DxO Optics Pro de
déterminer le module approprié (icône de statut de module
optique DxO : ).
Soit parce que le module optique DxO approprié n’est pas
présent sur l’ordinateur (icône de statut de module optique
DxO : ).
Soit parce qu’il existe une ambiguïté qui empêche DxO
Optics Pro de sélectionner le module optique DxO approprié (icône de statut de module optique DxO : ).
10
2.3. Étape 3 : l’onglet “Traiter”
Pour appliquer les corrections effectuées dans l’onglet
Personnaliser, il est nécessaire de lancer le traitement de vos
images, ce qui va entraîner la création de nouveaux fichiers. Par
défaut, les images de sortie sont au format JPEG de haute qualité
et sont stockées dans le même répertoire que les images originales.
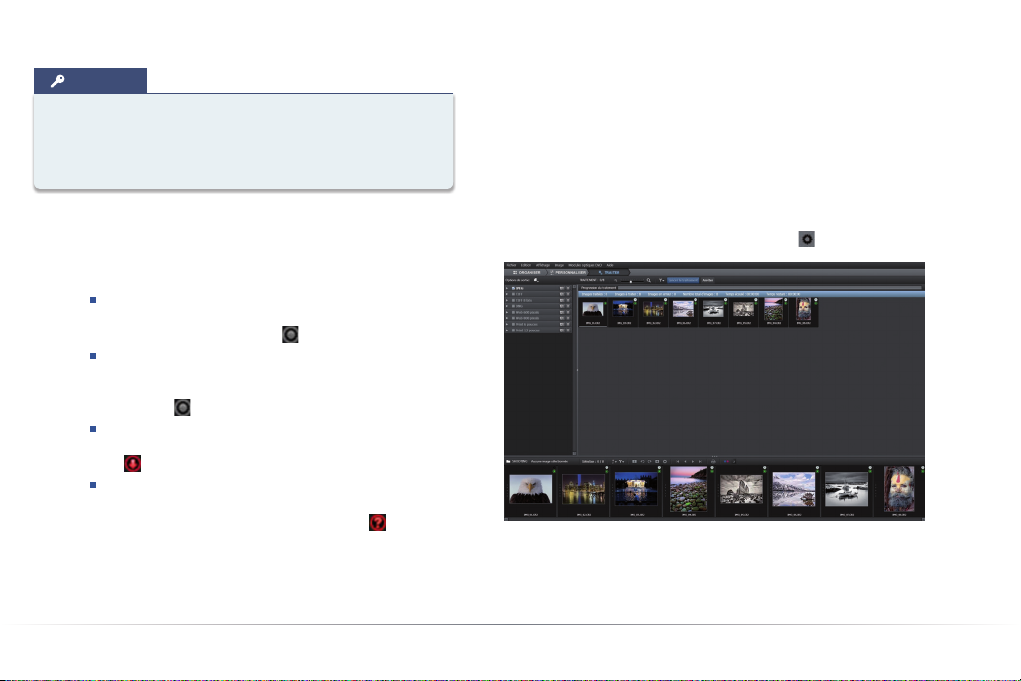
Lorsque que vous cliquez sur Traiter la sélection, les vignettes des
images en cours de traitement sont affichées accompagnées cha-
cune d’une barre de progression et d’une icône .
L’onglet “Traiter”.
Page 11
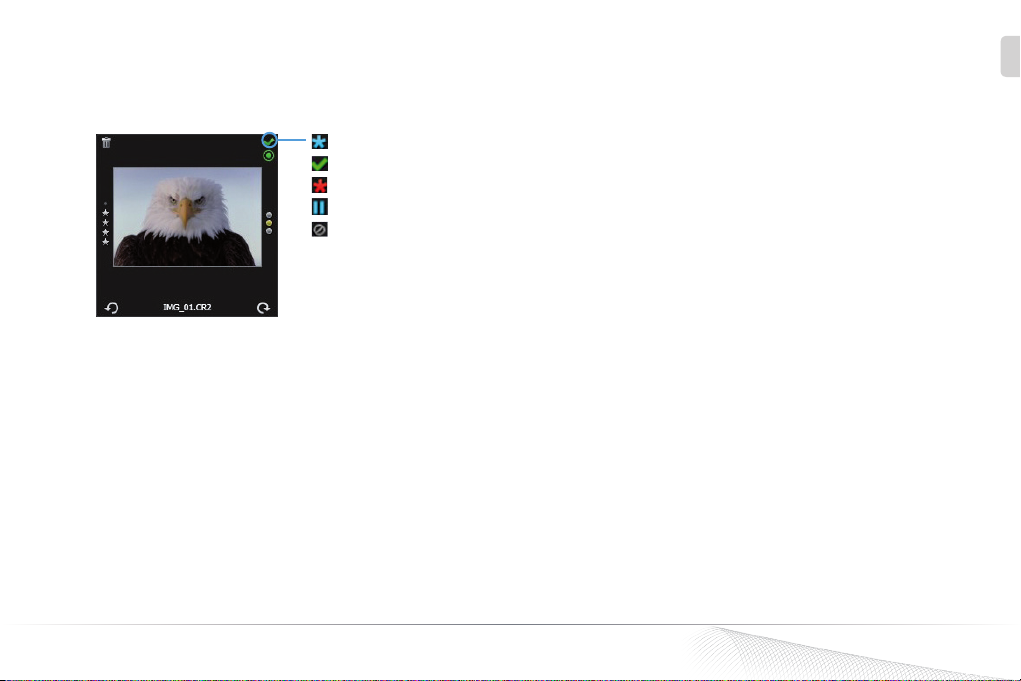
L’icône s’affichant dans le coin supérieur droit des vignettes de
l’Explorateur d’images indique le statut de traitement de chaque
image :
En attente de traitement.
Image traitée.
Erreur de traitement.
Ne pas traiter.
Traitement impossible.
FR
DxO Optics Pro 8 - Guide de démarrage rapide ©DxO Labs 2012 - Tous droits réservés
11
Page 12
Les autoréglages
3.1. Qu’est-ce qu’un autoréglage ?
Un autoréglage est systématiquement appliqué aux photos ouvertes
dans DxO Optics Pro. Les autoréglages permettent d’appliquer très
simplement un jeu de réglages à une ou plusieurs images, sans
entrer dans le détail des sous-palettes et de tous leurs outils. En
utilisant les autoréglages, vous pouvez appliquer vos réglages
favoris pour arriver au résultat que vous souhaitez, et ensuite, au
besoin, affiner les corrections de chaque image.
NOTE
Certains autoréglages ne sont disponibles que pour les images
au format RAW. Dans ce cas, ils sont notés “RAW seulement”.
Ils n’auront pas d’effet sur des images qui ne sont pas dans
ce format.
DxO Optics Pro propose d’emblée une trentaine d’autoréglages. Vous
pouvez y accéder dans la liste déroulante Autoréglages ,
située dans la barre d’outils supérieure des onglets Organiser
et Personnaliser, ou en faisant un clic-droit sur les vignettes de
l’Explorateur d’images.
12
Voici, ci-dessous, la description et le contenu des autoréglages DxO
par défaut et Aucune correction :
DxO par défaut : cet autoréglage est appliqué par défaut à toutes
les nouvelles images, à moins d’en avoir choisi un autre dans les
préférences. Il comprend les corrections de base suivantes, à
condition de disposer du module optique DxO adéquat :
Exposition auto.
Lumière réglée sur “Léger”.
Rendu des couleurs inchangé pour les fichiers JPEG, et
rendu des couleurs du fabricant de l’appareil photo dans le
cas des fichiers RAW.
Protection des couleurs saturées en mode automatique.
Bruit en mode automatique.
Distorsion en mode automatique.
Vignetage en mode automatique.
Aberration chromatique en mode automatique.
Netteté de l’objectif activée, et curseur Global réglé sur
− 0.50 (correction moyenne).
Page 13
NOTE
Toutes les autres corrections sont désactivées par cet
autoréglage.
Aucune correction : cet autoréglage désactive toutes les corrections DxO Optics Pro. Bien entendu, dans le cas d’un fichier RAW,
DxO Optics Pro assure toujours la conversion RAW (avec les réglages
de base prévus pour le boîtier).
NOTE
Vous pouvez créer vos propres autoréglages : après avoir appliqué vos corrections sur vos images, faites un clic-droit sur la
vignette, dans l’Explorateur d’images, et sélectionnez dans le
menu contextuel “Créer un autoréglage à partir des réglages
courants”.
Une description plus détaillée des autres autoréglages fournis avec
DxO Optics Pro est disponible dans le guide utilisateur.
3.2. Appliquer des autoréglages
Il existe plusieurs manières d’appliquer un autoréglage à une image :
Comme mentionné précédemment, un autoréglage par
défaut est automatiquement associé lors de la première
ouverture d’une image.
Par un clic-droit sur une vignette, dans l’Explorateur
d’images.
Depuis le menu déroulant Autoréglages, dans les onglets
Organiser ou Personnaliser.
A partir de la palette Editeur d’autoréglages (espace de
travail DxO - utilisateur avancé).
Vous pouvez également copier des corrections d’une image à l’autre :
Dans l’Explorateur d’images, faites un clic-droit sur la
vignette de l’image.
Sélectionnez Copier les réglages de correction dans le
menu contextuel.
Faites un clic-droit sur l’image de destination, puis
choisissez Coller les réglages de correction dans le menu
contextuel.
FR
DxO Optics Pro 8 - Guide de démarrage rapide ©DxO Labs 2012 - Tous droits réservés
13
Page 14
En savoir plus sur l’onglet « Personnaliser »
4.1. Description des fonctionnalités de la
fenêtre Image
4.1.1. Barre de commandes
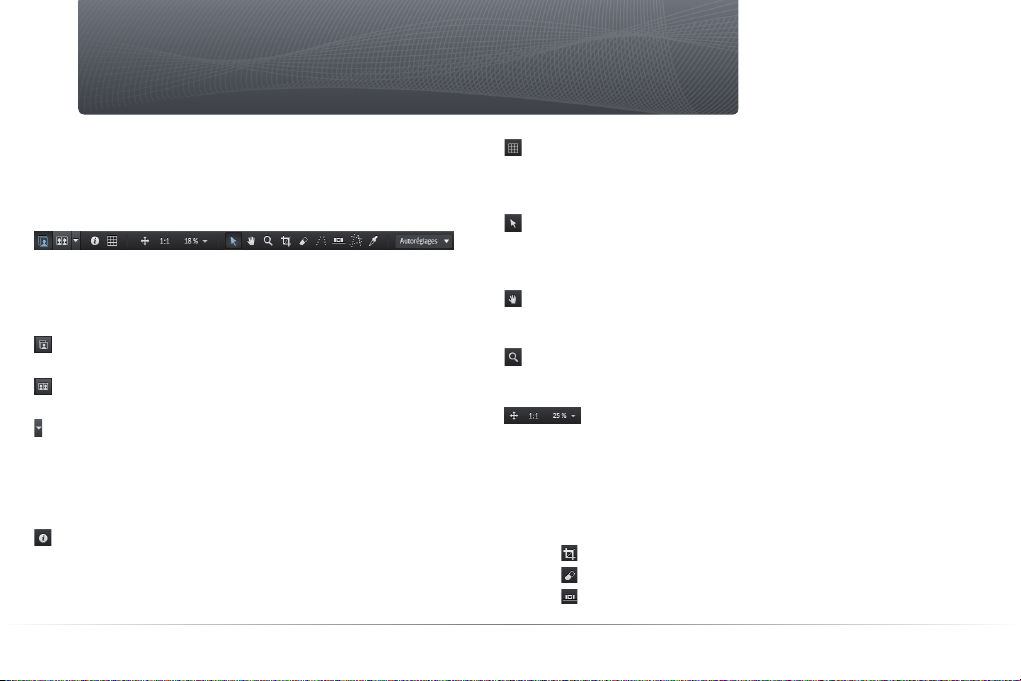
La barre de commandes.
La barre de commandes longe le haut de la fenêtre Image. Il s’agit
d’un élément d’interface disponible quel que soit l’espace de travail.
De gauche à droite, elle contient les commandes suivantes :
Affichage mono-image : affiche un aperçu de l’image telle qu’elle
sera corrigée.
Affichage des images côte à côte : l’image originale, avant
correction, et l’image corrigée sont affichées l’une à côté de l’autre.
Menu déroulant : permet de déterminer l’image de référence. En
général, il s’agit de l’image originale, avant correction, mais, si vous
avez créé des copies virtuelles, vous pourrez choisir l’une d’elles en
tant que référence. Dans ce cas, les copies virtuelles apparaîtront
dans la liste. Les copies virtuelles permettent de comparer des
corrections différentes.
Information : cette icône permet de faire apparaître ou
disparaître les légendes “avant correction” et “prévisualisation des
corrections”, incrustées dans l’image (sur Mac, allez dans le menu
Affichage>Afficher les informations sur les images).
14
Grille : permet d’afficher une grille en incrustation dans l’image ;
elle est particulièrement utile pour les corrections de distorsion et
de perspective (sur Mac, allez dans le menu Affichage>Afficher la
grille).
Outil flèche : en mode d’affichage mono-image, permet de
basculer entre l’image originale et l’image corrigée, en cliquant et
en maintenant le bouton de la souris (ou grâce au raccourci Ctrl+D
sur Windows).
Outil main : permet de déplacer la partie visible de l’image dans
toutes les directions. Lorsqu’un autre outil est utilisé, on peut activer
temporairement l’outil main en pressant la barre d’espace.
Loupe : autorise l’agrandissement de l’image affichée jusqu’à
1600 %. Vous pouvez également tracer un rectangle pour zoomer à
l’endroit voulu.
Zoom : la commande de zoom vous permet de choisir
un taux d’agrandissement de 2% à 1600 %. Les deux sous-icônes
seront employées pour : (1) ajuster l’affichage à la taille de l’écran
(2) pour un affichage à 100% (ou 1:1). Le menu déroulant permet
de choisir parmi des taux de zoom communs (6 possibilités, de 25 à
400%), ou de saisir une valeur de votre choix.
Outils de correction :
Recadrage.
Outil anti-poussières.
Rétablissement de l’horizon.
Page 15
Forcer les parallèles.
Rectangle.
Pipette de balance des blancs.
Balance couleur multi-points (sur Mac uniquement).
Le menu déroulant Autoréglages permet de choisir un
autoréglage à appliquer à votre image.
ASTUCE
Vous pouvez zoomer dans l’image à l’aide de la molette de la
souris (sur Mac, appuyez simultanément sur la touche Cmd).
À la première ouverture de DxO Optics Pro, l’espace de travail
par défaut est DxO – Premiers pas avec, à l’écran, une sélection
restreinte de palettes et sous-palettes. Par exemple, ni la palette
Courbe des tons, ni la sous-palette Anamorphose de volume, toutes
deux demandant un certain degré d’expérience, n’apparaîtront dans
cet espace. Par contre, d’autres sous-palettes telles que DxO Smart
Lighting (qui améliore le contraste de l’image) ou Distorsion seront
présentes.
ASTUCE
Pour déployer le contenu d’une sous-palette, cliquez sur la
petite flèche à gauche. (PC uniquement : vous pouvez également cliquer sur le titre de la sous-palette).
FR
4.1.2. Les palettes
Sur la droite de la fenêtre de DxO Optics Pro figurent les menus
déroulants d’affichage des différentes palettes et de sélection des
espaces de travail.
Une palette est un regroupement logique de sous-palettes. La
palette Lumière et couleur, par exemple, regroupe les sous-palettes
relatives aux corrections de base de la couleur, de l’exposition et du
contraste. Une sous-palette regroupe l’ensemble des réglages d’une
correction donnée (par exemple vibrance, saturation, etc. dans la
palette Accentuation des couleurs).
DxO Optics Pro 8 - Guide de démarrage rapide ©DxO Labs 2012 - Tous droits réservés
Une sous-palette est active lorsqu’une coche est présente devant
son nom. D’autre part, la mention « Auto » figurant à droite du
titre de la barre de sous-palette indique que les réglages de la
correction correspondants sont automatiquement optimisés par
DxO Optics Pro. Si vous modifiez un paramètre dans les souspalettes et que vous souhaitez revenir aux valeurs optimales
recommandées par DxO Optics Pro, cliquez sur la baguette magique
située à droite du réglage concerné. Dans le cas de l’espace de travail
DxO - Premiers pas, seules les palettes Histogramme, Lumière et
couleur et Corrections sont affichées.
15
Page 16
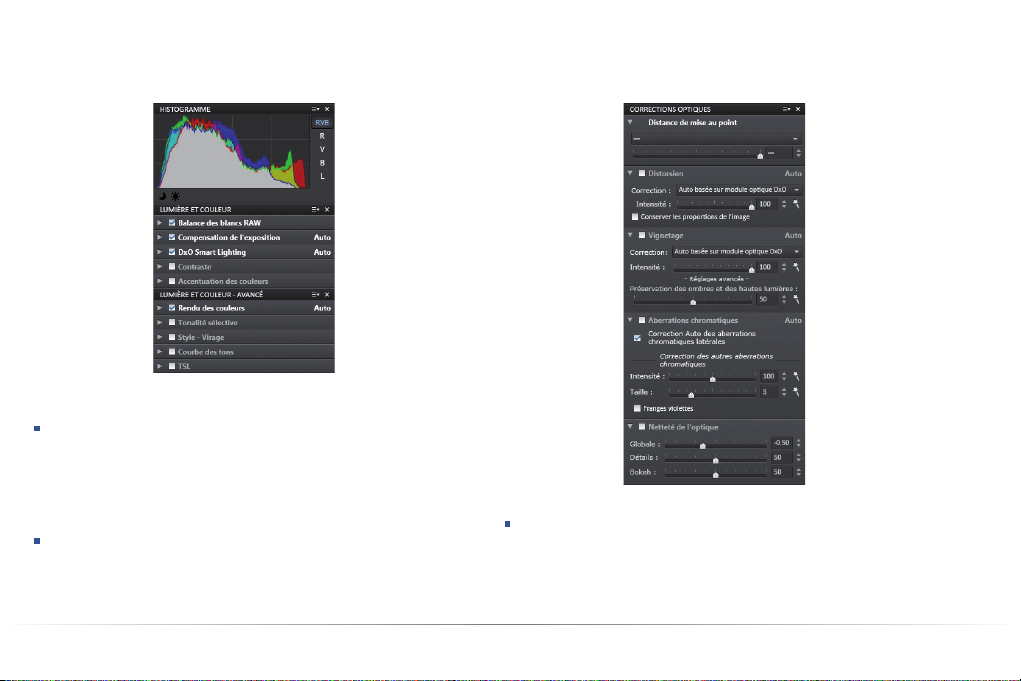
L’espace de travail DxO - Utilisateur avancé propose tous les outils
disponibles dans le programme :
et moyens) ou encore les Outils TSL (correction de teinte, de la
saturation et de la luminosité par canaux de couleurs).
Les palettes Histogramme,
Lumière et couleur et Lumière et couleur - Avancé.
Lumière et couleur : cette palette regroupe tous les outils de
corrections essentielles, comme la Balance des blancs (suppression
des dominantes de couleur), la Compensation de l’exposition
(récupération et ajustement des hautes lumières), le DxO Smart
Lighting (ajustement des parties sombres), le Contraste (global et
local) et l’Accentuation des couleurs (saturation et vibrance).
Lumière et couleur – Avancé : dans cette palette, vous trouverez
des outils de corrections avancés comme le Rendu des couleurs
(neutralité du rendu, simulation du rendu de films argentiques),
la Tonalité sélective (correction précise des tons clairs, sombres
16
La palette Corrections optiques.
Corrections optiques : cette palette vous permet de corriger
la Distorsion (qui affecte la majorité des objectifs), le Vignetage
(assombrissement des coins et des bords de l’image), les
Aberrations chromatiques (franges de couleur) et de compenser la
différence de piqué entre le centre et la périphérie de l’image.
Page 17
Géométrie : dans cette palette, vous pouvez Redresser l’horizon,
Corriger les parallèles ou la Perspective (notamment en photo
d’architecture), l’Anamorphose de volume (déformation d’objets
cylindriques ou sphériques, comme la tête des personnes photographiées au grand-angle) et Recadrer votre image (tailler l’image ou
changer le rapport hauteur/largeur).
Détail : cette palette contient des outils corrigeant le Bruit
numérique (réduction du bruit de luminance et des artefacts de
couleur du bruit de chrominance, notamment dans les images
à haute sensibilité ISO), la Netteté (accentuation globale de la
netteté), le Moiré (correction des artefacts à haute-fréquence) et les
Poussières (suppression des tâches générées par les poussières
présentes sur le capteur de l’appareil photo).
DxO FilmPack : si DxO FilmPack est installé sur votre ordinateur,
vous pouvez l’utiliser directement dans DxO Optics Pro, qui affiche
automatiquement cette palette dédiée. Vous pouvez simuler un vaste
choix de films et de traitements argentiques, Convertir les images
en noir et blanc en mélangeant les canaux et appliquer des effets
de Vignetage.
NOTE
La palette DxO FilmPack est également affichée dans l’espace
de travail DxO – Premiers pas.
4.2. Les copies virtuelles
FR
En corrigeant une image, vous pouvez souhaiter essayer différents
réglages et les comparer. Les copies virtuelles répondent parfaitement à ce besoin.
ASTUCE
Vous pouvez créer une copie virtuelle en faisant un clic-droit
directement sur une vignette ou en cliquant sur l’icône présente dans la barre de commandes de l’Explorateur d’images.
Dès que la copie virtuelle est créée, elle apparait dans l’Explorateur
d’images, et porte sur sa gauche un numéro . Le numéro « 1 »
indique l’image originale.
Une copie virtuelle se comporte exactement comme une image
normale. Elle peut être visualisée dans l’onglet Organiser et
corrigée dans l’onglet Personnaliser. Les copies virtuelles seront
traitées avec création de fichiers de sortie, de la même manière que
les autres images. Vous avez la possibilité de créer autant de copies
virtuelles que vous le souhaitez.
DxO Optics Pro permet de comparer des copies virtuelles entre
elles : dans la barre d’icônes de l’onglet Personnaliser se trouve le
menu déroulant avec ces trois icônes : . Dans le menu déroulant du mode d’affichage, vous pouvez désigner une copie virtuelle
comme image de référence.
DxO Optics Pro 8 - Guide de démarrage rapide ©DxO Labs 2012 - Tous droits réservés
17
Page 18
Personnaliser DxO Optics Pro
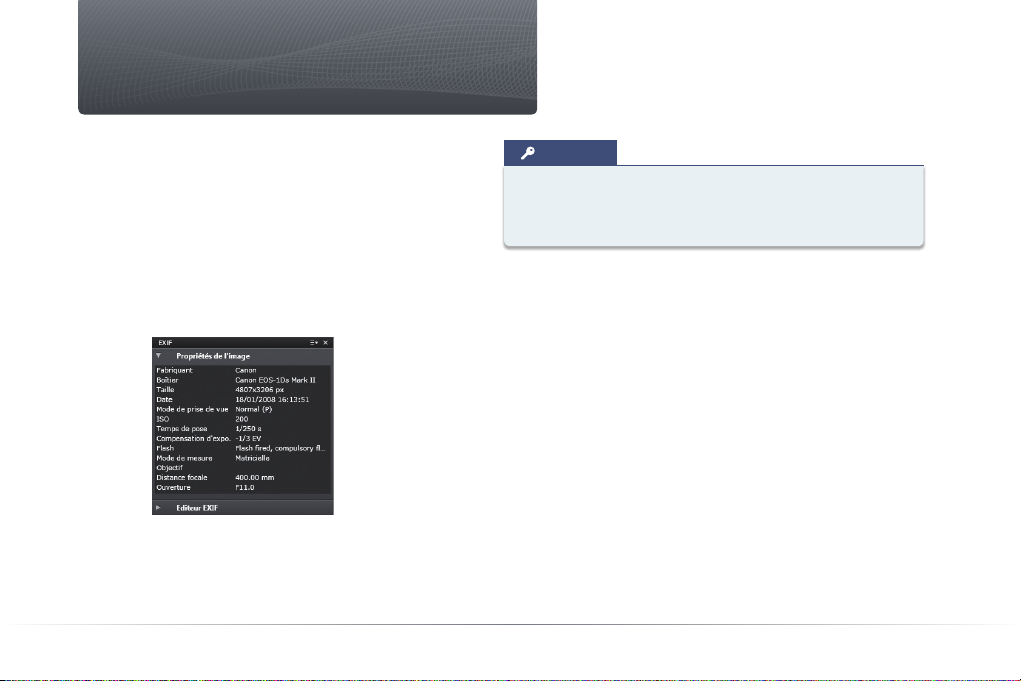
Vous pouvez personnaliser DxO Optics Pro en créant votre propre
espace de travail, par exemple en ajoutant un outil à l’espace
DxO – Premiers pas. Dans l’exemple suivant, on a ajouté la palette
EXIF, très utile pour afficher les informations enregistrées par le
boitier lors du déclenchement (vitesse d’obturation, ouverture du
diaphragme, sensibilité ISO, mode d’exposition, etc.). Cette palette
permet également d’ajouter le nom de l’auteur et un copyright à
l’image, ces informations étant jointes aux données EXIF de l’image
de sortie. En combinant les palettes de commande et leur disposition, vous pouvez créer une interface adaptée à votre méthode de
travail.
La palette EXIF ajoutée à l’espace de travail DxO – Premiers pas.
Vous pouvez également enregistrer de nombreux autoréglages
personnels, qui s’ajoutent aux jeux d’autoréglages d’origine. La liste
de ces autoréglages figure dans le guide utilisateur, et il est très
facile d’en créer d’autres, pour répondre à des besoins particuliers.
18
ASTUCE
L’interface et certains comportements de DxO Optics Pro
peuvent être modifiés dans les préférences (PC : menu
Édition / Mac : menu DxO Optics Pro).
Page 19
Imprimer les images
FR
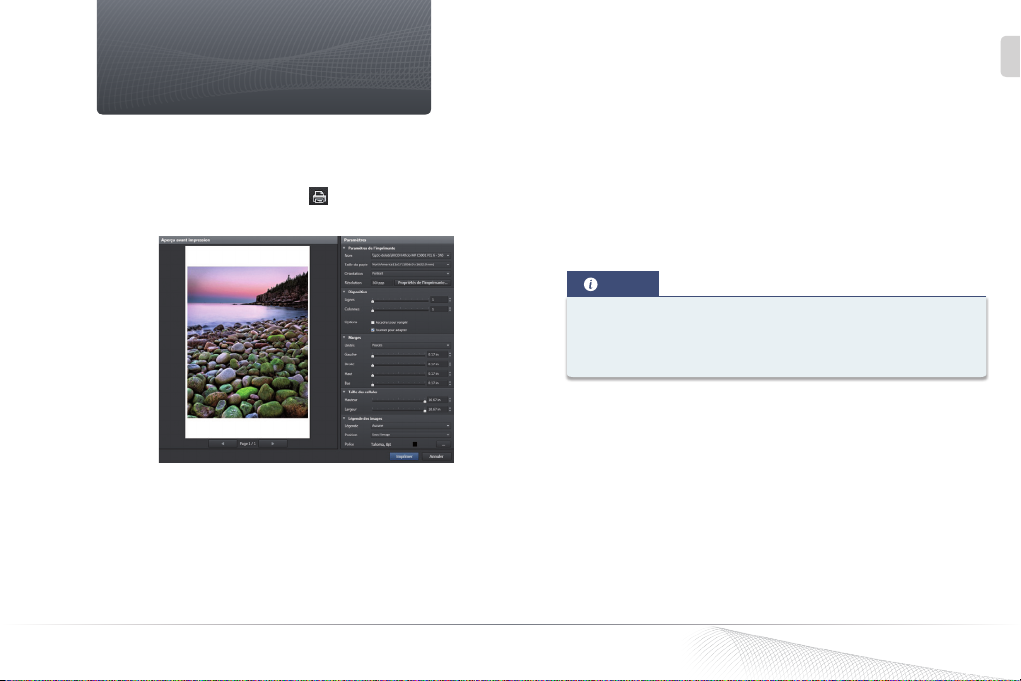
DxO Optics Pro 8 propose l’impression de vos photographies. La
boîte de dialogue est accessible à partir de n’importe quel onglet
– Organiser, Personnaliser, Traiter – par l’intermédiaire du menu
Fichier, ou en cliquant sur l’icône , dans la barre de commandes
de l’Explorateur d’images.
La boîte de dialogue d’impression.
La boîte de dialogue affiche un aperçu de l’image à imprimer.
La boîte de dialogue donne accès aux réglages du pilote d’impression.
L’impression est permise avec tout type de fichier pris en charge par
DxO Optics Pro, y compris les images au format RAW et les copies
virtuelles.
DxO Optics Pro 8 - Guide de démarrage rapide ©DxO Labs 2012 - Tous droits réservés
Plusieurs options de mise en page sont disponibles : remplir la page
avec la photo, pivoter, ajouter une légende extraite des métadonnées
(nom de fichier, date, etc.) et choisir sa position, sélectionner la police
de caractère et sa couleur. De plus, vous pouvez régler les marges,
créer des planches-contact en déterminant le nombre de rangées
et de colonnes, et en réglant la taille des cellules automatiquement
ou manuellement. Vous pouvez créer et imprimer plusieurs pages.
NOTE
Dans la version Windows, les outils d’impression apparaissent
dans une fenêtre flottante tandis que sur Mac, il s’agit d’une
boîte de dialogue du système d’exploitation.
19
Page 20
Summary
1. Introducing DxO Optics Pro 8 .......................... 21
1.1. Welcome!.......................................21
1.2. Basic principles of an image enhancement session ....22
2. Correct and process your first image in just a few minutes . 24
2.1. Step 1: Organize tab ..............................24
2.2. Step 2: Customize tab.............................25
2.3. Step 3: Process tab...............................28
3. Presets............................................. 30
3.1. What is a preset?.................................30
3.2. Applying presets .................................31
4. More about the Customize tab ......................... 32
4.1. Description of the functions in the Image pane ........32
4.2. Virtual copies....................................35
5. Customizing DxO Optics Pro ........................... 36
6. Printing images ..................................... 37
20
Thank you for choosing DxO Optics
Pro. This Quick-Start Guide will enable
you to get started with your software
right away by taking you through its
principal functionalities.
Online resources:
If you have any questions about this
software, please read the complete
documentation on our website at:
www.dxo.com/doc
Photos : Hector Martinez - Mike & Tammy Rice
Design : Stéphanie Morin (Arkyda)
Page 21
Introducing DxO Optics Pro 8
DxO Optics Pro user interface.
1.1. Welcome!
Welcome to a software world that offers you innumerable opportunities for enhancing your images automatically or by adjusting the
correction settings yourself.
EN
Discover how to process your photos and achieve better image quality to suit your own taste and subject matter the very first time you
use your software.
DxO Optics Pro 8 - Quick-Start Guide ©DxO Labs 2012 - All rights reserved
21
Page 22
Unlike many post-production programs that most of the time merely
present you with an uncorrected image and expect you to make all
the corrections and adjustments one by one, DxO Optics Pro corrects
your images automatically and precisely.
DxO Labs has calibrated and measured the defects in more than
160 camera bodies and over 8,600 camera/lens combinations.
The measurements for each camera/lens combination are stored
in individual DxO Optics Modules, which DxO Optics Pro uses to
automatically correct the defects for each specific combination.
So there are as many DxO Optics Modules as there are calibrated
camera/lens combinations.
If the type of camera body you use to take your pictures has been
calibrated by DxO Labs, DxO Optics Pro can:
Convert RAW image file types (e.g. CR2, NEF, RAF, etc.)
into various output formats (JPEG, TIFF, DNG).
Reduce noise automatically.
If, in addition, the DxO Optics Module for your particular camera/lens
combination is available, then you have access to automatic optical
corrections. If no DxO Optics Module is available, then you still have
access to all DxO Optics Pro corrections, but you have to perform
optical corrections manually (when needed).
Even if your camera model has not been calibrated by DxO Labs, you
can still manually apply DxO Optics Pro corrections to its JPEG files,
including manual optical corrections and manual noise reduction.
22
1.2. Basic principles of an image enhance-
ment session
You can use DxO Optics Pro to work directly on your images individually, or group them together to create a Project (an easy way to
regroup and organize the pictures you want to process).
DxO Optics Pro does not alter or modify your original image files; it
associates each image file with a set of correction settings, stored in
a sidecar file (bearing a “.dop” extension) along with the original file.
So you can modify or undo the corrections at any time.
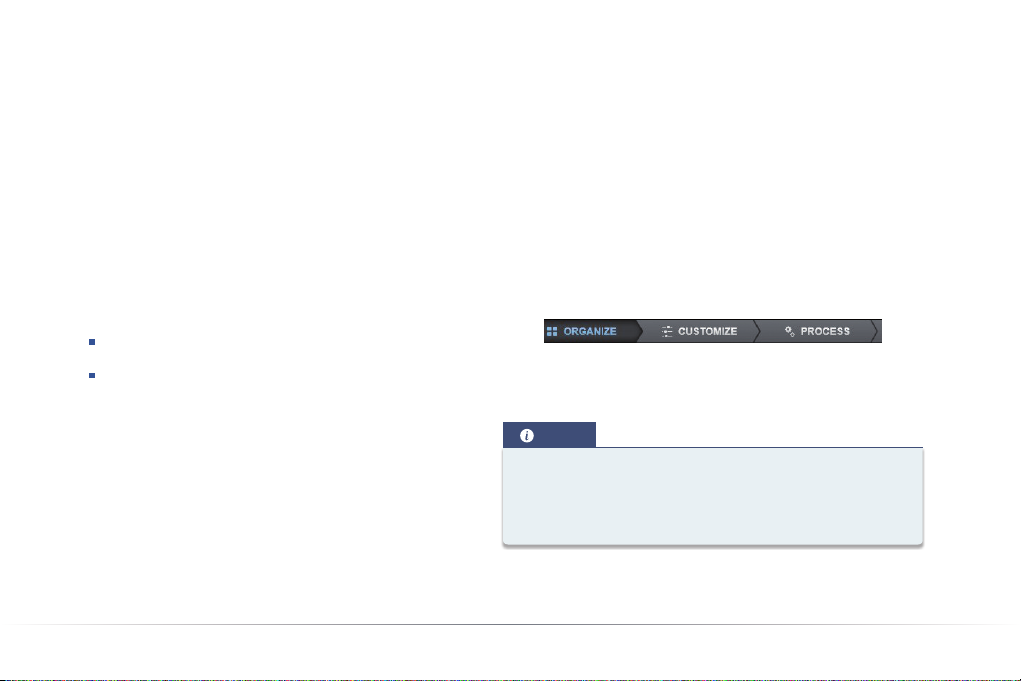
Managing your photos involves three main steps, each of which has
its own tab:
As soon as the program starts, the Organize tab lets you browse
the directories on your computer to select the image(s) you want
to work on.
NOTE
The bottom Image Browser pane shows thumbnails of the
images in the folder or the project you’re currently browsing.
The central Viewer pane shows a preview of the corrected photos that will be applied to your images when they are processed.
Page 23
The Customize tab allows you to both preview the corrections and
either manually or automatically adjust the correction settings for
specific images. The new settings are saved and will be applied when
you process the image (under the Process tab). You can save your
settings as presets and subsequently apply them to other images.
NOTE
All your corrections are saved automatically as you go along.
If you shut down the program before you have processed your
images, the next time you open your images in DxO Optics Pro,
you will find that the same settings have been remembered for
these images.
The Process tab is where you launch the automatic processing of all
the images you’ve selected.
TIP
You can also start processing by right-clicking on one of the
thumbnails in the image browser (or use the shortcut Ctrl + K
in Windows or Cmd + K on a Mac)..
EN
DxO Optics Pro 8 - Quick-Start Guide ©DxO Labs 2012 - All rights reserved
23
Page 24
Correct and process your first image in just a few minutes
DxO Optics Pro reads the camera and lens information recorded
in your image’s EXIF metadata. This information is used to link the
image with the appropriate DxO Optics Module and thus to automatically determine the optimum correction settings for each image.
IMPORTANT : When using DxO Optics Pro, always start from original,
unmodified files. Note that some download or cataloguing programs
may affect EXIF data while transferring photos onto your computer – for example, by replacing data or file names with their own. If
this is the case, DxO Optics Pro may no longer be able to read all
the shot data and apply its automatic settings. So we recommend
off-loading your memory cards onto the computer using “copy-andpaste” via a card reader, instead of using an image import or organizing program. However, if all original image data is preserved when
entered into a database, as in Adobe Photoshop Lightroom, you’ll
have no trouble processing them.
2.1. Step 1: Organize tab
When you open DxO Optics Pro, you’ll see the first of three tabs,
Organize, representing the first of the three steps needed to process
your photos. In the upper left-hand section, the Source pane helps
you browse through two types of image sources:
The files and directories in your operating system directory.
The projects you have created in DxO Optics Pro.
24
When you select File System in the Organize tab, a browser
shows you the contents of your hard disk in the left-hand column.
You can navigate through your volumes and folders to locate the
images you want to process. The image thumbnails and names will
appear in the Image browser as you go. This pane, located at the
bottom of the window, is a real tool for organizing and selecting your
images: you can adjust the size of the browser, and rate, rotate, or
delete the thumbnails in it.
TIP
You can use “drag and drop” to move or copy the images to
different folders on your hard drive: select images in the image
browser and drag them onto the desired target folder name in
the source browser (hold Shift to move your images, Ctrl/Cmd
to drop them).
A single click on the image thumbnail displays the image in the
Viewer – the main display panel. A combination of correction settings
(a preset) is automatically applied to the image. The preset by default
is named DxO default; it performs all optical corrections, noise
removal, and exposure optimization corrections. If you do not want to
use the default preset, you can select a different one – either created
by DxO Labs, or a custom one you have made yourself.
Page 25
A second icon, Project Database , can be found when you click on
the header of the Source browser.
TIP
When working with RAW formats, you can achieve more natural
color rendering by selecting the “DXO default - Neutral color”
preset, specially designed for RAW files.
In DxO Optics Pro, a project is a logical group of images that you want
to process. This organization tool is very useful for selecting and regrouping pictures stored in different folders. For more information
on how to create and use projects, please refer to the full User Guide.
The image browser.
The Image browser is the thumbnail strip located at the bottom of
the application window. It contains several important tools.
The following icons, always located in the thumbnail’s top right
corner in the Image browser, inform you about the status of the DxO
Optics Module associated with each image:
DxO Optics Module enabled and ready to use.
DxO Optics Module not available for this image.
DxO Optics Module available, but needs to be downloaded.
DxO Optics Module ambiguity (needs to be solved).
DxO Optics Module ambiguity (solved).
In the third case (“DxO Optics Module available, but needs to be
downloaded”), DxO Optics Pro displays a list of DxO Optics Modules,
identified as matching your equipment via the picture’s EXIF data,
and asks you to select which one(s) you want to download.
You can also see another small icon , below the module availability
icon, which is shown by default and means that the file is awaiting
processing.
At this stage, you can start the image processing without making any
manual corrections, either by right-clicking on the thumbnail in the
Image browser, or by going directly to the Process tab.
2.2. Step 2: Customize tab
While in the Customize tab, you can still see the thumbnails in the
Image browser at the bottom of the screen, and above it the Viewer
pane, which lets you preview the corrections performed on your
images. You can also display both “before” and “after” images, as
follows:
Single image display: displays a preview of the image as it will
be corrected. If you click on an image in the viewer and hold down
the mouse button, the “before correction” image will be shown as
long as you hold.
EN
DxO Optics Pro 8 - Quick-Start Guide ©DxO Labs 2012 - All rights reserved
25
Page 26
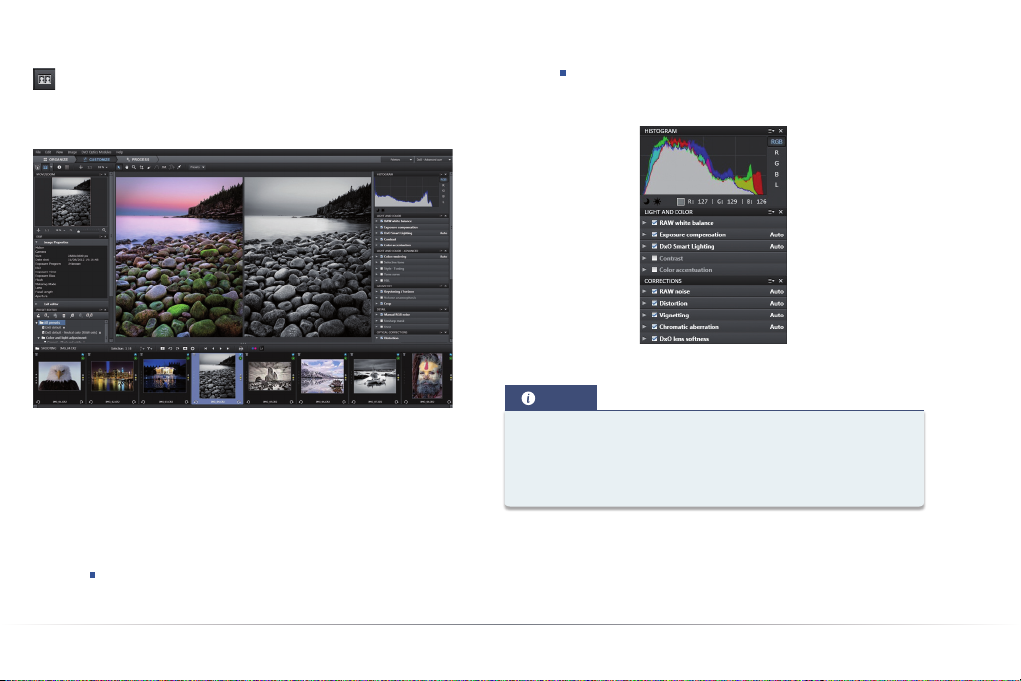
Dual image (side-by-side) display: displays the reference
image – i.e., the uncorrected image – and a preview of the image as
it will be corrected by DxO Optics Pro next to it. You can zoom in if
necessary, to compare details in the same area of both images.
DxO - Advanced user workspace, which gives you access
to the complete set of tools.
You can move instantly between these two workspaces.
Palettes and sub-palettes available in the “First steps” workspace.
An example of dual image display
(“before/after correction” images side by side).
If you are not satisfied with the default correction, the best thing is
to try another preset from the dropdown menu (see part 3 below for
more details).
You can also manually adjust your images using the correction
palettes. Two workspaces, containing different palettes, are
available to you:
DxO - First steps workspace which opens by default when
you use the program for the first time, and contains a set
of basic tools.
26
NOTE
If you begin with DxO Optics Pro, we strongly recommend the
“First steps” workspace, in order to see and learn how the
slider actions can change your photo (make sure to use the
“before/after” display mode).
Page 27
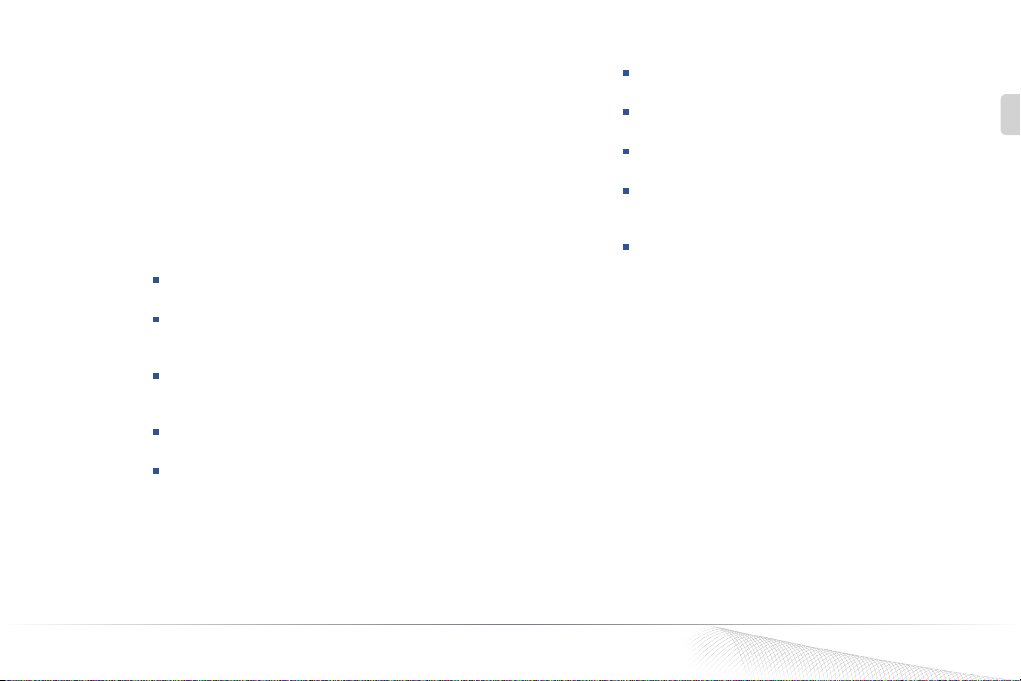
The DxO - First steps workspace gives you access to the following
palettes:
Histogram: Shows the distribution of color and luminance levels
within the image. The DxO Optics Pro histogram tool calculates the
brightness values for each color channel (Red, Green, Blue), and displays them all superimposed or individually on the same graph. You
can choose to display each channel separately. A global Luminance
display mode is also available.
Light and Color: For correcting exposure, contrast, and color balance
with the following sub-palettes:
White balance: Corrects color shifts (e.g., indoor pictures
with a yellow cast).
Exposure compensation: Recovers and adjusts the
highlights and the bright tones in the image, or brightens
an underexposed image, etc.
DxO Smart Lighting: Automatically lifts the shadows and
optimizes the image contrast (three predefined modes are
available).
Contrast: Adjusts the global contrast and the microcon-
trast (local contrast).
Color accentuation: Enhances the colors globally (satu-
ration) or with a smarter, more selective method (vibrancy).
Corrections : Remove or corrects the lens and sensor defects that
affect your image. The following defects are corrected automatically (if your equipment is supported) and can, in all cases, also be
adjusted manually:
Noise: Grain and color artifacts produced by the camera,
especially at high ISO settings.
Distortion: Mostly (but not only) affects images shot with
wide-angle lenses, in which straight lines appear curved.
Vignetting: The corners of the image are darker than the
center, especially at wide aperture settings.
Chromatic aberration: Colored artifacts (often purple or
green) appear in sharp transitions between dark and light
areas, often along edges.
DxO Lens softness: Blur introduced by the lens (correc-
tion for this defect is only available if the corresponding
DxO Optics Module for your image is loaded).
Do remember, however, that the effects of some of these corrections (i.e., noise, chromatic aberration, and lens softness) are better
viewed at zoom factors over 75%. However, with DxO Optics Pro 8,
the noise correction preview at every zoom level is available if you
check the relevant option in Preferences.
You can try out these very powerful corrections on a few images:
moving the sliders even slightly can have a significant effect. Always
remember, though, that all these corrections are reversible, as they
never affect original files. So when you first try out the program,
don’t hesitate to play around and push the settings a bit too far to
learn how each correction behaves.
EN
DxO Optics Pro 8 - Quick-Start Guide ©DxO Labs 2012 - All rights reserved
27
Page 28
TIP
You can restore a slider’s default value by double-clicking on its
handle. Otherwise, you can simply use the DxO default preset
to restore all settings to their default value.
IMPORTANT : If distortion, lens softness, and vignetting corrections
are not available in automatic mode, this means that DxO Optics Pro
has been unable to associate a DxO Optics Module to your image,
because:
No DxO Optics Module is available for the camera/lens
combination used to take the picture (status icon: ).
DxO Optics Pro is not able to identify the appropriate DxO
Optics Module, because your image’s EXIF data has been
modified or corrupted (status icon: ).
The appropriate DxO Optics Module, although available, is
not present on your computer (status icon: ).
There is a DxO Optics Module ambiguity (status icon: ),
which means that DxO Optics Pro is not able, for various
reasons, to identify the correct module among a choice of
different modules.
28
2.3. Step 3: Process tab
Once you are satisfied with all the settings applied to your images,
you can process them to generate a new file incorporating all the
corrections. By default, the program is configured to generate highquality JPEG files in the same directory where the original shots
are located. When you hit the Start processing button, the selected
thumbnails are displayed along with a progress bar.
An icon appears on the right-side above the images currently
being processed. A green checkmark replaces the cogs once processing is complete.
Process tab.
Page 29
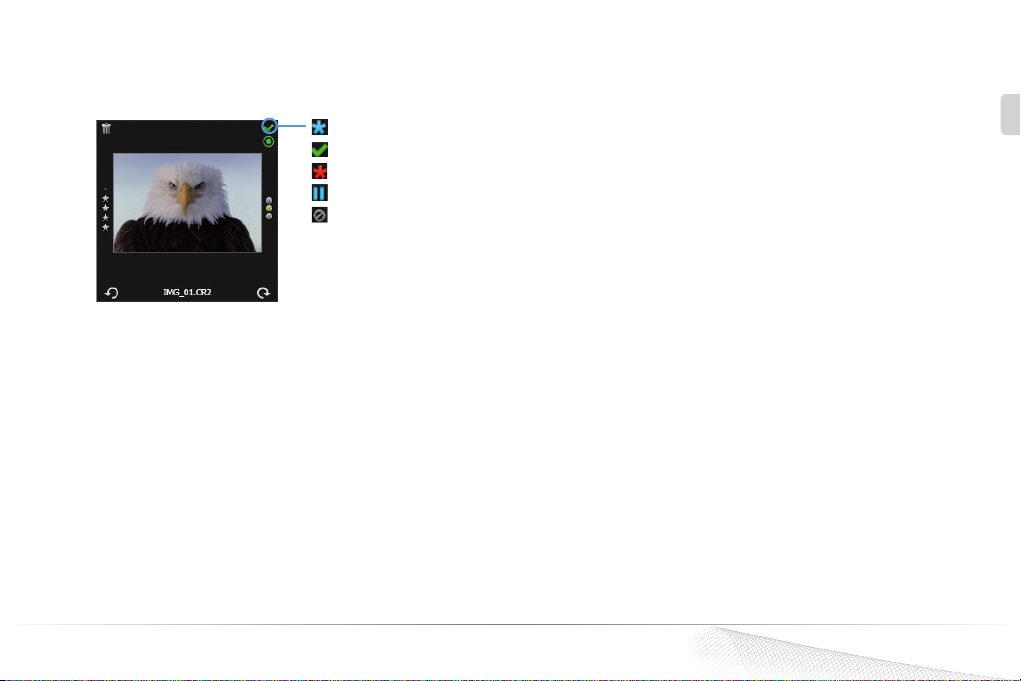
The icon at the top right corner of the Image browser thumbnails
indicates the processing status of each image:
Waiting to be processed.
Processed image.
Processing error.
Do not process.
Cannot process.
EN
DxO Optics Pro 8 - Quick-Start Guide ©DxO Labs 2012 - All rights reserved
29
Page 30
Presets
3.1. What is a preset?
A preset is automatically applied to a photo after it is selected and
displayed in the Image browser. A preset is a powerful tool that
allows you to apply a combination of settings (supplied with DxO
Optics Pro, or the ones you have created) to one or more images in
one go, without having to venture into the details of the correction
palettes each time. By using presets, you can apply your favorite
settings to achieve the kinds of global results you want. After you
apply a preset, you can fine-tune corrections and adjustments that
perhaps need to be done on an image-by-image basis.
NOTE
Some presets are only available for RAW images: these presets
are flagged as “RAW only” to warn you that they will not produce
the expected results on non-RAW images.
DxO Optics Pro comes with nearly 30 presets. These can be accessed
from the Presets dropdown menu in the upper command bar of the
Organize and Customize tabs, or at any time with a right-click on
the thumbnails in the Image browser at the bottom of the screen.
30
Here are descriptions of the DxO default and No correction presets:
DxO default preset: This basic preset is applied by default with all
new images, unless you select another preset in the preferences. It
includes all the following basic corrections, provided you have the
necessary DxO Optics Modules:
Autoexposure.
Lighting set to “Slight auto”.
Color rendering unchanged for processing JPEG images,
and default camera color rendering as set by the manufacturer for processing RAW images.
Protect saturated colors set to “auto”.
Noise set to “auto”.
Distortion set to “auto”.
Vignetting set to “auto”.
Chromatic Aberration set to “auto”.
Lens softness activated and “Global” slider set to − 0.50
(i.e. average correction).
Page 31
NOTE
All other corrections are disabled in the “DxO default“ preset.
No correction : This preset disables all DxO Optics Pro corrections. Of
course, when it is applied to a RAW image, DxO Optics Pro still takes
care of RAW conversion (with the most basic settings appropriate for
your camera).
NOTE
You can very easily create your own presets: when you are
finished fine-tuning the corrections and adjustments to your
image, simply right-click on the thumbnail of that image in the
Image browser, and select Create a preset from the current
settings in the context menu.
A detailed explanation of the other presets provided with DxO Optics
Pro is given in the full User Guide.
3.2. Applying presets
There are several ways of applying a preset to an image:
As mentioned above, a default preset is automatically
associated with an image the first time it is opened.
By right-clicking at any time on a thumbnail in the Image
browser.
From the Presets dropdown menu in the upper command
bar, both in the Organize and Customize tabs.
From the Preset editor palette (advanced user workspace).
Note that you can also apply correction settings from one image to
other images as follows:
Right-click on the thumbnail of the corrected image in the
Image brower.
Choose “Copy correction settings” in the context menu.
Right-click on the selected destination images and choose
“Paste correction settings” in the context menu.
EN
DxO Optics Pro 8 - Quick-Start Guide ©DxO Labs 2012 - All rights reserved
31
Page 32
More about the Customize tab
4.1. Description of the functions in the
Image pane
4.1.1. Upper command bar
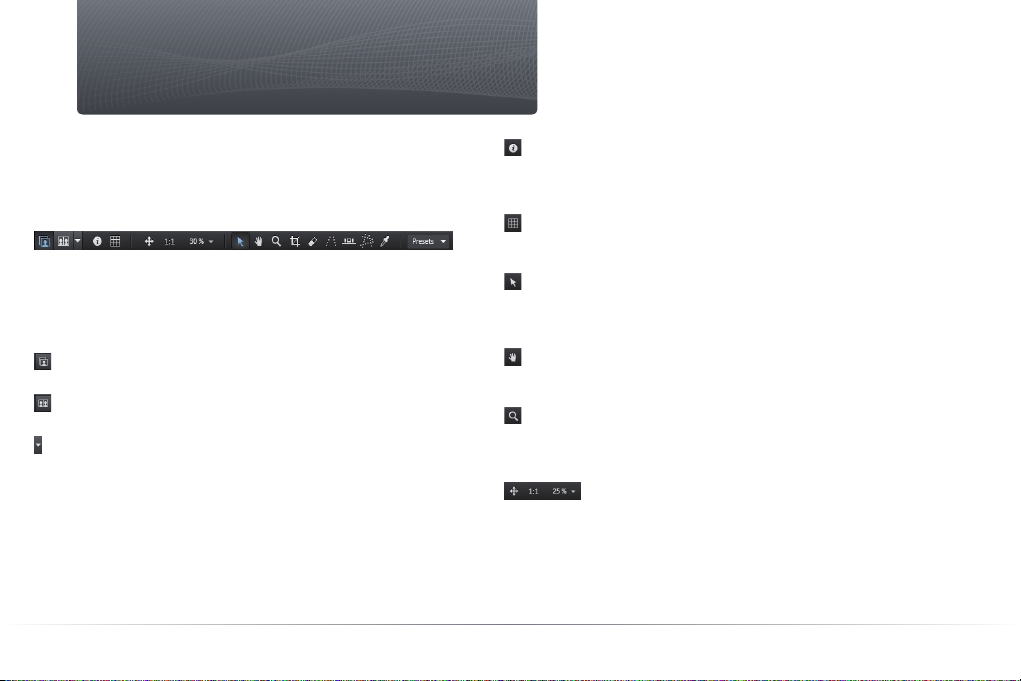
The command bar.
The upper command bar runs along the top of the Viewer pane. It is
an integral part of the user interface, whatever the workspace you
choose. From left to right, it contains the following groups of icons
and commands:
The Single image display icon displays a preview of the image as
it will be corrected.
The Dual image display icon shows the reference image and the
corrected image side by side.
The Drop-down icon lets you decide which image will be the refe-
rence image. Most of the time it will be the image before correction.
But if you have created virtual copies of an image, you can use one of
them as the reference image. In this instance, the processed virtual
copy (copies) will appear in the drop-down menu along with the reference image. Using a virtual copy allows you to compare one set of
corrections against another, instead of one set of corrections against
the original.
32
The Information icon shows or hides two semi-transparent cap-
tions: “before correction / correction preview” tells you which image
is being displayed (on a Mac, go to Menu>Show image information
overlay).
The Grid icon shows or hides a grid overlay over the image; this is
particularly useful for correcting distortion and keystoning (Windows
only. On Macs, go to the View menu to display the grid).
The Ordinary pointer tool, when active and when the “Single
image display” mode is enabled, toggles between the corrected
image and the reference image by simply clicking on the reference
image (Ctrl + D has the same effect).
The Hand tool can be used to move the displayed area of the
image in all directions. While using any other tool, the Hand can be
called temporarily by holding down the space bar.
The Magnifying glass tool lets you magnify the image by a factor
of up to 1600% when you click with it on the image. It also lets you
draw a rectangle on the image to define an area you want to zoom
in to.
The Zoom commands let you adjust the scale of the
display between 2% and 1600%. The first two sub-icons are used:
(1) to select a fit-to-screen display and (2) to select a 100% (or 1:1
scale) display. The drop-down menu lets you directly access commonly-used display factors (six choices, from 25 to 400%), or enter
the zoom factor you want.
Page 33
The Correction tools:
Cropping.
Dust removal.
Horizon adjustment.
Parallel correction.
Perspective correction.
White balance.
Multi-point color balance (Mac only).
The Presets dropdown list allows you to choose a preset to
apply to your image.
TIP
If your mouse has a scroll wheel, this is the fastest way to zoom
in and out on the image. On a PC, simply use the scroll wheel;
on a Mac, keep Cmd pressed while using the scroll wheel.
4.1.2. Palettes
To the right of the window you will see the dropdown menus for
selecting workspaces and choosing which correction palettes to
display.
A palette is a logical group of sub-palettes (rollups). The Light and
Color palette, for example, combines all the rollups used for the basic
color, exposure, and contrast corrections. A sub-palette combines all
the settings for a given correction (for example, vibrancy saturation,
etc., in the Color accentuation palette).
The first time you open DxO Optics Pro, the DxO – First steps
workspace will be set by default. Only a subset of all available palettes
and sub-palettes will be displayed on the screen. For example,
neither the Tone Curve sub-palette, nor the Volume Anamorphosis
sub-palette, which both need a certain degree of experience, will be
displayed. On the other hand, a number of sub-palettes such as DxO
Smart Lighting (which radically improves the contrast of any image)
and Distortion will both be visible.
TIP
A rollup is opened or closed simply by clicking on the arrow on
the left-hand side of its header. (For Windows only: you can also
click on the header to open or close the rollups).
A rollup is active when there is a checkmark in front of its name. The
word “Auto” to the right of the rollup bar means that DxO Optics Pro
has automatically optimized the settings for this correction.
If you change a setting on a rollup and want to revert to the optimum
value recommended by DxO Optics Pro, simply click the small magic
wand icon to the right of the setting concerned.
In the case of the DxO - First steps workspace (the default workspace
the first time your run the program), only the Histogram, Light and
Color, and Corrections palettes are displayed.
EN
DxO Optics Pro 8 - Quick-Start Guide ©DxO Labs 2012 - All rights reserved
33
Page 34
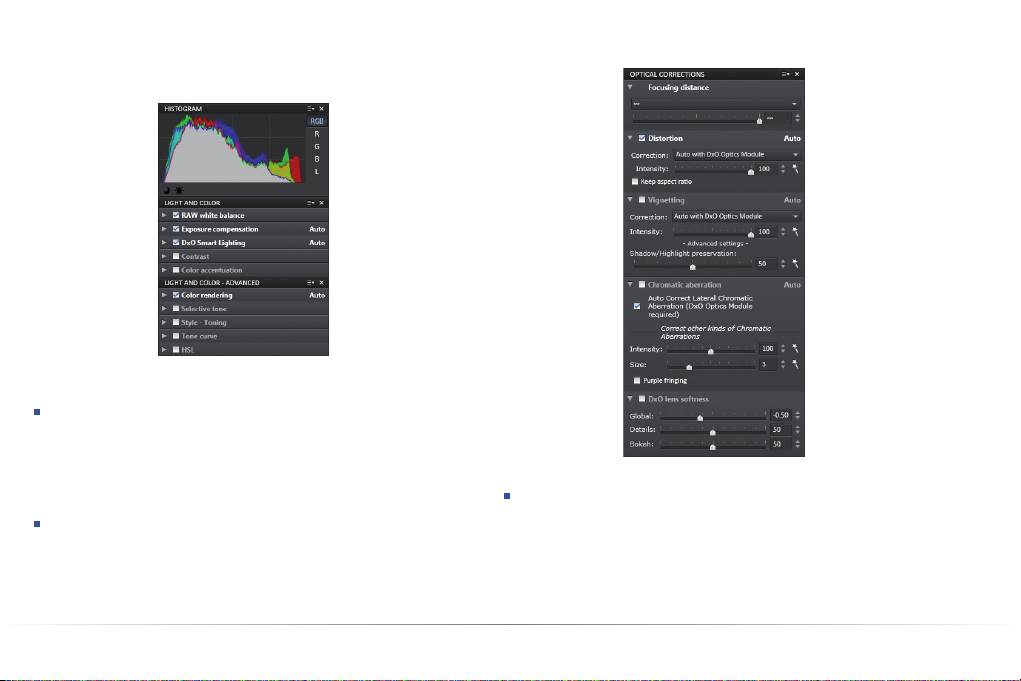
The DxO – Advanced user workspace offers you all of the tools that
currently exist in the program, as follows:
The Histogram, Light and Color
and Light and Color - Advanced palettes.
Light and Color: Groups all the tools required to perform the basic
exposure, contrast, and color corrections to your images, such as
RGB White balance (to remove color casts), Exposure compensa-
tion (to recover bright tones and highlights), DxO Smart Lighting (to
correct backlit photos and open shadows), Contrast (both global and
local), and Color accentuation (saturation and vibrancy).
Light and Color – Advanced: This palette gives you access to
advanced tools such as Color rendering (to fine-tune neutral
rendering or to apply film rendering), Selective tone (to selectively
correct bright, dark or midtone areas), Tone curve (to adjust global
contrast and brightness), and HSL (to correct hue, saturation, and
luminance on a per-color channel basis).
34
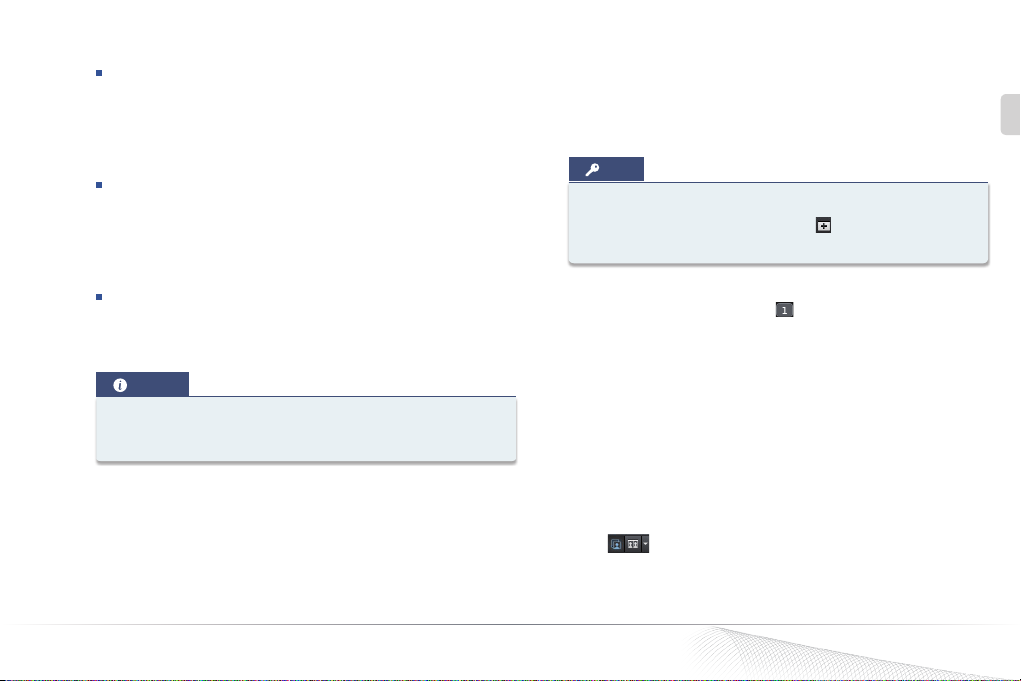
The Optical corrections palette.
Optical corrections: This palette lets you enhance the optical quality
of your gear with specialized tools such as Distortion (affecting most
of lenses in several ways), Vignetting (darkening of image corners
and edges), Chromatic aberration (color fringes along high-contrast
edges), and DxO lens softness (an exclusive tool to homogenize the
sharpness between the edges and center of the image).
Page 35
Geometry: In the Geometry palette, you can correct and modify
the image using the Horizon tool (to level the image), Keystoning (to
force parallels or a rectangle, mostly for architectural photography),
Volume anamorphosis (to correct distorted spherical or cylindrical
objects, such as people or heads taken with wide-angle lenses), and
Crop (to reframe the picture or change the aspect ratio).
Detail: The Detail palette contains another set of important
corrections sliders, such as Noise (to reduce the luminance and
chromatic artifacts in high-ISO pictures), Unsharp mask (to adjust
image sharpness), Moiré (to control the level of high-frequency
artifacts), and Dust (to eliminate camera sensor dust spots showing
in the image).
DxO FilmPack : If DxO FilmPack is installed on your computer, you
will be able to use it in DxO Optics Pro, which will display its dedicated palette of tools to simulate a large choice of films, convert to
black and white with the channel mixer, and apply vignetting effects.
NOTE
If DxO FilmPack is installed on your computer, the palette will
be displayed in the DxO – First steps workspace as well.
4.2. Virtual copies
While adjusting an image, you may find that you want to try out different settings on the same image at the same time. Virtual copies
are the perfect solution, as explained below.
TIP
You can create a virtual copy by right-clicking directly on a
thumbnail, or by clicking on the icon in the Image Browser
command bar.
Once the virtual copy has been created, it will appear in the image
browser and displays a number to the left of its filename (the
number “1” is always assigned to the original image).
A virtual copy behaves exactly as the original image, so you can view
it in the Organize tab, or adjust its settings in the Customize tab.
When you process your images, an output image will be generated
for each virtual copy you select. You can create as many virtual
copies as needed.
DxO Optics Pro’s virtual copy function goes even further: since you
can compare virtual copies with each other, you can also specify
which one to use as the reference image when comparing the corrections with the current image (by default, the reference image is
the uncorrected original version). Go to the display mode dropdown
menu , and replace the reference image with any virtual copy
of the same image.
EN
DxO Optics Pro 8 - Quick-Start Guide ©DxO Labs 2012 - All rights reserved
35
Page 36
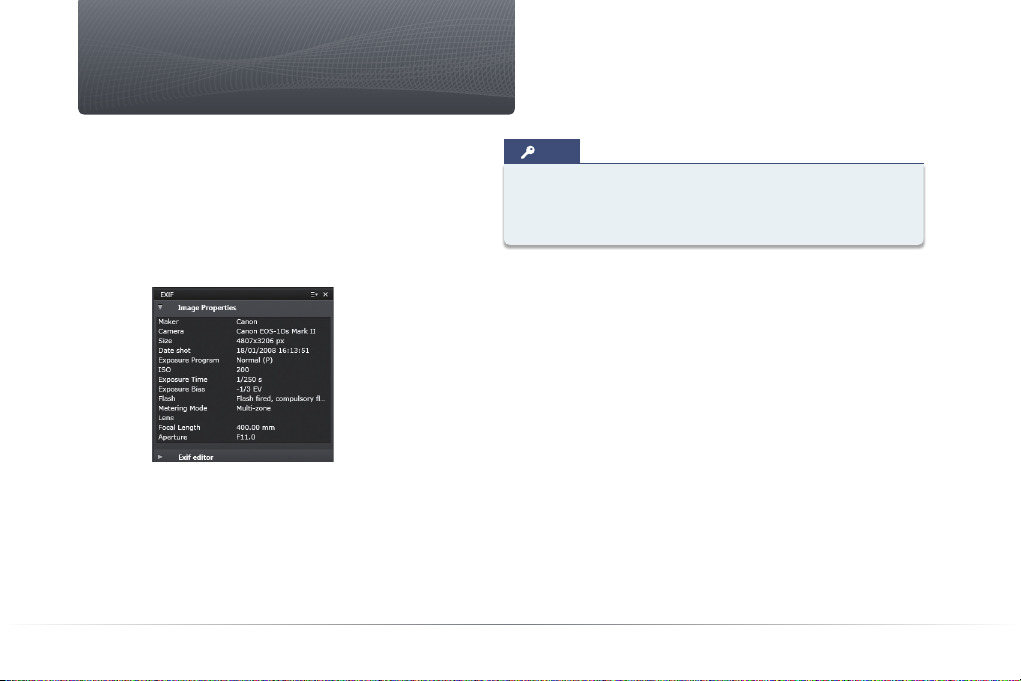
Customizing DxO Optics Pro
You can customize DxO Optics Pro by creating your own workspace by
simply adding a function to the DxO – First steps workspace – here,
the EXIF palette, which is very handy for showing the shooting data
as recorded by your camera (shutter speed, aperture value, ISO,
metering mode, and so on), as well as author and copyright details,
to be stored in the output image’s EXIF data. By combining the
control palettes and the way they are arranged, you really can create
your own interface for correcting images efficiently.
The EXIF palette added to the DxO - First steps workspace.
Customizing also involves saving as many custom settings as you
choose to create, all of which will be added to the library of presets
already provided with the program. A list of these presets appears
in the main User Guide, and it’s easy to create others of your own.
36
TIP
The look and behavior of DxO Optics Pro can also be customized
via the Preferences sub-menu accessible from the Edit menu
(Windows) or DxO Optics Pro menu (Mac).
Page 37
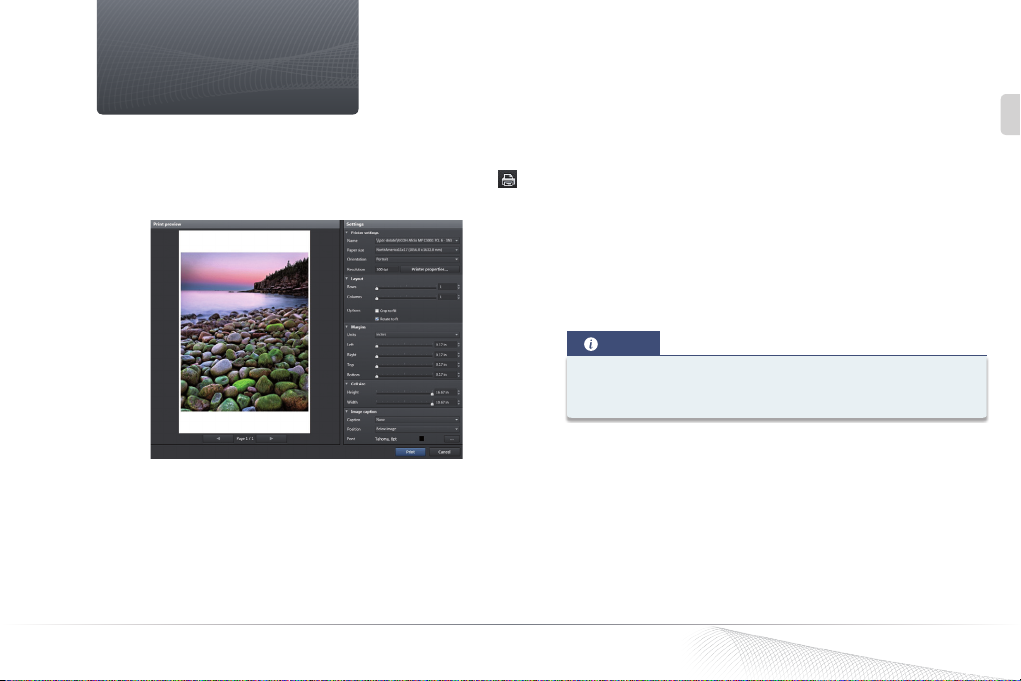
Printing images
DxO Optics Pro 8 adds the possibility of printing your photos. You can
access the print dialog box from any of the Organize, Customize or
Process tabs, via the File menu, or by clicking on the Print button
in the Image browser command bar.
The print dialog box.
The dialog box shows a preview of the page to be printed.
Please note that the print dialog box gives you direct access to the
printer driver settings.
EN
Printing is possible from any kind of file supported by DxO Optics Pro,
including RAW files and, of course, virtual copies.
There are different options for the page layout: fill the page with the
picture, rotate, add a caption taken from the metadata (filename,
date, etc.), choose the caption position, and select the font (plus the
color).
Furthermore, you can set the margins, create contact sheets by
adding multiple pictures, set the number of columns and lines, and
adjust the size of the cells (automatically or manually). You can also
create and print multiple pages.
NOTE
In the Windows version, the print tools appear in a floating
window; on a Mac, they show up in a system dialog box.
DxO Optics Pro 8 - Quick-Start Guide ©DxO Labs 2012 - All rights reserved
37
Page 38
Inhalt
1. Einführung in DxO Optics Pro 8.......................................39
1.1. Willkommen! ..................................................39
1.2. Grundlagen einer Sitzung zur Bildoptimierung ......................40
2. Korrigieren und verarbeiten Sie Ihr erstes Bild in nur wenigen Minuten ...42
2.1. Schritt 1: Register Organisieren ...................................42
2.2. Schritt 2: Register Bearbeiten ....................................44
2.3. Schritt 3: Register Entwickeln ....................................47
3. Presets...........................................................48
3.1. Was ist ein Preset?..............................................48
3.2. Presets anwenden ..............................................49
4. Mehr über das Register Bearbeiten...................................50
4.1. Beschreibung der Funktionen im Bild-Fenster.......................50
4.2. Virtuelle Kopien ................................................53
5. DxO Optics Pro individuell konfigurieren ..............................54
6. Bilder drucken ....................................................55
38
Vielen Dank, dass Sie sich für DxO
Optics Pro entschieden haben.
Diese Kurzanleitung führt Sie durch
die wichtigsten Funktionen, damit
Sie sofort mit der Software starten
können.
Online-Dokumentation:
Wenn Sie irgendwelche Fragen zu
dieser Software haben, werfen Sie
bitte einen Blick in die vollständige
Dokumentation auf unserer Website
unter (www.dxo.com/doc).
Photos : Hector Martinez - Mike & Tammy Rice
Design : Stéphanie Morin (Arkyda)
Page 39
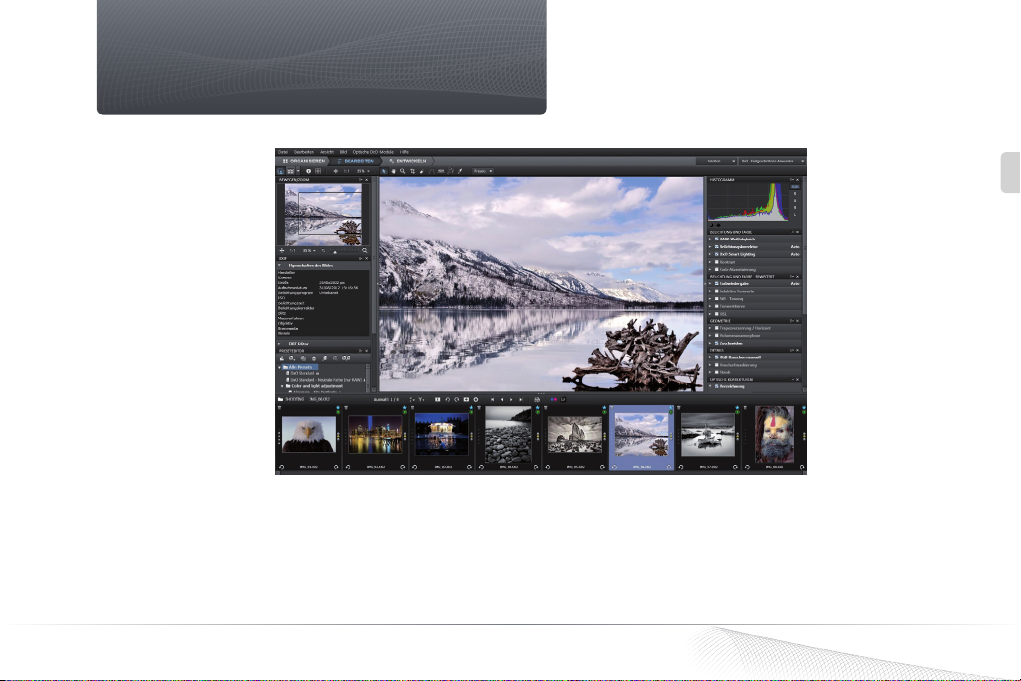
Einführung in DxO Optics Pro
DxO Optics Pro Benutzeroberfläche.
DE
1.1. Willkommen!
Willkommen zu einer Softwarewelt, die Ihnen zahllose Möglichkeiten
gibt, um Ihre Bilder automatisch zu verbessern, oder Korrekturen
manuell anzuwenden.
DxO Optics Pro 8 - Kurzanleitung zum schnellen Einstieg ©DxO Labs 2012 - Alle Rechte vorbehalten
Sie werden lernen, wie Sie Ihre Bilder entwickeln, wenn Sie
Ihre Software erstmalig nutzen. Danach werden Sie Ihr Wissen
erweitern, sodass Sie Schritt für Schritt die Qualität Ihrer Fotos
verfeinern können um sie Ihrem Geschmack und bevorzugten
Themen anzupassen.
39
Page 40
DxO Optics Pro arbeitet nicht wie die meisten Bildverarbeitungsprogramme. Statt Ihnen ein unkorrigiertes Bild zu präsentieren und von
Ihnen zu erwarten, dass Sie die Korrekturen manuell vornehmen,
korrigiert DxO Optics Pro Ihre Bilder automatisch und präzise.
DxO Labs hat die Eigenschaften von mehr als 160 Kameras (DSLRs
und Spiegellose-Kameras) sowie über 8600 Kamera-Objektiv
Kombination (Stand Sommer 2012) ausgemessen und kalibriert.
Die Messungen für jede Kamera-Objektiv Kombination sind in
den einzelnen optischen DxO-Modulen abgelegt. Sie werden von
DxO Optics Pro benutzt, um die Schwächen der jeweiligen
Kombination automatisch zu korrigieren. Also gibt es genauso
viele optische DxO-Module, wie kalibrierte Kamera-Objektiv
Kombinationen.
Sofern das Kameragehäuse, das Sie für Ihre Aufnahmen einsetzen,
von DxO Labs kalibriert wurde, kann DxO Optics Pro:
RAW Bilder (z.B. für CR2, NEF, RAF, etc.) in verschiedene
Formate konvertieren (JPEG, TIFF, DNG).
Automatisch das Rauschen reduzieren.
Wenn zusätzlich optische DxO-Module für Ihre Kamera-Objektiv Kombination vorhanden sind, können Sie alle Korrekturen von
DxO Optics Pro anwenden, auch die automatischen optischen Korrekturen. Wenn kein optisches DxO-Modul vorhanden ist, können Sie
dennoch alle Korrekturen von DxO Optics Pro nutzen und Sie nehmen (falls notwendig) die optischen Korrekturen manuell vor.
Falls die Kamera, welche Sie für Ihre Aufnahmen nutzen, noch nicht
von DxO Labs kalibriert wurde, kann DxO Optics Pro Ihre RAW-Daten
nicht lesen. Selbstverständlich können Sie aber Korrekturen an den
40
JPEG Daten manuelle Korrekturen vornehmen, samt optische Korrekturen und der Rauschminderung.
1.2. Grundlagen einer Sitzung zur
Bildoptimierung
DxO Optics Pro ist dafür bekannt, dass Sie große Freiheiten bei der
Bearbeitung Ihrer Bilder haben: Sie können individuell direkt mit Ihren Bilder auf der Festplatte arbeiten, oder Sie gruppieren die Bilder
in Projekten. Projekte sind eine einfache Möglichkeit, Bilder, die Sie
bearbeiten möchten, zu sammeln und zu verwalten.
DxO Optics Pro modifiziert die Originaldateien nicht. Stattdessen
wird jeder Bilddatei ein Set an Korrektureinstellungen zugeordnet,
die in einer Einstellungsdatei (mit der Dateiendung *.dop) neben
dem eigentlichen Bild gespeichert werden. So können Sie Ihre Korrekturen jederzeit ändern, oder verwerfen.
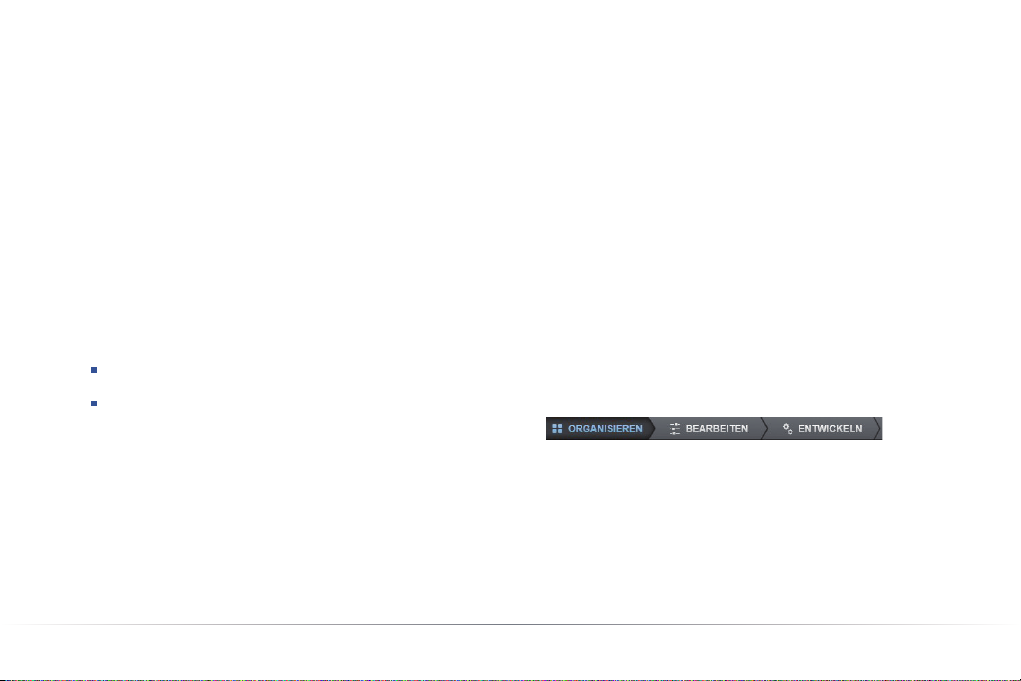
Die Verarbeitung Ihrer Bilder erfolgt in drei Schritten, von denen
jeder sein eigenes Register hat:
Sobald das Programm gestartet ist, können Sie im Register Organi-
sieren Verzeichnisse auf Ihrem Rechner durchsuchen und die Bilder
auswählen, die Sie bearbeiten möchten.
Page 41
ANMERKUNG
Das Bild-Browser-Panel zeigt die Miniaturbilder der Bilder
eines Ordners oder Projektes, das Sie gerade durchsuchen. Das
zentrale Bild-Panel (Bild-Fenster) zeigt eine Vorschau auf die
Bilder mit ihren Korrekturen, die beim Entwickeln angewendet
werden.
Im Register Bearbeiten erhalten Sie sowohl eine Vorschau der Korrekturen, können aber auch Korrektureinstellungen für die jeweiligen Bilder manuell oder automatisch anpassen. Diese neuen
Einstellungen werden gesichert. Sobald Sie die Verarbeitung im
Register Entwickeln starten, werden sie auf die Bilder angewendet.
Sie können Ihre Einstellungen außerdem in sogenannten Presets
sichern und später auf weitere Bilder anwenden.
ANMERKUNG
Alle Ihre Korrekturen werden ständig automatisch gesichert.
Wenn Sie das Programm schließen, bevor Sie Ihre Bilder
entwickelt haben, werden Sie für diese Bilder nach dem Öffnen
von DxO Optics Pro wieder dieselben Einstellungen vorfinden.
Im Register Entwickeln starten Sie die automatische Verarbeitung
aller Bilder, die Sie selektiert haben.
TIPP
Sie können die Verarbeitung auch starten, indem Sie auf eines
der Miniaturbilder im Bild-Browser einen Rechtsklick machen.
Alternativ verwenden Sie die Tastaturkürzel Strg + K (Windows)
bzw. Cmd + K (Mac).
DE
DxO Optics Pro 8 - Kurzanleitung zum schnellen Einstieg ©DxO Labs 2012 - Alle Rechte vorbehalten
41
Page 42
Korrigieren und verarbeiten Sie Ihr erstes Bild in nur wenigen Minuten
DxO Optics Pro liest die Kamera- und Objektiv-Informationen, die in
den EXIF-Metadaten Ihres Bildes gespeichert sind. Diese Information wird als Verbindung zwischen dem Bild und dem entsprechenden optischen DxO Modul benutzt und so können die optimalen Korrektureinstellungen für jedes einzelne Bild automatisch ermittelt
werden.
WICHTIG : Wenn Sie mit DxO Optics Pro arbeiten, sollten Sie immer
mit der originalen, unveränderten Datei starten. Einige Programme
zum Download oder Katalogisierung können Ihre EXIF - Daten verändern, während die Bilder auf den Rechner übertragen werden - so
werden z.B. Daten oder Dateinamen durch eigene Bezeichnungen
ersetzt. Wenn dies der Fall ist, kann DxO Optics Pro nicht mehr alle
Daten der Aufnahme finden und keine automatischen Korrekturen
anwenden. Daher empfehlen wir, dass Sie Ihre Speicherkarten mit
einem Kartenleser auslesen und die Funktion Kopieren/Einsetzen
verwenden, anstatt ein Programm zum Import und Organisieren
von Bildern einzusetzen. Wenn die Bilder jedoch in eine nicht-destruktive Datenbank geladen werden, wie zum Beispiel in Adobe®
Photoshop® Lightroom®, werden Sie keine Probleme haben, sie zu
entwickeln.
42
2.1. Schritt 1: Register Organisieren
Wenn Sie DxO Optics Pro öffnen, sehen Sie das erste von drei Registern. Es ist mit Organisieren bezeichnet und entspricht dem ersten
von drei Schritten, um Ihre Bilder zu entwickeln. Im oberen linken
Bereich, dem Durchsuchen-Panel können Sie durch zwei Arten von
Bildquellen navigieren:
Die Dateien und Ordner Ihres Betriebssystems (Dateisystem) ;
Projekte, die Sie in DxO Optics Pro erstellt haben.
Wenn Sie auf das Icon Dateisystem im Register Organisieren
klicken, zeigt Ihnen ein Browser den Inhalt Ihrer Festplatte in der
linken Spalte. Sie können durch Ihre Verzeichnisse und Ordner
navigieren um die Bilder herauszusuchen, die Sie bearbeiten wollen. Gleichzeitig erscheinen die Miniaturbilder und Namen im Bild-
Browser. Dieses Fenster im unteren Bereich Ihres Monitors ist ein
richtiges Organisations - und Auswahlwerkzeug: Sie können die
Größe des Panels ändern, die Miniaturbilder in unterschiedlichen
Größen anzeigen, sie bewerten, drehen und löschen.
Page 43
TIPP
Sie können Bilder per „Drag & drop” in andere Verzeichnisse
Ihrer Festplatte verschieben oder kopieren: Dazu wählen
Sie die Dateien im Bild-Browser aus, ziehen Sie auf den
Namen des Zielverzeichnisses im Durchsuchen-Panel. Zum
Verschieben der Bilder halten Sie die Umsch-Taste gedrückt,
Strg/Cmd um sie zu kopieren.
recht nützlich um Bilder, die in verschiedenen Ordner gespeichert
sind, zu selektieren und gruppieren. Weitere Informationen, wie man
Projekte erstellt und damit arbeitet finden Sie im Benutzerhandbuch.
DE
Mit einem einzigen Klick auf das Miniaturbild einer Datei erscheint
das Bild im Bild-Panel (Bild-Fenster). Dabei wird automatisch eine
Kombination von Einstellungen (einem Preset) auf Ihr Bild angewendet. Das Standardpreset heißt DxO Standard und es enthält
alle optischen Korrekturen, Rauschminderung und Belichtungskorrekturen. Statt dem Standardpreset können Sie auch ein anderes
auswählen - entweder ein von DxO Labs mitgeliefertes, oder eines,
das Sie erstellt haben.
TIPP
Wenn Sie mit RAW-Daten arbeiten, erhalten Sie mit dem Preset
„DXO Standard – Neutrale Farben“, welches speziell für RAWDaten entwickelt wurde, neutralere Ergebnisse.
Ein zweites Icon namens Projektdatenbank bietet Zugang auf die
in DxO Optics Pro erstellten Projekte.
In DxO Optics Pro ist ein Projekt eine logische Gruppe von Bildern,
die Sie verarbeiten möchten. Dieses Organisationswerkzeug ist
DxO Optics Pro 8 - Kurzanleitung zum schnellen Einstieg ©DxO Labs 2012 - Alle Rechte vorbehalten
Der Bild-Browser.
Der Bild-Browser ist der Streifen Miniaturbilder, der sich im unteren Bereich des Programmfensters befindet. Er enthält zahlreiche
wichtige Werkzeuge. Das runde Icon in der rechten oberen Ecke
eines Miniaturbildes im Bild-Browser liefert Ihnen Informationen
über den Status des optischen DxO Moduls, das jedem Bild zugeordnet wird:
Optisches DxO-Modul aktiv und einsatzbereit.
Kein optisches DxO-Modul für dieses Bild verfügbar.
Optisches DxO-Modul verfügbar, muss aber geladen
werden.
Mehrdeutigkeit für optisches DxO-Modul (muss aufgelöst
werden).
Mehrdeutigkeit für optisches DxO-Modul (aufgelöst).
Im dritten Fall (optisches DxO-Modul verfügbar, muss aber geladen
werden) bietet DxO Optics Pro Ihnen eine Liste von optischen DxOModulen an, die mittels der EXIF Daten identifiziert wurden und bittet Sie auszuwählen, welches Sie herunterladen wollen.
43
Page 44
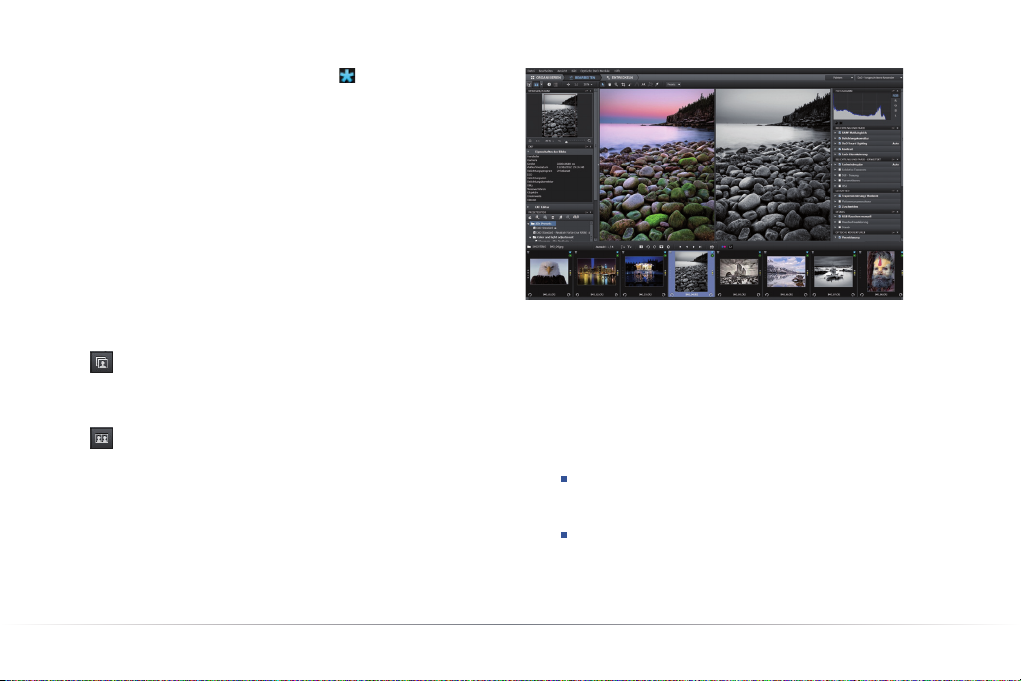
Außerdem sehen Sie ein weiteres kleines Icon , unterhalb des
Icons für die Modulverfügbarkeit: Es wird standardmäßig angezeigt
und bedeutet, dass das Miniaturbild auf die Verarbeitung wartet.
An diesem Punkt können Sie das Entwickeln der Bilder starten, ohne
irgendwelche manuellen Einstellungen vorzunehmen. Dazu machen
Sie einen Rechtsklick auf ein Miniaturbild im Bild-Browser oder
gehen direkt in das Register Entwickeln.
2.2. Schritt 2: Register Bearbeiten
Auch im Register Bearbeiten befindet sich im unteren Bereich des
Monitors der Bild-Browser mit den Miniaturbildern und darüber
das Bild Panel (Bild-Fenster). Hier bekommen Sie eine Vorschau
der Korrekturen an Ihren Bildern. Einen „vorher/nachher“ Vergleich
eines Bildes zeigen Sie so an:
Einzelbildanzeige: zeigt eine Vorschau des Bildes mit
den Korrekturen. Wenn Sie auf das Bild klicken, sehen Sie
den Zustand vor der Korrektur, bis Sie die gedrückte Maustaste wieder loslassen.
Bildanzeige nebeneinander: zeigt nebeneinander das
Referenzbild – in der Regel das unkorrigierte Bild – und
eine Vorschau des Bildes mit den Korrekturen von DxO
Optics Pro. Sie können einzoomen, um Details in den jeweiligen Bildbereichen zu vergleichen.
44
Beispiel für einen vorher/nachher Vergleich in der Darstellung
nebeneinander.
Sollte Ihnen die Standardkorrektur nicht zusagen, wählen Sie am
einfachsten ein anderes Preset aus der Auswahlliste (siehe Kapitel 3
für weitere Informationen).
Sie können die Einstellungen für Ihre Bilder aber auch manuell mit
Korrekturpaletten anpassen. Dazu stehen Ihnen zwei Arbeitsbe-
reiche mit unterschiedlichem Umfang an Paletten zur Verfügung:
Der Arbeitsbereich DxO – Erste Schritte (Standard beim
ersten Start der Software) enthält eine Auswahl an Basiswerkzeugen.
Der Arbeitsbereich DxO – Fortgeschrittene Anwender mit
allen verfügbaren Werkzeugen.
Sie können jederzeit von einem Arbeitsbereich zum anderen
wechseln.
Page 45
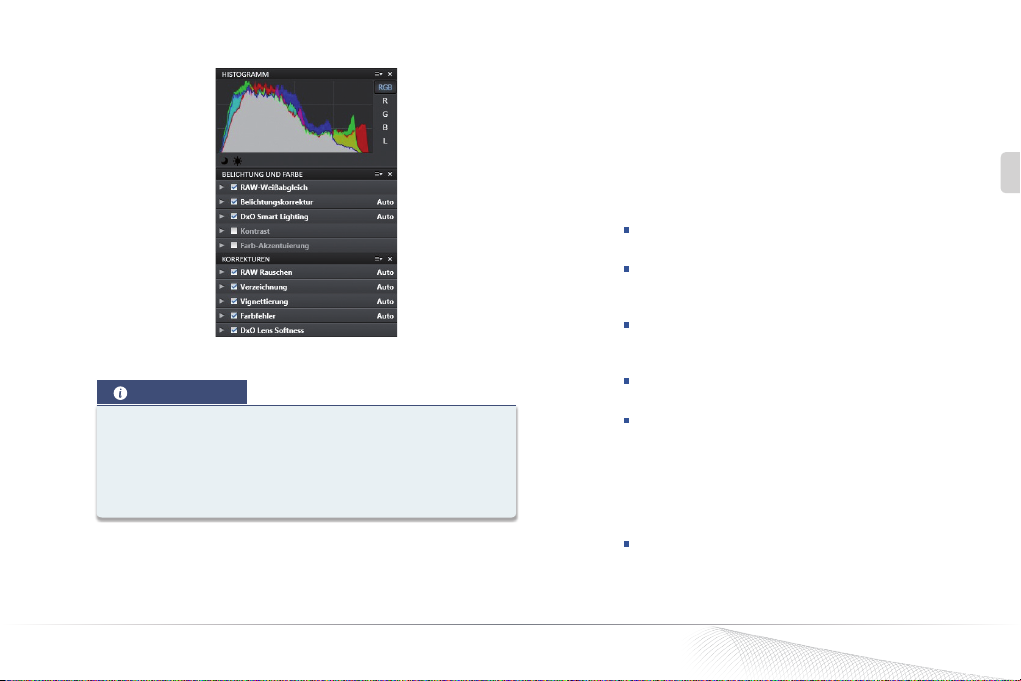
Paletten und Unterpaletten im Arbeitsreich „Erste Schritte“.
ANMERKUNG
Für Ihre ersten Schritte empfehlen wir Ihnen, sich auf den
gleichnamigen Arbeitsbereich zu konzentrieren und erst
einmal herauszufinden, wie eine einfache Aktion mit einem
Schieberegler Ihr Bild verändern kann (am einfachsten mit der
„vorher/nachher“ Anzeige).
Im Arbeitsbereich DxO – Erste Schritte stehen Ihnen die folgenden
Paletten zur Verfügung:
Histogramm : gibt Ihnen Informationen über die Verteilung der Hel-
ligkeits- und Farbwerte innerhalb des Bildes. Das DxO Histogramm
berechnet für jeden Farbkanal (Rot, Grün, Blau) Helligkeitswerte
und zeigt Sie in derselben Grafik einzeln oder als Überlagerung an.
Sie können wählen, ob jeder Kanal einzeln angezeigt wird. Außer-
dem gibt es einen Modus für die globale Helligkeit.
Belichtung und Farbe dient zur Korrektur der Belichtung und Farb-
balance eines Bildes und enthält die folgenden Unterpaletten:
Weißabgleich: Korrektur von Farbverschiebungen (z.B.
wenn Innenaufnahmen gelblich werden)
Belichtungskorrektur: Stellt Spitzlichter wieder her und
passt helle Töne im Bild an, regelt die Helligkeit unterbelichteter Bilder, etc.
DxO Smart Lighting: um Schatten automatisch an-
zuheben und den Kontrast eines Bildes zu optimieren (es
stehen drei vordefinierte Modi zur Verfügung)
Kontrast: Passt den globalen Kontrast und den Mikro-
kontrast (lokalen Kontrast) an.
Anhebung der Farben: Verstärkt die Farben global (Sätti-
gung) oder selektiv (Vibrancy).
Korrekturen: um Mängel des Bildes zu beseitigen, die im Objektiv
und dem Sensor begründet liegen. Die folgenden Mängel werden
automatisch behoben (sofern Ihre Ausrüstung unterstützt ist) und
können in jedem Fall manuell angepasst werden:
Rauschen: Korn- oder Farbartefakte der Kamera, beson-
ders bei hohen ISO Einstellungen.
DE
DxO Optics Pro 8 - Kurzanleitung zum schnellen Einstieg ©DxO Labs 2012 - Alle Rechte vorbehalten
45
Page 46
Verzeichnung: Hauptsächlich bei Weitwinkelobjektiven
und Zooms beobachtet man, dass eigentlich gerade Linien
gekrümmt abgebildet werden.
Vignettierung: Durch diesen Abbildungsfehler erschei-
nen die Bildecken dunkler als die Bildmitte, besonders bei
großen Blendenöffnungen sichtbar.
Chromatische Abberation: ein Farbartefakt (meist in
Magenta oder Grün) an kontrastreichen Übergängen, z.B.
an Konturen.
DxO Lens Softness: objektivbedingte Unschärfe (die
Korrektur dieses Fehlers ist nur möglich, wenn das
entsprechende optische DxO Modul geladen ist).
Bitte beachten Sie, dass der Effekt dieser Korrekturen (Rauschen,
Chromatische Aberration und Lens Softness) bei Zoomfaktoren oberhalb von 75% besser sichtbar sind. Mit DxO Optics Pro 8 gibt es
jedoch bei jeder Zoomstufe eine Vorschau der Rauschminderung,
wenn Sie in den Programmeinstellungen die entsprechende Option
aktiviert haben. Bitte beachten Sie, dass Auswirkungen auf die Leistungsfähigkeit Ihres Rechners zu erwarten sind, wenn Sie diese
Option aktivieren, weshalb sie als Standard deaktiviert ist.
TIPP
Mit dem Tastaturkürzel Strg + Z (Windows) bzw. Cmd + Z (Mac)
können Sie das Preset zurücknehmen und zu den vorherigen
Einstellungen zurückkehren.
Sie können die Effekte dieser leistungsfähigen Korrekturen mit
ein paar Bildern schnell ausprobieren. Werden die Schieberegler
46
nur ein wenig verändert, kann das schon einen signifikanten Effekt
haben! Das Schöne daran: Alle Änderungen sind reversibel, da Sie
nicht direkt auf der Originaldatei arbeiten. Sie können bei Ihren ersten Tests mit der Software also mutig experimentieren und auch einmal in die Extreme gehen, um ein Gefühl dafür zu bekommen, wie
das Programm reagiert.
TIPP
Indem Sie auf einen Schieberegler doppelklicken, können Sie
zu seinem Standardwert zurückkehren. Oder Sie wählen einfach das DxO Standard-Preset um alle Einstellungen auf ihren
Standardwert zurückzusetzen.
WICHTIG: Wenn die Korrekturen für die Verzeichnung, Schärfe und
Vignettierung nicht im automatischen Modus zur Verfügung stehen,
heißt das, dass DxO Optics Pro ihrem Bild kein optisches DxO-Modul
zuordnen konnte:
Entweder, weil kein optisches DxO-Modul für die Kamera-
Objektiv-Kombination, die für diese Aufnahme verwendet
wurde, existiert (optisches DxO-Modul Status-Icon: ).
Oder weil DxO Optics Pro das passende optische DxO-
Modul nicht identifizieren konnte, weil die EXIF-Daten des
Bildes modifiziert oder beschädigt wurden (optisches DxOModul Status-Icon: ).
Oder weil das entsprechende optische DxO-Modul nicht
auf Ihrem Rechner installiert ist (optisches DxO-Modul Status-Icon: ).
Page 47
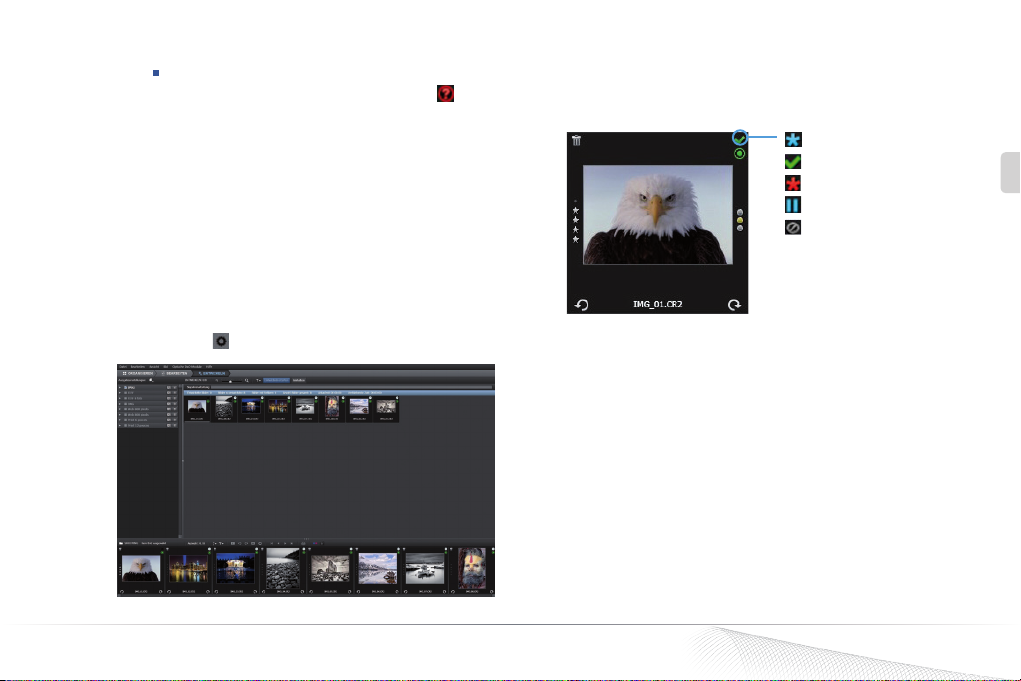
Oder weil es eine Mehrdeutigkeit für optische DxO-Mo-
dule gibt (optisches DxO-Modul Status-Icon: ) und DxO
Optics Pro konnte aus unterschiedlichen Gründen aus
verschiedenen Modulen nicht automatisch das richtige
auswählen.
2.3. Schritt 3: Register Entwickeln
Sobald Sie mit den Einstellungen zufrieden sind, die Sie auf Ihre Bilder angewendet haben, können Sie die Bilder entwickeln, um eine
neue Datei mit allen Ihren Korrekturen zu erzeugen. Als Standard
ist konfiguriert, dass JPEG-Daten mit hoher Qualität in denselben
Ordner wie das Original geschrieben werden.
Sobald Sie auf den Button Entwickeln starten klicken, wird für die
Miniaturbilder, die Sie für die Verarbeitung ausgewählt haben ein
Fortschrittsbalken angezeigt. Während ein Bild entwickelt wird,
erscheint das Icon rechts oben im Miniaturbild.
Register Entwickeln.
Das Icon in der rechten oberen Ecke der Miniaturbilder des Bild-
Browsers gibt Ihnen Informationen über den Verarbeitungsstatus
eines jeden Bildes:
Wartet auf Entwickeln
Entwickeltes Bild
Fehler bei der Verarbeitung
Nicht Entwickeln
Kann nicht verarbeitet werden
DE
DxO Optics Pro 8 - Kurzanleitung zum schnellen Einstieg ©DxO Labs 2012 - Alle Rechte vorbehalten
47
Page 48
Presets
3.1. Was ist ein Preset?
Wird ein Bild selektiert und im Bild-Browser angezeigt, wird automatisch auch ein Preset angewendet. Ein Preset ist ein leistungsstarkes Werkzeug mit dem Sie quasi mit einem Klick eine Kombination von Einstellungen (die in DxO Optics Pro mitgeliefert wurden
oder die Sie sich selbst zusammengestellt haben) auf eines oder
mehrere Bilder anwenden können, ohne zu tief in die Details der
Korrekturen in den Unterpaletten einzusteigen.
Indem Sie Presets benutzen, können Sie Ihre bevorzugten Einstellungen anwenden, um ein bestimmtes Ergebnis zu erzielen. Davon
ausgehend können Sie dann mit individuellen Feineinstellungen
fortfahren oder Anpassungen vornehmen, die eventuell Bild für Bild
vorgenommen werden sollen.
ANMERKUNG
Einige Presets stehen nur für RAW-Bilder zur Verfügung und
sind mit „nur RAW“ gekennzeichnet, um Sie darauf hinzuweisen, dass Sie auf „nicht-RAW-Bildern“ nicht den erwarteten
Effekt bewirken können.
48
DxO Optics Pro wird mit rund 30 Presets ausgeliefert. Sie können
im Register Organisieren und Bearbeiten jeweils aus einem Dropdown-Menü Presets in der rechten Hälfte der Iconleiste
ausgewählt werden. Oder Sie machen zu einem beliebigen Zeitpunkt
einen Rechtsklick auf die Miniaturbilder im Bild-Browser.
Hier eine Beschreibung der Presets DxO Standard und Keine Kor-
rektur:
DxO Standard Preset : Dieses Basis Preset wird als Standard auf alle
neuen Bilder angewendet, außer Sie wählen in den Programmeinstellungen ein anderes Preset aus. Es enthält alle Basiskorrekturen,
sofern die notwendigen optischen DxO-Module installiert sind:
Belichtung: Modus automatisch
DxO Lighting: steht auf „Leicht“
Farbwiedergabe: für JPEG-Bilder unverändert, Kamera-
Standardeinstellungen des Herstellers für die Verarbeitung von RAW-Daten
gesättigte Farben erhalten: Modus automatisch
Rauschminderung: Modus automatisch
Verzeichnung: Modus automatisch
Vignettierung: Modus automatisch
Chromatische Aberration: Modus automatisch
Page 49
DxO Lens Softness: aktiviert und der Schieberegler „Glo-
bal” steht auf − 0.50 (mittlere Korrektur)
ANMERKUNG
Alle weiteren Korrekturen sind in diesem Preset deaktiviert.
Keine Korrektur : Dieses Preset deaktiviert alle DxO Optics Pro Korrekturen, wenn es auf ein RAW-Bild angewendet wird. DxO Optics
Pro sorgt dennoch für die RAW-Konvertierung (mit den Basiseinstellungen für Ihre Kamera).
Im Benutzerhandbuch finden Sie eine ausführliche Beschreibung
der Presets, die mit DxO Optics Pro ausgeliefert werden.
ANMERKUNG
Sie können ganz einfach eigene Presets erstellen: wenn Sie
mit den Korrekturen und Feineinstellungen in Ihrem Bild
fertig sind, machen Sie einfach einen Rechtsklick auf das
Miniaturbild im Bild-Browser und wählen im Kontextmenü
Preset aus aktuellen Einstellungen erzeugen.
3.2. Presets anwenden
Es gibt eine Reihe von Möglichkeiten, ein Preset auf ein Bild anzuwenden:
wie schon erwähnt, wird das Standard-Preset automa-
tisch angewandt, wenn das Bild zum ersten Mal geöffnet
wird.
• jederzeitimBild-Browser indem Sie auf ein Miniaturbild
rechtsklicken.
• ausdemDrop-down-MenüPresets in der Iconleiste der
Register Organisieren und Bearbeiten.
• In der Palette Preset Editor (Arbeitsbereich fortge-
schrittene Anwender).
Sie können Korrekturen aber auch folgendermaßen von einem Bild
auf das andere übertragen:
Im Bild-Browser machen Sie einen Rechtsklick auf das
Miniaturbild des korrigierten Bildes.
Wählen Sie aus dem Kontextmenü Korrektureinstellun-
gen kopieren.
Machen Sie auf diese Bilder einen Rechtsklick und wählen
aus dem Kontextmenü Korrektureinstellungen einfügen.
DE
DxO Optics Pro 8 - Kurzanleitung zum schnellen Einstieg ©DxO Labs 2012 - Alle Rechte vorbehalten
49
Page 50
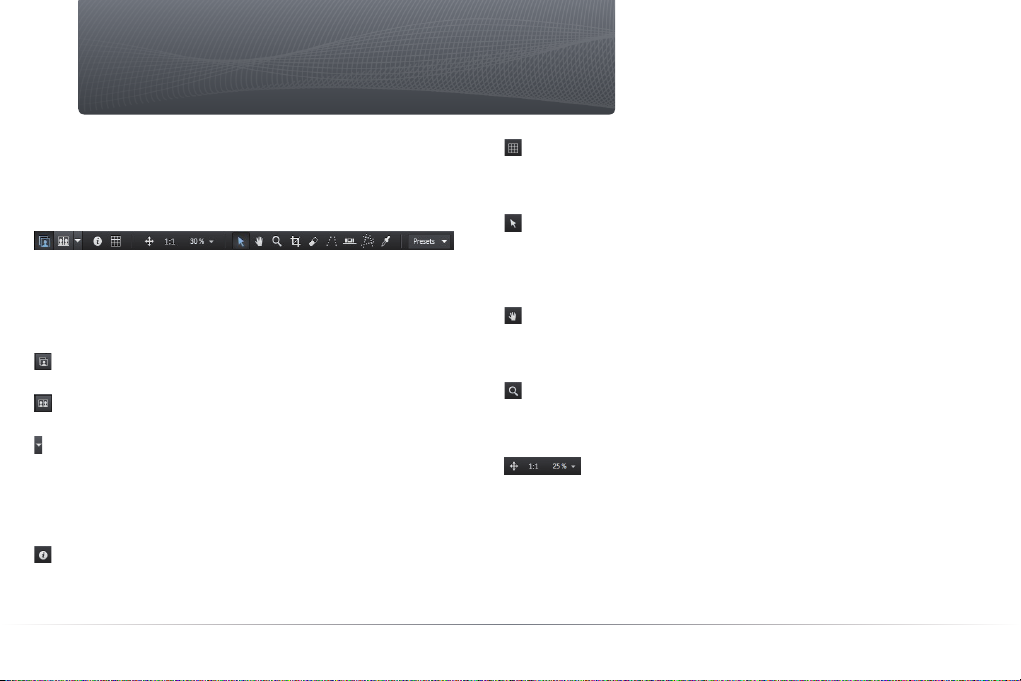
Mehr über das Register Bearbeiten
4.1. Beschreibung der Funktionen im Bild-
Fenster
4.1.1. Iconleiste
Die Iconleiste.
Die Iconleiste befindet sich im oberen Bereich des Bild-Fensters.
Sie ist fester Bestandteil der Benutzeroberfläche, egal welchen
Arbeitsbereich Sie wählen. Von links nach rechts enthält sie die folgenden Funktionen:
Das Icon für die Einzelbildanzeige zeigt eine Vorschau des Bildes
mit seinen Korrekturen.
Das Icon für Anzeige der Bilder nebeneinander zeigt das Origi-
nalbild vor der Korrektur und das korrigierte Bild nebeneinander an.
Im Drop-down-Menü können Sie entscheiden, welches Bild Ihr
Referenzbild sein soll. In der Regel wird es das Originalbild vor der
Korrektur sein. Wenn Sie aber virtuelle Kopien des Bildes haben,
erscheinen sie in dieser Liste und Sie können auch eine dieser virtuellen Kopien als Referenzbild wählen, um verschiedene Korrekturen zu vergleichen.
Das Icon Information blendet die semi-transparente Information
„vor der Korrektur/Vorschau der Korrekturen“ ein und aus, damit
Sie wissen, welches Bild angezeigt wird. Auf dem Mac gehen Sie im
Menü auf Ansicht > Overlay Bildinformation einblenden.
50
Das Gitter-Icon zeigt oder verbirgt ein Gitteroverlay, das über das
Bild gelegt wird. Es ist besonders für Korrekturen der Verzeichnung
und der Perspektive nützlich. Auf dem Mac aktivieren Sie das Gitter
im Menü Anzeige > Gitteroverlay einblenden.
Das Standard Zeige-Werkzeug: Wenn dieses Werkzeug zusam-
men mit der Einzelbildanzeige aktiv ist, wird durch einen Klick auf
das korrigierte Bild zwischen diesem und dem Referenzbild hinund hergeschaltet werden (Strg + D unter Windows hat denselben
Effekt).
Das Hand-Werkzeug dient zum Verschieben des sichtbaren Bild-
ausschnitts. Wenn Sie sich in einem anderen Werkzeug befinden,
kann es vorübergehend aktiviert werden, indem Sie die Leertaste
gedrückt halten.
Mit der Lupe können Sie durch Klicken auf das Bild bis zum
Zoomfaktor 1600% vergrößern. Sie können außerdem auf dem Bild
ein Rechteck aufziehen, um den Bereich festzulegen, auf den Sie
zoomen möchten.
Mit den Zoom Funktionen können Sie die Anzeige
zwischen 2% und 1600% skalieren. Die beiden ersten Unter-Icons
werden verwendet: (1) um das Bild in Fenstergröße anzupassen und
(2) um eine 100% (bzw. 1:1 Skalierung) zu wählen (= tatsächliche
Größe). Das Drop-down-Menü wird verwendet, um schnell auf typische Anzeigegrößen zugreifen zu können (sechs Möglichkeiten
zwischen 25% und 400%) oder einen beliebigen Skalierungsfaktor
einzugeben.
Page 51
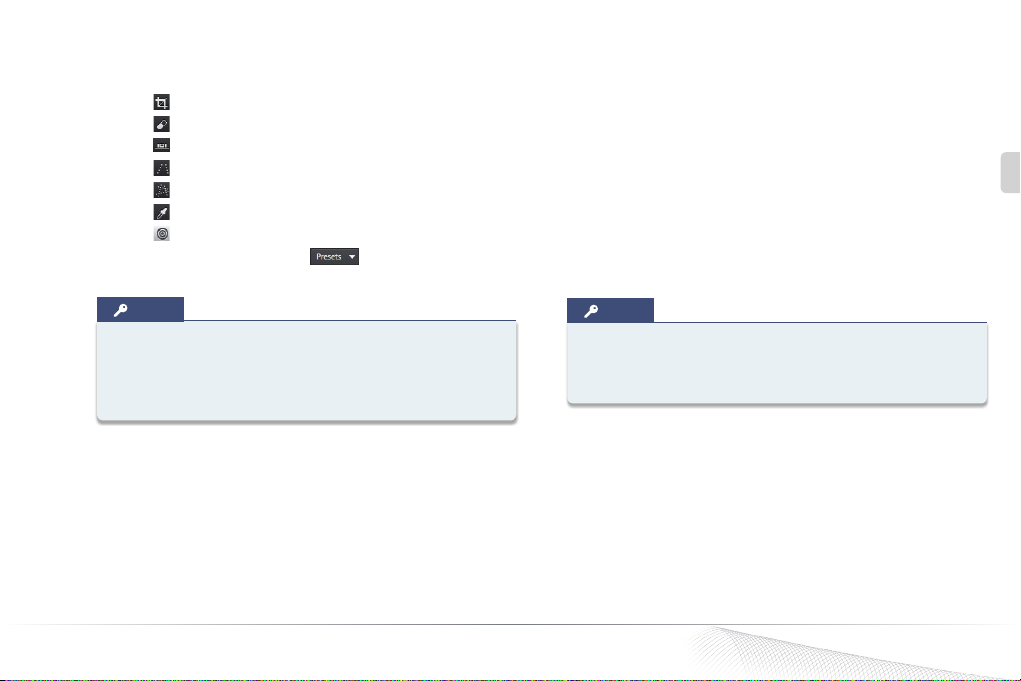
Die Korrektur-Werkzeuge:
Zuschneiden
Staub entfernen
Horizont anpassen
Parallelen korrigieren
Perspektive korrigieren
Weißabgleich
Mehr-Punkt-Farbabgleich (nur Mac)
In der Preset Drop-down-Liste können Sie ein Preset
auswählen, das auf Ihr Bild angewendet wird.
anpassungen. Eine Unterpalette enthält alle Einstellungen für eine
bestimmte Korrektur (zum Beispiel Vibrancy, Sättigung, etc. in der
Palette Farb-Akzentuierung).
Wenn Sie DxO Optics Pro zum ersten Mal öffnen, ist standardmäßig
der Arbeitsbereich DxO – Erste Schritte selektiert, eine Auswahl
aller verfügbaren Paletten und Unterpaletten. Hier werden
zum Beispiel weder die Unterpalette Tonwertkurve noch die
Volumenanamorphose angezeigt, für die beide ein gewisser Grad
an Erfahrung notwendig sind. Im Gegensatz dazu sind andere
Unterpaletten, wie z.B. DxO Smart Lighting, die den Kontrast der
Bilder grundlegend verbessert oder Verzeichnung, die einen stark
sichtbaren Defekt in Bildern korrigiert, beide angezeigt.
DE
TIPP
Falls Ihre Maus über ein Scrollrad verfügt, ist dies die schnellste Möglichkeit, um ein- und auszuzoomen. Auf einem PC
können Sie das Scrollrad direkt verwenden, während Sie bei
einem Mac die Taste „Cmd“ zusätzlich gedrückt halten müssen.
4.1.2. Paletten
Ganz rechts im Fenster befinden sich die Drop-down-Menüs um
den Arbeitsbereich auszuwählen sowie welche Korrekturpaletten
angezeigt werden.
Eine Palette besteht aus einer logischen Gruppe von Unterpaletten.
Die Palette Belichtung und Farbe zum Beispiel kombiniert alle Unterpaletten für die Basis-Farbkorrektur, Belichtungs-und Kontrast-
DxO Optics Pro 8 - Kurzanleitung zum schnellen Einstieg ©DxO Labs 2012 - Alle Rechte vorbehalten
TIPP
Eine Unterpalette wird geöffnet und geschlossen, indem man
auf ihre Kopfzeile klickt (nur Windows) oder auf den Pfeil links
der Bezeichnung der Unterpalette.
Eine Unterplatte ist aktiv, wenn der Haken vor der Bezeichnung der
Funktion gesetzt ist. Das Wort „Auto“ auf der rechten Seite der Palettenleiste signalisiert, dass DxO Optics Pro automatisch die beste
Korrektur für dieses Bild gewählt hat.
Wenn Sie in einer Unterpalette einen Wert geändert haben und zu
dem Wert zurückkehren möchten, den DxO Optics Pro für dieses Bild
empfiehlt, klicken Sie einfach auf das Zauberstab-Icon rechts neben
dem jeweiligen Werkzeug.
51
Page 52
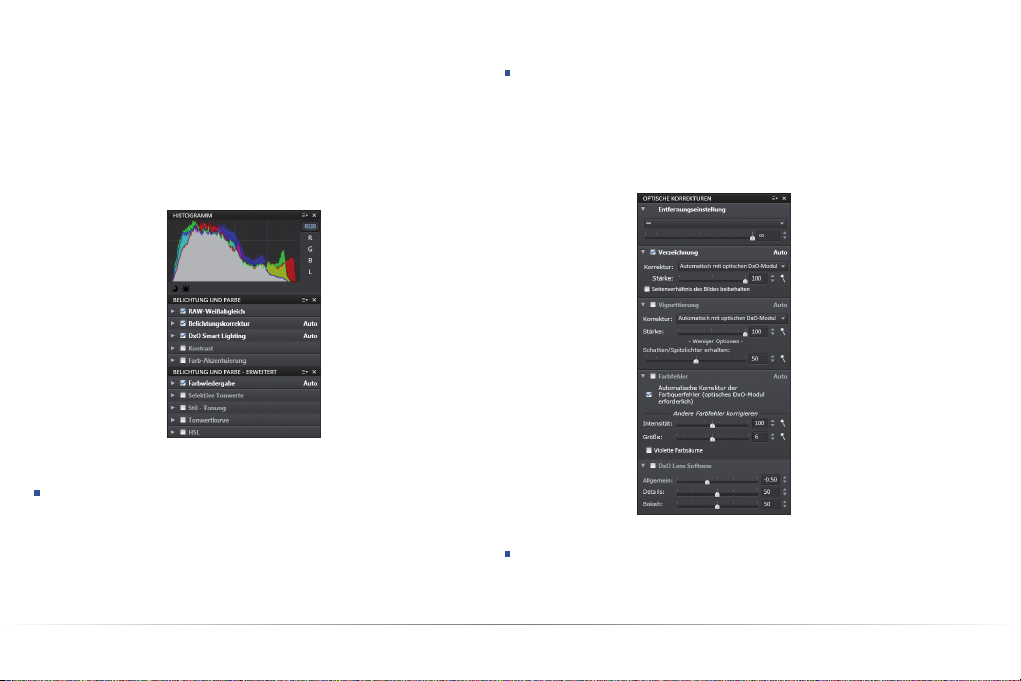
Im Arbeitsbereich DxO – Erste Schritte, der als Standard geöffnet
wird, wenn Sie Optics Pro zum ersten Mal starten, werden nur die
Paletten Histogramm, Belichtung und Farbe und Korrekturen angezeigt.
Im Arbeitsbereich DxO – Fortgeschrittene Anwender hingegen stehen Ihnen alle in der Applikation vorhandenen Werkzeuge zur Verfügung:
Belichtung und Farbe – Erweitert: In dieser Palette finden Sie
erweiterte Bearbeitungswerkzeuge wie Farbwiedergabe (um die
neutrale Wiedergabe fein abzustimmen, oder einen Film-Look anzuwenden), Selektive Tonwerte (um helle Töne, Mitten und dunkle
Bereiche selektiv zu korrigieren), Tonwertkurve (um den globalen
Kontrast und die Helligkeit anzupassen), sowie HSL (zur Korrektur
von Farbton, Sättigung, Helligkeit, auch pro Kanal).
Histogramm, Belichtung und Farbe,
Belichtung und Farbe - Fortgeschrittene Paletten.
Belichtung und Farbe: Enthält alle Werkzeuge, die benötigt wer-
den, um Basiskorrekturen für die Belichtung, Kontrast und Farbe
auf Ihre Bilder anzuwenden. Dazu gehören der Weißabgleich (um
Farbstiche zu entfernen), Belichtungskorrektur (um Spitzlichter
und helle Töne wiederherzustellen), DxO Smart Lighting (um Gegenlichtaufnahmen zu korrigieren und Schatten zu öffnen) Kontrast
(sowohl global als auch lokal) sowie akzentuieren von Farben (Sättigung und Vibrancy).
52
Palette Optische Korrekturen.
Optische Korrekturen: In dieser Palette können Sie optische
Qualität Ihrer Ausrüstung mit spezialisierten Werkzeugen
verbessern. Dazu gehören die Verzeichnung (die meisten Objektive
Page 53
sind auf unterschiedliche Weise davon betroffen), Vignettierung
(abgedunkelte Bildecken), Chromatische Aberration (Farbsäume
entlang kontrastreicher Kanten) sowie DxO Lens Softness (ein
exklusives Werkzeug um den Schärfeabfall zwischen Bildmitte und
Rand zu homogenisieren).
Geometrie: In der Palette Geometrie können Sie den Horizont
und die Perspektive ausrichten (insbesondere in der Architekturfotografie), korrigieren die Volumenanamorphose (verzerrte zylin-
drische oder sphärische Objekte wie Köpfe auf Gruppenfotos, die
mit Weitwinkelobjektiven aufgenommen wurden) und Ihre Bilder
zuschneiden (beschneiden, oder das Seitenverhältnis ändern).
Detail: Die Palette Detail enthält Werkzeuge wie Rauschminde-
rung (um Helligkeits- und Farbrauschen bei Aufnahmen mit hoher
Empfindlichkeit zu entfernen), Schärfe, Moiré (zur Kontrolle hochfrequenter Artefakte) und Staub (um Flecken im Bild zu eliminieren,
die von Staub auf dem Sensor stammen).
DxO FilmPack: Falls DxO FilmPack auf Ihrem Rechner installiert
ist, können Sie es in DxO Optics Pro in einer eigenen Palette nutzen.
DxO FilmPack enthält eine große Auswahl an Film-Simulationen,
konvertiert mittels Kanal-Mixer in Schwarzweiß und Sie können
Vignettierungseffekte anwenden.
4.2. Virtuelle Kopien
Wenn Sie Ihre Bilder korrigieren, möchten Sie vielleicht verschiedene Einstellungen für ein Bild austesten. Virtuelle Kopien sind
dafür die beste Lösung, wie Sie gleich sehen werden.
TIPP
Sie erstellen für ein Bild eine virtuelle Kopie, indem Sie im
Bild-Browser auf sein Miniaturbild rechtsklicken, oder Sie
klicken auf das entsprechende Icon in der Iconleiste des
Bild-Browsers .
Sobald die virtuelle Kopie erstellt wurde, ist sie im Bild-Browser
angezeigt. Man erkennt sie an einer Nummer gleich neben
dem Dateinamen. Die Nummer „1“ wird immer dem Originalbild
zugeordnet.
Eine virtuelle Kopie verhält sich analog zu den normalen Bildern. Sie
können sie wie gewohnt im Register Organisieren oder Bearbeiten
anzeigen. Wenn Sie Ihre Bilder entwickeln, wird für jede virtuelle
Kopie ein eigenes Ausgabebild erzeugt. Sie können so viele virtuelle
Kopien anlegen, wie Sie benötigen.
Die Funktionalitäten der virtuellen Kopien in DxO Optics Pro gehen
sogar noch weiter, denn Sie können virtuelle Kopien sehr einfach
und schnell miteinander vergleichen und auswählen, welches Sie
als Referenzbild nutzen möchten, wenn Sie Korrekturen miteinander vergleichen (Standard ist das unkorrigierte Originalbild). Im
Drop-down-Menü für die Anzeige , können Sie das Referenzbild durch eine beliebige virtuelle Kopie ersetzen.
DE
DxO Optics Pro 8 - Kurzanleitung zum schnellen Einstieg ©DxO Labs 2012 - Alle Rechte vorbehalten
53
Page 54
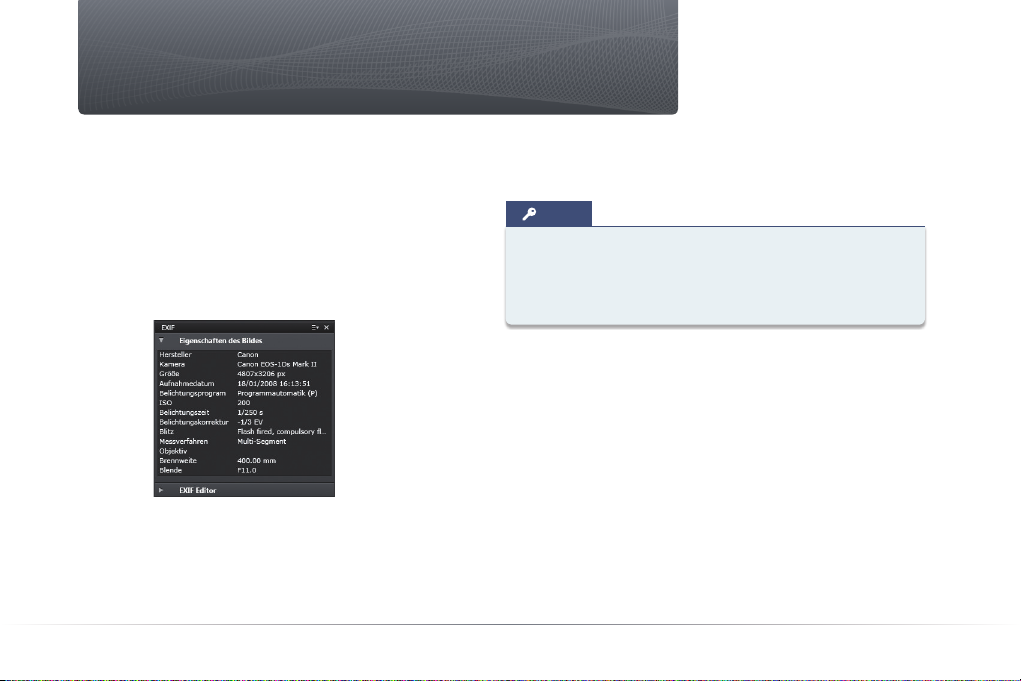
DxO Optics Pro individuell konfigurieren
Sie können DxO Optics Pro individuell konfigurieren, indem Sie
Ihren eigenen Arbeitsbereich erstellen, z.B. dadurch, dass Sie
eine Funktion zum dem Arbeitsbereich DxO - Erste Schritte
hinzunehmen. In unserem Beispiel ist es die EXIF Palette, welche
die Aufnahmedaten zeigt, die Ihre Kamera aufgezeichnet hat
(Belichtungszeit, Blende, Empfindlichkeit, Messmethode usw.),
aber auch Bildautor und Copyrights, die in den EXIF-Daten des
Bildes gespeichert sind. Indem Sie Ihre Einstellungspaletten
selbst zusammenstellen, können Sie sich Ihr eigenes Interface für
Korrekturen mit optimaler Effizienz schaffen.
Der Arbeitsbereich DxO - Erste Schritte erweitert um die EXIF-Palette.
Zu den individuellen Konfigurationen gehören auch die verschiedenen persönlichen Einstellungen, die als eigene Presets gesichert werden und der schon vorhandenen Bibliothek an Presets
54
hinzugefügt werden können. Eine Liste der vorhandenen Presets
befindet sich im Benutzerhandbuch und es ist sehr einfach, neue
zu erstellen.
TIPP
Das Erscheinungsbild und Verhalten von Optics Pro kann
außerdem in dem Menu Programmeinstellungen (unter
Windows im Menü Bearbeiten bzw. auf dem Mac im DxO Optics
Pro Menü) wesentlich beeinflusst werden.
Page 55
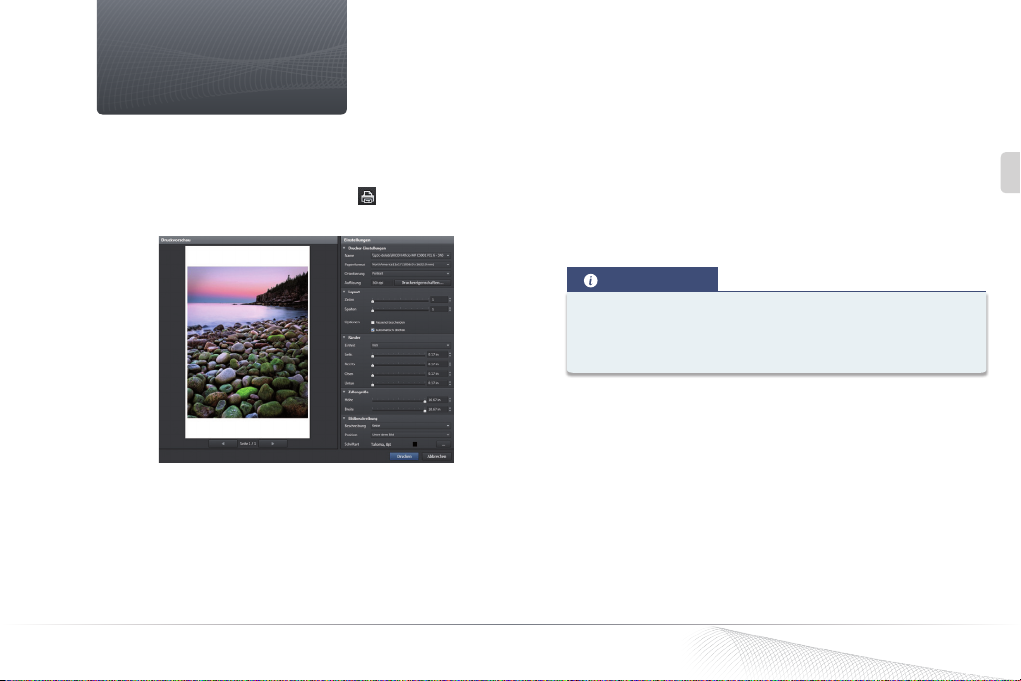
Bilder drucken
DxO Optics Pro 8 hat neu die Möglichkeit, Ihre Bilder zu drucken.
Sie gelangen von allen drei Registern Organisieren, Bearbeiten
oder Entwickeln, über das Menü Datei in den Druckdialog. Oder Sie
klicken einfach auf den Button Drucken , in der Iconleiste des
Bild-Browsers.
Das Dialogfenster zum Drucken.
Das Dialog-Fenster zeigt eine Vorschau der Seite, die gedruckt wird.
Bitte beachten Sie, dass das Dialogfenster zum Drucken direkt auf
die Einstellungen des Druckertreibers zugreift. Es können alle von
DxO Optics Pro unterstützten Dateiformate gedruckt werden, einschließlich RAW-Daten und virtuelle Kopien.
DxO Optics Pro 8 - Kurzanleitung zum schnellen Einstieg ©DxO Labs 2012 - Alle Rechte vorbehalten
Es gibt verschiedene Optionen für das Seitenlayout: Seite mit Bildern
auffüllen, Orientierung, Beschriftung aus Metadaten hinzufügen
(Dateinamen, Datum, etc.), Position der Beschriftung, Schriftart und
Farbe. Des Weiteren können Sie Ränder definieren, Kontaktbögen
mit mehreren Bildern erzeugen, die Anzahl Spalten und Zeilen
festlegen, die Größe der Zellen automatisch oder manuell anpassen
und natürlich mehrere Seiten zusammenstellen und drucken.
ANMERKUNG
In der Windows-Version erscheinen die Werkzeuge zum
Drucken in einem schwebenden Fenster; in der Mac-Version
erscheinen Sie in einem Systemdialog-Fenster.
55
DE
Page 56
www.dxo.com
P/N 100308
 Loading...