

Page 1

DxO Optics Pro V4.1 Installation Guide
Installation Guide
DxO Optics Pro V4.1 and DxO FilmPack
Thank you for your interest in our products! You will find below
some information about the purchase, the installation and the
activation of DxO Optics Pro and DxO FilmPack.
Before accessing DxO products, you need to get from our website
the “DxO Download Manager”: this little program will help you to
download the full software, including specific modules corresponding
to your photographic equipment. At the first launch of DxO Optics
Pro, you will have to activate it using your activation code.
Summary:
1- On-line Purchase p. 1
2- Download DxO Optics Pro p. 3
3- Installation p. 5
4- Activation p. 6
5- FilmPack p.10
1. On-line Purchase
There are three options for purchasing:
1. Visit us at www.dxo.com and click on “Buy” or
2. Go directly to our on-line store at https://shop.dxo.com or
3. Click “Buy” in your demo version.
Next:
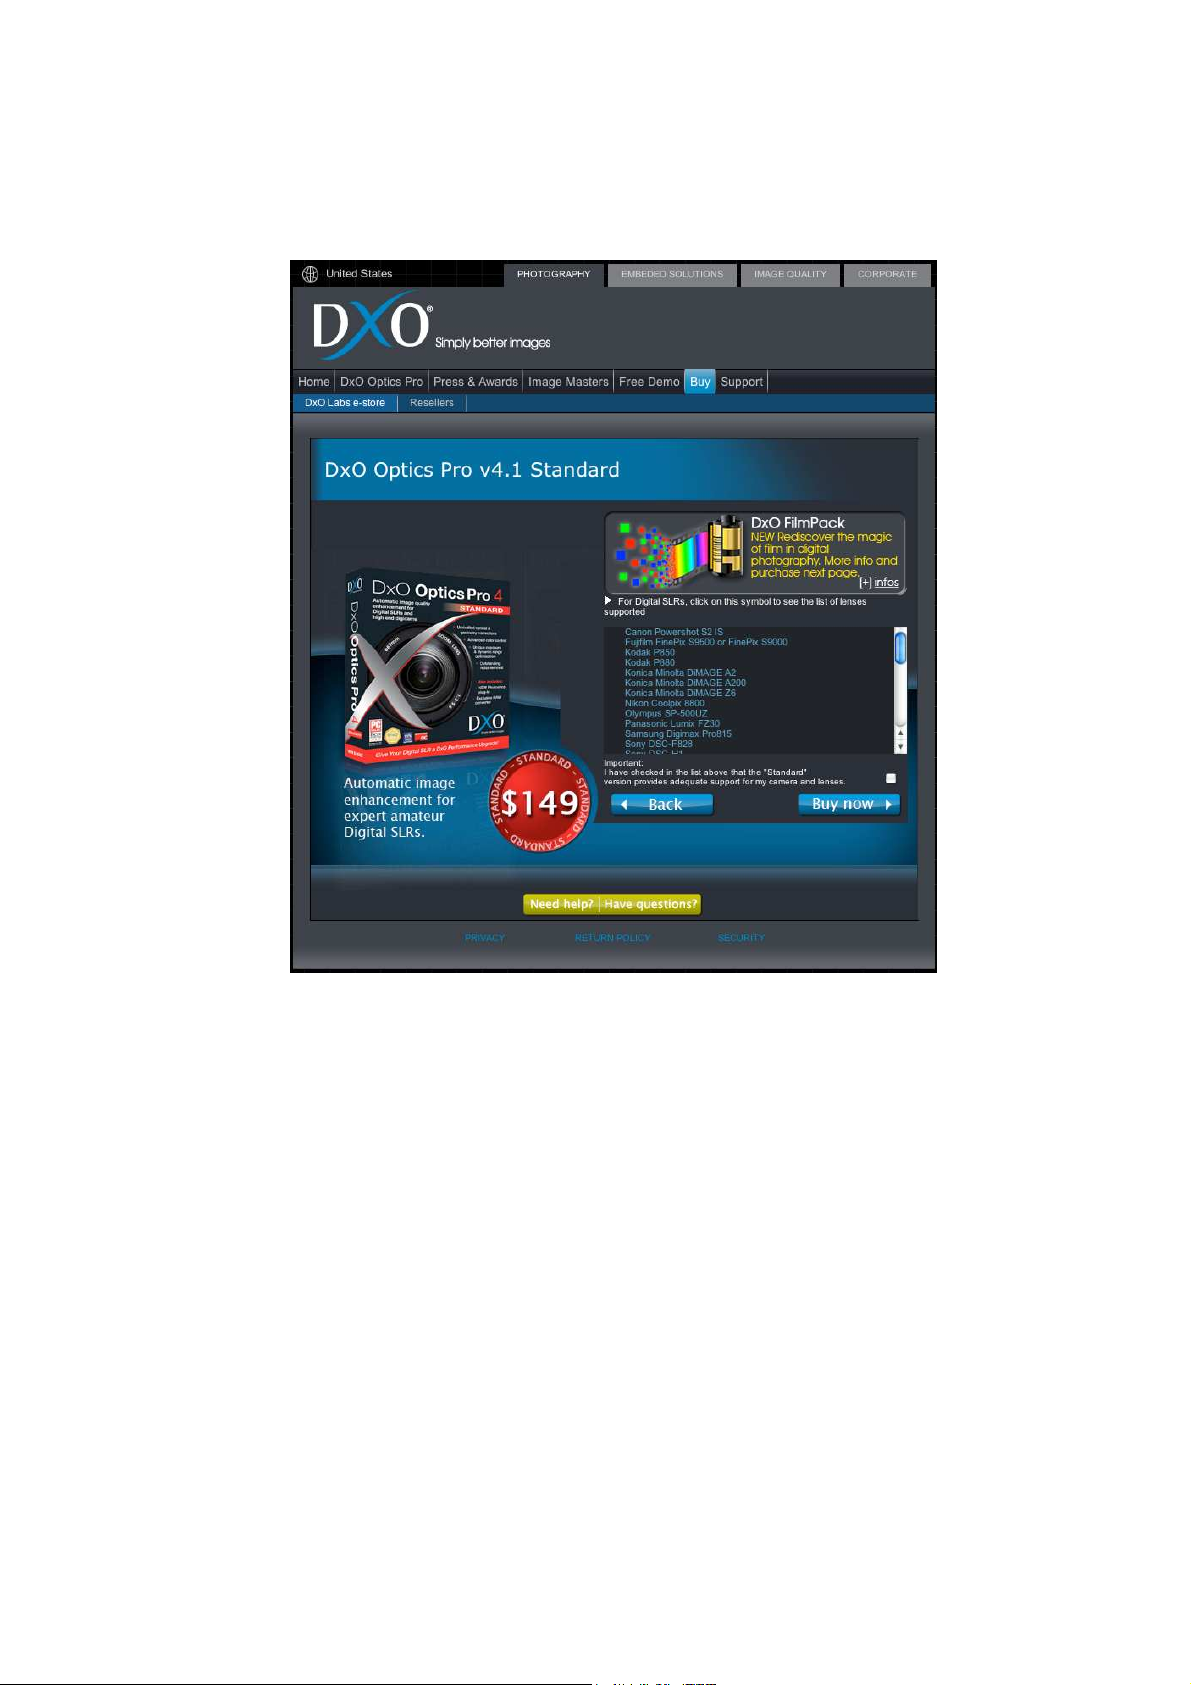
• Choose the version (Starter, Standard or Elite) that supports
your camera equipment. (You can click on “Compare
Versions” to see which camera bodies and lenses are included
in which version). Click on the version you need.
©DxO Labs 2006 -
1 - All rights reserved
Page 2
DxO Optics Pro V4.1 Installation Guide
•
Choose the platform. At the bottom of the page, check the
confirmation that you are sure this is the version you need for
your camera equipment. Click on “Buy Now.”
• Select your country and, if applicable, enter a promotion code.
Click on “Buy Now.”
• Enter your personal information. Be sure to check “I agree
with DxO’s product return policy.” Click on “Check Input”.
• Check your order summary. Click on the credit card of your
choice and click on “Purchase now”.
• Input your credit card information and click on “Finish your
order”. You’re done purchasing!
After the purchase is completed, you will be given an order
confirmation that contains the link to download the DxO
Download Manager. You will also receive an email with your
order number, the activation number and the link to download
the DxO Download Manager.
©DxO Labs 2006 -
2 - All rights reserved
Page 3
DxO Optics Pro V4.1 Installation Guide
2. Download (Same for all types of purchases)
The DxO Download Manager was introduced with Version 4.0 of
DxO Optics Pro in order to better allow you to download the DxO
modules you need when you need them.
Please note: you will need to be connected to the Internet with a
high-speed link for two downloads: (1) DxO Download Manager
and (2) software and DxO modules.
Step One: Download DxO Download Manager
• Click on the link from your on-line order confirmation (or in
your email) to download the DxO Download Manager for
your version. The file is entitled DxODMSetup.exe
(Windows) or DxODMSetup.dmg (Macintosh). You should
use Safari or IE Explorer to download.
• When the DxO Download Manager icon is on your desktop,
click on the icon to launch the download of your software.
Step Two: Download your software and modules with the
DxO Download Manager.
DxO Download Manager allows you to choose the language,
platform and DxO modules that you need to install.
• Choose the language. Click “Next”
• Click on “I accept the terms of the License Agreement”.
Click “Next”.
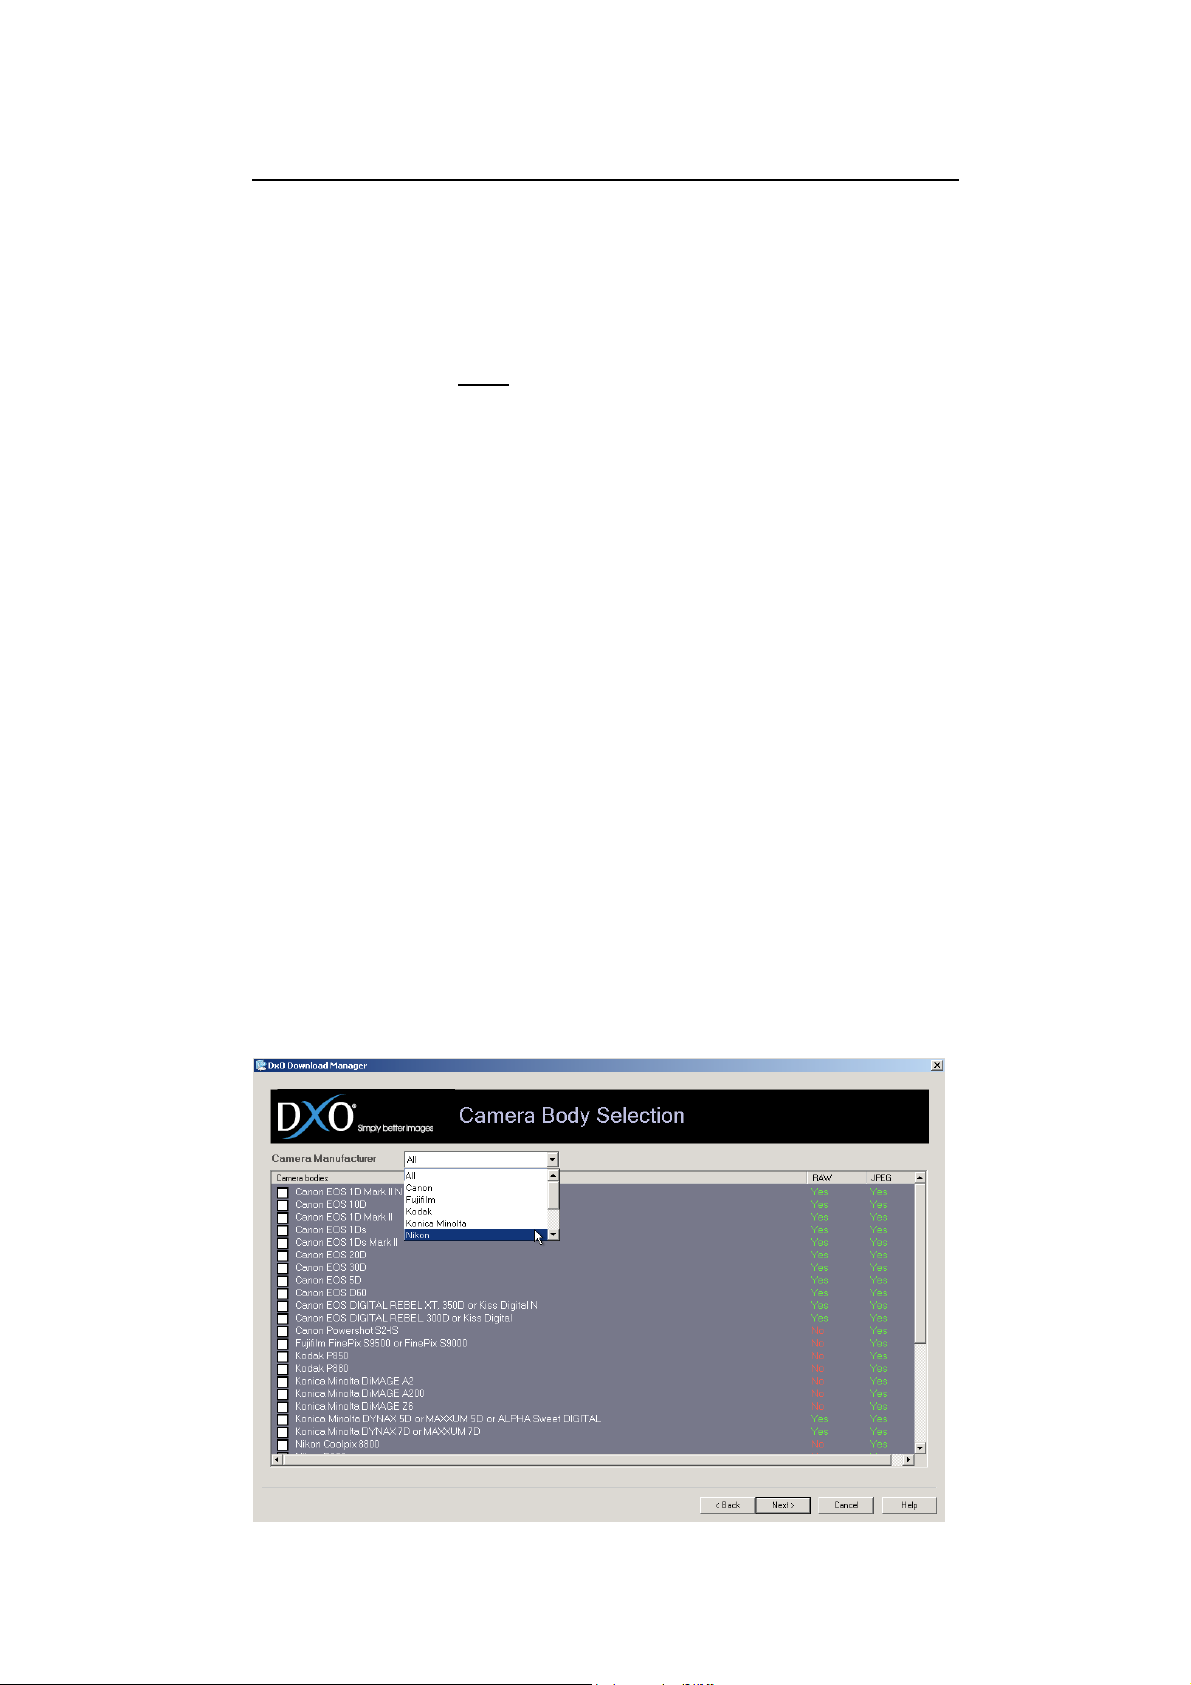
• Under “Camera Body selection”, choose all the camera
bodies you need. Click “Next”. You can also sort by camera
manufacturer in the drop-down list in the middle of this
page to reduce the list.
©DxO Labs 2006 -
3 - All rights reserved
Page 4
DxO Optics Pro V4.1 Installation Guide
•
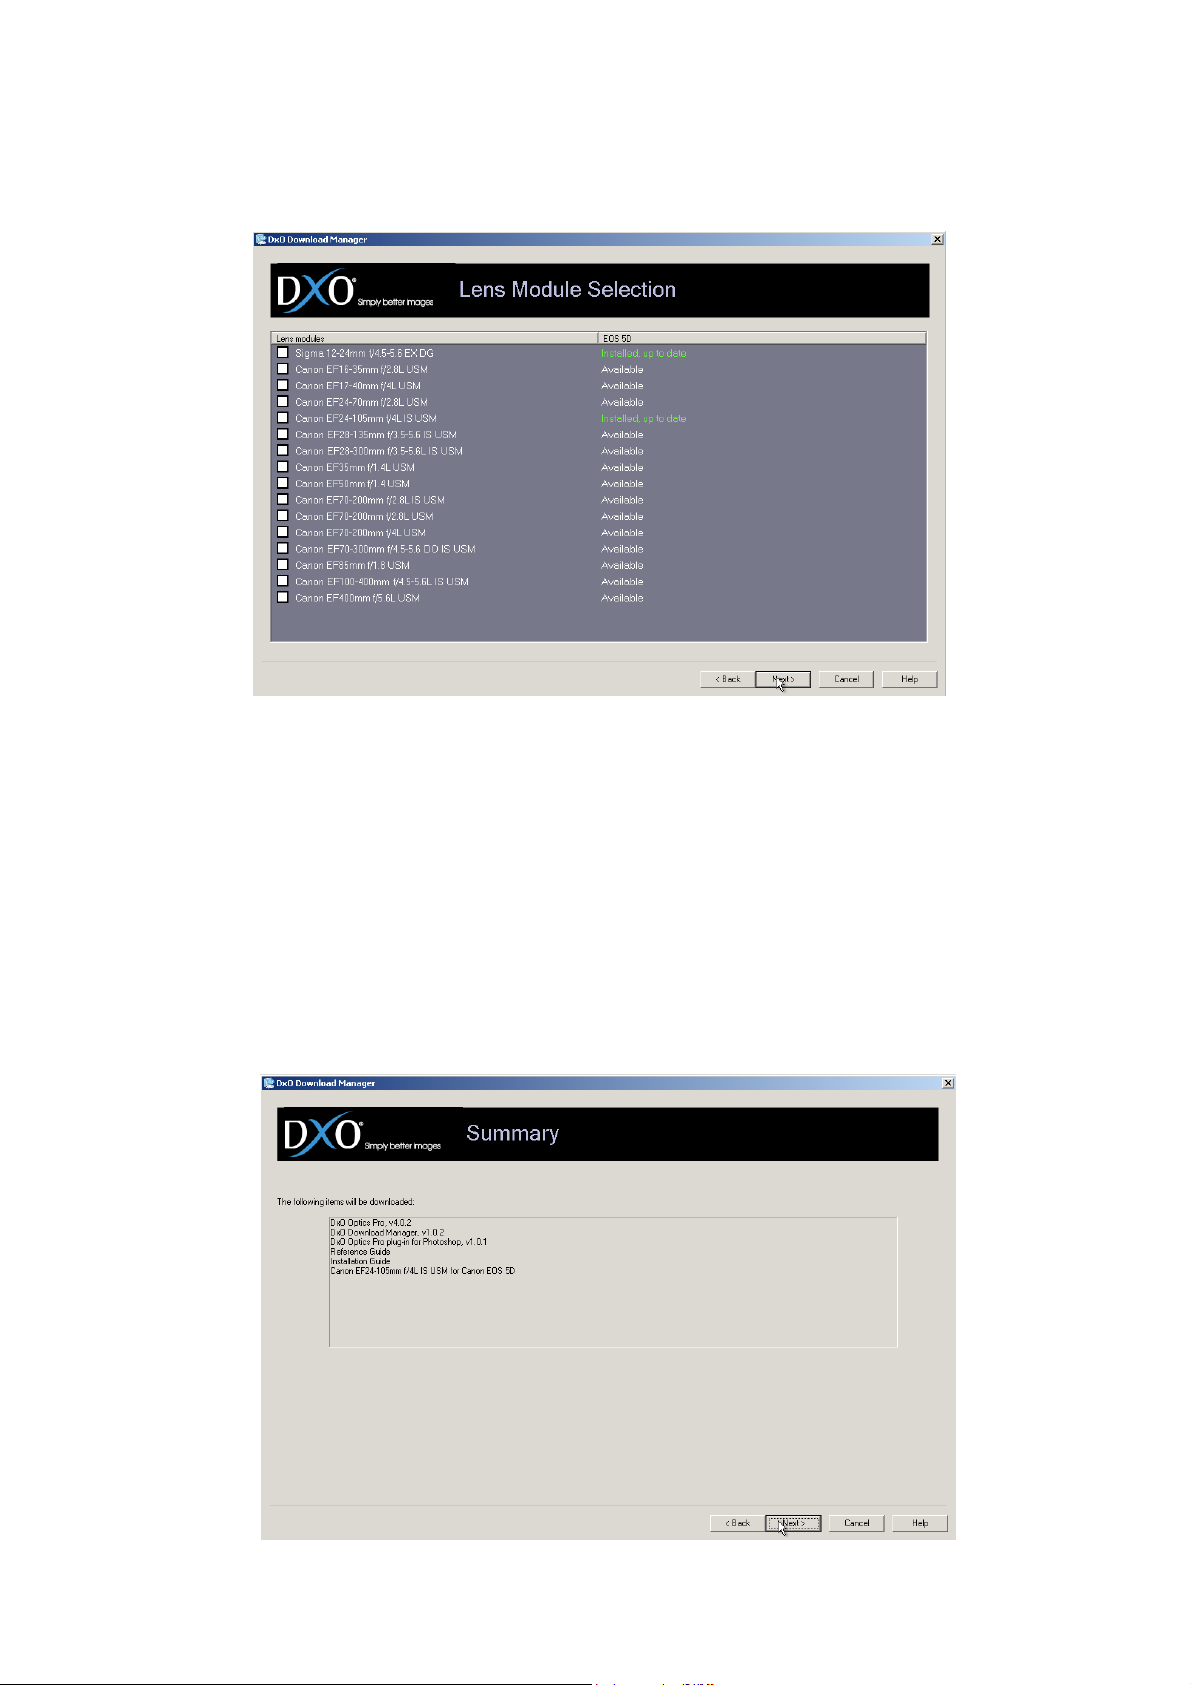
Under “Lens Module selection”, choose all the lenses you
need. Click “Next”.
• Under “Updates and Platform selection”, choose whether to
download all or only some of the software components
(including the reference manual and the Adobe Photoshop
plug-in).
o Under “Where do you want to install DxO Optics Pro”
Click either “On This computer” or “Save downloaded
files for installation on another computer”.
o Choose platform.
• Under “summary”, review the camera and bodies you are
installing. Click “next”. The files will start downloading.
©DxO Labs 2006 -
4 - All rights reserved
Page 5
DxO Optics Pro V4.1 Installation Guide
3. Installation
After downloading, if you have selected “install on this computer”,
a dialog box will open automatically.
• Click on “I accept the terms in the License Agreement”.
Click “Next”.
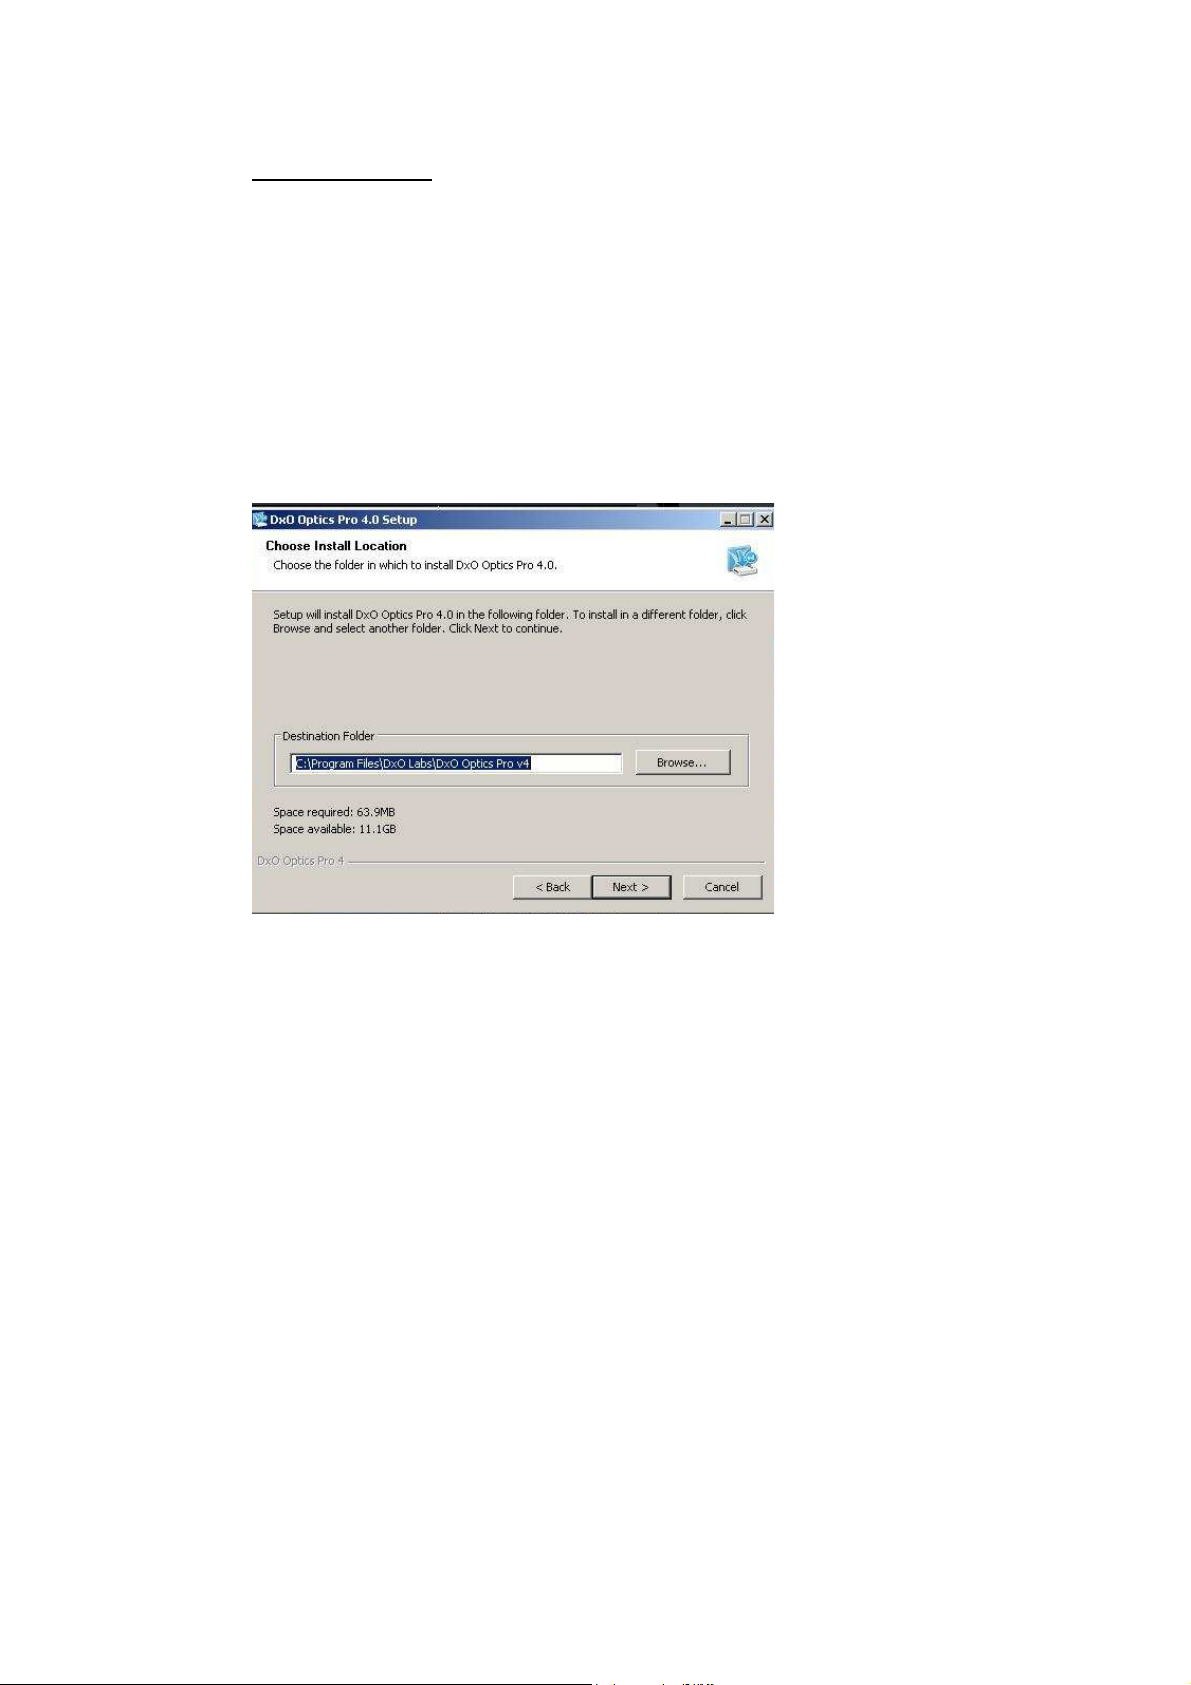
• The default location for installation is in the folder
“Program Files/DxO Labs/DxO Optics Pro” (“Applications /
DxO Labs / Dxo Optics Pro” on Macintosh). To accept this
location, click “Next”. (Click “Browse…” to change
locations).
• Choose Start Menu Folder for DxO Optics Pro shortcuts.
You can accept the default name of DxO Optics Pro or add
a new name. Click “Install”.
If you chose to save files for installation on another computer,
they will be located in the default location for downloading files
(My Documents for example). You can then copy the folder called
“DxO Optics Pro V4 Install” and its content to another computer.
To launch the installation on this computer, click on the setup file
located in the “DxO Optics Pro V4 Install” folder.
Once Installation is complete, you can start using DxO Optics pro.
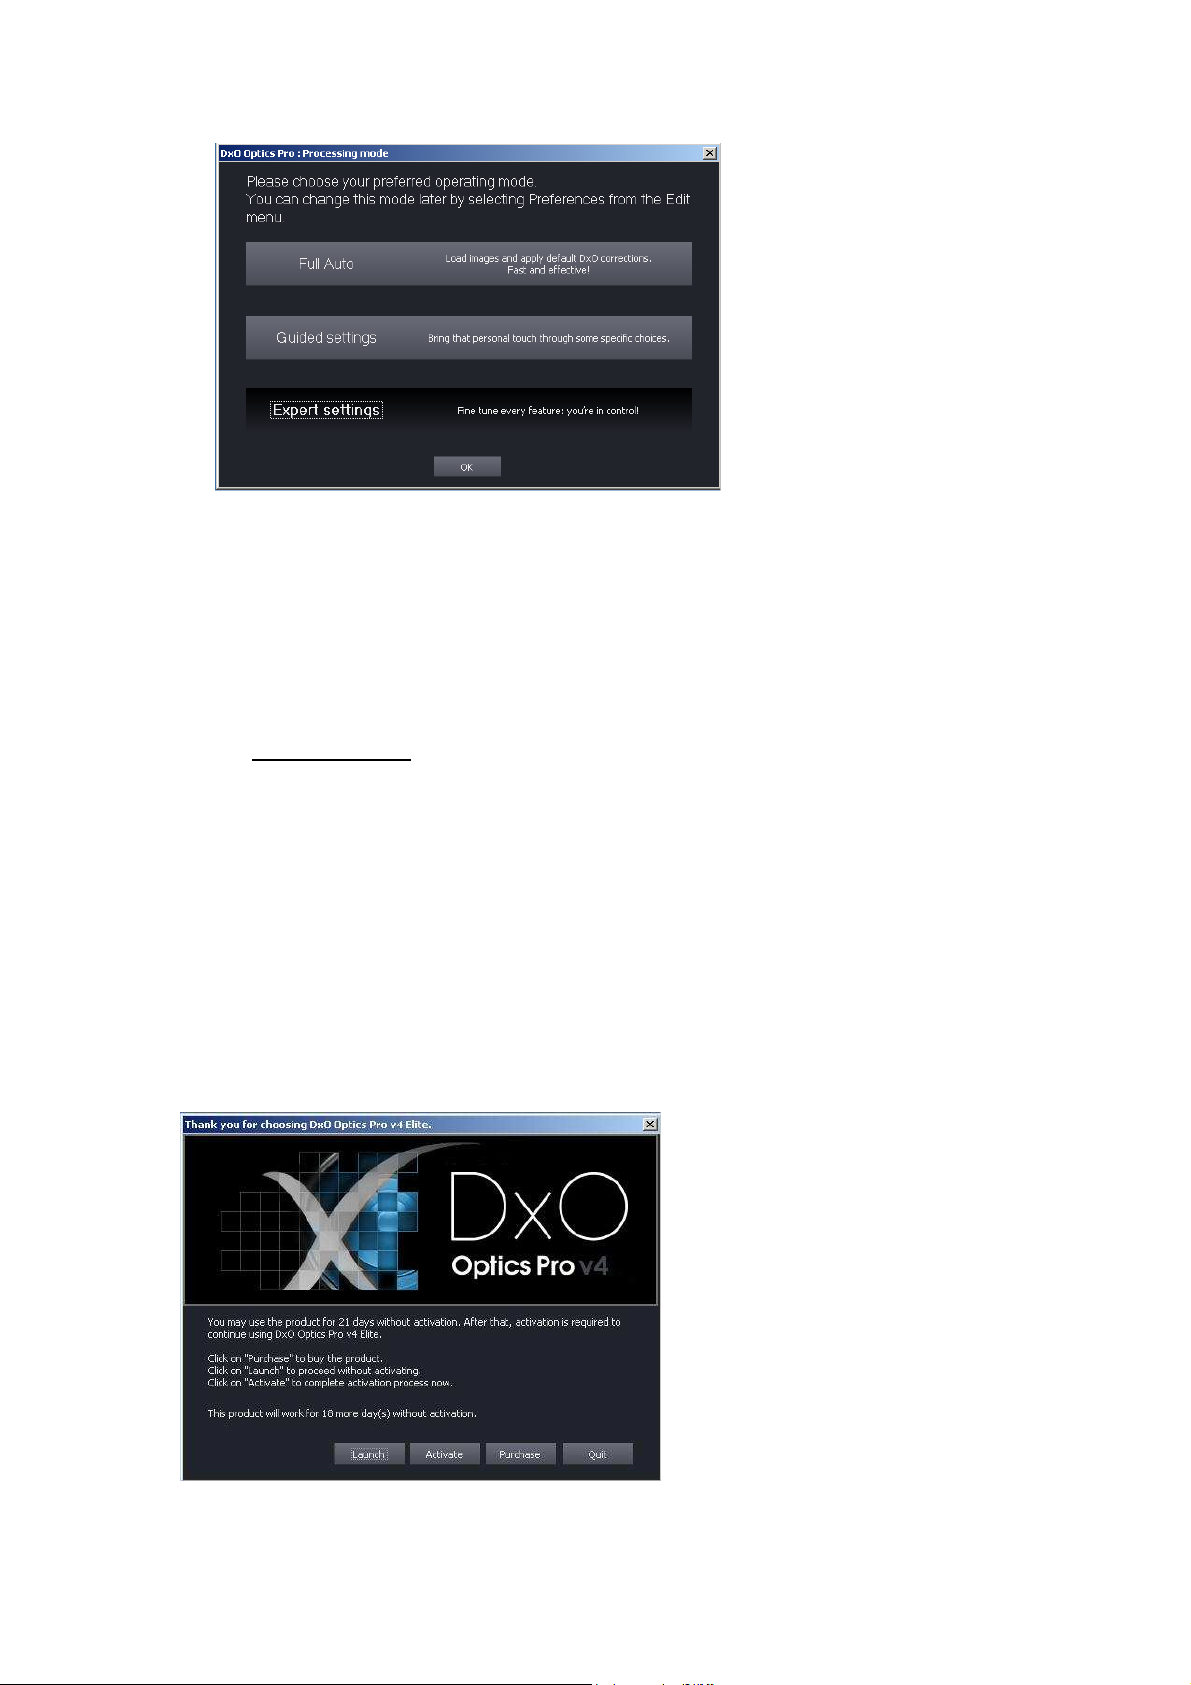
The first thing you can do is to confirm the language of
installation. Next, you will choose what mode you would like DxO
Optics Pro to open in:
©DxO Labs 2006 -
5 - All rights reserved
Page 6
DxO Optics Pro V4.1 Installation Guide
This choice can later be changed in the Preferences, available in
the File Menu (Windows version) or DxO Optics Pro Menu
(Macintosh version). See the Reference Manual for more
information on the different working modes.
4. Activation
Once DxO Optics Pro is installed, you can use it for 21 days before
activation. We recommend activating early so as not to interrupt
your use of DxO Optics Pro!
On-line Purchase Activation
Activation on a computer with an internet connection:
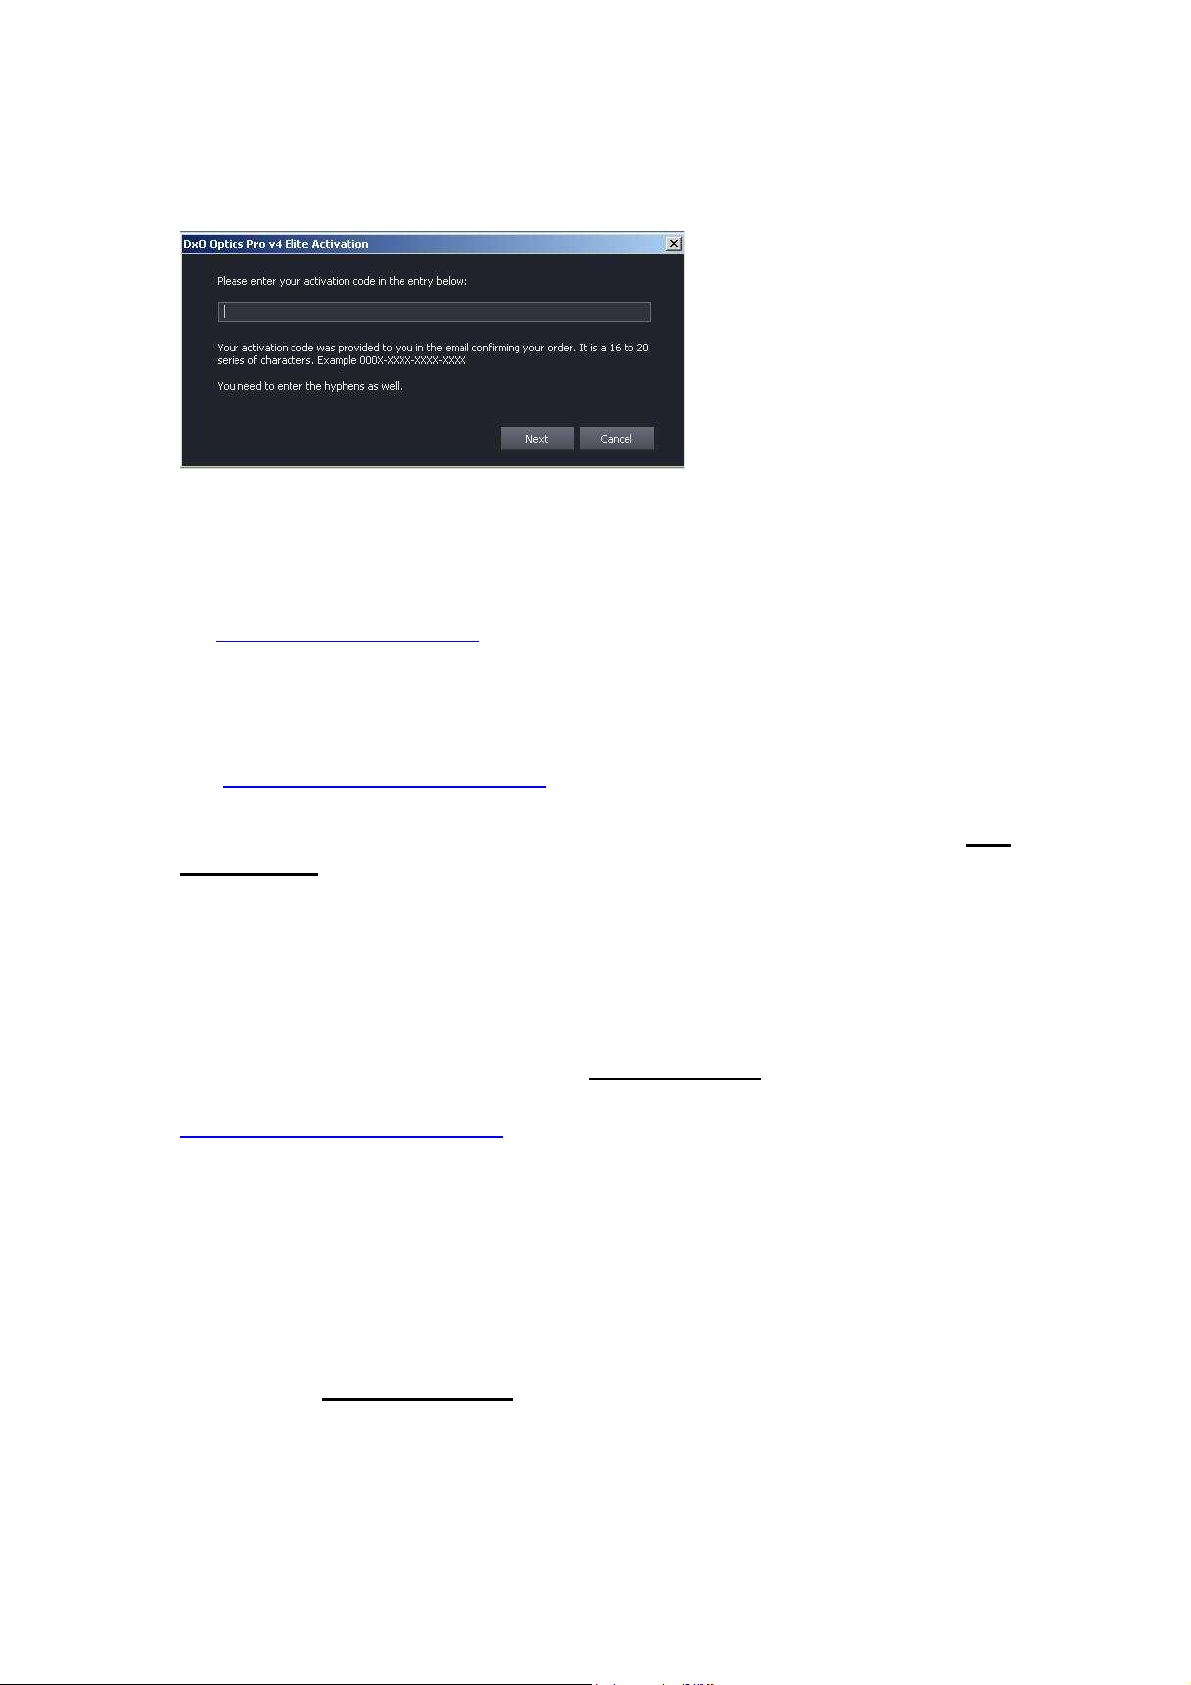
• If you are connected to the Internet, the activation process is
very simple. Upon opening DxO Optics Pro you have this
menu. Click on “Activate.”
©DxO Labs 2006 -
6 - All rights reserved
Page 7
DxO Optics Pro V4.1 Installation Guide
•
In this window, input the activation code you received in the
email with the download link and click “Next”.
• Activation is complete.
Note: If you have lost your email or order form, you can access
your activation code by logging into your account at
https://shop.dxo.com and ask for the free upgrade.
Activation on a computer without Internet connection:
If the computer on which you are installing DxO Optics Pro is not
connected to the Internet, you can activate from another computer
at: https://activation.dxo.com.
On the computer on which you want to activate DxO Optics Pro (not
connected to the Internet)
• Open DxO Optics Pro. Click on “activate”.
• Enter your activation code (from your order confirmation
email or from your account profile on our website).
• The software will then give you a challenge code.
• Do not close DxO Optics Pro.
Next, turn to your computer that is connected to the Internet. You
will need to enter the following information on this page:
https://activation.dxo.com
• Your email and password to your DxO account;
• Your “activation code,” (from your order confirmation email
or from your account profile on our website) and
• Your “challenge code” that the software has provided you.
Once you input all of this information of these codes into the
manual activation code page you will receive the “response code”.
Lastly, back on the computer on which you want to activate DxO
Optics Pro (not connected to the Internet)
• Enter the response code.
• Activation is complete.
©DxO Labs 2006 -
7 - All rights reserved
Page 8
DxO Optics Pro V4.1 Installation Guide
Important Note: Keep the activation dialog box of DxO Optics
Pro open on the computer upon which you are installing DxO
Optics Pro while activating. If you close the dialog box, the
challenge code will change and the response code will no
longer be valid.
CD Activation
DxO Optics Pro, when purchased in a store and not on-line, comes
with a CD activation code.
Activation on a computer with an internet connection:
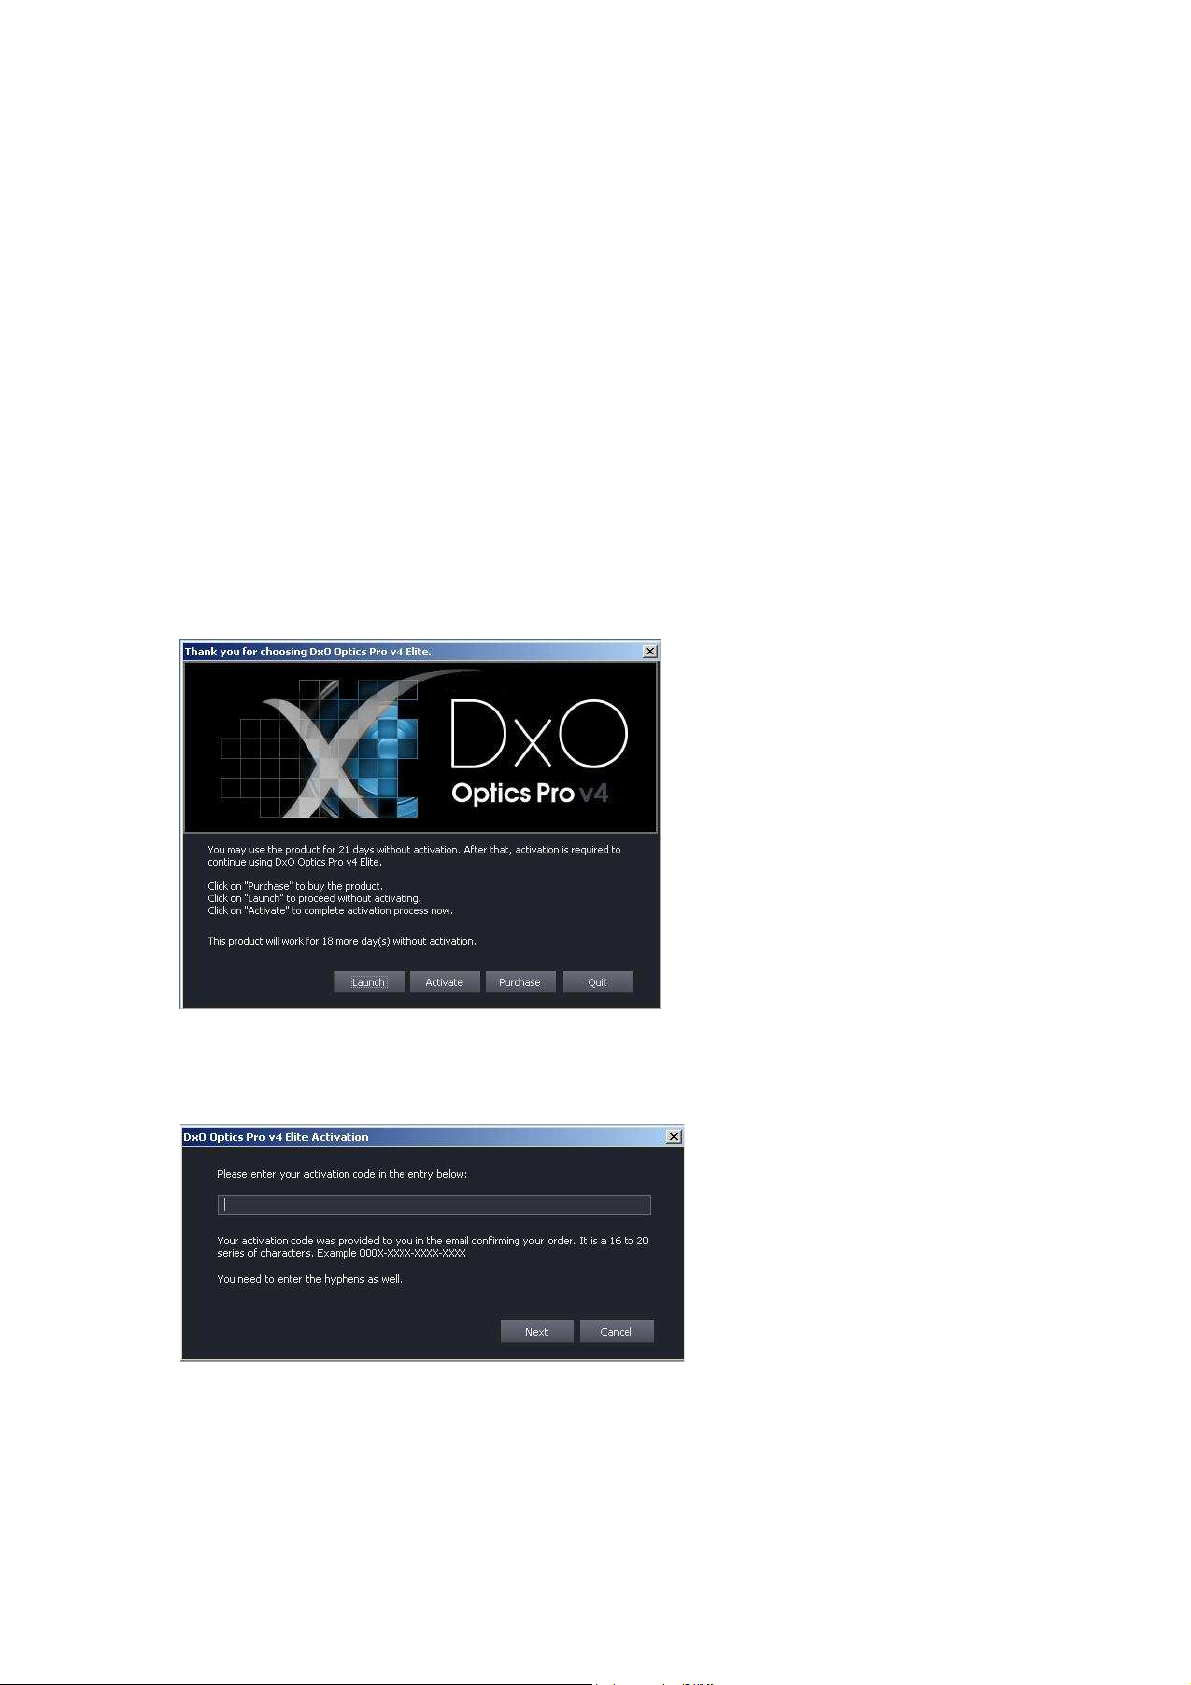
• If you are connected to the Internet, the activation process is
very simple. Upon opening DxO Optics Pro you have this
menu. Click on “Activate.”
• In this window, input the activation code provided with your
CD and click “Next”.
• A form will appear. It appears only the first time you try to
activate.
• Fill in the form. This will create a DxO account to validate the
activation.
• Activation is complete.
©DxO Labs 2006 -
8 - All rights reserved
Page 9

DxO Optics Pro V4.1 Installation Guide
Activation on a computer without Internet connection:
If the computer on which you are installing DxO Optics Pro is not
connected to the Internet, you can activate from another computer
at: https://activation.dxo.com.
On the computer on which you want to activate DxO Optics Pro (not
connected to the Internet)
• Open DxO Optics Pro. Click on “activate”.
• Enter your activation code (provided with your CD).
• The software will then give you a challenge code.
• Do not close DxO Optics Pro.
Next, turn to your computer that is connected to the Internet.
Go to https://activation.dxo.com.
You will first need to setup a DxO account.
Then enter the following information:
• Your email and password to your DxO account;
• Your “activation code,” (provided with your CD) and
• Your “challenge code” that the software has provided you.
Once you input all of this information of these codes into the
manual activation code page you will receive the “response code”.
Lastly, back on the computer on which you want to activate DxO
Optics Pro (not connected to the Internet)
• Enter the response code.
• Activation is complete.
Important Note: Keep the activation dialog box of DxO Optics
Pro open on the computer upon which you are installing DxO
Optics Pro while activating. If you close the dialog box, the
challenge code will change and the response code will no
longer be valid.
Re-activations and additional activations
You must activate DxO Optics Pro after disk reformatting and
reinstallation or when installing on a different computer. You must
also re-activate after any purchased upgrade or with the DxO
FilmPack add-on. Re-activation is not necessary when updating with
only minor updates.
©DxO Labs 2006 -
9 - All rights reserved
Page 10
DxO Optics Pro V4.1 Installation Guide
5. DxO FilmPack Installation and Activation
The DxO FilmPack is a new DxO add-on product to complement
your DxO Optics Pro software. The DxO FilmPack is available for
download with the release of version 4.1 of DxO Optics Pro. (DxO
FilmPack is not compatible with previous versions of DxO Optics
Pro).
Downloads of DxO Optics Pro version 4.1 will include the DxO
FilmPack. You can then choose whether or not to purchase this addon. DxO FilmPack is available for all editions of DxO Optics Pro
(Starter, Standard and Elite).
Several options of purchasing and activating the DxO FilmPack are
possible:
If you already own DxO Optics Pro version 4.1, an additional
purchase of the FilmPack alone will require you to go to Help/DxO
FilmPack Activation in order to activate the software.
If DxO Optics Pro Version 4.1 and the DxO FilmPack are both
purchased and activated at the same time, just one activation is
necessary for both.
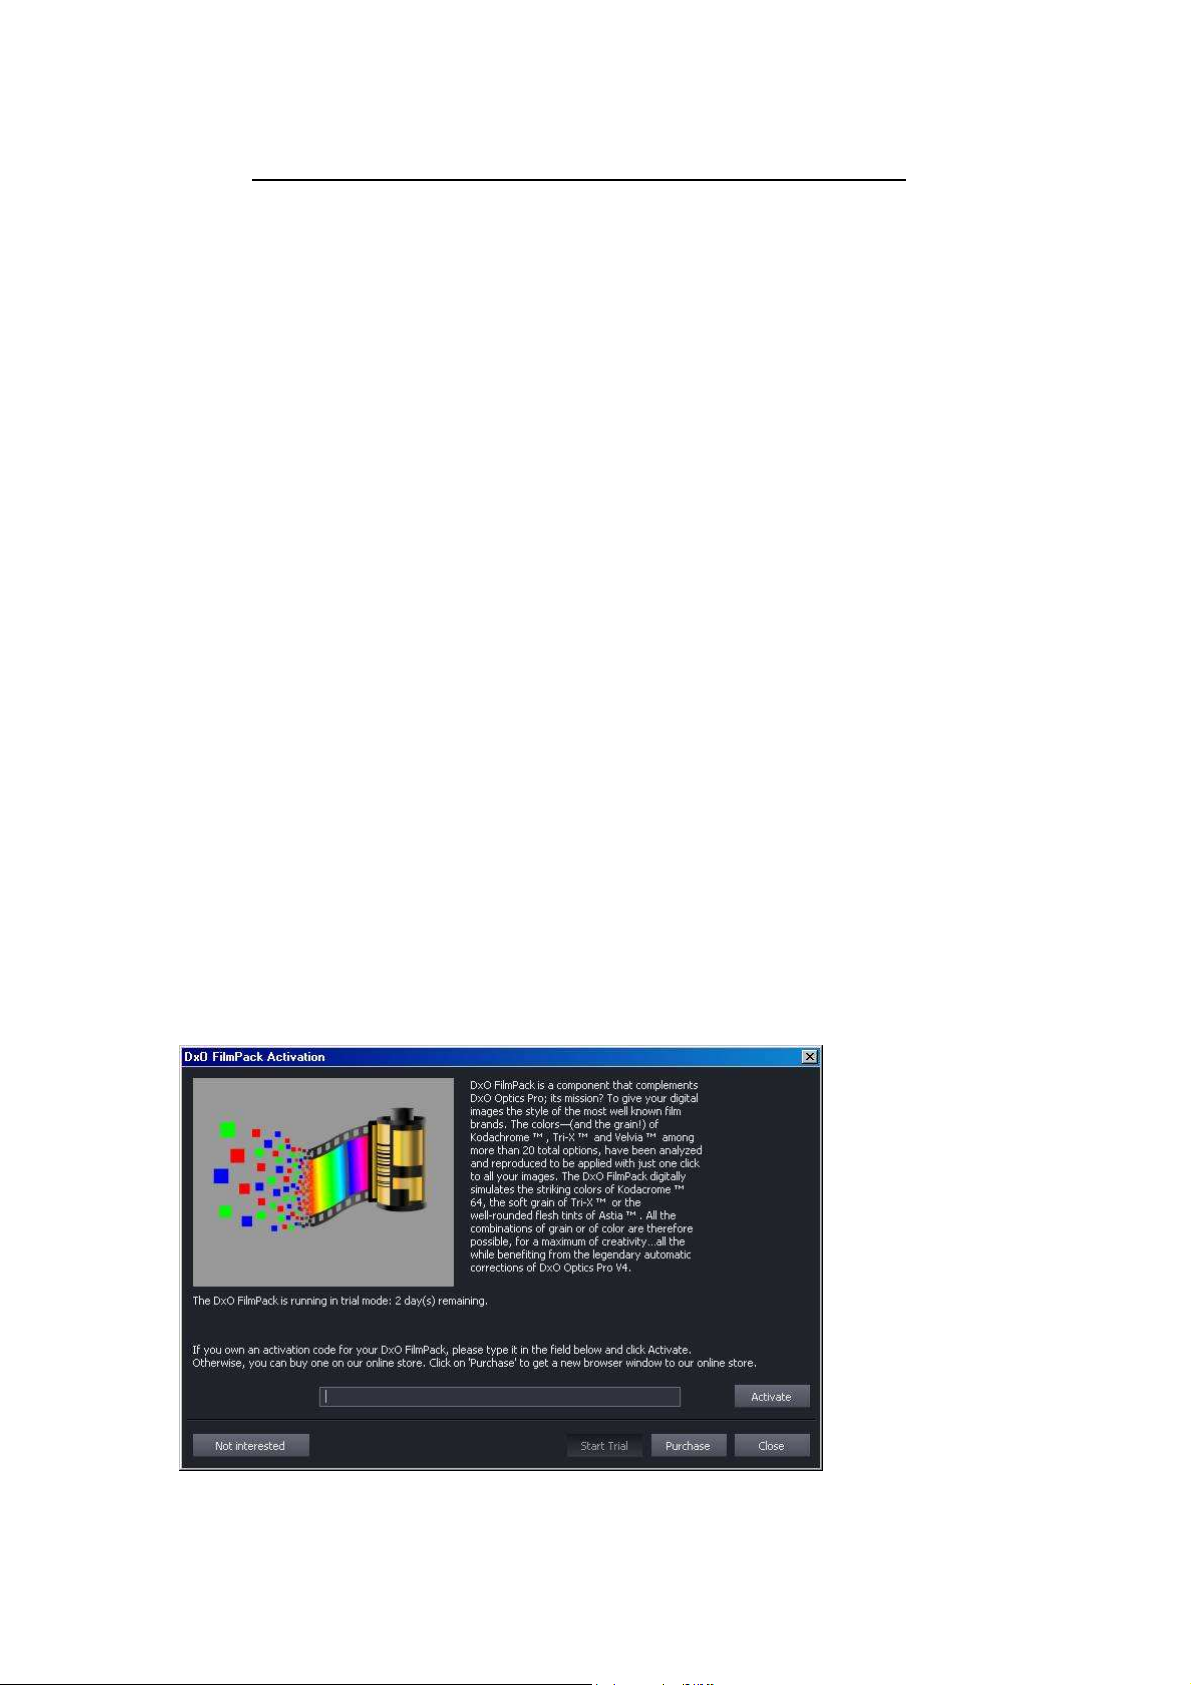
Activation
The DxO FilmPack appear as a splash screen upon installation of
DxO Optics Pro 4.1. This screen is also available via the menu Item
« Activate FilmPack », in the Help Menu (Windows version) or the
DxO Optics Pro Menu (Macintosh version).
©DxO Labs 2006 -
10 - All rights reserved
Page 11

DxO Optics Pro V4.1 Installation Guide
Enter your activation code and click on the « Activate » button. The
activation code is available on the web page of your order
confirmation, and alternatively in the order confirmation sent by
email.
The various functions of DxO FilmPack are available under the
Enhance tab, in the DxO Color palette. You’ll find there some local
menus that allows-the selection of the color rendition profiles and
the grain of 20 films. For more details about how to use DxO
FilmPack, please refer to the Reference Manual, chapter 19th.
©DxO Labs 2006 -
11 - All rights reserved
 Loading...