

Page 1
INSTALLATION GUIDE
DXO OPTICS PRO 6
Thank you for your interest in DxO Optics Pro!
Information regarding purchasing, installing, activating, and updating the DxO software is provided below.
Important Note : Internet access is required to download and activate DxO, even if you purchased the
software from a distributor and you have the installation CD. It is, nevertheless, possible to use the Internet
connection available on a different computer than you are installing DxO Optics Pro to perform the necessary
functions.
Page 2

DxO Optics Pro 6 Guide d’installation
Table of Contents:
1. Purchasing ___________________________________________________________________________ 3
1.1 Purchasing from the DxO Labs Internet Online Store ____________________________________________ 3
1.2 Purchasing a boxed CD from a reseller _______________________________________________________ 3
2. Downloading for installation on a computer connected to the internet __________________________ 4
2.1 Downloading after purchasing from the dxo labs internet online store _________________________________ 4
2.2 Downloading after purchasing from a reseller _____________________________________________________ 4
3. Installation on a computer that is not connected to the internet _______________________________ 5
3.1 Download prerequisites for installing DxO Optics Pro 6 _____________________________________________ 5
3.2 Download DxO Optics Pro 6 ___________________________________________________________________ 5
3.3 Download DxO Optics Modules ________________________________________________________________ 5
4. Installation __________________________________________________________________________ 6
4.1 Installation sur PC ___________________________________________________________________________ 6
4.3 Installation of DxO Optics Modules _____________________________________________________________ 9
4.3 Installation on a computer that is not connected to the Internet _____________________________________ 10
4.3.1 Installation Prerequisites _____________________________________________________________________________ 10
4.3.2 Installation OF DxO Optics Pro 6 _______________________________________________________________________ 10
4.3.3 Installation of DxO Optics Modules _____________________________________________________________________ 10
5. Activation __________________________________________________________________________ 11
5.1 Activation with an Internet Connection _____________________________________________________ 11
5.2 Activation without an Internet Connection ___________________________________________________ 12
5.3 Backup license file ______________________________________________________________________ 16
5.4 Restore license file ______________________________________________________________________ 17
6. Boxed CD Versions Prior to Version 6 _______________________________________________________ 18
7. Updates ______________________________________________________________________________ 19
7.1 Minor updates _________________________________________________________________________ 19
7.2 Upgrading to elite edition ________________________________________________________________ 19
7.2.1 Upgrades for pc version ______________________________________________________________________________ 19
8. Re-install dxo optics pro 6 _____________________________________________________________ 19
9. Problem solving______________________________________________________________________ 20
©DxO Labs 2009 - 2 - All rights reserved
Page 3

DxO Optics Pro 6 Guide d’installation
1. PURCHASING
There are two ways to buy DxO Optics Pro. You can either buy and download directly on the DxO Labs Website using the
following link, or buy a box containing the CD from one of our specialist dealers.
1.1 PURCHASING FROM THE DXO LABS INTERNET ON LINE STORE
Once you have completed your purchase, you will receive an e-mail containing:
- A link to download the DxO software
- Your activation code, needed to activate the software..
1.2 PURCHASING A BOXED CD FROM A RESELLER
When you purchase a boxed CD from a reseller, the box contains:
- A CD with an installation file that allows the download of the required installation file. You will be able to
download directly using the CD the version of the DxO software you purchased.
- A 4-page booklet of installation notes with your activation code printed on the front page.
©DxO Labs 2009 - 3 - All rights reserved
Page 4

DxO Optics Pro 6 Guide d’installation
2. DOWNLOADING FOR INST ALLAT ION ON A COMPUTER CONNE CTED TO THE IN TERN ET
2.1 DOWNLOADING AFTER PUR CHASING FROM THE DXO LABS INTERNET ONLINE STORE
Note : You must have a fast Internet connection to download DxO Optics Pro software.
If you have purchased DxO Optics Pro from the DxO Labs website online store, you should complete all of the steps of
the purchasing process, which includes creating a customer account, before downloading the installation file, which
should be done last.
Follow instructions and read fully this Installation Guide so that you understand all stages of installation, registration,
activation, and update.
2.2 DOWNLOADING AFTER PURCHASING FROM A RESELLER
Note : You must have a fast Internet connection to download DxO Optics Pro software.
If you you have purchased a DxO Optics Pro version CD from a reseller, the CD contains a single file that you will use
to download the full installation setup file.
Follow instructions and read fully this Installation Guide so that you understand all stages of installation, registration,
activation, and update.
©DxO Labs 2009 - 4 - All rights reserved
Page 5

DxO Optics Pro 6 Guide d’installation
3. INSTALL ATION ON A COMPUTE R THAT IS NOT CONNECTED TO THE INTER N ET
3.1 DOWNLOAD PREREQUISIT ES FOR INSTALLING DXO OPTICS PRO 6
To install DxO Optics Pro on a machine not connected to the Internet you must
To install dxo optics pro on a machine not connected to the internet you must first make certain that the
following prerequisites are installed on your pc. normally they are part of your computer’s microsoft windows
operating system:
- Microsoft Visual C++ 2005 Redistributable Runtime Package (x86) SP1
- Microsoft Visual C++ 2008 Redistributable Runtime Package (x86) SP1
- Microsoft .NET Framework 3.5 Runtime Package (x86) SP1
If you do not have these on your computer, you will need to download and install these from Microsoft’s web
site: http://search.microsoft.com/
3.2 DOWNLOAD DXO OPTICS PRO 6
You can download the installer from this link:
http://download-center.dxo.com/v6/Win/DxO_OpticsPro6_Setup.exe
3.3 DOWNLOAD DXO OPTICS MODULES
You must download the DxO Optics modules from here:
http://www.dxo.com/fr/photo/dxo_optics_pro/manual_download
You must also download a .dll file that will allow DxO Optics Pro to associate your image files with
corresponding DxO optics modules. This file can be downloaded from this link:
http://download-center.dxo.com/v6/Win/ProfileList.dll
Once you have downloaded these files, copy them onto a removable storage device. Then proceed to the
section on installing on a computer not connected to the Internet.
©DxO Labs 2009 - 5 - All rights reserved
Page 6
DxO Optics Pro 6 Guide d’installation
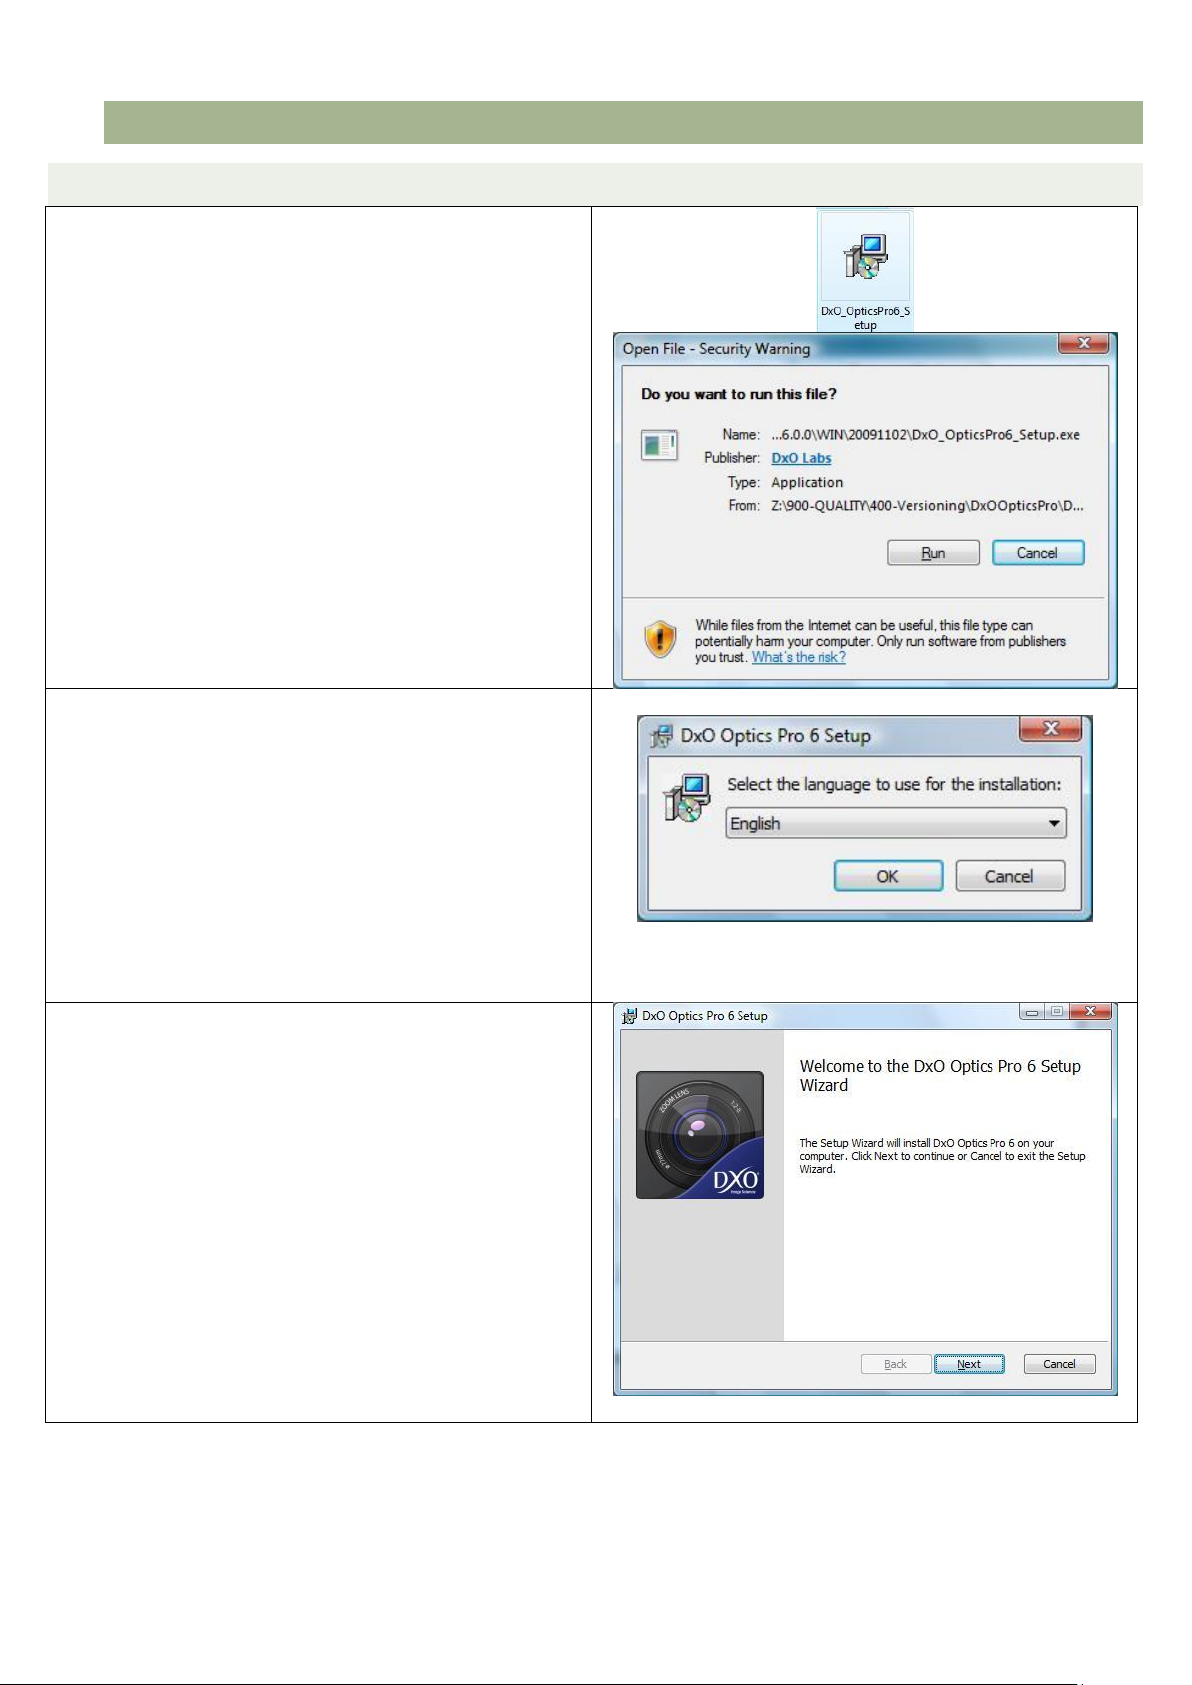
Double click on the Setup executable file to begin the
installation.
An installation window will appear. You must choose the
supported language you want to use with the installation
program.
A welcome window opens, indicating the setup of DxO
Optics Pro has started. Click "Next."
4. INSTALL ATION
4.1 INSTALLATIO N SUR PC
©DxO Labs 2009 - 6 - All rights reserved
Page 7
DxO Optics Pro 6 Guide d’installation
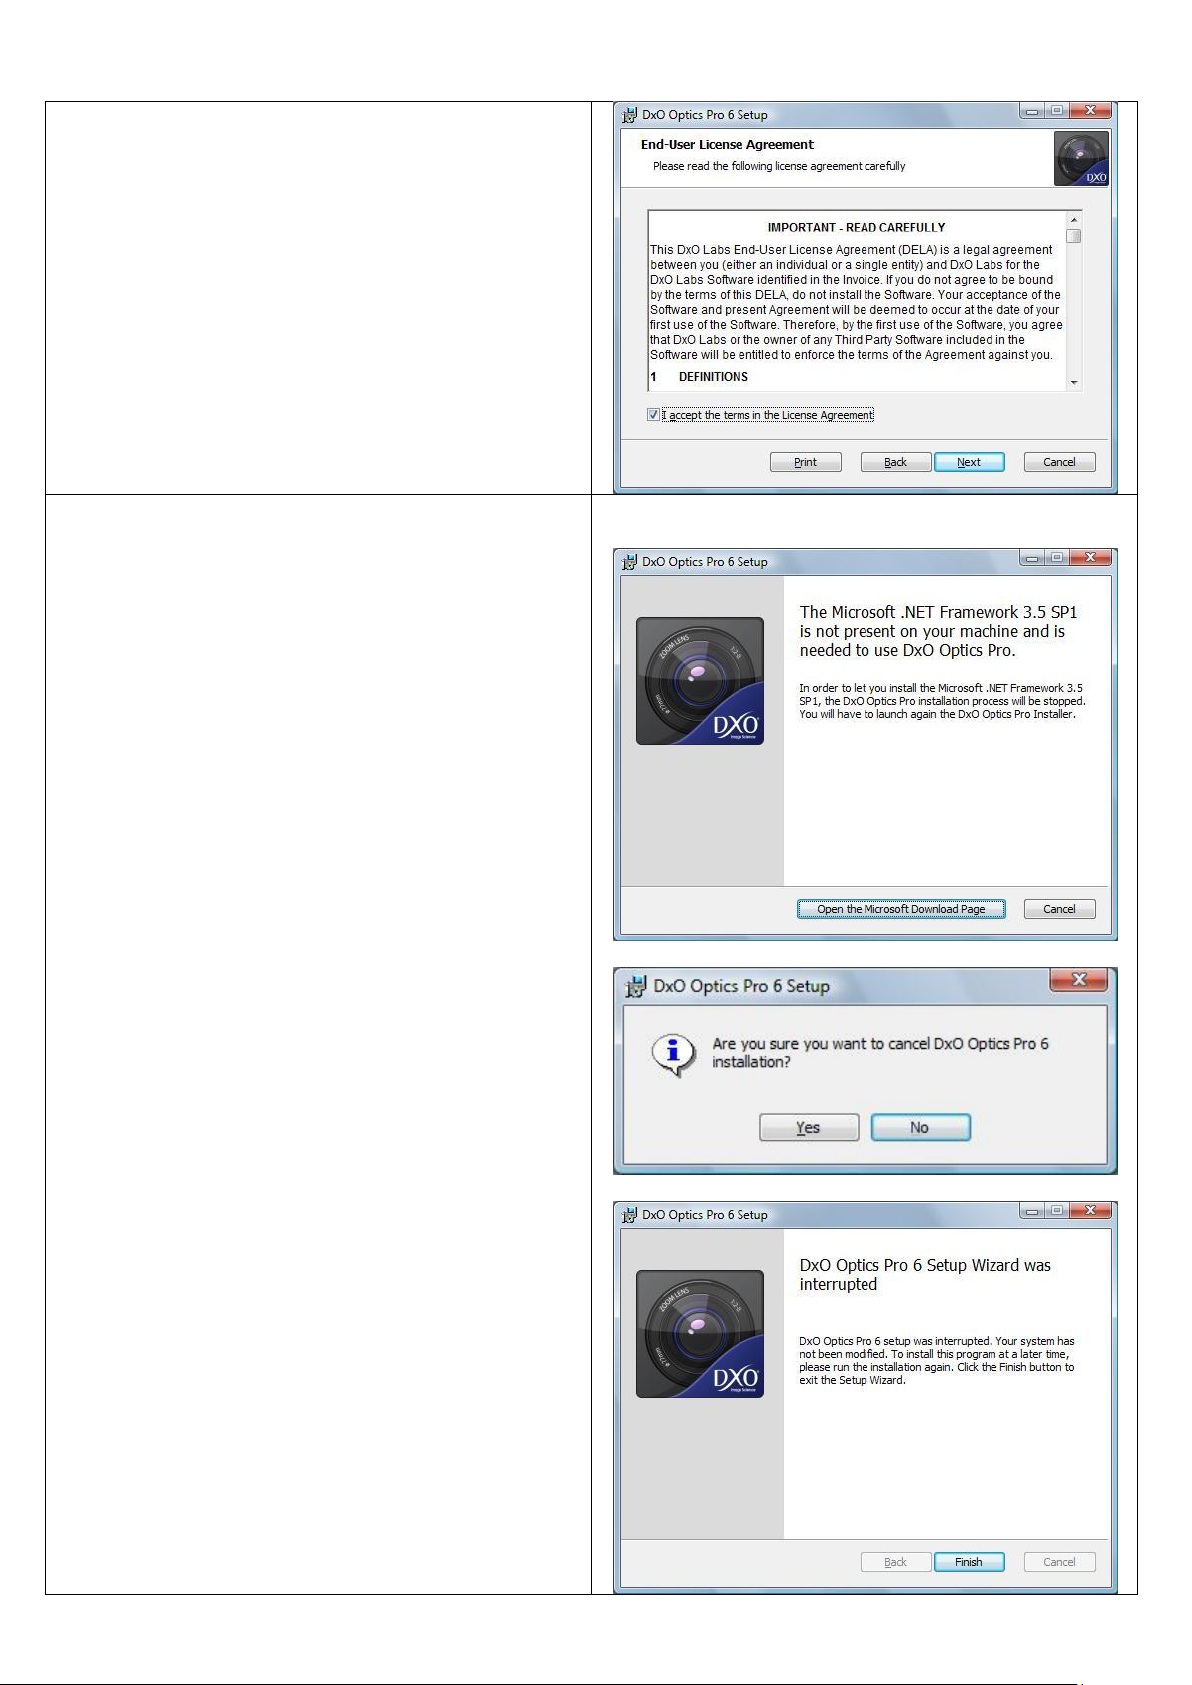
To continue installing DxO Optics Pro, you must have the
Microsoft Windows component. NET Framework on your
computer.
In case where this is not already installed on your
computer, the installer will suggest a link to the Microsoft
web site where you may download it so you can install
this essential component necessary for the correct
functioning of DxO Optics Pro, on your computer. This is
essential in order to continue with the installation of DxO
Optics Pro.
You may continue the installation of DxO Optics Pro once
the missing component is installed on your computer.
©DxO Labs 2009 - 7 - All rights reserved
Page 8
DxO Optics Pro 6 Guide d’installation
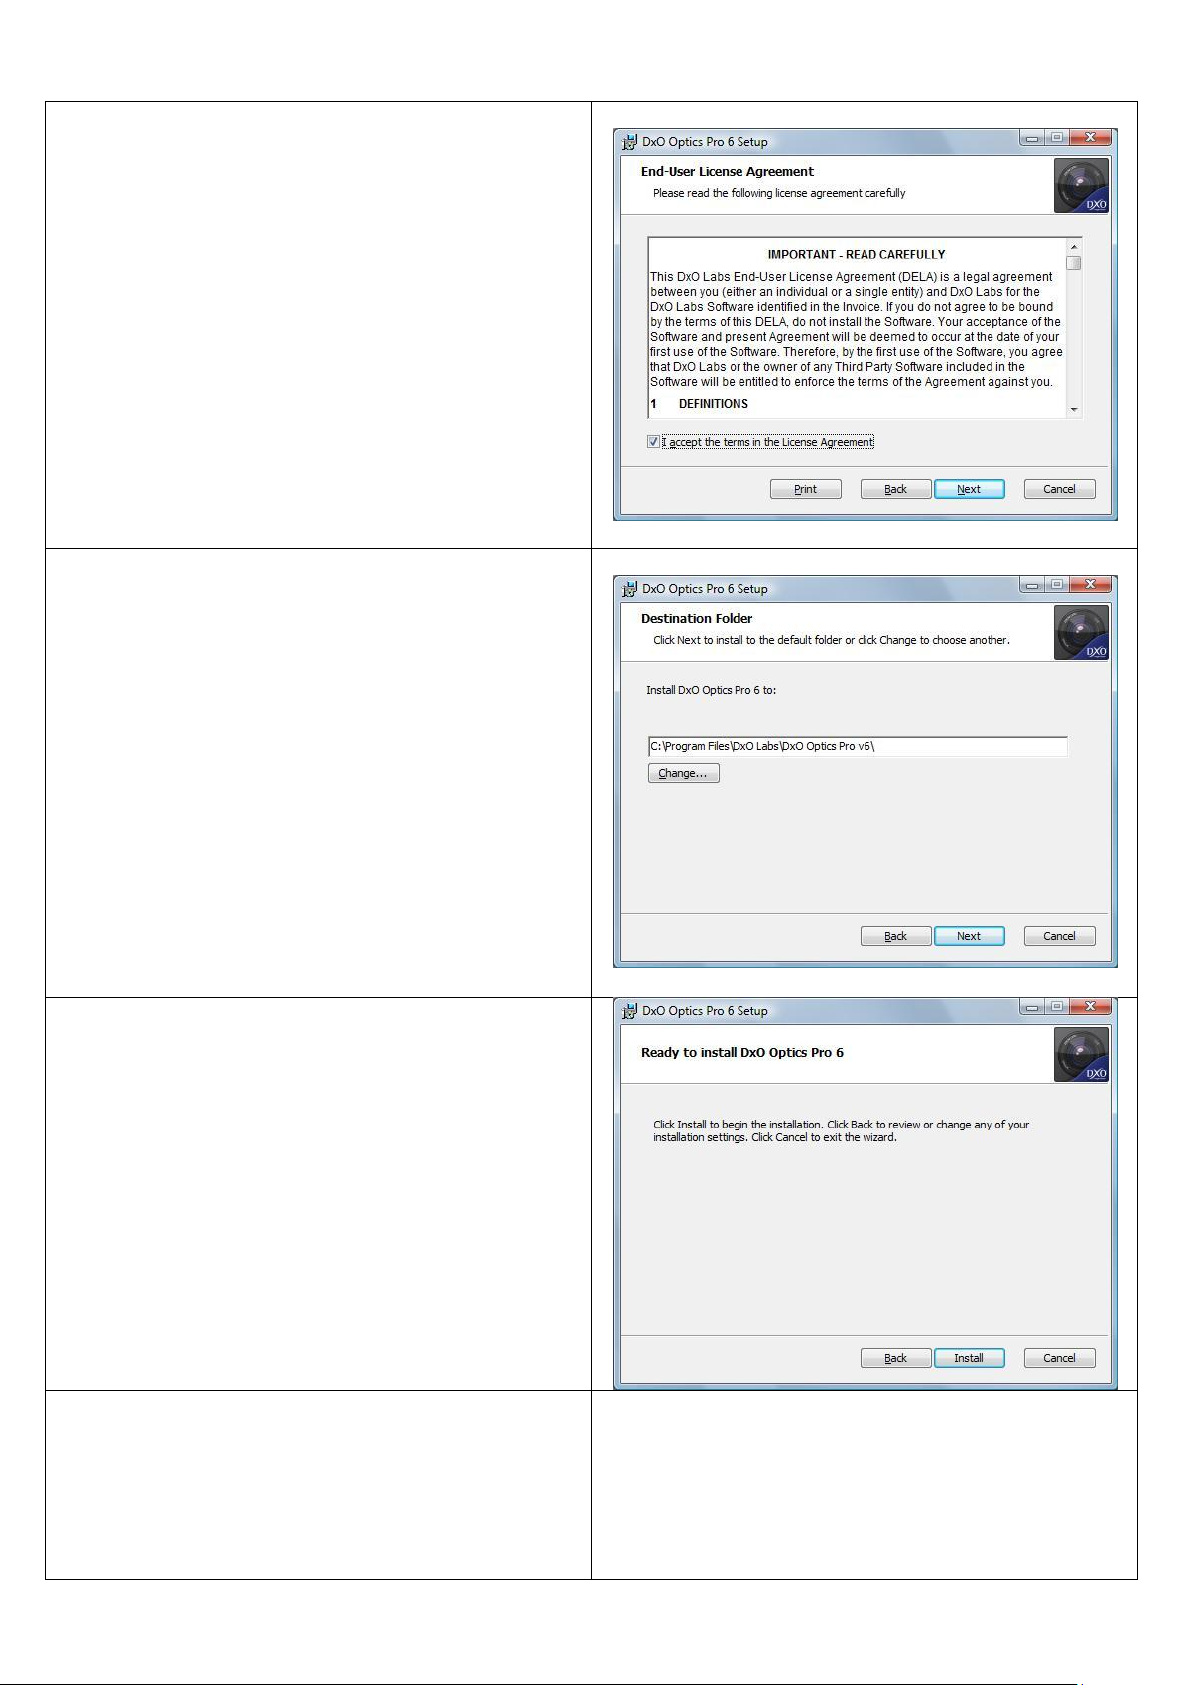
You can now accept the conditions for using the software
by checking the box "I accept the conditions" given in the
window.
Select the destination directory in which DxO Optics Pro
will be installed.
Click install.
©DxO Labs 2009 - 8 - All rights reserved
Page 9
DxO Optics Pro 6 Guide d’installation
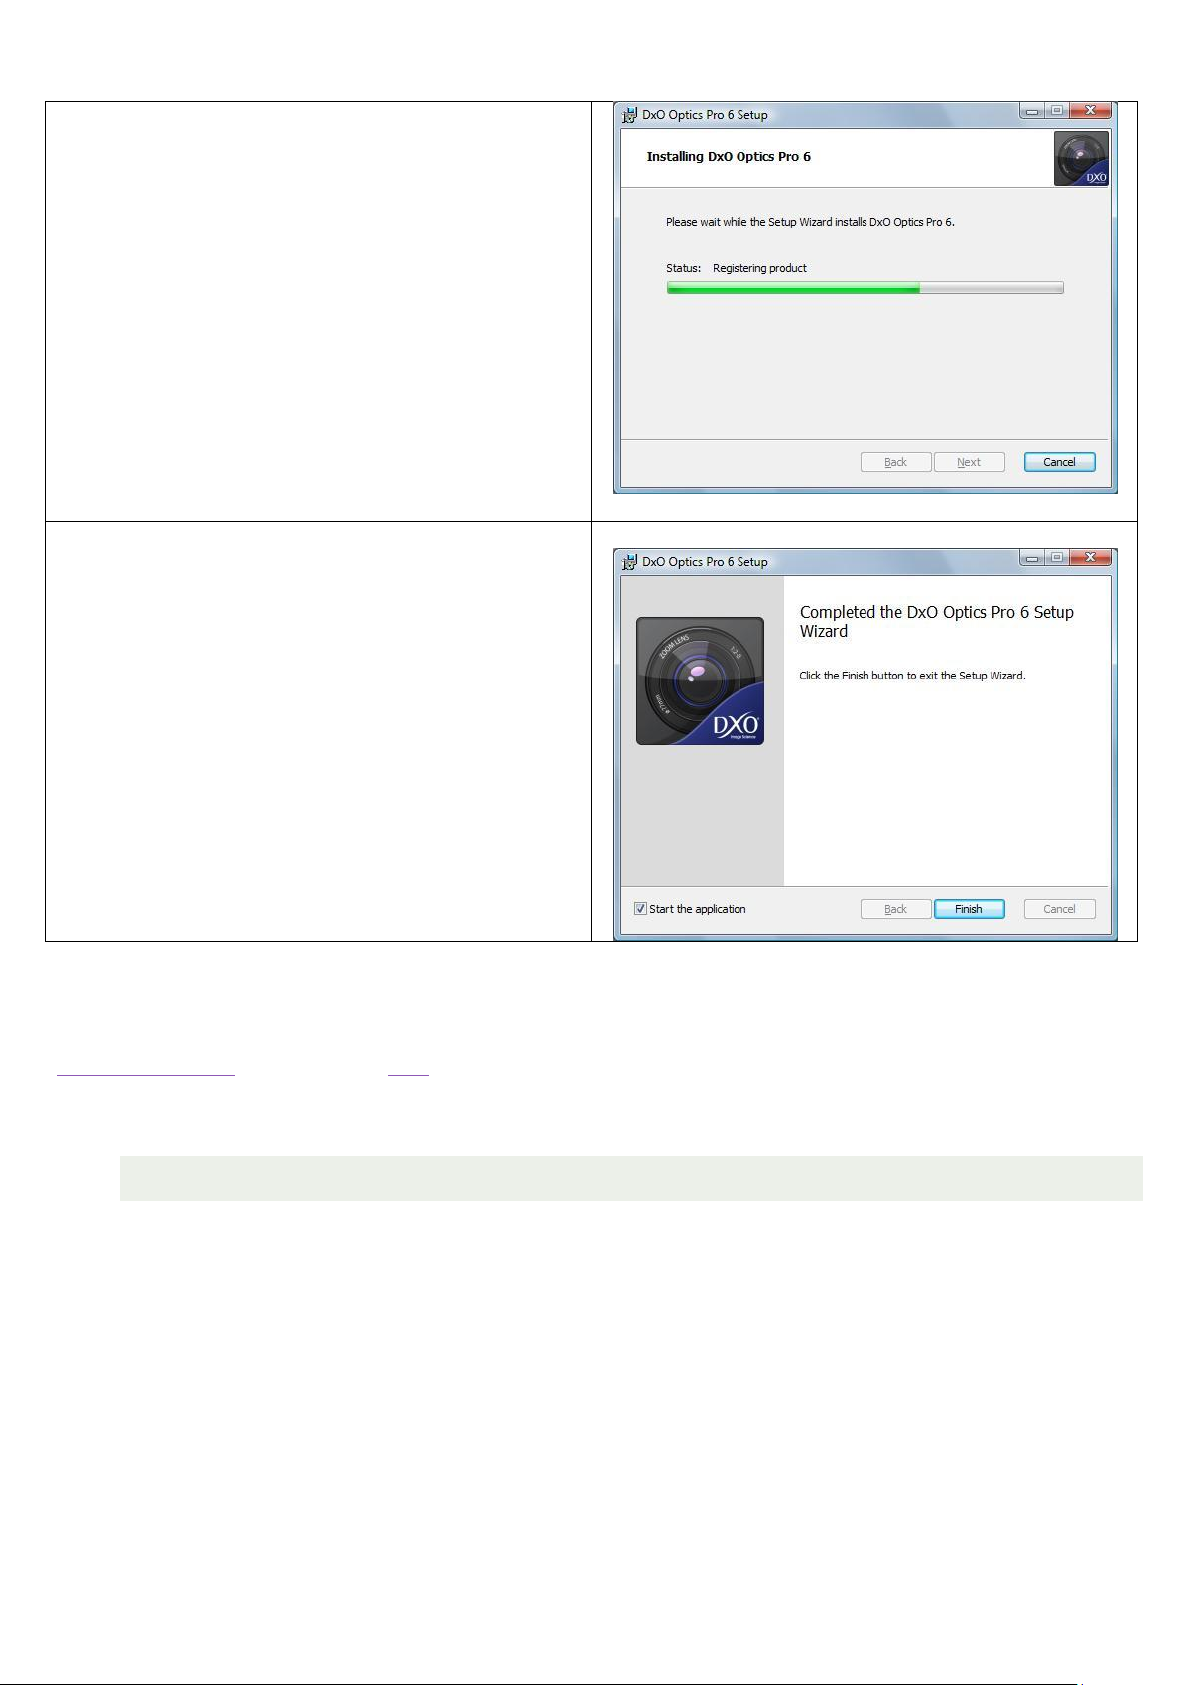
The installation starts and may take several minutes.
The installation is complete, you can now use the
software.
If you encounter any problems during the installation steps, you can seek help on the DxO Labs website, with
Customer Support, or consult the FAQ.
4.2 INSTALLATION OF D XO OPTICS MODULES
To make the correction of optical defects introduced by your equipment, it is necessary to install on your
computer correction modules which correspond to your specific camera/lens comninations.
With DxO these optical correction modules can be installed at any time (if the computer is connected to the
internet), going in the "DxO Modules”, then clicking “Add New Modules” and selecting the necessary
camera/lens combinations.
In the situation where the computer is not connected to the Internet please follow the instructions in chapters
3.3 and 4.3.3.
©DxO Labs 2009 - 9 - All rights reserved
Page 10

DxO Optics Pro 6 Guide d’installation
4.3 INSTALLATION ON A COMPUTER THAT IS NOT CONNECTED TO THE INTERNET
Important : Make sure you have downloaded the necessary components for installation as described in
chapter 3.1.
4.3.1 INSTALLATION PREREQUISITES
Start by installing the prerequisites listed in paragraph 3.1 on your machine not connected to the Internet.
4.3.2 INSTALLATION OF DXO OPTICS PRO 6
Follow the installation procedure "4.1 Installing PC.”
4.3.3 INSTALLATION OF DXO OPTICS MODULES
- Start by installing the file “ProfilList.dll”. This file has to be copied in this folder:
In Windows XP:
C:\Documents and Settings\user_name\Local Settings\Application Data\DxO_Labs
In Windows Vista and Windows 7:
C:\Users\user_name\AppData\Local\DxO_Labs\DxOModules
- Then install the files "DxO optics modules”.
These files must be placed in the following directory:
In Windows XP:
C:\Documents and Settings\user_name\Local Settings\Application Data\DxO_Labs\DxOModules
In Windows Vista and Windows 7:
C:\Users\user_name\AppData\Local\DxO_Labs\DxOModules
Important:
It is likely that your system is configured to hide certain directories or folders. To get there, here are
the steps:
- Open Windows Explorer (open a folder or My Computer for example).
- In XP go to the Control Panel Window and select "Folder Options"
- Under Vista and Windows 7, also go to “control Panel” and select "Folder Options and Research"
- Select the tab "View"
- For the option Hidden files and folders, select "Show hidden files and folders"
- Validate the change by clicking "OK"
©DxO Labs 2009 - 10 - All rights reserved
Page 11
DxO Optics Pro 6 Guide d’installation
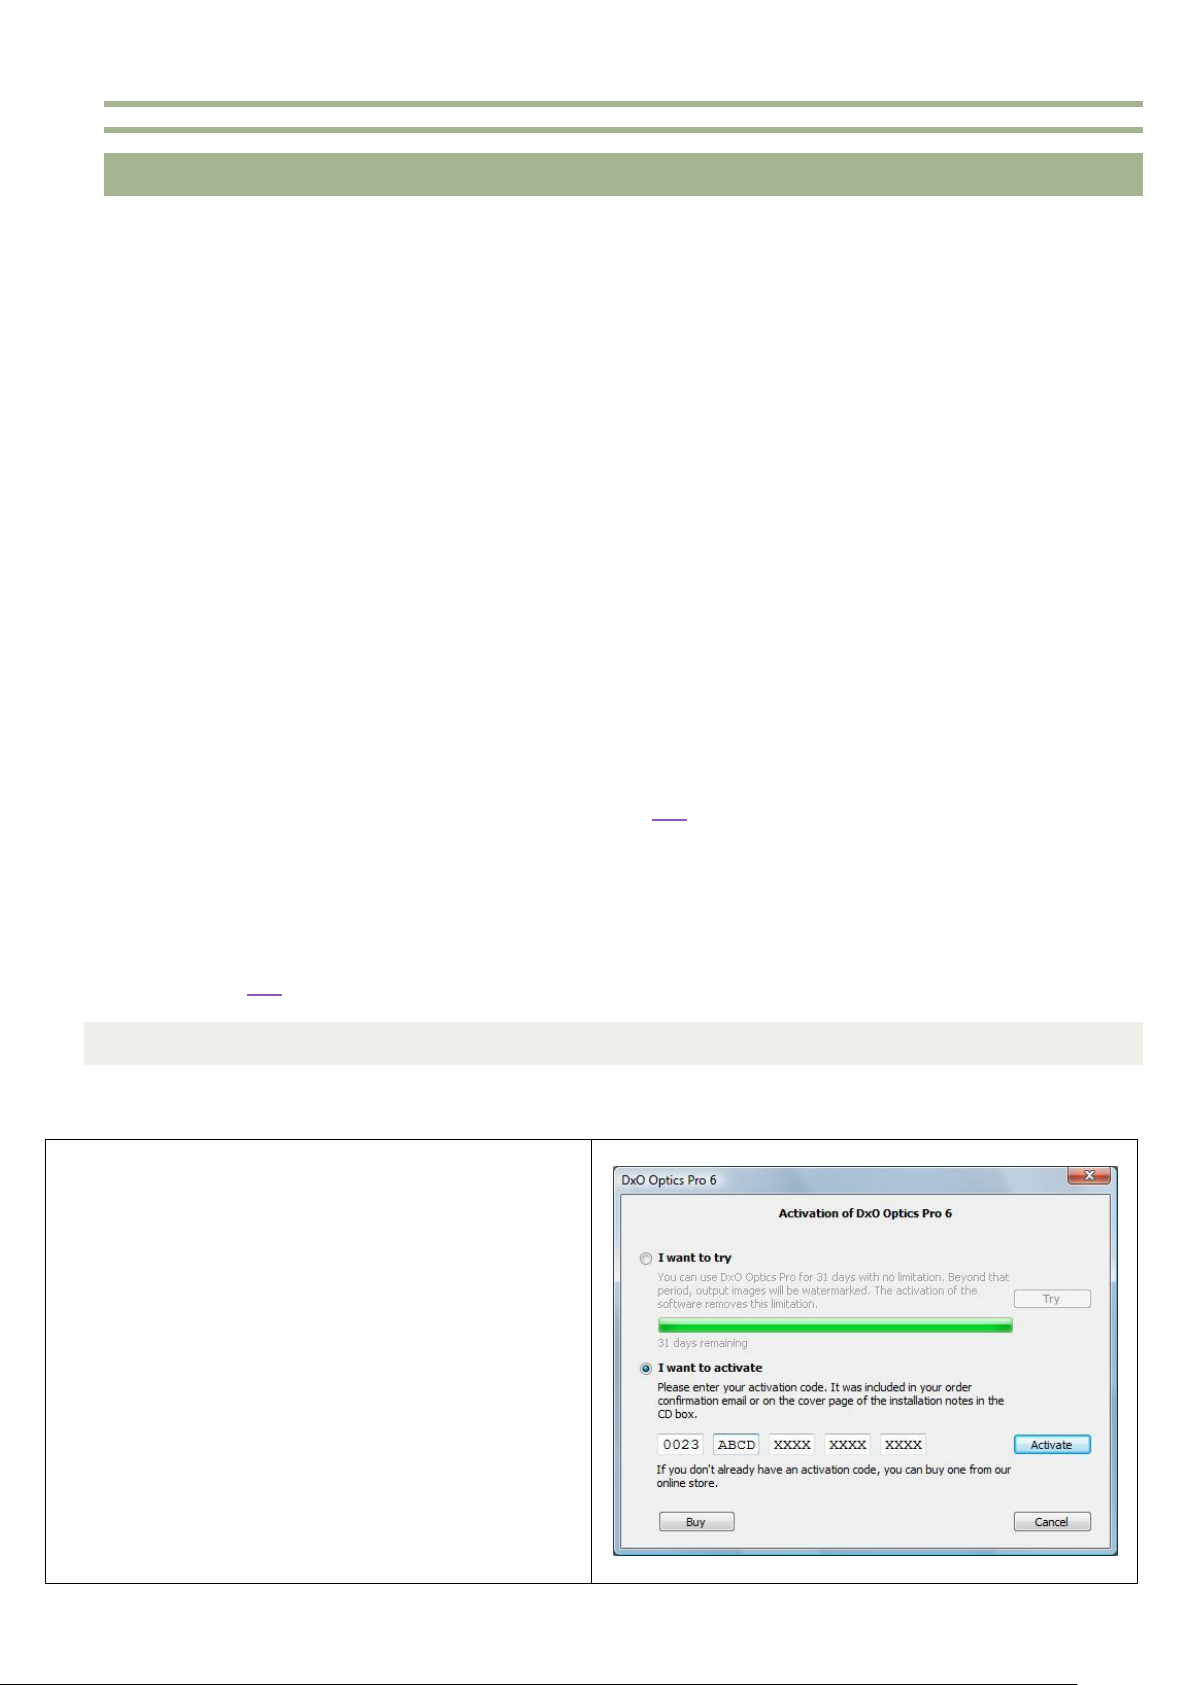
At the launch of DxO Optics Pro, a dialog box appears.
Enter your activation code and click "Enable".
5. ACT IVAT ION
Once the application is installed, it can be fully used for 31 days without requiring activation. DxO Optics Pro
will work without restriction during this time period. Beyond 31 days, the output images are then marked with
a watermark "DxO Optics Pro 6 DEMO". We therefore recommend that activate as soom as possible, to avoid
seeing having watermarks appear on all of your output images at an unexpected time.
The DxO software License provides for use of activated copies of the software on two different computers.
Double-click the icon DxO Optics Pro on your computer desktop to start the software.
In the case of a purchase of CD in a box from a reseller, the activation code is on the front page of the
booklet "Installation Notes" included in the box. Note that to activate the software, you must first register
your product by linking it to a client account. We therefore urge you to proceed with the creation of customer
account now by completing a form available at the following link.
In the case of a purchase online, your activation code you received by mail. If you have lost or mail order
form containing the activation code you can retrieve your user account by logging on to your customer area,
using the following link.
5.1 ACTIVATION WITH AN INTERNET CONNECTION
If your computer is connected to the Internet, activation is done very simply by following these steps:
©DxO Labs 2009 - 11 - All rights reserved
Page 12
DxO Optics Pro 6 Guide d’installation
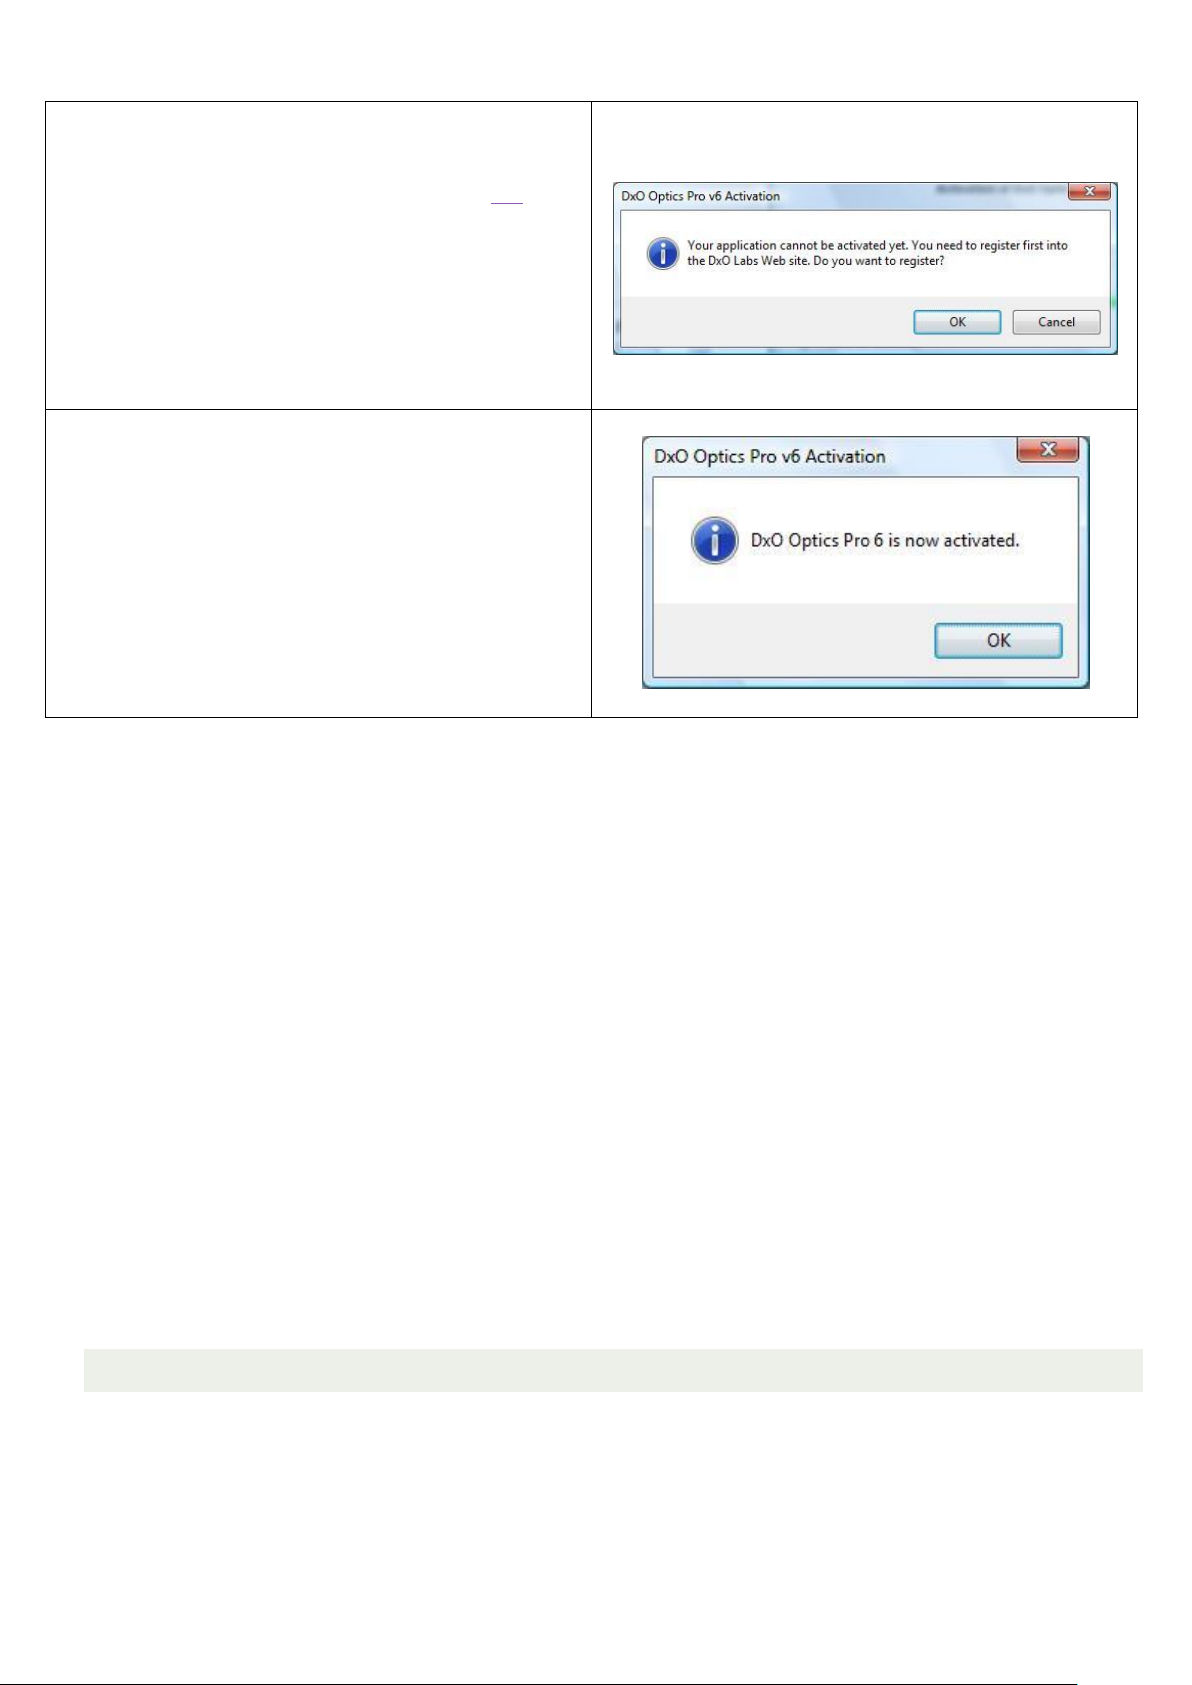
If you have not created your account, a message appears
asking you to visit the page to create an account on the
DxO Labs website, accessible from the following link. Fill
out the form and submit.
A message will tell you when your account has been
created and your activation code is now attached to
customer account.
Return to the application and enter your activation code.
A message informs you of the proper activation of DxO
Optics Pro. Click "OK". You can now use the software.
5.2 ACTIVATION WITHOUT AN INTERNET CONNECTION
If the computer on which you install DxO Optics Pro can not be connected to the Internet, you can activate
DxO Optics Pro from another computer connected to Internet, according to the manual activation process
described below. Note that you will need a removable media (USB stick, CD ...) to transfer downloaded files to
the computer offline (File, DxO optics modules ...)
©DxO Labs 2009 - 12 - All rights reserved
Page 13
DxO Optics Pro 6 Guide d’installation
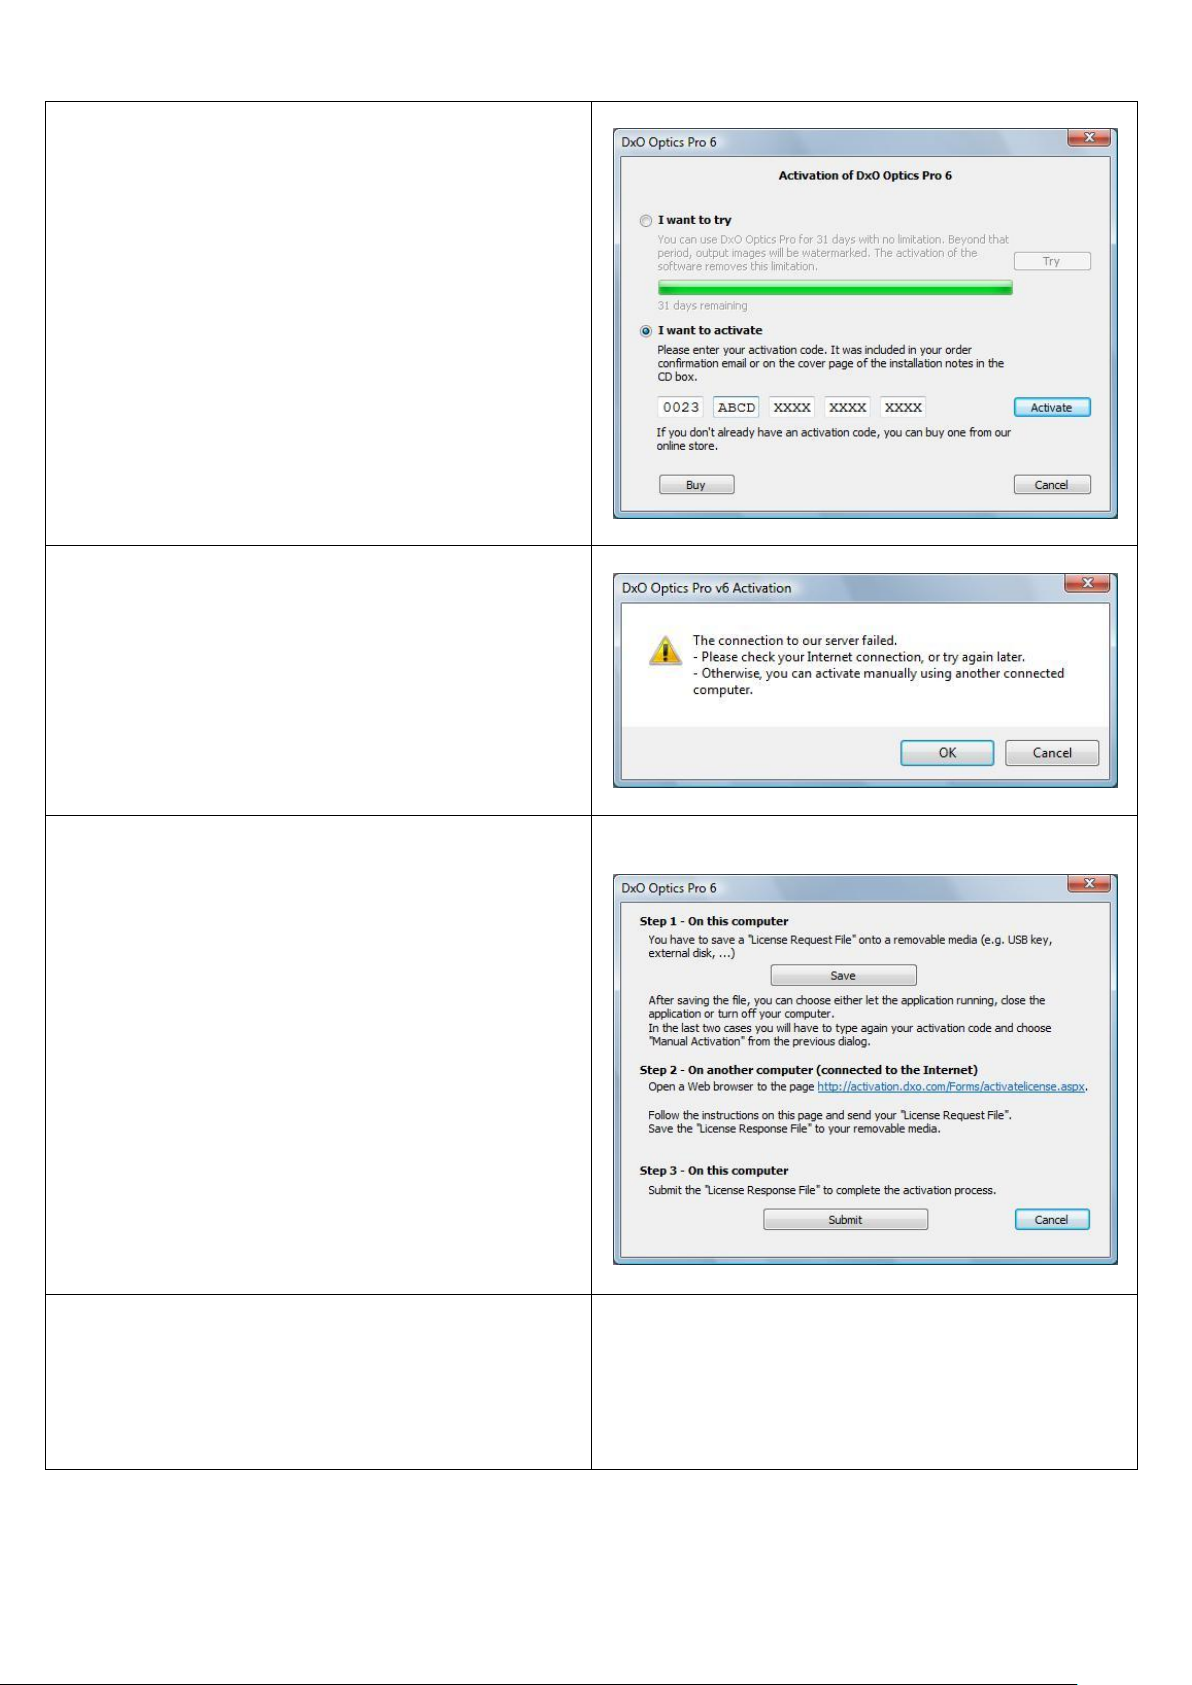
At the launch of DxO Optics Pro, a dialog box appears.
Enter your activation code and click "Enable".
DxO Optics Pro will find an Internet connection to link the
activation code to a client account, and inform you that if
it can not do because no connection is possible. Click "OK"
to continue.
A window appears, allowing you to save the file "License
Request". This file will then get on a computer connected
to the "License Response File " that will activate the
software on the computer offline.
For this you must first register the "Request License File"
on removable media (USB stick, CD ...). Click on "Save
License Request File.
We recommend that you do not close this window and
not leave no DxO Optics Pro for the moment, if you will
resume the activation process from the beginning.
Choose the destination backup file (removable media).
©DxO Labs 2009 - 13 - All rights reserved
Page 14

DxO Optics Pro 6 Guide d’installation
Note the URL listed in the window, and from a computer
connected to the Internet visit the DxO Labs website,
having access to your activation code and the removable
media contains the "License Request File. You can then
proceed to the manual activation, accessible via the URL
listed above or by using the following link.
On this page you need to enter your activation code and
import the "License Request File. Then click "OK".
In case you have not created your account, a web page
will appear with a form, allowing you to create your
account. Fill out this form and then confirm to create your
account.
Note: If your activation code is already registered, then
you will be taken directly to the next step backup "License
Response File.
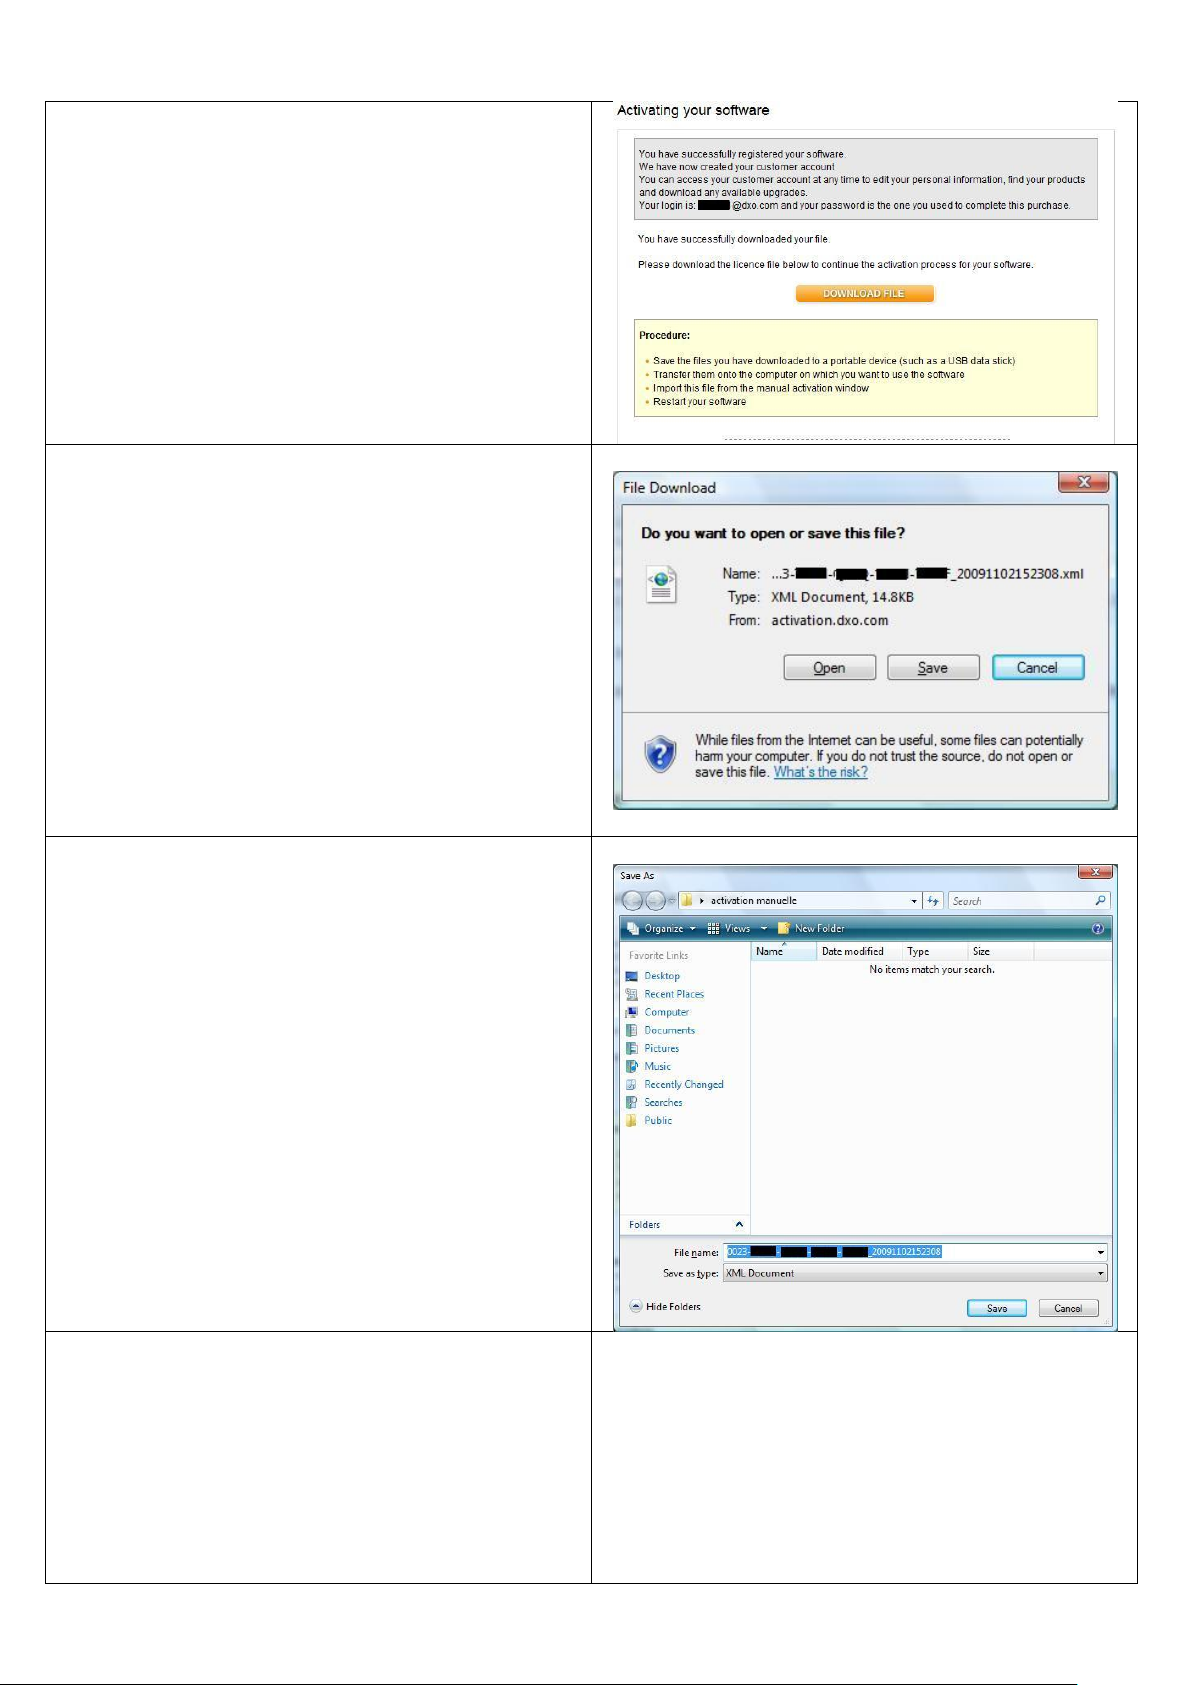
A message informs you that your account has been
created and your activation code is now stored. You can
continue the activation of DxO Optics Pro. To do this, click
©DxO Labs 2009 - 14 - All rights reserved
Page 15
DxO Optics Pro 6 Guide d’installation
"Download file"
You can then download the "License Response File. Click
"Save" to save this file on removable media (USB, CD) can
then import it on the computer DxO Optics Pro is
installed.
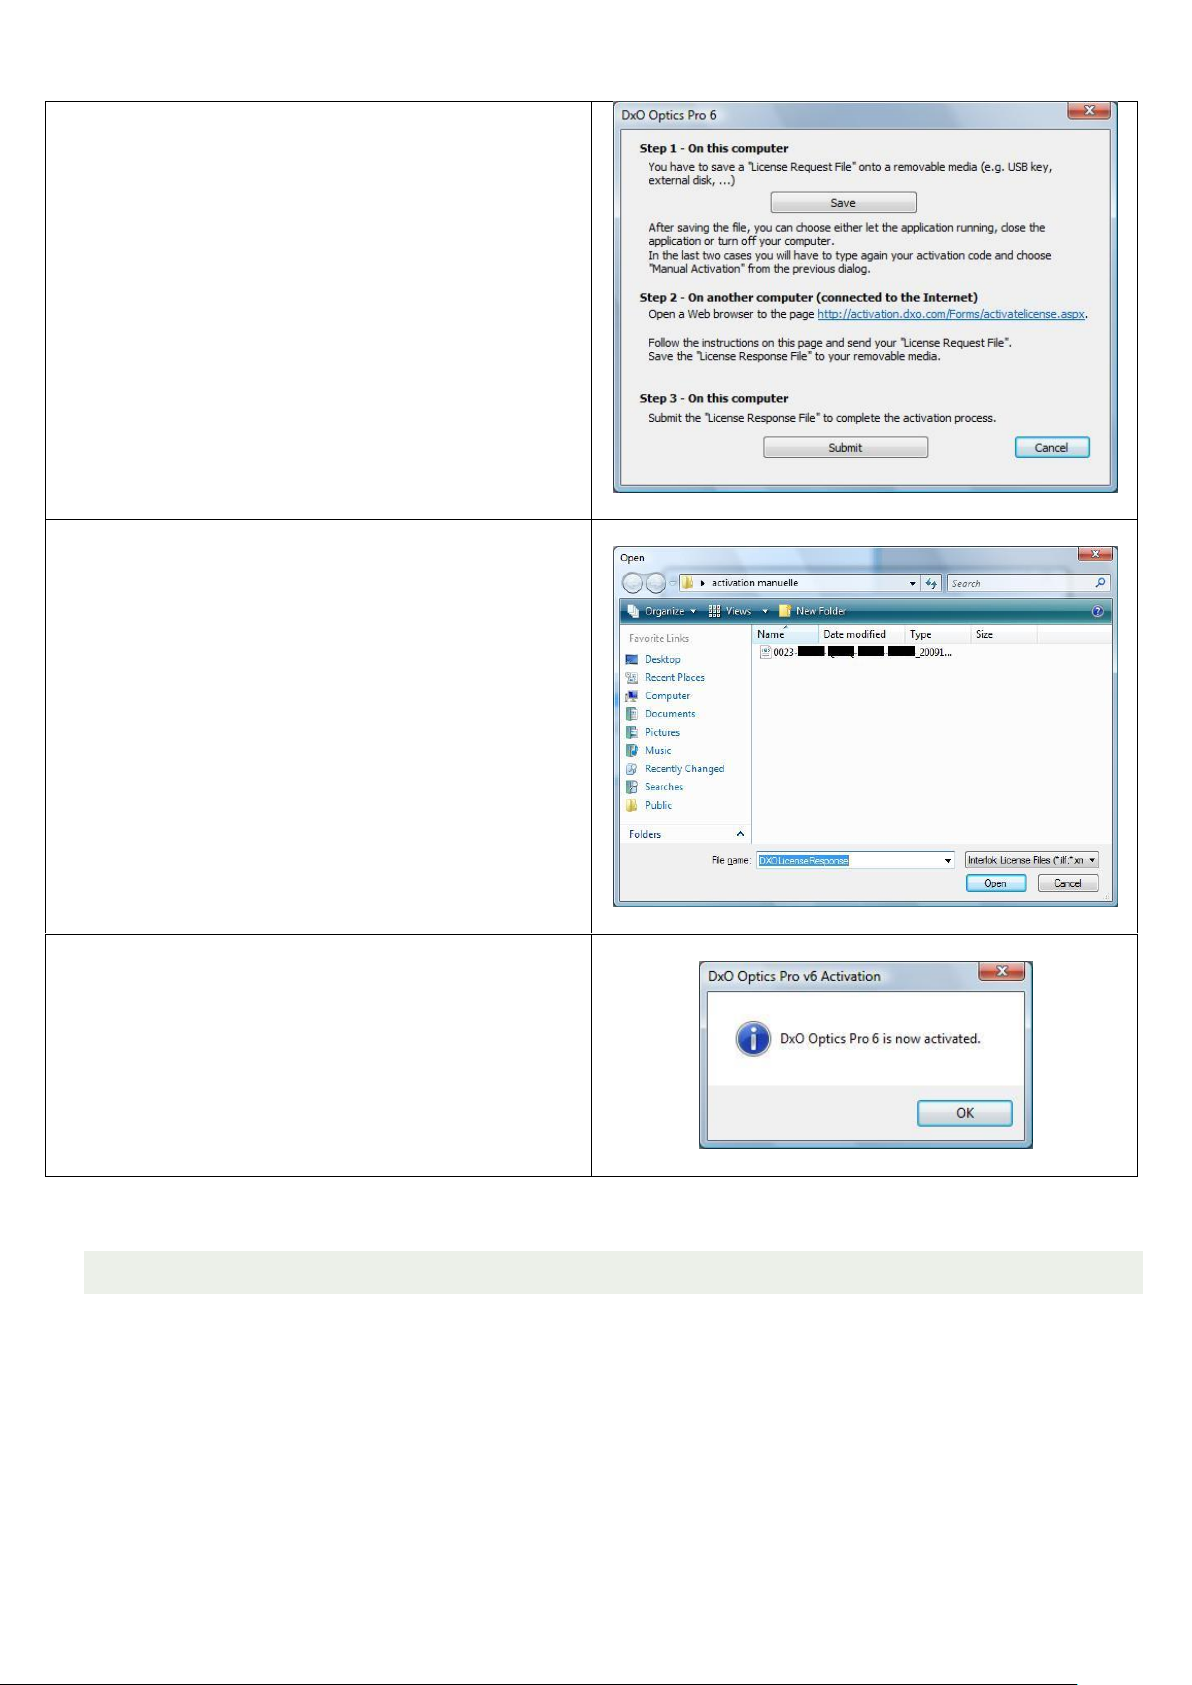
A window now appears on the screen, allowing you to
download the DxO optics correction modules. Click on the
link in order to access the complete list of downloadable
modules. Follow the instructions on the webpage, and
save on your removable media files corresponding to
camera/lens modules that you need to use in DxO.
Turn on the computer that is not connected to the
Internet, where DxO Optics Pro is installed. Next click on
"Submit Response License File". When it has completed
saving the file, you may either close this window, or
restart the application.
©DxO Labs 2009 - 15 - All rights reserved
Page 16
DxO Optics Pro 6 Guide d’installation
You can then import the "License File Response",
recorded in advance on the removable media in order to
activate DxO Optics Pro. Select the file and click Open
Activation of DxO Optics Pro is now validated. A message
appears to confirm the activation.
5.3 BACKUP LICENSE FILE
DxO Optics Pro 6 uses the file system license (License file) as the method of activation. The license file
was generated during the activation process and is specific to the machine on which it was installed. In
case you need for some reason to reinstall Optics Pro on this machine in the future, it is advisable to
make a backup copy of this file and keep it in a safe place.
This same procedure also applies to the plug-in versions of both FilmPack 1 and FilmPack 2 for DxO
Optics Pro 6.
- Open Windows Explorer
- In XP go to the Control Panel and select "Folder Options"
©DxO Labs 2009 - 16 - All rights reserved
Page 17

DxO Optics Pro 6 Guide d’installation
- Under Vista, go to Control Panel and select "Folder Options and Research"
- Select the tab "View"
- For the option Hidden files and folders, select "Show hidden files and folders"
- Validate the change by clicking "OK"
- In XP, navigate to the folder "C: \ Documents and Settings \ All Users \ Application Data \ PACE AntiPiracy \ License Files"
- On Vista and Windows 7, navigate to the folder “C: \ ProgramData \ PACE Anti-Piracy \ License Files "
- Copy the file "DXOOpticsProV6.ilf" to your backup media (such as a USB thumb drive) – you can copy
it from this to something more permanent, such as a CD.
5.4 RESTORE LICENSE FILE
If you need to restore it to your computer, follow this procedure to restore your license file and reactivate
DxO Optics Pro 6:
- Open Windows Explore
- In XP go to Control Panel and select "Folder Options"
- Under Vista, go to Control Panel and select "Folder Options and Research"
- Select the tab "View"
- For the option Hidden files and folders, select "Show hidden files and folders"
- Validate the change by clicking "OK"
- In XP, navigate to C: \ Documents and Settings \ All Users \ Application Data \ PACE Anti-Piracy \ License
Files. If these directories do not exist, you must create them.
- On Vista and Windows 7, navigate to the folder C: \ ProgramData \ PACE Anti-Piracy \ License Files. " If
these directories do not exist, you must create them.
©DxO Labs 2009 - 17 - All rights reserved
Page 18

DxO Optics Pro 6 Guide d’installation
6. BOXED CD VERSIONS PRIOR TO VERSION 6
It is possible that some retailers still have and may be selling cd boxes for versions 3, 4 or 5 of dxo optics pro. if you
purchase a new cd of one of these older versions you will be entitled to and automatically receive an upgrade to version
6.
- In the case of a boxed CD v3, it is necessary that you contact DxO Labs Support ond the company web site, using
the following link.
- If your purchase a boxed CD v4 or v5, follow the procedure describe on this web page.
©DxO Labs 2009 - 18 - All rights reserved
Page 19

DxO Optics Pro 6 Guide d’installation
7. UPDATES
7.1 MINOR UPDATES
Periodically, DxO Labs offers updates to the software. These updates are available from the Update Center,
accessible from this link, or directly using the software by using the pull-down menu option HELP "Check for
Updates".
These updates ensure optimum use of DxO Optics Pro. This way you will always have the latest software with all its
features.
Major software Upgrades will require that you pay a fee; minor updates will continue to be provided free of charge
You may also upgrade from the STANDARD EDITION to the ELITE EDITION in this same manner using a special
upgrade selection provided in the software.
New DxO Optics Pro camera/lens modules are added regularly, and download directly from the software. By
continued development of these modules, DxO Engineering will provide support for new hardware (cameras and
lenses), recently available on the market. Thus, support for additional cameras and lenses can be easily added by
customers to their installed copies of DxO Optics Pro.
If you do not have an Internet connection on the computer where you have installed DxO Optics Pro, you can
download these updates using another computer and then update your software. Refer to chapters on downloading
and installation to another computer, and follow the instructions.
7.2 UPGRADING TO ELITE ED ITION
7.2.1 UPGRADES FOR PC VERSION
If you have the Standard Edition and need to Upgrade to the Elite Edition (to be able to process images from
Professional level cameras), you can perform this Upgrade, through the Upgrade Center, accessible by using the
following link.
You have to first connect to the Upgrade Center, using your account’s associated e-mail address and password.
Once you have been so identified, you will see a list of your products. Just click on the upgrade you want, then
complete your purchase.
Follow the instructions to make payment. At the end of the process, an Elite activation code will be provided.
With DxO Optics Pro running, click on the "Help" pull-down menu and select "License to use software” and choose
“Elite.” Then enter your activation code and restart Optics Pro. You will then automatically be upgraded to DxO Optics
Pro 6, ELITE EDITION.
8. RE-INST ALL DXO OPTICS PRO 6
At any moment, you can download the latest version of Optics Pro 6 and access your activation code from
your online customer account.
©DxO Labs 2009 - 19 - All rights reserved
Page 20

DxO Optics Pro 6 Guide d’installation
9. PROBLEM SOLVING
For a complete list of frequently asked questions or to contact technical support, use the URL link:
http://help.dxo.com/faq/index.php?action=show&lang=en
©DxO Labs 2009 - 20 - All rights reserved
 Loading...