

Page 1
DxO ViewPoint 2
SHIFT YOUR PERSPECTIVE
User Guide
Microsoft® Windows® | Apple® OS X
EN
®
Page 2

Contents
Chapter 1 - Introduction ........................................................4
Welcome .................................................................................4
New features in DxO ViewPoint 2 .............................................................4
DxO help and resources ....................................................................5
System requirements ......................................................................5
Installation, registration, and activation .......................................................5
Uninstalling ..............................................................................7
Chapter 2 - DxO ViewPoint and your production workflow............................8
DxO ViewPoint versions.....................................................................8
Supported file formats .....................................................................8
Workflow with host application...............................................................8
Chapter 3 - The DxO ViewPoint workspace .......................................10
The interface ............................................................................10
Correction tool palettes (general) ...........................................................12
Visualization palette ......................................................................12
Menus ..................................................................................12
Saving and importing current settings .......................................................13
Resetting corrections .....................................................................13
Preferences .............................................................................13
Warning messages .......................................................................14
Chapter 4 - Correcting distortion................................................15
About distortion ..........................................................................15
Correcting distortion automatically ..........................................................15
Managing DxO Optics Modules ..............................................................16
Applying an automatic distortion correction in plugin mode ......................................16
Correcting distortion manually..............................................................17
Chapter 5 - Correcting volume deformation ......................................18
About volume deformation .................................................................18
Determining the type of volume deformation . . . . . . . . . . . . . . . . . . . . . . . . . . . . . . . . . . . . . . . . . . . . . . . . . . 18
Correcting horizontal/vertical volume deformation .............................................19
Correcting diagonal volume deformation .....................................................19
Chapter 6 - Fixing perspective..................................................21
About perspective ........................................................................21
Forcing vertical parallels ..................................................................21
Forcing horizontal parallels ................................................................23
Forcing a rectangle .......................................................................23
Correcting perspectives in 8-point mode .....................................................24
Advanced settings ........................................................................25
Chapter - Straightening the horizon .............................................28
About horizons ...........................................................................28
Straightening the horizon by plotting a horizontal reference line..................................28
Straightening the horizon by plotting a vertical reference line ....................................29
Straightening the horizon by using the slider or by entering values................................29
Chapter 8 - Cropping ..........................................................30
Automatically cropping an image ............................................................30
Manually cropping an image................................................................31
Keyboard shortcuts ...........................................................32
DxO ViewPoint - Guide utilisateur ©DxO Labs 2012 - Tous droits réservés
DxO ViewPoint 2 - User Guide ©DxO Labs 2013 - All rights reserved
2
Page 3

©2013 DxO Labs. All rights reserved.
Photo credits: Olivier Lambolez, Olivier Revon, Nyght Falcon
Text: Gilles Théophile
Layout: degresfahrenheit.com
More information about DxO ViewPoint can be found at www.dxo.com
Trademarks
DxO ViewPoint is a registered trademark of DxO Labs both in the European Union and in other countries.
Adobe, Photoshop, Photoshop Lightroom, Photoshop Elements are registered trademarks of Adobe Systems, Incorporated. Apple, Aperture, Mac OSX and the Mac logo are trademarks of Apple, Inc.,
registered in the United States and in other countries. Microsoft, Windows, Windows Vista, and Windows 7 and Windows 8 are registered trademarks of Microsoft Corporation. All other trademarks
are the property of their respective owners.
The information contained in this guide is provided “as is.” In all cases, including negligence, DxO Labs cannot be held responsible for any damage, be it specific, direct, indirect, or consecutive,
which may result from or be tied to the use of any information contained in this guide, with or without the software described in this document.
Acknowledgments
DxO ViewPoint may utilize the following copyrighted material, the use of which is hereby acknowledged:
JPEG
Portions of this software utilize the work of the Independent JPEG Group.
TIFF
Portions of this software utilize TIFF format.
Copyright © 1988-1997 Sam Leffler
Copyright © 1991-1997 Silicon Graphics, Inc.
Permission to use, copy, modify, distribute, and sell this software and its documentation for any purpose is hereby granted without fee, provided that (i) the above copyright notices and this permission notice appear in all copies of the software and related documentation, and (ii) the names of Sam Leffler and Silicon Graphics may not be used in any advertising or publicity relating to the
software without the specific, prior written permission of Sam Leffler and Silicon Graphics.
IN NO EVENT SHALL SAM LEFFLER OR SILICON GRAPHICS BE LIABLE FOR ANY SPECIAL, INCIDENTAL, INDIRECT OR CONSEQUENTIAL DAMAGES OF ANY KIND, OR ANY DAMAGES WHATSOEVER
RESULTING FROM LOSS OF USE, DATA OR PROFITS, WHETHER OR NOT ADVISED OF THE POSSIBILITY OF DAMAGE, AND ON ANY THEORY OF LIABILITY, ARISING OUT OF OR IN CONNECTION
WITH THE USE OR PERFORMANCE OF THIS SOFTWARE.
QuaZIP
Portions of this software utilize QuaZIP technology.
Copyright © 2005-2011 Sergey A. Tachenov
Qt SDK
This software is based in part on The QT framework. This software is © John Doe 2011. It is licensed under the LGPL license.
OpenSSL
This product includes cryptographic software written by Eric Young ([email protected]). This product includes software written by Tim Hudson ([email protected]).
Notices, Terms, and Conditions pertaining to third-party software are located at http://www.dxo.com/thirdparty and incorporated by reference herein.
DxO ViewPoint - Guide utilisateur ©DxO Labs 2012 - Tous droits réservés
DxO ViewPoint 2 - User Guide ©DxO Labs 2013 - All rights reserved
3
Page 4
Introduction
1.1. Welcome
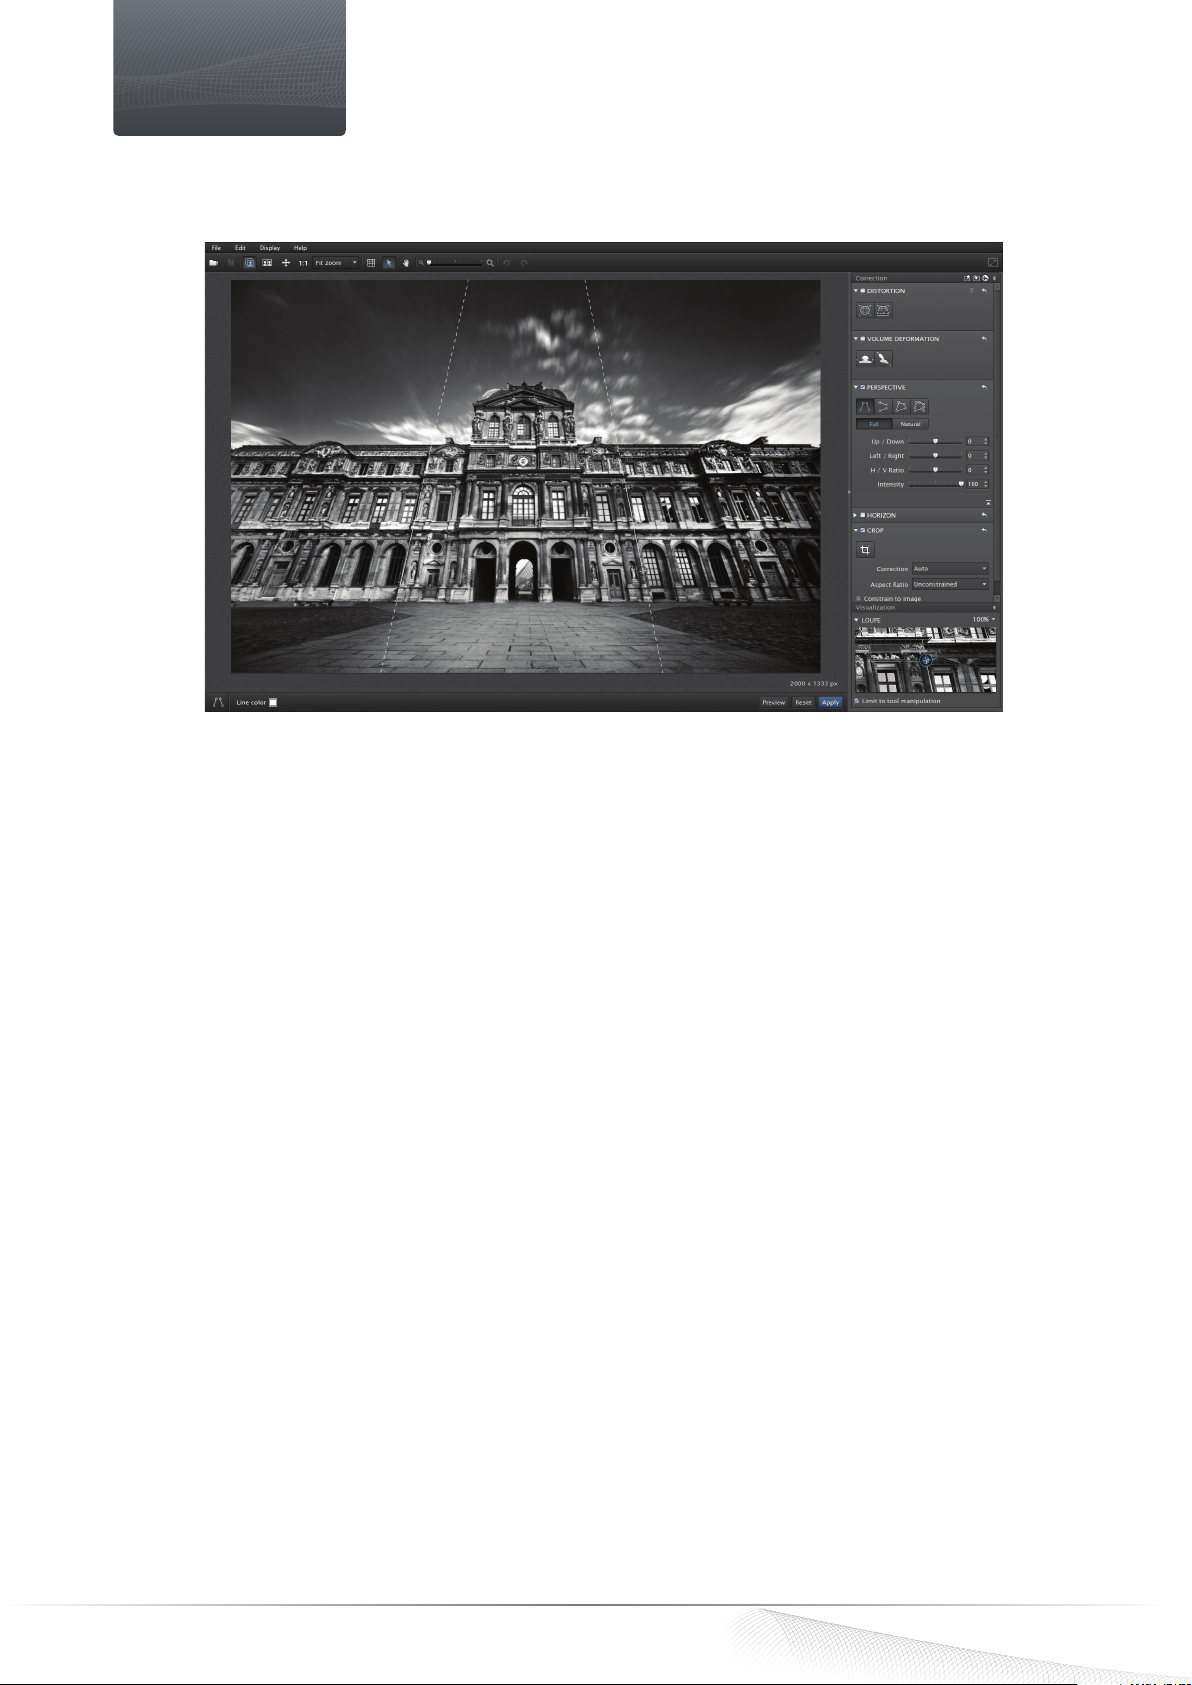
DxO ViewPoint 2 as a standalone application.
Thank you for choosing DxO ViewPoint, the first software solution for Mac and Windows entirely dedicated to correcting lens
distortions and deformed elements on the edges of photos, and to redressing problems with perspective and tilted horizons.
Based on DxO Labs’ exclusive lens and geometric correction technologies, DxO ViewPoint lets you easily and efficiently
restore the natural proportions of the subjects in your images.
New features in DxO ViewPoint 2
1.2.
Distortion correction
Use the Distortion tool to correct lens distortion. Thanks to DxO Optics Modules, you can automatically apply corrections to
your images that are perfectly adapted to the equipment you use. If your lens is not yet supported by a DxO Optics Module, you
can make corrections manually. Three distortion correction modes are available — barrel, pincushion, and fisheye.
Correcting volume deformation
The Volume deformation tool takes into account your shooting parameters. You can use it to easily correct the deformation
of subjects located on the edges of images, whether the distortion is horizontal, vertical, or diagonal.
Fixing perspectives and the horizon
Use the Perspective tool to easily rectify convergent lines as well as complex perspective problems and thus give your
architectural photos a more natural look. Use the Horizon tool to level tilted horizon lines in your landscape photos.
Advanced cropping feature
Thanks to DxO ViewPoint 2’s automatic cropping feature, you can easily preserve the proportions of your image for a more
natural rendering, as well as maximize the visible field for an optimal result.
DxO ViewPoint - Guide utilisateur ©DxO Labs 2012 - Tous droits réservés
DxO ViewPoint 2 - User Guide ©DxO Labs 2013 - All rights reserved
4
Page 5
A clear and intuitive interface
DxO ViewPoint has a workspace composed of a large viewing area along with simple and intuitive toolbars and control
palettes. Thanks to the software’s explicit icons, you can readily identify the rights tools for applying your corrections in just
a few clicks. Place your anchor points with precision using the Loupe palette and use the composition grid to fine-tune your
corrections. You can choose between two display modes: single image for making corrections with a maximum of precision,
or side-by-side to be able to see changes in real-time.
Accessible to all
Use DxO ViewPoint as a (32- or 64-bit) standalone application for Mac and Windows or as a plugin for Adobe® Photoshop®
®
CS3, CS4, CS5, CS6, and CC; Adobe
®
Aperture® 3.
Apple
1.3.
DxO help and resources
Find DxO help and resources for DxO ViewPoint 2 — tutorials, guides, webinars – in the DxO Academy (http://www.dxo.com/
intl/photography/tutorials). You can also access this page directly in DxO ViewPoint 2 by selecting Help > DxO Academy.
System requirements
1.4.
For the best results with DxO ViewPoint, your computer must conform to the following minimum specifications:
Photoshop® Elements® 9, 10 and 11; Adobe® Photoshop® Lightroom® 3, 4, and 5; and
Microsoft® Windows
Windows Vista® (32, 64-bit), Windows 7 (32, 64-bit), Windows 8 (32, 64-bit)
®
Pentium® 4, Intel® Dual Core, or equivalent AMD® processor
Intel
2 GB of RAM
400 MB of available disk space
Macintosh
Mac OS X 10.6 Snow Leopard, 10.7 Lion, 10.8 Mountain Lion
Intel® Mac processor
2 GB of RAM
400 MB of available disk space
Installation, registration, and activation
1.5.
Important: An Internet connection is required to follow the steps described below.
®
NOTE
To process large image
files, a 64-bit system
and 4 GB of RAM are
recommended.
Registration
You need to register your license in order to activate your software. To do so, go to the DxO Labs website at http://www.
dxo.com/CD and follow the registration procedure. If you do not have a customer account, fill out the new customer form. If
you already have a customer account, log in.
Downloading
Once you have registered your license, you will find important information in your customer account about the software, along
with the download link for DxO ViewPoint. This procedure ensures that you will be installing the latest version of the software.
Click on either the Win or Mac button (depending on your equipment) to begin downloading the installer.
DxO ViewPoint - Guide utilisateur ©DxO Labs 2012 - Tous droits réservés
DxO ViewPoint 2 - User Guide ©DxO Labs 2013 - All rights reserved
5
Page 6
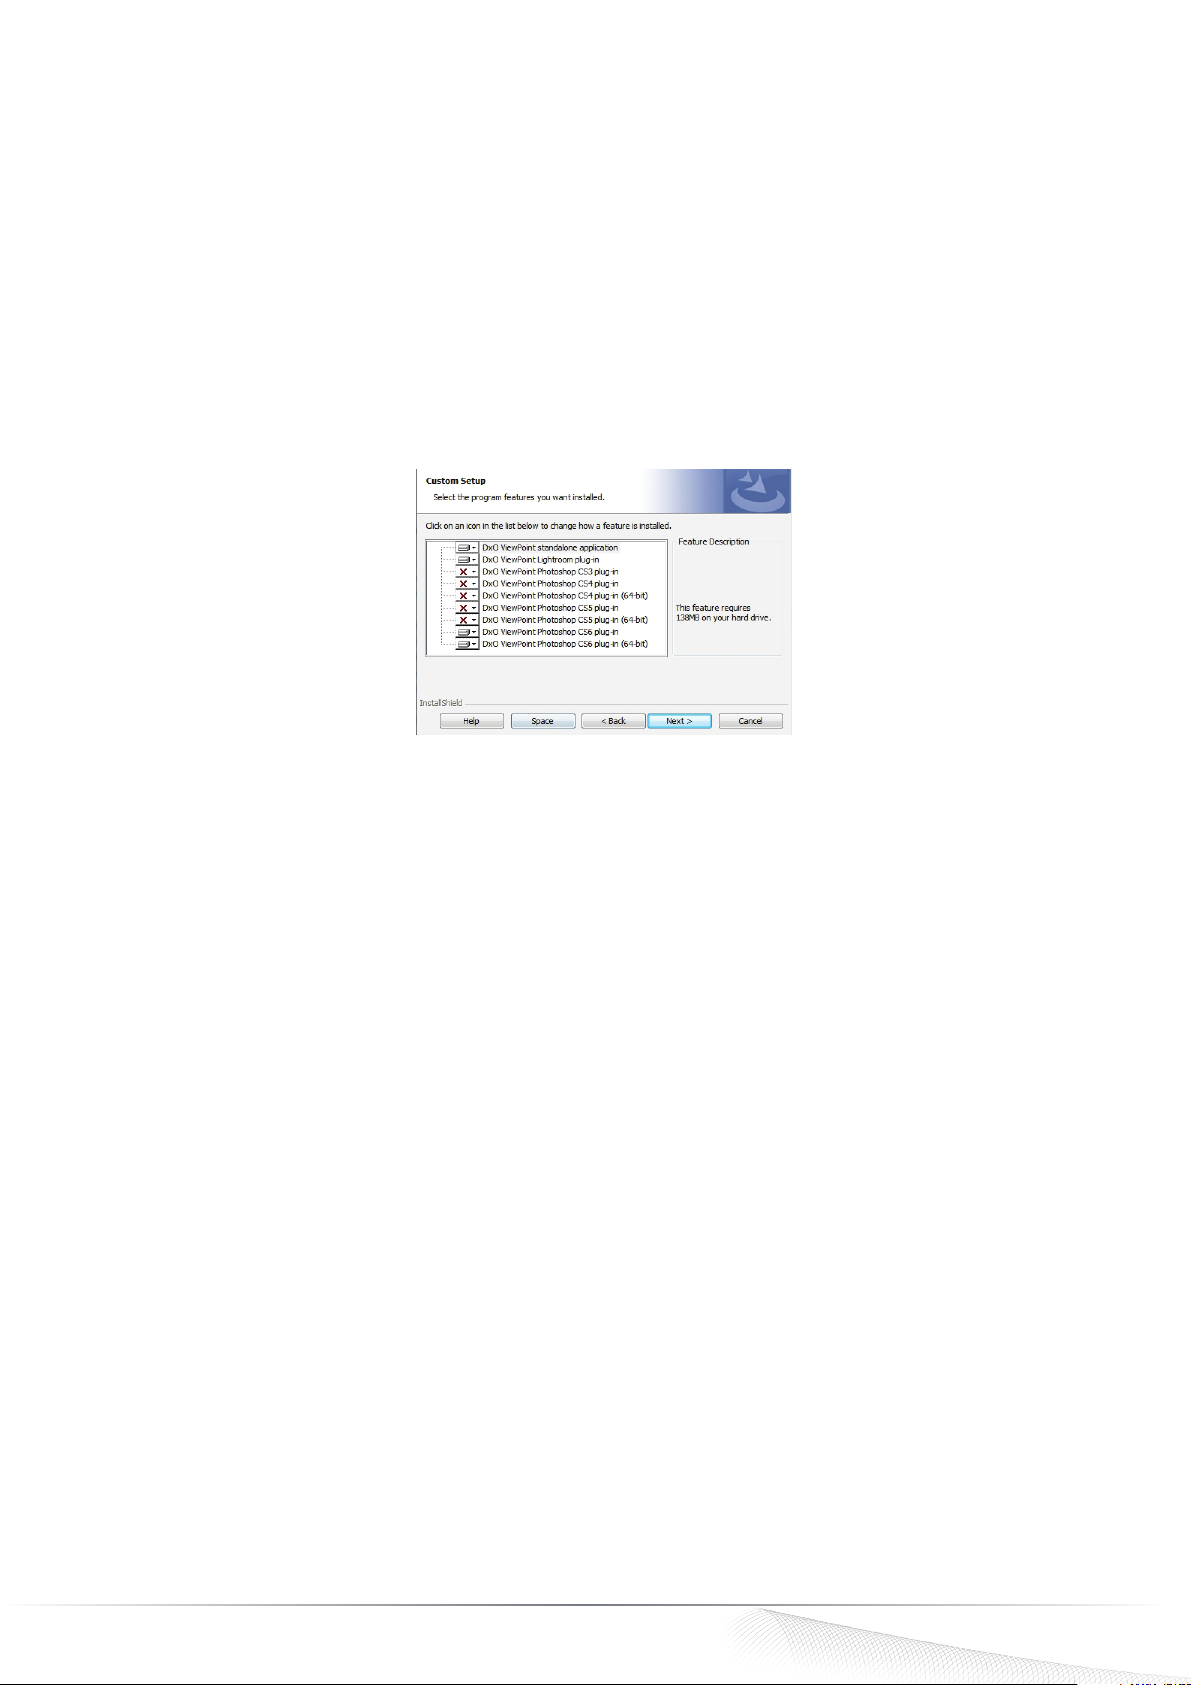
After the download is completed, double-click on the installation program icon that you just downloaded and follow the
specified installation procedure. There are several options for installing DxO ViewPoint:
®
• Standalone application for Microsoft
®
• Plugin for Adobe
• Plugin for Adobe
Photoshop®
®
Photoshop® Elements
• Plugin for Adobe® Photoshop® Lightroom
Windows and Macintosh
®
®
• Plugin for Apple® Aperture®
Important: A single license allows you to install and run DxO ViewPoint on two separate computers.
Installation - Microsoft Windows
After accepting the license agreement, click on Next. You can select between Standard and Custom installation. The standard
installation will automatically install all relevant plugins. Custom installation allows you to choose which plugin(s) to install.
Microsoft® Windows installation window.
A new window will open asking you to choose the folder in which you want to install DxO ViewPoint. If the program does not
®
automatically detect the directory in which to install the Adobe
Photoshop® plugin, you can select the appropriate folder by
using the Browse button.
Click the Install button. The installation starts and may take several minutes.
Installation – Mac OS X
After accepting the license agreement, click on Next. A window will open that allows you to select the component(s) you want
to install.
A new window will open asking you to choose the folder in which you want to install DxO ViewPoint. If the program does not
®
automatically detect the directory in which to install the Adobe
Photoshop® plugin, you can select the appropriate folder by
using the Browse button.
Click the Install button. The installation starts and may take several minutes.
Activation
Your activation code can be found on the cover of the installation notes provided in the box with your software or in your online
DxO customer account.
When you launch DxO ViewPoint for the first time, enter your activation code in the appropriate field in the software activation
window and click on the Activate button.
A message informs you that DxO ViewPoint has been properly activated.
DxO ViewPoint - Guide utilisateur ©DxO Labs 2012 - Tous droits réservés
DxO ViewPoint 2 - User Guide ©DxO Labs 2013 - All rights reserved
6
Page 7

NOTE
To activate DxO ViewPoint for Microsoft® Windows Vista®, Windows 7 or Windows 8, you must open a session as an
administrator. Further, if you are using Windows Vista® and the User Accounts Control is activated, you must launch
DxO ViewPoint as an administrator. To do so, right-click on the DxO ViewPoint shortcut icon on the Windows desktop
and select “Execute as an administrator.” You only have to do this once.
1.5. Uninstalling
Microsoft Windows
For Microsoft® Windows, click on Start > Programs > DxO ViewPoint 2 > Uninstall DxO ViewPoint 2 and follow the procedure
for uninstalling.
Mac OS X
For Mac OX S, click on Applications > DxO ViewPoint 2 > Uninstall and follow the procedure for uninstalling.
DxO ViewPoint - Guide utilisateur ©DxO Labs 2012 - Tous droits réservés
DxO ViewPoint 2 - User Guide ©DxO Labs 2013 - All rights reserved
7
Page 8
DxO ViewPoint and your production workflow
2.1. DxO ViewPoint versions
DxO ViewPoint comes in two versions:
• As a standalone application, DxO ViewPoint is autonomous. It applies its corrections
to the images, which then can be integrated into a host application for further
processing (see below for supported image file formats).
NOTE
DxO ViewPoint can be
installed simultaneously
• As a plugin, DxO ViewPoint can be used with four applications:
®
• Adobe
Photoshop® CS3, CS4 (32 and 64-bit), CS5 (32 and 64-bit), CS6 (32 and
64-bit), CC (32 and 64-bit).
®
• Adobe
• Adobe
• Apple
Photoshop® Elements 9, 10, 11.
®
Photoshop® Lightroom® 3, 4, 5.
®
Aperture® 3.
as a standalone application or as a plugin on
your computer, so you
can use either version
whenever you want.
If an image has been previously opened in one of these applications, you can
temporarily transfer the image into DxO ViewPoint. You can process the image in DxO
ViewPoint and then transfer it back into the other application.
2.2.
Supported file formats
DxO ViewPoint processes JPEG and 8- or 16- bit TIFF files up to 200 Megapixels in RGB.
2.3.
Workflow with host application
DxO ViewPoint readily integrates with the workflow of photographers who use Adobe
®
solutions. Used as a plugin for Adobe
®
Photoshop® Elements®, or as a plugin for Apple® Aperture®, the application is
Adobe
called directly by the host software from an image that is already open.
Photoshop®, Adobe® Photoshop® Lightroom®, or
NOTE
DxO ViewPoint uses DxO
Optics Module distortion
corrections; to avoid a
double correction, we
advise you not to use the
lens correction features
Launching the plugin for Adobe® Photoshop® Lightroom® 3, 4 and 5
in your host application.
To correct an image with DxO ViewPoint while working in Adobe® Photoshop® Lightroom®
3, 4, or 5:
• Launch the plugin version of the application from the Photo > Edit in > Edit in DxO ViewPoint 2 menu. You can also
right-click on the image that you want to correct and select the command Edit in > Edit in DxO ViewPoint 2.
• A dialog box will open showing the option Edit a Copy with Lightroom Adjustments. This option will allow you to use
®
DxO ViewPoint 2 to touch up images previously corrected in Adobe
Photoshop® Lightroom®.
• Choose the file export format — JPEG or TIFF in 8-bit or 16-bit (16-bit images have higher quality, but the files are much
larger). Generally, you should keep the resolution at its actual value, and the compression option should be “None.”
• Click on the Edit button to launch DxO ViewPoint.
DxO ViewPoint - Guide utilisateur ©DxO Labs 2012 - Tous droits réservés
DxO ViewPoint 2 - User Guide ©DxO Labs 2013 - All rights reserved
8
Page 9
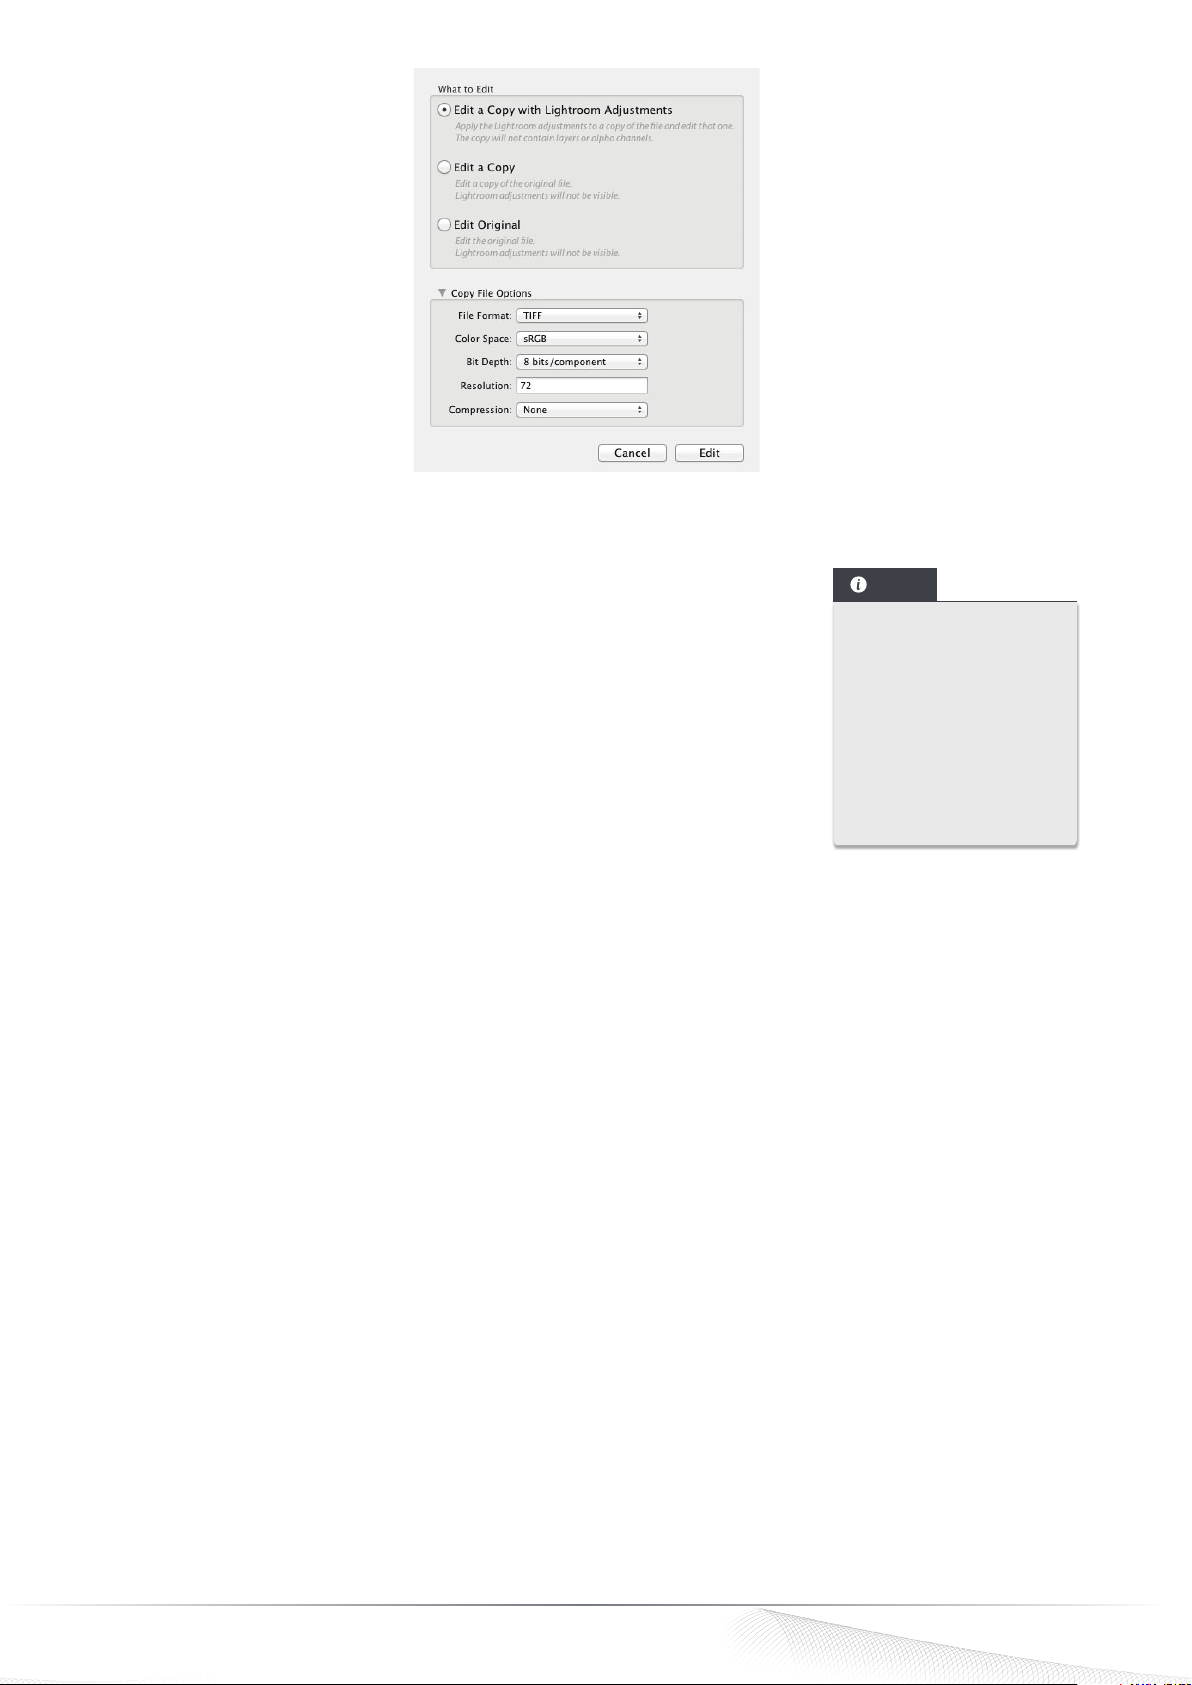
Dialogue box and plugin options for Adobe® Photoshop® Lightroom® 5.
Launching the plugin for Adobe® Photoshop® CS3, CS4, CS5, CS6 and CC
To correct an image in DxO ViewPoint while working with Adobe® Photoshop® CS3, CS4,
CS5, CS6 or CC, launch the application from the Filters > DxO Labs > DxO ViewPoint 2
menu.
Launching the plugin for Adobe® Photoshop® Elements® 9, 10 or 11
To correct an image in DxO ViewPoint 2 while working with Adobe® Photoshop® Elements®
9, 10 or 11, launch the application from the Filters > DxO Labs > DxO ViewPoint 2 menu.
NOTE
As DxO ViewPoint
sometimes modifies
the image size, it is not
compatible with Adobe®
Photoshop’s smart
objects and dynamic
filters, which can be
applied only to images
whose size remains
constant.
Launching the plugin for Apple® Aperture® 3
To correct an image in DxO ViewPoint 2 while working with Apple® Aperture® 3,
• Launch the application from the Photos > Edit with > DxO ViewPoint 2.
• You can also right-click on the image and select Edit with a plugin > DxO ViewPoint 2 from the contextual menu.
Opening images with DxO ViewPoint as a standalone application
To correct an image directly in the DxO ViewPoint application:
• Go to the File > Open menu.
• In the system dialogue window, choose a TIFF or JPEG file.
DxO ViewPoint - Guide utilisateur ©DxO Labs 2012 - Tous droits réservés
DxO ViewPoint 2 - User Guide ©DxO Labs 2013 - All rights reserved
9
Page 10
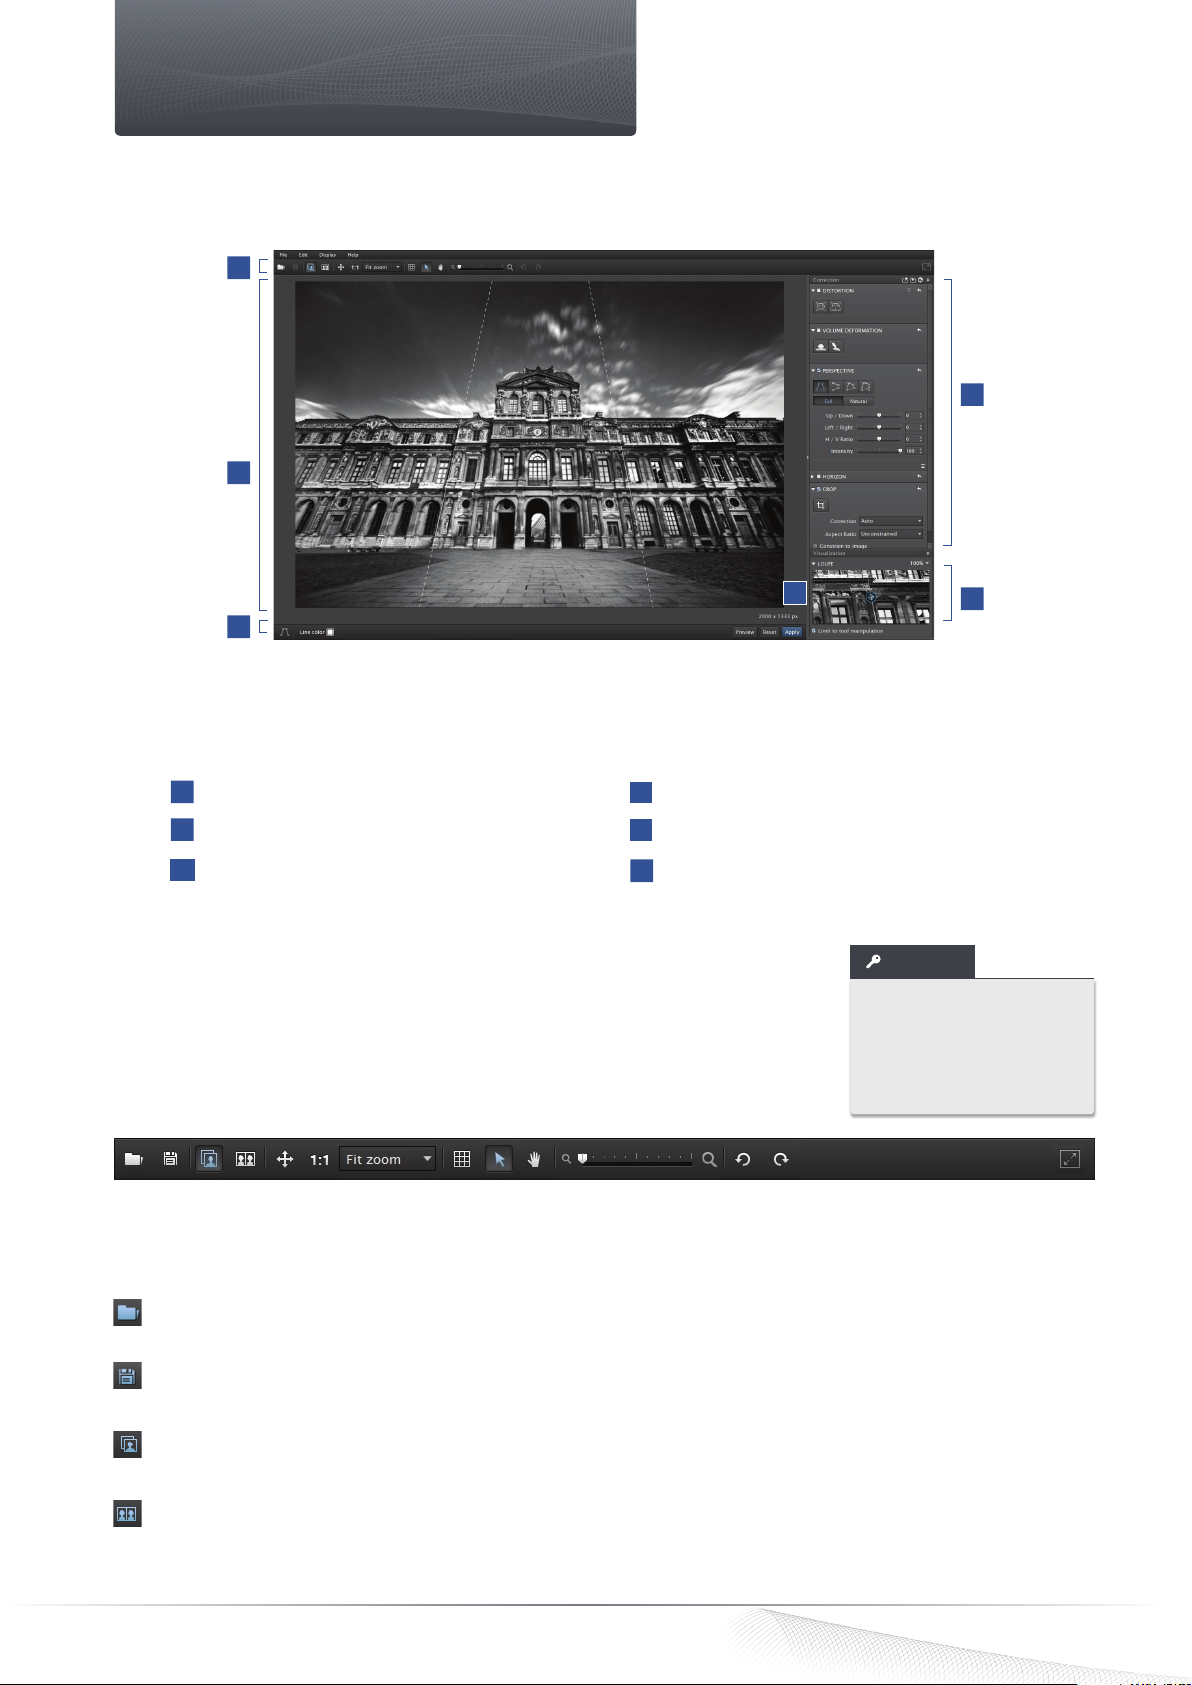
The DxO ViewPoint workspace
3.1. Interface
1
2
3
The DxO ViewPoint user interface is composed of 6 principal parts:
1
The upper toolbar
1
The six principal parts of the DxO ViewPoint user interface.
4
The Correction palette
4
6
5
2
The image display and file depot
3
The lower toolbar
The image display and file depot
The image display is the largest part of the application workspace and is where images
are displayed as you correct them. It is also a file depot area into which you can drag and
drop image files directly from your computer directories.
5
The Visualization palette
6
Image size indicator (in pixels)
TIP
You can click directly in
the display area to open
your system directory and
choose the image you
want to correct.
The upper toolbar
Located at the top of the DxO ViewPoint window, the upper toolbar includes tools for opening and saving files, as well as for
different display modes and navigation. From left to right:
File > Open*: Opens a dialog box to allow you to select an image to correct from the system files or directories in which
you store your photos.
File > Save As*: Opens a system dialog box to allow you to save the image corrected and processed in DxO ViewPoint.
(Note: It is common practice to save the corrected image under a different name than that of the original.)
Display single image button: Display corrected and initial images one behind the other; to toggle, left-click with your
mouse.
Display corrected and initial images side-by-side: The image before correction is displayed on the left; after correction,
on the right.
DxO ViewPoint - Guide utilisateur ©DxO Labs 2012 - Tous droits réservés
DxO ViewPoint 2 - User Guide ©DxO Labs 2013 - All rights reserved
10
Page 11
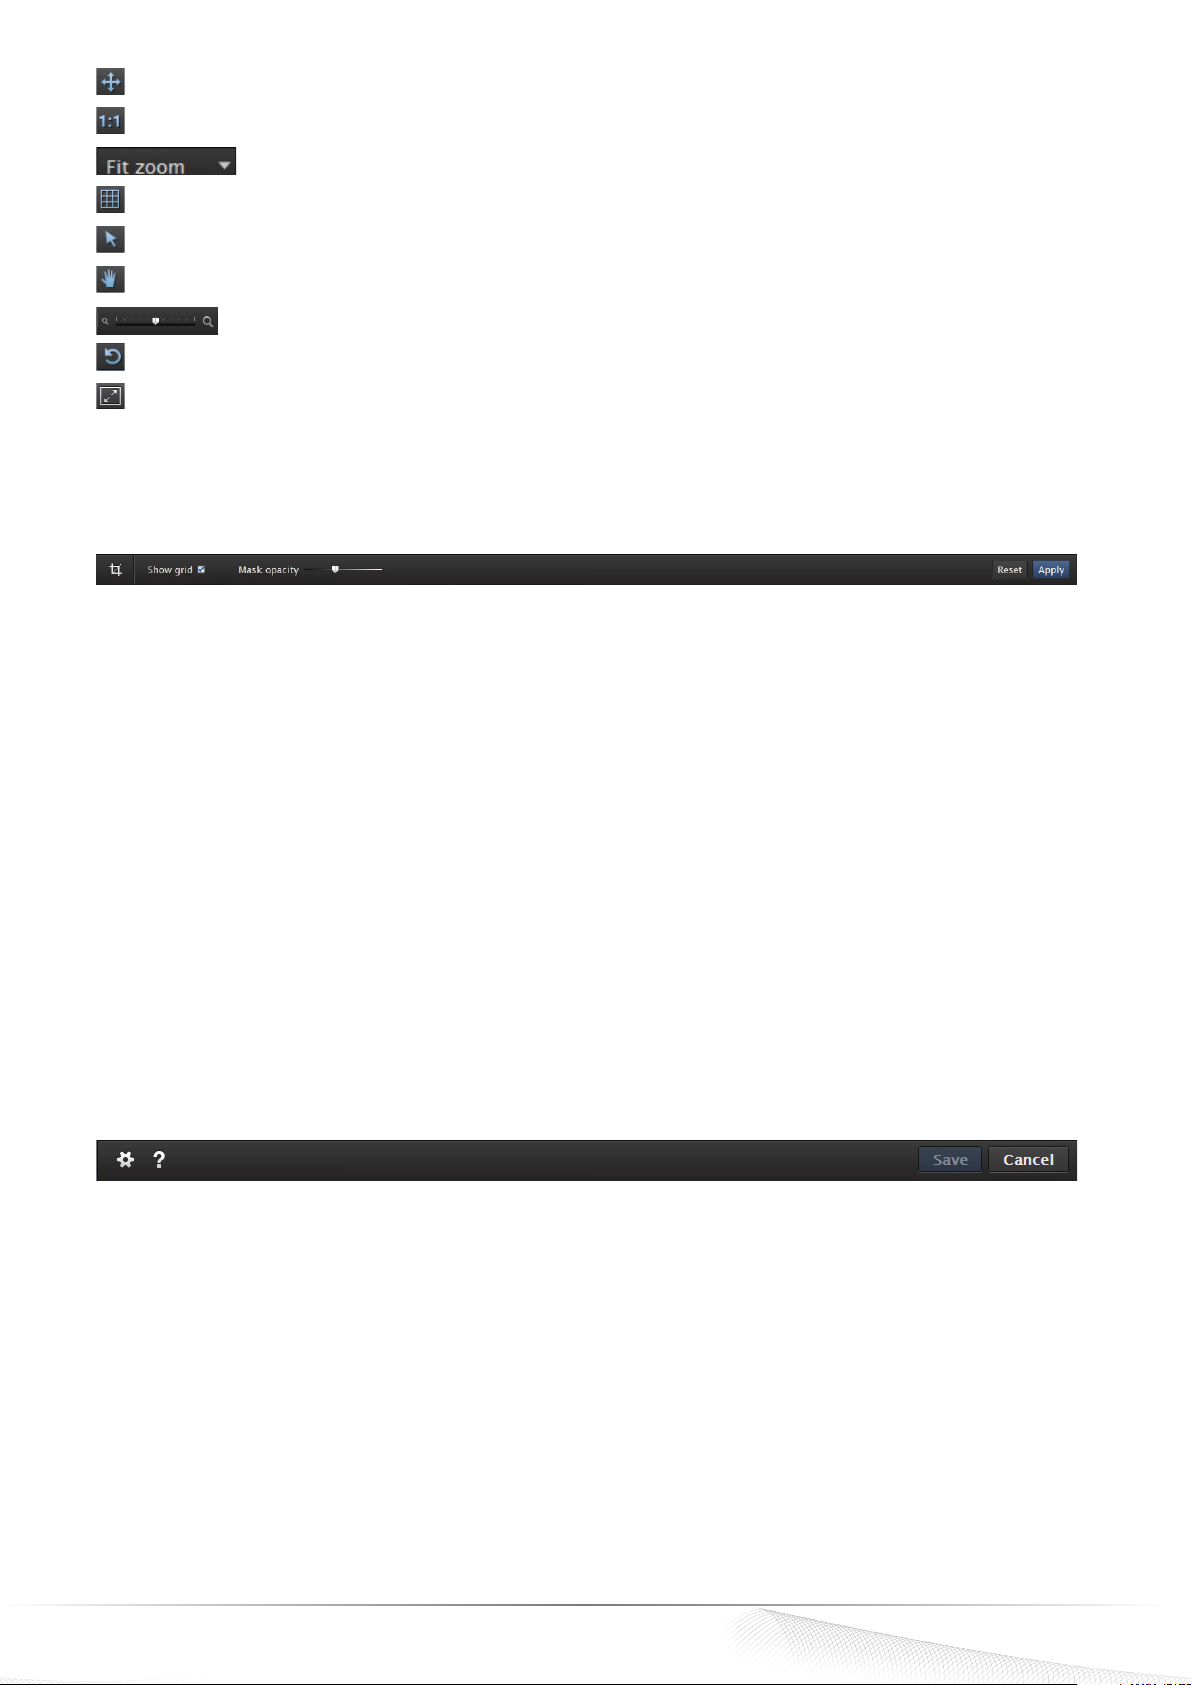
Fit to screen: Adjusts the image size to fit the application display screen.
1:1 button: Display image at 100% (1 image pixel = 1 screen pixel).
Fit zoom: This drop-down menu uses predefined zoom values for enlarging or reducing the image display.
Toggle Grid overlay: This button activates/deactivates the superimposition of the composition grid on an image.
Arrow tool: Activates the mouse cursor after you have used another tool, such as the Hand, to navigate within an image.
Hand tool: Lets you navigate within an enlarged image.
Change zoom: Adjust the zoom level using the slider or a mouse wheel.
Rotation tools for pivoting the image to the left or to the right.
Full screen: Click on this button to use the entirety of your screen when working in DxO ViewPoint. To return to the regular
display, click on the button again (upper right corner).
* Only in the standalone application version.
Lower toolbar (standalone application version)
This toolbar is displayed at the bottom of the application window, and depending on the correction tool selected and activated
in the palettes, can include the following commands (from left to right):
• Tool selected: This icon serves as a reminder of the tool you are currently using.
• Line color: Clicking on the small blue (default color) square opens a color picker that allows you to choose the color of
your perspective and horizon correction lines so as to optimize their visibility on the image you are correcting. (Note: This
command is not available with the Crop tool. Also note that the application remembers the last line color you choose.)
• Opacity Mask: Available only with the Crop tool, this slider brightens or darkens the parts the image that are outside
the crop area.
• Display grid: Available only with the Crop tool, this checkbox activates or deactivates the superimposition of the
composition grid on the image.
• Preview : Available only with the Perspective and Horizon tools, this tool lets you refresh the content of the image after
you have applied your corrections.
• Reset: Undoes all unsaved corrections and returns to the original image.
• Apply: Applies the corrections and then closes the lower toolbar. To reopen the lower toolbar, click on a tool icon in one
of the correction palettes.
The lower toolbar (plugin version)
In the plugin version of DxO ViewPoint, a second toolbar is located on the bottom of the window and contains the following
commands (from left to right):
• Help: Accesses DxO ViewPoint online help (Internet connection required).
• Preferences: Opens the dialog box to adjust the application settings.
• Save: Definitively applies the corrections and then quits from the plugin before returning to the host application.
• Cancel: Allows you to quit from DxO ViewPoint, but first, a dialogue box will ask you if you want to save your changes or
not. If you click on Cancel within the dialog box, it will close the dialog box and return you to the DxO ViewPoint interface.
DxO ViewPoint - Guide utilisateur ©DxO Labs 2012 - Tous droits réservés
DxO ViewPoint 2 - User Guide ©DxO Labs 2013 - All rights reserved
11
Page 12
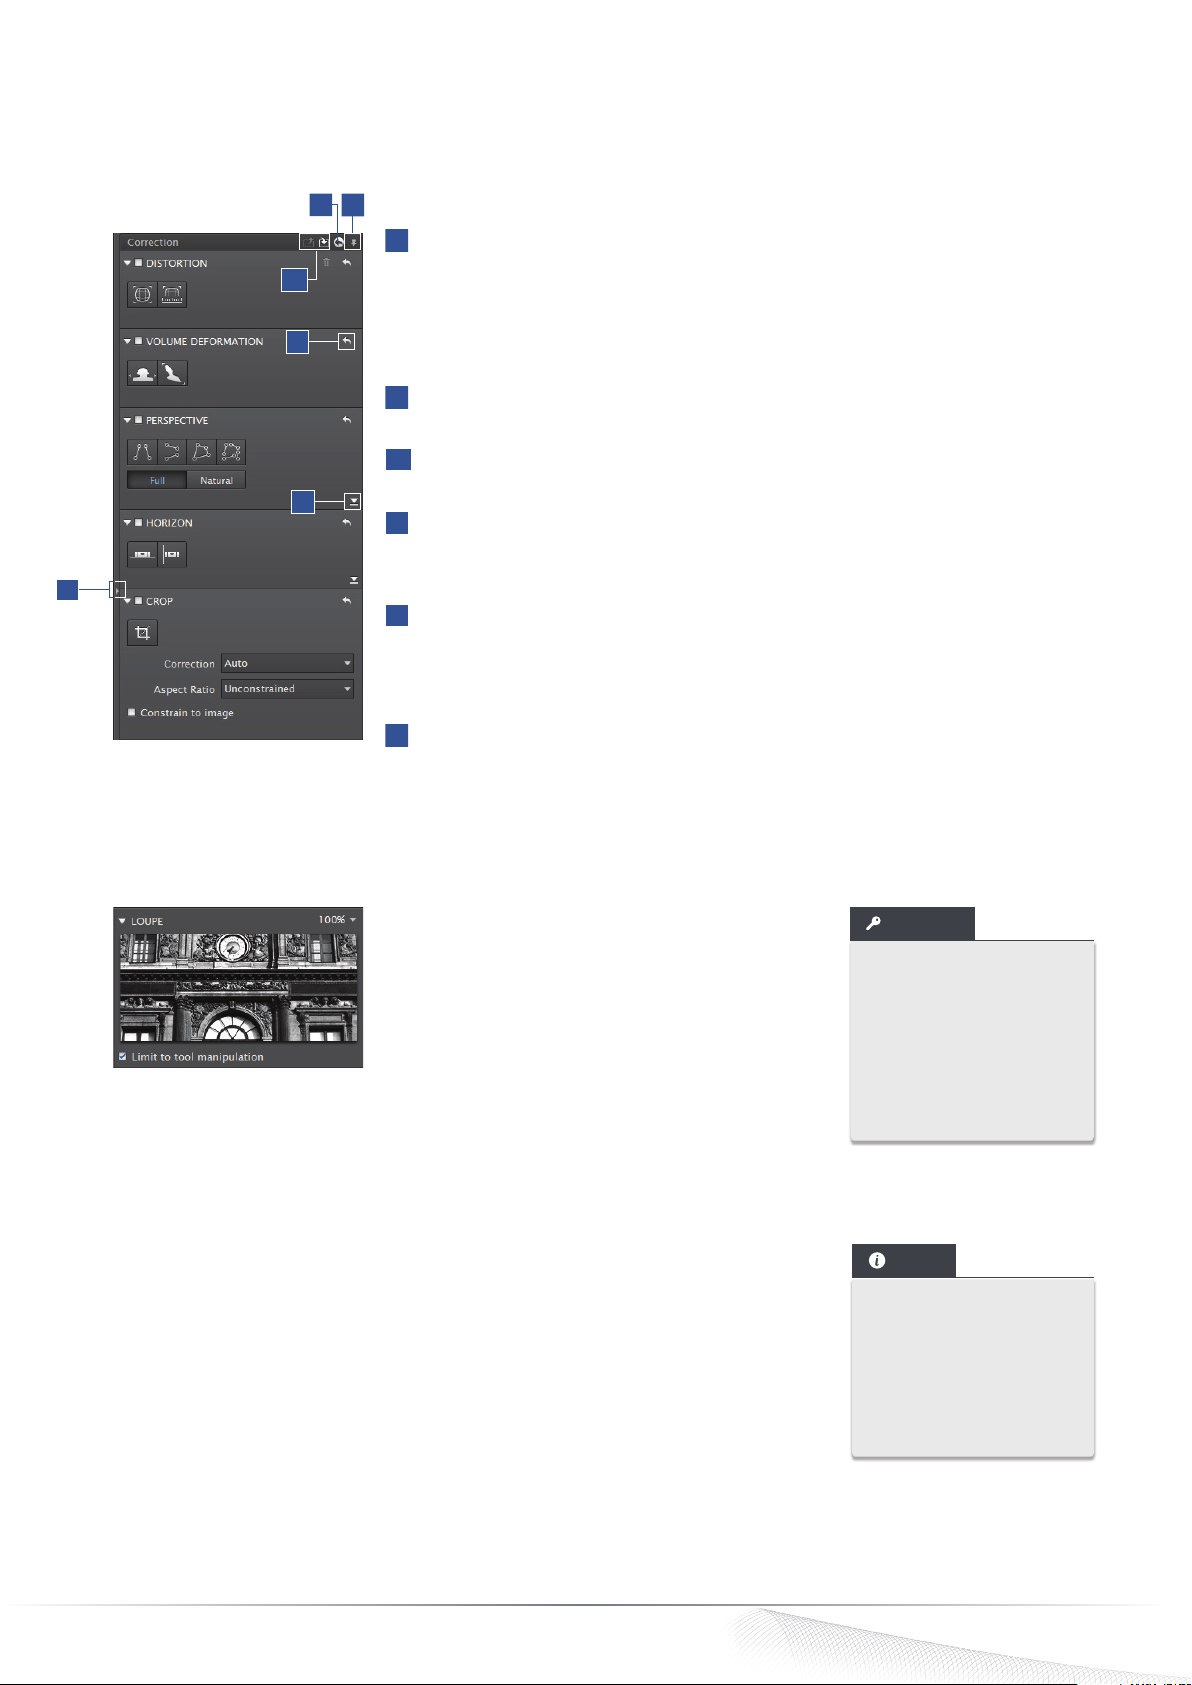
3.2. Correction tool palettes (general information)
The different correction tools – Distortion, Volume deformation, Perspective, Horizon, and Crop – will be explained in greater
detail in their respective sections in this guide. Below are brief descriptions of the general features of the palettes and of the
commands that all palettes have in common:
2
1
Detach the palettes: You can move a palette by grabbing the palette header or clicking
1
3
on the push-pin icon (in the upper right-hand corner of the palette) and then dragging
it to any part of the DxO ViewPoint window.
4
5
6
Visualization palette
3.3.
Replace palettes: You can return the palettes to their default positions on the right side
of the image workspace by clicking on the push-pin icon.
Reset all corrections: This feature lets you reset all the corrections to their default
2
settings and to return to the initial image you started with (see part 3.6).
Save/import current settings: Save your settings for one image so you can apply them
3
to another (see part 3.5).
4
Reset correction: Each tool has a circular arrow reset button located in the upper
right corner of each section (Distortion, Volume deformation, Perspective, Horizon,
and Crop).
Display or hide sliders : The Distortion, Volume deformation, Perspective, and Horizon
5
palettes each contain a certain number of advanced settings sliders. To open the
sliders, click on the arrow icon in the lower right corner of the relevant palettes. To
hide them, click on the arrow icon.
Hide controls : Click on the small arrow located just above the lines separating the
6
palette tool sections to hide or deploy tool controls.
The Visualization palette contains a Loupe that lets you
more accurately place perspective and horizon anchor
points without having to zoom in on the entire image
in the display field. The Loupe magnifies the image at
100% and at 200%; you can select either level in the
menu in the upper right corner of the Loupe tool box.
The Loupe displays the portions of the image that the
mouse rolls over. The Visualization palette can be detached from its default location
and placed anywhere in the DxO ViewPoint window (see the preceding paragraph). DxO
ViewPoint memorizes the position of the palettes when you quit the application.
Menus
3.4.
Microsoft® Windows® standalone application and plugin versions:
File: Open and Save images; quit from application.
Edit: Undo/Redo commands and access to Preferences.
Display: Enter full-screen mode, hide tool panes, and display/hide the superimposed
composition grid.
Help: Access to DxO online help, product activation, check for updates, and version
information (“About”).
TIP
If you check the Limit
to tool manipulation
box, the Loupe will be
active only when you are
working with correction
lines and anchor points,
the Crop tool, or the Hand
tool.
NOTE
In the standalone
application version of DxO
ViewPoint, the File > Save
command overwrites
the original file, and the
File > Save As command
creates a new file.
DxO ViewPoint - Guide utilisateur ©DxO Labs 2012 - Tous droits réservés
DxO ViewPoint 2 - User Guide ©DxO Labs 2013 - All rights reserved
12
Page 13
Mac OS X standalone application and plugin versions:
DxO ViewPoint 2 : Access to version information (“About”) and to preferences.
File (standalone version): Open, Open Recent, Save, Save As, and Close commands.
File (plugin version): Save command.
Edit: Undo/Redo correction commands, and display/hide the superimposed composition
grid.
Display: Enter full-screen mode, hide tool panes, and display/hide the superimposed
composition grid.
Help: Access to DxO online help, DxO Academy tutorials, product activation, and check
for updates.
Saving and importing current settings
3.5
You can save all the current settings you apply to an image so as to be able to apply them to another photo with the same
characteristics.
NOTE
In the plugin versions, the
Save button acts like the
File > Save command (per
above), and consequently
all corrections overwrite
the original file.
Saving current settings:
After you have chosen your settings and applied your corrections, save your correction settings by clicking on the icon
located at the top of the correction tools palette.
Importing custom settings:
Open a new image and then click on the icon to import your saved settings. The entirety of your previous corrections will
be applied to your new image.
In plugin mode, this feature offers a non-destructive workflow and allows you to apply the corrections saved in DxO ViewPoint
to an image changed in the host application.
Resetting corrections
3.6
So long as your corrections have not been applied nor saved, they can be reversed or modified as desired throughout the
duration of your work in DxO ViewPoint. To reset one or more of the corrections applied, click on the circular arrow
top right of the relevant palette(s).
Preferences
3.7.
at the
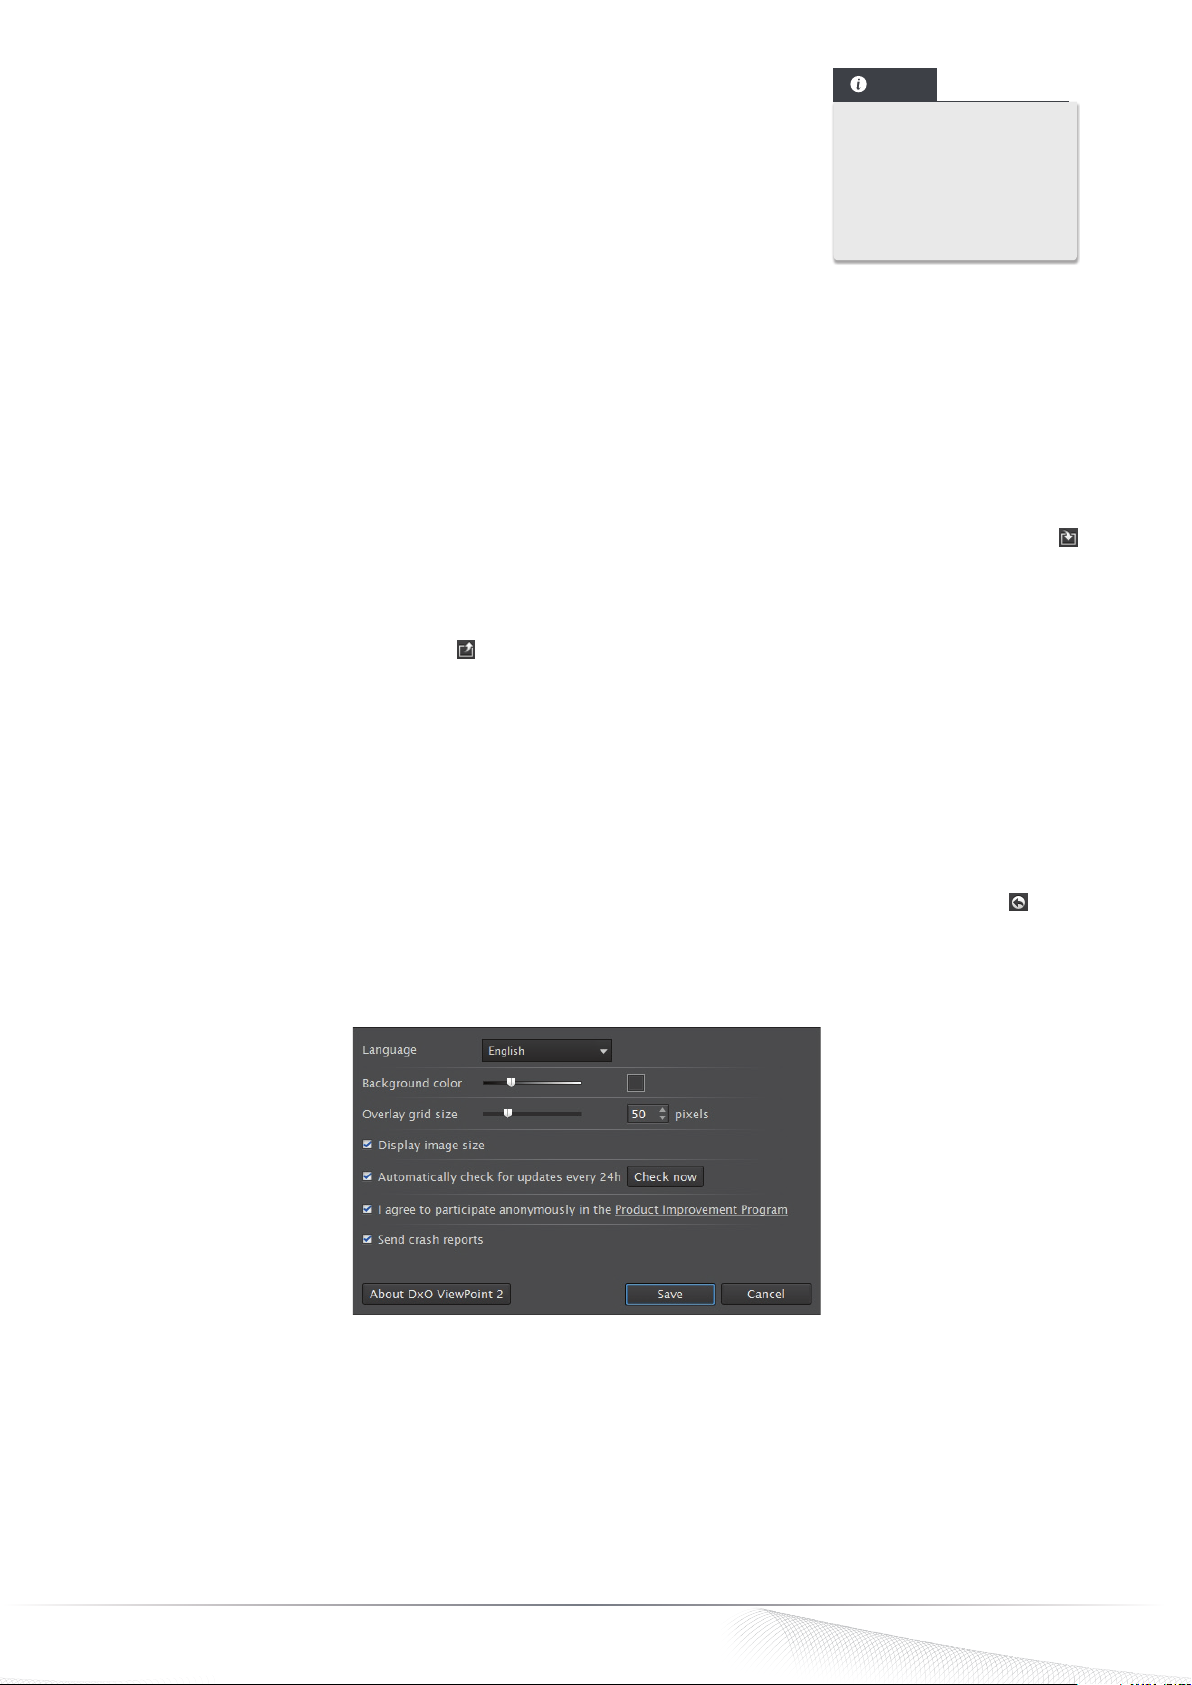
The Preferences dialogue box lets you control a certain number of settings:
Language: Change the program language (English, German, French, or Japanese). Note that you must restart the application
if you change the language.
Background color: Change the shade of the gray background in the image display area. To return to the default shade, doubleclick on the slider.
Overlay grid size: Adjust the size of the grid squares. To return to the default size, double-click on the slider.
Show/hide image size: Display the dimensions of the image in pixels underneath the main workspace window.
DxO ViewPoint - Guide utilisateur ©DxO Labs 2012 - Tous droits réservés
DxO ViewPoint 2 - User Guide ©DxO Labs 2013 - All rights reserved
13
Page 14
Automatically check for updates every 24h: Self-explanatory. An adjacent Check now button lets you manually inquire about
application updates (Internet connection required).
Product Improvement Program: Choose to participate or cease to participate in this anonymous user feedback program
designed to help perfect DxO ViewPoint.
Send crash reports: Activate or deactivate automatic generation and sending of error reports following a program crash.
About DxO ViewPoint 2: Contains information about the application version, along with certain legal notices.
Save: Save all changes made in the Preferences window.
Cancel: Undo all changes and close the Preferences window.
Warning messages
3.8.
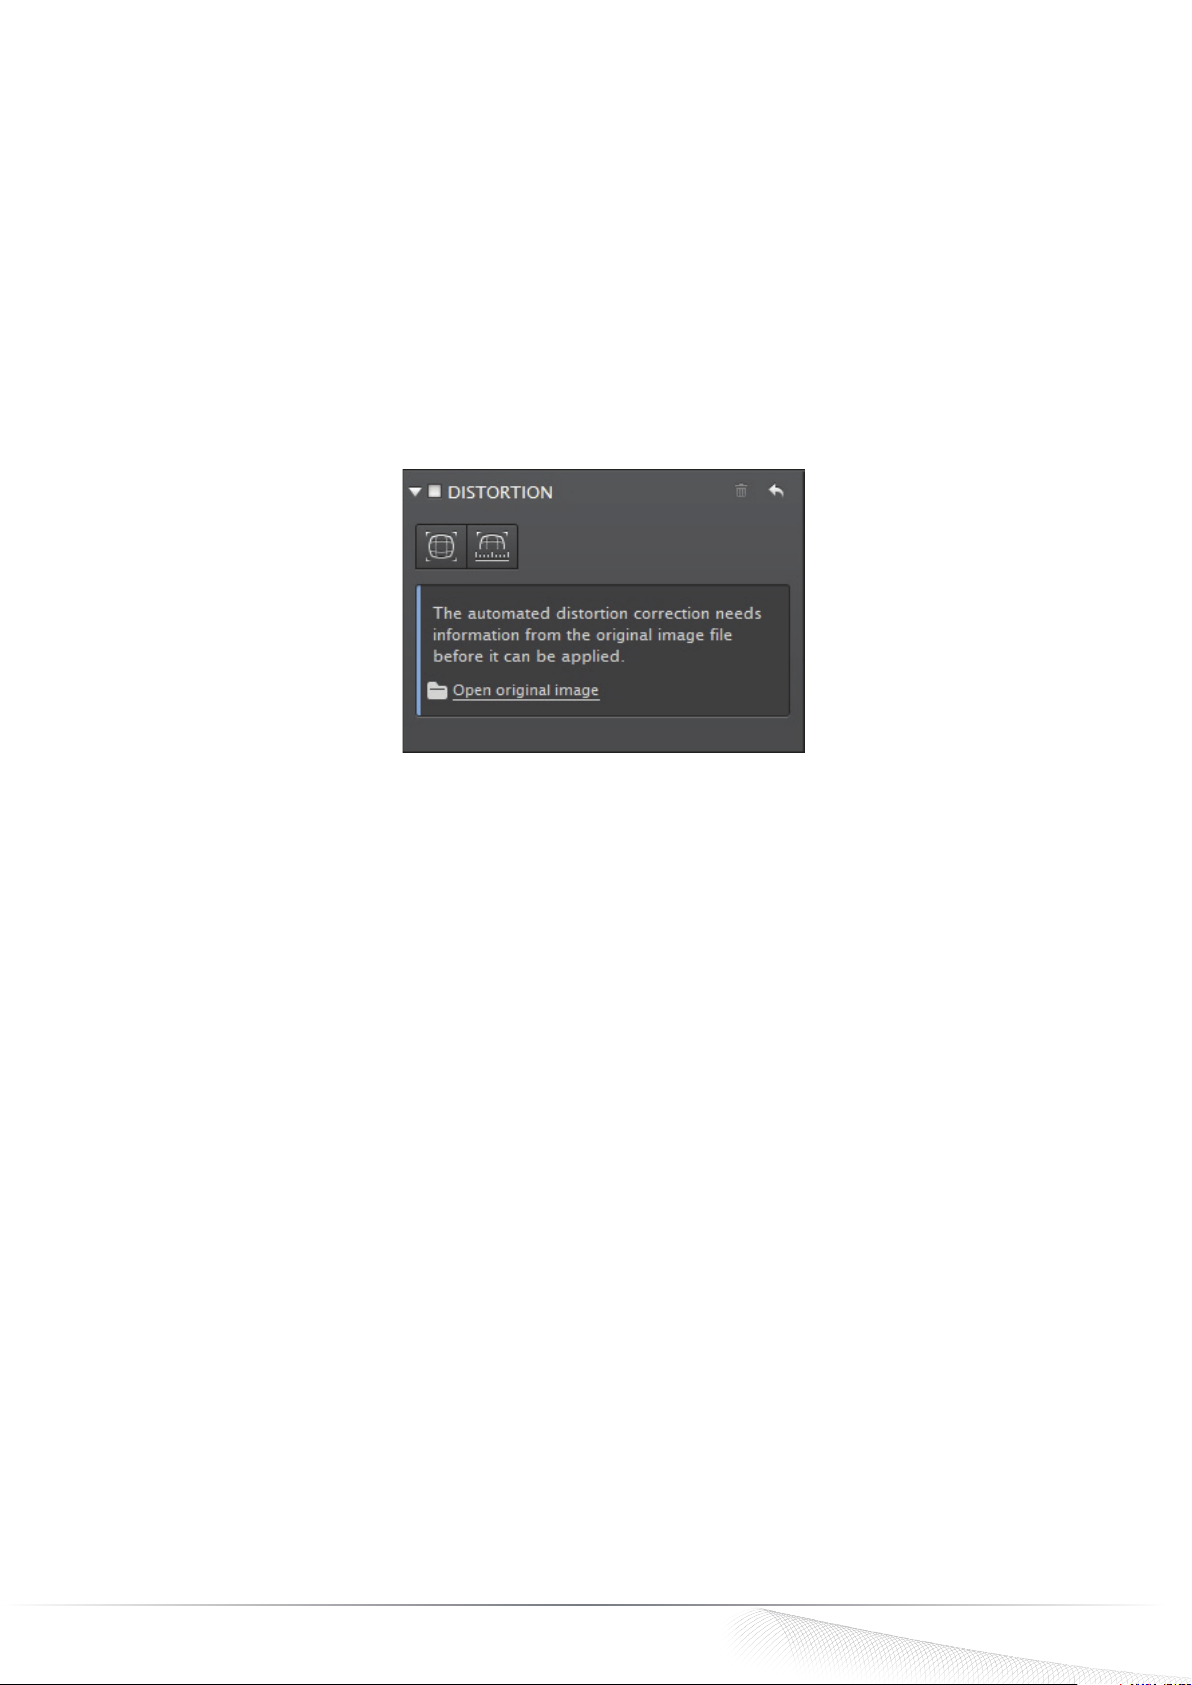
Warning messages tied to EXIF data or to DxO Optics Modules can appear in the DxO ViewPoint Distortion, Volume deformation
and Perspective palettes.
Warning message in the Distortion palette.
Distortion palette:
• EXIF data: In plugin mode, if EXIF data is not available, DxO ViewPoint will retrieve the information from the original
file. If that is not possible, then automatic distortion correction cannot be performed, although manual correction is still
possible.
• DxO Optics Modules: Different messages address ambiguity (i.e., several different DxO Optics Modules are available for
the same equipment), and the availability of and updates to Optics Modules. If there are no DxO Optics Modules available,
then automatic correction cannot be performed, although manual correction is still possible.
Perspective/Volume deformation palettes: If EXIF data is missing, then automatic correction will not occur. The message will
suggest manually adjusting the H/V Ratio slider to modify the image proportions or the intensity.
DxO ViewPoint - Guide utilisateur ©DxO Labs 2012 - Tous droits réservés
DxO ViewPoint 2 - User Guide ©DxO Labs 2013 - All rights reserved
14
Page 15
Correcting distortion
4.1. About distortion
All lenses are more or less affected by distortion, which takes two principal forms:
• Barrel: Lines are curved toward the exterior of the image.
• Pincushion: Lines are curved toward the interior of the image.
Some lenses are affected by both phenomena — for example, a zoom lens can display
a barrel distortion at its shortest focal length, and a pincushion distortion at its longest
focal length… not counting all the distortion variations at intermediate focal lengths.
DxO ViewPoint lets you correct distortion for every kind of lens, either automatically for camera/lens combinations supported
by DxO Optics Modules, or manually if the camera/lens combination you use is not yet supported by a DxO Optics Module.
DxO ViewPoint also corrects automatically or manually the circular distortion seen in images taken with fisheye lenses.
Correcting distortion automatically
4.2.
If your material is supported by a DxO Optics Module, you can correct your image automatically.
Step 1 – Open an image in DxO ViewPoint by selecting File > Open, or drag and drop your image into the application window.
Step 2 - In the Distortion palette, click on the Automatic button.
NOTE
DxO ViewPoint uses DxO
Optics Module distortion
corrections; to avoid a
double correction, we
advise you not to use the
lens correction features
in your host application.
Step 3 – A dialogue box will indicate if a DxO Optics Module for your equipment is already installed, or if not, whether it is
available for downloading.
Step 4 – Click on OK to correct the image using the selected DxO Optics Module and to
close the dialogue box.
DxO ViewPoint - Guide utilisateur ©DxO Labs 2012 - Tous droits réservés
DxO ViewPoint 2 - User Guide ©DxO Labs 2013 - All rights reserved
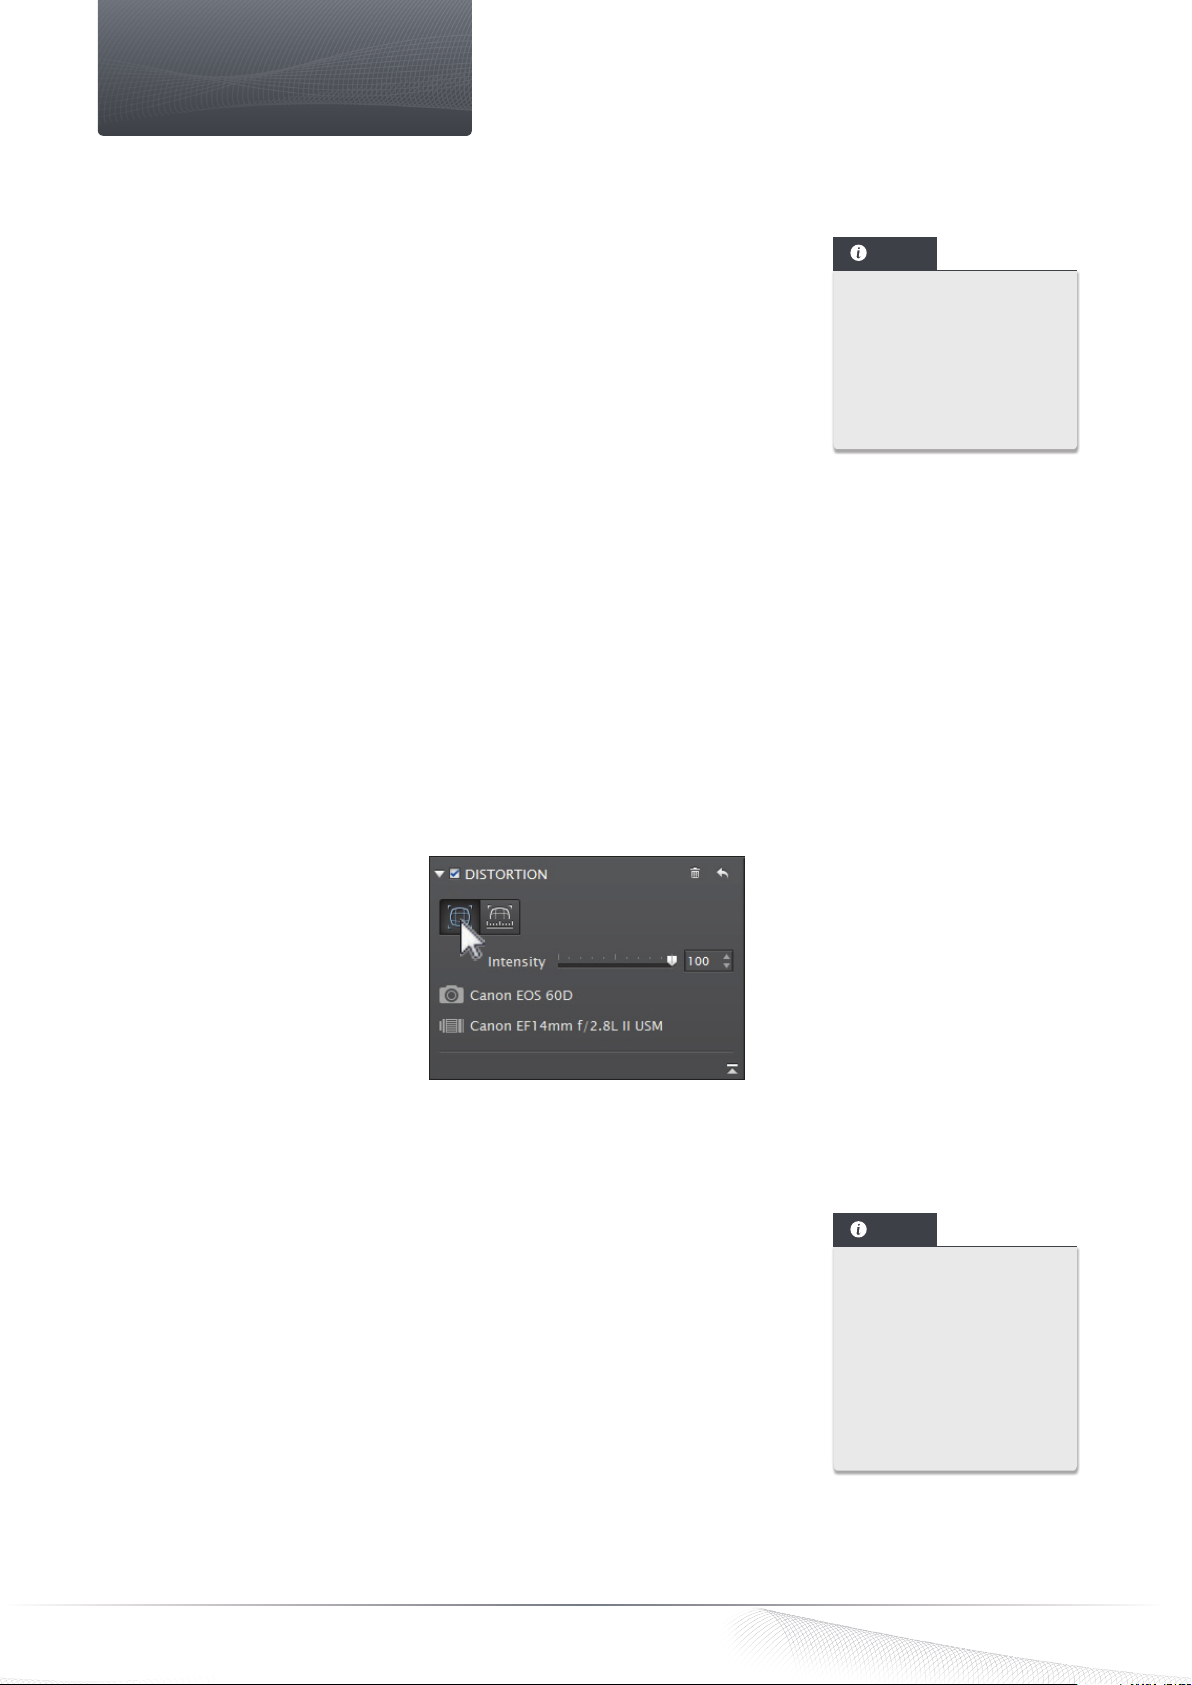
NOTE
When a DxO Optics
Module is installed and
taken into account, the
Distortion palette displays
the following information:
camera model used,
lens model used, and
the name of the original
image file.
15
Page 16
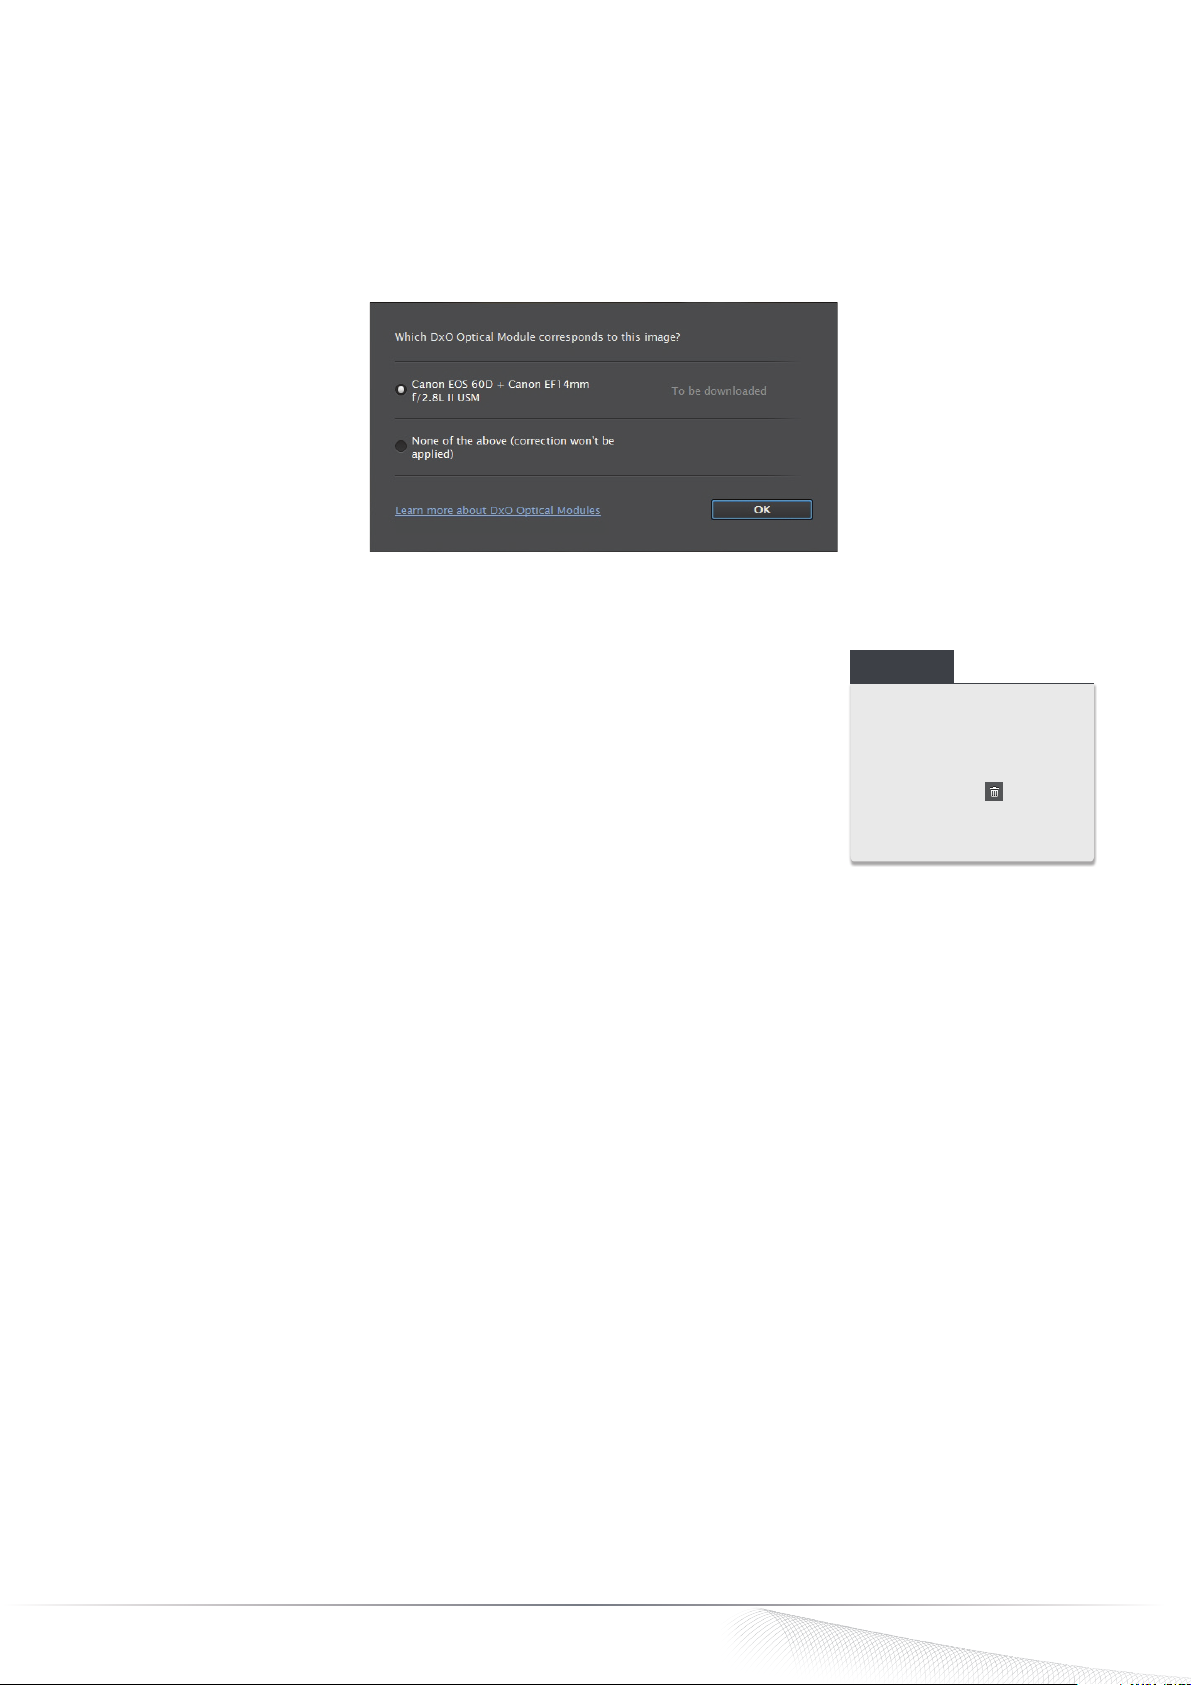
4.3. Managing DxO Optics Modules
Downloading and installing DxO Optics Modules
When you choose automatic distortion correction, a dialogue box about managing DxO Optics Modules will open. This dialogue
box indicates which DxO Optics Module(s) can be used, allows you to choose among the appropriate DxO Optics Modules
available if there is any ambiguity — that is, if DxO ViewPoint cannot fully identify the camera/lens combination you used to
take the shot.
DxO Optics Module dialogue box.
The same dialogue box also displays the status of the appropriate available DxO Optics
NOTE
Modules — “Installed,” “Update available,” or “Download.” Select the DxO Optics Module
you want to use and then click on OK. If you are downloading an updated version or a new
module, you will see a progress bar. As soon as the download is finished, the installation
will be immediately effected and taken into account. You will not need to restart the
application.
You can eliminate the DxO
Optics Module you are
using for processing an
image by clicking on the
trash can icon located
in the upper right of the
If a DxO Optics Module is not available
Distortion palette.
If no DxO Optics Module is available for your equipment, the automatic correction will
not be applied, and the Automatic button is deactivated. In this case, you can manually
correct your image (see part 4.5).
4.4. Applying an automatic distortion correction in plugin mode
As a plugin, if DxO ViewPoint does not find the necessary EXIF metadata information, a dialogue box will offer to find the
original image in order to retrieve the missing information. This said, certain programs modify and sometimes eliminate
the EXIF data necessary for DxO ViewPoint to determine the proper DxO Optics Module to use (this is the case with Adobe
®
Photoshop
Lightroom® and Apple® Aperture®).
Step 1 – Open your image in DxO ViewPoint.
®
Step 2 – If a dialogue box in the Distortion palette requests access to the original file, click on Open original image.
Step 3 – To find the original image, click on Open in the system dialogue box that appears at the top of DxO ViewPoint. You will
need to find the JPEG or RAW image file that was loaded directly from your camera before processing.
Step 4 – After finding and selecting the original image, validate by clicking on Open. If the corresponding DxO Optics Module
is not already installed, a new dialogue box will open and prompt you to download it (if available); otherwise it will display the
information about the shooting equipment and the name of the original file.
Step 5 – After you have applied your corrections, click on the Save button on the lower right. DxO ViewPoint will close and the
corrected file will be transferred back to the host application.
DxO ViewPoint - Guide utilisateur ©DxO Labs 2012 - Tous droits réservés
DxO ViewPoint 2 - User Guide ©DxO Labs 2013 - All rights reserved
16
Page 17
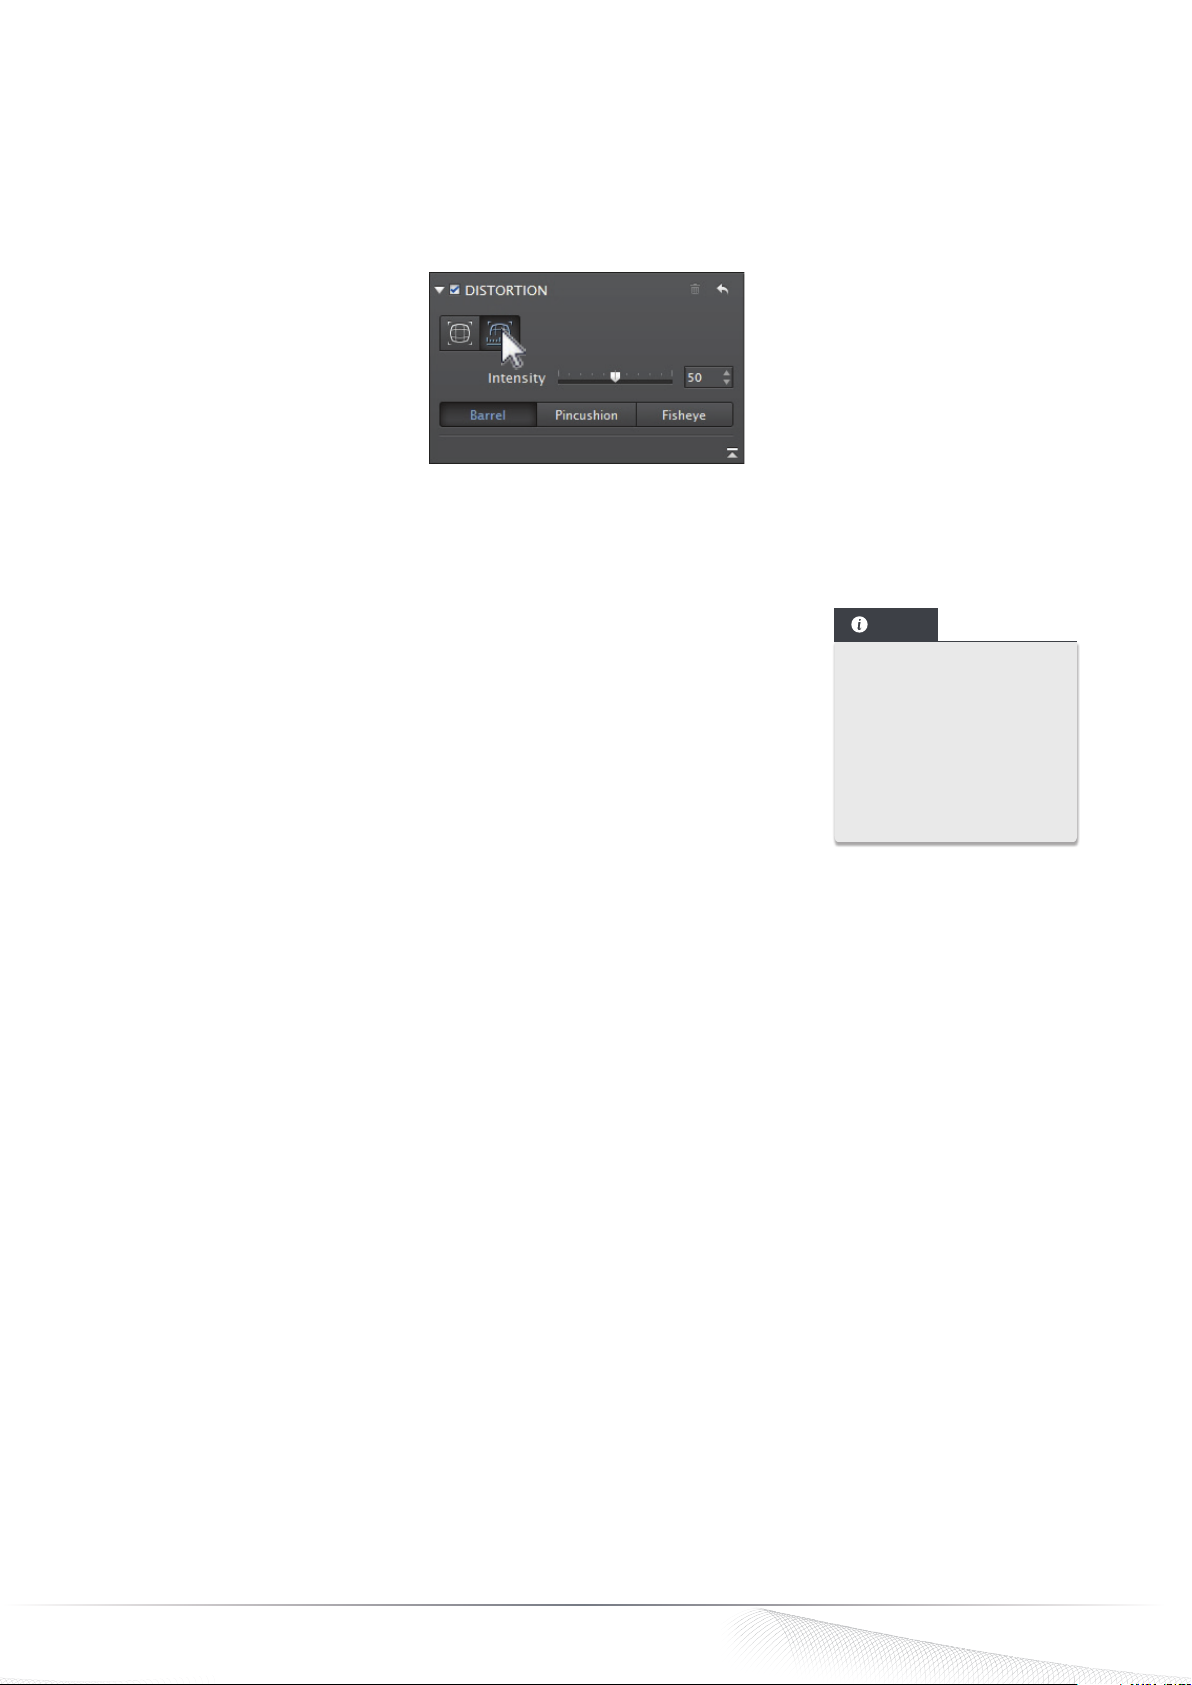
4.5. Correcting distortion manually
If your shooting equipment is not supported by a DxO Optics Module, you can manually correct your image.
Step 1 – Open an image in DxO ViewPoint by selecting File > Open, or drag and drop your image into the application window.
Step 2 – In the Distortion palette, click on the Manual button.
Distortion palette manual correction.
Step 3 – Depending on the type of distortion visible in the image, select either Barrel, Pincushion, or Fisheye. The correction
will be applied immediately.
Step 4 – If necessary, you can use the Intensity slider to fine-tune the correction.
NOTE
With respect to the
Distortion palette,
see part 3.8 for more
information concerning
messages about missing
EXIF data (making
automatic correction
impossible).
DxO ViewPoint - Guide utilisateur ©DxO Labs 2012 - Tous droits réservés
DxO ViewPoint 2 - User Guide ©DxO Labs 2013 - All rights reserved
17
Page 18
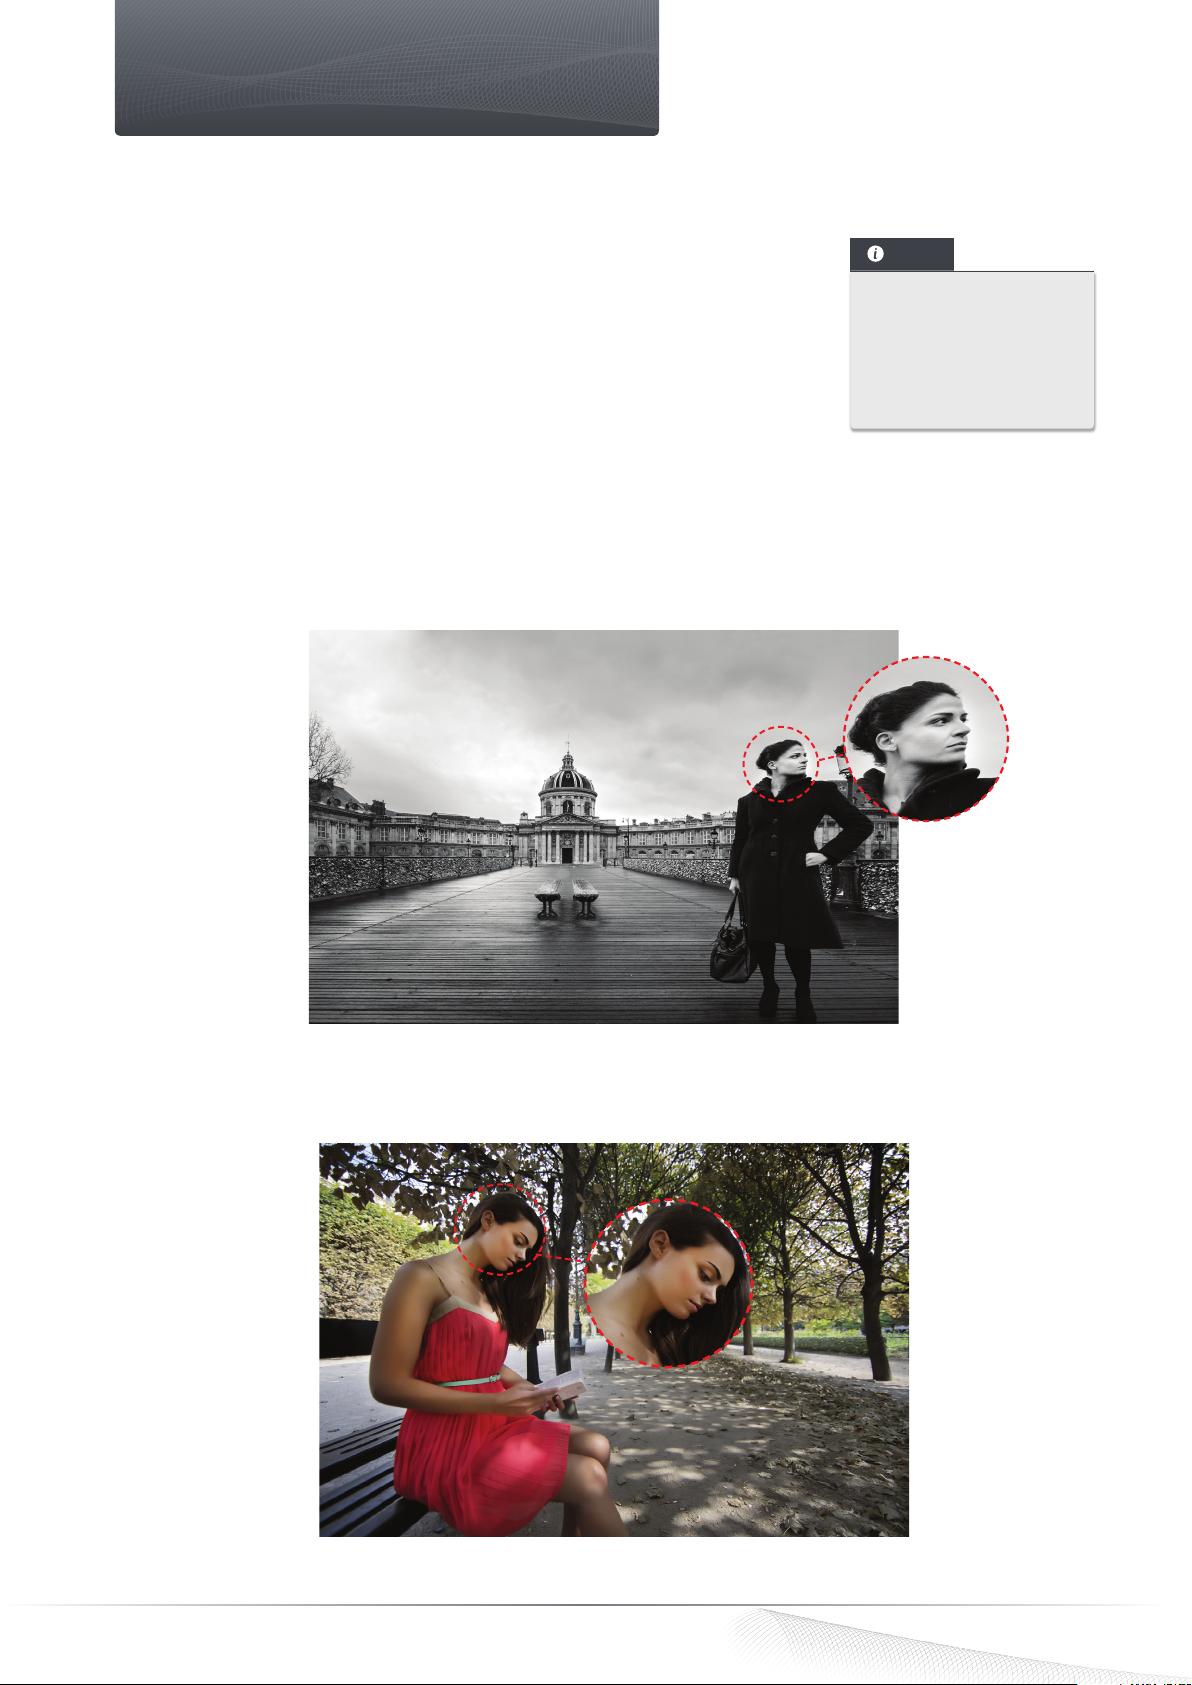
Correcting volume deformation
5.1. About volume deformation
The deformation of subjects located on the edges of images is geometrical flaw that is
frequently seen in interior, marriage, and other event photos.
Known as “volume deformation,” this flaw is due to taking pictures of groups of people or
objects with a wide-angle or wide-angle zoom lens. The curve of the lens stretches out
and distorts the subjects on the image edges.
5.2. Determining the type of volume deformation
Look carefully at your image to determine the kind of distortion affecting it:
• If the spherical objects (such as heads) near the edges of your image appear stretched or flattened, your image is
suffering from a cylindrical or horizontal/vertical volume deformation, in which case you need to use the horizontal/
vertical correction tool.
NOTE
For optimal quality
results, we advise you
to correct any problems
with distortion before
correcting volume
deformation.
• If objects seem to stretch toward the corners of the image, then you are dealing with diagonal volume deformation, in
which case you will need to use the diagonal correction tool.
DxO ViewPoint - Guide utilisateur ©DxO Labs 2012 - Tous droits réservés
DxO ViewPoint 2 - User Guide ©DxO Labs 2013 - All rights reserved
18
Page 19
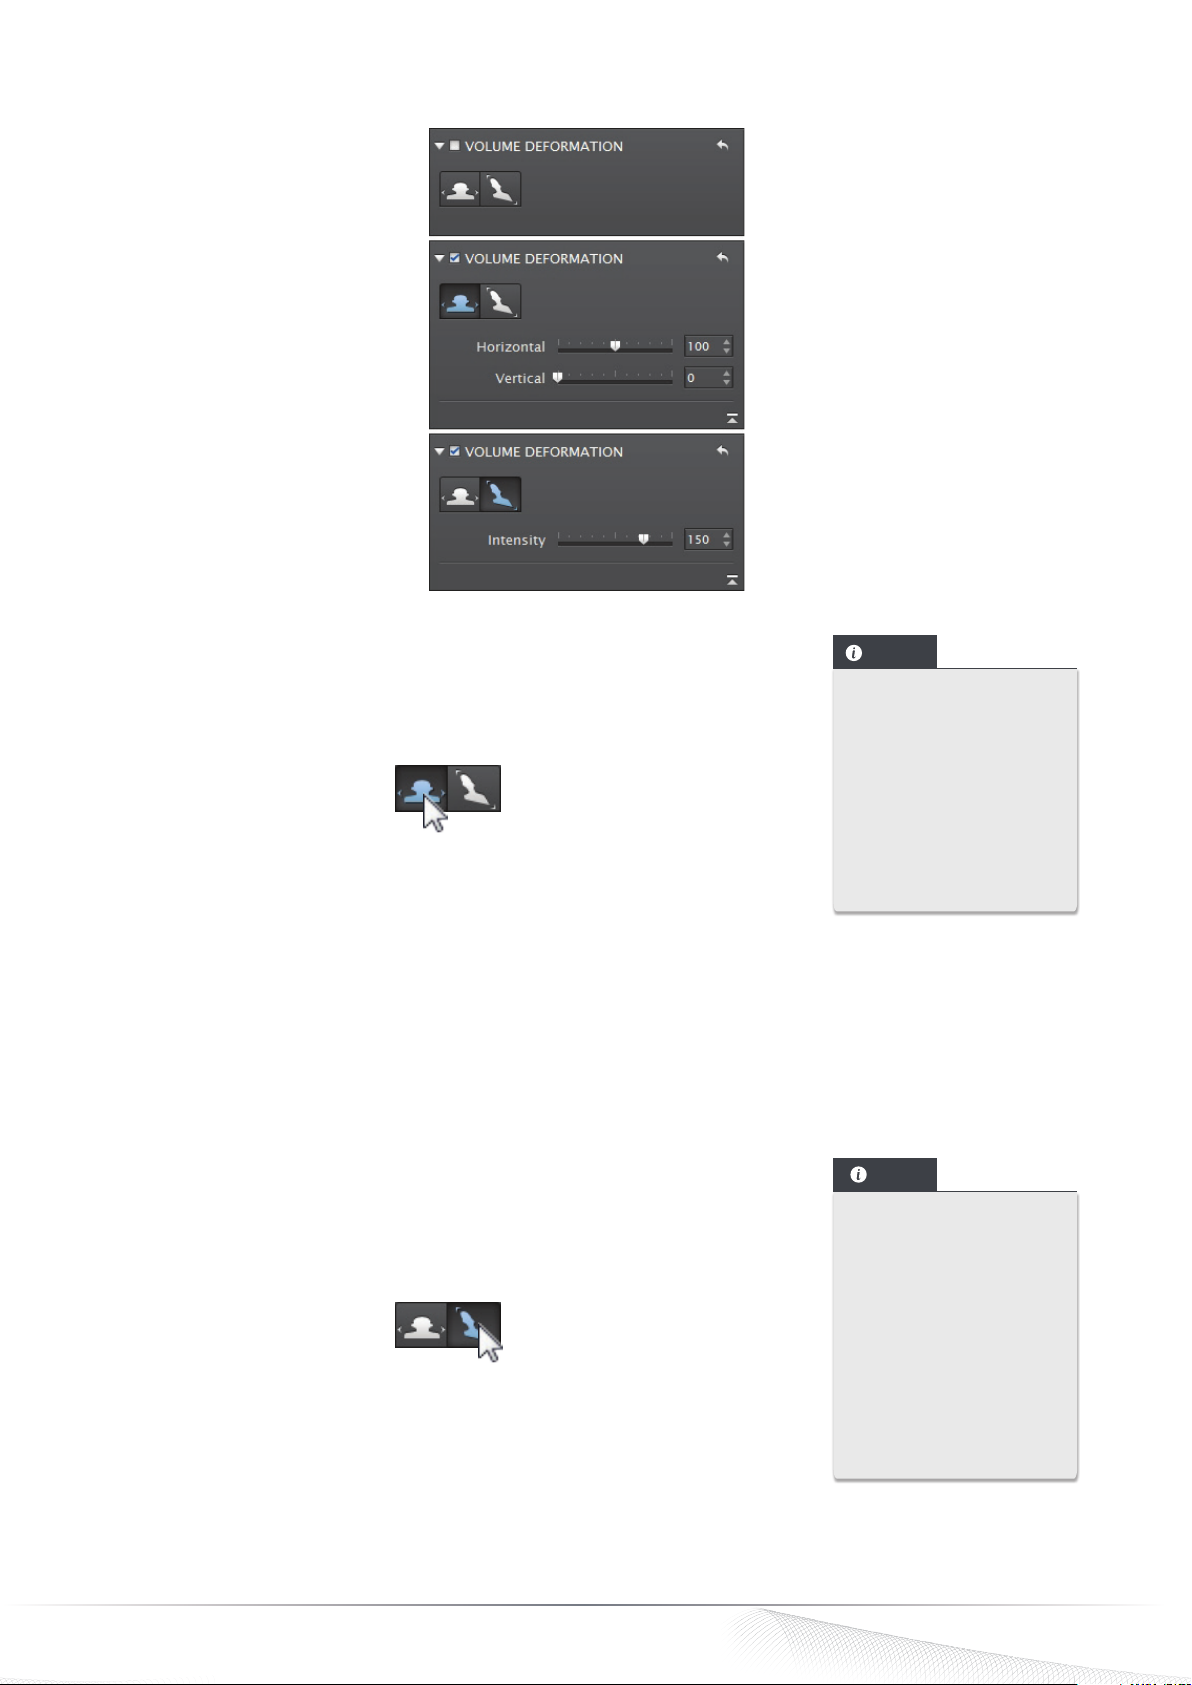
5.3. Correcting horizontal/vertical volume deformation
The three states of the Volume deformation palette.
Applying the correction
After opening your image in DxO ViewPoint, activate the horizontal or vertical volume
deformation correction by clicking on the Horizontal/Vertical button in the Volume
deformation palette.
The correction is automatically applied to the image.
NOTE
DxO ViewPoint displays
a new warning message
if it detects volume
deformation in the
image. This message is
located in the Volume
deformation palette and
offers you the opportunity
to directly fix the problem
by clicking on Correct.
Fine-tuning the settings
The settings can be adjusted by using the sliders.
• The Horizontal slider can stretch the image content toward the edges of the photo (slider moved to the left) or can
compress the objects toward the center (slider moved to the right). Its default value is 100 (slider at center).
• The Vertical slider flattens the image content vertically. Its default value is 0 (slider on the left).
Correcting diagonal volume deformation
5.4.
NOTE
Applying the correction
After opening your image in DxO ViewPoint, activate the diagonal volume deformation
correction by clicking on the Diagonal button in the Volume deformation palette.
The automatic correction is immediately applied to the image.
When in doubt, don’t
hesitate to experiment
with both tools, and
then choose the one
that makes the subjects
in your image appear
the most natural. Keep
in mind that you can
fine-tune the automatic
correction by using the
sliders in the Volume
deformation palette.
DxO ViewPoint - Guide utilisateur ©DxO Labs 2012 - Tous droits réservés
DxO ViewPoint 2 - User Guide ©DxO Labs 2013 - All rights reserved
19
Page 20
TIP
Double-click on any
slider to return it to its
default value setting.
NOTE
Correcting volume
deformation can clip the
total surface area of the
image. If you think you
will need to apply this
correction, give a larger
frame to your photo when
shooting.
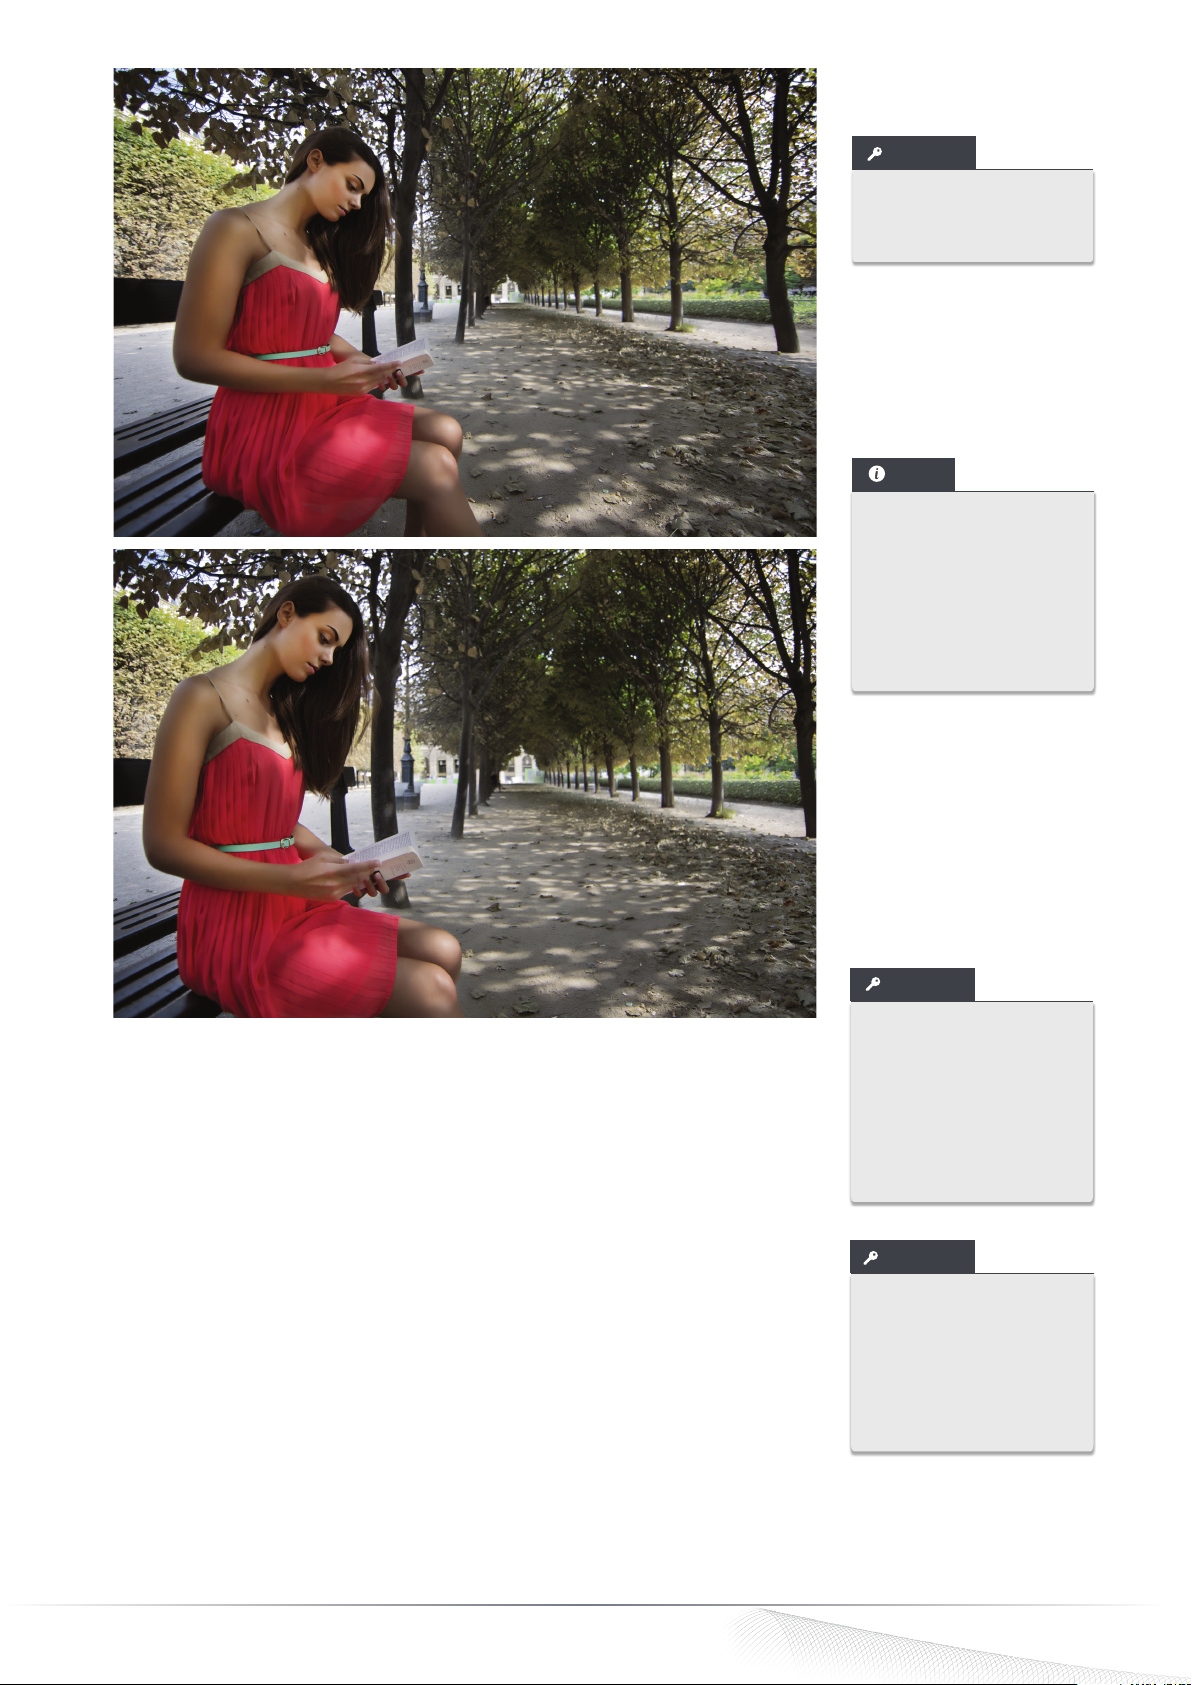
Correction of diagonal volume deformation, before and after.
Fine-tuning settings
If necessary, you can manually fine-tune the correction by adjusting the Intensity slider.
Moving the slider to the left, the image will be progressively stretched and distorted
toward the center; moving to the right, the image is stretched and distorted toward the
edges. The default setting for this slider is 150.
TIP
You can fine-tune the
value settings of your
corrections by clicking on
the up and down arrows
located on the right side
of the slider value. You
can also manually enter
a value.
TIP
You can better see the
changes effected by the
volume deformation
correction if you display
the composition grid,
which serves as a visual
reference.
DxO ViewPoint - Guide utilisateur ©DxO Labs 2012 - Tous droits réservés
DxO ViewPoint 2 - User Guide ©DxO Labs 2013 - All rights reserved
20
Page 21
Fixing perspective
6.1. About perspective
In architectural photography, the position of the photographer relative to a building almost always means a low-angle or
high-angle shot. In both cases, convergent lines distort the subject, and the distortion becomes even more pronounced
toward the edges of the image. DxO ViewPoint 2 offers tools for correcting vertical and horizontal parallel lines, for forcing a
rectangle (to straighten out, for example, window and door frames), as well as an 8-point correction mode that allows you to
correct each side completely independently.
Forcing vertical parallels
6.2.
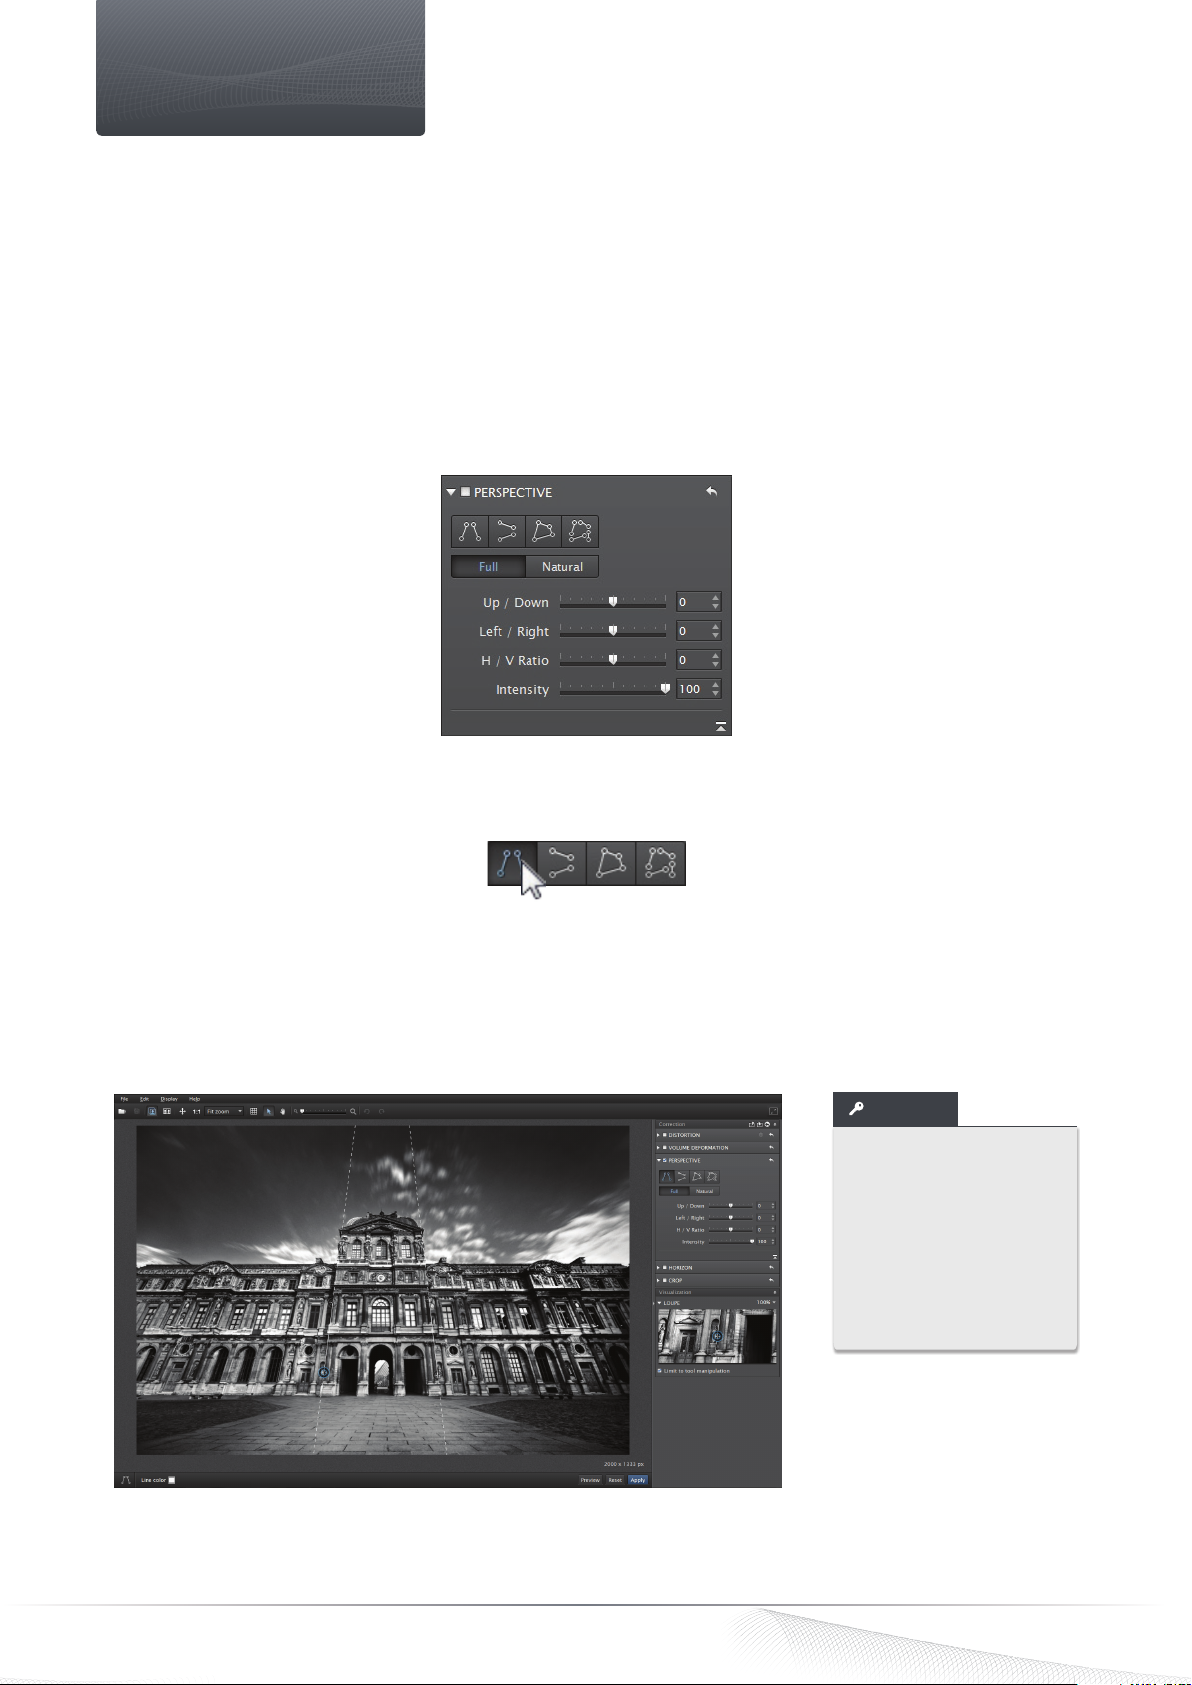
Perspective palette.
After opening your image in DxO ViewPoint, go to the Perspective palette and then click on the Force Vertical Parallel button.
Placing anchor points
Two vertical lines, each one with two circular anchor points, will be superimposed on your image. Choose two vertical
reference elements in your image, preferably located on the same plane, for optimal correction.
TIP
You can change the color
of the lines to improve
their visibility with respect
to the background color
of your image. Click on
the colored Line color
block located in the lower
toolbar and select the
color you want to use.
Choose your vertical reference elements and place of the correction lines.
DxO ViewPoint - Guide utilisateur ©DxO Labs 2012 - Tous droits réservés
DxO ViewPoint 2 - User Guide ©DxO Labs 2013 - All rights reserved
21
Page 22
Place the mouse cursor on one of the anchor points. Click on it and drag it to the end of one
of your reference elements. Move the second anchor point so as to align the line with your
vertical element. Do the same thing with the anchor points in the second vertical line.
Image zoom.
For even more precise positioning, you can use your keyboard navigation or arrow keys to
adjust the anchor points. The Tab key (Windows only) will let you quickly toggle between
one anchor point and another. After you have created a guideline, you can move it by
clicking on the center of the line with your mouse and dragging the line to the desired
location.
Verifying the correction
DxO ViewPoint lets you verify your correction settings before applying them to your image.
To do so, click on the Preview button in the lower toolbar.
TIP
To place your anchor
points more precisely,
you can zoom in on
your image whenever
you wish using the
zoom tools in the upper
toolbars, or you can use
the Loupe located in the
Visualization palette. You
can also use the Hand
tool to manipulate the
position of your image
more quickly.
TIP
Correcting perspective
can result in substantial
cropping, so be sure to
take your shot with a sufficiently large frame.
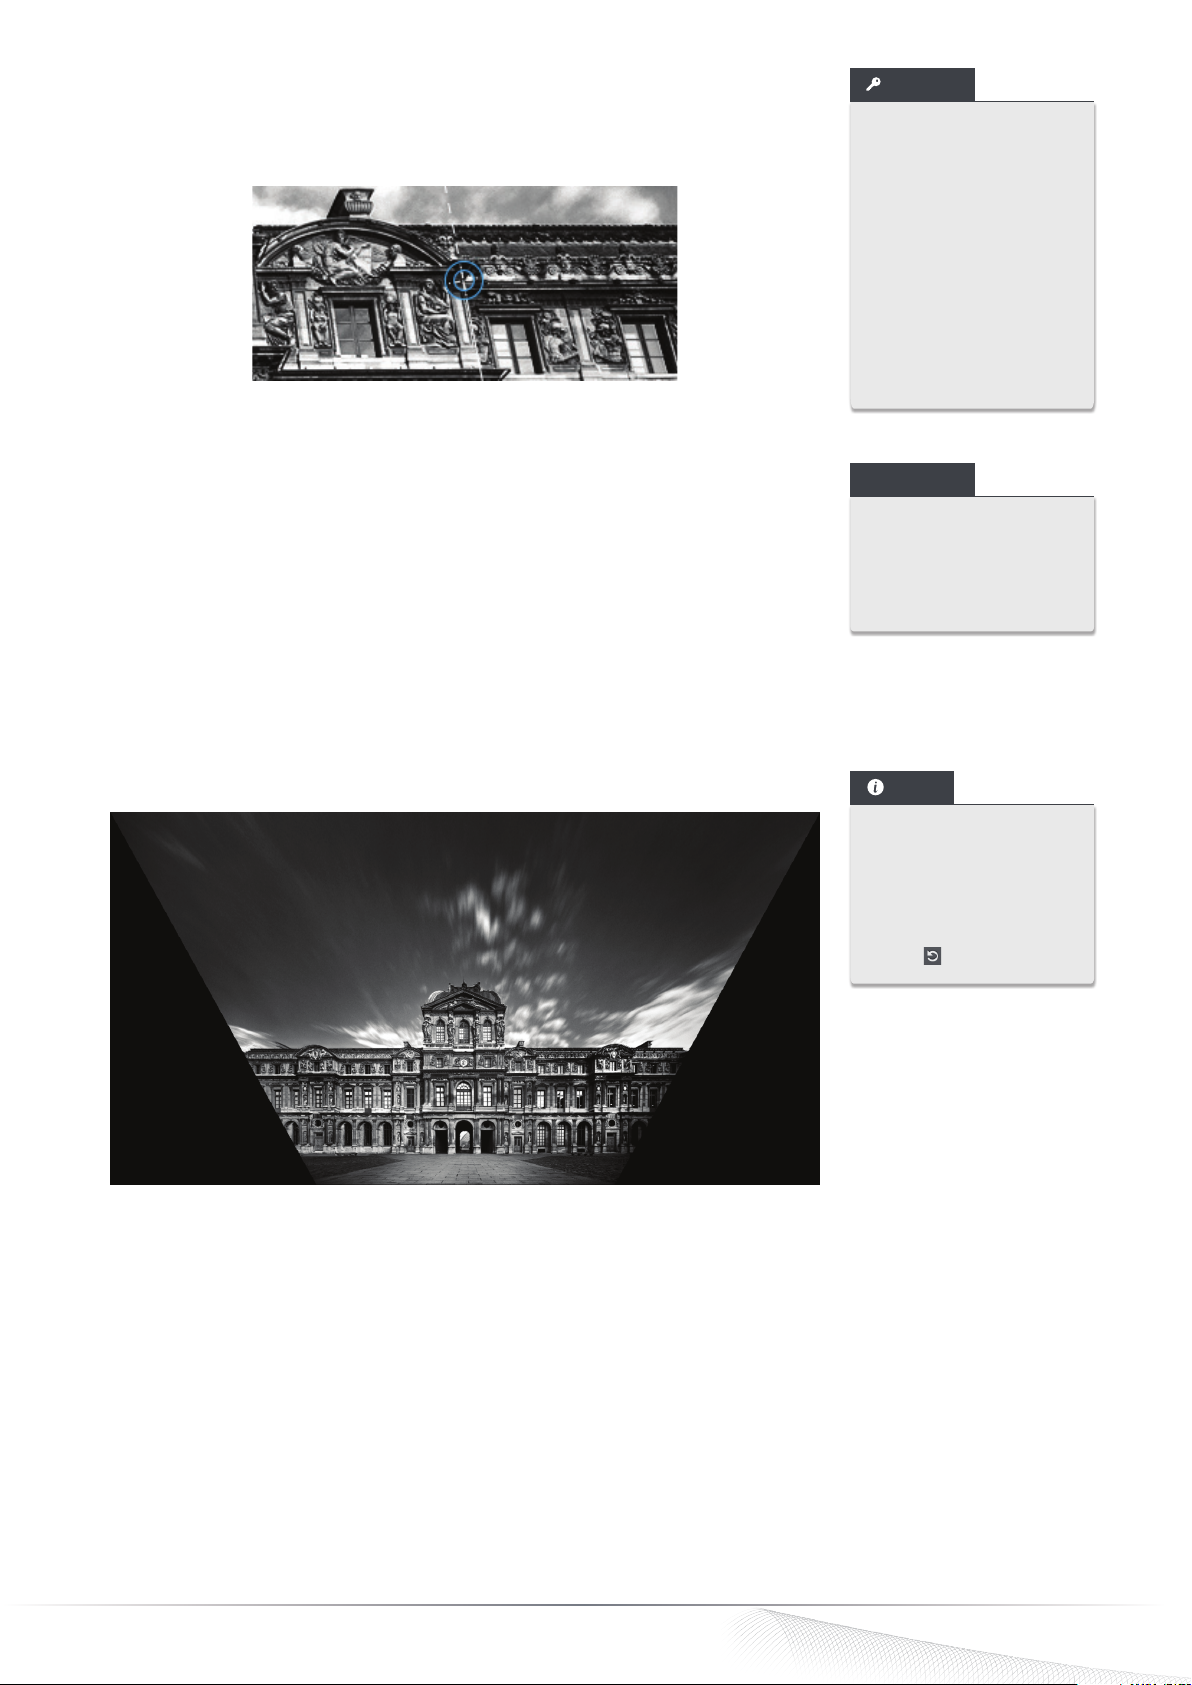
DxO ViewPoint will correct your image and will darken the parts of the image that will be
suppressed when the automatic crop is applied (see Chapter 8 – Cropping).
NOTE
So long as the corrected
image has not been
saved, the changes can
be undone and can be
reset by clicking on the
Reset the correction
button .
The darkened zones indicate the parts of the image that will disappear when cropped.
The greater the correction, the more the image will be cropped to compensate for rectifying the low- or high-angle shot.
DxO ViewPoint - Guide utilisateur ©DxO Labs 2012 - Tous droits réservés
DxO ViewPoint 2 - User Guide ©DxO Labs 2013 - All rights reserved
22
Page 23
6.3. Forcing horizontal parallels
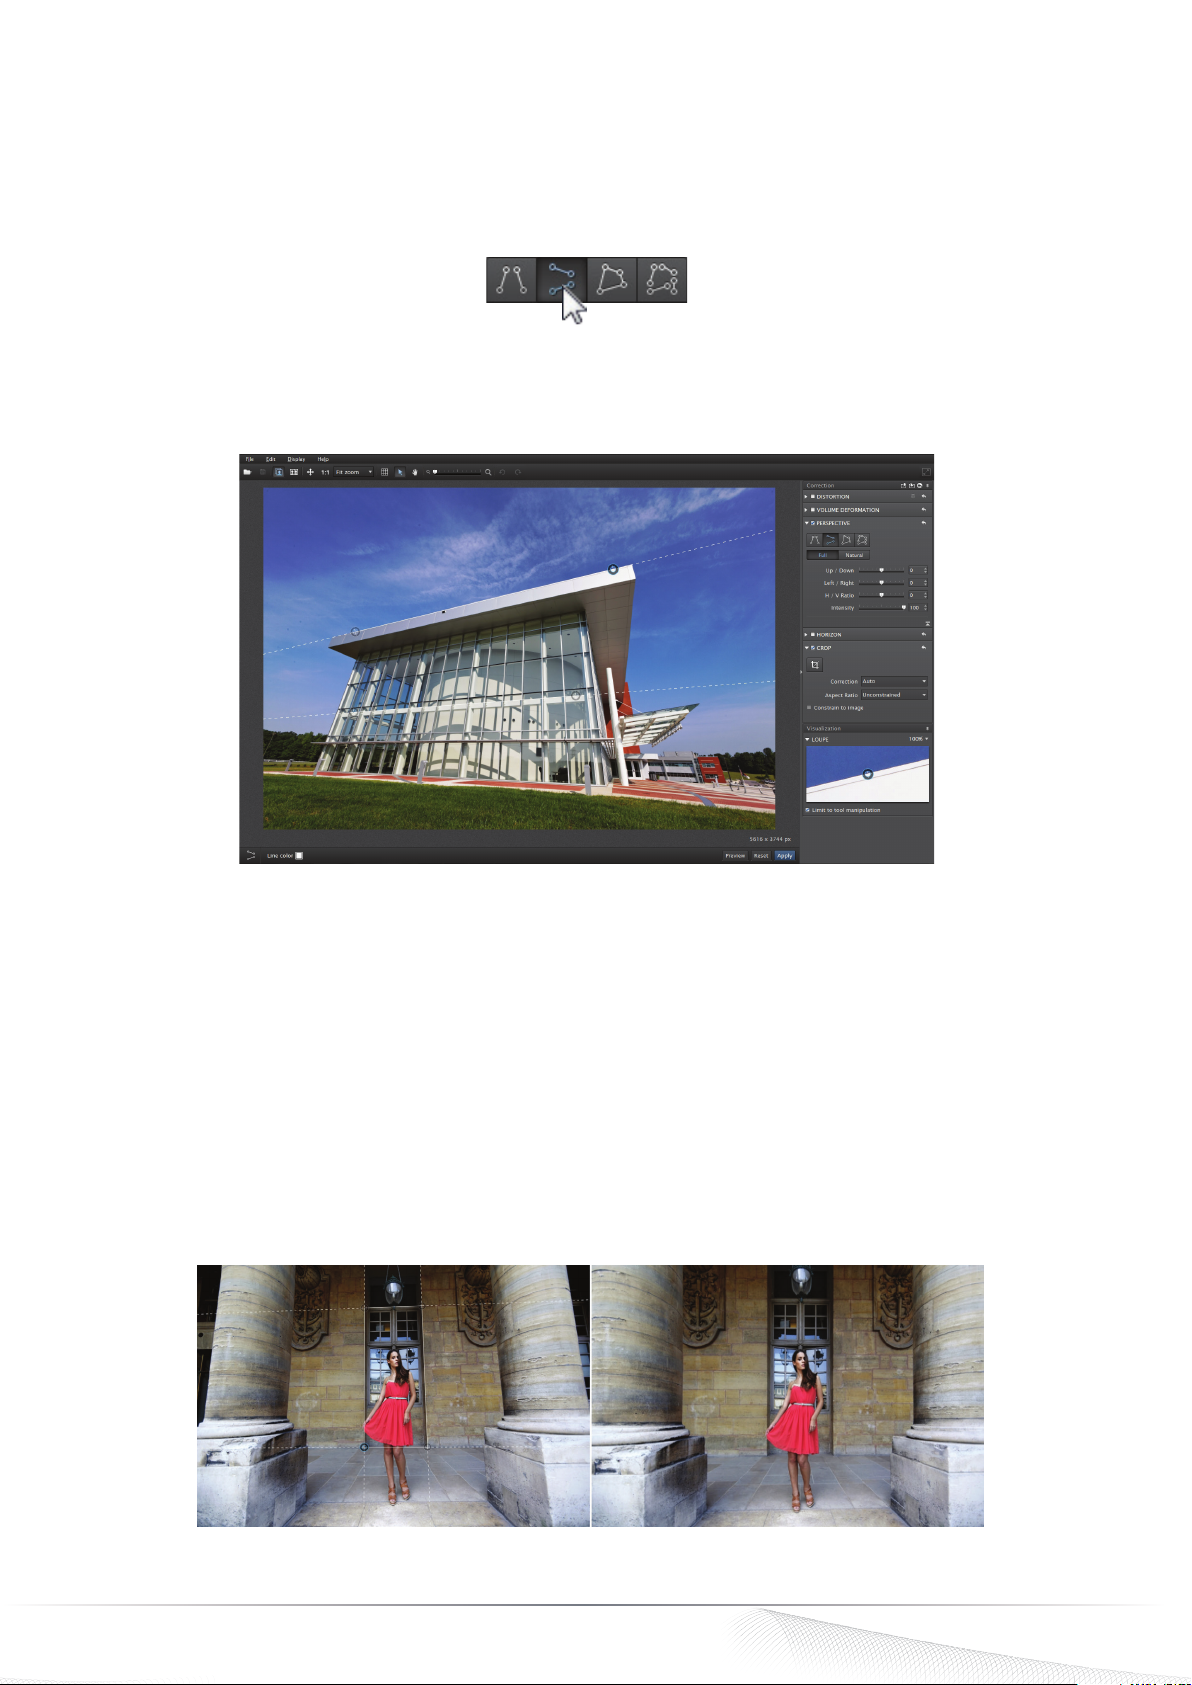
The principle is identical to that for forcing vertical parallels: the reference lines are horizontal and will let you align and level,
for example, the top and bottom of a building, a window frame, or a door.
To activate the correction for horizontal perspectives, click on the Force Horizontal Parallel button in the Perspective palette.
Placing the anchor points
Two horizontal lines with two circular anchor points will be superimposed on your image. Choose two horizontal reference
elements in your image and place your lines in the same way as for correcting vertical perspectives.
Choosing horizontal reference elements and placing correction lines.
Verifying the correction
Verify your correction by clicking on the Preview button in the lower toolbar. DxO ViewPoint will darken the parts of the image
that will be suppressed when the automatic cropping is applied.
Forcing a rectangle
6.4.
A third function of the perspective correction feature lets you use a reference rectangle to simultaneously correct both vertical
and horizontal perspectives independently on each side. The applications are numerous: you can restore the exact shapes
and forms to distorted elements in the scene, or straighten an interior space (such as an airport arrivals hall, a museum, or
palace gallery) that was not shot in perfect alignment with an axis, or was taken at a too-low or too-high angle, etc.
Image corrected (on right) using the Rectangle tool.
DxO ViewPoint - Guide utilisateur ©DxO Labs 2012 - Tous droits réservés
DxO ViewPoint 2 - User Guide ©DxO Labs 2013 - All rights reserved
23
Page 24
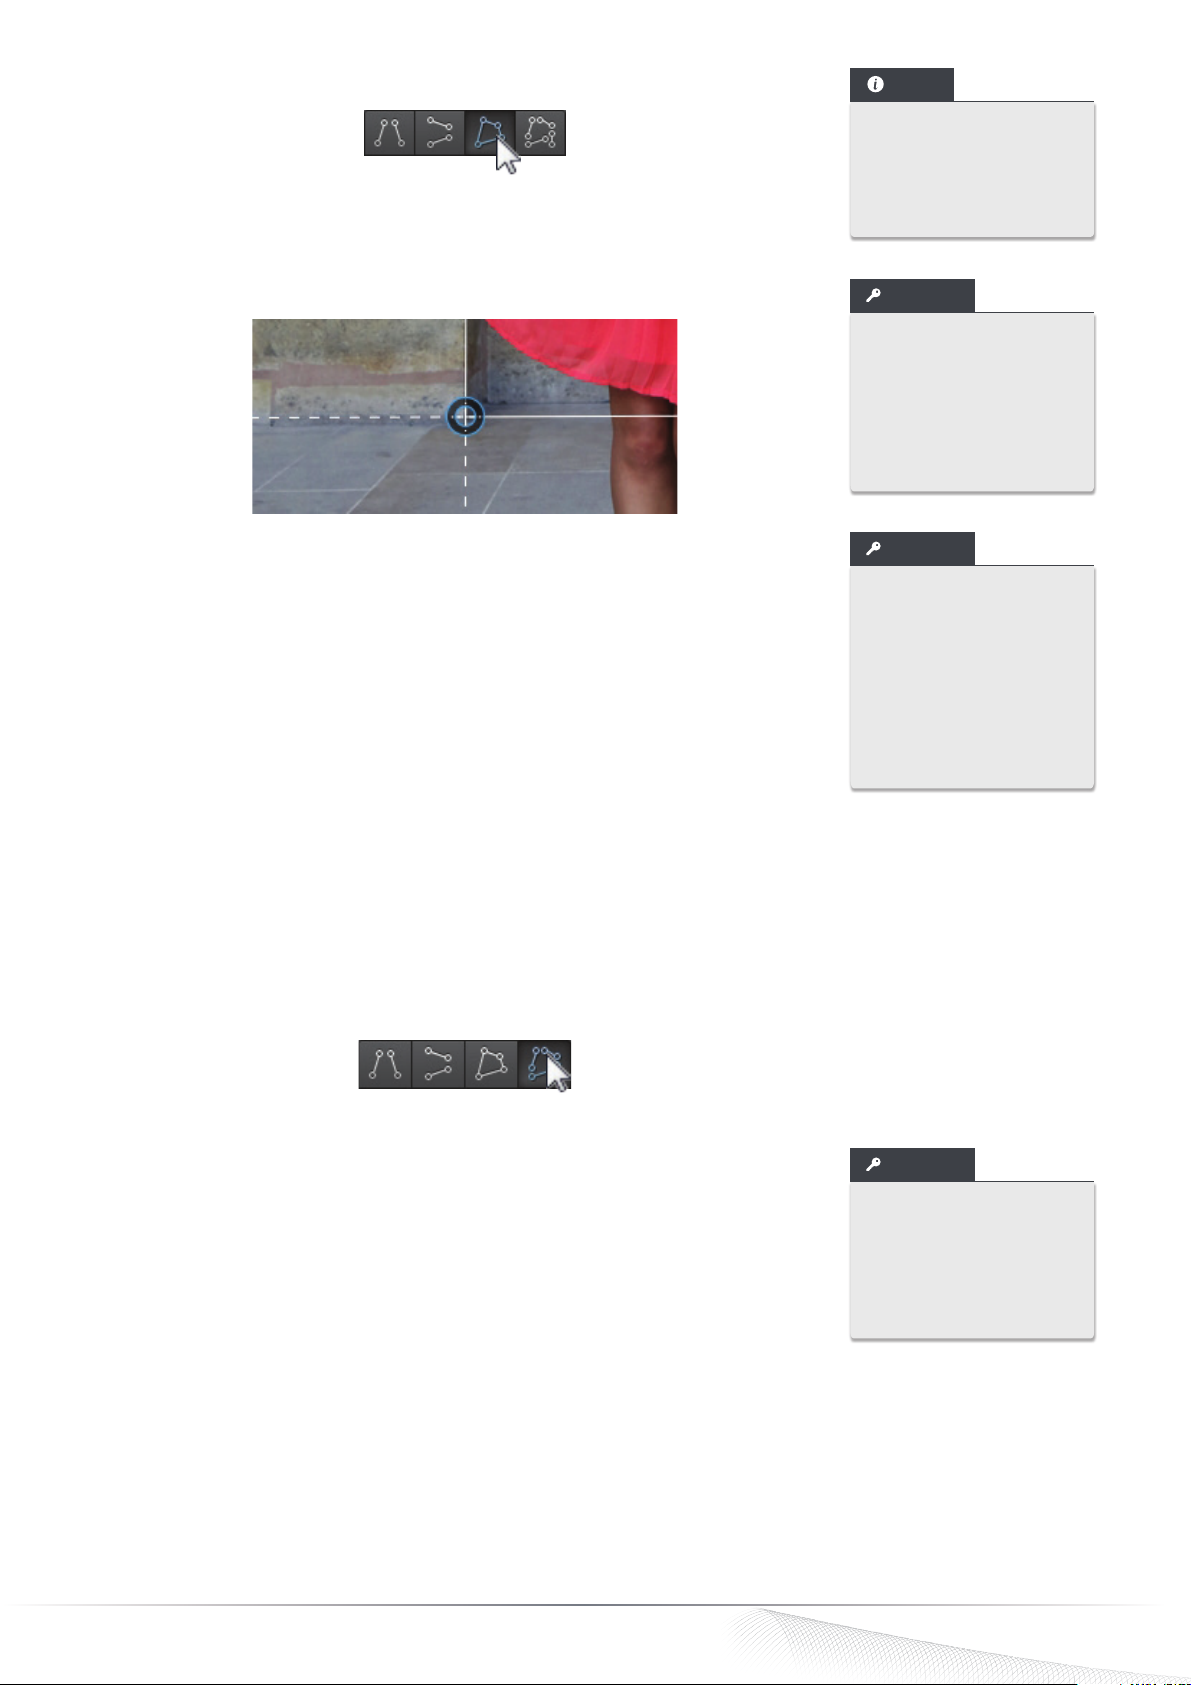
To activate the correction, click on the Rectangle button.
Placing anchor points
You can act on all four lines: place the anchor points on the axes of the vertical and
horizontal reference lines (which should be on the same plane as much as possible — that
is, on elements located at approximately the same shooting distance).
NOTE
Manipulating one
anchor point circle in the
Rectangle tool affects
both a vertical and a horizontal line.
TIP
Clicking on Ctrl/Cmd
while moving an anchor
point will cause the correction to take effect in
real time without having
to click on the Preview
button.
Each anchor point acts on two lines at the same time.
Verify the correction
Verify your correction by clicking on the Preview button in the lower toolbar. DxO ViewPoint
will darken the parts of the image that will be suppressed when the automatic cropping
is applied.
Correcting perspectives in 8-point mode
6.5.
The 8-point perspective correction follows the same principle as forcing a rectangle,
with one important difference: while forcing a rectangle lets you adjust the four sides
independently, the lines need to be placed on the same plane in order to achieve an
optimal result. With the 8-point method, you can place the lines on different planes, which
gives you great flexibility when making complex corrections, or when the elements that
need to be fixed are not all at the same distance from the where the photo was shot.
To activate the correction, click on the 8 points button.
TIP
You can display the
composition grid to verify
that all the principal elements in your image have
been correctly adjusted
according to your settings, instead of relying
solely on a naked-eye
assessment.
Place the anchor points
You can act on each of four lines in a completely independent way: you can place them on
the vertical and horizontal reference lines in the image, even if they are not on the same
plane — that is, even if they are at different distances from the shooting point. The lines
should be located as far away as possible from each other.
DxO ViewPoint - Guide utilisateur ©DxO Labs 2012 - Tous droits réservés
DxO ViewPoint 2 - User Guide ©DxO Labs 2013 - All rights reserved
TIP
If you hold down Ctrl/Cmd
while moving your anchor
point, the correction will
be applied in real time
without your having to
refresh the display.
24
Page 25
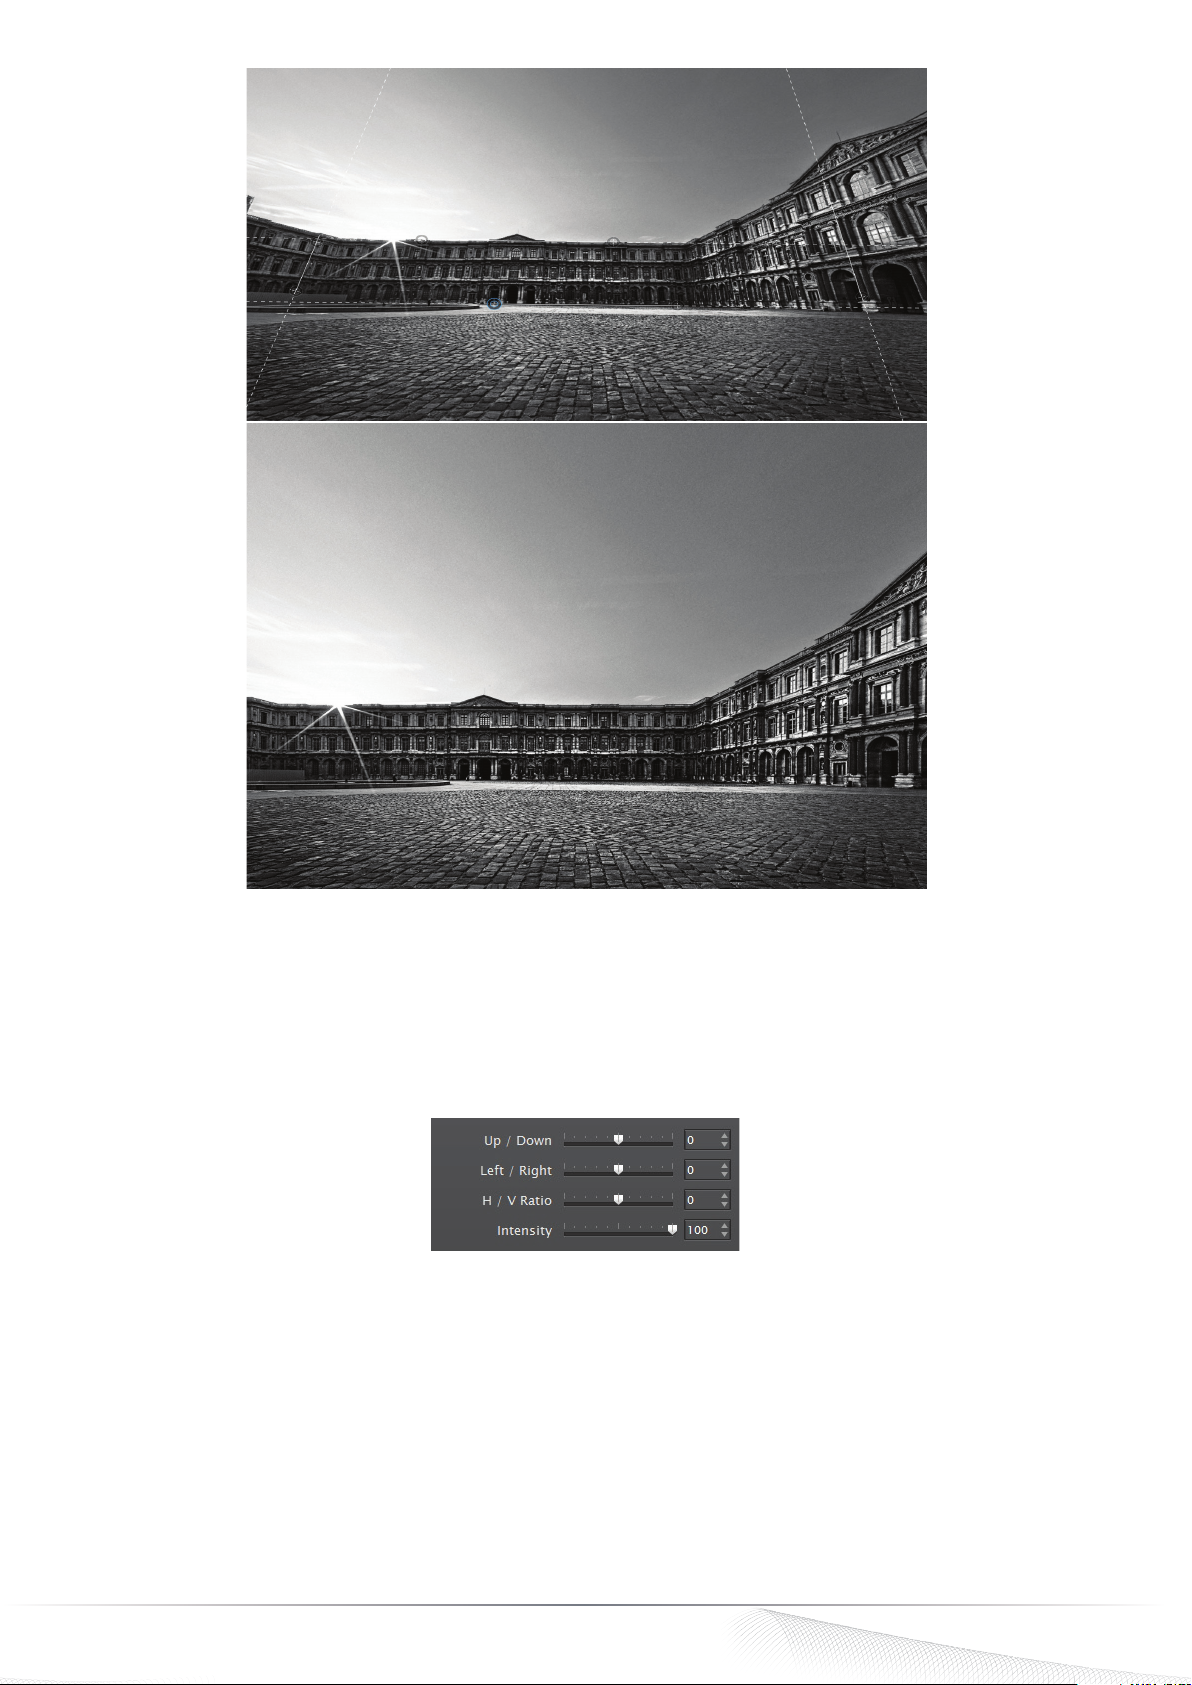
Before
After
Verify the correction
Verify your correction by clicking on the Preview button in the lower toolbar. DxO ViewPoint will darken the parts of the image
that will be suppressed when the automatic cropping is applied.
Advanced settings
6.6.
The Perspective palette sliders.
Advanced setting sliders
The Perspective palette provides four sliders for fine-tuning correction settings:
• Up/Down: Toggles the image around a horizontal axis. This command can be used if the image has few reference lines,
and also to compensate as much as possible for a shot that was not perfectly in line with the subject.
• Left/Right: Toggles the image around a vertical axis.
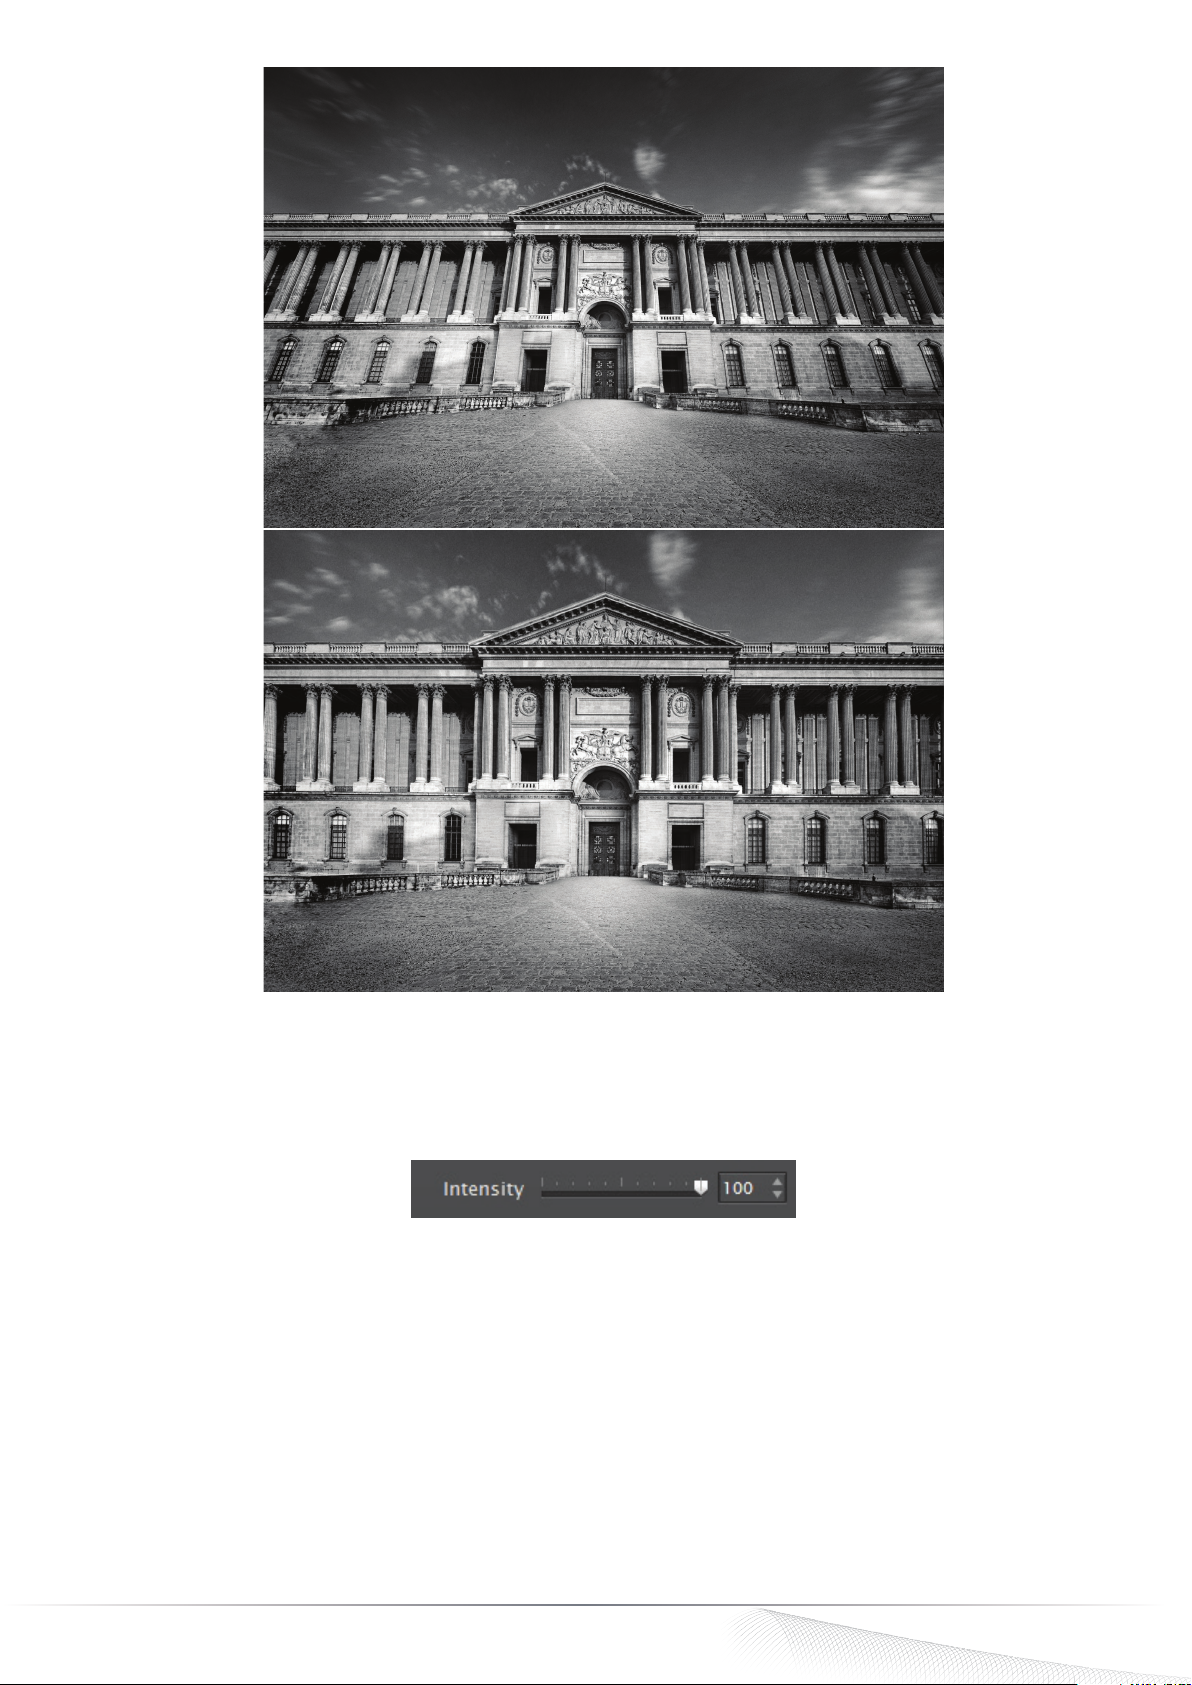
• H/V Ratio: This slider lets you fix distortions that can sometimes accompany perspective corrections. The default value
is 0. Moved to the left, the image is compressed vertically; moved to the right, the image is compressed horizontally.
DxO ViewPoint - Guide utilisateur ©DxO Labs 2012 - Tous droits réservés
DxO ViewPoint 2 - User Guide ©DxO Labs 2013 - All rights reserved
25
Page 26
After
Effect of the H/V Ratio slider.
• Intensity : This cursor, with a default value of 100, helps you find the best compromise between possible corrections
and the most natural rendering.
The Intensity slider lets you adjust the perspective correction to achieve the most natural look.
Full and Natural buttons
You can also select one of two correction modes, “Full” or “Natural”:
• Full: Applies an unrestricted perspective correction at maximum intensity (100), which can result in a pronounced
deformation of the image.
• Natural: Applies a correction with the intensity pre-set to 75 for a more realistic rendering.
DxO ViewPoint - Guide utilisateur ©DxO Labs 2012 - Tous droits réservés
DxO ViewPoint 2 - User Guide ©DxO Labs 2013 - All rights reserved
26
Page 27
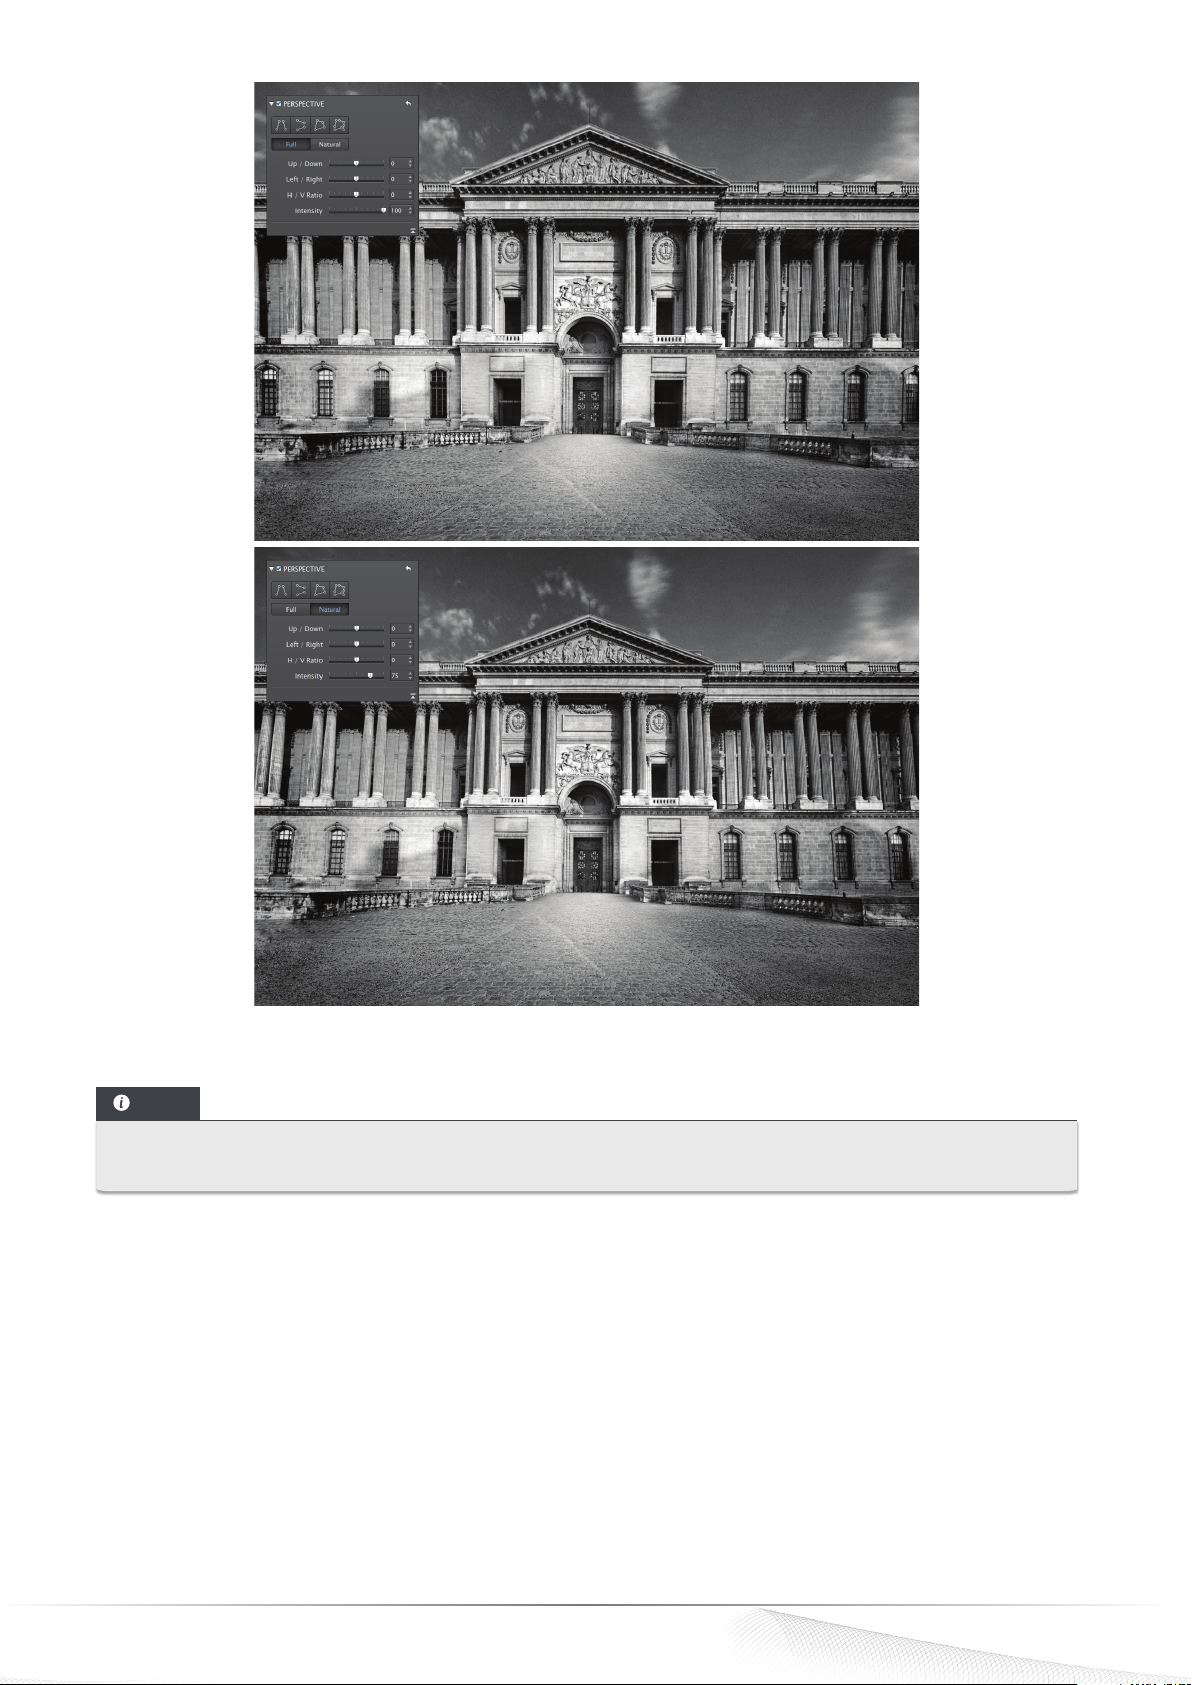
Full vs. Natural perspective correction.
NOTE
With respect to the Perspective palette, see part 3.8 for more information concerning messages about missing EXIF
data making impossible the automatic correction of the image aspect ratio.
DxO ViewPoint - Guide utilisateur ©DxO Labs 2012 - Tous droits réservés
DxO ViewPoint 2 - User Guide ©DxO Labs 2013 - All rights reserved
27
Page 28
Straightening the horizon
7.1. About horizons
A common flaw in landscape photography: the horizon is tilted by several degrees, or vertical elements such as poles or trees
appear slanted. In all instances, tilting occurs most often because the photographer does not hold the camera absolutely
level. The solution to this problem is simple: adjust the entire image by several degrees.
Straightening the horizon by plotting a horizontal reference line
7.2.
The Horizon tool lets you correct compositions with a tilted horizon line. This feature can be used in tandem with the
Perspective tool.
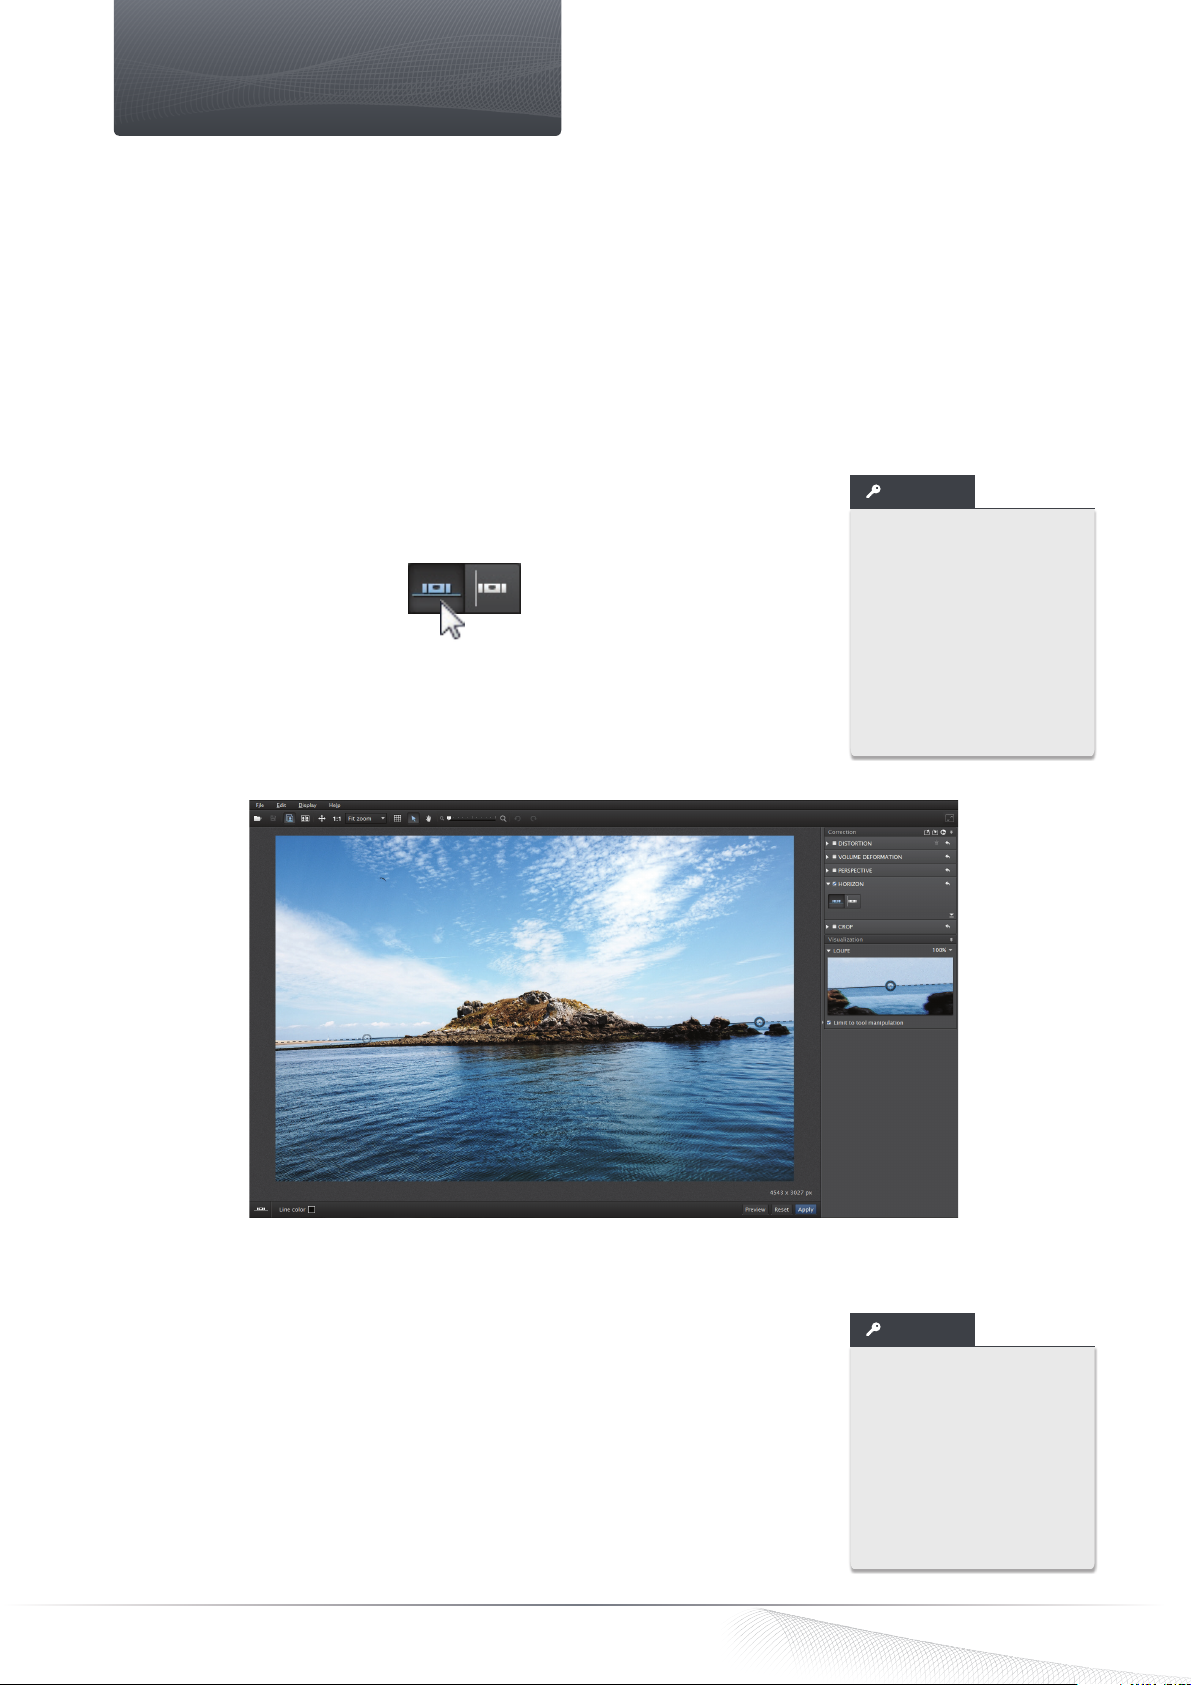
To activate the tool, click on the Horizontal Level button in the Horizon palette, and place
the anchor points.
A horizontal line with two circular anchor points will be superimposed on your image.
Choose a horizontal reference element in your image.
TIP
You can change the
color of the correction
lines to improve their
visibility with respect to
the background color of
your image. Click on the
colored Line color block
located in the lower toolbar and select the color
you want to use.
Choice of horizontal reference element and placement of the correction line.
Place the mouse cursor on one of the anchor points. Click on the anchor point to grab
and move it to one of the ends of your reference element. Move the second anchor point
to align with the line on your horizontal element.
DxO ViewPoint - Guide utilisateur ©DxO Labs 2012 - Tous droits réservés
DxO ViewPoint 2 - User Guide ©DxO Labs 2013 - All rights reserved
TIP
To place your anchor
points more precisely,
you can zoom in on your
image whenever you wish
using the zoom tools in
the upper toolbar, or you
can use the Loupe located
in the Visualization
palette.
28
Page 29
Verify the correction
Verify your correction by clicking on the Preview button in the lower toolbar. DxO ViewPoint will darken the parts of the image
that will be suppressed when the automatic cropping is applied.
Straightening the horizon by plotting a vertical reference line
7.3.
Proceed in the same way as for recovering the horizon by drawing a vertical reference line.
7.4. Straightening the horizon by using the slider or by entering values
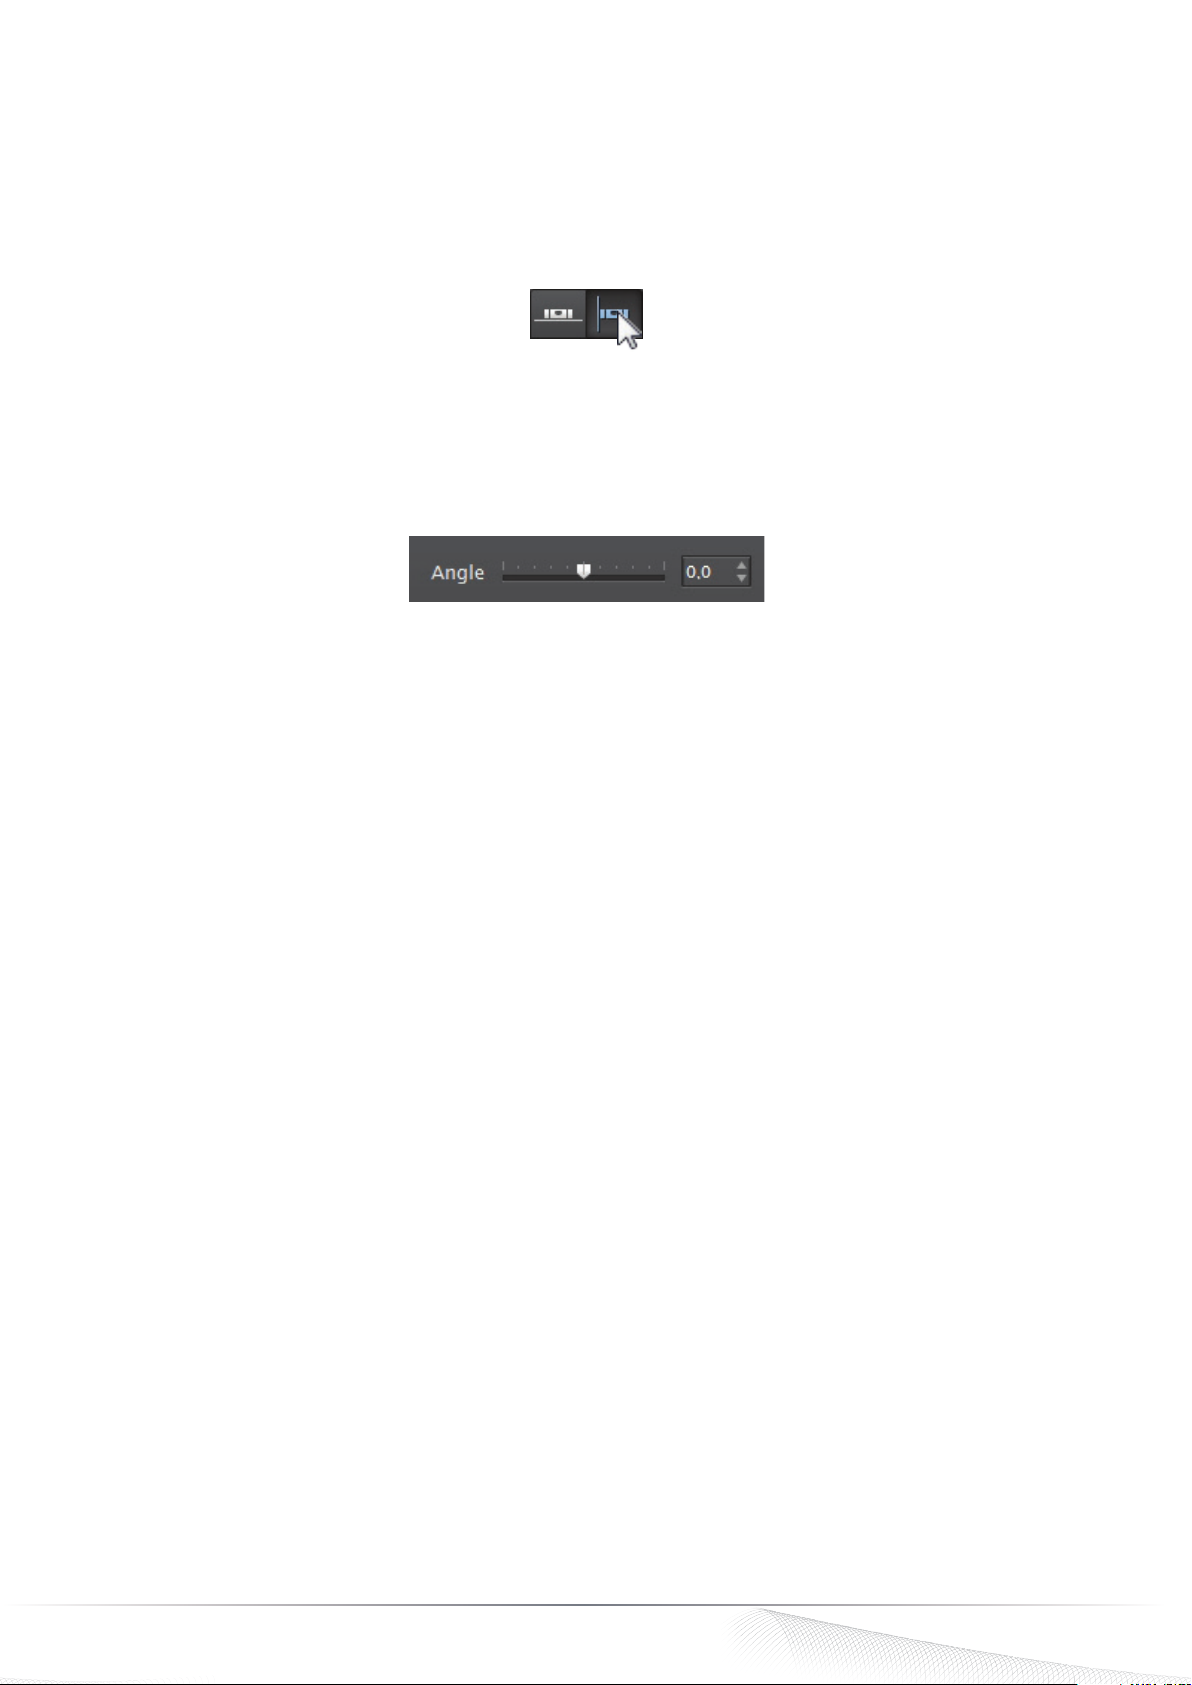
The angle is indicated in degrees to the right of the slider in the Horizon palette. To display the slider, click on the small arrow
in the lower right-hand side of the palette.
Angle slider
DxO ViewPoint - Guide utilisateur ©DxO Labs 2012 - Tous droits réservés
DxO ViewPoint 2 - User Guide ©DxO Labs 2013 - All rights reserved
29
Page 30
Cropping
The corrections done using the Distortion, Volume deformation, Perspective, and Horizon tools include an automatic crop
feature that maximizes the visible field of the image. DxO ViewPoint’s Crop tool lets you adjust the proportions of the final
image to suit your tastes.
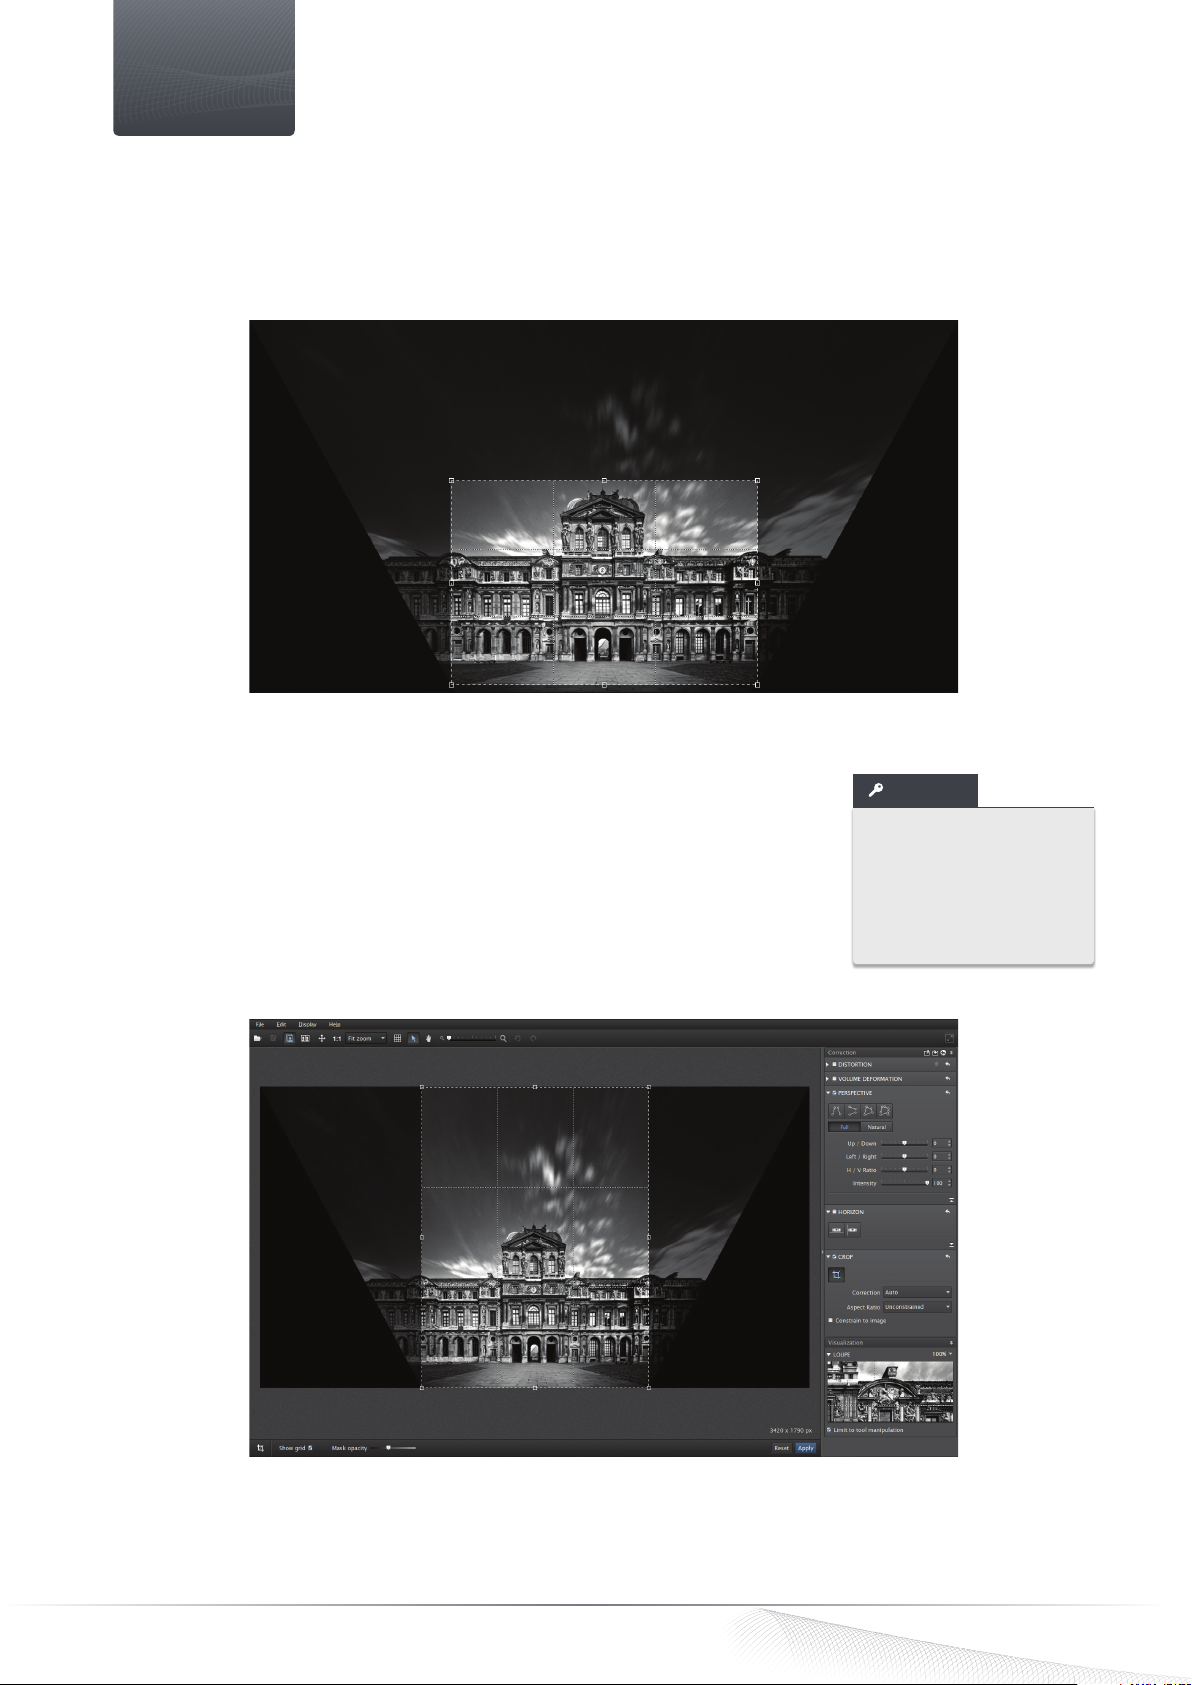
The darkened zones on the image represent the areas lost after correction.
8.1. Automatically cropping an image
After opening your image in DxO ViewPoint, go to the Crop palette and click on the Crop
button. An adjustable grid will be superimposed on your image.
Select Auto mode in the Correction drop-down menu. In this mode, DxO ViewPoint
calculates the preserved zone of the image as closely as possible and displays darkened
zones that correspond to the surface area that will be lost in the original image.
TIP
Checking/unchecking
the Show grid box in the
lower toolbar lets you
activate/deactivate the
composition grid in the
image.
Auto mode calculates the crop as closely as possible.
DxO ViewPoint - Guide utilisateur ©DxO Labs 2012 - Tous droits réservés
DxO ViewPoint 2 - User Guide ©DxO Labs 2013 - All rights reserved
30
Page 31
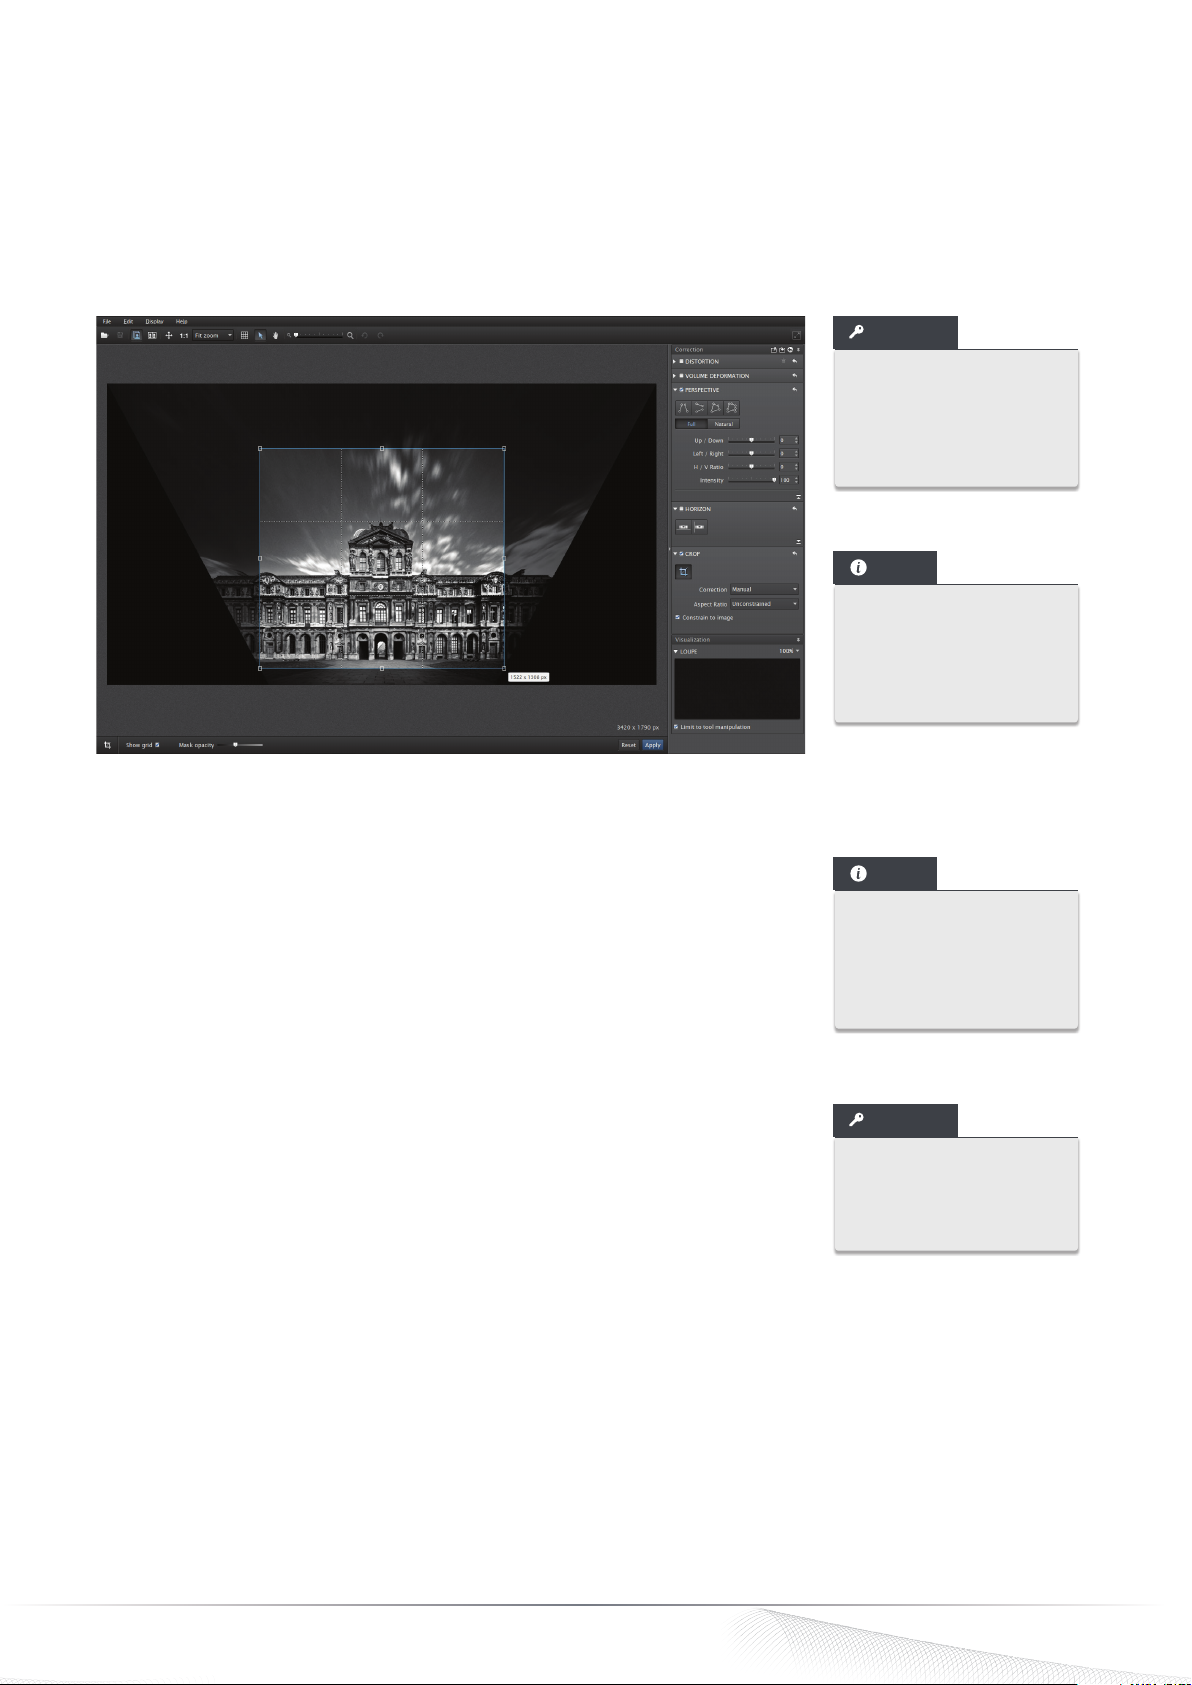
Several formats are offered in the Aspect Ratio drop-down menu: 16/9 (TV format), 5/4, 5/2, 2/1, 3/2 (APS-C reflex and fullformat cameras), 4/3 (compact camera format), and 1/1 (square format). By clicking on Preserve in the Aspect Ratio drop-
down menu, you will preserve the proportions of the original image. By selecting Unconstrained, you can manually apply
a correction. By selecting Add Custom, you can enter the pixel values (for height and width) of your choice and define the
proportions of the custom crop.
Select the format you would like: the grid superimposed on your image will be automatically modified. By clicking on the grid,
you can also change the position of the frame and adapt it to the composition of your image.
TIP
The crop grid is divided
into thirds, making it
easy to apply the “rule of
thirds” when composing
your final image.
NOTE
Even though the crop is
applied when you click on
Apply, this can be undone
so long as the image is
not saved.
The grid can be resized and repositioned.
By checking the Constrain to image box, the frame is automatically confined to the part
of the image being worked on so as to avoid having any dark zones superimposed on the
perspective corrections.
To apply the crop, click on the Apply button in the lower toolbar.
Save your changes by clicking on File > Save As (or Save if you use DxO ViewPoint as a
plugin).
Manually cropping an image
8.2.
After opening your image in DxO ViewPoint, click on the Crop button in the Crop palette.
The adjustable grid will be superimposed on your image. To adjust the proportions of the
final image to suit your tastes, select Manual mode from the Correction drop-down menu.
Change the dimensions of the adjustable grid by manipulating the resizing points located
in the corners and on the sides of the grid. You can also change the overall position of the
frame to adapt it to the composition of your image.
NOTE
Whether in automatic
or manual mode, DxO
ViewPoint 2 automatically
detects the orientation of
the crop zone.
TIP
You can use the navigation or arrow keys on your
keyboard to adjust the
position of the crop zone.
DxO ViewPoint - Guide utilisateur ©DxO Labs 2012 - Tous droits réservés
DxO ViewPoint 2 - User Guide ©DxO Labs 2013 - All rights reserved
31
Page 32

Keyboard shortcuts
Command
Fit display to screen
Display at 100%
Zoom in
Zoom out
Arrow tool
Hand tool
Crop tool
Rotate image left
Rotate image right
Show/Hide superimposed grid
Move anchor points
Toggle between anchor points
Redefine the crop zone
Open
Save as
Quit
Undo
Redo
Preferences
Show image before and after
correction
Full screen
Exit full screen mode
Show/Hide controls
Online help
Accelerated mode for Perspective and
Horizon tools
Microsoft Windows shortcut
F3
F4
Ctrl ++
Ctrl +P
H or spacebar
C
Ctrl + L
Ctrl + R
G
tuvw
Tab
tuvw
Ctrl + O
Ctrl + S
Alt + F4
Ctrl + Z
Ctrl + Y
Ctrl + Shift + P
Ctrl + D
F
F or Esc
F9
F1
Press on Ctrl when placing anchor
points on the image
Mac OS X shortcut
Cmd + 0
Cmd + 1
Cmd + +
Cmd + P
H or spacebar
C
Cmd + L
Cmd + R
G
tuvw
tuvw
Cmd + O
Cmd + S
Cmd + Q
Cmd + Z
Cmd + Shift + Z
Cmd + ,
Cmd + D
F
F or Esc
Tab
Cmd + /
Press on Cmd when placing anchor
points on the image
DxO ViewPoint - Guide utilisateur ©DxO Labs 2012 - Tous droits réservés
DxO ViewPoint 2 - User Guide ©DxO Labs 2013 - All rights reserved
32
Page 33

dxo.com
DVP2.0-130918
 Loading...