

17 Meter
Add-On Kit
for the Hustler
4/5/6-BTV
Vertical
Antennas
DXE-AOKC-17M
DXE-AOKC-17M-INS Revision 1a
DXE-AOKC-17M
Installed on a BTV
DX Engineering 2021
1200 Southeast Ave. - Tallmadge, OH 44278 USA
Phone: (800) 777-0703
Tech Support and International: (330) 572-3200
Fax: (330) 572-3279
E-mail: DXEngineering@DXEngineering.com
- 2 -
The DX Engineering DXE-AOKC-17M kit adds 17 meter coverage to the Hustler BTV series of
vertical antennas without giving up any existing band coverage. This kit will operate across the
entire 17 meter band, 18.068 through 18.168 MHz. The DXE-AOKC-17M 17 Meter Add-On Kit
has a very wide SWR bandwidth, so adjustment of the tuning rods is typically not critical. The
minimum SWR will vary from as low as 1.2:1 to over 1.6:1, depending upon several variables. Even
if the minimum SWR is over 100 kHz away from the 17 meter band, the resulting SWR in the band
is typically very low. Therefore, precise adjustment isn’t necessary.
The DXE-AOKC-17M 17 Meter Add-On Kit is rated at 1,500 watts PEP SSB, 1,000 watts CW and
is conservatively rated for RF power handling of 375 watts RTTY and Digital modes including
FT8, at antenna SWR of 2:1 and below.
Installation of the DXE-AOKC-17M can have the effect of narrowing the SWR bandwidth of 20,
15 and 10 meters, a reasonable trade-off for adding the extra band. After the DXE-AOKC-17M is
installed and tuned, any required shift of the usable SWR frequency ranges on those bands is
accomplished by trap sleeve repositioning on the respective band trap. SWR may be optimized for
CW and digital or SSB segments by careful trap sleeve tuning adjustments.
The frequency of lowest SWR on 17 meters is affected by the presence and tuning of the DXE-
VMN-1 Vertical Matching Network, which is required for 40 and 80 meter impedance matching.
Adjustment of tuning rods will likely be required. Optimization of the SWR only for 40 meters, with
a VMN-1 coil tap point only a couple of turns from the bottom, will typically result in a lower
minimum SWR on 17 meters. However, if both 80 and 40 meter operation is desired, then it is best
to favor 80 meters by setting resonance to an 80 meter frequency with the resonator whip length,
then adjusting the SWR to around 1.5:1 with a coil tap point above the middle turns of the DXEVMN-1 coil. This approach results in an elevated SWR minimum on 17 and 40 meters between
1.5:1 to 2:1 or above. Even so, the antenna is usable at full mode rated power on all bands. Keep in
mind that a 1.5:1 SWR represents only 4% reflected power and a 2:1 SWR represents only about
10% reflected power. Completely normal operations are possible at these modestly elevated SWR
levels, using a tuner when required by the transceiver or amplifier.
IMPORTANT: Running a continuous carrier power mode (FT8, AM, RTTY) on any band on
which the antenna has a trap, will create an accumulation of heat inside the trap windings,
depending upon power level and keying cycle times. When a high level of RF continues to be
applied to a trap or coil that has not sufficiently cooled, irreparable damage will occur. Aside from
conducting operations that do not interfere with others, this is a very practical reason why RF
power output must be limited to a level that accomplishes communications, when using coil
loaded and trap antennas. Typically, antenna coils and trap components cannot be operated above
a 3:1 SWR.
Before operating at any power level, the antenna SWR at the operating frequency MUST be
checked. This is especially important if high power operation is planned. This test does not include
whether or not a tuner can tune an existing high SWR. The actual antenna SWR needs to be
double-checked. The presence of fog, rain, frost, and unknown damage or impediments, such as a
tree branch, can cause a drastic shift in the antenna system SWR curve. Simply beginning to operate

- 3 -
without checking the antenna SWR, especially just starting to operate on an antenna of unknown
SWR with an automatic tuner and at high power levels, can cause irreparable damage to any and all
components of the system, including traps, tuners, amplifiers and transceivers which is not covered
under warranty.
WARNING: STOP TRANSMITTING if the SWR on any antenna rises dramatically, especially
on a trap or resonator band. Damage to the trap or resonator may have occurred and will occur if a
high level of RF power is used for an extended period of time.
If your BTV is installed on the roof or in an elevated position, at least four resonant radials for 17
meters should be added (14 ft. each).
Your BTV can have both the DXE-AOKC-17M - 17 Meter add-on-kit and the DXE-AOKB-12M
12 Meter add-on-kit installed at the same time. Mount them 180 degrees apart from each other.
Included Parts
Pre-assembled 17 Meter element wire with #10 soldered ring terminals
Four Stainless Steel Band Clamps with Threaded Studs
Bottom Aluminum Mounting Bracket
Spring loaded End Insulator to keep the 17 Meter element wire snug
Upper Insulated Mounting Bracket
Custom 17 Meter Coil assembly
Two 14” long Tuning Rods with Corona Balls
All Stainless Steel Hardware
Scotch-Brite® Pad for cleaning the 17 Meter element connections

- 4 -
Parts List NOTE: Extra hardware parts are included in the kit
DXE-AOKC-17M 17 Meter add-on Kit
Drawing #
Quantity
Description
1
11
#10-24 Hex Nut, Stainless Steel
2
12
#10 Split Washer, Stainless Steel
3
16
#10 Flat Washer, Stainless Steel
4
1
AOK-17M Lower Bracket, 5052 Aluminum
5
6
#10 External Tooth Washer, Stainless Steel
6
4
1-1/4” ECLS - Studded Band Clamp, Stainless Steel
7
2
#10-24 Hex Nut, Nyloc, Stainless Steel
8
1
Element Spring, Stainless Steel
9
1
End Insulator, DX Engineering
10
1
3/8” OD, 1/4” Thick, Spacer, Aluminum
11 (ref)
1
Scotch-Brite® Cleaning Pad
12
1
Element Wire, 14awg, approx. 107”, Teflon, Blk, w/#10 Ring Terminals soldered
13
1
AOK 17M Upper Bracket, HDPE Star Board, Black
14
3
#10-24 x 3/4” long, Carriage Bolt, Stainless Steel
15
1
#10-24 x 1” long, Carriage Bolt, Stainless Steel
16
1
AOK-17M Tuning Rod Bracket, Aluminum
17
1
AOK-17M Coil Bracket, HDPE Star Board, Black
18
1
AOK-17 Meter Coil, Aluminum
19
3
#10-24 x 1”, Hex Bolt, Stainless Steel
20
2
Tuning Rods, 14.375”, Stainless Steel, with Large Corona Ball
21
1
#10 x 1” OD Fender Washer, Stainless Steel
22
1
#10-24 Wing Nut, Stainless Steel

- 5 -
DXE-AOKC-17M
Exploded
Parts
Drawing

- 6 -
DXE-AOKC-17M
Assembled
Parts
Drawing
Required Tools and Parts - Not Included
5/16” and 3/8” Nut Driver
Flat Blade Screwdriver
Pliers
Jet Lube SS-30 Pure Copper Anti-Seize JTL-12555
Jet-Lube SS-30 Pure Copper Anti-Seize is the choice of engineers and technicians in government, industry and leading
Amateur Radio contest stations, for protecting mechanical assemblies of aluminum tubing, general hardware and copper
grounding systems. On bonded metal surfaces Jet-Lube SS-30 assures electrical and RF conductivity while preventing
oxidation and corrosion. Surpassing the capabilities of other aluminum anti-oxidants, the wide temperature range of JetLube SS-30 prevents long-term drying and caking, and allows easy disassembly and effortless cleaning of parts.
Suggested Parts - Not Included
Ruggedized BTV Reinforced Lower Tube DXE-RLT
Build or refurbish any Hustler BTV antenna to be stronger with a DX Engineering Ruggedized BTV Reinforced Lower
Tube. The DXE-RLT double-wall aluminum tube is stronger than the original single-wall tube, and it works on all BTV
Series antennas, new and old. It is overall 72 in. so it is direct replacement; it takes the place of the original Hustler BTV
antenna 72 in. lower tube (HSR-4087-1).
OMNI-TILT™ Vertical Antenna Tilt Base DXE-OMNITILT-1P
Due to the design of the 17 meter and 12 meter add-on-kits for the BTV series antennas, the OMNI-TILTTM Base is
desired rather than the DXE-TB-3P style Tilt Base. If the DXE-TB-3P is used, the clamps holding the lower bracket
assembly must be removed to allow the tilting action to be performed. The DX Engineering OMNI-TILT™ Vertical
Antenna Tilt Bases are a completely new design that incorporates features that make this Tilt Base a 'must have' for all
types of vertical antennas. NOTE: The OMNI-TILT™ REQUIRES two (2) optional DXE-OTMC-250P clamps to attach
the non-tilt part of OMNI-TILT™ to a Mounting Pipe, 1-1/4 to 2-1/2 inches OD.

- 7 -
Assembly
Before you start installation, use an antenna analyzer to measure the SWR for each band in your Hustler BTV
and record those measurements. If the antenna needs to be tuned, do it prior to installing this add-on kit to
ensure installation is not a cause of radical de-tuning of your antenna. This will assure your antenna is
working properly before adding the 17 meter kit. When installing stainless steel hardware, JTL-12555 Jet-
Lube SS-30 must be used to prevent thread galling on stainless steel and ensure ideal RF coupling between
parts.
When mounting the assembled DXE-AOKC-17M to the antenna, You can either tilt the antenna down or
remove the antenna from the existing base and use a table to lay the antenna on. Installation of the parts is
straight forward and easy to accomplish.
The following assembly procedure is just one suggestion for the installation of the 17 meter add-on-kit. You
may vary from this sequence as you see fit as long as the measurements and hardware stack-ups are followed.
Refer to the exploded assembly drawing for reference when assembling the AOKC-17M kit.
1. Assemble the two element clamps (6) to the upper bracket (13) using four flat washers (3), two
split washers (2) and two hex nuts (1) as shown.
2. At the other end of the upper bracket (13) install the tuning rod bracket (16) using two 3/4” long
carriage bolts (14), two flat washers (3), two split washers (2) and two hex nuts (1) as shown.
Tighten the hardware in place until the carriage bolts press flush to the surface of the upper
bracket assembly.

- 8 -
3. Install the wing nut (22), split washer (2), large flat washer (21) and carriage bolt (14) to the
tuning rod bracket (16) as shown. Just snug the hardware in place so it won’t come loose,
4. Check the 17 Meter coil (18) ends to verify they are in line with the coil. If they are slightly
bent, you can use pliers to gently and carefully bend them into place. The coil is made from
aluminum so it is easy to bend.
5. Attach the 17 Meter coil (18) to the upper bracket (13) using the coil bracket (17), 1” long
carriage bolt (15), external tooth washer (5), flat washer (3), split washer (2) and hex nut (1) as
shown.
6. Carefully and evenly stretch the coil (18) to fit the coil bracket (17). At the bottom of the coil
bracket (17) attach the bottom of the coil (18) using the 1” long hex bolt (19), flat washer (3),
external tooth washer (5), flat washer (3), split washer (2) and hex nut (1) as shown.

- 9 -
7. Attach two element clamps (6) to the lower bracket (4) using an external tooth washer (5), flat
washer (3), split washer (2) and hex nut (1) as shown.
Note: If you are also installing the DXE-AOKB-12M 12 Meter Add-on-kit, the lower brackets
will be both mounted to the same studded band clamps. When installing the two lower
brackets add an external tooth washer (5) on each studded band clamp between the two
mounting brackets to ensure good electrical connection.
8. Assemble the wire insulator (9) using the 1” hex bolt (19). flat washers (3), split washer (2), hex
nut (1), spring (8) and nyloc hex nut (7) as shown below. Note the side of the insulator that has
the cupped area. The spacer (10) is inserted in the large hole in the insulator. When attaching the
spring (8) and nyloc hex nut (7), allow a gap to permit the spring to swivel in place.
5. On end of the lower bracket (4) loosely install the 1” hex bolt (19), flat washers (3), split washer
(2) and nylock hex nut (7) as shown.. Note install the nyloc nut (7) just snug at this point. It
will be tightened when the element wire is installed.
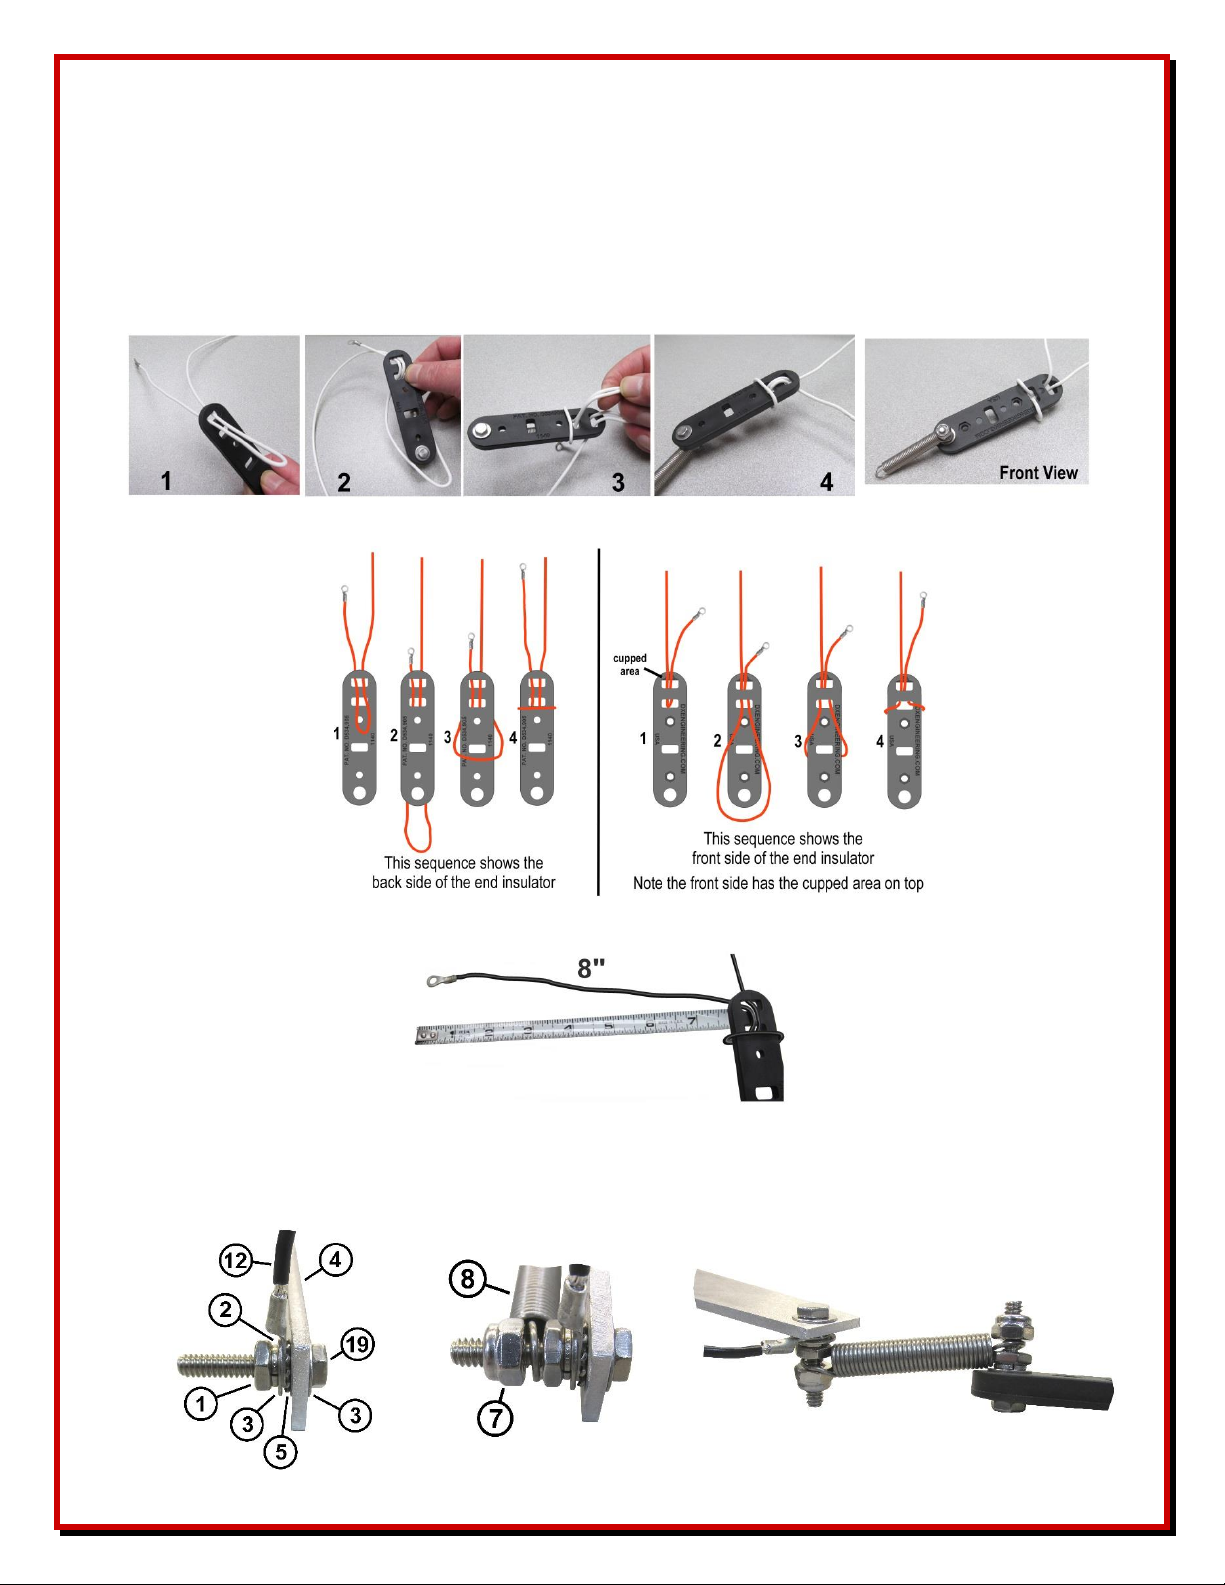
- 10 -
6. Attach one end of the approximately 107” 17 Meter element wire with terminal (12) to the lower
insulator assembly as shown below. Fold the wire so there is approximately 10” of wire in a
loop. Note carefully how the wire is routed through the insulator in reference to the
insulator’s cupped area. When you have completed the wire installation, you want
approximately 8” of wire as shown below. You can make adjustments to the wire positioning as
needed before continuing to the next step in the assembly.
Element wire shown as White for clarification - actual color is Black
Element wire shown as Red for clarification - actual color is Black
7. Remove the previously installed nyloc hex nut (7), attach the black element wire with terminal
(12) to the lower bracket (4) as show below. Insert the end of the spring (8), re-attach the nyloc
hex nut (7) and tighten. Allow a small gap so the spring can still rotate.

- 11 -
9. Connect the other end of the element wire (12) to the bottom of the coil bracket (17) using an
external tooth washer (5), split washer (2) and hex nut (1) as shown below.
10. Install the tuning rods (20) evenly placed to the upper assembly. Slightly loosen the wing nut
(22) and slip the rods under the large flat washer (21) in the grooves that are in the tuning rod
bracket. Tighten in place. The final rod lengths will be adjusted during tuning.
11. The drawing shown below is the completed 17 Meter AOKC assembly for reference.

- 12 -
12. Use the included Scotch-Brite® pad to clean the aluminum surface of the BTV base where the
lower bracket assembly with the two clamps will be positioned - approximately 1” above the
bottom edge of the BTV Base as shown below. Remove the warning label if it is in the way.
Ensure there is no sticky residue left over from the removed label. Use a small amount of JetLube SS-30 over this cleaned area just prior to installing the two clamps. Position the assembly
so the spacing between the lower bracket and the BTV base bracket as shown below. Tighten the
clamps in place with the bracket horizontal as compared to the BTV base as shown.
NOTE: If a DXE-AOKB-12M is also (being) installed, it is perfectly acceptable to reposition the
12M upper bracket in order to combine its lower bracket with the DXE-AOKC-17M lower
bracket onto one set of clamps at the lower positioning, as described for the DXE-AOKC-17M.
This instruction supersedes the DXE-AOKB-12M manual.
13. Position the upper assembly on the BTV 12” above the 10 Meter Trap as shown so the lower
bracket spring is just slightly putting pressure on the element wire. Not tugging on it excessively
or the antenna may get a “tilt’ if the spring has too much tension. Tighten the two element
clamps in place. The Upper and lower assemblies should be in alignment with each other. The
element wire should be snug with the spring just slightly holding it in place.
14. Re-mount (or tilt up) the complete antenna to the tilt base (depending if it was removed or just
tilted down).

- 13 -
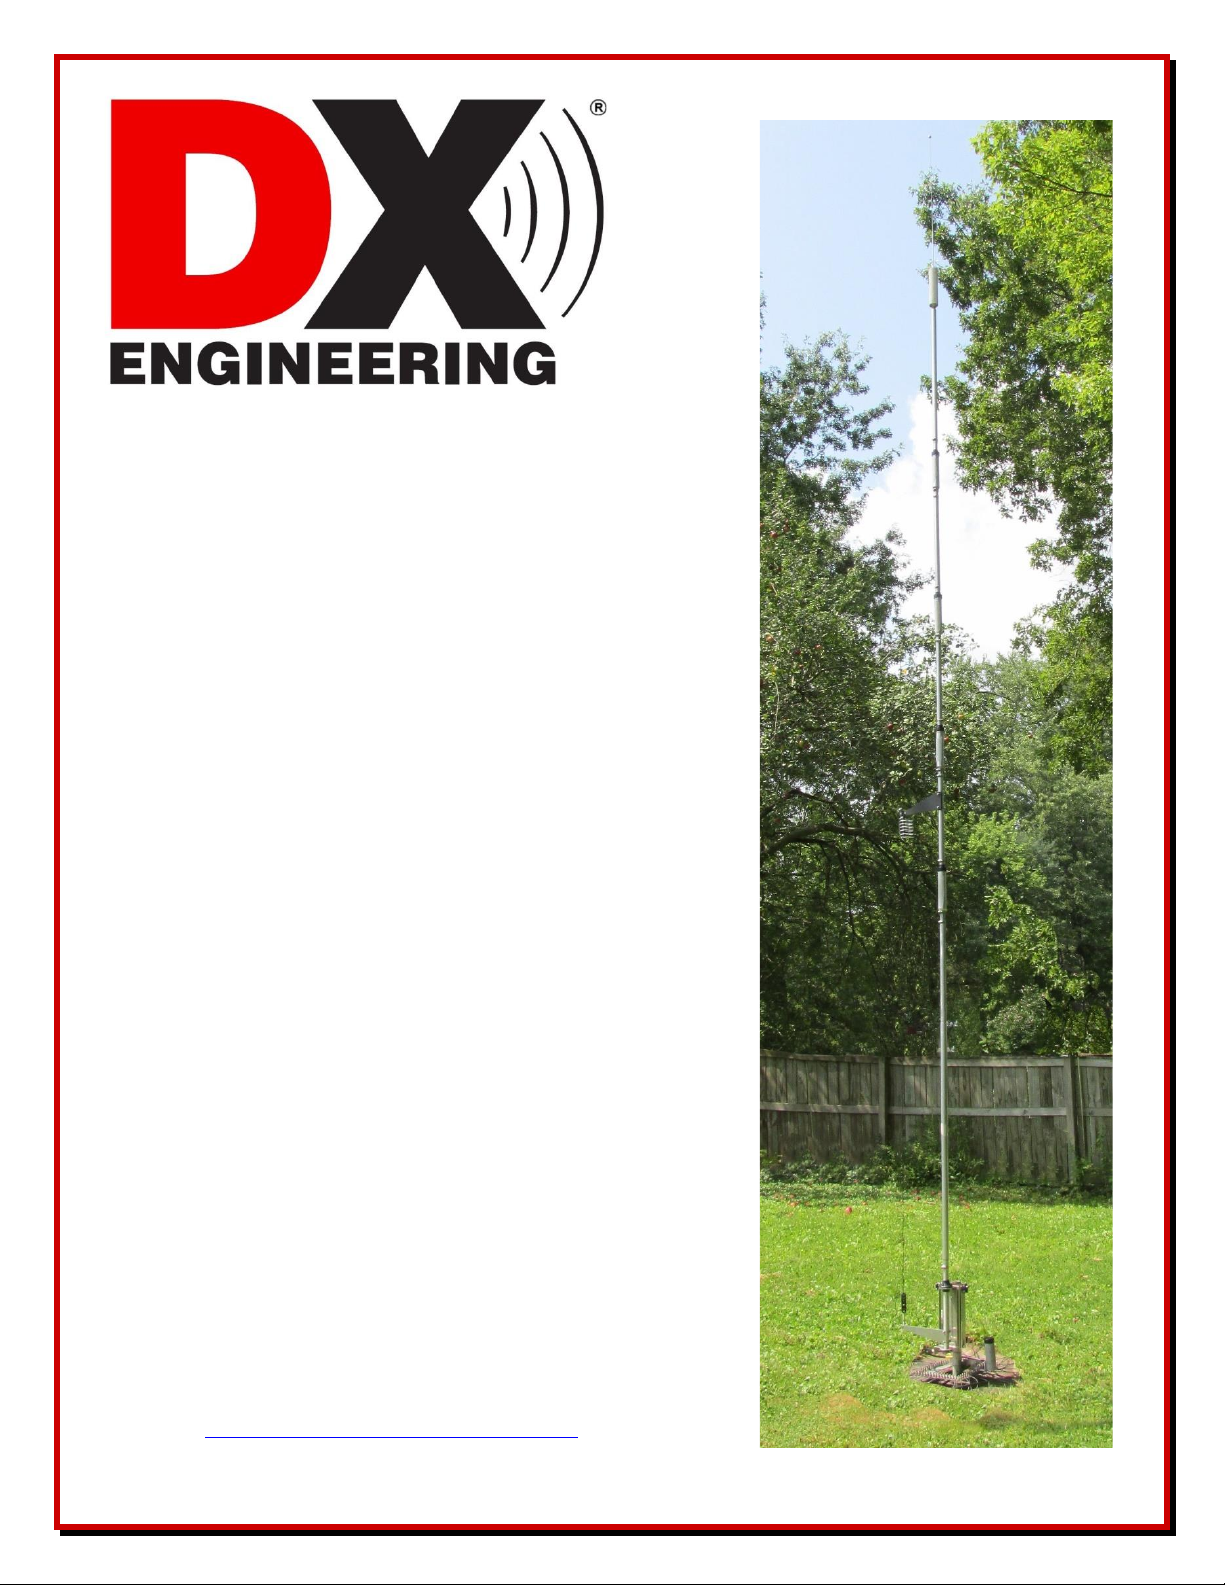
The photograph below shows the DXE-AOKC-17M 17 Meter Add-on-kit installed on a Hustler
BTV Antenna.
The BTV antenna is mounted to an optional DXE-OMNITILT-1P Tilt Base.
Other options shown installed include:
DXE-VMN-1 Vertical Antenna Matching Network used for 80 and 40 meter tuning.
DXE-AOK-DCF Direct Coax Fee Add-on-kit for the BTV antenna and a DX Engineering
coaxial cable jumper connected between the DXE-AOK-DCF and a DXE-UHF-FDFB-KIT
SecureMount™ Bulkhead Connector.
DXE-RADP-3 Radial Plate and radial wires.

- 14 -
Tuning
Installation of the DXE-AOKC-17M can have the effect of narrowing the SWR bandwidth of 20, 15
and 10 meters, a reasonable trade-off for adding the extra band. After the DXE-AOKC-17M is
installed and tuned, any required shift of the usable SWR frequency ranges on those bands is
accomplished by trap sleeve repositioning on the respective band trap. SWR may be optimized for
CW and digital or SSB segments by careful trap sleeve tuning adjustments.
The frequency of lowest SWR on 17 meters is affected by the presence and tuning of the DXEVMN-1 Vertical Matching Network, which is required for 40 and 80 meter impedance matching.
Adjustment of tuning rods will likely be required. Optimization of the SWR only for 40 meters, with
a VMN-1 coil tap point only a couple of turns from the bottom, will typically result in a lower
minimum SWR on 17 meters. However, if both 80 and 40 meter operation is desired, then it is best
to favor 80 meters by setting resonance to an 80 meter frequency with the resonator whip length,
then adjusting the SWR to around 1.5:1 with a coil tap point above the middle turns of the DXEVMN-1 coil. This approach results in an elevated SWR minimum on 17 and 40 meters between
1.5:1 to 2:1 or above. Even so, the antenna is usable at full mode rated power on all bands. Keep in
mind that a 1.5:1 SWR represents only 4% reflected power and a 2:1 SWR represents only about
10% reflected power. Completely normal operations are possible at these modestly elevated SWR
levels, using a tuner when required by the transceiver or amplifier.
IMPORTANT: Running a continuous carrier power mode (FT8, AM, RTTY) on any band on
which the antenna has a trap, will create an accumulation of heat inside the trap windings,
depending upon power level and keying cycle times. When a high level of RF continues to be
applied to a trap or coil that has not sufficiently cooled, irreparable damage will occur. Aside from
conducting operations that do not interfere with others, this is a very practical reason why RF power
output must be limited to a level that accomplishes communications, when using coil loaded and
trap antennas. Typically, antenna coils and trap components cannot be operated above a 3:1 SWR.
WARNING: STOP TRANSMITTING if the SWR on any antenna rises dramatically, especially
on a trap or resonator band. Damage to the trap or resonator may have occurred and will occur if a
high level of RF power is used for an extended period of time.
Before operating at any power level, the antenna SWR at the operating frequency MUST be
checked. This is especially important if high power operation is planned. This test does not include
whether or not a tuner can tune an existing high SWR. The actual antenna SWR needs to be
double-checked. The presence of fog, rain, frost, and unknown damage or impediments, such as a
tree branch, can cause a drastic shift in the antenna system SWR curve. Simply beginning to operate
without checking the antenna SWR, especially just starting to operate on an antenna of unknown
SWR with an automatic tuner and at high power levels, can cause irreparable damage to any and all
components of the system, including traps, tuners, amplifiers and transceivers which is not covered
under warranty..
An antenna analyzer is the best way to adjust the low SWR frequency of the antenna. Measurements
should be made at the antenna using a short (5 or 6 ft) piece of 50Ω coax between the antenna and
the analyzer. If you are too close to the antenna your presence can affect the tuning, if you are too
far, the coax length may act as a radial and resonate. Taking readings close to the antenna also

- 15 -
eliminates the possibility of a long or marginal feedline influencing the tuning or causing erratic
readings. If necessary, tune the antenna for low SWR on 18.160 MHz. Normally, the SWR readings
go down somewhat and the bandwidth readings increases once the feedline is reconnected and you
measure the SWR at the operating position.
Adjustment of the low SWR frequency is done by slightly loosening the
wing nut holding the tuning rods and adjusting the length of the tuning
rods. Adjust both tuning longer to go lower in frequency or shorter to go
higher in frequency. Both tuning rods should be adjusted equally and
should not need to be adjusted more than a couple of inches. Make
adjustments in small steps. 1/2 in. of adjustment should change the
resonant frequency by about 75 kHz.
Typical 17 Meter SWR after tuning
The 17m add-on kit electrically couples to
the rest of the vertical and does have some
influence on the tuning of adjacent bands. If
retuning is required make minor adjustments
as necessary. Refer to the DX Engineering
BTV Installation and Assembly Guide
available from DX Engineering.
In some installations, particularly those with
very good soil conditions or a very good
radial system, the traps themselves may
have been changed from factory dimensions
during the initial installation of the vertical
to resonate the vertical in each band. In
those cases where the traps have already been adjusted, leave them as-is for now.
Check the vertical for low SWR on each band and note those frequencies. This will help determine
what adjustments are needed. After installation and tuning of the 17m kit, the BTV will likely be
tuned to about the same frequency in the 10 meter band and a little higher in the 15 and 20 meter
bands. No difference is likely on 30, 40 or 80 meters. In most cases, re-tuning to the desired
frequencies for each band can be accomplished by adjusting the tubing dimensions of each section
as described in the DX Engineering Hustler BTV Installation and Assembly Guide.

- 16 -
Manual Updates
Every effort is made to supply the latest manual revision with each product. Occasionally a manual
will be updated between the time your DX Engineering product is shipped and when you receive it.
Please check the DX Engineering web site (www.dxengineering.com) for the latest revision manual.
Technical Support
If you have questions about this product, or if you experience difficulties during the installation,
contact DX Engineering at (330) 572-3200. You can also e-mail us at:
DXEngineering@DXEngineering.com
For best service, please take a few minutes to review this manual before you call.
Warranty
All products manufactured by DX Engineering are warranted to be free from defects in material and workmanship for a period of one
(1) year from date of shipment. DX Engineering’s sole obligation under these warranties shall be to issue credit, repair or replace any
item or part thereof which is proved to be other than as warranted; no allowance shall be made for any labor charges of Buyer for
replacement of parts, adjustment or repairs, or any other work, unless such charges are authorized in advance by DX Engineering. If
DX Engineering’s products are claimed to be defective in material or workmanship, DX Engineering shall, upon prompt notice thereof,
issue shipping instructions for return to DX Engineering (transportation-charges prepaid by Buyer). Every such claim for breach of
these warranties shall be deemed to be waived by Buyer unless made in writing. The above warranties shall not extend to any products
or parts thereof which have been subjected to any misuse or neglect, damaged by accident, rendered defective by reason of improper
installation, damaged from severe weather including floods, or abnormal environmental conditions such as prolonged exposure to
corrosives or power surges, or by the performance of repairs or alterations outside of our plant, and shall not apply to any goods or parts
thereof furnished by Buyer or acquired from others at Buyer’s specifications. In addition, DX Engineering’s warranties do not extend
to other equipment and parts manufactured by others except to the extent of the original manufacturer’s warranty to DX Engineering.
The obligations under the foregoing warranties are limited to the precise terms thereof. These warranties provide exclusive remedies,
expressly in lieu of all other remedies including claims for special or consequential damages. SELLER NEITHER MAKES NOR
ASSUMES ANY OTHER WARRANTY WHATSOEVER, WHETHER EXPRESS, STATUTORY, OR IMPLIED, INCLUDING
WARRANTIES OF MERCHANTABILITY AND FITNESS, AND NO PERSON IS AUTHORIZED TO ASSUME FOR DX
ENGINEERING ANY OBLIGATION OR LIABILITY NOT STRICTLY IN ACCORDANCE WITH THE FOREGOING.
©DX Engineering 2021
DX Engineering®, DXE®, DX Engineering, Inc.®, Hot Rodz®, Maxi-Core®, DX Engineering THUNDERBOLT®, DX Engineering
Yagi Mechanical®, EZ-BUILD®, TELREX®, Gorilla Grip® Stainless Steel Boom Clamps, Butternut
®
, SkyHawk™, SkyLark™,
SecureMount™, OMNI-TILT™, RF-PRO-1B®, AFHD-4® are trademarks of PDS Electronics, Inc. No license to use or reproduce any
of these trademarks or other trademarks is given or implied. All other brands and product names are the trademarks of their respective
owners.
Specifications subject to change without notice.
 Loading...