Page 1

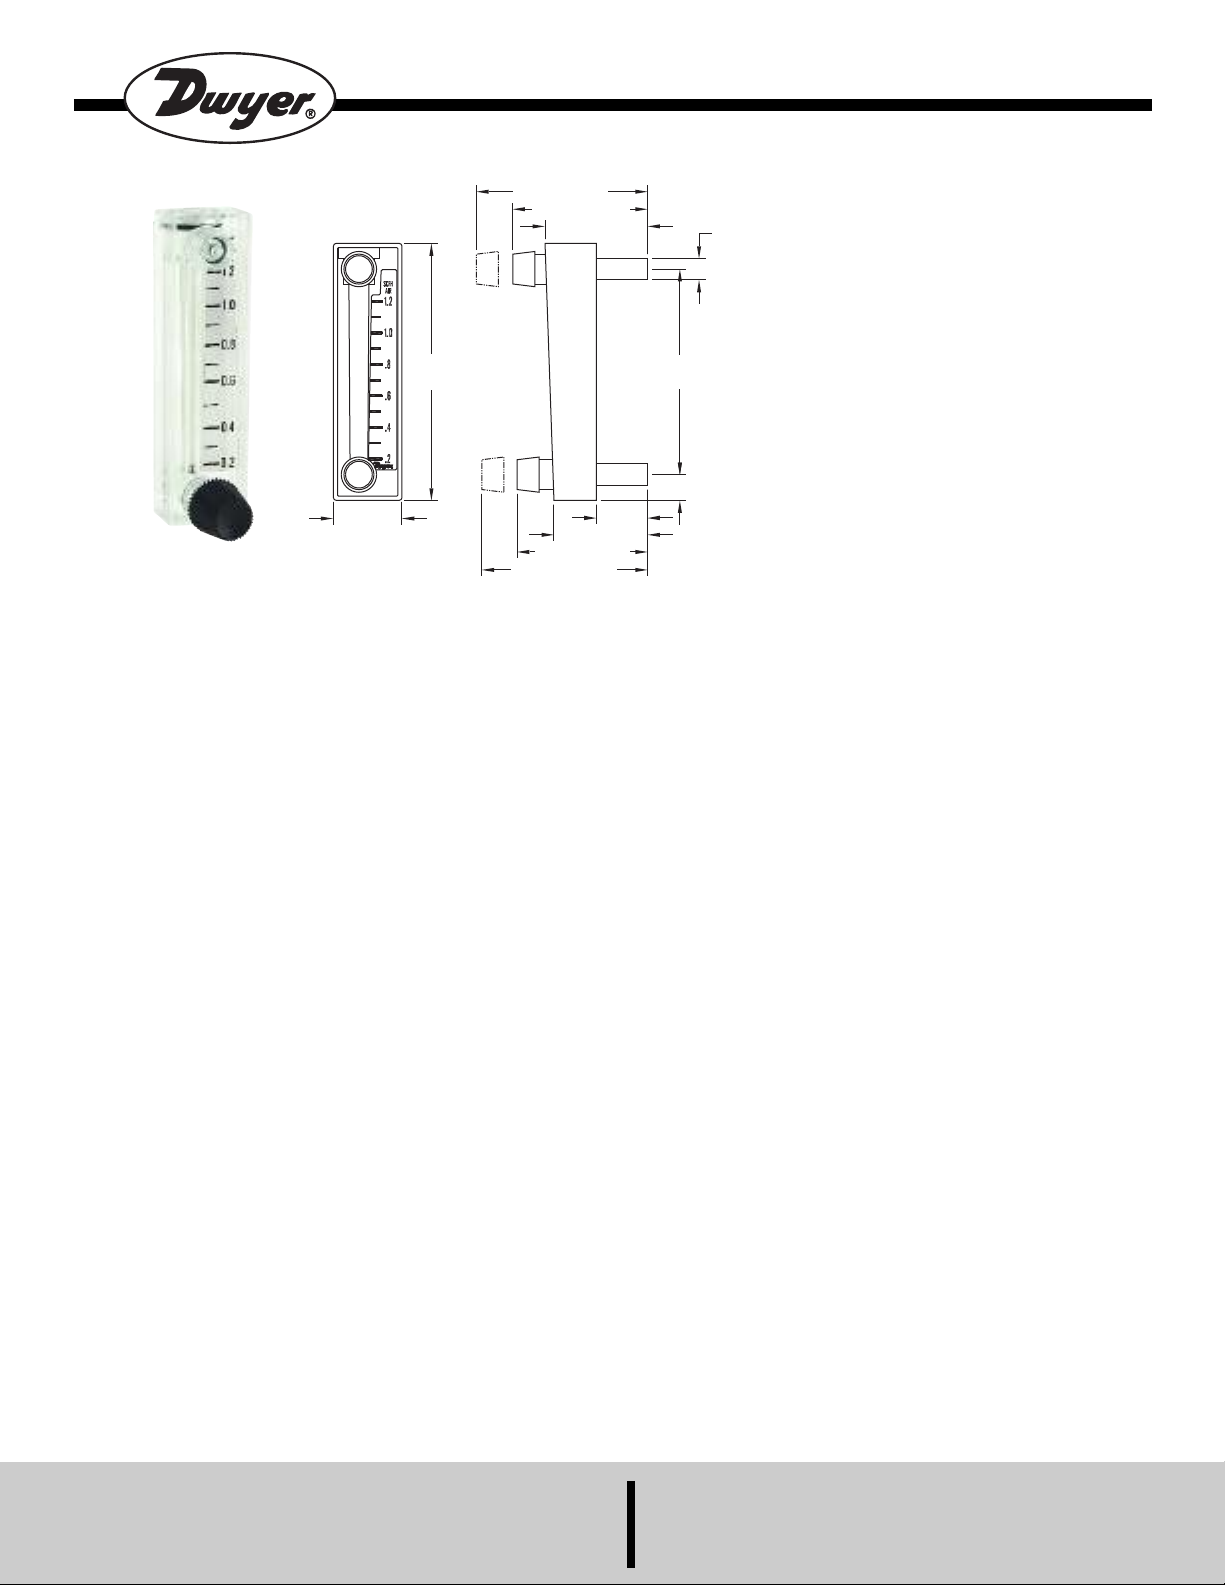
MMA Series Mini-Master®Flowmeter
3-3/4
[
95.25]
1
[25.40]
2-27/64 [61.52]
1
-29/32 [48.42]
1-3/8 [34.95]
3
/4 [19.05]
3/8 [9.53]
3
[76.20]
Ø
5/16 [7.94] TYP
1-1/2 [38.10]
1-31/32 [50.01]
2-1/2 [63.50]
Specifications - Installation and Operating Instructions
PECIFICATIONS
S
eter Body: Molded transparent nylon.
M
loats: Stainless steel, black glass, K-Monel,
F
Tungsten carbide, Aluminum.
Connections: Molded with body, 5/16˝ OD for
push-on tubing, push-on tubing with clamp, or
compression union.
O” rings: Buna-N (Fluoroelastomer
“
vailable).
a
cale: Brushed aluminum with clear epoxy
S
coating.
Pressure Rating: 100 psi maximum.
Accuracy: ±4% of full scale.
Bulletin F-49
he Series MMA Mini-Master
T
direct reading scales for air or water. Installation, operation, and maintenance are
simple and require only a few common sense precautions to assure long, accurate,
trouble-free service.
CALIBRATION
All flowmeters are calibrated at the factory and normally will remain within their
accuracy tolerance for the life of the device. If at any time you wish to recheck its
calibration, do so only with instruments or equipment of certified accuracy. Do not
attempt to check the Mini-Master
variations in piping and back pressure can cause significant differences between
the indicated and actual readings.
LOCATION
Select a location where the flowmeter can be easily read and where the
temperature will not exceed 130°F (54°C). The mounting surface and piping to the
flowmeter should be free from vibration which could cause fatigue of fittings. Piping
must be carefully arranged and installed to avoid placing stress on fittings and/or
flowmeter body. For maximum flowmeter life, avoid direct exposure to weathering.
Avoid locations or applications with questionable atmospheres or solvents.
Damage due to contact with incompatible gases or liquids is not covered by
warranty. Compatibility should be carefully determined before placing in service.
PIPING
Inlet Piping:
It is good practice to approach the flowmeter inlet with as few elbows, restrictions
and size changes as possible. Inlet piping should be as close to the flowmeter
connection size as practical to avoid turbulence which can occur with drastic size
changes. The length of inlet piping has little effect on normal pressure fed
flowmeters.
For vacuum service, the inlet piping should be as short and open as possible to
allow operation at or near atmospheric pressure and maintain the accuracy of the
device. Note that for vacuum service, any flow control valve used must be installed
on the discharge side of the flowmeter.
Discharge Piping
Piping on the discharge side should be at least as large as the flowmeter
connection. For pressure fed flowmeters on air or gas service, the piping should be
as short and open as possible. This allows operation at or near atmospheric
pressure and assures the accuracy of the device. This is less important on water or
liquid flowmeters since the flowing medium is generally incompressible and back
pressure will not affect the calibration of the instrument.
CAUTION: Meter may rupture if temperature or pressure ratings are exceeded.
Read all specifications and instructions carefully before use. Do not remove caution
label from flowmeter.
®
lowmeters are available with a wide variety of
f
®
flowmeter with a similar flowmeter as even minor
eries MMA Mini-Master
S
assembled for OEM quantity applications or with necessary components to allow
assembly by the user in the required configuration. The three possible options for
field assembly are:
PRESSURE FED OR VACUUM WITHOUT VALVE - Both upper and lower
openings in front are plugged. (Standard configuration supplied from factory.)
PRESSURE FED WITH VALVE - Upper opening is plugged and valve is installed
in lower opening.
VACUUM OPERATION WITH VALVE - Lower opening is plugged and valve is
installed in upper opening.
ASSEMBLY INSTRUCTIONS
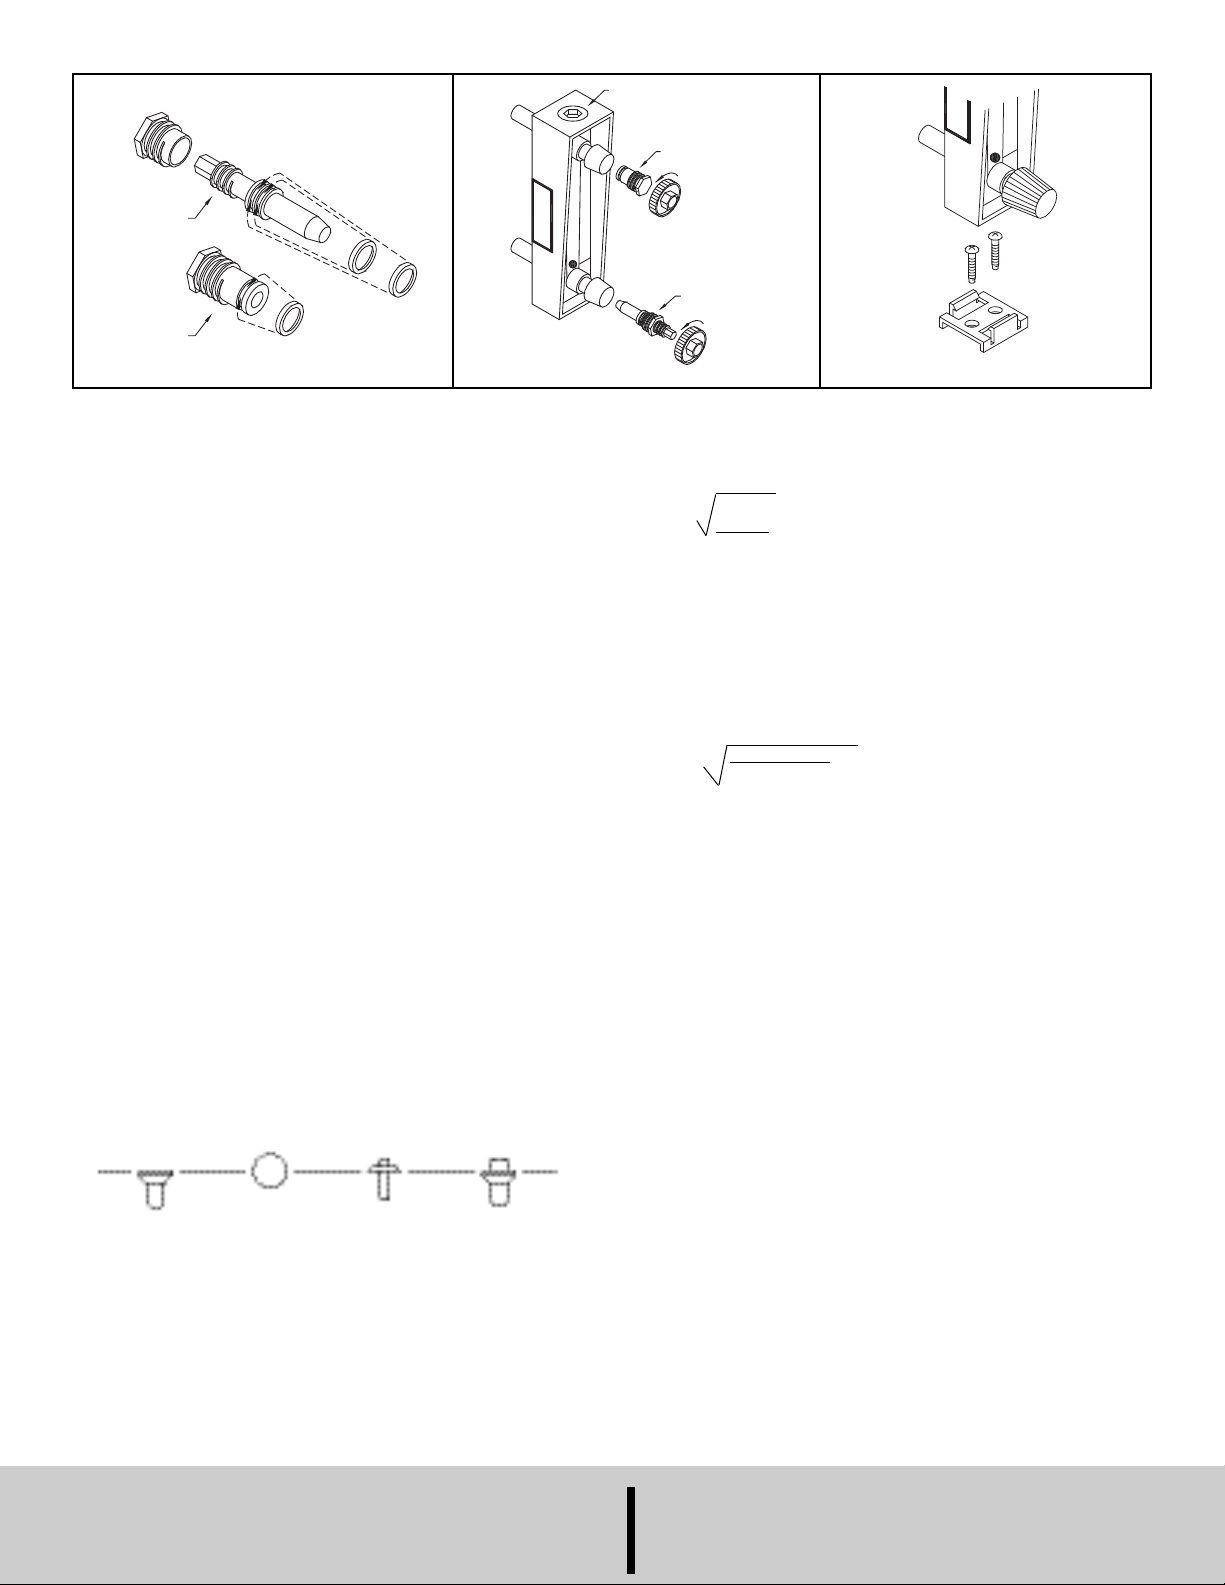
Refer to Figures A and B.
1. For Operation without Valve: Flowmeter is factory-configured with the front upper
and lower valve plugs assembled for operation without a valve.
2. For Operation with Lower Valve: Using the black circular installation tool
provided, remove the lower valve plug. Turn the valve plug CLOCKWISE to
remove.
Knead the bag containing the “O” rings and lubricant until the rings are completely
coated. Be careful not to overstretch or nick them. Install two “O” rings on the valve
stem. Apply small amount of remaining lubricant onto the threads of the valve stem.
Screw mating plug onto valve stem in clockwise direction up to stop. Using
installation tool, thread the valve assembly into body turning COUNTERCLOCKWISE until snug. Limit torque to 3 in/lb. Snap knob onto hex end of valve
stem to complete assembly.
3. For Operation with Upper Valve (Vacuum Systems):
Remove the top plug from the flowmeter using the black circular installation tool
provided. Turn the plug COUNTER-CLOCKWISE to remove. Take care not to lose
the float (ball) from the flow tube.
Cut off protruding ball stop leaving no more than 1/32˝ stub. This is necessary to
allow free passage of the valve assembly.
Re-assemble the top plug.
Replace the upper valve plug with the valve assembly as in No. 2 above.
®
lowmeters are supplied in two basic configurations: Fully
f
DWYER INSTRUMENTS, INC.
P.O. BOX 373 • MICHIGAN CITY, IN 46360, U.S.A. Fax: 219/872-9057 e-mail: info@dwyer-inst.com
Phone: 219/879-8000 www.dwyer-inst.com
Page 2

VALVE STEM
PLUG
TOP PLUG
P
LUG
VALVE ASSEMBLY
ating Plug
M
Fig. A
Turn valve assembly and
plug assembly counter-
lockwise to install.
c
ig. B
F
F
ig. C
INSTALLATION AND MOUNTING
(Flowmeter must be installed in vertical position)
PANEL MOUNTING - Drill two 11/32˝ diameter holes on 3˝ centers on a vertical
line. Insert flowmeter from front and push on spring retainer clips from rear, pliers
ay be necessary.
m
URFACE MOUNTING - Attach plastic mounting clip to a horizontal surface using
S
#4 Phillips head B-type self-tapping screws provided. See figure C. Clip will bow
ownward slightly when properly tightened. Snap flowmeter into clip. Be sure
d
lowmeter is vertical after mounting.
f
CONNECTIONS
CAUTION: Select tubing rating higher than supply pressure to flowmeter.
5 PSI MAXIMUM. Use 1/4˝ ID x 3/8˝ OD plastic tubing. Slip tubing onto
2
connections a minimum of 3/8˝.
50 PSI MAXIMUM. Use 1/4˝ ID x 3/8˝ OD plastic tubing. Slip tubing onto
connections a minimum of 3/8˝. Use pliers to expand spring type tubing clamps and
install on both connections.
100 PSI MAXIMUM. Use suitable 5/16˝ compression union with metal or semi-rigid
plastic tubing.
OPERATION
Once all connections are complete, introduce flow as slowly as possible to avoid
possible damage due to shock. With liquids, make sure all air has been purged
before taking readings.
The performance of low range units used in air or gas applications may be affected
by static electricity. Excessive static charge may cause the ball float to behave
erratically or provide a false reading. To ensure the proper function of the unit, the
application should be designed to minimize or dispel static electricity.
The standard technique for reading a Variable Area Flowmeter is to locate the
highest point of greatest diameter on the float, and then align that with the
theoretical center of the scale graduation. In the event that the float is not aligned
with a grad, an extrapolation of the float location must be made by the operator as
to its location between the two closest grads. The following are some sample floats
shown with reference to the proper location to read the float.
The correct location to measure the actual pressure and temperature is at the exit
of the flowmeter, except under vacuum applications where they should be
measured at the flowmeter inlet. The equation to correct for nonstandard operating
conditions is as follows:
2
1
1
Q
Q
=
here: Q
W
x
2
P
T
x
1
T
P2x
1
Actual or Observed Flowmeter Reading
=
2
Standard Flow Corrected for Pressure and Temperature
Q
=
1
P
= Actual Pressure (14.7 psia + Gage Pressure)
2
P
= Standard Pressure (14.7 psia, which is 0 psig)
1
T
= Actual Temperature (460 R + Temp °F)
2
T
= Standard Temperature (530 R, which is 70°F)
Example: A flowmeter with a scale of 10-100 SCFH Air. The float is sitting at the 60
grad on the flowmeter scale. Actual Pressure is measured at the exit of the meter
as 5 psig. Actual Temperature is measured at the exit of the meter as 85°F.
2
Q
= 60.0 x (14.7 + 5) x 530
14.7 x (460 + 85)
2
= 68.5 SCFH Air
Q
MAINTENANCE
The only maintenance normally required is occasional cleaning to assure proper
operation and good float visibility.
DISASSEMBLY: Use the circular black installation tool to remove valve (when
used) and plugs. Fittings on front turned CLOCKWISE to remove and top plug is
turned COUNTER-CLOCKWISE. Take care to prevent loss of float.
CLEANING: The flowmeter body and other parts can be washed in a mild soap and
water solution. A cotton swab or soft bristle brush will help when cleaning flow tube.
Avoid solvents and liquid soaps and avoid prolonged immersion.
RE-ASSEMBLY: Coat “O” rings and valve stem threads with silicone stop cock
grease or petroleum jelly. Check “O” rings after assembly to make sure they are
properly seated.
ADDITIONAL INFORMATION
For additional flowmeter information, conversion curves, correction factors and
other details on the entire line of Dwyer
®
flowmeters, please request a Dwyer
Instruments, Inc. full-line catalog.
Variable Area Flowmeters used for gases are typically labeled with the prefix “S” or
“N”, which represents “Standard” for English units or “Normal” for metric units. Use
of this prefix designates that the flowmeter is calibrated to operate at a specific set
of conditions, and deviation from those standard conditions will require correction
for the calibration to be valid. In practice, the reading taken from the flowmeter
scale must be corrected back to standard conditions to be used with the scale units.
©Copyright 2012 Dwyer Instruments, Inc. Printed in U.S.A. 4/12 FR# 59-440474-00 Rev. 8
DWYER INSTRUMENTS, INC.
Phone: 219/879-8000 www.dwyer-inst.com
P.O. BOX 373 • MICHIGAN CITY, IN 46360, U.S.A. Fax: 219/872-9057 e-mail: info@dwyer-inst.com
 Loading...