Page 1

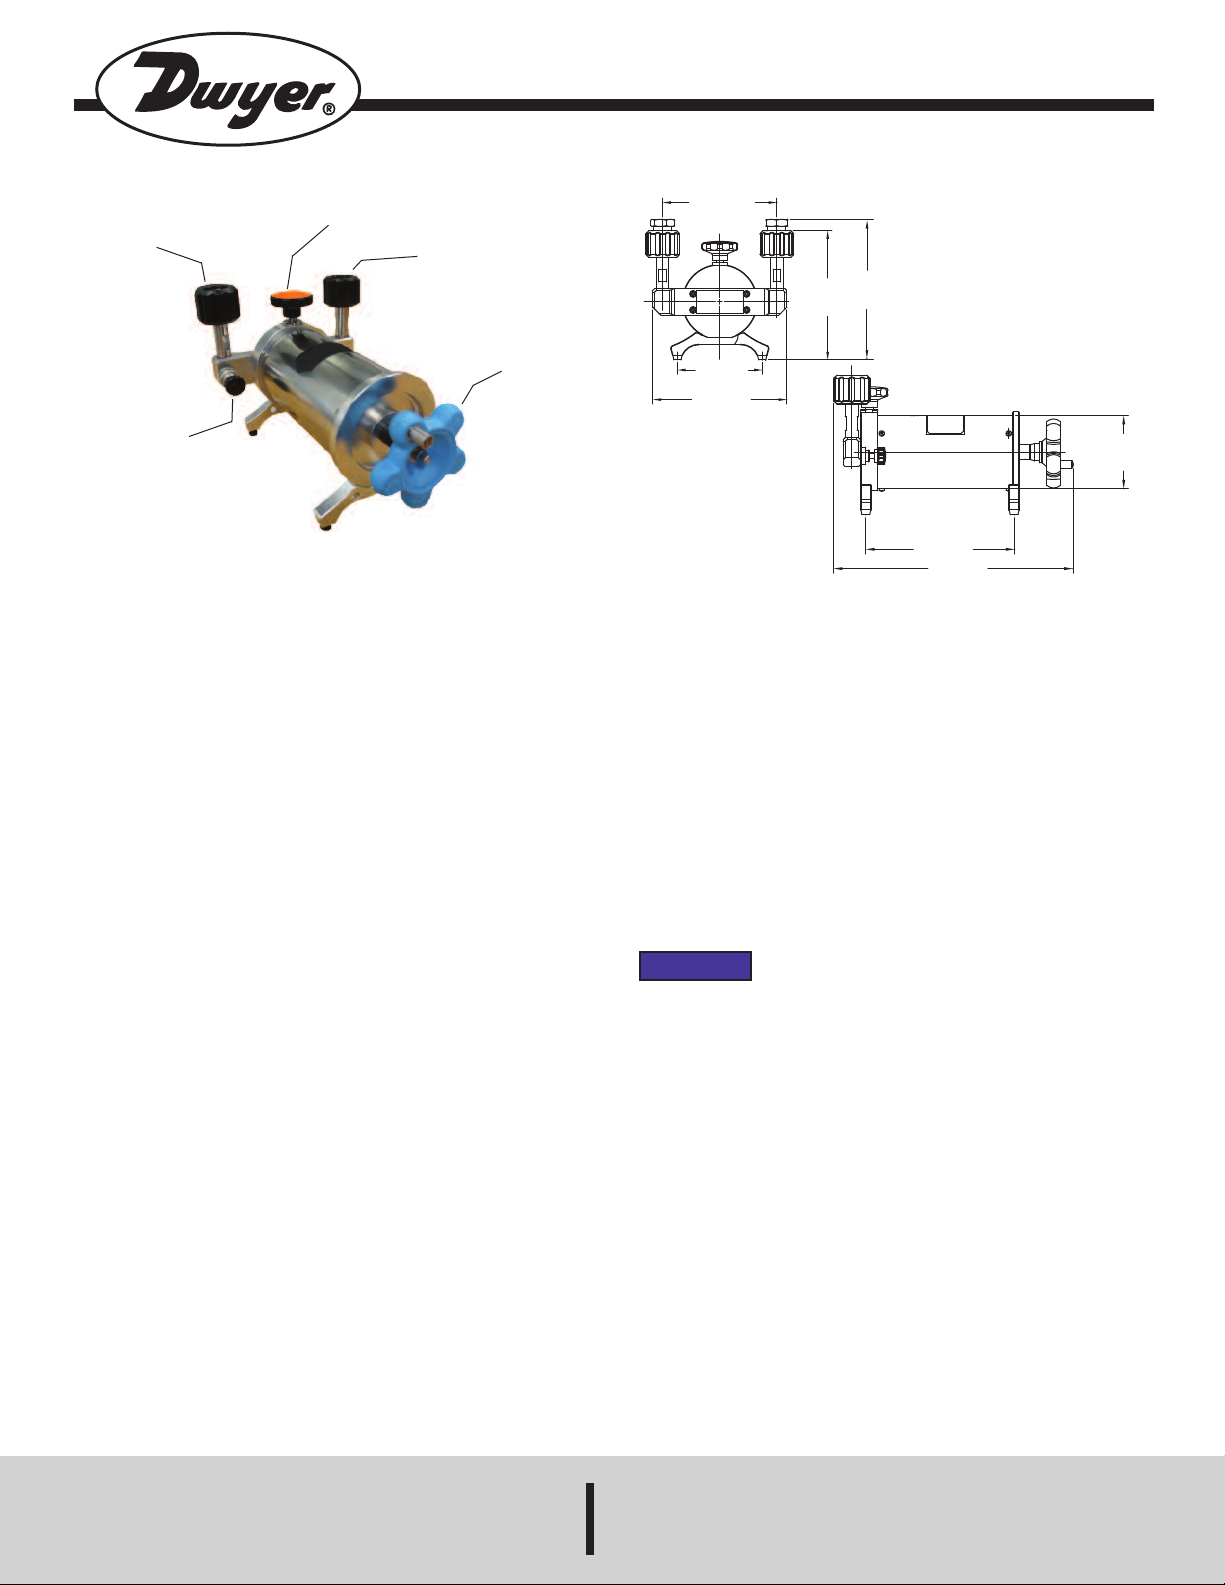
3-47/64
[95.00]
5-29/32
[150.00]
5-45/64
[144.91]
6-13/64
[157.60]
5-1/32
[128.00]
6
-3/32
[
154.60]
9-51/64
[248.67]
Ø
2-63/64
[
76.00]
1. QUICK
CONNECTOR
. VENT VALVE
2
RELEASE VALVE)
(
Model LPCP Low Pressure Calibration Pump
Specifications - Installation and Operating Instructions
3. FINE ADJUST
HAND-WHEEL
4. QUICK
CONNECTOR
. COARSE
5
DJUST
A
AND-WHEEL
H
Bulletin P-LPCP
The Model LPCP Low Pressure Calibration Pump is a low air pressure source
ith the ability to easily adjust and stabilize. This hand pump possesses a pressure
w
ange of ± 5.8 psi; uses air as the media, and can adjust the pressure easily with
r
great stability. The LPCP is made up of quick connectors for fast instrument connect
and disconnect. The pump has a heat-insulator between the cover and pressure
chamber to lessen the heat effect during the micro-pressure calibration. The adjusting
resolution is up to 0.01 Pa (0.0001 mbar). These features make the LPCP ideal for
calibrating pressure transducers, precision pressure gages, and other pressure
instruments.
CONNECTION
Direct connection
If the connector of the unit under test is M20*1.5, please connect it with the hand
pump directly.
Connect by pipe
If the connector of the unit under test is not M20*1.5, please use the other adapter
to connect.
CALIBRATION PROCEDURE
Positive pressure calibration
1. First, make sure the vent valve (2) is open. Turn the coarse adjust hand-wheel
(5) counterclockwise to the maximum and connect the reference gage and the
gage under test on the ports (1) and (4) tightly.
2. Close the vent valve (2).
3. Turn the coarse adjust hand-wheel (5) clockwise to apply the pressure. Then
use the fine adjust hand-wheel (3) to get the desired value.
4. Calibrate the next point until all calibration points are verified.
5. The next procedure is reverse calibration: turn the coarse adjust hand-wheel
counterclockwise (5) to decrease the pressure. Turn the fine adjust hand-wheel
(3) to get the desired pressure value. Calibrate the pressure one by one until
all selected points are verified.
Negative (Vacuum) pressure calibration
1. First, make sure the vent valve (2) is open. Turn the coarse adjust hand-wheel
2. Turn the hand-wheel (5) counterclockwise to exhaust.
3. Close the vent valve (2). When the pressure approaches the desired vacuum
4. The operation procedure of reverse calibration, use coarse adjust hand-wheel
(5) clockwise to the maximum. Connect the reference gage and the gage under
test on the ports (1) and (4) tightly.
value, stop. To fine adjust the pressure, use the hand-wheel (3). Calibrate all
selected points one by one.
(5) first, then use the fine adjust hand-wheel (3) to get the desired vacuum
pressure.
PECIFICATIONS
S
edia: Air.
M
enerated Pressure Range: 5.8 psi (0.4 bar) vacuum to 5.8 psi (0.4 bar) positive
G
pressure.
Pressure Resolution: 0.01 Pa; 0.0001 mbar.
Material:
Ram/adapters: 316 SS;
Body: Steel/aluminum;
Seals: Buna-N.
Test Gage Connection: M20*1.5; 1/4˝ NPT with included adapters.
Reference Gage Connection: M20*1.5; 1/4˝ NPT with included adapters.
Dimensions:
Height: 5.7˝ (145 mm);
Base: 6.09˝ (155 mm) x 3.73˝ (95 mm).
Weight: 2.21 lb (1.0 kg).
NOTICE
PRECAUTIONS
1. Please don’t add any oil or water into the pipeline.
2. To avoid damaging the airproof surface, please don’t operate the shut-off valve
aggressively.
3. This product can not directly calibrate pressure meters that are used under acid
or alkali conditions. If necessary, you must make sure the meters are cleansed
by CCl
solvent or melted oil spray to avoid any corrosion damage to the test
4
pump.
MAINTENANCE
Upon final installation of the Model LPCP Low Pressure Calibration Pump, no
routine maintenance is required. A periodic check of system calibration is
recommended. The Model LPCP is not field serviceable and should be returned if
repair is needed (field repair should not be attempted and may void warranty). Be
sure to include a brief description of the problem plus any relevant application
notes. Contact customer service to receive a return goods authorization number
before shipping.
DWYER INSTRUMENTS, INC.
P.O. BOX 373 • MICHIGAN CITY, INDIANA 46361, U.S.A. Fax: 219/872-9057 e-mail: info@dwyermail.com
Phone: 219/879-8000 www.dwyer-inst.com
Page 2

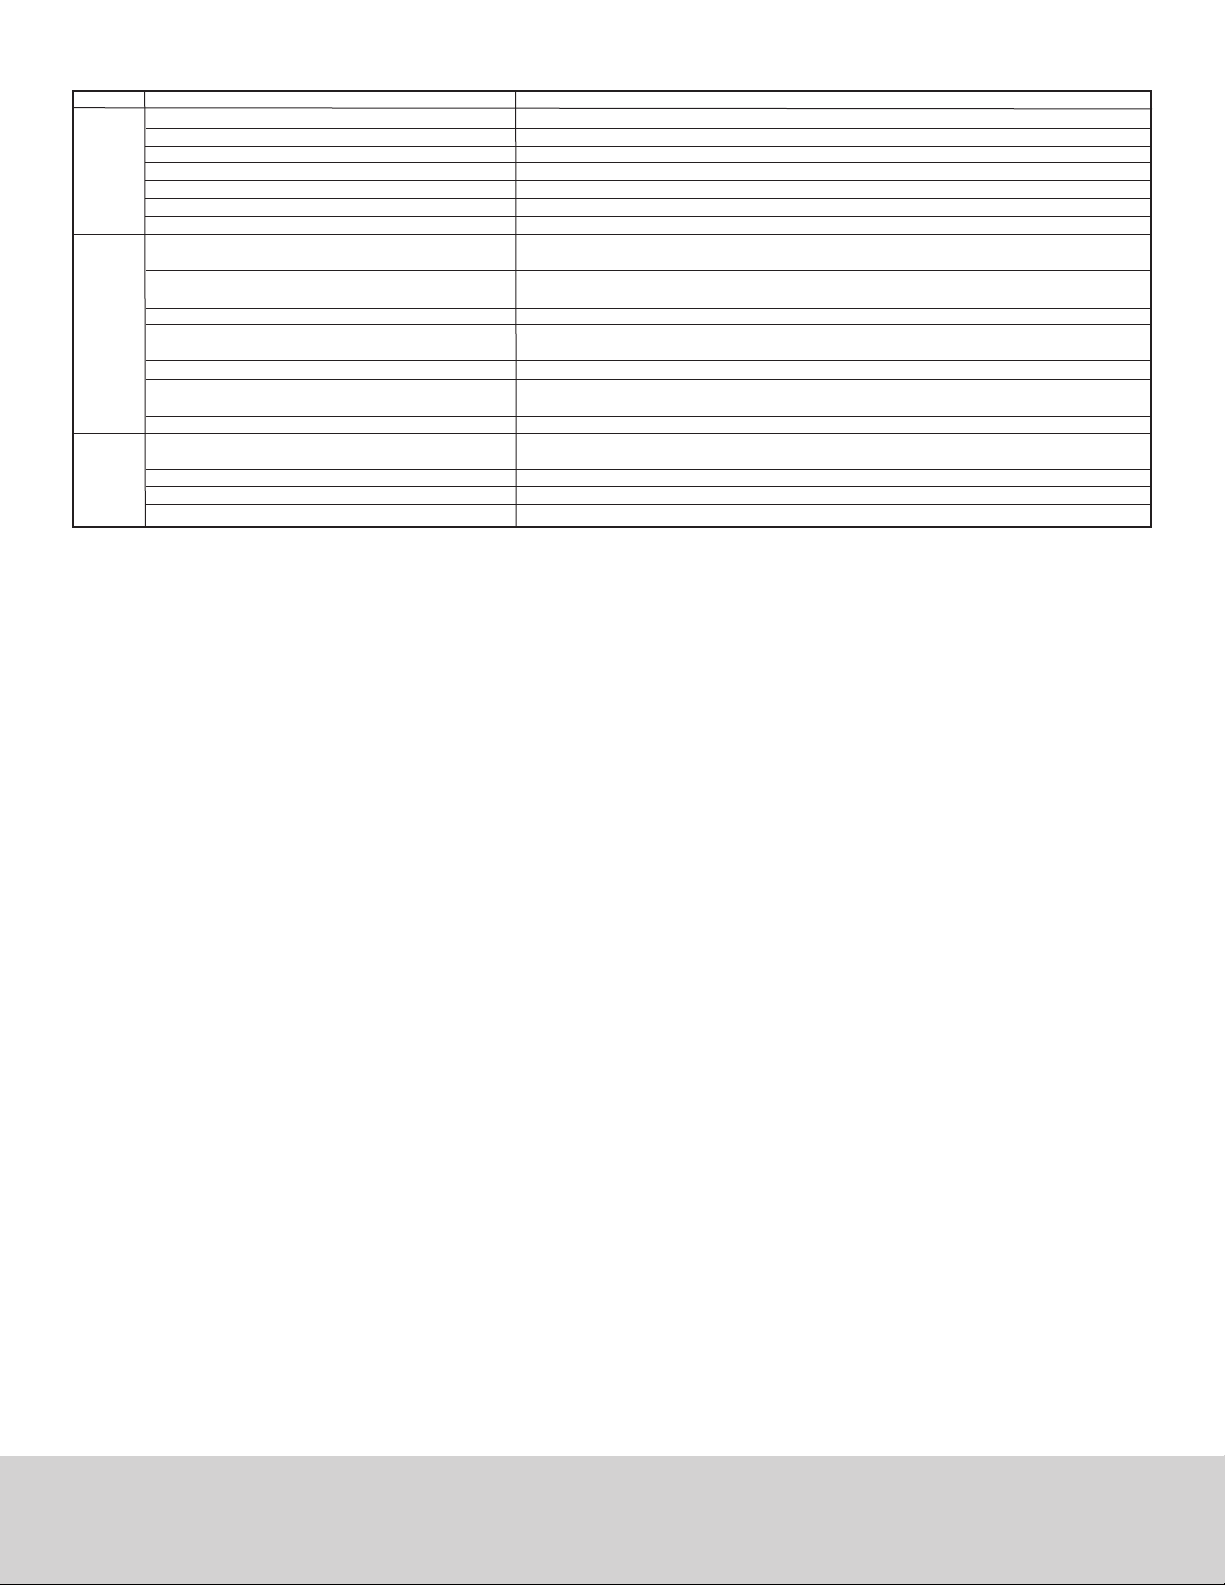
ROUBLESHOOTING
T
roblems
P
ard to
H
ressurize
P
eakage
L
roblems
P
Other
Attentions
Causes
. Isolating/vent is not open.
A
. Release valve is not closed.
B
. The gage under the test is loose.
C
. O-seal has broken off.
D
E. Flexible hose is loose.
F. Lever falls off.
G. If the (±) conversion handle & port is correct or not.
. For pressure gage under test, the screw’s bottom
A
urface isn’t smoothed. (straight screw).
s
. The screw thread of test meter is taper screw.
B
C. Rubber seal on joint is aged or frayed.
D. The system has been blocked, the cover of isolating
and release valve is dirty.
. Test meter has leaks.
E
. Pressure pump leaks.
F
G. Flexible hose leaks.
A. Oil slide in system.
B. The movement components sound abnormal.
. The conversion seal loop of the (±) pressure is broken.
C
. Some parts are aging.
D
olutions
S
pen the isolating/vent valve.
O
Close the release valve.
Turn the reference gage and the gage under test tightly.
Install or replace new O-seal (3 pieces, D= ø8).
onnect flexible hose well.
C
urn the lever clockwise.
T
lease confirm the position of conversion handle when system has no pressure.
P
se a transition joint with a PTFE seal in the joint which will be screwed tightly to the tested meter
U
joint by a tool, then screw them tightly to the test pump again.
Must use the PTFE plat seal and transition joint to tighten the screw thread, then screw them tightly
with the pneumatic test pump again.
hange O-seal (3 pieces, D= ø8).
C
ressurize and release pressure again and again to drift impurity that is rested on seal surface of
P
solating or release valve.
i
eplace other meter and test leakage again.
R
Connect the reference gage and block the other port with plugs tightly. Pressurize and check the
airproof performance.
Cut 15 mm hose head and try again.
n order to avoid liquid impurity from test meter, suction back into test pump and confirm the location
I
f (±) conversion handle before test.
o
ubricate the key components timing.
L
Should be switched under the system if no pressure.
Lubricate rubber seal periodically.
©Copyright 2014 Dwyer Instruments, Inc. Printed in U.S.A. 2/14 FR# R1-443835-00 Rev. 1
DWYER INSTRUMENTS, INC.
Phone: 219/879-8000 www.dwyer-inst.com
P.O. BOX 373 • MICHIGAN CITY, INDIANA 46361, U.S.A. Fax: 219/872-9057 e-mail: info@dwyermail.com
 Loading...