

Page 1
Bulletin F-92
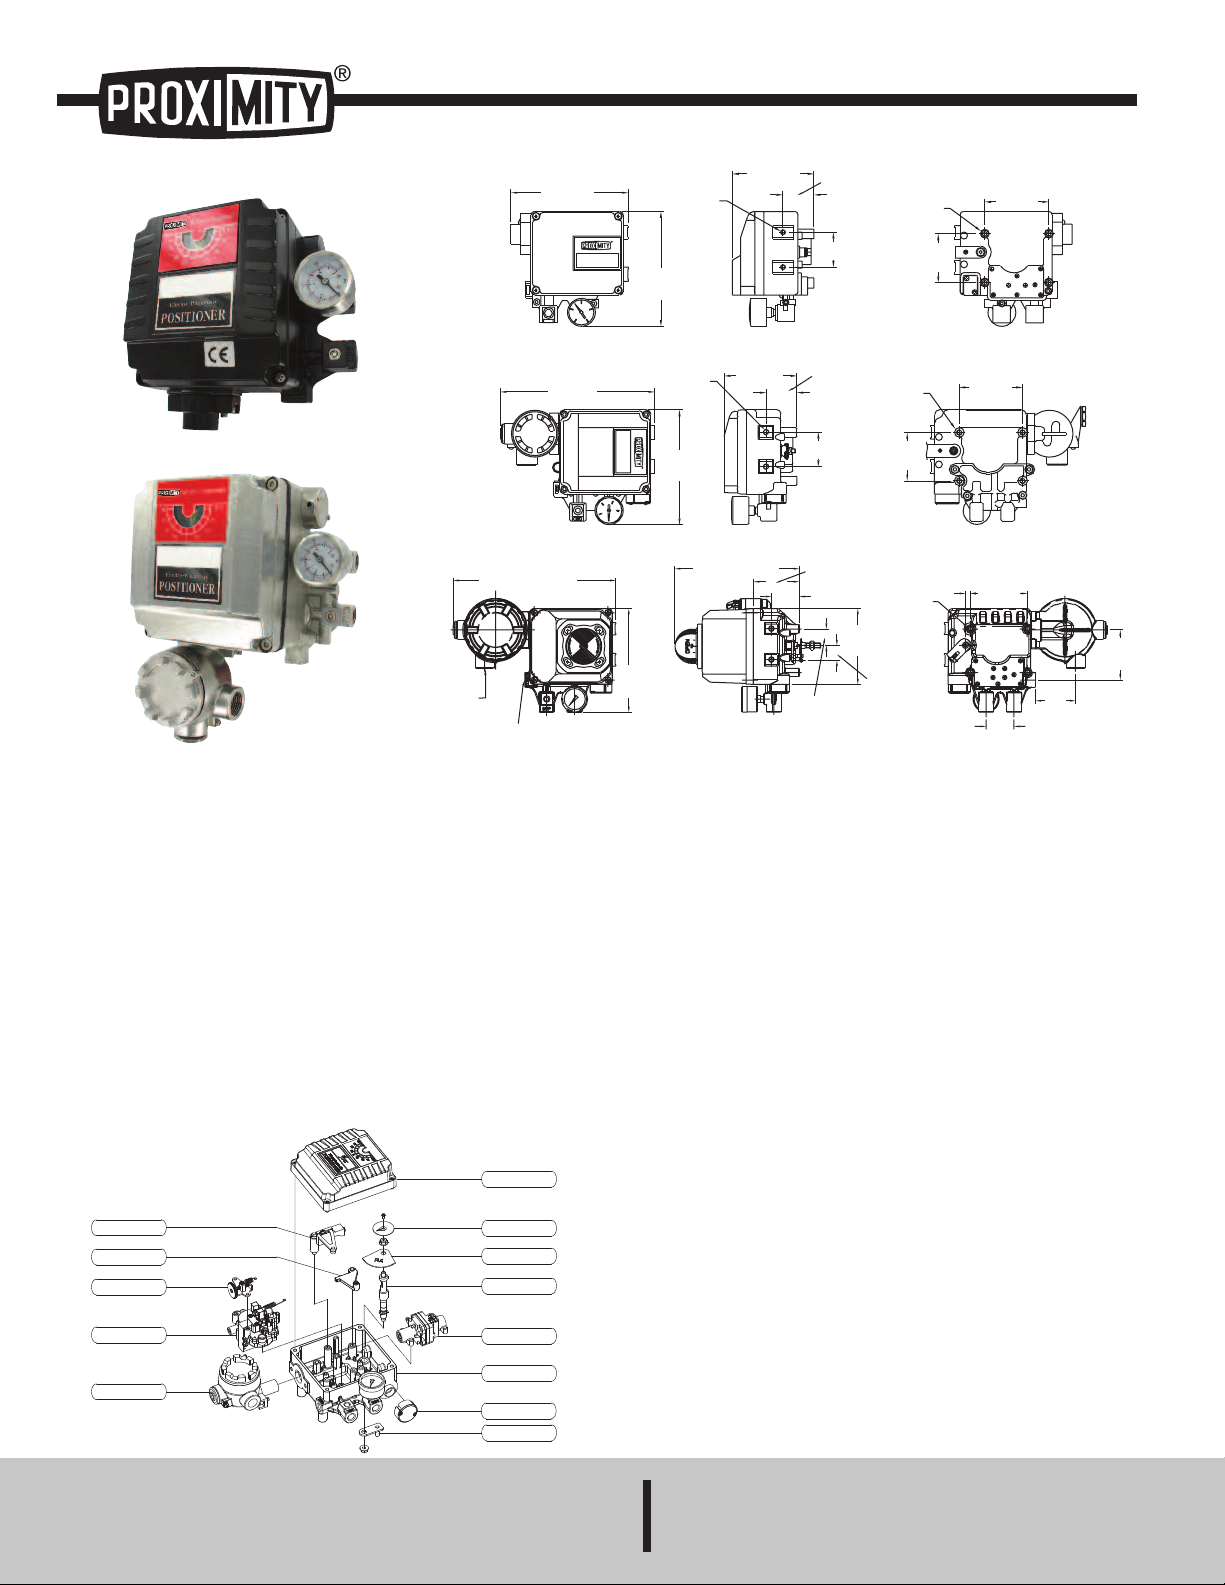
SPAN UNIT
CONNECTOR
ZERO UNIT
TORQUE MOTOR
JUNCTION BOX
FEEDBACK LEVER
VENT UNIT
BASE BODY
PILOT VALVE
FEEDBACK SHAFT
CAM
INDICATOR
COVER
INTERNAL LIMIT SWITCH VERSION
STAINLESS STEEL VERSION
STANDARD VERSION
1-49/64
[45.01]
2-35/64
[64.51]
3-5/32
[80.32]
3
-39/64
[
91.82]
5
/16
[
8.00]
4-M8x1.25P
4-51/64
[122.02]
2
-57/64 [73.51]
1
-49/64
[
45.01]
6
1/64
[24.30]
1-3/64
[26.51]
CONDUIT
ENTRY
2-PF (G) 1/2
2-NPT 1/2
OUT 2
PT (NPT) 1/4
1
0-5/16 [261.85]
6-37/64
[167.04]
7-7/8 [200.03]
6
-9/16
[
166.69]
8
-3/4
[225.30]
2
X M8X1.25
1
-31/32
[
50.01]
4-9/16
[115.89]
1-25/32
[45.24]
3-19/32
[91.29]
4
X M8X1.25
2-3/4
[69.85]
6-43/64
[169.47]
6
-9/16
[
166.69]
2X M8X1.25
1-25/32
[
45.24]
4
-41/64
[
117.87]
1
-31/32
[
50.01]
4
X M8X1.25
3-5/8
[92.08]
2
-49/64
[
70.25]
Electro-Pneumatic
POSITIONER
Electro-Pneumatic
POSITIONER
Series 265ER PRECISOR®II Electro-Pneumatic Rotary Positioner
Specifications - Installation and Operating Instructions
The Series 265ER PRECISOR®II Electro-Pneumatic Positioner is used for
rotary operation of pneumatic rotary valve actuators by means of electrical
controller or control systems with an analog output signal of 4 to 20 mA or split
ranges.
FEATURES
• There is no resonance in the range of 5 to 200 Hz.
• Perform 1/2 Split Control without any other substitutes.
• Easy to adjust zero and span.
• Easy to convert from Reverse Action to Direct Action or vice versa.
• Easy Feedback Connection.
• Fast and accurate response.
• Low air consumption.
• Easy to protect from hunting effect by using output orifice in small size of
actuator.
• Designed as block build structure for maintenance and repair.
STRUCTURE
PROXIMITY DIV., DWYER INSTRUMENTS, INC.
P.O. BOX 358 • MICHIGAN CITY, INDIANA 46360 U.S. A.
SPECIFICATIONS
Input Signal: 4 to 20 mA DC.
Input Impedance: 250 ±15 Ω.
Material: Aluminum diecasting.
Air Supply: 20 to 101 psig (1.4 to 7.0 bar).
Air Supply Connection: 1/4˝ NPT.
Gage Connection: 1/8˝ NPT.
Electrical Connection: Screw terminal.
Conduit Connection: 1/2˝ NPT female.
Linearity: ±2% of FS.
Hysteresis: 1% of FS.
Sensitivity: ±0.5% of FS.
Repeatability: ±0.5% of FS.
Air Consumption: 0.10 scfm (3 LPM) at 20 psig (1.4 bar) supply.
Flow Capacity: 28 scfm (80 LPM) at 20 psig (1.4 bar) supply.
Stroke: 0 to 90°.
Enclosure Rating: IP66.
Operating/Ambient Temperature Limits:
265ER-XX and 265-XXLS: -4 to 158°F (-20 to 70°C);
265ER-XXSS: -40 to 158°F (-40 to 70°C);
265ER-XXFM: 4 to 140°F (-20 to 60°C).
Weight: 6.2 lb (2.8 kg).
Phone: 219/879-8000 www.dwyer-inst.com
Fax: 219/872-9057 e-mail: info@dwyermail.com
Page 2
RINCIPLE OF OPERATION
S
P
A
R
E
INPUT SIGNAL
4~20 mA
OUT2
O
UT1
SUPPLY
OUT2 OUT1
OUT2
OUT1
1
2
3
4
5
6
7
8
9
10
11
12
13
14
15
15
E
P
ncrease the input current signal to change in lift position of valve. Force exerted
I
y (1) Torque Motor reduces Nozzle Back Pressure with increase in gap between
b
2) Flapper and (3) Nozzle. Then (5) Spool moves upward and the (7) Seat opens
(
simultaneously. Air pressure of OUT1 pipe is discharged to (10) Actuator. As
pressure in the actuator chamber goes up, (12) Actuator Stem starts to rotate.
The movement of (12) Actuator Stem exerted force to the (a) Feedback Spring
hrough Feedback Shaft connections. Then (10) Actuator will stop at the point of
t
orce balance exerted by the input current signal and the feedback spring.
f
BLOCK DIAGRAM OF 265ER
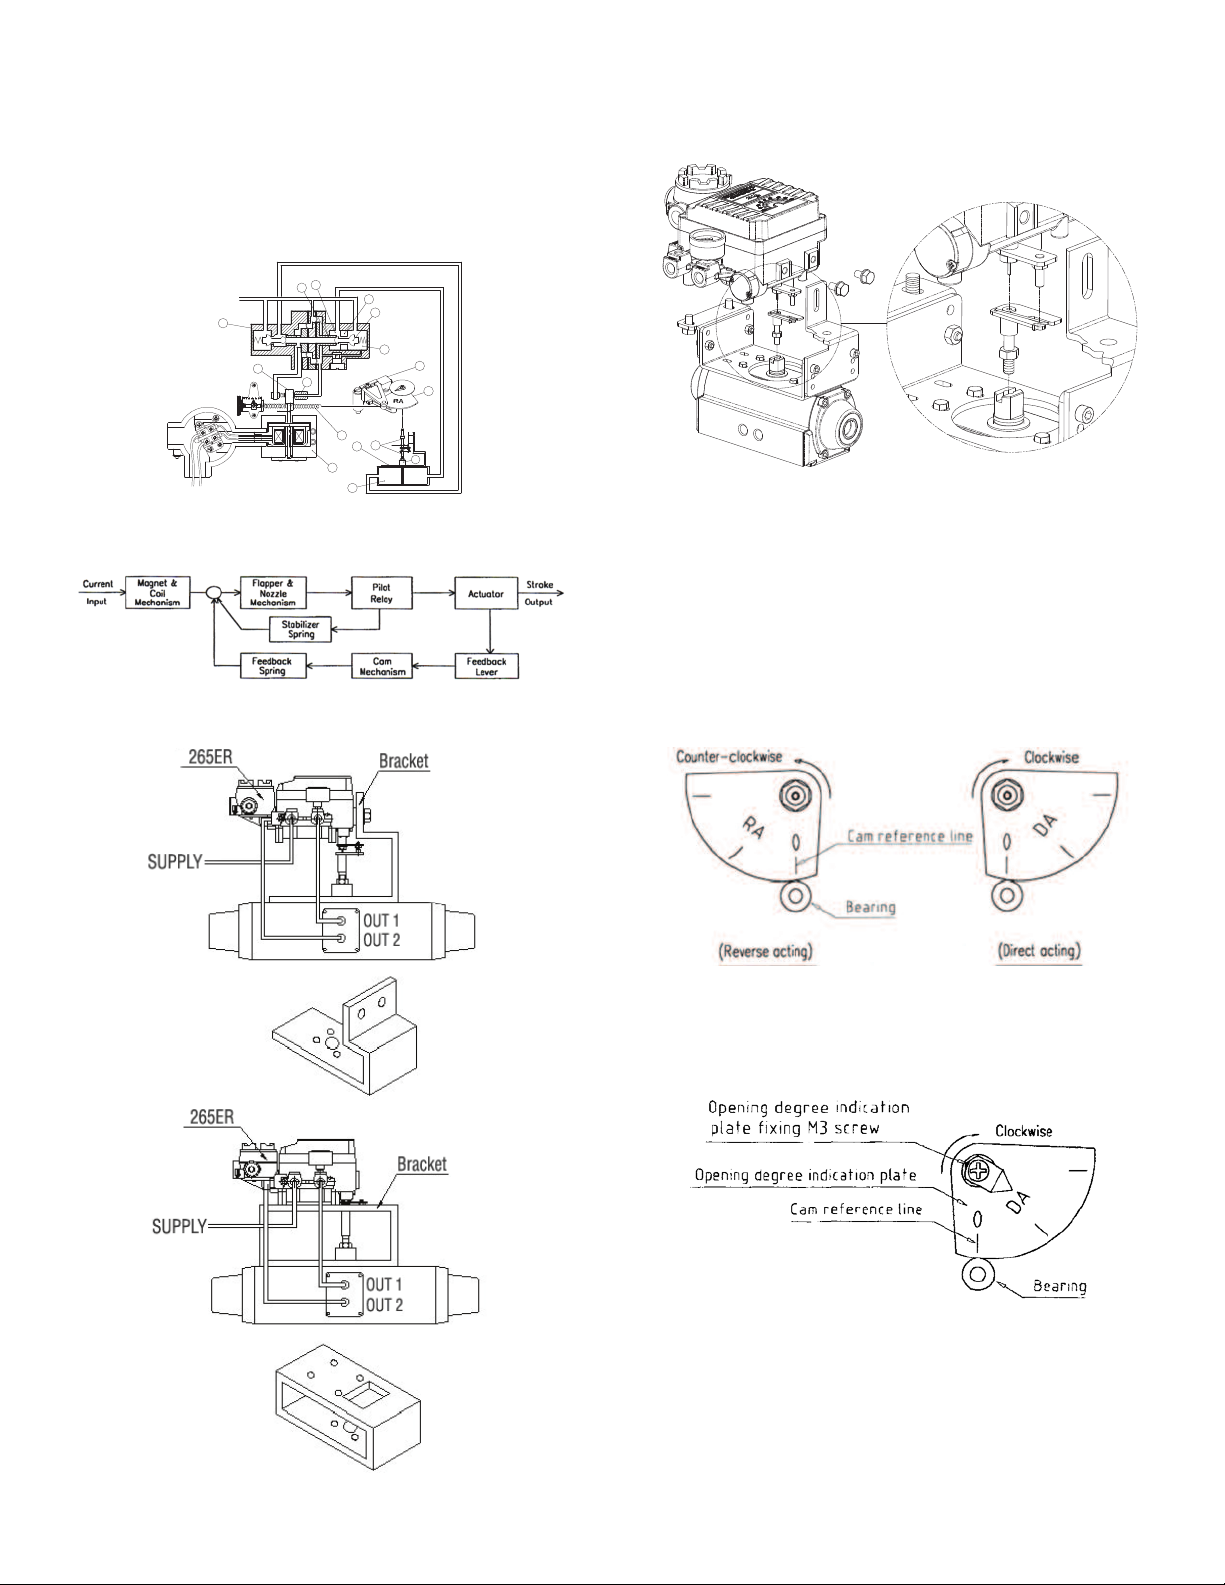
INSTALLATION
Example of attaching to actuator
onnection with Feedback Shaft
C
ttach to the position at which the positioner feedback shaft and the rotary
A
ctuator main shaft are almost concentric (range in which the spring pin of
a
eedback shaft edge enters the hole of fork lever assembly shaft edge).
f
NSTALLATION cont.
I
Cam Attaching Procedure
Use the DA face of cam to turn the actuator main shaft clockwise (viewed from
the positioner front cover side) at the time of input feedback shaft. Use the RA
face to turn it counter-clockwise (reverse action). Correctly attach the cam to the
lange part of feedback shaft. Attach the cam in the procedure of loosening the
f
exagonal nut with flange first, setting the using actuator to the starting position
h
nd then setting the cam reference line and the bearing contact point of span
a
adjusting arm unit to the matching position. Do not apply the supply pressure
when attaching the cam as other wise it is very dangerous. When the positioner
is shipped out of our plant, the cam is tentatively tightened to the shaft. Be sure
to firmly lock the cam to the lock nut [tightening torque 17.7 to 22.1 in-lbs (2.0 to
2.5 Nm)].
Attaching Procedure of Opening Degree Indication Plate
Lock the cam and then adjust the zero point and span. Then fix the opening
degree indication plate to the shaft using the M3 screw provided. At the time, set
the opening degree indication plate to the state of attaching reference line.
Page 3

AIR PIPING CONNECTION
SPARE
Grounding
External Grounding Terminal
M4*0.7P Round Head Screw
Internal Grounding Terminal
M4*0.7P Round Head Screw
00
DADA
RARA
00
00
DADA
RARA
00
RARA
00
00
DADA
00
DADA
RARA
00
S
UP.
OUT 1
OUT 2
OUT2
SUP.
OUT2
SUP.
OUT2
SUP.
OUT2
SUP.
Direct Action
Reverse Action
I
NPUT SIGNAL
4
~20 mA
SUP.
OUT1
I
NPUT SIGNAL
4
~20 mA
S
UP.
O
UT 1
O
UT 2
INPUT SIGNAL
4~20 mA
SUP.
O
UT 2
INPUT SIGNAL
4~20 mA
Fully purge the pipe to remove foreign matter. Use a clean supply air fully
removed of humidity and dust. Use a Series AFR filter regulator to keep supply air
ressure constant. When using the double acting type as the single acting type,
p
lind either OUT1 or OUT2 and also remove the pressure gauge to close its
b
onnection.
c
ELECTRICAL WIRING
Connect the (+) and (-) output terminals from the regulator with the (+) and (-)
input terminals, respectively, of the positioner.
- Use Cable Gland in pressure tight packing type. (Cable O.D.= 0.375˝).
- Use 1/2˝ NPT standard for conduit thread connection type. There is a
spare bolt in the terminal board.
Zero Adjustment
Set input signal to the Stroke starting signal (4
mA) then turn the Zero Adjuster clockwise or
ounterclockwise. In case of Spring Actuator,
c
heck if it is set to standard pressure in Zero
c
oint. If not, repeat Zero adjustment.
P
pan Adjustment
S
djust Range Adjustment so that an Actuator
A
tops at 0% position of the Stroke by the 0%
s
applied input signal and 100% position for
100% input signal respectively. Check Zero
Point and repeat Zero Span Adjustment. 1/2
plit Range can be used by Zero and Span
S
djustment. After setting, tighten up Lock
A
crew of Span adjustment.
S
uto/Manual Switch
A
his is a Switch for changing Auto and Manual. Shipped products are set for Auto.
T
o use Manual operation, turn A/M Switch counterclockwise. In manual operation,
T
the pressure of an AFR regulator connects to Actuator. After using, return switch
to "A". Not available for Single Acting - OUT2 and Double Acting.
Seat Adjuster
o need to adjust in the field because Seat
N
djuster is to be adjusted before shipment for
A
alanced pressure point of output pressure.
b
Seat Adjuster is always used for Doubleacting. If the balanced pressure point of
output pressure needs to be changed, use
Seat Adjuster. If the sensitivity is poor
because of the actuator type of load
condition, turn the seat adjuster screw
clockwise. If hunting occurs, turn the seat
adjuster screw counterclockwise. (The
amount of turning varies by actuators. Do not
loosen the stopper screw at this time since it
is set to avoid the screw coming.)
ADJUSTMENT
Check the following prior to starting the adjustment:
• The pipeline is correctly connected with the pressure supply port and OUT1 and
OUT2 port.
• The wires are correctly connected with the (+), (-) and grounding terminals.
• The actuator and positioner are sturdily connected.
• For locking of the auto/manual changeover screw of pilot valve (fully tightened
in the clockwise direction).
• The span adjusting lever of internal feedback lever is attached to the correct
(Direct or Reverse) position.
• For correct use of the cam face (Direct or Reverse) and that flange nut is firmly
locked.
High Pressure Balance
(13.1 - 14.5 psi Ps)
Med. Pressure Balance
(7.3 psi Ps)
Low Pressure Balance
(5.8 - 7.3 psi Ps)
Ps = Sup. Pressure
.
Page 4

AINTENANCE
M
f the supply air is fouled, the positioner may not operate normally. Periodically
I
heck the compressed air cleaning system and make sure that clean air is always
c
upplied. When disassembling the pilot valve, coat grease to the O-ring of the
s
sliding section. When the fixed orifice is clogged with carbon particles or others,
remove the pilot valve Auto/Manual changeover screw (built-in fixed aperture)
and clean it by inserting a 32 AWG wire into the aperture. If it must be replaced
ith new one, stop the supply pressure and remove the stopper screw of the pilot
w
alve. Check the positioner once a year. Treatment at an early stage is especially
v
mportant if the positioner is used in severe environments, like coastal area. In
i
he unlikely event the 265ER Series Positioner should fail, the unit can be
t
returned to the factory for warranty repair if the warranty period has not expired.
Contact our customer service department for a RGA number and to setup the
return.
AUTION AND HANDLING
C
o not apply large vibration or impact to the positioner. The positioner must be
D
handled very carefully during transportation and operation. If the positioner is
used at temperatures outside of the specification, the sealing materials
deteriorate quickly and also the positioner may not operate normally. Do not
remove the terminal cover at a dangerous position during power conduction. Be
ure that the terminal cover and body cover are installed during the operation. If
s
ou leave the positioner at the operation site for a long time without using it, put
y
he cover on it so that rain water does not enter the positioner. If the atmosphere
t
is of high temperature or high humidity, take measures to avoid condensation
inside. The condensation control measures must be taken thoroughly for export
shipment
TROUBLESHOOTING
Condition
Not operating with Input
Signal applied
OUT1 pressure raised,
does not come down
Output pressure is
operated by A/M switch
only
Hunting occurs
Actuator is operated by
On/Off only
Linearity is not good
Hysteresis is not good
Cause
Too low or no supply air
Loose connection
Wrong wiring for (+) and (-)
Short or open circuit of terminal
motor
Clogged nozzle
Loose or wrong setting
of feedback lever
Leakage of A/M switch
Wrong contact or search of
Flapper
Clogged fixed orifice
Clogged nozzle
Off-positioned stabilizer spring
Too low of actuator volume
Clogged fixed orifice
Wrong connection of
OUT1 and OUT2 tube
Wrong setting of feed-back
lever
Wrong Zero, Span Adjustment
Supply pressure is unstable
Wrong setting of Seat Adjuster
Loose connection of actuator
and positioner
Cam Shaft is worn out
What To Do
Input or increase supply air
Tighten set screw of terminal
Connect wiring (+) and (-)
Replace Motor Unit
Replace Motor Unit
Correct setting and tighten
Tighten or replace A/M switch
Replace Motor Unit
Clean or replace fixed orifice
Clean nozzle or replace Motor
Unit
Insert stabilizer spring
Insert orifice
Clean or replace fixed orifice
Correct position of tube
Readjust setting of feedback lever
Readjustment of Zero, Span
Adjustment
Replace regulator
Readjust Seat Adjuster
Tighten connection
Replace Cam Shaft
©Copyright 2014 Dwyer Instruments, Inc. Printed in U.S.A. 4/14 FR# RP-443333-20 Rev. 7
PROXIMITY DIV., DWYER INSTRUMENTS, INC.
P.O. BOX 358 • MICHIGAN CITY, INDIANA 46360 U.S. A.
Phone: 219/879-8000 www.dwyer-inst.com
Fax: 219/872-9057 e-mail: info@dwyermail.com
 Loading...