

Page 1
v.15.march.2017
Page 2
2
“To be used only
where the climate
is not tropical”
“The Lightning Flash with arrowhead symbol
within an equilateral triangle, is intended
to alert the user to the presence of uninsulated
“dangerous voltage” within the product enclosure
that may be of suf�icient magnitude to constitute
a risk of shock to persons.”
“The exclamation point within an equilateral
triangle is intended to alert the user to the
presence of important operating and
maintenance (servicing) instructions in the
literature accompanying the product.”
“To be used only
with altitude
not exceeding 2000 m”
MORE INFORMATION
For warranty and service information, please contact your local DV Mark distributor (contact information available at www.dvmar
k.it). For more technical information, please visit us at www.dvmark.it and ll out the form on the Support
page. We hope you enjoy your power amp and use it to make great music!
IMPORTANT SAFETY INSTRUCTIONS
1) Read these instructions;
2) Keep these instructions;
3) Heed all warnings;
4) Follow all instructions;
5) Do not use this apparatus near water;
6) Clean only with dry cloth;
7) Do not block any ventilation openings. Install in accordance with the manufacturer’s instructions;
8) Do not install near any heat sources such as radiators, heat registers, stoves, or other apparatus (including amplifiers)
that produce heat;
9) Do not defeat the safety purpose of the polarized or ground-type plug. A polarized plug has two blades with one wider tha
n the other.
A grounding type plug has two blades and a third grounding prong. The wide blade or the third prong are provided for yo
ur safety. If the provided plug
does not fit into your outlet, consult an electrician for replacement of the obsolete outlet;
10) Protect the power cord from being walked on or pinched, particularly at plugs, convenience receptacles, and the point wh
ere they exit from the apparatus
11) Only use attachments/accessories specified by the manufacturer;
12) Use only with the cart, stand, tripod, bracket, or table specified by the manufacturer, or sold with the apparatus.
When a cart is used, use caution when moving the cart/apparatus combination to avoid injury from the tip-over (and Fig
21 DU Tipping Cart Symbol).
13) Unplug this apparatus during lightning storms or when unused for long periods of time;
14) Refer all servicing to qualified service personnel. Servicing is required when the apparatus has been damaged in any way,
such as power-supply cord or
plug is damaged, liquid has been spilled or objects have fallen into the apparatus, the apparatus has been exposed to r
ain or moisture, does not operate
normally, or has been dropped;
15) “WARNING: TO REDUCE THE RISK OF FIRE OR ELECTRIC SHOCK, DO NOT EXPOSE THIS APPARATUS TO RAIN OR MOISTURE AND OBJECTS FILL
ED
WITH LIQUIDS, SUCH AS VASES, SHOULD NOT BE PLACED ON THIS APPARATUS”.
16) TO COMPLETELY DISCONNECT THIS APPARATUS FROM THE AC MAINS, DISCONNECT THE POWER SUPPLY CORD PLUG FROM THE AC
RECEPTACLE;
17) THE MAINS PLUG OF THE POWER SUPPLY CORD SHALL REAMIN READILY ACCESSIBLE.
18) In case of voltage selector make sure the switch on the rear panel is on the correct voltage before connecting it to the
AC power, and the fuse is the right
value for that voltage (This selector is not available on the 100V version).
Please change the voltage/fuse values label located near the voltage selector matching the voltage/fuse values when you
need to change the voltage of the
apparatus.
19) “WARNING: THIS APPARATUS MUST BE SECURELY ATTACHED TO THE FLOOR OR WALL IN ACCORDANCE WITH INSTALLATION ISTRUCTION.
TIPPING, SHAKING, OR ROCKING THE MACHINE MAY CAUSE INJURY OR DEATH.”
20) “CAUTION: THESE SERVICING INSTRUCTIONS ARE FOR USE BY QUALIFIED SERVICE PERSONNEL ONLY. TO REDUCE THE RISK OF ELECTRIC SH
OCK
DO NOT PERFORM ANY SERVICING OTHER THAN THAT CONTAINED IN TEH OPERATING INSTRUCTIONS UNLESS YOU ARE QUALIFIED TO DO SO”
PRÉCAUTIONS D’EMPLOI
1) Lire ces instructions;
2) Conserver ces instructions;
3) Suivre tous les conseils d’utilisations;
4) Suivre toutes les instructions;
5) Ne pas utiliser cet appareil au bord de l’eau;
6) Nettoyer uniquement avec un chiffon humide;
7) Ne pas bloquer le système de ventilation. Installer conformément aux instructions du fabricant;
8) Ne pas installer l’appareil près d’une source de chaleur tel qu’un radiateur, un fourneau, ou bien un autre appareil qui produit de la chaleur;
9) Ne pas modifier le système de sécurité de la fiche polarisée ou de de la fiche pour les prises de terre. Une fiche polari
sée a deux broches, l’une étant plus
distante de l’autre. Une fiche pour prise de terre a deux broches et une pointe pour la masse.
La broche plus distante et la pointe pour la masse ont été installées pour votre sécurité. Si la fiche fournie de rentre pas dansvotre prise de courant
consulter un électricien pour la substitution;
10) Protéger le cordon d’alimentation afin qu’il ne soit pas piétiné ou écrasé tout particulièrement au niveau des fiches, des prises de courant femelles, et des
parties qui sortent de l’appareil;
11) Utiliser uniquement les accessoires recommendés par le fabricant;
12) Utilisez uniquement avec le chariot, le socle, le trépied, le support ou la table spécifiés par le fabricant ou vendu avec l’appareil. Lorsque vous utilisez un
chariot, soyez prudent lorsque vous déplacez l’ensemble chariot / appareil pour éviter toute blessure du renversement (et la figure 21 DU Tipping panier
Symbol).
13) Ne pas branché l’appareil en cas d’orage accompagné d’éclairs. Le débrancher en cas de non utilisation prolongée;
14) S’adresser à un service assistance agréé si l’appareil a subi des dommages, si le cordon d’alimentation ou la fiche a été endommagé,
si un liquide a été renversé sur l’appareil ou bien si un object est tombé dans l’appareil, si ce dernier a été exposé à la pluie ou à l’humidité,
s’il ne fonctionne pas correctement ou s’il est tombé;
15) “AVERTISSANT: POUR RÉDUIRE LE RISQUE DU FEU OU DE DÉCHARGE ÉLECTRIQUE, N’EXPOSEZ PAS CET APPAREIL À LA PLUIE OU L’HUMIDITÉ
ET
LES OBJETS REMPLIS DE LIQUIDES; TELS QUE DES VASES, NE DEVRAIENT PAS ÊTRE PLACÉS SUR CET APPAREIL”;
16) POUR DÉCONNECTER COMPLETEMEN L’APPAREIL DU RESEAU D’ALIMENTATION, DÉCONNECTER LE CORDON D’ALIMENTATION DE LA PRISE
MURALE;
17) LA PRISE DU RESEAU D’ALIMENTATION DOIT DEMEURER AISEMENT ACCESSIBLE.
18) En cas de sélecteur de tension s'assurer que l'interrupteur sur le panneau arrière est sur la bonne tension avant de le
raccorder à l'alimentation secteur et
le fusible est la bonne valeur pour que la tension (Ce sélecteur n'est pas disponible sur la version 100V).
S'il vous plaît changer la tension / valeurs de fusibles étiquette située près du sélecteur de tension correspondant aux
valeurs / fusibles de tension lorsque
vous avez besoin de changer la tension de l'appareil.
19) “AVERTISSEMENT: CET APPAREIL DOIT ÊTRE ASSUJETTI AU PLANCHER OU AU MUR CONFORMÉMENT AUX INSTRUCTIONS D’INSTALLATION. LE
FAIT DE L’INCLINER, DE LE BALANCER OU DE L’AGITER PEUT CAUSER DES BLESSURES OU LA MORT.”
20) “ATTENTION: CES INSTRUCTIONS D'ENTRETIEN SONT DESTINÉES PAR PERSONNEL QUALIFIÉ SEULEMENT . POUR REDUIRE LE RISQUE DE CHOC
ÉLECTRIQUE NE PAS EFFECTUER TOUT ENTRETIEN AUTRE QUE CELLES CONTENUES DANS TEH MODE D'EMPLOI SAUF SI VOUS ÊTES QUALIFIÉ
POUR LE FAIRE”
SAFETY INSTRUCTIONS
Page 3
Marco De Virgiliis
3
MARK VISION
A Word from Marco De Virgiliis
Thank you for choosing the DV MARK EVO1 head.
DV Mark continues creating tools revolutionizing the classics to present days, in a word ... EVOLUTION!
We know there are many amps that have cool tones, but one of the biggest problem in the sea of choices is they deliver their tone in one unique way, and it is not
always the ‘right’ sound for each unique performance.
NOW the ideal amp does exist... the DV MARK EVO 1.
Thanks to six AMPS tone choices for each channel many cool options come with this rEVOlutionary amp, plus you can update them with other preferred amps
you can download from our website.
The DV MARK EVO 1 features two channels with a classic standard amp controls interface, reverb control for each channel, MIDI ports, on board tuner, aux in and
headphones out, FX loops, XLR Line Outs, Boost, and a powerful 250W power amp with an impressively warm tone and incredible dynamic.
We hope you will enjoy your new guitar amp, and we invite you to contact us any time with your comments and questions, at [email protected].
Thanks again, and good music!
Page 4
4
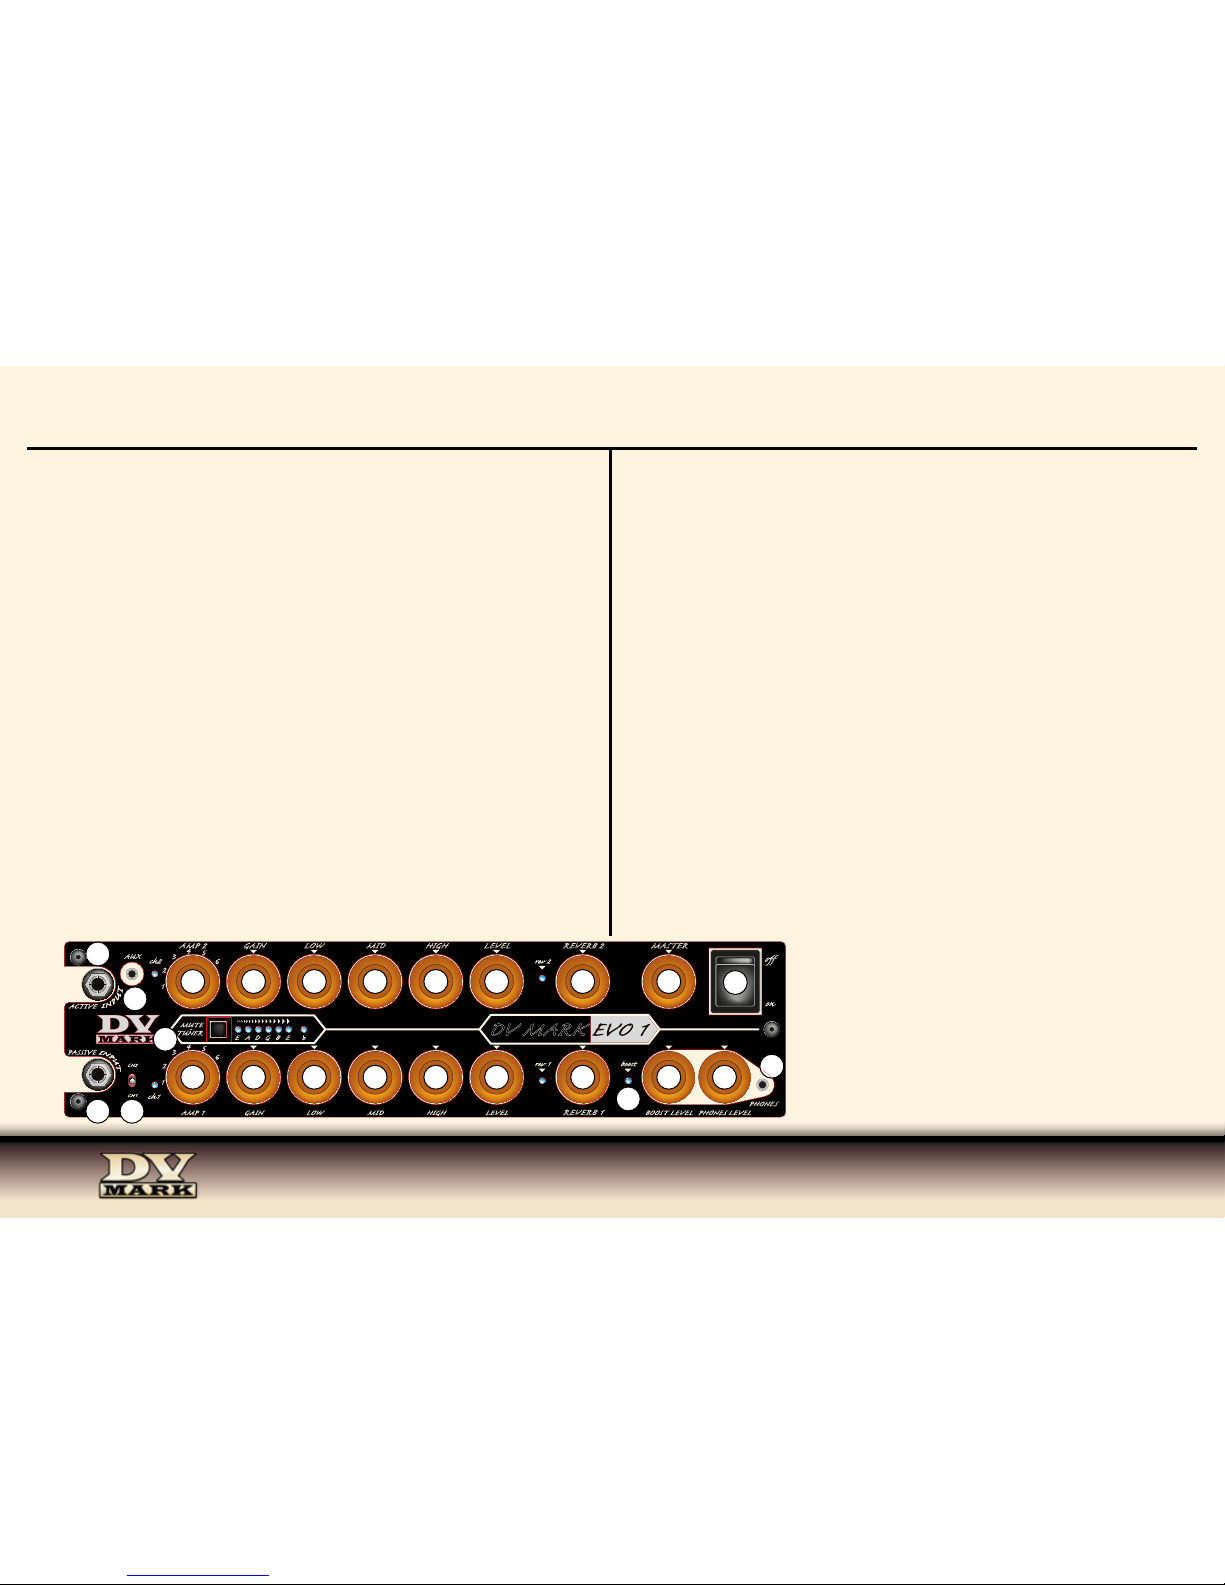
1) PASSIVE INPUT Connect your guitar to this input using a standard ¼” shielded instrument cable, this input is designed to best
interface with signal from instruments with passive electronic/pickups.
2) CH1/CH2 This channel selector switches between the Channel 1 and Channel 2.
Channel-switching can also be controlled by a EVO pedal that can be plugged into the MIDI IN on the rear panel (30).
3) AMP 1 Select between six AMPS tone choices available at channel 1.
FACTORY SETTING CH1
• DARKFACE ‘65 (65 Blackface FENDER® TWIN) > CLEAN
• MARAGOLD (DV Mark Greg Howe signature) > CLEAN
• TOP 30 (Vox AC30) > CLEAN
• TRIPLE 6 CH1 (DV Mark Triple 6) > CLEAN
• ROCK ‘75 (UK) (MARSHALL
®
JCM800®) > CRUNCH
• ECSTASY CH2 (BOGNER XTC® CH2) > CRUNCH
note: You can update AMPs choices for each channel as for your preference between the 15 available at the DV
MARK EVO SOFTWARE)
4) GAIN This knob sets the gain level of the channel 1.
5) LOW This knob controls the amount of low frequencies of the selected AMP / CH1.
6) MID The Mid control regulates the midrange frequencies of the selected AMP / CH1.
7) HIGH The High knob controls the amount of high frequencies of the selected AMP / CH1.
8) LEVEL Controls the level of the selected AMP model on CH1.
9) REVERB 1 Controls the level of the reverb assigned to channel 1.
REV FACTORY SETTING CH1: SPRING REVERB (Accutronics ®)
note: - You can customize the REVERB parameters as for your preference thanks to the DV MARK EVO SOFTWARE.
- REVERB 1 ON/OFF switching can be controlled by the EVO controller.
10) ACTIVE INPUT Connect your guitar to this input using a standard ¼” shielded instrument cable, this input is designed to best
interface with signal from instruments with active electronic/pickups.
11) AUX Use this input to plug in an iPod, CD or MP3 player using a stereo mini plug 1/8”.
This signal mixes in evenly with the instrument connected to the input/s.
FRONT PANEL
12) AMP 2 Select between six AMPS tone choices available at channel 2.
FACTORY SETTING CH2
• TRIPLE 6 CH2 (DV Mark Triple 6) > CRUNCH
• SLODRIVE (US) (SOLDANO X88R ® CH2) > CRUNCH
• JCMARK (MARSHALL ® JCM800 ®) > CRUNCH
• MARAGOLD (DV Mark Greg Howe signature) > LEAD
• SLODRIVE (US) (SOLDANO X88R ® CH3) > LEAD
• RECTO (US) (Mesa Boogie ® DUALRECTIFIER ®) > LEAD
note: You can update AMPs choices for each channel as for your preference between the 15 available at the DV
MARK EVO SOFTWARE)
13) GA IN This knob sets the gain level of the channel 2.
14) LOW This knob controls the amount of low frequencies of the selected AMP / CH2.
15) MID The Mid control regulates the midrange frequencies of the selected AMP / CH2.
16) HIGH The High knob controls the amount of high frequencies of the selected AMP / CH2.
17) LEVEL Controls the level of the selected AMP model on CH2.
18) REVERB 2 Controls the level of the reverb assigned to channel 2.
REV FACTORY SETTING CH2: REVERB (DV MARK custom item)
note: - You can customize the REVERB parameters as for your preference thanks to the DV MARK EVO SOFTWARE.
- REVERB 2 ON/OFF switching can be controlled by the EVO controller.
19) MU TE/TUN ER The DV Mark EVO 1 features an onboard tuner that lets you tune your instrument at a regular 440Hz tuning, half
step down and a whole tone down. The default status is 440Hz and the light on the “b” will light in green. Pushing and holding the
MUTE/TUNER button, the LED will light in Orange after releasing it and you can tune your instrument half step down. Pressing and
holding the same button a second time will make the “b” LED light in red, that means you’re ready to tune your instrument a whole
step down. Pressing and holding again you’ll go back to the 440 Hz tuning mode.
20) MA STER This control is the master feed from the end of the channels CH1/CH2 to the power stage. Start with the Master control
OFF (all the way counter-clockwise) and turn it up gradually until you reach your desidered volume.
21) BOOST LEVEL This knob controls the boost level with a range up to +12dB for notching
up your volume for solos during live performance.
22) BOOST This LED signals when the BOOST is actived, BOOST ON/OFF switching is
controlled by the EVO controller.
23) PHONES LEVEL Controls the level of the signal send to the PHONES OUTPUT (24).
24) PHONES For quiet practing plug headphones into this mini plug 1/8” input.
25) ON/OFF SWITCH This switch delivers AC power to the amp.
The DV Mark EVO 1 is manufactured to be used in the country where it has been sold, and it’s
factory preset to that country’s voltage. So make sure you’re sending the correct voltage to your
amp before you connecting it to AC power and turning power on.
10
11
24
AMP 2 GAIN LOW MID HIGH LEVEL
rev 2
REVERB 2 MAS TER
ch2
AUX
CH1
CH2
ACTIVE
PASSIVE
AMP 1
GAIN LOW MI D HIGH LEVEL
REVERB 1
BOOST LEVEL PHONES LEVEL
MUTE
-
TUNER
PHONES
DV MARK
ch1
on
rev 1 boost
E A D G B E
i
1
2
3
4
5
6
1
2
3
4
5
6
1
2
3
4
5
6
7
8
9
12
13 14 15
16
17
18
19
20
21
22
23
25
Page 5
5
AMPS SELECTION at DV Mark EVO 1 software
clean
• TRIPLE 6 CH1 (DV Mark Triple 6)
• DARKFACE ‘65 (65 Blackface FENDER® TWIN REVERB®)
• SLODRIVE US (SOLDANO X88R® CH1)
• ECSTASY CH1 (BOGNER XTC® CH1) clean
• MARAGOLD (DV Mark Greg Howe signature)
• TOP 30 (Vox AC30)
crunch
• TRIPLE 6 CH2 (DV Mark Triple 6)
• ROCK ‘75 UK (MARSHALL® JCM800®)
• SLODRIVE US (SOLDANO X88R® CH2)
• ECSTASY CH2 (BOGNER XTC® CH2)
• JCMARK (MARSHALL® JCM800®)
lead
• RECTO US (Mesa Boogie® DUALRECTIFIER®)
• SLODRIVE US (SOLDANO X88R® CH3)
• ECSTASY CH3 (BOGNER XTC® CH3)
• PROGRESSIVE (MARK V hi-gain inspired)
• MARAGOLD CH3 (DV Mark Greg Howe signature)
REVERB SELECTION at DV Mark EVO 1 software
• NONE (no reverb)/ SPRING REVERB / REVERB
Parameters: TIME / COLOR / DIFFUSION
CAB SELECTION at DV Mark EVO 1 software
• NONE (no CAB emulator)
• 4x12” VINTAGE 30® (Celestion® Vintage 30®)
• 2x12 CELESTION® (Vox® AC 30®)
• 1x12 JENSEN® (Fender® De Luxe®)
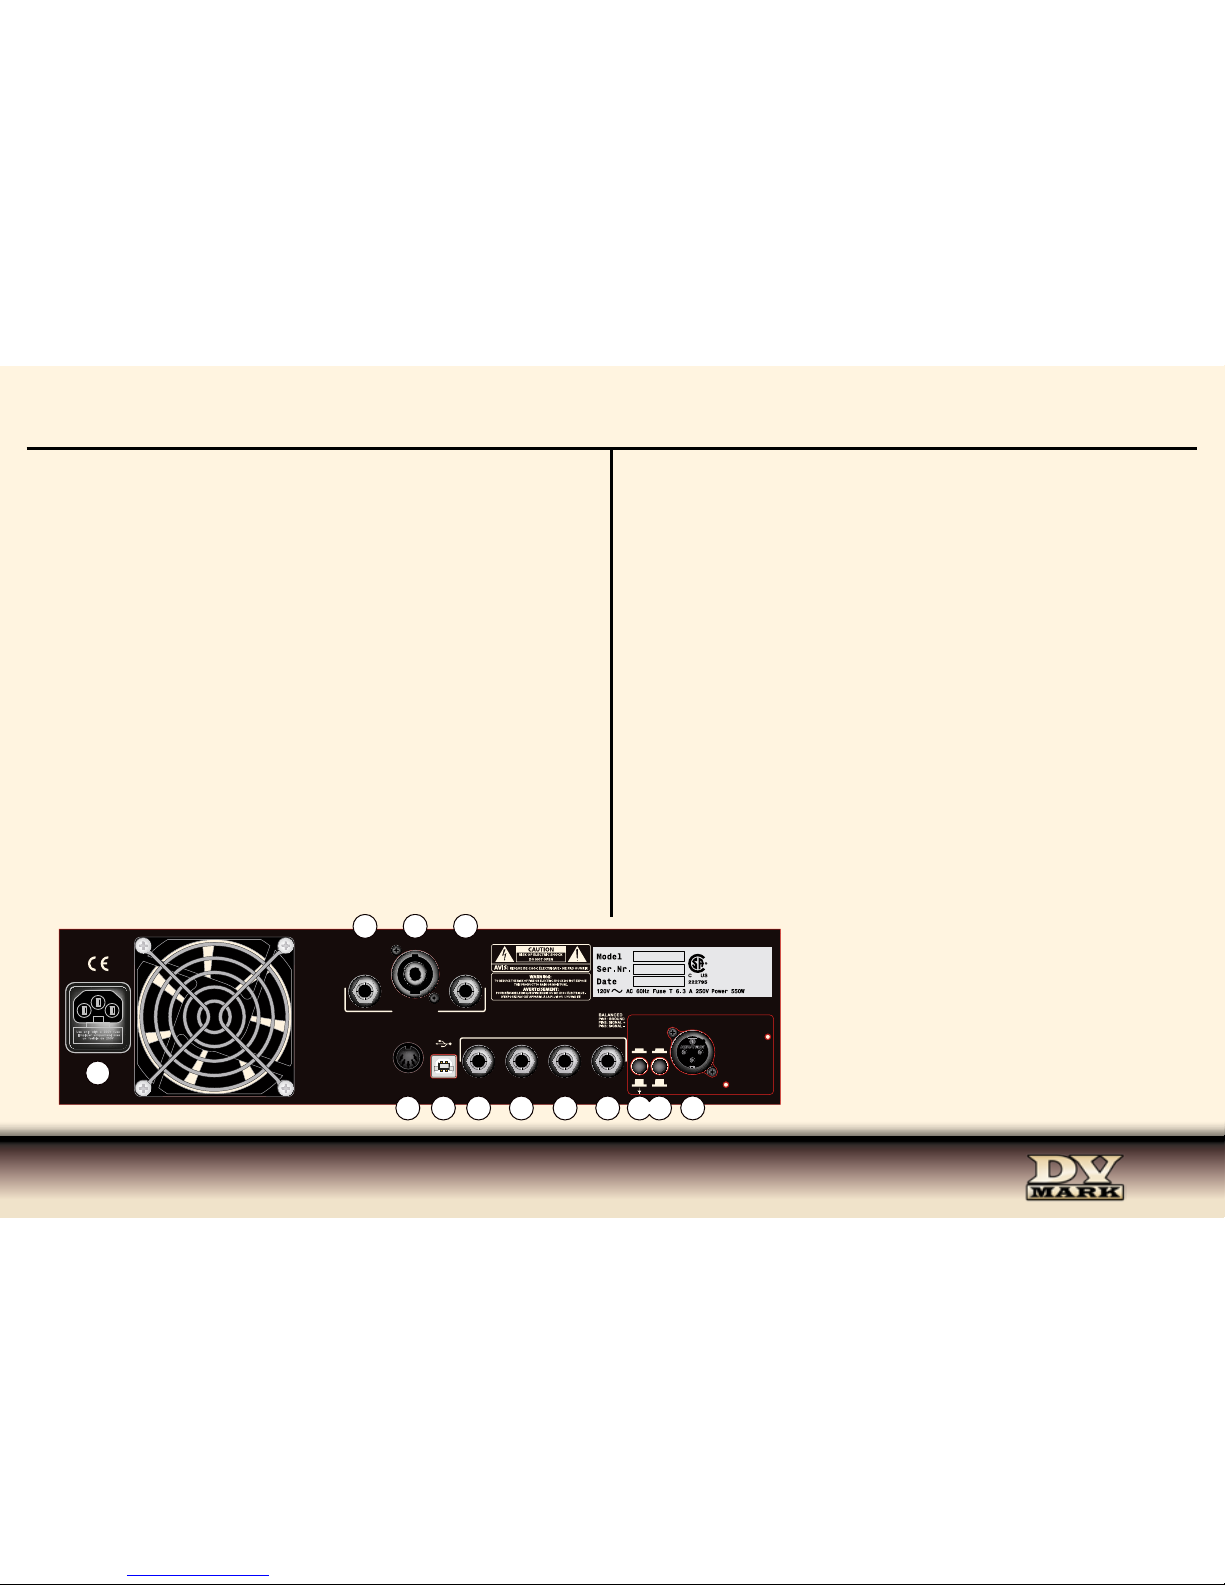
32/34) SEND/ RETURN 1 If you use effect pedals or rack gear, you can route them through
the CH1 using SEND 1 (32) and RETURN 1 (34), connecting the SEND to the input of the effect
and the RETURN to the effect’s output using instrument cables.
33/35) SEND/ RETURN 2 If you use effect pedals or rack gear, you can route them through
the CH2 using SEND 2 (33) and RETURN 2 (35), connecting the SEND to the input of the effect
and the RETURN to the effect’s output using instrument cables.
36) ) +4 / -10d B Output Le vel selec t switch (+ 4/-10dB) rel ated to th e LINE OUT X LR level.
37) GROUND LIFT Occasionally when you’re playing live and using the LINE OUT, the
soundman will detect a hum from your amp’s signal. This is almost always due to a grounding
problem related to your power source; you will likely eliminate this hum simply by flipping the
GROUND LIFT switch.
38) LINE OUT This output sends the preamp signal to the mixing console, to recording
device, DI, etc. The Line Out signal is post reverb and effects connected to the send/return.
CAB/Speaker Emulator is assignable at the XLR Line Out using the DV Mark EVO 1 software.
REAR PANEL
26) AC PO WER SOCKET Make sure the unit is grounded; all three terminals of the AC power plug must be connected to avoid any
injury to the user or damage to the unit.
The DV Mark EVO 1 is manufactured to be used in the country where it has been sold, and it’s factory preset to that country’s voltage.
So make sure you’re sending the correct voltage to your amp before you connect it to AC power.
27/28/29) SPEAKER OUT Connect your cabinet/s to the speaker out/s (minimum load 4 ohm, the speaker outputs are in parallel).
The speaker JACK outs (27-29) accepts ¼” Jack speaker cables, the SPEAKON (28) accepts SPEAKON speaker cable (either 2 poles
or 4 poles connector -standard wiring +1/-1).
Do not use instrument cables.
The DV Mark EVO 1 delivers 250W of power into a 4 ohm cabinet (or two 8 ohm cabinets) or 150W into an 8 ohm cabinet.
30) MID I IN Connecting the EVO PEDAL to this MIDI input you’ve access to switch CH1/CH2, turn ON/OFF FX1 and FX2, TURN ON/
OFF the BOOST and the MUTE/TUNER functions.
• The MIDI RX CHANNEL is setted on #0
The switch between channel are setted as for the PROGRAM CHANGE:
• PC#1=Ch1 / PC#2=Ch2
REVERB 1, REVERB 2, BOOST, MUTE/TUNER ON/OFF are setted as for the CONTROL CHANGE:
• REVERB 1 ON = (CC #1,1) / REVERB 1 OFF = (CC #1,0)
• REVERB 2 ON = (CC #2,1) / REVERB 1 OFF = (CC #2,0)
• BOOST ON = (CC #3,1) / BOOST 1 OFF = (CC #3,0)
• TUNER ON = (CC #28,1) / TUNER OFF = (CC #28,0)
31) USB - This USB port allows to connect your DV Mark EVO 1 to a computer thanks to an USB A/B (printer) cable to set your
preferred AMPs on CH1 and CH2, parameters of REVERB 1/REVERB 2 and virtual CAB/Speaker Emulator (assignable at the XLR Line
Out) using the DV Mark EVO 1 software, and then storing your favorite settings on the amp.
10
11
24
AMP 2 GAIN LOW MID HIGH LEVEL
rev 2
REVERB 2 MAS TER
ch2
AUX
CH1
CH2
ACTIVE
PASSIVE
AMP 1
GAIN LOW MI D HIGH LEVEL
REVERB 1
BOOST LEVEL PHONES LEVEL
MUTE
-
TUNER
PHONES
DV MARK
ch1
on
rev 1 boost
E A D G B E
i
1
2
3
4
5
6
1
2
3
4
5
6
CLASS 2 WIRING
1 + = SIGNAL
1 - = GND
MIDI IN USB
SEND 1 SEND 2 RETURN 1 RETURN 2 LINE OUT
1
POST MIX
LINE OUT
2
GND LIFT
SPEAKER OUT
LOOP
PRE MIX
MINIMUM
LOAD
4 OHM
CAUTION:
FOR CONTINUED PROTECTION
AGAINST RISK OF FIRE
REPLACE ONLY WITH SAME
TYPE AND RATING FUSE.
ATTENTION:
REMPLACER UNIQUEMENT PAR
UN FUSIBLE DE MEME TYPE.
27
28
29
30
31
32
33
34
35
3637
38
26
LINE OUT
-10 dB
GND LIFT
+4 dB
1
2
3
4
5
6
7
8
9
12
13 14 15
16
17
18
19
20
21
22
23
25
Page 6
6
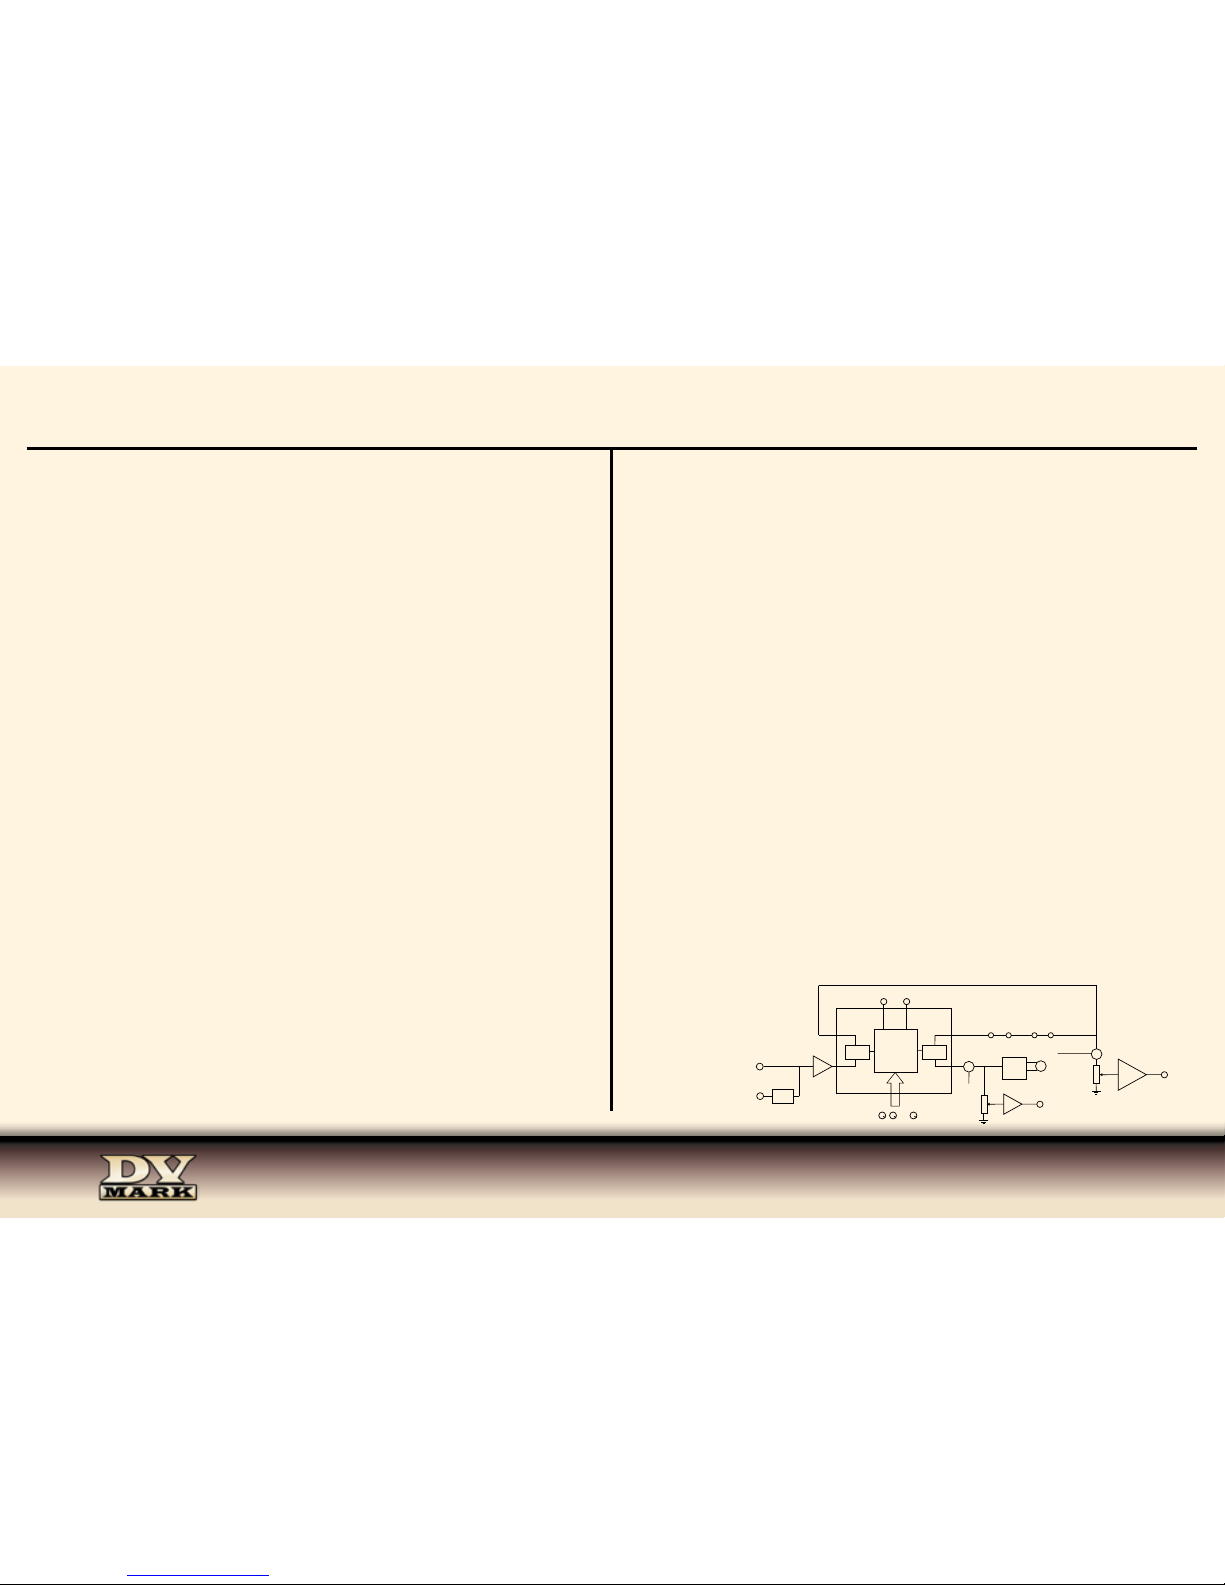
Channels: Two
PASSIVE INPUT: 1x 1/4” mono jack (impedance 1MΩ)
ACTIVE INPUT: 1x 1/4” mono jack (impedance 1MΩ)
AUX IN: 1x 1/8” stereo jack
USB port: USB type B
2 RETURN INPUTS : 2x 1/4” mono jack (impedance 500KΩ)
2 SEND OUTPUTS : 2x 1/4” mono jack (impedance 1KΩ)
SPEAKER OUTPUTS : 2x 1/4” mono jack + 1x Speakon parallel wiring, minimum
impedance load 4 ohms
LINE OUT: 1x XLR male balanced (GND Lift switch, +4/-10dB level switch)
PHONES OUTPUT: 1x 1/8” stereo jack
MIDI IN: DIN 5 poles
CONTROLS (for each channel)
Gain /Low / Mid / High / Level / REVERB Level
Amps Selection: 6 for CH1 / 6 for CH2
OTHER CONTROLS (commons)
Channel Switch: CH1 / CH2
Boost Level, Phones Level, Master
MIDI FUNCTIONS
switch CH1/CH2, FX1 ON/OFF, FX2 ON/OFF, BOOSTER ON/OFF, MUTE/TUNER
TECHNICAL SPECS
OUTPUT POWER
250W RMS @ 4 ohms / 150W RMS @ 8 ohms (impedance minimum load 4 ohms)
OTHER
HEIGHT: 3.94 in. / 100 mm
WIDTH: 14.17 in. / 360 cm
DEPTH: 10.04 in. / 255 cm
WEIGHT: 7.72 lbs / 3,5 kg
POWER REQUIREMENT: 100V; 120V; 230V; 240V 50/60Hz (Voltage is factory preset
according to region of sale).
DV Mark amps/combos are manufactured to be sold and used in the country of purchase, and are factory preset to that country’s voltage. Due to homologation issues, the
voltage may not be changed.
FUSE:
EUROPE 4 A 250V T 5x20
AUSTRALIA/UK 4 A 250V T 5x20
USA/CANADA 8 A 120V T 5x20
JAPAN 10 A 100V T 5x20
A/D
D/A
DSP
Line
out
Phone
Speaker
In
passive
In
active
Att
...
USB
Midi
+
+
Aux_in
Aux_in
Master
Phone
level
S/R 1
S/R 2
Page 7
EVO1 CONTROLLER
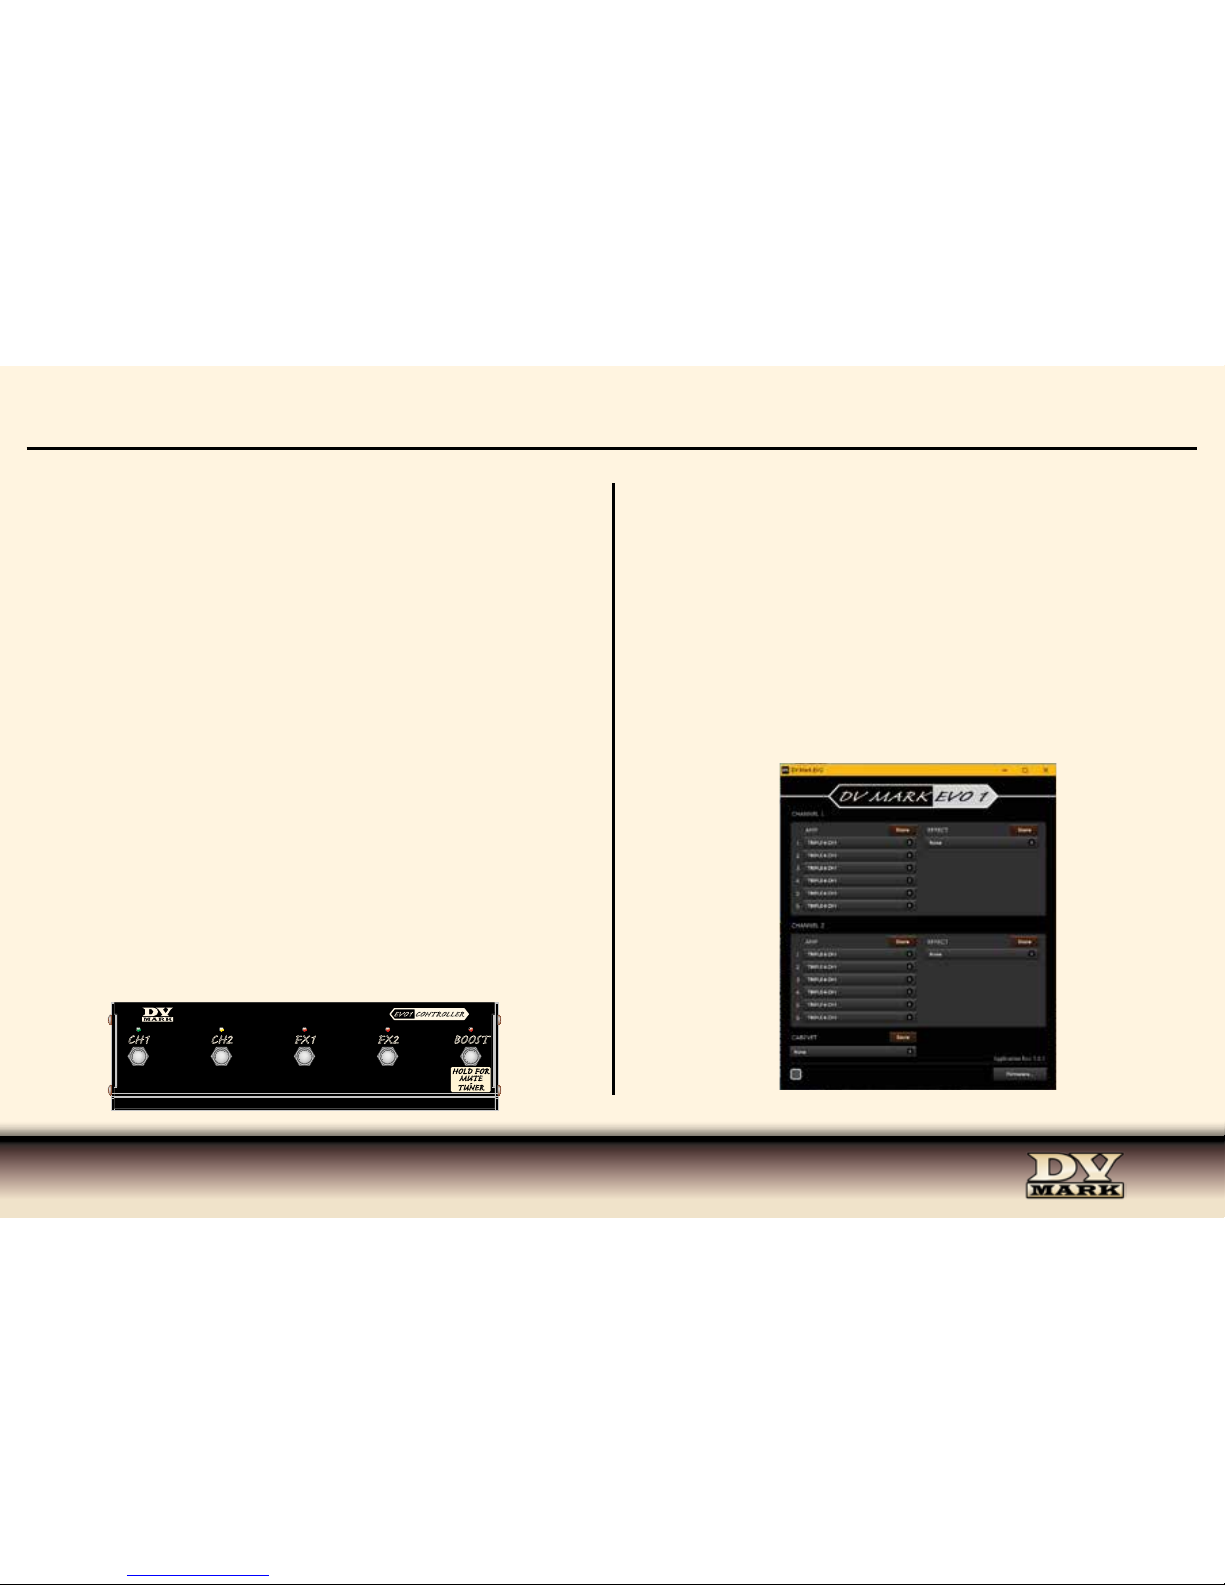
The optional EVO 1 CONTROLLER allows to switch between CH1 / CH2 and turn ON/OFF the FX1, FX2 and BOOST, plus accessing
the TUNER with MUTE function pressing and holding the boost switch.
The EVO 1 MIDI port features 9VDC phantom power (200 mA) via MIDI 5 poles cable (all pins connected) to power the EVO
CONTROLLER (or MIDI Pedalboard compatible with this voltage/power).
The EVO 1 can be controlled also via programmable MIDI pedalboard as for the MIDI commands listed below:
• TRX MIDI CHANNEL #0
• CH1 Program Change #1
• CH2 Program Change #2
• FX1 Control Change #1 (ON 1 / OFF 0)
• FX2 Control Change #2 (ON 1 / OFF 0)
• BOOST Control Change #3 (ON 1 / OFF 0)
• TUNER Control Change #28 (ON 1 / OFF 0)
The DV Mark EVO Control software is available for FREE DOWNLOAD at www.dvmark.it (for Windows and MAC) and it allows to
customize your DV Mark EVO 1 selecting the preferred AMP on each of the six locations of the two channels and the preferred type of
reverb (or none) for each channel and its parameters, plus virtual CAB/Speaker Emulator choices (assignable to the XLR Line Out).
- DOWNLOAD the DV Mark EVO Control software and unzip the file, then install the version compatible with your computer.
- Connect the USB port on the rear panel of the DV Mark EVO 1 to a computer using a USB A/B (printer) cable, when the unit is
communicating with the software the connection LED on the left bottom side will turn from grey into green.
- To select an AMP in one of the 6 positions of CH1 click on the arrows on its right side and the list of AMPS will be shown, select
the desired one clicking on its name, then press STORE; same procedure for CH2.
- To select the reverb type for CH1 click on the arrows on EFFECT section and select the desired one clicking on its name, set the
parameters as for your preference and press STORE; same procedure for CH2.
EVO1 CONTROLLER
CH1 CH2
BOOST
FX1 FX2
HOLD FOR
MUTE
-
TUNER
The DV Mark EVO Control software is available for FREE DOWNLOAD at www.dvmark.it (for Windows and MAC) and it allows to
customize your DV Mark EVO 1 selecting the preferred AMP on each of the six locations of the two channels and the preferred type of
reverb (or none) for each channel and its parameters, plus virtual CAB/Speaker Emulator choices (assignable to the XLR Line Out).
- DOWNLOAD the DV Mark EVO Control software and unzip the file, then install the version compatible with your computer.
- Connect the USB port on the rear panel of the DV Mark EVO 1 to a computer using a USB A/B (printer) cable, when the unit is
communicating with the software the connection LED on the left bottom side will turn from grey into green.
- To select an AMP in one of the 6 positions of CH1 click on the arrows on its right side and the list of AMPS will be shown, select
the desired one clicking on its name, then press STORE; same procedure for CH2.
- To select the reverb type for CH1 click on the arrows on EFFECT section and select the desired one clicking on its name, set the
parameters as for your preference and press STORE; same procedure for CH2.
- To select virtual CAB/Speaker Emulator to assign to the XLR Line Out, click on the arrows on CABINET section and select the desired
one clicking on its name and press STORE.
- The FIRMWARE button on the right bottom side allows to upgrade the EVO1 amplifier firmware when new updates are released.
DV MARK CONTROL SW
7
Page 8

EVO CONTROLLER
8
Page 9
srl
Italy - 66020 San Giovanni Teatino CH - Via Po, 52
Tel: +39 0854407764 / 0854465705 - Fax: +39 0854407764 / 0854407399 - www.dvmark.it - [email protected]
www.markaudio.it
www.markbass.it
TM
www.momark.it
TM
Product specications are subject to change without notice
 Loading...