

Page 1

DV Gen
DVC Gen
v.01.february.2016
15
15
Page 2

SAFETY INSTRUCTIONS
“To be used only
where the climate
is not tropical”
“The Lightning Flash with arrowhead symbol
within an equilateral triangle, is intended
to alert the user to the presence of uninsulated
“dangerous voltage” within the product enclosure
that may be of suf�icient magnitude to constitute
a risk of shock to persons.”
“The exclamation point within an equilateral
triangle is intended to alert the user to the
presence of important operating and
maintenance (servicing) instructions in the
literature accompanying the product.”
“To be used only
with altitude
not exceeding 2000 m”
1. IMPORTANT SAFETY INSTRUCTIONS
1) Read t hese instructions;
2) Keep t hese instruct ions;
3) Heed all war nings;
4) Follow all instructions;
5) Do not us e this appar atus near w ater;
6) Clean o nly with dry cloth;
7) Do not block any vent ilation openings. Inst all in accordance with t he manufactur er’s instructions;
8) Do not ins tall near any hea t sour ces such as radia tors, hea t register s, sto ves, or other app aratus (in cluding amplifiers) tha t
produce heat;
9) Do not de feat the safet y purpose of the pol ariz ed or ground-ty pe plug. A polar ized plug ha s two blade s with one wider tha n
the other. A grounding typ e plug has two blades and a t hird grounding prong.
The wide blade or th e third p rong are prov ided f or your s afe ty. If t he provided plug do es not f it into your ou tlet , consult an
electrici an for replaceme nt of the obsolete o utlet;
10) Prote ct the pow er cord from b eing walke d on or pinche d, partic ularly at plu gs, conve nience re ceptacl es, and the p oint where
they exit from the apparatus;
11) Only use attachments/accessories specified by the manufacturer;
12) Use only w ith the car t, stand, tripo d, bracket , or table spe cified by th e manufacture r, or sold w ith the apparat us.
Whe n a car t is used, use caution wh en mov ing the car t/apparatus combination to avoid injury from the tip-over (and Fig 21
DU Tipping Cart Sy mbol).
13) Unplug this app aratus during lightning storms or wh en unused for long period s of time;
14) Refer all ser vicing to qu alified servic e per sonn el. Servicing is required when the a pparatus has b een d amaged in any
way, suc h as power-supply c ord or plug is da maged, liquid has been spilled or obje cts have fallen in to the a pparatus, th e
appa ratus has b een expos ed to rain or moisture, doe s not operat e normally, or ha s been dropped;
15) “Warning: to r educe the risk of fire or ele ctric shock, do not expose th is apparatus to rain or moisture; and o bjects fill ed with
liquids, such as vases, should not be pl aced on this apparatu s”;
16) To completely disconnect this ap paratus from th e AC mains, disconnect the power supply cor d plug fron the AC receptacle;
17) The mains plug of the po wer supply cord sha ll reamin readily accessible.
18) In cas e of volt age s elector make sure the s witc h on the rear p anel is on the correct voltag e before connec ting it to the AC
power, and the fuse is the right value for t hat voltag e (This selector is not av ailable on th e 100V v ersion).
Pleas e change th e volt age /fu se values label located ne ar th e volt age selec tor ma tchin g the voltage/ fuse values when you
need t o change the voltage of the appara tus.
19) “WARNING: t his appara tus must be secur ely attac hed to the floor or wall in acc ordance with ins tallation istru ction. Tipping,
shaking, or rocking the machin e may cause injury or dea th.”
1. PRÉCAUTIONS D’EMPLOI
1) Lire ces instruc tions;
2) Conserver ces instructions;
3) Suivr e tous les conseils d ’utilisations;
4) Suivr e toutes les instr uctions;
5) Ne pas utiliser cet appa reil au bord de l’eau;
6) Nettoyer uniquemen t avec un chif fon humide;
7) Ne pas bloqu er le systèm e de ventilation. Insta ller conformément au x instructions du f abricant;
8) Ne pas installer l’appareil près d’une so urce de chal eur tel qu’un r adiateur, un fourneau, ou bien un autre appareil qui produit de
la chaleur;
9) Ne pas modif ier le systè me de sécurité de la fiche polarisée ou de de la fich e pour les pris es de terre. Une fiche pol arisée a deux
broches, l’une étant plus dis tante de l’autre. Une fiche pour prise de te rre a deux broche s et une pointe p our la masse.
L a broche plu s distant e et la pointe p our la mas se ont été in stallée s pour votr e sécurit é. Si la fiche f ournie de r entre pa s dans votr e
prise d e courant consulter un élect ricien pour la substitution;
10) Prot éger le cor don d’alime ntation a fin qu’il ne soi t pas piétin é ou écras é tout part iculièrem ent au nive au des fich es, des pri ses de
courant fe melles, et des partie s qui sortent de l’a ppareil;
11) Utilis er uniquement les accessoires r ecommendés par le fa bricant;
12) Utilis ez uniquement avec le ch ariot, le socle, le trépied, le suppor t ou la table spécifiés p ar le fabric ant ou vendu avec l’appareil.
Lors que vous utili sez un char iot, soyez p rudent lor sque vous d éplacez l ’ensembl e chariot / ap pareil pour é viter tout e blessur e du
renverse ment (et la figure 21 DU Tipping panier Sy mbol).
13) Ne pas bran ché l’appa reil en cas d’o rage accompag né d’éclair s. Le débranche r en cas de non u tilisation prolong ée;
14) S’adre sse r à un servic e assistance a gréé si l’appare il a subi d es dommages, si le cordon d’ali mentation ou la fiche a été
endommag é, si un liquide a été renvers é sur l’appareil ou bien si un object est to mbé dans l’a ppareil, si c e dernier a été expo sé à
la pluie ou à l’humidité, s’il ne fonctionne pas corre ctement ou s’il est tombé;
15) “Avertis sant: pour réduire le risque du feu ou d e déc harg e électriq ue, n’e xposez pas cet appa reil à la pluie ou l’ humidité et l es
objet s remplis de liquides; tels q ue des vases, ne d evraient p as être placés sur cet appar eil”;
16) Pour déconnecter totale ment cet appareil du se cteur, débranch ez la cordon d ’alimenta tion fiche de l a prise sect eur;
17) La prise de courant doit ê tre facilement a ccessible.
18) En ca s de sélect eur de tensio n s’assurer que l’i nterrupt eur sur le panneau a rrière est sur la bonn e tension avant de le raccord er à
l’alim entation s ecteur e t le fusible es t la bonne va leur pour qu e la tension (Ce s électeu r n’est pas dis ponible sur l a version 100 V).
S’il vous plaî t changer l a tension / val eurs de fusibles é tiquett e situ ée près du sélecteur de tension correspondant aux vale urs /
fusibles de t ension lorsque vous avez besoin de ch anger la ten sion de l’appareil.
19) “AVERT ISSEMENT: cet appareil doit ê tre assujetti au plan cher ou au mur c onformém ent aux inst ructions d’inst allation.
Le fait de l’inclin er, de le balancer ou d e l’agiter pe ut causer d es blessures ou la mort.”
MORE INFORMATION
For warranty and ser vice information, please contact your local DV Mark distributor (contact information available at ww w.dvmark.it). For more technical inform ation, please visit us at w ww.dvmark.it
hope you enjoy your amplifier and us e it to make gre at music!
and fill out the form on the Contact Us page. We
2
Page 3

MARK VISION
A Word from Marco De Virgiliis
Thank you for choosing DV MARK!
The DV Mark Silver Generation Amps will bring about a much easier lifestyle for every musician around the world. Thanks to our cutting-edge proprietary technology we can offer affordable and great sounding amps, easy-to-use, reliable and ultra-portable… improving the quality of musicians life, making it easier!
• TheDV GEN 15 is an addictive 15W class A all-tube head of DV Mark Silver Generation Series, that will charm you with its vintage personality and
impress you with its incredible full sound-tone, its versatility, feel and reliable performance.
• Matchingallfeaturesofthe15WclassAall-tubeDVGEN15headwithasingle12”DVNeoclassicspeaker,theDVC GEN 15 combo is a perfect
choice for gigging guitarists, with best portability and zero compromise on volume or tone.
This amp also feature a Dual Voltage Switch 120V/240V (not available on the 100V version manufactured for Japan) to use the amp in countries with different
voltages, without having to carry an external converter!
DV Mark DV GEN 15 head and DVC GEN 15 combo allow you to get killer tube tone at a fraction of the weight you’d expect. We hope you will enjoy your
new guitar amp, and we invite you to contact us any time with your comments and questions, at [email protected].
Thanks again, and good music!
Marco De Virgiliis
3
Page 4
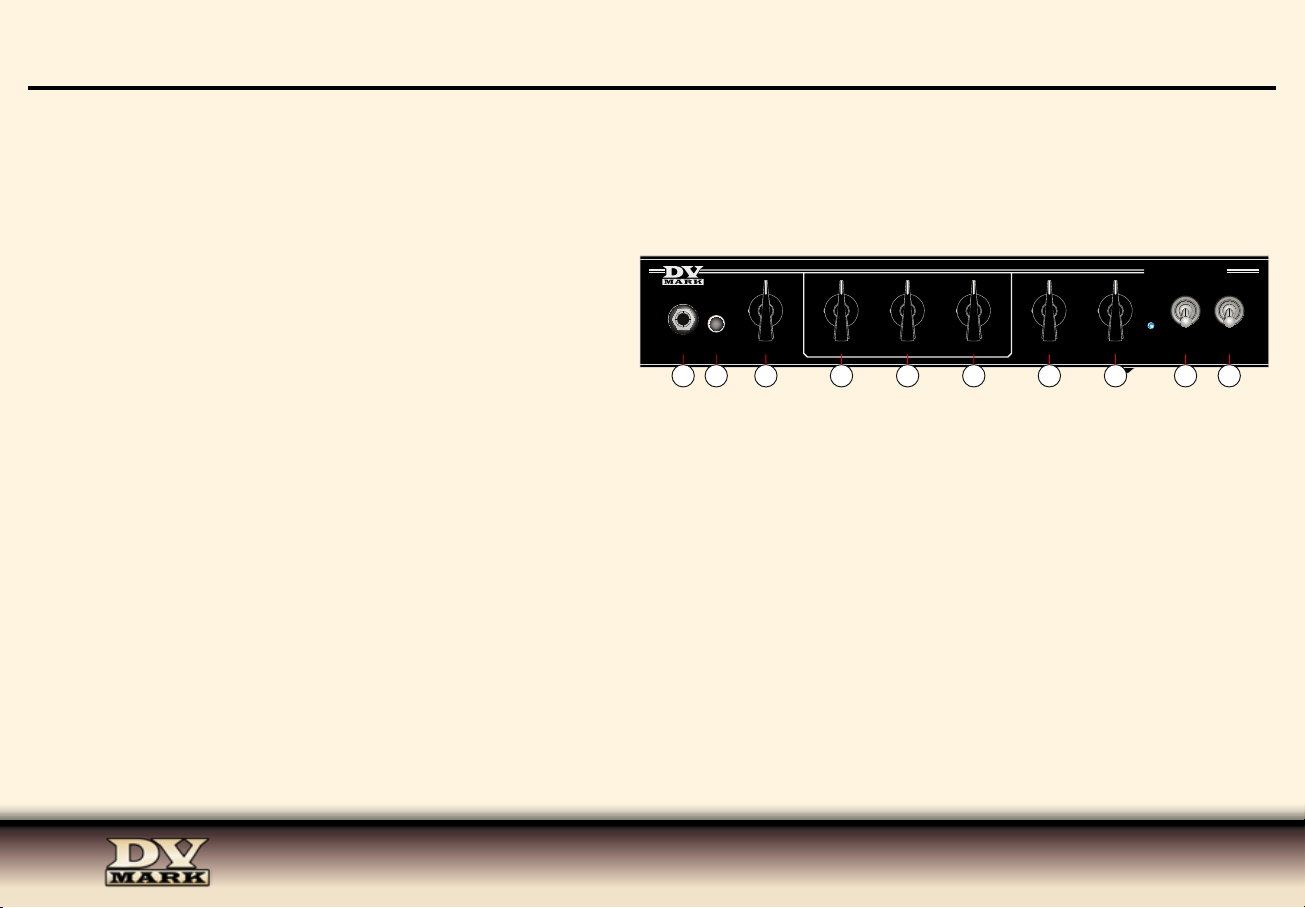
FRONT PANEL
1) INPUT Connect your guitar to this input using a standard ¼” shielded instrument cable.
2) BOOST This switch increases your level by +6 dB, which is very useful for live solos. With the right gain setting the boost control also lets you
change from a clean sound to a crunch/overdrive sound.
3) GAIN This knob sets the gain level, and is the preamp most powerful control. It not only determines the amount of drive or saturation (to get clean,
crunch or overdriven sounds, or anything in between), but also plays an
important role in tone shaping.
4) BASS This knob controls the amount of low frequencies in your sound.
When you’re starting to explore sounds on the amp, avoid boosting the
lows too much as this can reduce your attack and muddy your sound—
especially with higher gain settings.
5) MIDDLE The Middle control regulates the midrange frequencies and
INPUT BOOST
172
456
3
2
1
GAIN
3
456
7
3
8
2
9
1
100
456
7
3
8
2
9
1
100
BASS
MIDDLE
4
456
7
3
8
2
9
1
100
HIGH
5
6
456
7
3
8
2
9
1
100
REVERB
456
7
3
8
9
100
7
2
9
1
100
MASTER
8
is an important part of your tone shaping. The frequency range it boosts
or cuts has a big effect on the character of your sound. For a more scoopy tone, lower the mids. Turn the knob up for more focused attack and better
pitch definition.
6) HIGH The High knob controls the amount of high frequencies in your sound. It can produce unwanted noise (hiss) or pickup feedback when really
cranked, so it’s best to avoid extreme settings.
7) REVERB Level control for the onboard reverb. This amp features a last generation digital reverb, it’s sweet-sounding, warm and natural.
8) MASTER This control is the master feed from the end of the preamp channel to the tube power stage. It allows you to obtain a wide range of sounds/
colours in relation to the gain setting—for example, very low gain sounds at high volumes, or high gain sounds at low volumes.
9) STANDBY Before powering on, make sure this switch is in standby position.
When you turn on the power, make sure this switch is in standby position for about 30 seconds. Between sets or whenever you’re on a break from
playing, put the amp in standby position, this will extend the power tubes life.
10) POWER This switch delivers AC power to the amp. Make sure the unit is grounded; all three terminals of the AC power plug must be connected to
avoid any injury to the user or damage to the unit.
The DV GEN 15 head and DVC GEN 15 combo feature a 120V/240V Voltage Selector
(not available on the 100V version manufactured for Japan) to
use the amp in countries with different voltages, so make sure to properly set the voltage switch on the rear panel before connecting it to the AC power,
and use the right fuse value as well. Follow the procedure described in the STANDBY section above (9) before powering up your amp.
Gen
8
ON
15
9 10
ON
OFFSTANDBY
4
Page 5
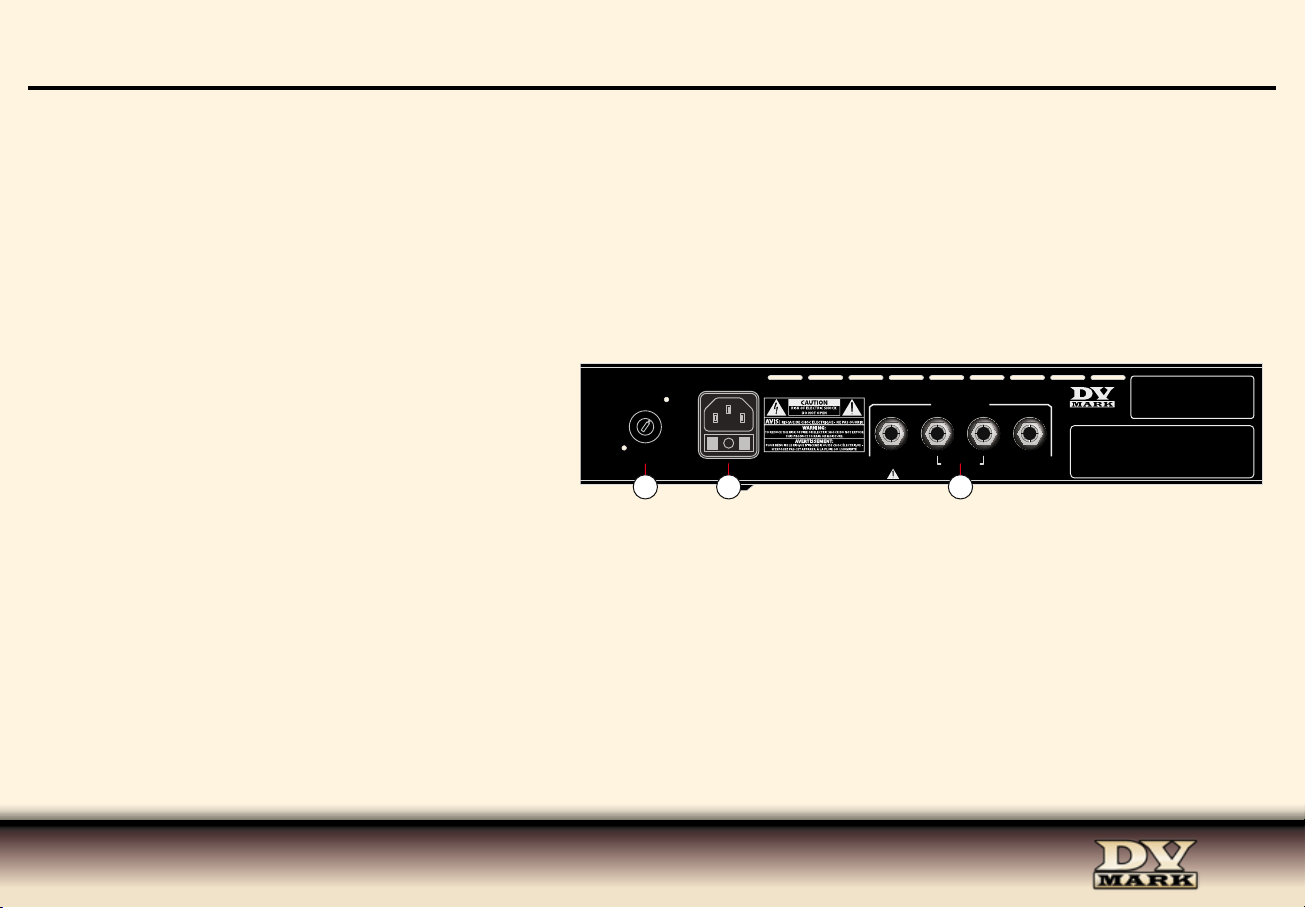
REAR PANEL
INPUT BOOST
1
2
3
456
7
8
9
100
GAIN
ON
ON
OFFSTANDBY
1
2
3
456
7
8
9
100
BASS
1
2
3
456
7
8
9
100
MIDDLE
1
2
3
456
7
8
9
100
HIGH
1
2
3
456
7
8
9
100
REVERB
1
2
3
456
7
8
9
100
MASTER
Gen
15
172
6
5
4
3
8
9 10
11) VOLTAGE SELECTOR The DV GEN 15 head and DVC GEN 15 combo feature a 120V/240V Voltage Selector to use the amp in countries with
different voltages, so make sure the switch on the rear panel is on the correct voltage before connecting it to the AC power, and the fuse is the right
value for that voltage
Please change the voltage/fuse values label located near the voltage selector matching the voltage/fuse values when you need to change the voltage
of the apparatus.
12) AC POWER SOCKET Make sure the unit is grounded; all three terminals of the AC power cord must be connected to avoid any injury to the user
or damage to the unit.
13) SPEAKERS OUTS One 4 ohm jack, two jacks for a total of 8
ohm (wired in parallel, you can connect two 16 ohms speakers
or only one 8 ohms speaker) and one 16 ohm jack are provided
for speaker cabinet connections. Verify the impedance of your
speaker cabinet to make sure you connect it to the correct output.
(not available on the 100V version manufactured for Japan).
120
VOLTAGE
11
240
12
SPEAKER OUTS
4 Ω total 8 Ω 16 Ω
DO NOT OPERATE THIS AMPLIFIER WITHOUT CONNECTING LOUDSPEAKERS
13
5
Page 6
TECHNICAL SPECS
Channels: One
Controls: Gain
Boost (on/off)
EQ Controls: Bass - Middle - High (passive)
Speaker Outputs: Two ¼” Jacks mono out 8 ohm
One ¼” Jacks mono out 4 ohm
One ¼” Jacks mono out 16 ohm
Power Output: 15W Class A
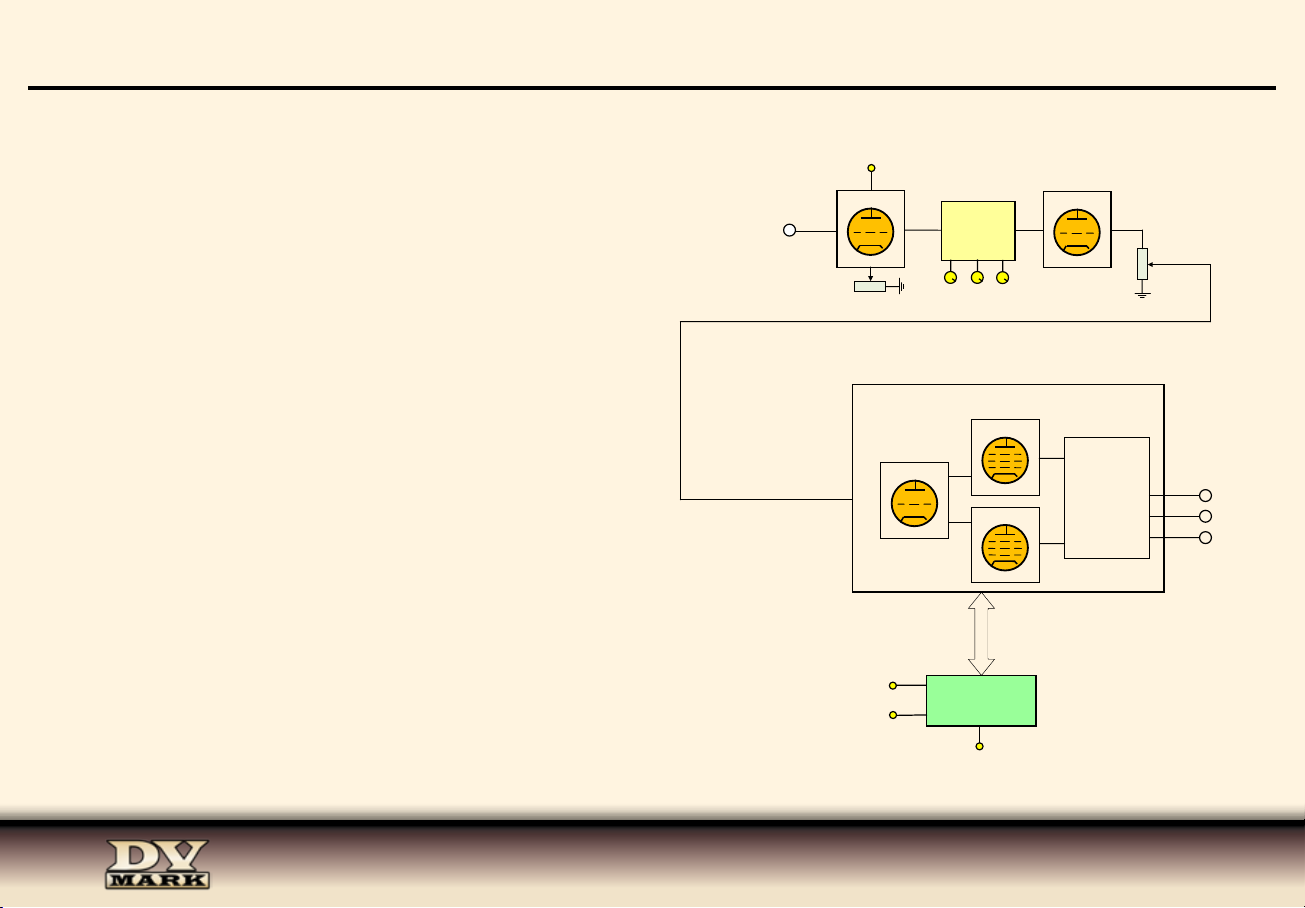
BLOCK DIAGRAM
Input
Boost
Gain
Passive
tone
control
Low Mid High
Master
Other Features: Dual Voltage selector 120V/240V
(not available on the 100V version manufactured for Japan)
Dimensions: DV GEN 15 379 x 220 x 21 mm
14.92” x 8.66” x 8.43”
DVC GEN 15 375 x 395 x 375 mm
14.76” x 15.55” x 14.76”
Weight: DV GEN 15 5,7 kg
12.57 lbs
DVC GEN 15 9,1 kg
20.06 lbs
POWER REQUIREMENT: 100V; 120V; 230V; 240V - 50/60Hz
FUSES: T 1,25A 250V for 100V/120V setting;
T 630mA 250V for 230V/240V setting
6
mains
fuse
ECC83
Power amp
EL84
EL84
Power Supply
Output
transformer
16 ohm
8 ohm
4 ohm
Page 7

NOTE
7
Page 8

Product specications are subject to change without notice
www.markbass.it
www.momark.it
www.markaudio.it
srl
Italy - 66020 San Giovanni Teatino CH - Via Po, 52
Tel: +39 0854407764 / 0854465705 - Fax: +39 0854407764 / 0854407399 - www.dvmark.it - [email protected]
 Loading...