

DVDO Quick6r User Manual

DVDO Quick
6R™
6x2 4K Ultra HD HDMI Switcher (Roku Ready Certified)
User Guide
Version 1.0

DVDO Quick6R 6x2 4K Ultra HD HDMI Switcher
DVDO-UG-1001-B.01 © 2014 Silicon Image, All rights reserved 2
Important Safety Information
• Follow all instructions.
• Use only a dry cloth to clean.
• Use caution not to block any vents in either unit.
• To reduce the risk of electric shock, do not use near water or expose to rain or moisture. Keep away from
excess moisture.
• Do not use near heat sources such as room heaters or hot A/V equipment.
• Read all warnings.
• Use only accessories, including mounting brackets, approved by DVDO.
• Unplug the device during lightning storms or when unused for long periods of time.
• Keep away from open flames.
• Protect all connected cords including power cords from being pinched, compressed, or stepped on.
• Do not open the case. All servicing should be done only by qualified and approved service personnel.

DVDO Quick6R 6x2 4K Ultra HD HDMI Switcher
DVDO-UG-1001-B.01 © 2014 Silicon Image, All rights reserved 3
Contents
Overview .......................................................................................................................... 4!
Key Features ................................................................................................................. 4!
In the Box ...................................................................................................................... 4!
InstaPrevue Visual Switching Technology .................................................................... 5!
InstaPort S Single-second Switching Technology ........................................................ 6!
Roku Streaming StickSupport ....................................................................................... 7!
Input/Output ..................................................................................................................... 8!
Front Panel ................................................................................................................... 8!
Rear Panel .................................................................................................................... 9!
Connections ..................................................................................................................... 9!
AVR via AUX HDMI and AVR via S/PIDF Modes ......................................................... 9!
Mirror Mode ................................................................................................................. 12!
Audio Return Channel (ARC) ......................................................................................... 14!
Remote Control .............................................................................................................. 17!
Onscreen Display Menu System .................................................................................... 18!
Updating Firmware ......................................................................................................... 23!
Updating Firmware Using the Onscreen Display ........................................................ 23!
Upgrading Firmware Using the Update Firmware Button ........................................... 24!
Troubleshooting a Firmware Update Error .................................................................. 25!
Resetting to Factory Default Settings ............................................................................ 25!
Serial Control ................................................................................................................. 25!
Troubleshooting ............................................................................................................. 26!
Specifications ................................................................................................................. 30!
FCC Interference and Compliance Statement ............................................................... 31!
ROKU END USER AGREEMENT .............................................................................. 32!
Warranty ......................................................................................................................... 37!
Getting Help ................................................................................................................... 40!
Legal notices .................................................................................................................. 41!
Installing and using the Roku Streaming Stick (Roku Ready Version) .......................... 42!

DVDO Quick6R 6x2 4K Ultra HD HDMI Switcher
DVDO-UG-1001-B.01 © 2014 Silicon Image, All rights reserved 4
Overview
Quick
6R
™
is DVDO’s latest HDMI switcher for home entertainment and theater applications supporting Roku
Streaming Stick (Roku Ready® Version)
Key Features
• InstaPrevue® technology
• Six HDMI inputs, two HDMI outputs; 4K Ultra HD capable
• MHL® capability on two inputs
• Auto switching – three modes
• Optical and coax S/PDIF outputs
• Serial and IR remote control
• Simple firmware update using USB flash drive
• Onscreen Display (OSD) for easy setup and control
• Special AVR mode for easy integration with any existing audio receiver
• Auto negotiating Mirror mode ensures compatibility
• Remote control, including discrete on and off codes with Roku specific buttons
In the Box
• Quick6R HDMI switcher
• 12 VDC power supply
• Remote control
• Quick Start Guide
• InstaPort® S Single-second technology

DVDO Quick6R 6x2 4K Ultra HD HDMI Switcher
DVDO-UG-1001-B.01 © 2014 Silicon Image, All rights reserved 5
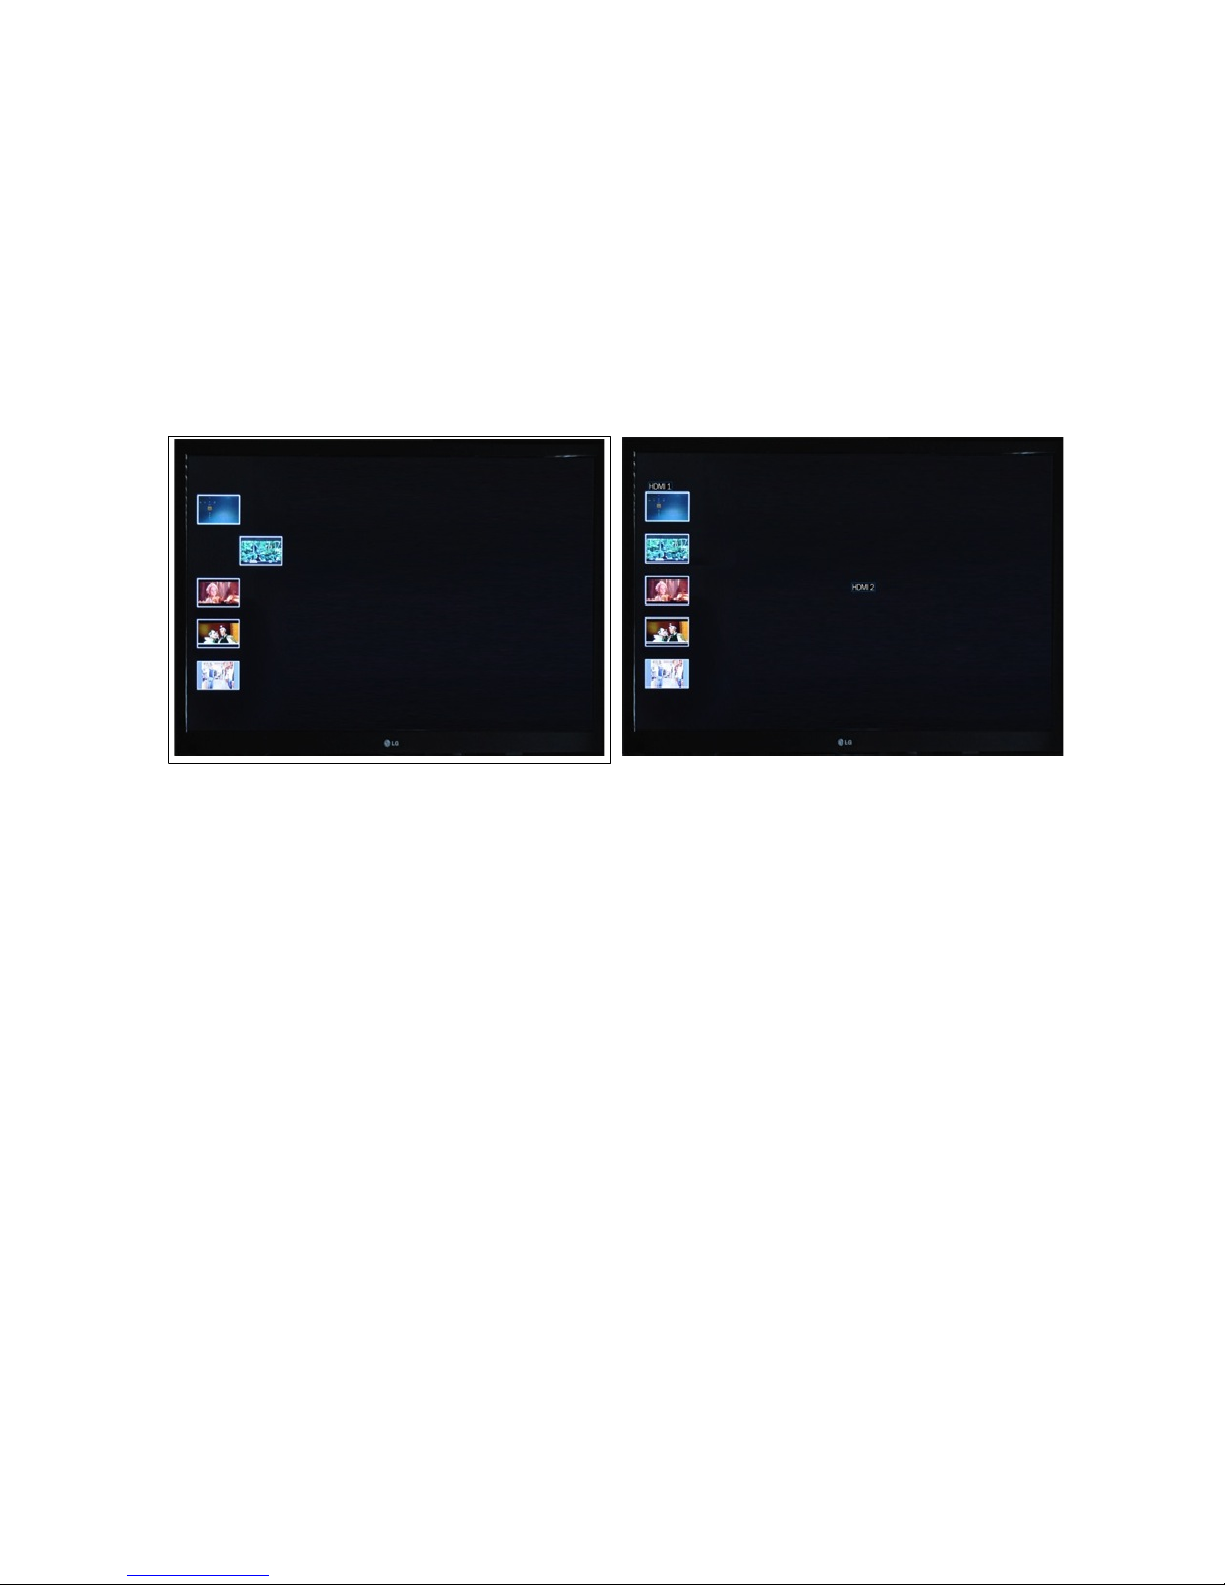
InstaPrevue Visual Switching Technology
Quick6R InstaPrevue technology gives you a simple way to view and select inputs. Instead of choosing from
a text list of input names, Quick6R offers visual input selection by displaying individual preview windows for
each active input. Activate InstaPrevue by pressing the InstaPrevue button: .
Note that preview windows only display connected inputs that are active.
Use the arrow buttons on the remote control to select the input you want to watch and press the ENTER
button to switch to that input.
There are two modes available that are set in the InstaPrevue Setup > Activate Names menu:
• Offset mode: The selected window is offset to show which input is selected.
• Named mode: The name of the selected input shows above its preview window.
DVDO Quick6R 6x2 4K Ultra HD HDMI Switcher
DVDO-UG-1001-B.01 © 2014 Silicon Image, All rights reserved 6
Offset Mode
Named Mode
InstaPort S Single-second Switching Technology
The Quick6R InstaPort S Single-second technology makes it possible that when you select an HDMI source,
that contents becomes available immediately, without delay. With InstaPort S technology, the only delay in
the system is caused by the TV when you switch between sources of different resolutions, while the TV
syncs to the new format.
The Quick6R superior source switching performance is possible because the InstaPort S technology
performs the HDCP authorization immediately when the device is connected. This is in contrast to the usual
situation when, upon connecting a source to an HDMI switcher, the HDCP authorization process is not
initialized until that source is selected as the input to be displayed on the TV.

DVDO Quick6R 6x2 4K Ultra HD HDMI Switcher
DVDO-UG-1001-B.01 © 2014 Silicon Image, All rights reserved 7
Roku Streaming Stick (Roku Ready Version) support
Quick6R is certified as Roku Ready and ships with a remote control that supports all the functionality of the
Roku Streaming Stick (Roku Ready Version). The Roku Streaming Stick is available from www.roku.com
and only functions in the Input #6. Full installation and operational instructions are in the “Installing and
Using the Roku Streaming Stick” section of this users guide.
DVDO Quick6R 6x2 4K Ultra HD HDMI Switcher
DVDO-UG-1001-B.01 © 2014 Silicon Image, All rights reserved 8
Input/Output
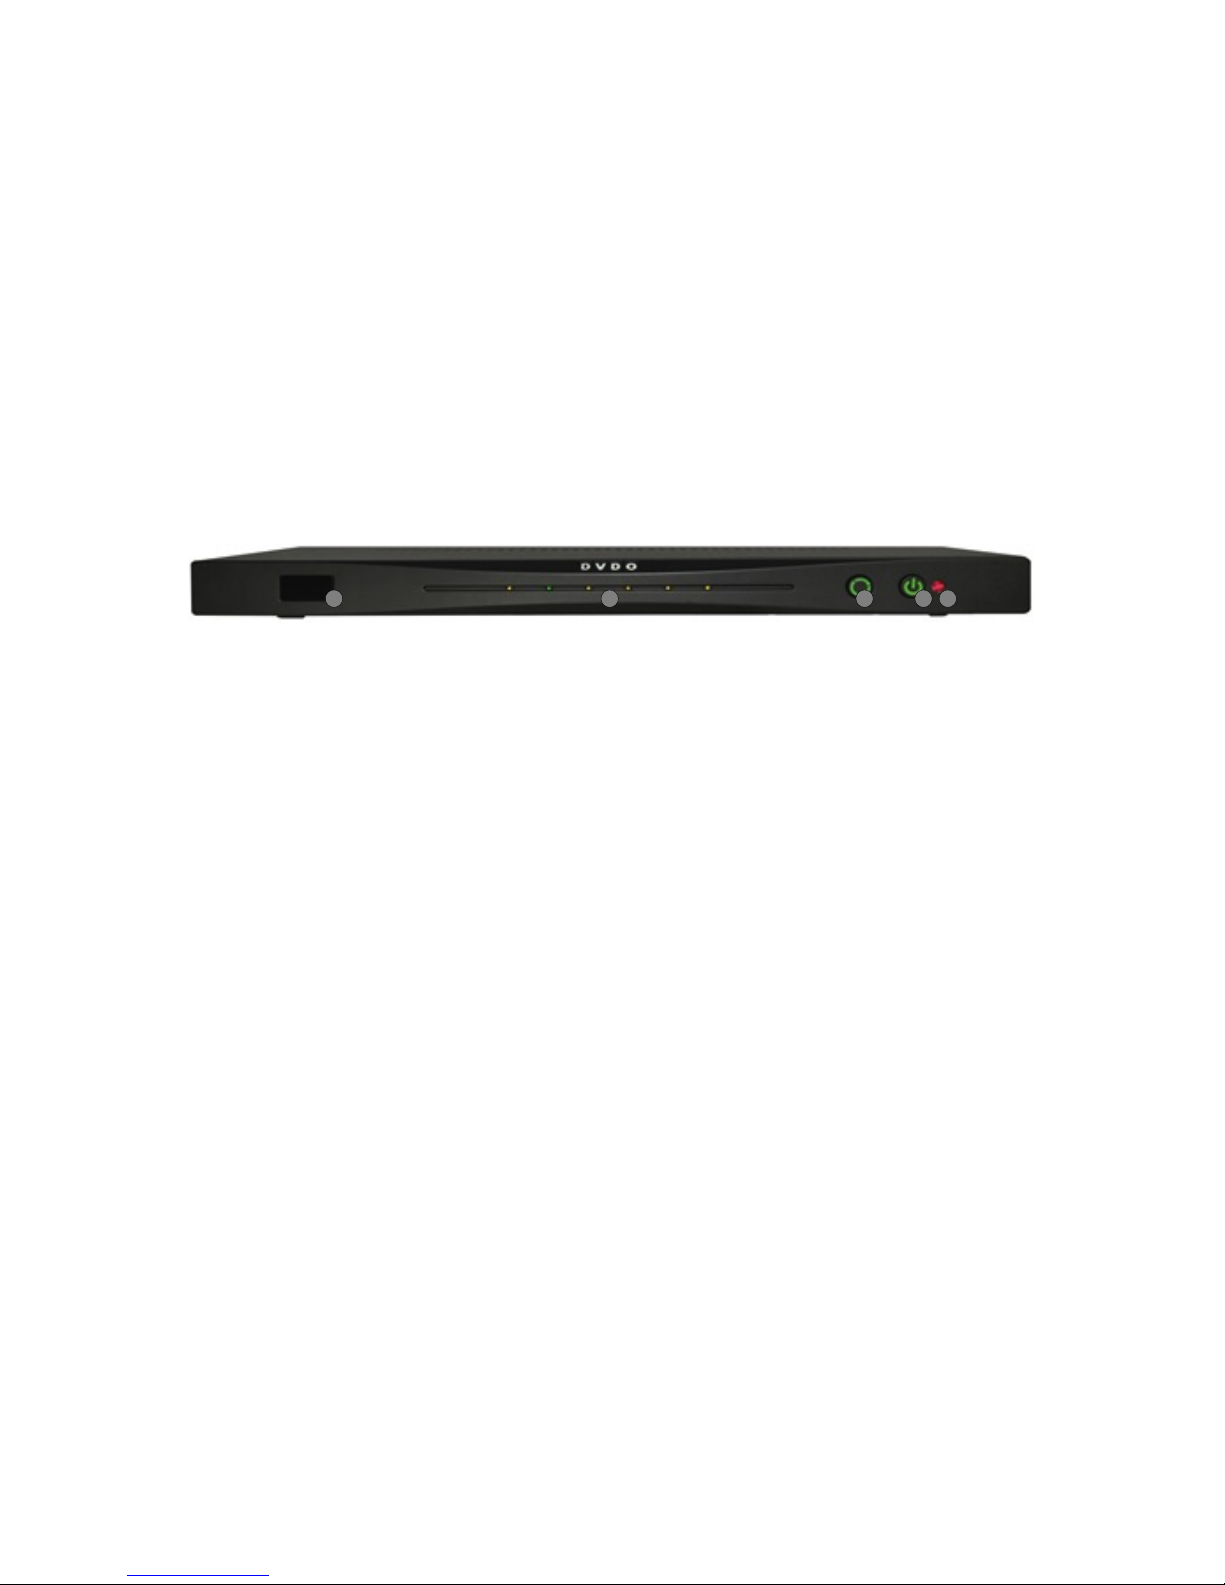
Front Panel
1 3 4 52
1
IR window
Remote control receiver
2
Input indicators
Off = no connection, Amber = HDMI connected, Green = active input.
3
Input select
Manually cycles through connected inputs.
4
Power switch
Press to turn on the Quick6R or to turn off.
5
Power indicator
Lights up in green when the Quick6R is on.
DVDO Quick6R 6x2 4K Ultra HD HDMI Switcher
DVDO-UG-1001-B.01 © 2014 Silicon Image, All rights reserved 9
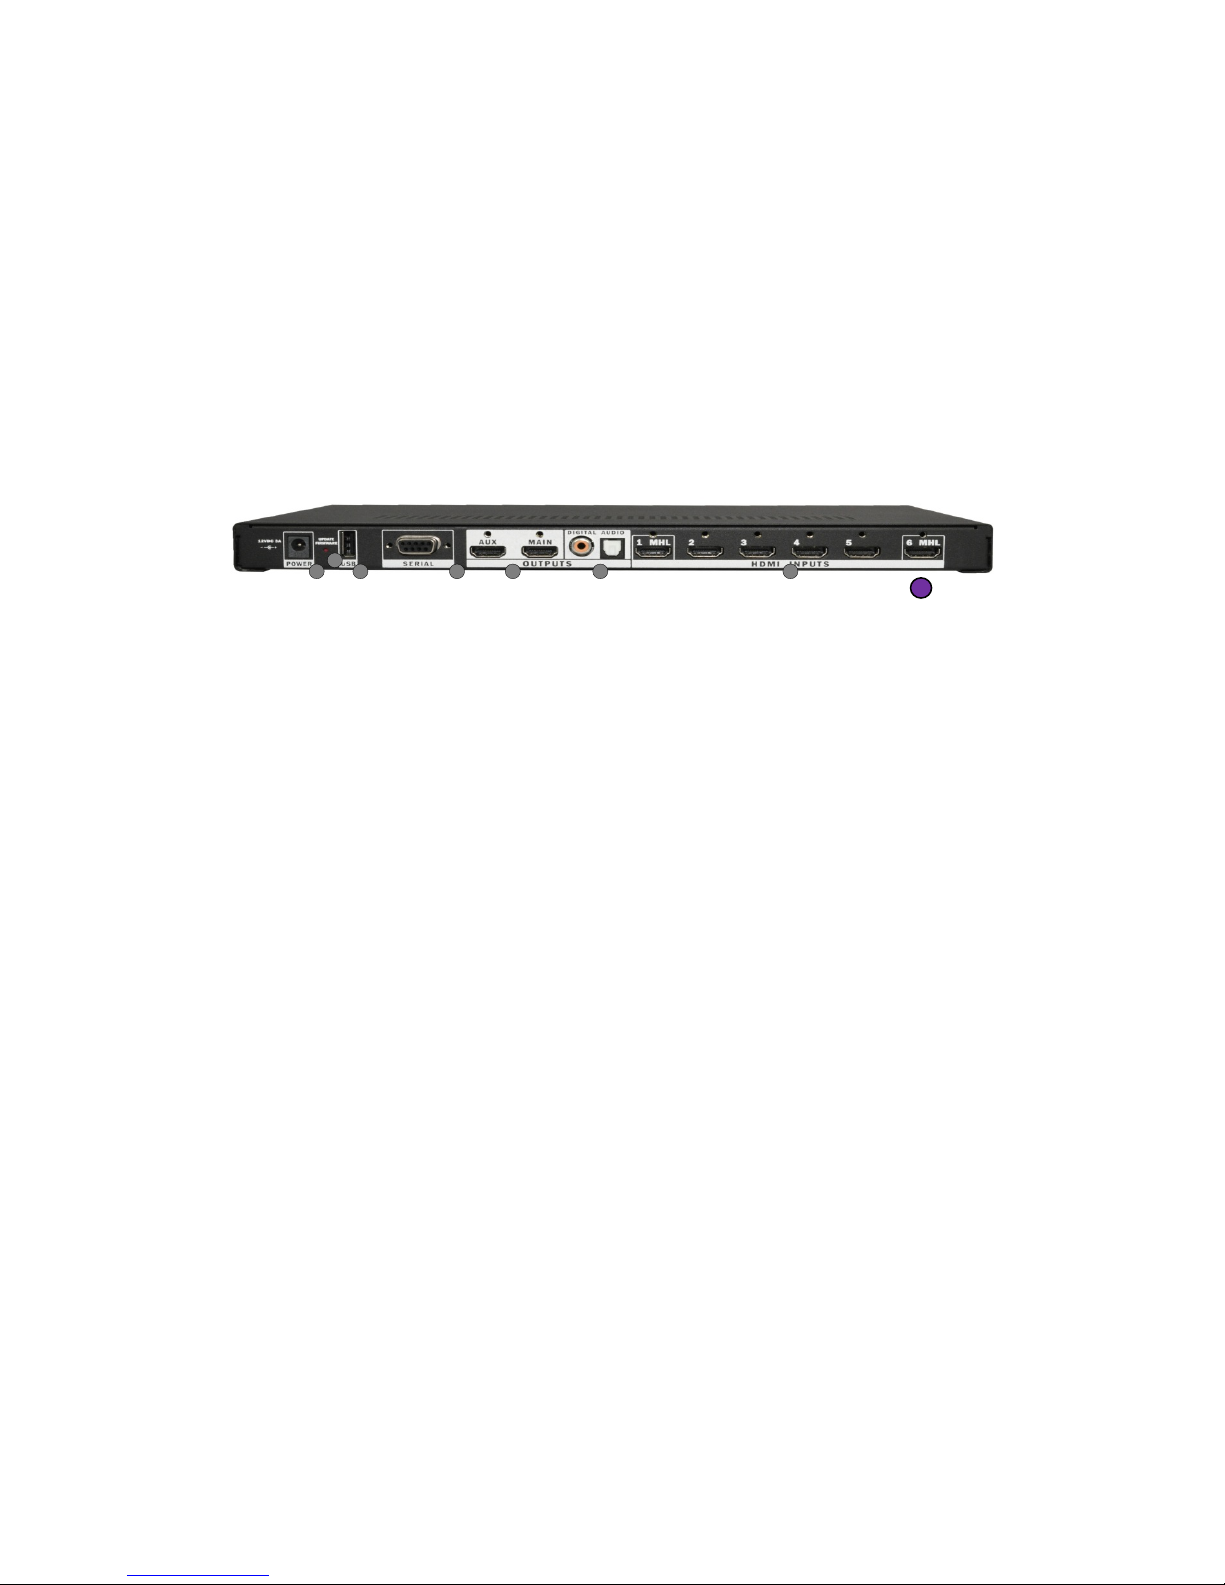
Rear Panel
!
1
2
4 5 6 73
1
Power input
12 VDC 3 A minimum
2
Update Firmware button
See the Updating Firmware section on page 23 for details. This button is held
during power-up to start the firmware update process from an attached USB
flash drive.
3
USB connector
Primarily used for updating firmware, and also supplies 5 V @ up to 1 A for
accessories.
4
Serial port
Allows control of Quick6R by external control systems.
5
HDMI outputs
MAIN output is always active, AUX output depends on OSD setting; The two
available modes are Mirror and AVR.
6
S/PDIF audio outputs
Coax and optical: Whenever the audio stream permits, audio is extracted from
the active input and sent to the S/PDIF outputs.
7 HDMI Inputs 1 through 6
Input 1 and Input 6 are each capable of connecting to an HDMI device or an
MHL mobile device using only a passive cable. Each of these ports can supply
up to 900 mA for charging the mobile device.
8
Input #6
Input #6 is the only port that will accept the Roku streaming stick
Connections
AVR via AUX HDMI and AVR via S/PIDF Modes
In these AVR connection modes, Quick6R becomes the primary HDMI switch and control center for a home
theater. Connection to an existing Audio-Video Receiver (AVR) is accomplished using either HDMI or
S/PDIF (for older AVRs with no HDMI). If the AVR has an HDMI input, this is the preferred connection
because it provides the best overall experience. With either connection, the AVR is always left on that input
and all switching is done with Quick6R.
8

DVDO Quick6R 6x2 4K Ultra HD HDMI Switcher
DVDO-UG-1001-B.01 © 2014 Silicon Image, All rights reserved 10
If the Quick6R connection to the AVR is from the AUX HDMI output, then choose AVR via AUX HDMI in the
output setup menu. If the Quick6R connection to the AVR is from the optical or coax S/PDIF output, then
choose AVR via S/PDIF in the output setup menu.
Why Use AVR Mode?
The AVR mode extends the life of your existing AVR. In most installations, the AVR is used not only as the
audio amplifier but also as the central video switch. Since the audio needs to match the video being
displayed, running everything through the AVR is the simplest method. While AVRs tend to have a long life
and continue to provide basic audio functions, video standards and features change more often. Adding
Quick6R to an existing system upgrades the entire entertainment center to the latest features. With Quick6R
installed, the AVR becomes the primary audio processor and Quick6R becomes the primary switch in the
system. Quick6R routes the best possible audio to the AVR and the best possible video to the TV.
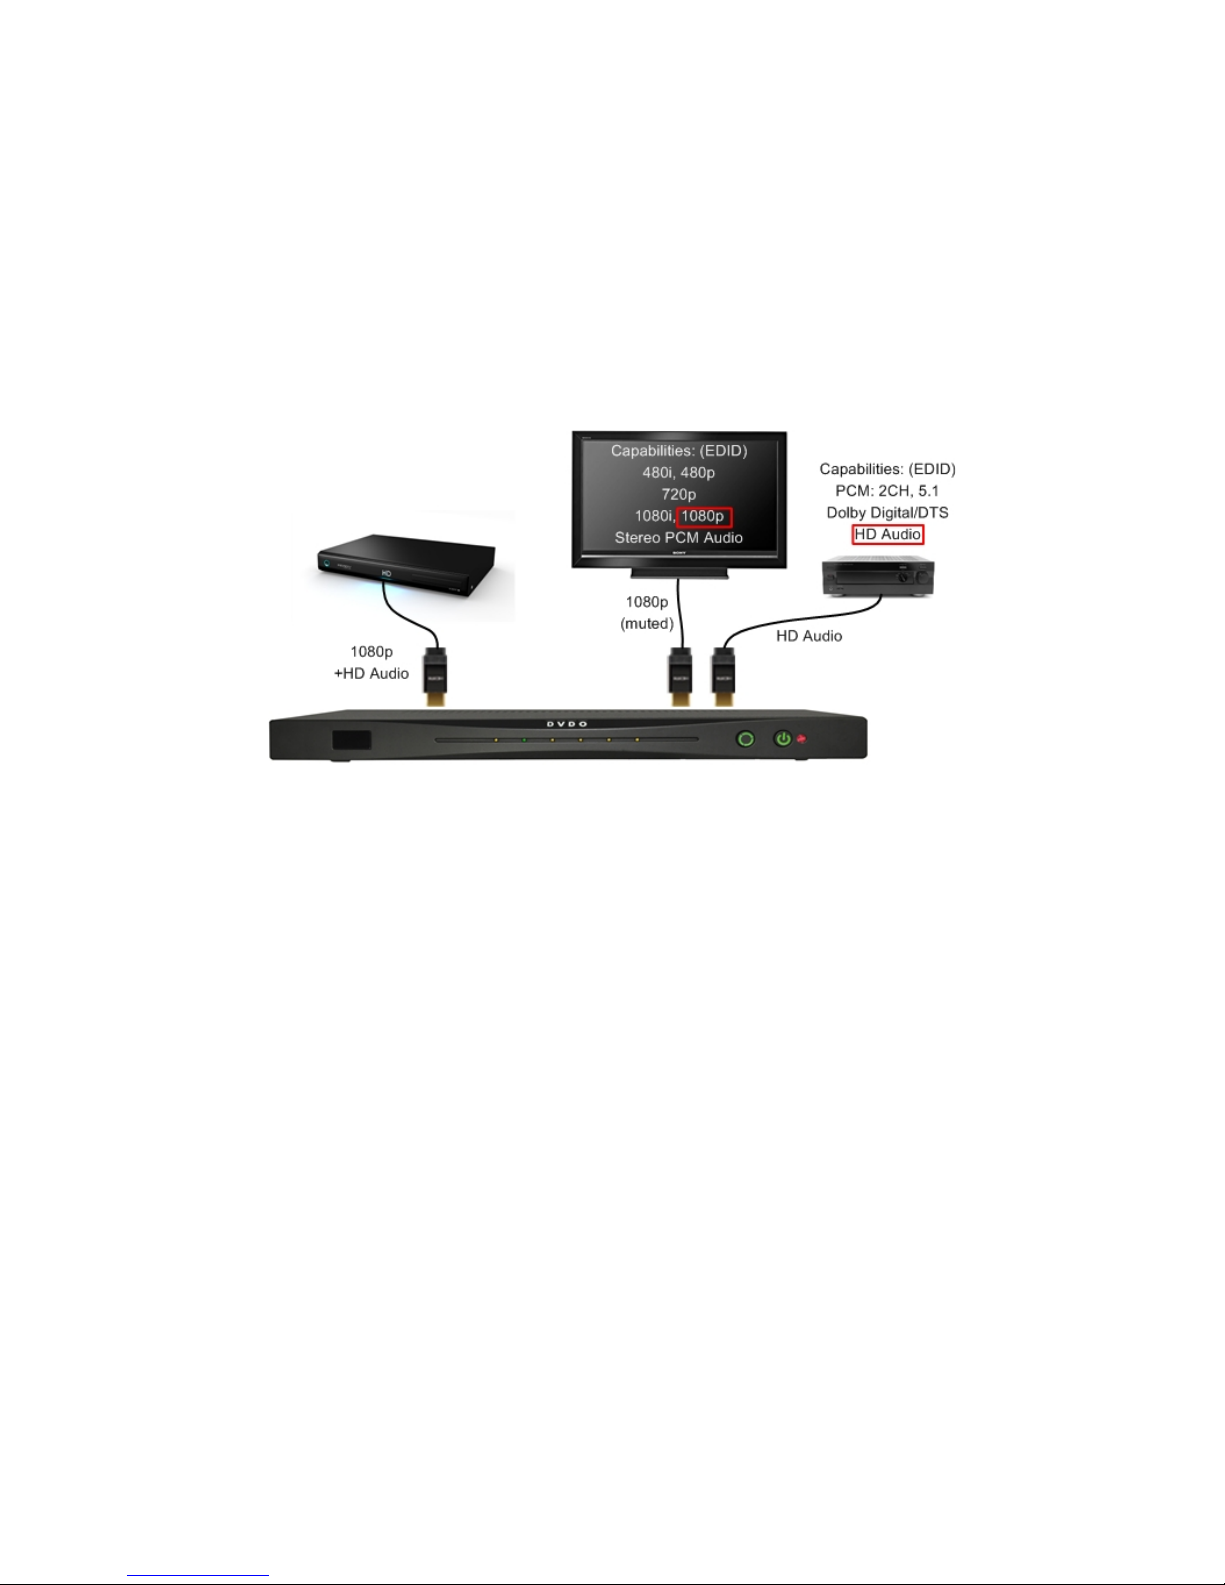
Audio and Video Resolution and Routing
When Quick6R is put into AVR via AUX HDMI mode, the full audio capabilities of the AVR are scanned and
combined with the best possible video capabilities of the TV and the combination is reported back to all
inputs. In this way, the inputs send the best possible audio routed to the AVR and the best possible video
routed to the TV. Since the input signal could have a resolution of up to 4K (Ultra HD) with HD audio, and
the TV may not be able to handle HD audio, Quick6R mutes the audio going to the TV when the AVR is on.
HD Audio includes Dolby® TrueHD as well as DTS-HD Master Audio™ formats.
When the AVR is disconnected or powered off, the audio capability of the TV which is normally just PCM
stereo is reported back to the inputs and the TV audio is unmuted. In this way you can choose to watch a
program just with the TV audio (AVR off) or with full surround sound from the AVR (no audio from the TV).
This special negotiation only happens if the AVR is connected to the AUX HDMI output.
When Quick6R is put into AVR via S/PDIF mode, the video capabilities of the TV are scanned and combined
with a prestored capability list of a standard AVR connected through S/PDIF and the combination is reported
to all the inputs. This is necessary because the capabilities of the connected AVR cannot be read through
S/PDIF. This allows full TV resolution up to 4K while delivering the full audio capabilities possible over
S/PDIF, including bit stream such as Dolby, DTS, and other formats. In this mode, Quick6R also mutes the
audio going to the TV to prevent formats unknown to the TV from causing unwanted noise.

DVDO Quick6R 6x2 4K Ultra HD HDMI Switcher
DVDO-UG-1001-B.01 © 2014 Silicon Image, All rights reserved 11
Because S/PDIF offers no way to detect if the AVR is on or off, if you want to use the TV speakers the output
mode must be switched manually back to Mirror or AVR via AUX HDMI.
AVR Mode Routing
DVDO Quick6R 6x2 4K Ultra HD HDMI Switcher
DVDO-UG-1001-B.01 © 2014 Silicon Image, All rights reserved 12
AVR Mode Resolution
Mirror Mode
In this configuration, Quick6R allows two devices to share a single stack of equipment. This mode is normally
used to feed both a TV and video projector in the same room or for a second monitor in a close but related
area, such as a bar at the back of a home theater.
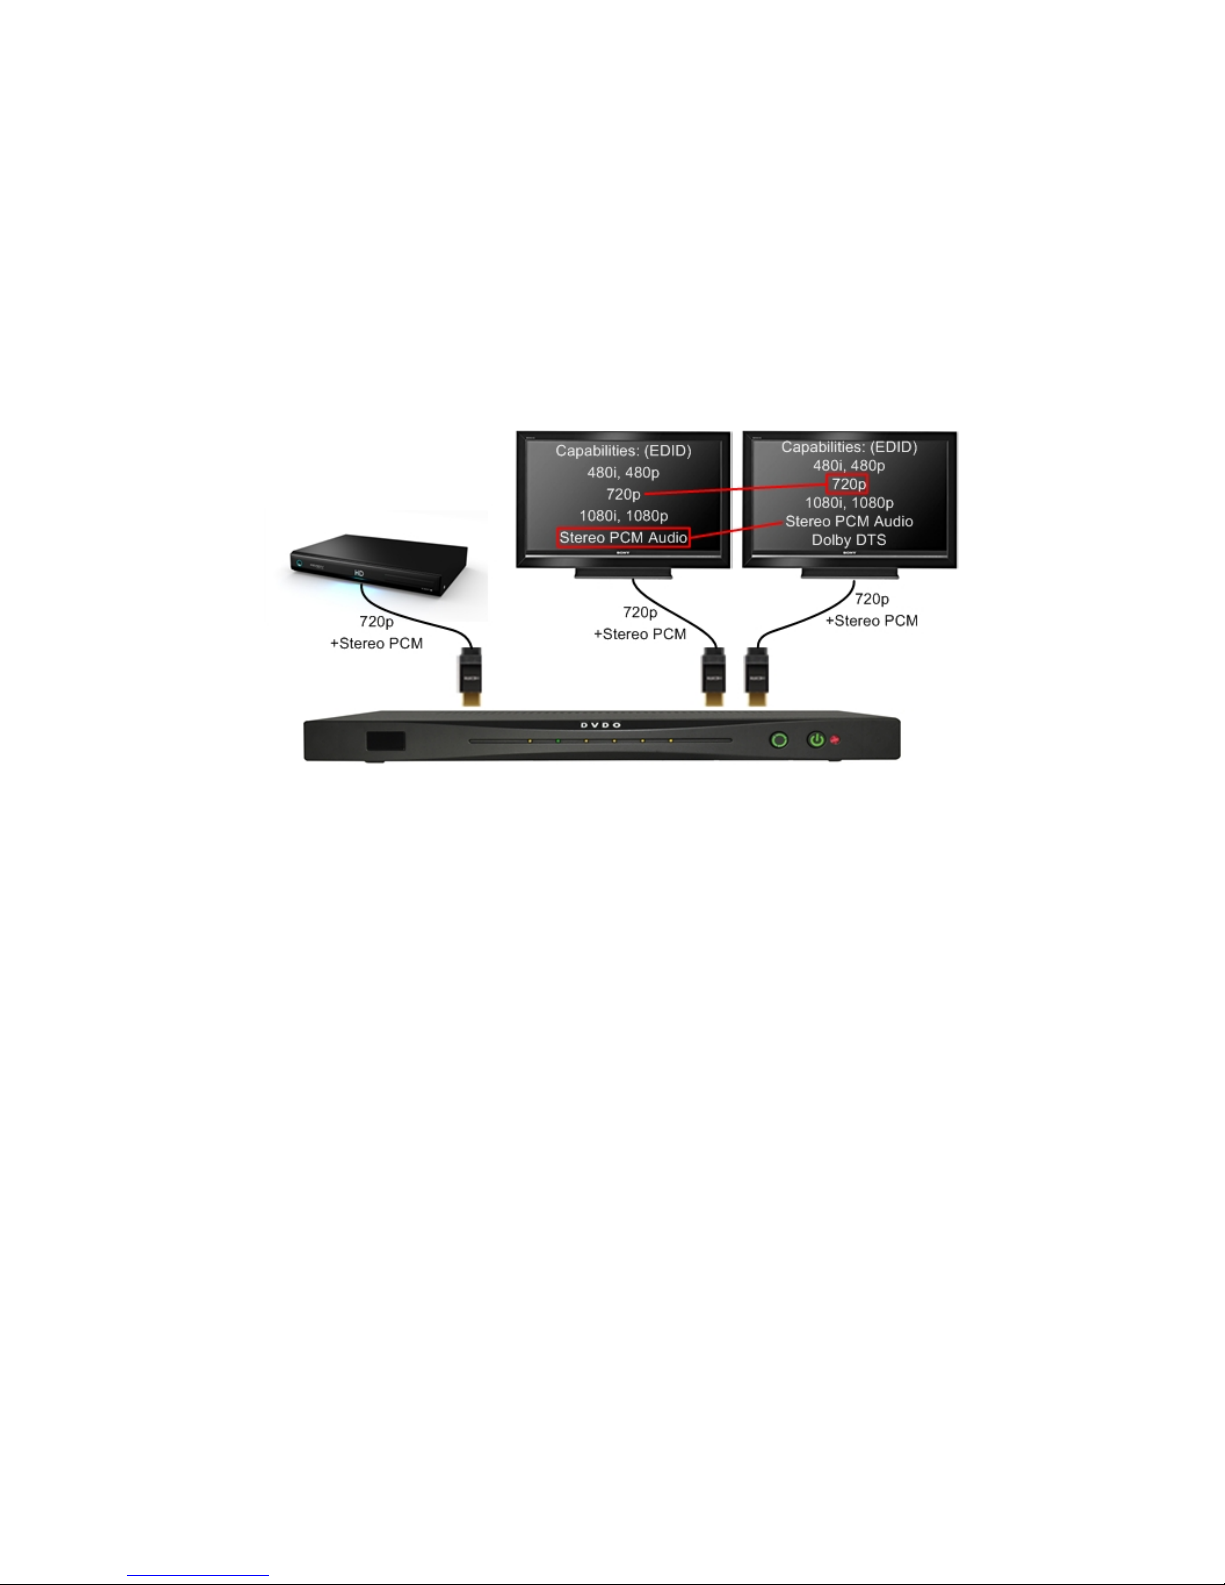
Audio and Video Resolution and Routing
In Mirror mode, the two outputs provide the same audio and video signal. If they have different capabilities,
the highest common video resolution and audio capability is reported to the inputs. For example, the main
TV is 1080p, PCM stereo, and the Aux TV is 720p, 5.1-channel capable; in this case 720p PCM stereo is
reported to all inputs.
The Onscreen Display (OSD) is only shown on the main output.

DVDO Quick6R 6x2 4K Ultra HD HDMI Switcher
DVDO-UG-1001-B.01 © 2014 Silicon Image, All rights reserved 13
Mirror Mode Routing
DVDO Quick6R 6x2 4K Ultra HD HDMI Switcher
DVDO-UG-1001-B.01 © 2014 Silicon Image, All rights reserved 14
Mirror Mode Resolution
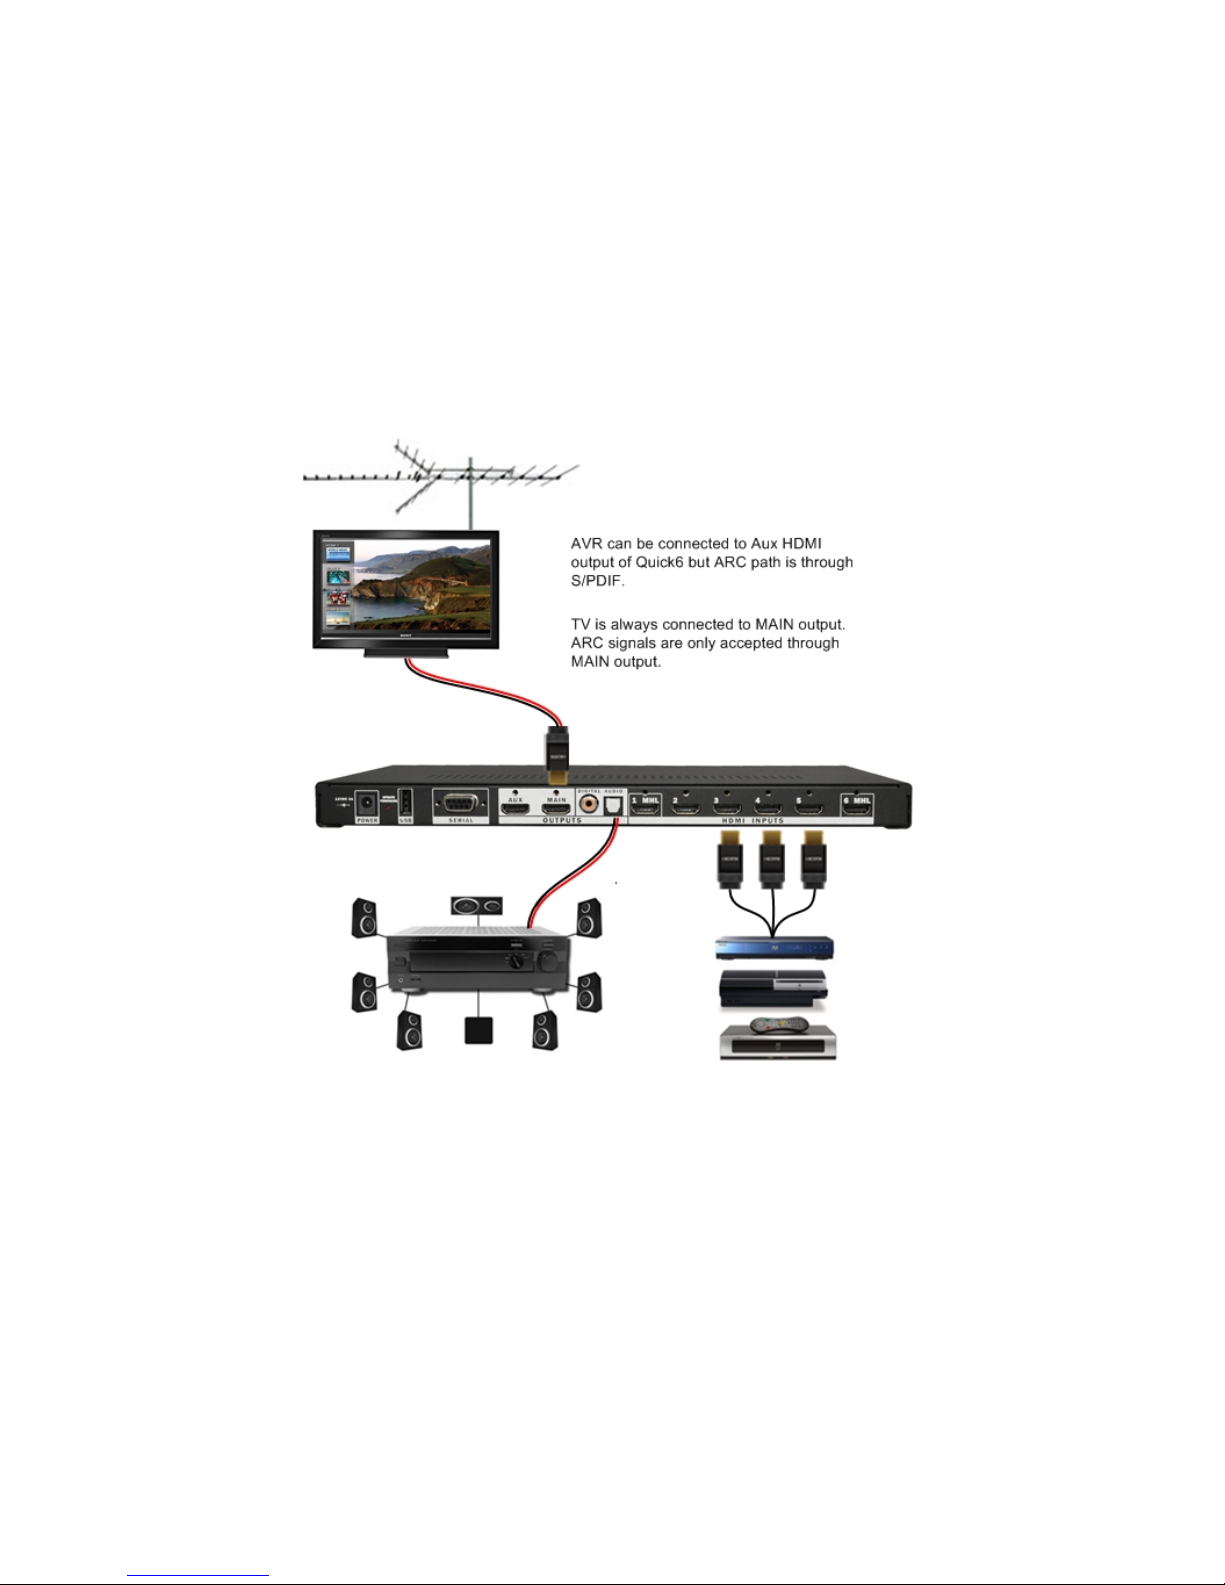
Audio Return Channel (ARC)
In certain setups, the TV may be the source of audio. This is most common when watching live terrestrial TV
from an HD antenna. In this case, the TV receives a live ATSC signal over-the-air. The video is displayed
onscreen, but you may want the audio to be played from the AVR. The audio path is shown in red in the
figure below.
In most cases the preference is to route audio from the Quick6R HDMI or MHL inputs to the Aux HDMI output
or to the S/PDIF output, using ARC only when viewing over-the-air broadcasts.
Most TVs can be put into automatic ARC mode so that when sensing that an audio receiver capable of
receiving ARC is connected, they automatically negotiate with the receiver to establish an ARC channel.
DVDO Quick6R 6x2 4K Ultra HD HDMI Switcher
DVDO-UG-1001-B.01 © 2014 Silicon Image, All rights reserved 15
Audio Return Channel

DVDO Quick6R 6x2 4K Ultra HD HDMI Switcher
DVDO-UG-1001-B.01 © 2014 Silicon Image, All rights reserved 16
Quick6R has a special control mechanism allowing you to easily switch ARC on and off. To use ARC with a
Quick6R system:
1. Ensure that your TV is capable of ARC and that the correct TV HDMI input (usually marked ) is
connected to the Quick6R MAIN HDMI output.
2. Put the TV into the ARC-on mode and enable CEC (manufacturers label these two menu items
differently; refer to the TV’s user documentation for more information).
3. Connect an audio receiver from either the coax or optical Quick6R S/PDIF output to the S/PDIF input of
the receiver.
4. Switch the receiver to the S/PDIF input source.
5. Press the ARC button on the Quick6R remote control or select Send Initiate ARC on the Quick6R
Onscreen Advanced Settings menu.
You can enable or disable ARC with the Onscreen Display. The ARC button on the remote control toggles
between enabling and disabling ARC mode.
Normally, leave the TV with ARC on and CEC enabled. When you want to use ARC, switch the audio
receiver to the S/PDIF input and press the ARC button on the Quick6R remote.
 Loading...