


DVDO EDGE
High Definition Video Processor & Hub
Setup Guide
Version 1.0
1
This Setup Guide presents setup and configuration guidance for DVDO EDGE in summary form. For more complete information please refer to the DVDO EDGE Product Manual
included on the CD.
Customer Support Information
email: edgesupport@dvdo.com
phone: 1-877-382-EDGE (1-877-382-3343)
web site: www.dvdo.com/edge
Check the web site for news and updates for your DVDO EDGE
To learn about VRS Video Processing Technology, visit
http://www.anchorbaytech.com/vrs_technology/
DVDO by Anchor Bay Technologies
983 University Avenue, Building A
Los Gatos, California 95032 USA
2

System Configuration: Most people will use one of the two configurations shown on this page and the next.
Digital Display Using Built-in Audio
For this configuration to work, your display should have HDMI input and built-in audio. Connect your source components (DVD Player, Set Top Box, Game console, etc.) to EDGE’s inputs. Connect EDGE’s Video/Audio HDMI output to your display.
The DVDO universal remote can control EDGE and up to 7 other components in your system.
3

Digital Display with a Separate AV Receiver
This configuration features a separate AV Receiver for audio processing. Your Display must have either an HDMI or DVI input. If the Display has DVI input, you will need an HDMI to DVI adapter cable. Your AV Receiver can be connected using HDMI or Optical cables. Details of the Display and AV Recveiver connections are shown on the next page.
4

EDGE Output Connections
DVDO Edge -- Rear View of output Connectors
Connect your TV to the Video/Audio output.
Connect your AV Receiver to the Audio Only HDMI output if the Receiver has HDMI.
OR
Connect your AV Receiver to the Optical Audio Out connector if your Receiver does not have HDMI.
1. If you don’t have an AV Receiver, skip to # 2.
If your AV receiver has HDMI input, connect an HDMI cable from Edge’s Audio Only HDMI output to an HDMI input on your AV receiver.
If your AV Receiver does not have HDMI, connect an Optical cable from the Optical Audio Out to an optical input on your
AV Receiver.
Use your AV Receiver’s remote to power on the AV Receiver and set its input
to Edge.
2. Connect your TV.
If your TV has HDMI input,connect an HDMI to HDMI cable from Edge’s Video/Audio output to an HDMI input on your TV.
If your TV or monitor has DVI input, you will need an HDMI to DVI adapter cable. Connect the HDMI end to Edge’s Video/Audio HDMI output and the DVI end to your TV or monitor.
Use your TV’s remote to power up and set its input to Edge.
Plug in Edge’s AC cable (if you haven’t done so already).
5
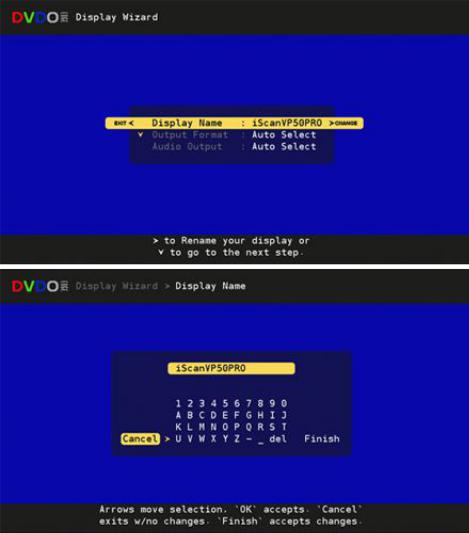
Display Wizard: Step 1, Configure Your Outputs
EDGE automatically chooses a Display Name, Video Output Format, and Audio Output Connector. Use the Display Wizard to make any changes you would like, OR accept the automatic settings, and EXIT the Wizard (Left Arrow).
You should see the Display Wizard on your TV as shown left. The Display Wizard assists setup of your TV and your audio.
Using Display Wizard, you can
1. Name your Display.
2. Select an output video format.
3. Select an output connector for audio.
If you don’t want to change anything, press Left Arrow to Exit the Wizard.
1a. Name your Display
If you want to change the name of your display, press Right Arrow to go to the on-screen keyboard.
Otherwise, press Down Arrow to go to the next setup step 2.
1b. Name your Display - Keyboard
Use this on-screen keyboard to rename your display.
When you are finished, highlight “Finish” then press OK to accept the new name.
If you want to exit the keyboard screen with no changes, highlight “cancel” then press OK.
6

Display Wizard: Step 2, Video Output Format
EDGE automatically chooses a Video Output Format by polling your display for its preferred format. Or, you may use the Display Wizard to change your Video Output Format as shown on this page.
2a. Select an output video format.
EDGE defaults to “Auto Select”
and communicates with your TV to find the TV’s preferred format.
If you want to change the output format, press Right Arrow to go to the Output Format screen, shown below.
Otherwise, use Down Arrow to use the preferred format, and proceed to the next step 3.
2b. Output Format Selection.
Use the Down Arrow to highlight the output format you want, then press OK.
EDGE will switch to the new output format. You will have to confirm that you can see a picture within 10 seconds. If you don’t confirm, EDGE assumes that you can’t see the picture and will return to the previous format.
7

Display Wizard: Step 3, Audio Output Connector
EDGE automatically chooses an Audio Output Connector. Or, you may choose an Audio Output Connector manually using the Display Wizard, as shown on this page.
3a. Select an audio output connector.
You have 4 choices for audio output:
A. Auto: Default setting.
Automatically chooses an output depending on the capabilities of the attached, powered-on components.
B. Video HDMI: Outputs audio on the Video HDMI connector.
Use this setting if your TV has audio capability and you don’t have (or don’t want to use) an AV Receiver.
C. Audio HDMI: Outputs audio on the Audio HDMI connector.
Use this setting if you have an HDMI capable AV Receiver.
D. Optical: Outputs audio on the Audio Optical connector. Use this setting if you have an AV Receiver that does not have HDMI input.
Make a selection and/or press < to exit this screen.
You finished with your Video and Audio output setup.
Left Arrow Exits Display Wizard
8

Input Wizard -- Configure Your Inputs: Step 1, Naming an Input
Input Wizard guides you through Naming an Input, Setting Input Priority (for automatic input switching), and Associating an Audio Input with a Video Input.
Input Wizard guides you through the setup of your input components. You can run the Input Wizard for every input component.
Using the Input Wizard, you may
1. Rename an input component.
2. Set an Input Priority for the component.
3. Associate an Audio Input with the video input.
1a. Input Name
Use the on-screen keyboard to rename this input, or press Down Arrow to go to step 2.
1b. Input Name - Keyboard
Use this on-screen keyboard to rename your display.
When you are finished, highlight “Finish” then press OK to accept the new name.
If you want to exit the keyboard screen with no changes, highlight “cancel” then press OK.
9
 Loading...