

DVDO AVLab TPG User Manual

DVDO AVLab TPG - 4K Test Pattern Generator
DVDO AVLab TPG
TM
4K Test Pattern Generator
User’s Guide
Version 1.01

DVDO AVLab TPG - 4K Test Pattern Generator
DVDO AVLab TPG 2 A.04
Important Safety Information
• Follow all instructions
• Use only a dry cloth to clean
• Use caution not to block any vents in either unit
• Indoor use only: To reduce the risk of electric shock, do not use near water or e xpose to rain or
moisture. Keep away from excess moisture
• Do not use near heat sources such as room heaters, hot A/V equipment
• Read all warnings
• Use only accessories approved by DVDO including mounting brackets
• Unplug the device during lightning storms or when unused for long periods of time
• Keep away from open flames
• Protect all connected cords including power cords from being pinched, compressed, stepped on
• Do not open the case. All servicing should be done only by qualified and approved service personnel
• Electrical Input Rating: Power over USB 5Vdc 350mA. Caution: Use Only the supplied AC/DC Adapter.
•
Operating temperature range: e.g. 0 to 40oC.
•
For charging the connected Phone/Tablet (MHL) from the HDMI connector, use a 5Vdc 3A supply.
•
To disconnect power sources, remove the AC/DC adapters from the wall outlets and any USB connection.

DVDO AVLab TPG - 4K Test Pattern Generator
DVDO AVLab TPG 3 A.04
Contents
Overview ........................................................................................................................ 4
Input/Output ................................................................................................................. 5
Connections ................................................................................................................... 6
Controls: buttons and the remote ............................................................................ 8
On-Screen Display Menu System ............................................................................ 11
Updating Firmware ..................................................................................................... 13
Serial Control and Driver Installation ..................................................................... 14
Test Pattern List ............................................................................................................. 15
Test Pattern Explanations .............................................................................................. 21
Frame & Geometry ..................................................................................................... 21
Vertical lines, Horizontal lines, and every other pixel: ................................................. 23
Judder (Frame Rate)................................................................................................... 24
PLUGE patterns (2 white and 2 black) ........................................................................ 24
Brightness & Contrast ................................................................................................. 25
Multiburst (Sharpness) ................................................................................................ 28
Color Bars: (8 iRE75, 8 IRE 100, 8x3) ........................................................................ 28
Grey Ramp ................................................................................................................. 28
Solid colors ................................................................................................................. 29
XHatch (coarse, fine, and focus) : ................................................................................ 29
A Typical Calibration Session: ................................................................................. 30
Troubleshooting: ............................................................................................................ 35
Specifications .............................................................................................................. 36
FCC Interference and Compliance Statement ...................................................... 37
Warranty and Getting Help ...................................................................................... 38
Legal notices ............................................................................................................... 41
Appendix A: Virtual Serial Command Protocol ............................................................... 43
Appendix B: Disabling signed driver restrictions in Windows 8 ...................................... 52
Windows 8.1: .............................................................................................................. 52
Windows 8.0: .............................................................................................................. 62

DVDO AVLab TPG - 4K Test Pattern Generator
DVDO AVLab TPG 4 A.04
Overview
Thank-you for purchasing the DVDO AVLab TPG – 4K Test Pattern Generator. AVLab TPG is an advanced
4K UltraHD Test Pattern Generator designed specifically for setup and calibration of displays in the field.
Housed in a rugged metal case, and sized to fit in your pocket, AVLab TPG is ready to take to any
installation job. While there are some exceptional test pattern discs available like Staci Spears …, to
properly set up and calibrate a display or projector, it is critical to have a source that can be trusted to put
out exact colors and patterns digitally - directly to the display.
Key features
• 4K UltraHD test patterns: from 480 to 4K/60 as well as custom resolutions
• 4K HDMI and MHL2 input for pass through testing
• Audio stripping to S/PDIF
• USB (TV/Computer) or external 5V@2A powered
• Built in IR receive plus dongle support
• Manual resolution and pattern buttons built in
• Custom remote for easy test pattern access
• On-screen display for setup and pattern choice
• USB controlled (virtual serial) for connection to CMS software
In the Box
• AVLab TPG
• Remote Control
• USB cable
• Some models include external power supply and HDMI cable
DVDO AVLab TPG - 4K Test Pattern Generator
DVDO AVLab TPG 5 A.04
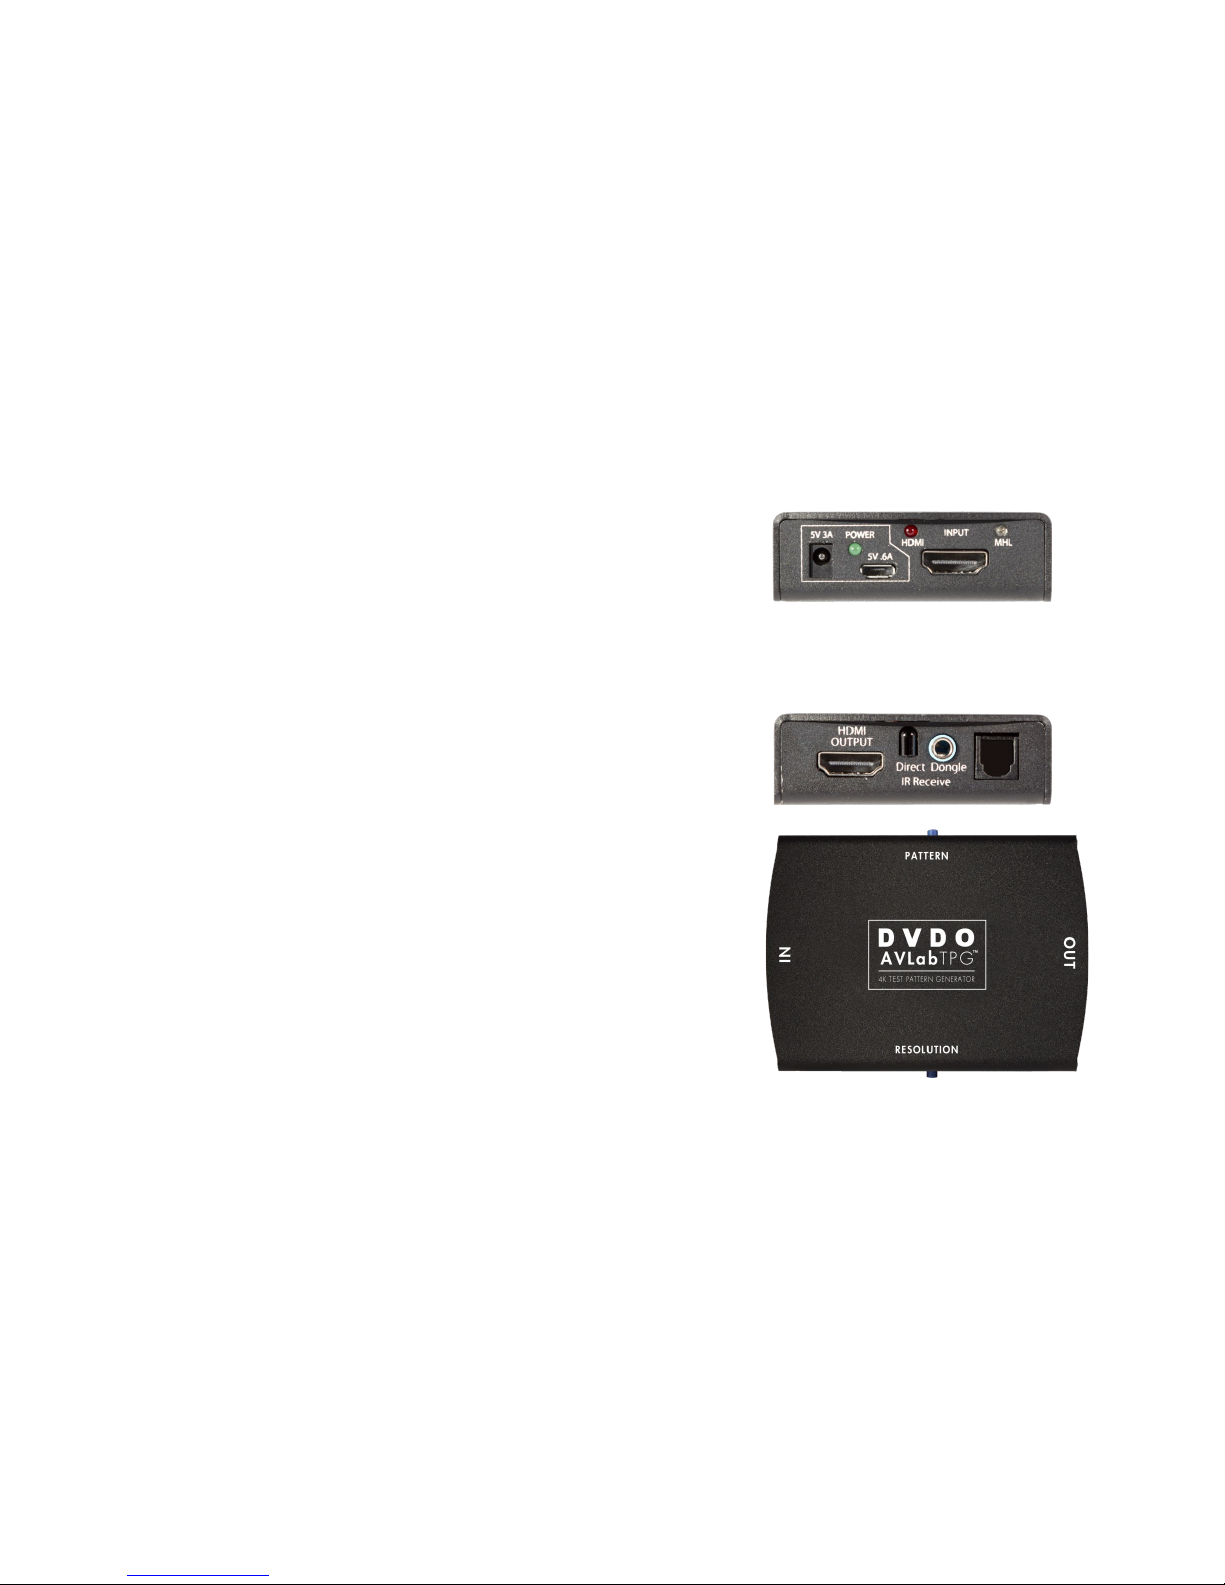
Input/Output
Input Panel
1. Power in: Either 5V@3A coaxial power in or USB
power from TV/Computer/USB adapter @ minimum
.4A
2. Power indicator – Green LED indicates power is on
3. HDMI/MHL input: Accepts up to 4K HDMI or up to 1080p/60 MHL
4. Input indicators (Red = HDMI input active, Blue = MHL input active)
Output Panel
1. HDMI output (to display)
2. IR receive: Built in IR receiver and 1/8” connec tion for IR receive
dongle (e.g. Monoprice.com 8060)
3. S/PDIF optical output
Buttons
1. Patterns Button – Manually cycles through popular
patterns
2. Resolution button – Manually changes output resolution.
Commonly used if the AVLab TPG is left in a resolution that the
current display does not support.
3. F/W update button (recessed) – hold while applying power to
put AVLab into firmware update mode.

DVDO AVLab TPG - 4K Test Pattern Generator
DVDO AVLab TPG 6 A.04
Connections
AVLab is normally connected in one of three ways:
1) Manual mode: This Is normally used for quick
display/projector setup to verify scaling,
geometry, focus, and basic brightness/contrast.
• Power can be supplied via USB cable from the
TV USB port (if available), from a standard
USB power supply, or a computer.
• HDMI out to the display/projector.
• Control using built in buttons and/or IR
remote control
USB
HDMI

DVDO AVLab TPG - 4K Test Pattern Generator
DVDO AVLab TPG 7 A.04
2) CMS software mode
• USB from PC for power/control
• Camera to PC via USB
• HDMI out to TV
• Control from remote or PC software
In this mode, the PC uses supplied drivers to
create a virtual serial port connection to
AVLab TPG for control.
USB
HDMI
USB
To
Camera

DVDO AVLab TPG - 4K Test Pattern Generator
DVDO AVLab TPG 8 A.04
3) Pass Through mode
Input from HDMI or MHL source
MHL/HDMI
HDMI
USB or DC

DVDO AVLab TPG - 4K Test Pattern Generator
DVDO AVLab TPG 9 A.04
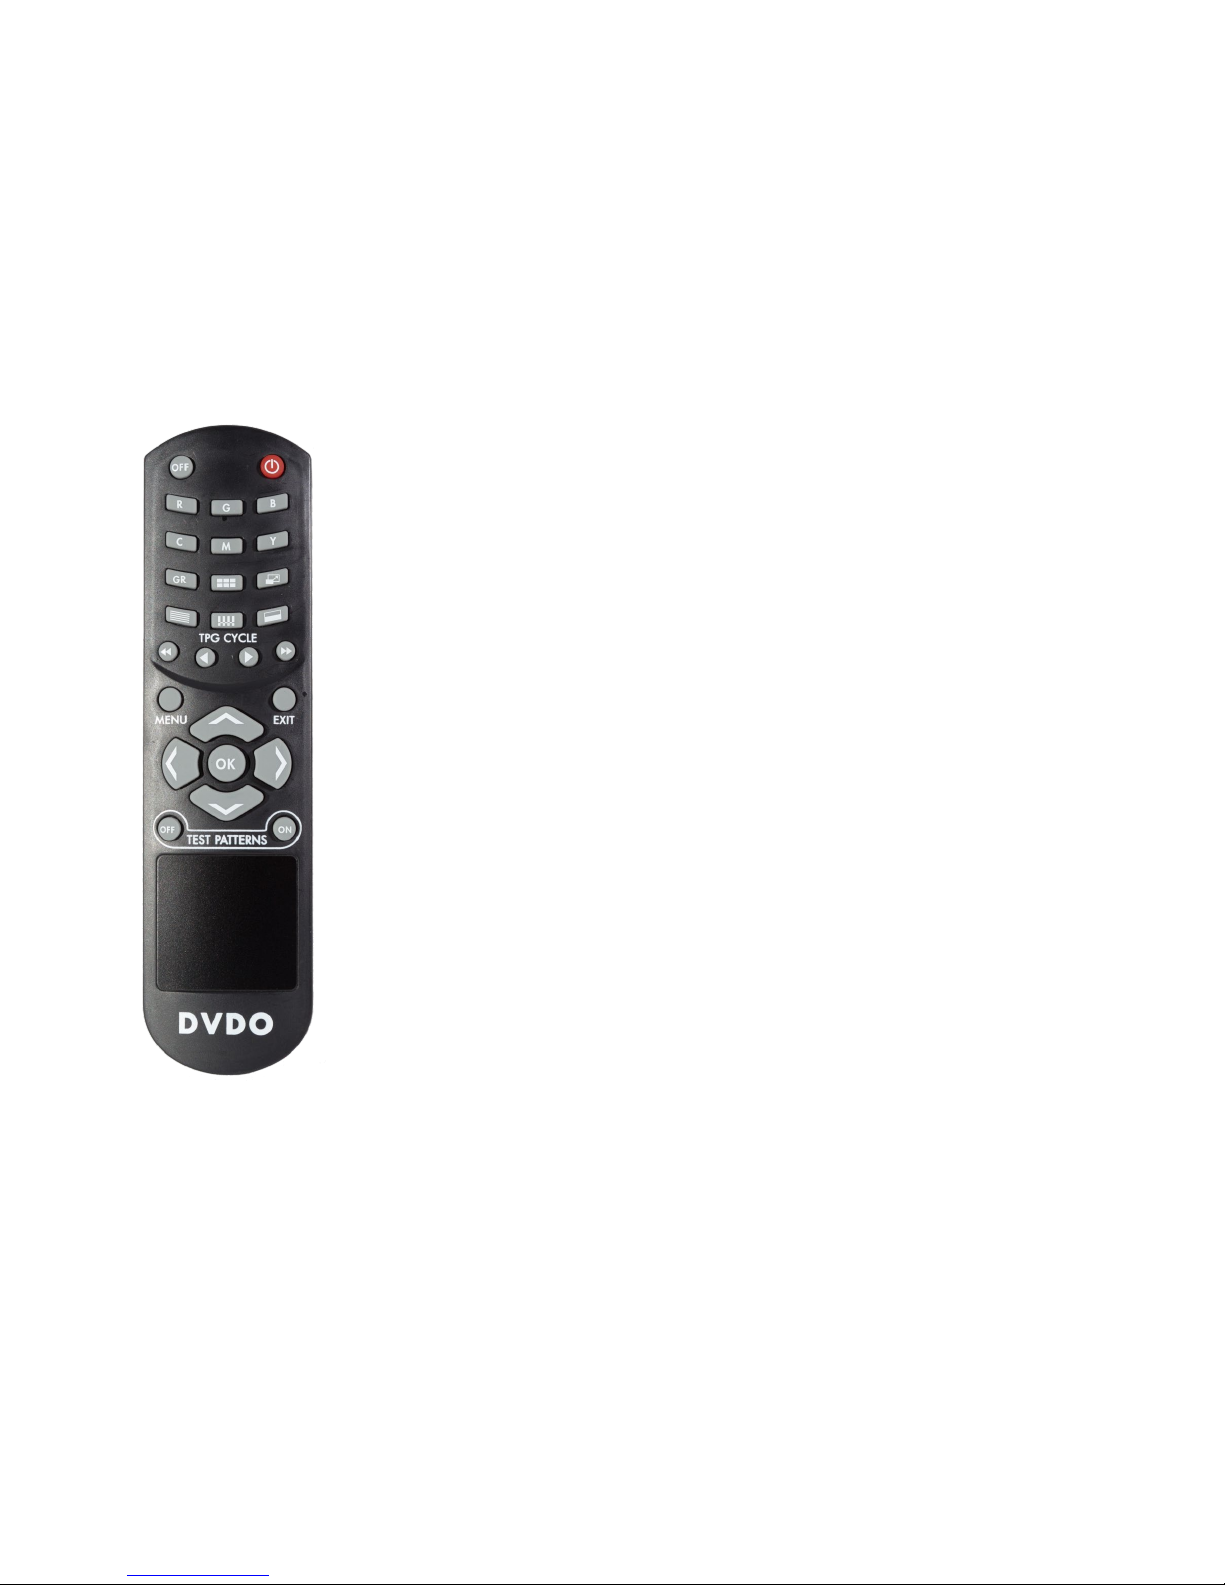
Controls: buttons and the remote
AVLab TPG has three physical buttons:
• Pattern button manually cycles through the most common patterns and can be used if you do not have the remote or
software control
• Resolution button cycles through four common video resolutions. This is particularly useful if the AVLab TPG is left in a
mode (i.e. 4K) from a previous calibration that the current display does not support. In this case, simply press the
resolution button slowly until you get to the “auto” setting and then use the OSD to correctly set output parameters.
• F/W update (recessed) button: if held down while power is initially applied, AVLab goes into firmware update mode.
See updating firmware section of this manual.
DVDO AVLab TPG - 4K Test Pattern Generator
DVDO AVLab TPG 10 A.04
The AVLab TPG remote is specifically designed to allow fast access
to patterns. Choose a pattern category using the top bank of
buttons, then use the cycle buttons < and > to choose different
patterns within that category. << and >> changes between
categories.
i.e. to get to Magenta 100 IRE, press the M button and then > 3
times to get to 100. For a 100 IRE color bar, press the color bar
button and then > to get to the one you want.
Power and Standby/Off buttons are discrete functions
R, G, B, C, M, Y, Gr: Individual color patterns.
Color Bars, Scaling, Visual patterns: Directly switches to
pattern category
<< >>: Changes category
< >: Changes pattern within category
ARC: Alternately enables and disables Audio Return Channel.
MENU: Brings up On-screen display (OSD) menu.
EXIT: Exits OSD menu and other special functions.
Navigation buttons: Used for OSD menu selections.
TPG on and off : Turns internal test pattern generator on and off
DVDO AVLab TPG - 4K Test Pattern Generator
DVDO AVLab TPG 11 A.04
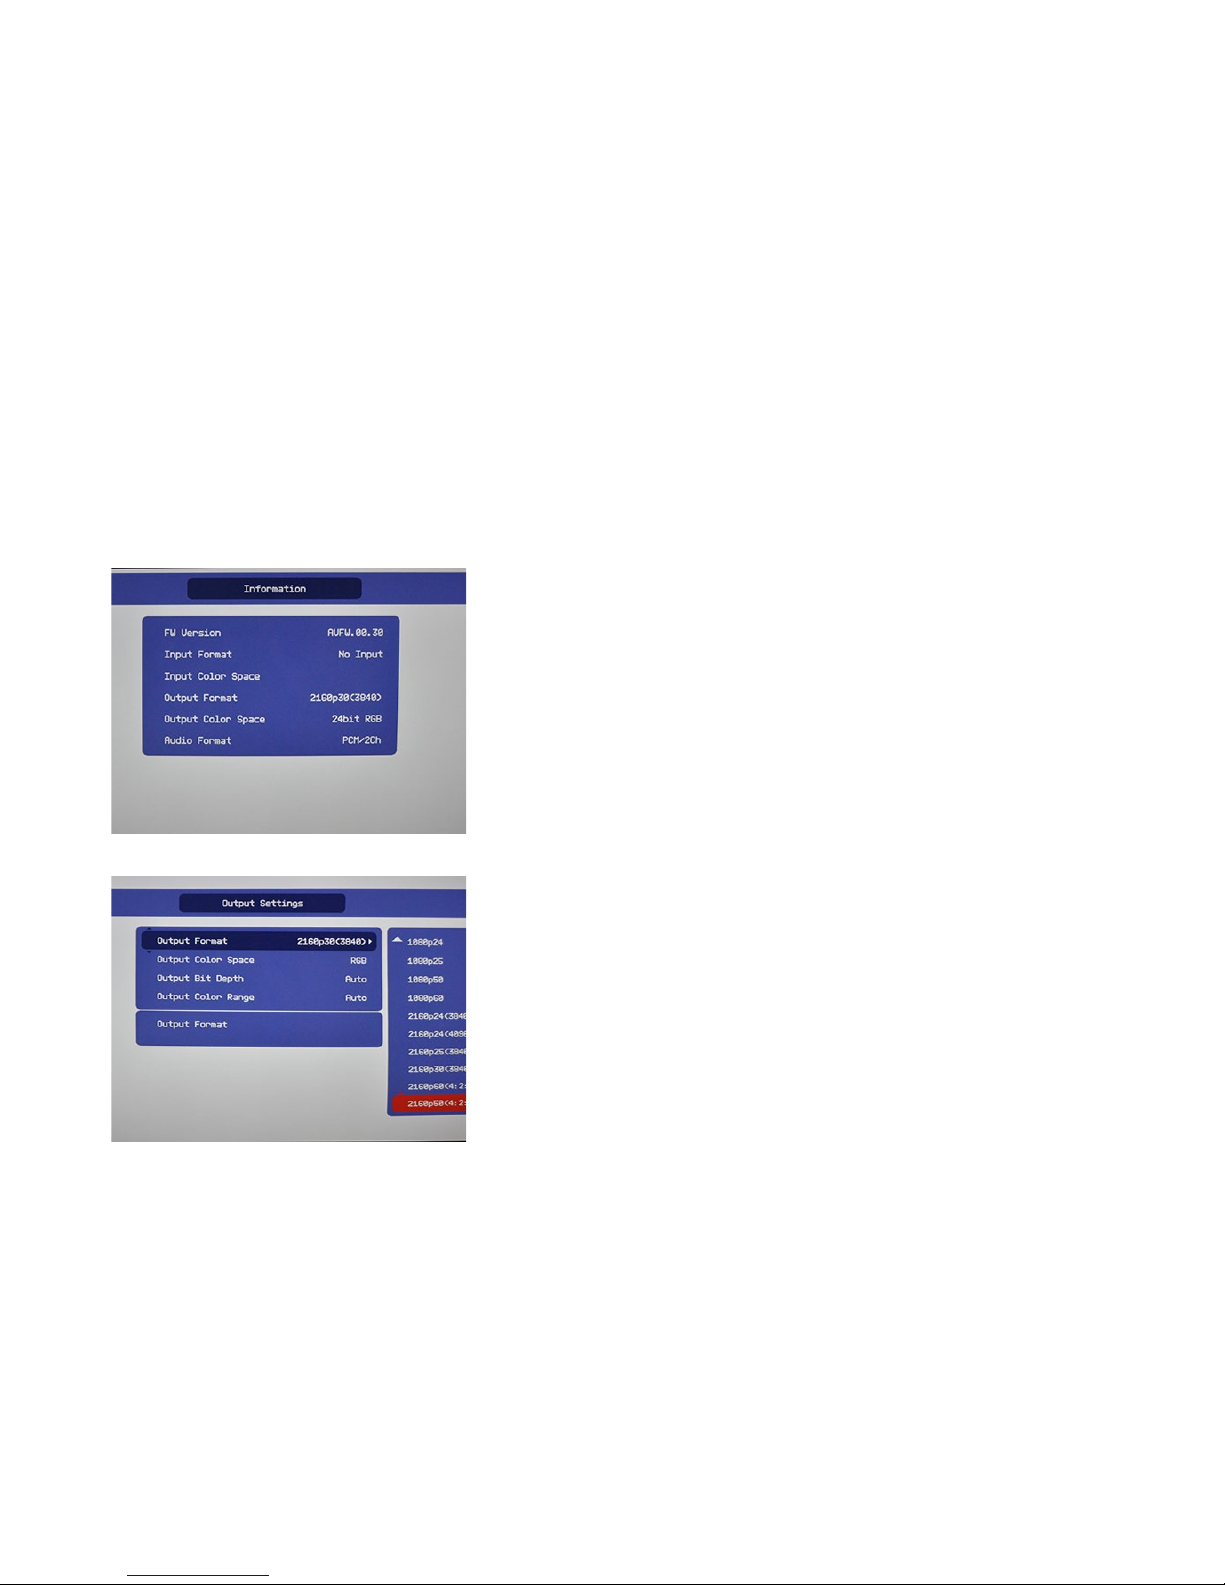
On-Screen Display Menu System
Pressing MENU on the remote control brings up the main menu, shown below.
Asterisks (*) in the descriptions indicate the factory default settings.
Information screen shows basic information on both the input and
output resolution and color space.
Output settings screen controls:
Output Format: from 480 to 4K/60
Output Color Space: RGB, YCbCr 4:4:4, or YCbCr 4:2:2
Output Color Depth: 8, 10, 12 bit
Output Color Range: Limited (16-238) or full (0-255)

DVDO AVLab TPG - 4K Test Pattern Generator
DVDO AVLab TPG 12 A.04
Test Patterns: Off, or select the specific test pattern to display.
Pass Through Mode: Choose Test Patterns for displaying test
patterns, or Pass Through to pass the input HDMI or MHL signal
through to the output. In pass through mode, the display EDID is
passed back to the input. AVLab TPG will sense the video that the
input sends and set the output resolution, bit depth, and color
space to match.

DVDO AVLab TPG - 4K Test Pattern Generator
DVDO AVLab TPG 13 A.04
Updating Firmware
AVLab TPG allows simple firmware update through an attached computer.
Firmware version can be checked using the OSD menu and accessing the information screen.
• While holding the recessed “F/W update” button on the side of AVLab TPG, plug a USB cable into a
computer and into AVLab TPG.
• AVLab TPG will be automatically installed as a removable drive.
• Go to that new drive and copy the existing firmware file to a directory on your computer (this is for
backup in case you would like to return to your current firmwa re version for some reason)
• Delete the existing firmware file from the new drive.
• Copy the new firmware file you downloaded to the now empty drive.
• AVLab will automatically eject itself when the update process is complete (~10 seconds).
• Unplug and replug AVLab to reset the device.
• Download the latest firmware from www.dvdo.com

DVDO AVLab TPG - 4K Test Pattern Generator
DVDO AVLab TPG 14 A.04
Serial Control and Driver Installation
AVLab can be controlled from a PC for interfacing to a Color Management System like CalMAN or
ChromPure. Before using this feature, drivers must be installed to allow the computer to connect a virtual
com port over USB.
** Important – the drivers currently available are unsigned drivers, so for Windows 8 and 8.1, you must
first enable unsigned driver installation by followi ng the steps in Appendix B.
Installing the Virtual serial driver:
Automatic installation:
Run the appropriate driver .msi installation package (Windows 7 or XP – use win7 driver for windows 8)
prior to plugging in the AVLab TPG to your computer.
After the installer completes, plug in the AVLab TPG.
A good check of proper driver installation is to run device manager, and under ports, AVLab will be listed
along with its associated com port.
Manual Installation:
If there is any problem, you can also manually install the driver.
Plug in AVLab via USB to your computer.
Go to Device Manager (Start>Control Panel>System>Device Manager)
Under the “Ports (Com & LPT)” section you will see AVLab listed
Right click on AVLab and choose “Update Driver Software”
Choose “Browse my computer for driver software”
Click on “Browse” button and navigate to the AVLab installation CD where the raw driver .inf files are
stored.
Click “OK” and allow the driver to update/install
DVDO AVLab TPG - 4K Test Pattern Generator
DVDO AVLab TPG 15 A.04
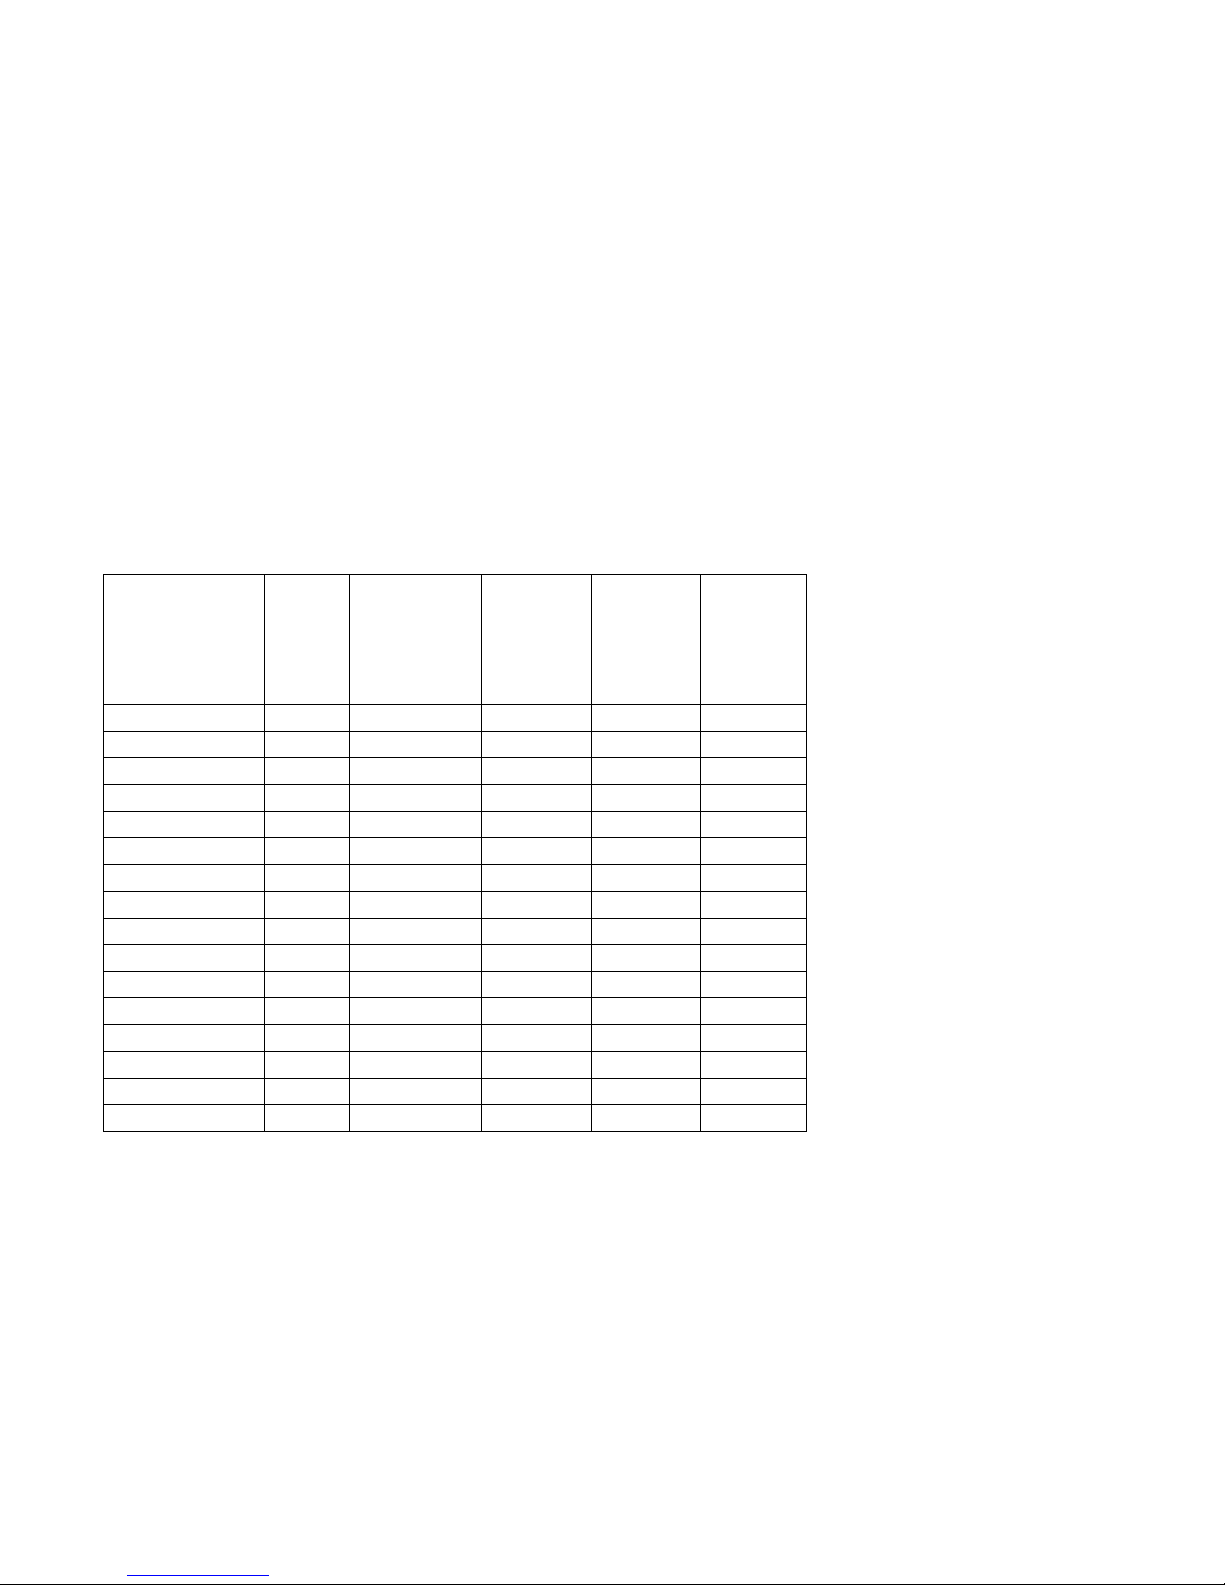
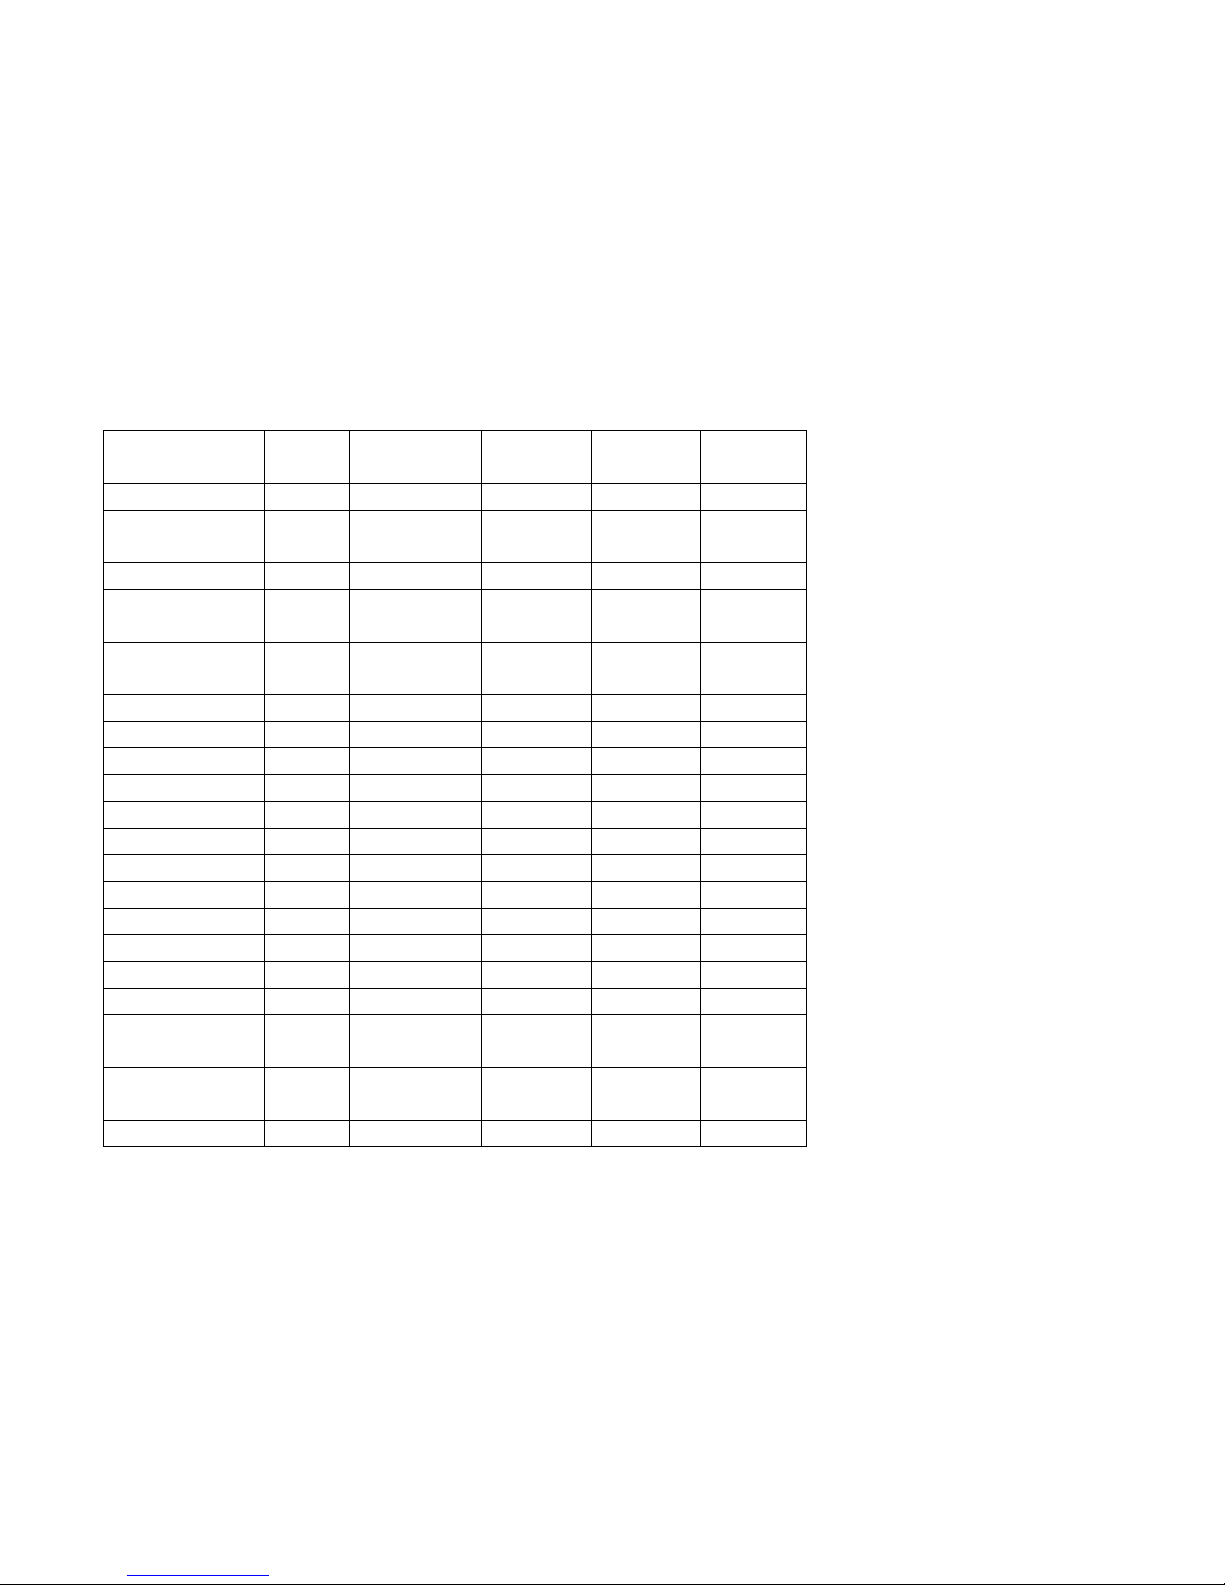
Test Pattern List
All loaded test patterns will be available from the serial connection, the IR remote, and the OSD, only a
subset are available from the external button.
Pattern
Full Screen
unless
otherwise
noted
Hex
for
Serial
Remote
Category
External
Button
In OSD
Red 10%
Red
Red 20%
Red
Red 30%
Red
Red 40%
Red
Red 50%
Red
Red 60%
Red
Red 70%
Red
X
Red 75%
Red
Red 80%
Red
Red 90%
Red
Red 100%
29
Red
X
X Green 10%
Green
Green 20%
Green
Green 30%
Green
Green 40%
Green
Green 50%
Green

DVDO AVLab TPG - 4K Test Pattern Generator
DVDO AVLab TPG 16 A.04
Green 60%
Green
Green 70%
Green
X
Green 75%
Green
Green 80%
Green
Green 90%
Green
Green 100%
30
Green
X
X Blue 10%
Blue
Blue 20%
Blue
Blue 30%
Blue
Blue 40%
Blue
Blue 50%
Blue
Blue 60%
Blue
Blue 70%
Blue
X
Blue 75%
Blue
Blue 80%
Blue
Blue 90%
Blue
Blue 100%
31
Blue
X
X Cyan 10%
Cyan
Cyan 20%
Cyan
Cyan 30%
Cyan
Cyan 40%
Cyan
Cyan 50%
Cyan
Cyan 60%
Cyan
Cyan 70%
Cyan
X
Cyan 75%
Cyan
Cyan 80%
Cyan
Cyan 90%
Cyan

DVDO AVLab TPG - 4K Test Pattern Generator
DVDO AVLab TPG 17 A.04
Cyan 100%
32
Cyan
X
X Magenta 10%
Magenta
Magenta 20%
Magenta
Magenta 30%
Magenta
Magenta 40%
Magenta
Magenta 50%
Magenta
Magenta 60%
Magenta
Magenta 70%
Magenta
X
Magenta 75%
Magenta
Magenta 80%
Magenta
Magenta 90%
Magenta
Magenta 100%
33
Magenta
X
X Yellow 10%
Yellow
Yellow 20%
Yellow
Yellow 30%
Yellow
Yellow 40%
Yellow
Yellow 50%
Yellow
Yellow 60%
Yellow
Yellow 70%
Yellow
X
Yellow 75%
Yellow
Yellow 80%
Yellow
Yellow 90%
Yellow
Yellow 100%
34
Yellow
X
X
Frame and
Geometry
1
Visual
X
X
Brightness
Contrast
2
DVDO AVLab TPG - 4K Test Pattern Generator
DVDO AVLab TPG 18 A.04
Alternating
pixels
3
Visual
X
X
Vertical Lines
4
Visual
X
X
Horizontal
Lines
5
Visual
X
X
Judder
6
Visual
X
X
8 Color Bars
75 IRE
7
Bars
X
X
8 Color Bars
100 IRE
8
Bars
X
X
0 IRE
35
Grey
10 IRE
9
Grey
20 IRE
10
Grey
30 IRE
11
Grey
40 IRE
12
Grey
50 IRE
13
Grey
60 IRE
14
Grey
70 IRE
15
Grey
X
80 IRE
16
Grey
90 IRE
17
Grey
100 IRE
18
Grey
X
X Gray Ramp
19
Visual
X
X
Cross Hatch
Coarse
20
Visual
X
X
Cross Hatch
Fine
21
Visual
X
X
Focus
22

DVDO AVLab TPG - 4K Test Pattern Generator
DVDO AVLab TPG 19 A.04
Half Pattern
Black White
23
Half
X
X
Half Pattern 7-
Color Bars
75 IRE
24
Half
X
X Half Pattern 7-
Color Bars 100
IRE
25
Half
X
X
Half Pattern 8-
Color Bars 75
IRE
26
Half
X
X
Half Pattern 8-
Color Bars 100
IRE
27
Half
X
X
White
28
X
X Black
35 X
X
ISF Pluge
White
36 X
X
ISF Pluge Black
37 X
X
ISF Pluge
White 2
38 X
X ISF Pluge Black
2
39 X
X
Create Custom
Pattern
AF
3
parameters:
R (0-100 in
IRE)

DVDO AVLab TPG - 4K Test Pattern Generator
DVDO AVLab TPG 20 A.04
G (0-100 in
IRE)
B (0-100 in
IRE)
Window (1100 in %)

DVDO AVLab TPG - 4K Test Pattern Generator
DVDO AVLab TPG 21 A.04
Test Pattern Explanations
AVLab TPG has three types of test patterns:
• Visual patterns which can be used to roughly set display parameters and check performance and
calibration.
e.g. Frame and Geometry, Brightness, Contrast, focus, color bars, grey ramp etc.
• Metering patterns that can be used with a simple meter to read and adjust colorimetry
e.g. solid primary, secondary and grey colors
• Dynamically generated patterns
e.g. when connected to a software package, AVLab can create any color and window size
This is an explanation and how to use the visual patterns.
Frame & Geometry
This test pattern contains two specific test features. The first is a 1-pixel wide box around the very outside
of the image. This is used to determine when the entire iScan output image is visible on the display. The
arrows along the middle of each edge provide an indication of the amount of overscan (if any). The blue
boxes in the center of each quadrant are used for measuring display geometry. The rectangle in the
center of the gray boxes should appear square on a 4:3 aspect ratio display, the next large rectangle
should appear square on a 16:9 display, the next on a 1.85:1 display, and the largest rectangle should be
square on a 2.35:1 display. The blue boxes are also used as an indication that the horizontal positioning
of the output image is correct. This is particularly useful to align a video projector and also to visually
verify that a TV is not in overscan mode. If the blue boxes are displayed as red instead of blue, then the
Cb & Cr components are reversed. This can be corrected by ensuring that there is an even number of
pixels in the sum of the horizontal sync and horizontal back porch.
 Loading...