

Page 1
Overview
VeMail is a feature of the DV2000 and DV2000VS, which allows the voice mail system to send
copies of voice messages, and faxes to specified e-mail boxes as .wav and .tif files respectively.
DV2000 is a client on the e-mail server. DV2000 is not itself an e-mail server.
The physical connection to the network consists of an RJ45 cable between the network and the
10BASE T / 100 BASE TX Network Interface Card included standard in the DV2000. The type of
network is largely immaterial.
This document provides information on implementation and trouble shooting of VeMail features.
Setting-up VeMail
To send VeMail, DV2000 must be integrated into your TCP/IP network and have the address of
the SMTP server. The basic steps to integrate to your network are as follows:
♦ Edit the SMTP Server Address for VeMail
♦ Configure network integration and adapters in the Network Neighborhood (installed by
default).
♦ Set the TCP/IP protocols in the Network Neighborhood. (DHCP is set by default)
♦ (Optional) Enter the System Identity in the Network Neighborhood.
VeMail
Technical Notes – Setting-up VeMail and the SMTP Server Interface
Note: The configuration and settings for each network are unique. This section should be
considered to be a checklist. For the precise settings for your application please consult with
your network administrator.
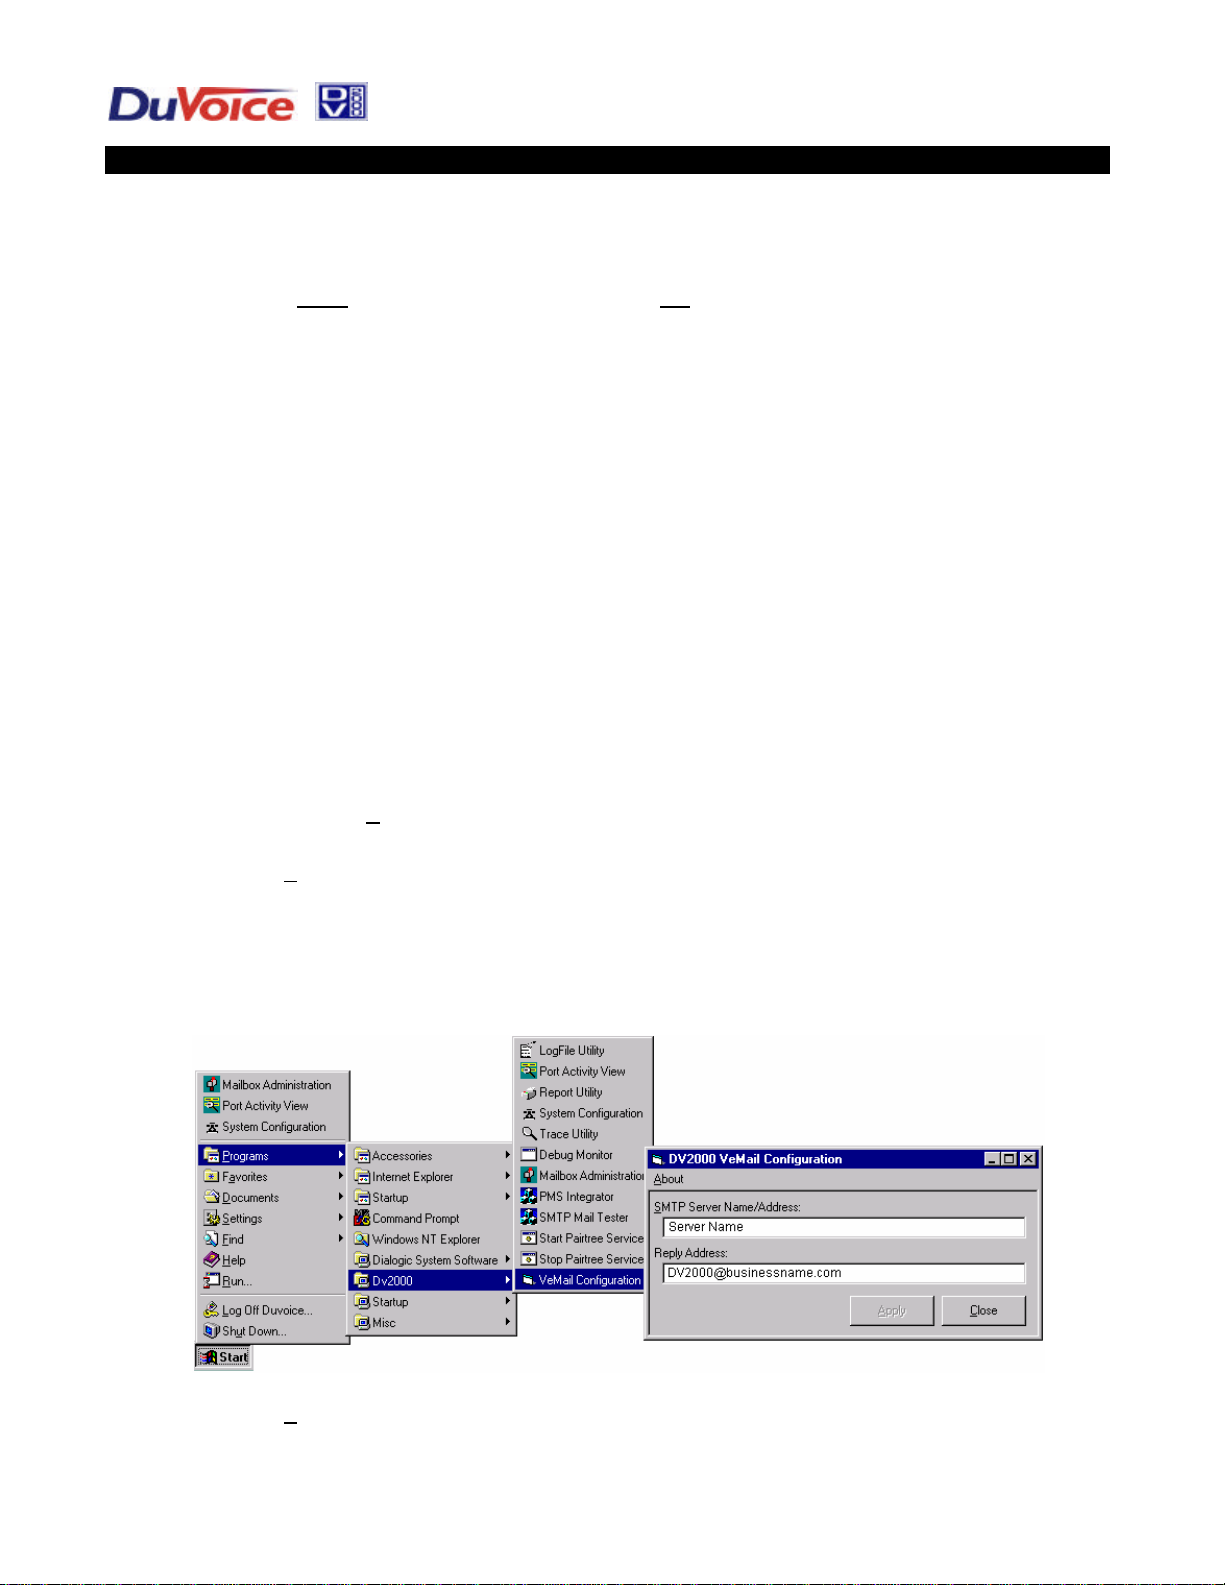
Enter SMTP Server Name/Address and Reply Address for VeMail
From the Start menu,
♦ Click Programs
♦ Click DV2000
♦ Click VeMail Configuration
♦ Enter the name or IP address of your SMTP Server
♦ Enter the reply address you would like to display in the “from” line of the VeMail
messages. (Note: this address must be a properly formatted internet e-mail address)
♦ Click Close
1
Page 2
VeMail
Technical Notes – Setting-up VeMail and the SMTP Server Interface
Setting-up Network Integration
Note: Only a qualified network administrator should perform Network Administration tasks.
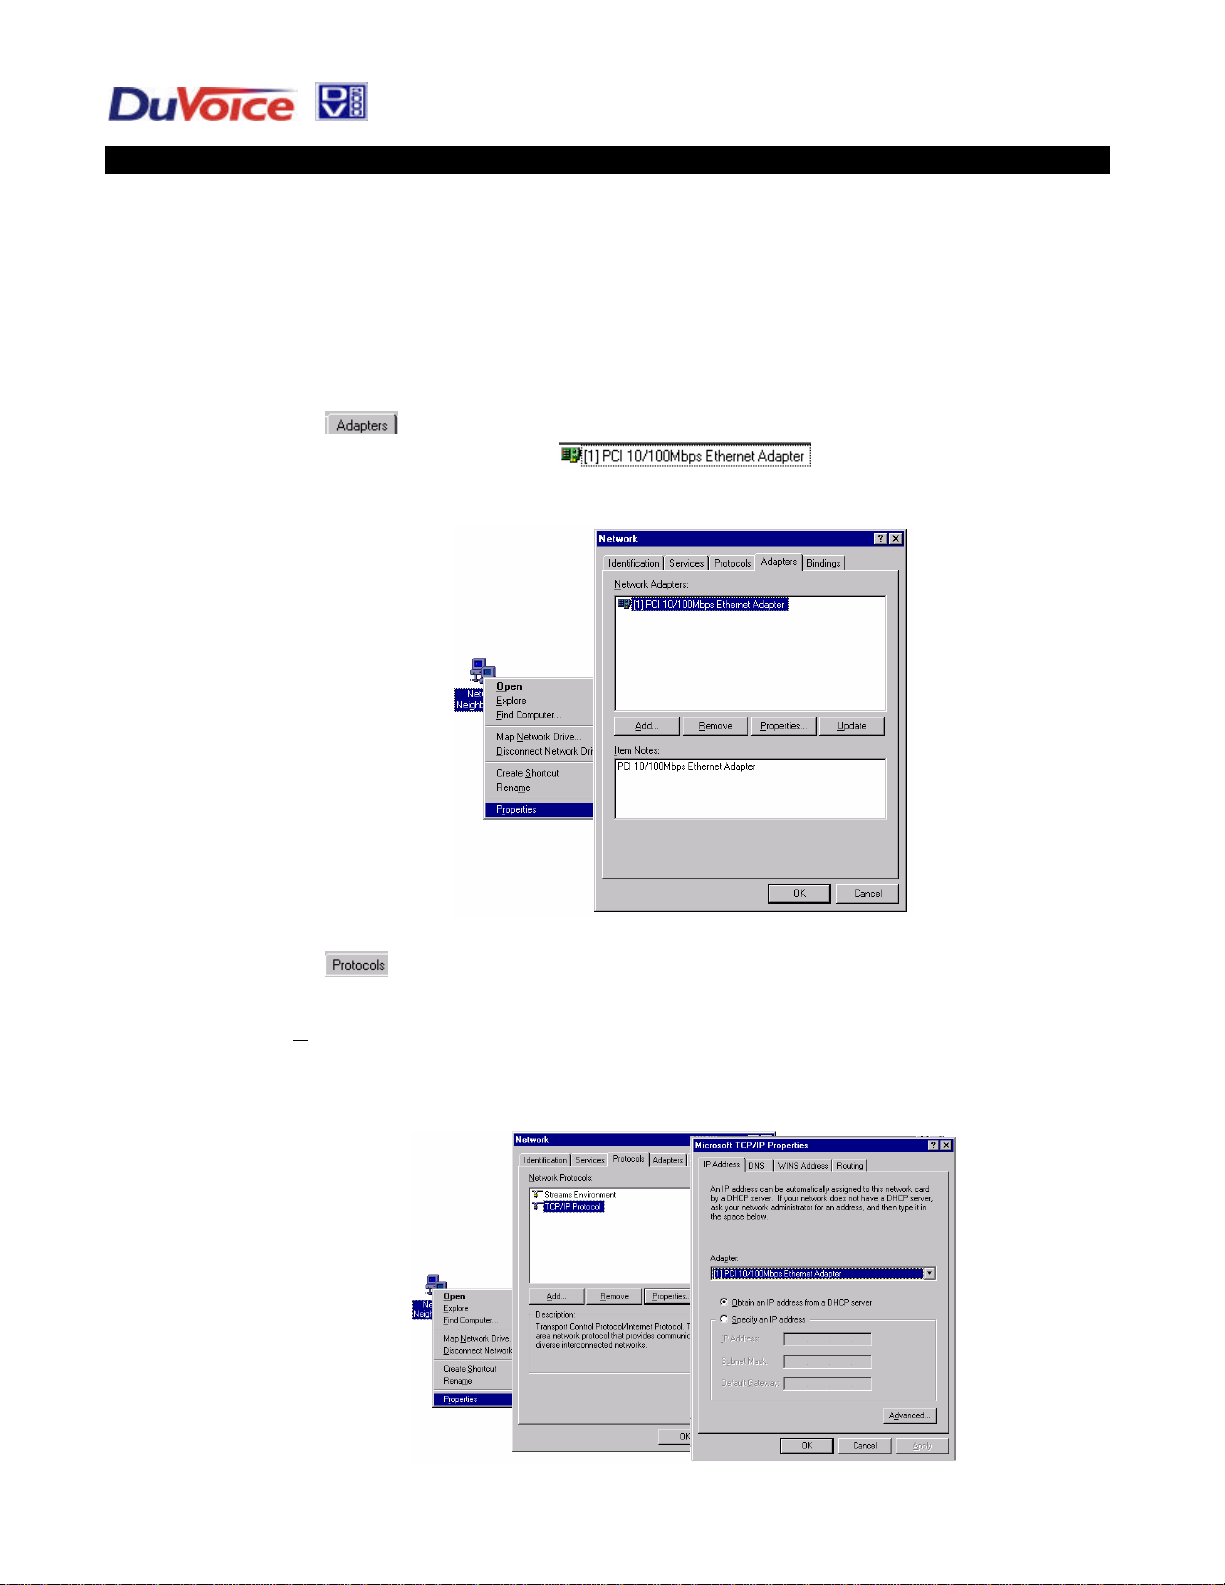
Enter TCP/IP Properties
Set-up the Network Adaptor
♦ In Explorer, Right click on Network Neighborhood
♦ Click Properties
♦ Select the tab
♦ By default, the adaptor will be set for If you are using some other Network
Integration Card, load and select the appropriate adaptor, You must reboot the computer for the changes to
take effect.
Set the TCP/IP Protocols
♦ Select the tab
♦ Highlight TCP/IP Protocol
♦ Select Obtain an IP address from a DHCP ser ver (default setting).
OR
♦ Set a static TCP/IP setting as directed by the LAN system administrator.
2
Page 3
VeMail
Technical Notes – Setting-up VeMail and the SMTP Server Interface
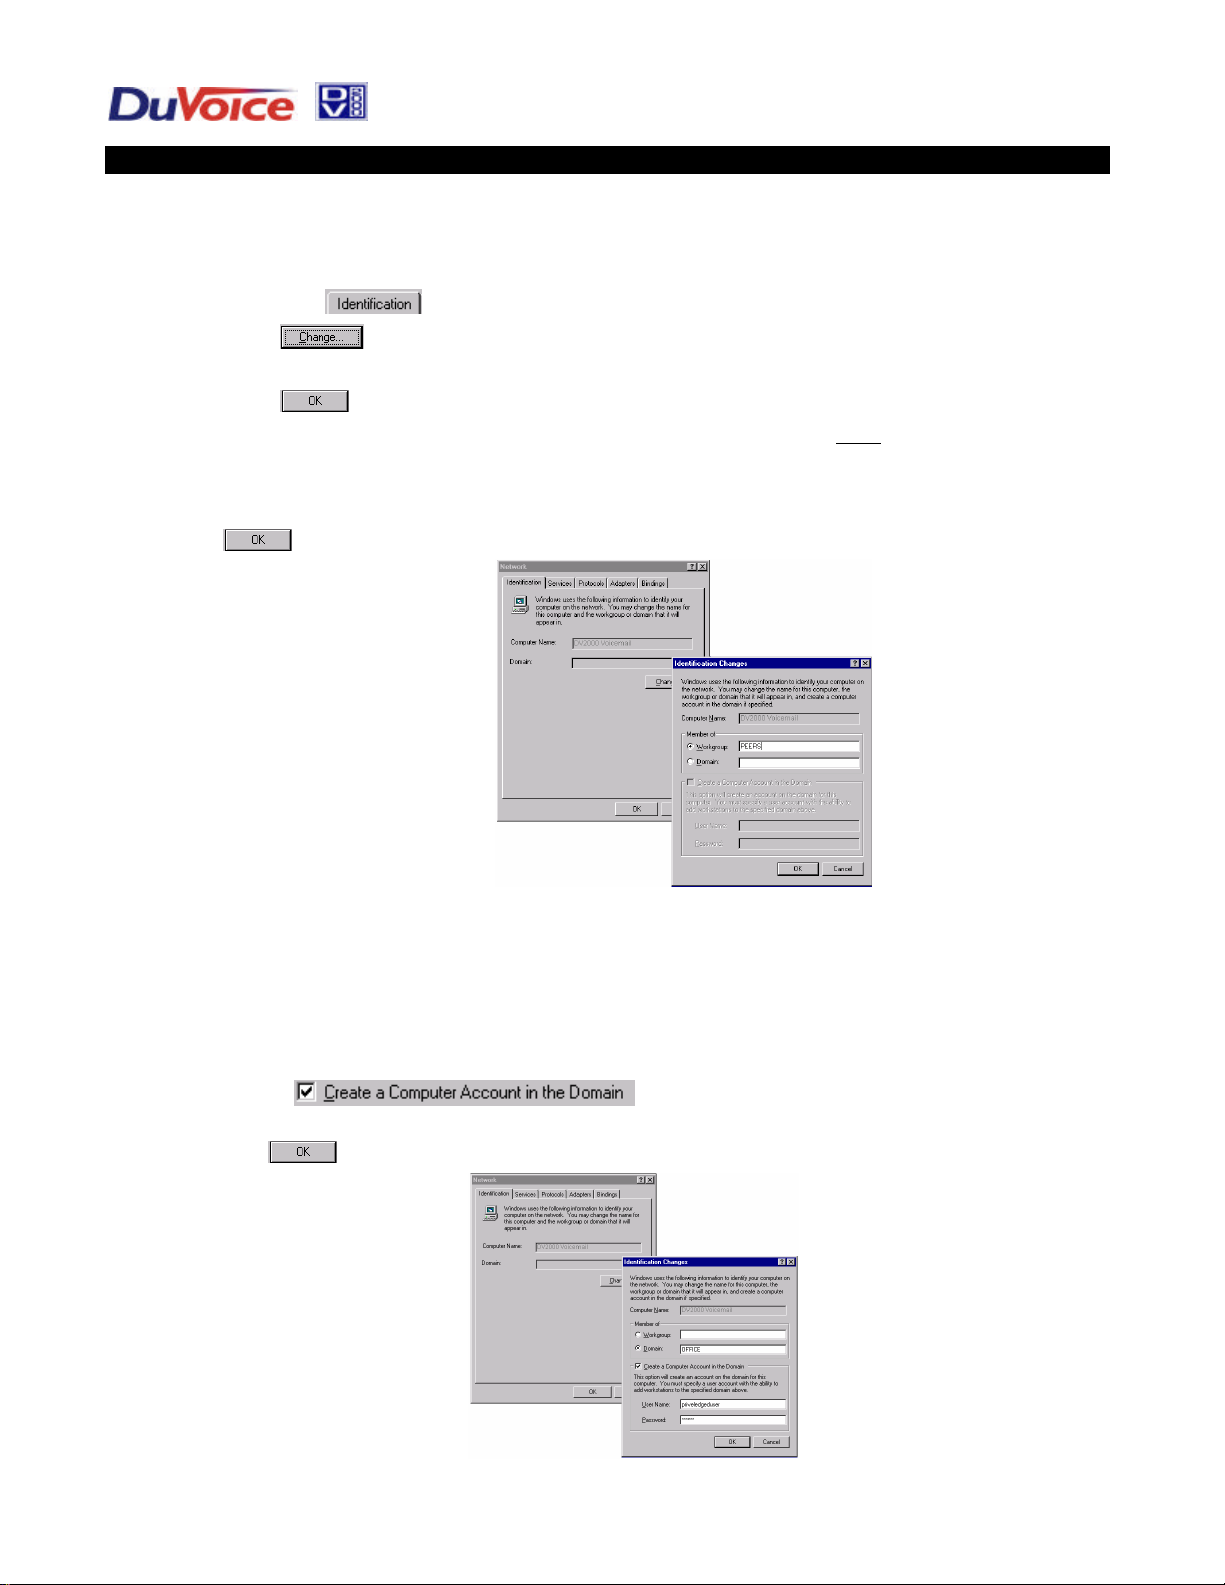
Enter System Identification
♦ Right click on Network Neighborhood.
♦ Click Properties.
♦ Select the tab.
♦ Click
♦ Edit the Computer Name.
♦ Click to save your changes
♦ Reboot the computer. (Note: After changing the machine name, you must reboot before
trying to add it to a domain.)
♦ Return to Network Neighborhood Properties
♦ If you have con figured the DV2000 as part of a workgroup, enter the workgroup name, click
to save your changes and you are done.
Making DV2000 a part of the domain
It is often desirable to make the DV2000 part of a domain to provid e access to the system over
the LAN (for example to perform maintenance and administration via the LAN instead of through
the modem). Inclusion in the domain is optional and usually not necessary for SMTP mail to
work.
♦ If you are configuring the DV2000 to be part of a domain, complete the following instructions:
♦ Enter the Domain Name
♦ Check
♦ Enter the name and password of a user that is authorized to add machines to the domain,
click to save your changes and you are done.
Setting up VeMail and E-mail Notification in Mailboxes
3
Page 4
VeMail
Technical Notes – Setting-up VeMail and the SMTP Server Interface
There are two types of e-mail messages sent by DV2000.
1. A VeMail message consists of an e-mail message with a .wav copy of voice-mail
messages as an attachment. The body of the message includes the time, date,
origin, and length of a message.
2. E-mail Notification is similar to pager notification and consists of an e-mail
message, the body of which includes the number and type of message(s) in the voice
mailbox. There are no at tachments in an e-mail notification message.
Address List
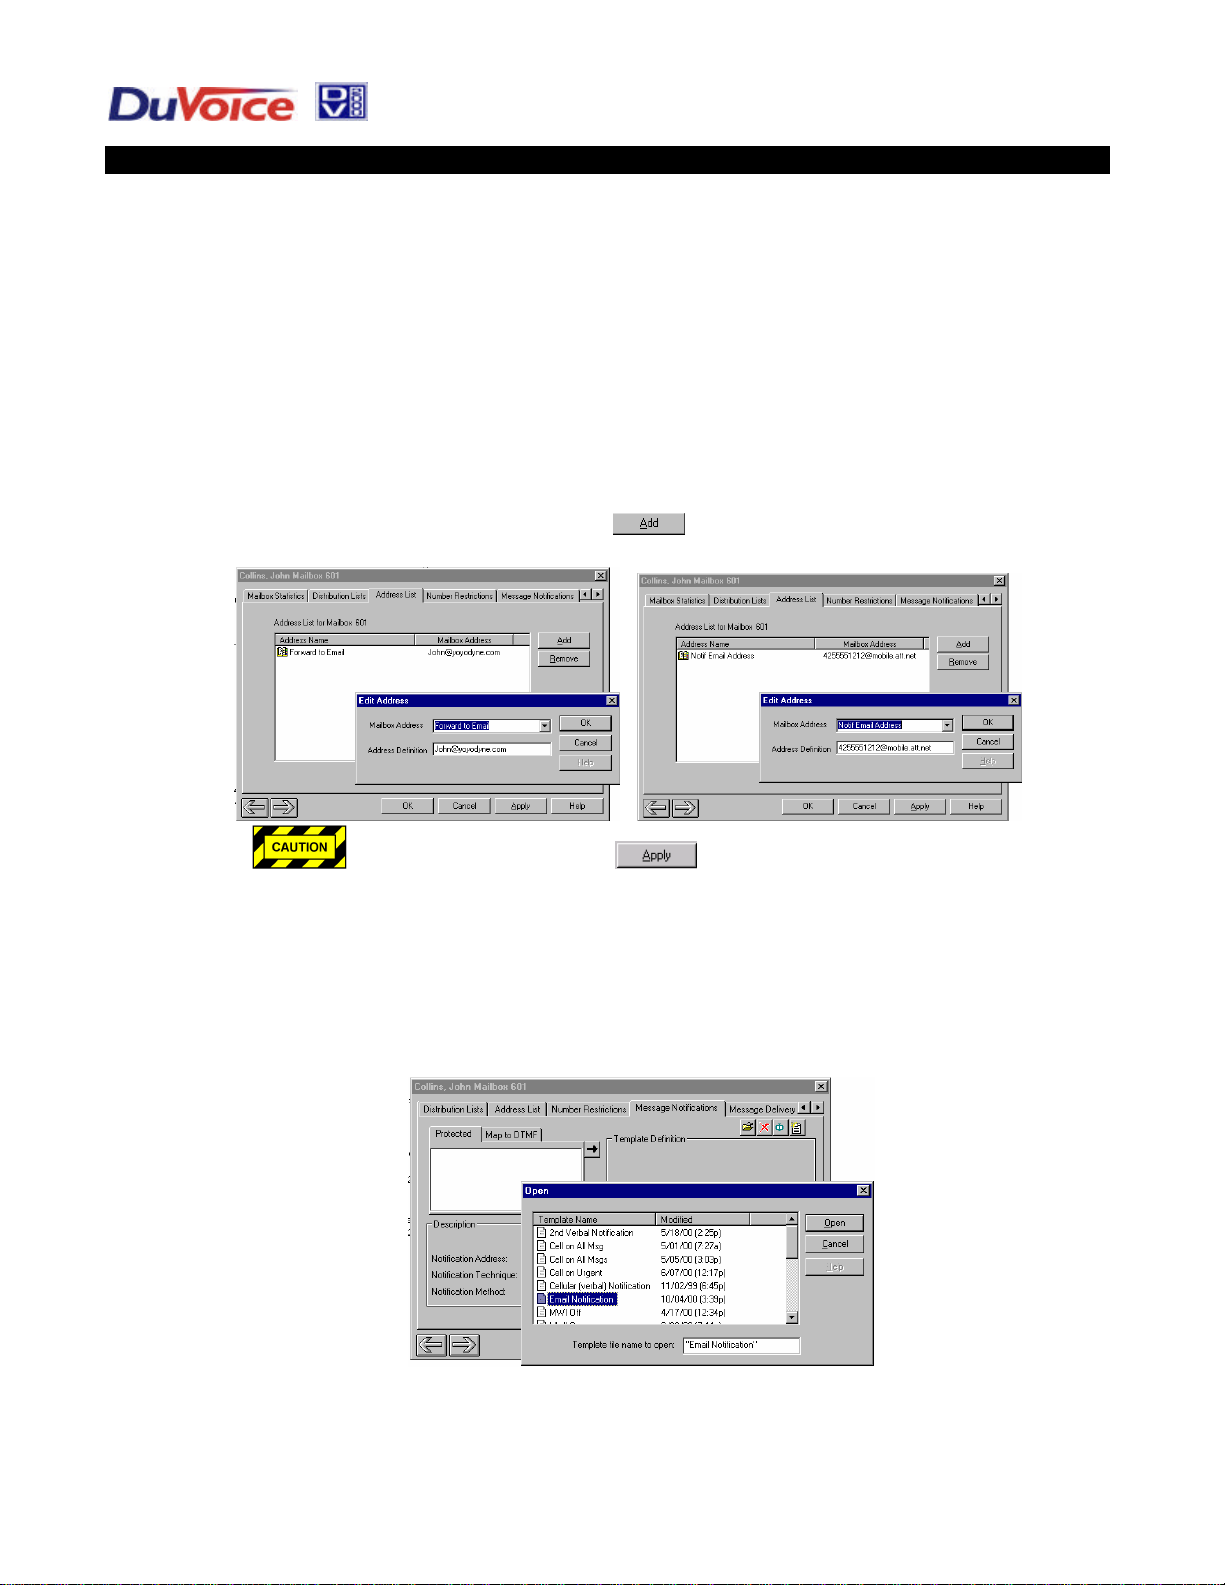
Addresses for VeMail and / or e-mail notification must be entered in the address list tab of
each mailbox user with these features. See the Address List section of the Mailbox
Administration Manual for more details.
To add addresses for a mailbox, click on the button, and then select the address
type and enter the definition in the Edit Address dialog.
You must remember to press after adding or editing an address;
otherwise the address will appear as “invalid” when used in a notification or delivery
template.
Message Notification
This feature is most commonly used to deliver message notification to e-mail accounts
on cellular telephones. You can create a new notification template or use or edit the
existing e-mail notification template on your system. See the Message Notification
Section of the Mailbox Administration Manual for more details.
The notification itself consists of an e-mail message that states the name of the
mailbox, and the type and number of new messages.
4
Page 5
VeMail
Technical Notes – Setting-up VeMail and the SMTP Server Interface
VeMail (Message Delivery)
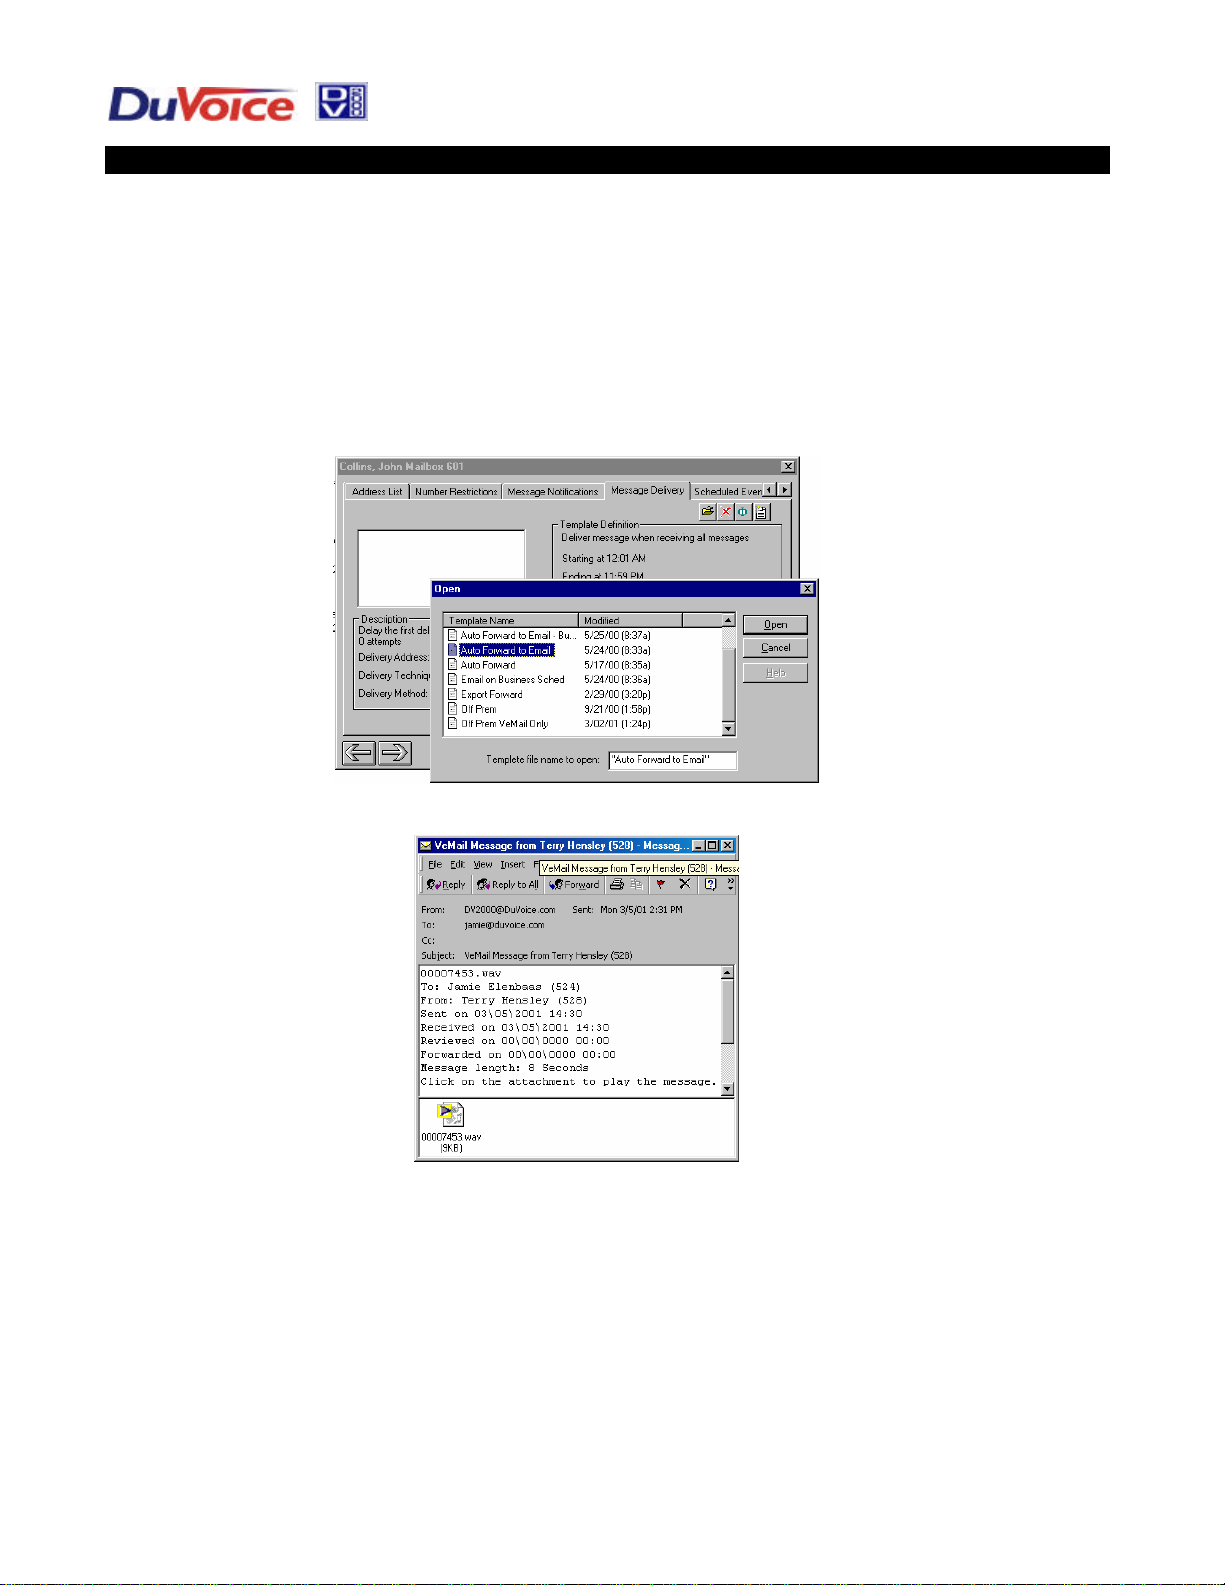
Like E-mail Notification, VeMail consists of an e-mail message. Unlike E-mail
Notification, VeMail also includes the origin of the message and a .wav file copy of the
message attachment that can be played on any PC or MAC with speakers and a sound
card. You can create a new delivery template or use or edit the existing e-mail delivery
template on your system.
See the Message Notification Section of the Mailbox Administration Manual for more
details.
A sample of an actual VeMail Message
5
Page 6
VeMail
Technical Notes – Setting-up VeMail and the SMTP Server Interface
Testing and Trouble Shooting
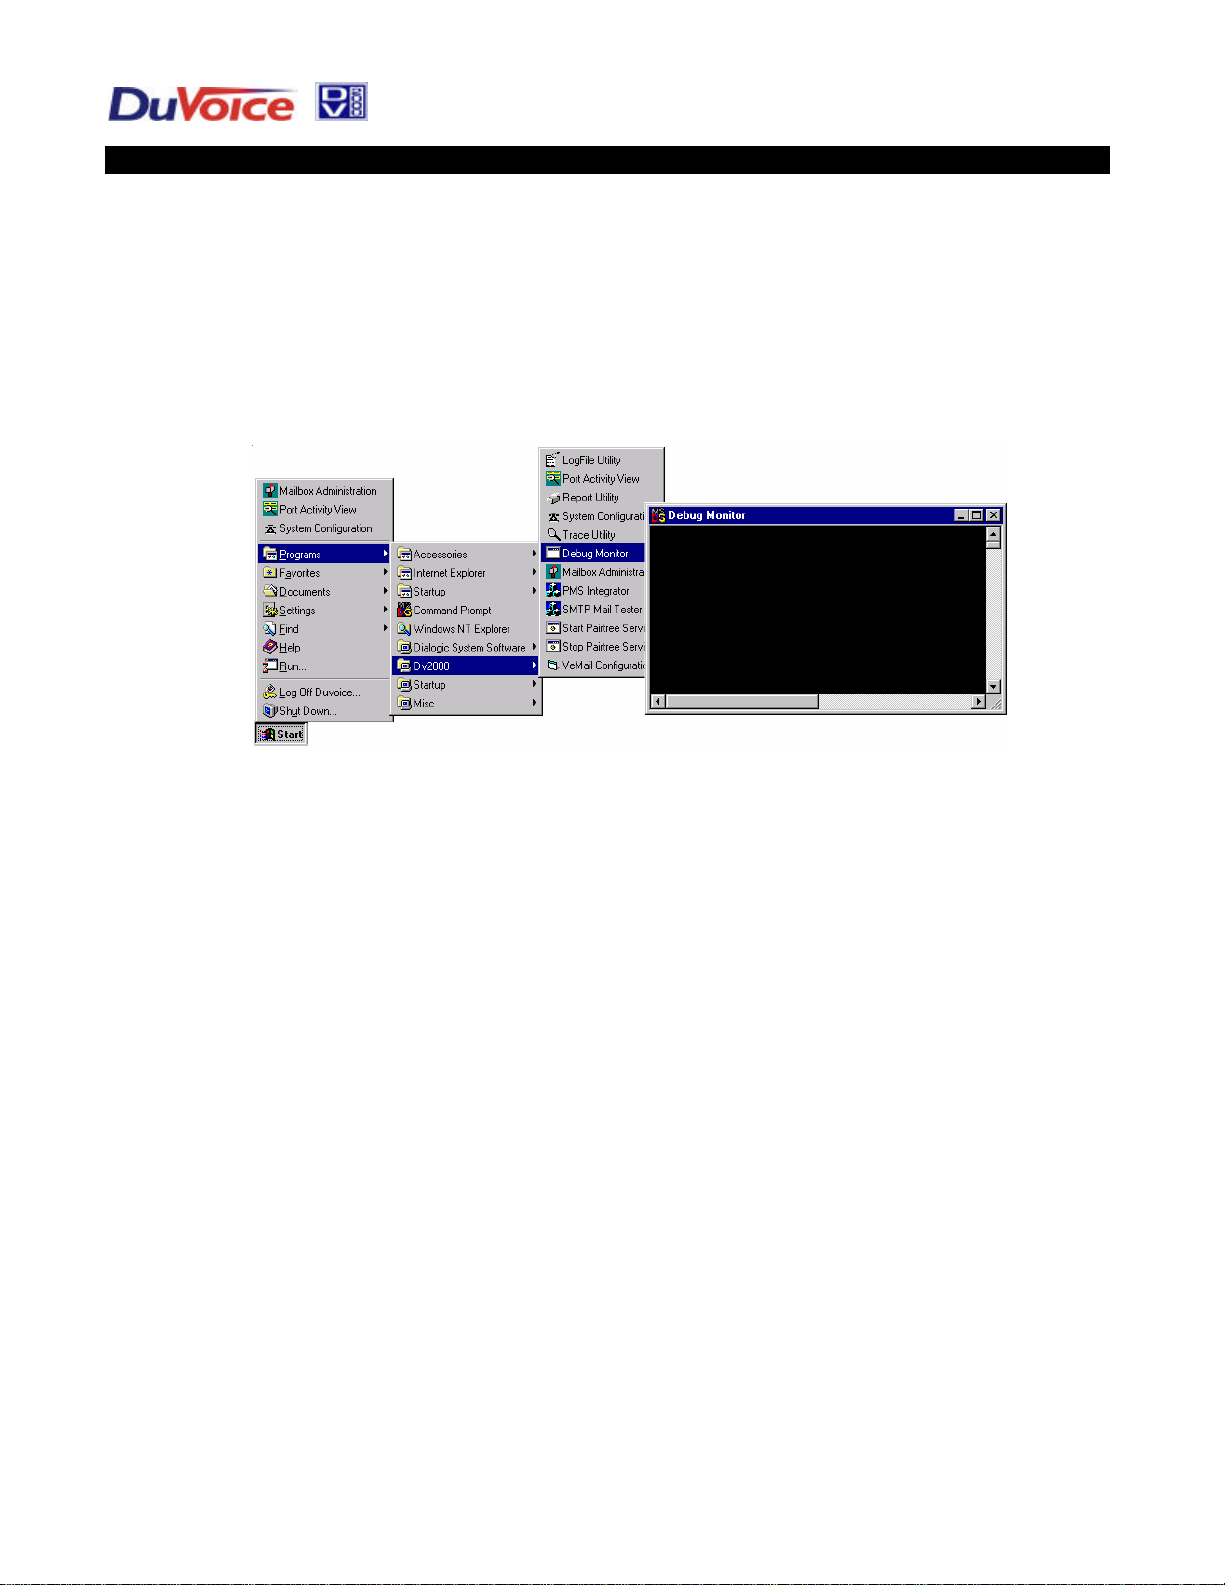
Debug Monitor and SMTP MailTest are two tools you can use to diagnose problems associated
with sending e-mail messages from DV2000. SMTP MailTest (below) can be run with or without
running Debug monitor.
Opening the Debug Monitor:
On an idle system, the Debug Monitor may be opened from the Start Menu=>
Programs=>DV2000=>Debug Monitor. Once it is up, it will display any debug messages as they are
generated.
On a busy system (one which is answering calls), the Debug Monitor should be opened as
follows, so that the monitor may be stopped when the e-mail process terminates. (Otherwise, the
monitor will continue to receive unnecessary information from other calls.)
1) Open a command window: Start Menu / Programs / Command Prompt
2) If the Command Prompt window does not show a slider bar on the right hand side, then do
these steps to allow more data to be viewed:
a. Click on the window icon in the upper left hand corner
b. Click properties on the drop down menu
c. Go to the Layout tab
d. Adjust the Height setting in the Screen Buffer Size area to 400.
e. Press OK
f. Select “Modify shortcut which started this window”
g. Press OK
3) Change to the Pairtree32 directory: cd\Pairtree32
4) Run the Debug Monitor: dbmon
5) NOTE: Processes are slowed down by virtue of the Debug Monitor being open in a window.
Processes will run faster when the Debug Monitor window is minimized.
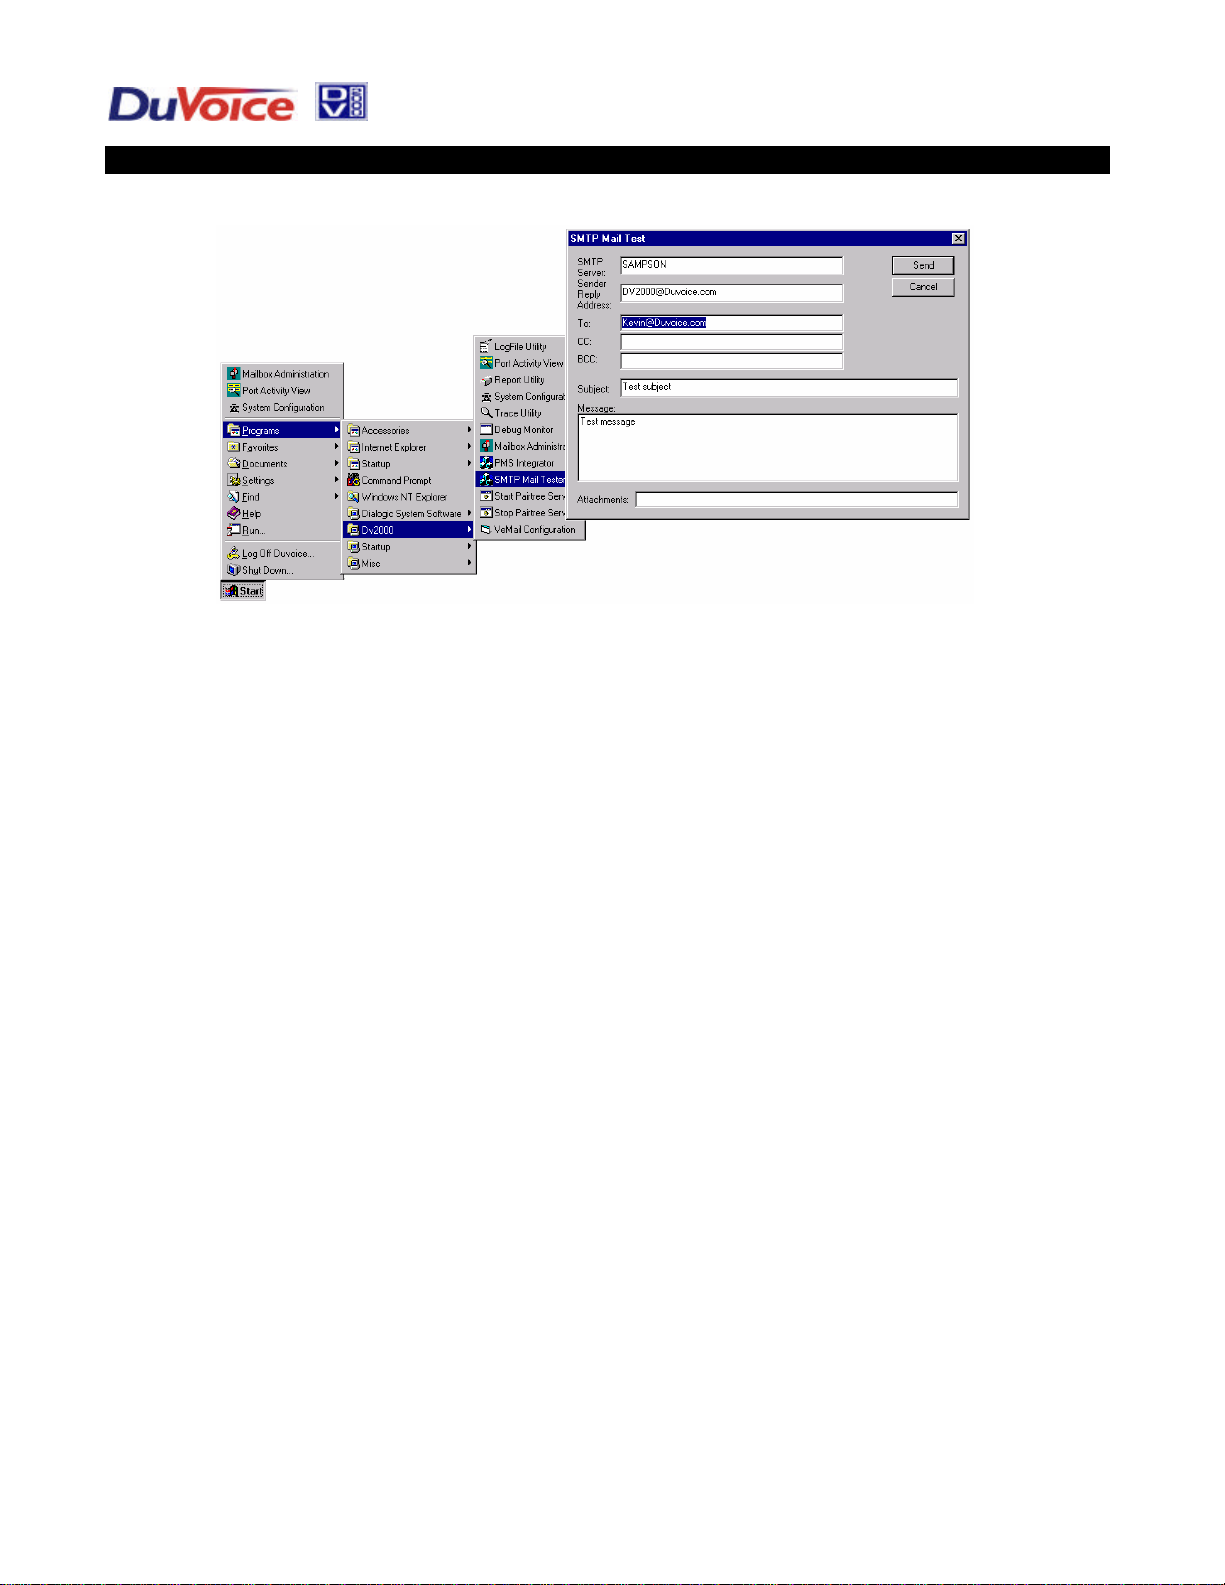
SMTP MailTest utility
1) With the monitor open, start the SMTP MailTest utility
2) Enter the SMTP Server’s name or IP address on the first line.
a. The SMTP server name is the same found on any client/workstation in the office
used to send/receive e-mail, (especially if Microsoft Outlook Express is used.)
b. If the office has an internal MS Exchange e-mail system, than that server’s name is
used. To use SMTP, in the MS Exchange environment, the Internet Mail Connector
must be installed.
6
Page 7
VeMail
Technical Notes – Setting-up VeMail and the SMTP Server Interface
3) Specify a valid test e-mail address to send to.
4) Send the message.
5) If a message box opens indicating that there was an error, look for these error messages on
the event monitor.
a. Error Message
Unknown error; connect()gethostbyname() failed! Is the
mail server name correct? Is TCP/IP installed on this
machine?
Corrective Action
i. Check to make sure the mail server name or IP address is correct
ii. Check to make sure the computer is correctly configured to communicate on
the LAN with TCP/IP.
1. Run the NT utility: ipconfig from a command window and verify the
TCP/IP settings.
b. Error Message
eCEmailSocket::Connect() failed: XXXXXXXX
Corrective Action
i. Is there a proxy machine between the DV2000 and the e-mail server? If so,
check to make sure that proxy client software has been installed on the
DV2000.
ii. Try to telnet to the server: telnet servername or IP address:25. If this does
not work, then there is no connectivity to the server or the server does not
support the SMTP protocol
6) Check the e-mail address spelling carefully for any errors or try another e-mail address. If the
message is still not delivered, then there is some problem between the e-mail server and the
recipient. Try sending to a different e-mail address.
7) Make sure that if any changes to the SMTP server name/address is discovered, that those
changes are set also in the VeMail Configuration utility.
8) Make sure to close Debug monitor at the competition of your testing.
7
 Loading...